|
|
|
Aug 25, 2011 15:47:48 GMT
|
|
Hi Bruce,
Thank you so much for this thread! I always wondered how you take such amazing photos.
I have a cheapo samsung S760 which has some limited manual control for ISO 100 and 400, aperture and shutter speed. I'm going to go and have a play!
I'm looking on ebay at old DSLR's. It seems that I can get camera's with more manual settings (circa 2003) for around £30-50. Things like the Konica Minolta Dimage Z1/Z2 etc... Is there any mileage in buying something like this to mess around with. ie cameras with some of the capability for very little cost?
Cheers,
Rich
|
| |
|
|
|
|
|
|
|
Aug 28, 2011 10:33:43 GMT
|
|
Excellent thread! I've got a Nikon D40 DSLR and i've always photographed my friends at drift events. I've only used a small zoom lens so far. Then I discovered polarising filters which reduced glare on bright days (they work the same way as polarised sun glasses). My aim was to capture the facial expressions of the drivers by reducing the glare on the windscreen. The problem being that i had to stand extremely close to the track and risk life and limb. I have now acquired a longer zoom lens but haven't had the opportunity to use it yet. I have noticed that the proffesional photographers use a telephoto lens meaing they can stand MILES away without risk of being hit by a sideways car. I believe they use telephoto lenses to shoot wildlife to gain close up photo's without disturbing the animals. I'm not a pro photographer (I actually repair fork lifts hence the name) and I only really enjoy photographing motor sport. I'll keep checking back on this one and i'll post up some of my better efforts.
|
| |
|
|
berendd
Europe
why do I need 3 keys for one car?
Posts: 1,449
|
|
Aug 29, 2011 10:41:11 GMT
|
Great thread Bruce keep up the good work in here! I 'd like to add some information about stops and aperture right here. Bruce allready told you that a lower aperture gives you a smaller depth of field, but another advantage of lower apertures is that you can use a faster shutter speed. When you regularly use a camera to point and shoot (note: you don't have to have a point and shoot camera to point and shoot, this can also be an slr) you will most likely shoot your pictures out of your hand and not on a tripod. This meaning a faster shutter will give you less movement blur and thus sharper pictures! Choosing a camera should not be done by comparing megapixels but you could compare minimum apertures on their lenses. Note that on most lenses using the minimum aperture will result in deformation of the picture (test this by taking pictures of a brick wall on different apertures and checking if the lines are still straight (especially in the edges) Have a pic of someone polishing wheels at a certain meeting... 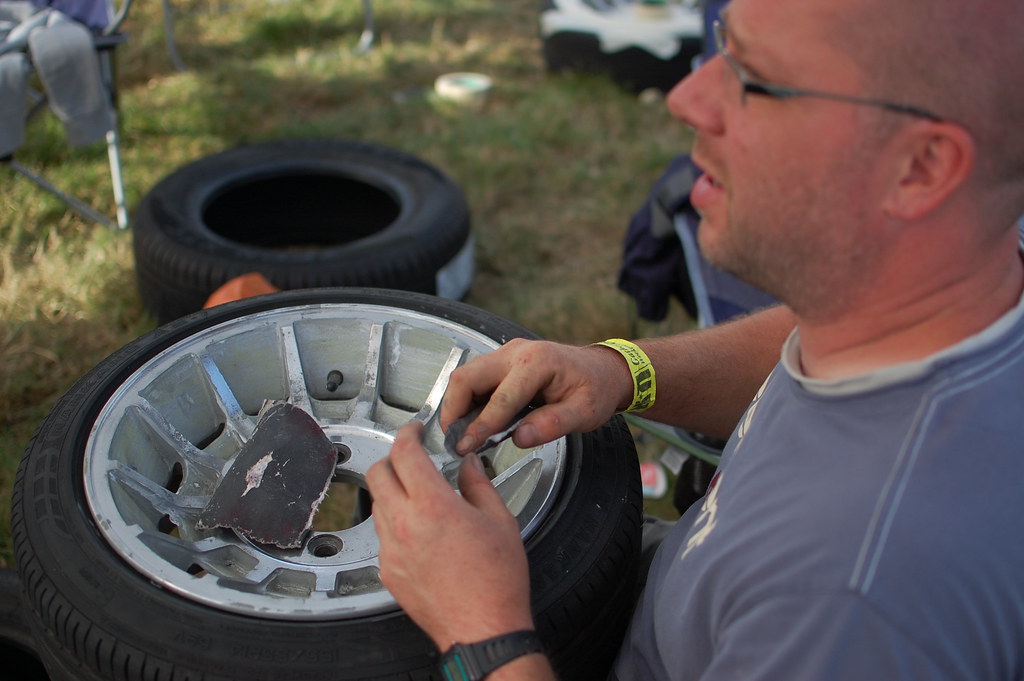 DSC_8637 DSC_8637Camera Nikon D40 Exposure 0.001 sec (1/1600) Aperture f/2.2 Focal Length 35 mm by looking at the EXIF data I just found out I left ISO at 200 that means the picture could have been sharper, mmh everyone makes their mistakes.. |
| |
|
|
|
|
|
|
|
|
Ca you set up a thread when you get back with like bi weekly challenges?? You can choose the winner.
|
| |
|
|
Garry
East Midlands
Posts: 1,722
|
|
|
|
Just got a Canon 1000D, thread bookmarked  Can't wait for the next installment. |
| |
|
|
|
|
|
|
|
Guys, I am really sorry for neglecting this thread... As said before, I was really, really busy leading up to the Gathering then off on holiday (taking photos  ) and since returning I've not had a chance to sit down and write the next bit about exposure as a 'whole'. This morning I've been spending a good few hours getting some illustrations drawn up to explain things and scratching my head as to the best way to demonstrate exposure in visual terms too. After lots of different examples set-up and photographed, I finally (by accident) discovered the best and most effective way to demonstrate it. So here we go....EXPOSURE! It's a bit of a tricky one to explain, but I'll do my bestest. This section covers 'correct' exposure. Something I covered very briefly on the first page by showing under exposure and over exposure (the pics of my GF's Smart car). I also explained the three basic elements of exposure which are 'aperture', 'shutter speed' and 'ISO'. These three are what go together to make up an exposure. Correct exposure is where the colours and tones are all 'correct' i.e. natural looking. There are many ways of getting a correct exposure and this is where properly understanding the way aperture, shutter speed and ISO works will help you get a correct exposure. The best way to get a 'correct' exposure is to take control of your camera. A point & shoot, or a DSLR in auto mode will make these decisions for you. By selecting Aperture Priority or Shutter Priority you gain some control of what you are shooting, but only in Manual mode will you really be able to get full control of the shot. I would encourage you to really make sure you understand about exposure before totally relying on shooting in manual mode. Experimentation is the key here and only by playing with your camera, trying out different exposure settings will you really start to understand how it all comes together. In order to help with this, I have thought through the best way I can think to explain it, so sit tight and I hope it all makes sense?? CORRECT EXPOSURE: I've drawn this digram to try and visualise the way the three elements of exposure work. In the middle you have a 'correct' exposure, so the shot it looking natural. The three bars each represent one part of the exposure. In this illustration we have all the elements set at a 'correct exposure' where the picture will come out looking correct. 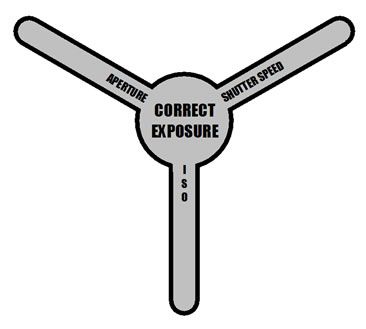 I haven't set any data to the different elements, but just imagine this is a 'baseline' being used to illustrate how there isn't ONE SET way of getting a correct exposure. This is just an 'average' shot which has used a combination of aperture, shutter speed and ISO to get a shot that looks natural. Now, if you decide you want to change the aperture for the same shot, you can. You are not restricted to the one range of settings shown above. HOWEVER....if you alter the aperture, you alter the exposure. If you do this, then one of the other elements has to be changed in order to compensate and get the exposure correct again. Here I have changed the aperture from the original settings, but in order to get a correct exposure, I have had to change the shutter speed too. By opening the aperture more, I've had to shorten the shutter speed. More light is let in by the wider aperture, so to get the correct exposure, I've had to make the shutter open for less time. ISO has not been changed because the different aperture has been compensated for with the shorter shutter speed: 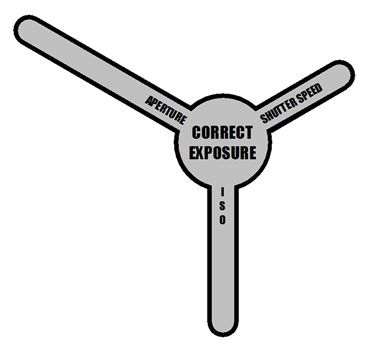 Lets change things again. This time I want to take a longer exposure (i.e. hold the shutter open for longer) because I want to introduce some movement to the picture. You can do this by changing the shutter speed but, again, in order to get a correct exposure, you also need to change one of the other settings. In this case, I have reduced the aperture to allow less light in while the shutter is open for a longer period. ISO has not been changed: 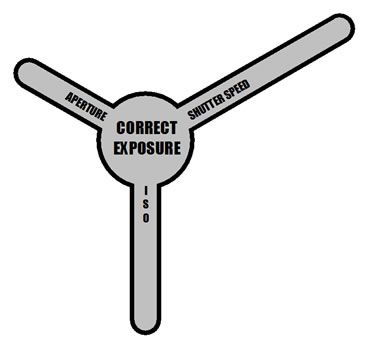 Finally....if I want to have a smaller aperture AND keep the shutter speed short (i.e. let less light in for a shorter length of time) then I need to think about increasing the ISO. A short shutter speed and smaller aperture doesn't let a lot of light in, so to stop the image becoming dark (under exposed from too little light) I need to increase the ISO to make the sensor more sensitive to the lesser light I am letting in which in turn allows us to keep a correct exposure. As we know from the ISO section, doing this will reduce the image quality. 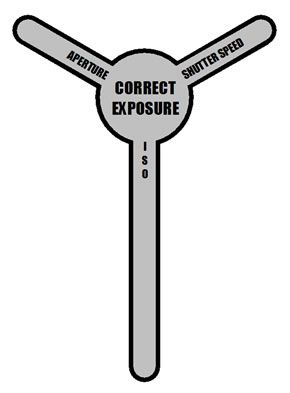 Generally, you should always try and keep the ISO as low as possible and only change it if you really can't capture the image you want by changing the aperture and shutter speed alone. |
| |
|
|
|
|
|
|
|
ANALOGY TIME!! This was a hard one to find an analogy for, but after a lot of thought and different (failed) analogies, I finally came up with this one which I think most of you could relate to. Lets look at correct exposure in terms of using some wet & dry to remove some paint from a car panel. Aperture = the size of the sheet of wet & dry Shutter Speed = the speed at which you remove all the paint ISO = the grain/grit size of the wet & dry Correct Exposure = ALL paint removed Take an A4 sheet of 800 grit wet & dry and rub the panel over. It removes all the paint (correct exposure) at a reasonable speed with a reasonable finish. This is our 'base setting' If we make the sheet of wet & dry bigger (A3 sheet is the same as enlarging the aperture) but keep the grit at 800 (same ISO) then it will remove more paint at a time. In other words, due to having the larger sheet, it won't take as long to remove all the paint (faster shutter speed). If wewere to take the same amount of time as above then I'll have removed all the paint and probably quite a bit of metal too! (Over exposure) Basically I can remove the paint in half the time which is the same as increasing the shutter speed to compensate for the larger sheet. Bigger sheet, but less time = all paint removed (correct exposure). Now lets decrease the size of the sheet to A5 (making the aperture smaller) but keep the grit the same (800) - in order to rub the paint off the panel in the same time will mean not all the paint will come off due to only having half the sanding surface. This in exposure terms would be under exposure (darker image) but if we take TWICE as long rubbing the paint off, the extra time allows the smaller sheet to remove all the paint eventually. By reducing the sheet size, the time needs to be extended to acheive the same result. Lastly, we can change the grit to a coarser grit (40 grit equates to a higer ISO). Because this will remove paint quicker, we can not only use a smaller sheet (A5 sheet = smaller aperture) but also take less time to remove all the paint (faster shutter speed). Smaller sheets of wet & dry and less time taken combined is good except that the final finish will be rougher due to using a coarser grit - the same as losing image quality by increasing the ISO. I do hope that makes some sense? Photo examples to come when I've had some lunch ;D |
| |
|
|
|
|
|
|
|
Let's now visualise the whole thing to help you fully understand how there are different ways of getting a correct exposure. After setting up and photographing numerous model cars and not being happy with the examples, then remote control cars but not being able to get the wheels to turn slow enough consistently, I finally (after hunting around the house for an example) stumbled across our old Hidamari no Tami which seemed to fit the bill perfectly, so this is what you'll have to put up with on this example. Here is the 'baseline' shot - just an average shot with the camera settings somewhere in the middle, but showing a correct exposure. Due to the light in my study being on the darker side this morning, my baseline shot was a long-ish exposure. Aperture: f/8.0 Shutter speed: 0.6sec ISO: 100 CORRECT EXPOSURE 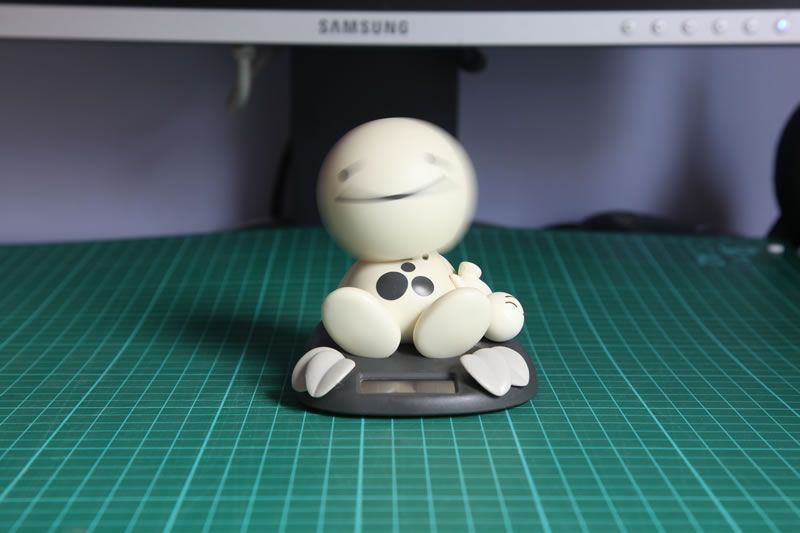 I set it on a cutting matt so that you could see the effect of the aperture changes on the cutting grid. I also made sure the bottom of the monitor in the background could be seen so that you could read/not read the Samsung logo from shot to shot. The idea of chosing the Hidamari no Tami was that you could also see the shutter speed differences through the amount of blur from his contantly nodding head. In the above shot you can see the amont of blur front/middle/back from the f/8.0 aperture but you can read the Samsung logo in the background. The blur from the head is from the long-ish shutter speed of around half a second. This is a correct exposure because all the colours/tones look correct. Lets change the aperture to something a lot smaller (letting a lot less light in) but keep the shutter speed the same - note what happens to the exposure: the background/foreground become clearer/more in focus than before due to the change in aperture, the head remains just as blurry because the shutter speed is the same as before, but the whole image is a lot darker because I haven't adjusted the shutter speed to compensate for the smaller aperture. Aperture: f/22.0 Shutter speed: 0.6sec ISO: 100 UNDER EXPOSURE 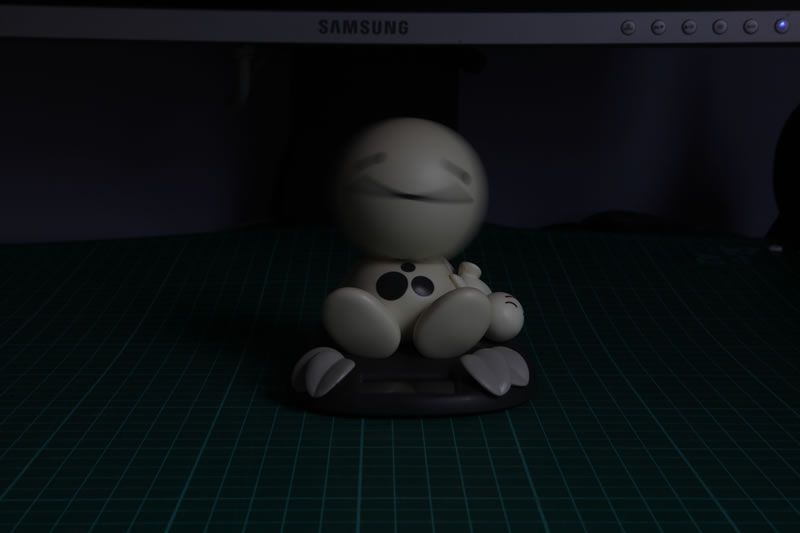 Keeping the aperture at f/22.0 but changing the shutter speed to something much longer to allow more light in (compensating for the smaller aperture) means that the exposure is once again corrected but other changes occur. The background/foreground are still sharper than the original baseline shot thanks to the smaller aperture, but the head is even MORE blurry than before due to the length of time the shutter has to stay open. This can be a good thing if you want to capture movement, but not good if you don't have a tripod or a VERY steady hand. The exposure is correct. Aperture: f/22.0 Shutter speed: 5.0sec ISO: 100 CORRECT EXPOSURE 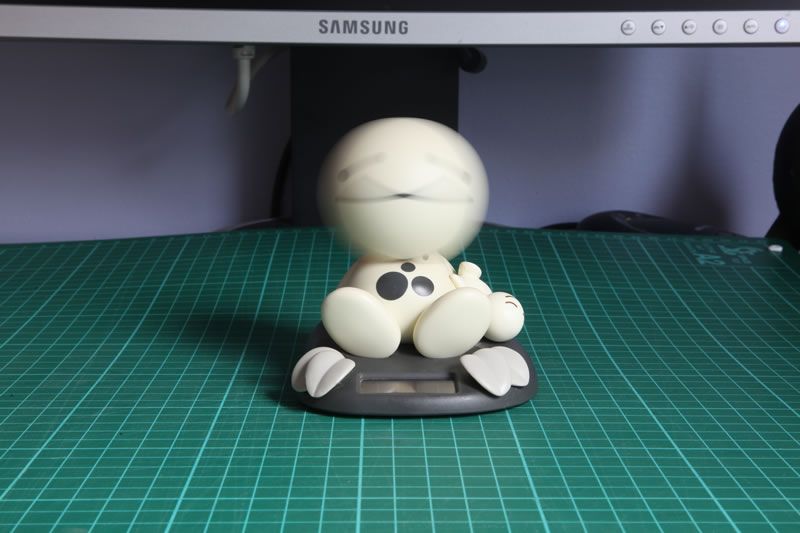 While keeing the shutter speed at 5.0seconds, lets take the aperture to the other extreme , changing one setting without compensating with another. The above shot was at f/22.0 (smallest aperture letting in very little light) with a long exposure, so lets see the effects of now opening the aperture wide to f/4.0 (letting in lots of light) but still keeping the shutter speed open a long time. Aperture: f/4.0 Shutter speed: 5.0sec ISO: 100 OVER EXPOSURE  If I then enlarge the aperture to f/4.0 (the largest/widest this lens will go) I also need to up the shutter speed to something faster compensate for the wider aperture letting more light in. The settings have changed, but the exposure remains correct. Note the extra blur of the Samsung logo and the lines on the cutting matt due to the aperture being opened more....but also the head is LESS blurry due to the shutter speed now being faster to compensate. Great if you want the Hidamari to be the focal point amongst the blurry foreground/background and also if you want to avoid too much movement in the shot (motion blur). It's also a benefit if you want to avoid using a tripod. The faster shutter speed means less chance of unwanted blur from handshake. Aperture: f/4.0 Shutter speed: 1/6sec ISO: 100 CORRECT EXPOSURE 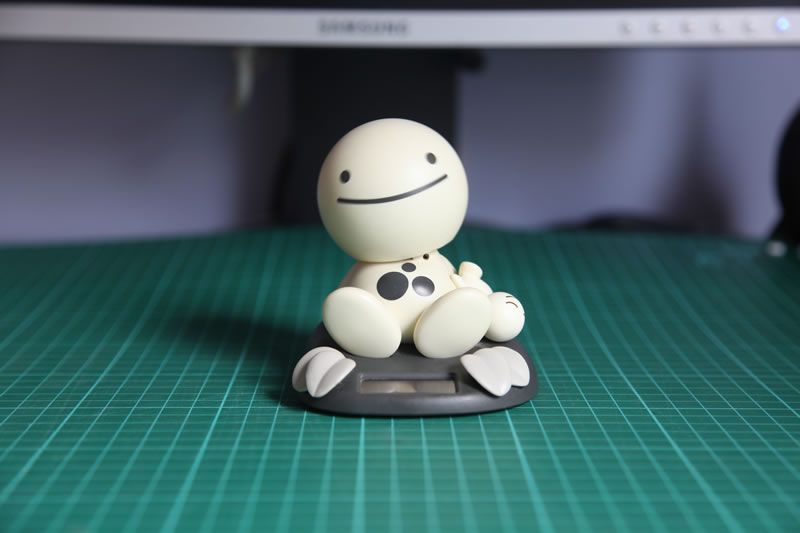 Finally, lets see the results if I change the ISO and the aperture and the shutter speed. Here I am trying to keep the aperture as small as possible (background/foreground more in focus) but then keep the shutter speeds pretty fast too. When I originally set the aperture small to f/22.0 I had to used a shutter speed of 5.0 seconds to get a correct exposure. If I wanted to get the shutter faster to avoid the head from going blurry then I had to use a wider aperture, letting in more light but this meant more foreground/background blur. In order to achieve less blur of the foreground/background but also less motion blur whilst still maintaining a correct exposure, something has to give...and that's where you change the ISO. By setting the ISO at 3,200 I am making the sensor a lot more sensitive to light. Now I can close up the aperture (let in less light) AND make the shutter speed a lot quicker because the sensor is able to compensate for it.....BUT....at the expense of image quality. Changing this setting allows me to capture a correct exposure with no background blur or motion blur, but the payoff is a more grainy image (probably not that noticable on this shot due to how much it's been reduced, but refer to the ISO section to see how higher ISO can rapidly reduce image quality) Aperture: f/22.0 Shutter speed: 1/8sec ISO: 3,200 CORRECT EXPOSURE 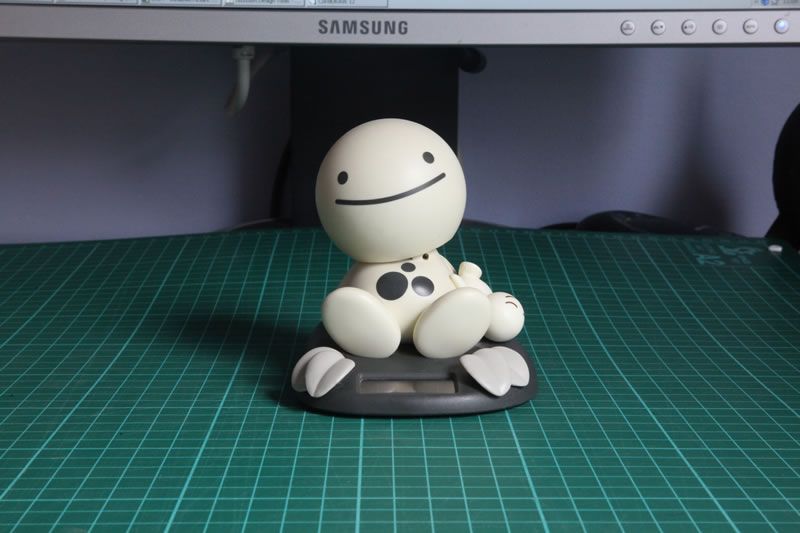 Notice how you can clearly read Samsung but also no blur of the head which has not been acheived in any of the other shots. This is the benefit of higher ISO, but at the sacrifice of quality. So there you go - how you can change settings for different effects, but still get a correct exposure. Now go and have a play yourself.... |
| |
|
|
smellyferret
Posted a lot
 Back in a retro after 7 years!
Posts: 1,121
|
|
Oct 11, 2011 19:26:16 GMT
|
Great thread Bruce! I will have to get a decent camera! Saw this on another forum and thought it was an ideal RR type thing! Hope you don't mind me posting here.. www.wimp.com/easystabilizer/Basically a cheap/simple way to stabilise a camera if you don't have the option of a tripod (or want to carry it around!), I've not tried it, but it makes perfect sense! |
| |
|
|
|
|
|
Oct 13, 2011 21:58:24 GMT
|
Great thread Bruce! I will have to get a decent camera! Saw this on another forum and thought it was an ideal RR type thing! Hope you don't mind me posting here.. www.wimp.com/easystabilizer/Basically a cheap/simple way to stabilise a camera if you don't have the option of a tripod (or want to carry it around!), I've not tried it, but it makes perfect sense! That is a genius idea, good spot  |
| |
|
|
|
|
|
|
|
Oct 13, 2011 22:47:07 GMT
|
|
|
| |
|
|
|
|
|
Oct 26, 2011 20:20:51 GMT
|
|
|
| |
 Click picture for more |
|
lae
Posted a lot
Posts: 1,045
|
|
Oct 26, 2011 22:13:45 GMT
|
|
|
| |
Currently:
Mk1 Focus blandmobile
Formerly:
1969 MG Midget
1972 Avenger GT
1981 Datsun Cherry
1989 Corolla
1979 Mercedes W123 200D
1995 Ford Falcon
1996 Ford Telstar (bet you had to google that one)
|
|
|
|
|
Nov 29, 2011 12:25:49 GMT
|
 This is my new baby, I will post up results over the next few weeks as I start to get to grip with it. |
| |
|
|
Sinky
Posted a lot
Run Baby Run......Please!
Posts: 1,395
|
|
Nov 30, 2011 17:00:27 GMT
|
|
Great Thread.Thanks
Oooooof^^^^^^^^^
|
| |
2001 Volvo XC70 wagon
2003 Piaggio X9 Evo
|
|
|
|
|
Dec 12, 2011 22:25:29 GMT
|
Right, a few weeks into owning my camera, using it almost everyday, just messing around with settings and that. First shots were just blurred, badly lit messes but I think I'm making progress. Here's a shot I took earlier which I'm quite happy with. 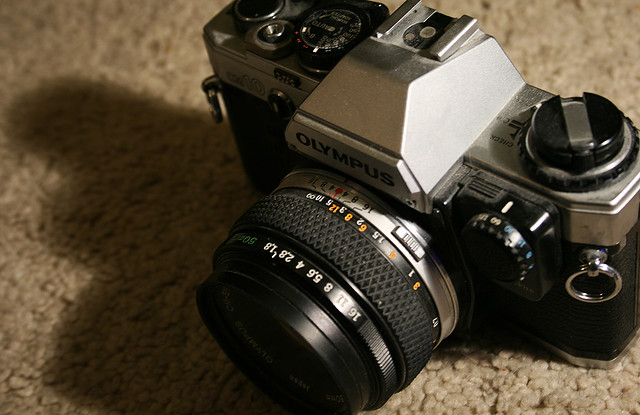 Olympus OM10 Olympus OM10 by Will Carter Photography, on Flickr |
| |
Last Edit: Dec 13, 2011 13:56:01 GMT by WillCarter
|
|
|
|
|
Dec 13, 2011 13:50:06 GMT
|
|
Mmmmmm, OM10 with 50mm kit lens. Great bit of kit, excellent glass - capable of stunning shots.
|
| |
|
|
|
|
|
Dec 13, 2011 13:57:04 GMT
|
Mmmmmm, OM10 with 50mm kit lens. Great bit of kit, excellent glass - capable of stunning shots. I'm not sure how well it works if it works at all, it's one my sister has picked up in secondhand shop for a couple of quid. |
| |
|
|
bmw156
Part of things
Posts: 796
|
|
Dec 13, 2011 16:01:27 GMT
|
|
Just started having a read through as I own a Nikon D50 DSLR and want to take better pics.
I was reading through the price guides, and must say I picked up my DSLR for £150 of ebay.
It was a gamble as it was second hand, and also a gamble that the lenses were ok. All turned out great and I have my self a nice camera. I now want a 70-300 lense for it, and am also looking around ebay!
|
| |
|
|
|
|
|
|
|
|
Just read this and want to say thanks MM.
|
| |
Remember the days when sex was safe and motorsport was dangerous. Vintage bling always attracts pussy. |
|
|
|


 Can't wait for the next installment.
  [*]
[*] [*]
[*]

 ) and since returning I've not had a chance to sit down and write the next bit about exposure as a 'whole'.