|
|
|
Dec 14, 2013 18:25:33 GMT
|
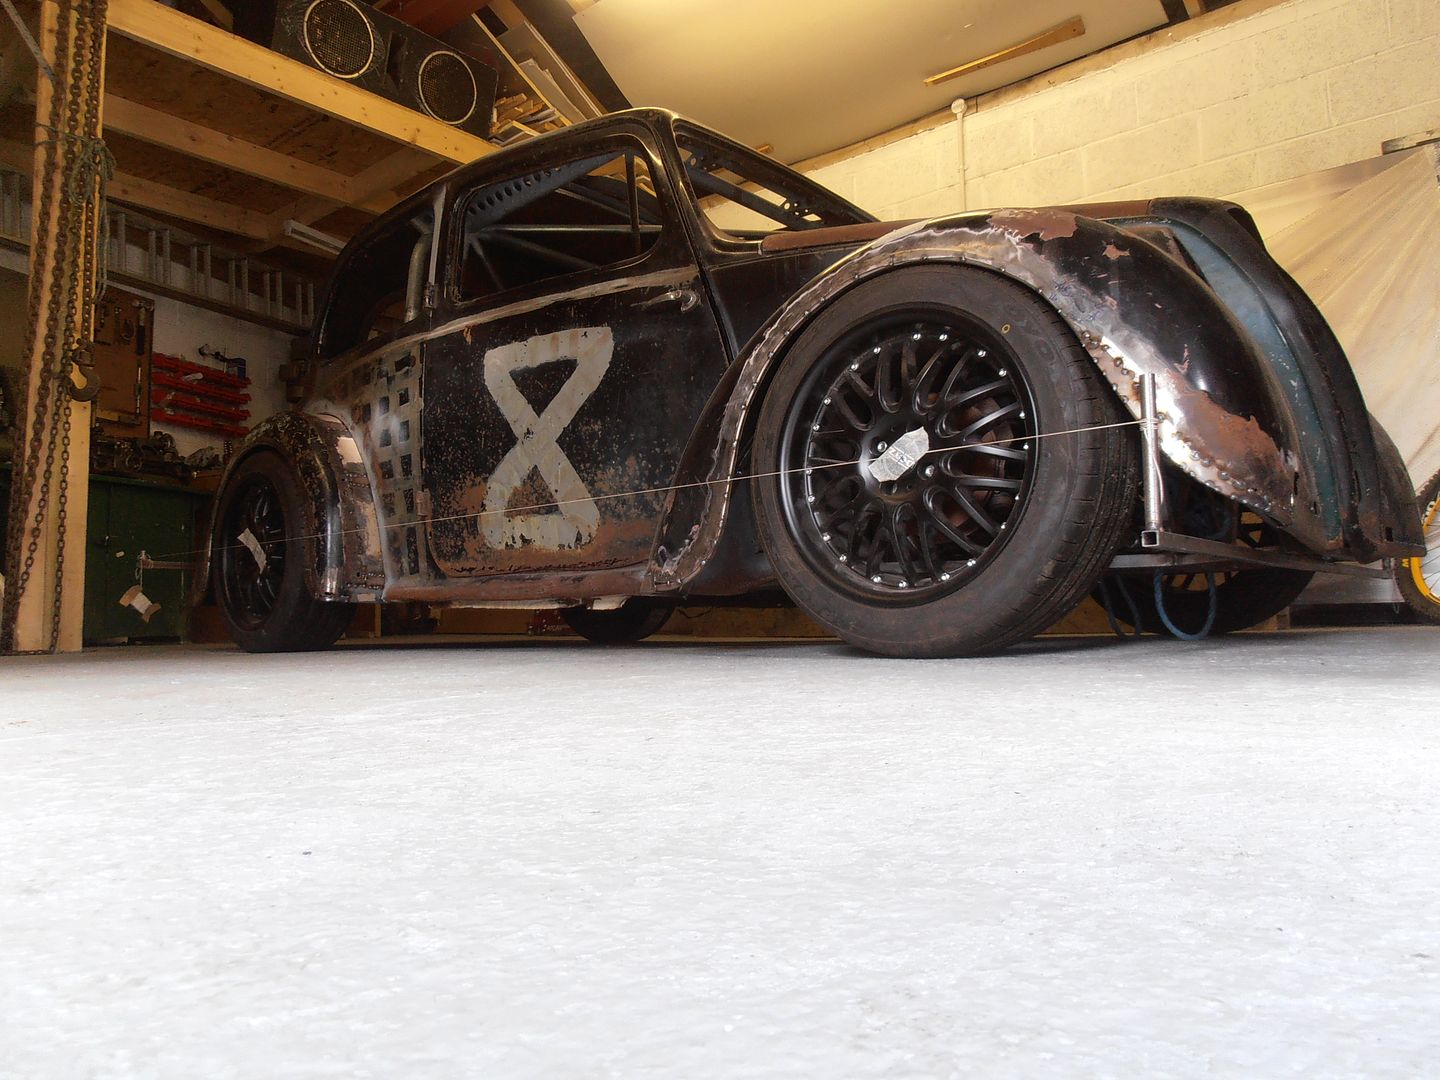
I'm new to this forum, and although I've read some of it on and off in the past this is about the first time I've actually posted anything on it. The story of this car is quite involved, and started when I first bought it was back in 1984, but it has gone through several reincarnations and spec changes since then, including being altered for Chrysler 7T2-R, Rover V8 and PRV V6 power. In its most recent form it was altered yet again to take a more modern Volvo B6304 'whiteblock' modular engine. This straight 6 cylinder 3-litre 24 valve all-alloy unit was always intended to be turbocharged for this car, and its suitability for this is already well proven in the very similar B5254T 5-cylinder turbocharged version as fitted to the Volvo 850T5 etc. Initially the car was going to be run with a fairly stock naturally aspirated version of the engine lifted almost straight from a 3-litre 960 until its chassis could be developed around the new drivetrain's weight etc. The engine would be mated to a 5-speed Volvo M46 gearbox from a 740 (which is never normally found behind a whiteblock motor) and would drive into one of Volvo's bulletproof 1041 axles from a 950 estate that has an Eaton G80 locking differential as standard. Rather than post loads of photos, this video gives a fairly good summary of the cars rebuilding from a partly rotten shell.... by the way all four chassis rails at the start had to be made from scratch out of rectangular hollow section. In fact with the exception of the shortened Avenger sills everything had top be made from scratch... Six years down the line, the car is now working rather well as a package and has proven to be very reliable while still giving a combination of good performance and fuel economy. It should in reality have had the turbocharged engine fitted at least a couple of years ago though, but demands on my time for other things as well as the fact that I'm using the car almost all year round have made it impossible to find time to complete the installation of the new drivetrain in any single winter 'downtime' period , which is actually only 2 or 3 months long in reality. I'm actually on my third M46 gearbox now, having quickly sheared the output shaft clean off of the first one and finding the internals of the second eventually starting to 'complain' loudly enough to warrant a cautionary replacement. I therefore have a Borg Warner T5 from a Sierra Cosworth waiting to go in at the same time as the new engine. It will also need a change of engine management system at the same time. Other than reworking some frontal plenum ducting to fit an intercooler (a chinabay type...not those shown in the video), the inner offside wing panel will need some modification to give clearance to the lower turbo. This, and completing the rest of the exhaust system in-car (as it is quite a tight installation) means that this really can't happen until the car can be taken out of service, but I can't risk being left without a car to use. From past experience I just cant see all of this happening inside of 3 months? The Catch 22 then is that I badly want to get more power in the car over a winter, but don't want to be left without a car to use the following year! This video gives a good idea of how more power could be used to good effect, particularly if it is also nice and controllable... Anyway, to bring things up to date, I plan to tackle this conundrum on two levels. The first is to squeeze a bit more power out of the current engine in such a way that can (unlike all of the turbo parts that are waiting to go in) be installed in the very limited time available, which in reality means a complete package that can be developed almost entirely out of the car. I'll come back to this. The second is to build another car altogether which will let me take the current one out of service for long enough to get all of the turbo drivetrain parts installed, which I'd guess would be a year. The new car is already under construction but is making sporadic progress. It is a marginally younger Talbot Sunbeam which this time will be fitted with a 4.4 litre BMW M62B44, the 32valve quad-cam engine that some on here will already be familliar with. It will drive into a 6-speed M5 gearbox and also into a Volvo 1041 live axle with an Eaton G80 locking differential which I've found to work very well. This is it after some bulkhead modification to get it to fit in the smallish engine bay.. 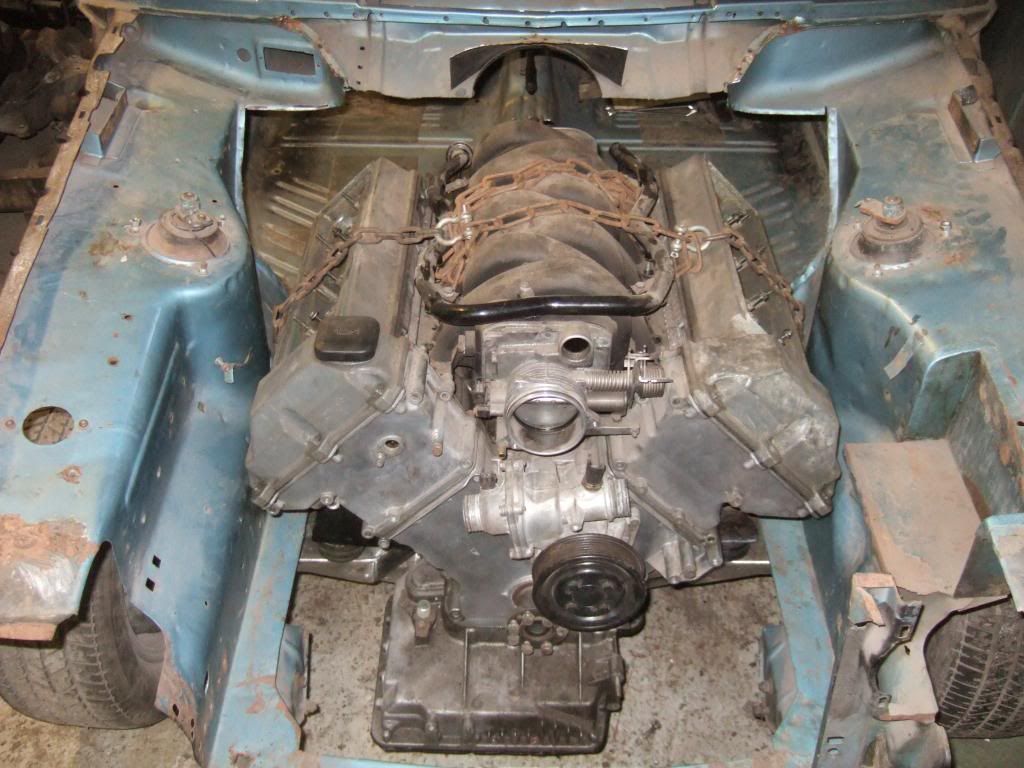 ...and from the gearbox side.....  More or less as it is now after fabricating some new panels... 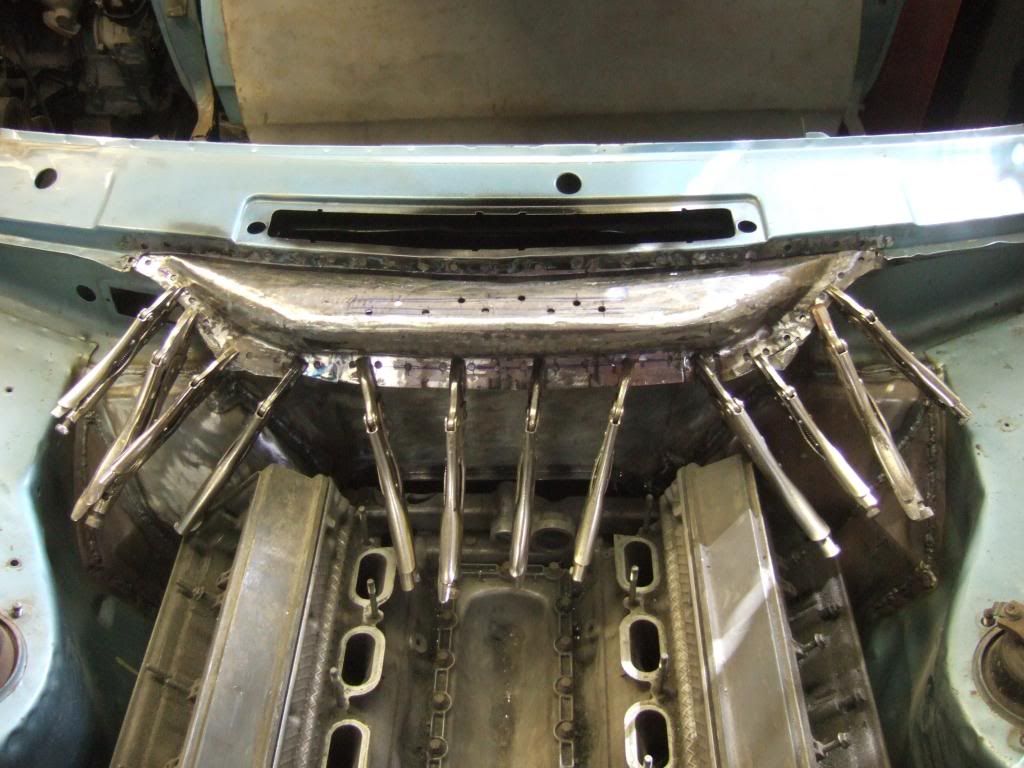 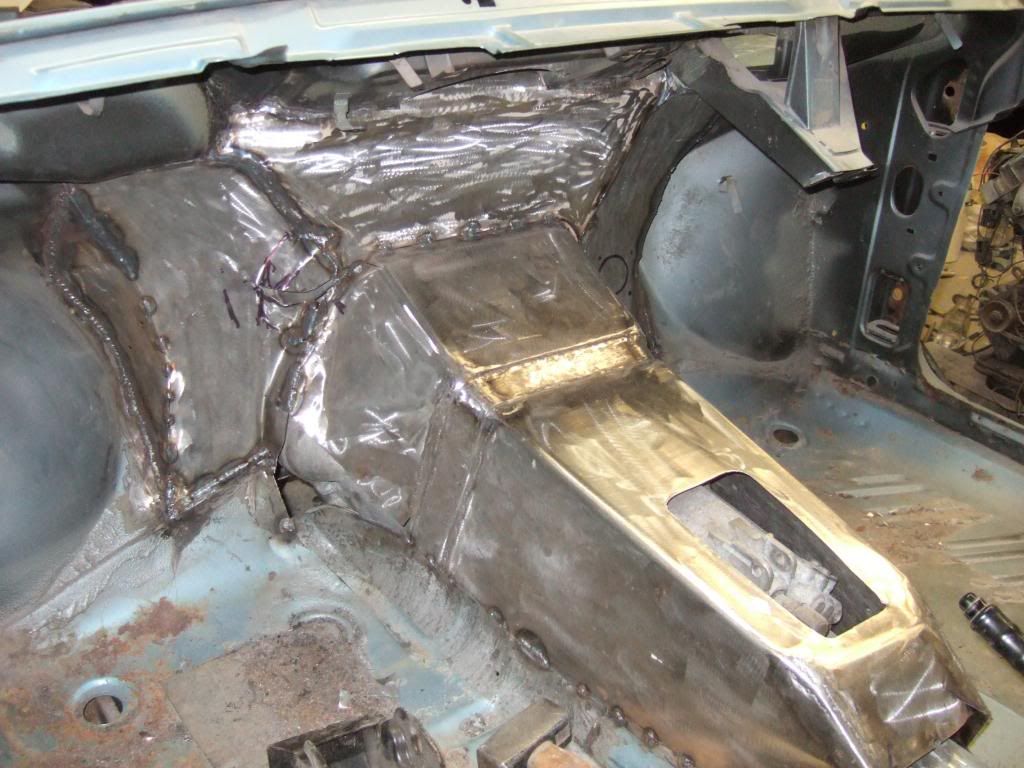 My thinking has changed a bit on the tunnel though, and I'm thinking of remaking this one-piece one in two pieces with a slightly more rounder top side. 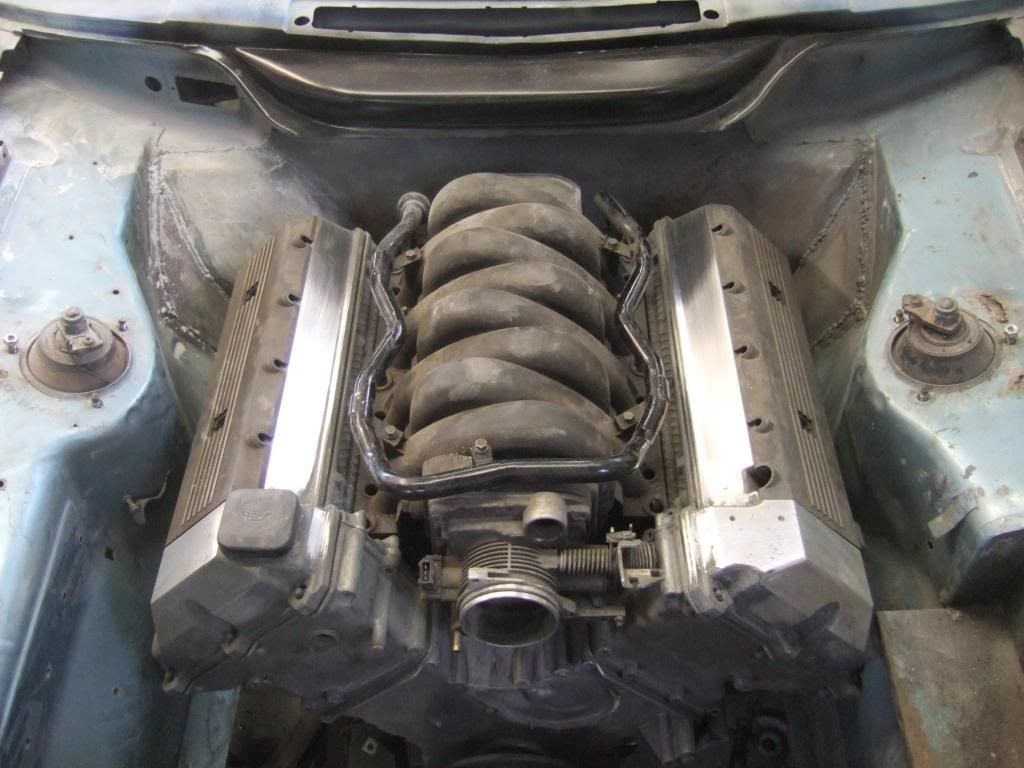 Anyway, I'm not sure if there is a photo limit per post here, so I'd better conntinue on another post.... |
| |
|
|
|
|
|
|
|
Dec 14, 2013 18:55:33 GMT
|
So, as we all know, these kind of projects never go very quickly and it is likely that the original car would otherwise still be running naturally aspirated for another coupler of years until the new one is ready. I looked at other options including 'normal' tuning of the engine in atmo form, but parts for this engine aren't at all common and this just isn't likely to produce the goods at a reasonable cost. This is when I bagan to have thoughts on supercharging one of these engines instead. A supercharger installation could I imagined have been developed almost entirely off of the engine (as it neatly avoided the very tight and restrictive, time consuming exhaust system downpipe work needed on the turbo arrangement), and I thought could use an air-water-air charge cooler to help keep things simple and compact rather than use an intercooler. Second hand superchargers seemed to be readily available from places like Ebay for not huge amounts of money too. I decided that an Eaton roots-type blower would be suitable, but that the M45 and M60 types from the 'New Mini' or smaller engined Kompressor Mercedes cars wouldn't fit the bill. These units get much less efficient if driven abovectheir designed upper rpm, so I figured on using the larger M112 unit from a Jaguar XJ6R or XJR8/ XKR8 and under-driving it if necessary over an M90. With hindsight I'm not sure that this is correct thinking? Anyway, after being outbid at the last minute on two, I finally won this unit, and roughly offered it up about 12" above where it was planned to fit... 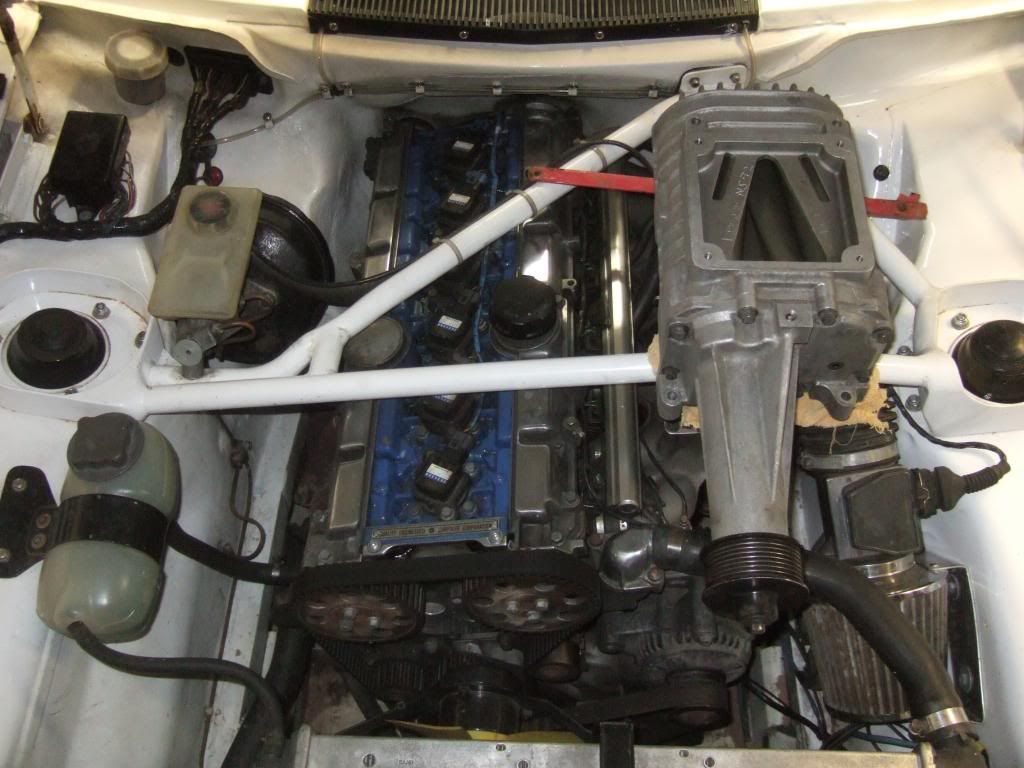 ...and after offering it up to a spare engine... 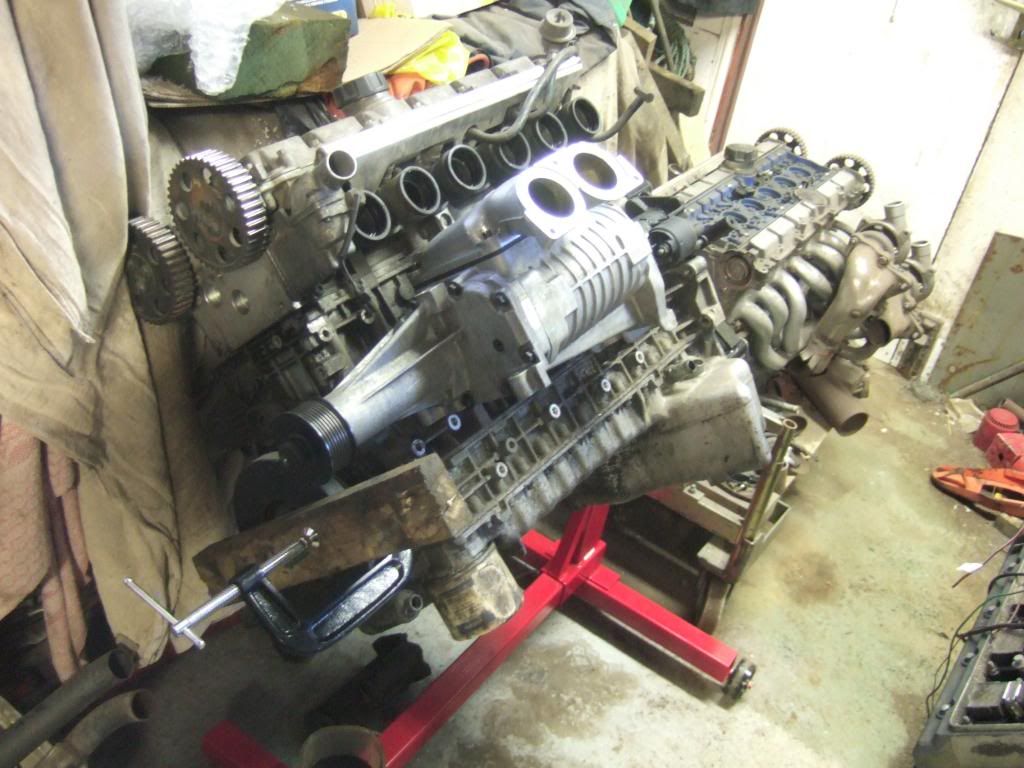 ...began mounting it... 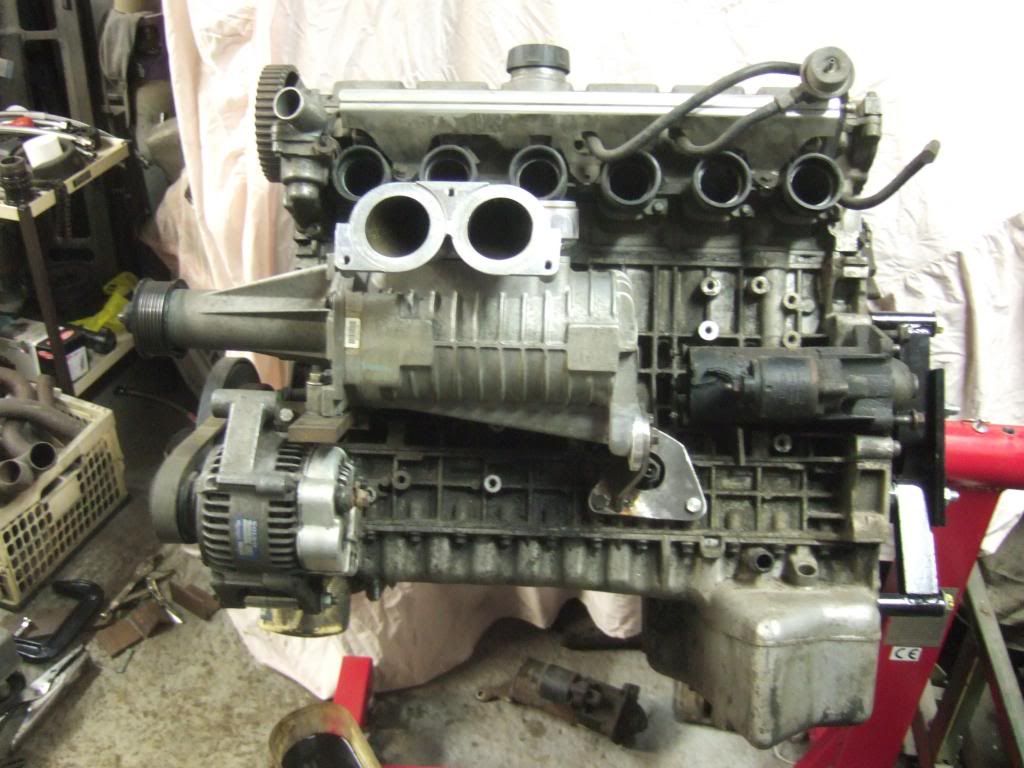 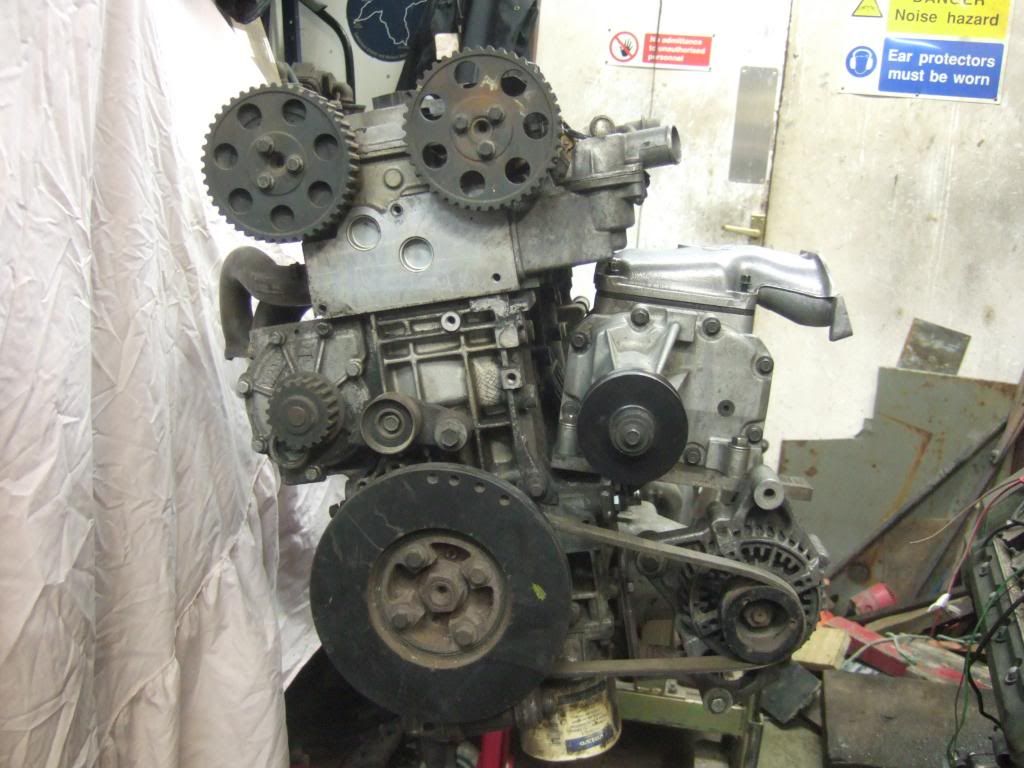 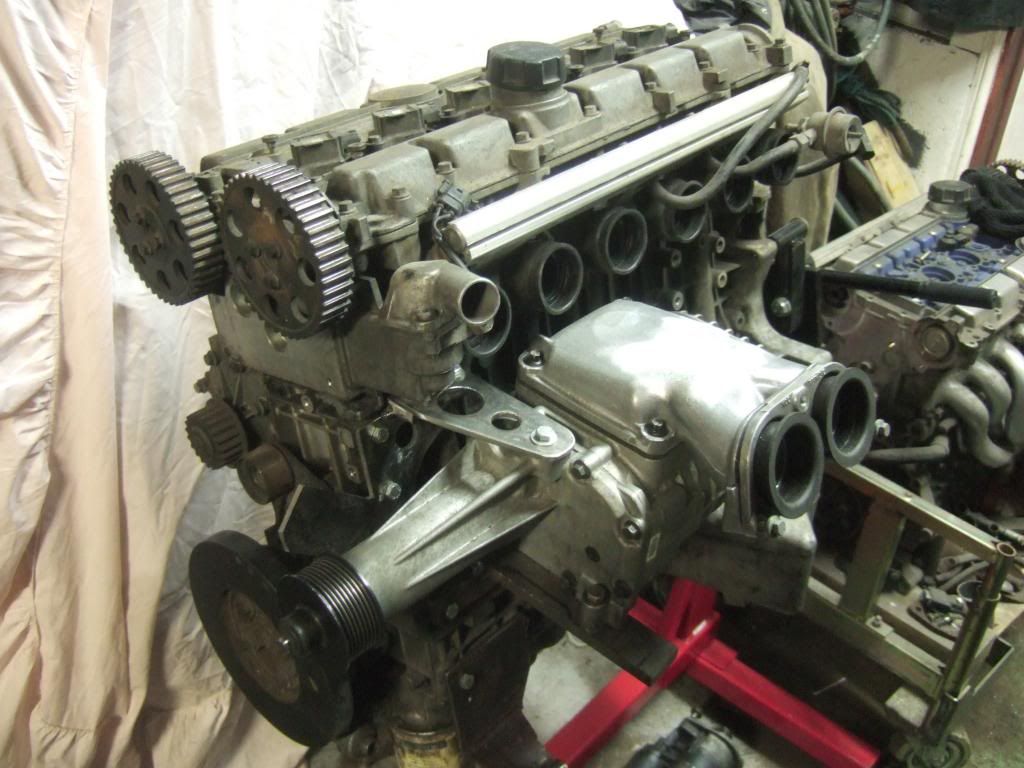 ....and that is just about as far as I've got at the moment. Some harsh use over the last few months now demands quite a few suspension parts and bushes etc be changed on the car before its next outing at the end of January. I'm hoping to get most of the remaining parts needed for this engine ready by then too, so that if all goes to plan there is at least a possibility that the supercharger might be fitted between February and the cars first event of 2014 in April. Fingers crossed! |
| |
|
|
bstardchild
Club Retro Rides Member
Posts: 14,886
Club RR Member Number: 71
|
|
Dec 14, 2013 19:09:14 GMT
|
|
Nice looking engine that volvo lump
Amazed you got a M62 in that engine bay - there is curse word all room round the one in my E38!!!
|
| |
|
|
|
|
|
Dec 14, 2013 19:34:25 GMT
|
|
I know just what you mean, I also have an E38 740i. There is actually more space for the offside exhaust manifold in the Sunbeam than there is in the 740i due to the design of the steering box and arm and their positioning in the latter.
I've removed all surplus / redundant parts like power steering and A/C pumps, and if you look at the previous photos also the cast-in brackets for the huge original alternator. Unlike most of the cars these engines come in, the Sunbeam has very little in the way of electrical or electronic gubbins, so will get by with a much smaller and more compact one.
The engine in the photos is actually a dummy one that I got purely for check fit purposes. I have polished the magnesium camcovers on this one to see if they tend to corrode or not, and if the permanent engine will need to have their original protective treatment painted instead.
So far, after several months like this (albiet only in a dry garage) they still look good.
They represent a lot of engineering and performance potential for very little money...... around £1 per bhp can't be bad.
The Volvo whiteblock range are also nice and under-rated engines. Unfortunately they aren't very well catered for in the aftermarket, but they are quite strong and do offer a fair bit of potential when turbocharged.
Their limiting factors are first their stock con rods (which can bent under higher than stock levels of boost, but are easily changed for common aftermarket H-beam versions) and ultimately by their close cylinder bore centres which necessitate thin cylinder liners at the larger bore sizes, which are known to crack near their tops at very excessive boost and heat levels. The close cylinder centres are ironically designed to keep the whole engine short for use in FWD applications.
Keep power expectations down to sensible levels and they are great engines.
|
| |
|
|
Davenger
Club Retro Rides Member
It's only metal
Posts: 7,272
Club RR Member Number: 140
|
|
Dec 14, 2013 21:28:56 GMT
|
|
You sir, are a hooligan!
Top work!
|
| |
|
|
|
|
|
Dec 14, 2013 21:32:16 GMT
|
Glad you put your build thread up mate, mental skills  |
| |
|
|
froggy
Posted a lot

Posts: 1,099
|
|
Dec 14, 2013 22:12:21 GMT
|
|
Have a look at the port spacings on a jag 6pot combined manifold with chargecooler might be an option . I have one somewhere at work which was mocked up on a bm 6 pot but ended up being turbocharged instead .
|
| |
|
|
hairymel
Club Retro Rides Member
avatar by volksangyl
Posts: 1,078
Club RR Member Number: 207
|
|
Dec 14, 2013 23:04:35 GMT
|
nice to see you posting here James knowing what pic whores RR'ers are i hope you don't mind me reposting one of your pic's of EGA 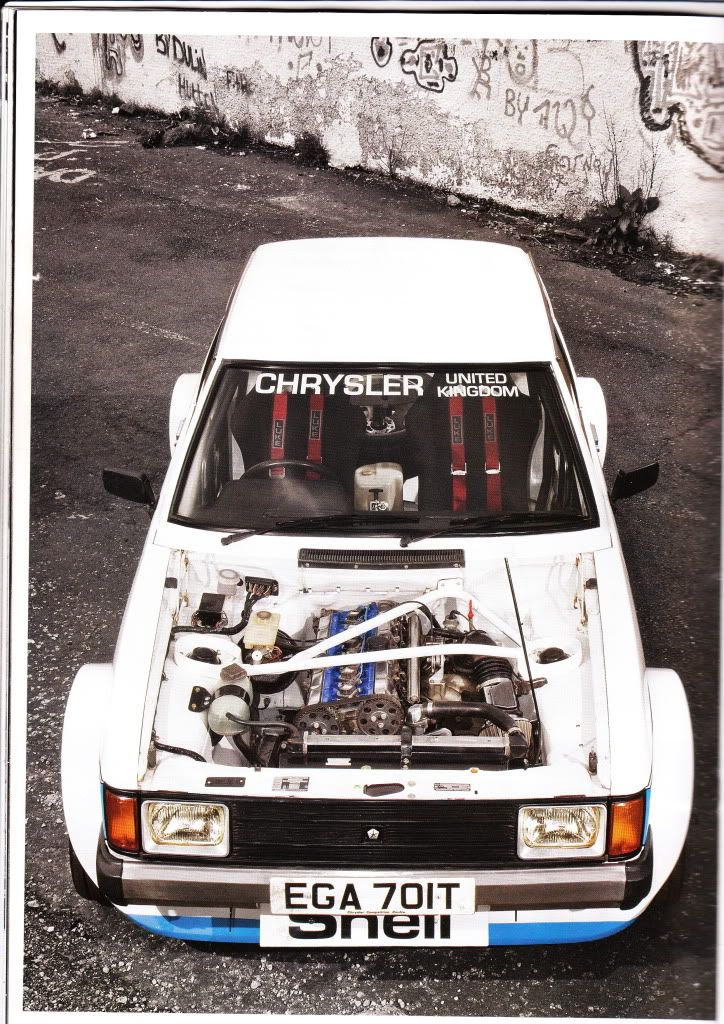 fawn mode/ i personally rate your (constantly evolving) build as the most impressive one on the owners club website and one of my top 5 inspirational builds in the whole wide world  /fawn mode i am also looking forwards to watching your progress on the bmw engined sunbeam  |
| |
whats that burning smell?
oh curse word :-(
|
|
|
|
|
|
|
Brilliant, fantastic skills, the video of the build is itself a work of art  Think the BMW engine will be great in the other car, I look forward to seeing its progress! |
| |
Last Edit: Dec 15, 2013 3:57:55 GMT by cerbsp6
|
|
|
|
|
Dec 15, 2013 19:26:37 GMT
|
Thanks for all of the nice comments guys. Froggy, I had been looking at using a Jaguar XJR6 chargecooler matrix and possibly even parts of a manifold from one. There is actually one on Ebay at the moment.... www.ebay.co.uk/itm/380793413585?ssPageName=STRK:MEWAX:IT&_trksid=p3984.m1423.l2648....but I'm not sure how big it is for either fitting or restriction purposes, and there is only one photo in the listing. I thought that a charge cooler should give a very compact intake system that could be developed out of the car to fit below the existing strut brace, but after talking with Claymore about his Subaru Legacy version giving unacceptablly high outgoing temperatures I'm having second thoughts? I've even considered making a plenum to carry a larger oil cooler element to do the same thing, or whether just to accept all of the plumbing that would be needed to route intake air through the front mounted intercooler I have for the turbo engine.... but that would give horribly long and torturous routes. If possible, could you take some photos of the charge cooler that you have from different angles....preferably with a tape rule alongside for scale? Mel, no problem. You flatter me, but I'm glad to hear that you like what I've done with EGA. Unfortunately it isn't always so warmly received by some other owners who prefer their cars to be more original, and in truth completely original ones will in time be worth more, but if I hadn't saved it at the time this cars fate would have been being crushed, so to my mind there is no loss in having modified it. In many ways its development is badly behind schedule and it is still a long way short of its full potential (partly because I've been using it), but it is still slowly moving in the right direction. I was pleased to see that you had tracked down another shell after your own disaster earlier in the year. It says a lot for your determination and spirit to have picked yourself back up after such a blow, and I look forward to see your progress on the new shell. BTW, that photo was by Steven McCann of SMC Photography, taken for an article in Retro Car Magazine a few years ago. Can you spot the mistake? The bonnet was only raised up not removed and he 'blended' a bonnet up and a bonnet down shot to get that pic....but note that the bonnet prop is still there in the photo! Cerbsp6, The BMW engine will be left in almost standard spec but with a light flywheel and lower than usual (for a BMW V8) final drive ratio, but make the overdrive 6th more usable. This should give good reliability and fuel economy, and in a Sunbeam that will likely weigh less than 60% of the donor vehicle hopefully also quite lively performance. I'll post up few details of its installation that might be useful to anyone doing something similar with one of these engines. |
| |
|
|
|
|
|
|
|
Dec 15, 2013 20:54:49 GMT
|
I originally bought the moonstone blue Sunbeam shell to rebuild as a fairly standard spec Series 1 Sunbeam Lotus (black with silver stripe and shark grey interior), but for the same sort of reasons as with EGA I started to go off using the Lotus engine even when left in a fairly low state of tune. I briefly considered a Lotus V8 from an Esprit (and I noticed that someone on here with a Cortina has gone down that road) but the only engines I ever saw for sale were going for silly money. Another option might have been using a Toyota/ Lexus V6 unit as fitted in the Evora... but that was always a bit of a loose association and a Lexus engine didn't seem right. As I already had/ have a BMW E38 740i and was quite familiar with the good and not so good points of its engine, and the fact that they can be picked up complete for £200-300, I seriously bagan to consider fitting one. The Sunbeam Lotus ZF gearbox wouldn't be up to the job behind one of these motors, so as these are now getting very valuable for historic rallying it was sold to help finance the project and a 6-speed Getrag M5 gearbox bought to replace it. I then bought two BMW M62B44 V8 engines, one from a 740i and one from a 540i. The two are internally identical, but have one or two minor detail differences in their fuel rails. The plan was to retain the stock Bosch Motronic DME engine management ECU, but I wasn't to know the difficulty that doing this would poresent at the time. It was around about this time that whithin about 2 months there were two interesting features in Practical Performance Car magazine that caught my eye. The first was a feature on fitting the same engine to a Capri (bmwv8capri 's car on here) followed by an article on transplanting the BMW V8 which obviously drew heavily from information gained in the previous months feature on the car. I have now (only yesterday) seen a link to the building of this Capri, and it is very interesting to note that in some areas we encountered exactly the same problems and independently came up with very similar solutions, and in others the installation in the two cars hit very different snags. The Capri V8 installation guide is an excellent and extremely informative read for anyone considering something like this, but as these engines are likely to be popular for transplanting into a whole variety of other cars I thought it might be useful to give some details of how I got around some of the other stumbling blocks when fitting one in the Sunbeam. As the Sunbeam has a much shorter engine bay than the Capri I really had no option other than to mount the engine far enough back to clear the radiator and adjust the bulkhead to suit it. This in some ways made things a bit simpler as the standard sump didn't foul the engine crossmember by very much. The Sunbeam anti-roll bar and steering rack lie behind the crossmember rather than ahead of it, which also helped make it fit more easily. All that was required then was to make a special one-off heavy duty replacement crossmember in such a way so as to carry the steering rack in a suitable position and yet clear the V8s sump pan.... 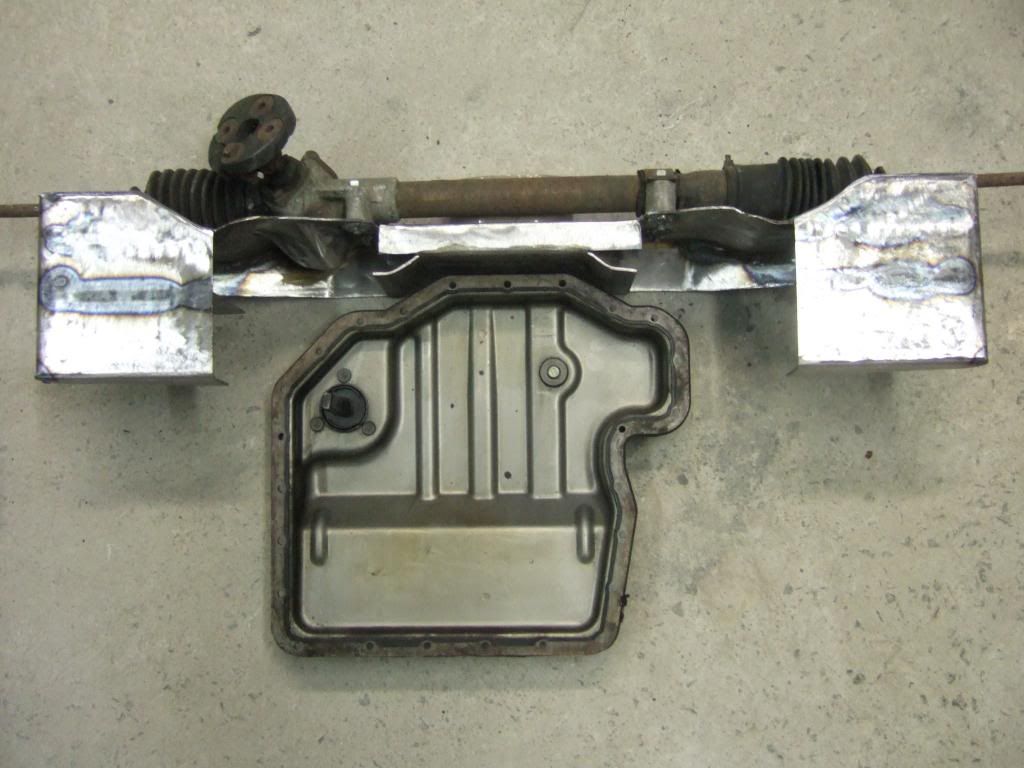 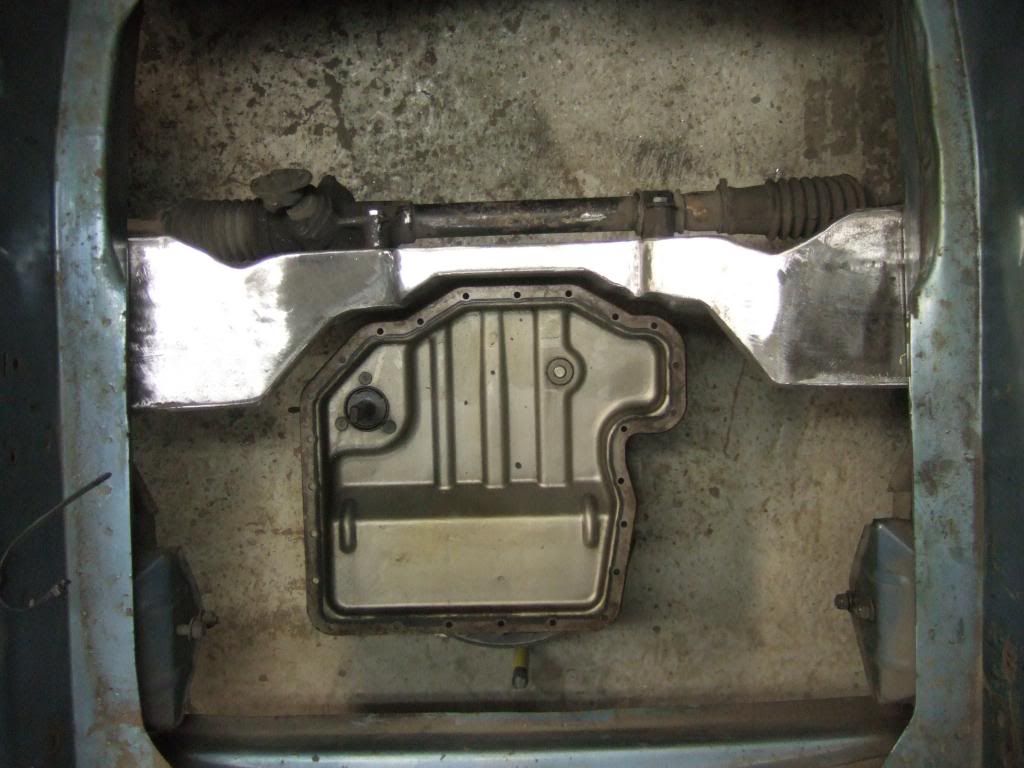 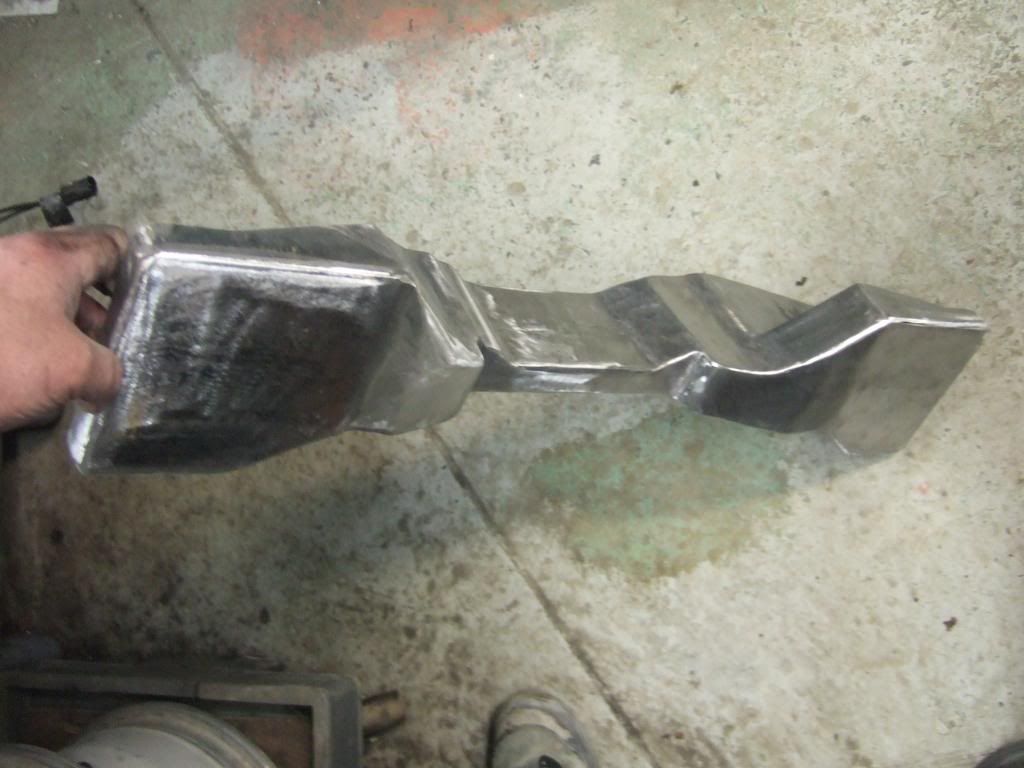 Original crossmember above with the new one below... 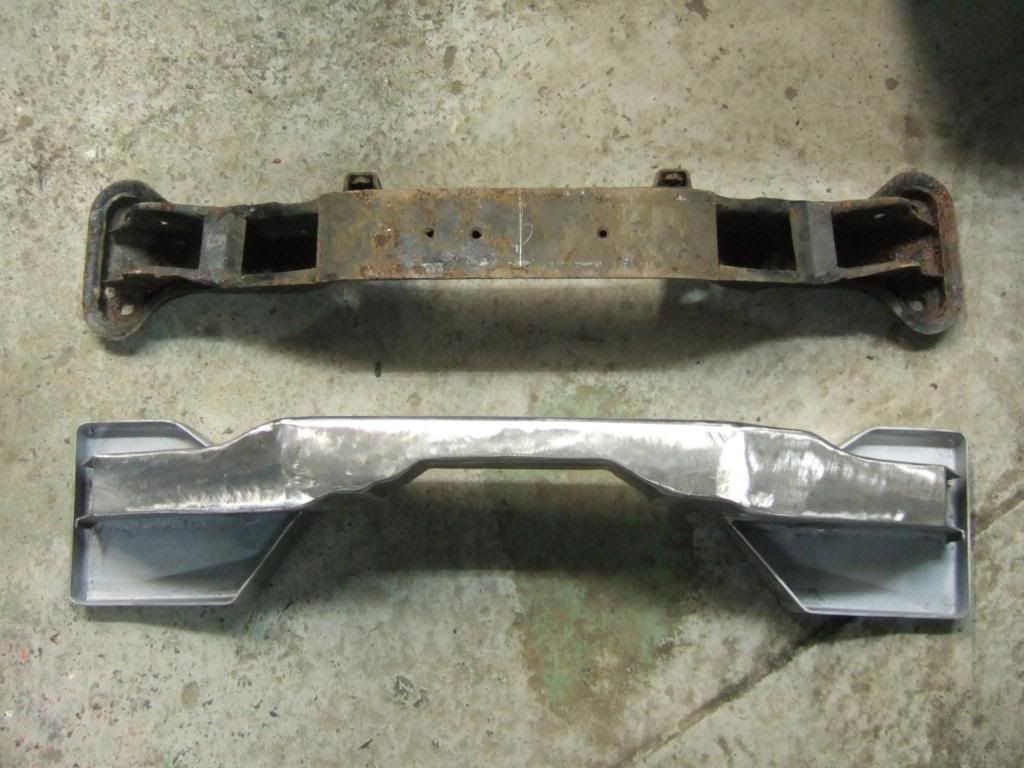 The BMW engine mount brackets also presented a couple of issues. Firstly, they are very long items....presumably to help the mounts resist the levels of torque reaction that the engine can produce. Secondly, the nearside cast bracket also incorporates the flow and return oil connection to either the filter (M60 engines) or the braided flexible lines to the remote oil filter (M62 engines). I plan to fit an engine brace/ damper from a strut top to help with the first issue, so on the offside a simple sheet steel bracket was made up to suit the new crossmember. The most common type of suitably simple aftermarket engine mountings seem to be either intended for a Ford Pinto or for a Rover V8, so I opted for a pair of 'old' Range Rover 50mm mounts, but ironically the more recent L322 Range Rover also uses the BMW V8..... which would later prove to be useful. New fabricated offside bracket on the left, original cast version on the right....  Here is a view of the stock nearside bracket from the rear showing the oil passageway O-ring seal positions.... 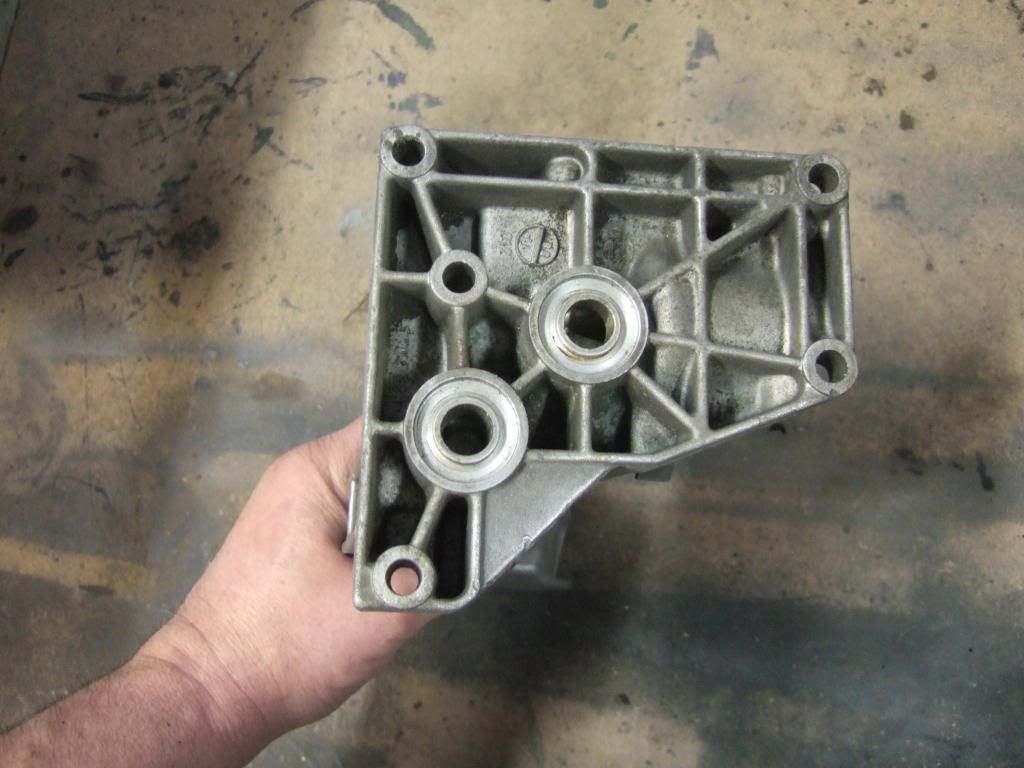 ...and here it is from the front showing the flexible line tap-off points.... 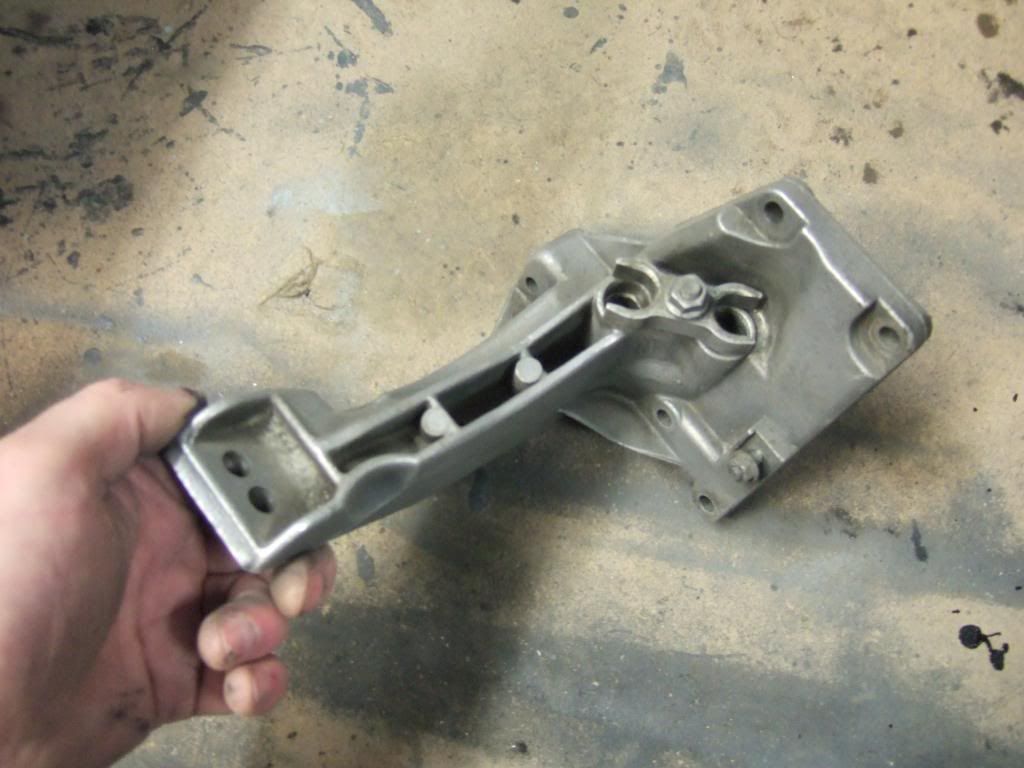 What I decided to do was keep the tap-off part and cut the rest down to this.... 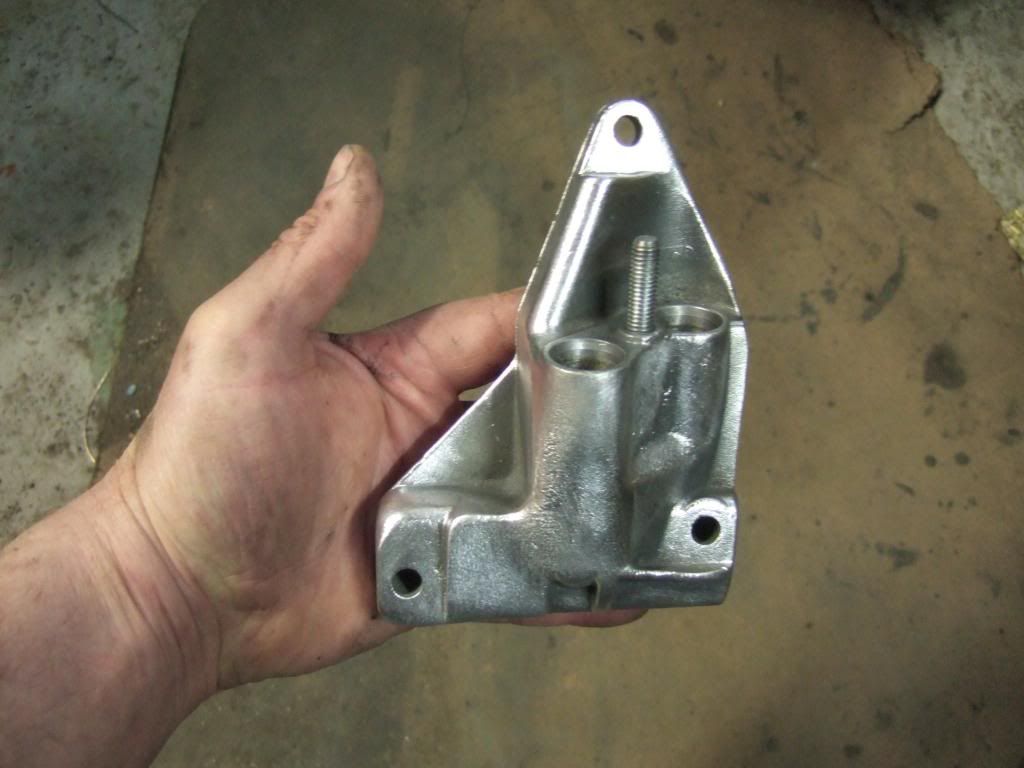 ...to let me form a sheet steel bracket around it like this... 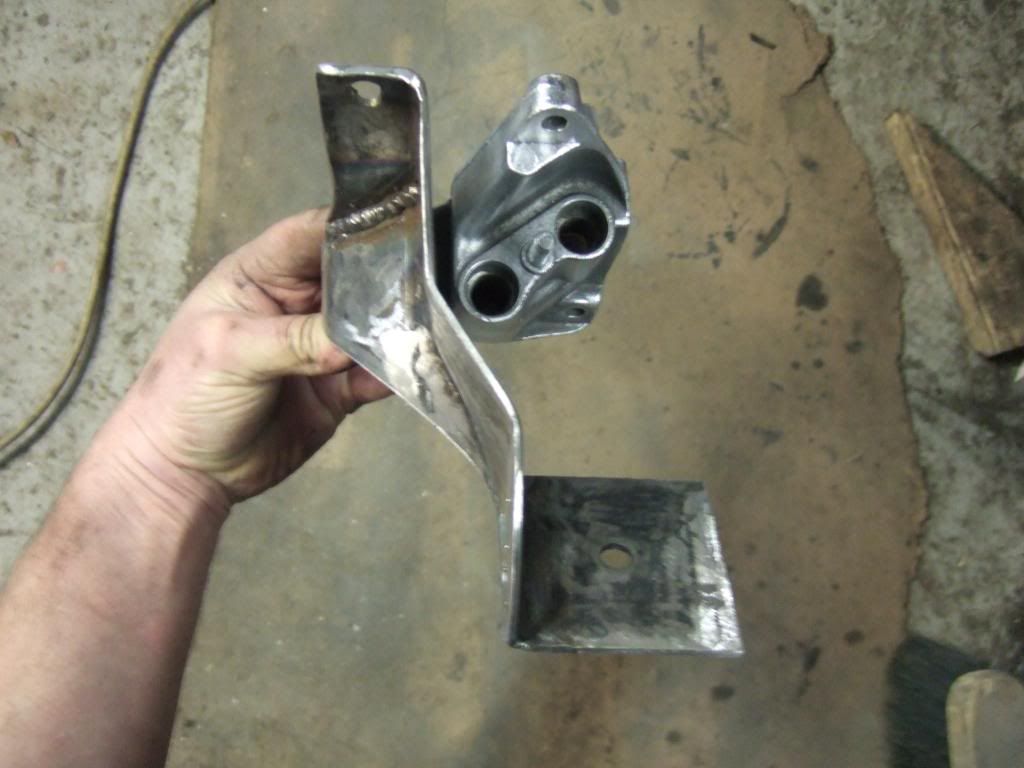 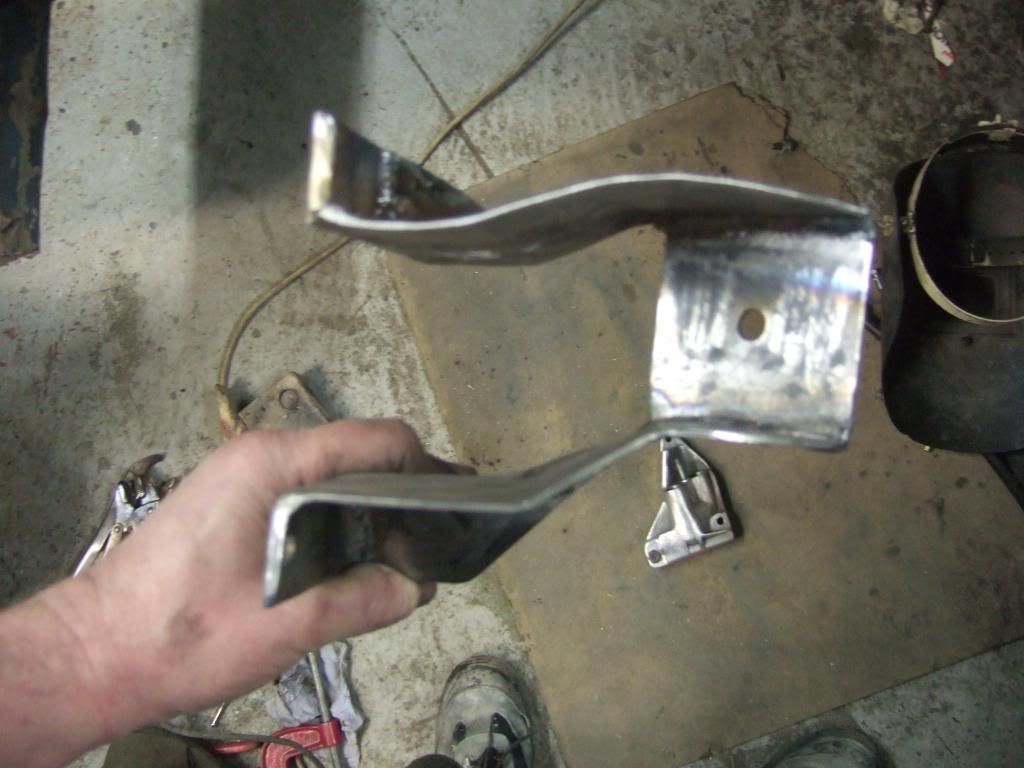 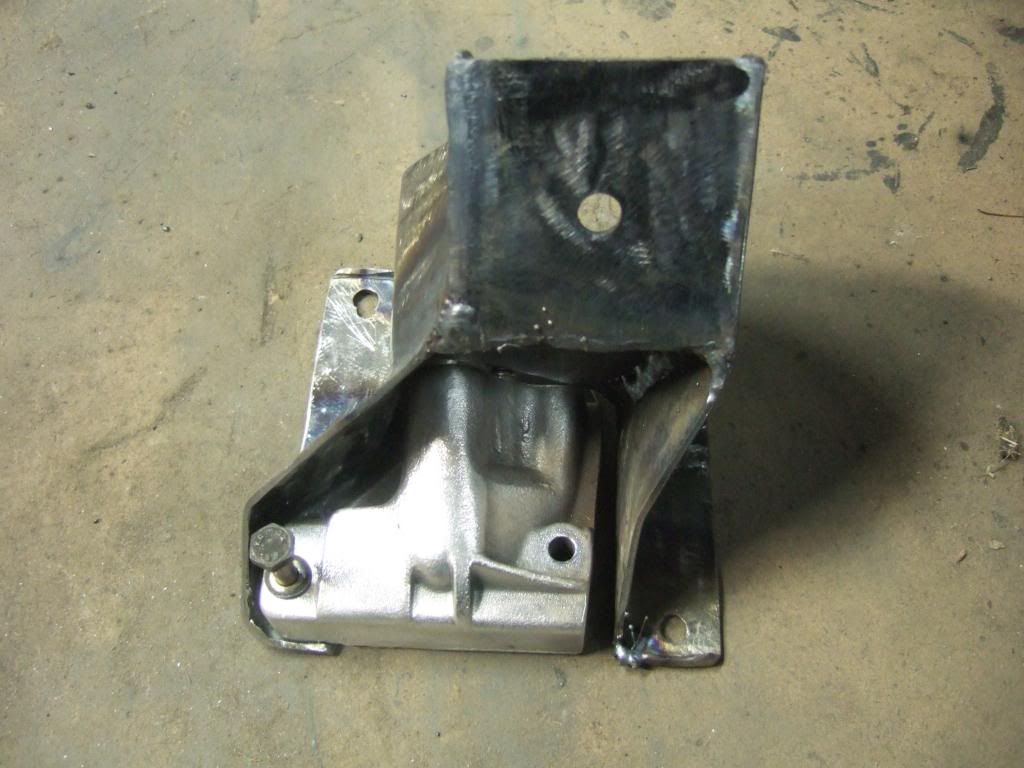 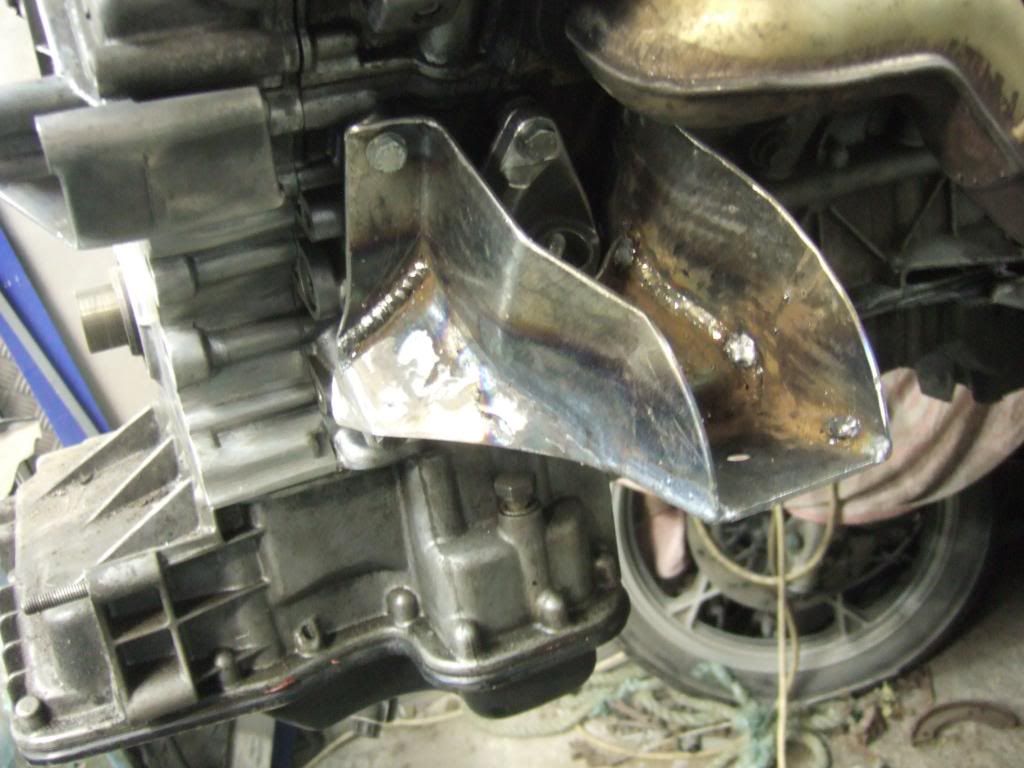 With both new brackets complete... 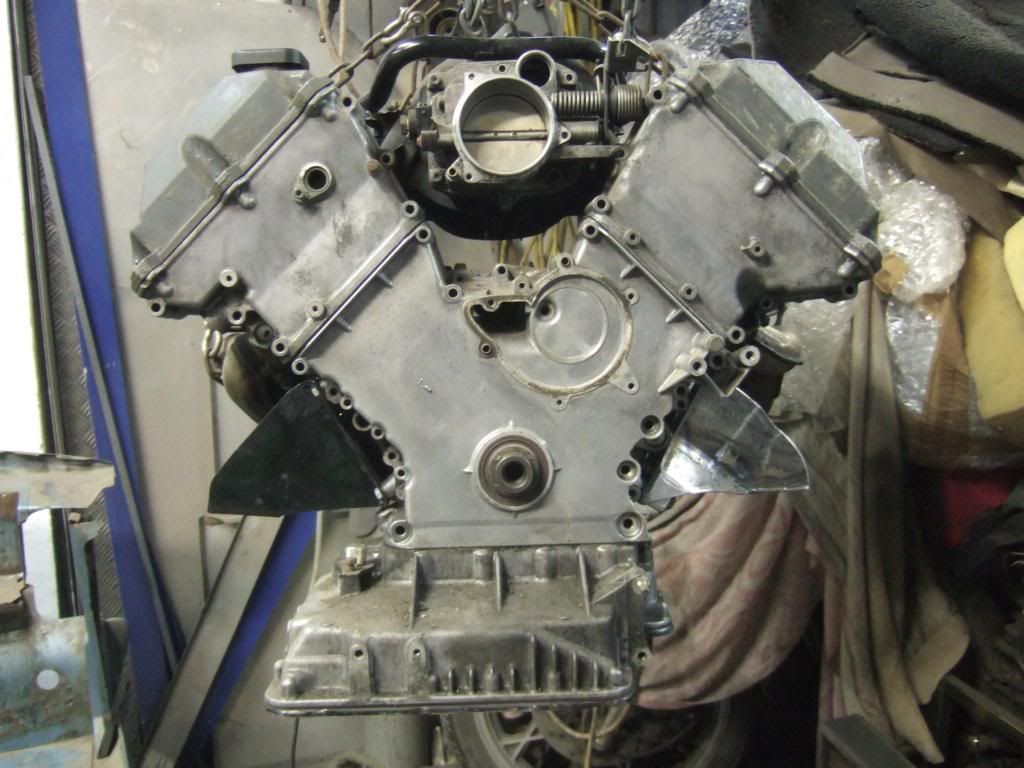 ...and sitting on the new crossmember... 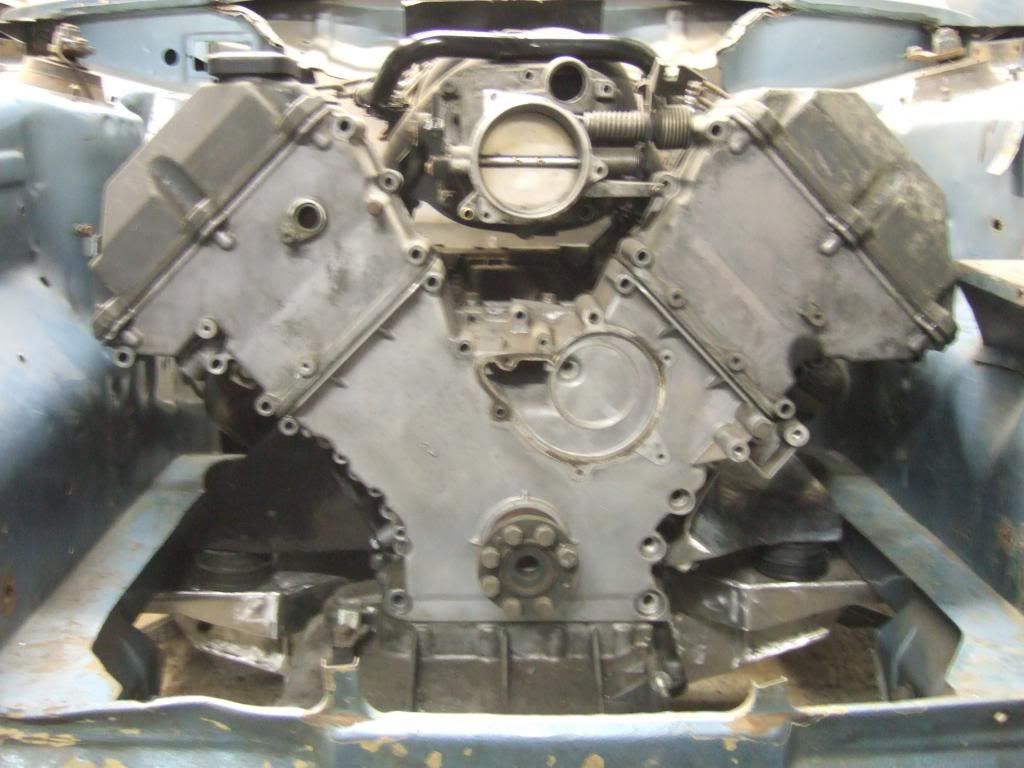 |
| |
|
|
jonomisfit
Club Retro Rides Member
Posts: 1,746
Club RR Member Number: 49
|
|
Dec 15, 2013 21:20:28 GMT
|
|
Welcome to the RR fold James. Looking forward to see how the engine and new car come along. Vids a good.
Did the jag engined "special" get finished? Pics?
|
| |
|
|
|
|
|
Dec 15, 2013 21:45:18 GMT
|
|
Ha Ha....I'm guessing from the name and knowing of the J36 project that it must be you Jono?
No, not yet finished, its in mothballs for the time being.
The chassis is 90% complete but still lots of things suspension arms etc to do as well as finalising the drivetrain. If you remember it wasn't supposed to have a centre differential as such originally, but just a pair of gears to turn the drive from the central gearbox around 180 degrees to the back axle. The upper gear was to have an electromagnetic clutch on it that could be pulsed to drive the front diff only when slip was detected at the rear end.
This all got overly complex and I was looking at a conventional centre diff instead, but the manual Range Rover one I had in mind doesn't have such a good reputation for strength when coupled up to the sort of torque a twin turbo AJ6 can produce.
Has life put a hold on your Avenger project for the time being or is it making any progress?
|
| |
|
|
|
|
|
Dec 15, 2013 22:05:19 GMT
|
Fantastic work , always admired your Sunbeam, seen it driving around localy a few times, quite a sight on the road. |
| |
72 Pontiac Firebird Formula 400. 95 BMW E34 525i Manual. 80 Lotus Elite, sold  86 Mk4 Escort RWD V8, sold |
|
|
|
|
Dec 15, 2013 23:22:10 GMT
|
Hi Mark, The white car (EGA) isn't usually used on the road very much other than being driven to or back from an event or meeting of some sort which it isn't being taken to by trailer, so I'd guess it would have been a Saturday or Sunday when you have seen it about. It does tend to stand out from normal road traffic a bit more than I'd really like to be honest, which puts me off driving it for more general use.... and now and again also attracts the attentions of the odd 'boy racer' which I'm not at all into. The new V8 car will be much more subtle and look externally exactly like a standard Series 1 Sunbeam Lotus, and will have slightly softer suspension and even such luxuries as carpets and rear seats...and a radio! It will be much more suitable for some of the longer distance and international tours I 'd like to do in future as well as UK shows and club meetings. This will also allow me to get a bit more extreme and less compromised with the spec of EGA and push its performance limits a bit closer. It was originally built purely for tarmac/ circuit use, but these days it often gets forced into doing things that it isn't always very well suited to....  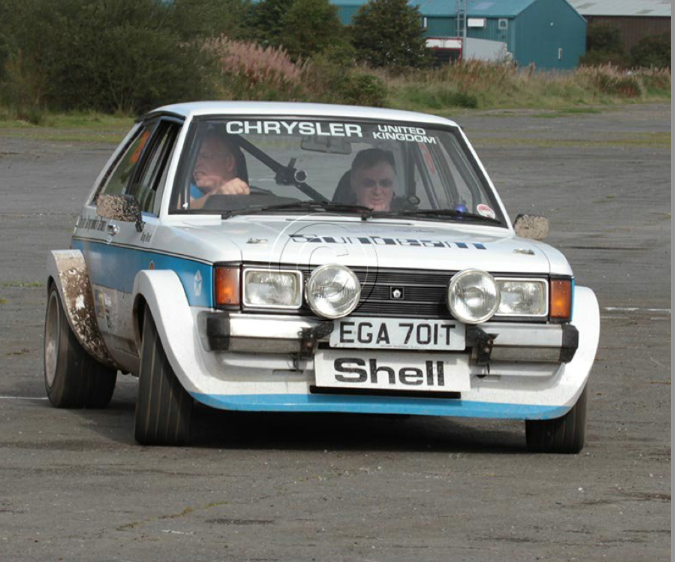 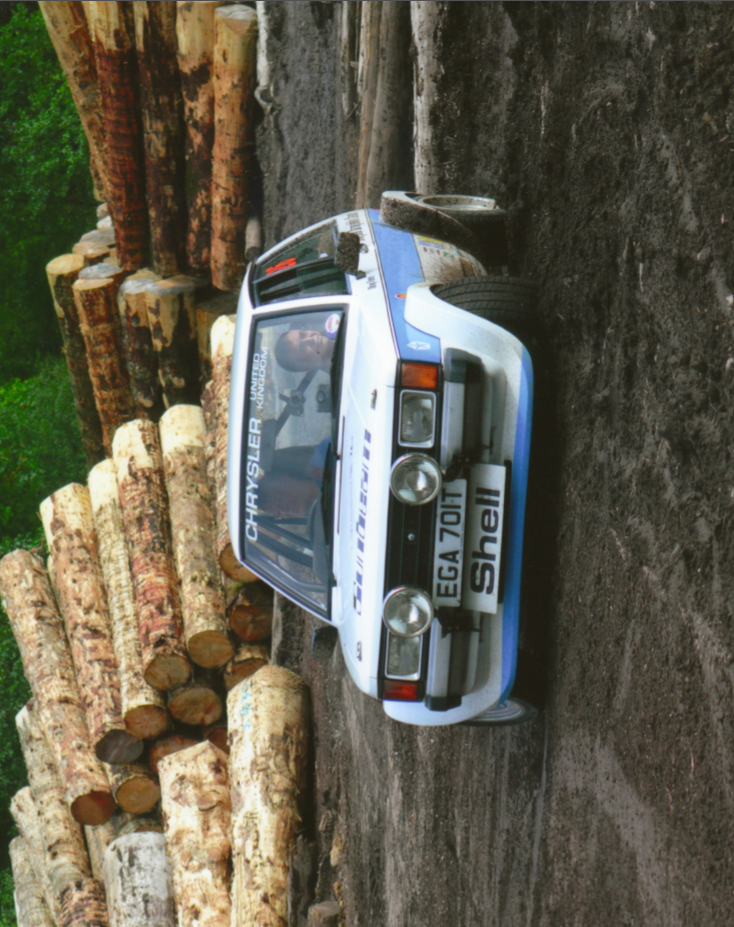 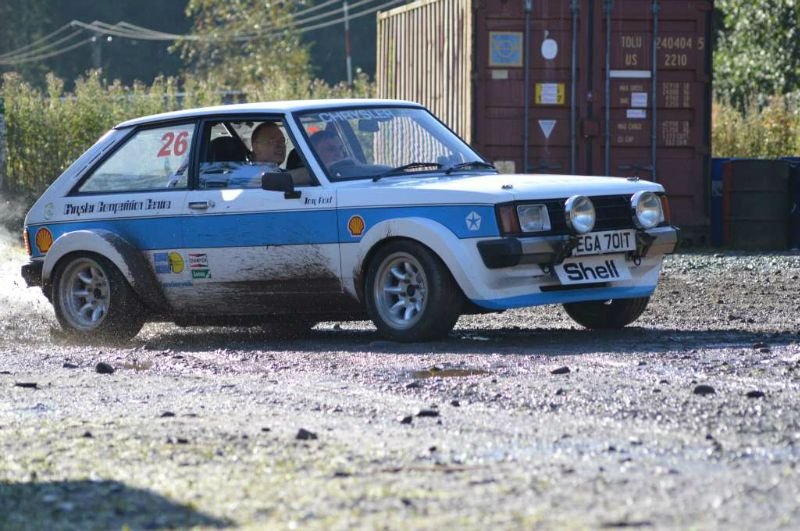 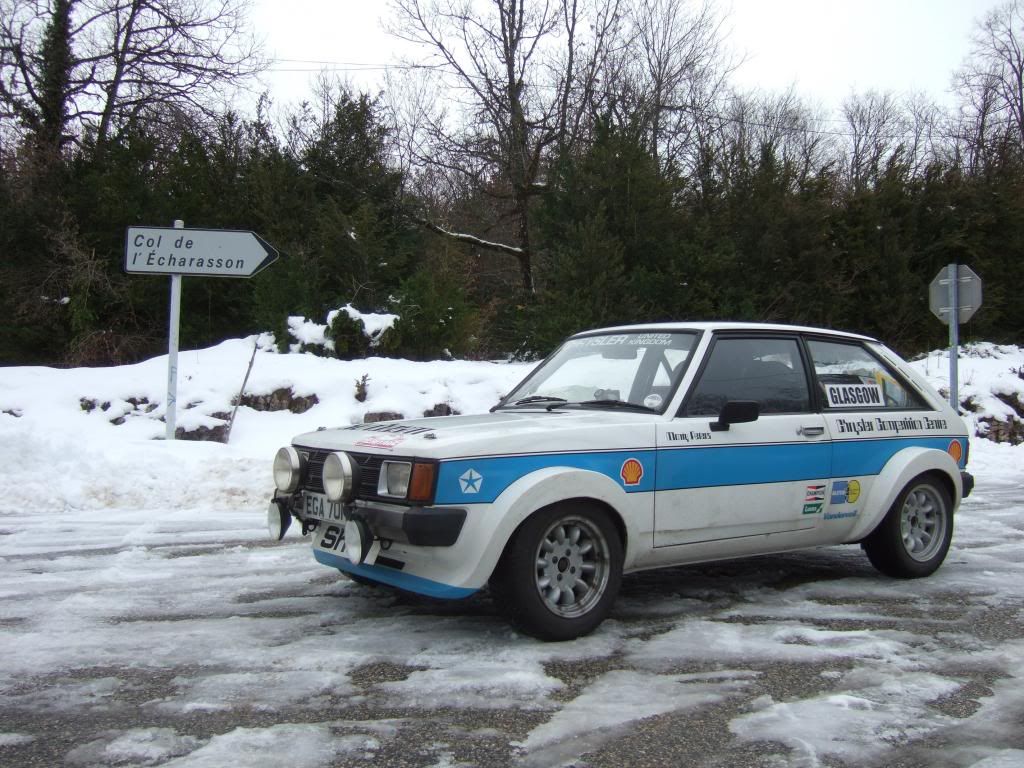 What is really needed is a tidy road car, a presentable sealed surface car, and a third more rugged loose/ rough events car....... |
| |
|
|
79cord
Posted a lot
Posts: 2,607
|
|
Dec 16, 2013 12:51:55 GMT
|
|
`Great to see the ingenuity & beautiful workmanship that's going/gone into both these cars & hear of the long term dedication towards them.
|
| |
|
|
|
|
|
Dec 21, 2013 17:23:19 GMT
|
Thanks 79cord. These cars were built locally to me in their day, and although they are a very rare sight on the road now many older local residents still recognise them and approach for a chat... and many have even been involved in building them! That really appeals to me. I do like to 'guild the lilly' a little bit when restoring them as well though! I've just started having a read over this site, and not only does it have a wide variety on interesting cars and projects, but there seems to be a good depth of general technical undertanding and know how as well, which isn't always the case on other sites. I've been reading up in particular of other peoples experiences with forced induction charge cooling, which is a subject that I'm not very familiar with but that I'll need to make a decision on very soon. The supercharger positioning and layout on the white car (EGA) would be very suitable for air-water charge cooling, but these weren't all that common as factory fitted (Jaguar, Subaru and Lotus being the obvious common fitments) as far as picking up second hand, and then these may not be of a suitable size or design for my use. Internet and Ebay searches have proved the few aftermarket systems to be very expensive compared with normal air-air intercoolers. I had thought about using an oil cooler matrix as a charge cooler, mounted inside a plenum enclosure and with its coolant water circulated to a frontal radiator by an electric auxiliary circulation pump from an XJ8 heating system. My BMW E38 has a very similar auxiliary heating system pump too. As oil coolers are designed to work with internal engine oil pressure, I don't think that pressure difference should be an issue for it. I'm not sure how restrictive to intake air flow an oil cooler matrix might be though, being designed to dissipate heat efficiently into its throughflow of air rather than for minimum restriction to that airflow? I'd be very interested to hear anyones experience or opinions on doing this before I start to cobble together the parts as I've heard some conflicting stories so far. On the supercharger itself, my idea is to run it initially at around 7 to 10 psi of boost pressure, and to make the new crankshaft sprocket to drive it fairly slowly to achieve this with good efficiency. These type of superchargers don't really work too well at higher pressure ratios, but even at low driven speeds it should easily be capable of supplying the 3-litre engines needs (I have possibly even overspecced its size for this purpose a bit) and gives me the option of trying out alternative crankshaft pulley diameters without any danger of overspeeding the supercharger. I'm aiming for around 300bhp with one of these engines in supercharged form. A naturally aspirated B6304 at peak rpm will consume something around 350 cubic feet per minute of air. Multiplying this out for 7psi and 10psi(1.48 and 1.68 pressure ratios respectfully) gives airflow requirements of 518 and 588cfm. Taking that to a airflow graph for the Eaton M112 then gives some clues to the necessary gearing... 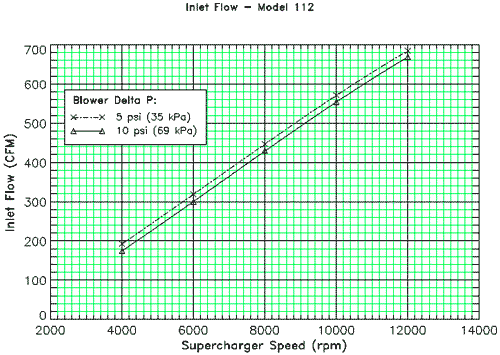 ...with a supercharger speed of between about 9500 and 10500 rpm being required. From this I can work out the size of crankshaft pulley that I'd need to gear it aproximately right. This next chart which shows the power absorbed in driving the supercharger, and shows parasitic loss at these speeds and pressure ratios interpolated between the lines shown to range between roughly 28bhp and 46bhp! Note how running higher pressure ratios still is going to greatly increase the power required... perhaps disproportionately to the additional extra engine power produced. When the airflow to the supercharger is closed by the throttle though even at higher rpm, the power loss can be as little as 3 or 4 bhp....  The next graph shows the temperature change caused by the compression. As applied to my engine, this looks likely to be in the range of about 130 to 180 degrees F. There is just no point increasing engine intake pressure while leaving temperatures like this as the loss of density will go a long way to nullifying the pressure increase.... plus you may well just have expended 40-odd bhp in achieving it! 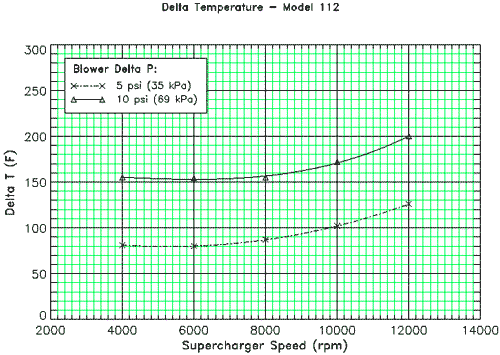 It should be obvious then that some serious thought and effort needs to be put into some form of charge cooling or intercooling to get the intake temperatures a bit closer to ambient. I would therefore be very interested in hearing anyones ideas on this subject, and in particular any data of real world systems and measured pressure drops and temperature change across this kind of charge cooler in comparison with intercooling. |
| |
|
|
|
|
|
Dec 25, 2013 13:07:39 GMT
|
Progress at the moment is very slow, and for most of the last few days I seem to have done little more than hold parts up against the engine in any possible way that it might be possdible to make them fit, so far without achieving very much. I dug out some parts that I thought might be a useful starting point for forming a chargecooler enclosure around, but the very limited available space in this area of the car just isn't making any really workable basic designs obvious. On the left is a spare Sunbeam heater matrix which has closely spaced fins and appears not to be so restrictive to airflow as I'd imagined, with a couple of different sized oil coolers on the right... 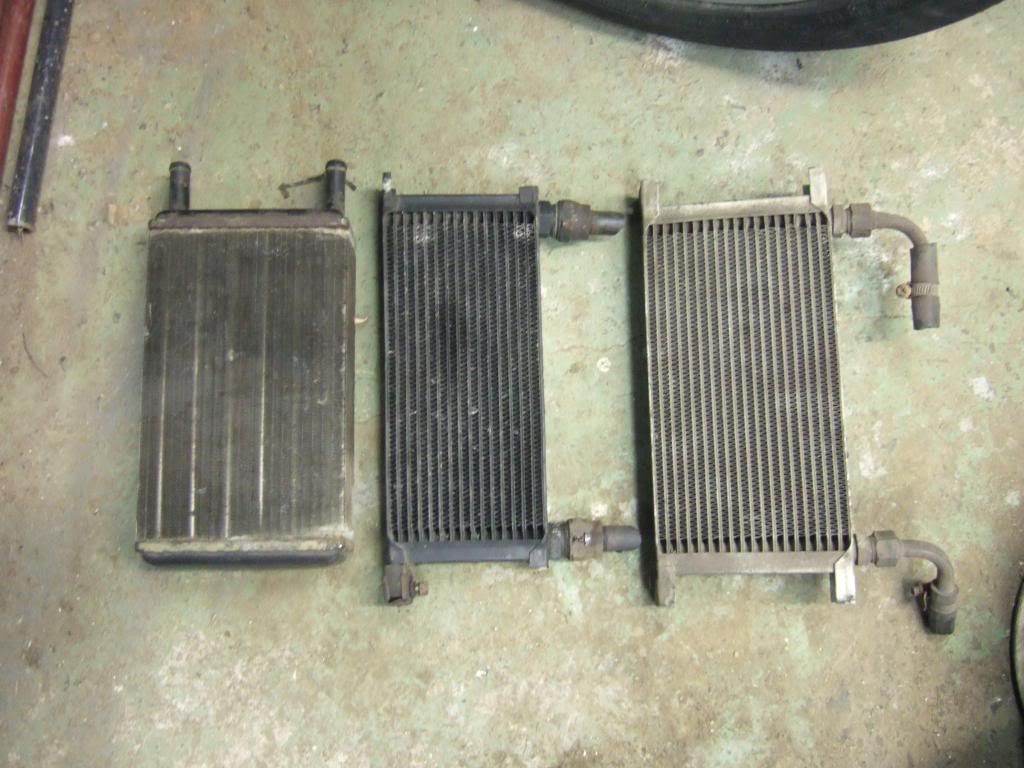 To minimise the plumbing and to help keep the whole thing compact enough to fit in the available space, I was thinking of making a two-part enclosure/ intake plenum that would incorporate the cooling element. The original intake rubbers could be retained to make it easier to remove for maintenance reasons. This idea doesn't lend itself easily to fitting in a way that can be easily installed while giving a satisfactory design though. Here I am playing about with a couple of the different versions... 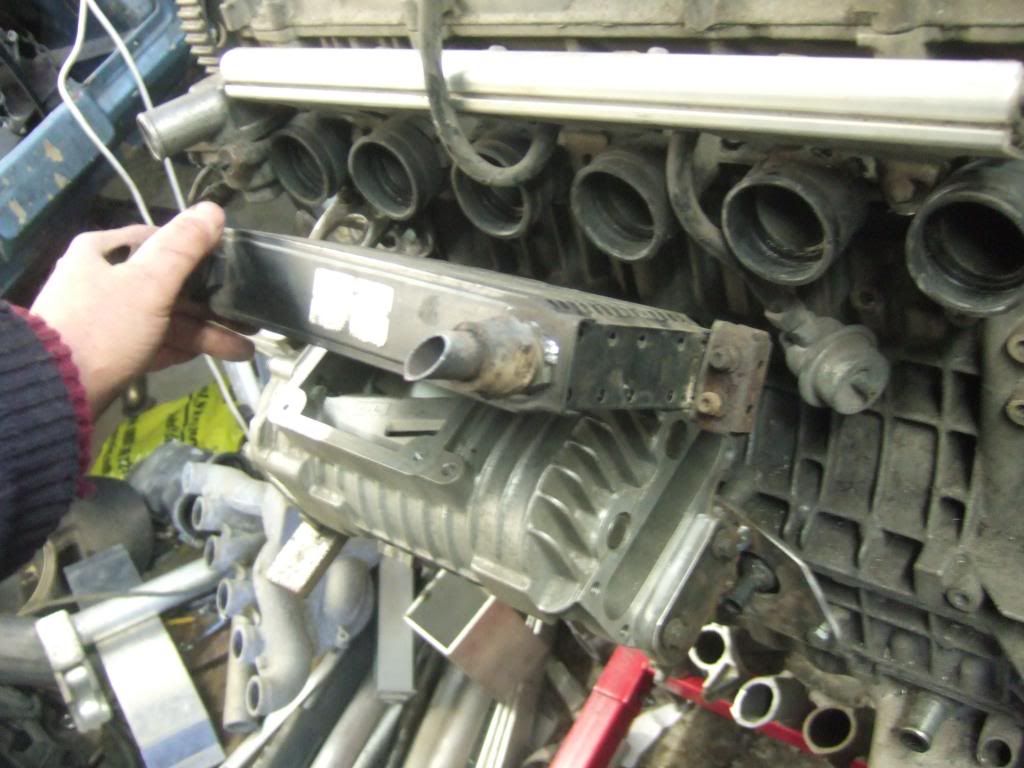 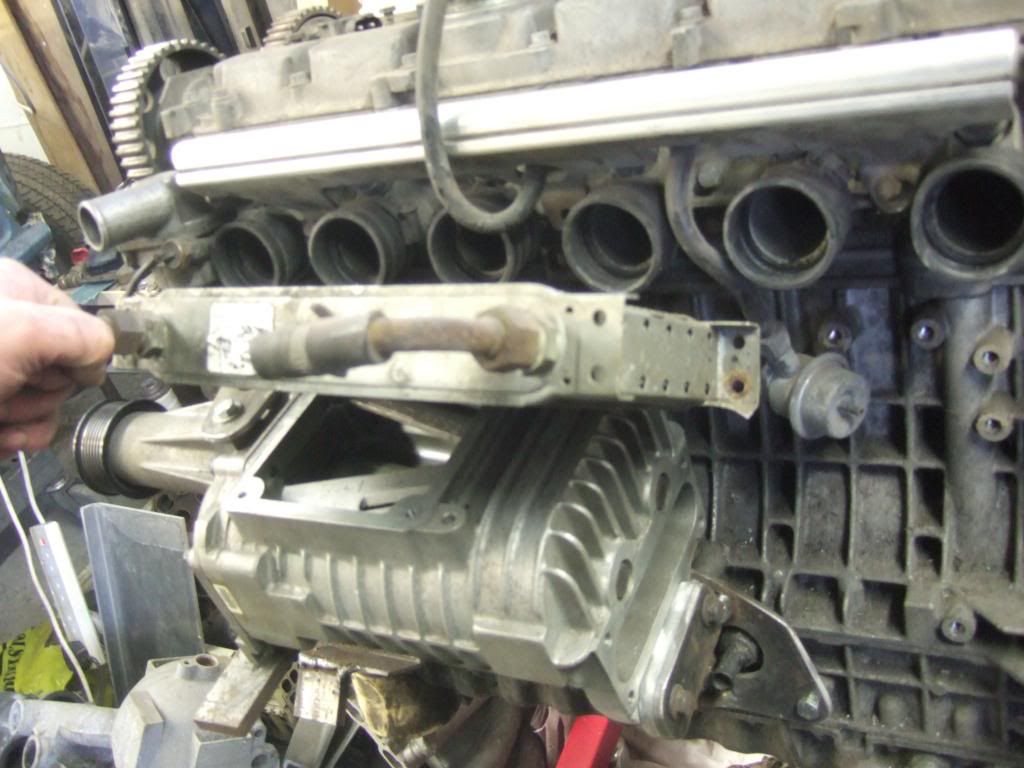 My thoughts then turned more towards air-air intercooling again. Here is the normal intercooler that I plan to fit when the twin turbo engine goes in, but I didn't really want to get involved in installing at this time with time being tight. Using it would also add a huge amount of pipe length and extra internal volume to the intake system which wasn't really what I wanted.... 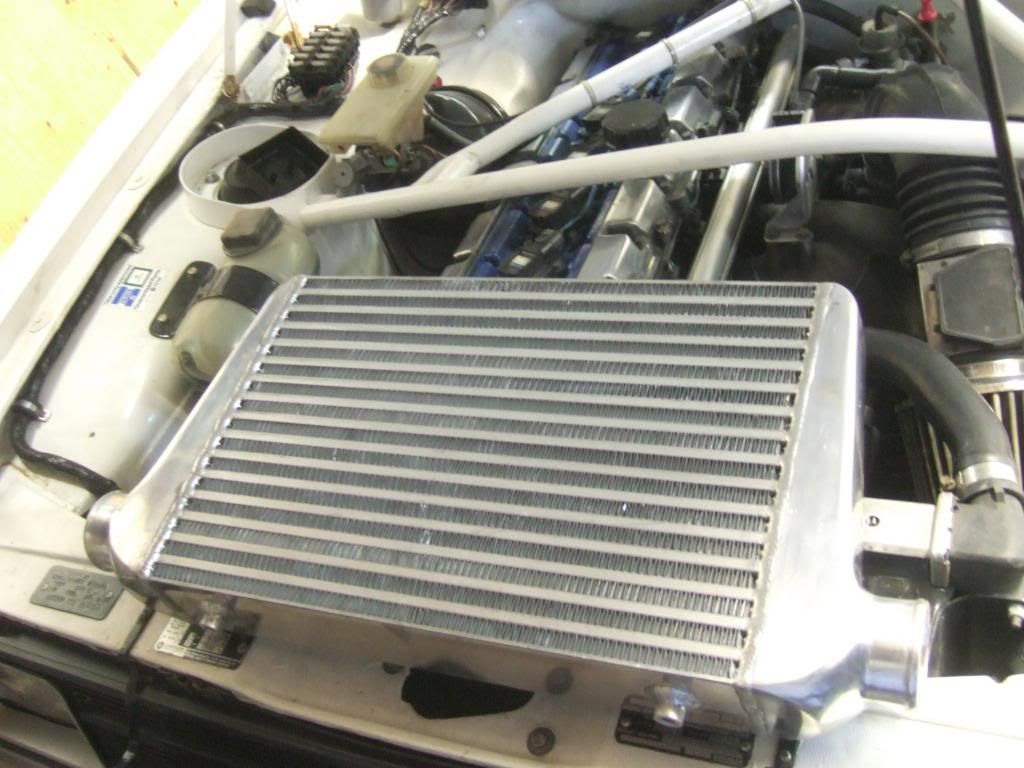 ...and here it is offered up to a scrap front panel. A lot of time consuming worjk needed top make this fit.... 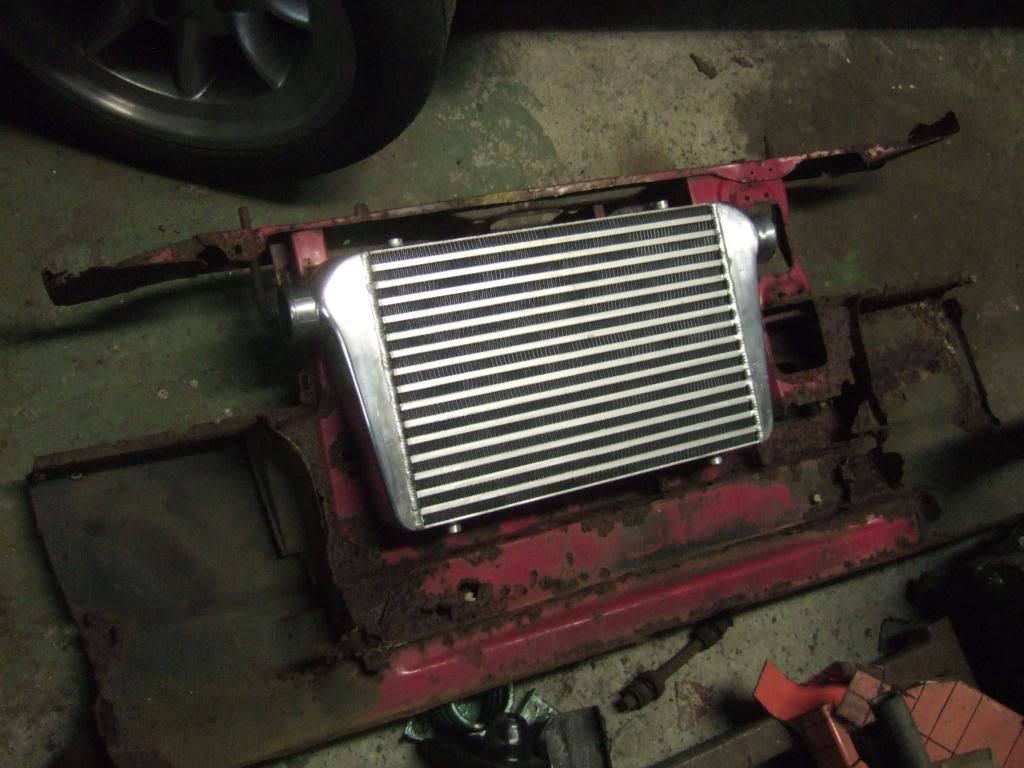 I also found this among my stock of old parts, an Audi Quatro Coupe intercooler. I reckon that this could be fitted in the space directly below the radiator relatively easily, and as it is a U-shaped cdesign the inlet and outlet connections are on the same side. The down side of this is that its internal air passages are very long and thin, and in addition to be intended for a 2.2 litre engine it ois probably going to be quite restrictive at the sort of airflow rates and pressures that I'd want it to operate at..... 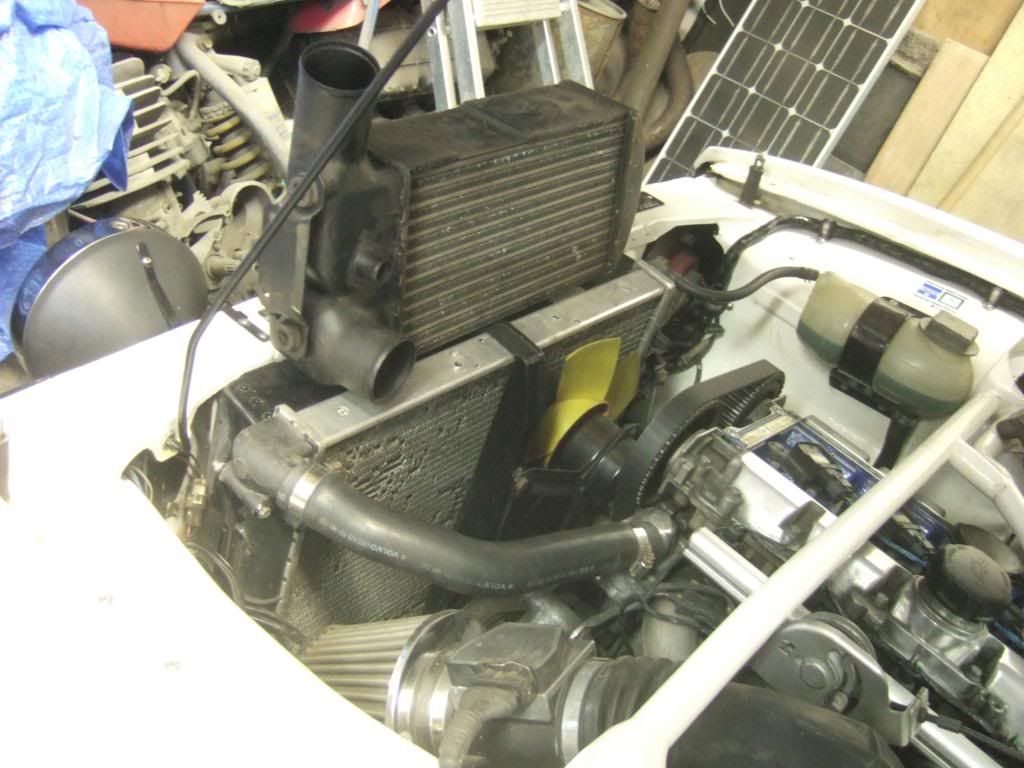 On the other hand, using a normal intercooler would allow me to make a new inlet manifold that is easier to remove for maintenance and could be used on BOTH forced induction versions of the engine. I had already started to cut up a stock intake manifold for this purpose a while ago.... 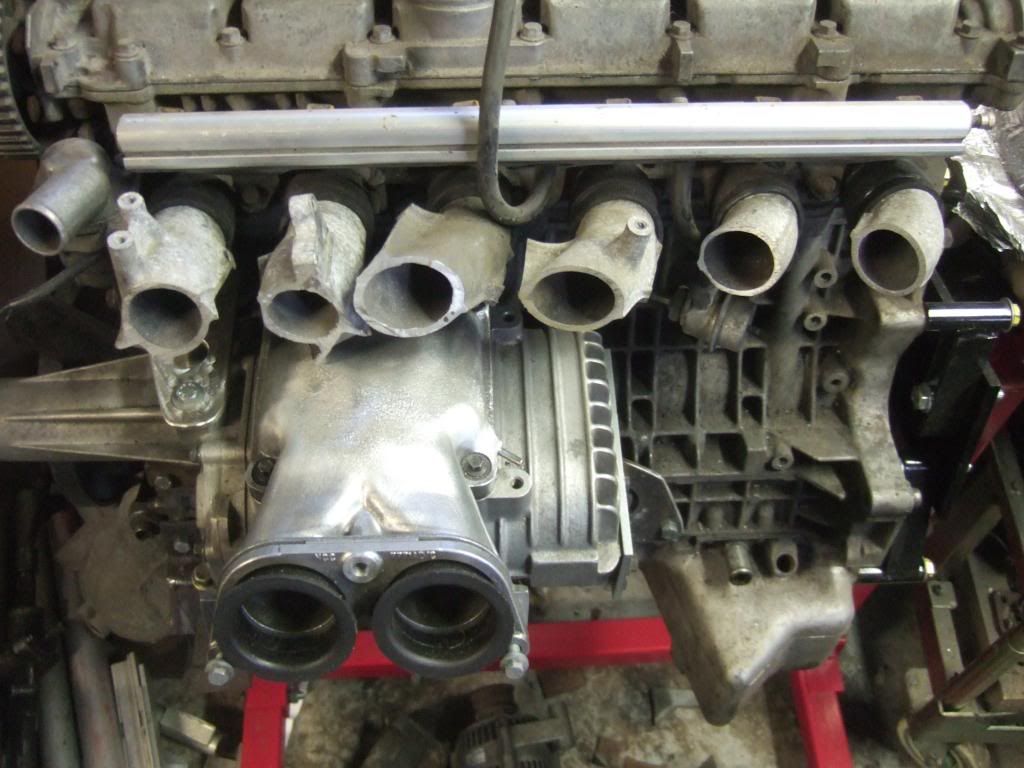 Given that the supercharger install is only intended as a short term fix anyway, this might be the best option. It would also give me more options on swapping in different intercooler elements later on, or even adding extra ones, if the initial parts prove to be totally inadequate. Most off the problems are coming about purely because there is so little available underbonnet space left over after shoehorning the engine into this little car, and not very much time to do it in either. Any ideas, comments or helpful tips gratefully recieved and much appreciated. Jim. |
| |
|
|
|
|
|
Dec 26, 2013 10:20:20 GMT
|
Here is an overview of my current conundrum. In an ideal world, my first choice would have been to fit a chargecooler element incorporated into a fabricated intake plenum manifold. With the limited space available, roughly offering up the heater matrix and oil cooler cores showed that the best layout for it would be something like this.... 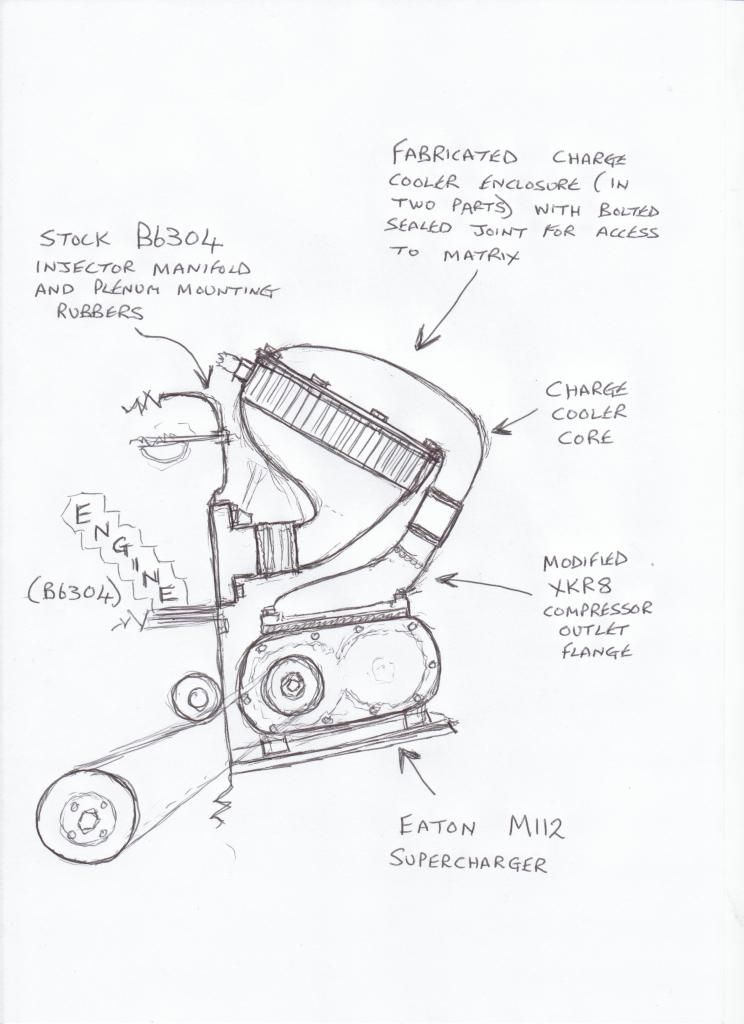 In this case the intake volume downstream of the throttle body can be kept quite small for good response, and with the throttle body mounted directly upstream of the supercharger there is no need for any bypassing. While it should be possible to build something like this fairly easily, I am not at all as yet 100% convinced that a heater matrix or oil cooler would be adequate for this purpose. Normally, the medium to be cooled (or to do the heating) in these passes through the long internal passages, and a large (unlimited) quantity of air passes over the surface of the fins or turbulators to remove the heat that has been conducted into them from these passages. The important point though is that the flow path of the cooling air here is very short, and its individual molecules are only in direct contact with the surface area of the material for a fairly short time. I'm simply not convinced that when one of these matrices is used as a charge cooler that the intake air is in contact with it for long enough to remove enough heat from it? As the intake temperature will increase with the boost pressure, this system may simply not cope at higher airflow rates and pressures. The second option is in some ways easier, but in others much more complicated. This would involve running the compressor output through a normal front mounted air-air intercooler. Other than a large amount of extra plumbing being needed which itself would take up a lot of the available space, the intake volume would have been excessive if the throttle body was kept upstream of the supercharger. Doing the obvious thing and mounting the throttle body on the inlet manifold (ie, downstream of the supercharger) would then require some kind of supercharger bypass system capable of flowing a large quantity of air, which complicates things greatly. I don't believe that the Audi Quattro intercooler shown in the previous photos would be very suitable for this, and the larger bar and plate type one I have for the turbo engine would take a lot of work tyo install as well as adding even more length and volume to the intake system. Installing it doesn't fit in with the 'quick fix winter supercharger plan' at all. On the plus side, I could make this intake manifold/ plenum to also suit the turbo engine that will be going in later on, so it wouldn't really be double work. A compressor bypass valve/s could be fitted and arranged to open with a vacuum feed from the inlet manifold, but again, this would have to have a lot of capacity to bypass the full airflow if the throttle was closed abruptly rather than just needing to bypass a smaller quantity of air to reduce the pressure in the system upstream of the throttle body. Here is a rough sketch of how these parts might be arranged in my car...  ... and for clarity, a sort of schematic diagram of what I think would be needed, although neither show the cooling medium plumbing or its radiator.... 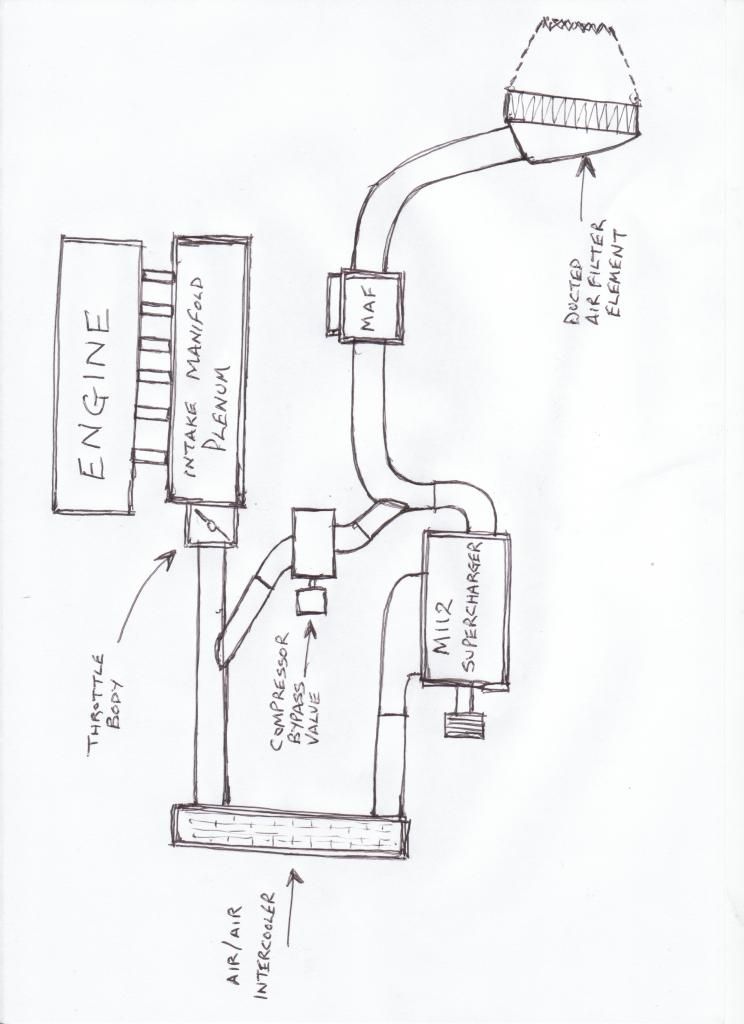 My gut feeling is to keep it simple for speed of installation, so I'm thinking of sticking with the charge cooler idea but abandoning the use of a heater or oil cooler matrix. I think that using a proper chargecooler matrix designed specifically for the job would be a better idea if there is any possibility of using close to double digit levels of boost pressure. From what Claymore said earlier though, even the Subaru Legacy chargecooler he used earlier proved not to be very effective at bringing down the charge air temperature, even if his circulation pump may have been suspect, and this is giving me big doubts. There is currently a Jaguar XJ6R chargecooler available, but it isn't particularly cheap and I'd like to be more sure that it would do what I want of it before both buying it and going to the trouble of forming an enclosure around it. Can anyone tell me in what way the core design or dimensions of one of these chargecoolers differ from a normal heater/ oil cooler matrix...preferably with a photo or two? |
| |
|
|
bstardchild
Club Retro Rides Member
Posts: 14,886
Club RR Member Number: 71
|
|
Dec 26, 2013 16:10:42 GMT
|
Can anyone tell me in what way the core design or dimensions of one of these chargecoolers differ from a normal heater/ oil cooler matrix...preferably with a photo or two? According to what I've read over the years my LC charge cooler which is remarkably compact drops intake temps from 120 deg to 60 deg at 0.7 bar of boost - from what I've gathered it's a doubled up version of the Lotus Esprit turbo charge cooler The radiator to cool the chargecooler fluid is a modified AC rad as far as I know (space was a bit tight) It was years ago on another forum but a member cut up a charge cooler in order to repair it and I'm stuggling to find the pics |
| |
|
|
|
|


 /fawn mode