|
|
|
Sept 13, 2014 22:38:46 GMT
|
Finally getting off my lazy r$e and doing an update with photos. Bit of a catch-up, so this goes back over the summer. Firstly, a bit of engine porn. You'll see later I've only done a bit of tinkering in here:  2014-04-08 12-42-35 BGU 122G Restoration 2014-04-08 12-42-35 BGU 122G Restoration by Rover_P5B_Coupe, on Flickr Started stripping the paint on two Rostyles (bit of trivia - they're known as Rostyles as they were designed and made by Rubery Owen (R ubery O wen STYLE - geddit?), a major Midlands engineering company until they disappeared in the 1980's. Anyway, they're chromed, and then have panels painted black. The chrome isn't great but it's good enough, but the black paint has seen better days. A bit of paint stripper, lots of masking, then POR etch primer and Hammerite Satin Black made all the difference.  2014-04-08 17-14-49 BGU 122G Restoration 2014-04-08 17-14-49 BGU 122G Restoration by Rover_P5B_Coupe, on Flickr  2014-04-08 17-15-16 BGU 122G Restoration 2014-04-08 17-15-16 BGU 122G Restoration by Rover_P5B_Coupe, on Flickr Didn't take any photos of the finished article, but they're now on the rear of the car so will try to get some shortly. Whilst this was happening in the back garden (wifey had conveniently gone away for two weeks, so I made the most of the opportunity!) I stripped the inside of the car - seats out, carpet out. This is behind the back seat - the bit on the floor is the rear seat heater (matrix and fan unit made by Smiths that is supplied by two water pipes that run from the engine):  2014-04-12 09-05-02 Rover P5B Coupe - Stripping and Cleaning The Interior (1) 2014-04-12 09-05-02 Rover P5B Coupe - Stripping and Cleaning The Interior (1) by Rover_P5B_Coupe, on Flickr  2014-04-12 09-05-40 Rover P5B Coupe - Stripping and Cleaning The Interior (1) 2014-04-12 09-05-40 Rover P5B Coupe - Stripping and Cleaning The Interior (1) by Rover_P5B_Coupe, on Flickr  2014-04-12 09-05-55 Rover P5B Coupe - Stripping and Cleaning The Interior (1) 2014-04-12 09-05-55 Rover P5B Coupe - Stripping and Cleaning The Interior (1) by Rover_P5B_Coupe, on Flickr Here's the petrol tank that sits in the boot behind the rear seat:  2014-04-12 09-06-36 Rover P5B Coupe - Stripping and Cleaning The Interior (1) 2014-04-12 09-06-36 Rover P5B Coupe - Stripping and Cleaning The Interior (1) by Rover_P5B_Coupe, on Flickr  2014-04-12 09-07-10 Rover P5B Coupe - Stripping and Cleaning The Interior (1) 2014-04-12 09-07-10 Rover P5B Coupe - Stripping and Cleaning The Interior (1) by Rover_P5B_Coupe, on Flickr This is the other side of the rear bulked, behind the seat:  2014-04-12 09-07-36 Rover P5B Coupe - Stripping and Cleaning The Interior (1) 2014-04-12 09-07-36 Rover P5B Coupe - Stripping and Cleaning The Interior (1) by Rover_P5B_Coupe, on Flickr This is the floor with the passenger seat removed. All pretty solid:  2014-04-12 09-41-20 Rover P5B Coupe - Stripping and Cleaning The Interior (1) 2014-04-12 09-41-20 Rover P5B Coupe - Stripping and Cleaning The Interior (1) by Rover_P5B_Coupe, on Flickr And this is the manky carpet - the smell is quite fruity:  2014-04-12 09-44-58 Rover P5B Coupe - Stripping and Cleaning The Interior (1) 2014-04-12 09-44-58 Rover P5B Coupe - Stripping and Cleaning The Interior (1) by Rover_P5B_Coupe, on Flickr And here's a photo showing the switch panel on the centre console - the console was removed and stripped and re-covered with new carpet and vinyl to match the original as far as possible:  2014-04-12 12-29-56 BGU 122G Restoration 2014-04-12 12-29-56 BGU 122G Restoration by Rover_P5B_Coupe, on Flickr  2014-04-12 17-47-35 Rover P5B Coupe - Stripping and Cleaning The Interior (1) 2014-04-12 17-47-35 Rover P5B Coupe - Stripping and Cleaning The Interior (1) by Rover_P5B_Coupe, on Flickr  2014-04-17 17-21-52 BGU 122G Restoration 2014-04-17 17-21-52 BGU 122G Restoration by Rover_P5B_Coupe, on Flickr Whilst this was happening, I needed to sort out the lack of external mirrors. As mentioned previously, I have an illogical dislike of wing mirrors (reminds me of caravanning) so I wanted door mirrors. I also wanted to buy British if possible, and I found a company called Tex Automotive who have been producing items in the UK for the last 67 years - they were original suppliers to Rover and other manufacturers. They have a massive range of mirrors, including some shapely door mirrors that should clip to the quarter light frame:  2014-04-12 15-24-29 Rover P5B Coupe - Stripping and Cleaning The Interior (1) 2014-04-12 15-24-29 Rover P5B Coupe - Stripping and Cleaning The Interior (1) by Rover_P5B_Coupe, on Flickr  2014-04-12 15-24-48 Rover P5B Coupe - Stripping and Cleaning The Interior (1) 2014-04-12 15-24-48 Rover P5B Coupe - Stripping and Cleaning The Interior (1) by Rover_P5B_Coupe, on Flickr  2014-04-12 15-25-05 Rover P5B Coupe - Stripping and Cleaning The Interior (1) 2014-04-12 15-25-05 Rover P5B Coupe - Stripping and Cleaning The Interior (1) by Rover_P5B_Coupe, on Flickr They seem beautifully made - very happy with them.  2014-04-12 15-25-47 Rover P5B Coupe - Stripping and Cleaning The Interior (1) 2014-04-12 15-25-47 Rover P5B Coupe - Stripping and Cleaning The Interior (1) by Rover_P5B_Coupe, on Flickr  2014-04-12 15-26-05 Rover P5B Coupe - Stripping and Cleaning The Interior (1) 2014-04-12 15-26-05 Rover P5B Coupe - Stripping and Cleaning The Interior (1) by Rover_P5B_Coupe, on Flickr For now, here's a general shot of the inside back in April...more to follow. 2014-04-12 17-47-35 Rover P5B Coupe - Stripping and Cleaning The Interior (1) by Rover_P5B_Coupe, on Flickr |
| |
Last Edit: Sept 13, 2014 22:51:40 GMT by lamsdale
|
|
|
|
|
|
|
Sept 13, 2014 22:47:44 GMT
|
Lexus V8 in it maybe?  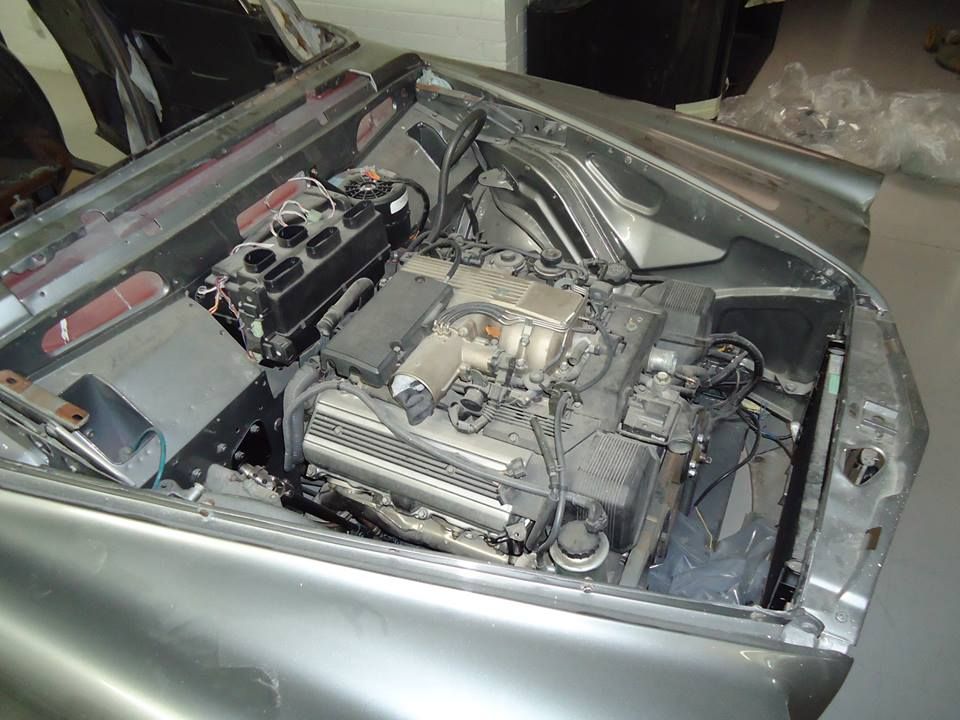 Not sure that's my thing - I'm not a freak about originality, and I can see the attraction of a bit of updating, but the Rover V8 is such a classic engine it seems a shame to lose it. Very impressive feat though - is it yours? |
| |
Last Edit: Sept 13, 2014 22:48:30 GMT by lamsdale
|
|
|
|
|
Sept 13, 2014 23:24:04 GMT
|
|
This really is a lovely car and well worth the work you're putting in.
A little known fact is that these, and the saloons, were very popular with undertakers (as personal cars) back in the day, certainly most of the ones that I knew anyway. Had the right amount of gravitas and not flash I suppose.
I had to smile at your comment somewhere about driving whilst listening to Radio 4. What other channel would possibly be appropriate?
|
| |
|
|
|
|
|
Sept 14, 2014 4:14:29 GMT
|
Not sure that's my thing - I'm not a freak about originality, and I can see the attraction of a bit of updating, but the Rover V8 is such a classic engine it seems a shame to lose it. Very impressive feat though - is it yours? No, Being done at a place here and it is a really impressive fitment though. I've had a P6b but not a P5 although I have always been a fan, personally I think the Rover motor is overrated, I see the attraction for a lot of people, especially when there aren't a lot of readily available options, but they are pretty limited. I always thought a BMW V8 would have been a good thing during their ownership, I think the biggest bonus will be getting rid of the old BW35 slush box |
| |
Last Edit: Sept 14, 2014 4:15:39 GMT by notsoswift
Contrary to popular opinion, I do have mechanical sympathy, I always feel sorry for the cars I drive.
|
|
hilux
Part of things

Posts: 12
|
|
Sept 14, 2014 7:04:00 GMT
|
|
Carry a spare coil, they tend to burn out, ensure the rocker cover breathers are clear/clean and fit Lumenition electronic ignition as the dizzy`s and bob weights lose their timing. When hot the oil pressure can drop so much the yellow light comes on - this is normal, make sure the rear brakes are adjusted properly many are ineffective.
As the production line continued body presses wore and the bonnet line along the wings will not be even on your car as will the turn in above the radiator at the bonnet corners - its expensive to get the gaps perfect. They were all like that. You'll find all the wing edges are lead loaded to get the panel gaps right. The best (over-engineered) part is the boot catch and its retainer - designed so you don't slam it - you simply push it shut with your little finger - try it. I think the retainer itself has 26 seperate parts if I recall correctly.
The bottom 6 inches of the whole car rots - check the sills and inner cills - also the rear inner wings
I had one from 1990 to 2002. Fully restored it (third place in the country in Popular Classics Concourse) Its still going strong I believe as it featured in a Daily Telegraph article about good classic car investments.
A chap called Bob Barton in Luton re-trimmed the all the furflex on the armrests (don't get oil or shoe polish on it!!) and made new carpets - he`s well known in classic car circles.
I had a P5 saloon and a P6 before it - love the old Rovers. I`ve loads of photo`s and experience if you want any advice. I think I still have an original workshop manual somewhere - that in itself is a work of art.
|
| |
|
|
|
|
|
Sept 14, 2014 8:25:54 GMT
|
I think the biggest bonus will be getting rid of the old BW35 slush box I'd certainly agree with that - the BW35 is badly under-geared on motorways, and slush box is a good description - seems the engine is only vaguely joined to the wheels most of the time. |
| |
|
|
|
|
|
Sept 15, 2014 16:38:57 GMT
|
Bit more of a catch-up on progress. Once I'd stripped the carpet, seats and console from the interior, the plan was to fit inertia seatbelts to make things more comfortable, and fit rear seatbelts as well so I can carry my 6 year old in some safety. You can buy Securon belts that are specced for the P5B, they come in beige which matches the interior colours pretty well, and Rover has seatbelt mounting points front and rear. So they were ordered. On trying to fit them it became clear that there were two problems: the base of the B-post is angled at about 30 degrees, so the inertia reel wouldn't work, and the seatbelt mountings on the rear shelf aren't located to allow an inertia reel to be mounted - they hit the rear screen. Here's the base of the B-pillar:  2014-04-19 17-05-44 Rover P5B Coupe - Stripping and Cleaning The Interior (1) 2014-04-19 17-05-44 Rover P5B Coupe - Stripping and Cleaning The Interior (1) by Rover_P5B_Coupe, on Flickr Obviously the mounting points weren't made with inertia reels in mind. Much discussion with John at J R Wadhams revealed the fact that Rover changed the design of the B-pillar and rear shelf sometime around 1970 to allow inertia reel belts to be fitted. Mine's a 1968 model. Curse-word. Now what. After a lot more head scratching and too many cups of tea I decided to make brackets for the front belts that have a 30 degree bend to get the inertia reels upright. These were made in 5mm thick steel and sprayed so they didn't look too terrible. Quite pleased with the result:  2014-05-17 20-27-09 Interior Renovation 2014-05-17 20-27-09 Interior Renovation by Rover_P5B_Coupe, on Flickr These were made long so that the reel is also moved up the pillar so they don't interfere with the front seats sliding back. The force in an accident is upwards to the top mount on the pillar, so they'll be very strong. The rear belts had a further complication - the rear parcel shelf is hollow, with wooden bracing and a hardboard covering, so it's obviously not suitable to bolt seatbelts to or through - even if the bolts were long enough (they weren't) the bending force on them in an accident would be significant. So I needed another solution. I came up with what I affectionately call 'the beam' - a hollow box section of steel, the bottom of which bolts to the original mounts on the rear parcel shelf, and then allows the rear inertia reels to bolt to the top of it. I could also make it tall to raise the rear belts off the rear parcel shelf so they don't loop-over the rear seats quite so much (that would wear the leather pretty quickly and fray the belts). This is what I came up with:  2014-05-17 20-26-24 Interior Renovation 2014-05-17 20-26-24 Interior Renovation by Rover_P5B_Coupe, on Flickr  2014-05-17 20-26-39 Interior Renovation 2014-05-17 20-26-39 Interior Renovation by Rover_P5B_Coupe, on Flickr And here it is mounted on the rear shelf, using standard seatbelt bolts:  2014-06-14 12-39-31 Interior Renovation 2014-06-14 12-39-31 Interior Renovation by Rover_P5B_Coupe, on Flickr  2014-06-14 12-37-50 Interior Renovation 2014-06-14 12-37-50 Interior Renovation by Rover_P5B_Coupe, on Flickr It's 4mm thick steel, and weighs a lot (quite in keeping with the Rover, really) and in a major crash the very worst that could happen is that the top of the box section moves forward slightly and flattens the box section slightly, moving the belts 1-2cm forwards. But as the beam is the full width of the rear seat, the force would be distributed right along the beam, so it's unlikely to happen in my view. I then needed to cut-down the rear parcel shelf to fit behind the beam, so I did this:  2014-06-19 13-59-02 Interior Renovation 2014-06-19 13-59-02 Interior Renovation by Rover_P5B_Coupe, on Flickr  2014-06-19 13-59-13 Interior Renovation 2014-06-19 13-59-13 Interior Renovation by Rover_P5B_Coupe, on Flickr Once that and the beam were covered in beige vinyl, as per the original rear shelf, it all looked quite good. The beam does cover part of the rear speaker opening, and I did consider cutting an arc out of the beam to allow for this, but decided that a) that was too much trouble and b) it was better to prioritise strength over sound quality. A central speaker isn't exactly hifi anyway, and the period radio I'll fit will add to that further, so I really don't care. I also added a rear speaker cover behind the beam, made from MDF and beige speaker cloth, and bought a new speaker (the original one was somewhat the worse for 46 years exposure on the rear shelf). I don't have a photo unfortunately but will add one soon. As mentioned previously, I also got a pair of reel covers for the rear belts, after contacting Securon and asking why they didn't supply them any more - apparently they decided a few years ago they weren't necessary. But a very nice lady at Securon found a pair in the warehouse and sent them to me for free. Thank you. After I managed to remove a stuck seatbelt bolt from the rear wheel arch (all the mountings are solid, luckily) I finally managed to get the seatbelts fitted. What I thought would be an afternoons work eventually turned-out to be about 6 weeks of thinking, getting frustrated, technical drawing, metalwork, woodwork, spraying, upholstery and finally getting them fitted. All part of the retro experience I suppose. |
| |
Last Edit: Sept 15, 2014 16:55:35 GMT by lamsdale
|
|
meltdown
South West
Isn't letting old age get the better of him, still making the same bad decisions with vehicles.
Posts: 687
|
|
Sept 15, 2014 18:34:56 GMT
|
Quality job there. I wish I'd fitted inertia's to the magnum. Did I mention how much I love these cars  . |
| |
Last Edit: Sept 15, 2014 18:37:23 GMT by meltdown
Powered by biscuits
|
|
ewokracing
Part of things
Snuffling for food in a river
Posts: 502
|
|
Sept 16, 2014 20:50:54 GMT
|
|
Nice work. I wish I owned a p5b instead of a p6b sometimes. Looks a lot easier to work on.
|
| |
|
|
|
|
|
Sept 20, 2014 19:10:45 GMT
|
Nice work on your p5b you are doing, it's a long road you are travelling but worth it in the long run. I have a coupe and had similar problems with inertia belts in the rear and found mounting them under the shelf(in the boot area) a good compromise though your solution seems the safest. Any other mods planned? 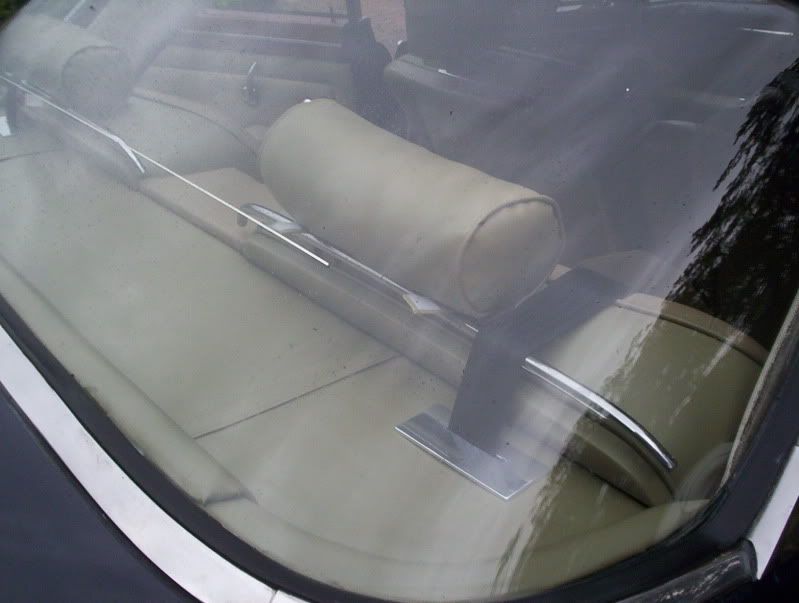 This an old photo and things have changed a little. |
| |
|
|
|
|
|
|
|
Sept 20, 2014 19:16:17 GMT
|
|
Beautiful car which is benefiting from you sympathetic well thought out workmanship. My Dad had one of these when I was a kid so I have a soft spot for the old Rovers. Keep up the great work and the updates, Bookmarked.
|
| |
1992 Range Rover vogue tdi
1991 Westfield
1970 MG B GT
To infirmity and behond.
|
|
Smiler
Posted a lot
I no longer own anything FWD! Or with less than 6 cylinders, or 2.5ltrs! :)
Posts: 2,492
|
|
Sept 20, 2014 21:48:05 GMT
|
|
Looking very tidy.
|
| |
www.Auto-tat.co.uk'96 Range Rover P38 DSE (daily driver) '71 Reliant Scimitar SE5 GTE 3.0ltr Jag V6 Conversion '79 Reliant Scimitar SE6A 3.0ltr 24valve Omega Conversion '85 Escort Cabrio 2.0 Zetec - Sold '91 BMW 525i - Sold '82 Cortina 2.9i Ghia Cosworth - Sold '72 VW Campervan - Sold '65 LandRover 88" - Sold
|
|
|
|
|
Sept 22, 2014 21:35:59 GMT
|
Nice work on your p5b you are doing, it's a long road you are travelling but worth it in the long run. I have a coupe and had similar problems with inertia belts in the rear and found mounting them under the shelf(in the boot area) a good compromise though your solution seems the safest. Any other mods planned? This an old photo and things have changed a little. I saw your solution somewhere when I was Googling for ideas for how to fit rear belts (maybe on the P5 forum?) - thought it sounded very neat and clever. I reckon it's a safe solution, but I thought mine would be less work. Not sure that was right tbh. A few minor mods planned (headlamp relays, hazard lights, rear fog light, maybe a high level brake light). Oh, and I bought a set of Jensen alloy wheels recently (same PCD), as the Rostyles are OK-ish but are crazy-expensive to restore - will keep them for 'best'. The alloys need a lot of work, so a longer term thing. Other than that it'll be fixing the numerous issues - leaking steering box, eventually get the clunking diff sorted, the exhaust blows a bit, the temp gauge sender has failed (and it seems to be seized in the manifold). |
| |
|
|
|
|
|
Sept 23, 2014 20:54:02 GMT
|
Here's a quick catch-up to the previous catch-up (I haven't got the hang of all this yet, obviously). As I said before, the Rostyle wheels needed some love - the chrome isn't too bad, but the black parts were pretty shabby. So I used paint stripper to clean the old paint off: 2014-04-08 17-15-16 BGU 122G Restoration by Rover_P5B_Coupe, on Flickr You can see the Chrome is pretty spotty on this one, but they look OK when they're polished and on the car. A bit of masking, then some etch primer and Hammerite Satin Black and they look much better. Here's one on the car:  2014-09-20 15-34-21 BGU 122G Finished Wheels and Parcel Shelf 2014-09-20 15-34-21 BGU 122G Finished Wheels and Parcel Shelf by Rover_P5B_Coupe, on Flickr Not perfect close-up, especially as the paint stuck to the masking in a few places, but much much better. These things cost about £400 each to re-chrome, so that's out of the question. After much searching I found out that Jensen Interceptor alloys are the same PCD, diameter and ½ inch wider, and don't look too different to Rostyles (if you squint a lot). Strangely there were 5 for sale on eBay about 5 miles away, so I ended up buying them as well. They need polishing and re-painting, so they're currently in the lock-up and I'll get around to doing them sometime. I'll keep the Rostyles for summer use. The original tyres were Cross-ply, which apparently were all 100 profile, so modern tyres look too low-profile in my view. The car has 205/70's on currently. I might look for some 80 profile tyres when I get the alloys done, as they're about the tallest available now, but most (all?) 80 profile tyres are 4x4 tyres or van tyres, so it's tricky. The other catch-up catch-up is the rear seatbelts and parcel shelf, where I had to make a 'beam' to mount the rear belts on, trim down the rear shelf cover and make a speaker cover. This was the beam when I was trying it for fit (it's the big gold-coloured thing on the rear shelf):  2014-06-14 12-37-33 Interior Renovation 2014-06-14 12-37-33 Interior Renovation by Rover_P5B_Coupe, on Flickr All looks OK now I've covered it in matching vinyl:  2014-09-20 15-34-38 BGU 122G Finished Wheels and Parcel Shelf 2014-09-20 15-34-38 BGU 122G Finished Wheels and Parcel Shelf by Rover_P5B_Coupe, on Flickr  2014-09-20 15-35-32 BGU 122G Finished Wheels and Parcel Shelf 2014-09-20 15-35-32 BGU 122G Finished Wheels and Parcel Shelf by Rover_P5B_Coupe, on Flickr I also cut a couple of pieces from black plasticard to fit under the seatbelts as they loop over the top of the rear seat. The side with the child seat gets a fair amount of use, and it will wear the leather / fray the seatbelt over time. The plasticard works surprisingly well - looks like an extension of the seatbelt reel, and after a day in the sun in the rear of the car they moulded themselves to the shape of the seat. Also note my repro window sticker from eBay - if you're going to drive a Rover you might as well go all the way with the blind patriotism. |
| |
Last Edit: Sept 23, 2014 21:01:11 GMT by lamsdale
|
|
|
|
|
Sept 23, 2014 21:20:39 GMT
|
|
A very neat installation and the wheel looks good as well.
Don't think I've ever seen a child seat in a 5B!
|
| |
|
|
eternaloptimist
Posted a lot
Too many projects, not enough time or space...
Posts: 2,578
|
|
Sept 23, 2014 23:30:49 GMT
|
|
Very neat installation
|
| |
XC70, VW split screen crew cab, Standard Ten
|
|
|
|
|
Sept 24, 2014 16:58:46 GMT
|
|
Looking good sir...!!!
I think I may have seen your car this Sunday just gone at the 'Vintage Car Boot' as I was trading from my Toledo... I thought that seatbelt beam looked familiar!
If that was your car then may I just say how really truly lovely it is?! What a cracker...
|
| |
***GARAGE CURRENTLY EMPTY***
|
|
|
|
|
Sept 24, 2014 22:56:05 GMT
|
Looking good sir...!!! I think I may have seen your car this Sunday just gone at the 'Vintage Car Boot' as I was trading from my Toledo... I thought that seatbelt beam looked familiar! If that was your car then may I just say how really truly lovely it is?! What a cracker... Ha! small world, that was us - we weren't trading, just showing off :-) A friend was trading from his Ford Falcon, so we thought we'd go along, as we love all things vintage. I looked over your Toledo but never realised it was yours - I've read about it on here as well. I have a special affection for 60's and 70's British Leyland metal. From talking to a few people it seemed trade wasn't as good as when it was on Southbank, but we really enjoyed the day. Would recommend it to anyone next time. |
| |
Last Edit: Sept 24, 2014 22:56:24 GMT by lamsdale
|
|
|
|
|
Nov 18, 2014 19:15:23 GMT
|
You'd think that a car that suffered a major engine fire 2 years ago would have had its fuel system pretty thoroughly checked and replaced. Not so. An occasional whiff of petrol was turning into a more frequent thing. After several checks it seemed there was an occasional leak from the pipe going from the float chamber to jet on the left hand SU carb. Fiddling soon turned that into a flood over the left hand manifold - not good! So a repair kit was ordered from Burlen, and yet again what I thought would be a quick job became more involved as it's impossible to get to the jet pipe without removing the carb and associated linkages, and one of the carb bolts is well obscured.  2014-04-20 11-54-04 Interior Renovation 2014-04-20 11-54-04 Interior Renovation by Rover_P5B_Coupe, on Flickr Anyway, after a bit of fiddling I managed to get the carb off and remove the offending jet pipe. The rubber o-ring at the float chamber end disintegrated in bits, and it looks like the pipe had been glued in - certainly there's something on the end of it that means it's unlikely to ever seal properly:  2014-09-06 13-56-39 BGU 122G Fixing an SU Carb Leak 2014-09-06 13-56-39 BGU 122G Fixing an SU Carb Leak by Rover_P5B_Coupe, on Flickr Anyway, shiny jet installed:  2014-09-06 12-42-00 BGU 122G Fixing an SU Carb Leak 2014-09-06 12-42-00 BGU 122G Fixing an SU Carb Leak by Rover_P5B_Coupe, on Flickr There's a knack to getting the pipe to seal properly, but there are numerous handy videos on YouTube. A few weeks later, and more petrol smells. Another session of poking around unearthed that fact that the fuel filter, after the electric fuel pump fitted by the PO, was bodged. Brass olives will never form a good seal on a cheap plastic fuel filter, but that's what had been fitted: 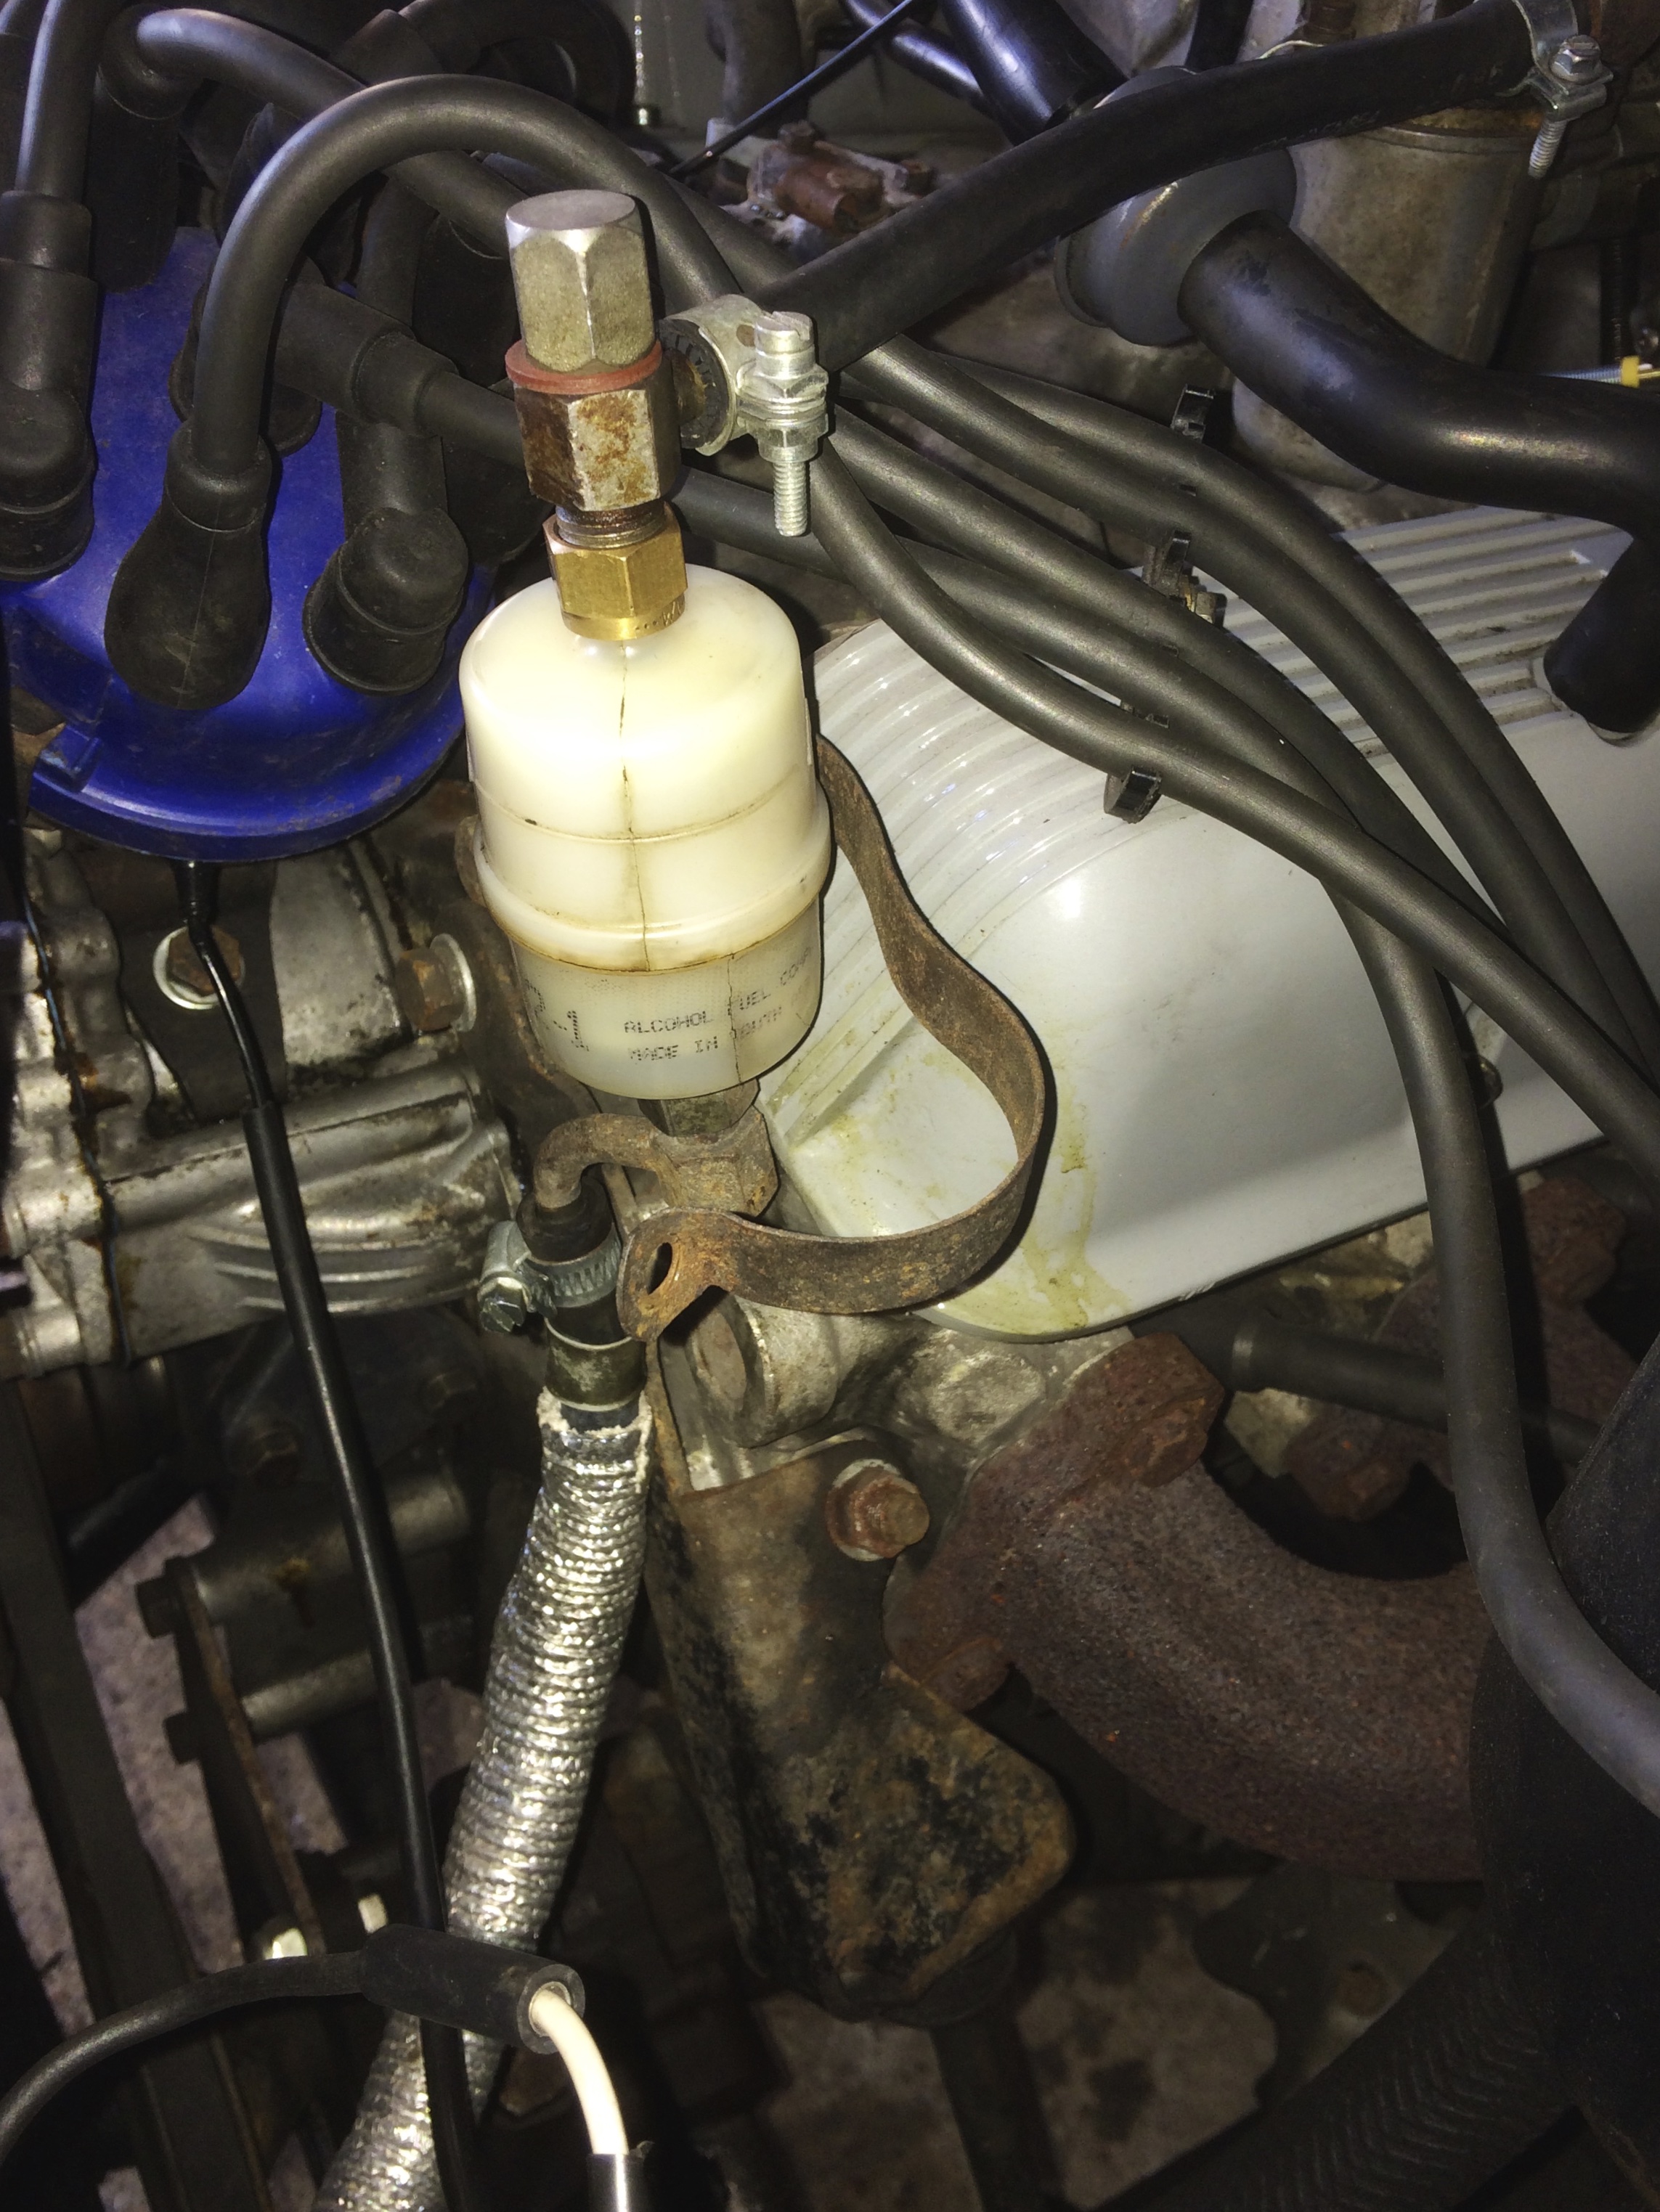 2014-09-27 16-48-48 BGU 122G 2014-09-27 16-48-48 BGU 122G by Rover_P5B_Coupe, on Flickr So, an order for some decent 8mm fuel pipe, jubilee clips and a metal filter meant I replaced this with a proper setup. Had to make a new bracket but the result is good - I just forgot to take a photo, but will fix that later. Also on the list of annoying niggles, the fuel gauge and temperature gauge seemed to be possessed by some sort of ghost, with random movements of the needle. Sometimes the temperature gauge would rise to max, then sink down. After an initial panic I decided it was the gauges that were faulty. They're both fed by a 10V regulator under the dash, and the original 1968 solution seems to be some sort of weird mechanical bi-metallic thingy that switches the 12V rapidly to give very roughly 10V. Again, internet to the rescue and I found a better solution was to replace this with a modern semiconductor voltage regulator. To keep things looking standard, I decided to fit this in the original regulator casing, so opened it up:  2014-06-28 17-37-51 BGU 122G Restoration 2014-06-28 17-37-51 BGU 122G Restoration by Rover_P5B_Coupe, on Flickr  2014-06-28 17-42-16 BGU 122G Restoration 2014-06-28 17-42-16 BGU 122G Restoration by Rover_P5B_Coupe, on Flickr There you can see the standard arrangement, as made by Smiths. I removed the insides and wired-up a 10V regulator off eBay:  2014-06-29 22-04-18 BGU 122G Restoration 2014-06-29 22-04-18 BGU 122G Restoration by Rover_P5B_Coupe, on Flickr  2014-06-29 22-16-42 BGU 122G Restoration 2014-06-29 22-16-42 BGU 122G Restoration by Rover_P5B_Coupe, on Flickr and just about got it all to fit:  2014-06-29 22-25-48 BGU 122G Restoration 2014-06-29 22-25-48 BGU 122G Restoration by Rover_P5B_Coupe, on Flickr Once fitted the gauges all worked correctly, and the temperature gauge word fine. Well, for a few weeks - it now seems the sender has failed, as the temp gauge reads nothing but if I earth the sender wire it reads max, so it isn't the gauge I think. New sender ordered, but it seems the old one is well and truly stuck in - I don't want to crack the manifold removing it, so I'm soaking it to see if it will free up. Not ideal having no temp gauge though, but at least it's winter. Almost forgot - the PO had fitted an electric fuel pump, with a switch inside the car to stop power to it. Seems he thought in the event of major accident he'd calmly switch-off the pump to stop fuel being pumped into a stalled engine compartment. Not very practical or safe, to say the least. So I sourced a second hand Range Rover (keep it in the family, I thought) fuel pump inertia switch and wired that into the supply, mounting on the firewall in the engine. Hopefully, in the event of an accident, it will trip and cut-off the fuel pump. Other than that been driving it a fair bit, and loving it. Lots still to sort out, but very slowly getting there. I'm determined to do it all properly - I really hate bodges. Currently making a USB power supply for phones and satnav that's hopefully in-keeping with a 1960's interior. Also need to tune the engine pretty urgently, as since fitting the new jet it stalls at tickover fairly often - need to get a day to play around with that soon, so will book a day off work. Also, had a morning to myself at the weekend (wifey and son went off for the morning) so went a bit of a drive and took some pictures of the car:  2014-11-15 12-10-43 BGU 122G 2014-11-15 12-10-43 BGU 122G by Rover_P5B_Coupe, on Flickr  2014-11-15 12-09-47 BGU 122G 2014-11-15 12-09-47 BGU 122G by Rover_P5B_Coupe, on Flickr  2014-11-15 12-09-27 BGU 122G 2014-11-15 12-09-27 BGU 122G by Rover_P5B_Coupe, on Flickr  2014-11-15 12-01-43 BGU 122G 2014-11-15 12-01-43 BGU 122G by Rover_P5B_Coupe, on Flickr  2014-11-15 12-01-14 BGU 122G 2014-11-15 12-01-14 BGU 122G by Rover_P5B_Coupe, on Flickr  2014-11-15 11-57-39 BGU 122G 2014-11-15 11-57-39 BGU 122G by Rover_P5B_Coupe, on Flickr That's it for now, more to come. |
| |
Last Edit: Dec 2, 2014 9:54:22 GMT by lamsdale
|
|
|
|
|
Nov 18, 2014 20:55:02 GMT
|
|
Absolutely stunning. A credit to you. signed up for updates.
|
| |
|
|
|
|


 .
.