Apologies if this has been done before, or is in the wrong place. I did have a search for a previous version but couldn't find one so thought I'd have a go at my own. In addition, I'd like to say this isn't meant to be a "this is the only way you can do this" sort of thing; simply that this is the way I do it, and it's a method I've arrived at through trial and error over the years so it seems worth passing on to anyone who cares
sooooooooo...
What with the weather being quite nice... well, it's not been raining 24 hours a day, for a change... I've been sitting out in the garden enjoying the rays and slightly furtively polishing my manifold. Errrrrm, no, that isn't a euphemism for anything. I've really been polishing my manifold. So I thought this would be an ideal opportunity to do a quick How To cos if you've never tried it, metal polishing can seem a black art. In actual fact, it's simply graft and a bit of tedium but if you have a bit of time, amazing results can be had with little expense and much application. Still, I do get asked about it quite a bit, so hopefully this thread will answer any questions suitably!
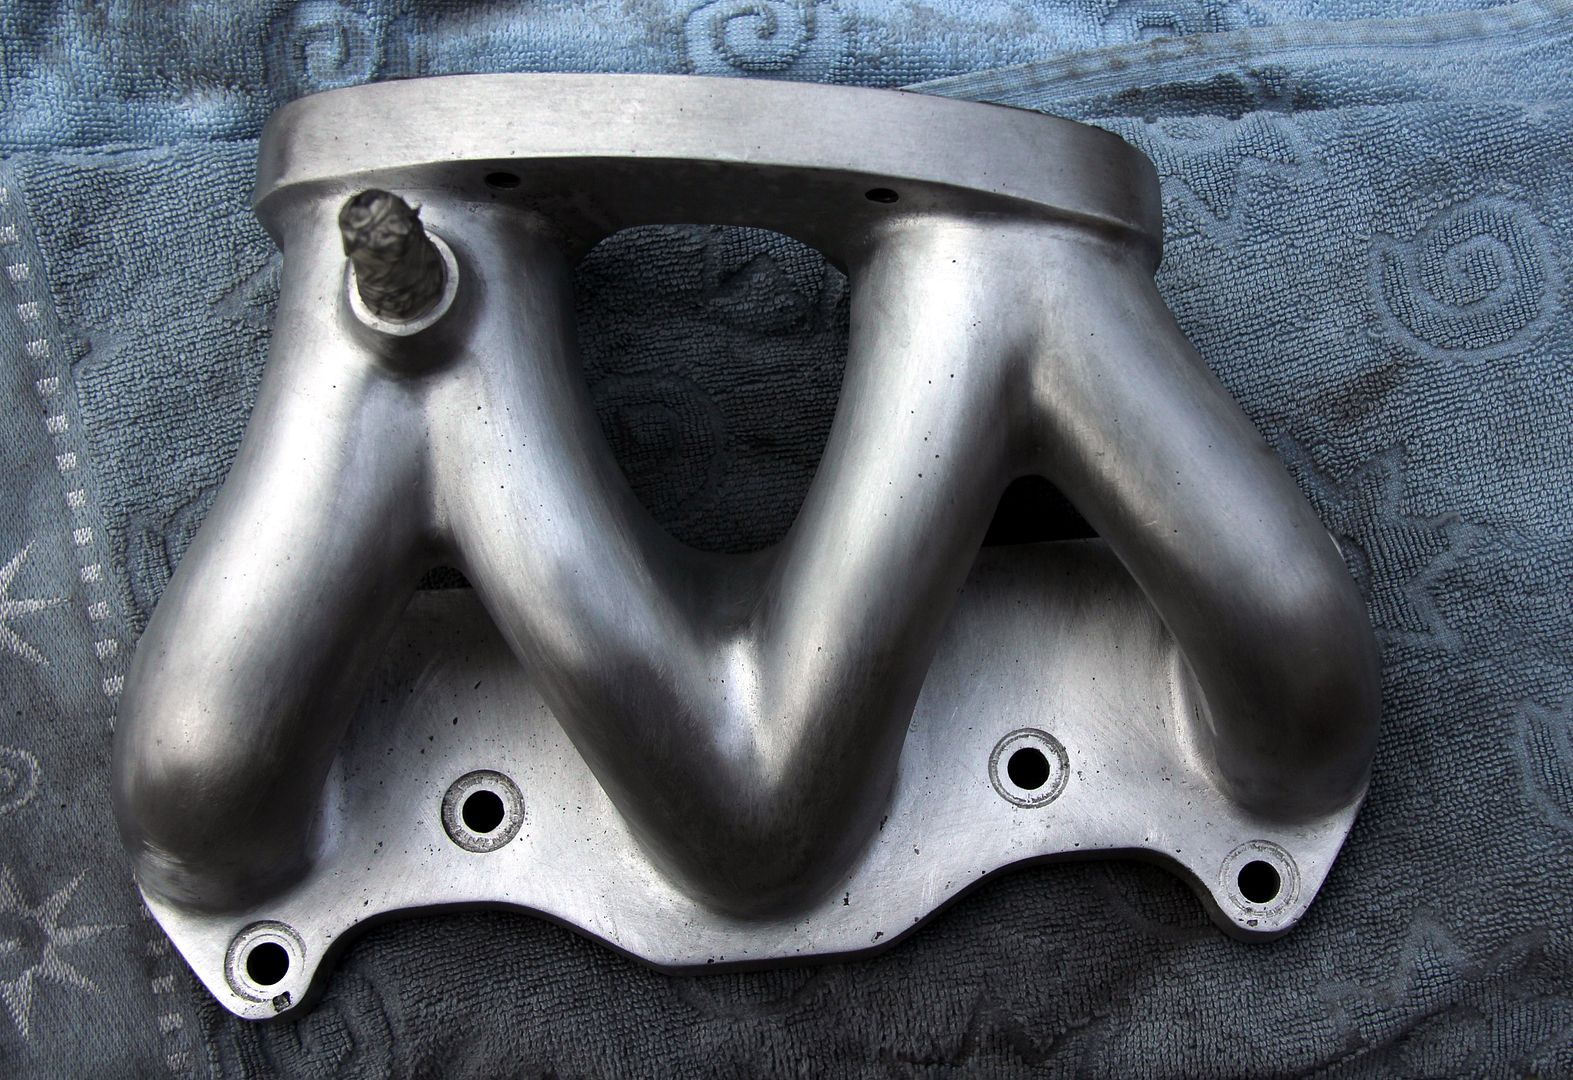
So, first you need something to polish. Exhibit A for the prosecution;
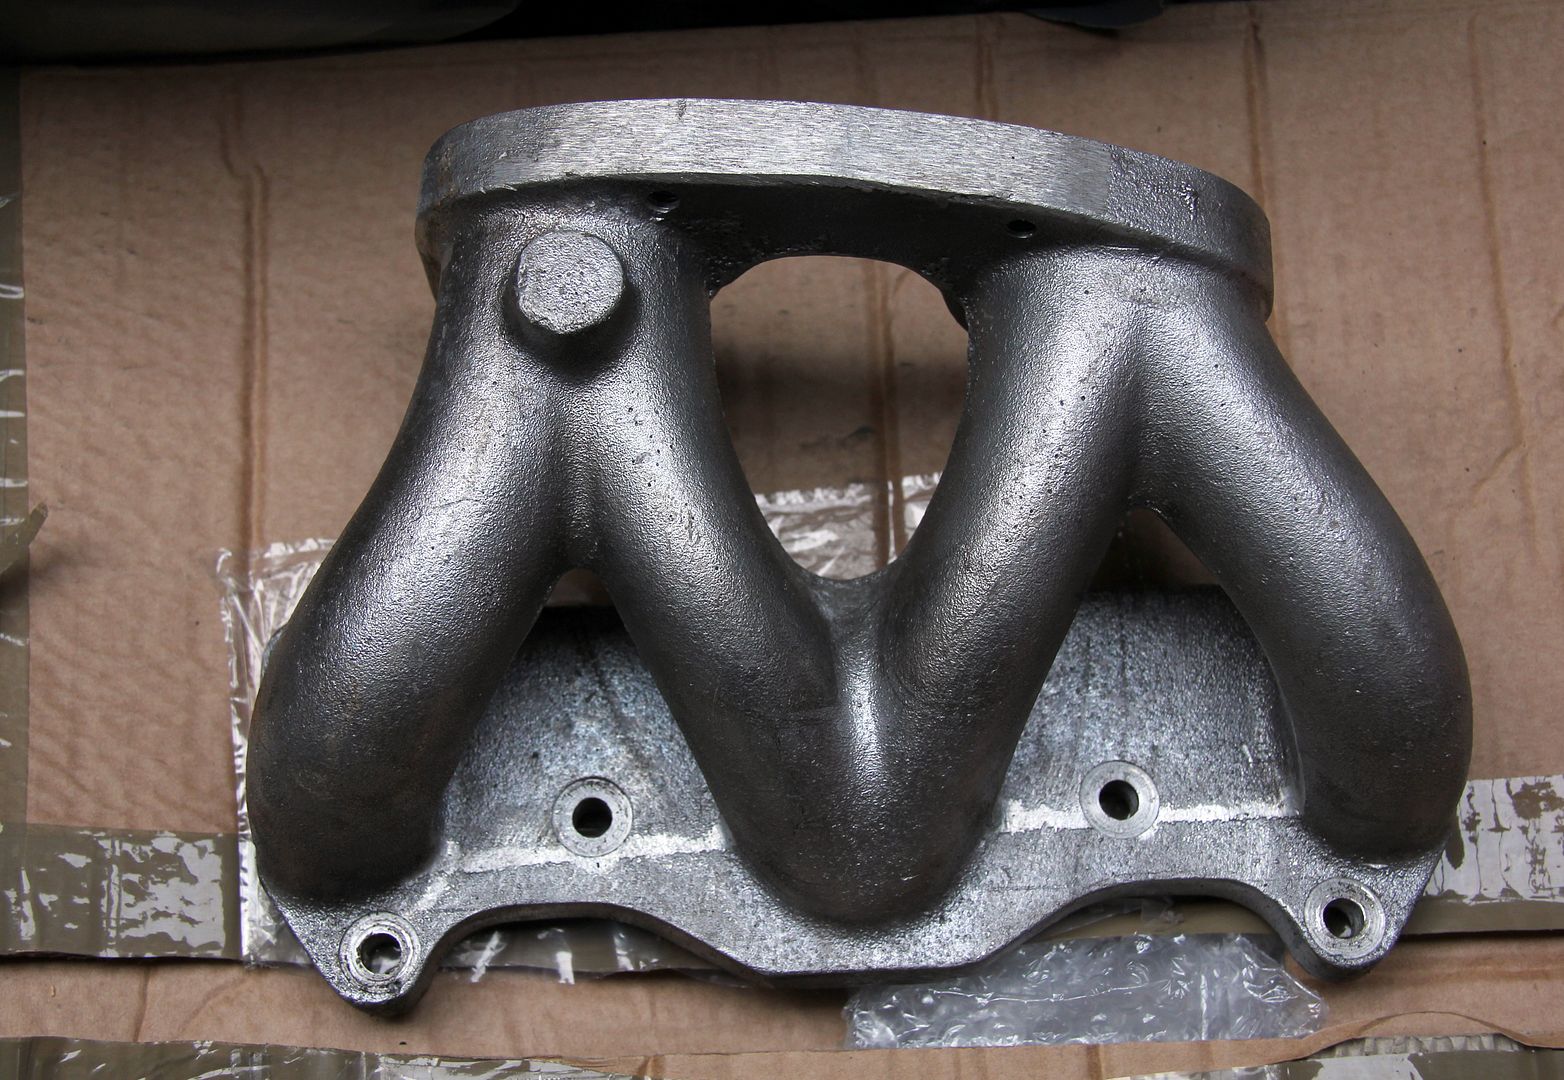
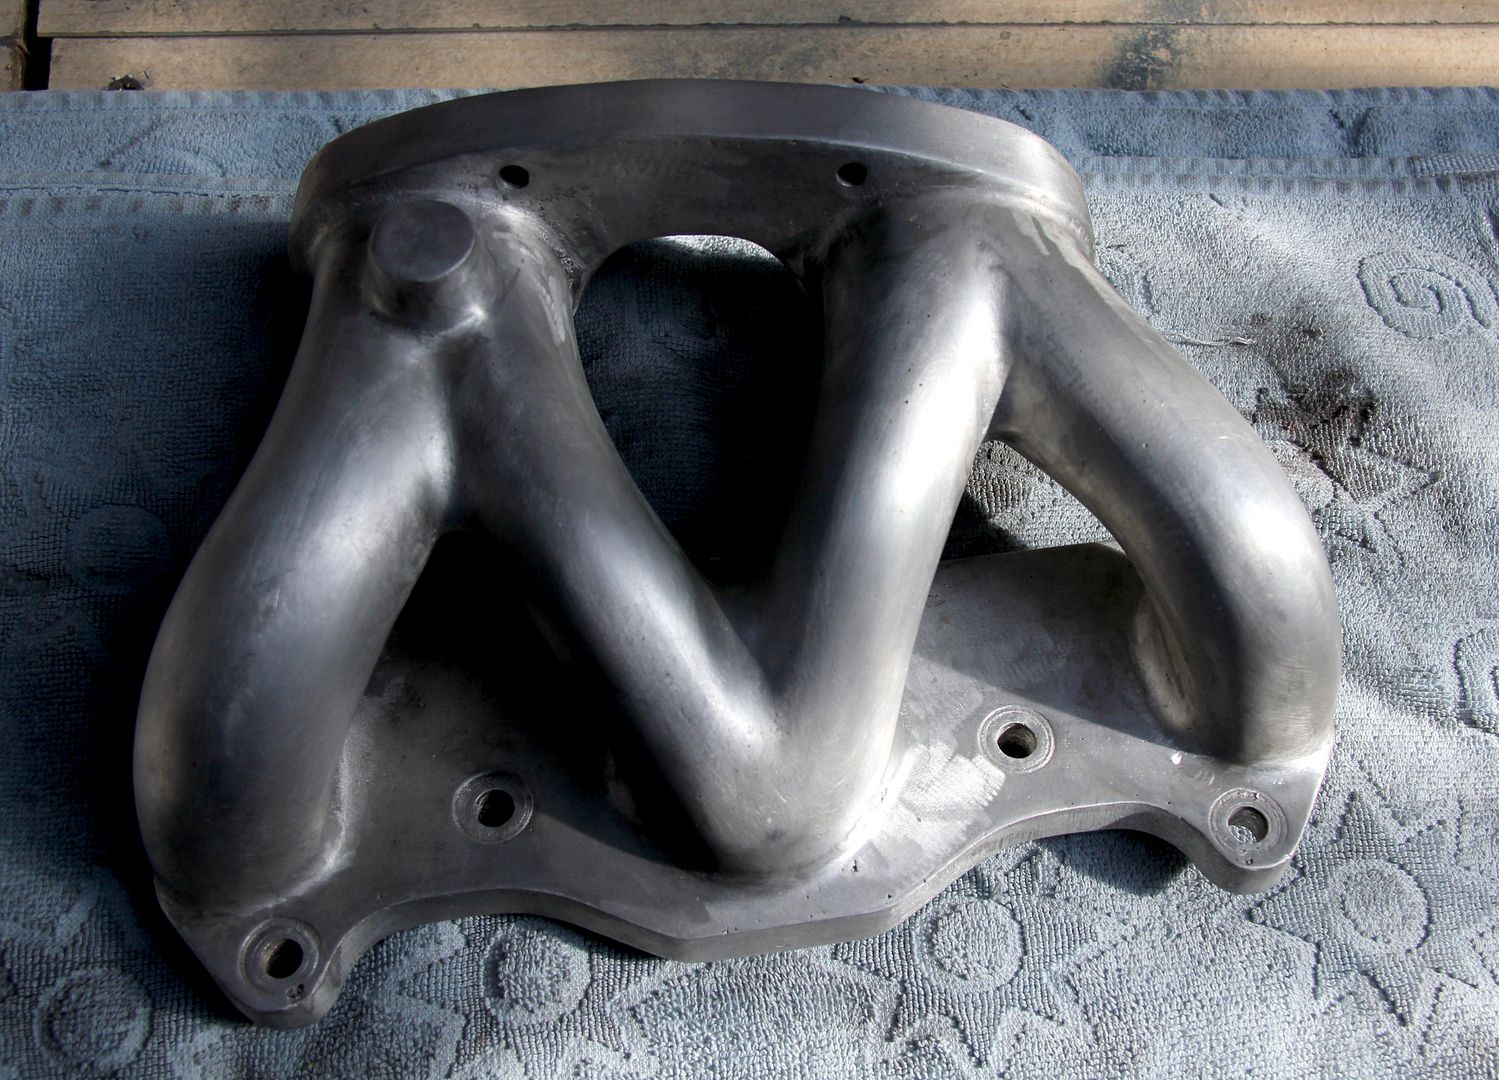
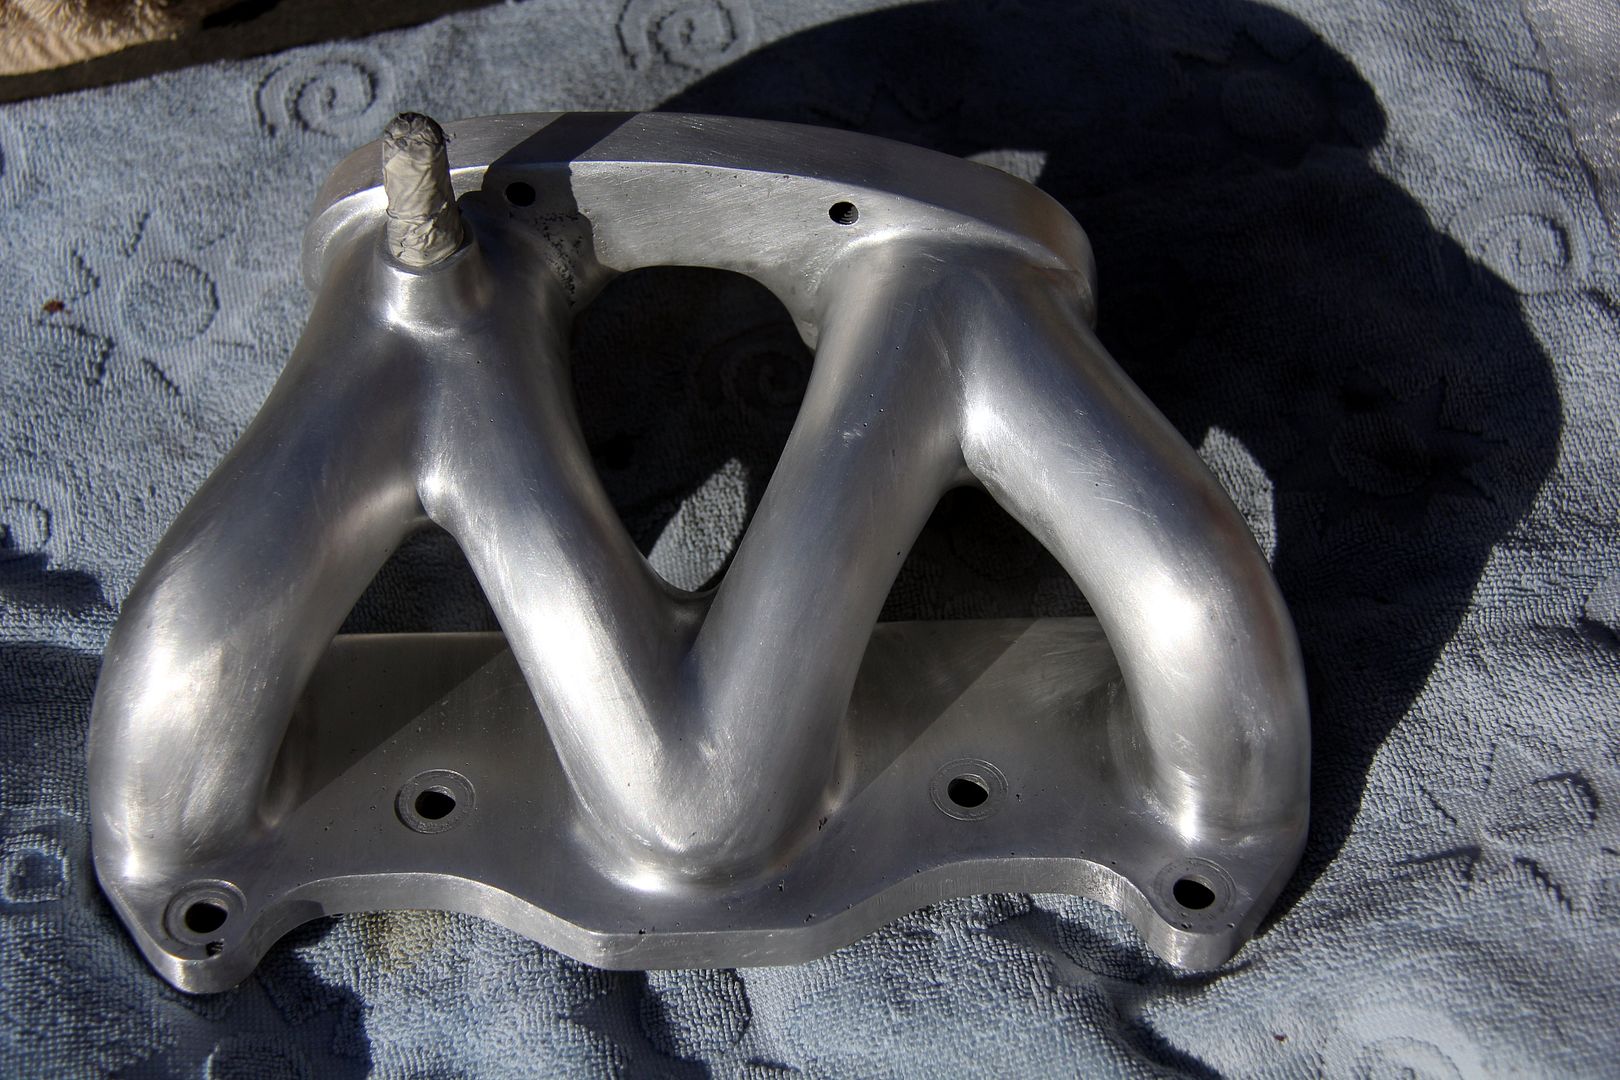
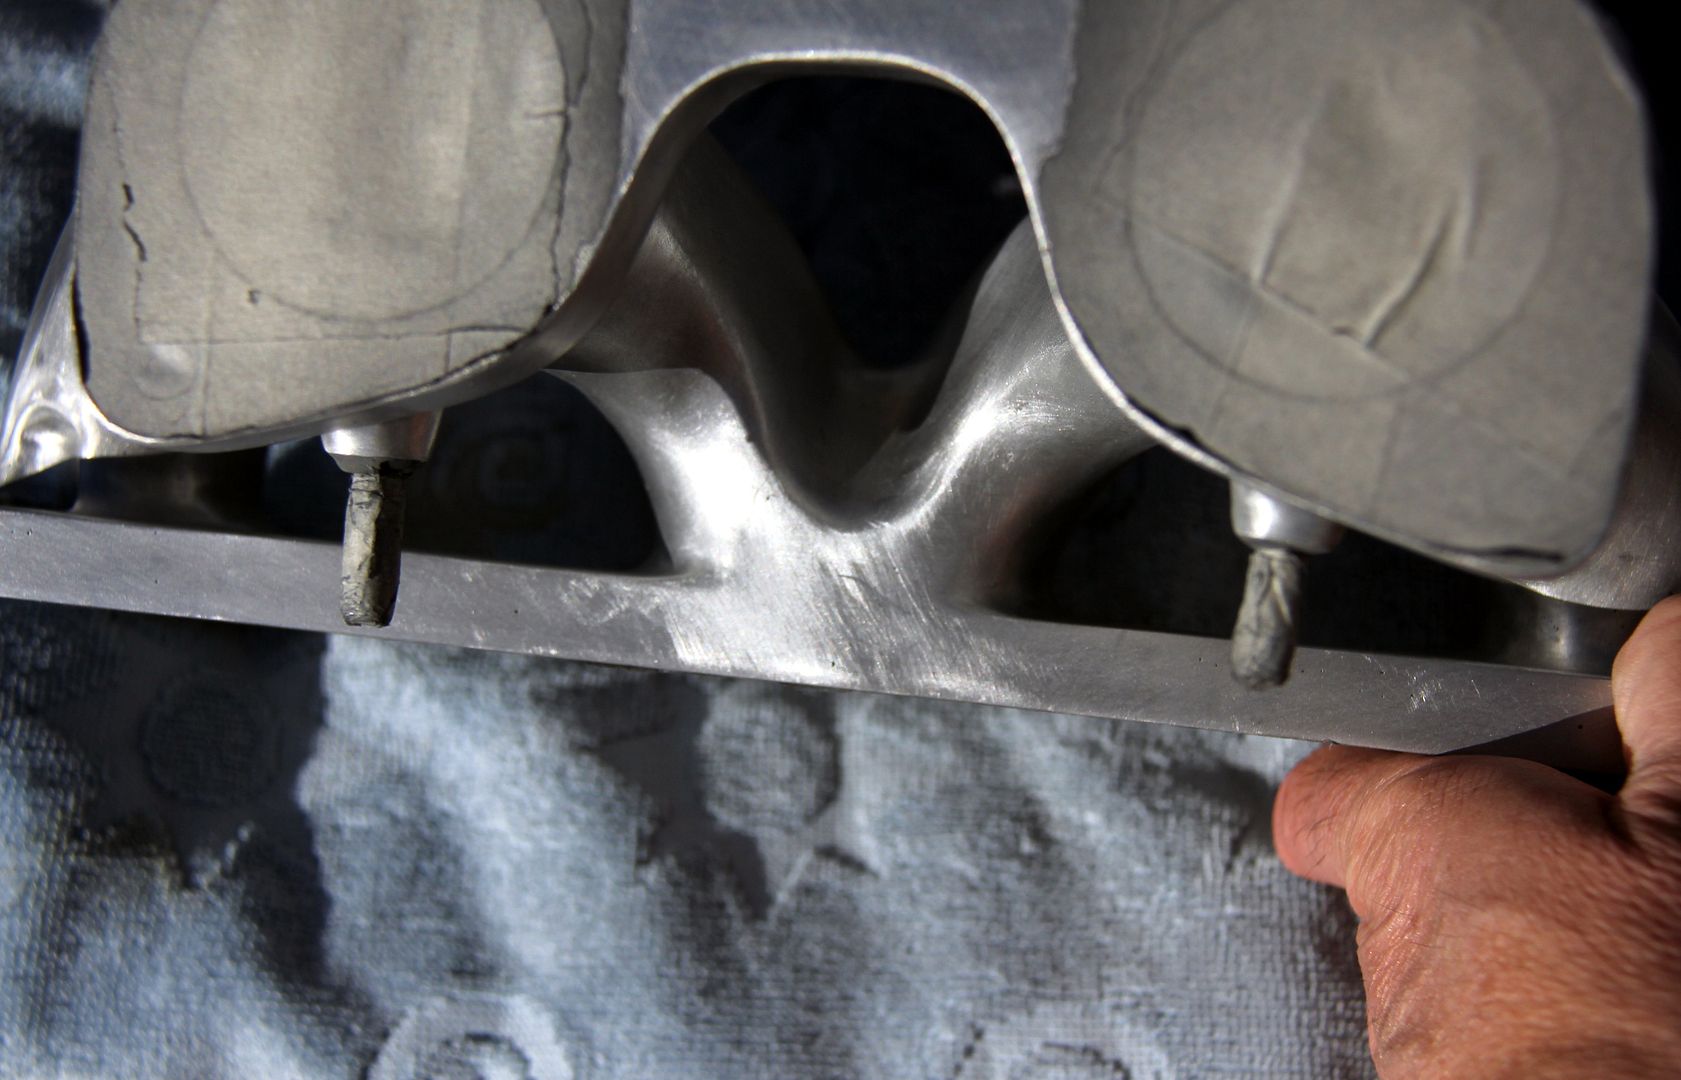
This is an intake manifold for a 12A rotary engine. It mounts a 48IDA Weber downdraft carburettor. It's of unknown make and provenance as it came with a spare engine I bought by accident on eBay (OK, I was a bit drunk) but I think the dude said he'd got it from Aus. Anyway, it's pretty representative of small-volume castings... rough, and very unfinished.
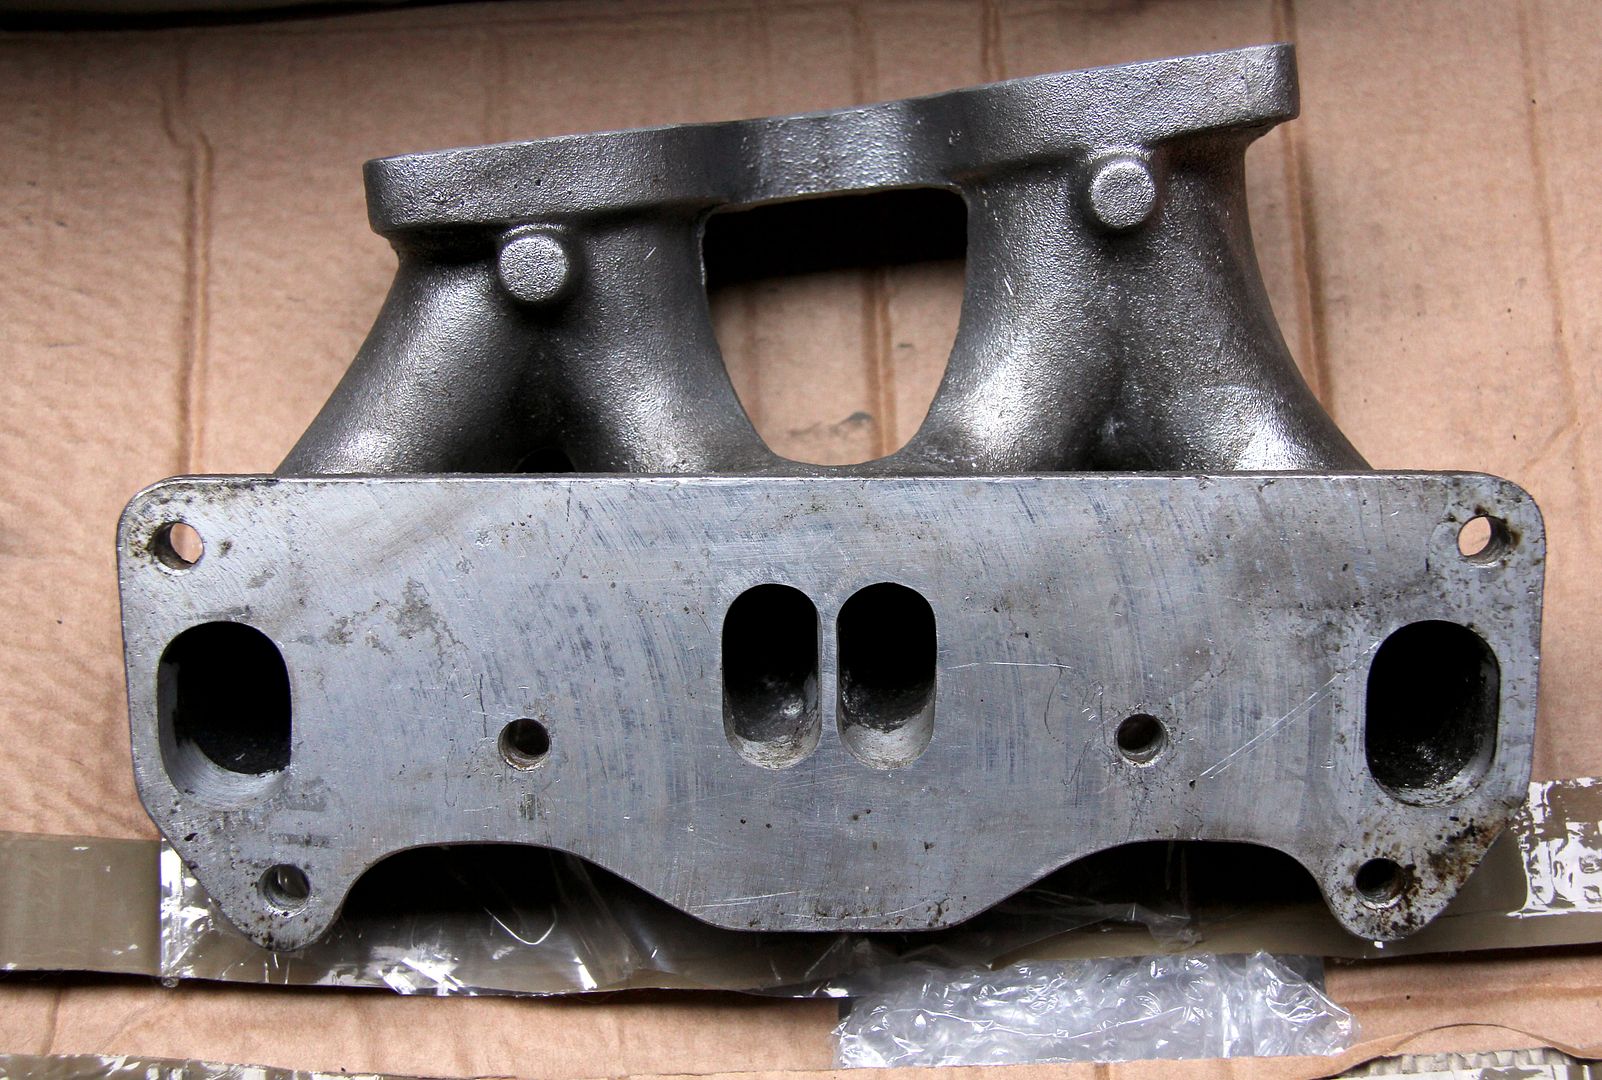
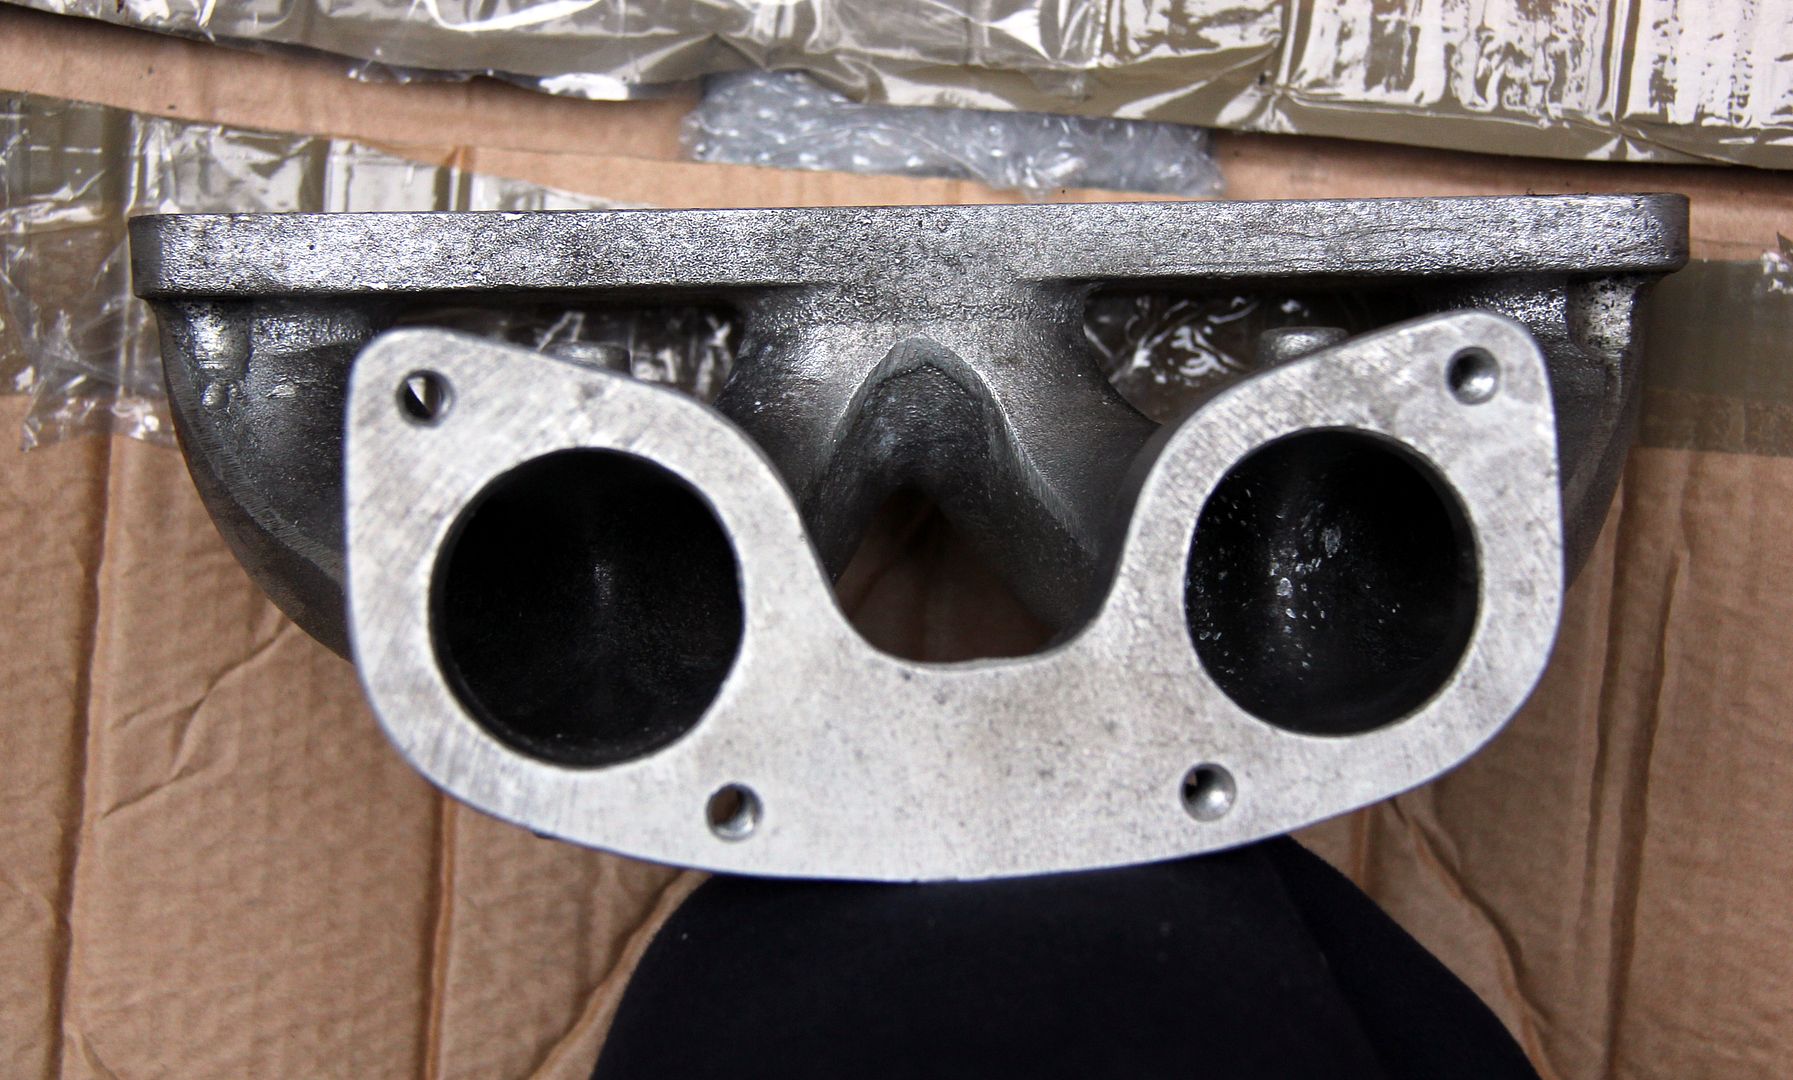
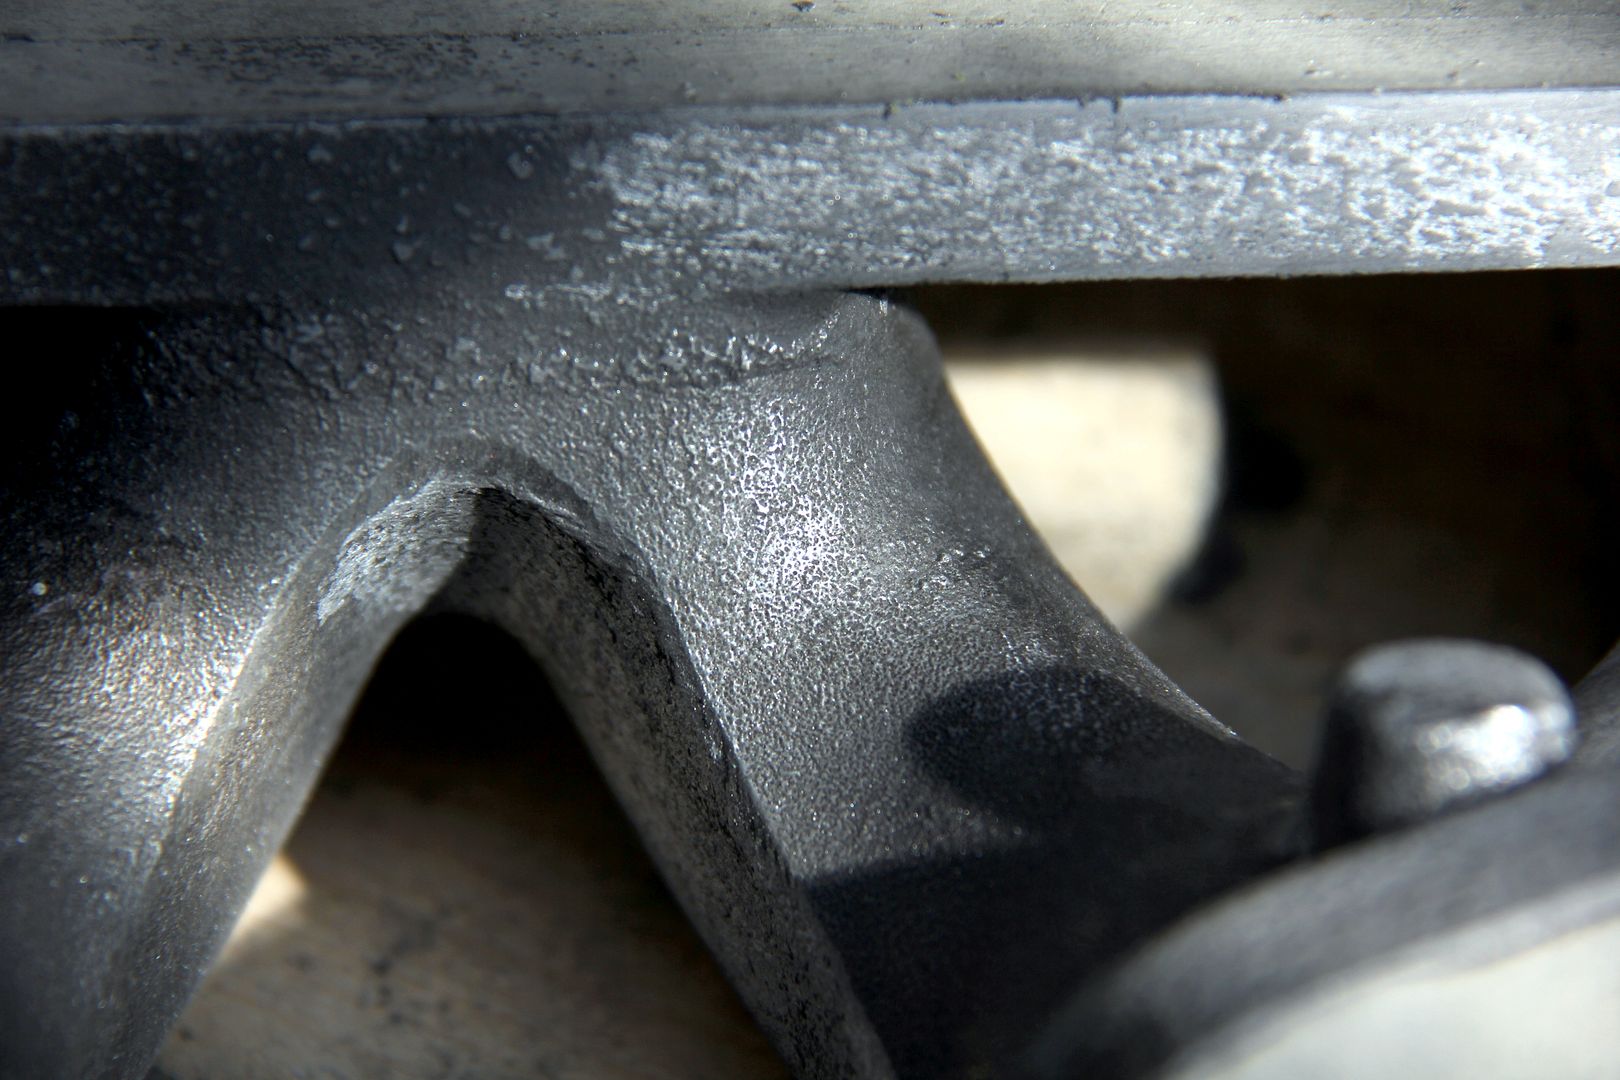
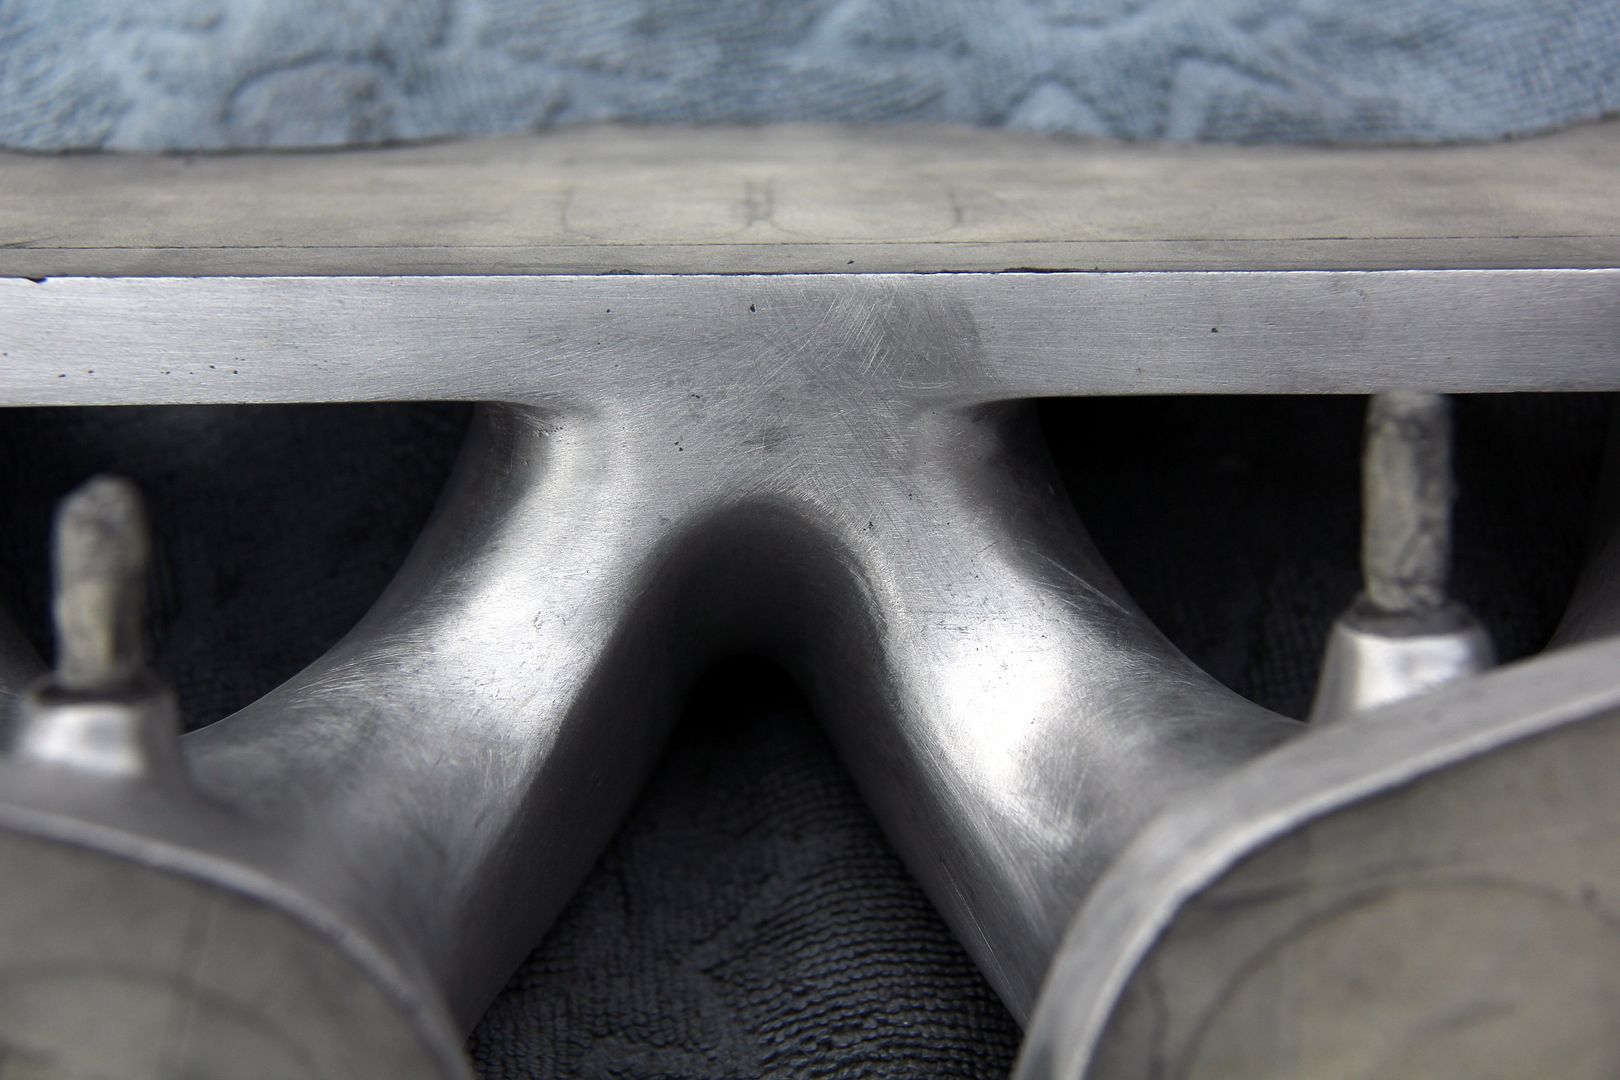
As long as it does what it needs to, i.e. provide somewhere to hang your carburettor from whilst offering holes to move fuel-air mix from one point to another, there's absolutely no percentage in the manufacturer spending time (which equals money) making it pretty and smooth. Hence you end up with huge ridges and lips where the two sides of the mould don't quite match properly (possibly through much use and wear). You can see this problem pretty clearly in the cleft where the two central intakes merge;
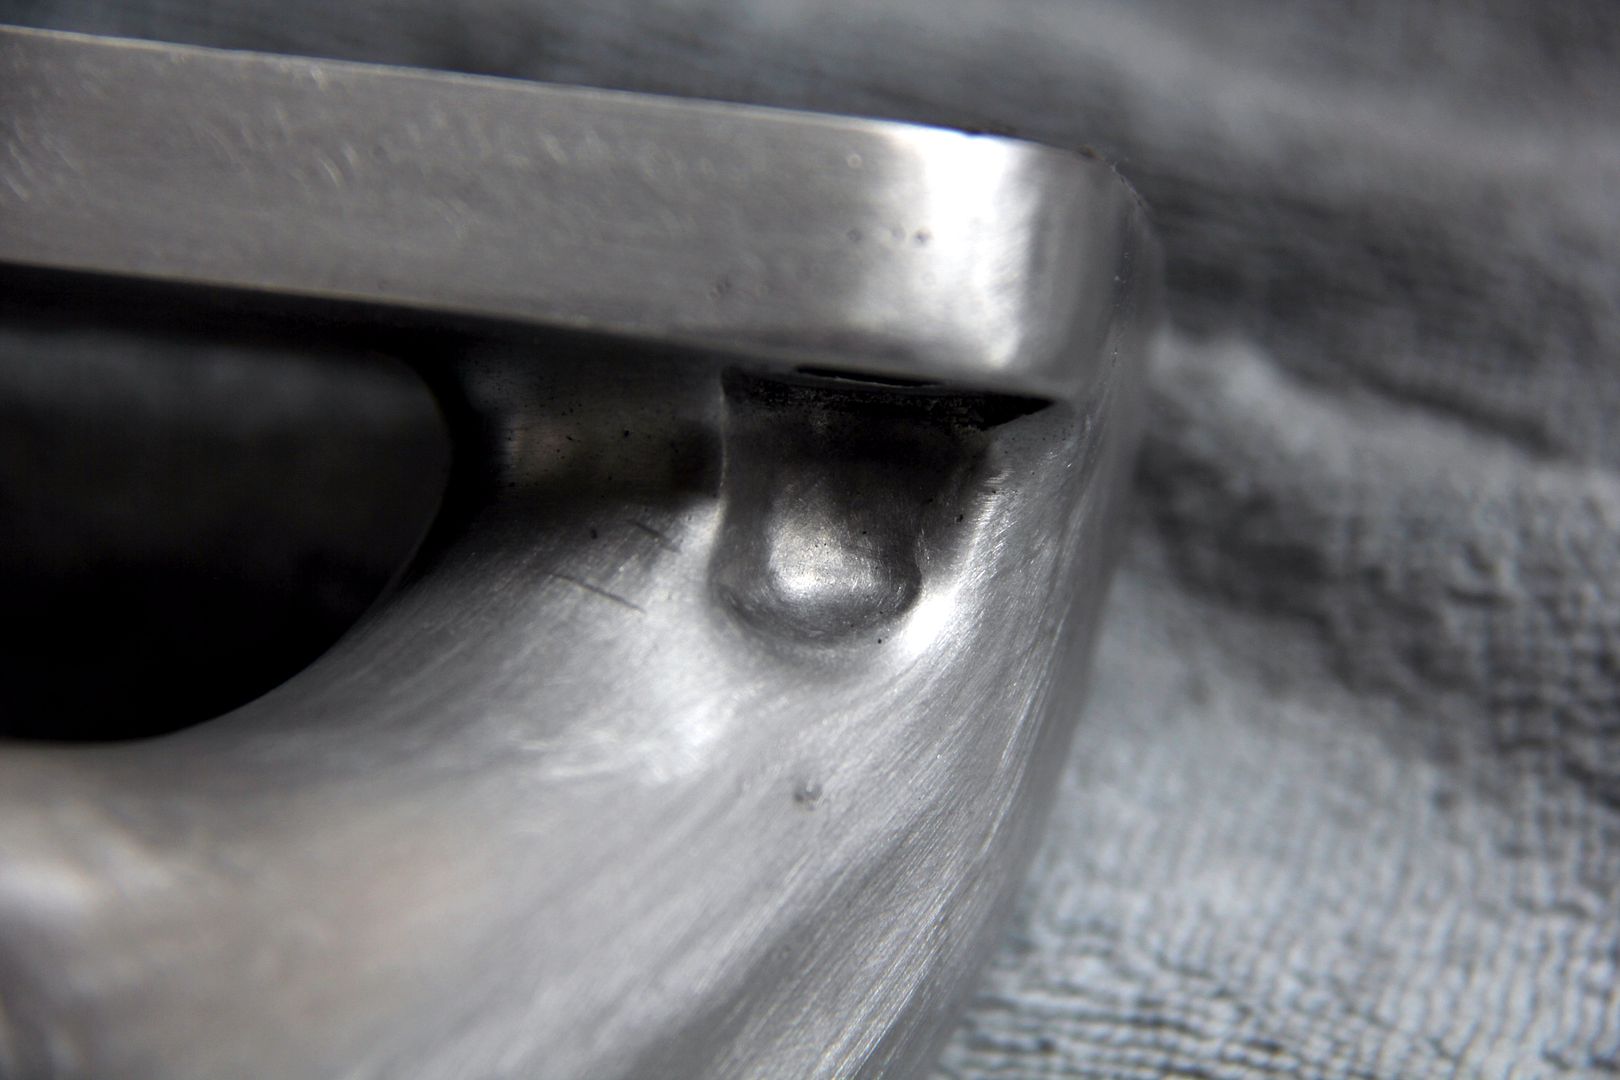
In addition the casting process leaves a very rough surface. This shows pretty clearly here, along with another ridge caused by miss-matched moulds;
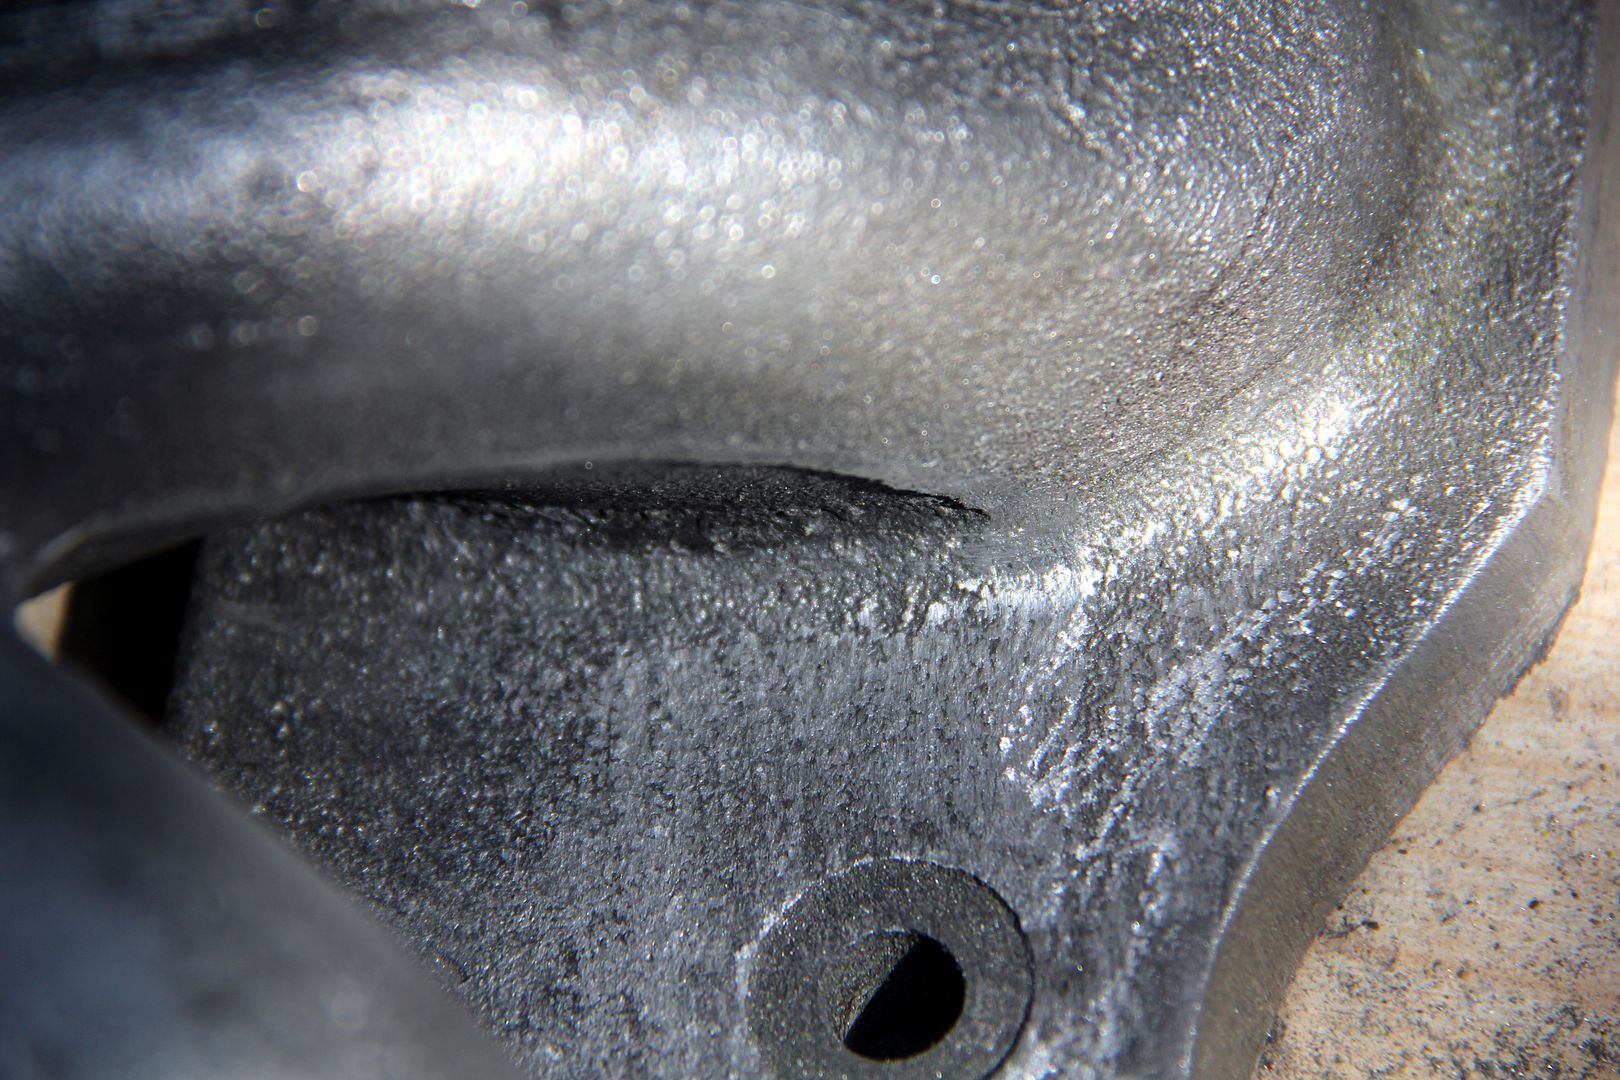
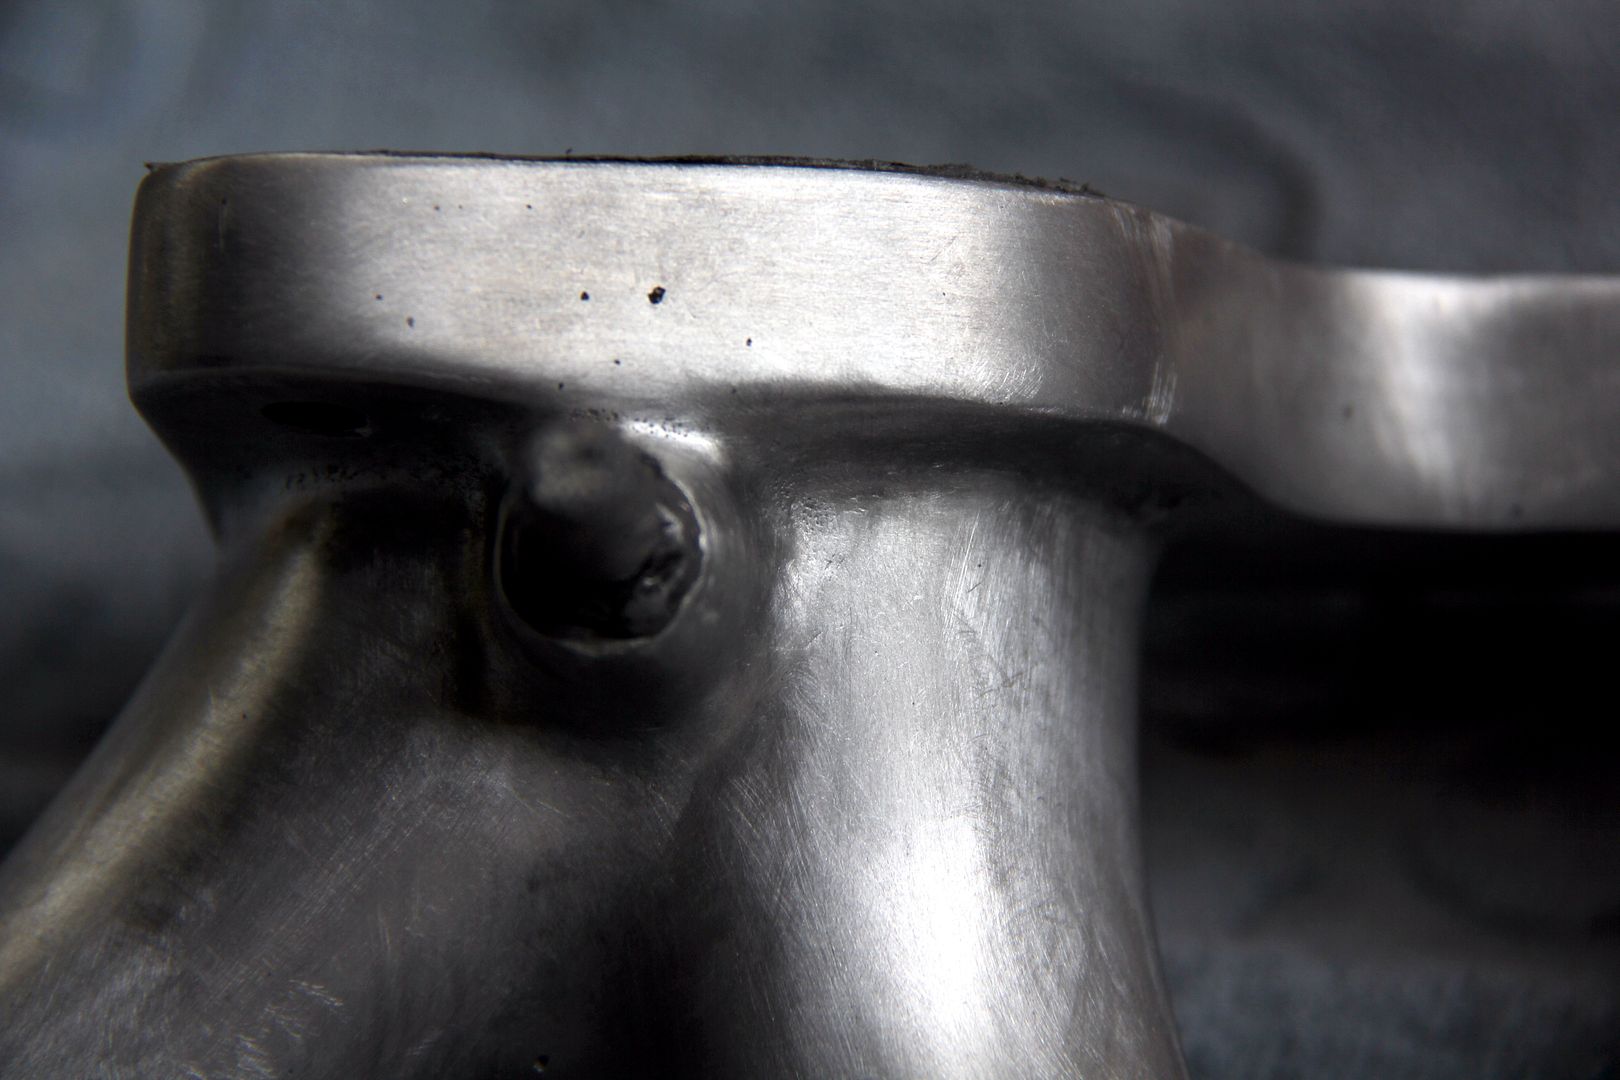
In fact, the mould even retains lumps and bumps from where the original pattern part was welded up and the welds weren't dressed back, passing on their irregularities to every casting thereafter. This manifold is, in short, nasty. I wasn't even going to use it until I realised my original carburettor solution wasn't going to fit due to the inconvenience of a brake servo in the way. With this setback in mind and stuck with the Weber route, I decided if I had to use the manifold it was at least going to have to look a hell of a lot better than this. So, where to start?
Well, with castings as bad as these you really need to get brutal on them initially. The lips and ridges of miss-matched moulding make for a great alliteration but unsightly polishing, so getting rid of those is the first stage. A hand file is as good as anything, although be cautious with these. Don't use anything too coarse because especially on a soft metal like aluminium it's very easy to put deep score marks into it that you will seriously regret later in the process. The problem with this particular piece is the intricacy of it; there are plenty of nooks and crannies and blind areas where it's impossible to get power tools in so a lot of the initial donkey-work had to be by files.
With that said, there are a few powered devices that can make it easier. A Dremel (other proprietary brands of rotary tool are available) is essential really, especially with an extended flexi-drive. You can get little 8mm barrel-shaped sanding papers for them, which don't last long on metal this rough, but are ideal for those hard-to access areas. If the piece has a slightly less restrictive layout then one of these is a godsend;
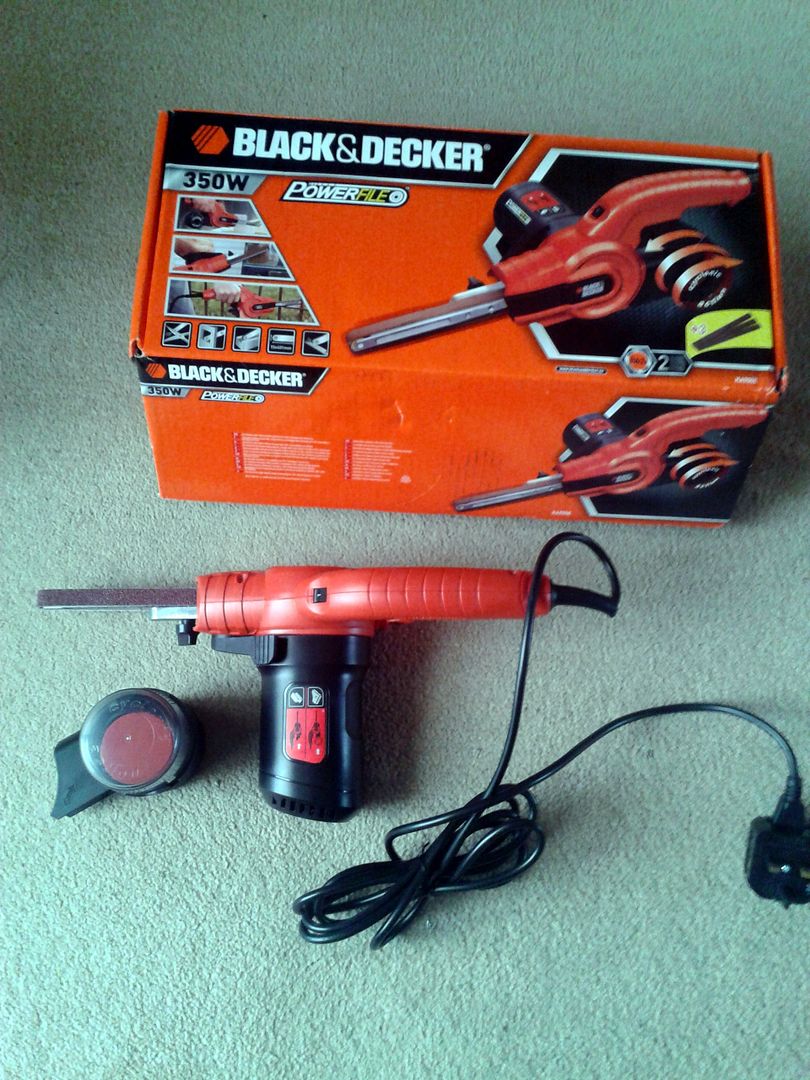
A Black and Decker Powerfile is basically like a hand-held linisher, with a sanding belt running on a narrow extended bed. You can get anywhere from 40 to 800 grit sanding belts for it.... 40 will be far too coarse for alloy though. I don't use anything coarser than 120 grit personally because you're running the risk of putting score-marks into the metal that you'll be cursing later (more on this later). Likewise, I'd advise against using a grinder with sanding or flap discs; it's just too aggressive. Fine if you're polishing steel, but not on alloy.
Really at this stage what you're going to be using is good-old fashioned sandpaper. In my experience, aluminium oxide paper works best, used dry... it makes a lot of dust so breathing apparatus or at least a paper mask is advised. I tend to start with 120 grit, which does a lot of the real work of smoothing the roughness of the casting. This is not really polishing. Not yet. At this stage we're trying to get the surface as smooth and uniform as possible, which means getting rid of all the weld blobs, the ridges, the ripples and bobbles of the casting process. Which really leads us onto the question;
what actually is polishing?
Seems an odd question to ask this far in, but it's worth taking a minute because it makes what we're doing easier to understand. Basically, a surface reflects light. If it's metal it reflects quite a lot of light. If it's rough metal it reflects it in all random directions and intensities. This is because the light bounces off all the little surface imperfections and scatters, breaking up its cohesiveness. The smoother we make the surface, the more "together" the light stays as it reflects. When the surface is perfectly smooth it'll reflect all the light back more-or-less as it arrived. We call this phenomenon "a reflection". And when I say smooth, I don't just mean free from all the bobbles and warts like on our casting above. The flatter the surface the better, too, so we don't want gradual depressions and ripples in it either... more on this later, too.
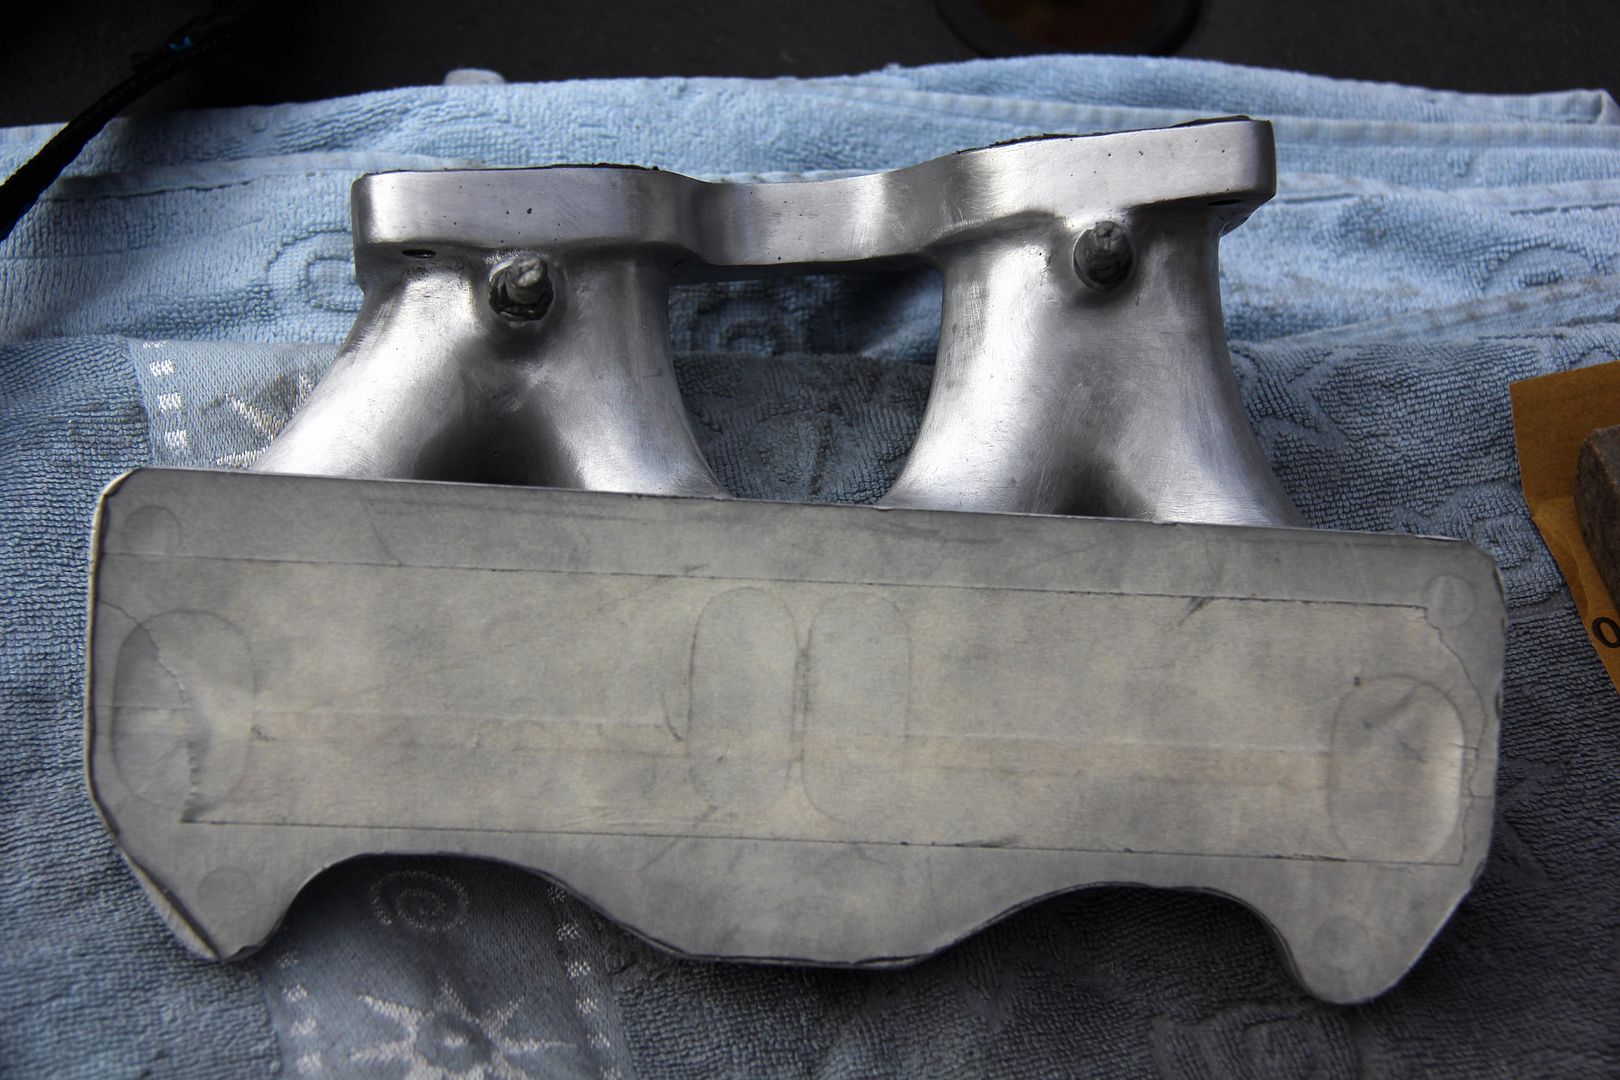
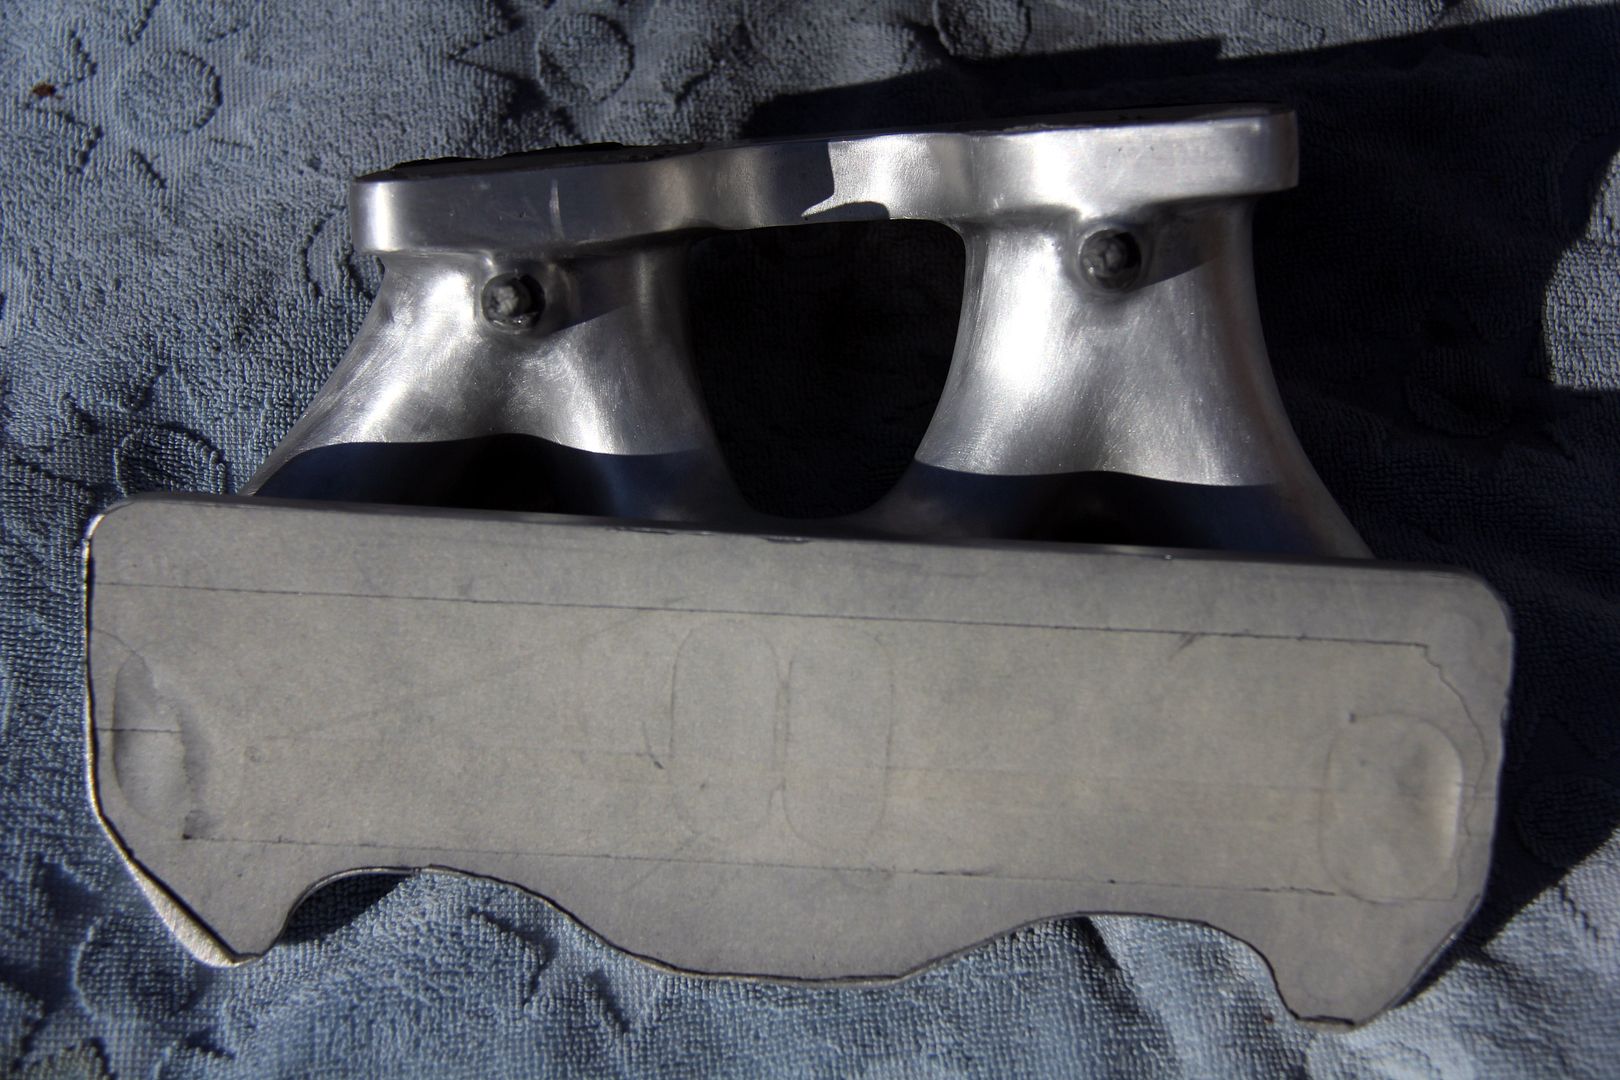
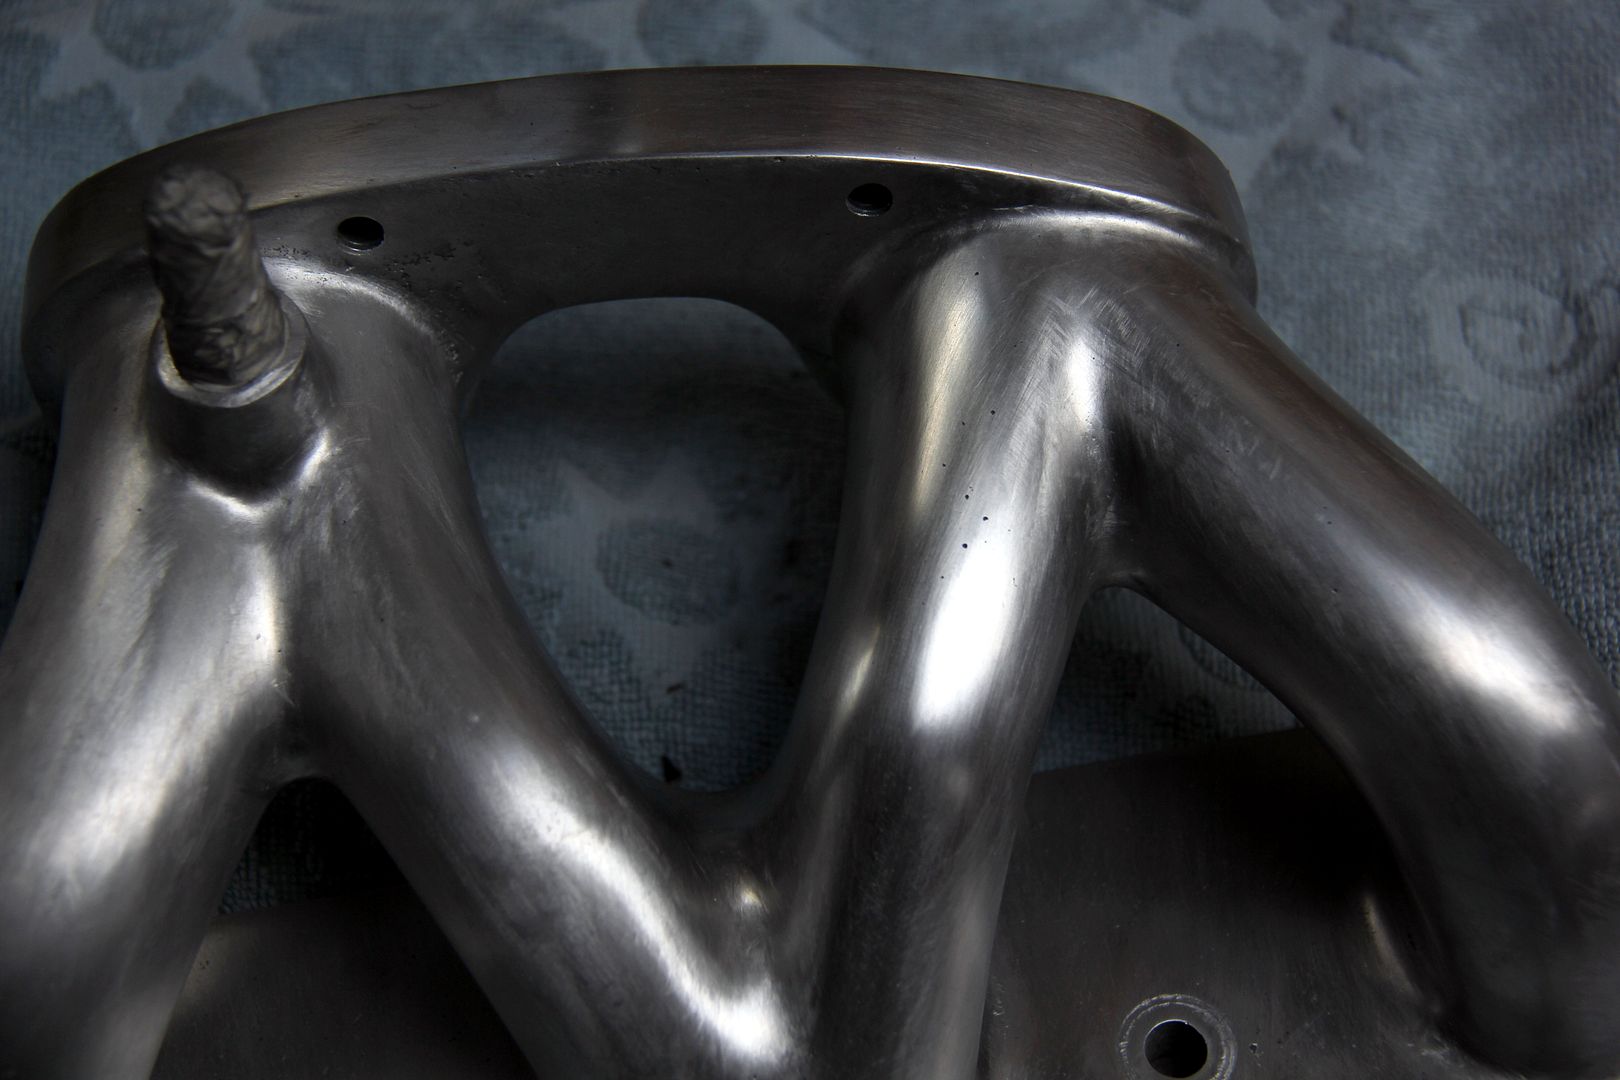
If possible, we'd be using a sanding block because this will highlight waves as well as obvious imperfections. Clearly on our example manifold, this isn't really feasible due to all the damned curves. Anyway, this is how it ends up after plenty of filing, then a couple of hours sanding with first 120 grit paper, then 240 grit;
As you can see, it's still pretty un-shiny but there's a lot of progress here. The horrible ridges across the mounting backplate have been filed flat, as have all the mould lines around the actual runners. Plenty far to go! What we're looking for is a consistent satin finish all over without any rough bits or suspiciously shiny patches (these tend to be bits that are "low" to the overall surface and aren't being touched by the sandpaper). At this point you can try something a bit different and employ a mop and abrasive if you have them. A mop is simply a cylindrical fabric item that mounts onto a bench grinder (or a drill will do if you don't have a grinder) like this;
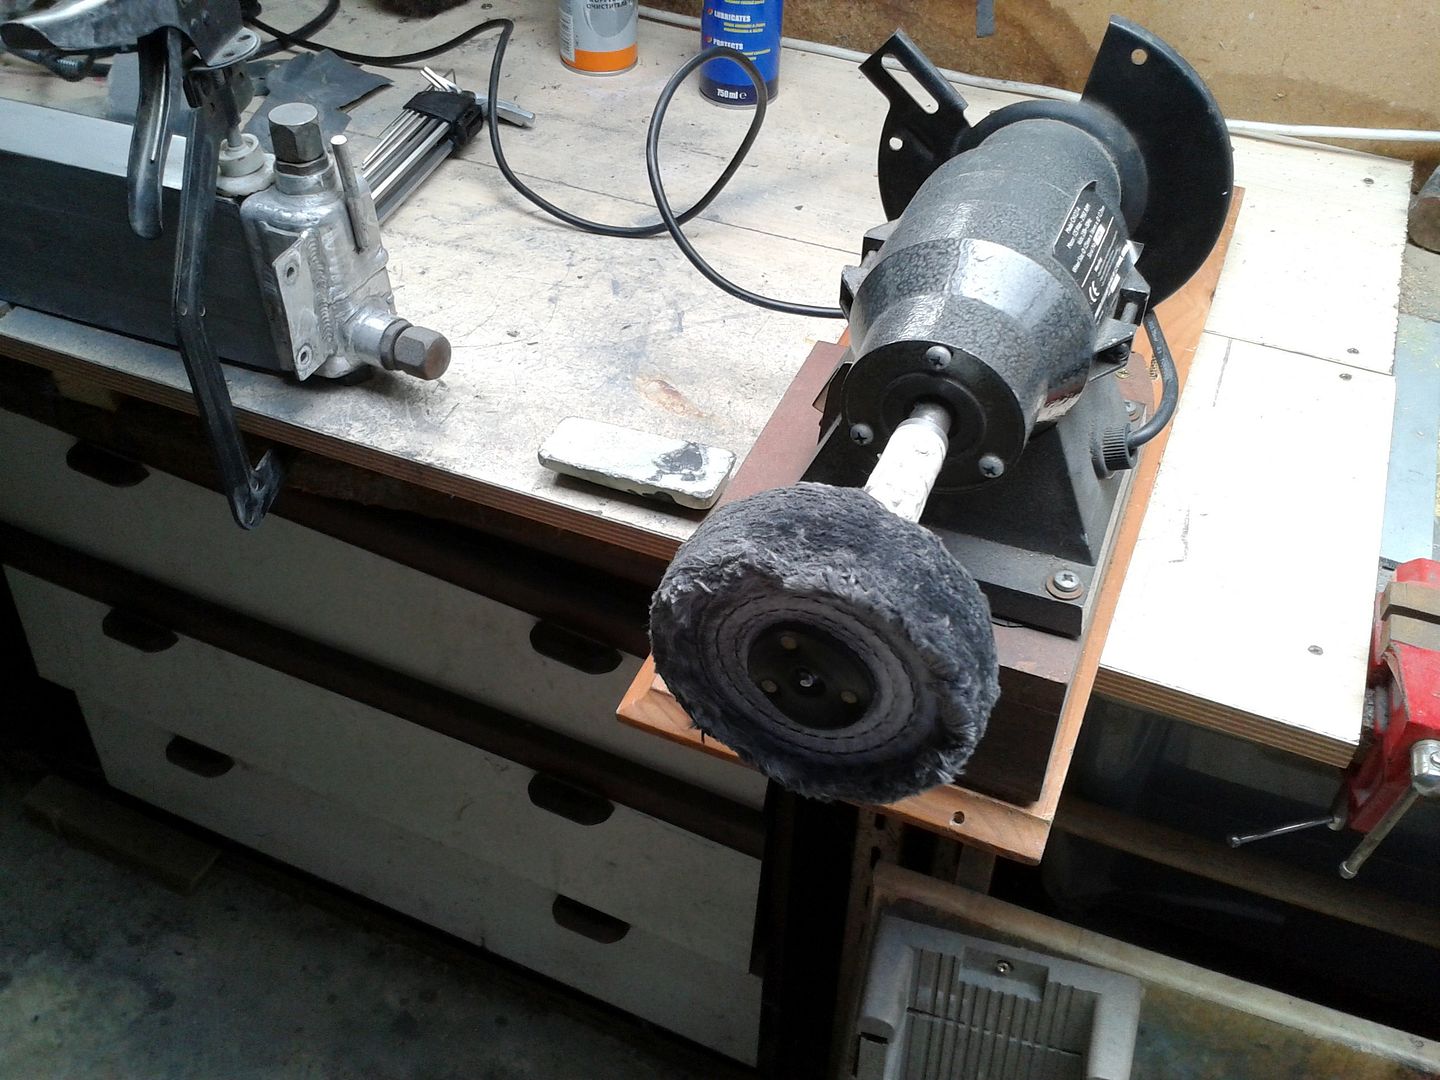
If at all possible, you need a grinder rather than a drill. This is because the drill requires at least one, preferably two, hands to operate it. The grinder leaves both hands free. If you use a drill you therefore either need a secure drill stand to mount it to or a means of clamping the work down to a bench. This has drawbacks such as risking damaging the work, plus it's a lot easier to move the work around against the mop rather than the mop around the work.
So, let's say we've got our bench grinder set up; what is this mop all about? Abrasive mops are different to polishing ones; they're a lot rougher, made from sisal string or similar and you apply what is basically a grinding paste held in a hard grease-based matrix to the mop as it spins. This essentially acts as a spinning sanding disc and will do the job of all those hours (and fingertips) sanding away with ally oxide paper. The drawback is it's not such a minutely controllable process as doing it by hand... there really is no substitute for feeling what is happening with the work as you go. It's also filthy; genuinely, horribly filthy. If you don't wear eye protection and breathing masks then expect to be blind and die from Miner's Lung at a very early age. Even with eye protection you'll end up looking like you've overdosed on the guy-liner and are on your way to a Sister of Mercy gig.
The advantage is that it's a hell of a lot quicker by some order of magnitude than hand-sanding, and an awful lot easier in terms of calories expended. In our case, the complexity of the work means we're stuck hand-sanding. But hey, we've got our MP3 player on, the sun is out and we're sitting in the garden with a glass of cider enjoying losing ourselves in the work for a while! At this point, it's almost impossible to do too much work. When you think you've done as much as you need with the 120 and 240 grit, you haven't. Do some more! Just listen to one more album on the MP3 player before you pack up for the day. This really is the stage that defines how good the final product will be, and if you skimp on the elbow grease now, it'll show on the finished piece.
However, there's been too much talk and not enough pics here recently, so we'll have a little tangent now for light relief. In the case of our example manifold, it was at this point I realised that the ports on it didn't match the engine, as they were "short ports" for the centre plate and the engine was "tall port". I therefore took it to my local rotary expert workshop to get them to machine the ports. If any work like this needs doing, you're obviously better off doing it now before the polishing really commences. The obvious reason is that should the tuner slip with a carbide burr cutting the ports (or whatever remedial work is necessary) then they've just drawn an etched line across your hours of hard work and you'll cry tears of blood all the time you're polishing it back out.
As this work had been done, I thought it best to perform the home modifications that were needed as well, for similar reasons. This involved inserting these little doobries into the manifold;
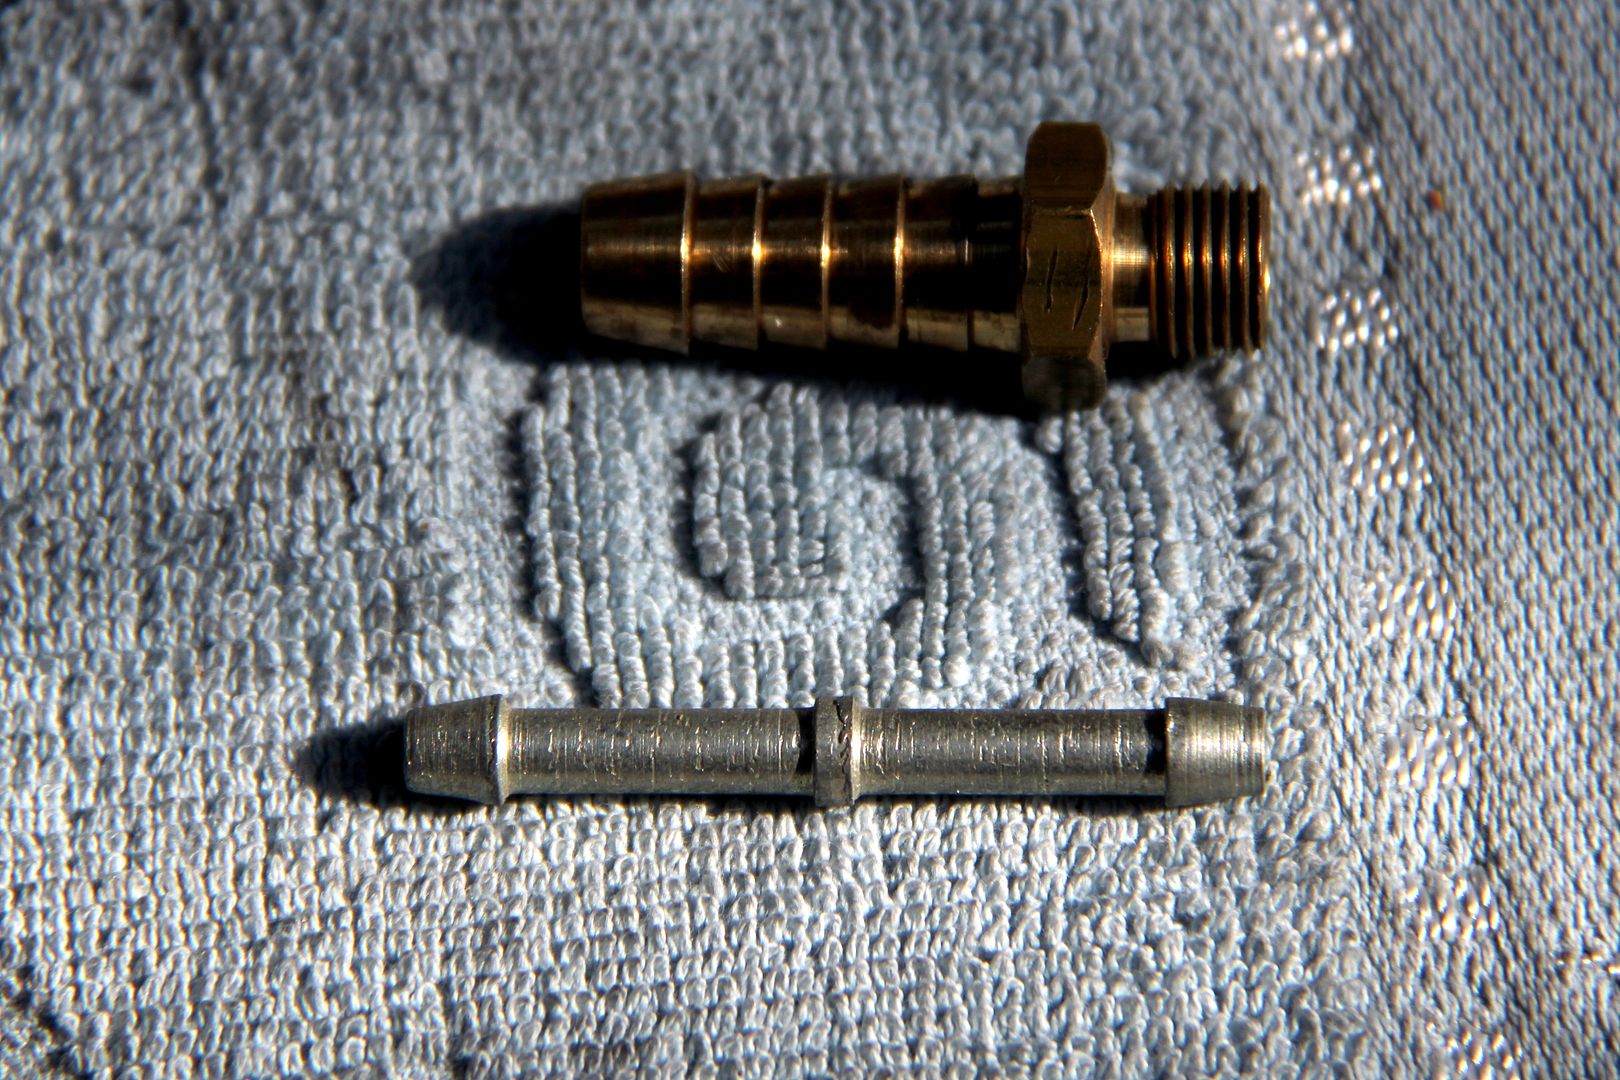
Rotary engines lubricate the apex seals of the rotor by injecting oil directly into the housing (those who know about all this can pop off and get the kettle on for a minute). There's no other way of getting the oil to them; the other seals can get their lubricant via jets through the eccentric shaft, but the apex seals are stuck out there on their own. On the older 12A engines such as this one, there is an oil metering pump (or OMP) that injects engine oil up to the carburettor via a couple of 5mm lines. The spigots that these lines feed to are inserted through the wall of the carb into the venturis. Now, I was reluctant to drill holes into my new and rather expensive Weber and since the unsung Australian artisan who made this manifold provided bosses cast into it for the purpose, it seemed easiest to use them. Hence the little steel inserts, which I got from a hydraulics supplier. No-one seems to make proper threaded hosetail inserts small enough. So, first step was a suitable hole;
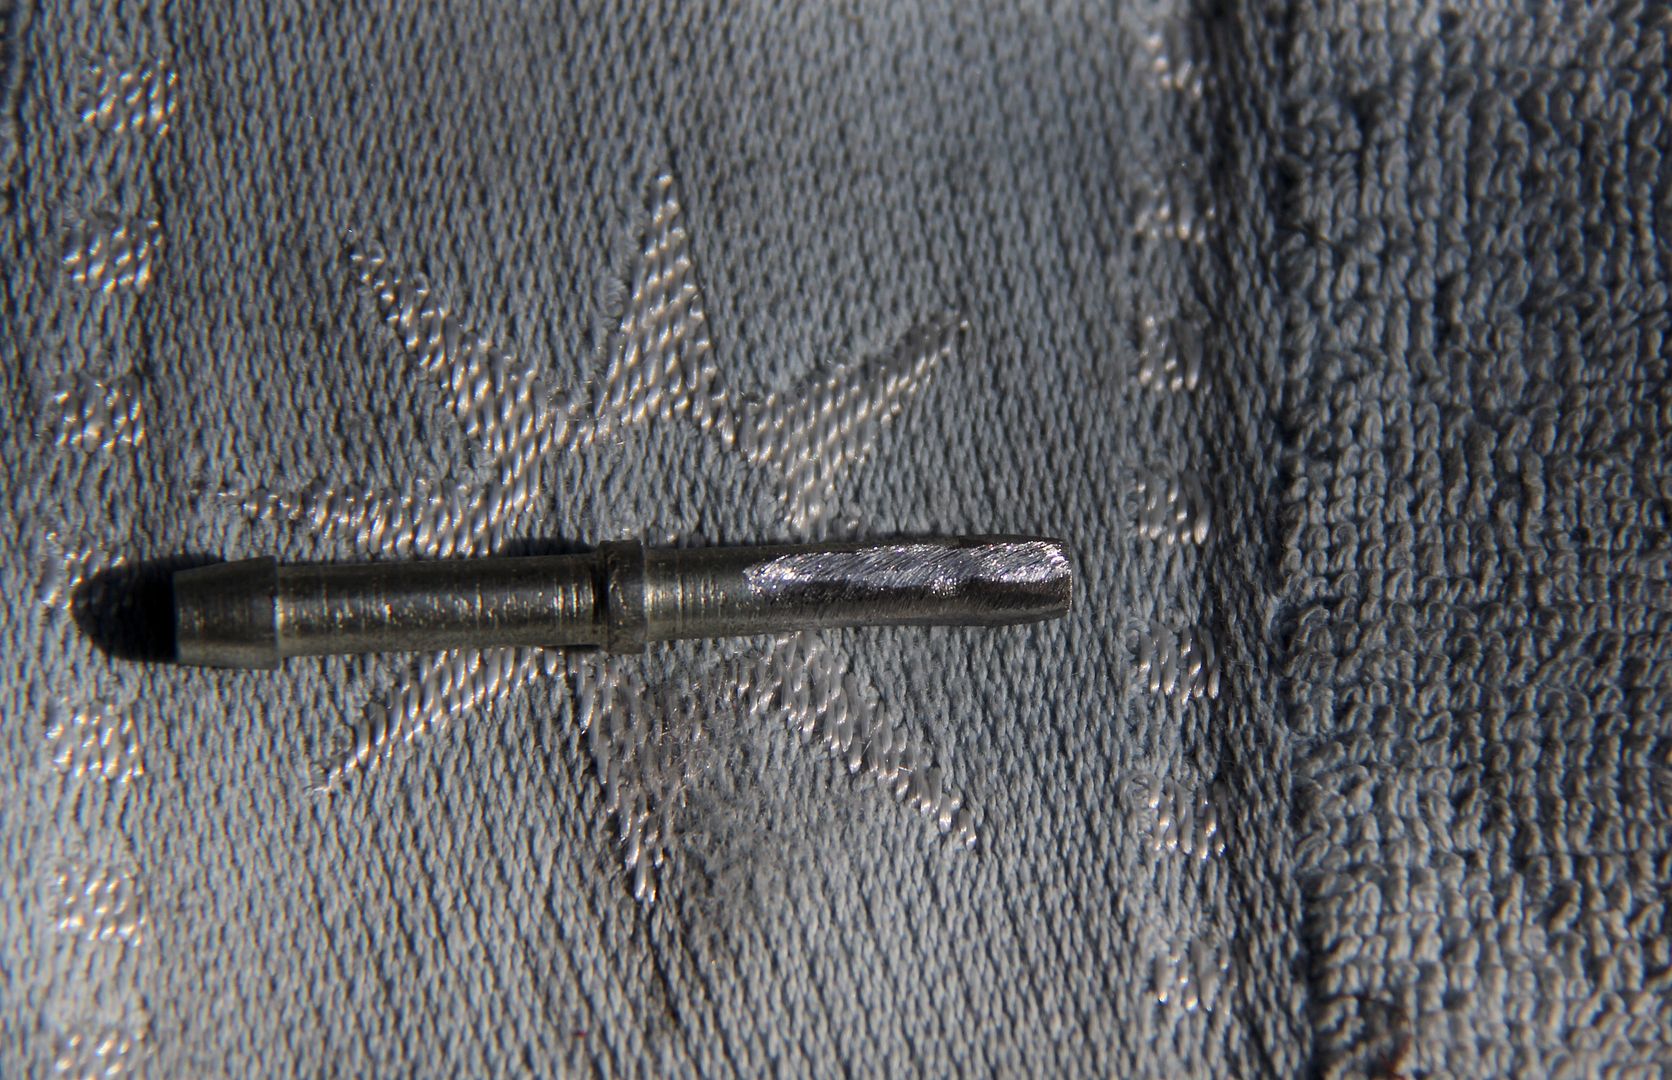
The hole through to the venturi is the right diameter for the spigot, then I drilled a larger diameter concentric half-way into the boss. This allows the ridge halfway along the spigot to socket into the boss. The only trouble is that the spigot had a barb each end, which meant if the hole was drilled to accommodate that, the main body would be too loose, but if the hole was drilled for the main body then I'd never get the barb through. The answer was simple, and another use of the Powerfile...
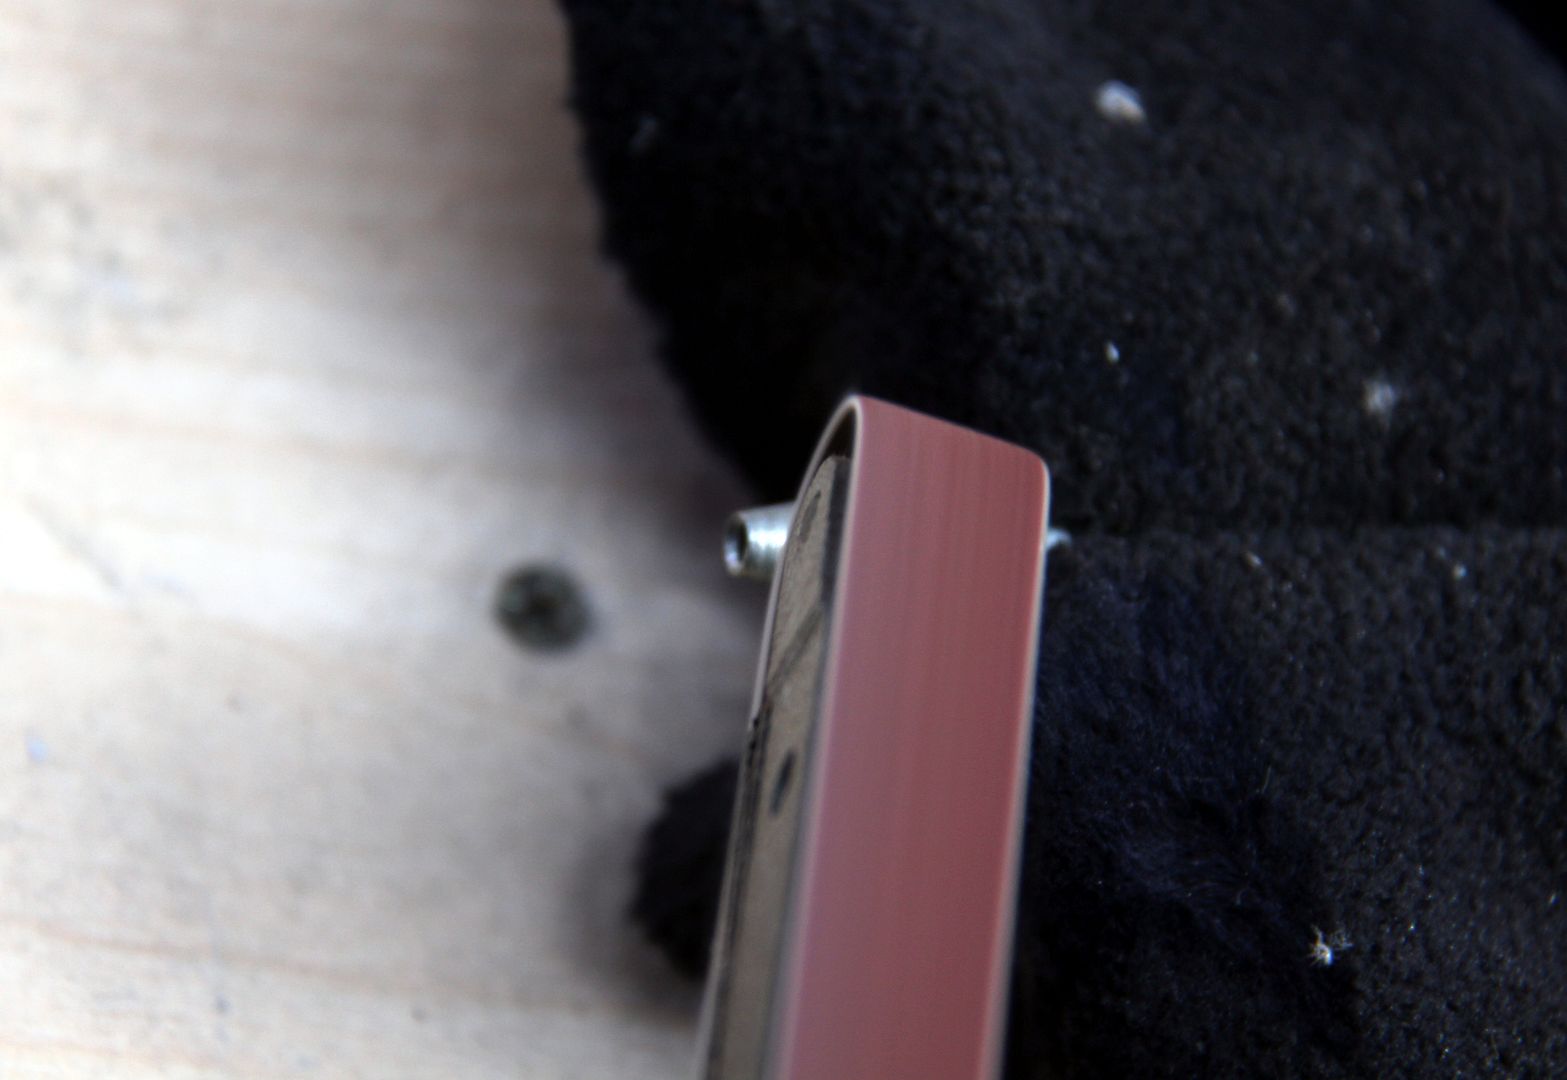
...quickly had one end bereft of its protuberance and ready to slip neatly into the waiting orifice. Oooer.
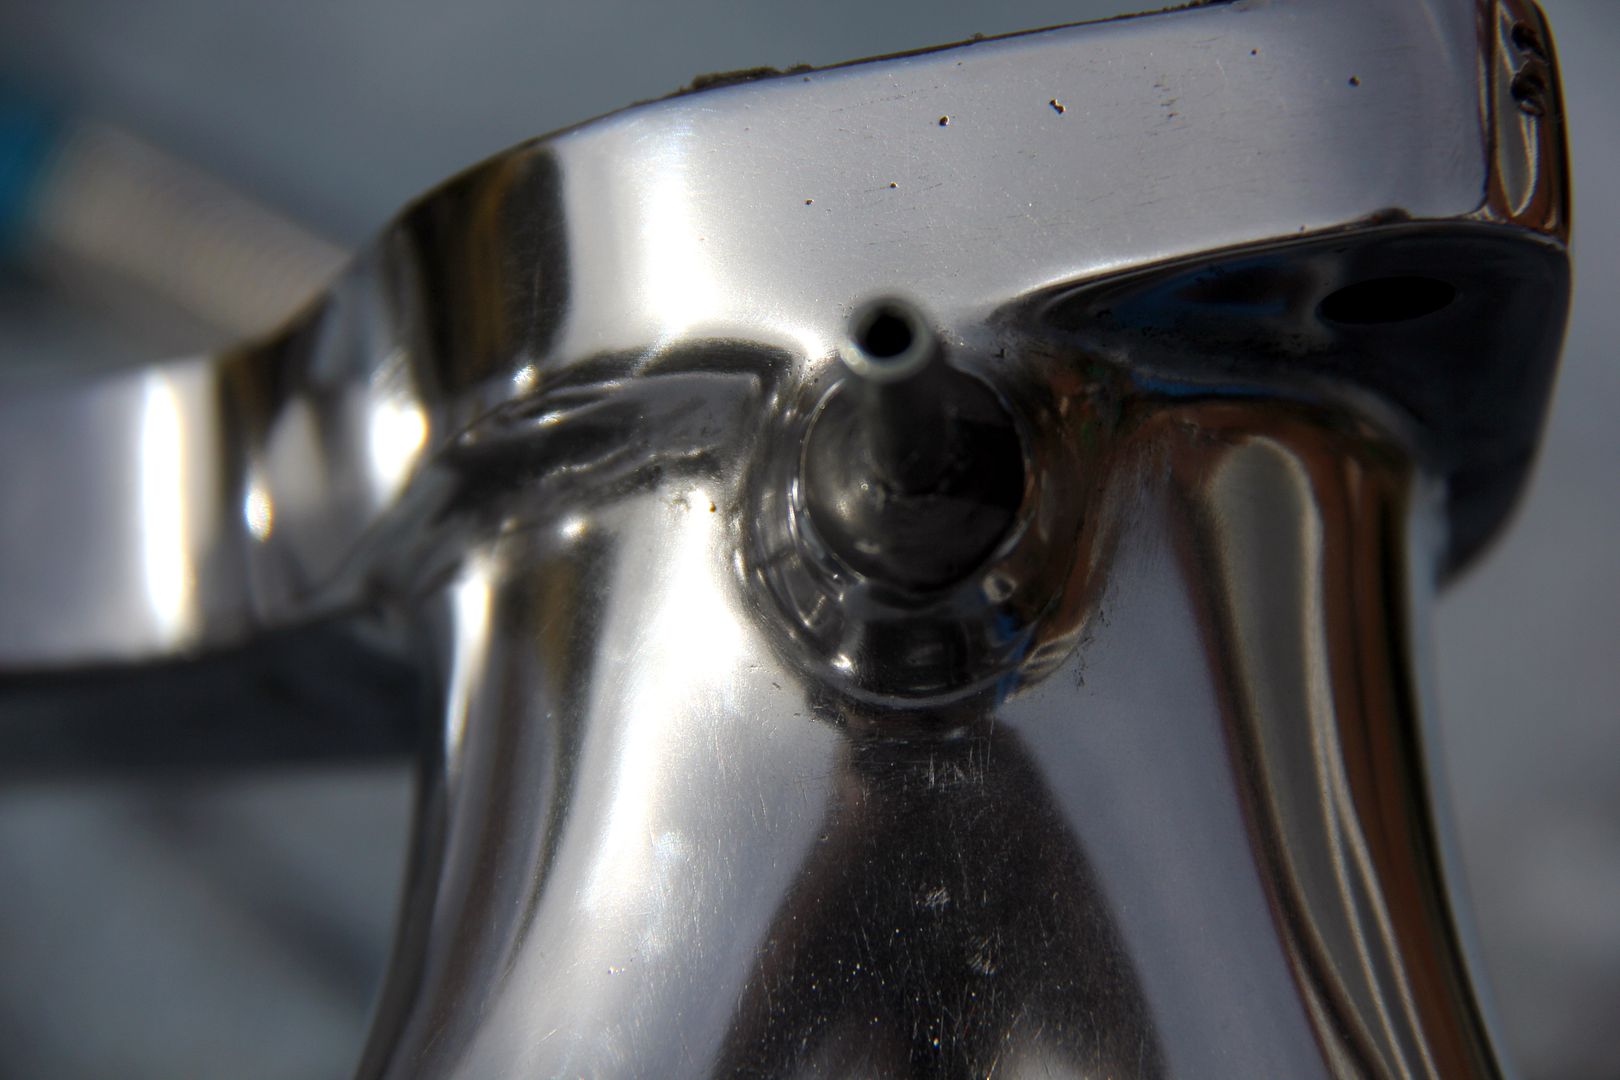
Then, all that remained was to leave the spigots in the fridge overnight to shrink them as much as possible and the application of heat to the manifold to expand that as much as possible. A few taps with a mallet and they slipped in like they were supposed to fit. Which of course they were. when they last few mm were sticking out, I applied a load of Chemical Metal and tapped them home. Obviously it's important not to get the Chemical Metal inside the spigots cos that would be a pain to get rid of. However, it all worked out rather neatly;
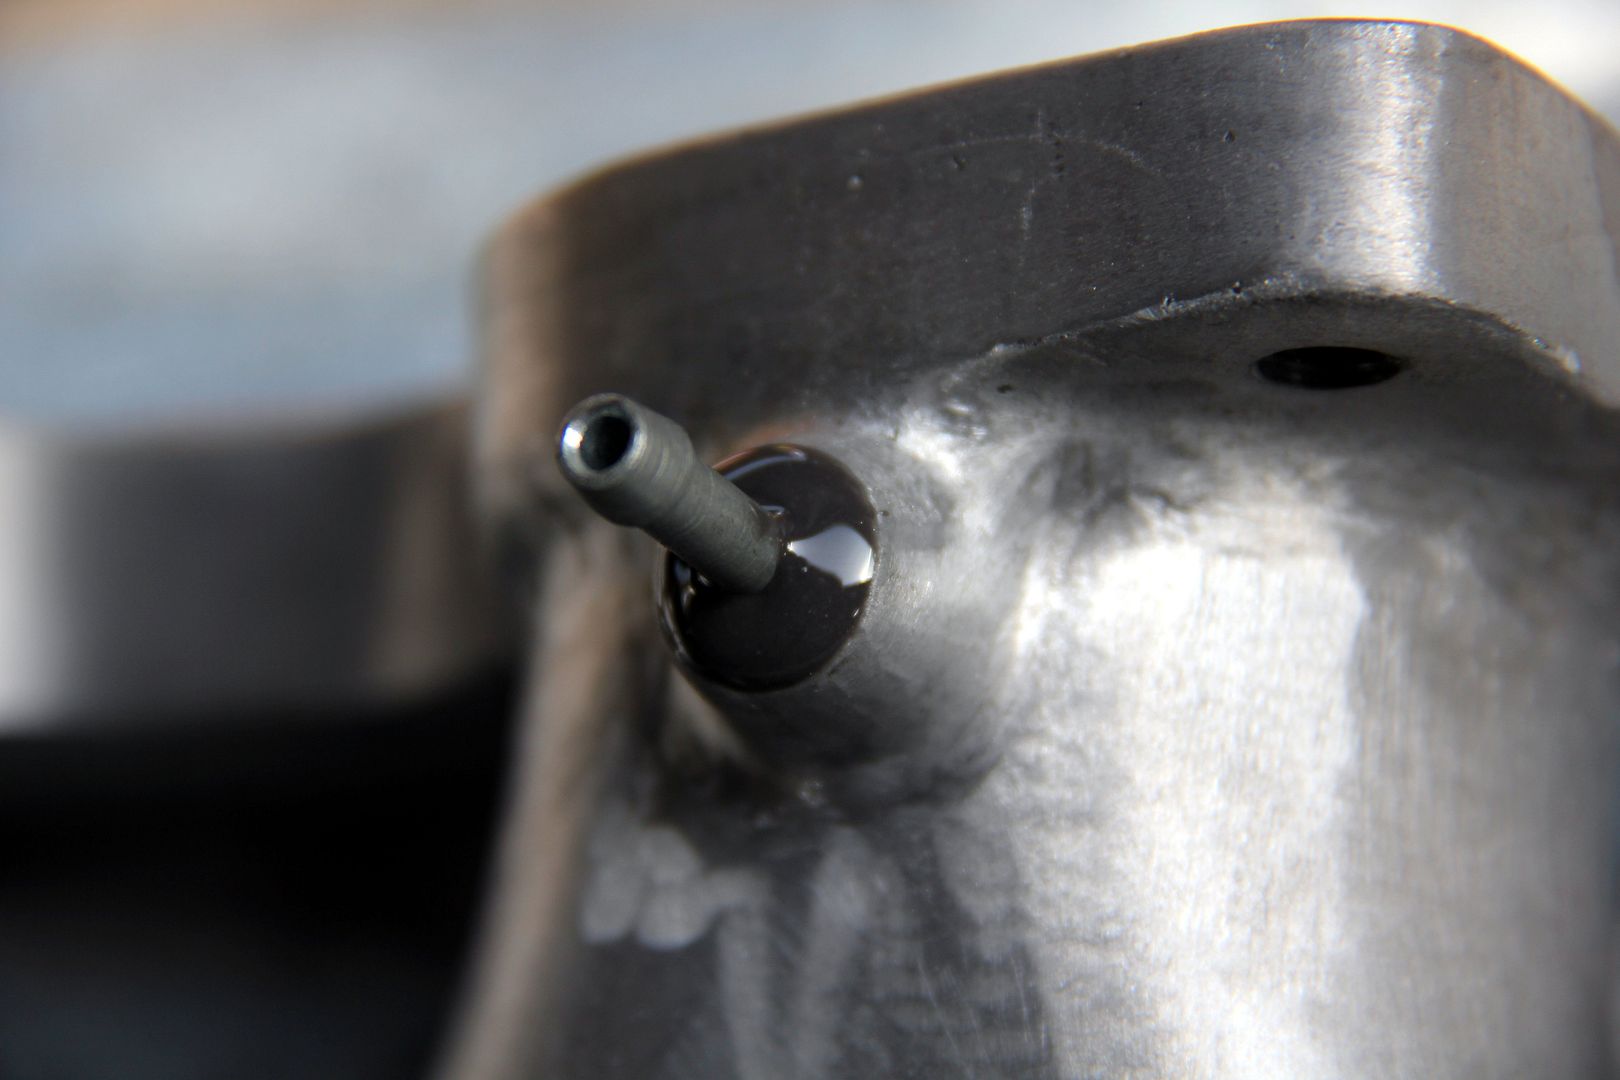
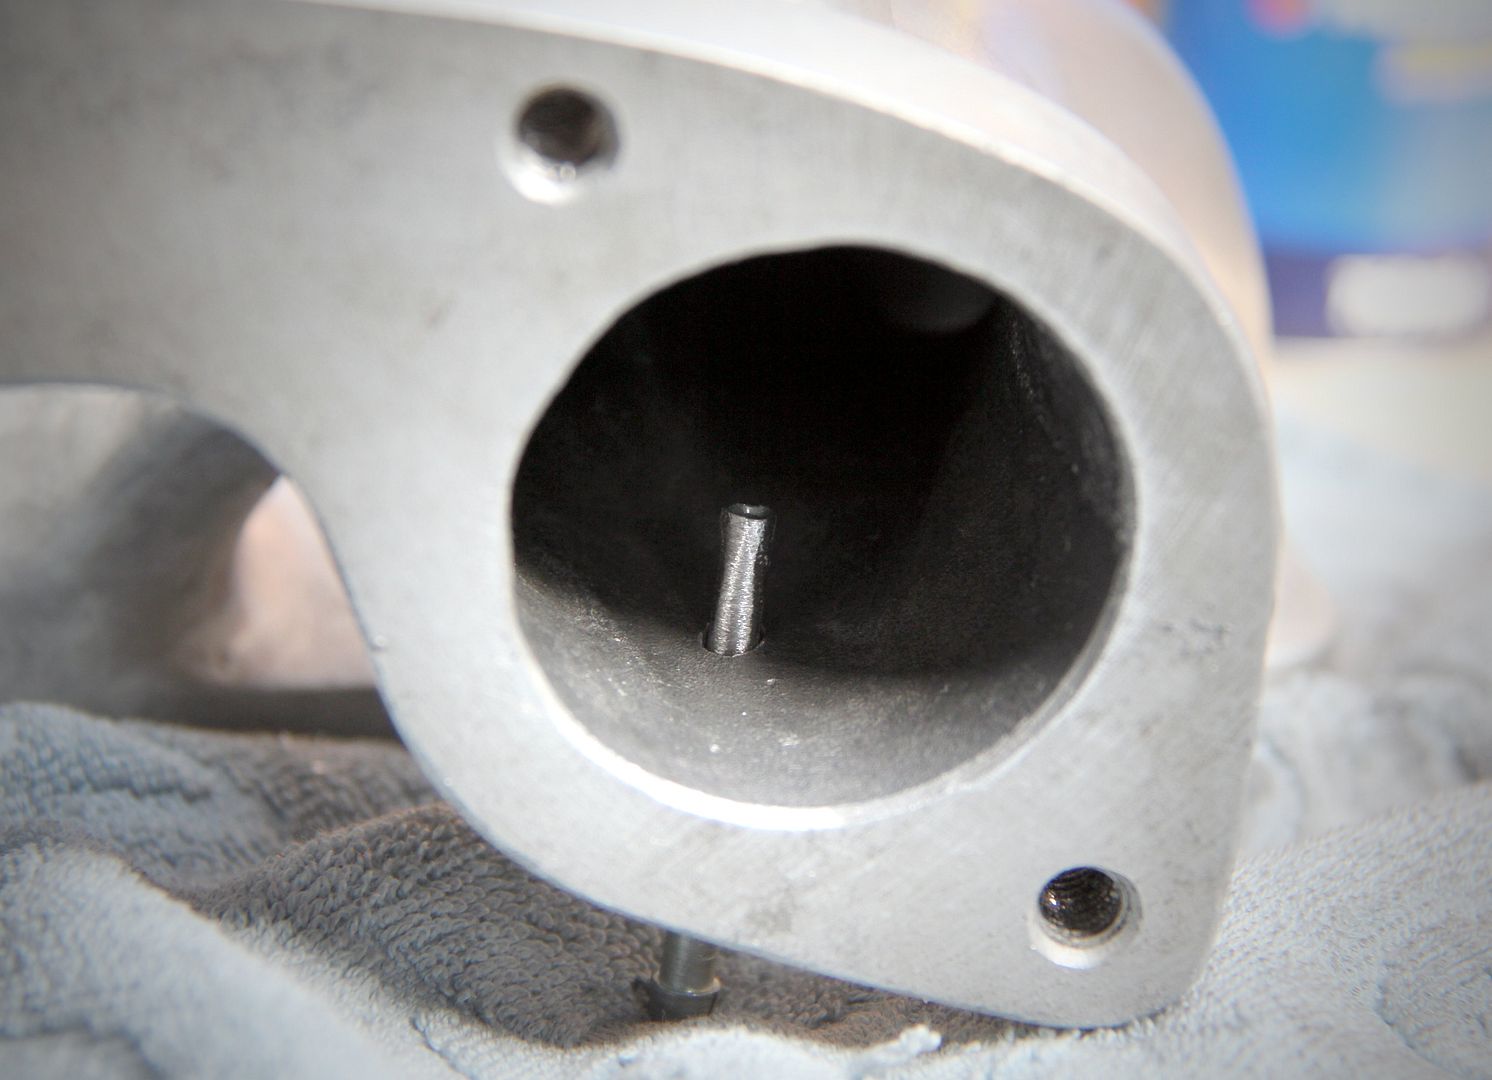
It was important to get this right, because as you can see they aren't coming out again this side of an act of God! Inside they stick out nicely into the airflow without making too much of an impediment. Much like the original ones do in the Nikki carburettor venturis, in fact. I skimmed them lightly with Chemical Metal here, too. Mostly because I'd stripped the plating off when I chamfered the barbs off, and they'll be sticking into a fuel/air mix. The last thing I want is my nice OMP spigots rusting away and dropping flakes of ferrous debris into the rotor housings! In that last photo, you can see sanding marks left by a Dremel drum sander. These contrast to the "grain" of the bulk of the sanding, and will need to be flatted back with paper. They are great at burning away lumps and bumps but are too small a diameter to sand large surfaces flat enough for polishing.
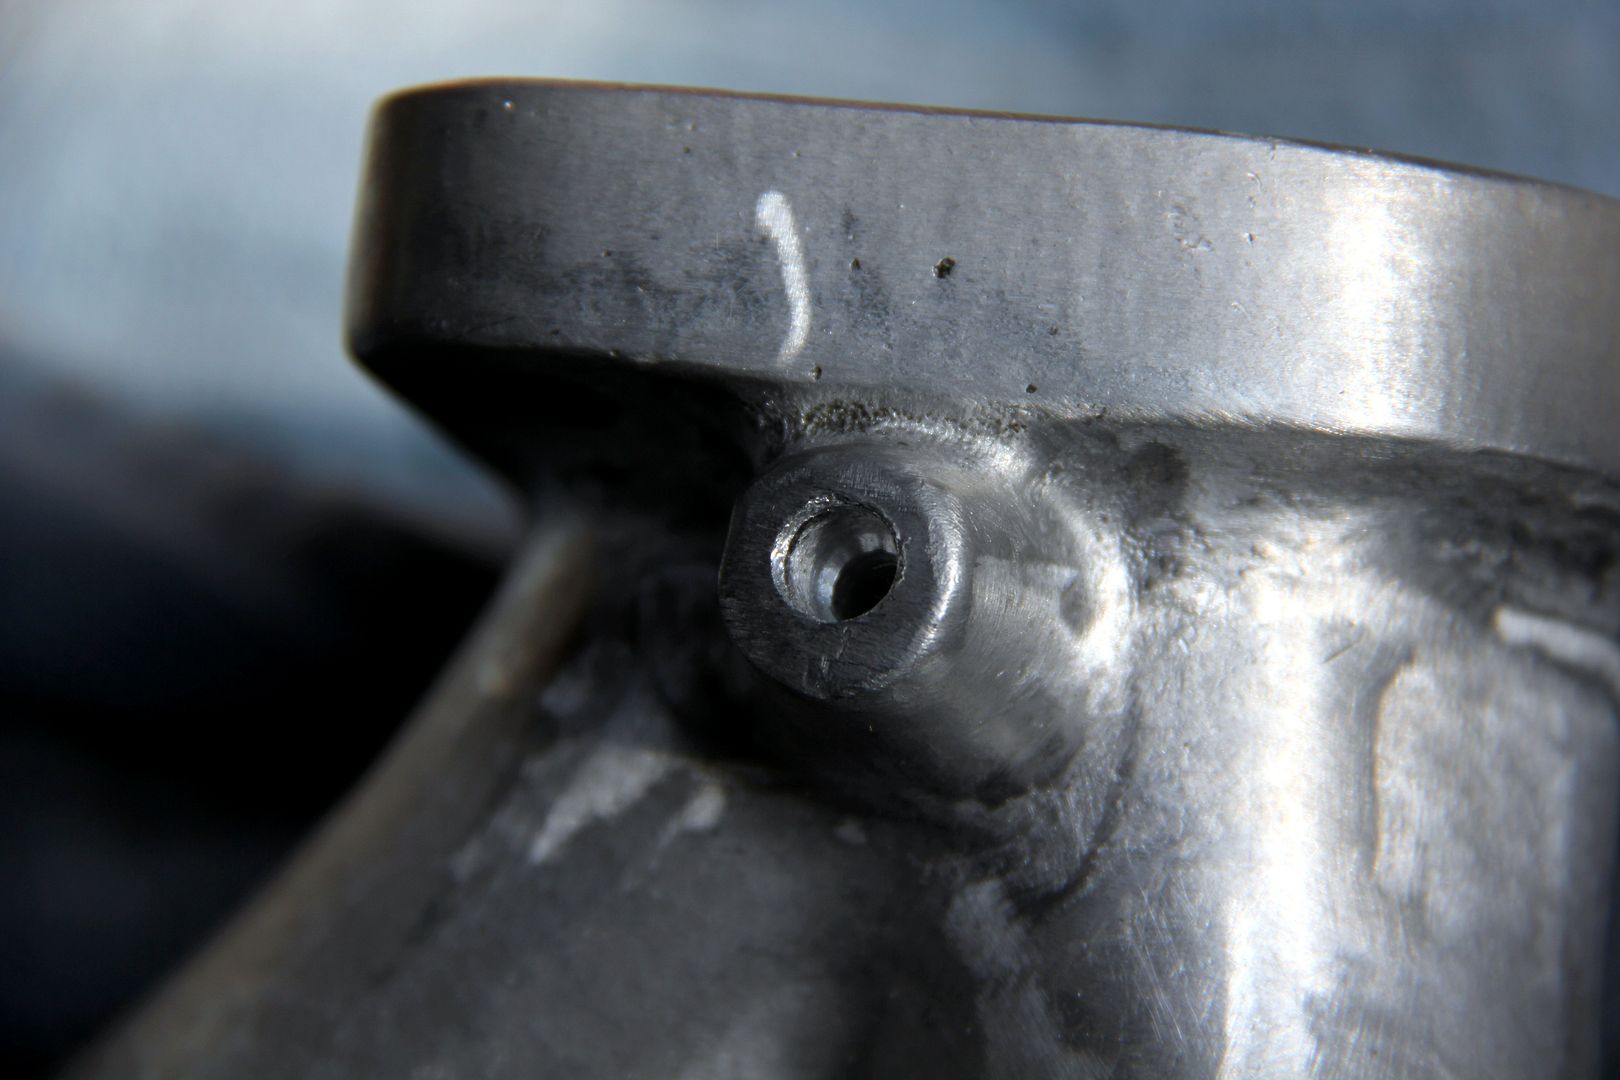
The final modification was to the other side of the manifold, and rather less of a faff. Being a nice modern car, the RX-7 has servo-assisted brakes and the servo operates under vacuum. Therefore a pipe is needed from the manifold so that engine vacuum can affect the servo. Again, the manufacturer provided a handy boss so it was simply a case of drilling a pilot hole, then working up to the correct size for the insert;
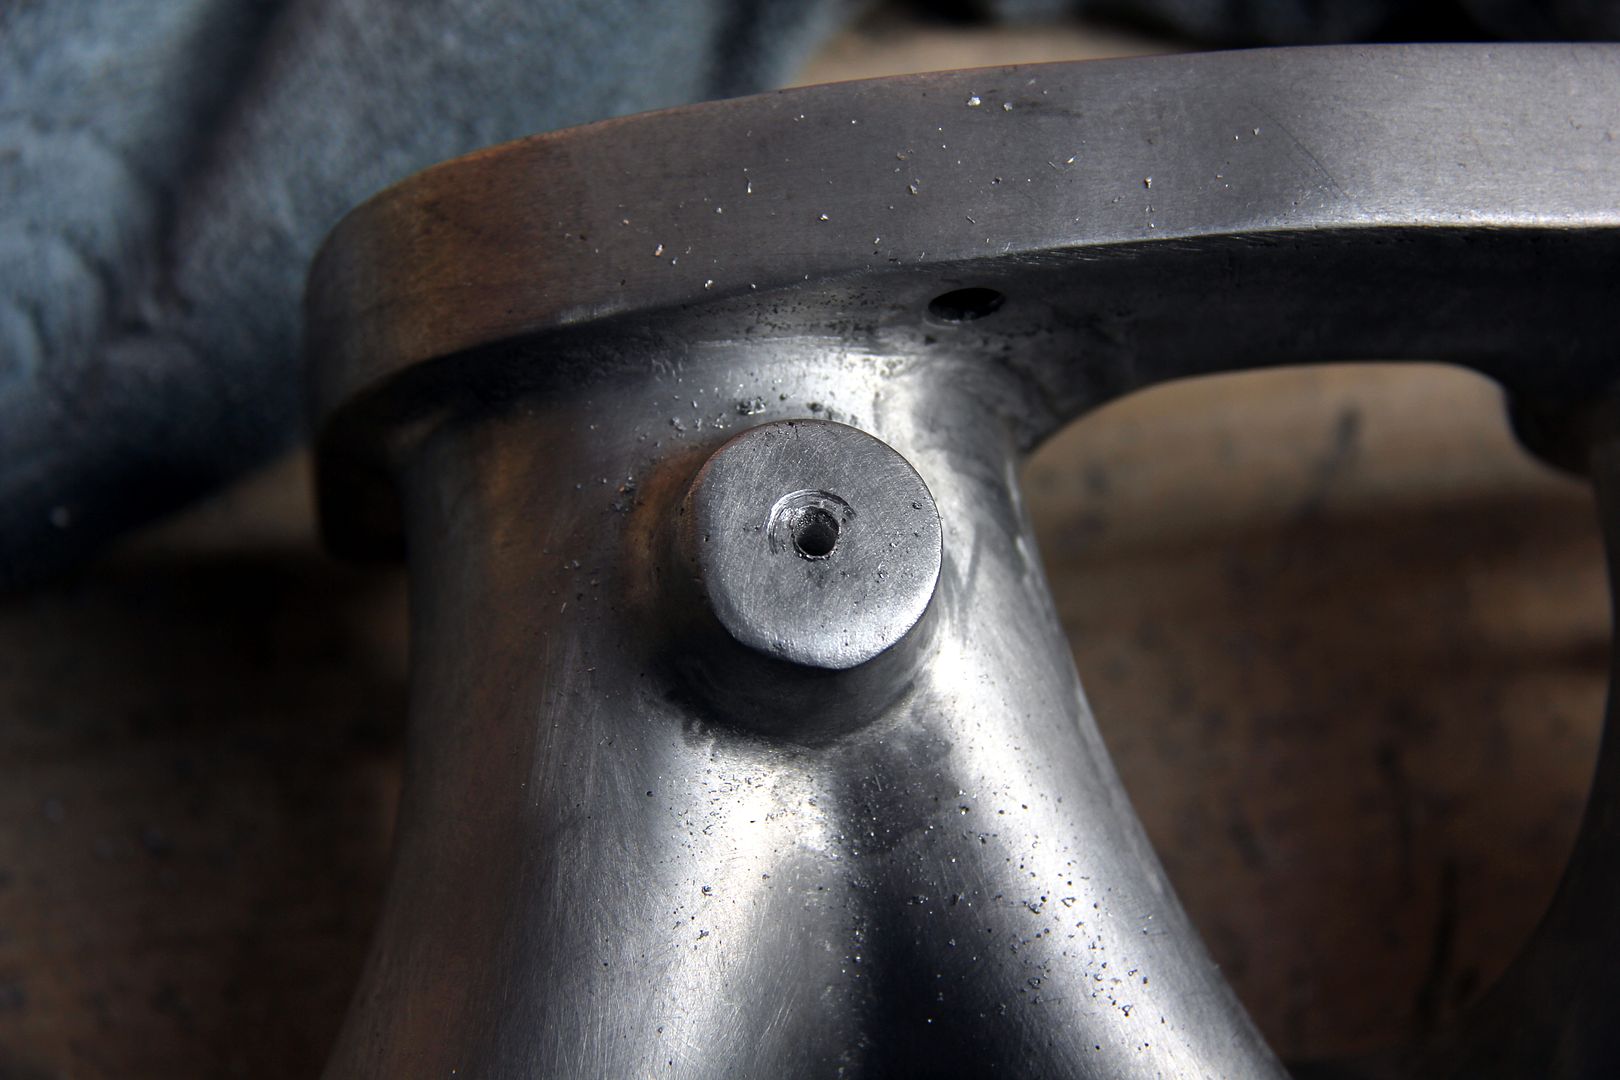
and then a tap and die finished off the job. The hosetail is a 100mm spigot mounted on an M10x1.0 thread, which is a fairly common tap size. I could have got any of the equally common ones such as 1/8th inch but the car is Japanese and metric so it seemed appropriate. If you gnaws up tapping the thread there's always the bodge....ahhhh...solution of resorting to Chemical Metal, lol

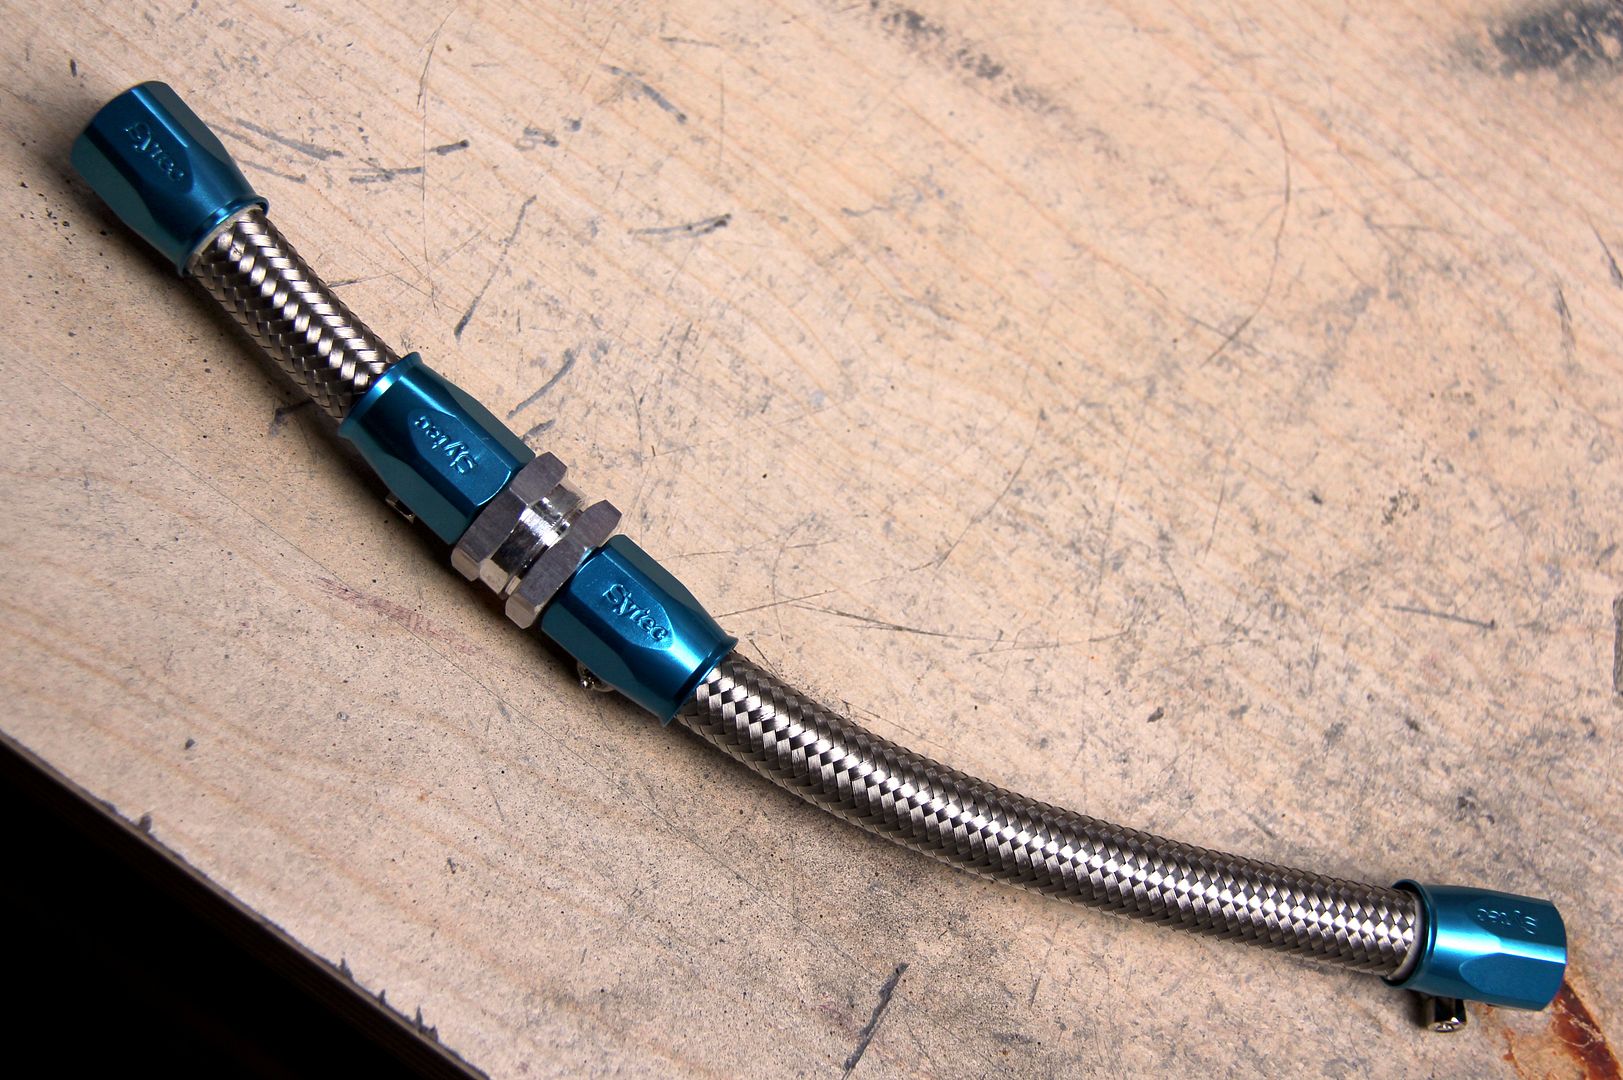
So with that in, all that remained was to make up a servo booster line. Arguably since it's a naturally aspirated car, it shouldn't need a one-way valve but Mazda saw fit to incorporate one into the original manifold (which incidentally mounts the servo line via a hideously ugly and nasty banjo fitting) so I put one into my line too. It's only a couple of quid, easy to pay for peace of mind.
Right, so with all the necessary modifications done, we can get back to the polishing without fear of inadvertently scraping a complete nightmare into our lovely work! Having done with the bulk work of 240 grit, I move onto the 400 grit paper. This is the stage where you first get to see how good your prep work has been!
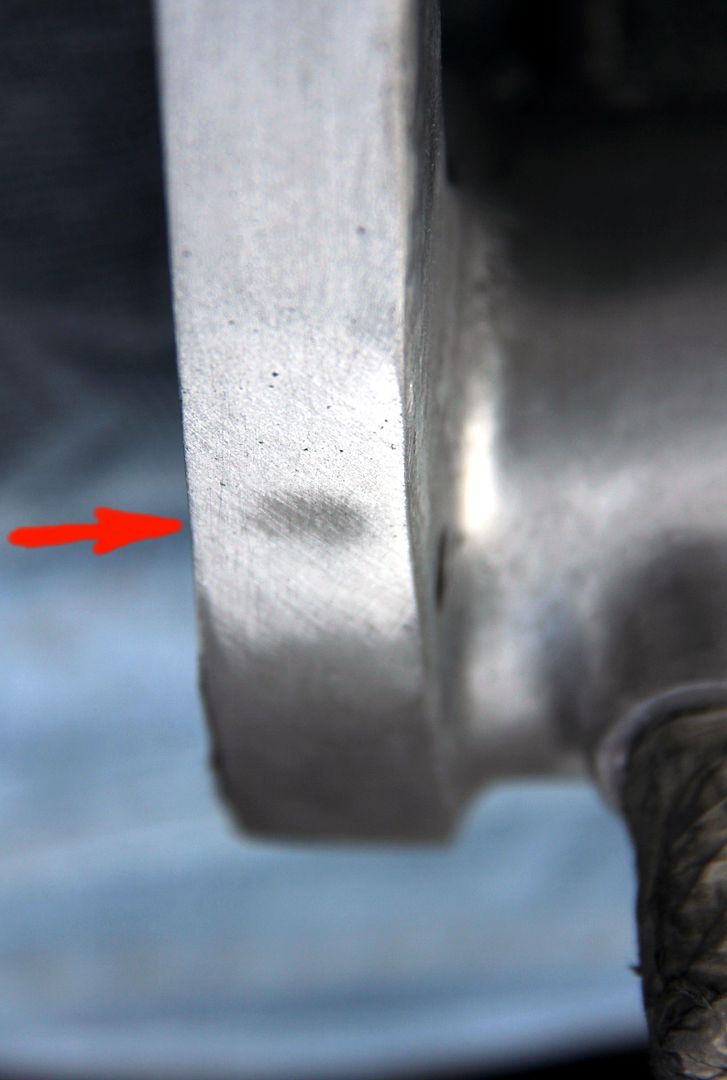
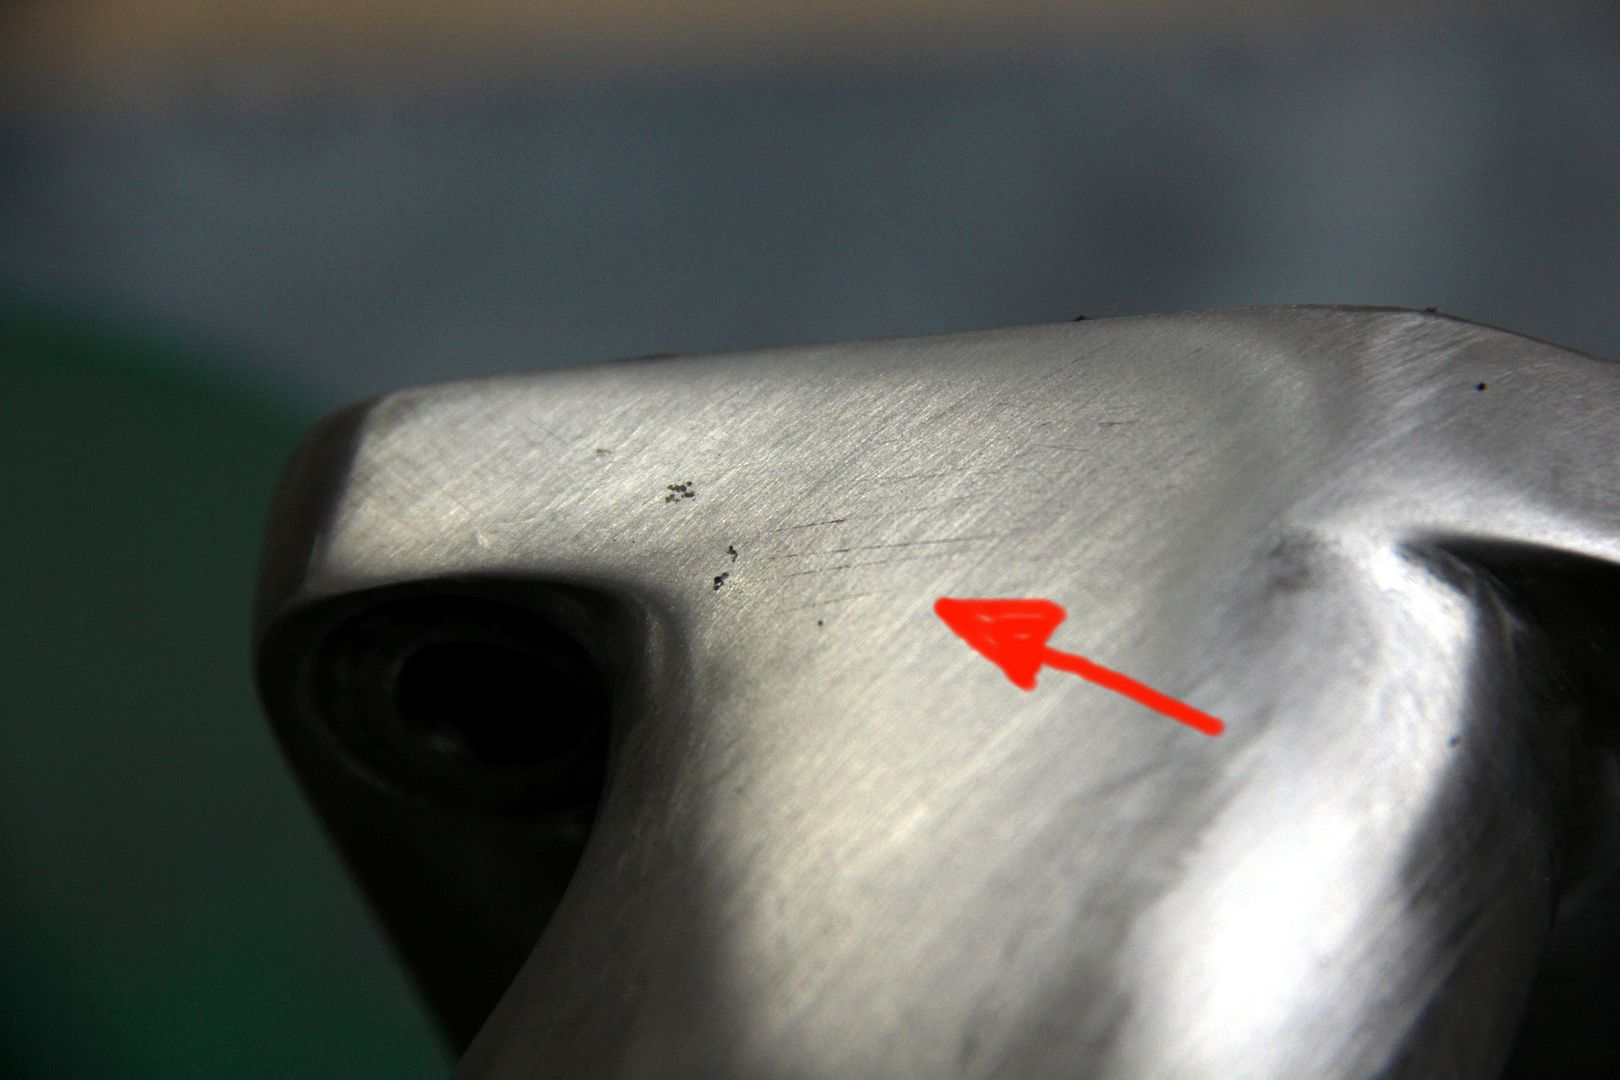
As you can see, a definite "grain" starts to emerge with sanding. This is a lot to do with the fact certain areas dictate which direction you can sand in by nature of their shape and how ambidextrous you are! Ideally a circular or criss-cross pattern would be used when sanding, but it's often not possible and the strokes all end up in the same direction. This can be both a help and a hindrance. It's a disadvantage because it can hide score-marks that go in line with the "grain" and are hidden by it at this stage. When you get to using the mops, they suddenly spring into sharp relief. However, it can be a great way of spotting flaws as well, as this next pic shows;
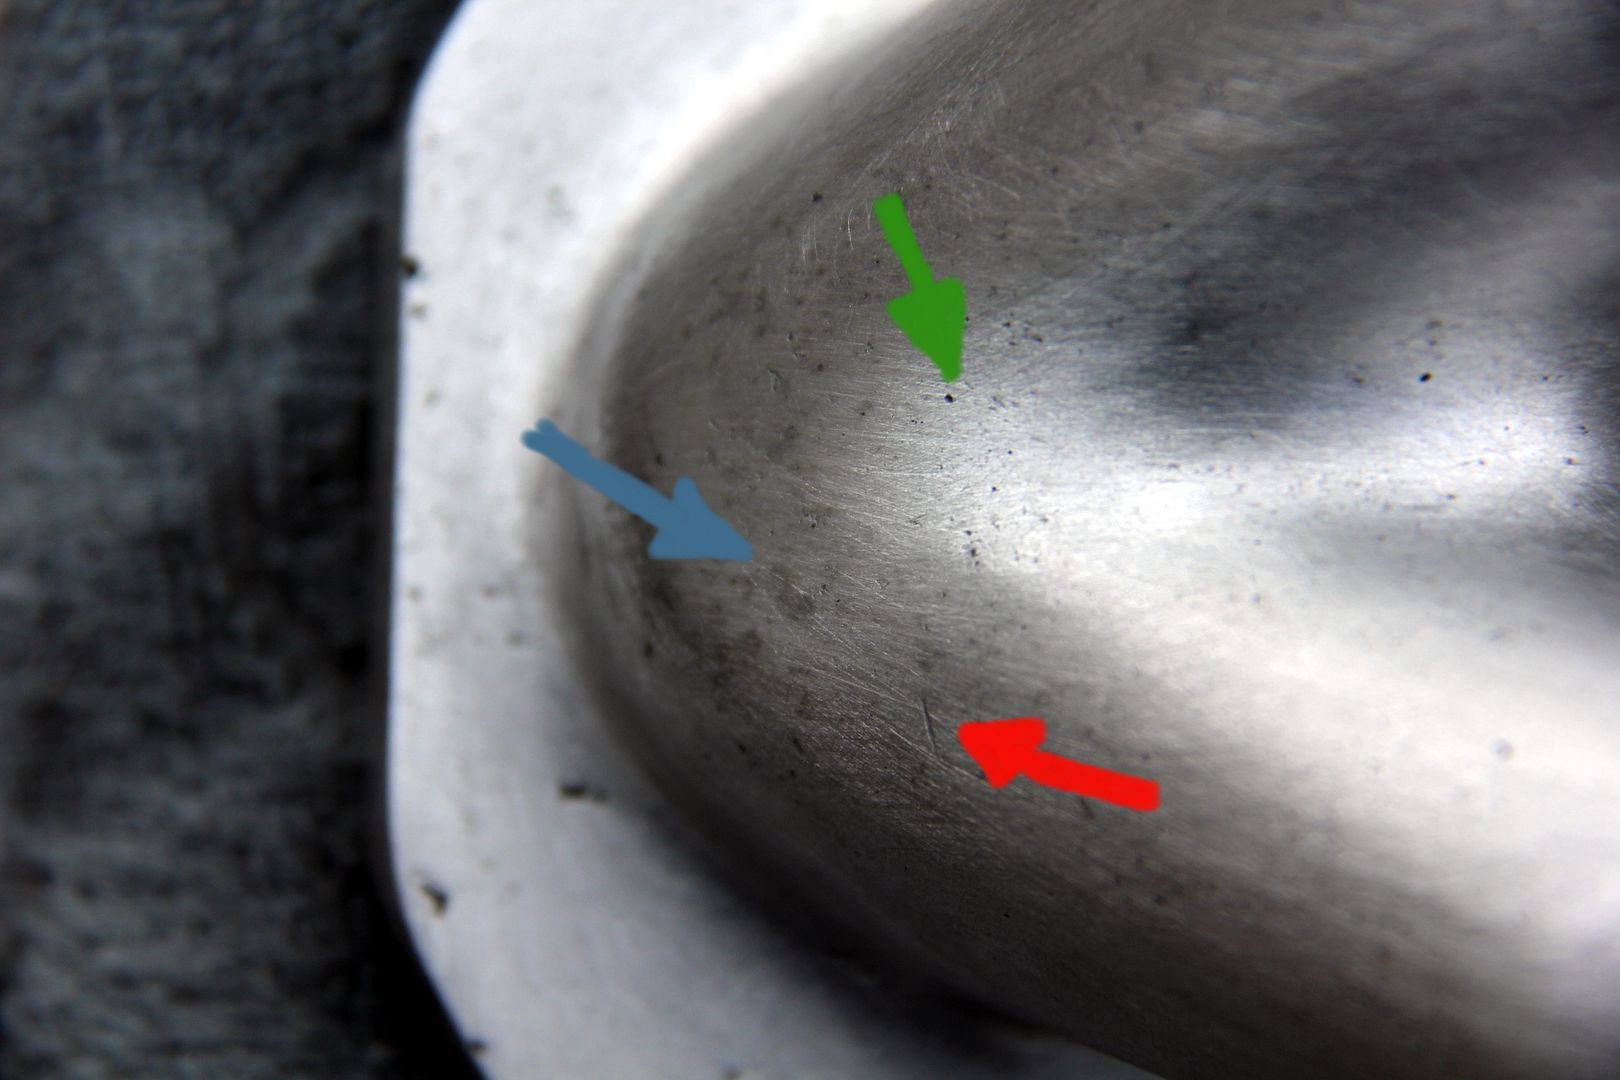
The red arrow there is a balls-up! It's a spot where the mandrel of the Dremel or the edge of a file or whatever has put a deep nick into the work. These tend to be so deep that it would take so much sanding to remove it's just not worth it, and you'll have to live with it and try not to be so clumsy in future. The green arrow is a speck left over from the casting, a tiny air bubble or lost grain of sand from the mould that has left a hole into the surface. Like many nicks, the more you try and sand them away, the worse they get. You have to live with these too, often you'll find if you try to sand them out they are actually the top of a sinus in the metal and they get worse the deeper you go! The blue arrow shows where the surface that looked smooth under 120 grit is in fact still far from perfect, and the finer grain of the 400 grit has started showing it up. You end up with these sort of "sanding shadows". At this stage you can just rub them down with the 400, or if they're particularly widespread or deep, go back to a coarser grit and start again. This is often actually the less time-consuming method.
this next pic shows how it's important to alter the direction of the sanding
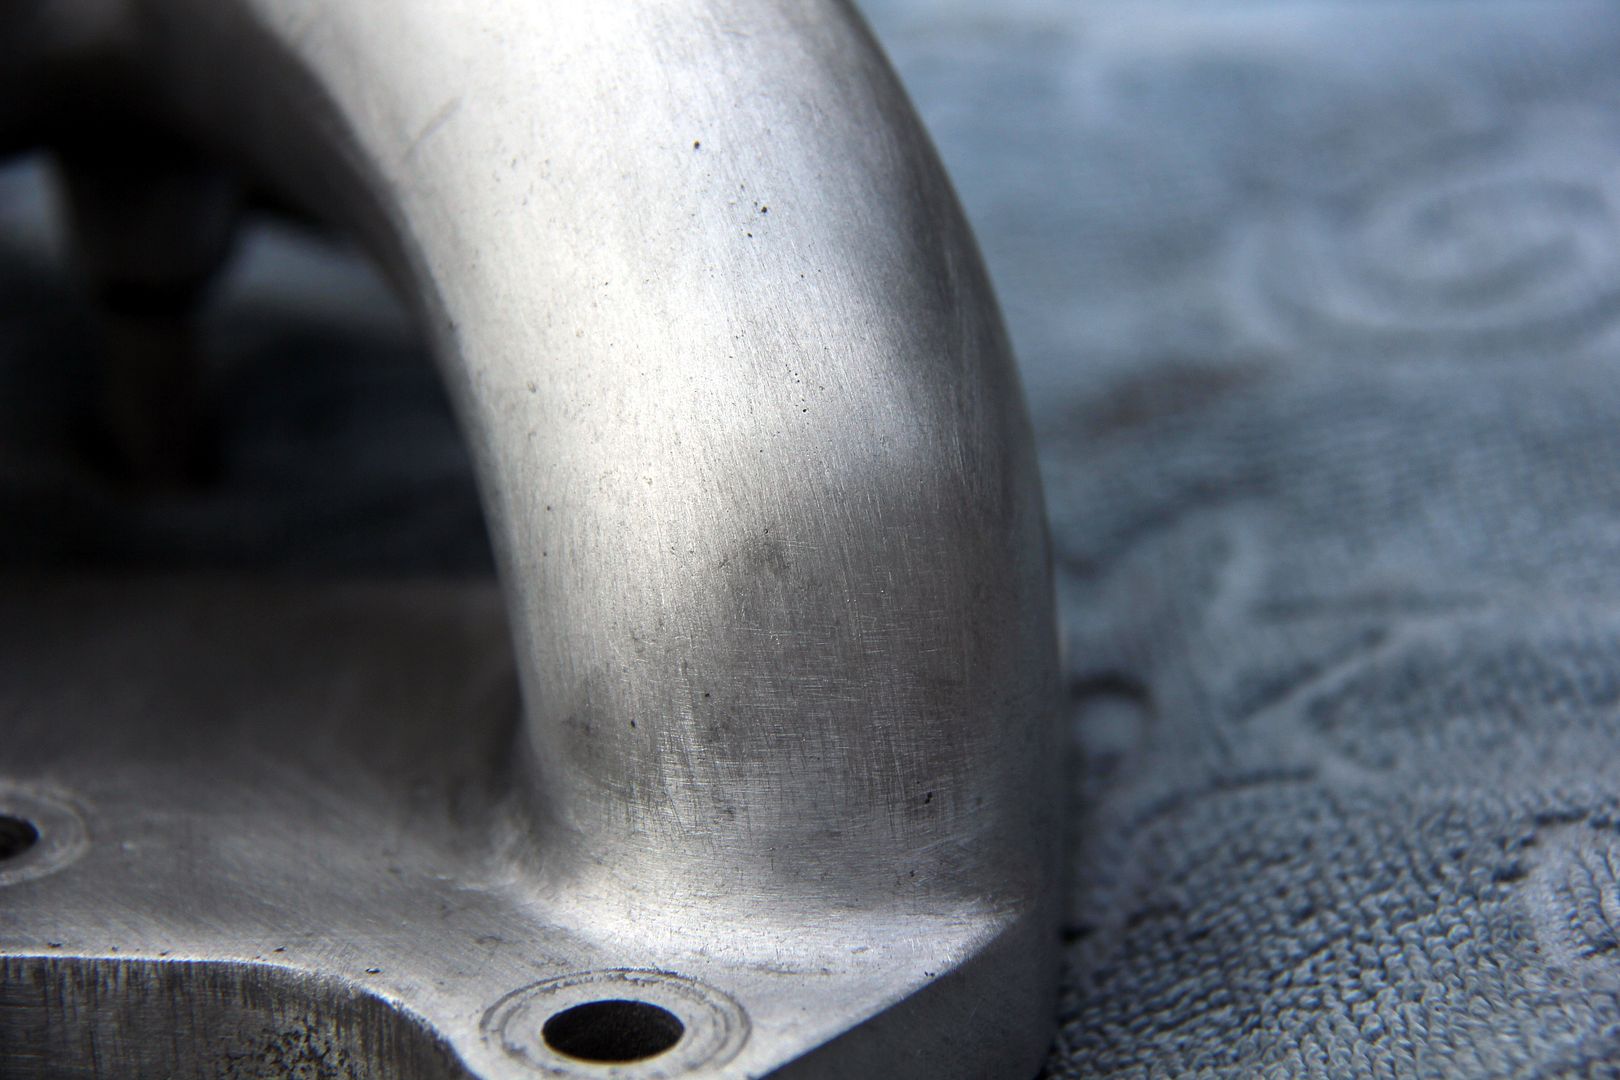
The shape of the piece her has dictated the direction it can be accessed with the paper, and there's a sort of neutral, untouched patch between the up-and-down sanding on the main runner and the circumferential sanding around the base where it joins the mounting plate. This is exactly what you want to rectify at this stage, and is the kind of thing you can miss when you use mops and abrasives. If you are using these, then try to vary the angle and pressure of the mop against the work as much as possible, and as with all the compounds, apply it to the mop little and often.
This was one of the trickiest areas to sand on the piece, and was made worse by how rough the casting was here. The 400 grit has shown up how some further coarse work is needed to remove the pitting still present
and this is another example of how the grain can reveal flaws that will ruin the final finish. This part of the mounting flange looked fine under 240 grit, but using a sanding block and 400 grit reveals there is actually quite a deep wave in the surface here. This is broad and shallow enough that it would be polished along with the true surface when we get onto the mopping stage, but it will reduce the overall shininess of the finish by reflecting light in different directions to the surrounding area. In short, you can make it smooth, but that's different to truly shiny, if that makes sense? The best solution is to use a sanding block (if possible) to smooth it completely congruent to the surrounding surface. Yes, it's a lot of work but it'll pay off in the end!
These recessed areas around the spigot bosses and under the carburettor mounting flange were the worst to get into, as you can see. The sandpaper butts up against the edges which stops it from smoothing the area properly. There's no chance of getting a powered tool in there, mops would never fit. The only thing that really works are rubber diamond-impregnated polishing burrs but these come up for sale so rarely nowadays, and are sacrificial to the work (meaning the more you use them, the quicker they wear down). They're great at getting into fiddly nooks and crannies though. Failing fluking some, the only real solution is to sacrifice your fingerprints trying to get in there with sandpaper
...but we're getting there. This is now moving on to 800 grit;
As you can see, it's now starting to get actually shiny, or at least a sort of sheened satin finish. Hope is in sight! By this point, the time you need to spend with each grit is massively reduced. Unlike sanding with 120 0r 240 grit, where you're never quite sure if you've done enough (you usually haven't!), this stage is self-limiting. You will see the surface finish change, and feel when the sandpaper stops gripping and starts gliding on the surface. It will also stop producing dust, and this is a sign that you've pretty much finished with this grit level
On really bad castings such as this, I used about four entire sheets of 120 grit, which I tear into quarters for ease of use. By the point we're at here, 800 grit, I'll probably only use a single sheet in quarters, which shows how putting the work in earlier pays off now. From this stage you could probably swap to using the polishing mops, but for myself I prefer to continue with the paper for a while. This is partially due to the complexity of the piece meaning access with the polishing mops is restricted, partially because I'd prefer sanding out in the sun to being in a dark garage getting splattered in polishing compounds.
Getting into nadgery little areas like this revetment for the mounting bolt is a personal choice as much as anything. When we get onto polishing proper, the overall shininess of the piece will lift any less smooth areas such as these, and you'll only notice they're still a bit matt if you look for them. Cynically, if I was doing this for sale I probably wouldn't bother too much with getting in here, but as this is going on my car my latent OCD wouldn't let me sleep at night knowing I hadn't bothered, so I did my damnedest to get them smooth as possible. However, you can see some file-marks left over that were just too deep for even my obsessiveness to bother with.
Those nadgery and irritating areas around the bosses are starting to get there, too;
And so on to 1200 grit! Now you're starting to see some reward for all those hours of hard work. The piece is actually starting to show some of how lovely it'll be when it's finished
Even now you'll turn up flaws you missed before, such as these filing marks left over from flatting away moulding imperfections right at the start all that time ago! The only real cure for this is to go back to coarse grit and work back up again in the affected area, and I guarantee by now there's no way you'll be willing to do this. You'll do what I did and think "sod it, that's good enough"
So now we get to the "fun" bit; mopping! In actual fact, you could have moved on to it a few grits back, but as I said, this particular piece's complexity meant it paid off to stick with sanding. Doing a nice, flat open piece you could probably switch at round about 400 grit. So, a word about polishing mops. Most kits provide all you'll need, usually three grades of mop and three of compound. Unlike the abrasive version, which are essentially sanding drums, polishing mops use a grease-based compound that's more like a cutting compound than the coarser abrasives. You'll probably end up with a range a bit like this;
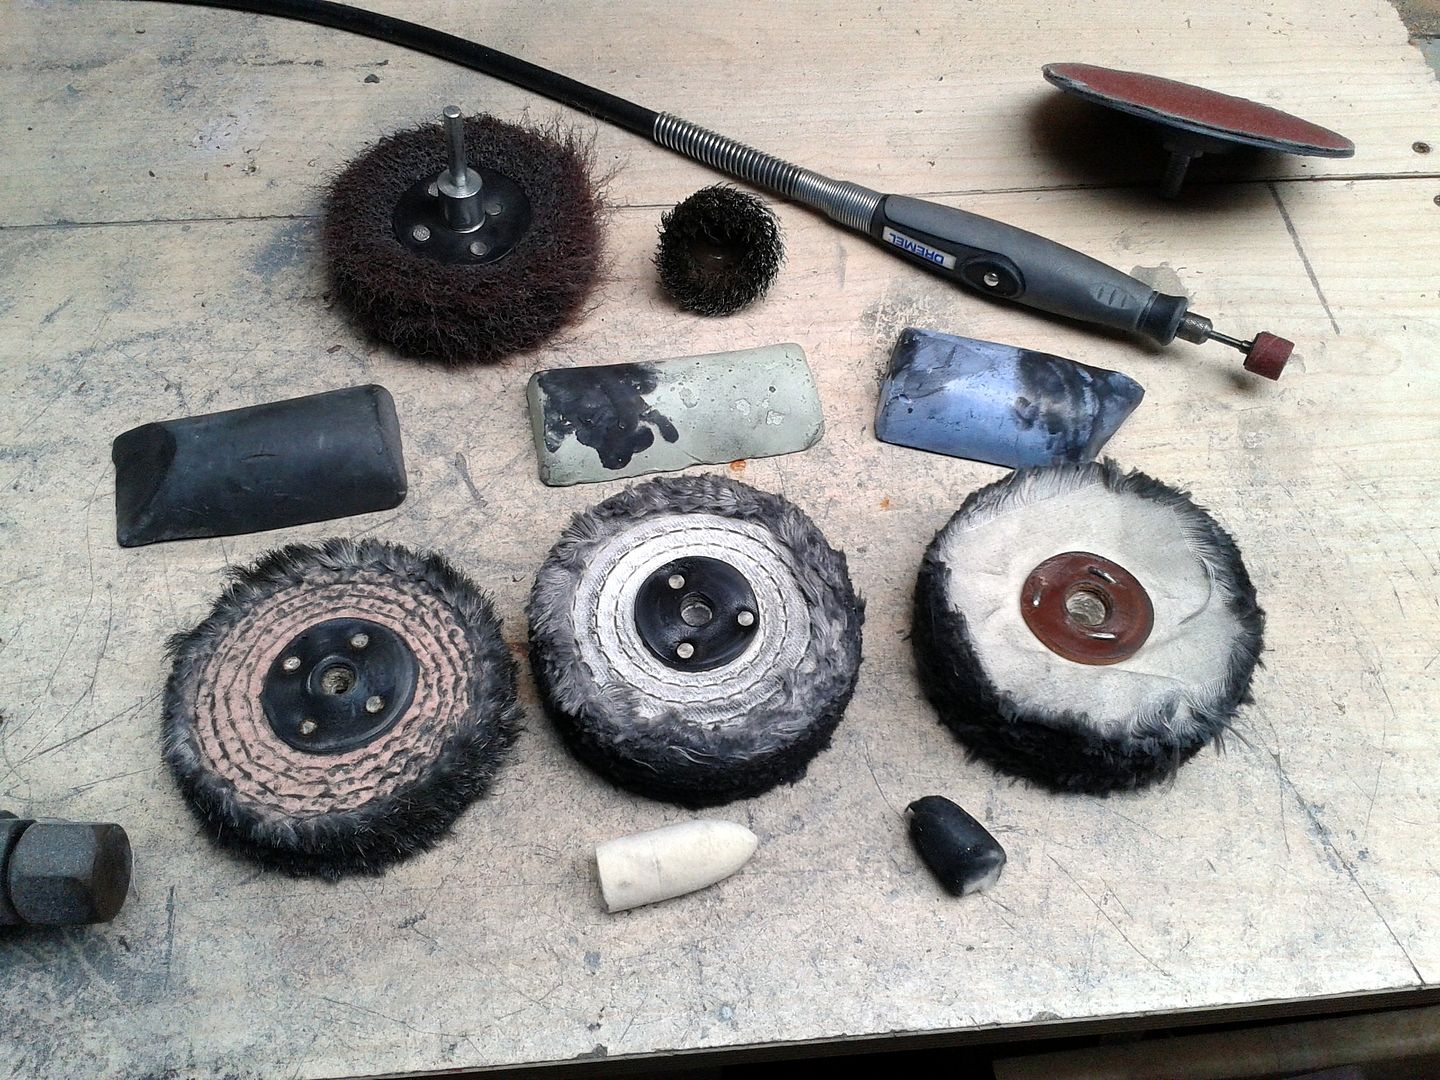
In the bottom left corner is a sisal mop with it's matching coarse compound. This will batter out swirls and scoring... to a point. On rough surfaces this is your first pass with polish, but on our example this won't be necessary because we're already past the stage it's useful. To use it on work already sanded to 1200 grit would be to actually roughen it back up. Next to it is a close-stitched mop and compound. This is the medium stage, and our first in this example. It really begins to make the surface shiny. In the bottom right corner is the final mop, an open cotton one with fine compound. This is the finishing mop, the one that makes everything beautiful. In front of these are a couple of felt bobs which are great for mounting on the pig-tail arbor and getting into small awkward spaces. They give a great finish but can be fraught to use; they tend to "catch" and it's easy to snap them by doing this. You can also get full felt mops, which also give a lovely final finish. It's definitely advisable to keep one mop per compound and not cross over because this will contaminate the mops and make everything more difficult
Mopping is easy... though it becomes better with experience. Basically, you start the mop spinning and rub the compound against it. The friction partially melts the grease matrix of the compound, applying some to the mop. You then hold the work against the mop, moving it around to cover all areas and varying pressure and direction of the motion to avoid uneven-ness. If you're ending up with black marks all over the work, you have too much compound. This is where experience comes in; learning to judge how much compound to get on the mop, and how much pressure is needed and how to move the work around efficiently. The mops have an annoying habit of "stalling" under too much pressure, and if you catch the work on the threads of the arbor it will leave horrendous gouges in it, which is heartbreaking. All you can do is try it, though, and see what works. Sooner or later the knack develops
Also in that pic are a few other useful tools that you could use in the earlier stages. The Dremel is shown with a sanding drum on the extended flexi-drive. These, as previously mentioned, are essential, but don't last long and do have an annoying habit of pinging off or snapping and firing themselves into your ocular orbit at escape velocity. You can also get Dremel polishing components; felt bobs on little arbors, They are great at getting into otherwise inaccessible areas though the compound Dremel supply is not especially great and for some annoying reason tends to come in containers that it's impossible to get the mops into. Irritating in the extreme. The best solution are genuine Dremel impregnated polishing mops, which are felt bobs already soaked in compound. They're expensive compared to the normal version, but last for ever, give an excellent finish, and are worth the price just for ease of use.
A wire brush used on a drill or grinder is a useful way of preparing the work before any other stage; it will remove loose crud and flakes of corrosion without scoring the surface too deeply. Although it goes without saying that the work should be properly cleaned and de-greased before you do anything else! Also shown is a velcro-backed rubber arbor-mounted sanding disc for a drill. These should be used sparingly; they're great on big, flat areas but I wouldn't use anything coarser than 180 grit on aluminium because it can be quite aggressive due to the speed of rotation. However, if the work allows, they're a great way of smoothing large rough patches quickly. The final item is a nylon sanding ball or disc, in this case. These can be useful making a satin finish on softer metals, or for prep work when the wire brush is too aggressive. They are essentially a scouring pad mounted on a spindle. They don't produce much real effect but can be useful for gentle prep. Be careful not to let any of these powered methods rest or catch any one area too long though; it's easy to introduce dips or waves into the work that no amount of later sanding will remove!
So, we're done. I find it best to do the nadgery bits with the little bobs and then do the broad strokes with the mops afterwards. This incorporates any directional or localised polishing effects left by the bobs into the overall lustre. And once you've been through all the compounds you end up with;
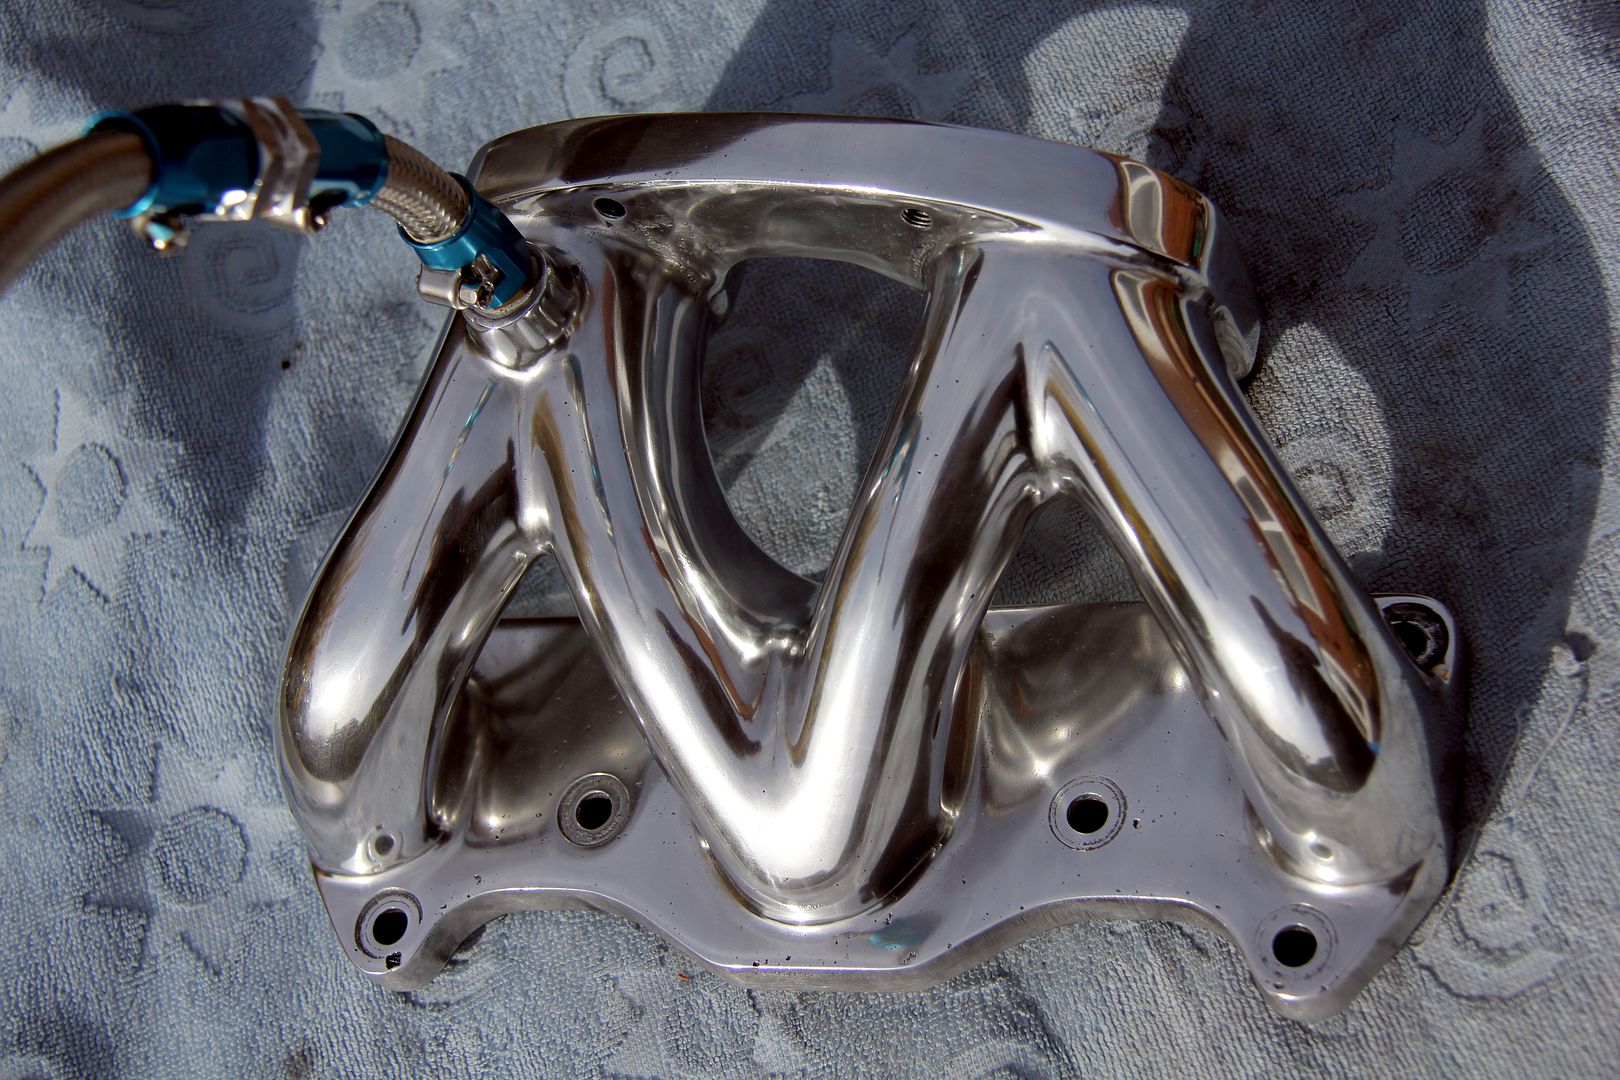
Boom! Shiny!
However, there are still a few things to point out here which may give you a further understanding of the process and see a few things that you want to avoid if at all possible;
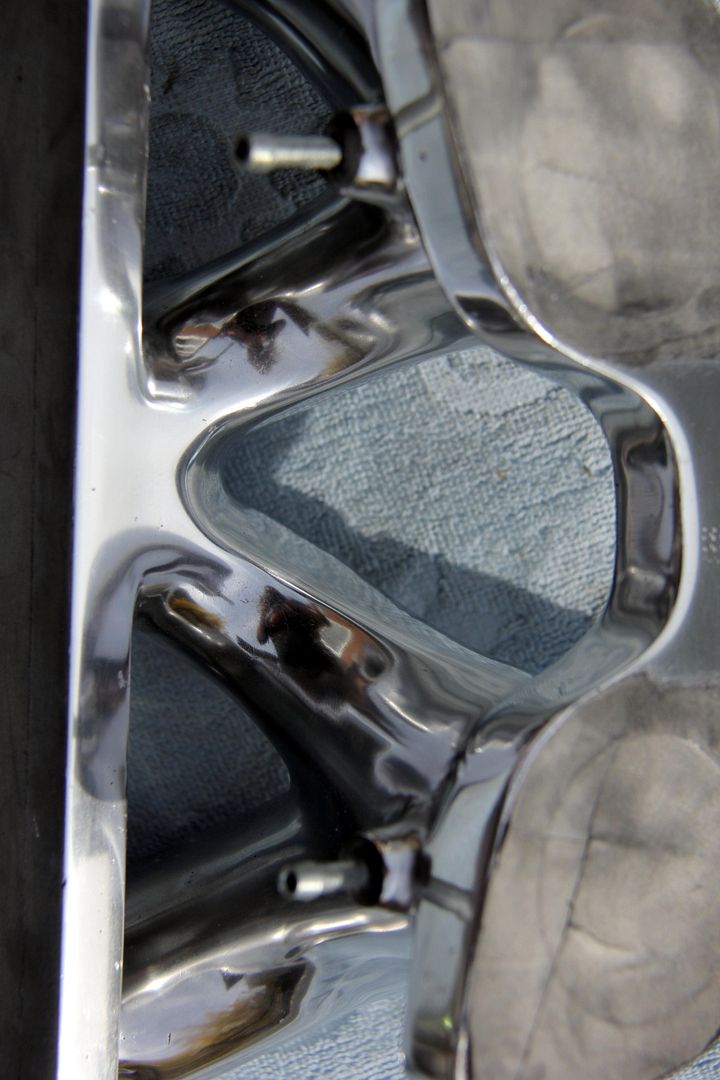
here we go: the red arrow indicates a score where I caught the work on the edge of one of the arbor threads. Yes, I swore! For this exact reason, I tend to wrap the arbor not covered by the mop in masking tape, but the thread edges are sharp when they're spinning at several zillion rpm and this is the end result. Without going back to the beginning you'll just have to write this off to experience and live with it.
The green arrow is a remainder of an original casting imperfection caused when the revetment for the mounting bolt was reamed out. Whoever did it slipped slightly with their burr, and this gouge is the result. It's too deep to have sanded out, and too acute to really polish smooth. Again, you just have to live with it. The revetment itself shows how an area can still be a bit pitted and slightly scored but look pretty shiny due to the rest of the work lifting it.
The blue arrow is some of those little bubble imperfections that I mentioned earlier; not much you can do about these either. They are all over the work, but don't actually distort the surface around them so don't really affect the overall shine very much.
The purple arrow shows the result of laziness at the sanding stage. It's a part where a wave in the surface could have been sanded out flat, but wasn't and now it leaves a shadow that the mop's can't really access. I could have been keen enough to sand it out, but it's the side of the flange that's almost against the bulkhead and so will be invisible when mounted up. So I can live with it
So, those are some of the flaws you'll almost inevitably carry through right to the finish. As with anything, you could reduce them if you have time and patience to burn, but most polishing is a compromise between what you want and what you're willing to put into it. Sadly, there really are no shortcuts in this and the quality of the finish is directly proportional to how much work you put in. However, if you cast your mind back to how gnarly and unpleasant the item we started with was, I think you'll agree that the end result is well worth a bit of elbow grease and time

And just to finish, for contrast, a before-and-after;
thanks for reading, and feel free to add any tips or pearls of wisdom you might have acquired yourself!
now, go away
Cheers, Nik
sooooooooo...
What with the weather being quite nice... well, it's not been raining 24 hours a day, for a change... I've been sitting out in the garden enjoying the rays and slightly furtively polishing my manifold. Errrrrm, no, that isn't a euphemism for anything. I've really been polishing my manifold. So I thought this would be an ideal opportunity to do a quick How To cos if you've never tried it, metal polishing can seem a black art. In actual fact, it's simply graft and a bit of tedium but if you have a bit of time, amazing results can be had with little expense and much application. Still, I do get asked about it quite a bit, so hopefully this thread will answer any questions suitably!
So, first you need something to polish. Exhibit A for the prosecution;

This is an intake manifold for a 12A rotary engine. It mounts a 48IDA Weber downdraft carburettor. It's of unknown make and provenance as it came with a spare engine I bought by accident on eBay (OK, I was a bit drunk) but I think the dude said he'd got it from Aus. Anyway, it's pretty representative of small-volume castings... rough, and very unfinished.

As long as it does what it needs to, i.e. provide somewhere to hang your carburettor from whilst offering holes to move fuel-air mix from one point to another, there's absolutely no percentage in the manufacturer spending time (which equals money) making it pretty and smooth. Hence you end up with huge ridges and lips where the two sides of the mould don't quite match properly (possibly through much use and wear). You can see this problem pretty clearly in the cleft where the two central intakes merge;

In addition the casting process leaves a very rough surface. This shows pretty clearly here, along with another ridge caused by miss-matched moulds;

In fact, the mould even retains lumps and bumps from where the original pattern part was welded up and the welds weren't dressed back, passing on their irregularities to every casting thereafter. This manifold is, in short, nasty. I wasn't even going to use it until I realised my original carburettor solution wasn't going to fit due to the inconvenience of a brake servo in the way. With this setback in mind and stuck with the Weber route, I decided if I had to use the manifold it was at least going to have to look a hell of a lot better than this. So, where to start?

Well, with castings as bad as these you really need to get brutal on them initially. The lips and ridges of miss-matched moulding make for a great alliteration but unsightly polishing, so getting rid of those is the first stage. A hand file is as good as anything, although be cautious with these. Don't use anything too coarse because especially on a soft metal like aluminium it's very easy to put deep score marks into it that you will seriously regret later in the process. The problem with this particular piece is the intricacy of it; there are plenty of nooks and crannies and blind areas where it's impossible to get power tools in so a lot of the initial donkey-work had to be by files.
With that said, there are a few powered devices that can make it easier. A Dremel (other proprietary brands of rotary tool are available) is essential really, especially with an extended flexi-drive. You can get little 8mm barrel-shaped sanding papers for them, which don't last long on metal this rough, but are ideal for those hard-to access areas. If the piece has a slightly less restrictive layout then one of these is a godsend;

A Black and Decker Powerfile is basically like a hand-held linisher, with a sanding belt running on a narrow extended bed. You can get anywhere from 40 to 800 grit sanding belts for it.... 40 will be far too coarse for alloy though. I don't use anything coarser than 120 grit personally because you're running the risk of putting score-marks into the metal that you'll be cursing later (more on this later). Likewise, I'd advise against using a grinder with sanding or flap discs; it's just too aggressive. Fine if you're polishing steel, but not on alloy.
Really at this stage what you're going to be using is good-old fashioned sandpaper. In my experience, aluminium oxide paper works best, used dry... it makes a lot of dust so breathing apparatus or at least a paper mask is advised. I tend to start with 120 grit, which does a lot of the real work of smoothing the roughness of the casting. This is not really polishing. Not yet. At this stage we're trying to get the surface as smooth and uniform as possible, which means getting rid of all the weld blobs, the ridges, the ripples and bobbles of the casting process. Which really leads us onto the question;
what actually is polishing?
Seems an odd question to ask this far in, but it's worth taking a minute because it makes what we're doing easier to understand. Basically, a surface reflects light. If it's metal it reflects quite a lot of light. If it's rough metal it reflects it in all random directions and intensities. This is because the light bounces off all the little surface imperfections and scatters, breaking up its cohesiveness. The smoother we make the surface, the more "together" the light stays as it reflects. When the surface is perfectly smooth it'll reflect all the light back more-or-less as it arrived. We call this phenomenon "a reflection". And when I say smooth, I don't just mean free from all the bobbles and warts like on our casting above. The flatter the surface the better, too, so we don't want gradual depressions and ripples in it either... more on this later, too.
If possible, we'd be using a sanding block because this will highlight waves as well as obvious imperfections. Clearly on our example manifold, this isn't really feasible due to all the damned curves. Anyway, this is how it ends up after plenty of filing, then a couple of hours sanding with first 120 grit paper, then 240 grit;

As you can see, it's still pretty un-shiny but there's a lot of progress here. The horrible ridges across the mounting backplate have been filed flat, as have all the mould lines around the actual runners. Plenty far to go! What we're looking for is a consistent satin finish all over without any rough bits or suspiciously shiny patches (these tend to be bits that are "low" to the overall surface and aren't being touched by the sandpaper). At this point you can try something a bit different and employ a mop and abrasive if you have them. A mop is simply a cylindrical fabric item that mounts onto a bench grinder (or a drill will do if you don't have a grinder) like this;

If at all possible, you need a grinder rather than a drill. This is because the drill requires at least one, preferably two, hands to operate it. The grinder leaves both hands free. If you use a drill you therefore either need a secure drill stand to mount it to or a means of clamping the work down to a bench. This has drawbacks such as risking damaging the work, plus it's a lot easier to move the work around against the mop rather than the mop around the work.
So, let's say we've got our bench grinder set up; what is this mop all about? Abrasive mops are different to polishing ones; they're a lot rougher, made from sisal string or similar and you apply what is basically a grinding paste held in a hard grease-based matrix to the mop as it spins. This essentially acts as a spinning sanding disc and will do the job of all those hours (and fingertips) sanding away with ally oxide paper. The drawback is it's not such a minutely controllable process as doing it by hand... there really is no substitute for feeling what is happening with the work as you go. It's also filthy; genuinely, horribly filthy. If you don't wear eye protection and breathing masks then expect to be blind and die from Miner's Lung at a very early age. Even with eye protection you'll end up looking like you've overdosed on the guy-liner and are on your way to a Sister of Mercy gig.
The advantage is that it's a hell of a lot quicker by some order of magnitude than hand-sanding, and an awful lot easier in terms of calories expended. In our case, the complexity of the work means we're stuck hand-sanding. But hey, we've got our MP3 player on, the sun is out and we're sitting in the garden with a glass of cider enjoying losing ourselves in the work for a while! At this point, it's almost impossible to do too much work. When you think you've done as much as you need with the 120 and 240 grit, you haven't. Do some more! Just listen to one more album on the MP3 player before you pack up for the day. This really is the stage that defines how good the final product will be, and if you skimp on the elbow grease now, it'll show on the finished piece.
However, there's been too much talk and not enough pics here recently, so we'll have a little tangent now for light relief. In the case of our example manifold, it was at this point I realised that the ports on it didn't match the engine, as they were "short ports" for the centre plate and the engine was "tall port". I therefore took it to my local rotary expert workshop to get them to machine the ports. If any work like this needs doing, you're obviously better off doing it now before the polishing really commences. The obvious reason is that should the tuner slip with a carbide burr cutting the ports (or whatever remedial work is necessary) then they've just drawn an etched line across your hours of hard work and you'll cry tears of blood all the time you're polishing it back out.
As this work had been done, I thought it best to perform the home modifications that were needed as well, for similar reasons. This involved inserting these little doobries into the manifold;

Rotary engines lubricate the apex seals of the rotor by injecting oil directly into the housing (those who know about all this can pop off and get the kettle on for a minute). There's no other way of getting the oil to them; the other seals can get their lubricant via jets through the eccentric shaft, but the apex seals are stuck out there on their own. On the older 12A engines such as this one, there is an oil metering pump (or OMP) that injects engine oil up to the carburettor via a couple of 5mm lines. The spigots that these lines feed to are inserted through the wall of the carb into the venturis. Now, I was reluctant to drill holes into my new and rather expensive Weber and since the unsung Australian artisan who made this manifold provided bosses cast into it for the purpose, it seemed easiest to use them. Hence the little steel inserts, which I got from a hydraulics supplier. No-one seems to make proper threaded hosetail inserts small enough. So, first step was a suitable hole;

The hole through to the venturi is the right diameter for the spigot, then I drilled a larger diameter concentric half-way into the boss. This allows the ridge halfway along the spigot to socket into the boss. The only trouble is that the spigot had a barb each end, which meant if the hole was drilled to accommodate that, the main body would be too loose, but if the hole was drilled for the main body then I'd never get the barb through. The answer was simple, and another use of the Powerfile...

...quickly had one end bereft of its protuberance and ready to slip neatly into the waiting orifice. Oooer.

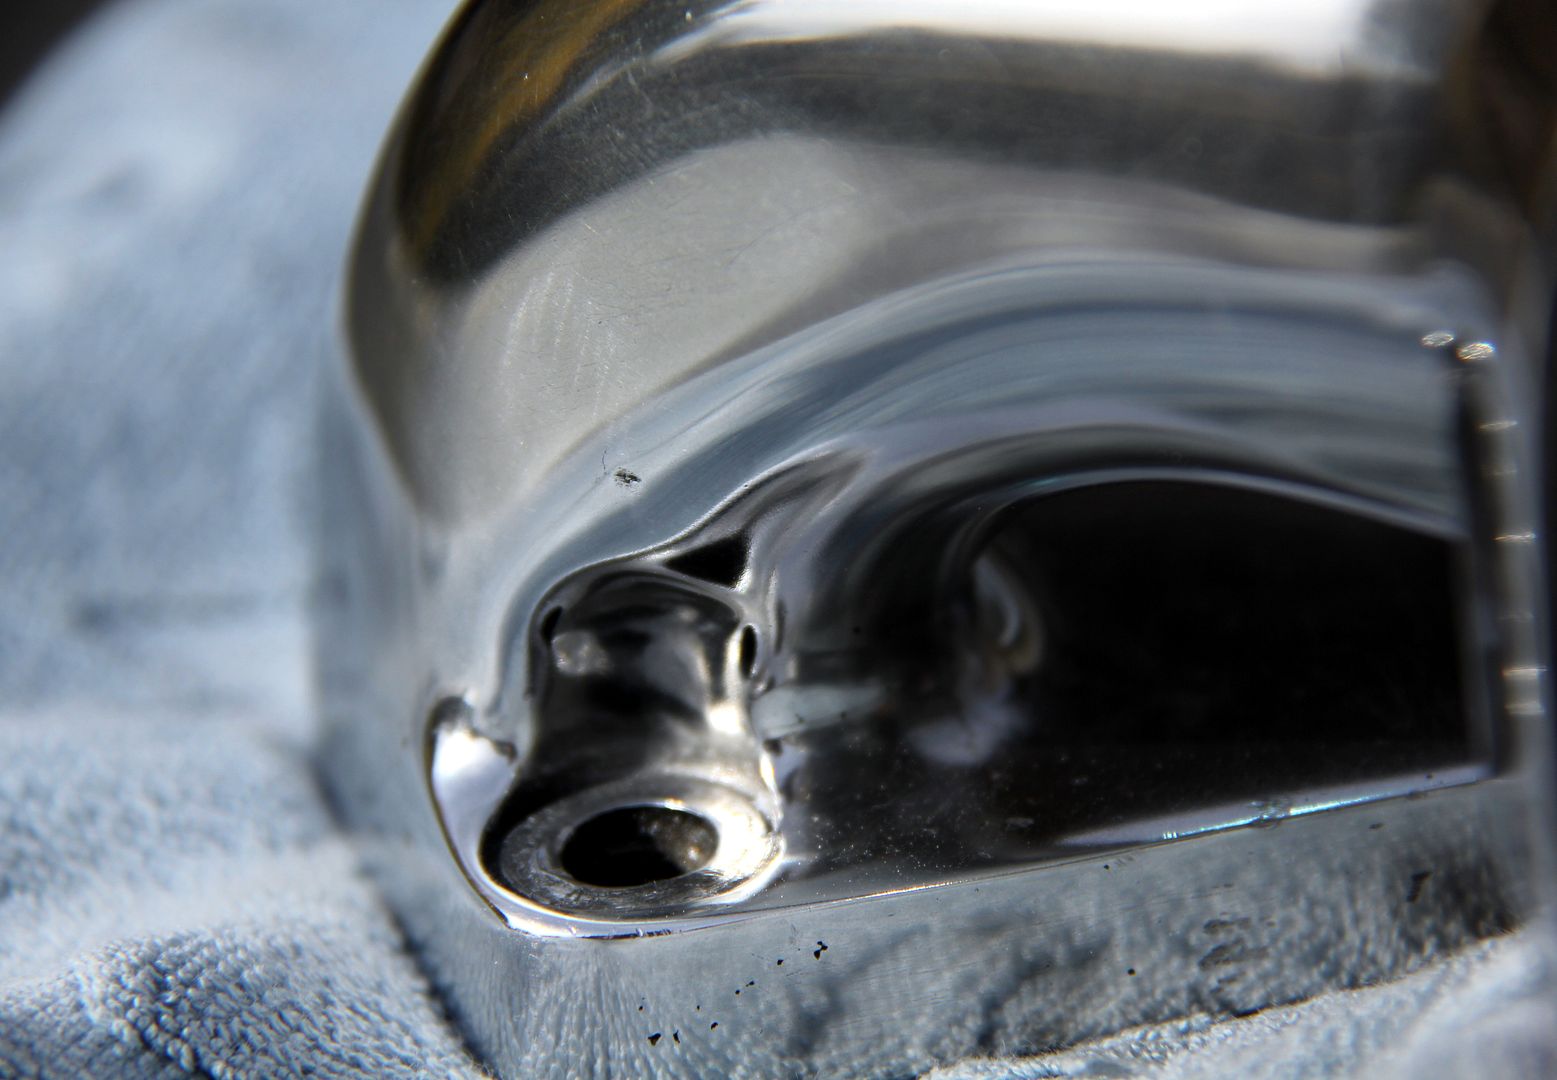
Then, all that remained was to leave the spigots in the fridge overnight to shrink them as much as possible and the application of heat to the manifold to expand that as much as possible. A few taps with a mallet and they slipped in like they were supposed to fit. Which of course they were. when they last few mm were sticking out, I applied a load of Chemical Metal and tapped them home. Obviously it's important not to get the Chemical Metal inside the spigots cos that would be a pain to get rid of. However, it all worked out rather neatly;

It was important to get this right, because as you can see they aren't coming out again this side of an act of God! Inside they stick out nicely into the airflow without making too much of an impediment. Much like the original ones do in the Nikki carburettor venturis, in fact. I skimmed them lightly with Chemical Metal here, too. Mostly because I'd stripped the plating off when I chamfered the barbs off, and they'll be sticking into a fuel/air mix. The last thing I want is my nice OMP spigots rusting away and dropping flakes of ferrous debris into the rotor housings! In that last photo, you can see sanding marks left by a Dremel drum sander. These contrast to the "grain" of the bulk of the sanding, and will need to be flatted back with paper. They are great at burning away lumps and bumps but are too small a diameter to sand large surfaces flat enough for polishing.

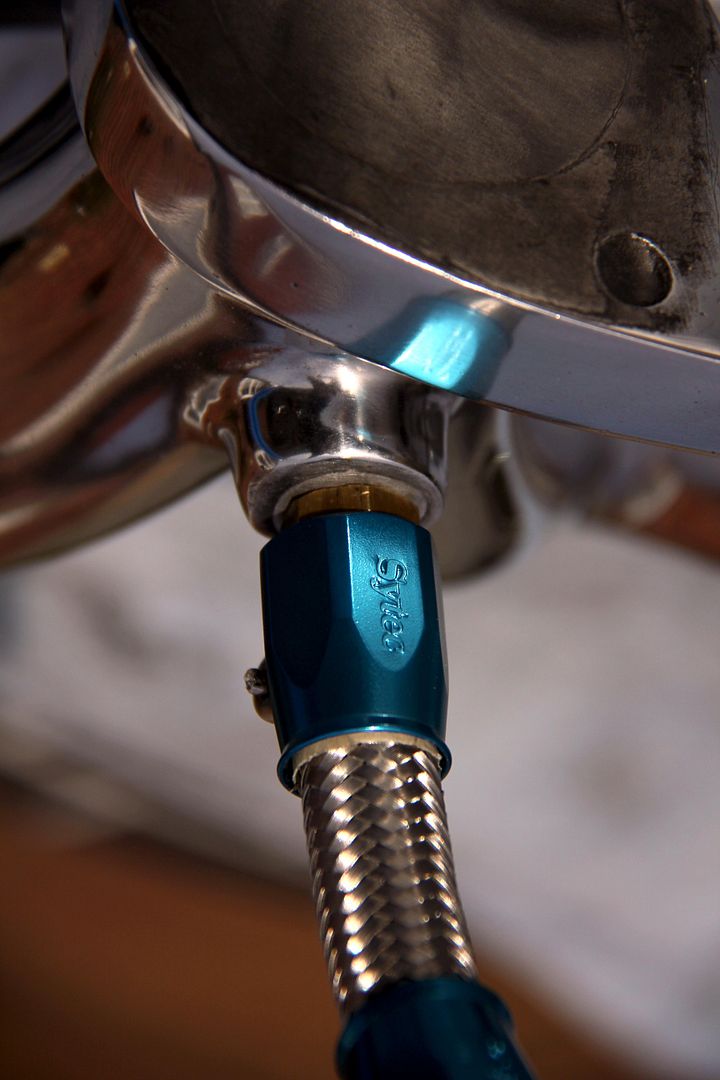
The final modification was to the other side of the manifold, and rather less of a faff. Being a nice modern car, the RX-7 has servo-assisted brakes and the servo operates under vacuum. Therefore a pipe is needed from the manifold so that engine vacuum can affect the servo. Again, the manufacturer provided a handy boss so it was simply a case of drilling a pilot hole, then working up to the correct size for the insert;

and then a tap and die finished off the job. The hosetail is a 100mm spigot mounted on an M10x1.0 thread, which is a fairly common tap size. I could have got any of the equally common ones such as 1/8th inch but the car is Japanese and metric so it seemed appropriate. If you gnaws up tapping the thread there's always the bodge....ahhhh...solution of resorting to Chemical Metal, lol

So with that in, all that remained was to make up a servo booster line. Arguably since it's a naturally aspirated car, it shouldn't need a one-way valve but Mazda saw fit to incorporate one into the original manifold (which incidentally mounts the servo line via a hideously ugly and nasty banjo fitting) so I put one into my line too. It's only a couple of quid, easy to pay for peace of mind.

Right, so with all the necessary modifications done, we can get back to the polishing without fear of inadvertently scraping a complete nightmare into our lovely work! Having done with the bulk work of 240 grit, I move onto the 400 grit paper. This is the stage where you first get to see how good your prep work has been!

As you can see, a definite "grain" starts to emerge with sanding. This is a lot to do with the fact certain areas dictate which direction you can sand in by nature of their shape and how ambidextrous you are! Ideally a circular or criss-cross pattern would be used when sanding, but it's often not possible and the strokes all end up in the same direction. This can be both a help and a hindrance. It's a disadvantage because it can hide score-marks that go in line with the "grain" and are hidden by it at this stage. When you get to using the mops, they suddenly spring into sharp relief. However, it can be a great way of spotting flaws as well, as this next pic shows;

The red arrow there is a balls-up! It's a spot where the mandrel of the Dremel or the edge of a file or whatever has put a deep nick into the work. These tend to be so deep that it would take so much sanding to remove it's just not worth it, and you'll have to live with it and try not to be so clumsy in future. The green arrow is a speck left over from the casting, a tiny air bubble or lost grain of sand from the mould that has left a hole into the surface. Like many nicks, the more you try and sand them away, the worse they get. You have to live with these too, often you'll find if you try to sand them out they are actually the top of a sinus in the metal and they get worse the deeper you go! The blue arrow shows where the surface that looked smooth under 120 grit is in fact still far from perfect, and the finer grain of the 400 grit has started showing it up. You end up with these sort of "sanding shadows". At this stage you can just rub them down with the 400, or if they're particularly widespread or deep, go back to a coarser grit and start again. This is often actually the less time-consuming method.
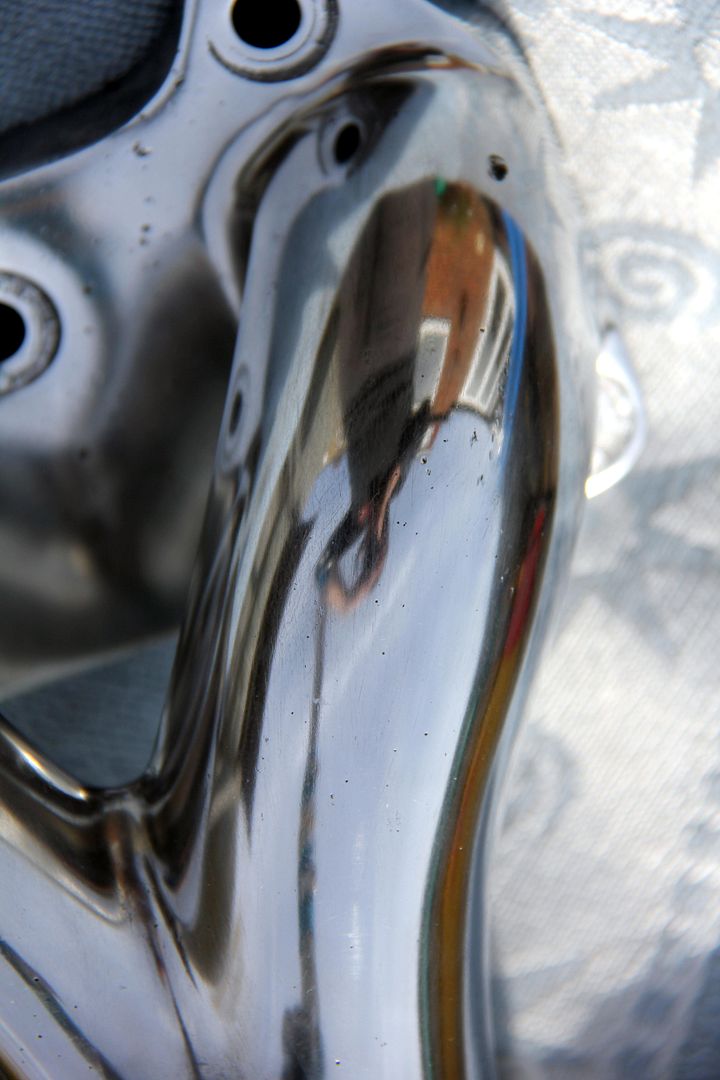
this next pic shows how it's important to alter the direction of the sanding

The shape of the piece her has dictated the direction it can be accessed with the paper, and there's a sort of neutral, untouched patch between the up-and-down sanding on the main runner and the circumferential sanding around the base where it joins the mounting plate. This is exactly what you want to rectify at this stage, and is the kind of thing you can miss when you use mops and abrasives. If you are using these, then try to vary the angle and pressure of the mop against the work as much as possible, and as with all the compounds, apply it to the mop little and often.
This was one of the trickiest areas to sand on the piece, and was made worse by how rough the casting was here. The 400 grit has shown up how some further coarse work is needed to remove the pitting still present

and this is another example of how the grain can reveal flaws that will ruin the final finish. This part of the mounting flange looked fine under 240 grit, but using a sanding block and 400 grit reveals there is actually quite a deep wave in the surface here. This is broad and shallow enough that it would be polished along with the true surface when we get onto the mopping stage, but it will reduce the overall shininess of the finish by reflecting light in different directions to the surrounding area. In short, you can make it smooth, but that's different to truly shiny, if that makes sense? The best solution is to use a sanding block (if possible) to smooth it completely congruent to the surrounding surface. Yes, it's a lot of work but it'll pay off in the end!

These recessed areas around the spigot bosses and under the carburettor mounting flange were the worst to get into, as you can see. The sandpaper butts up against the edges which stops it from smoothing the area properly. There's no chance of getting a powered tool in there, mops would never fit. The only thing that really works are rubber diamond-impregnated polishing burrs but these come up for sale so rarely nowadays, and are sacrificial to the work (meaning the more you use them, the quicker they wear down). They're great at getting into fiddly nooks and crannies though. Failing fluking some, the only real solution is to sacrifice your fingerprints trying to get in there with sandpaper

...but we're getting there. This is now moving on to 800 grit;

As you can see, it's now starting to get actually shiny, or at least a sort of sheened satin finish. Hope is in sight! By this point, the time you need to spend with each grit is massively reduced. Unlike sanding with 120 0r 240 grit, where you're never quite sure if you've done enough (you usually haven't!), this stage is self-limiting. You will see the surface finish change, and feel when the sandpaper stops gripping and starts gliding on the surface. It will also stop producing dust, and this is a sign that you've pretty much finished with this grit level

On really bad castings such as this, I used about four entire sheets of 120 grit, which I tear into quarters for ease of use. By the point we're at here, 800 grit, I'll probably only use a single sheet in quarters, which shows how putting the work in earlier pays off now. From this stage you could probably swap to using the polishing mops, but for myself I prefer to continue with the paper for a while. This is partially due to the complexity of the piece meaning access with the polishing mops is restricted, partially because I'd prefer sanding out in the sun to being in a dark garage getting splattered in polishing compounds.

Getting into nadgery little areas like this revetment for the mounting bolt is a personal choice as much as anything. When we get onto polishing proper, the overall shininess of the piece will lift any less smooth areas such as these, and you'll only notice they're still a bit matt if you look for them. Cynically, if I was doing this for sale I probably wouldn't bother too much with getting in here, but as this is going on my car my latent OCD wouldn't let me sleep at night knowing I hadn't bothered, so I did my damnedest to get them smooth as possible. However, you can see some file-marks left over that were just too deep for even my obsessiveness to bother with.

Those nadgery and irritating areas around the bosses are starting to get there, too;

And so on to 1200 grit! Now you're starting to see some reward for all those hours of hard work. The piece is actually starting to show some of how lovely it'll be when it's finished

Even now you'll turn up flaws you missed before, such as these filing marks left over from flatting away moulding imperfections right at the start all that time ago! The only real cure for this is to go back to coarse grit and work back up again in the affected area, and I guarantee by now there's no way you'll be willing to do this. You'll do what I did and think "sod it, that's good enough"

So now we get to the "fun" bit; mopping! In actual fact, you could have moved on to it a few grits back, but as I said, this particular piece's complexity meant it paid off to stick with sanding. Doing a nice, flat open piece you could probably switch at round about 400 grit. So, a word about polishing mops. Most kits provide all you'll need, usually three grades of mop and three of compound. Unlike the abrasive version, which are essentially sanding drums, polishing mops use a grease-based compound that's more like a cutting compound than the coarser abrasives. You'll probably end up with a range a bit like this;

In the bottom left corner is a sisal mop with it's matching coarse compound. This will batter out swirls and scoring... to a point. On rough surfaces this is your first pass with polish, but on our example this won't be necessary because we're already past the stage it's useful. To use it on work already sanded to 1200 grit would be to actually roughen it back up. Next to it is a close-stitched mop and compound. This is the medium stage, and our first in this example. It really begins to make the surface shiny. In the bottom right corner is the final mop, an open cotton one with fine compound. This is the finishing mop, the one that makes everything beautiful. In front of these are a couple of felt bobs which are great for mounting on the pig-tail arbor and getting into small awkward spaces. They give a great finish but can be fraught to use; they tend to "catch" and it's easy to snap them by doing this. You can also get full felt mops, which also give a lovely final finish. It's definitely advisable to keep one mop per compound and not cross over because this will contaminate the mops and make everything more difficult
Mopping is easy... though it becomes better with experience. Basically, you start the mop spinning and rub the compound against it. The friction partially melts the grease matrix of the compound, applying some to the mop. You then hold the work against the mop, moving it around to cover all areas and varying pressure and direction of the motion to avoid uneven-ness. If you're ending up with black marks all over the work, you have too much compound. This is where experience comes in; learning to judge how much compound to get on the mop, and how much pressure is needed and how to move the work around efficiently. The mops have an annoying habit of "stalling" under too much pressure, and if you catch the work on the threads of the arbor it will leave horrendous gouges in it, which is heartbreaking. All you can do is try it, though, and see what works. Sooner or later the knack develops
Also in that pic are a few other useful tools that you could use in the earlier stages. The Dremel is shown with a sanding drum on the extended flexi-drive. These, as previously mentioned, are essential, but don't last long and do have an annoying habit of pinging off or snapping and firing themselves into your ocular orbit at escape velocity. You can also get Dremel polishing components; felt bobs on little arbors, They are great at getting into otherwise inaccessible areas though the compound Dremel supply is not especially great and for some annoying reason tends to come in containers that it's impossible to get the mops into. Irritating in the extreme. The best solution are genuine Dremel impregnated polishing mops, which are felt bobs already soaked in compound. They're expensive compared to the normal version, but last for ever, give an excellent finish, and are worth the price just for ease of use.
A wire brush used on a drill or grinder is a useful way of preparing the work before any other stage; it will remove loose crud and flakes of corrosion without scoring the surface too deeply. Although it goes without saying that the work should be properly cleaned and de-greased before you do anything else! Also shown is a velcro-backed rubber arbor-mounted sanding disc for a drill. These should be used sparingly; they're great on big, flat areas but I wouldn't use anything coarser than 180 grit on aluminium because it can be quite aggressive due to the speed of rotation. However, if the work allows, they're a great way of smoothing large rough patches quickly. The final item is a nylon sanding ball or disc, in this case. These can be useful making a satin finish on softer metals, or for prep work when the wire brush is too aggressive. They are essentially a scouring pad mounted on a spindle. They don't produce much real effect but can be useful for gentle prep. Be careful not to let any of these powered methods rest or catch any one area too long though; it's easy to introduce dips or waves into the work that no amount of later sanding will remove!
So, we're done. I find it best to do the nadgery bits with the little bobs and then do the broad strokes with the mops afterwards. This incorporates any directional or localised polishing effects left by the bobs into the overall lustre. And once you've been through all the compounds you end up with;

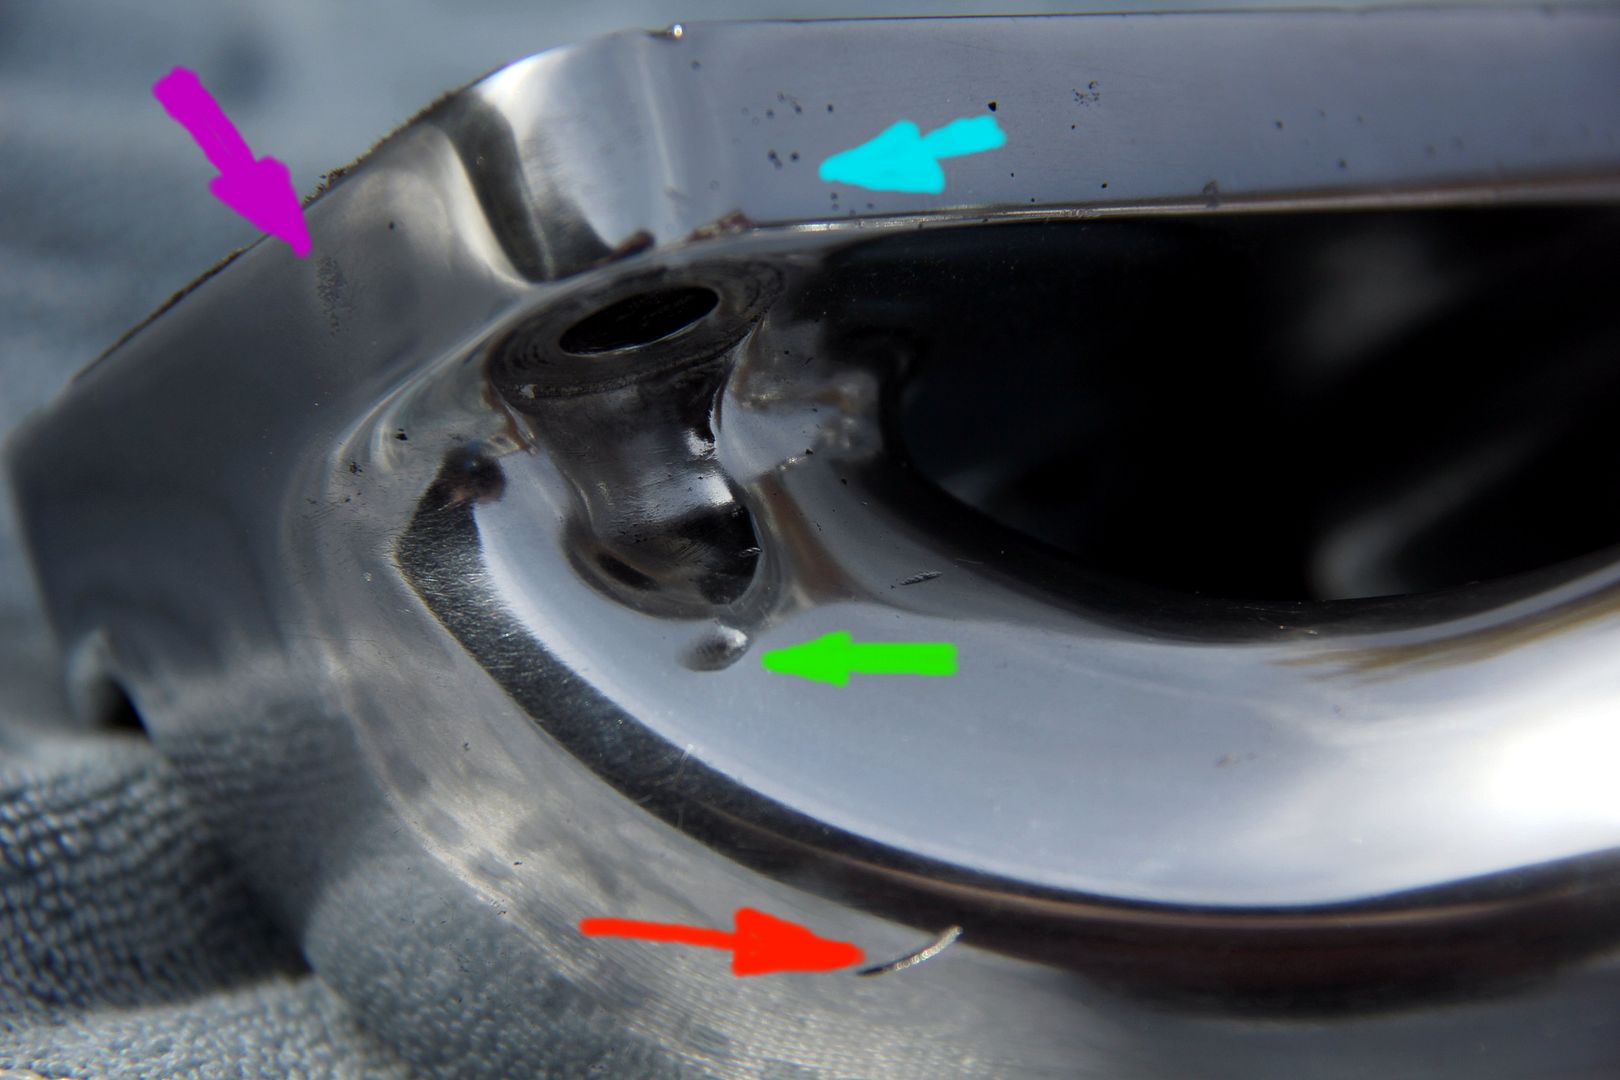
Boom! Shiny!

However, there are still a few things to point out here which may give you a further understanding of the process and see a few things that you want to avoid if at all possible;

here we go: the red arrow indicates a score where I caught the work on the edge of one of the arbor threads. Yes, I swore! For this exact reason, I tend to wrap the arbor not covered by the mop in masking tape, but the thread edges are sharp when they're spinning at several zillion rpm and this is the end result. Without going back to the beginning you'll just have to write this off to experience and live with it.
The green arrow is a remainder of an original casting imperfection caused when the revetment for the mounting bolt was reamed out. Whoever did it slipped slightly with their burr, and this gouge is the result. It's too deep to have sanded out, and too acute to really polish smooth. Again, you just have to live with it. The revetment itself shows how an area can still be a bit pitted and slightly scored but look pretty shiny due to the rest of the work lifting it.
The blue arrow is some of those little bubble imperfections that I mentioned earlier; not much you can do about these either. They are all over the work, but don't actually distort the surface around them so don't really affect the overall shine very much.
The purple arrow shows the result of laziness at the sanding stage. It's a part where a wave in the surface could have been sanded out flat, but wasn't and now it leaves a shadow that the mop's can't really access. I could have been keen enough to sand it out, but it's the side of the flange that's almost against the bulkhead and so will be invisible when mounted up. So I can live with it
So, those are some of the flaws you'll almost inevitably carry through right to the finish. As with anything, you could reduce them if you have time and patience to burn, but most polishing is a compromise between what you want and what you're willing to put into it. Sadly, there really are no shortcuts in this and the quality of the finish is directly proportional to how much work you put in. However, if you cast your mind back to how gnarly and unpleasant the item we started with was, I think you'll agree that the end result is well worth a bit of elbow grease and time


And just to finish, for contrast, a before-and-after;
thanks for reading, and feel free to add any tips or pearls of wisdom you might have acquired yourself!
now, go away

Cheers, Nik


 within the first couple of days l would have got board and painted it silver