Rebel
Part of things

Posts: 343 
|
|
|
|
Having got the pipework and unions sorted out, I trial fitted the new master cylinder, 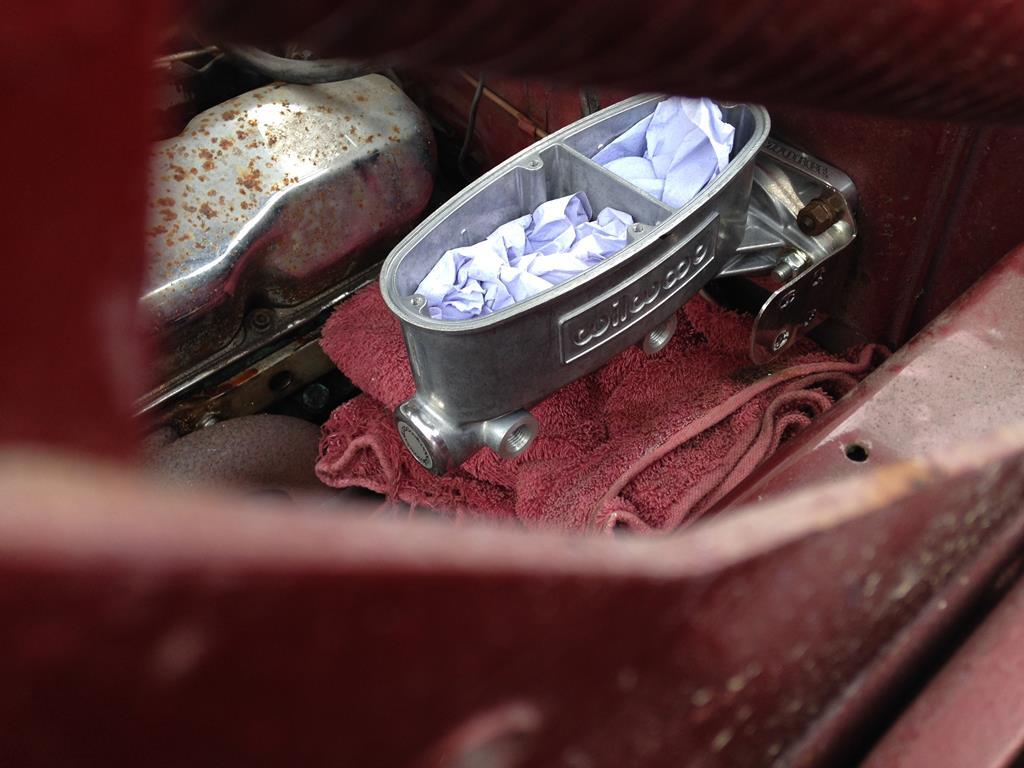 Due to it originally being a drum brakes all round car, changing to disc brake front / drum rear means it needs a brake proportioning valve adding in to the rear brake pipe. Some people fit these in the rear pipe under the floor, sometimes the brake pipe is fed through the floor so that the proportioning valve can be fitted inside the car. I didn't really want to put any holes in the floor and had decided that I'd just mount the valve under the floor. Then, after bending the huge 12ft length of pipe to run from front to back under the car, I fitted it and realised afterwards that I'd forgot to put the proportioning valve in the pipe! Not really wanting to take the pipe off again, I had a look online and found some pictures of cars in the states with the valve attached to the master cylinder, the bulkhead and even under the master cylinder. After checking the available space around the master cylinder, I decided to make a bracket and attach the valve to the side of the master cylinder. I had a bit of stainless steel lying around and using the tried and trusted CAD ( cardboard aided design ), made a template, transferred it to the stainless steel and cut it out. The bracket needed 7 holes drilling in it, which wasn't easy, but I managed and once bent into shape, it was a perfect fit. Once the bracket was all bolted up and had the proportioning valve bolted to it, it looked like this 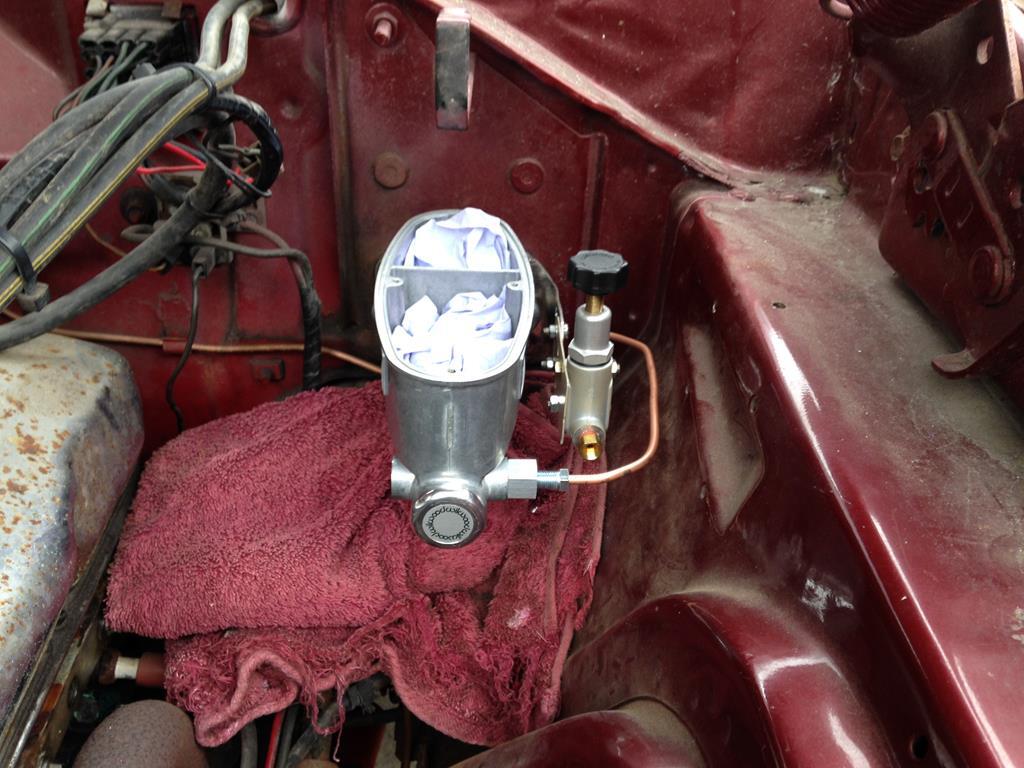 When all the brake pipes were fitted, it looked a bit steam punkish but as a first attempt at replacing an entire brake system, I'm happy with it. 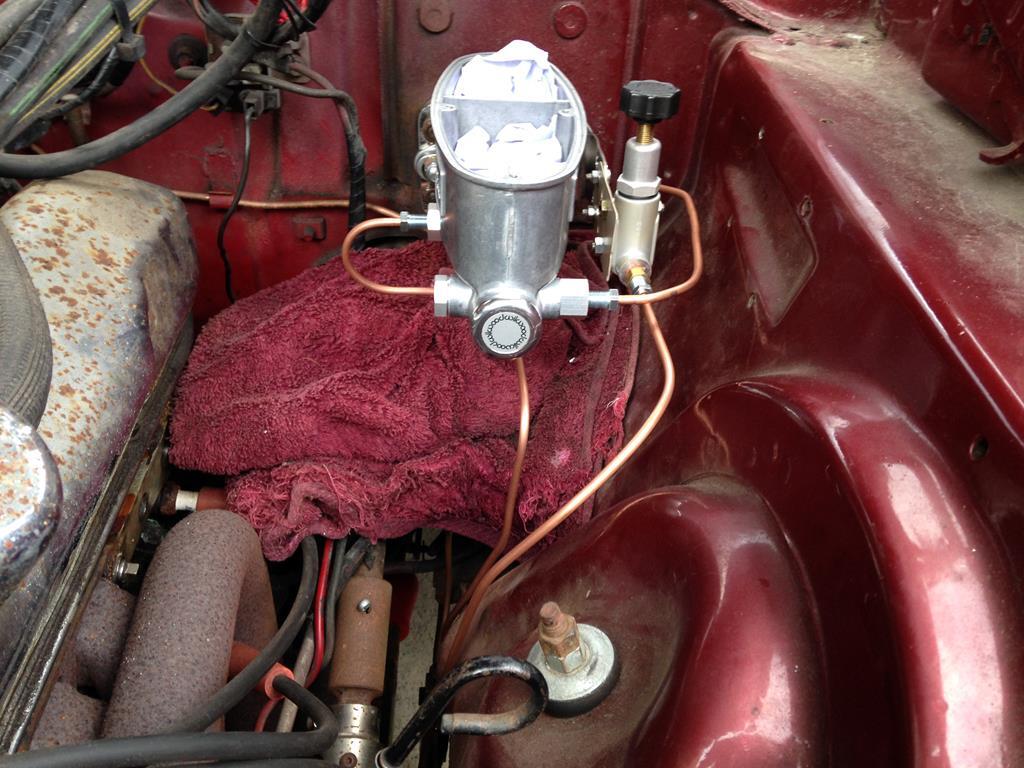 In case you're wondering, the colour matching towel is there to protect the paintwork from any spilt brake fluid and only temporary. |
| |
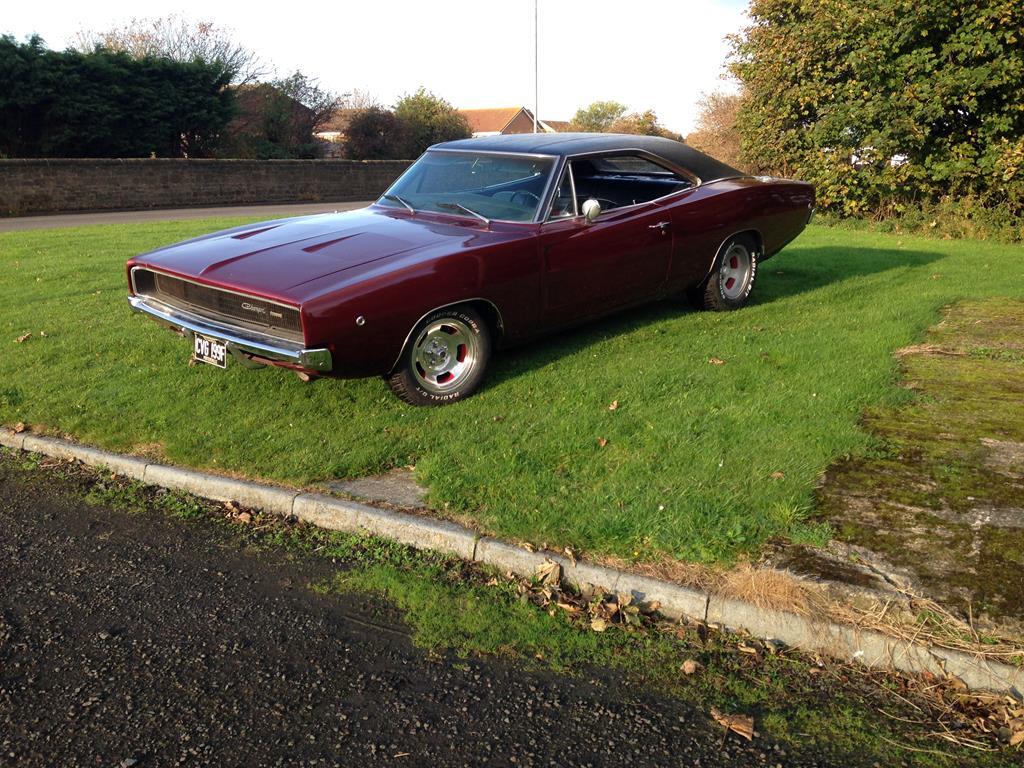
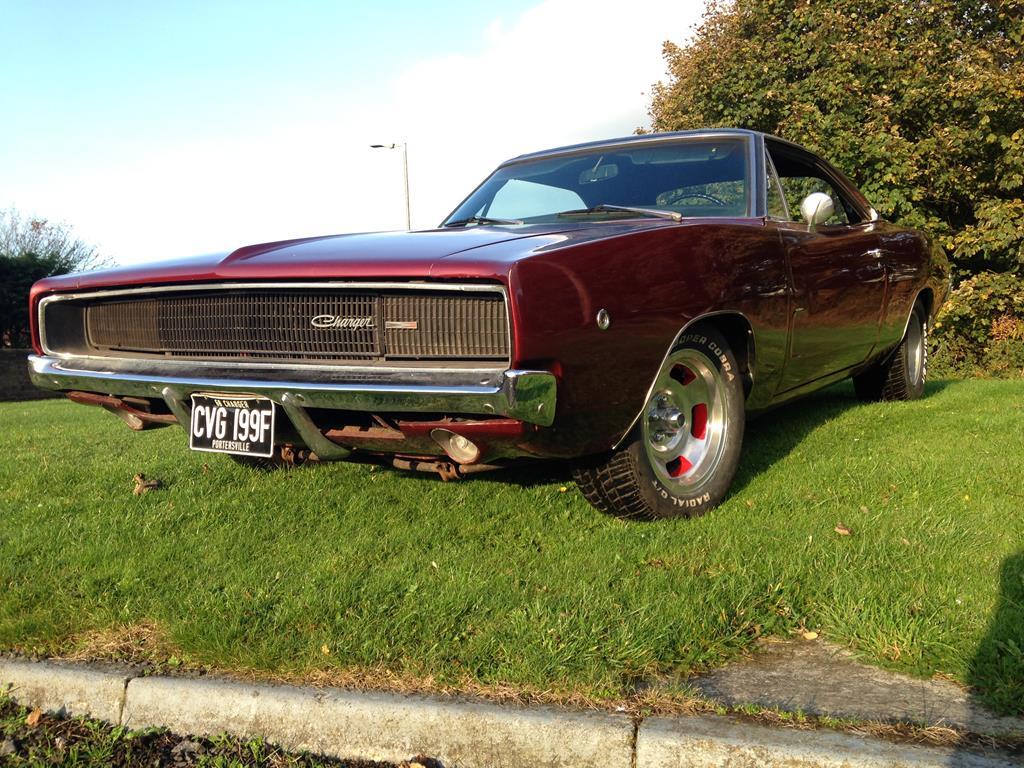
1968 Dodge Charger
1985 Chevrolet Camaro
1993 Toyota Hilux Surf
2001 Ford Mondeo
|
|
|
|
|
|
|
|
|
|
It may be a good moment to switch over to silicon brake fluid. This doesn't attract moisture so doesn't need to be renewed every 2 years and when spilling it leaves you paint undamaged. Have it in my MG V8 for approx 10 years now without any problems
Peter
|
| |
|
|
dikkehemaworst
Club Retro Rides Member
Posts: 1,583
Club RR Member Number: 16
|
|
Aug 17, 2017 10:01:56 GMT
|
|
If all of the pipes are new, deffo switch to silicone!!
|
| |
|
|
Rebel
Part of things
Posts: 343
|
|
|
|
|
All the pipes are new, including the flexi's. However, the rear wheel cylinders are not new, but are in excellent condition so didn't need replacing. The system was previously using DOT 3 fluid and there was probably still a residual amount in the cylinders, so, I used DOT 4 fluid because of the possibility of any issues caused by the remaining DOT 3 mixing with the new DOT 5
|
| |
1968 Dodge Charger
1985 Chevrolet Camaro
1993 Toyota Hilux Surf
2001 Ford Mondeo
|
|
Rebel
Part of things
Posts: 343
|
|
|
|
And this is how the master cylinder looks fully installed with the lid bolted on 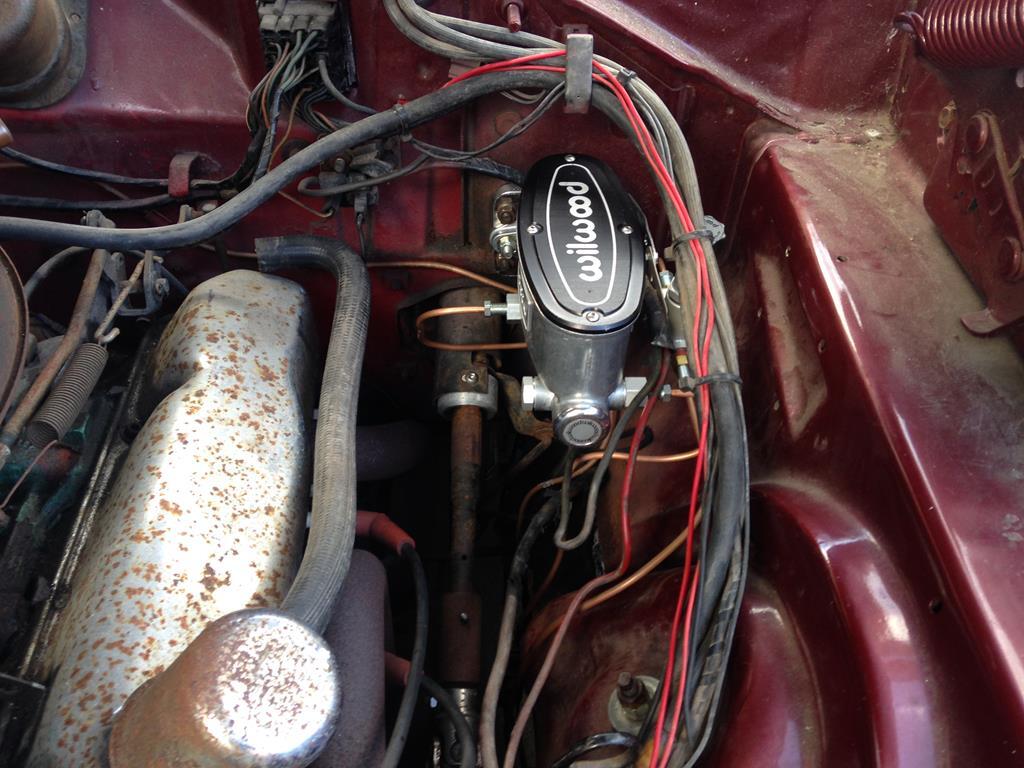 Once the brake pipes, master cylinder and proportion valve were fully fitted, I could make a start on fitting the brake discs and calipers. A seemingly easy task which provided plenty of problems. Anyhoo, it started with the opening of many boxes, 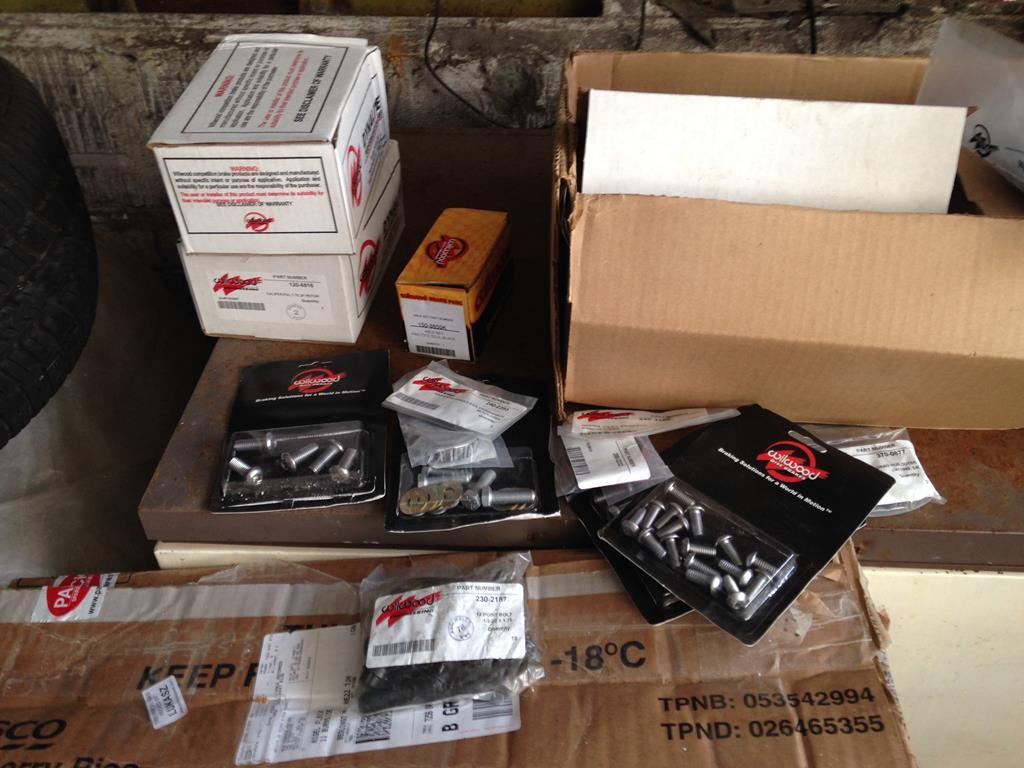 The discs and hubs in the kit are a two piece item which needs bolting together before installing on the spindles ( stub axles ) of the car. This is how they looked when the boxes were opened, 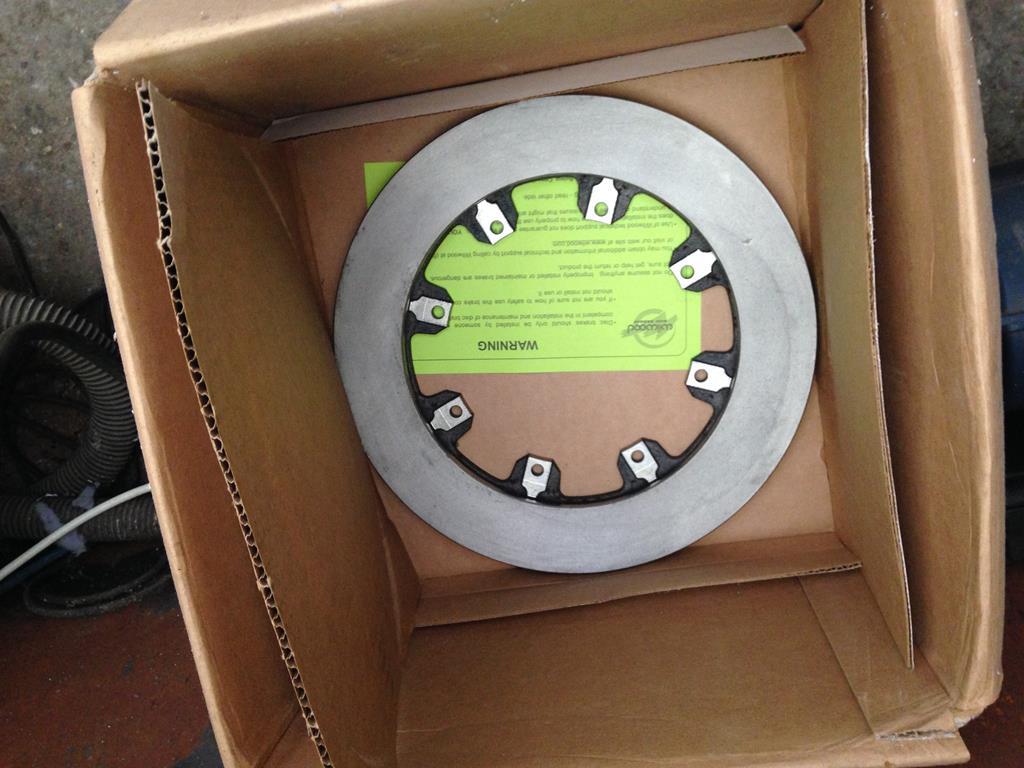 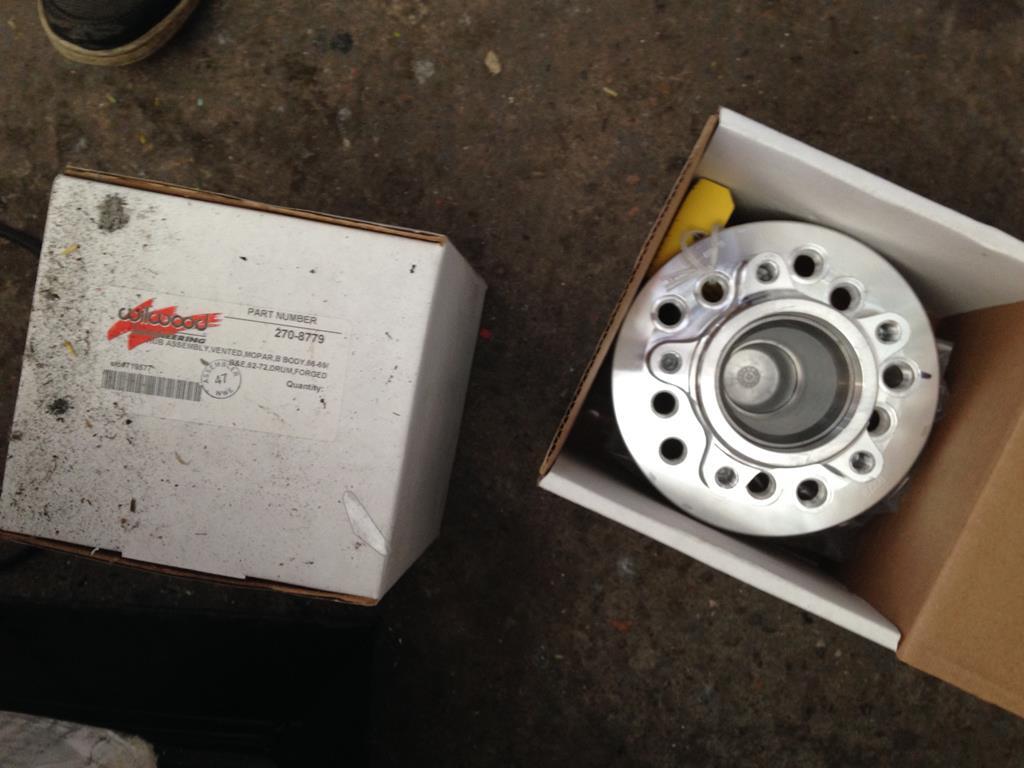 And, this is they look when the discs are attached to the hubs, 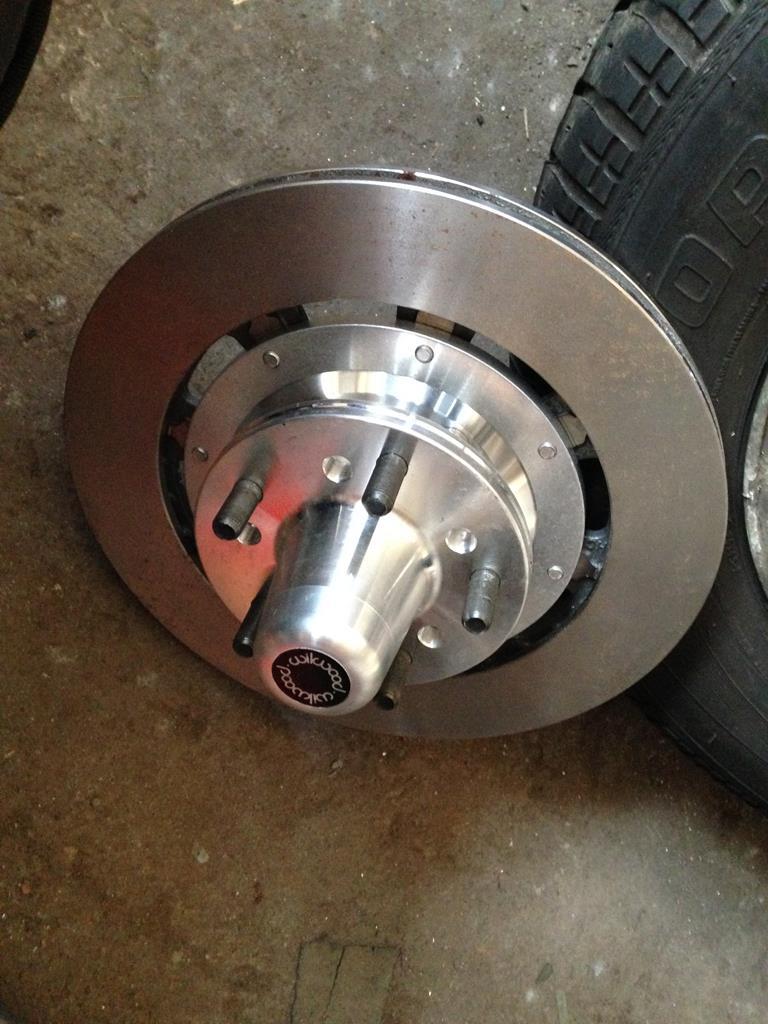 Having got the hubs and discs assembled, I added the bearings and went to put them on the spindles only to find that the large hub nut that keeps the bearings in place now wouldn't fit. There was no threads showing at all at the end of the spindle! Further investigation revealed that the new hub / bearings didn't go all the way to the end of the spindle, as can be seen below, 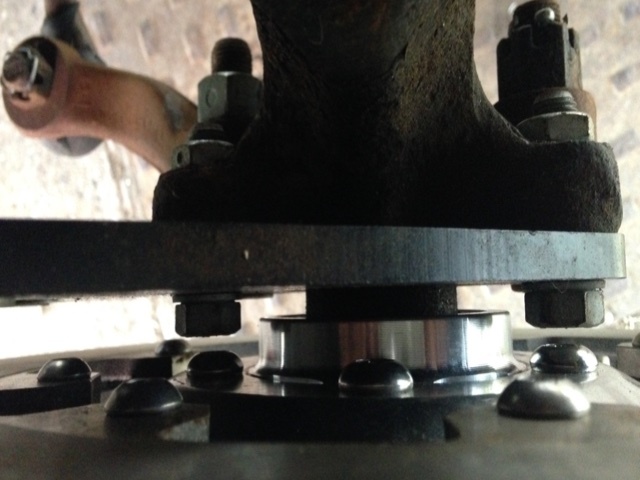 No matter how hard I pushed at the hubs, they just didn't want to go any further. Taking the hub back off the spindle left me with this 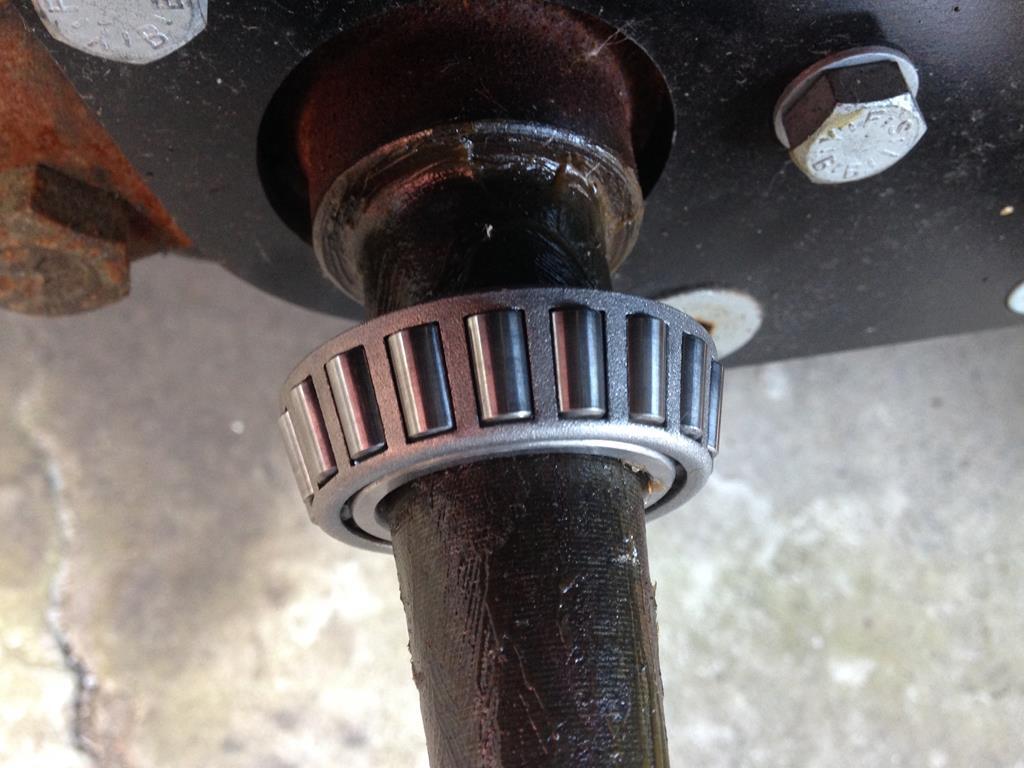 The bearings were stuck on the spindle. With a little help from the very gentle use of a puller, I managed to get the bearings off the spindle without causing any damage. After checking with a couple of people in the know, I was advised to try again but this time use the hub nut to help with pushing the hub assembly all the way home. |
| |
1968 Dodge Charger
1985 Chevrolet Camaro
1993 Toyota Hilux Surf
2001 Ford Mondeo
|
|
|
|
|
Sept 2, 2017 10:12:49 GMT
|
... looks like the spindles need a LIGHT cleaning with emery cloth (or brands probably available  ) first , then use the nut to ease the bearings home ... |
| |
|
|
Rebel
Part of things
Posts: 343
|
|
Sept 3, 2017 22:50:24 GMT
|
... looks like the spindles need a LIGHT cleaning with emery cloth (or brands probably available ) first , then use the nut to ease the bearings home ... Exactly, both spindles were given a light clean and the hub assembly was mounted again without the front bearings. This allowed enough thread to show so that the hub nut could be used to ease them a little further onto the spindle. Hub nut removed, the front bearings were then fitted and the hub nut reinstated and tightened to the correct spec, not forgetting to add a new split pin as well |
| |
1968 Dodge Charger
1985 Chevrolet Camaro
1993 Toyota Hilux Surf
2001 Ford Mondeo
|
|
Rebel
Part of things
Posts: 343
|
|
|
|
Having got the disc and hub assembly fitted and bolted to the spindles, next up was the new brake calipers, 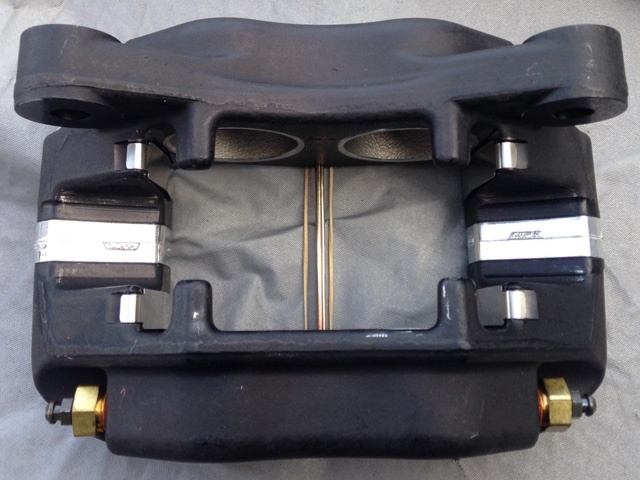 However, when trying to slip the calipers over the disc to bolt up to the caliper bracket, this is what happened,  The caliper bracket looked as though it was too far away from where the disc was sitting. After actually reading the instructions properly, it turned out that I'd bolted the discs to the hubs the wrong way round! So, take the disc and hub assembly off again. Take the disc off and turn it round and reattach it to the hub. This time, the calipers fitted perfectly and looked like this on the car 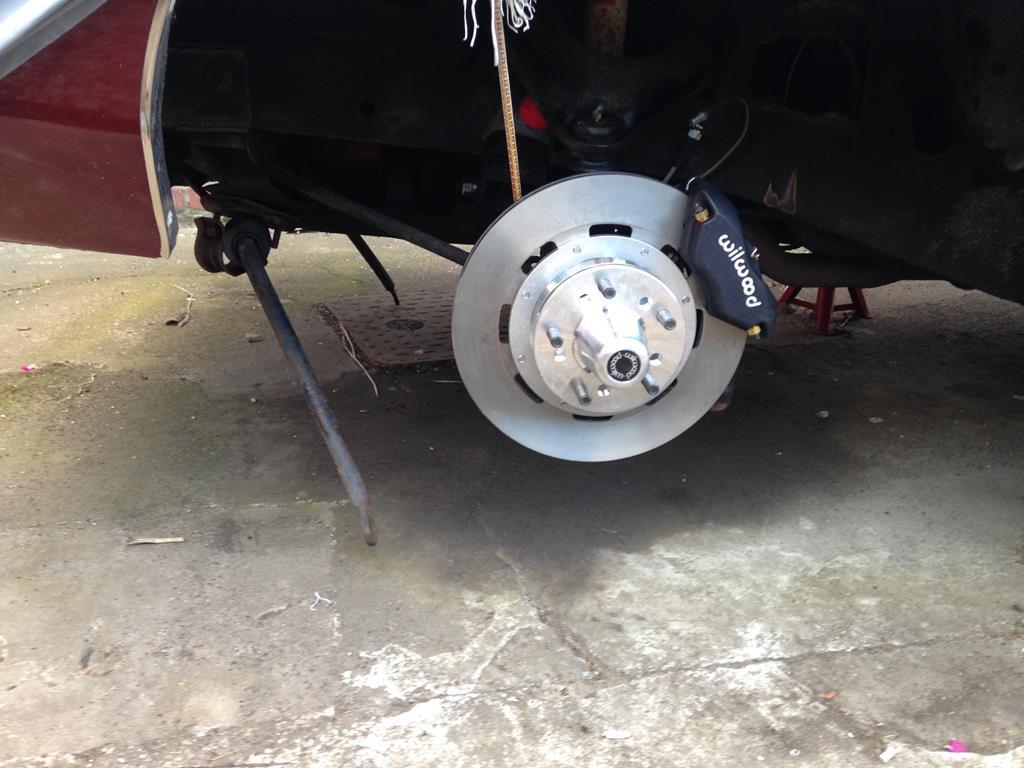 With all the brake lines connected up and ready to go, it was brake bleeding time. |
| |
1968 Dodge Charger
1985 Chevrolet Camaro
1993 Toyota Hilux Surf
2001 Ford Mondeo
|
|
Rebel
Part of things
Posts: 343
|
|
|
|
|
Bled the brakes and the pedal seemed to be a bit spongy after bleeding, also noticed that the brake lights were on permanently. Checked the brake light switch under the dash and the brake pedal was sitting too low and not making contact with the switch. The new master cylinder has an adjustable pushrod, adjusted the length of the pushrod to lift the brake pedal enough to make contact with the brake light switch. Bled the brakes again and got a load more air out of the system. Checked the brake lights and they were coming on with the brakes applied and going off when you took your foot off the pedal.
With the brakes sorted, I went to put the wheels on, only to find that they no longer fit!
|
| |
1968 Dodge Charger
1985 Chevrolet Camaro
1993 Toyota Hilux Surf
2001 Ford Mondeo
|
|
Rebel
Part of things
Posts: 343
|
|
|
|
The disc conversion kit comes with an advisory stating that some 15 inch wheels won't fit due to the discs and calipers. Sure enough my wheels didn't fit! I did originally think that if my wheels didn't fit, I would just buy some new wheels. When push came to shove though, the more wheels I looked at with a view to buying, the more I actually liked my wolfrace slot mags. They suit the car and look good on it as well. This left me with a small problem, I needed bigger wheels. The obvious answer would be to change from 15 inch to 16 inch, however, these days there's a better selection of 17 inch tyres than there is for 16 inch rims, which would dictate changing to a 17 inch rim, but, going up two sizes in rim diameter would mean coming down two sizes in tyre sidewall height. This would mean lower profile tyres which I don't like. I much prefer tyres to look like tyres, not rubber bands. having a closer look at the inside rim of my wheels revealed this,  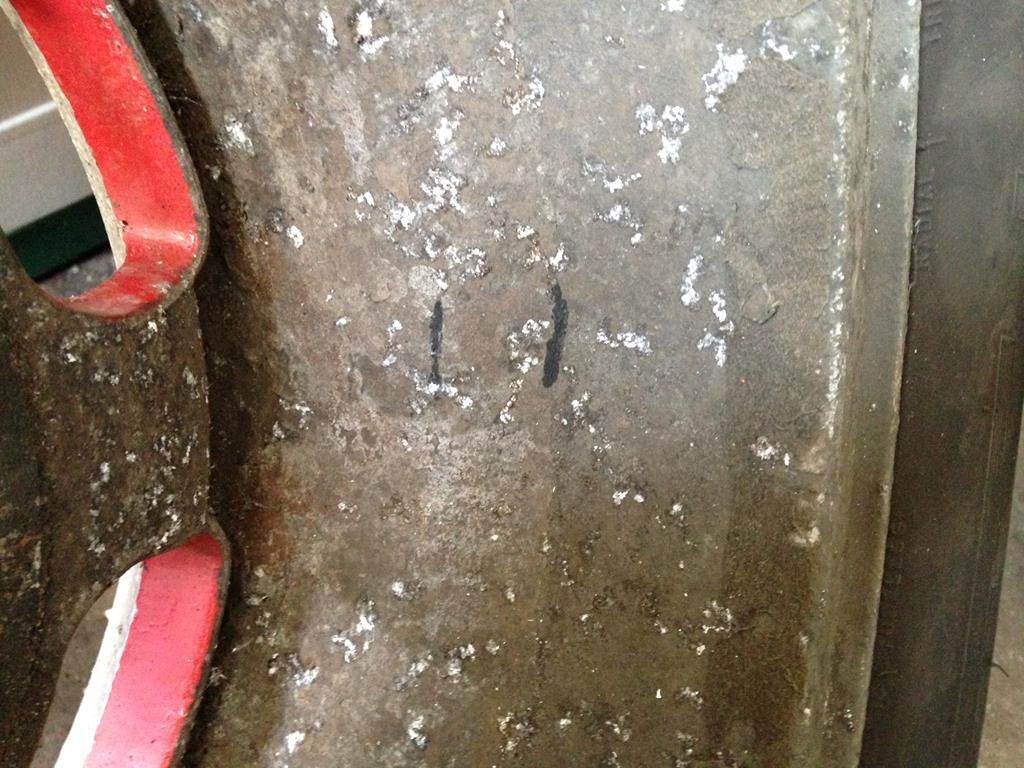 Hopefully you can see the " step " in the rim ( in the second pic, the step is between the two black lines ). This means that my 15 inch rim turns into a 14 inch rim closer to the centre hub. I searched for an answer to my problem, I couldn't have the step machined out because the wheel would either end up in two peices or be so thin in that area that hitting a bump or pot hole would split it in half, if weight of the car didn't break it first. I didn't really want to grind the new calipers down either in case I took too much of them and ruined them. So the search for wheels continued. The whole thing became a catch 22 situation, I needed two front wheels to make it driveable, once I could drive it, I could have it MOT'd. The biggest wolfrace slot mag I could find to fit the Charger was 15 inches. There was a set of four on the bay of fleas that were 16 inches, but they were to fit a Land Rover so had a different PCD than I was looking for. |
| |
1968 Dodge Charger
1985 Chevrolet Camaro
1993 Toyota Hilux Surf
2001 Ford Mondeo
|
|
|
|
Rebel
Part of things
Posts: 343
|
|
Sept 9, 2017 21:18:28 GMT
|
While searching through various wheel manufacturers web sites, the bay of fleas and the farce book sales pages, all to no avail. It was looking more and more likely that I would need to change to a larger rim. A mate stepped in with a temporary solution in the form of a pair of 40mm wheel spacers! I'm not a fan of spacers, I don't like the extra strain on various suspension parts by using them, or the fact that you need to regularly check that the nuts are still tight. Even though Porsche use them on most of their cars, I still don't trust them. But, at least I'd be able to go for an MOT with them on and afterwards drive to anyone selling wheels so that I could try them on the car. 40mm seemed a bit excessive to me though, even though once fitted with the wheels on as well, the tyres still weren't sticking out of the bodywork at all. In order to try and feel better about using spacers, I bought a pair of 5mm slip on spacers which turned out to be too small, so I bought a pair of 20mm bolt on ones, these gave enough room for the wheels to fit without rubbing on the calipers but the wheel studs stuck out by 5 or 6mm preventing the wheels from sitting flush with the hubs. As the spacers were purely temporary, I didn't want to take everything apart to fit shorter wheel studs, nor did I want to cut the wheel studs. So, I refitted the borrowed 40mm spacers again. As luck would have it, late one night, I found a seller on the bay of fleas advertising a set of 5 never been on a car before wolfrace slot mags. A change of plan for him meant that he no longer needed them. I sent him a message asking for pics of the inside of them, he sent me a selection of pics which seemed to confirm that his were all flat on the inside with no steps. Deciding to take a chance on them, we agreed a price to include delivery by the seller. Once delivered, I quickly tried them and they fitted perfectly, no need for spacers and everything sat flush and bolted up nicely. This is the difference between my old wheels and the new ones. The new one is on the right in the pics, 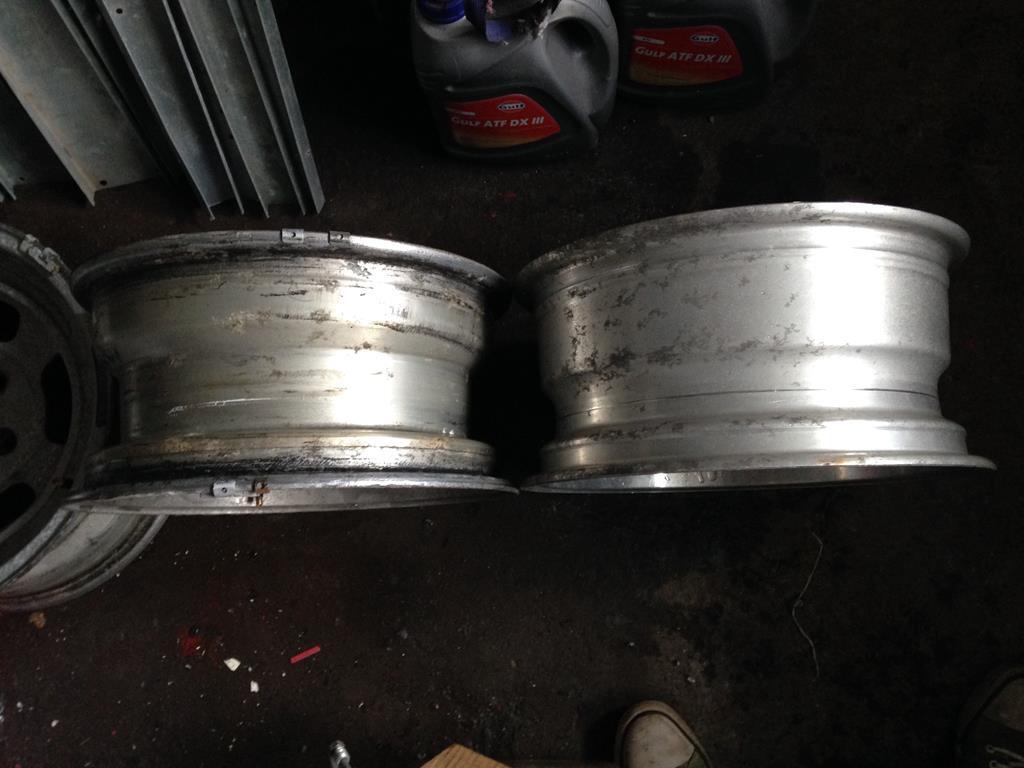 The difference is also very evident from the front, again, the new one is on the right. 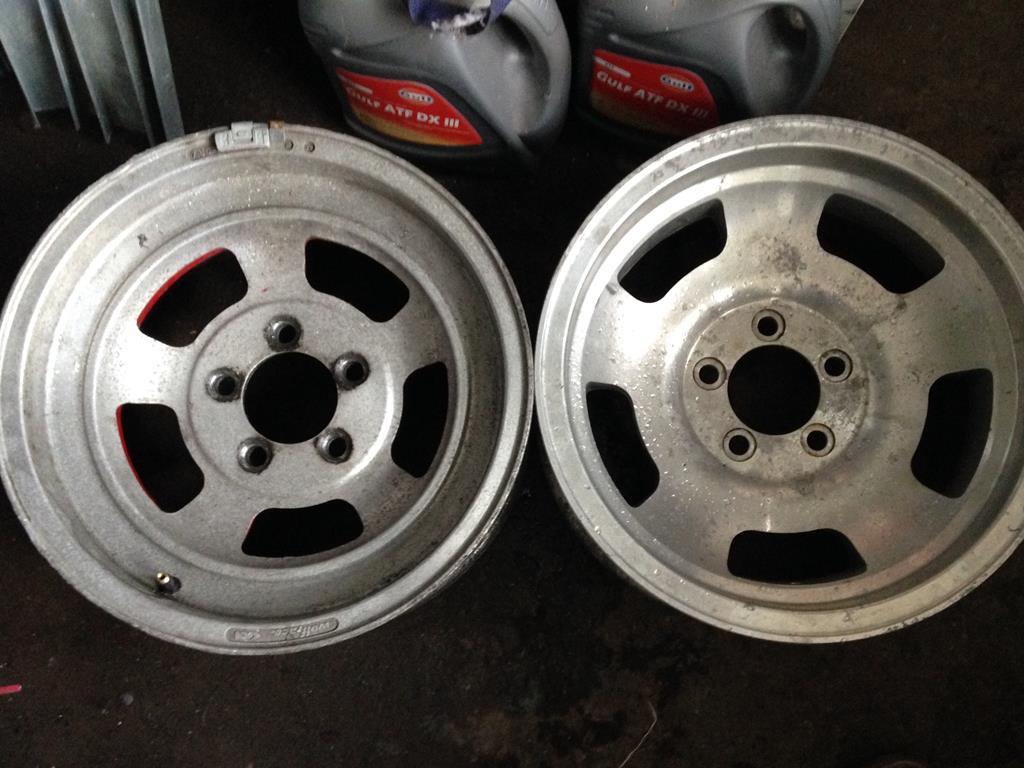 Ironically, the new front wheels now match the design of the rear ones exactly, which is a nice little bonus. |
| |
1968 Dodge Charger
1985 Chevrolet Camaro
1993 Toyota Hilux Surf
2001 Ford Mondeo
|
|
Rebel
Part of things
Posts: 343
|
|
Sept 10, 2017 1:35:34 GMT
|
|
After getting the wheel issue resolved, there was just a couple of cable ties to replace on the back axle as extra security for holding the brake pipes that run along the axle in place. There was originally a cable tie at either end as well as the factory clips for holding the pipes in position, I guess the original clips aren't as close fitting as they were 49yrs ago. Due to the cable ties having been there since I acquired the car almost 12yrs ago, I replaced them.
One of the new brake pipes in the engine bay was just a little too close to the inner wing and looked as though it might rub against it with the vibration of driving, thinking that it might cause problems in the long run and also the MOT inspector might not like it if he noticed it, I covered it with a 3 inch length of rubber pipe, just to prevent any problems.
Having done everything, it was finally time to try and start it....
I borrowed a battery from one of my other cars, connected it up, slid the key in the ignition and turned it. Nothing, tried it again and there was a single click, not the multiple clicks you get from a flat battery, just a single click.
I knew the engine turned over by hand so it hadn't seized. Took the battery off and put it on charge, while it was charging, I checked and cleaned all the earths. The earth lead that goes from the rear of the engine block to the firewall was so brittle that as soon as I touched it, it fell apart!
I replaced it with a short battery earth lead, more than twice as thick which hopefully should be good for another 49yrs. Also found that the main lead from the starter motor to the battery was loose, tightened up and all other connections seemed to be good to go.
The next day, the fully charged battery was reconnected, key slid into the ignition and turned, again nothing but a single click! Thinking that it might be the starter motor at fault, we ( a mate had called round and gave me a hand ) ran a cable from the battery to the starter relay. The starter motor kicked in and turned the engine over, after 4 or 5 turns it fired right up and sounded...... well, it sounds like this
We left it running for about 5 minutes while we checked that all the lights, indicators and horn etc worked. Then turned it off, tried restarting it a couple of minutes later and started up no problem just using the key.
|
| |
1968 Dodge Charger
1985 Chevrolet Camaro
1993 Toyota Hilux Surf
2001 Ford Mondeo
|
|
Rebel
Part of things
Posts: 343
|
|
Sept 10, 2017 3:15:05 GMT
|
|
Tried to start it again the next day and it was back to the single click again, I was hoping at this point that it was just a sticking starter relay with standing for a couple of years. Got it to start by shorting it out again. Turned it off and tried again half an hour later and it fired up on the key this time.
The day after, and finally booked in for an MOT test, this time it started off the key, hopefully the earlier starting problem is just a sticking starter relay, only time will tell.
The last time I drove this car, it had power steering, drum brakes all round and front suspension bushes that were shot. Now, there's no power steering, disc brakes and new suspension bushes. As well as new ball joints, tie rods and anti roll bar drop links.
I had set the alignment as best as I could without proper tracking tools. I headed off to the MOT garage and it drove really well, the steering was nowhere near as heavy as I was expecting it to be without power assistance, pulling out of junctions, the steering wheel would self centre, something it didn't used to do all that well at all.
During the MOT test, the rear brakes recorded virtually no effect at all, causing it to fail the MOT for the first time in nearly 12 years! However, everything else was ok, all I need to do is a little bit of adjustment on the rear brakes and go for a retest..........
|
| |
1968 Dodge Charger
1985 Chevrolet Camaro
1993 Toyota Hilux Surf
2001 Ford Mondeo
|
|
Rebel
Part of things
Posts: 343
|
|
|
|
You've gotta love an easy fix! Had a look at the rear brakes and it turned out that I'd left the proportioning valve fully open. The hand brake ( or parking brake ) worked perfectly, proving that there was nothing wrong with the brake shoes or the rear drums. As the hand brake is cable operated and the foot brake is standard fluid, I figured that there just wasn't enough pressure getting to the rear shoes. After a couple of adjustments of the proportioning valve ( basically, turning the control knob clockwise to increase the pressure to the rear end ) and with the car up on axle stands and back wheels spinning, pushing the brake pedal locked the rear wheels. A couple days later and it was back to the MOT station. This time it passed and i was handed the all important MOT certificate, drove straight to my local post office to tax it, then headed straight to my local cruise. 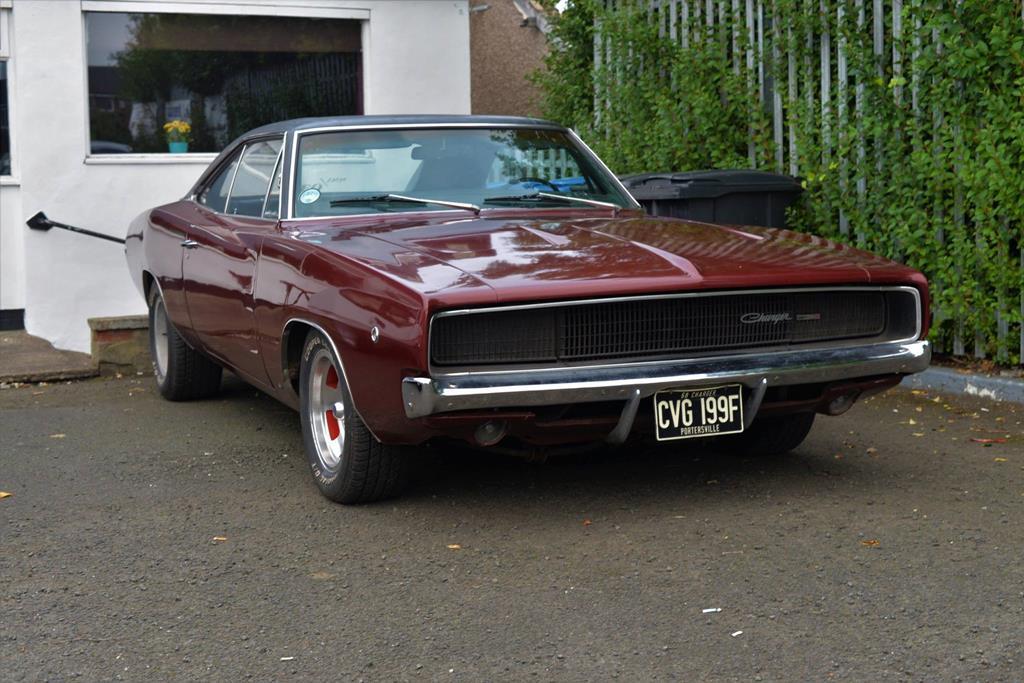 |
| |
1968 Dodge Charger
1985 Chevrolet Camaro
1993 Toyota Hilux Surf
2001 Ford Mondeo
|
|
Rebel
Part of things
Posts: 343
|
|
|
|
Of course, it doesn't end there ( well, it wouldn't, would it ? ). Now that it's legally road worthy, I can sort out all the little bits and pieces that are going to crop up as well as a few changes that I've been planning while it's been off the road. However, a couple of things did show up almost straight away. After dismantling the front steering and suspension and replacing all the bushes and ball joints, as well as replacing the front brake drums with discs etc. The alignment needed setting up, I drove to a local ATS to get the caster / camber and toe set up where I wanted it but their gauges wouldn't fit over the tyres due to it sitting so low at the front that the top of the tyres weren't visible. I offered to adjust it while there as it's only one bolt on either side and an easy job. The guy at ATS declined my offer stating that it would change all the settings, I did advise that it wouldn't as they hadn't actually changed anything yet, but he didn't seem to understand my point of view! Anyhoo, I called a mate and asked for a hand with it and we did the old fashioned way, using a protractor, set square and tape measure, no pictures of sadly as I forgot to take any. We adjusted the height, lifting it by 2 inches ( I know that seems a huge amount, but it was really low ). Now it drives really well and self centres when coming out of a corner, which it never used to. When he was refitting the left hand wheel, my mate commented that there seemed to be a fair bit of play in the bearing on that side. So the next day I took the wheel off to check it. Sure enough the hub nut had come loose, only being held on by the split pin! When I removed the old front drums and bearings, I kept everything, as you do, just in case! Rummaging through the old bits and pieces, I found a pair of these, 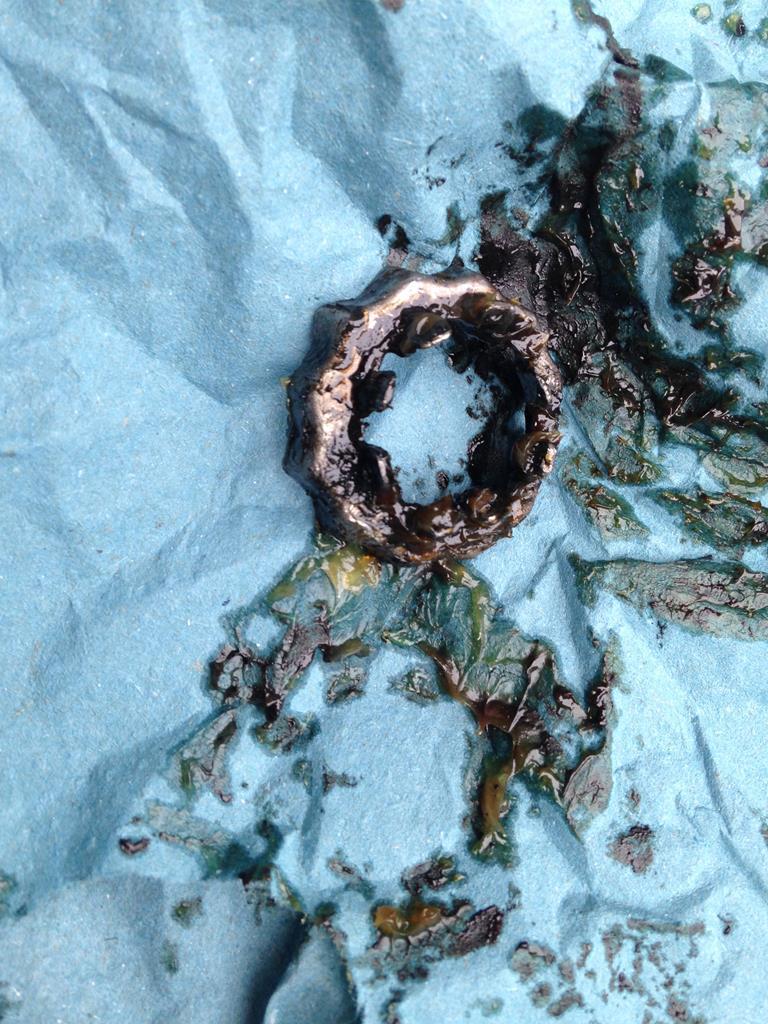 Which I'd forgotten to fit to this, 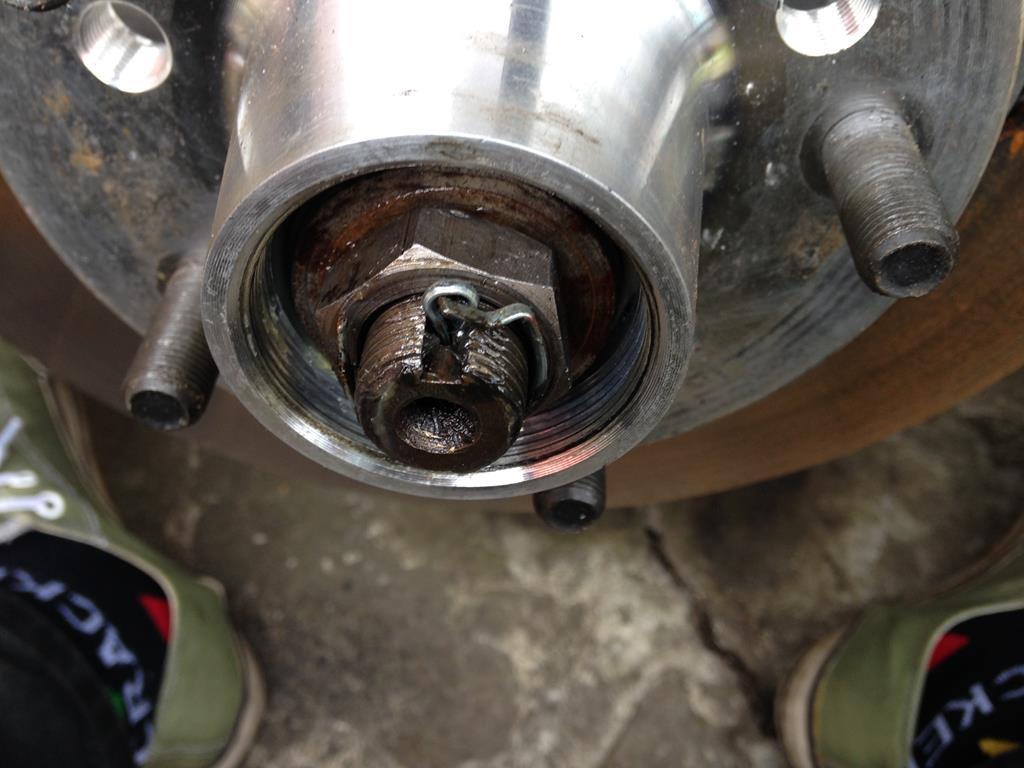 I took the split pin out, tightened up the hub nut and added the castellated washer ( if that's the right name for it ), replaced the split pin and put the wheel back on. Then repeated the process on the other side. There was also a small split in one of the tie rod boots, so I swapped that for a new one and we were good to go, again. Wait though - that's not the end either, Driving to my local ATS for the alignment that didn't happen, highlighted a vibration, quite a big one. Which as it turns out is both universal joints on the propshaft that need replacing, so no long or fast journeys at the moment then! |
| |
1968 Dodge Charger
1985 Chevrolet Camaro
1993 Toyota Hilux Surf
2001 Ford Mondeo
|
|
|
|
|
|
|
That Charger of yours is really looking good. I love the slots on it, and only wish that I could find a set for my Barracuda! The only thing is, now that you've got disc brakes instead of drums, new suspension bushes, new ball joints, tie rods and anti roll bar drop links, do you think you're getting the proper '68 Dodge Charger driving experience? Surely you remember the Duke boys, and how they sawed away at the steering wheel even when they were going in a straight line don't you?  |
| |
|
|
Rebel
Part of things
Posts: 343
|
|
|
|
|
Thanks PP, I do indeed remember Bo and Luke constantly adjusting the steering wheel to keep the General between the ditches. In small town America where the roads were mostly compacted dirt and gravel, you'd have a hard time keeping anything in a straight line when you had the pedal to the metal. In original condition, they're awful to drive, the power steering is overpowered, you can drive everywhere with one finger which is nice and easy but, there's no feedback from the road. They don't stop easily without a lot of pressure on the brake pedal and after using the brakes a couple of times on a spirited run, they tend to fade quite quickly, add to that the imbalance in the front drums under heavy braking and a steering box that's vague at best and it all adds up to something that's not really all that enjoyable. Not to mention that the lower control arm bushes on mine weren't just worn out but were virtually non existent, a grooved and subsequently useless brake drum on one side along with matching grooves and useless brake shoes all being masked by the over powered power steering. In reality it just wasn't enjoyable to drive at all! Your barracuda might well be similar, although being a bit lighter in weight, yours might handle a bit better.
I swapped out the front drum brakes for discs more for safety than anything else, they were an option originally, so they're really just an upgrade. Changing from power steering to manual is also in keeping with originality as power steering was an option back in '68 as well. I don't see it as not getting the '68 Charger driving experience but more like getting the full '68 Charger driving experience and still being alive with no broken bones afterwards to tell people about it, lol.
I think the slot mags work really well, when I thought I might have to go with something different and everyone was advising to go up to a 17 inch rim with lower profile tyres, I just didn't want to go that route. When I bought it, it was on 14 inch rims with 70 series tyres and the arches swallowed the wheels which made it look all wrong, changing to 15 inch rims with 60 series rubber makes it look just about right in my opinion. Although the rear wheels will look better when the 10x15's are on, instead of the 8.5x15's that are on now.
Theres still plenty of slot mags available out there if you want a set for the barracuda, they ain't cheap anymore though, sadly. Unless you get lucky.
|
| |
1968 Dodge Charger
1985 Chevrolet Camaro
1993 Toyota Hilux Surf
2001 Ford Mondeo
|
|
Rebel
Part of things
Posts: 343
|
|
|
|
|
|
| |
1968 Dodge Charger
1985 Chevrolet Camaro
1993 Toyota Hilux Surf
2001 Ford Mondeo
|
|
|
|
|
|
|
After getting the wheel issue resolved, there was just a couple of cable ties to replace on the back axle as extra security for holding the brake pipes that run along the axle in place. There was originally a cable tie at either end as well as the factory clips for holding the pipes in position, I guess the original clips aren't as close fitting as they were 49yrs ago. Due to the cable ties having been there since I acquired the car almost 12yrs ago, I replaced them. One of the new brake pipes in the engine bay was just a little too close to the inner wing and looked as though it might rub against it with the vibration of driving, thinking that it might cause problems in the long run and also the MOT inspector might not like it if he noticed it, I covered it with a 3 inch length of rubber pipe, just to prevent any problems. Having done everything, it was finally time to try and start it.... I borrowed a battery from one of my other cars, connected it up, slid the key in the ignition and turned it. Nothing, tried it again and there was a single click, not the multiple clicks you get from a flat battery, just a single click. I knew the engine turned over by hand so it hadn't seized. Took the battery off and put it on charge, while it was charging, I checked and cleaned all the earths. The earth lead that goes from the rear of the engine block to the firewall was so brittle that as soon as I touched it, it fell apart! I replaced it with a short battery earth lead, more than twice as thick which hopefully should be good for another 49yrs. Also found that the main lead from the starter motor to the battery was loose, tightened up and all other connections seemed to be good to go. The next day, the fully charged battery was reconnected, key slid into the ignition and turned, again nothing but a single click! Thinking that it might be the starter motor at fault, we ( a mate had called round and gave me a hand ) ran a cable from the battery to the starter relay. The starter motor kicked in and turned the engine over, after 4 or 5 turns it fired right up and sounded...... well, it sounds like this We left it running for about 5 minutes while we checked that all the lights, indicators and horn etc worked. Then turned it off, tried restarting it a couple of minutes later and started up no problem just using the key. Ooh I just lurves that v8 rumble |
| |
|
|
Rebel
Part of things
Posts: 343
|
|
|
|
|
You can't beat the rumble of a V8, always makes you stop and look when you hear it
|
| |
1968 Dodge Charger
1985 Chevrolet Camaro
1993 Toyota Hilux Surf
2001 Ford Mondeo
|
|
|
|


 ) first , then use the nut to ease the bearings home ...