adam73bgt
Club Retro Rides Member
Posts: 4,867
Club RR Member Number: 58
|
|
|
|
Picked this up recently as something a bit different to have a play with. Like many of us I'm a bit of a serial tinkerer but I've never really done a proper bike project. Growing up in semi-rural Suffolk, I did always have a bike but my working on them was fairly limited to general maintenance, changing inner tubes etc. I did have a go at cycle speedway for a while which was pretty cool and a couple of years ago did the London to Brighton ride with my dad sharing riding duties between his Raleigh Record Ace and a newer Dawes hybrid bike we bought which was really too big for either of us  Since moving to Coventry 10 years ago for uni, I never bothered having a bike here as everything was in walking distance/nowhere to keep it/ worries about it being nicked. Fast forward to present day though, my dad had sold his old Raleigh, and as part of helping to organise and clear out the family garage, I picked up the aforementioned Dawes bike, put some new mudguards and tyres on it and gave it a general tidy up 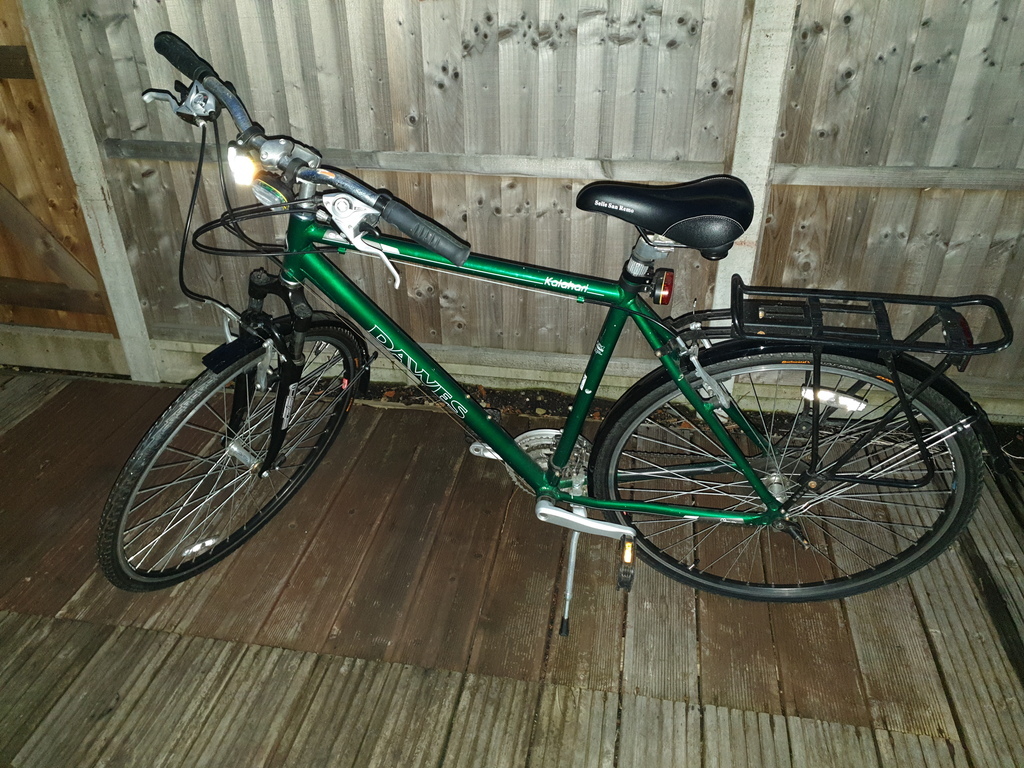 It's still too big for me though so is due to be sold soon. But fixing it up a bit planted an idea in my head to get a bike for myself again, I liked the old Record Ace road/touring style of bike so got looking about and found this locally going for cheap 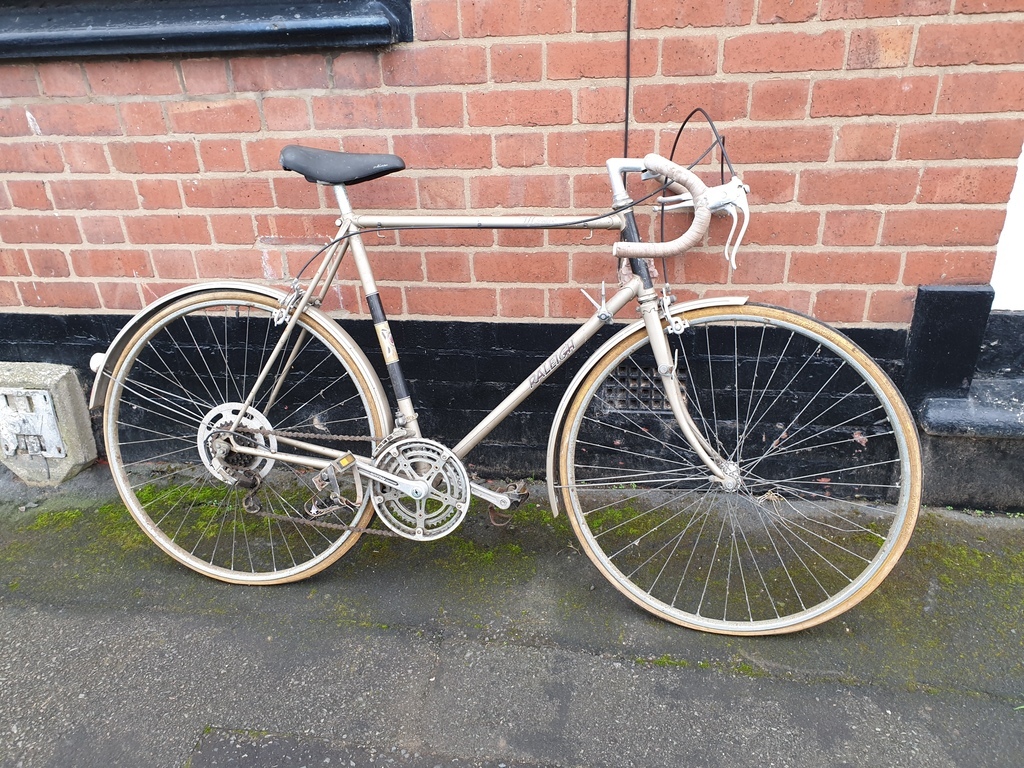 The ad wasn't very detailed but apparently it's a Raleigh Medale, checking the serial number seems to suggest it's a 1982 bike 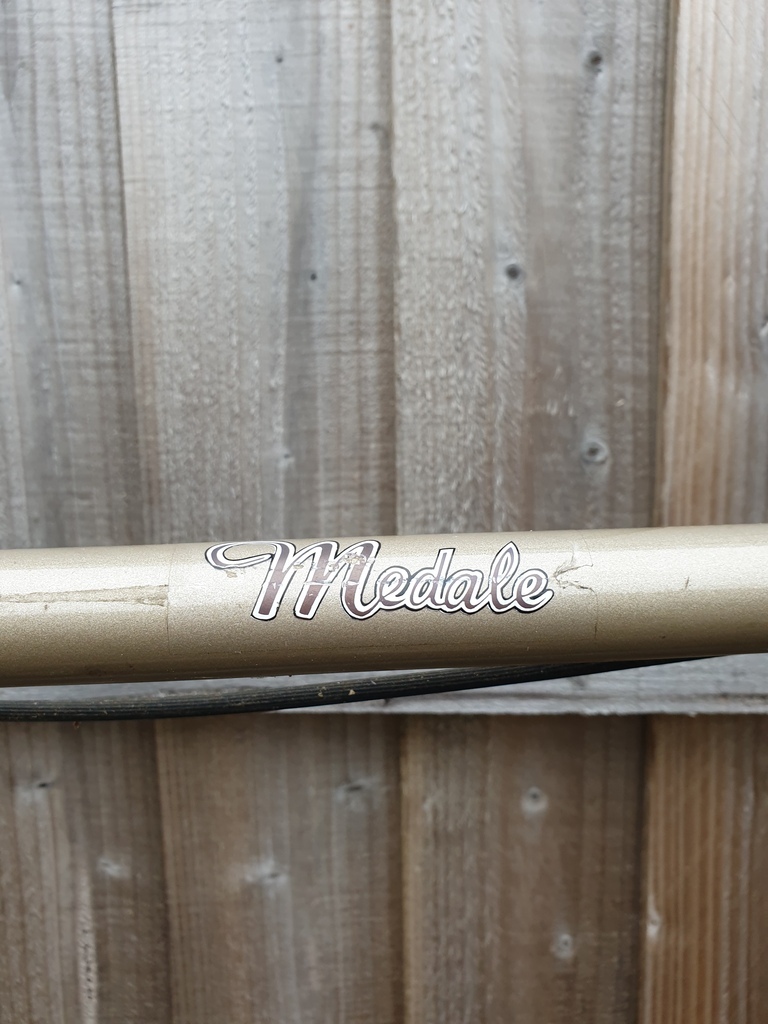 10 speeds (a bit of research seems to suggest they were available in 5 and 10 speed variants), 27" wheels and I can't really tell you that much more about it as I'm really not a bike expert! However it seems to be fairly solid, so I'll just start cleaning bits up and freeing bits off and see where I get with it. The tyres and handlebar grips will need replacing, the brakes seem to be free so will clean those up, the rear gear changer is sticky but moving, the front one seems stuck and the chain and gears themselves have a bit of rust on them so will research what the best methods are for cleaning these up. So yeah, something else to keep me busy alongside the car projects  |
| |
Last Edit: Nov 18, 2020 16:38:48 GMT by adam73bgt
|
|
|
|
|
|
|
Nov 10, 2020 13:04:00 GMT
|
|
the medale was I think a rebadged Carlton grandprix from the tail end of the 70s/early 80s when raleigh bought them out. it has the same seat stay join detail etc.
should have wienmann side pull brakes. these are just long enough to run 700c wheels (just is the choice word) which would free up some tyre choices for you.
looks a nice stead, they are a bit flexi under heavy load and obviously, not a modern bike, but still enjoyable to ride.
it's getting harder to find frames of this age thanks to the fixie crowd and their desire to convert all old bikes to knee ruiners. (note, I have a 79 carlton grandprix that is single speed because it was just a frame when I got it).
|
| |
|
|
adam73bgt
Club Retro Rides Member
Posts: 4,867
Club RR Member Number: 58
|
|
Nov 10, 2020 15:47:06 GMT
|
|
Ah thats interesting, thanks for the info!
Good point about the wheels, the ones on this look to have a little corrosion, if they are too far gone then maybe some 700c's would be the way to go.
Yeah as I'm not into full on high performance cycling, and I've never really understood the fixie thing, this should just make a nice chilled rider
|
| |
|
|
awoo
Posted a lot

Posts: 1,504
|
|
Nov 11, 2020 10:24:19 GMT
|
|
if you like the 70s look of the bike, putting 700c wheels in there would probably screw that up a bit, it will leave big gaps between the frame and won't look right, in the same way big gaps in wheel arches after a swap out of wheels on a car looks off and messes with the proportions.
some aluminium rim 27" wheels would look right and perform better than steel. you should be able to get a pair easily enough on eBay and there are enough tyre choices out there for just normal riding.
even so, just some soapy Brillo pads will take the worst of the rust from the existing rims if you don't want to start spending out on it.
|
| |
|
|
melle
South West
It'll come out in the wash.
Posts: 1,984
|
|
Nov 12, 2020 12:10:19 GMT
|
convert all old bikes to knee ruiners. I've never really understood the fixie thing, this should just make a nice chilled rider
I had a 12-speed Raleigh Rapide, very similar to yours but a step up in their range I think.
|
| |
www.saabv4.com'70 Saab 96 V4 "The Devil's Own V4" '77 Saab 95 V4 van conversion project '88 Saab 900i 8V
|
|
|
|
|
Nov 12, 2020 14:08:27 GMT
|
yep I've ridden fixed. I used to use it for winter training (still use a single speed for it now) and in the one place it belongs, the track. I live in the northwest, granted not the most mountainous of regions in the UK, but the hills can still be an ordeal. wouldn't say I love riding fixed, one of life's little pleasures is coasting down a big hill.  difference is that my fixed bike was intended to be a fixed wheel bike and not a conversion of a old bike that happened to have forward facing dropouts. these days, winter training on a fixed wheel has fallen out of fashion, with trainers and the likes of zwift seemingly being the preferred method. inspiration picture, this is the grandprix on 700c rims:  old bike old bike by David Rees, on Flickr |
| |
|
|
melle
South West
It'll come out in the wash.
Posts: 1,984
|
|
Nov 12, 2020 14:27:06 GMT
|
|
Agree, fixies and hills aren't a great combination.
|
| |
www.saabv4.com'70 Saab 96 V4 "The Devil's Own V4" '77 Saab 95 V4 van conversion project '88 Saab 900i 8V
|
|
adam73bgt
Club Retro Rides Member
Posts: 4,867
Club RR Member Number: 58
|
|
Nov 12, 2020 15:41:22 GMT
|
I've never ridden one as far as I can recall so I'll plead ignorance on them! Maybe a project for the future will be to make one and see what it's all about |
| |
|
|
adam73bgt
Club Retro Rides Member
Posts: 4,867
Club RR Member Number: 58
|
|
Nov 18, 2020 16:38:11 GMT
|
Well I've been busy taking this all apart, plenty of photos taken just for my memory so I remember how it all goes back together 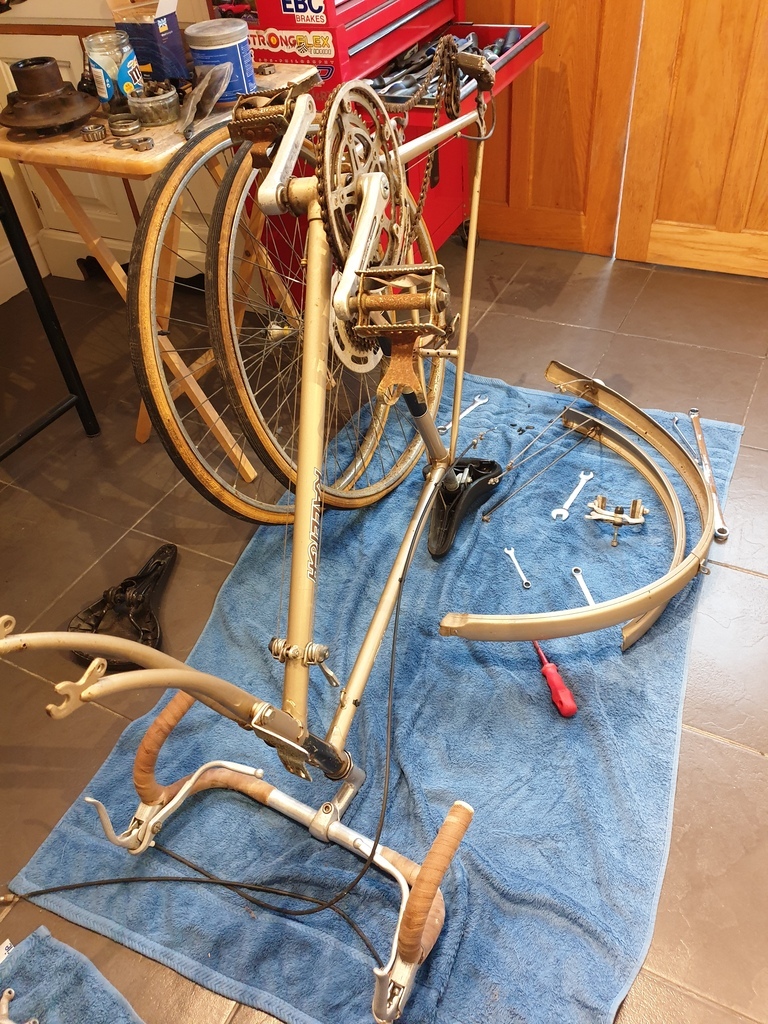 Wheels came off easily and have been set to one side, I've got new 27" tyres so I'll be sticking with the original wheel size, remains to be seen how I go about refurbing/replacing them. First bits that I've properly gone through are the front and rear brake calipers, both Weinmann's, they didn't actually seem to be in too bad nick, I just disassembled, washed them in soapy water, gave some bits a clean up with some metal polish then reassembled with grease on all the moving parts. 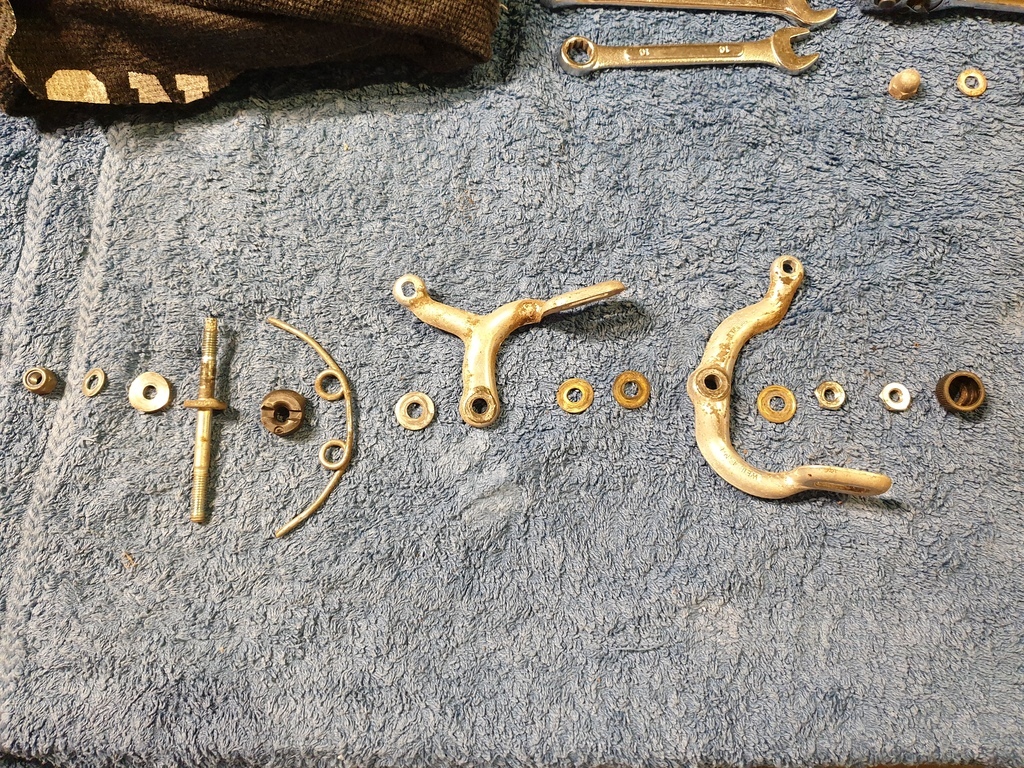 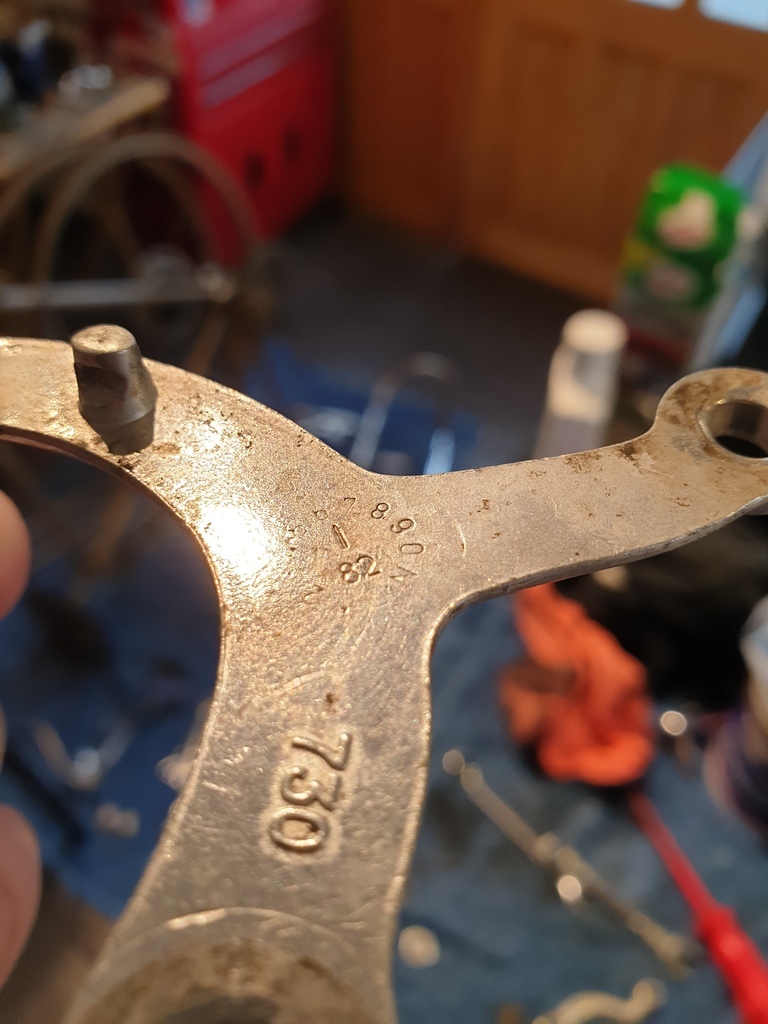 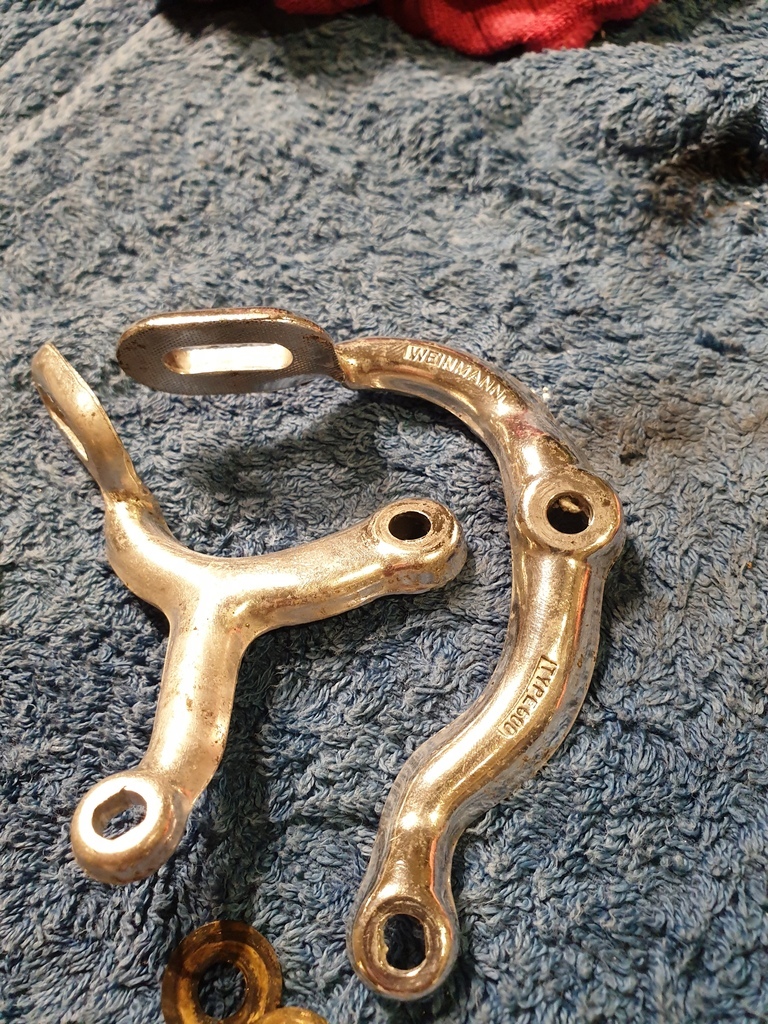 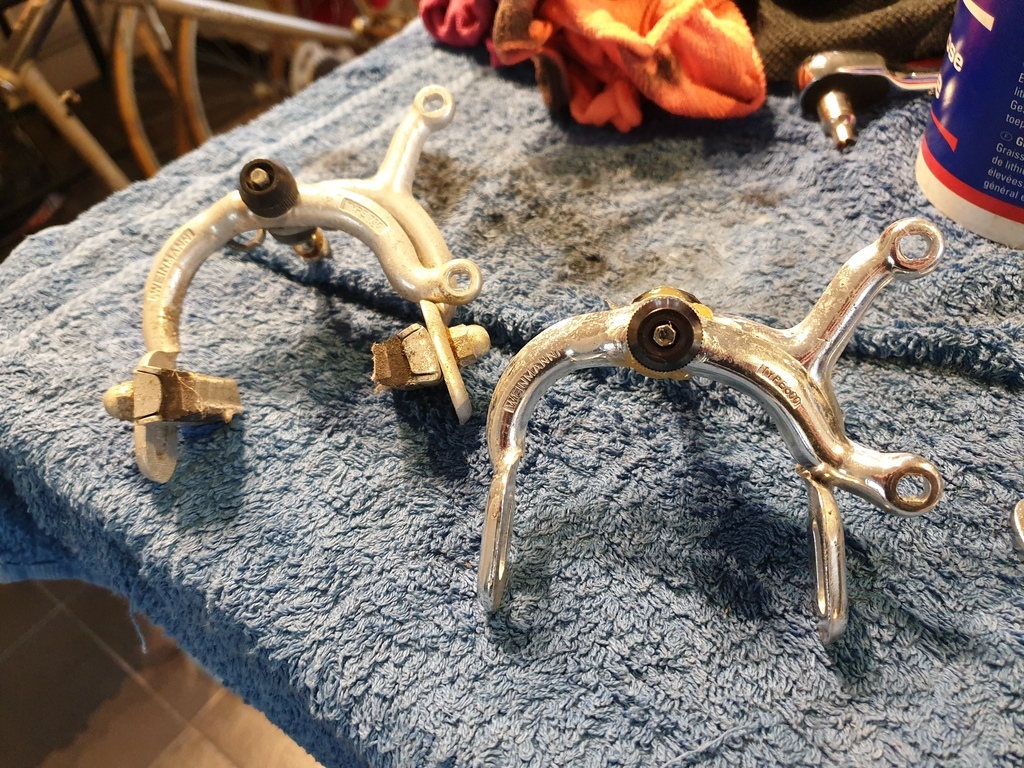 The side by side calipers shows the rear before cleaning up and the front which I'd just done, I'm not going crazy on getting them mirror polished, just nicely tidied up and functional. The arms all have date stamps on them for various months between April and June 1982 so seems I did read up on the frame code correctly to get the date right! I've got the forks/stem (not an expert with my terminology!) out of the front and managed to not lose any of the ball bearings 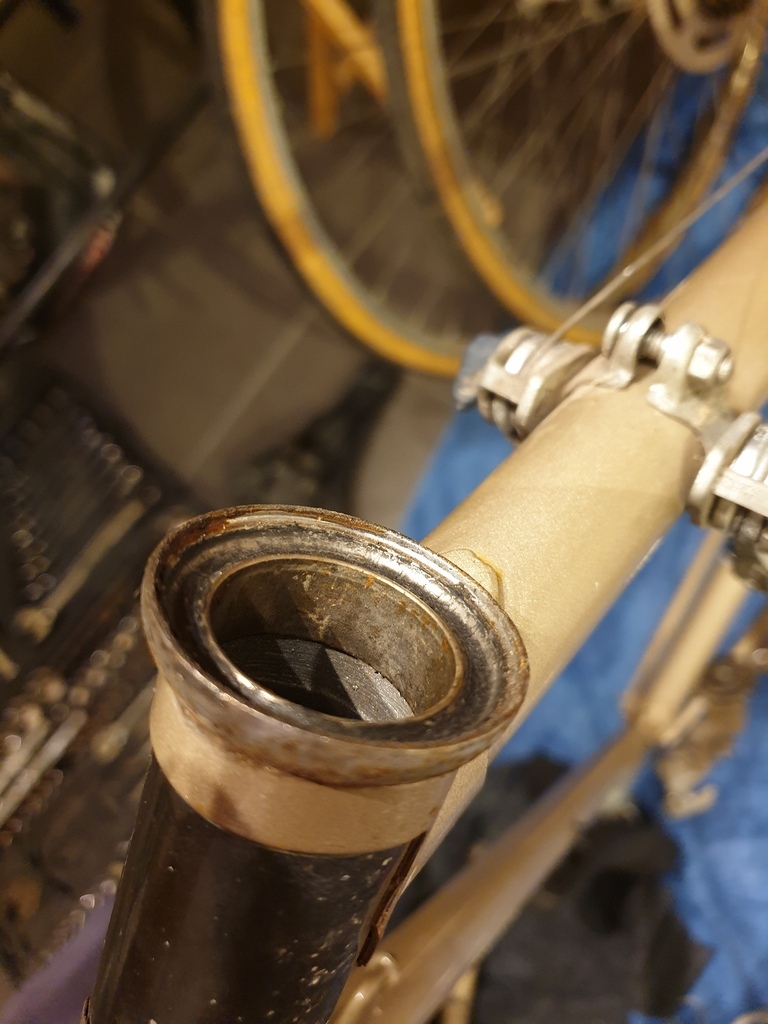 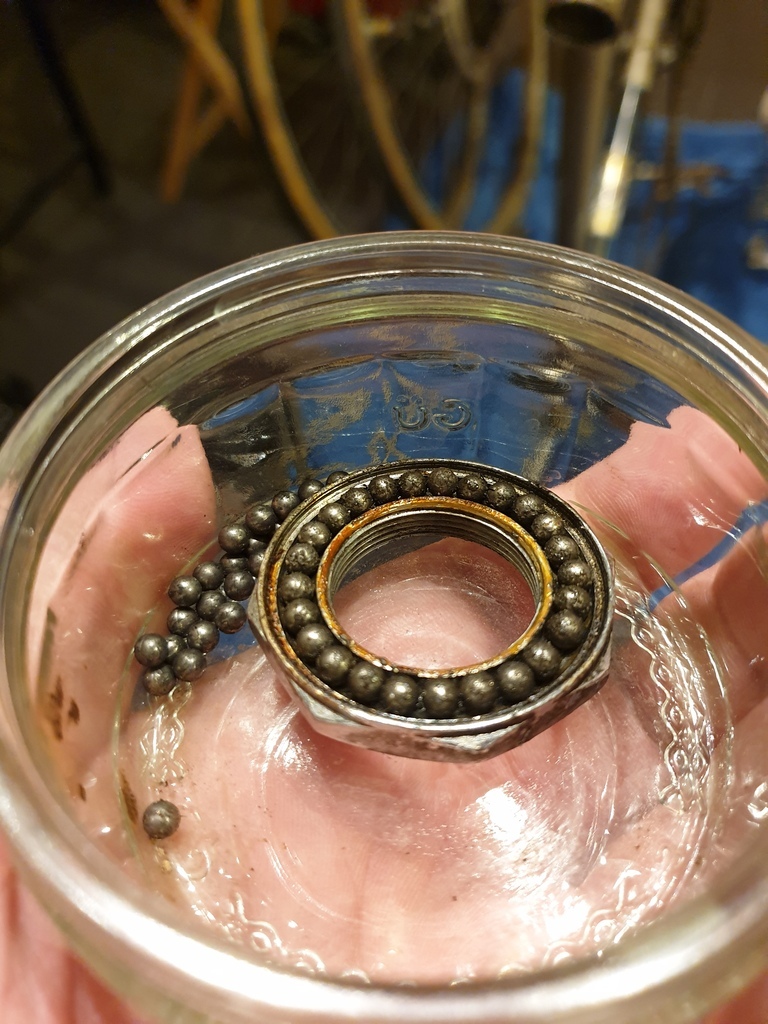 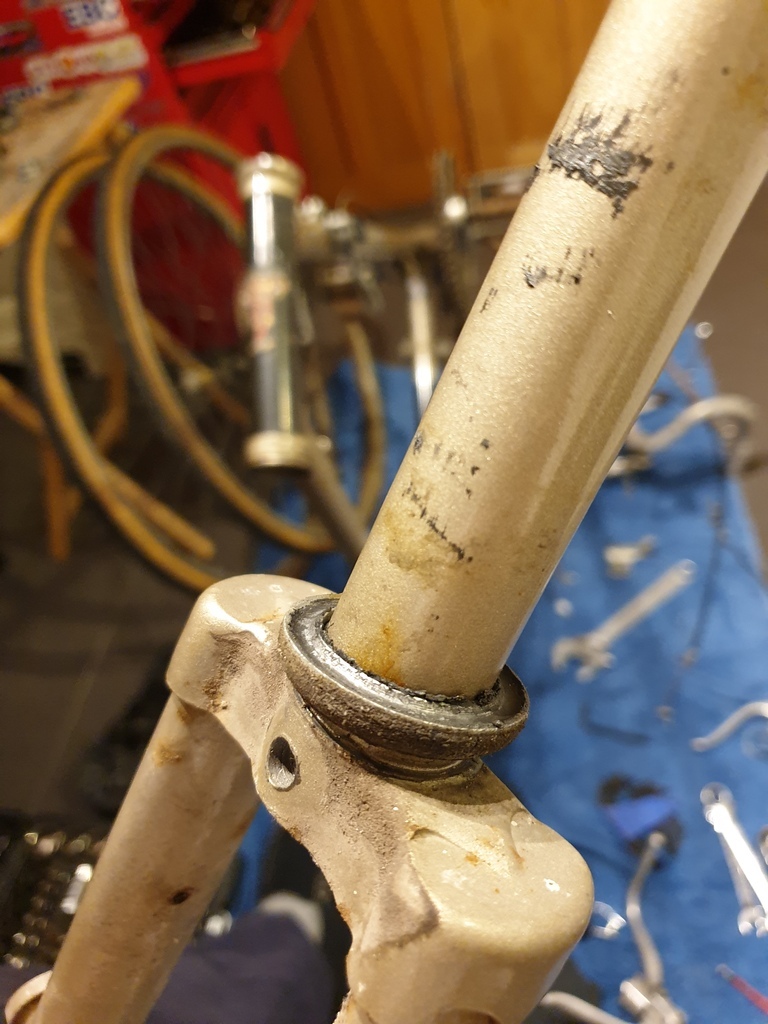 The bearings and races look ok on an intial inspection, I'll give them all a good clean up and check again before regreasing and putting it back together. I've taken off the brake levers for the clean and lubricate treatment also, and the grip tape off the bars which was very faded 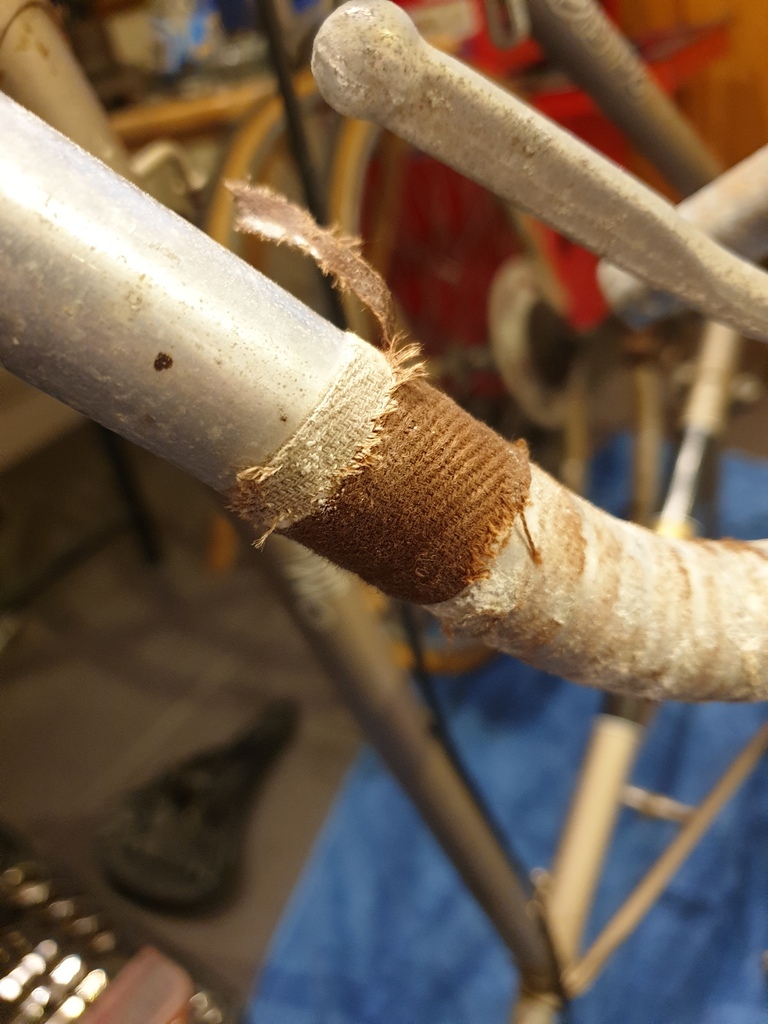 I'll likely replace the brake cables also and I need to remember to get some new brake blocks Pedals are off and very rusty, I think replacement will be the name of the game there also. Found that I had a chain tool in my little cycle tool kit that I had for the London - Brighton ride, so removed the rusty and dry old chain. 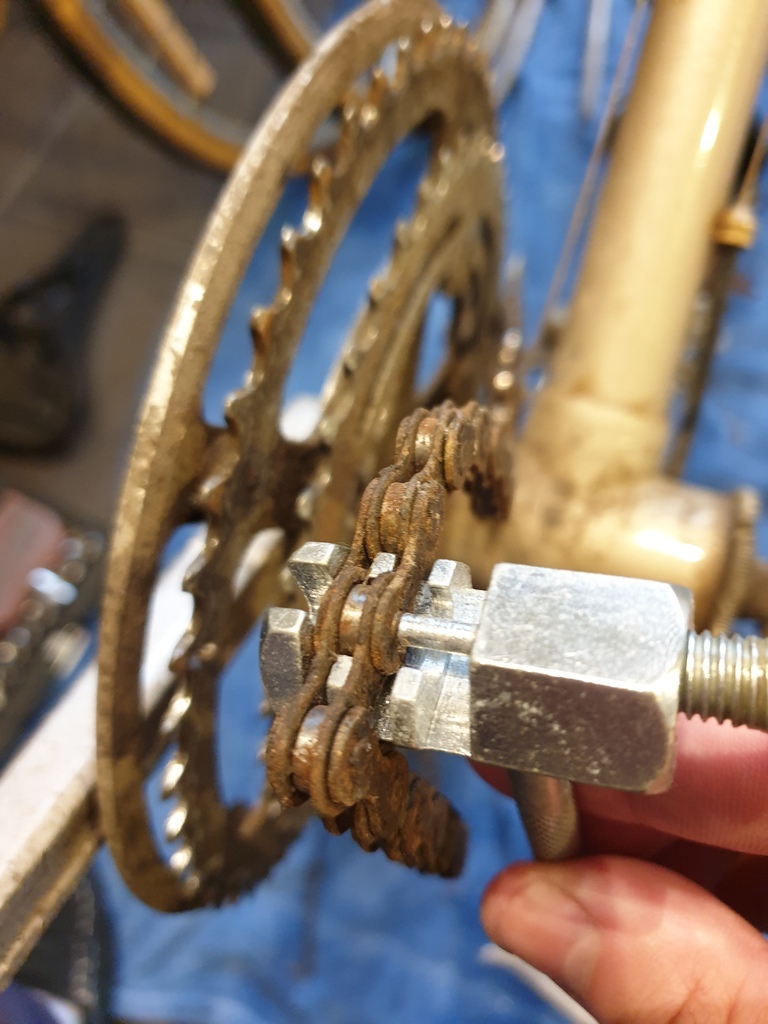 That will want replacing also. The derailleur is a Huret, the top pivot is very sticky but the other one and the jockey wheels are free, it's very caked in years of dirt and grease so will want a long dip in some degreaser or similar. The gears look ok to me, in need of a clean. 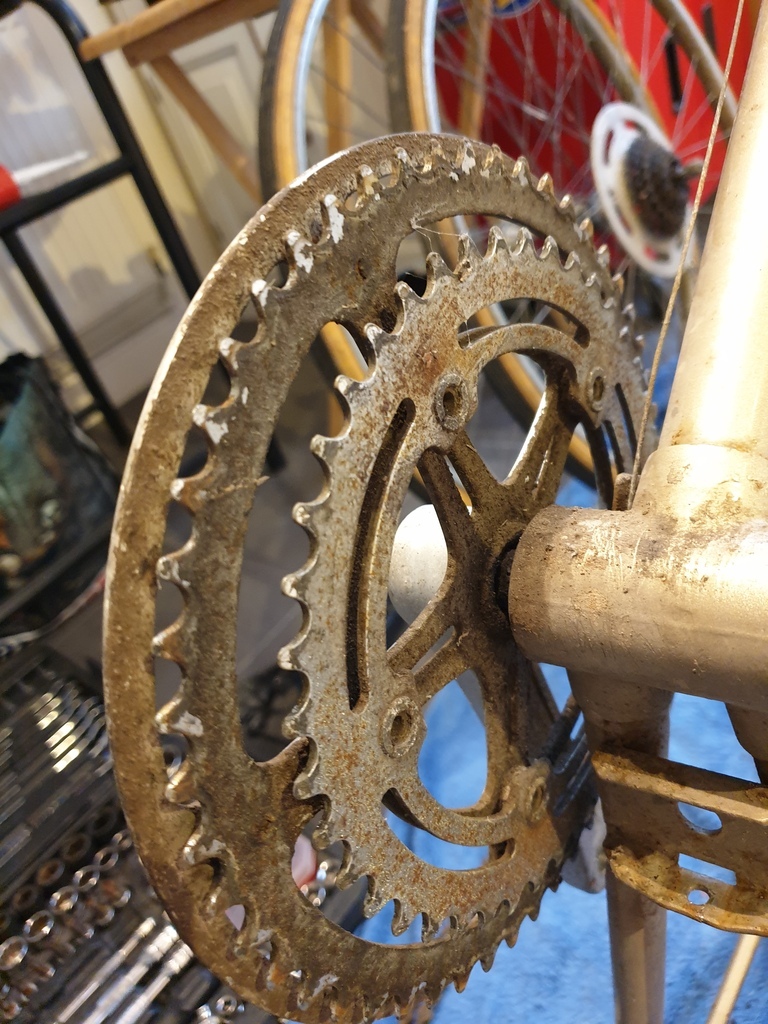 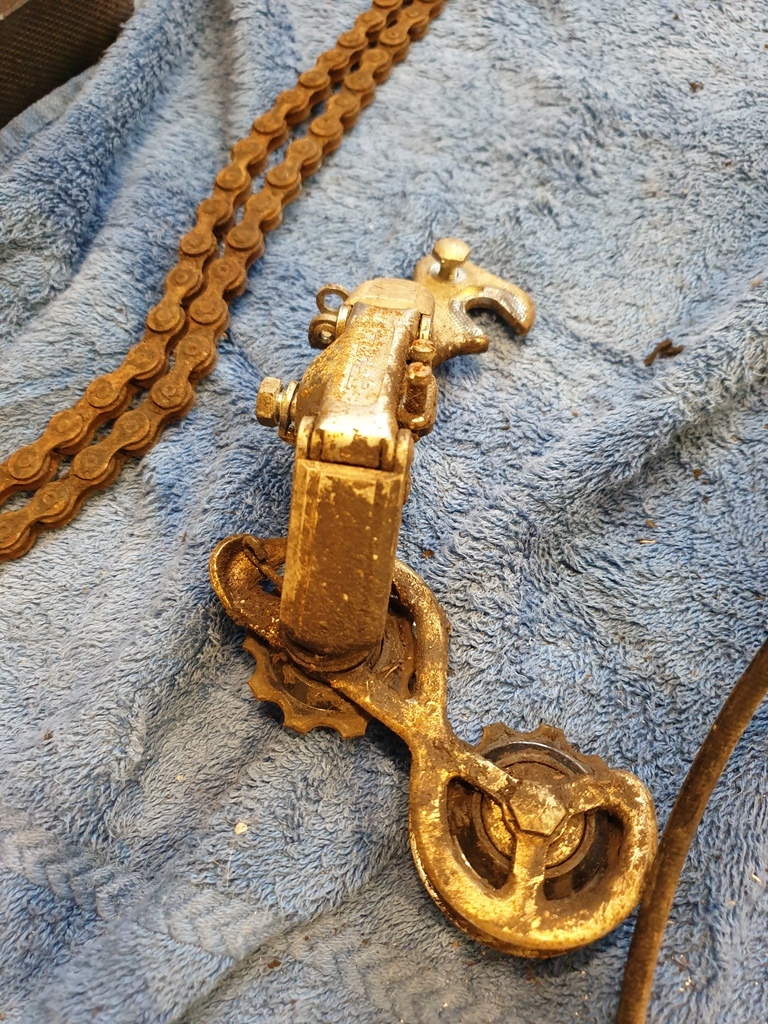 Last bits to remove/inspect are the crank and the front gear selector which was stuck so will need some investigation and freeing off. So far, so happy, I'm hoping to get this all sorted without spending huge sums of money so it seems to be going ok so far. Knowing where/how to find the right replacement parts at a good price is probably the main challenge really |
| |
|
|
adam73bgt
Club Retro Rides Member
Posts: 4,867
Club RR Member Number: 58
|
|
Nov 18, 2020 16:42:41 GMT
|
Oh and also while taking off the rear mudguard, noticed the very faint sticker suggesting that the bike was supplied by Thorntons Cycle Centre in Rugby 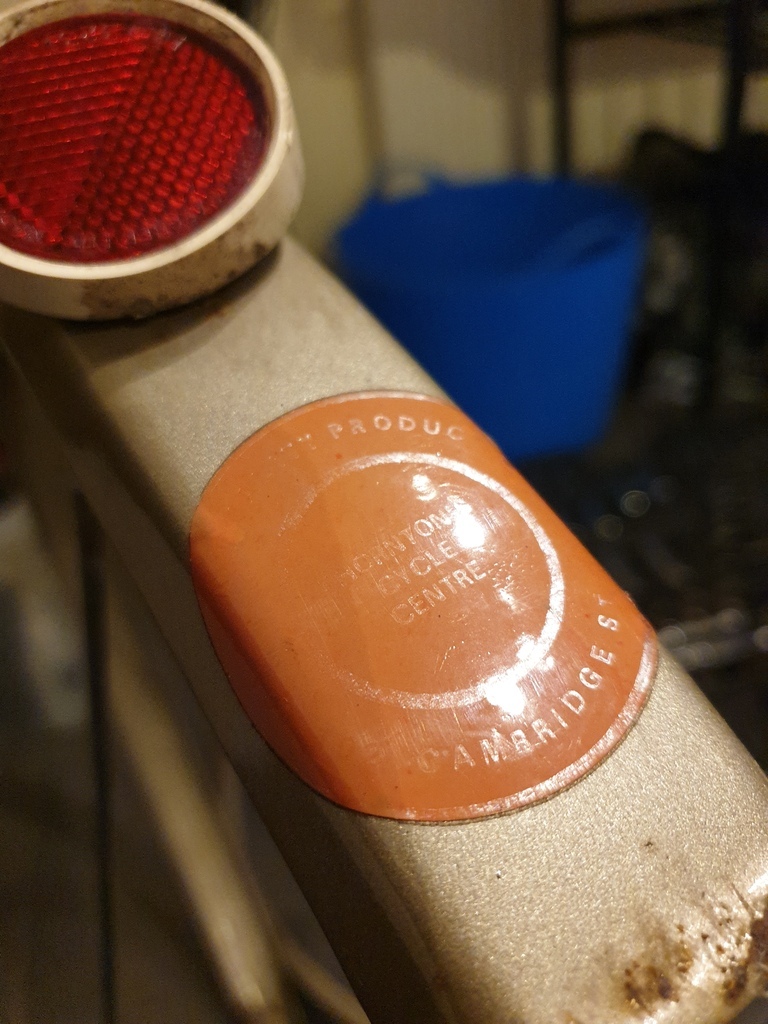 According to local news sites it seems they sadly shut up shop last year, but maybe once I get it finished I'll take it for a ride to Rugby, would be a nice ride from mine |
| |
|
|
|
|
|
|
|
Nov 18, 2020 17:12:46 GMT
|
headrace bearing look dulled and possible nearing dead. cheap enough to replace. races look OK underneath the black grease so that's a plus. drop of locktite on the pivot bolt of the brakes once you've set them is a good idea. chain, a modern 7-8 speed should fit fine, buy something with a powerlink to save the hassle of a new pin. replace the cable outers and inners, for the few quid it costs for a metre of brake outer a couple of ferrules and 2 new inners, it isn't worth the bother. new pads are a must though. brake out the autosol if you are keeping the wheels, it should bring them up just fine. chain rings look ok, can't see the rear end but it has the chances of being fried. it's a freewheel rather than a freehub. you'll need a special tool to remove it but you can still by the freewheel easy enough. rear mech, give it a good clean with degreaser then check for play, but as you are on friction shifters rather than indexed, it should be fine, make sure you set the stops when you refit it, they have a tendency to drive in to the rear wheel. sticky shifters, probably dry friction plates, easy enough to sort. happy riding. check the threads on the pedals, they maybe 1/2" by 20tpi rather than the more regular (these days) 9/16" 20tpi. if they are the later than the world is your oyster so to speak. |
| |
Last Edit: Nov 18, 2020 17:14:39 GMT by novocaine
|
|
melle
South West
It'll come out in the wash.
Posts: 1,984
|
|
Nov 18, 2020 17:38:51 GMT
|
Good work so far! but as you are on friction shifters rather than indexed, it should be fine, make sure you set the stops when you refit it, they have a tendency to drive in to the rear wheel. His rear wheel has a shield, so not much that can go catastrophically wrong. It would have been easier to remove the pedals with the rear wheel still in place, they can get really stuck (n/s has a left hand thread!). Don't overdo the grease on the brake calipers and mechs, it only attracts dust. I agree with novocaine , replace the headset (yours is probably 1", measure before you order) and the brake cables. I've upgraded some of my bikes to Goodridge cables for both brakes and shifters, makes a huge difference. Consider replacing the bottom bracket as well, it will make a noticeable difference in pedalling effort and isn't that expensive. |
| |
www.saabv4.com'70 Saab 96 V4 "The Devil's Own V4" '77 Saab 95 V4 van conversion project '88 Saab 900i 8V
|
|
adam73bgt
Club Retro Rides Member
Posts: 4,867
Club RR Member Number: 58
|
|
Nov 18, 2020 17:55:48 GMT
|
Thank you so much Given me plenty to check and read up on haha Ah yes the bearing balls seem to be very cheap so might as well replace those, I was having some trouble getting the lock nut tight enough on the brakes due to not having a really thin spanner to hold the other nut so loctite for extra security is a good shout. Yeah I agree on the brake cables and pads, new stuff will be less hassle in the long run. I need to do some reading to understand hub and chain types better! The rear wheel did seem to turn ok but I'll have to have a proper look at the hub and gears when I get round to doing the wheels. I did watch a video on youtube about setting the derailleur stops earlier, seems fairly straightforward and made me wonder why I never bothered learning how to sort them properly before. Would have been handy when I was a teenager as we often ended up using bikes for goalposts when playing football and then wondered why they never shifted quite right after a few games Yeah I won't throw the old pedals just yet, from reading it seems like Raleigh did like to use odd thread sizes here and there so I'll be sure to check them |
| |
|
|
adam73bgt
Club Retro Rides Member
Posts: 4,867
Club RR Member Number: 58
|
|
Nov 18, 2020 18:01:36 GMT
|
It would have been easier to remove the pedals with the rear wheel still in place I realised this after looking at a guide online after I'd already torn half the bike apart hahah, but the pedals thankfully didn't put up too much of a fight in the end once I worked out which way I was meant to be turning. Yeah I'll make sure to get rid of any excess grease, that was my concern as well with dirt sticking to it. Headsets look pretty cheap as well to be fair, I'll get what I have all cleaned up then make a decision. Which bit is the bottom bracket?... (I really am new to this ) Edit: Ignore this, Google has the answers |
| |
Last Edit: Nov 18, 2020 18:03:30 GMT by adam73bgt
|
|
melle
South West
It'll come out in the wash.
Posts: 1,984
|
|
Nov 18, 2020 18:04:13 GMT
|
|
You can get complete head sets for not a lot of money, only replacing the balls doesn't make much sense imo.
Check out the late Sheldon Brown's website, it's still live years after his death and remains a great source.
|
| |
www.saabv4.com'70 Saab 96 V4 "The Devil's Own V4" '77 Saab 95 V4 van conversion project '88 Saab 900i 8V
|
|
|
|
|
Nov 18, 2020 19:17:39 GMT
|
|
It will be a 1" headset. Bigger issue is what thread is on the fork. It was standarised but that didn't stop anybody from using an obscure thread. This is the reason I said just the bearings not the whole headset. Bit of careful measuring and you could replace the whole thing. Bb will be open race,if the races aren't fubar then you'll be fine.
The style of derailleur had a tendency to flip over when over shifted too.
|
| |
|
|
|
|
|
Nov 18, 2020 20:21:43 GMT
|
Looks pretty good, I pulled a Raleigh Record out of a skip must've been nearly 30 years ago now. I've faffed with it a lot, and it's been several different bikes for me. Right now the frame is in the back of my garage waiting to be resurrected again at some point. I generally pop 700c wheels onto bikes with 27" wheels, usually because the original wheels are rusty, or buckled. But also because it's just a bit easier to get hold of decent wheels and tyres. This is my Williams racing bike as it was when I got it... 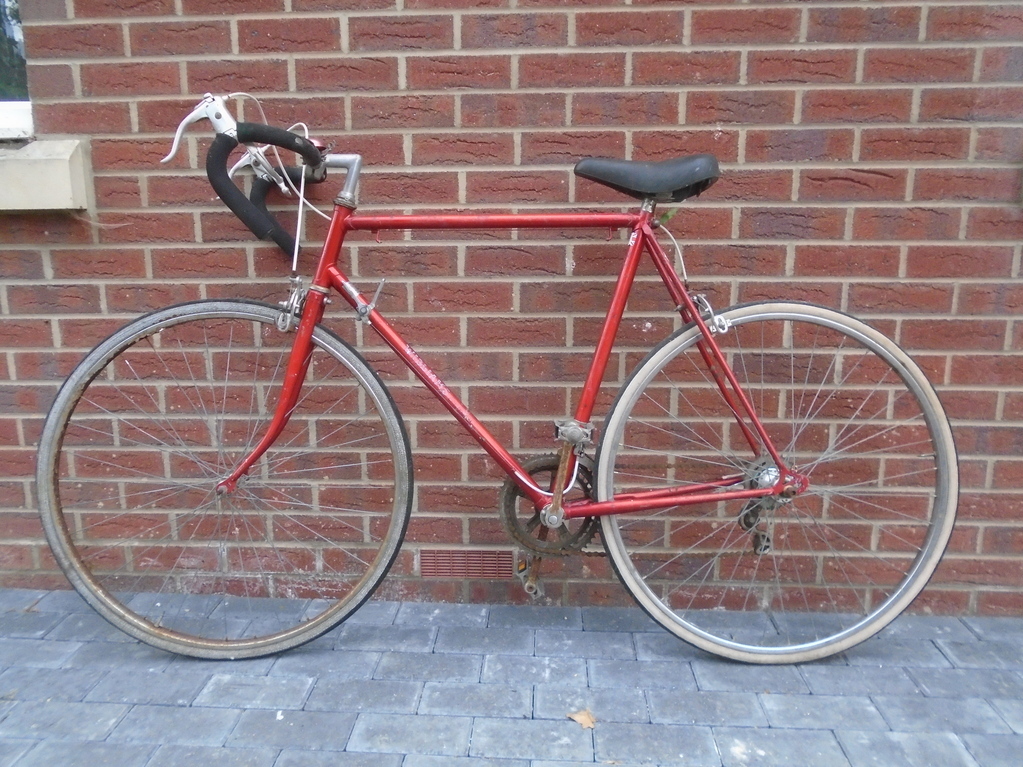 I thought it looked OK, but the wheels were rusty, and a little bit buckled, and the tyres were knackered, and as I had some 700c wheels hanging around I did this...  Which I thought looked pretty cool, and rides pretty nicely too. |
| |
|
|
adam73bgt
Club Retro Rides Member
Posts: 4,867
Club RR Member Number: 58
|
|
Nov 20, 2020 17:24:41 GMT
|
Thats a cool looking bike pistonpopper and good job on saving another bike from being skip fodder, I think most of the enjoyment I'll get out of this is taking something that was neglected and making it work again Looks like I got lucky with the pedal threads 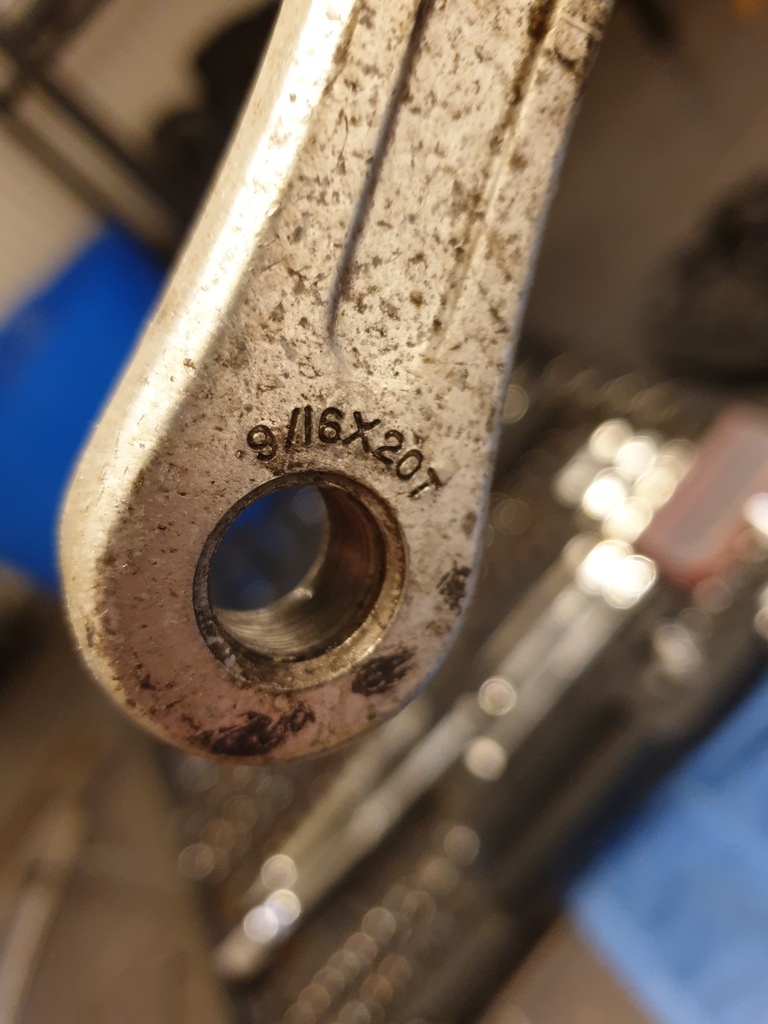 so I'll get looking for some suitably period looking replacements. I started cleaning up the wheels today as I need a crank puller tool before I can go any further with the bottom bracket. 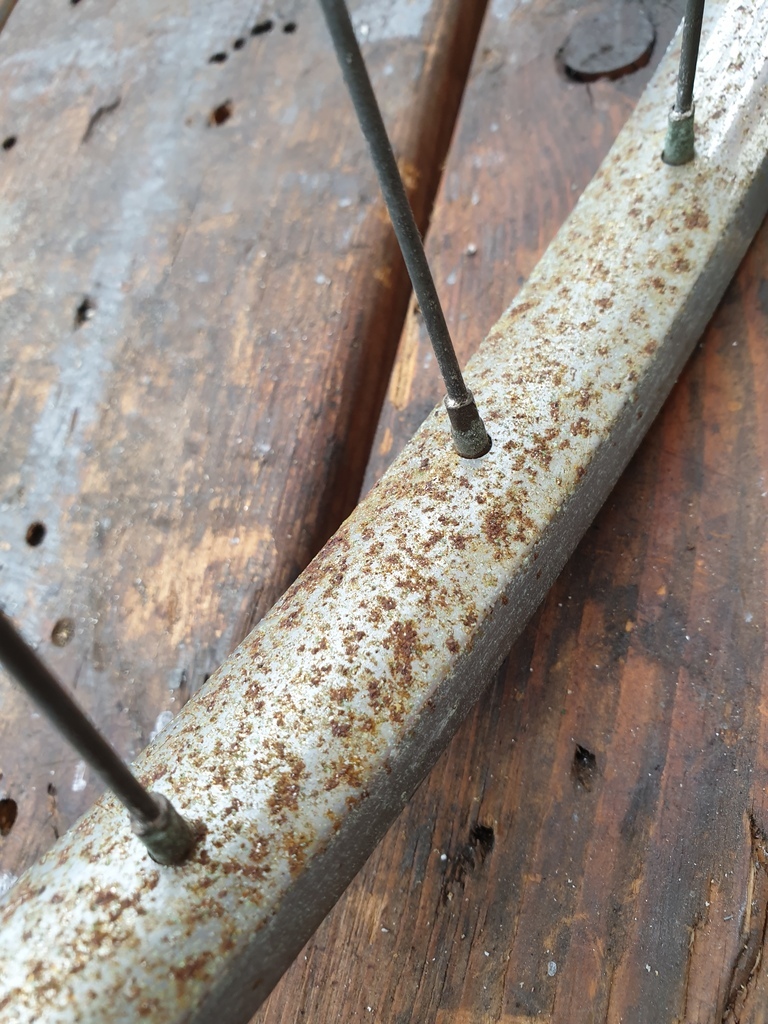  One of the inner tubes appears to be original to the bike.. It had one puncture repair on it but this makes me think it's not really been ridden much at all. I made a start on the pitting on the front wheel. Now realistically these wheels are never going to be show winners, but after some 240 grit wet and dry, some fine scotchbrite (literally the two things I had closest to hand!) and a quick going over with some Autoglym Metal Polish (I don't really rate this very highly, Autosol has done better for me in the past), the results are pretty pleasing to me 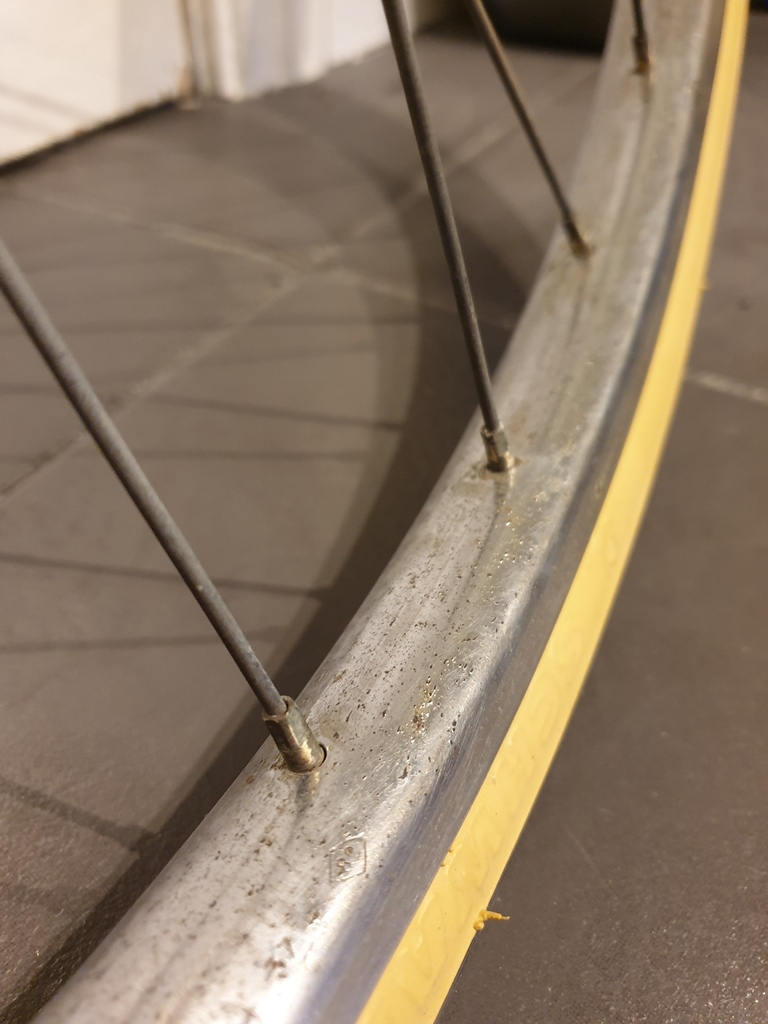 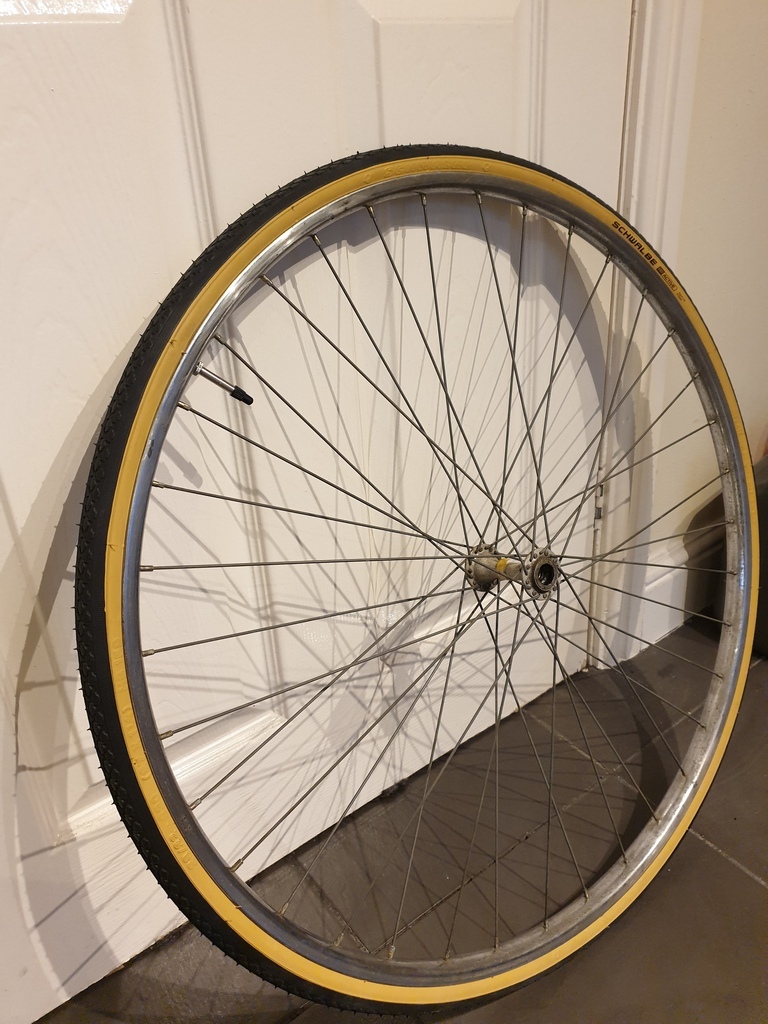 The next bits are all about bearings, I took the front axle out and got the bearings out. Happily the races look great so just need to measure up and buy some new bearings there. 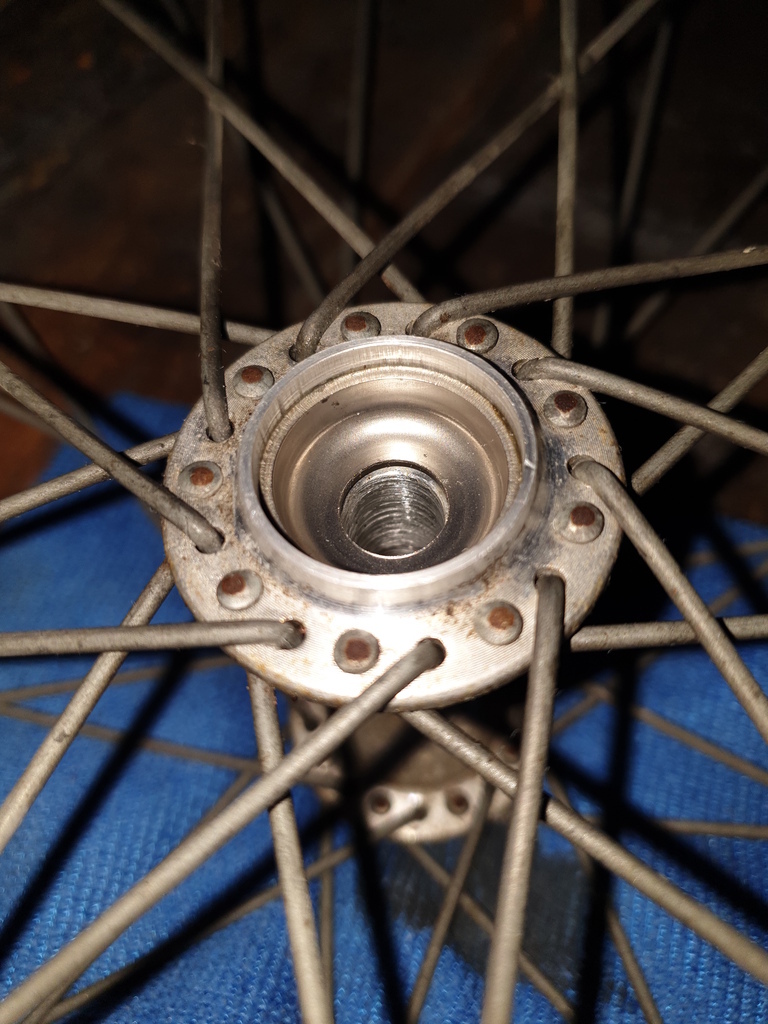 Similar story with the rear axle 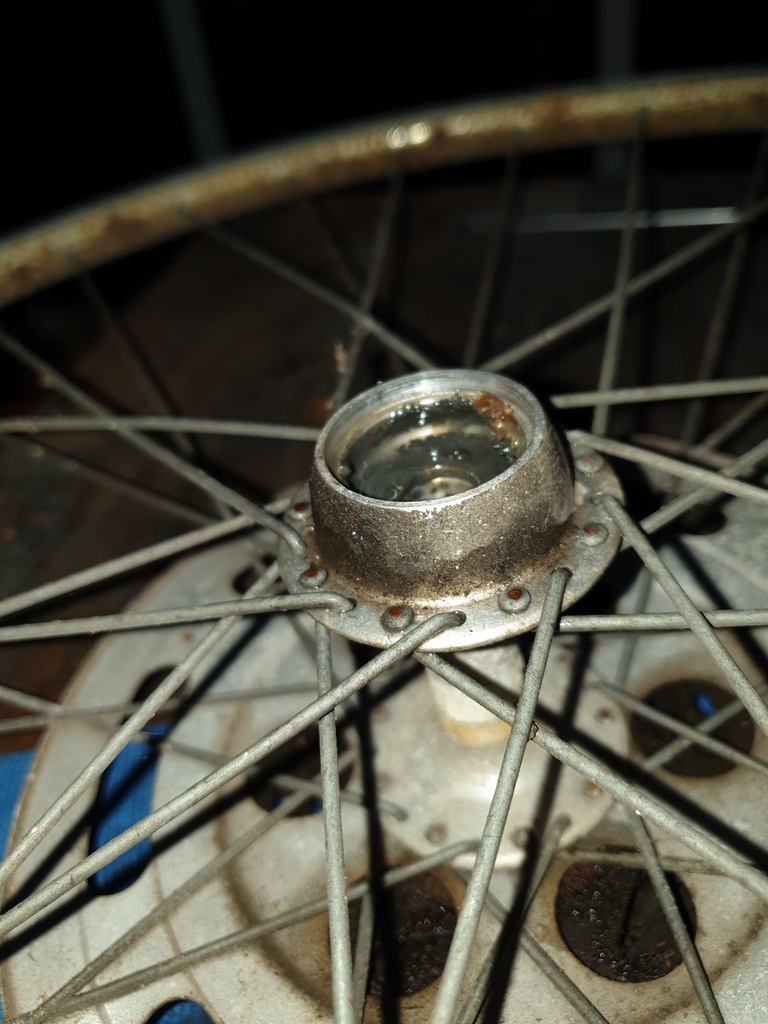 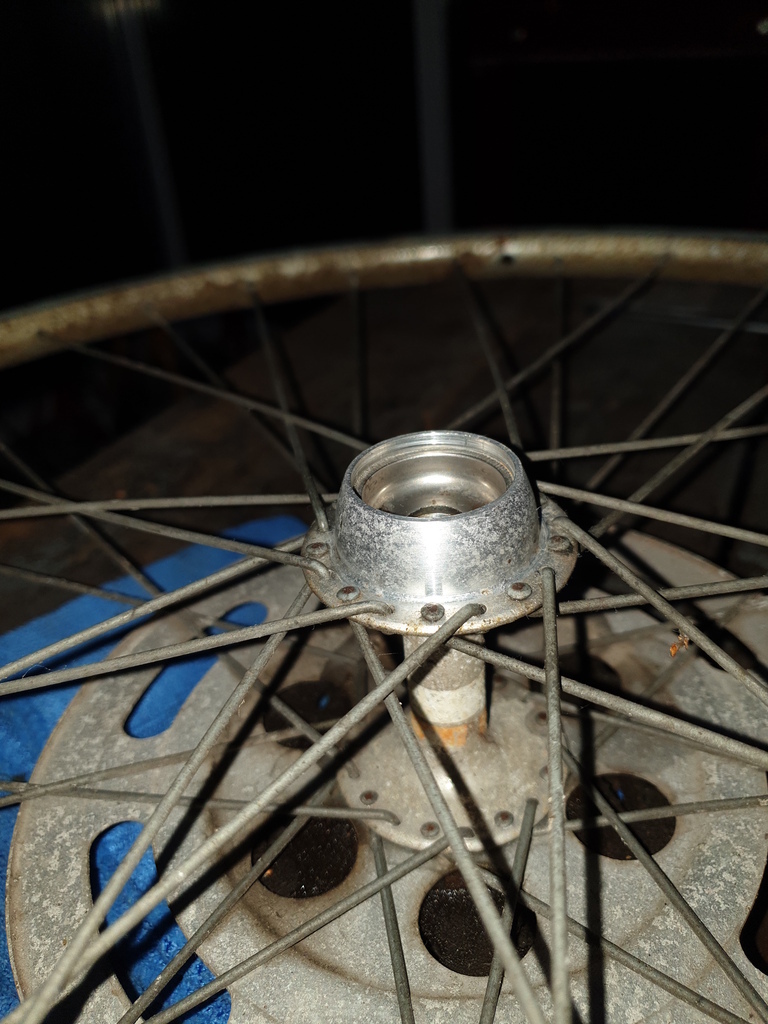 Brake cleaner is making short work of the old grease and grime. I also cleaned up the headset bearing races and to be honest they look great to me, so while a new headset is pretty cheap, I think I'll be even cheaper and just get new bearings for now 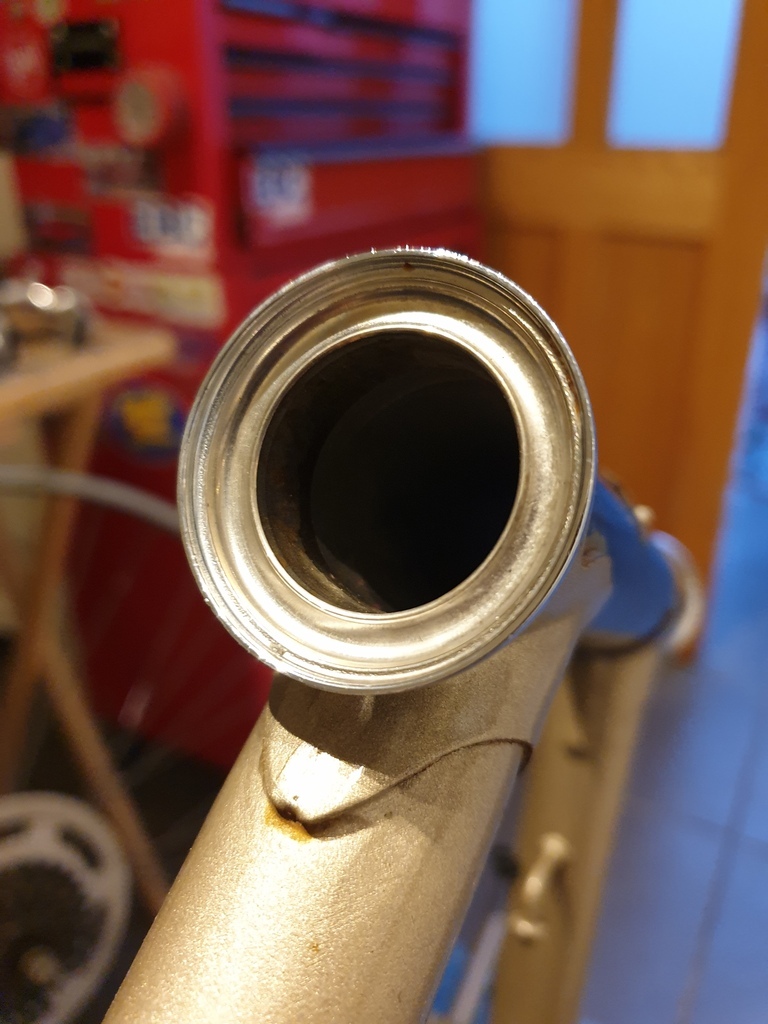 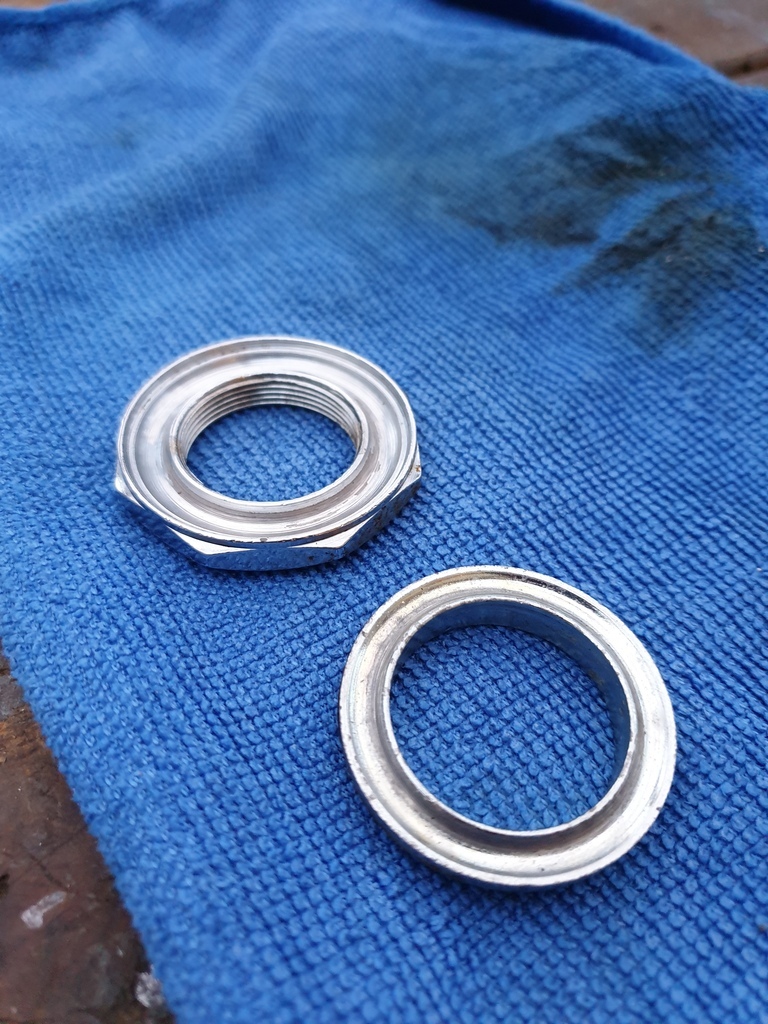 If I get any issues, at least I know how to take it all apart to replace the races now  I need to order a tool to get the freewheel off as well, it seems to sound like I'd expect a freewheel to sound.. but I'll get it off, clean it up and see what I'm working with  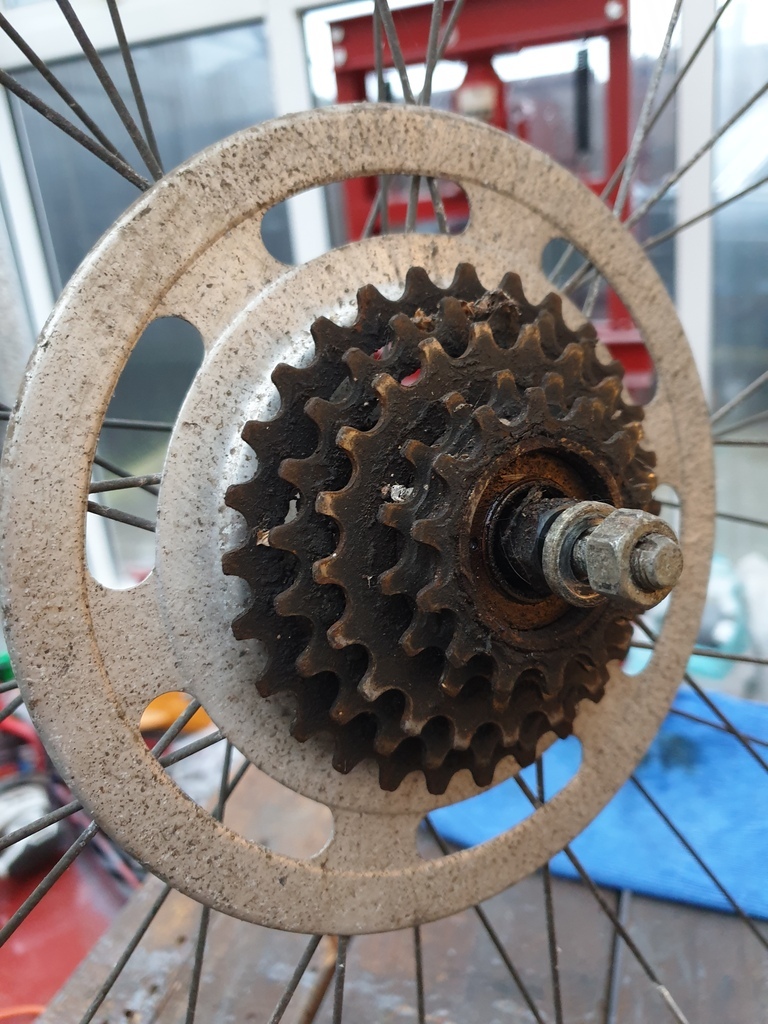 |
| |
|
|
awoo
Posted a lot
Posts: 1,504
|
|
Nov 20, 2020 21:39:06 GMT
|
|
Just clean that cassette up with brake cleaner. There’s no need to dismantle it. If you do it will be very fiddly to get back again, they have about a hundred million tiny loose ball bearings inside.
|
| |
|
|
adam73bgt
Club Retro Rides Member
Posts: 4,867
Club RR Member Number: 58
|
|
Nov 27, 2020 16:01:34 GMT
|
Just clean that cassette up with brake cleaner. There’s no need to dismantle it. If you do it will be very fiddly to get back again, they have about a hundred million tiny loose ball bearings inside. This was my original intention.. but then I thought about how all the other bearings on the bike had very old sticky grease and the fact that I'd dunked the freewheel in TFR to loosen the muck had probably also washed away the remains of the grease in there, I ended up taking it apart 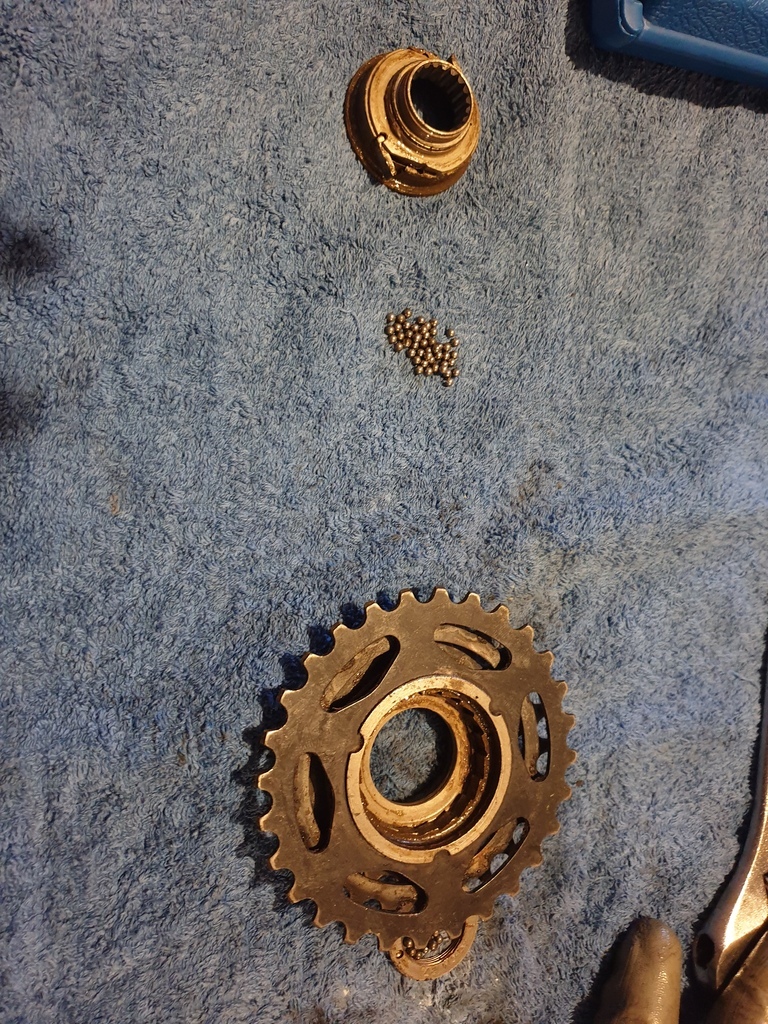 A total of 77 1/8" bearings in there if anyone is counting I had watched a video on disassembling and reassembling these before I did it so it wasn't too bad and I was quite glad to get in there with some brake cleaner and get it as clean as I could. Not many pics of the reassembly, new bearings (easier than trying to clean the old ones) and lots of grease 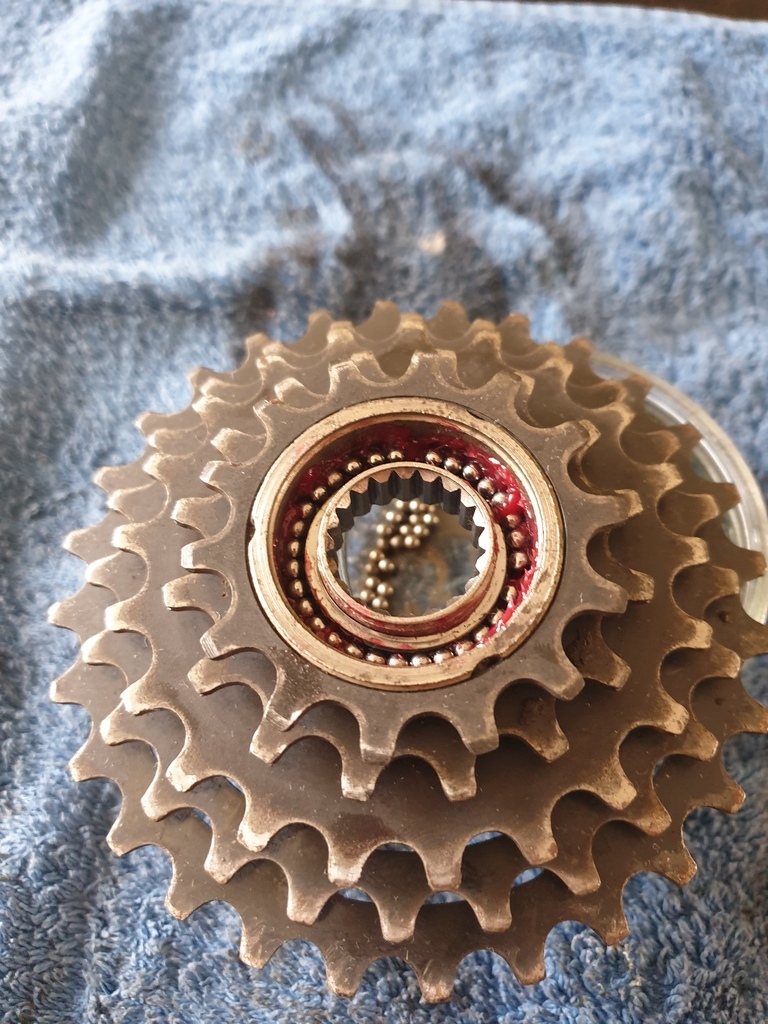 So thats all pretty sorted. My other bearing deliveries seem to have been held up in the post a bit, some 1/4" bearings did arrive today which means I can build up the rear wheel axle and put the freewheel back on. Other stuff I've been doing; managed to get the bottom bracket out, had to buy the proper spanner for it as the flats are very shallow, for the one on the drive side which is reverse thread and tighter, I used a bolt and some washers to help clamp the spanner in place 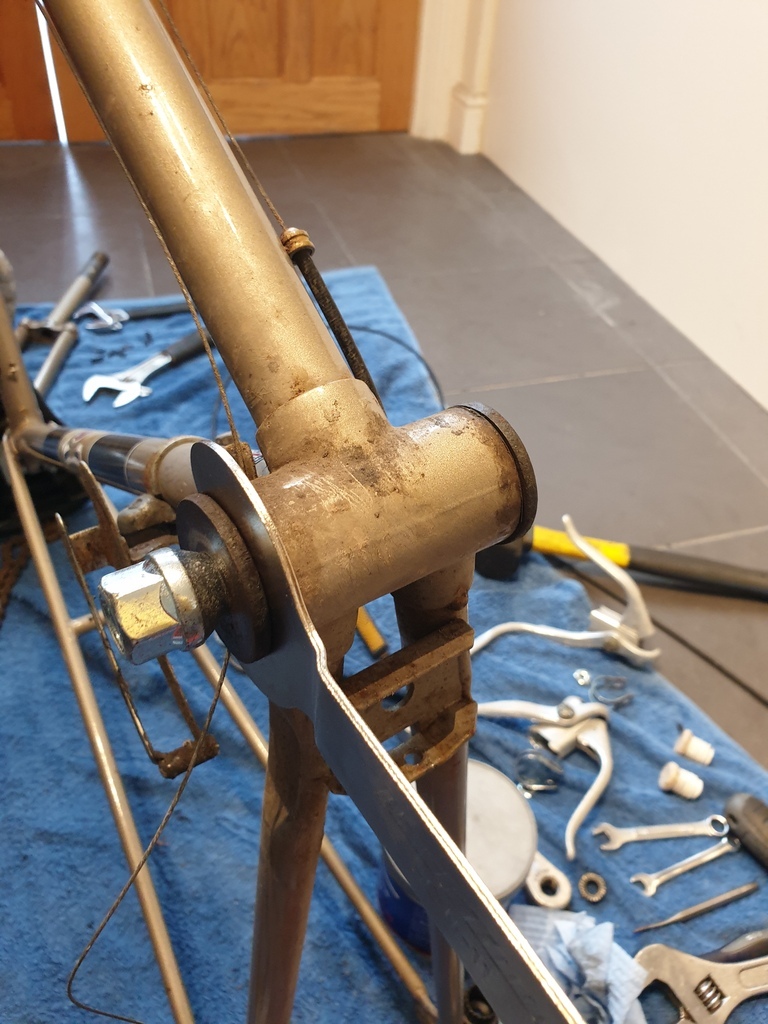 I thought about converting to a newer type of bottom bracket but for ease at the moment I've just cleaned up the races and cups and will be regreasing the bearings (new bearings just because easier than cleaning old ones etc.) I took the front chainrings apart to clean them up and used some Deox C to get rid of the pitting, certainly a big improvement from the before pics I put up before 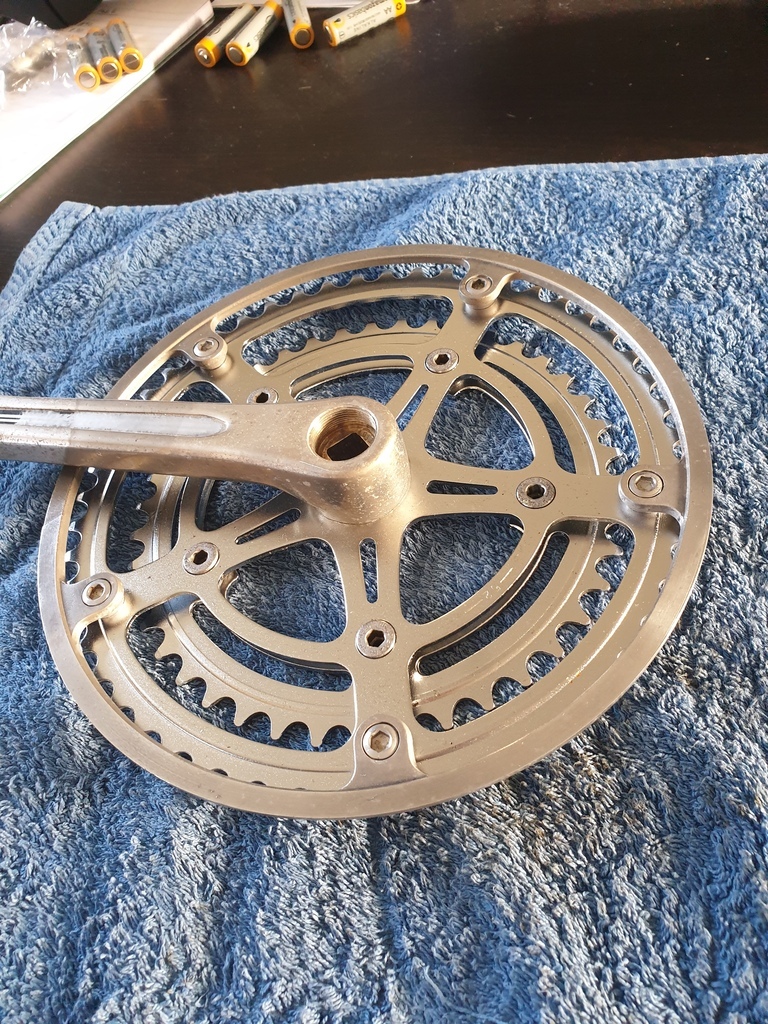 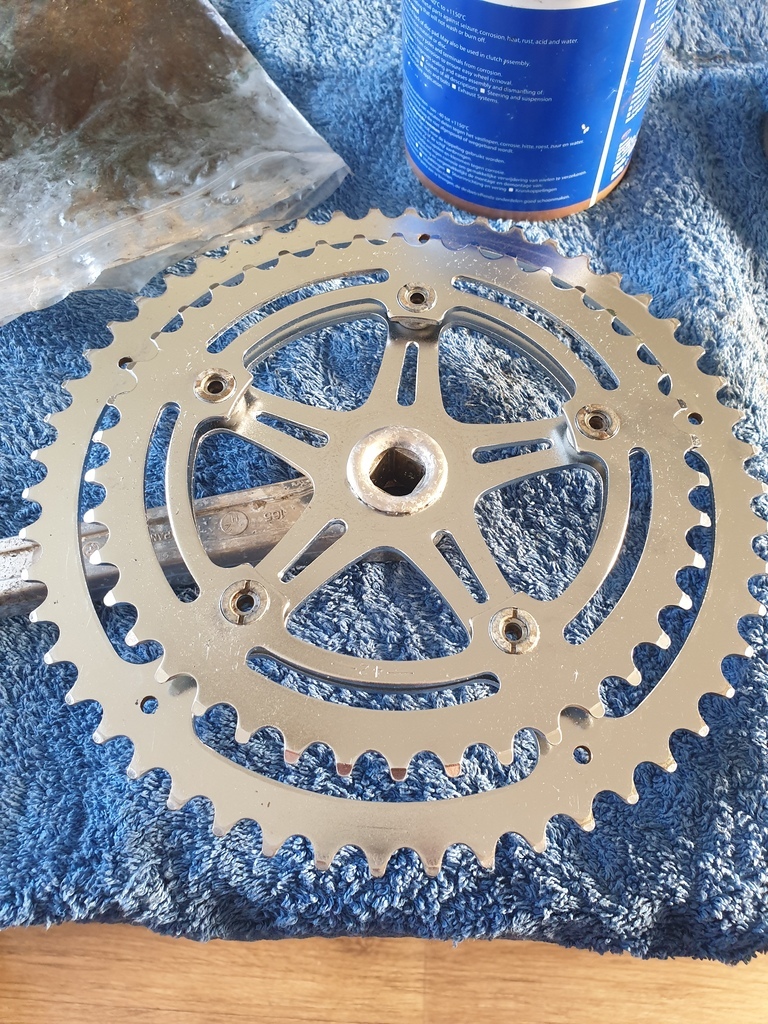 New brake pads 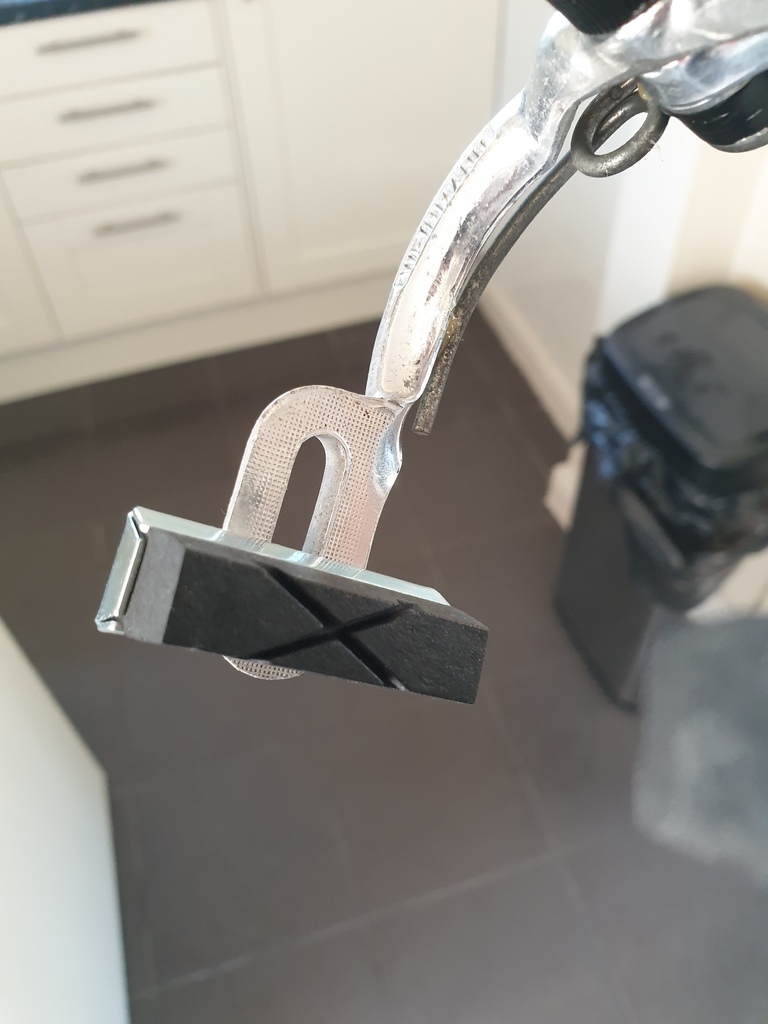 Cleaned up the guard for the chain on the rear wheel 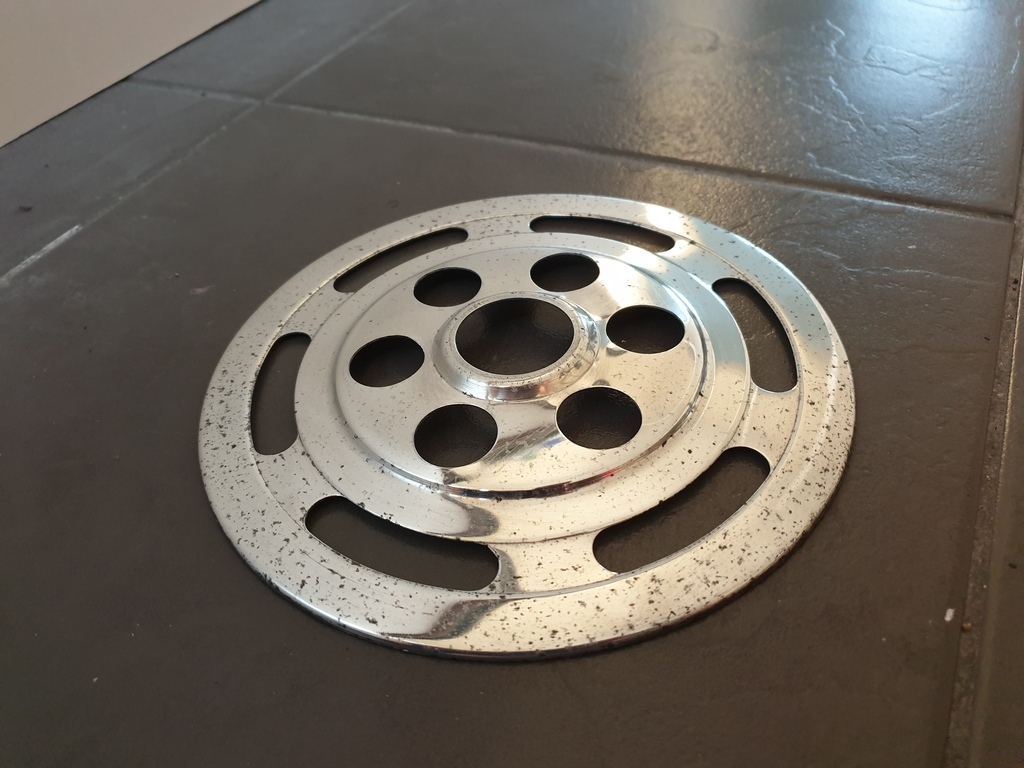 The derailleur got soaked in TFR to loosen the grease and dirt then taken apart to make sure it was totally clean and could be properly lubricated prior to reassembly 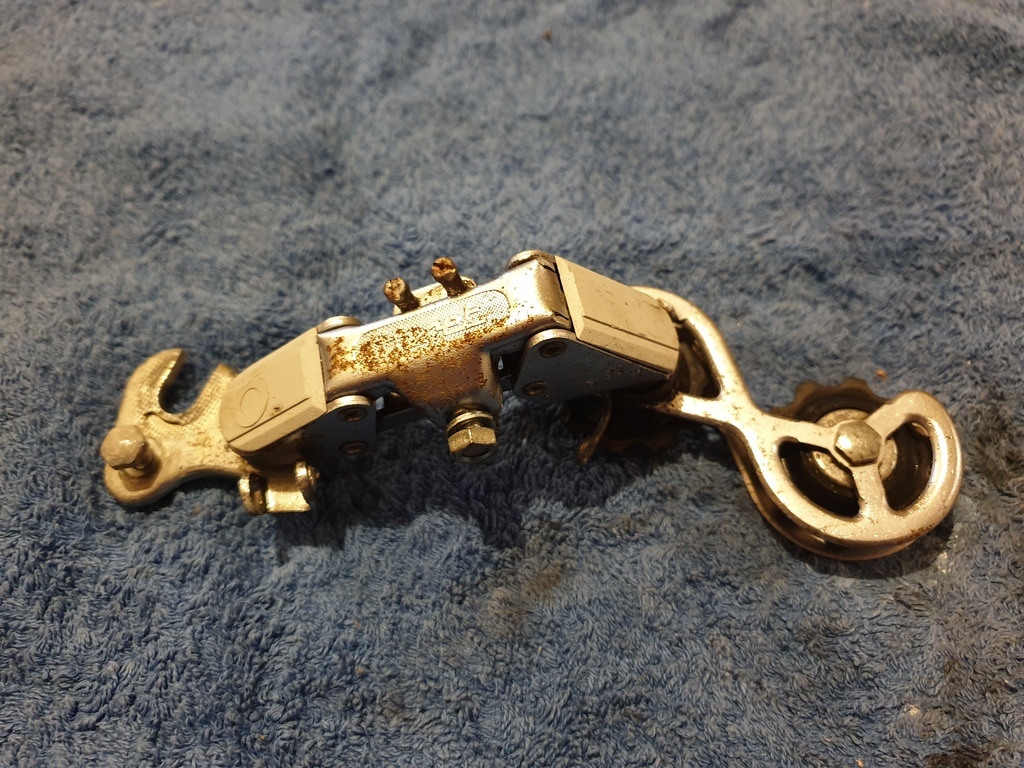 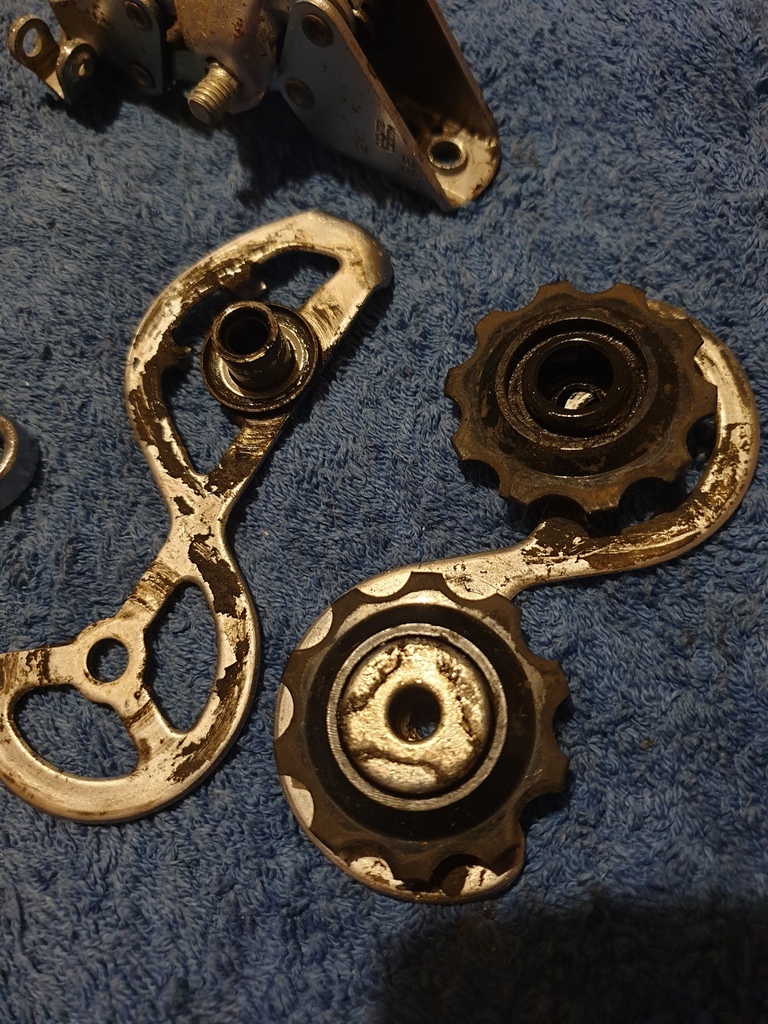 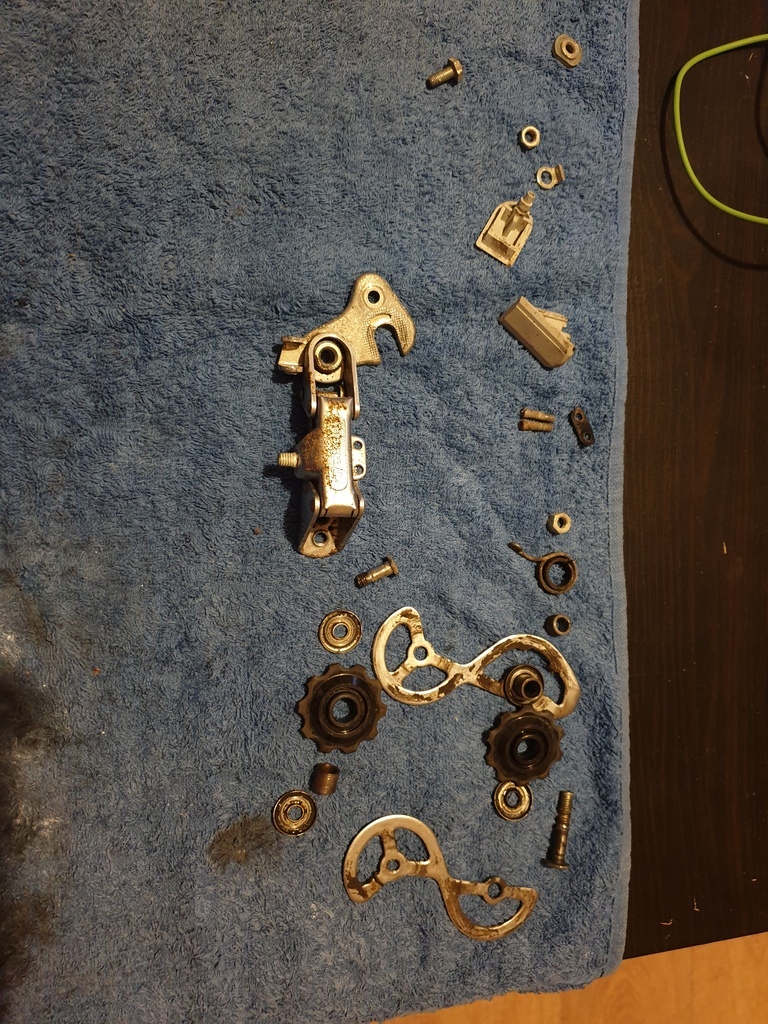 Deox C did a good job of removing the rust on the body and the spring inside 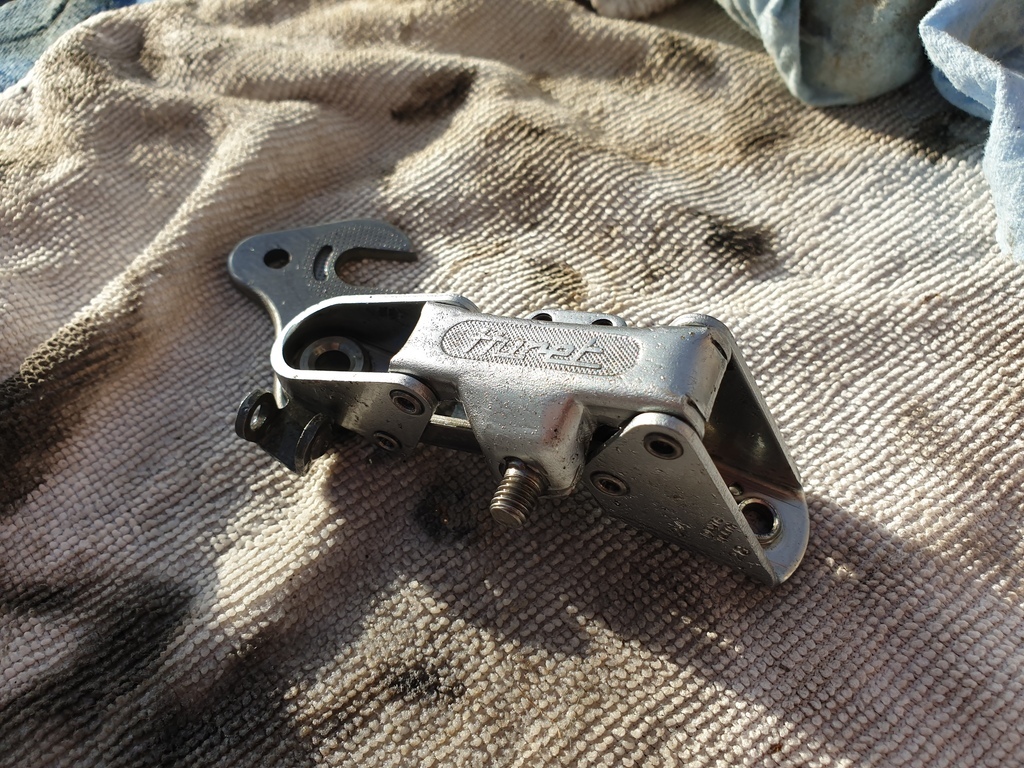 It also seemed to help with loosening up the top pivot, after rinsing off the Deox C, I covered it in WD40 to avoid rusting, wiped it off then reassembled 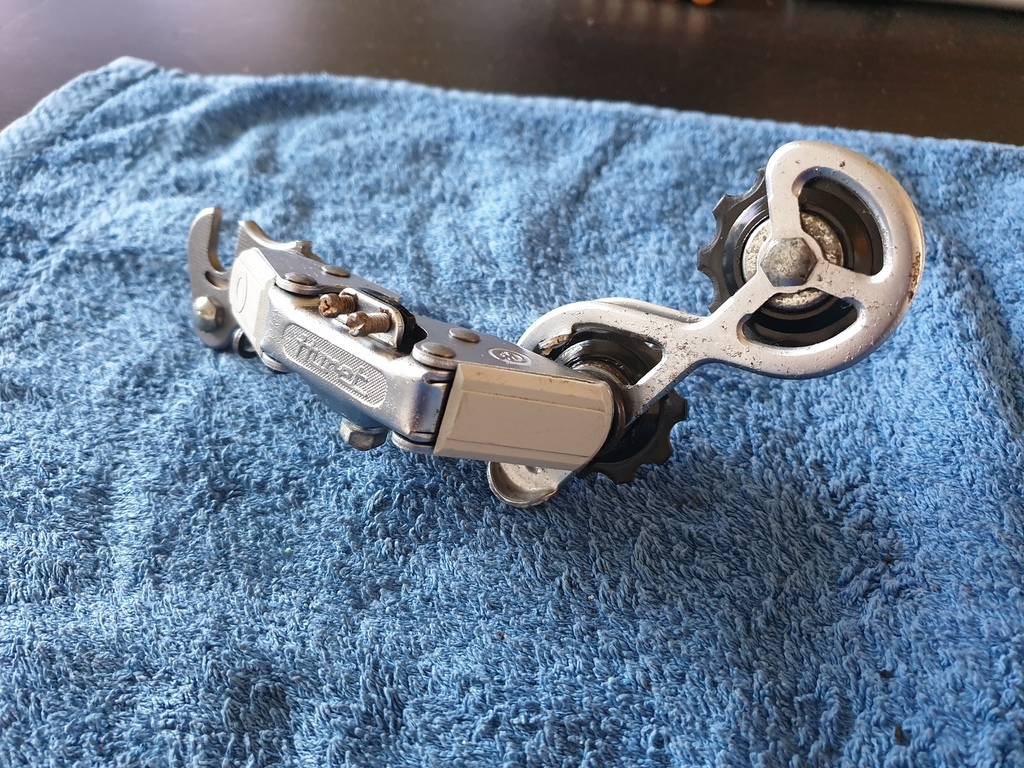 No photos but I also tried the Deox C on the pedals and while they're still not great I may use them for the time being as they spin freely but just look a lil ugly Next jobs really depend on me getting the bearings, then its just the usual clean, grease, assembly. I've taken apart the friction shifters and I do need to buy some cables for the brakes and gears, the brake levers could do with a lil clean and polish and I need to sort some tape for the handle bars too. Inching closer to it being an actual bike again |
| |
|
|
|
|


