|
|
|
Sept 27, 2011 8:27:32 GMT
|
First time l've seen this good work and very interesting. ;D Bet you thought quick clean up and l'll be driving it in a couple of months  That's what I initially thought yes but, as you can see, it's turned out to be a slightly bigger project than expected (I suspect that most projects are like that!) - liking your Herald build very much indeed  |
| |
|
|
|
|
|
|
|
Sept 27, 2011 8:40:00 GMT
|
What a great car you're building. I used to have a Scimitar SS1, but had to sell it when my daughter was born. I wish I still had it. At least I know it went to a good home and is still on the road. Plus, I never would have bought my 944 if I hadn't sold my Scimitar. 
What shade of red is yours? I had mine resprayed Rover Nightfire red shortly after buying mine. I also had to have the sills replaced with galvanized ones. That said, every year I would crawl under it and coat the chassis with underseal. I never had any of the usual electrical gremlins that these cars suffer from and I can hardly remember it ever letting me down. (It was my daily driver).
Anyway, that's enough boring you. Here's some pic's, plus some of how I would have loved to customise it. ;D Hi Porsche - many thanks for the kind words  I've no idea what colour it is - which may make matching it fun! I've never seen another SS1 this colour so I'm wondering if it was one intended for the bigger GTE? It's definitely been resprayed as there are patches of the original red showing through in places & there are loads of runs under the front bumper  - it's not the best respray I've ever seen!! The SS1's you've posted pictures of are well known hillclimbers/racers - very heavily modified but very fast &, no doubt, great fun Thanks again to all the positive comments |
| |
|
|
Colonelk
Posted a lot

Posts: 3,740
Club RR Member Number: 83
|
|
Sept 27, 2011 20:19:16 GMT
|
Havent seen this one before I think! Cracking little project |
| |
|
|
|
|
|
Sept 28, 2011 9:38:16 GMT
|
|
hi does the type 9 gearbox fit straight on the zetec without any mods adaptor plates etc
|
| |
|
|
|
|
|
Sept 28, 2011 9:58:27 GMT
|
hi does the type 9 gearbox fit straight on the zetec without any mods adaptor plates etc Yes indeedy - I had no problems fitting the type 9 to the Zetec - don't forget that you'll need a spigot bearing to go in the end of the crank. The type 9 & Zetec engine combination has been used in kit cars (Westfields etc) for years now. I'm not a Ford guru but I'm pretty sure that Ford engine blocks have a common bellhousing stud/bolt pattern so the type 9 will fit most of the older engines (kent, Pinto, Cologne V6, CVH, Zetec). Don't get a Duratec though as this is, I think, a Mazda design so has a different stud pattern. I'm sure someone on here could give you the definitive answer - the Burtonpower website is a mine of information for all things Ford have a look at the tecchnical info section |
| |
|
|
|
|
|
Sept 28, 2011 10:27:45 GMT
|
|
ok thanks what clutch and starter are you using zetec?
|
| |
|
|
|
|
|
Sept 30, 2011 7:54:11 GMT
|
ok thanks what clutch and starter are you using zetec? The flywheel is from a 1.6 or 105PS 1.8 Escort, and the main clutch plate is from a Mk1 Mondeo 1.6; don't know what the release bearing's off but the part number is CCT133 (I think it fits lots of rwd Ford stuff). I can't remember the starter motor part number but LRS707 rings a bell - I had to take it off recently (so that I could take the sump off) & it's sitting in the garage so I'll try & check this weekend |
| |
|
|
|
|
|
Nov 15, 2011 15:20:39 GMT
|
Hi again - managed to get another day in on the SS1 this weekend. This resulted in 2 things: 1.) me putting my back out (extremely painfully) as I twisted round (whilst kneeling) to pick up a part ..... & 2.) the rear suspension back on the car I was in too much pain to take many pics but here's one I took anyway before the soothing benefits of a cuppa & a long hot bath took precedence A few days on & my back's still hurting like hell so it looks like it'll be a while before I get anything else done on the car The bolts on the rear suspension all need tightening up but the weight of the car needs to be on its wheels/suspension (not on axle stands) for me to do this properly, the anti-roll bar bushes need replacing & despite me putting the brakes & wheels back on it still needs a new set of rear brake shoes ..... there's nothing in the drums apart from the new wheel cylinders - might be best to remember that if I ever get the thing running & decide to take it for a test drive!! More updates as & when I'm able to move  |
| |
|
|
|
|
|
|
|
Hi again – a bit more progress on the SS1 I finally decided that I wasn’t happy with the new position of the alternator - I'd moved it from the passenger's side of the engine bay to the drivers side - so I dug out the old combined alternator/engine mount, refitted it & decided to try & modify it so that I could use it with the new water pump (which has a different outlet design to the old one). I cut a hole in the mount - which meant lots of drilling & filing - for the water pump outlet to pass through but it still didn’t fit meaning that I had to keep enlarging the hole until it fitted over the water pump outlet - by this time though I’d completely removed one side of the bracket. The bracket fitted over the pump outlet then but was considerably weakened so the strength had to be put back into it. Not having access to a welder meant that a, hopefully, superior botch was required! Cue one strip of extremely hard steel - the only drill I had which would touch it was a centre drill & I then had to enlarge the holes with a rotary burr in my Dremel (lots of work for a couple of 8mm holes!) - a couple of spacers & some bolts. The mount, as shown in the photos, isn't quite finished & will have to come off for a final bit of fettling/painting & the top strap/stabilizer bar also needs finishing. It looks a bit ( a lot) naff but seems pretty strong as it is & it means that I’ve finally found a use for the Landrover alternator adjusting strap I bought ages ago which is much longer than the standard SS1 item. I’ll try & take some better photos of the whole shebang when it’s off the car &/or finished - I'd quite like to get it welded for complete strength. The drive belt (originally intended for a 2 litre Lancia Thema amongst others) took a bit of finding but fits fine - for the record it's 1100mm long with 4 ribs. The pictures also show the exhaust manifold I’m probably going to use (at least initially) – it’s a bog standard Mondeo jobbie so probably doesn’t flow that well but it’ll do to get the car up & running with. Due to the alternator, water rail & starter motor all being on that side of the engine space is extremely tight so I may well end up keeping the thing The other option would be to get a one off manifold/exhaust system built up on the car at a later date. Also, due to the new (old?) position of the alternator, I've had to move the dipstick tube & have secured it to one of the thermostat housing bolts - shown in the last photo - it runs close to the manifold though so may need a bit of heat wrap/protection. Solving one problem always seems to lead to the others & I now need to re-route the heater pipes & to do this I'll need longer ones - at least this problem looks to be fairly simple to rectify. Opinions welcome as always    |
| |
|
|
|
|
|
Feb 21, 2012 15:04:22 GMT
|
Hi all – spent the weekend working on the SS1. Thought I’d get the engine bay rear crossmember back in. Normally it’s a pretty weedy looking bit of top hat section steel. I'd had to remove it in order to fit the Zetec sump. Fortunately I’d left stubs of the crossmember either side of the engine bay thinking that I’d either weld the original back on, or make a removable one, at a later stage. It soon became clear that because the sump is so close to the crossmember that a removable one would probably make things easier – especially if I ever needed to drop the sump or remove the engine at a later date. I’ve used a length of square section steel (part of an old engine stand I was given) which, with a bit of tickling with the angle-grinder, fitted inside the stubs. I’ve cut it to fit between the main chassis members but left overhangs each side as I intend to drill up through these, & the chassis rails, so that I have both horizontal & vertical bolts (M10) holding the crossmember in place. I’m not sure I’ve described that very well but hopefully you can see what I mean from the photos (since the photos were taken I've drilled the vertical holes). I’ve no idea if it’s as strong as the original but I feel happier with it there. Some of the drilling isn't very straight (not really happy with it but stuck with it for the moment). I have to say that drilling under the car (even with a right angle drill) was anything but easy So it's in & secure but, of course, it all needs to come out again so that I can paint it! The sump doesn't actually touch the crossmember at any point but clearance is tight, especially on the right hand side, so the sump needs to come off - for about the eleventybillionth time - so that I can grind away some more of the webbing to increase said clearance. Removing the sump means the starter's got to come off again - for about the eleventybillionth & one time  Any questions/comments/observations more than welcome 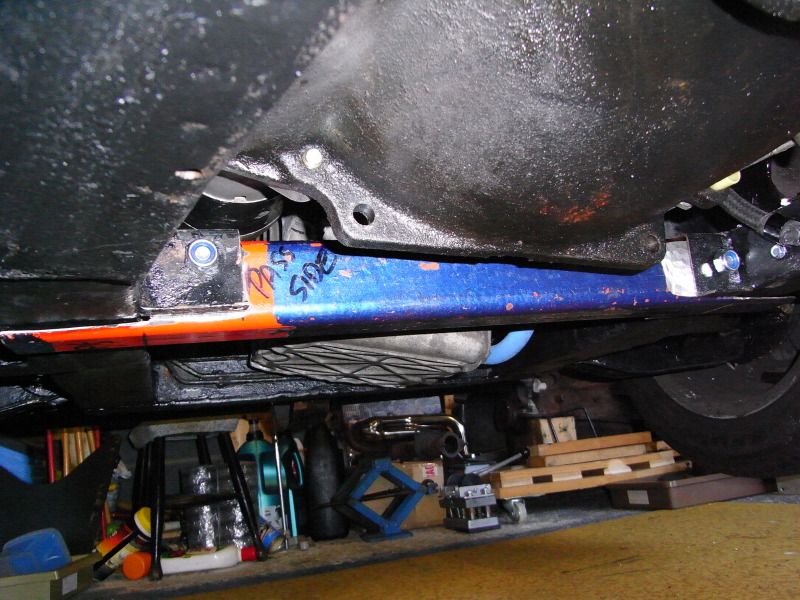  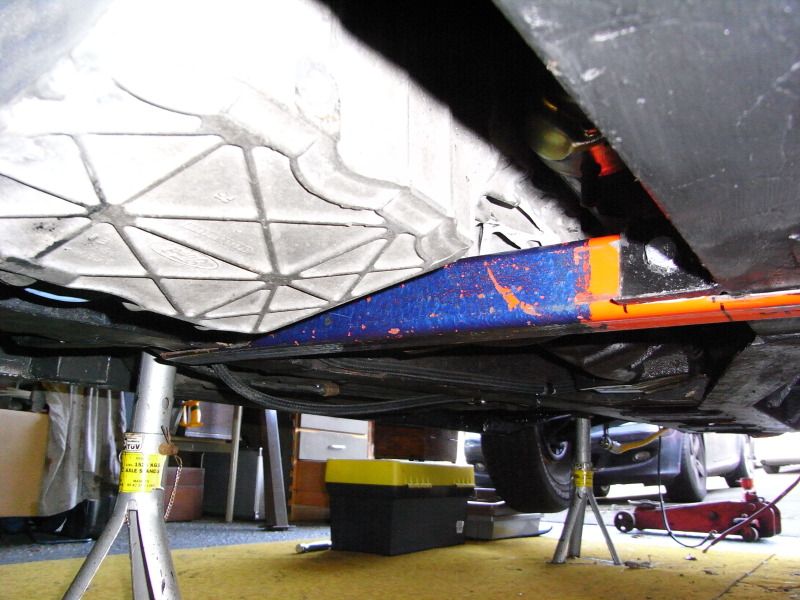  |
| |
|
|
|
|
rodney
Posted a lot
https://www.facebook.com/RD-vehicle-transport-and-recovery-services-525622614268010/
Posts: 1,677
|
|
Feb 21, 2012 20:20:43 GMT
|
is it a 2.0?? have you got a 1.6 or 1.8 water pump instead of the 2.0?? , as the 2.0 run the wrong way unfortunately its a cool project |
| |
facebook: rodney dean / rd transport  |
|
|
|
|
Feb 21, 2012 21:01:40 GMT
|
is it a 2.0?? have you got a 1.6 or 1.8 water pump instead of the 2.0?? , as the 2.0 run the wrong way unfortunately its a cool project Ta for the reply but rest easy I fitted a 1.8 water pump (+ new cambelt & tensioners) some time ago |
| |
|
|
|
|
|
Mar 23, 2012 10:10:42 GMT
|
Well work on the SS1 proceeds at a rate that would make the average glacier appear supersonic in comparison No theatre duties until June means that I can finally spend a few consecutive evenings/weekends working on the car – which is just what I’ve been doing. Unfortunately painting an anti-roll bar isn’t very exciting & you can only give it one coat of paint at a time so 3 coats require 3 evenings ….. & taking photos of paint drying is about as exciting as actually watching it dry in real time!! Anyway said painting was finally completed & I refitted the front anti-roll bar a couple of nights ago with the help of my “Westfield in bits” owning friend Matt (thanks Matt ;D). I’d bought new polyurethane bushes for both the front & rear ARB’s so fitted those at the same time. Didn’t take long in the grand scheme of things & the jobs a good ‘un Front ARB drop links + poly bushes:  Front ARB chassis mount + poly bush: 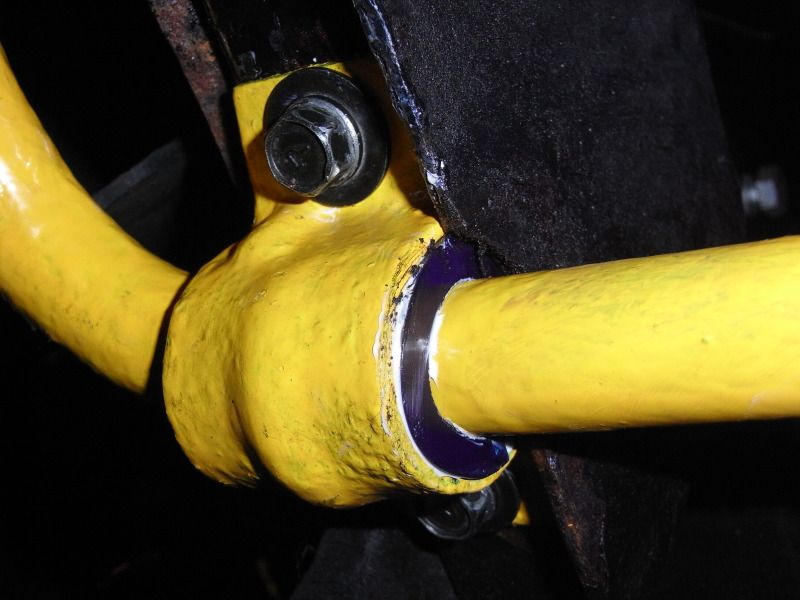 Last night I attacked the sump with the angle grinder …… AGAIN …… & this is the result. The channel should give more clearance for the new bolt in cross-member I made a couple of weeks ago. Note all the alloy dust in the background – I had a big clean/tidy up just after this photo was taken so I now have a nice clean & tidy garage to clutter up again.  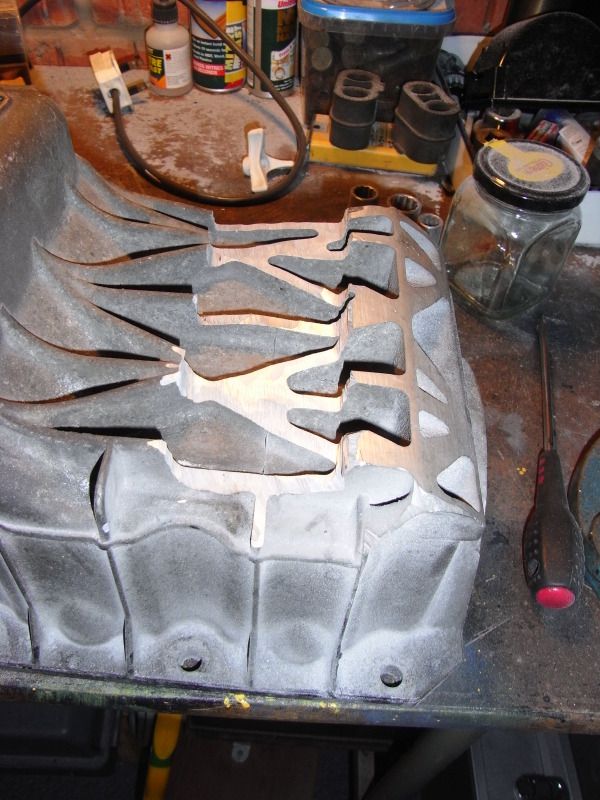 I was thinking about bolting it all back together again but the sump’s been on & off so many times I’m now thinking that a new sump gasket (rubber) might be a good idea. I fitted a new one when I fitted the engine but the sumps been on & off about loads of times since then. To remove the sump the starter motor & the new cross-member also have to come off so it doesn’t make much sense bolt it all up, only to remove it all again when the new gasket arrives (I’ve not even ordered it yet) so I’m going to leave it as it is for the moment. Next job on the agenda is to fit the new brake shoes I got last week. More when I’ve done more |
| |
|
|
|
|
|
Mar 23, 2012 12:41:32 GMT
|
|
It'll be awesome once its done. How long til the supersonic glacier melts? ;-)
|
| |
Koos
|
|
|
|
|
Mar 23, 2012 19:26:54 GMT
|
a quality project which desrves much more attention (from us i mean) i don't know what reliant cross members are like, but i know what engine hoists/stands are like and that replacement is properely hench. i was wondereding why the sump pan is so reinforced? is it stressed in the donor vehicle, like doubles as a crank girdle or something ? keep up the good work |
| |
|
|
|
|
|
Mar 23, 2012 19:55:09 GMT
|
|
Great project, looking forward to seeing it complete.
|
| |
|
|
|
|
|
|
|
I fitted a new radiator to the SS1 last week. It’s actually for a 1 litre Polo (I think) but these radiators are used in Zetec engined kit cars & my friend, who’s rebuilding a Westfield with a stage 3 tuned crossflow engine, is using one of these radiators. It’s slightly smaller than the standard SS1 radiator so required a couple of raising blocks, new mounts & a bit of re-routing of the coolant hoses. I’m also using a Polo cooling fan which fits directly onto the old Reliant fan mount with no modifications at all – bar some washers/spacers - this must make it one of the cheapest/easiest upgrades available for the SS1 & the original fan looks pathetic next to it. I was going to use a second-hand DGAV carb but whilst renewing the gaskets, needle valves etc last week it turned out to have no fast idle screw – my fault entirely I suspect as a few weeks earlier I'd removed the auto-choke mechanism & must have removed the fast idle gubbins by mistake at the same time!! Sod it (or words to that effect!) I thought! I decided to dip into the piggy bank & ordered a new DGV carb (no auto choke) which should arrive next week – all a bit annoying but no-ones fault but mine & at least I know that the new carb will be set up properly (it’s being jetted for a 2 litre Pinto). The old black rubber heater hoses have gone & been replaced with blue silicon ones; unfortunately I’ve ordered the wrong sized hose clips so I’ll have to re-order & fit these later on. As well as all the above I’ve refitted the sump, starter motor & cross-member. I’ve fitted new rear brake shoes but now the old drums won’t go back on over the new shoes. They have a definite lip so will need skimming …… it never ends! Next step is installing the Megajolt – not sure where to start to be honest – after that the exhaust manifold/system will be the next big headache as the only manifold I’ve found that fits is the standard Mondeo cast iron one – not exactly free-flowing – and there’s damn all room/clearance for a down pipe So I think it’ll have to be a bodge job until I can afford something better – but that’s a bridge I’ll cross when I come to it. Opinions welcome as always 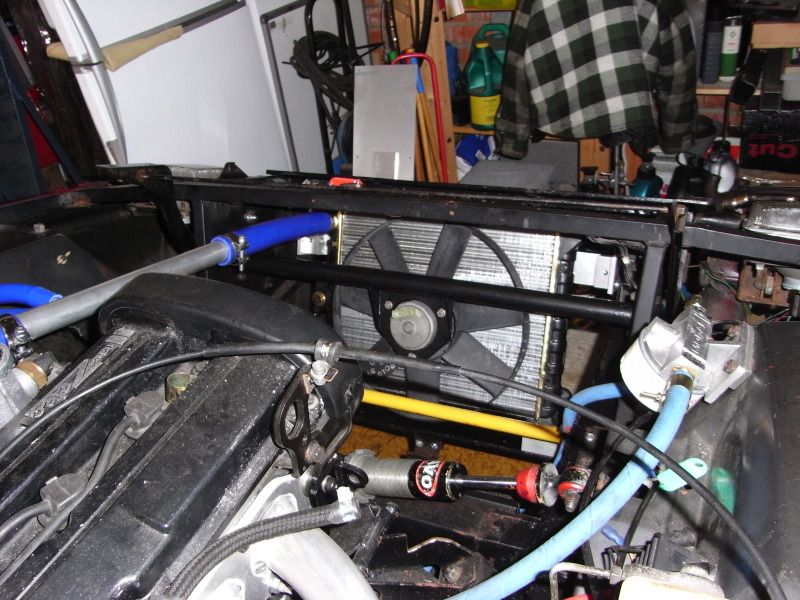   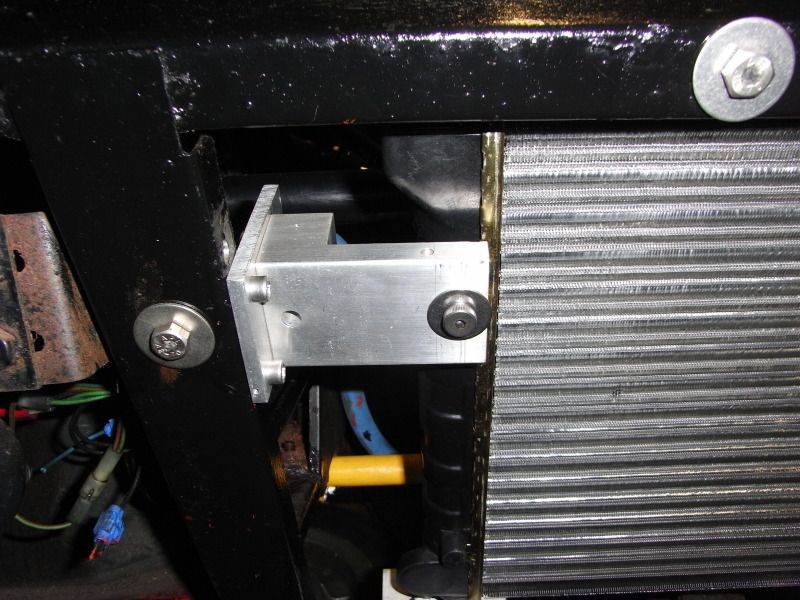 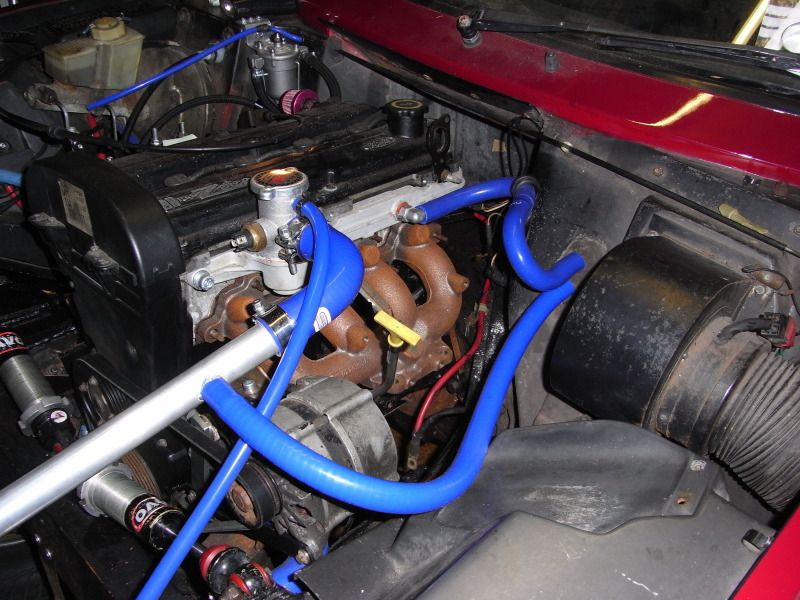 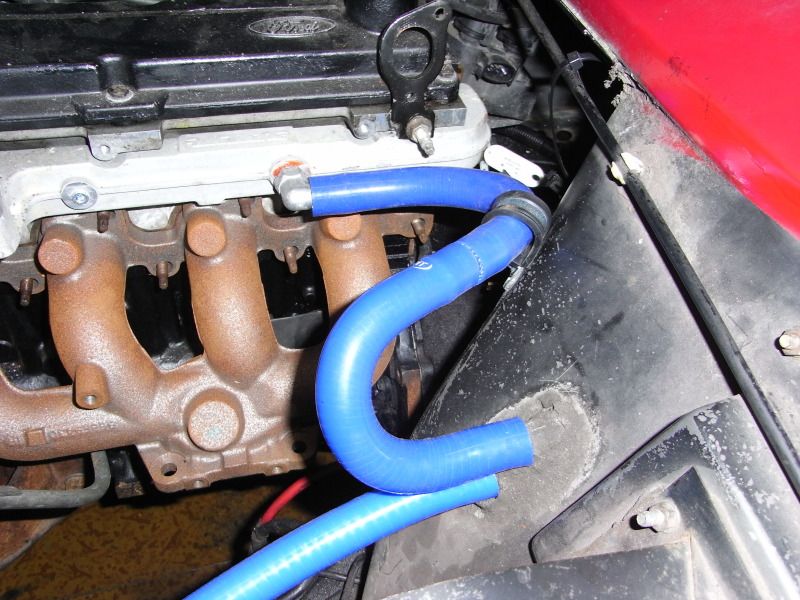 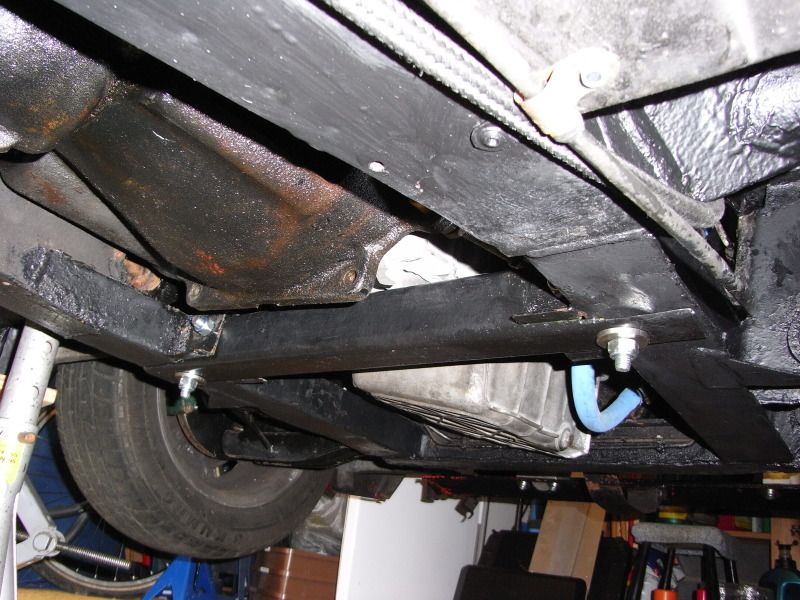 |
| |
|
|
|
|
|
|
|
Aye up – I’ve been busy on the SS1 this week. On Ebay last week I won a CVH free(ish) flow exhaust manifold, which came off another SS1. My idea was to fit this manifold on the Zetec as it follows the same route as the original exhaust; meaning I could refit the whole of the original system. The stud patterns of the Zetec head & CVH manifold are completely different but adaptor plates are available which allow RS Turbo manifolds to be fitted to Zetec engines (so making turbo-charging that bit easier). One of these adaptors was duly purchased (also from Ebay). So on Monday evening I decided to start getting the engine ready for the adapter & new manifold. This meant removing the coolant pipes/hoses, the alternator, alternator/engine mount & the Mondeo exhaust manifold that I’d already fitted & was intending to use. The adaptor is fitted to the Zetec head using the original exhaust stud holes – so the studs obviously had to come out. The manifold studs on the Zetec handily have a Torx head on them so allowing them to be loosened/tightened with a suitable Torx socket. To cut a long story short I managed to undo 8 of the 9 Zetec studs but the last one refused to loosen & was too close to the water rail to get a stud remover on. The last thing I wanted was shear it off in the cylinder head so to make room for a stud remover the water rail had to come off as well Last night I fitted the adaptor & CVH exhaust manifold and refitted the alternator/engine mount, alternator, coolant pipes etc. All went smoothly but I took the opportunity to tweak a few bits & pieces (alternator support & dipstick tube mounting) so it all took rather longer than I thought it would. As the pictures show the adaptor plate overlaps the exhaust port slightly – which I’m not too happy about – but the exhaust manifold itself fits fine & should allow me to use (temporarily) the somewhat knackered exhaust system that the car came with. I’ll have to see how the car runs with this exhaust manifold but I’m much happier with this arrangement than I was with the Zetec manifold I was intending to use as I'd have had to build an exhaust system from scratch. At the very least it’ll do to get the car up & running with & I can upgrade the whole exhaust system (including the manifold) later on as & when funds allow. So there you have it – that’s the engine installation just about finished I still need to sort out the air filter but I know what I'm going to use so that's not too big a problem. The next major job on the horizon is the wiring (Megajolt ecu/EDIS installation, cooling fan, fuel pump etc). Once all that's all sorted though it'll be "put it all back together & turn the key" time! We’re away at the coast this weekend & I intend having a beer (or twelve) to celebrate ;D Couple of photos showing the adaptor plate fitted - note overlap on exhaust ports.   Everything back together.  Exhaust manifold exit under the car.  Opinions welcome as always |
| |
|
|
|
|
|
Apr 19, 2012 10:03:40 GMT
|
|
I love these cars, and with a 2.0 zetec in they'll fly. I'd have personally kept the OE injection because carbs baffle me and I like the idea of an immobiliser in the key etc.
Have you considered porting that manifold and adaptor to remove that big step? You'll lose power there.
Fairly easy to do by bolting the adaptor to the manifold and using a zetec gasket to mark the shape of the ports on the zetec head. Then just grind out as much as you dare before breaking through. Perhaps get someone to lay some weld down on the left side of the manifold ports to give you more to go at?
|
| |
|
|
|
|
|
Apr 19, 2012 11:05:23 GMT
|
I love these cars, and with a 2.0 zetec in they'll fly. I'd have personally kept the OE injection because carbs baffle me and I like the idea of an immobiliser in the key etc. Have you considered porting that manifold and adaptor to remove that big step? You'll lose power there. Fairly easy to do by bolting the adaptor to the manifold and using a zetec gasket to mark the shape of the ports on the zetec head. Then just grind out as much as you dare before breaking through. Perhaps get someone to lay some weld down on the left side of the manifold ports to give you more to go at? Ta for the reply - you're probably right & I did think about porting the adapter (probably should have) but I was on a bit of a roll & was keen to see if everything fitted as I was hoping it would ....... it did I have a new Zetec exhaust gasket (fits between the adaptor & cyl head) but when I offered it up it was an appallingly bad fit. I reused the old one (bad me!) so a couple of new manifold gaskets (1 x Zetec & 1 x CVH) are top of the shopping list; as it all needs to come apart again I may have a bash at grinding away the ports then but I'll have to do some measuring first as it's no use grinding away the adaptor to match the Zetec ports if the CVH manifold doesn't then cover the enlarged port (hope that makes sense?). I'm keen to get the car running though (after having had it for 4 years!) so will probably leave things as they are until I can afford a better flowing (custom?) set up. I've heard good things about Tony Banks Exhausts, he isn't far from me so I'll pop round to see him when the car's up & running I'm also thinking of sending the pic to the seller of the adapter & see if the overlap is normal or not. |
| |
|
|
|
|


 - it's not the best respray I've ever seen!! The SS1's you've posted pictures of are well known hillclimbers/racers - very heavily modified but very fast &, no doubt, great fun