


Hi all!
i've been lurking in the RR shadows for a while, but thought i'll put up a thread of my project since you're all doing it .
.
The full on proper thread is on migweb.co.uk, but i'll try to keep up and update this as much as I can, might help some peeps, some peeps may help me .
.
Anyway, I won this on ebay last november and went up to scotland to collect it from a pleasant chap whose name escapes my sieve-like memory.
Since then i've been tidying it and tidying it, turning it from a trackday thrashabout to what will some day be a quick road car and I won't be swearing at it every time I go to sainsbury's.
To warn yous, this will be a disgracefully low-budget/high hours build because i'm a uni student, therefore have more time than money, and hopefully more sense than money lol.
The most up-to-date thread is here: www.migweb.co.uk/forums/projects-restorations/376417-1978-kadett-c-2l-8v-turbo-adventures.html(i hope it's cool linking)
i'll do a quick recap here, but there's a lot more details on mig.
anyway, it started off like this:
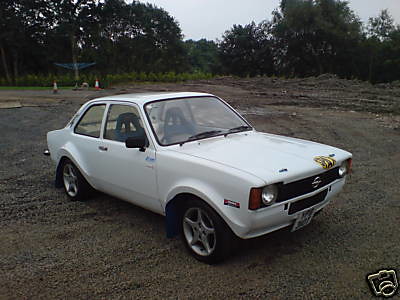
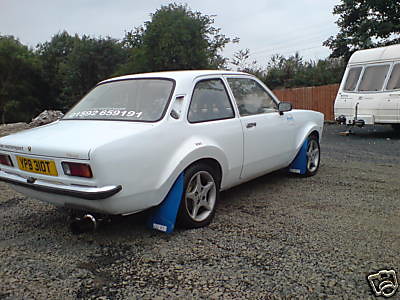

(can you guess what it is yet!?)
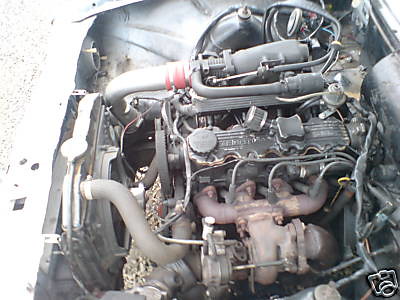
it was running a c20seh vauxhall cavalier engine with a sneaky T3 on standard management and a cossie FPR, and i'm surprised how far it lasted. Though in my ownership I didnt drive it much because I couldn't afford 18 mpg.
after fearing borewash from such severe overfuelling compression test showed good things:

then it had a fuel pressure gauge to help tune the fuelling a bit:
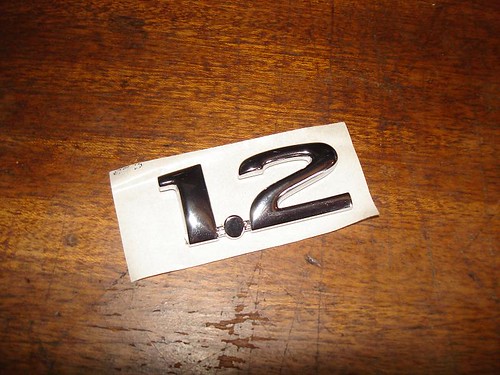
then the most important item:
It smoked like i've never seen before upon cold startup, so I suspected stem seals, so got a spare head to work on:
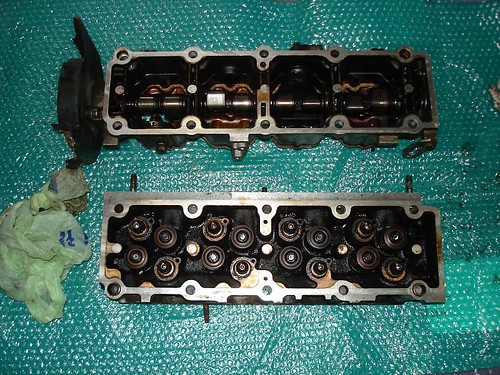
cleaned up, replaced the seals, did a little trickery to the quench pads:

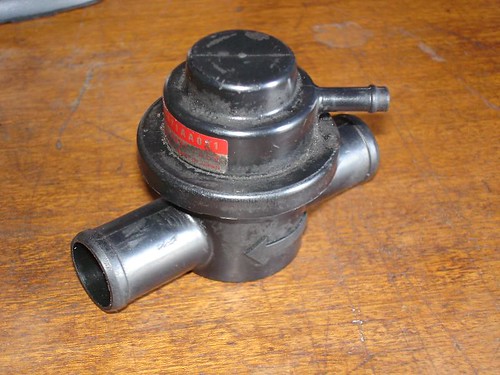
turns out it still smoked, so turbo was the main suspect, considering how much play there was in the shaft. So to stop the chatter (which was immense, but ultimately unwanted) I got a recirculating bov:
then onto turbo disassembly:
it was getting clear where the problem lies:
shaft was fubar'd:
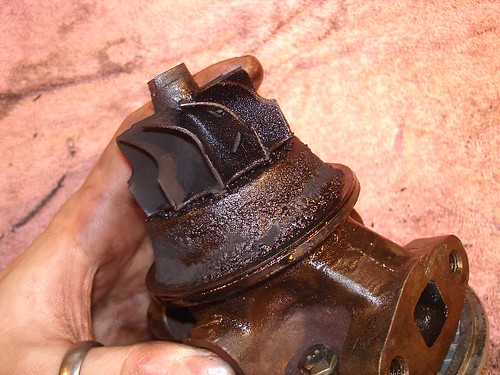
some quite severe blade damage:
then bought a replacement turbo, which had a much better shaft:

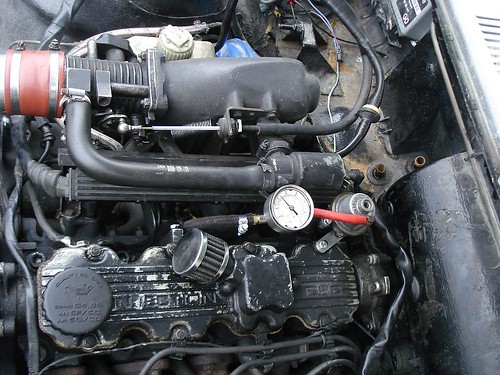
upgraded it with a 360* thrust bearing:

sent the assembly to AET turbos for balancing:

what they did to it, compared to how I sent it!
They did an amazing job, all for £65 iirc. Though they then tried to sell me a whole re-machined core assembly and after I said no, they called my parts 'scrap' and a waste of time. Hmm what lovely people.
Though they did do an amazing job!

![]() i362.photobucket.com/albums/oo70/djivesp/DSC06873.jpg
i362.photobucket.com/albums/oo70/djivesp/DSC06873.jpg
[/img]
assembled as per markings, with all new staggered seals, bearings, 360 degree thrust plate, new gaskets and bolts, and a painted actuator:


new seals and caps for the injectors:

assembly (what a mess):

then, after a few weeks of happy motoring, I find this laying in the road after a big bang. Oh dear!

the thing ripped right off, I didn't really like it anyway.
so, off to the shop to get fixed up:

handy I had a toolbox in the boot when I lost the backbox with a few spare jubilees xD.

one pretty straight through exhaust lol.
sparkles:

new box looks much better:

it received a nice wash at some point too haha:

then something fresh and cool:
wash:

mask:

primer:

white :
:


looks approx 573 times better:

then replaced the gearstick saddle bush (was rattling its tits off):

ugh... rust, never to be overlooked!

this was filled with filler and foam, why oh why!


CAD:

welded all up:

just bashed and shaped steel plates, none of this repair panel business..
rear of the sill was rotted through:

that's the bad side done!
sorted the crappy old fuseholder, aka 'fuseRandomlyDropperWhilstDriving", recycled tigra's item - needed lots of fuses for future :
:

busting out the megasquirt from my previous project:
soldering more inputs&outputs:

clutch switch for launch control:

spare ECU that will be gutted, for housing relays, and so I can use the original loom:

sorting loom out:

postie then brings me presents:

shawing!

double shawingg!

above is the new centre console type thing and switches, made that out of an old (and broken) hifi case.
the screen is a touchscreen, and the idea was to have a car-lappy, and be able to map whilst driving, and also have a 'centrafuse' front end for music, satnav, films, etc etc. Shooting many birds with one stone
'lightened' amp going under the seat (didn't want to fit a stereo, but wanted music):

then, speedbumps claimed the exhaust once again. This time it cracked all the way around the downpipe flange, so some more serious fixage was required.
this time I made a few cuts and welds to 'tuck' the system closer to the floor, which gave me a few more mm of speedbump clearance.

welded a lamdba boss in the downpipe too for the wideband:

wideband display (it's the JAW unit)

started planning the layout for the fake ECU box:

snow piccy:

which also gave me some naughty ideas about the front arches (more on that later).
when I got the car, I found both the original springs in their original places, but snapped . So that's snapped springs as well as leda coilovers where the shocks are.
So I popped the springs out and drive like that for a while, but the ride quality was dead awfull, turns out the snapped springs were still raising the front a little, and supplied the only suspension the front had.
So anyway, after closer inspection it turns out that the ledas were bottoming out because the top platforms weren't sitting in the turrets properly, but were 'wedged somewhere 2 inches away'. Bad times, why nobody saw this I don't know (including mot man?!)
Anyway, so decided to experiment with the suspension a little:
tigra springs:

a couple of coils out:

shortened bump stops:

chopped some material from the top spring platforms for better fit:

then tried it with the leda springs off as I suspected them to be too high poundage:

but then it just sagged till it hit the bump stops again.
With more blasted about, I found the perfect setup - the soft tigra springs (150lb's I think from what I measured) provide the first layer of bumpage absorption, then the ledas take over when the load is really high. So the soft spring iron out the little bumps, but when you throw it into a corner, the ledas do their thing and it's the best of both worlds..
anyway, built the fake ecu box:


some more continuity testing to figure out loom pinnage:

IAT sensor in the charge pipe (it's a SAAB sensor - which is GM so perfect as megasquirt comes pre-calibrated for GM sensors):


another pic of dash workings. (trial testing with different laptop)

dark winter nights. BRrrr cold!

found some electrical shortfalls :/.. Bodge-tastic!!

megasquirt mounted and earthed:

mm wiring, lovely!


new intake pipe, as AFM no longer needed

toyota oil cooler with pipes welded to vauxhall sandwich plate pipes:

then gave up on the idea of using the original loom, so re-made everyhing for neatness.
this is how it looked:

MAP line damper for megasquirt:

then turned my attention to the boot:

seems this section of chassis leg wasn't joined to the boot floor for some reason!
so cut and bent some plate:

all welded up:

before sorting:

after sorting:

new battery cables (0 gauge jump lead cable):

then went to count the teeth on the diff's rack and pinion to find out what final drive it has, and a general checkup to see how welded it really is:

did a fluid change and this sorted the mad moaning/groaning on boost! yay
then made a little circuit for megasquirt boost control:

then painted the god-awfull gold drums:
before:

after:

it was time to sort the previously bodged boot repair:
chipped all I could away:


mixed up some filler with fibreglass strands for strength and consistency:

then smoothed it in (can find an after pic now doh!)
then the rear bumper came off (unnecessary weight)

and because of this:

then plugged the holes in the boot floor with sealant, with gaffer tape underneath. Mainly to lessen the road noise. Left drainage holes that actually needed to be there for drainage.

then did some mapping and finally drove it on megasquirt for a few weeks. Then!!
uh oh!

had serious ignition issues.
tested coilpack fine (ford pack):

after a lot of blasted about it turns out my leads weren't man enough, and spark kept arcing between them and engine and manifold. Bad times. A lot of the sheath had burned off from the plug leads where it's nearest to the exhaust manifold because of the heat, so I ended up using some hard as nails toyota leads with rubber pipe over them, crimped to the ford coilpack ends, working fine so far
then did another compression test.
all good once again (too worryingly good):

then I had a manifold blow from hell.
sent me sleepy many times behind the wheel, not good!
so whipped it off and found this nastyness:

cleaning time:

filed the flange to make sure it was flat and true, it was.
then paint time:

and slipped one of those on:

the exhaust came out, AGAIN. this time I shortened the downpipe, to give even more clearance.

improved the oil return from the turbo too, its really badly done. It was drilled at such an angle that oil sits in the bottom of the return pipe and causes smoke upon startup, as it just escapes out the turbo seal because it's the easyer path than pushing this stagnant oil into the return, uphill.
Much improved now, it used to be long and windy, went right round the engine mount.

all assembled and no manifold blow hooray!

note pink shoelace lol!
real men have shoelace holding their cars together haha!
then nicked the tacho out of the tigra clocks:

built a little circuit and interfaced it with megasquirt and got this:

then butchered one of these tubs:

printed a little face for the LED's:

cut:

glue (and some UV led's for the backlight):

paint needle white:

then lots of this:

and finally this:


shawing!
then.. DIY water injection:
piston type coffee machine pump:

brass fittings:

pipe and nozzle from the states (ebay)

beautiful!

then found a home for the boost control driver:

and made a circuit-on-a-lead launch control jobbie:

the coffee machine pump runs on 240v, so mounted the pump together with an inverter in a PC power supply box with a big fan (powered straight off the inverter - it used to have a pishy little fan):
![]() i362.photobucket.com/albums/oo70/djivesp/IMG_0566.jpg [/img]
i362.photobucket.com/albums/oo70/djivesp/IMG_0566.jpg [/img]

then sorted out new fuel pipes and fuel filter, and stuck thick sound insulation in the boot that my dad scored from work. Also you can see a charcoal canister from the tigra - no more petrol fumes making my passenger sleepy (my girlfriend lol).

back to water injection:
mounted the nozzle in the boost pipe (before TB). it's before the IAT sensor too so I should see a temp drop when it comes on. Threaded aswell so removable

the boost pipe in it's place:

mounted the box where the pump is there behind the headlight, but don't have a photo of this.
then attention turned to the engine.
I wanted 16v rods as they are thicker near the wrist pin than the 8v items. But they attach to the piston differently so I have to have 16v pistons too.
The c20let (2l 16v turbo, calibra cavalier) pistons would have gone straight in and low CR, but the dish was all wrong, the squish would have been bad, making an inefficient and slow burn with potential det.
So I had a spare set of c20xe NA flat tops, which would have made 11:1 CR if out straight in, but I wanted 9.5-10 ish..
CC'd the head:

43cc's
preliminary dish design:

final dish design (large circle)

printed this off, and drew the circumference on the piston face:

ground down a nice smooth dish:

smooth, then repeat

7.5cc's gave 10:1 CR if I remember right
then went and took too much out of piston #3, so had to enlarge them all.
anyway, ended up with 4 smooth, strong factory forged pistons with a 9cc dish giving me 9.6:1 CR, and a little lower once in bore.

.
these will be going into my spare fresh 16v bottom end, with the current 8v head on top..
anyway..
then attention turned to the rear running gear.
since with the new pistons i'll be going for more boost and more aggressive ignition timings, water injection and more power, the rear axle's death will be imminent. It's a manta axle with a welded diff, and at the previous 200hp mark it was complaining, alot.
so, I wanted independent rear suspension, same PCD if possible, good brakes, a little more track maybe as I have big arches, ad most importantly a much stronger diff that would sort me out as long into the future as possible (wanting something straight or V6 later on)..
So I toyed with the idea of adapting the front of the tigra to work on the rear of the kadett (as I have the whole tigra here it would have been relatively easy),so glad I didn't now!
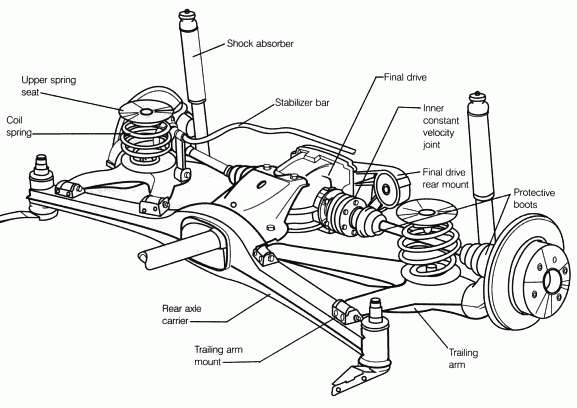
anyway, after some suggestions I went with a BMW e30 325i rear setup.
Found the whole lot on offer for cheap, snapped it up, it was only half an hour up the road.
seems pretty simple:
this is what I acquired:

looks like it's going to be quite an easy conversion, the most difficult being joining the props and hanging the diff under the boot floor:
old axle out:

loose mock-up:

spring platforms almost match

shocker bolts straight in:

how i'll be mounting it up to the car:

straight to the chassis legs:

making the mounting plates from thick as dash angle iron:

whilst doing all this, my long thought and planned sub-project is taking shape:
before:


almost there:

all will be one shell as per this 3d mockup video:

and made from this, with bare clear gelcoat:

lightnesss!
now waiting for some brakes from V8Chevette, and MOT time approaching!
So now were upto the present, and it's fooking raining, so thinking of nipping to tescos to get a gazebo and crack on
Hope you lot enjoy the progress (sorry it was so hard and fast lol)
i've been lurking in the RR shadows for a while, but thought i'll put up a thread of my project since you're all doing it
 .
.The full on proper thread is on migweb.co.uk, but i'll try to keep up and update this as much as I can, might help some peeps, some peeps may help me
 .
.Anyway, I won this on ebay last november and went up to scotland to collect it from a pleasant chap whose name escapes my sieve-like memory.
Since then i've been tidying it and tidying it, turning it from a trackday thrashabout to what will some day be a quick road car and I won't be swearing at it every time I go to sainsbury's.
To warn yous, this will be a disgracefully low-budget/high hours build because i'm a uni student, therefore have more time than money, and hopefully more sense than money lol.
The most up-to-date thread is here: www.migweb.co.uk/forums/projects-restorations/376417-1978-kadett-c-2l-8v-turbo-adventures.html(i hope it's cool linking)
i'll do a quick recap here, but there's a lot more details on mig.
anyway, it started off like this:
(can you guess what it is yet!?)
it was running a c20seh vauxhall cavalier engine with a sneaky T3 on standard management and a cossie FPR, and i'm surprised how far it lasted. Though in my ownership I didnt drive it much because I couldn't afford 18 mpg.
after fearing borewash from such severe overfuelling compression test showed good things:
then it had a fuel pressure gauge to help tune the fuelling a bit:
then the most important item:
It smoked like i've never seen before upon cold startup, so I suspected stem seals, so got a spare head to work on:
cleaned up, replaced the seals, did a little trickery to the quench pads:
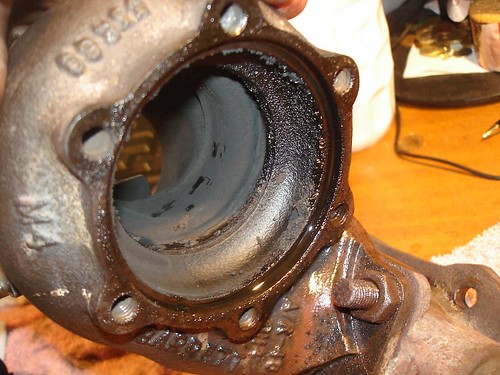
turns out it still smoked, so turbo was the main suspect, considering how much play there was in the shaft. So to stop the chatter (which was immense, but ultimately unwanted) I got a recirculating bov:
then onto turbo disassembly:
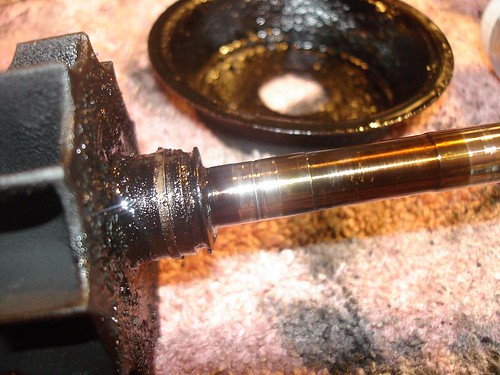
it was getting clear where the problem lies:
shaft was fubar'd:
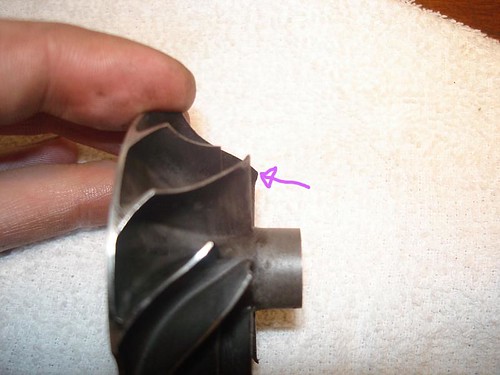
some quite severe blade damage:
then bought a replacement turbo, which had a much better shaft:
upgraded it with a 360* thrust bearing:
sent the assembly to AET turbos for balancing:
what they did to it, compared to how I sent it!
They did an amazing job, all for £65 iirc. Though they then tried to sell me a whole re-machined core assembly and after I said no, they called my parts 'scrap' and a waste of time. Hmm what lovely people.
Though they did do an amazing job!
[/img]
assembled as per markings, with all new staggered seals, bearings, 360 degree thrust plate, new gaskets and bolts, and a painted actuator:
new seals and caps for the injectors:
assembly (what a mess):
then, after a few weeks of happy motoring, I find this laying in the road after a big bang. Oh dear!
the thing ripped right off, I didn't really like it anyway.
so, off to the shop to get fixed up:
handy I had a toolbox in the boot when I lost the backbox with a few spare jubilees xD.
one pretty straight through exhaust lol.
sparkles:
new box looks much better:
it received a nice wash at some point too haha:
then something fresh and cool:
wash:
mask:
primer:
white
 :
:looks approx 573 times better:
then replaced the gearstick saddle bush (was rattling its tits off):
ugh... rust, never to be overlooked!
this was filled with filler and foam, why oh why!
CAD:
welded all up:
just bashed and shaped steel plates, none of this repair panel business
..rear of the sill was rotted through:
that's the bad side done!
sorted the crappy old fuseholder, aka 'fuseRandomlyDropperWhilstDriving", recycled tigra's item - needed lots of fuses for future
 :
:busting out the megasquirt from my previous project:
soldering more inputs&outputs:
clutch switch for launch control:
spare ECU that will be gutted, for housing relays, and so I can use the original loom:
sorting loom out:
postie then brings me presents:
shawing!
double shawingg!
above is the new centre console type thing and switches, made that out of an old (and broken) hifi case.
the screen is a touchscreen, and the idea was to have a car-lappy, and be able to map whilst driving, and also have a 'centrafuse' front end for music, satnav, films, etc etc. Shooting many birds with one stone
'lightened' amp going under the seat (didn't want to fit a stereo, but wanted music):
then, speedbumps claimed the exhaust once again. This time it cracked all the way around the downpipe flange, so some more serious fixage was required.
this time I made a few cuts and welds to 'tuck' the system closer to the floor, which gave me a few more mm of speedbump clearance.
welded a lamdba boss in the downpipe too for the wideband:
wideband display (it's the JAW unit)
started planning the layout for the fake ECU box:
snow piccy:
which also gave me some naughty ideas about the front arches (more on that later).
when I got the car, I found both the original springs in their original places, but snapped
 . So that's snapped springs as well as leda coilovers where the shocks are.
So I popped the springs out and drive like that for a while, but the ride quality was dead awfull, turns out the snapped springs were still raising the front a little, and supplied the only suspension the front had.
So anyway, after closer inspection it turns out that the ledas were bottoming out because the top platforms weren't sitting in the turrets properly, but were 'wedged somewhere 2 inches away'. Bad times, why nobody saw this I don't know (including mot man?!)
Anyway, so decided to experiment with the suspension a little:
tigra springs:
a couple of coils out:
shortened bump stops:
chopped some material from the top spring platforms for better fit:
then tried it with the leda springs off as I suspected them to be too high poundage:
but then it just sagged till it hit the bump stops again.
With more blasted about, I found the perfect setup - the soft tigra springs (150lb's I think from what I measured) provide the first layer of bumpage absorption, then the ledas take over when the load is really high. So the soft spring iron out the little bumps, but when you throw it into a corner, the ledas do their thing and it's the best of both worlds
..anyway, built the fake ecu box:
some more continuity testing to figure out loom pinnage:
IAT sensor in the charge pipe (it's a SAAB sensor - which is GM so perfect as megasquirt comes pre-calibrated for GM sensors):
another pic of dash workings. (trial testing with different laptop)
dark winter nights. BRrrr cold!
found some electrical shortfalls :/.. Bodge-tastic!!
megasquirt mounted and earthed:
mm wiring, lovely!
new intake pipe, as AFM no longer needed
toyota oil cooler with pipes welded to vauxhall sandwich plate pipes:
then gave up on the idea of using the original loom, so re-made everyhing for neatness.
this is how it looked:
MAP line damper for megasquirt:
then turned my attention to the boot:
seems this section of chassis leg wasn't joined to the boot floor for some reason!
so cut and bent some plate:
all welded up:
before sorting:
after sorting:
new battery cables (0 gauge jump lead cable):
then went to count the teeth on the diff's rack and pinion to find out what final drive it has, and a general checkup to see how welded it really is:
did a fluid change and this sorted the mad moaning/groaning on boost! yay
then made a little circuit for megasquirt boost control:
then painted the god-awfull gold drums:
before:
after:
it was time to sort the previously bodged boot repair:
chipped all I could away:

mixed up some filler with fibreglass strands for strength and consistency:
then smoothed it in (can find an after pic now doh!)
then the rear bumper came off (unnecessary weight
)and because of this:
then plugged the holes in the boot floor with sealant, with gaffer tape underneath. Mainly to lessen the road noise. Left drainage holes that actually needed to be there for drainage.
then did some mapping and finally drove it on megasquirt for a few weeks. Then!!
uh oh!
had serious ignition issues.
tested coilpack fine (ford pack):
after a lot of blasted about it turns out my leads weren't man enough, and spark kept arcing between them and engine and manifold. Bad times. A lot of the sheath had burned off from the plug leads where it's nearest to the exhaust manifold because of the heat, so I ended up using some hard as nails toyota leads with rubber pipe over them, crimped to the ford coilpack ends, working fine so far
then did another compression test.
all good once again (too worryingly good):
then I had a manifold blow from hell.
sent me sleepy many times behind the wheel, not good!
so whipped it off and found this nastyness:
cleaning time:
filed the flange to make sure it was flat and true, it was.
then paint time:
and slipped one of those on:
the exhaust came out, AGAIN.
 this time I shortened the downpipe, to give even more clearance.
improved the oil return from the turbo too, its really badly done. It was drilled at such an angle that oil sits in the bottom of the return pipe and causes smoke upon startup, as it just escapes out the turbo seal because it's the easyer path than pushing this stagnant oil into the return, uphill.
Much improved now, it used to be long and windy, went right round the engine mount.
all assembled and no manifold blow hooray!
note pink shoelace lol!
real men have shoelace holding their cars together haha!
then nicked the tacho out of the tigra clocks:
built a little circuit and interfaced it with megasquirt and got this:
then butchered one of these tubs:
printed a little face for the LED's:
cut:
glue (and some UV led's for the backlight):
paint needle white:
then lots of this:
and finally this:
shawing!
then.. DIY water injection:
piston type coffee machine pump:
brass fittings:
pipe and nozzle from the states (ebay)
beautiful!
then found a home for the boost control driver:
and made a circuit-on-a-lead launch control jobbie:
the coffee machine pump runs on 240v, so mounted the pump together with an inverter in a PC power supply box with a big fan (powered straight off the inverter - it used to have a pishy little fan):
then sorted out new fuel pipes and fuel filter, and stuck thick sound insulation in the boot that my dad scored from work. Also you can see a charcoal canister from the tigra - no more petrol fumes making my passenger sleepy (my girlfriend lol).
back to water injection:
mounted the nozzle in the boost pipe (before TB). it's before the IAT sensor too so I should see a temp drop when it comes on. Threaded aswell so removable
the boost pipe in it's place:
mounted the box where the pump is there behind the headlight, but don't have a photo of this.
then attention turned to the engine.
I wanted 16v rods as they are thicker near the wrist pin than the 8v items. But they attach to the piston differently so I have to have 16v pistons too.
The c20let (2l 16v turbo, calibra cavalier) pistons would have gone straight in and low CR, but the dish was all wrong, the squish would have been bad, making an inefficient and slow burn with potential det.
So I had a spare set of c20xe NA flat tops, which would have made 11:1 CR if out straight in, but I wanted 9.5-10 ish..
CC'd the head:
43cc's
preliminary dish design:
final dish design (large circle)
printed this off, and drew the circumference on the piston face:
ground down a nice smooth dish:
smooth, then repeat
7.5cc's gave 10:1 CR if I remember right
then went and took too much out of piston #3, so had to enlarge them all.
anyway, ended up with 4 smooth, strong factory forged pistons with a 9cc dish giving me 9.6:1 CR, and a little lower once in bore.
.
these will be going into my spare fresh 16v bottom end, with the current 8v head on top
..anyway..
then attention turned to the rear running gear.
since with the new pistons i'll be going for more boost and more aggressive ignition timings, water injection and more power, the rear axle's death will be imminent. It's a manta axle with a welded diff, and at the previous 200hp mark it was complaining, alot.
so, I wanted independent rear suspension, same PCD if possible, good brakes, a little more track maybe as I have big arches, ad most importantly a much stronger diff that would sort me out as long into the future as possible (wanting something straight or V6 later on
)..So I toyed with the idea of adapting the front of the tigra to work on the rear of the kadett (as I have the whole tigra here it would have been relatively easy),so glad I didn't now!
anyway, after some suggestions I went with a BMW e30 325i rear setup.
Found the whole lot on offer for cheap, snapped it up, it was only half an hour up the road.
seems pretty simple:
this is what I acquired:
looks like it's going to be quite an easy conversion, the most difficult being joining the props and hanging the diff under the boot floor:
old axle out:
loose mock-up:
spring platforms almost match
shocker bolts straight in:
how i'll be mounting it up to the car:
straight to the chassis legs:
making the mounting plates from thick as dash angle iron:
whilst doing all this, my long thought and planned sub-project is taking shape:
before:
almost there:
all will be one shell as per this 3d mockup video:
and made from this, with bare clear gelcoat:
lightnesss!
now waiting for some brakes from V8Chevette, and MOT time approaching!
So now were upto the present, and it's fooking raining, so thinking of nipping to tescos to get a gazebo and crack on
Hope you lot enjoy the progress (sorry it was so hard and fast lol)


