[*]
[*] [*]
[*]

....including TonyBMW, Dez, BiAS, Grunty, Black8Driver etc....
Collectively, you have given my mojo a stupidly massive boost! Your threads, tips, tricks and various welding advice gave me the confidence to give some fabricating a go. And it worked!
This thread is a visual way of me saying THANK YOU!! (and to show what I have acheived with your online help)
I've only welded a few things in my life and it's always been random stuff, dead simple stuff or drunken late night melting metal kinda stuff. Nothing complicated and nothing specific.
After reading your threads and having various bits of it stick in my mind...I decided to have a go at actually fabricating something.
I know it's a random start, but bear with me on this!
The Area 52 workbench - upon which I fitted a new worktop to the middle section on Sunday.
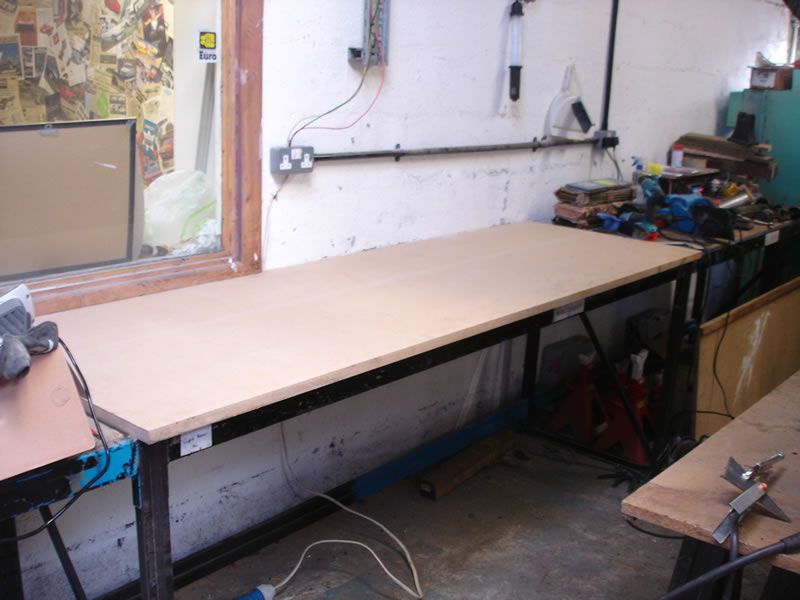
This middle section is directly in line with the 2 post lift and we discovered at the weekend that any cars Volvo 240 length or longer will hit the workbench when being raised on the lift.
I devised a way of having the worktop flip up and out of the way (good old door hinges) and the front crossbar can be lifted out. The rest of the workbench is welded completely together and bolted to the floor & back wall to make it really solid. The only non-welded part is the middle front crossbar.
This means the bench can easily be moved out of the way for bigger cars, but stay in place the rest of the time.
The only problem I had was how to hold the worktop up in the air??
A simple rotating wooden 'toggle' was going to be the answer to lock it into place when vertical, but Morgs mentioned something about making it a bit more fancy and engineered. The seed was planted!
With the tips & techniques shared by the RR experts in welding and fabricating....and Grunty's comment (a year or so ago) about the best way to learn is just 'do' ringing in my ears, I dug out some sheet metal, the grinder and the welder.
Take two pieces of metal and clamp them together. Tack the corners with the welder to stop them moving apart.

Now make a mess with a grinder to cut out a mid-section.

Drill a hole through both pieces then grind the tack welds off the corners, radius the corners slightly and make sure everything is nice & smooth

Now clamp between a piece of box section and weld a plate across the top....then remove the clamp (plate was cut out from a flat sheet with a cutting disc)

I forgot to get any shots of the plate with the 'raw' weld, but this is what it looked like with a flap wheel dusted over it:


Now weld a piece of plate over the next section...then hammer the end around to meet the first piece of plate...

...well, it would have met if I had measured properly!! Time to learn how to fill with weld!

Welds smoothed back with a flap wheel and gap filled with molten metal courtesy of Mr Mig...and smoothed with a flap wheel again.

Starting to take shape


Cut and hammer a bit more plate into the 'infill' shape...

...then keep hammering to try and replicate the profile (this is where a proper bender would have helped A LOT!!)

Once again, weld all the edges up

The smooth back to flat metal with the trusty flap disc


Now cut a bit of box section to length....along with a bit of flat bar (drilled for wall mounting)

Weld the box to the flat trying not to make too much mess!

Voila...ready to fit into the 'other piece'

And one latch/catch....made

Collectively, you have given my mojo a stupidly massive boost! Your threads, tips, tricks and various welding advice gave me the confidence to give some fabricating a go. And it worked!
This thread is a visual way of me saying THANK YOU!! (and to show what I have acheived with your online help)
I've only welded a few things in my life and it's always been random stuff, dead simple stuff or drunken late night melting metal kinda stuff. Nothing complicated and nothing specific.
After reading your threads and having various bits of it stick in my mind...I decided to have a go at actually fabricating something.
I know it's a random start, but bear with me on this!
The Area 52 workbench - upon which I fitted a new worktop to the middle section on Sunday.
This middle section is directly in line with the 2 post lift and we discovered at the weekend that any cars Volvo 240 length or longer will hit the workbench when being raised on the lift.
I devised a way of having the worktop flip up and out of the way (good old door hinges) and the front crossbar can be lifted out. The rest of the workbench is welded completely together and bolted to the floor & back wall to make it really solid. The only non-welded part is the middle front crossbar.
This means the bench can easily be moved out of the way for bigger cars, but stay in place the rest of the time.
The only problem I had was how to hold the worktop up in the air??
A simple rotating wooden 'toggle' was going to be the answer to lock it into place when vertical, but Morgs mentioned something about making it a bit more fancy and engineered. The seed was planted!
With the tips & techniques shared by the RR experts in welding and fabricating....and Grunty's comment (a year or so ago) about the best way to learn is just 'do' ringing in my ears, I dug out some sheet metal, the grinder and the welder.
Take two pieces of metal and clamp them together. Tack the corners with the welder to stop them moving apart.
Now make a mess with a grinder to cut out a mid-section.
Drill a hole through both pieces then grind the tack welds off the corners, radius the corners slightly and make sure everything is nice & smooth
Now clamp between a piece of box section and weld a plate across the top....then remove the clamp (plate was cut out from a flat sheet with a cutting disc)
I forgot to get any shots of the plate with the 'raw' weld, but this is what it looked like with a flap wheel dusted over it:
Now weld a piece of plate over the next section...then hammer the end around to meet the first piece of plate...
...well, it would have met if I had measured properly!! Time to learn how to fill with weld!
Welds smoothed back with a flap wheel and gap filled with molten metal courtesy of Mr Mig...and smoothed with a flap wheel again.
Starting to take shape
Cut and hammer a bit more plate into the 'infill' shape...
...then keep hammering to try and replicate the profile (this is where a proper bender would have helped A LOT!!)
Once again, weld all the edges up
The smooth back to flat metal with the trusty flap disc
Now cut a bit of box section to length....along with a bit of flat bar (drilled for wall mounting)
Weld the box to the flat trying not to make too much mess!
Voila...ready to fit into the 'other piece'
And one latch/catch....made


 Great welding practice too!


 Ax GTi Turbo
 [*]
[*]