|
|
|
Jan 19, 2012 12:38:27 GMT
|
|
Wouldn't be the first time the front and back of a car had different design teams working almost independently.
You may find the rear end breaks up better with the bumper once you do the lights- the standard ones are somewhat dominant over the back end.
--Phil
|
| |
|
|
|
|
|
|
|
Jan 20, 2012 23:17:57 GMT
|
PhilA: I'm having thoughts about the rear lights, they require tinkering with as I may be doing something different to what I Photochopped after discovering those aluminium trims come off. Keeping it to myself for now. Right, fiddly update again. Lot of pictures, not a lot of progress, lol. I've successfully repainted the fancy grille bars. Seth has very kindly offered to polish the other bars providing I do a bit of prep first, which my wrist said "OHTHANKGOD" very loudly at me, so that's a good thing. Interestingly, I now suspect those Ikea bars are actually stainless steel rather than aluminium because they have more characteristics in common with the former than the latter. Here we go then. Start out with a brush for dusting, a sharpish craft knife (not a sharp one or a blunt one, sharpish is best for this), some cotton buds and a bit of turps or other thinner.  Carefully scrape the paint off the raised areas with the knife. I tried using sandpaper to begin with which was too aggressive, and the cotton buds in turps which wasn't aggressive enough. This seems the happy medium.  Be sure to clean the scrapings away as you go. Don't worry too much about little bits in the dimples of the casting, we'll get those later.  Right, that's that all clean and ready for the next bit. There's a few tiny lines and dots of red still to remove.  So use a cotton bud tipped in turps. Removes the paint without removing the gold finish.  Before and after.  Finished all five.  Next job is to mount them in the grille. Got the ingredients - washers, nuts, threadlock and bolts - but I need to slice the bolts in half and I'm done with that for tonight, need to rest the old wrist (which is getting much better!)  So the other job I did was the red paint on the front panels. Done some more reading and research and I've been giving myself more work than I need to. I've spent many hours flatting back the old badly prepped but otherwise fine paint to get a nice smooth finish. The wings are a lot more forgiving, but the bonnet was a mess.  I used a bit more paint than before and moved it around a lot more with the roller which seems to have resulted in a better finish, especially when combined with HOURS of hand sanding to rectify previous mistakes.   After a while the paint had dried and looks spray-gun fresh which I'm quite excited about.  So even though I already knew that preparation was key and that I shouldn't rush a job or do it in less than ideal conditions, this has rather proved the point to me. I'm not going to make excuses for the previous paint attempts, the only good panels are the wings which I took ages over, rather I'm happy that I can at least rectify my mistake and get an excellent finish. I plan to get all the red paint ready for polish, give it a quick buff and then mask it off before doing the black. That way the black can be got to the same standard, all the masking removed and the whole panel buffed uniformly to what should be a step-free mirror finish... I hope. Time is at least on my side now.
|
| |
|
|
|
|
|
Jan 20, 2012 23:46:41 GMT
|
|
Good to see this going forwards still!
|
| |
|
|
|
|
|
|
|
|
slowly, yes. 2011 meant I didn't get as much done as I wanted, but I've got plenty I can do for free due to stockpiling stuff.
Worryingly, I just discovered sparkly metallic VHT gold paint... I'm such a magpie!
|
| |
|
|
|
|
|
Jan 21, 2012 12:32:12 GMT
|
Been tinkering with the rear end, playing about with and discarding a lot of ideas and this is the one I've settled on until a better one comes along.  I've made the decision to eliminate all the badges to keep people guessing, especially with how many people are reminded of a Datsun on the front, but I still want to hint at the car's actual heritage. To match the bonnet, the central panel in red remains recessed into the black, this helps smooth out the sides of the car and give a slightly more finished look than if I just smoothed the panel completely. After various attempts with placing the lights without the aluminium trims I came to the conclusion they just ended up looking lost, I want the lights to be a feature after all, not something that blends in, so they're back where I started. For that VW heritage, there's a shallow V in the back panel now, which really helps to frame the lights and finish things off. If I were to add any badges I'd simply put a round VW logo on that VW in open suggestion of the old split window campers. I know I don't have the skills to make the tailgate look like the above, so I expect I'll have to pay someone to do it for me :/ Ah well, I'm not planning to put Built Not Bought stickers everywhere so it doesn't worry me too much. |
| |
|
|
dw1603
Part of things

Posts: 591
|
|
Jan 21, 2012 19:30:33 GMT
|
If you are not happy with the rear bumper, could you work one of these in? Datsun 200L 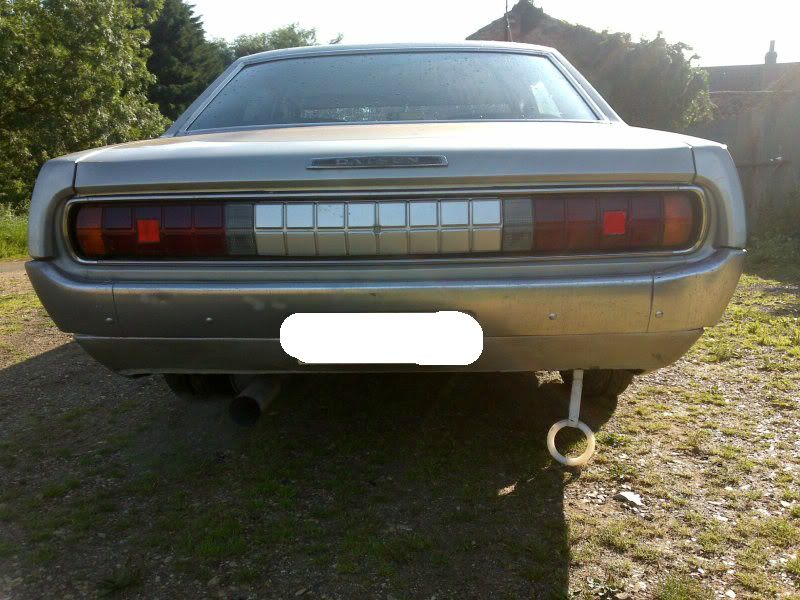 Assuming you could find one of course! |
| |
|
|
|
|
|
Jan 21, 2012 21:22:20 GMT
|
Finding one would be tricky, it's true. Not something I'd considered, I was too focused on blade type bumpers so it gives me something new to explore. Thank you  |
| |
|
|
The Doctor
Club Retro Rides Member
Posts: 3,434
Club RR Member Number: 48
|
|
Jan 21, 2012 22:38:35 GMT
|
|
that photoshop has to happen!
Beautifull!
|
| |
|
|
|
|
|
|
|
The Doctor: Once I've ironed out the legalities I suspect something very much like it will. No new ideas have come along yet. Tomorrow Today, as it turns out, the EXCITING THING happens. You know it's exciting because Bruce MysteryMachine has a grubby little paw in the machinations. Going to be about a 100mile round trip spending money on petrol I probably shouldn't to get a thing I don't actually need... should be fun! Back payment from the Council has FINALLY arrived, though it seems to be short by more than was expected, so I will have to have words with them tomorrow before we set off. It's why I've been hovering on RR all day, that and my wrist has been playing up like it's gone into remission or something, which I hope it hasn't (I was told the Ultrasound can make it feel a bit funky). I wonder how much sleep I won't get?
|
| |
|
|
|
|
|
Jan 24, 2012 17:24:18 GMT
|
23rd January.We had typical weather, on the nicer side.  There were lots of windy roads.  We got a bit lost. This is probably North Hykem.  But eventually we got to 80mojo's place an hour late. Had an oggle at his Mantas, but the light wasn't great so I only got the one picture come out.  Got back home and straight in the garage. Discovered my passenger seat had gone a bit fuzzy, my own fault for not leaving a window down a little bit. I knew the carpet was a little damp but I didn't expect to be laying up the car for as long as I have so I made no precautions. Should clean off easily enough though.  Trial fit of the wheel just rested against the car. Needs spacers.  The calipers get in the way of the wheel, or vice versa.  It's okay though, they made me this happy.  24th January 24th JanuaryWent out to the garage with the housemate to have a proper look at how the wheels fit. I now know the wheels are Lancia 1500 GT items, they're superlight so I wonder if they might be magnesium. Importantly I had to test the centre bore and happily, it seems to be identical, the wheel fits firmly and snugly against the hub and doesn't wobble or jiggle about, it also won't hold itself on the hub but neither do my other wheels when the car is jacked up on one side. Housemate can blur his face at will like that, comes in handy.   With shorter tyres and some air pressure they should just about clear the stock arches, but some massaging may be required. This is not a problem, I'll be altering the rear arches anyway, probably widening them a touch for a little extra clearance.  No poke.  But yes... happy enough with these. Just need a set of wobble bolts all round and some 25mm spacers at the front to get them all to fit.  So in conclusion: At least 25mm (the distance from edge of hub to edge of caliper) spacers for the front. Wobble bolts. Chromed/polished Bullet centre caps Suitable wheel nut covers - I've found some with green crystals I like, or I could just get more bullets. 60 or 65 profile tyres, but not as thin as 55 Whitewalls or redlines, I'll have to do some mock-ups to decide.
|
| |
|
|
|
|
lizardking
Part of things
'zon the revelator
Posts: 502
|
|
Jan 24, 2012 18:00:14 GMT
|
|
seriously digging your garage attire old chap is that a health and safety fedora?
|
| |
I'M SO RETRO , I SH1T SPANGLES
'68 Amazon,97 x300 jaaaaaaag,96 Mx-5,86 1300 mg Trike
L300 Delica ex MM
|
|
|
|
|
Jan 24, 2012 18:08:19 GMT
|
Health and Safety... what's that then? Normally, when I'm working, I at least roll my shirt sleeves up  |
| |
|
|
|
|
|
|
|
|
Done some pricing up...
Tyres: Falkens, £30 a corner at 155 or 165 (whichever fits best, currently on 165 but they look a bit balloony) 65 r13
Bullet centre caps: £8 per wheel, £5 postage
25mm Spacers: approx. £25 new (postage unknown)
Wobble Bolts: approx. £15 new (postage free or very little, depends where I buy)
Total - £227 (ish)
|
| |
|
|
|
|
|
|
|
|
Nice purchase.
Something unfortunately said "centre caps with spikes and knives".
That is irrational.
-Phil
|
| |
|
|
EmDee
Club Retro Rides Member
Committer of Autrocities.
Posts: 5,920
Club RR Member Number: 108
|
|
Jan 25, 2012 16:35:41 GMT
|
|
25mm? I'm surprised you need that much, hope you've double checked that! Also since they're going on the front I'd recommend hubcentric bolt-on jobbies - which would mean you may be looking at closer to £40-£50 for the pair.
Oh and by the way, they're not magnesium, they're winnium.
|
| |
|
|
|
|
|
Jan 25, 2012 17:42:28 GMT
|
EmDee: more research is likely to be required then, I'll probably do an ask in the technical section. I'm going from no knowledge to what I can learn online with this one. I'm wondering if I've measured wrong now. What I did was measure from the hub face to the point on the caliper that's furthest out. The wheel is very flat on the back so I wanted to be sure I didn't foul anything. In this picture: You can see how much the caliper bulges in the middle, that's where I got my 25mm measurement from. The back of the wheel has a much larger flat area than the hubs on the car, that big bulge is what seems to be fouling the wheels. How do hubcentric spacers differ from normal spacers, is it just a machined locating ring or is there more to it than that? And yes, Winnium indeed. I still think they're astonishingly light though, either that or my Tarantulas and other alloys I've handled are shockingly heavy. Regardless, lightness of new wheels will balance out heaviness of new grille, lol.
|
| |
Last Edit: Jan 25, 2012 17:43:14 GMT by Deleted
|
|
|
|
|
Jan 28, 2012 12:15:26 GMT
|
I'm liking this alot mate. You do all the things I think about and then decide I'm not able to do! For the tyres it will be the aspect ratio that makes them look 'balloony' rather than the width. If it were me I'd go with 165/65 on the front and 175/60 on the front. In fact I did:  Should fit nicely in the archs with no rubbing. |
| |
1980 Derby GLS
1992 Rover 216 Gti - Sold
2006 Hilux - Sold (boo hoo) need a 2wd pickup. Anyone?
2009 Avensis Tourer - Gone
1993 Mk1 Golf Cabby
1983 mk1 golf. Project rust bucket
1998 Toyota Corolla. Project crash repair
2007 Volvo V70. Daily for sale!
Looking for a winter project - any suggestions?
|
|
|
|
|
Jan 28, 2012 13:16:10 GMT
|
|
I'm curious then about the fitting of tyres. I thought you had to have the tyres the same width as the wheels and the Lancia wheels are 155 wide.
That greeny does look nice.
|
| |
|
|
craig1010cc
Club Retro Rides Member
Posts: 2,993
Club RR Member Number: 35
|
|
Jan 28, 2012 14:58:01 GMT
|
If you do go for 25mm spacers, why not get them as PCD adapters so that you can run your normal wheel bolts? Would be a much better solution IMO. Looks great though Rear bumper wise, what about a one with a long wrap round the side like a XJ6? |
| |
|
|
|
|
|
Jan 29, 2012 14:32:11 GMT
|
I'm curious then about the fitting of tyres. I thought you had to have the tyres the same width as the wheels and the Lancia wheels are 155 wide. That greeny does look nice. Ahhh the murky world of tyre fitting! Lets say the tyres you have at the moment are 155/70 R13. The 155 refers to the width of the tread in mm. The 70 refers to the % of the width for the size of the side wall. In this case 70% of 155mm. The R13 refers to the radius of the wheel. So if you change the width (155) to a bigger width (say 165) then to keep the same rolling radius you will need to decrease the size of the sidewall. ie 65%. So by fitting a 165/65 size tyre the 'rolling radius' of the wheels remains the same. This means your speedo will read the same. Pop down to the local tyre place and have a chat with them. Most will help you out. Try independants rather than the big chains though. They tend to be more helpfull  |
| |
1980 Derby GLS
1992 Rover 216 Gti - Sold
2006 Hilux - Sold (boo hoo) need a 2wd pickup. Anyone?
2009 Avensis Tourer - Gone
1993 Mk1 Golf Cabby
1983 mk1 golf. Project rust bucket
1998 Toyota Corolla. Project crash repair
2007 Volvo V70. Daily for sale!
Looking for a winter project - any suggestions?
|
|
|
|