craig1010cc
Club Retro Rides Member
Posts: 2,993
Club RR Member Number: 35
|
|
Apr 11, 2014 16:40:37 GMT
|
Gaz had key'd it well with the DA before any orange was shot, so it should be a good base. Ah yes, the bottom pulley, we had to whip that off to remove the supercharger bolt on pulley and it was all a bit of a rush job. I take it the bolts where in the boot? With the alternator, try giving it a good dousing of WD40 and turning it with a socket. I had the same on my MPI mini after it sitting for 12+ months and that sorted it out with no ill effects (infact twice as it got laid up a 2nd time  ) |
| |
|
|
|
|
RobinJI
Posted a lot
 "Driven by the irony that only being shackled to the road could ever I be free"
Posts: 2,995
|
|
Apr 13, 2014 17:42:22 GMT
|
I did try giving it a good douse of GT85 and a wriggle with a spanner but no joy unfortunately  it's notchy rather than stiff. I haven't actually looked for the bolts for the pulley yet, hopefully they'll be in the boot. If not they're just standard M6s so I'm sure I can dig out something suitable. Spent most of this afternoon scrubbing away with de-greaser to get the engine looking a bit smarter and make it much nicer to work on without a coating of grime everywhere. The old things done a fair few miles and it looks like there's been a slight oil weep from the front of the engine for a good number of those so it had a thick coating over loads of it. Sadly I forgot to get any before pictures, but it was really caked, you could barely tell what shape the steering rack was and most of the front of the engine was in a similar state. I'll replace the seals/gaskets that are the most likely culprits before it goes on the road, and now it's nice and clean it should be fairly obvious where it's coming from if it's still leaking. In fact I'm probably going to pull both manifolds off and give the block a damn good clean and a lick of paint sometime before it goes for a test. This is how it was looking when I locked up, a massive improvement in my eyes, much more inviting to take the spanners to: 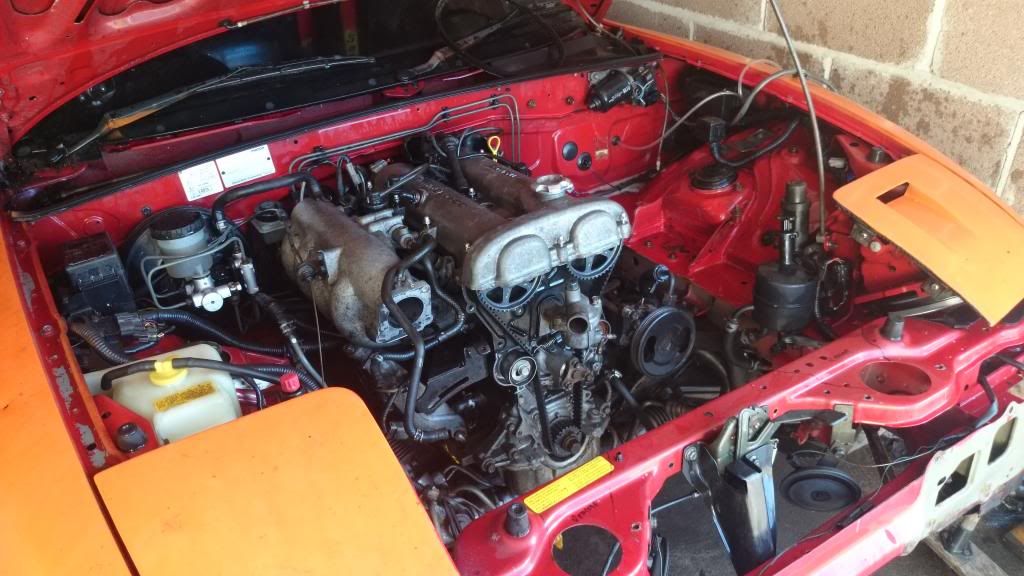 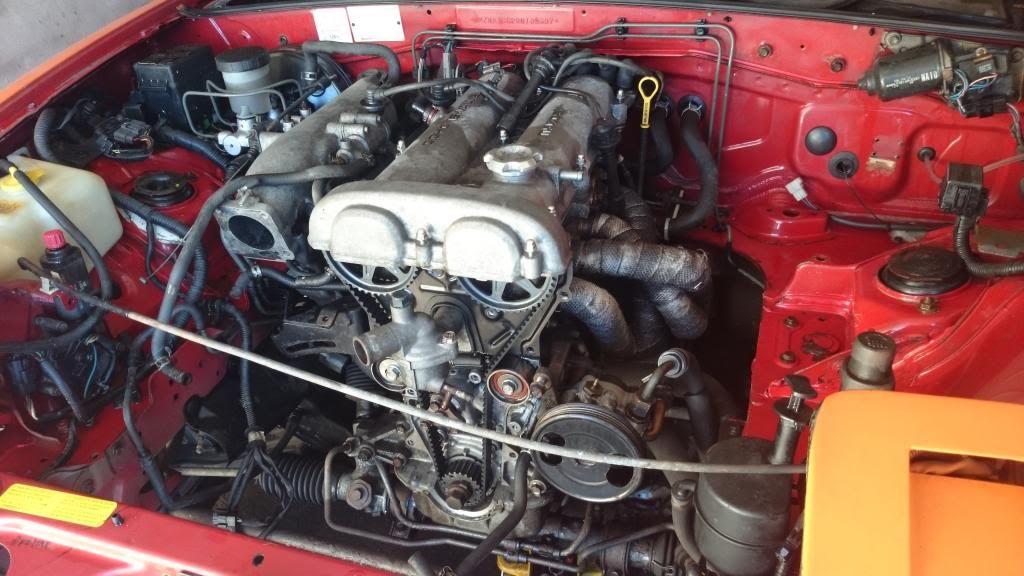 This is the bumper I'm thinking of fitting, I'm not 100% about the look but at least it's relatively subtle/plain looking. The main thinking's that it eradicates most of the overhang which will help reduce front end lift and should cut down drag a bit too. It'll make fitting a proper splitter easier too. If I don't mind the look of it once fitted then the spotlight holes will probably eventually get used as vents for ducting to the brakes and air intake (split horizontally). As I said, it needs a little repair work! 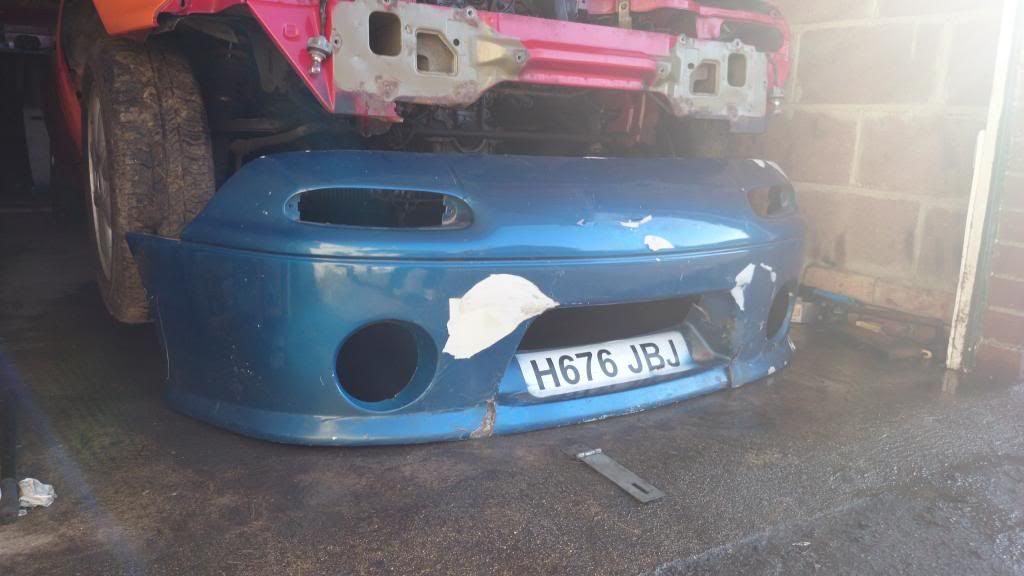 It feels lighter than the original bumper too, and loosing weight's one of my main aims with this car, there's quite a bit of weight to be lost from it once I've removed the previous botched repair work from the back too, so it should give a decent weight saving in an important place once repaired properly. |
| |
|
|
|
|
|
Apr 13, 2014 18:58:35 GMT
|
|
If you are not too sure of the look of that bumper....send it my way...
|
| |
Ginetta G15 BMW K1100 conversion Sold
Mk1 Mx5 on ITB'S Sold
TVR Chimaera 400 supercharged
MR2 Red Roadster 2ZZ
Bee*R 324 Skyline
95 Cherokee Jeep
|
|
craig1010cc
Club Retro Rides Member
Posts: 2,993
Club RR Member Number: 35
|
|
|
|
Does look a hell of a lot better than when I was getting that pulley off I'm sure the bolts are all in the boot. Have to admit I prefur the stock nose, but can see why your heading towards this one |
| |
|
|
|
|
|
Apr 14, 2014 11:52:08 GMT
|
|
If you have ever used the MX5 candle power headlights at night you will want to fill them with b-i-g driving lights
|
| |
Ginetta G15 BMW K1100 conversion Sold
Mk1 Mx5 on ITB'S Sold
TVR Chimaera 400 supercharged
MR2 Red Roadster 2ZZ
Bee*R 324 Skyline
95 Cherokee Jeep
|
|
RobinJI
Posted a lot
"Driven by the irony that only being shackled to the road could ever I be free"
Posts: 2,995
|
|
Apr 18, 2014 12:06:52 GMT
|
|
A little progress on this this week, but I've been distracted by mountainbikes so not very much.
I pulled the inlet off the other night, which I was sort of dreading given that a fair few of the bolts I've touched so far have sheared off at the base of the head (something I'm not used to, for some reason my old VW's have never put me through this particular hardship). Luckily after a quick soak with plusgas and the use of a 6 sided socket they all came out intact, although the nuts and bolts will be replaced when it goes back together, probably with studs all round (originally 3 sud/nuts and the rest are bolts) and brass coated k-nuts; a treatment I plan to give the exhaust manifold too.
Having had a closer look at it, I'm not very impressed with the inlet which is making me sway towards swapping it out for a set of ITBs. I'm not sure on this one really, as I'm well aware that N.A. tuning one of these engines for any real gain basically means a full build, not just bolting bits on. I'm in 2 minds, as the ITB set-up would be great fun for the time being, and it'd loose the standard plenum which would be a good thing even if I did charge it, but on the other hand, it's a lot of effort when there's much easier ways to replace the plenum, and the money could go elsewhere (i.e. suspension, extinguisher, additional cage bracing etc.) It would be fun though.
|
| |
|
|
craig1010cc
Club Retro Rides Member
Posts: 2,993
Club RR Member Number: 35
|
|
Apr 18, 2014 13:57:11 GMT
|
a set of bike TB's on it would be cool, and sound ace  Plus you've got the hard part already done as the squirt is already in and running |
| |
|
|
RobinJI
Posted a lot
"Driven by the irony that only being shackled to the road could ever I be free"
Posts: 2,995
|
|
Apr 23, 2014 20:45:55 GMT
|
It is tempting, just need to explore what to do about a manifold/airbox. (I don't really want to run open trumpets as it'll be the back-up daily.) So over the weekend I made a start on fitting some new padding on the roll cage. Big solid metal bars next to your head don't need too much explanation as to why they should be padded, especially if you ever drive the car without a helmet on. The trouble is they tend to be padded with stuff along the lines of pipe-lagging, which is great for comfort, but will absorb sod all energy if you headbutt it hard in a crash. The proper stuff the for job's hard foam similar to what you'd find in a decent helmet. That way, although it's not much more comfy than the metal to knock your head against getting in/out of the car, in a real impact it'll absorb a decent amount of energy. This is all particularly important in the little MX-5 as although the cage is a tight fit to the roof/screen, there's not much space in there so your head does tend to be a bit close to the cage for comfort. A while back I bought a load of FIA approved padding to put in the Mini project I was planning, so I thought I'd set about fitting it in the MX-5 for a bit of added safety. A start: 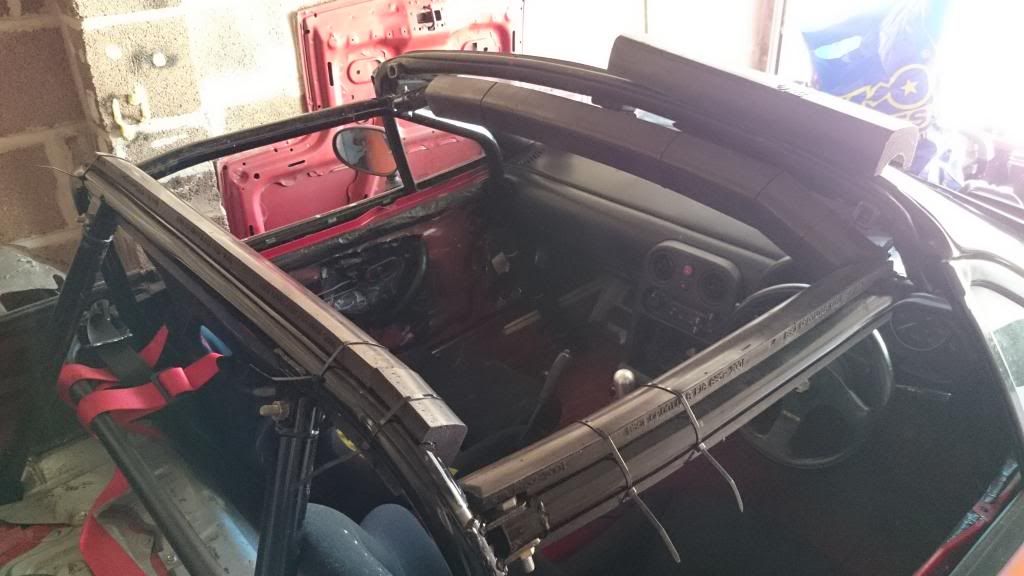 And an awkward 'selfy' photo of myself to show how close the cage is, I'm not 100% happy with it and over time I want to get the seat down lower to get a bit more clearance.  Around this point my friend Alan popped round to say hello in his 1934 Jowett, which lead to a trip to the beach in the old girl:  En Route:  At the beach:  Lovely day:  A stop off in the hills on the way home:  Again, not a bad day! I do enjoy rural life sometimes:  Anway, that basically took up the rest of the day, and was great fun! I'd love something vintage at some point. So much fun despite not breaking hte 38mph barrier  Last night I added some more to cage padding to fill the corners as well as covering the b-pillar and the rear leg on the drivers side. The passenger side will probably wait until I next turn the car around. After that I took the mounting bracket off a spare bumper I had and test fitted the aftermarket bumper with it. It's not as bad fit as I'd been expecting. The pannel gaps need a tweak (expected really given the state it's in!) but the contours flow into the body properly which is the bit I was most worried about. I'm quite liking the look of it given that I'm going for an aggressive track-car look: 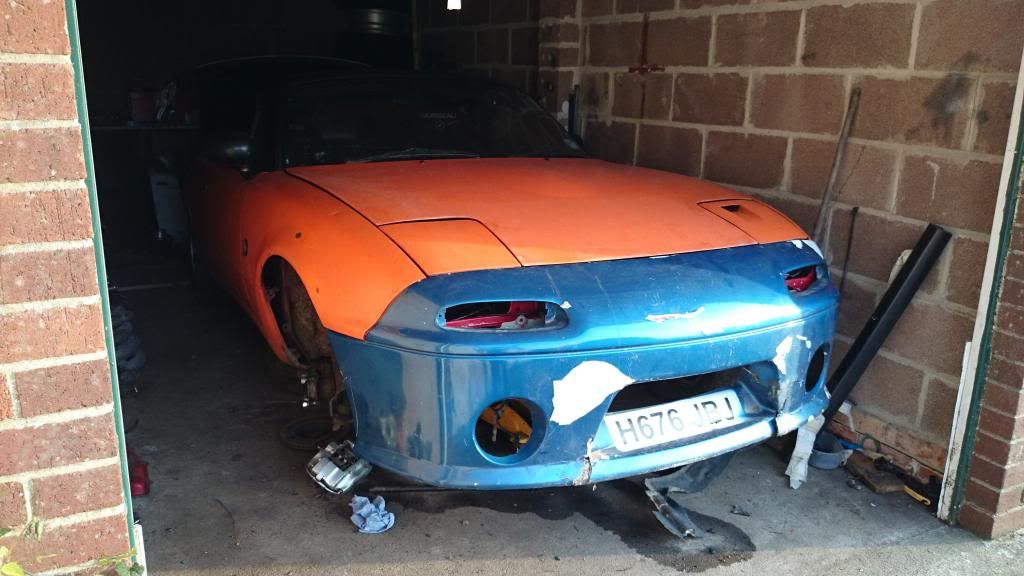 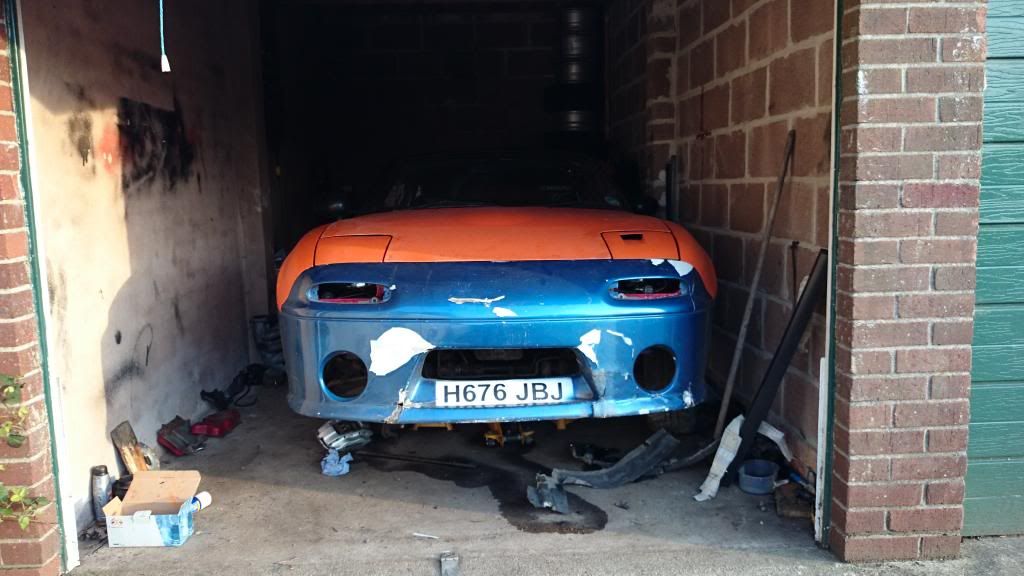 As I'd hoped it does come down to be level with the floor/subframe, good for aero and should make future plans easier: 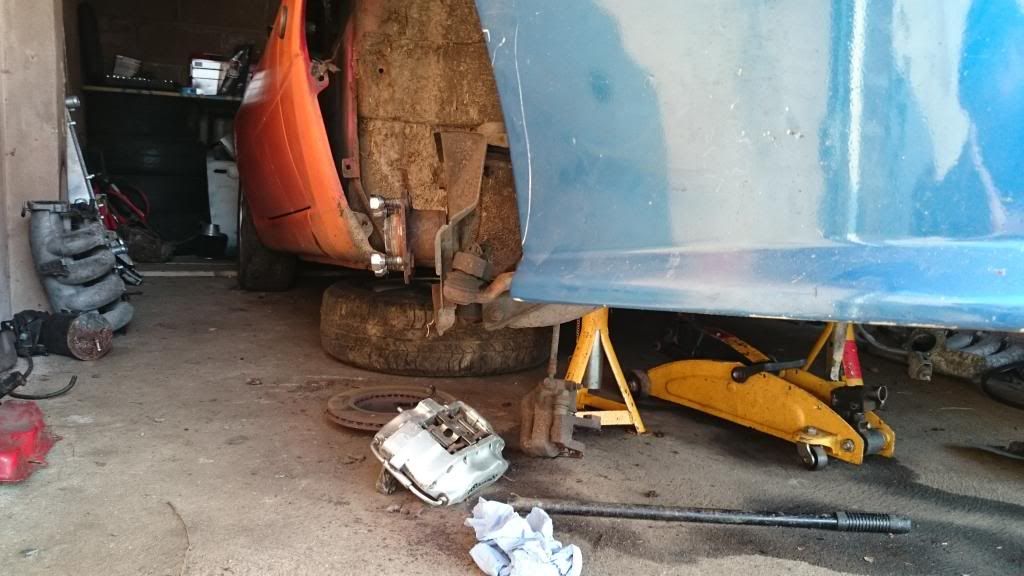 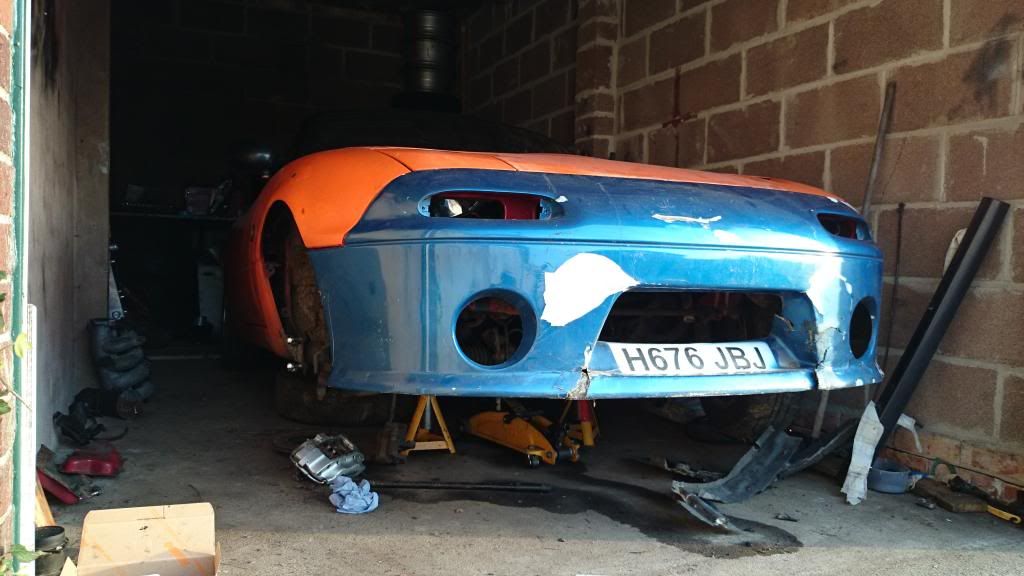 Looks like I'll be having fun with fibreglass sometime soon then. |
| |
Last Edit: Apr 23, 2014 21:26:09 GMT by RobinJI
|
|
|
|
|
Apr 24, 2014 11:00:23 GMT
|
love the project thus far, I'd have an MX in a heartbeat but my boss tells me I need more seats. Just a bit of advice on your sheared bolt problems, having worked for years on J stuff, then switching to VWs for ten years; I found when I bought my mitsi that I started shearing off fasteners and reminded myself that J fasteners are pretty cheeselike in comparison to german ones and had to recalibrate my inbuilt torque settings. I also found that the bolt would tend to undo a fraction, then go tight and snap - to get them out with more success I developed a technique, slacken bolt a touch, then tighten it again a little bit, slacken, tighten and so-on, much like tapping a thread this two steps forward, one step back seemed to work. Apologies if this is teaching you to suck eggs |
| |
|
|
|
|
|
Apr 24, 2014 11:57:30 GMT
|
|
I have just done a fairly comprehensive rebuild on my 5 (Will Carters old ride) i can sympathise with the sheared bolt problem I tried heat,plus gas,being gentle.Some worked some didn't,so i got fairly proficient at drilling out the remains of the old bolts.I broke so many In the end i had to go to a local mazda breakers and beg him for a bag of nuts and bolts
Bumper looks like an M2...very nice. What sort of aero are you planning i have a set of canards for the bottom of the bumper you might be interested in.
|
| |
Ginetta G15 BMW K1100 conversion Sold
Mk1 Mx5 on ITB'S Sold
TVR Chimaera 400 supercharged
MR2 Red Roadster 2ZZ
Bee*R 324 Skyline
95 Cherokee Jeep
|
|
|
|
RobinJI
Posted a lot
"Driven by the irony that only being shackled to the road could ever I be free"
Posts: 2,995
|
|
Apr 24, 2014 16:30:46 GMT
|
|
Thanks for the tips guys, I'll take it all on board. I'm glad I'm not the only person to notice the cheese like bolts. I kept a whole load of bolts off a Passat I broke a while back, so I'm generally ok for replacements (I'm yet to snap any of the m10 fine thread bolts, which are the only I'd struggle to replace.) It's just a pain getting the remains of the bolt out!
Wheelspinner, I'd not heard of an M2, a quick google would suggest that although the spotlamp positions identical, the front vertical face of the bumper's quite a lot more curvy, unless they did several versions? It would be cool to know what it actually is, I don't have a clue myself.
|
| |
|
|
|
|
|
Apr 24, 2014 17:46:35 GMT
|
|
Good to see progress on the beast robin. I'm glad you are going to go for montana paint again. You can always clearcoat it if you want it shiny :-)
If you want to supercharge it I can sell you my eaton45 and the brackets. You will still need the tensioner and inlet outlet to finish.
|
| |
|
|
RobinJI
Posted a lot
"Driven by the irony that only being shackled to the road could ever I be free"
Posts: 2,995
|
|
Apr 24, 2014 20:22:24 GMT
|
Cheers Gaz. I think I'm going to leave FI for a few months, or at least until I've got a feel for the car again. I'm exploring ways of making an inlet/plenum for bike throttle bodies at the moment; if I can make those two then it'll just be the ~£50 that the throttle bodies will set me back off eBay. I don't suppose you know what the Exhaust manifold is do you? All this talk of snapped bolts reminded me that I don't have a cordless drill, which means I have to remove anything that needs drilling to bring it into the house/shed, which is a little annoying to say the least. So as it's pay-day, I thought I'd treat myself to a new toy: 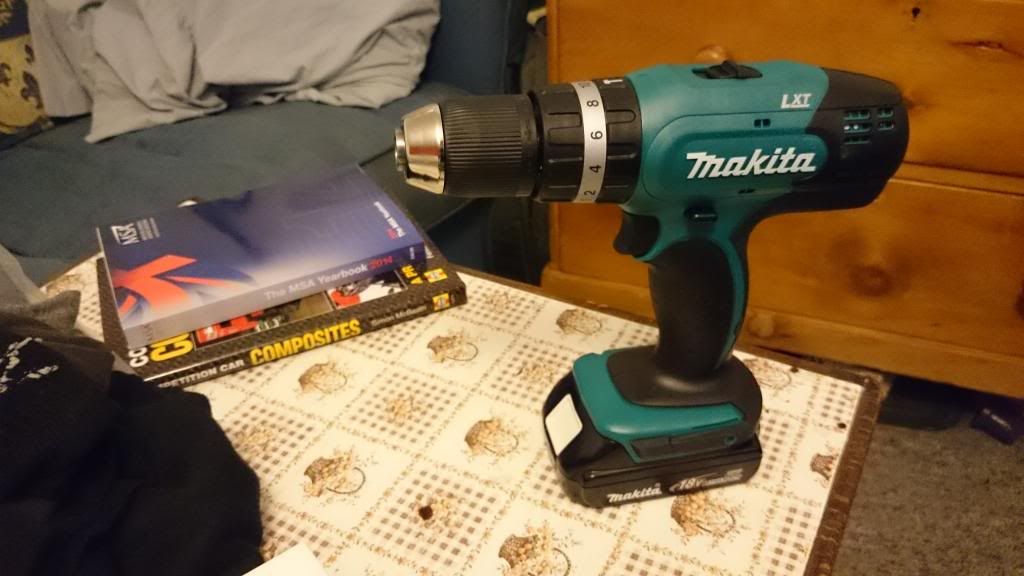 |
| |
|
|
|
|
|
Apr 25, 2014 10:47:12 GMT
|
an extension lead would have been cheaper  |
| |
|
|
|
|
|
Apr 25, 2014 20:09:13 GMT
|
I have done an ITB conversion using the original manifold and GSXR TB's i laser cut a plate and chopped the manifold and had it welded on. I can send some pics of it if you drop me an email. Other options are chop the manifold and use silicone hose to join it to the TB's, Mx5 Nutz is a mine of information search RobD,Skuzzle,MrPHam and Ardler Dan for a few ideas. www.mx5nutz.com/forum/index.php?showtopic=130069www.mx5nutz.com/forum/index.php?showtopic=108244&page=1www.mx5nutz.com/forum/index.php?showtopic=104772&hl=One problem is the brake bias gets in the way but its easy enough to move As said before you are half way there if you have an MS fitted and have an idea of how to home tune. If going ITB these engines have a a low compression ratio and benefit from a skim and some lumpy cams Apart from a nice sound (boy is it a nice sound) and faster throttle response you don't get much bang for your buck bhp wise but who cares. |
| |
Ginetta G15 BMW K1100 conversion Sold
Mk1 Mx5 on ITB'S Sold
TVR Chimaera 400 supercharged
MR2 Red Roadster 2ZZ
Bee*R 324 Skyline
95 Cherokee Jeep
|
|
RobinJI
Posted a lot
"Driven by the irony that only being shackled to the road could ever I be free"
Posts: 2,995
|
|
Apr 28, 2014 19:07:36 GMT
|
Regcheeseman, haha, very true! I wish I could reach the garage with a sensible extension lead Sadly I'd have to put about 4 together to get anywhere near. I may make up an extra long one sometime out of thicker cable to try and have some hope of still having 240v at the other end, but it's not ideal. Plus the cordless is just handy to have. Wheelspinner, thanks, those threads will keep me busy for a few lunchtimes! Yours looks like a nice set-up, cool little car. I've got a plan in mind for the inlet that I'm keen to give a go, it may or may not work, but it'll be fun trying it out. I need to assess my finances/priorities to see if I can afford the ITB's this month, as it'd be handy to at least make a start while the car's not on the road. I suspect in the long run it'll end up with forced induction, my daily driver's about 200bhp/ton and it'll feel odd having the weekend toy with a fair bit less! so I probably won't do anything about the low compression ratio or cams until I make a firm decision. Who knows though, I may get addicted to the response of the NA engine and decide to build a nice engine without any forced breathing. I'm certainly not a power-junky, if fact I'm almost a bit bored of the Scirocco's power. You rarely get to use full throttle/revs and in a way it'd be more fun having to work the car to keep the speed, rather than just riding the torque with zero effort. (Perfect in a daily, but a bit dull when trying to go for a fun drive.) On the other hand, with the MX-5 being rear drive, I may find myself craving the ability to get the back end squirming whenever I feel like it, which obviously hasn't been something I want in the front wheel drive Scirocco. I'm building the MX-5 to be as raw as possible, so it's a bit of a toss-up between having to work it to get the most from it (fun) or making it a bit of an animal (also fun, but in a different way.) |
| |
Last Edit: Apr 28, 2014 19:13:50 GMT by RobinJI
|
|
RobinJI
Posted a lot
"Driven by the irony that only being shackled to the road could ever I be free"
Posts: 2,995
|
|
Apr 30, 2014 17:23:38 GMT
|
Just been linked to this on another forum, very interesting reinforcement of my reasoning behind using that fiberglass bumper: Splitter or Air Dam - Which Design is Best? - Hancha BlogWhat I'll be aiming for's basically what he's labeled as design 6. I doubt the effects will be quite as dramatic once the air intakes are taken into account, but it shows the advantage of loosing the overhang. Even before the splitter's taken into account, the difference in bumper shape/air-dam's clear and evident between designs 2 and 5. Even between 3 (the closest to a standard mazda splitter I guess) and 5 there's a dramatic difference in lift caused by loosing the overhang. |
| |
|
|
joeytalent
Part of things
ITB Everything.
Posts: 440
|
|
|
|
I have done an ITB conversion using the original manifold and GSXR TB's i laser cut a plate and chopped the manifold and had it welded on. I can send some pics of it if you drop me an email. Other options are chop the manifold and use silicone hose to join it to the TB's, Mx5 Nutz is a mine of information search RobD,Skuzzle,MrPHam and Ardler Dan for a few ideas. www.mx5nutz.com/forum/index.php?showtopic=130069www.mx5nutz.com/forum/index.php?showtopic=108244&page=1www.mx5nutz.com/forum/index.php?showtopic=104772&hl=One problem is the brake bias gets in the way but its easy enough to move As said before you are half way there if you have an MS fitted and have an idea of how to home tune. If going ITB these engines have a a low compression ratio and benefit from a skim and some lumpy cams Apart from a nice sound (boy is it a nice sound) and faster throttle response you don't get much bang for your buck bhp wise but who cares. I went down the same route as RobD on Nutz for my ITB build - silicone piping and jubilee clips galore. Hoping to replace it for something a bit more permanent soon. Happy to answer any questions you might have as well. Also, I think you've actually got a decent bumper there - so many of the aftermarket ones are horrible, that one fits with the lines in the car pretty well! |
| |
|
|
RobinJI
Posted a lot
"Driven by the irony that only being shackled to the road could ever I be free"
Posts: 2,995
|
|
May 21, 2014 19:58:49 GMT
|
Thanks Joey, I'm pretty happy with the bumper, must start repairing it! Things have slowed up a bit as the Scirocco was due a bit of love, so distracted me for a while. I spent last night and part of this evening getting the engine closer to going back together though. I think I've decided I'm just going to go straight for the turbo route, but I want to get the car tried and tested on the road/track a bit first, so mods from now on will have forced induction in mind. Anyway, I decided to be a cheap skate, and I like making things, so I popped to a local engine builders and grabbed some gasket paper to knock up the gaskets to get the inlet back together and fitted. Home made gaskets: 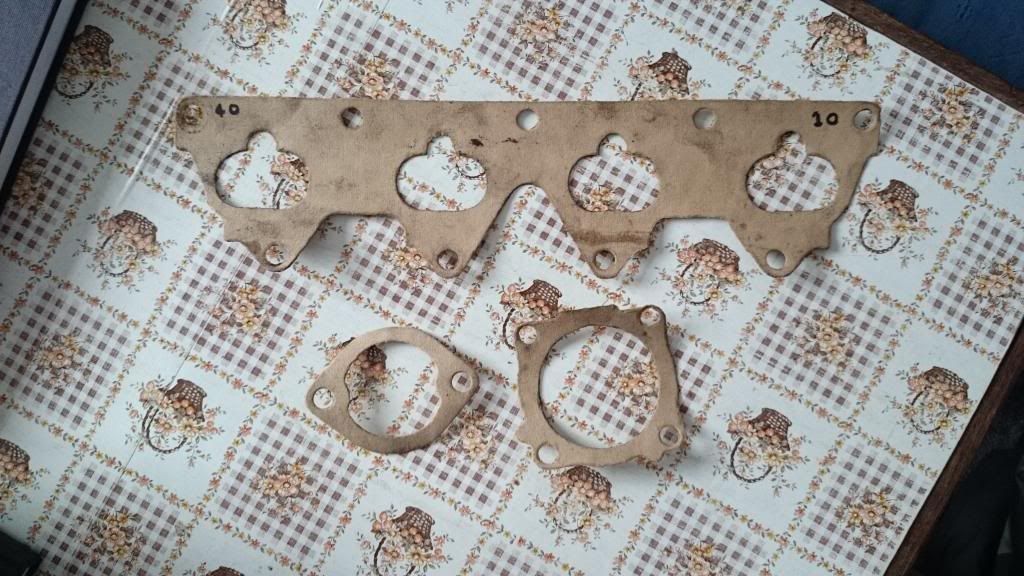 These are actually really quick and easy to make. Because the faces that gaskets are used on tend to have been machined flat leaving a sharp edge around them, you can just hold the gasket paper against the surface and gently tap around the edge with a hammer to cut it out perfectly. A ball hammer works nicely for the internal edges and bolt holes. This lot took maybe 10 minutes and 1/3rd of a £2 sheet of gasket material to make. I also decided to plunge in and get the VW throttle body mounted up: Idle valve blanking plate: 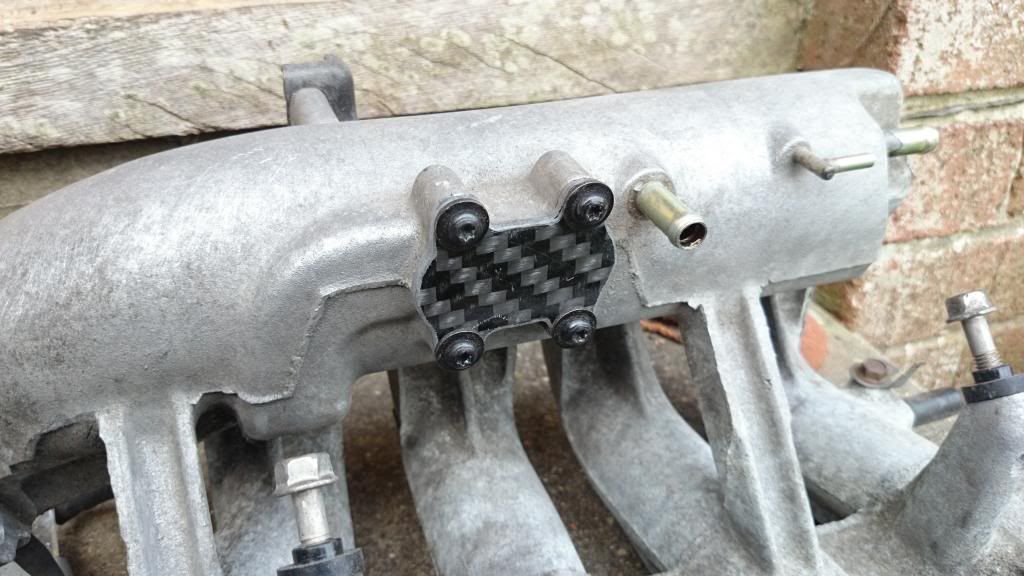 The VW throttle body won't need the external idle bypass system, so this was blanked off. I plan to turbo this car eventually, and the original mazda bypass system doesn't really like positive manifold pressures, and it's a messy complicated system that adds pipework and clutter to the engine bay. A comparison of the VW and Mazda throttle bodys: 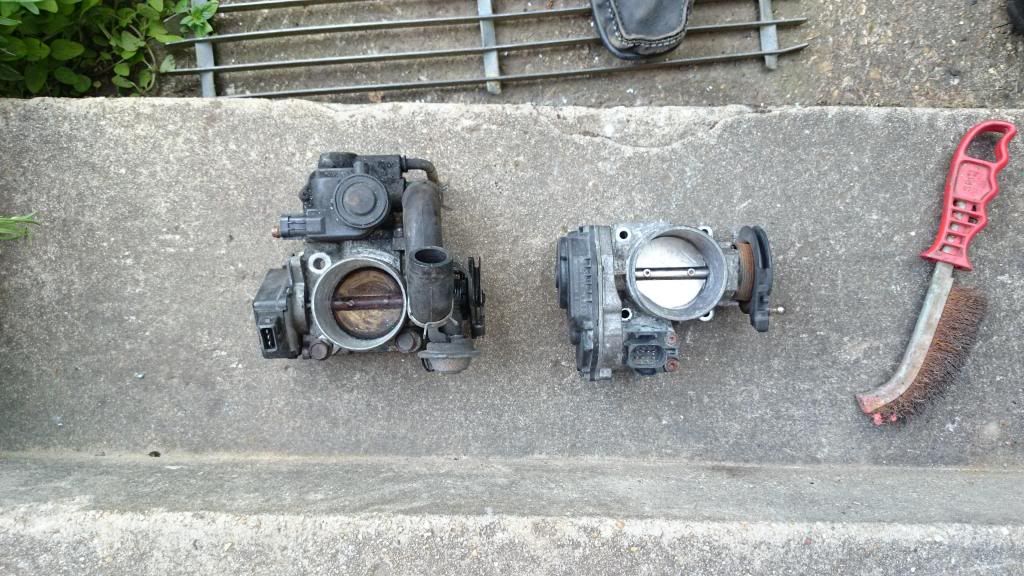 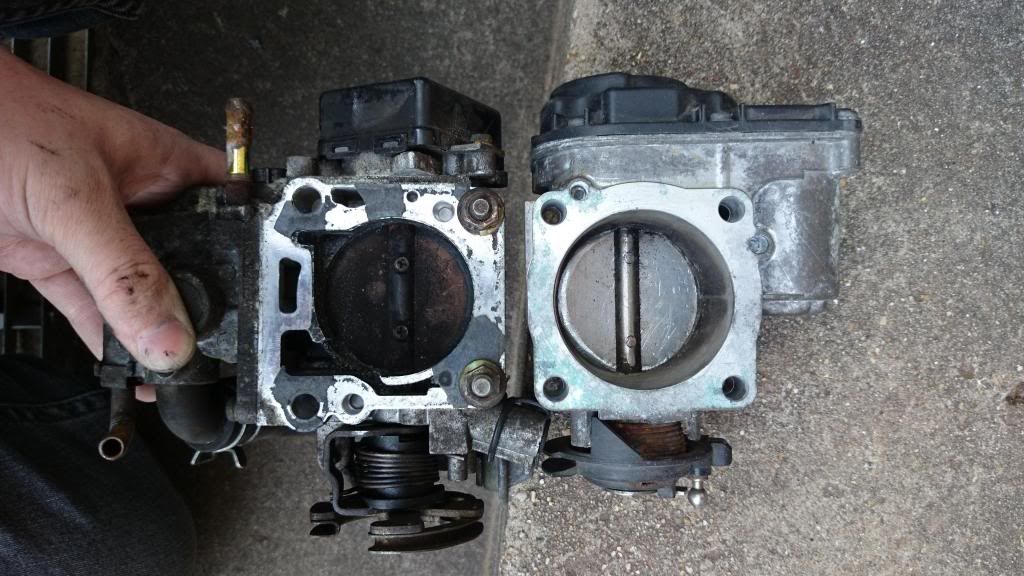 The idea of swapping over was mostly to de-clutter and simplify things, as the VW units all self contained. It uses a stepper-motor to open the throttle plate electronically in order to control idle, rather than relying on any sort of bypass. It's also got a decent throttle position switch built into it, whereas the original mazda one just has a 3 position switch for idle, full throttle then anything in between. The VW ones also a touch bigger diameter. 3 of the bolt holes line up, but as you can see, one of the mazda's ones strays from being a simple 'square', so I had to drill an extra hole in the manifold. The other 3 aren't a perfect match, but VW throttle body uses M6 bolts while the mazda one uses M8s, so there's enough tolerance in there that the bolts go through. It does mean I'll have to be careful that the bore's lined up nicely when I bolt it on though. The mounting face on the manifold after opening out the throat and drilling the new bolt hole: 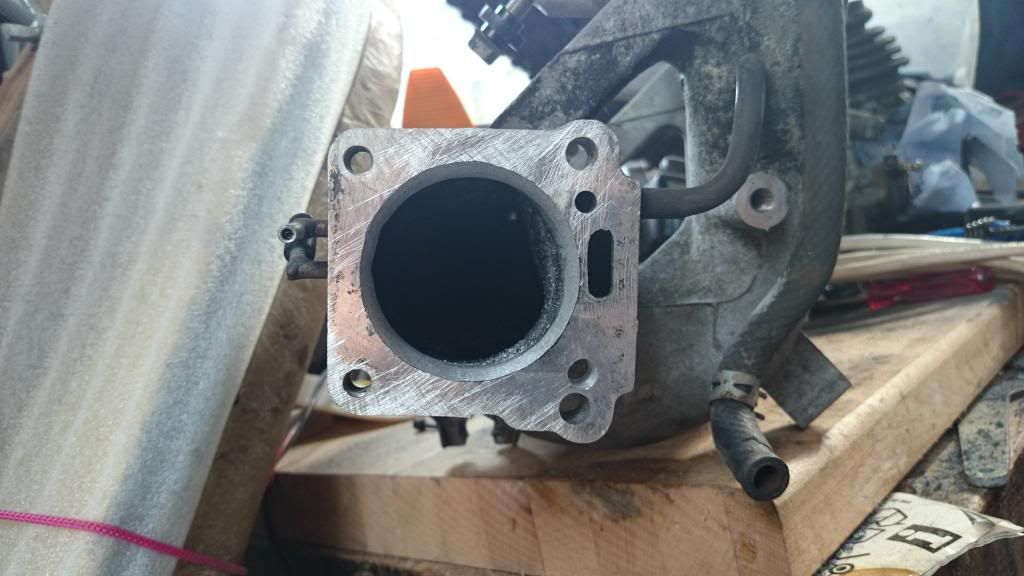 I couldn't open it out quite as much as I'd like as I was worried about the thickness of the metal in places, so it tapers in a touch from the face, but it's a nice smooth transition and should just form a slight venturi, hopefully not restricting flow too much. The view down the new throttle body: 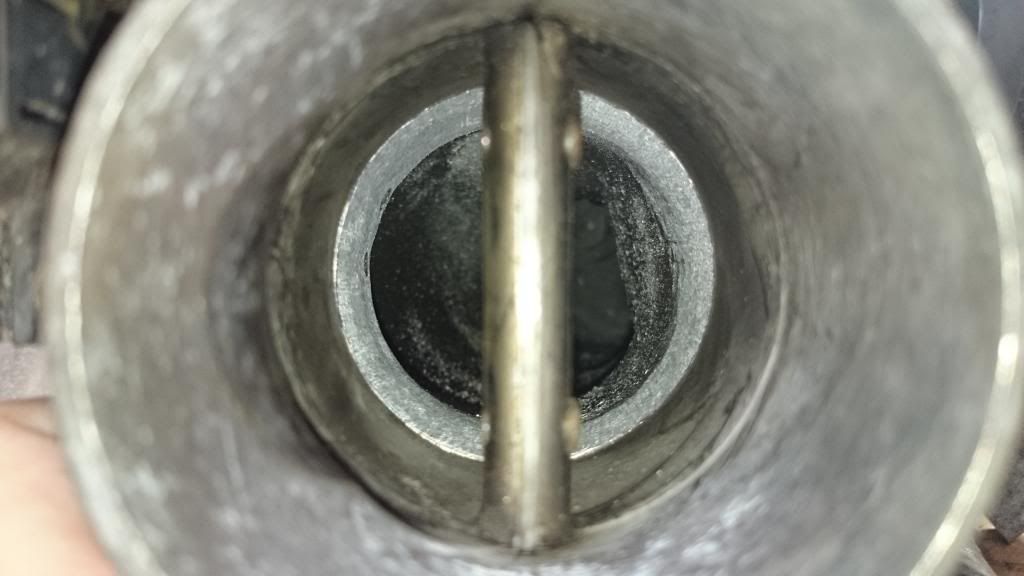 And offered up externally, I need to order some bolts to mount it and the manifold properly, cant find any M6s long enough in the shed: 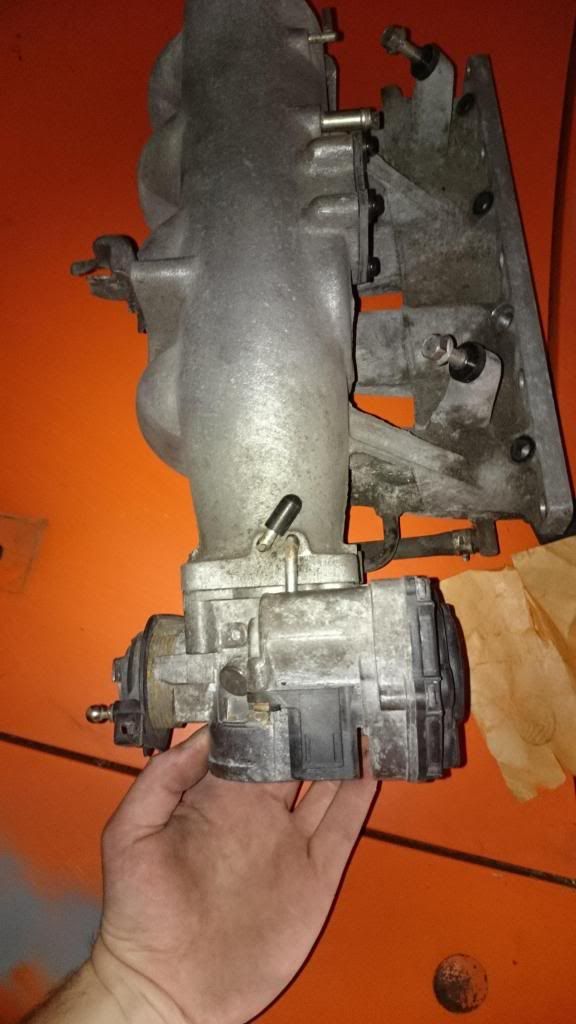 I also used the gasket as a template to port match the intake to the head, it was pretty close to be fair, but why not make it closer. So yeah, a little progress, and besides waiting for new bolts and injector seals to arrive, that lot's ready to go back together. I'll need to sort an intake pipe and air filter, but that'll probably just take the form of some alloy pipe and an S2000 filter down in the bumper. I want to get the N/A map dialed in nicely before going turbo (so I mostly only have to worry about the new positive pressure regions when the blower goes on.) I'll be curious to see what it'll do naturally aspirated. |
| |
Last Edit: May 21, 2014 20:02:12 GMT by RobinJI
|
|
g40jon
Posted a lot
Posts: 2,569
|
|
|
|
|
With the locating of the vw throttle body, you could always add a couple of small dowels to locate it. Just an idea.....
|
| |
|
|
|
|


 )
)


 it's notchy rather than stiff.


 Plus you've got the hard part already done as the squirt is already in and running


