|
|
|
Mar 12, 2021 14:49:01 GMT
|
Hmm, tricky one. Thing is I’ve had it coming up 33 years and the story is a bit scattered. Perhaps I’ll put a retrospective build thread up on here to try and tie it all together. The road trips though..... that would be a book. It’s done just under 90k with me since 1989 and somewhere between 2/3 and 3/4 of that covered in mainland Europe. Thanks for the interest 🙂 Nick I'd settle for a highlights  Seconded! Would love to read about your travels if you can find time to put together a thread! |
| |
|
|
|
|
|
|
|
Mar 12, 2021 13:56:41 GMT
|
|
I think if we go down the road of reporting badly built or incorrectly registered cars, we're at the start of a slippery slope which won't help us at all. Cars have been nailed together by incompetent people since the beginning (and some even run garages doing it!) and I dare say it happened a whole lot more in the times before the internet, when the wealth of knowledge was not available like it is today.
You just have to hope that an MOT tester picks up the faults, or a friend can give guidance on the proper way to do something.
RR members are very keen on people following the rules, and like to point out whether something needs an IVA or not. I think the intentions are largely well meant - if too many people take the pee with the rules it can jeapordise the whole arrangement, but at the same time I think we need to just give people the benefit of the doubt and concede that there will be a certain number of people who don't care and will break the rules.
|
| |
Last Edit: Mar 12, 2021 13:58:01 GMT by BenzBoy
|
|
|
|
|
Feb 28, 2021 11:10:44 GMT
|
I did a bit of testing of clutch parts yesterday. I wanted to avoid using a concentric clutch cylinder, simply due to accessibility when it came to changing it. The Patrol clutch bearing carrier looks like this: 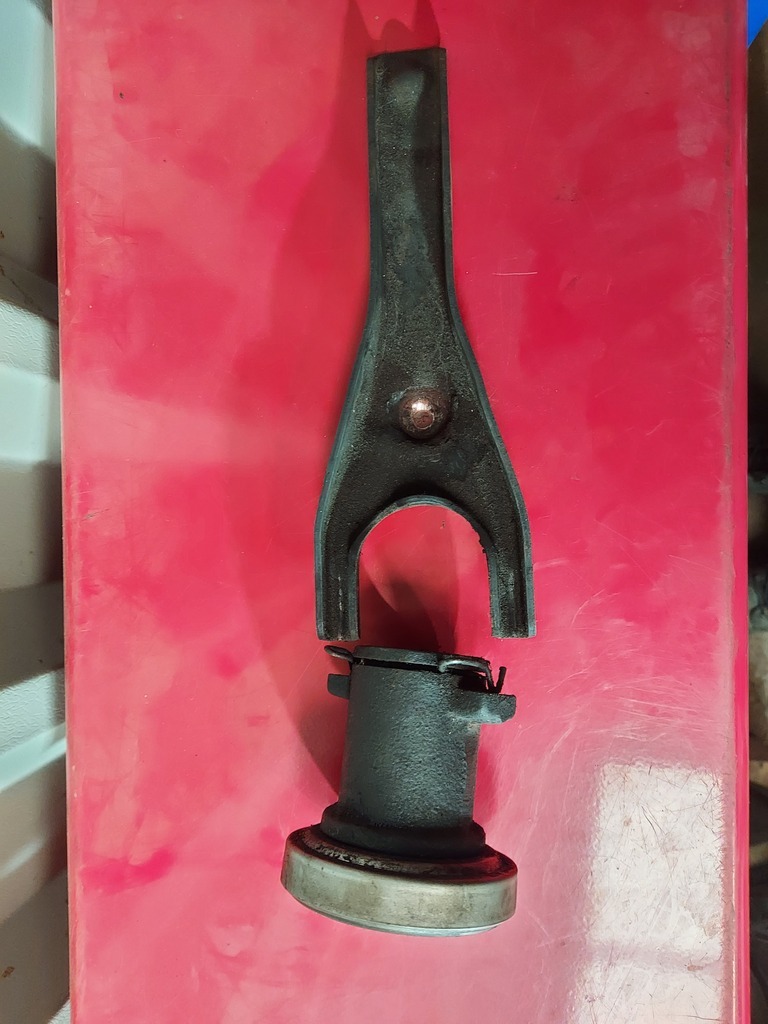 And installed on the gearbox with the new adaptor and bellhousing, sits here: 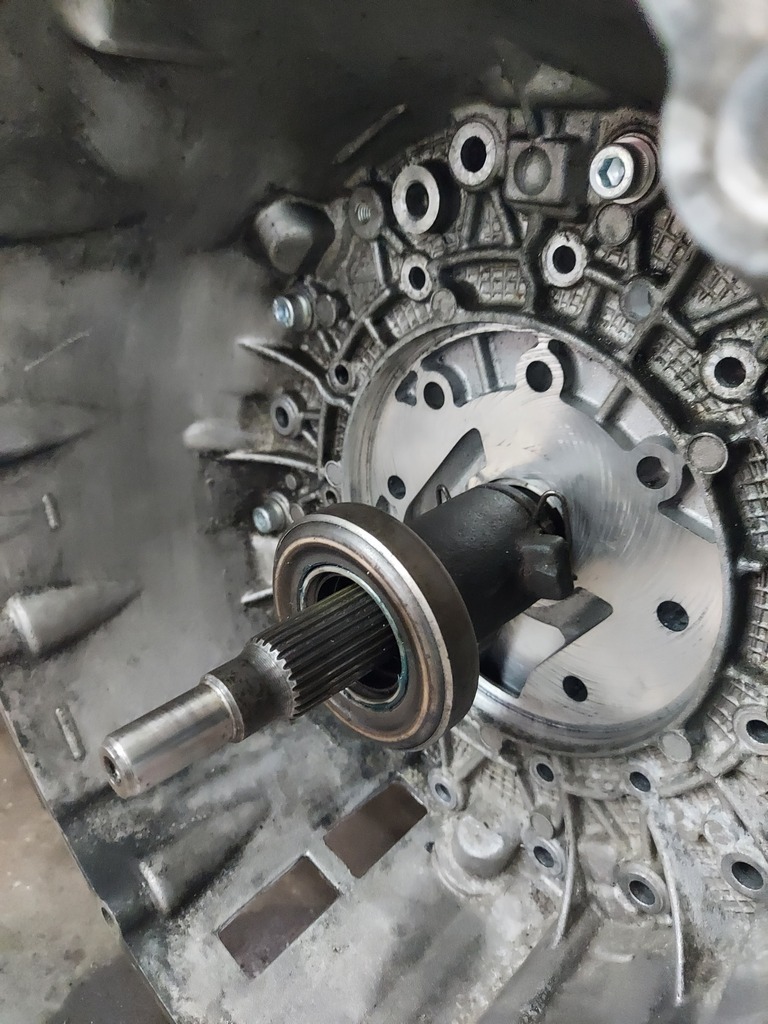 Realistically it's going to have to sit further forward to allow for the clutch fork, and at this point there isn't enough of the input shaft sleeve for the bearing carrier to travel on. Also I suspect the bearing will be too far forward. I had a hunch that the Nissan Skyline gearbox had the same input shaft sleeve, and I knew that the Datsun Z 'box did. These had a shorter bearing carrier which might work. Luckily I could borrow a Skyline R32 clutch fork and bearing to test it...  You can see that the bearing carrier is a lot shorter, and it sits nicely over the input shaft sleeve... 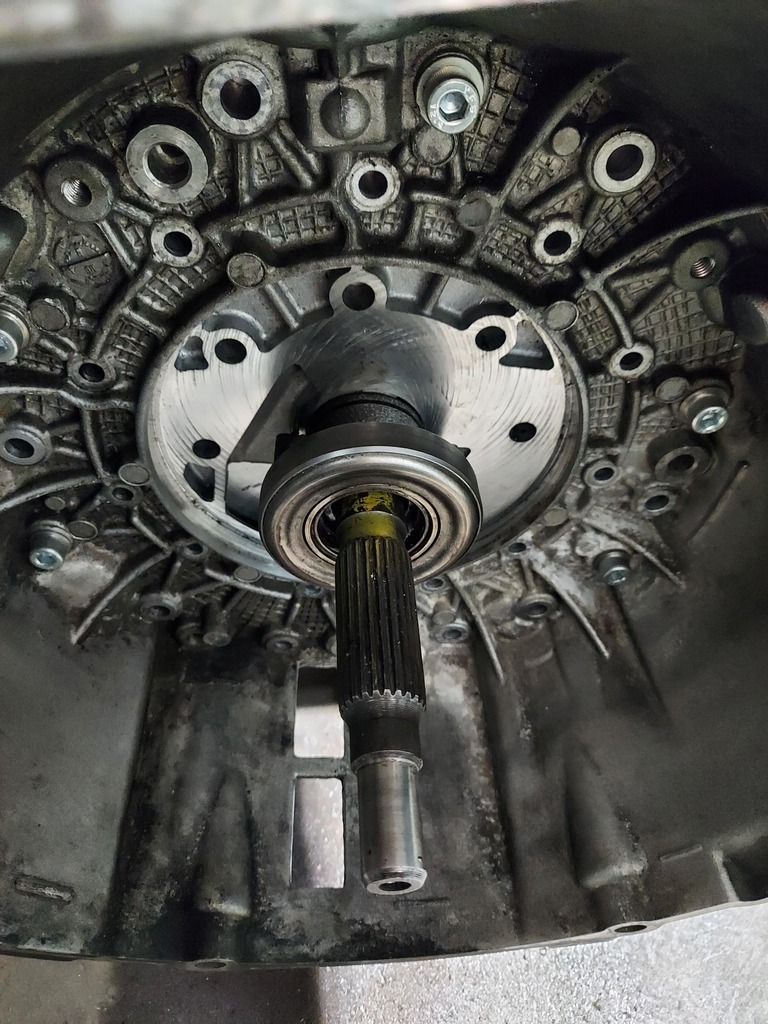 Even with it moving forward to allow for the fork it looked like it might stand a chance of working, however there is still not enough of the input shaft sleeve for it to travel on. Looks like the regular clutch fork and bearing set-up is out the window then! In any case, the Nissan release bearings are designed for a straight finger clutch diaphragm, but the Mercedes is a bent finger type, so requires a different (flat) bearing profile. I was going to cross that bridge when I reached it, but it looks like I won't need to now. I bought a Mercedes Sprinter CSC, as this will definitely work with my Mercedes Sprinter clutch. However, it looks like this: 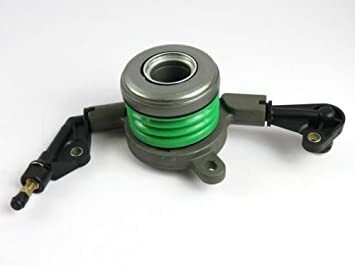 It's a bit of a pain in the backside to make it fit inside the bellhousing. So I've given that to my mate with an OM606-powered Volvo whose cylinder is leaking, and I've took a punt on a GM one which is more compact, and looks like it has a suitable flat-faced bearing that will be compatible with the bent finger Merc clutch diaphragm. In other news, I was all set to shave a few mm off the adaptor, but did a bit more measuring beforehand. As it stands I get almost full spline engagement. I might be 1mm shy but I reckon my measurements are +/- 1mm anyway, so that should be good enough. Besides, if I go too far the end of the input shaft may not sit in a desirable place for the spigot bearing to fit. This is something I'll be tackling in a future installment - the Mercedes spigot bearing is too small for the Nissan shaft and sits too far forwards, but I have a plan for this and I'll reveal more when I get to that part. I'm inching closer to getting engine and 'box bolted together, which will be a brilliant milestone! |
| |
|
|
|
|
|
Feb 24, 2021 22:12:19 GMT
|
Further to the adaptor, I've been busy at the other end of the vehicle too. The reason I had to take the Patrol off the road soon after its fresh MOT was due to the fuel tank springing a leak. I dropped the tank to repair it, and this naturally snowballed into a full engine transplant... New replacement tanks are pretty much unavailable. There's one 4x4 parts place offering new ones for £1300 but I'm not convinced they're the same as mine, and £1300 buys lots of other cool stuff! I did consider repairing my tank but having dropped it out I realised it was fairly crusty and had been repaired at least once before. I started looking for a similarly sized alternative, and decided that the Range Rover Classic fuel tank might be a good candidate. They're cheap, readily available, the filler neck is on the same side and the capacity is fairly similar. Dimensionally it should fit in the hole too. Plus, I could buy an EFI one, have the lift pump in the top and fit the V8 petrol's pick-up pipe and sender in the side of the tank but use it as a return! 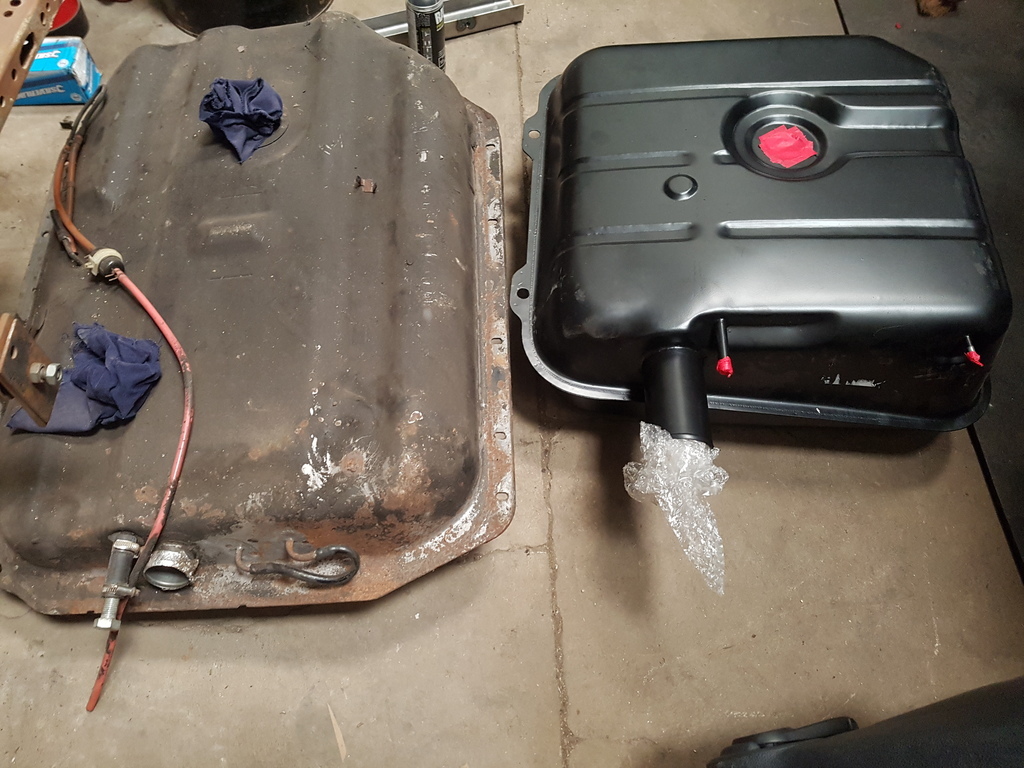 Here's the Patrol tank next to the Rangie. I know what you're thinking, the Patrol one looks way bigger! But there's only a few litres in it, and what the RR one lacks in width, it makes up for in depth. Time to test fit it into the hole... 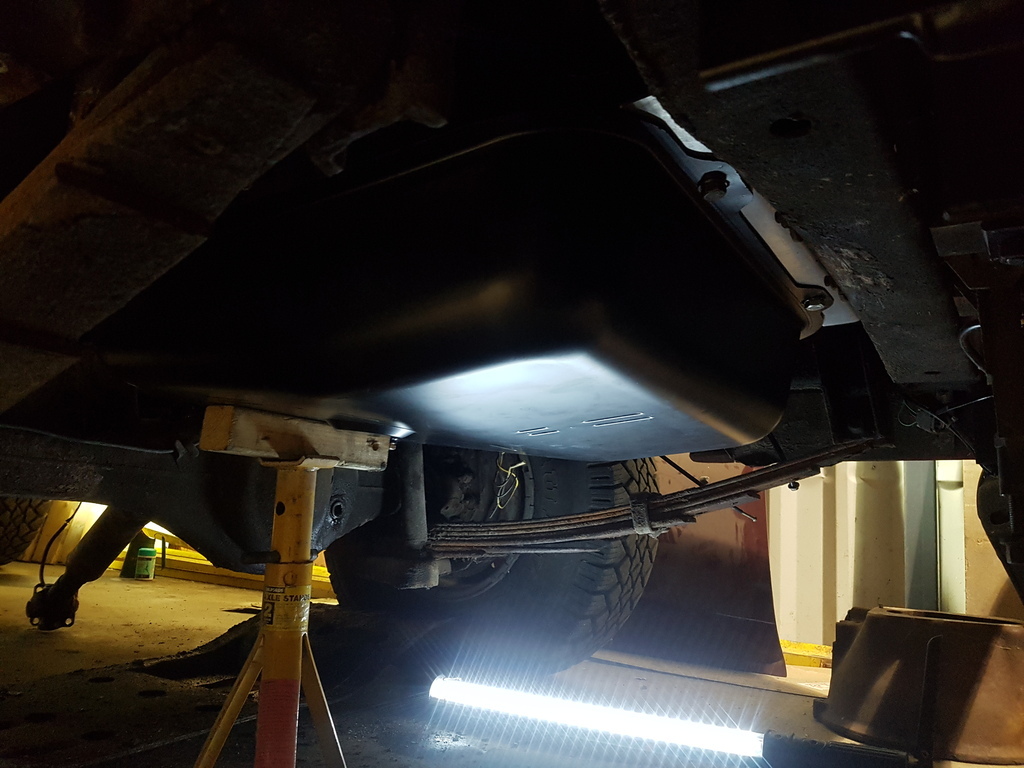 Seems like a good fit. I'd removed the spare wheel carrier mechanism from underneath to drop the tank, but I doubt I'll be refitting it as it was very crusty and I have the rear mounted spare now. Plus I need the space for the tank. After measuring carefully where I wanted the tank to fit, I made some brackets that fit to the original mounting points on the truck. 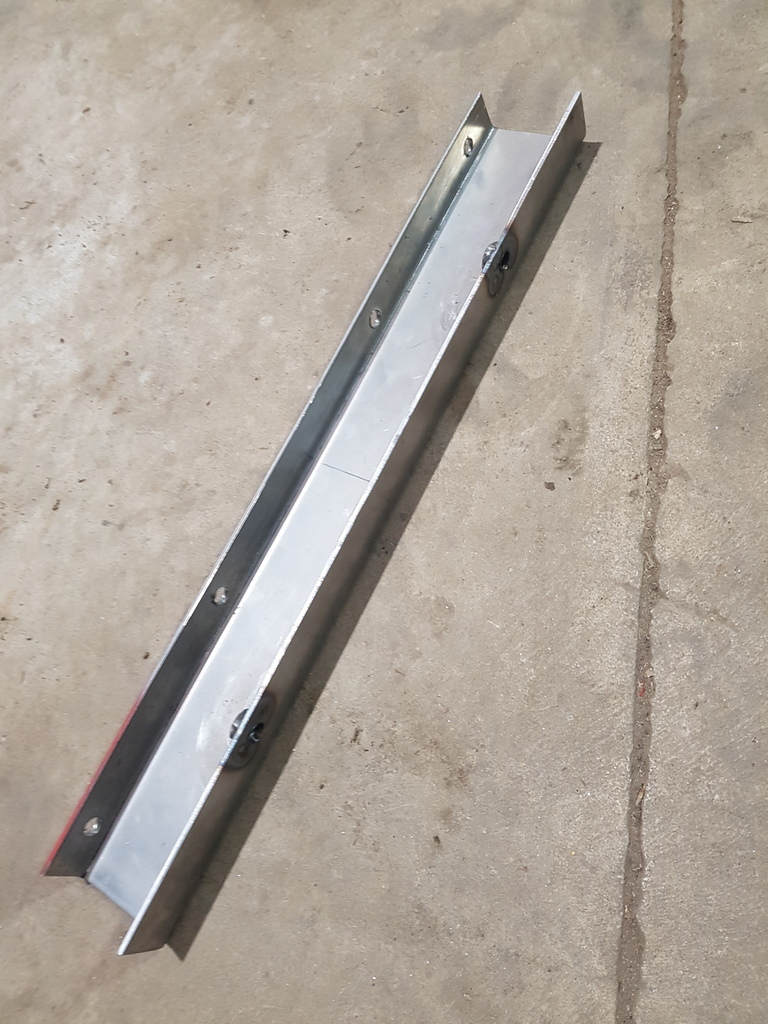  New tanks generally aren't that well protected, so I decided to give this one a bit more of a chance of lasting. The local paint shop were promoting aerosol versions of the Raptor truck bed liner. The spray gun applied Raptor is incredibly tough stuff. I hadn't tried the spray can so thought I'd take the opportunity. It's still a 2k product, so after you press the button underneath and release the hardener you've got a certain amount of time to get the stuff where you want it to be before it goes off. The aerosol application isn't as good as a gun, but it won't ever be. However it's fine for something like this, and I managed to cover my tank, and the brackets I'd made, and surprisingly not much of myself, in the Raptor. 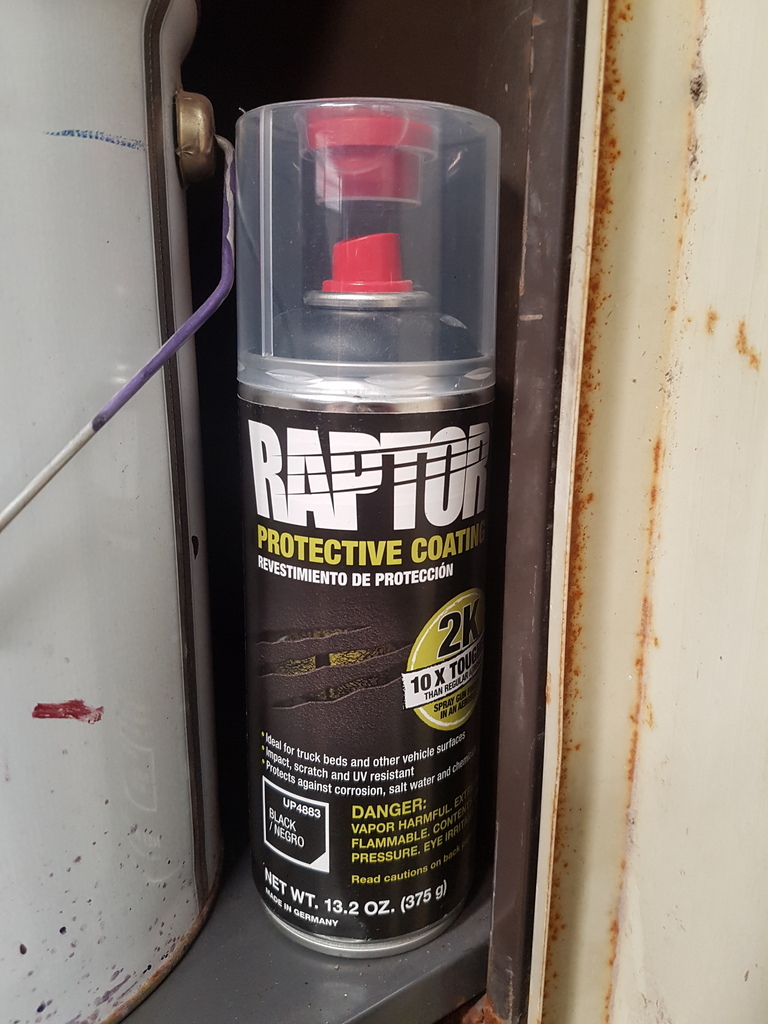  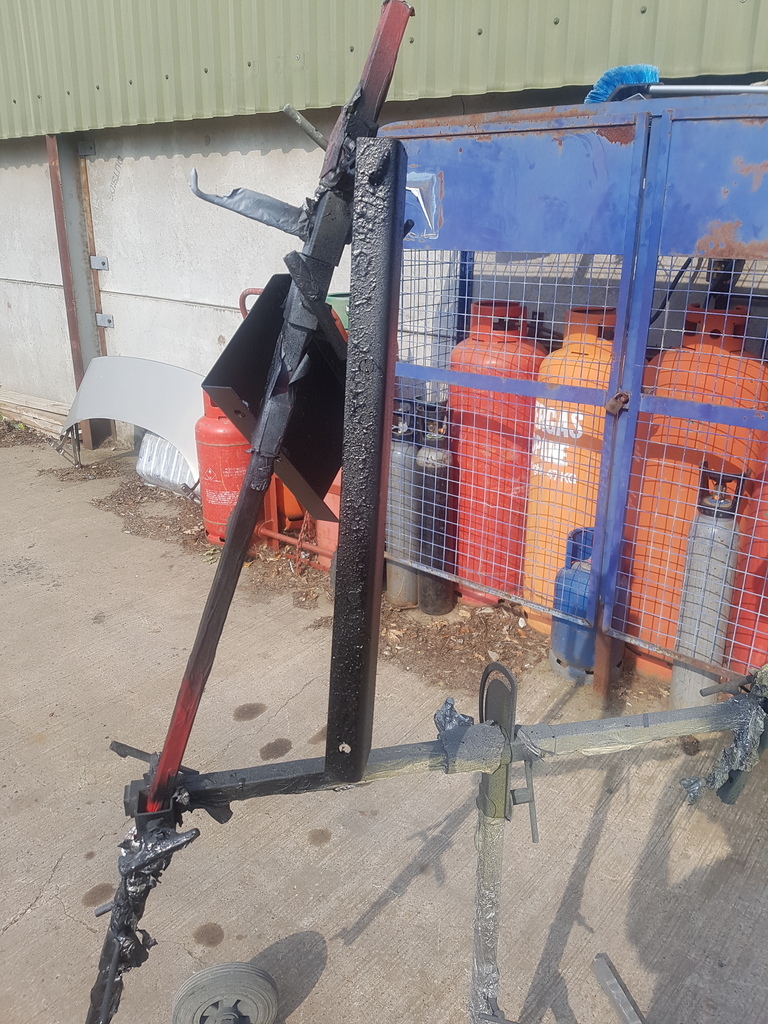 The tank fittings were bought new (God I love Land Rover stuff... so cheap!!) and seeing as I plan to run new fuel hose front to rear, I had AN fittings welded to the ends (my TIG welding skills are terrible, so I got someone else to do it!) 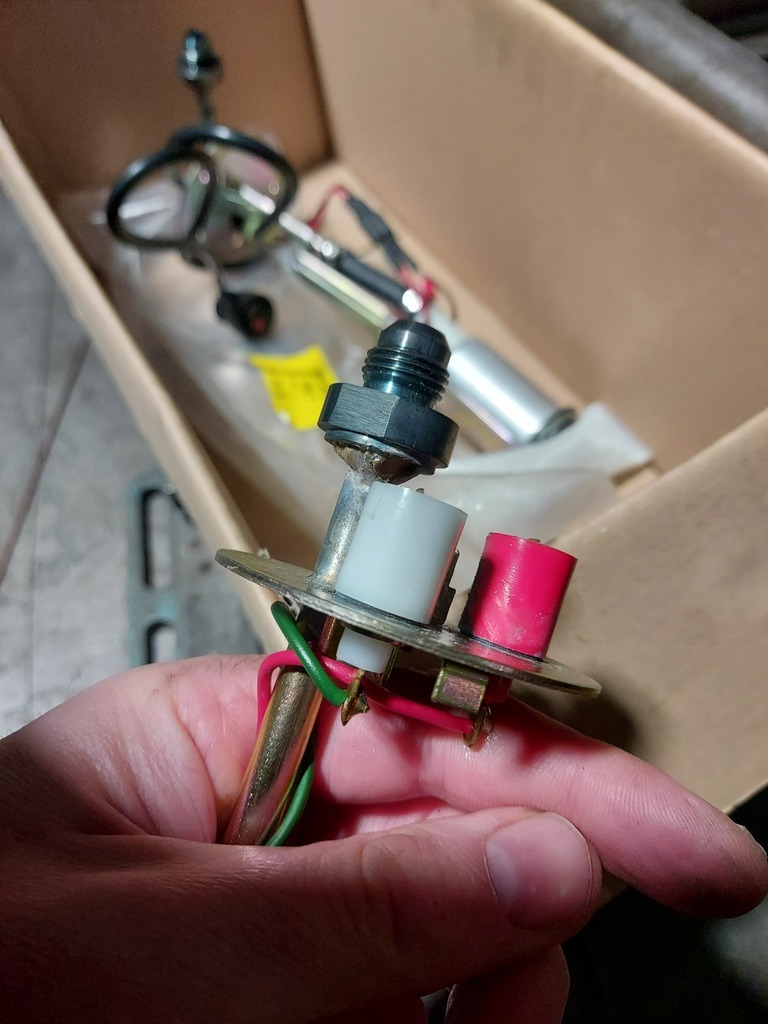  Before I fit the tank I need to rustproof the underside, and remove the crusty old fuel lines. I also need to fit shiny new fuel lines with AN fittings. I intend to use the Mercedes OM606 lift pump on the back of mechanical pump, so I'll take the in-tank one out and replace it with a length of pipe. When I start making bigger power I'll need a powerful lift pump, so this set-up gives me that option in the future. |
| |
Last Edit: Feb 24, 2021 22:39:42 GMT by BenzBoy
|
|
|
|
|
Feb 22, 2021 12:20:38 GMT
|
Neat job on the adapter! Daan Thanks! It's definitely been a learning process, but I was determined to solve the problem without changine the gearbox and then having a load of other problems to solve. I may need to tweak the thickness of the adaptor, because at the moment I don't think I'm getting full spline engagement through the clutch plate. I need to double check my measurements but I suspect shaving a few mm off of the adapter might be necessary. Not a huge task and I did make it on the thick side for this reason. |
| |
|
|
|
|
Time to jump off....?BenzBoy
@benzboy
Club Retro Rides Member 7
|
Feb 22, 2021 10:54:30 GMT
|
|
Refit is looking great, love the colour and the new seating! When all this madness is over I'll come and pay a visit with the missus. Can't promise to bring an interesting car as they'll inevitably still be in bits!
|
| |
|
|
|
|
|
Feb 21, 2021 11:56:10 GMT
|
Sorry for the radio silence on this... I have been chipping away at it, it's just that other things have got in the way. Anyway, time for an update! I was at the point where I had the adaptor plate all drawn up and ready to go. I'd got a quote to have it machined, which was a sizeable chunk of money but then it was a sizeable chunk of work! I was a little hesitant. If I'd got my measurements wrong, it would be a very expensive workshop door stop I was about to buy myself. There would be no scope for adjustment, it would be sh*t or bust. Then after an evening's meandering on the internet, I found myself on a Russian language UAZ forum (that was a really, REALLY convoluted rabbit hole!). I ascertained (thanks to Google translate) that they were having a discussion about adapting a Nissan Patrol transmission to fit the UAZ engine, and someone helpfully provided pictures. So with a bit of adaption to my own set-up, I figured out a method to fit a Mercedes 722.6 auto bellhousing (which bolts to the OM606) onto the Nissan Patrol transmission. And I could do it all with the tools and equipment available to me! Here's how I did it. First of all I needed to order a round disk of aluminium. I did some calculations and worked out the desired length of the bellhousing assembly, which gave me the thickness of the piece of aluminium I needed. A 300mm disk 40mm thick. Quite a chunk! 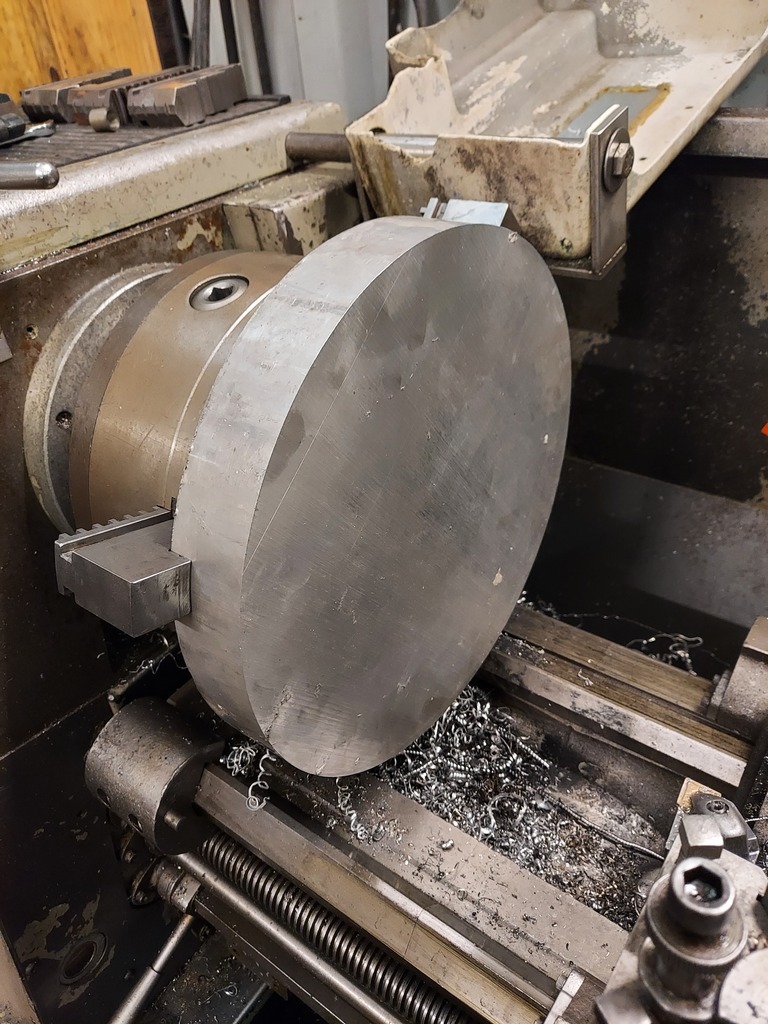 Here I'm facing it up in the lathe. A machine I've wanted to learn how to use for a while, and this was a great opportunity. Luckily I know people with some cool toys who let me play on them! 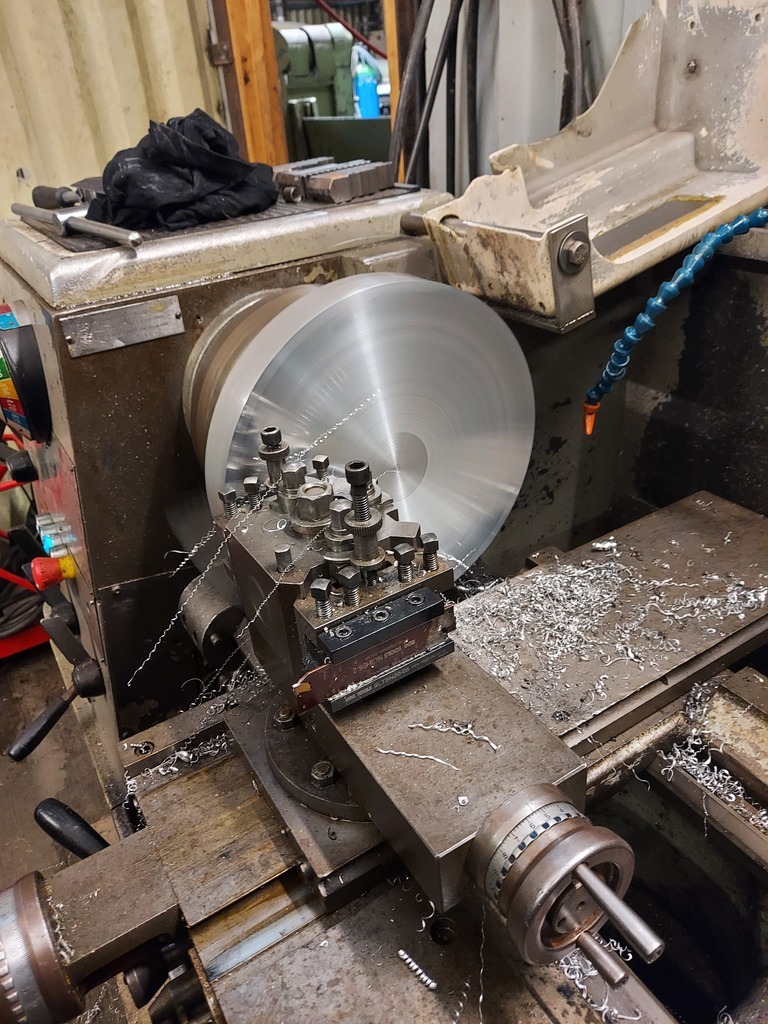 I then put a hole in the centre the exact diameter of the transmission input shaft sleeve. This means that critically, the adapter will be central to the input shaft. 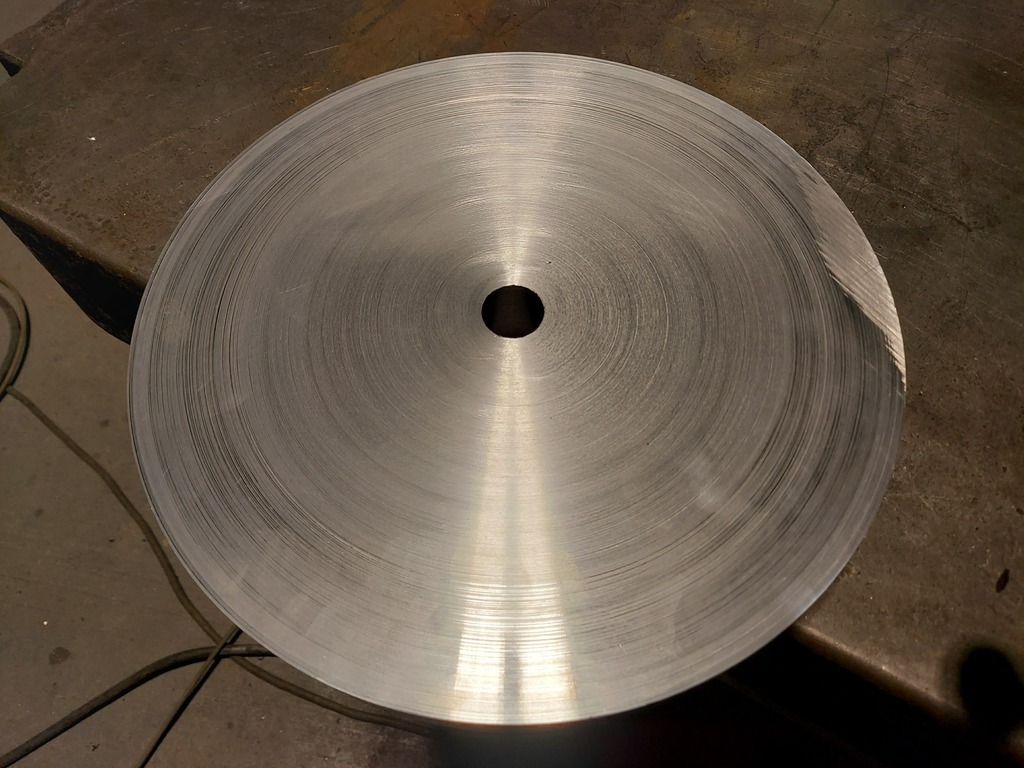 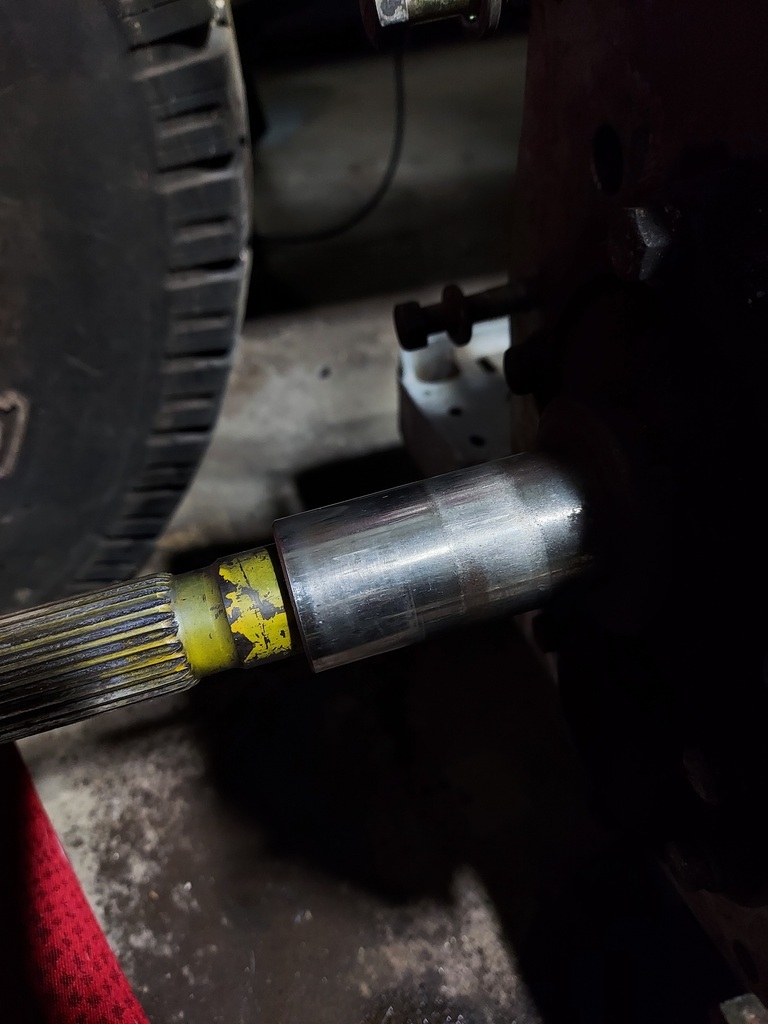 I then got some pointed tip grub screws and wound them into the gearbox face, slid the adapter over the sleeve and gave it a few firm taps. This marked the points which the holes need to be in order to bolt the adaptor to the transmission. 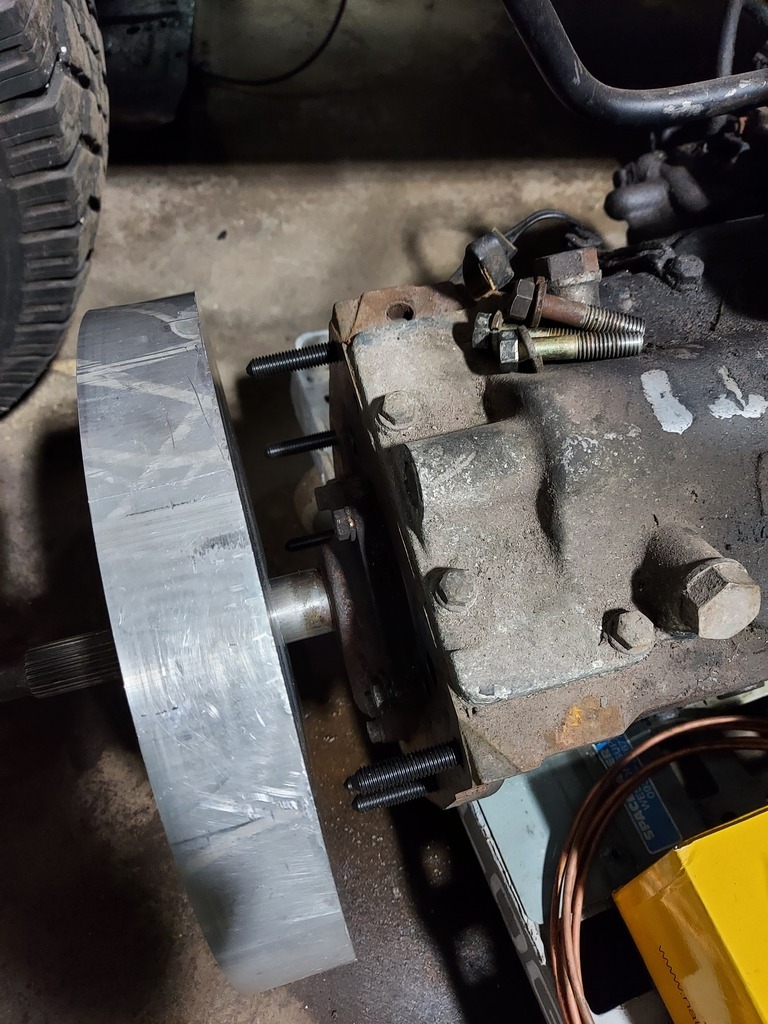 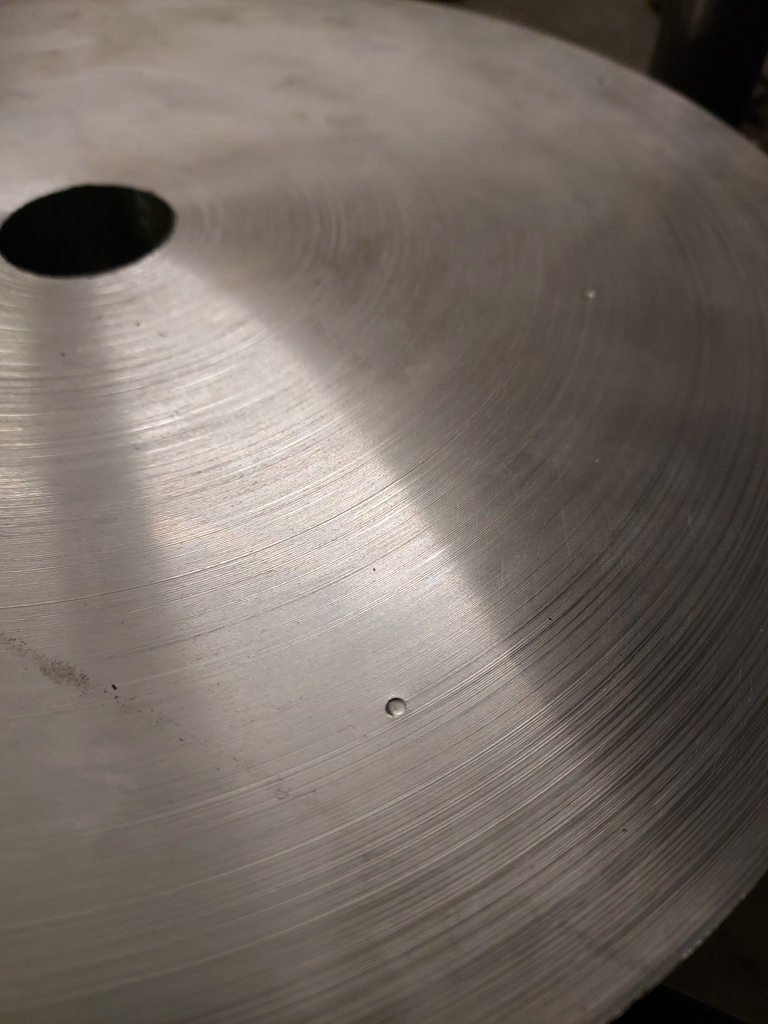 The holes were then drilled 0.5mm oversize to allow ease of fitment, and countersunk to accept tapered seat bolts so that they give a flat face to fit the bellhousing. 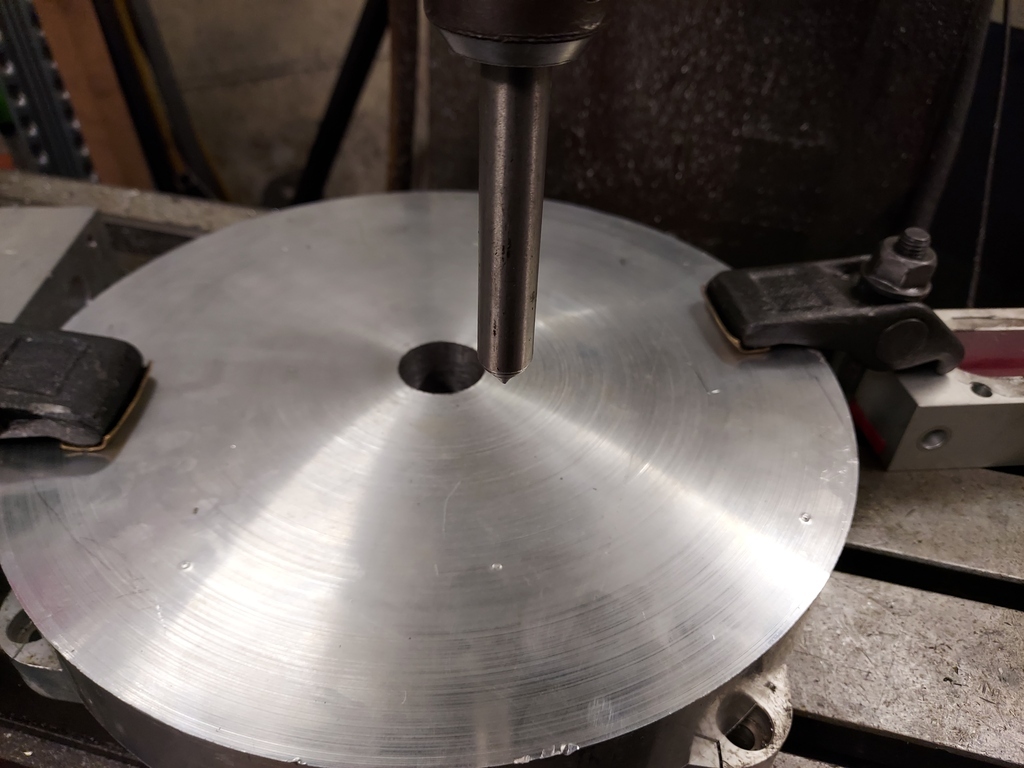 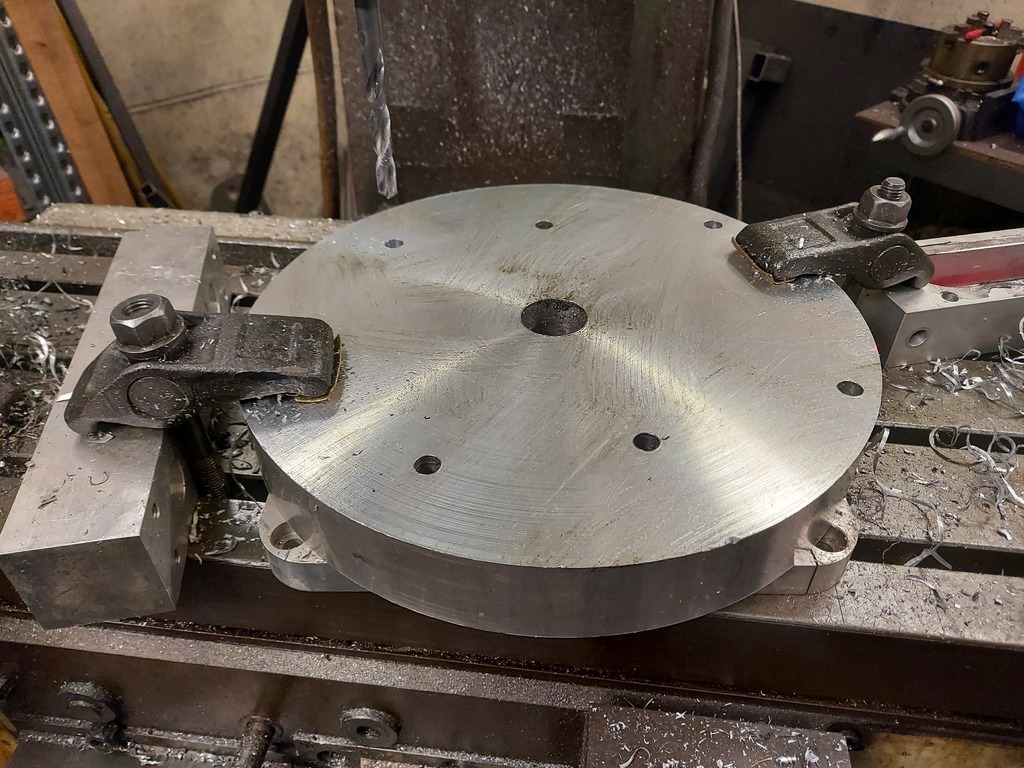 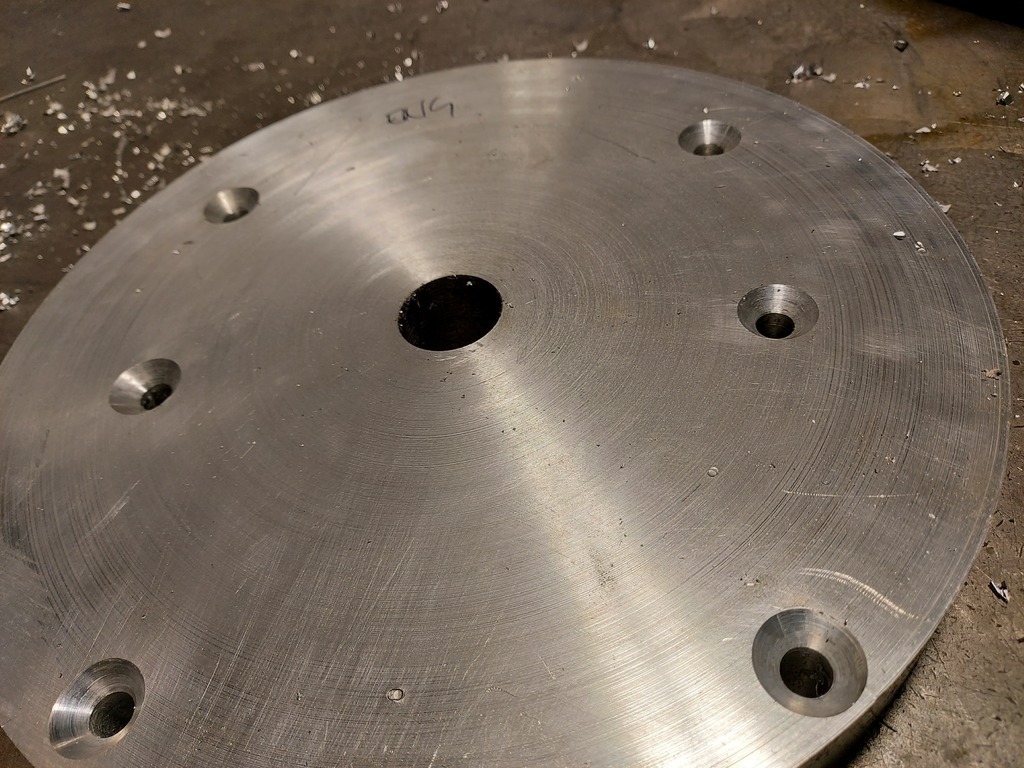 So that's the gearbox side sorted. I then needed to make the bellhousing bolt to the adaptor accurately. A pin was machined, with one end the exact diameter of the input shaft sleeve, and the other end the same diameter as the central register on the bellhousing. 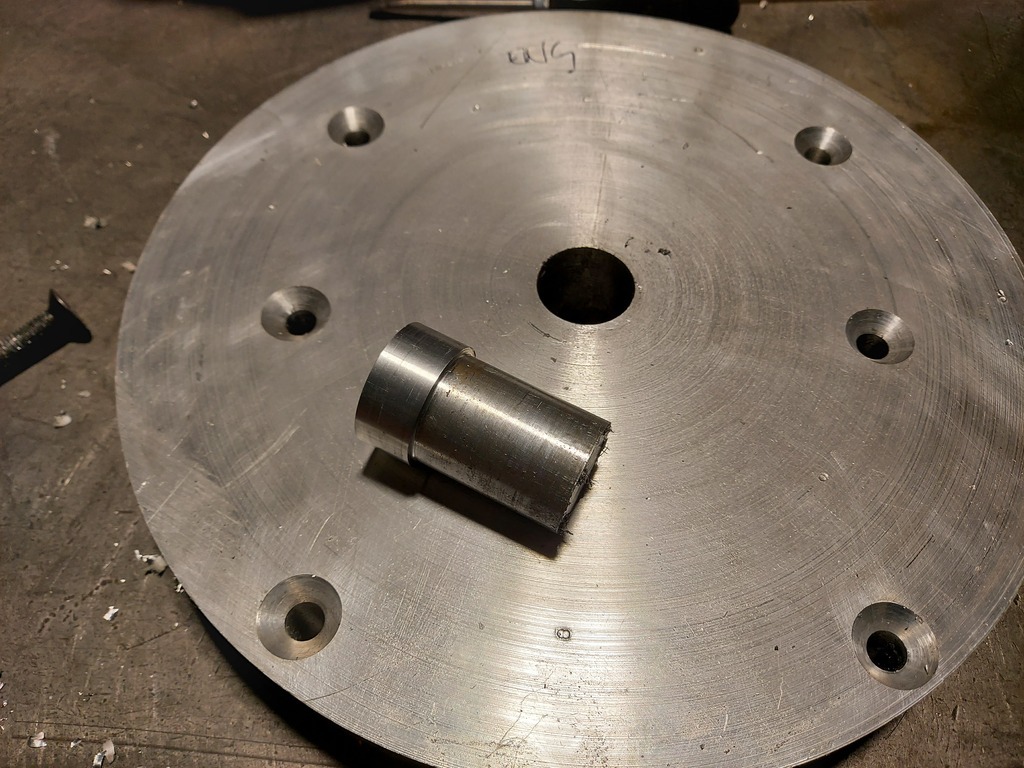 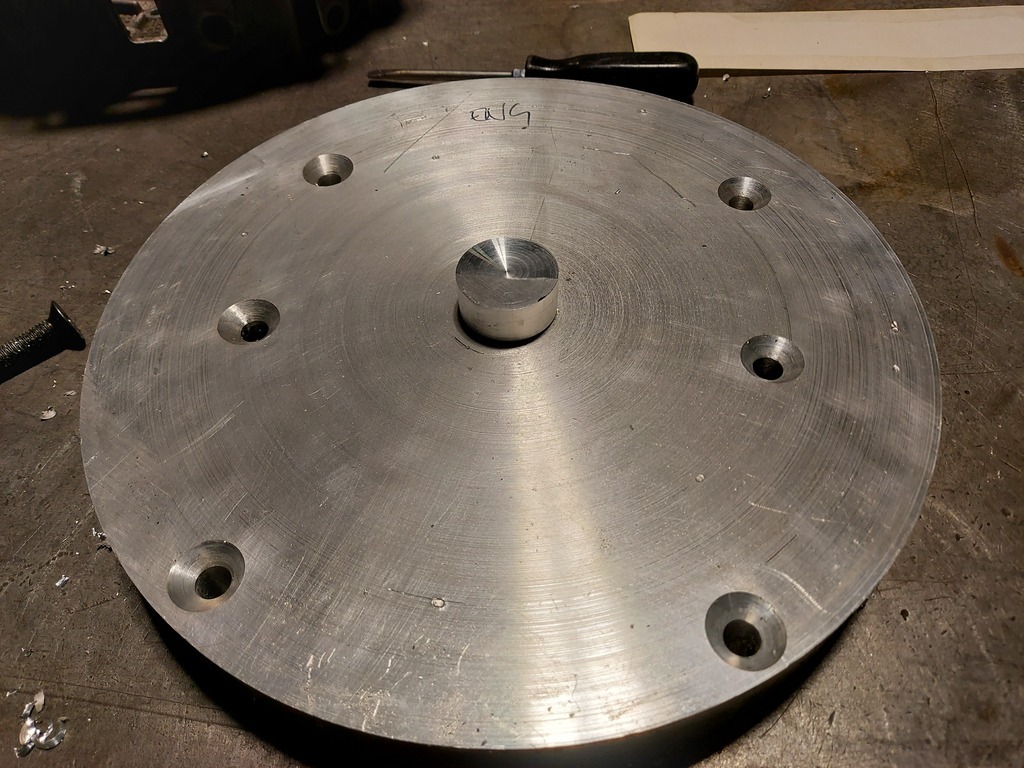 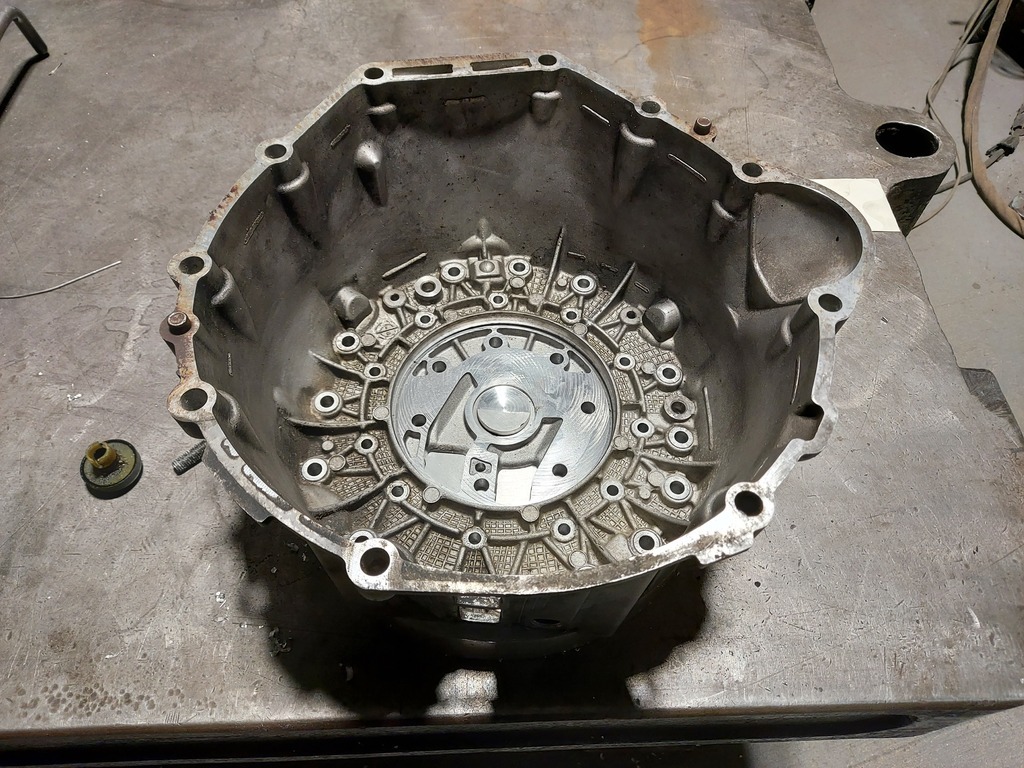 The OM606 sits at 15 degrees to the offside in its normal installation, so I did a bit of measuring and got the bellhousing clocked at the correct angle. I then used a transfer punch of the same diameter as the bolt holes to mark through their position on the adaptor, being careful to choose holes which don't conflict with the bolts holding the adaptor to the gearbox. As the transmission holes are slightly oversized from factory, I figured that there was a danger that the bellhousing could be bolted out of alignment as there would be no central register to fit it to on the gearbox. So I decided to take a belt and braces approach and install two locating dowels. That way if there is a bit of slack in the bolt holes it's not going to matter. 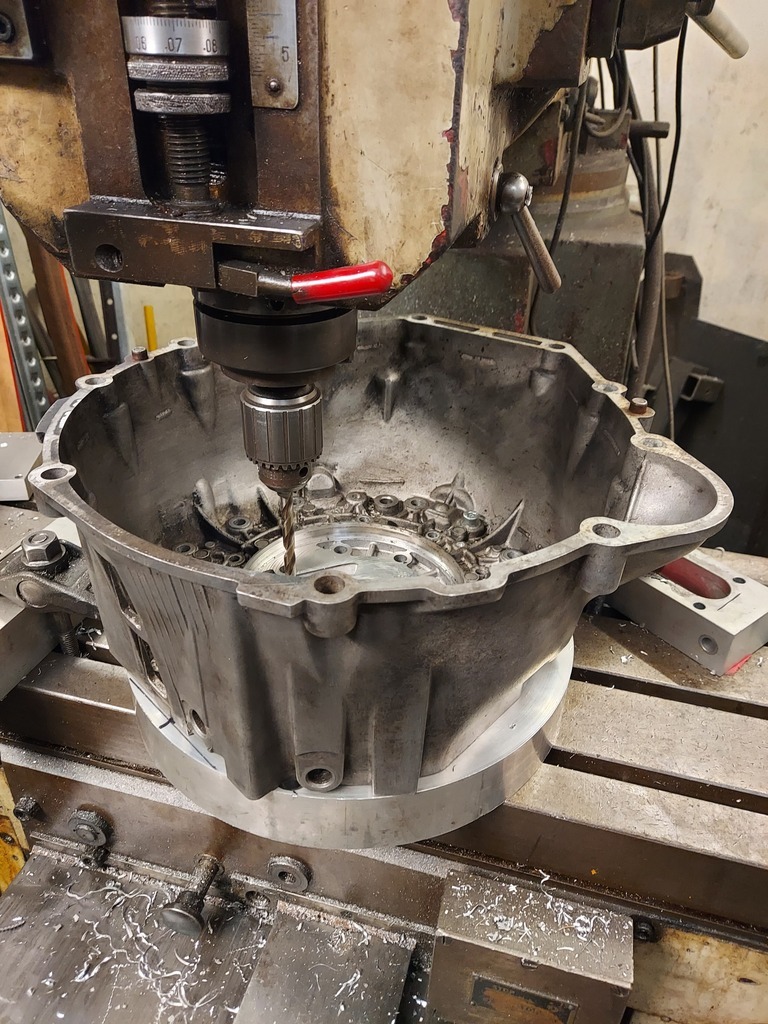 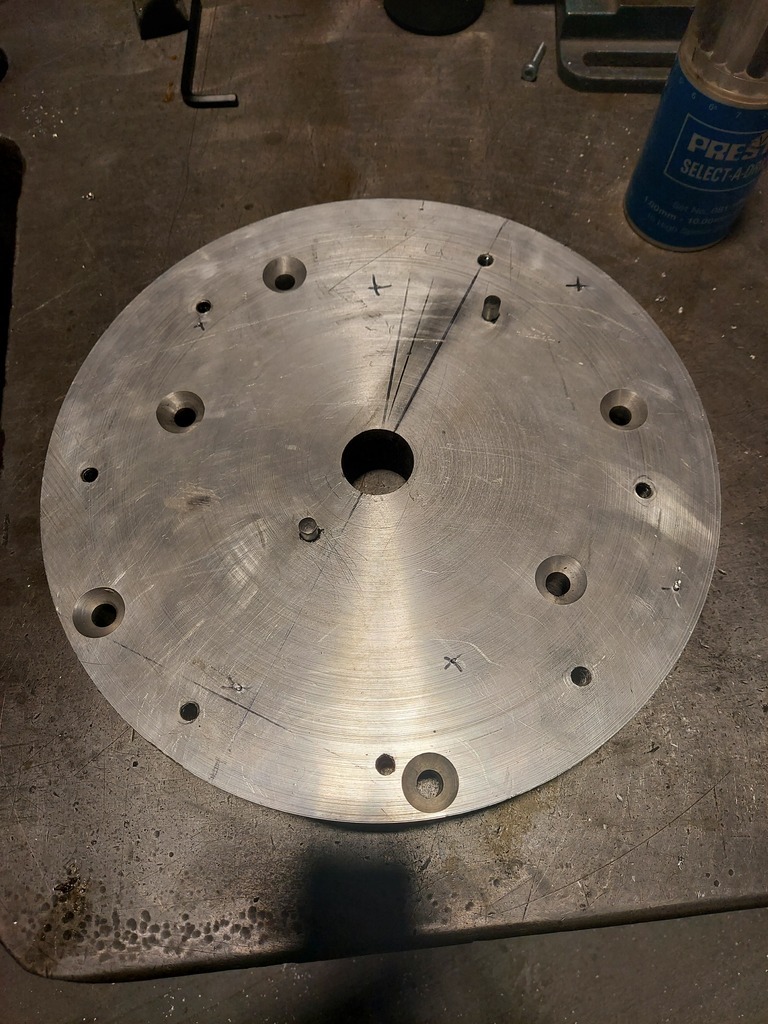 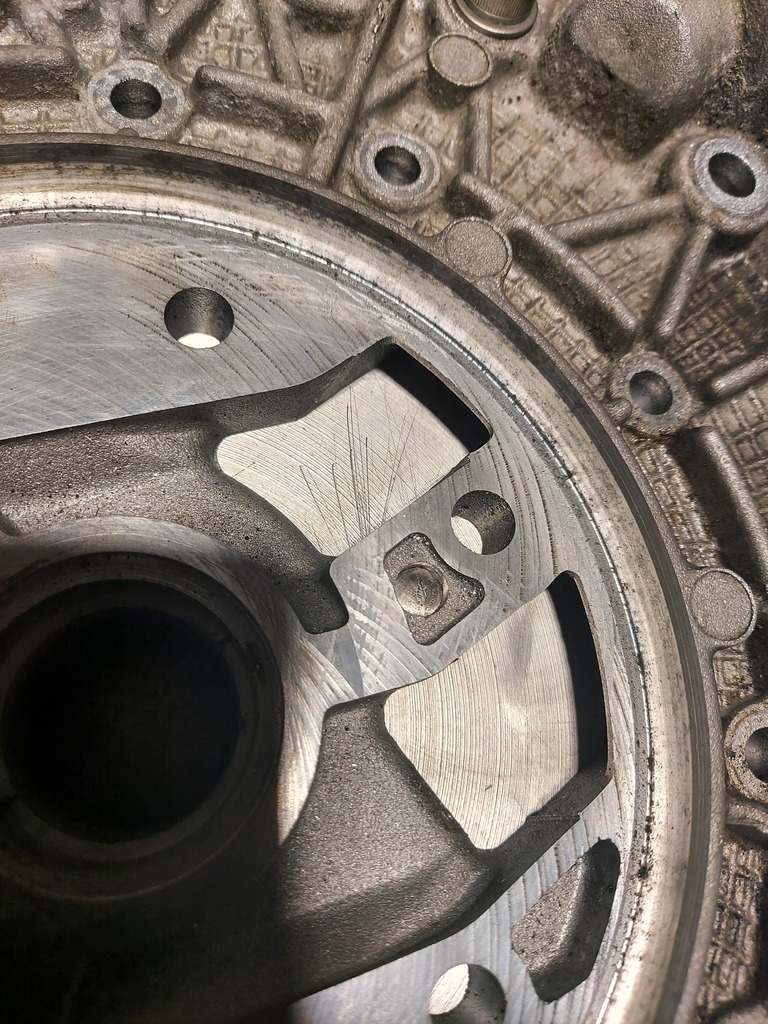 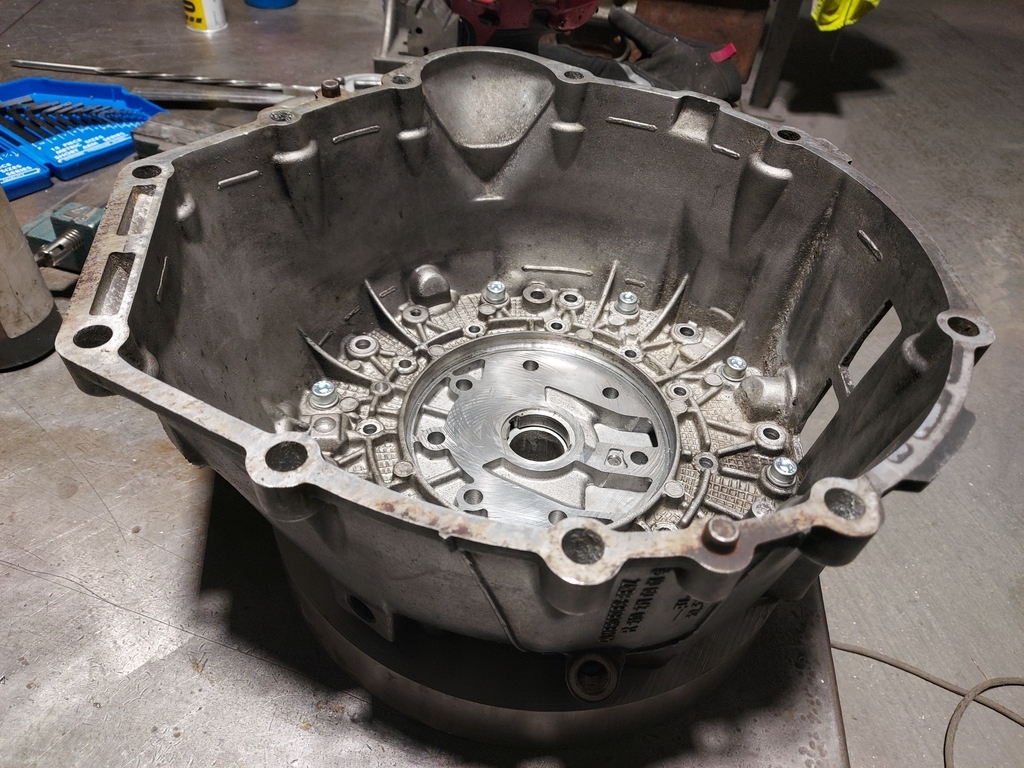 The assembly is coming together now! There was one more step to get it to work - the gearbox sleeve plate sits rather proud of the gearbox face. In the normal set-up the Patrol bellhousing has a cut-out to clear it. I needed to hollow out 25-30mm from the back of the adaptor to make it sit flush with the gearbox face. This means me getting familiar with another machine I've not used before - a milling machine. After a 5 minute crash-course on how to use it, I set about chewing chunks out of my hard work! 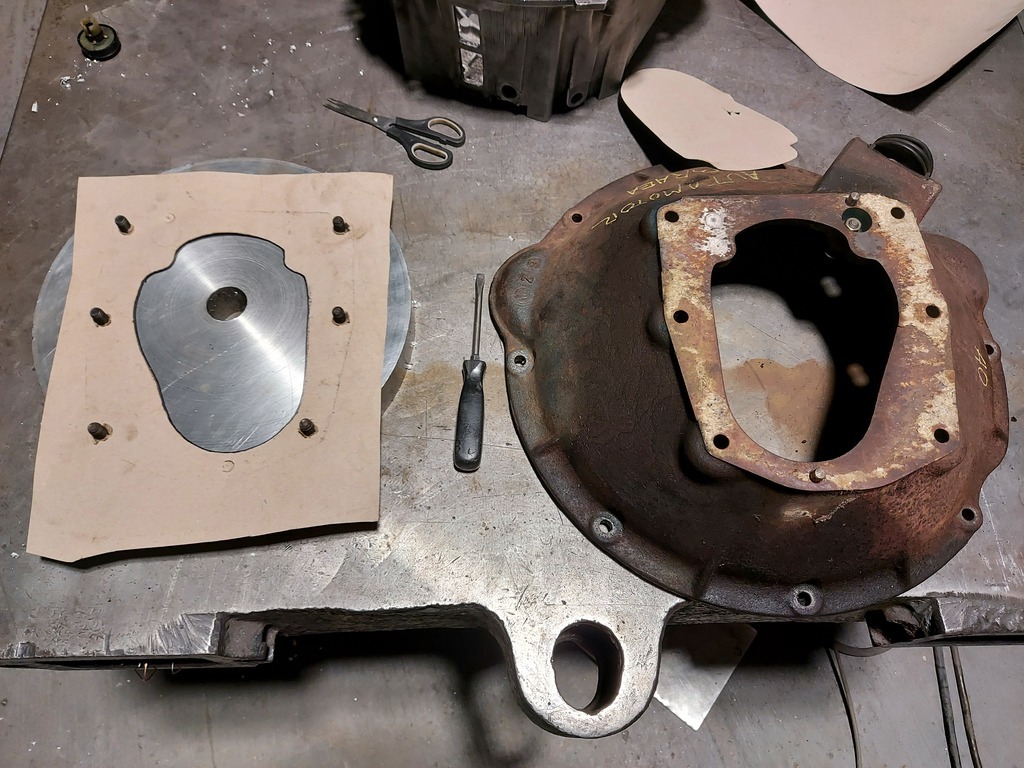 Here you can see the cut out in the original bellhousing (see, that bellhousing which I had sent from Portugal at great expense DID come in handy!). You may also notice that I've marked on the shape of the cutout the wrong way round. Fortunately this was noticed before I set about machining! 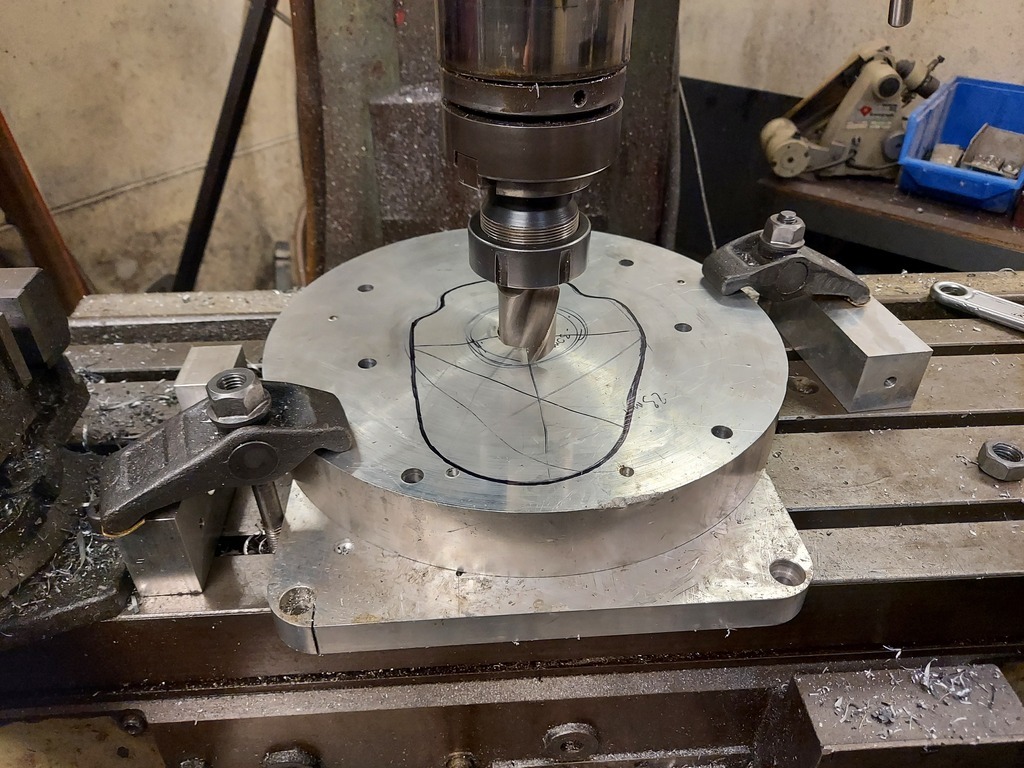 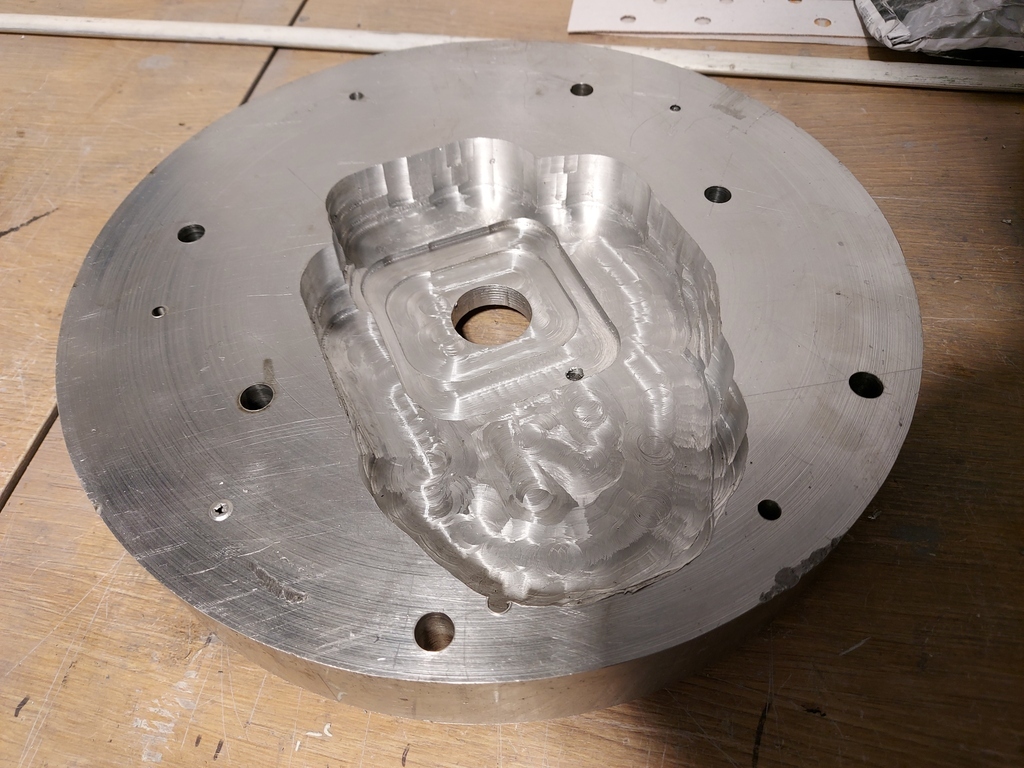  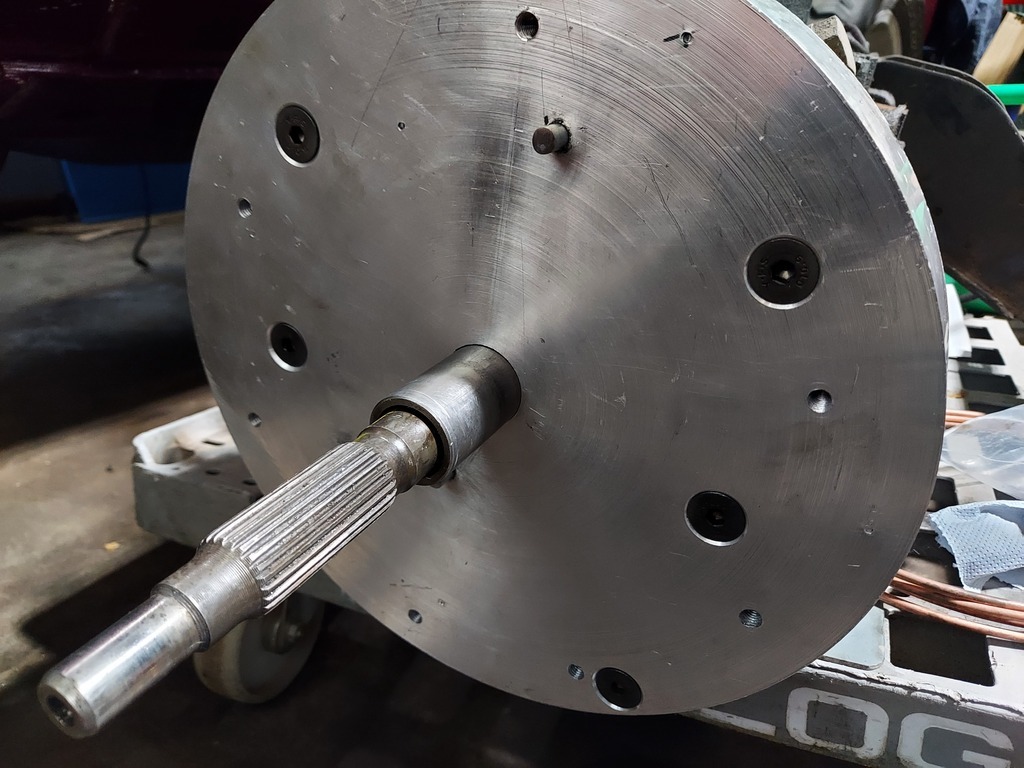 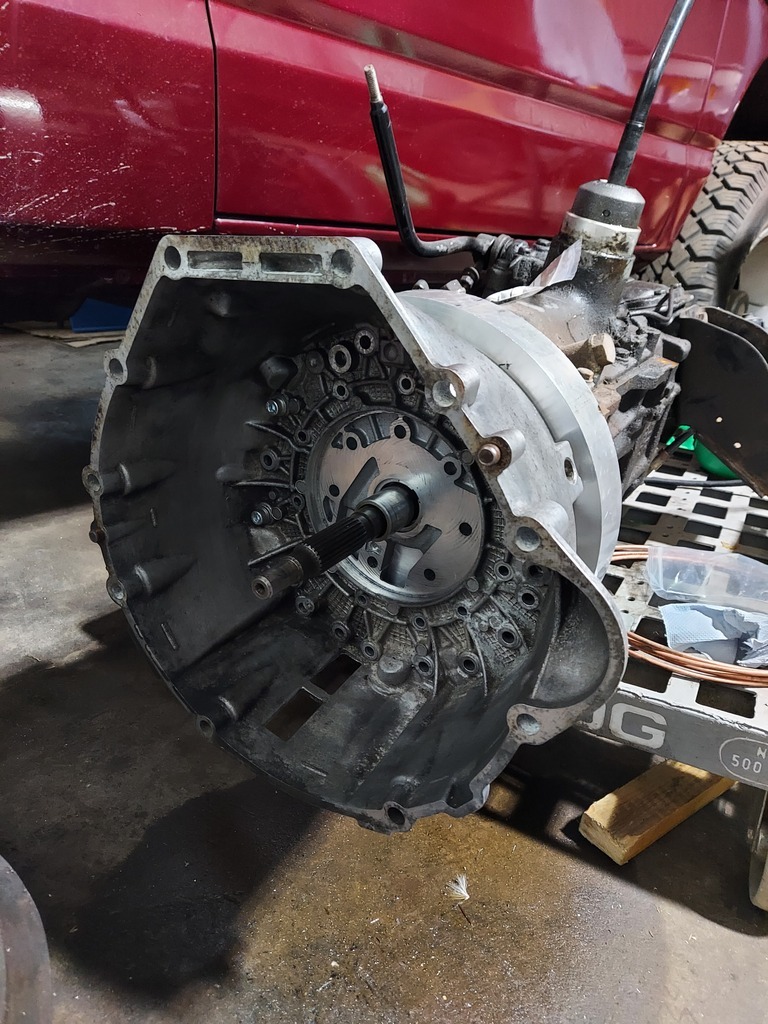 And there we have it! One Nissan Patrol to OM606 adaptor completed. This work was done over a long period, with a few hours stolen here and there over weeks and months to get it done. It was a big obstacle that I needed to overcome to make this engine fit, and now I've done it I feel like the project has some momentum again. The next conundrum is the clutch. I'm aiming to use the Nissan clutch fork however I need to do some work on the geometry and release bearing components. The other option is a concentric slave cylinder, but I'm not sure I like the idea of it being an engine-out job to change the slave cylinder, plus I have the headache of figuring out how to bleed the thing. More research needed on this, but it's not a show-stopper by any means. |
| |
Last Edit: Feb 21, 2021 12:24:21 GMT by BenzBoy
|
|
|
|
Bmw E39 Touring BenzBoy
@benzboy
Club Retro Rides Member 7
|
Feb 18, 2021 13:35:42 GMT
|
|
I used Febi where I could. Pricey but worth the money, especially if you're planning on keeping the car for a bit. I cheaped out on a "bargain" ebay rear arm kit and they lasted a few hundred miles before the bushed ripped out, and I don't drive my cars hard.
|
| |
|
|
|
|
Bmw E39 Touring BenzBoy
@benzboy
Club Retro Rides Member 7
|
Feb 17, 2021 22:01:58 GMT
|
|
The big fluid-filled subframe mount bushes on the rear suspension are a bit of a task to replace, and not cheap. They're different to the saloon ones (bigger). When I did mine, I dropped the subframe and replaced pretty much every arm and bush... I also replaced the brake line that runs left-to-right over the subframe while it was accessible. God knows how you're meant to do it with the subframe in place!
Don't bother with the cheapo suspension arms as they last literally days before the bushes disintegrate. Airbags too... those cheap Chinese ones on eBay are junk. I used Bilstein bags on mine and they're well worth the extra. I had an unsolveable suspension level sensor issue on mine which never went away despite me changing both level sensors (again, no cheap rubbish as they're just no good)
|
| |
|
|
|
|
|
Feb 17, 2021 11:16:24 GMT
|
Here's to another 17 years! Hopefully you'll have the Benz finished by then  An ambitious target but I'll do my best |
| |
|
|
|
|
|
|
|
Feb 17, 2021 11:15:23 GMT
|
|
Mine came through to my Gmail OK, although it gets filtered into the Promotions section.
|
| |
|
|
|
|
|
Feb 17, 2021 10:29:49 GMT
|
Has it really been that long? Wow... Scarily, I still have the same cars I had when I joined back in July 2004. That's quite an achievement Paul, I wonder how many other people can say the same? I joined in Dec 04, went AWOL for a while when I lost my mojo. I'm back regularly now even though I have nothing retro. Saying that, I've just bought a 17 year old Mondeo ST to replace the Grand Picasso I no longer require. Top work to Mr HT Wire, the other Mods and every member who makes this place what we love today. 😃 I still have the Mercedes which I owned when I joined in 2004. In fact, it was a Retro Rides flyer left under the wiper at Santa Pod which prompted me to visit and join! It's good to see that more of the original members are here and contributing, it's also great that RR continues to attract new members who get what the place is about and help the forum grow. Here's to another 17 years! |
| |
|
|
|
|
|
Feb 16, 2021 14:57:46 GMT
|
|
Seventeen?! Amazing! Congratulations RR, really glad this place is here and going from strength to strength. Back then it was pretty much the only forum that catered for the cars I was interested in, and 17 years later it's still the best place to come for my retro car needs!
|
| |
|
|
|
|
|
|
|
used this site in the past on a couple of oddities when it wasn't immediately apparent obd locationUnfortunately that's for the later 16-pin OBD port which mine pre-dates. Handy site for future ref though! That's exactly what I'm looking for! Thanks very much! |
| |
|
|
|
|
|
|
|
Is it pre-EOBD and therefore a Honda specific port under the bonnet?  Otherwise, they are usually just under the dash somewhere if it is the 16pin socket Thanks for that. It's pre-EOBD I think. The later Mk1 had a socket near the centre console but mine hasn't. I know a couple of people with professional diagnostic gear but I think I'll need to buy a lead that fits my car in order to try it. |
| |
|
|
|
|
|
|
|
|
As title... does anyone know? It isn't where the Americans say it is when you Google it. It's also not where the later UK Mk1s have it, in the driver's footwell behind the centre console (presumably that's to comply with OBD2 rules).
Failing that, does anyone know if there's a trick to getting it to display fault codes via a flashing light on the dash like some cars have? I just want to diagnose why my ABS isn't working.
|
| |
|
|
|
|
|
|
|
Great to catch up with this thread! Fantastic spec on the engine, that's going to get it shifting along at quite a rate. Interesting to see a size comparison with the LS block too. My own OM606 build has been slowly crawling along, but funnily enough I've been distracted from my cars by boats too, although mine are much slower than yours! Dammit BenzBoy, I only come back to the forum every now and again and one of the threads I come straight back to check on is yours! Have you got on any further since the snorkel fitment and landy air box? What's holding it up build wise?? Yes I hope it will shift along nicely! Many torques, I'll be interested to get it on the rolling road when it's fully built again to see what it makes - though that will be on giant mud tyres so that'll probably wind it right down numbers wise.. and I wonder how much loss I'll get through the drivetrain too. It's about the best I could do I think. I'm glad you're enjoying my little project! I'll update soon, I've been waiting until I've finished a chunk of work and reached some milestones before posting. I'm halfway through making my engine adaptor currently. My business has been holding progress up as I've been so busy, but I'm trying to make time at weekends again. I've also been playing with boats - me and the other half got a little river cruiser last summer, and this has snowballed into buying a classic wooden broads cruiser which we're going to be living on as soon as we sort everything out and lockdown ends. |
| |
|
|
|
|
|
|
|
|
Great to catch up with this thread! Fantastic spec on the engine, that's going to get it shifting along at quite a rate. Interesting to see a size comparison with the LS block too.
My own OM606 build has been slowly crawling along, but funnily enough I've been distracted from my cars by boats too, although mine are much slower than yours!
|
| |
|
|
|
|
|
|
|
|
Thanks for that, lots of useful info in there. Saved it for future bedtime reading!
|
| |
|
|
|
|
|
|
|
|
Thanks for updating this, I'm currently working out the clutch release mechanism in my own conversion so this info is pretty handy. Is the Helix info available online, or did you find it in a physical catalogue?
|
| |
|
|