|
|
|
|
|
|
A lot has been going on at Oldbus Garages the last 12 Months. I sold the house and bought a new one. Unfortunately the new one needs finishing off and it doesn't have a garage (yet) so that's going to keep me out of mischief for a while. The T4,the Cortina and the contents of my old workshop are hidden away for timebeing so a proper update will not be happening for a while.
Cheers,
Dave
|
| |
|
|
|
|
|
|
|
Apr 12, 2020 18:03:20 GMT
|
I think it looks great and such an amazing transformation and is one of my favourite builds on here 😎 is it too early to be discussing wheels? Cheers mate and it´s never too early to discuss wheels   I bought these ages ago and for the first time in my life had them professionally refurbished. Not cheap but well worth it, they´re Projekt Zwo 8,5x17-s for the front and 10x17´s for the rear. Defintely one of my favourites for the T4. Dave - It does not matter what we think - you do it the colour scheme that pleases you - its your van / bus after all - having said that I like anything that makes it's statement in a retro calm & calculated manner (and this will) - it does not have to be full of bling or be just ordinary to stand out from the crowd You´re right Chris, i was just being polite  I like the pinstripe detail. Looks good! It looks like you haven't greyed out behind the panel gaps, yet? At least on the rear of the door. Which I guess is because you haven't unmasked the van to open the door! Well actually i did make the effort and masked off part of the sill and B Post when i sprayed the door. I didn´t want too much grey on the inside but underestimated how much grey i needed so that you coan´t see any more red with the door closed. Next time i´ve got grey in the spraygun i´ll have to widen it a bit methinks. That grey really makes a difference. There was a LOT of red before. Nice work! Cheers George, i really was surprised how good it turned out as i had to take a guess on the right colour, and you´re right mate it was too much red especially as i haven´t painted the roof yet. Ive been thinking about this project on and off for a while now and am very glad we are hearing from you again...the van looks great. I really like the two tone detail...glad you took the extra time to make it happen. looking forward to more updates. JP Thanks JP, hope everything is ok the other side of the pond. love this build and thread, proper oldbus fabrication. Thanks, lots of error and a bit of trial (in that order) Updatewise i´m still cathcing up.... With a very cheap supply of aluminium profile available i took a deep breath, had a couple of beers and decided to bin the rear slide out. I know it was a lot of work but the main reason i wasn´t happy with it was that you could hardly put anything in the boot and i´d have ended up with fairly large van and having to throw everything on the bed when we went anywhwere, so i got the anglegrinder warmed out and chopped it all out. I then insulated the now empty floor, cut some of the ally profile to length amd filled it with construction foam. Horrible stuff but it should help keep the warmth in a bit.  The sides and floor have been double insulated with a bit of this stuff...  " alt=" "] and some of this...   and when i get round to finishing the roof i´ll try to get that stuff in there too. My son Christian sold his Sierra the other month and bought himself a 92 Multivan (guessed who influenced his decision a bit ) i had to tidy up the garage to get it in but it did make agreat pic.  Cheers, Dave |
| |
Last Edit: Apr 12, 2020 18:08:05 GMT by Oldbus
|
|
|
|
|
|
|
Talking about Tornado red, i did manage to get a bit done before the winter set in. I´d already done the tailgate but unfortunately it fell off the paintstand and not only wrecked the fresh paint job but got so bady dented that i had to get another one....so much for tial and error   Like i said, i chose Tornado red as it´s DIYable and on a normal T4 with a short wheelbase and without the high roof it looks good, but mine has the long wheelbase and high roof and with only one colour it´s a bit too much so i got some dark grey and copied VW´s two tone paint job that was available for the earlier T4´s   Once i´ve got the other side and roof done i´ll flatten it all back and clear coat it all. The roof will be getting some red red and grey too, not sure what you guys think but it definately works for me. Cheers, Dave |
| |
|
|
|
|
|
|
|
Glad to see this is still going. Nice half spray booth  Cheers, half spray booth It took me longer to clean up the garage than it did to make up the "spray booth" but it made a hell of a difference keeping the dust at bay and as Mr Grumpynorthener says i don´t like overspray either. With a little forward planning & preparation it is amazing what results with paintwork you can achieve in a small restrictive area with the minimum of equipment - just sheeting off the van like you have done in the pics saves overspray landing everywhere and dust migrating from elsewhere and embedding itself in the wet paint - Visitors to my own small workshop are always impressed that I produce high quality professional paint finishes without the requirement for a large heated spray booth & lots of very expensive equipment - it takes me longer but the with right mindset and some diligence expended at the preparation stage tends to produce good results - Oldbus - credit to you - it looks great PS - You are on the right track with the masking but have you come across 'Polymask' - available in 4m / 5m / 6m wide rolls readily via e bay or your local automotive paint factors - will save you a lot of effort with masking / protecting freshly painted panels etc - especially on a van of that size - example below www.ebay.co.uk/itm/Masking-Film-Roll-Static-Polymask-Over-Spray-Protection-4M-5M-or-6M-/202355387002Good look with the rest of the work - Chris Thanks for that Chris, i´ll bear that in mind when i get round to painting the rest in summer. On the subject of minimum equipment and lots of elbow grease. I definately agree with you there mate, although to be honest the quality you knock out is amazing, i´m nowhere near your level of skills when it gets down to spraying but over the years with trial and error or should i say more error than trial, the results do get better. Just don´t tell anyone how long it takes to get a decent finish and always buy decent paint. Tornado red - the best colour in the calssic VWs range. Looking forward to the updates. Tornado red was my third choice, if i´d have had free choice i´d have gone for Atlantis blue or a dark silver but as thy´re both metallic there´s no way i´d be able to get a decent finish with a garage DIY spray job...so Tornado red it is. Great result!. Glad that you are continuing with this build... Thoroughly enjoyed the inventiveness and thought processes for the slideouts. You´ll enjoy the new rear slide out then Dave, hundreds of anglegrinder discs and loads of trial and error Tornado red - the best colour in the calssic VWs range. Looking forward to the updates. the only car I ever bought new (so the one time I had a choice of colour) was a MkV Golf in Tornado Red - base spec but 2.0 TDI and sports suspension You´re right mate, it´s not exactly a rare colour but it´ll do me! |
| |
|
|
|
|
|
|
|
What happened to this fantastic build? Cheers, the build is still happening. Our internet at home is a night mare and i just haven´t found the time to upload the pics and update my thread. This thread proved to be so much better than I expected! Thanks for that mate, What an epic build. I can't wait to see it finished to see how much extra space you will have created. Cheers mate, much appreciated. Spacewise the conversion will help a bit but it´s still going to be a bit cramped up in there. Time for a litte update. I have been putting in the hours but i don´t have that many photos to show for it. As the last update was in summer i´ll show you what i got up to last autumn. With the days become shorter and the temperatures starting to drop i thought i´d try to get some paint on the van before it got too cold. Now there was no way i was going to get all the bodywork ready for paint so i thought i´d try to respay a bit at a time. It´ll mean a lot more masking than normal and to be honest although i´ve done one or two resprays in my time i´ve never done one an bit at a time. As all the welding on the right hand side was finished it seemed like a good place to start so after weeks of sanding and filling (i´ll spare you the details) i cleaned up the garage, gave the floor a once over with the garden hose and gave it a couple of coats of filler primer..   After another couple of weeks of sanding (god these long and high T4´s are no comparision to sanding down Merc 123´s or Capris) I knocked up a provisional spraying booth, got the gas heater going full blast, took a deep breath and gave the side a few coats of Tornado red   Hope you like it, i´m chuffed with the result. As i mentioned earlier there was no way i was going to get the other side done before it got too cold and to be honest i needed a break from sanding anyway so i thought i´d get some work done on the interior. I´d done most of the hard work but i managed to get hold of a load of aluminium profile.l..  so i´ve ripped out the rear slide out as it was way too heavy and have come with a better way of extending the bed out of the rear, but more of those antics in the next update. I can say i´ve been at it all winter and i´m still not finished. Cheers, Dave |
| |
Last Edit: Apr 4, 2020 17:45:29 GMT by Oldbus
|
|
|
|
|
Jul 20, 2019 18:37:49 GMT
|
Are you going to use door seals or something to make it a bit more air and water tight? You'll still get water driven inside if it's a bit windy.. Good solution, though! I´ve made it so that the original sliding door seal from VW should work, well that´s the cunning plan Fantastic work. I'm liking the stealth camper look too. ...stealth camper, i like that Fred, as long as i don´t have to paint it matt black to match the name though... ...much appreciated mate! Probably too late now, but if you use a compressor fridge, you don't need the vent in the side of the van, plus they use way less power than a 3 way. You could do away with the leccy hook up point below the filler by having the hook up via a short trailing lead through one of the rear fog light apertures, they come out easily an there is plenty of space behind them for the lead when it's not in use. Just sold my T4 and going bigger with MWB Crafter. You´re right about the fridge mate, however the 3 way ones do have one or two advantages. They´re cheap and readily available, mine came with the second hand kitchen i bought. My experience with the old three way fridges is that once you´ve got them up and runing on gas you´re laughing, they cool better and it doesn´t matter where you are....oh and did i mention they don´t cost much either  Alot of people put the electric socket behind one of the rear foglights in the bumper. Not a bad idea mate but i´ve just spent ages moving the hole from the side to under the filler neck so i´won´t be moving it again. I needed a break from sanding so i thought i´d attack the rust in the front left hand corner behind the wing....  Normally the main battery and all the wiring are hidden away in here...  I´ve seen worse (or should i say i´ve driven worse) but it still needed a bit of attention...so i chopped out all the rust...  and let in some 1,5mm plate   with the repairsection welded in i cleaned it all up a bit and gave it all a couple of coats of Ferpox epoxy primer   and to finish it all off, a coat of "Schutz" to help stop the rust coming back...   That´ll do me.... ...a good days work, much better than sanding filler. Cheers, Dave |
| |
|
|
|
|
|
Jul 14, 2019 16:02:24 GMT
|
and to finish off the update for the kitchen slide out, i´ve just made up the roof section...   ..folded out it overlaps the side windows which should help keeping the rain out  and with the slide out back in you can now see how it all folds away not taking up too much room.   it still needs a bit of fettling and after the respray i´ll cover up the inside with some wooden panels but it´s getting there slowly. It was nice to make a bit of progress today for a change as i´m back to sanding and filling as of tomorrow Cheers, Dave |
| |
|
|
|
|
|
|
|
The last few weeks i´ve been playing around with the kitchen slide out. With the slide out pushed out it obviously needs to be weatherproof but what i don´t want is big and clumsy side walls and roof in the way once it´s pushed back into the interior, the idea being that i want to be able to use the back without having to push out the slide outs so space will be a premium. As nice as it´ll be on a camping site with the slide outs open and the canopy out, if you´re just stopped on the side of the road somewhere i want it to look like a T4 just parked up. It´s taken so long to build as it didn´t quite work out at the first attempt, to be honest i think i´m at version number three at the moment but i think i´ve got it sorted now. The main idea is relatively simple, the upper side walls and roof will be foldable so that with the slide out pushed back in i can fold it all away and save a bit of space. The frame of the kitchen unit is just a mock up but you get the idea..  The side windows i made up out of the sliding window that was originally seperating the front from the back...  and they fold inwards...  it becomes a bit more clearer what i´m waffling on about in the next pic..  The side wall is made up out of some leftovers from the rear slide out so that the profile matches the original side panels, next job up is the foldable roofsection to match... Cheers, Dave |
| |
|
|
|
|
|
Jul 11, 2019 16:56:14 GMT
|
that would have taken me a month of Sundays! looks great! JP me to mate, me too Not going to tub it at the same time?  You'll need extra wide wheels to offset the weight.. that´s why i bought those Projekt Zwo 10x17´s.. Hi Lance, thanks for that idea. Luckily VW made up the right parts for the job..  and the good thing is the step inserts are made of plastic so it doesn´t matter when they get wet.  any progress? getting twitchy for updates! sorry for the lack of updates chaps. I have been putting in the hours, just not had much to show for it though... With the outer sill in place and the inner step doing what it should do, i thought i´d trail fit the new door  as with everything else on this build it took ages to get the gaps right, the bottom hinge was worn so that needed sorting but i got there in the end.   Whilst i was faffing around with the drivers door i found out that i could get away with fitting the electric socket under the filler cap, so i had to weld up the hole i´d already made in the side panel...  and made a new one in the bottom of the B Post  and why bother you may think? To be honest only because i think it looks better more at the weekend. Cheers, Dave
|
| |
Last Edit: Jul 12, 2019 3:48:55 GMT by Oldbus
|
|
|
|
|
May 13, 2019 16:42:54 GMT
|
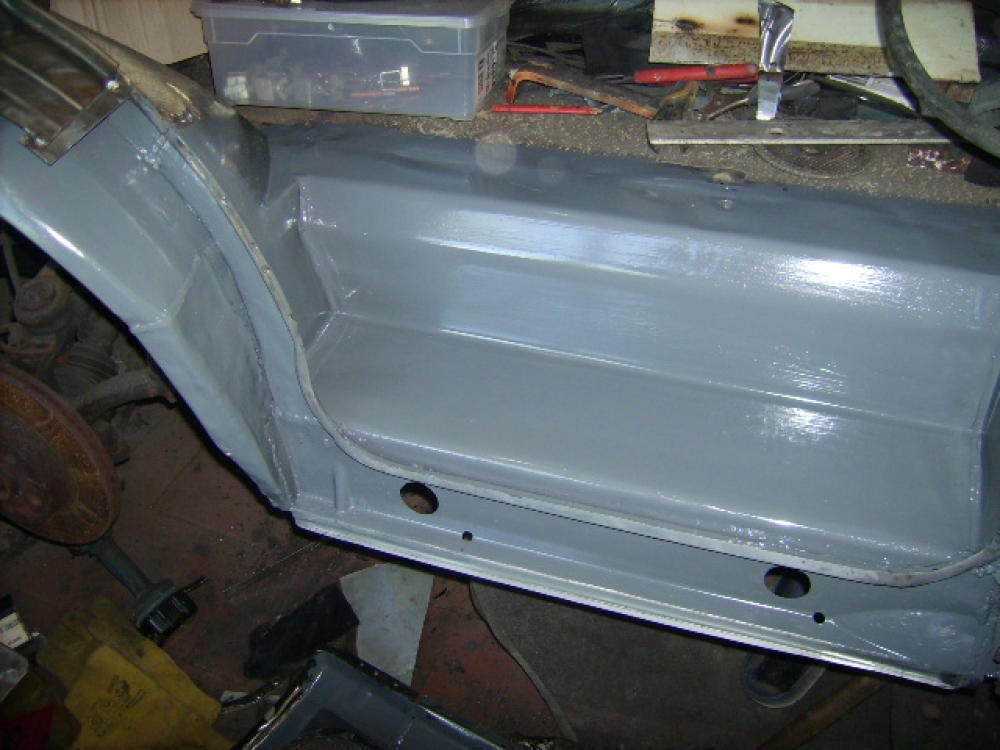
You are certainly going have earnt your holiday in it by the time its done You´re not joking mate and i´m still only half way through! When you`ve finished you can join the thread where this quote comes from: That conversion really does look tidy, i don´t think mine´s in the same league though... I can't wait to see this finished. It's going to be absolutely unique and brilliant! Me too mate, i think realistically if i get the bodywork finished this summer the rest should keep me busy this winter so that we can start using it next spring. I needed to take a break from sanding and filling so i thought i´d have a poke around the drivers sill and see how much welding it´ll be needing. Ooops, looks like this might take a while...  The inner sill isn´t any better either...  .. and the step is dead too which is hardly surprising as it´s been bodged up for the MOT a couple of times by the look of things.  So i got the anglegrinder warmed up and kept chopping holes in the van until i reached solid metal... ...which left me with a lot of this on the garage floor...  and a bit of a hole where the sill used to be...  I had some heavy duty plating lying around so i could redo the step without having to make the indentations, which saved a lot of time...  and remade the inner sill and adjoining edges for the door seal...  and it´s starting to look half decent again.  Next up is the outer sill/ wheelarch. Anything is better than sanding filler but that can wait until next week. Cheers, Dave |
| |
Last Edit: Jul 11, 2019 16:31:18 GMT by Oldbus
|
|
|
|
|
|
|
|
|
It’ll look good but it’s the moving bits and bobs that will make it special ! James You´re right James but you can´t see all the clever bits... Will it slide out in to a picnic table..? You lot are worse than me no, no and definately no, my trailer making days are over mate. know anybody who has done one? JP ...don´t know what you´re talking about mate Time for a little update methinks..... We had a couple of warm days over here last week so i made the most of my holidays and got the tailgate in paint..   Before i could spray the front bumper i had to attach the spoiler first so i glued it into place and as i don´t trust the glue i whacked in a few screws just to make sure...  and after a skim of filler to hide the countersunk screw heads...  i gave it a couple of coats of primer before the weather turned cold.  ..and as i had nothing better to do in whilst waiting for the filler to dry i chopped up my old knackered front grill...  ground out a recess to take the VW emblem...  and glued it into place... Next job up is to get the left hand rear side panel finished. That means welding in the new wheelarch, chopping in a couple of holes for the fridge ventilation, getting the whole lot looking half decent again and "adjusting" the sliding door gaps.  oh and i had to get rid of the door handle indentation too..    you can see in that last pic that the door edges are not made up of filler but have been cut and welded to fit.  Not quite up to TonyBMWs´or Grumpys´standards but once it´s all sanded back it´ll be ok. and after nearly a weeks work.... The big hole is for air circulation for the fridge, the little one below is for the electric socket
 it´s getting there slowly.  Cheers, Dave
|
| |
Last Edit: May 4, 2019 18:50:48 GMT by Oldbus
|
|
|
|
|
Apr 27, 2019 17:42:06 GMT
|
Hi JP, it´s VW Tornado red and i agree, it´s one of the best colours for the T4. I do like the dark grey ones but that´s metallic paint and that´s definately not DIYable in the carport. Hope your wife likes the idea of partially tornado red pavement? Don´t think see´s seen it yet mate, i´ll just have to nick her parking space and park the van in there once it´s finished The last of the removable panels that needed sorting is the tailgate. I managed to pick up a rust free one (easier said than done) but it had more dents in it than the rest of the bodywork together! I´ll spare you all the boring filling/sanding/filling pics but i did want to lose the VW emblem. So i knocked up a round plate to fill the hole ... just happened to be the same size as one of the cutting discs for the angle grinder  I then spent the next 2 hours weding it into place  and after nearly two days of filling/sanding i got it primed and ready for paint.  That´ll get done as soon as the weather warms up a bit. Next job up was to get the front bumper ready for paint. The one fitted to the van was knackered so i picked up a new one last winter and although i´m not too keen on go faster goodies i think the T4 needs a bit of help to get it looking good at the front so i got myself a spoiler too.  It doesn´t look that good laid on the garage floor but  with it fitted and together with the projekt Zwo wheels i think it´ll be ok. What do you guys think? Cheers, Dave |
| |
Last Edit: Apr 27, 2019 20:40:26 GMT by Oldbus
|
|
|
|
|
Apr 23, 2019 18:54:14 GMT
|
As i´d mentioned earlier i wasn´t happy with the slide out mechanism on the side door. It was basically just a bit of box section sliding in and out of another slightly larger bit of box section and in theory it should have worked ok but i didn´t, so i got myself some heavy duty wheels and knocked up a new set up. A bit of angle iron....  with a couple of these let into the floor...    leaves me with a frame that now slides in and out no matter how much weight is on it..  and with the side door welded to the slidy bit it´s more or less finished.  The weather has been really good the last few days so i´ve made the most of the sun and turned our carport into a paint booth...  and have used up the first couple of liters of VW Tornado red  I´ve got a few days off work so if the weather holds for a couple of days i´d like to get all the removable panels done that have been getting in the way in the garage. Cheers, Dave |
| |
|
|
|
|
|
|
|
given the little lull in updates i thought i'd just drop this here.... Sorry about the lack of updates chaps, i have been busy in the garage the last few weeks though, just not much to show for it unfortunately. The canopy is more or less finished and just needs some primer .. ![]() I´ve chopped out some strips of plastic out of the old interior and glued them to the underside of the canopy to close up the gap. Once it in paint it should look ok.
 and on the inside i´ve boxed it all in so no water can get in(hopefully) redone all the insulation and glued the old interior back into place.  I won´t be able to refit the cupboards that were originally in there but they were pretty small anyway so no serious loss. One major change that is going on is the constructionof the bed.  I picked up the miidle seat out of a Caravelle the other day and as it folds down flat i´ll be using it as a base for the last 45cm of the bed,. Withtthe slide out out our feet will be on top of the eat and when i push the bed back in all i need to do is fold the seat down and the bed will slide in above it. The main advantage is that once the bed is out, we can use the seat if the weather turns bad and we have to hide out in the van. ...and with a bit of luck the fridge should fit in next to it as well.  Most of the time i´ve been mucking around with the kitchen, i forgot take a pic but i wasn´t happy with it all so i´ve ripped it all out, including the sliding mechanism for the side door and am in the process of redoing it all...story of my life at the moment. I´d planned on getting it done today but the weather is so good i thought i´d make the most of the sun and have filled/ primed the wings, sliding door and passenger front door.  Cheers, Dave |
| |
Last Edit: Apr 7, 2019 15:18:52 GMT by Oldbus
|
|
|
|
|
Mar 10, 2019 17:55:06 GMT
|
Good evening,Sir! Sanding.....filler...sanding....schutz... sh#it has to be done! Looks good! Greet You´re not joking mate and the T4 is not erxactly small so there´s plenty more to sand, fill, sand, fill etc. Definately not looking forward to all that!
No real paint before schutz? No mate, i do it like most of the car manufactures do, a couple of coats of primer, seam sealer, "schutz" and the paint on top. The "Schutz" stuff is not the tar based rubbish, it´s the acrylic stuff which is basically just thick paint and has no problem being painted over. Well you can´t see all the work i´ve put into the canopy this week but it´s now in for good and with a bit of luck should be waterproff once i´ve closed it all off.....
All that´s left to do is fit the outside cover and seal.
 I´ve been playing around with kitchen i picked up the other day...  I forgot to take some "before" pics b u tyou get the idea. It´s out of a caravan which is handy as it doesn´t weigh much so after taking it to bits i´ve been mucking around how much of it i can actually fit in the van. Not forgetting that the bed has to slide back in too.   As i don´t have that much room to play with i think i´ll remake the wooden bit using those doors in the first pic, and get the fridge to fit under the sink.
I´ll lose some sunlight because of the height but i´ve been thinking about closing off the windows on that side anyway as i still have to make up a cupboard or two.
That way when the slide out is pushed out i´ll have enough room for a table and seat. All i need to do is find room for the coolbox, gas bottle,watertanks, spare battery and charger. Oops i think my van is still too small. Cheers, Dave |
| |
|
|
|
|
|
|
|
I´ve been sanding down the side the last couple of days so i´ll spare you the boring pics that look exactly the same as when i started, good thing is though it´s just about ready for paint, shame i can´t say the same about the rest though. I´ve also given the underbody it´s first coat of "Schutz" ...  and for the first time since i dragged the van home it´s looking better than when i bought it.  I´ll give the paint a couple of days to harden out properly and give it another coat at the weekend so that i can start refitting the rear axle. One other little job i´ve got done is to shrink the bit i cut out of the roof and strengthend it with some ally angles...  Next job up is to make the box that the awning will be going in so that i can refit it all and cross another job off the "to do" list Cheers, Dave |
| |
|
|
|
|
|
|
|
Noice. That hidden awning is a genius idea. Cheers Fred, to be honest i was watching a programm on Discovery a couple of months ago about luxury campers, the million dollar type, and one of them had a flush fit awning along with lots of other goodies (including a Porsche in the rear garage) so i thought if it´s good for them it´ll do for little old me! brilliant flush panel on the awning...looks great! JP Thanks JP, it´ll hopefully look a lot better once the paint is on. Talking of paint, the temperatures are up a bit over here so i thought i´d start to get it looking half decent again. First job was to fit some aluminium angle to the awning hole, strengthwise it didn´t really need any extra support but it tidys it all up a bit.  ..and them i dug my spray gun out of the box it´s been in since the move and gave the side panel a coat of spray filler.  I only put it on to see how much more filling i´d need to be doing but it´s ok..  and only needed the guide coat sanded back with some 400 wet and dry. So while i was on a winner i thought i´d carry on with the rest of the right hand side...  sorry for the iffy last pic as it looks pretty good if i say so myself, looks a bit less like a bag of sh** now Cheers, Dave |
| |
|
|
|
|
|
Feb 25, 2019 19:19:26 GMT
|
oh yes....!! certainly a good heavy lay up on the roof section , which is handy. definitely more transformer than transporter now. Some brilliant details going into this as usual. Cheers guys, i´ve been busy the last few days and haven´t been able to update the thread, but i have got a bit done. With the canopy now in place i need to make up something to get the side bit of the roof to open and close. I thought about some hinges and a handle but that´d look pretty naff so i´ve made up some little adapter plates that i´ll be sticking to the canopy, once they´re in place properly i´ll fit the chopped out bit of roof to them and just wind it in when i don´t need it.
 Flush fit so to speak. I´ll get some ally profile and some sort of seal and glue them to it and with a bit of luck it´ll then be all watertight....  One other little job i´ve got done is the side step for the sliding door. Now this job wasn´t on the "to do list" at all but when you´re jumping in and out of the back of the van a hundred times a day the step is way to small if you wear size 12 boots. Getting in is ok but climbing out again is a pain especially when your getting on a bit So i thought i´d enlargen it a bit....
Before...  During...  and after....  I´ve basically chopped the step in half, took out 120mm of the floor panel which is a far as you can go as the main chasis rail is directly behind it, and welded the two halfs back together with a strip of 1,2 mm plating to close the gap.  ... it´s a all a bit patchwork but didn´t cost anything and there´s so much welding wire gone in there thst´s it rock solid. It´ll do me especially as you won´t see any of it once i´m finished. Cheers, Dave |
| |
|
|
|
|
|
Feb 17, 2019 17:43:00 GMT
|
|
Looking forward to seeing another T4 getting the treatment it deserves.
|
| |
|
|
|
|
|
Feb 17, 2019 17:29:36 GMT
|
Doesn´t look like much but i´ve been working on the suncanopy all weekend. I took loads of measurements, masked off the bit i wanted to chop out and then clamped in some angle iron to help me get a straight cut.  Didn´t fancy cutting two 2,5m long cuts freehanded. I then took a deep breath or two and using those 1mm thin cutting discs got the anglegrinde going and chopped a big hole in my T4 I was suprised that the roof didn´t sag or flex but it didn´t budge an inch...
 The good news is i got my measurments right...phew!!!!     the brackets needed some adapting to get the angle right so that the canopy didn´t foul the hole but that´s now sorted. Next job up is to box it all in so that it´s watertight, then i´ll get the bit of roof that i chopped out glued to the canopy so that it´s a flush fit once rolled back in.. ....that should be fun. Cheers, Dave |
| |
Last Edit: Feb 17, 2019 17:32:32 GMT by Oldbus
|
|
|
|