|
|
|
|
|
Sounds neat eh! I've been doing a heck load more research into this idea over the last two days and I reckon I could do it. But not into this Imp. This one will keep the Datsun. The next Imp can become a baby Porsche. A Hillman 911  So I have been pinging out emails to places here in NZ and asking about to find out the length of an engine plus to find an engine I can buy... but it must be cheap!a lot on offer here. Not It will involve a lot of fabrication to do it the way I want to do it- that is to keep the Imp Transaxle. But that sound would be lovely in a dropped to the ground little Imp road racer. I'm itching to have a go at this idea. But this Imp first and then the Viva wagon to finish. However there is no reason why I cant start playing about with a suitable engine on the side.. So please..if you happen to trip over a Honda goldwing 1500 engine out in the woods please do post it to me. Alex and Hannah Marahau.  |
| |
Last Edit: Apr 3, 2018 9:42:16 GMT by yoeddynz
|
|
|
|
|
|
|
|
|
|
And this...
Plus this...
Hmmmmm.
|
| |
|
|
|
|
|
|
|
|
This Romanian has me sold on a goldwing engine with no mufflers :-)
|
| |
|
|
|
|
|
|
|
I also pondered the Honda Goldwing lump for that mini 911 Vibe  Thoughts of tiny 911 sounds coming from the back of an Imp has my mind in a blur of excitement/must go look up goldwing on interweb.. But first..an update. I managed to do a bit more on this in between stripping a Datsun 120Y down and property jobs continuing on from the cyclone mess. So where was I up to? Ahhhhh that's right. The arches...  No. Hang on. That's the wrong photo. Not them. This.. .jpg) So there was some rust I had cut out. Made a little fill in and using Nanas favourite butter knife I was able to keep it lined up for butt welding.. .jpg) Grind off and move on.. .jpg) So onto the offside rear corner. It was messy.. .jpg) This fell out.. .jpg) And the rest was cut out.. .jpg) I started a the rebuild with a tricky inner bottom piece connecting the outer guard bottom to the chassis rail. Luckily it looked like this section is a mirror image of the other side. You can see it has many curves, bends and folds, as pointed out by Mr troll... .jpg) So I copied it using folder, hammers, shrinker, pliers, hands.. .jpg) .jpg) Welded in. Instant strength again :-) .jpg) I then rebuilt the inside and started building the outer skin.. .jpg) .jpg) I've finished off the entire rear end but need to get some more photos. There were some rust bubbles around the arch which I cut out in sections in order to not lose the shape. I'll get more photos. I need to cover all the repairs in Epoxy primer before it starts flashing off in surface rust. Then move on to the floor. Yay. Lots of rust. But I have a rough plan on how to tackle it. Feeling happy with it all now its a lot more solid :-) |
| |
|
|
|
|
|
Mar 31, 2018 18:40:10 GMT
|
|
The 3pot? Would be fantastic. Expensive engines here in nz though. Anything euro and newish costs to much.
Toymota also make a neat little 3pot I think. Must look it up.
|
| |
|
|
|
|
|
|
|
|
Yes- I need to strengthen my rear arms too so would be interesting to see where to add gussets. Its something you cant just guess at.. It needs to be learned through experience first hand of where they fail I guess.
I'm kind of keen to see how far I could go with an Imp engine in the next one (without spending much money that is...)
|
| |
|
|
|
|
|
Mar 30, 2018 18:38:07 GMT
|
|
Ooooooohhhhh man is love a g15. That yellow one in the vid sounds great.
The dude in the locost thread mentions 875 pistons are hard to get? I presume he means forged pistons?
Is 998 the max you can bore an 875 block out to?
This next imp sounds great too. Its a bit more racey being a 1040 on bike carbs. Looks pretty damn quick too...
|
| |
|
|
|
|
|
|
|
Also.. what is the hillclimb scene like where you are? I see you mentioned it... We don't have lots of purpose built hillclimb tracks like in the UK except for one up in the Coromandel (look up Leadfoot ranch) However there are lots of fantastic climbs of which some, like our local climb, get closed off once or twice a year for a race if lucky. |
| |
|
|
|
|
|
|
|
Hi yoeddynz Ventured over from PH and caught up with this thread. You're doing some good work there, and especially surrounding all the rules it seems you guys have. I like the cut of your jib! Quite jealous of your surroundings too. Falling out of love with the UK at the moment - NZ looks nice! If you need any advice from someone who's been there and done it (or some of it at least) just give me a shout Rich Hey Rich. Cheers. I'm enjoying this one which is always handy.. however the engine conversion isn't mine so it doesn't hold the same value to me as if it would had I adapted the Datsun engine myself. However... I have more Imps on the way plus this race car shell. between them I can create another Imp to which I can start a fresh with my own take on my ideal Imp  This I look forward to very much and hence I am very interested in seeing as many other engine conversions as I can so I can absorb ideas and info I really did enjoy reading your thread and it certainly got my creative juices flowing! I do have 3 spare V6 engines kicking about.... |
| |
|
|
|
|
|
|
|
Mar 27, 2018 20:12:31 GMT
|
Still whittling away at the rust. However, for a break from looking at rusty Imps here is a link to an old Rootes Group promotional film made for the launch of the Imp. Some really good factory footage with some great machine shots. Yeah... watching this last night really made me want to sort my Imp (s) out so I can drive the thing! movingimage.nls.uk/film/0085 |
| |
|
|
|
|
|
Mar 24, 2018 18:41:14 GMT
|
|
Me too. Waiting here patiently as my popcorn goes cold....
|
| |
|
|
|
|
|
Mar 23, 2018 20:47:35 GMT
|
|
It is actually quite easy if you take your time. Having a nice wee folder plus the shrinker stretcher helps so much though. I fully recommend anyone taking on a rusty project, even just one car, to buy those two tools. At the least a shrinker stretcher. Once you finished the work you could sell the tools on to some one else ;-)
|
| |
|
|
|
|
|
|
|
...wondering if you could describe how you made that rear section in particular... JP OK here ya go :-) I have taken a few extra photos this time to show how I went about what is a fairly awkward bit to fabricate. I sneaked a little bit more time on this last night (well I didn't really sneak out to the shed.. I just worked till late) So in pictures.. here's the corner to repair... .jpg) Measured up to work out a size of steel needed. Add a bit extra because with the slight compound curve the shrinker will tease the steel and it'll end up smaller in other areas too... (hard to explain what I mean.. but yeah.. just cut a bit larger than you need) .jpg) I rolled my little folder out and in several small bends curved the edge up. The bend downwards of this corner has a 5mm or so radius... but not all the way round as it actually blends back in to the guard. .jpg) .jpg) Then into the shrinker.. .jpg) Then compare to original section. Its not a simple curve and has to be carefully manipulated by hand to get just right. .jpg) Cut, try, cut, try, cut.. until it just fits in neatly. Because its nice new thick steel and the area its getting welded into is good steel I don't mind a tiny gap. As I weld it the weld will sink in between rather than sitting out too far. Plenty of heat in short zaps. Meld it into one.. weld on, grind off, weld on, grind off....ahhhh grasshopper. :-) .jpg) .jpg) .jpg) Then the little finishing off bit underneath. A slight compound curve in itself but can be just bent to fit by hand... .jpg) Then fused in place.. ready for grinding (the boring bit..) .jpg) I have now started on the other side rear corner. Much worse inside as the battery box area was rotten. I'm not going to bother trying to make it all original like in there because there wont be a battery there. But maybe I'll make a handy space out of it. Maybe a box or something to take spare engine oil, some basic tools etc. I'll see. For now I just need to make it solid again :-) |
| |
|
|
|
|
|
Mar 22, 2018 17:43:57 GMT
|
Ha! He he... What an awesome typo. I won't correct it otherwise the schoolboy giggles will mean nothing to future readers. |
| |
Last Edit: Mar 22, 2018 17:45:10 GMT by yoeddynz
|
|
|
|
|
|
|
|
Once I get hooked on a project I end up putting the hours in. I wish I was this motivated when it comes to paid work..which is actually the same type of work but i get a downer on it. Its a problem because it means we live on a tight budget. Because our lifestyle is quite cheap I got away with working about 10-15 hours a week last tax year.
I must learn to see that paid work equals potential toys!
|
| |
|
|
|
|
|
|
|
... so you created those curved panels with your bender in stages, right? wondering if you could describe how you made that rear section in particular... JP I wasn't sure if I should have shown the process of bending up the sill panels to replicate the originals because...well I'd already taken heaps of photos already. The rear wing bottom panel was a compound curve which I was expecting to be tricky to make. I was thinking if have to smash one into shape using a sandbag or something. But luckily it had curves, although on separate plains, genital enough I was able to bend by hand with some help from the folder. I have to do sills on the 120y so I could always post the method up on this thread and we could pretend they are imp sills. I'll also pop a bit more detail into the construction of the rear corners as it might be interesting. Not really looking forward to the floor repairs... All those stamped ridges. If I was in blighty I'd just buy a replacement floor panel from the imp club I've recently joined. Cheap at £80! |
| |
|
|
|
|
|
Mar 21, 2018 21:36:19 GMT
|
|
Cheers man. I do enjoy doing thread updates... less grinding dust inside when on the computer :-)
|
| |
|
|
|
|
|
Mar 21, 2018 21:07:25 GMT
|
Started on the rot removal over the weekend. Its going well. Trying to sneak in time here and there between jobs but did some good hours on Sunday. As usual I am finding it super addictive and very satisfying. I had no idea what I was expecting to find under the outer sill skins so straight into it.. .jpg) and luckily the drivers side is in really good condition. Just surface rust. 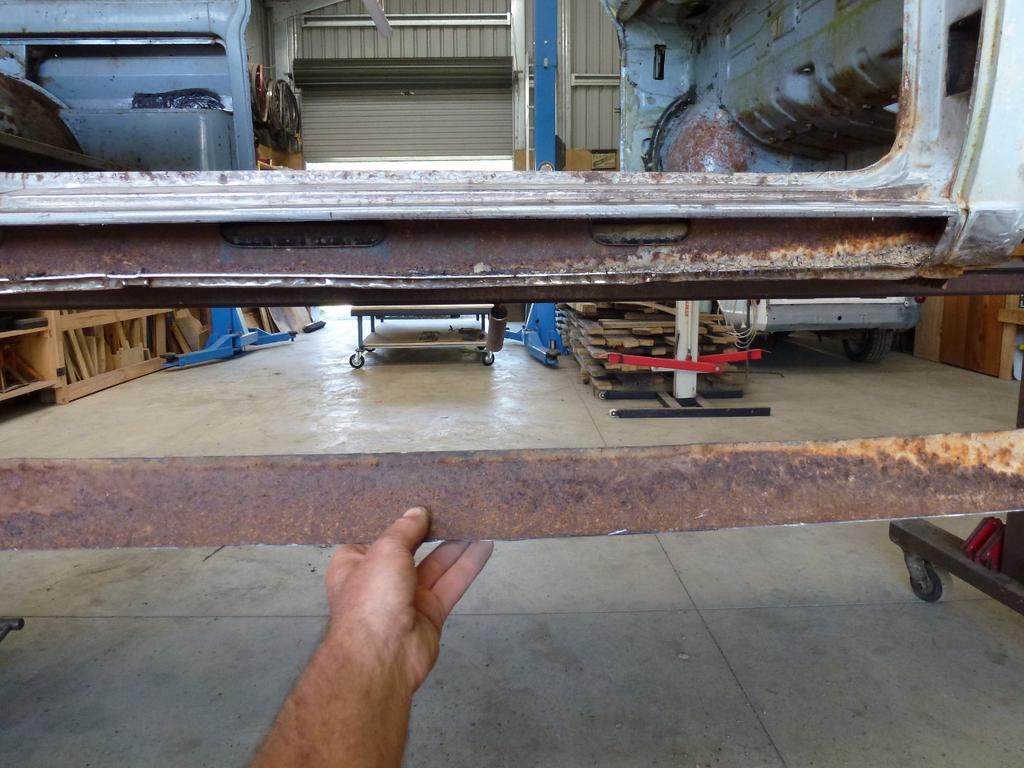 .jpg) Glad to have peeled off the skin though. Gave me a chance to clean it out and paint it. Then a new outer sill - which I have to make in two sections because my folder is only 600mm :-) .jpg) Also had to make new 'rear sill' or is it lower B pillar ? was clean as under there luckily so again just a new outer needed. .jpg) The passenger side though.. Oh dear. curse word. The rot had taken out the bottom half of the heater pipe boxing. The inner sill/floor edge had one small section with rot I had to cut out as well. Nothing for it but to chop it all out and let in some new steel. .jpg) Before I went any further I had to remove the long heater hoses- one on each side. I can see these being a right mare to re-install. I'm sure there are some secrets you fellow Imp old timers know about. .jpg) Then new boxing.. .jpg) New vertical sill piece. Lots of holes for plug welding.. .jpg) Welding in place. I must say I was happy that the shell was empty and resting on the table neatly along its length. There was enough decent upper sill including decent vertical sections to hold the shape of the doorway :-) .jpg) .jpg) 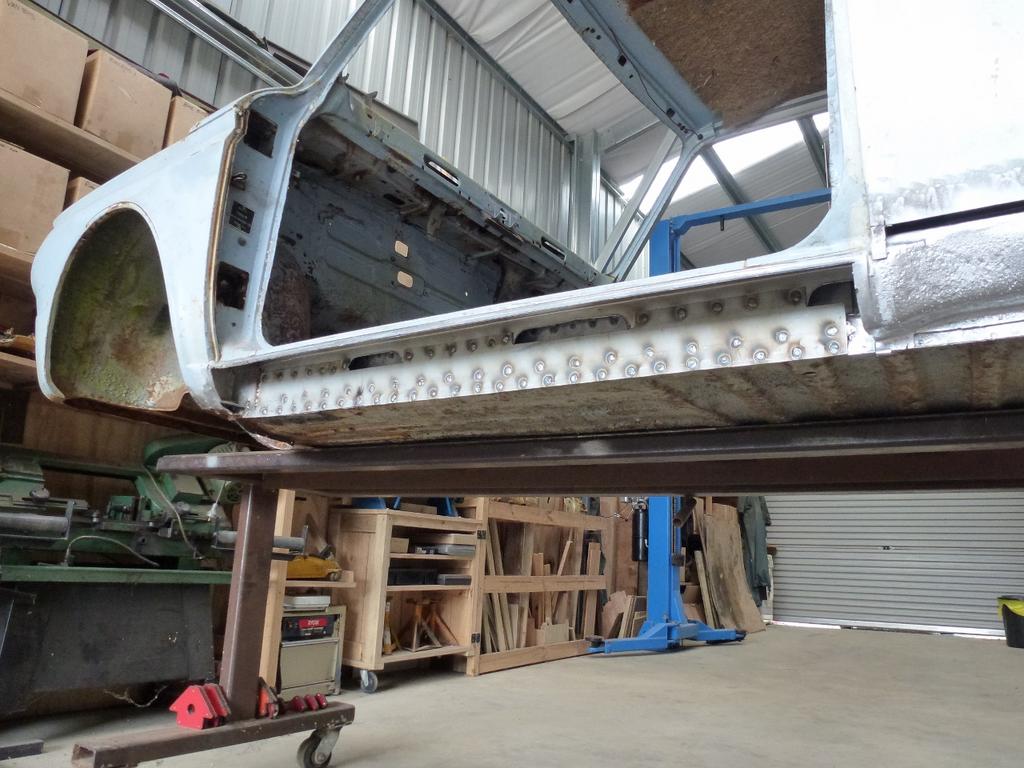 With that lot fixed I painted it all in a heavy zinc rich paint and then welded on the new outer. I butt welded the whole lot because I didnt want any little seams that might collect moisture. I'll fill the lot with cavity wax later on (always a fun job..) .jpg) .jpg) I then carefully shaped up a new 'LowerB pillar, guard bottom sill end' (what is this bit called...just the sill I guess..) and was about to weld it in place after having treated and painted the inner section. .jpg) But I was not feeling happy about the look of that inner bit. I just had to delve deeper and I'm glad I did. I knew the floor corner was rotten but I was going to deal with that later. However it made more sense to do the lot in one go. I cut the curved inner sill off and then there was this.. .jpg) Hmmmm... what's under here ?.... .jpg) Rebuilt it all.. 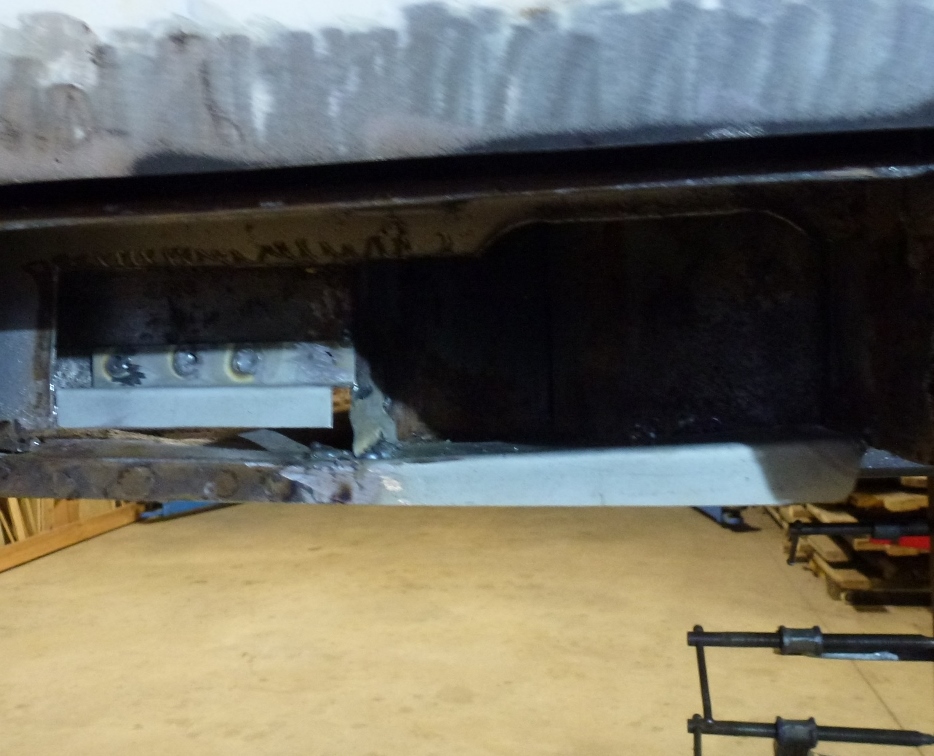 New inner cover... 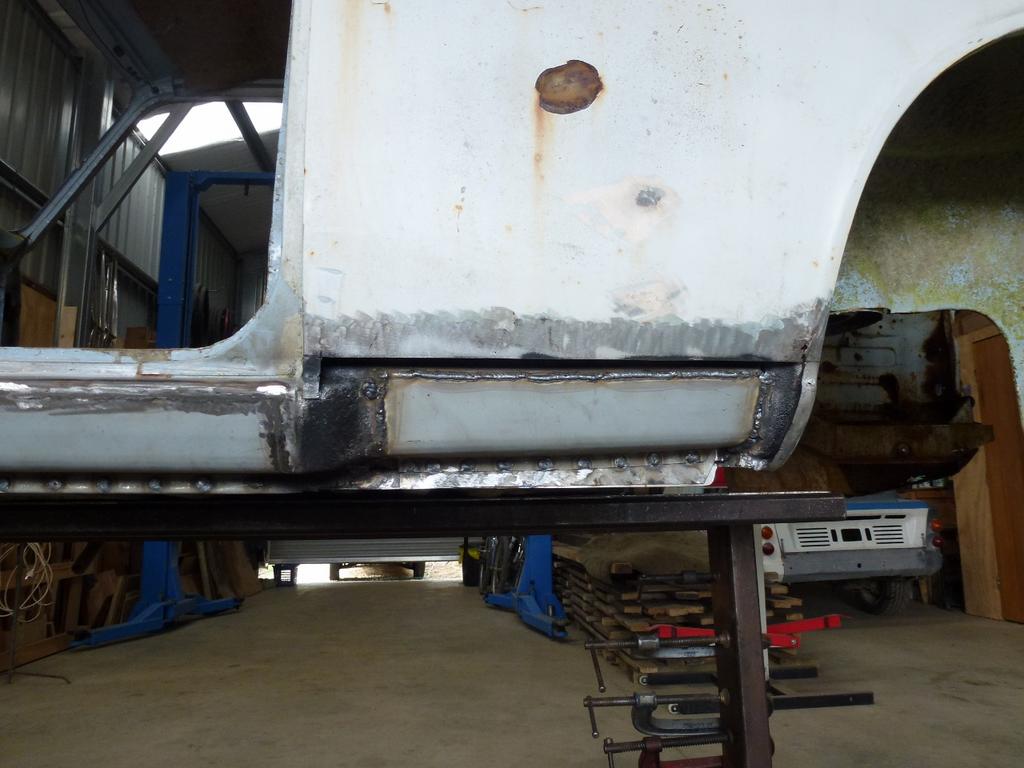 Then on with that outer..finally. Both sills complete, rot free and strong again :-) They are sort of the most critical of repairs to get right on this car. The rest is just about rot removal and letting in steel with having to use heaps of filler (I don't really enjoy sanding filler so I'd rather get the repair as close as possible and just allow for a skim if any ) .jpg) I was going to do the floor next but this lot was right there, laughing at me. I had to cut it out and see what gives.. .jpg) Note the factory carefully installed bags of foam, designed to absorb sound...and moisture... .jpg) Shaped a new piece to suit. Luckily not as tricky as I was expecting. Given the awkward shape around the corner I'll break these corner repairs down into sections. The wheel arch rot visible will be dealt with afterwards. .jpg) Drilled a new drain hole for future cavity wax applications and then painted the inner with Por 15.. .jpg) Ready in place to weld. .jpg) And that is where I was last night. Its welded in now and I'll continue on around the corner, then do the other side. The battery box is rotten but the battery will be moved up front anyway in order to redistribute the extra 20kg of the Datsun engine. Work will slow down on the Imp for now as I have sold on our family Datsun 120Y 2 door wagon on to a friend from Oldschool. I'll be doing a fair bit of rot removal on that before it gets taken away. That earns me money where as this Imp doesn't. So Datsun wins the time allocation. But I'm sure I'll sneak time in here and there. Plus Hannah can do work on either car to help with progress (when she's not at the beach swimming with her sister who's visiting - pfff....priorities..) I have also eventually come to realise that it might well be a slightly tall order to try and get this Imp on the road for the nationals in 2 weeks time....... :roll: So Viva HB wagoning we shall be for that fine event. But hey- I'll continue as is and at least I should have done the vast amount of rot work by then :-) |
| |
Last Edit: Mar 21, 2018 21:17:29 GMT by yoeddynz
|
|
|
|
|
Mar 17, 2018 18:43:04 GMT
|
|
Good job and congrats for doing it all in the cold, ready for spring :-)
|
| |
|
|
|
|


 This I look forward to very much and hence I am very interested in seeing as many other engine conversions as I can so I can absorb ideas and info
