ScORTED
Part of things
 ITBs = Bwaaaarp
Posts: 427
|
|
Jun 12, 2012 11:31:29 GMT
|
|
|
| |
"In engineering there is an answer to everything, It's just that we're usually too ignorant or too dim to see it." Keith Duckworth If you'd binned it into something that either didn't move, or survived intact (like I did, well, technically I landed on top of it, skillzorz... |
|
|
|
luckyseven
Posted a lot
Owning sneering dismissive pedantry since 1970
Posts: 3,839
Club RR Member Number: 45
|
|
Apr 14, 2013 20:48:16 GMT
|
Don't you just love it when the postman brings you presents ;D? On this occasion it was the long-awaited return of my old exhaust midpipe from the FD. It broke long ago, about two years, and I sent it off to Craig at Dyno Torque in Brum for fixing. Mainly because he's the only bloke I knew then who could weld titanium  It's pretty occult and specialist stuff, and he is a deity of weld! 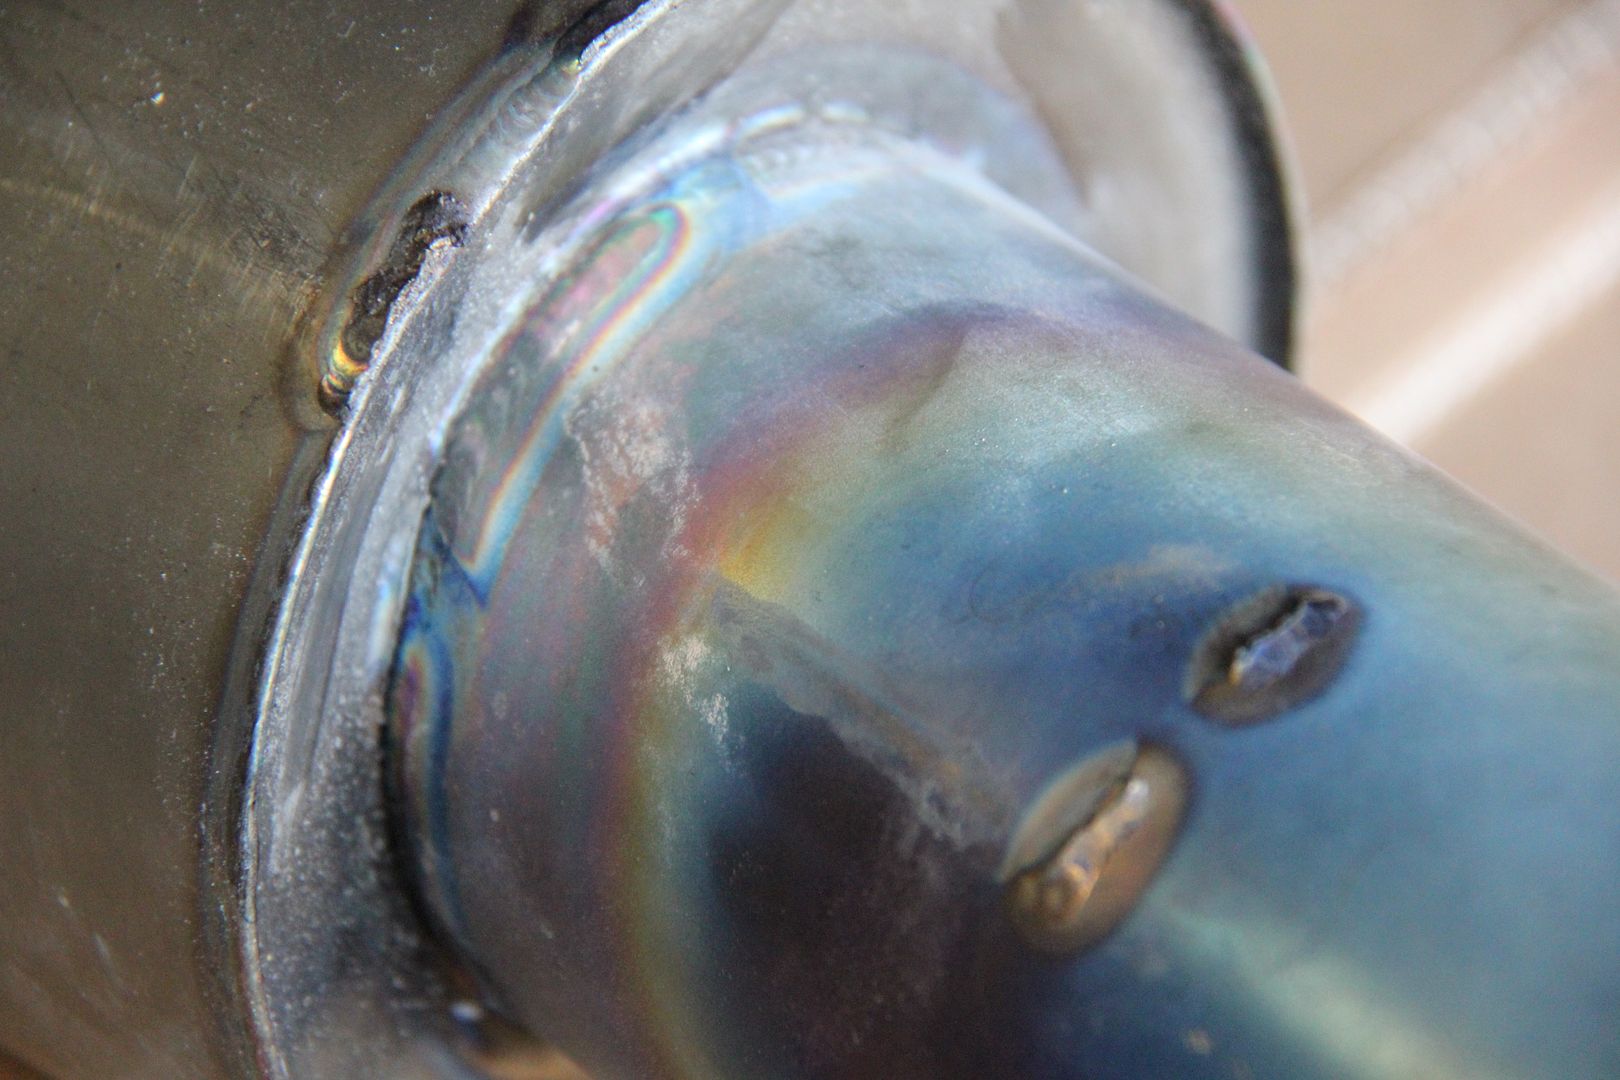 As you can see, it had a crack around the box face weld and the bracing that had supported the silencer box.. well, it was gone. At both ends. Not sure entirely how you go about breaking the hardest metal known to man, but somehow I'd managed it  Mind you, it was about the time I broke everything else on the car so it seemed about right. I've had a ridiculously loud Kakimoto Red Label pressed into service ever since, but it's finally lost the few vestiges of packing it once clung onto and got embarrassingly loud. Like, madness-inducing, ear-bleeding, involuntary faecal incontinence loud  Trouble is, the ARC 'zorst was built as a full system, so the backbox will only fit with this exact midpipe. So I had to get it fixed and pronto. The decision was made even more pressing by the failure of the downpipe gasket so the car is not only louder than the entire Apocalypse at the back end, but at the front it sounded like it had an unsilenced VW Beetle trapped under the bonnet. Anyway, a mate Colum up in Brum was good enough to apparently stand over Craig until he found the pipe in some dusty shelf somewhere and fixified it. Then he kidnapped it back and posted it down to me. So here it is... 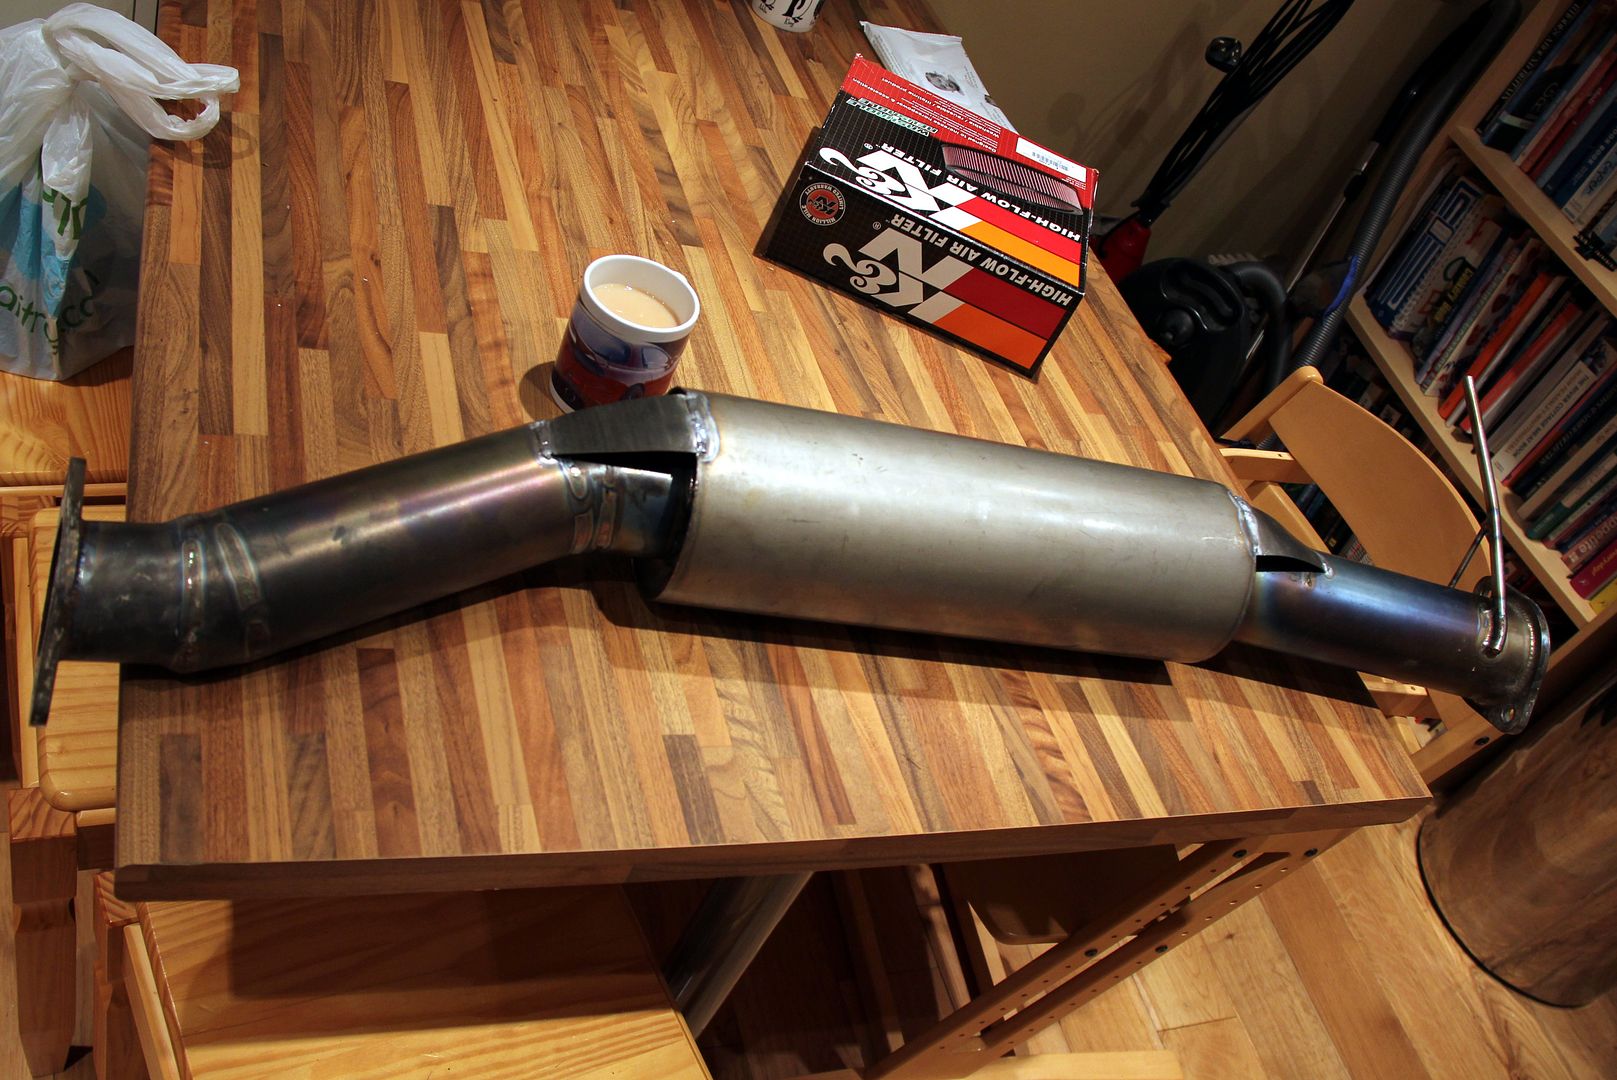 He's even managed to re-create the missing support flanges (oooh, flange) 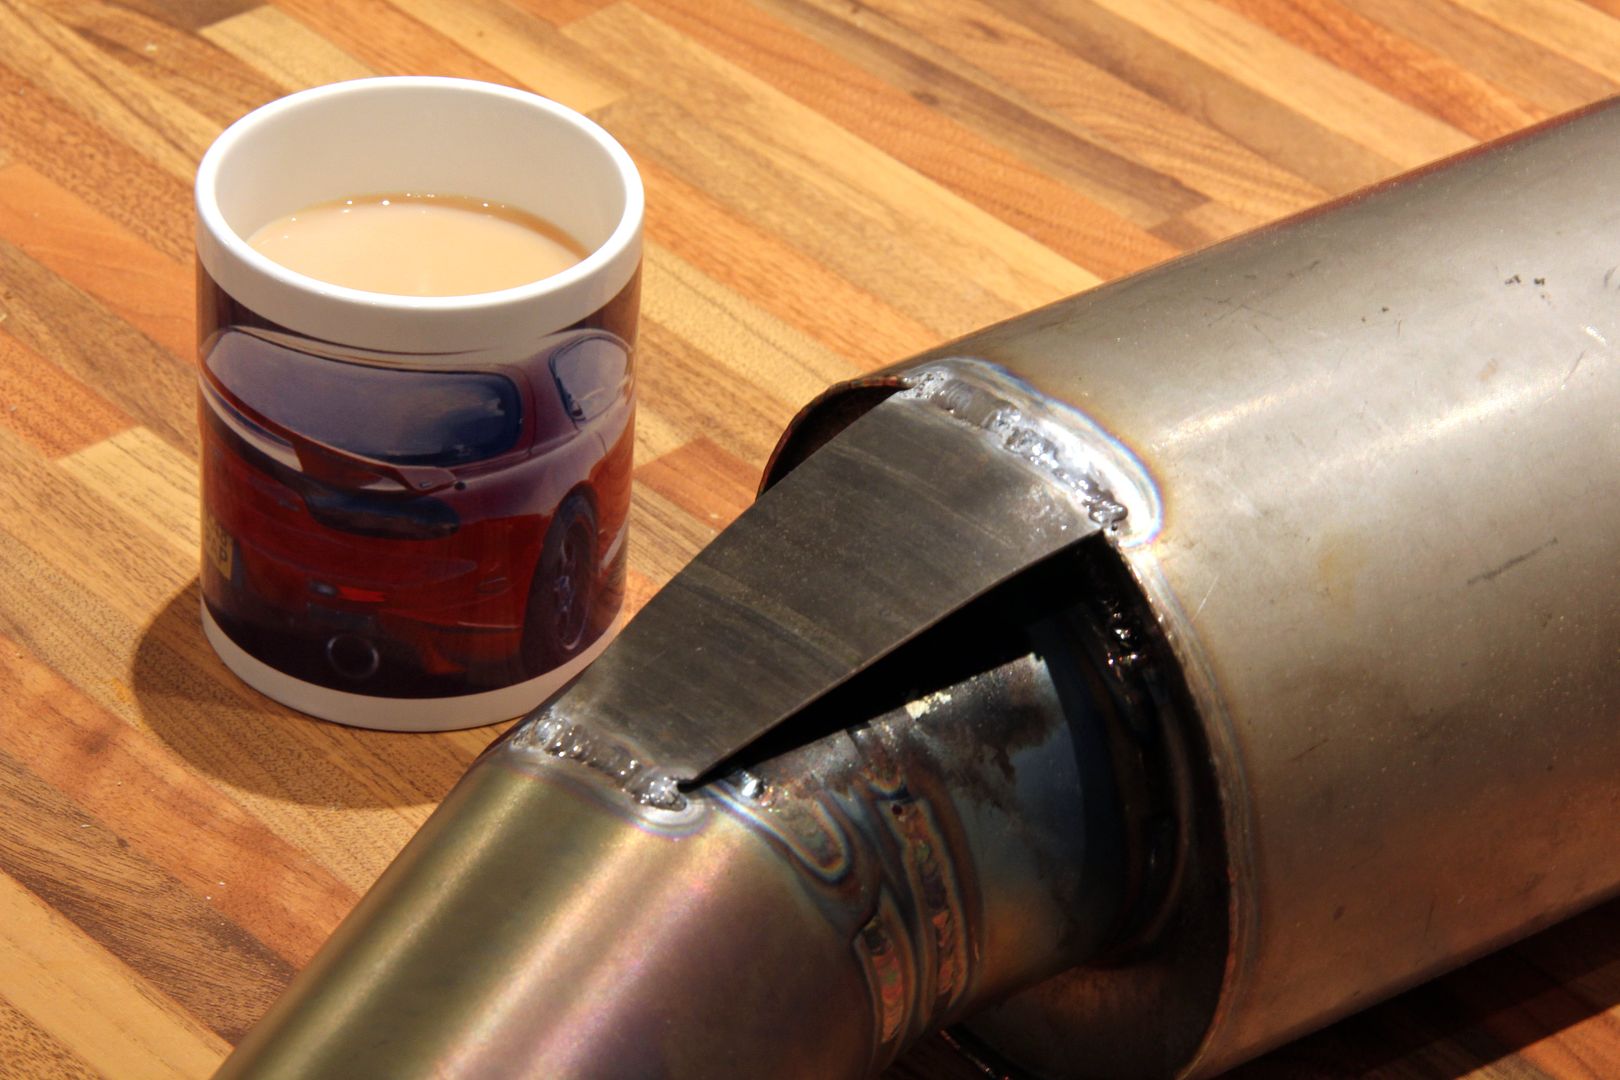 The best thing about neatly TiGed titanium is not only do you get the artistry of the actual weld itself (and Craig is definitely an artist) but it also turns all the pretty colours of the rainbow from the heat  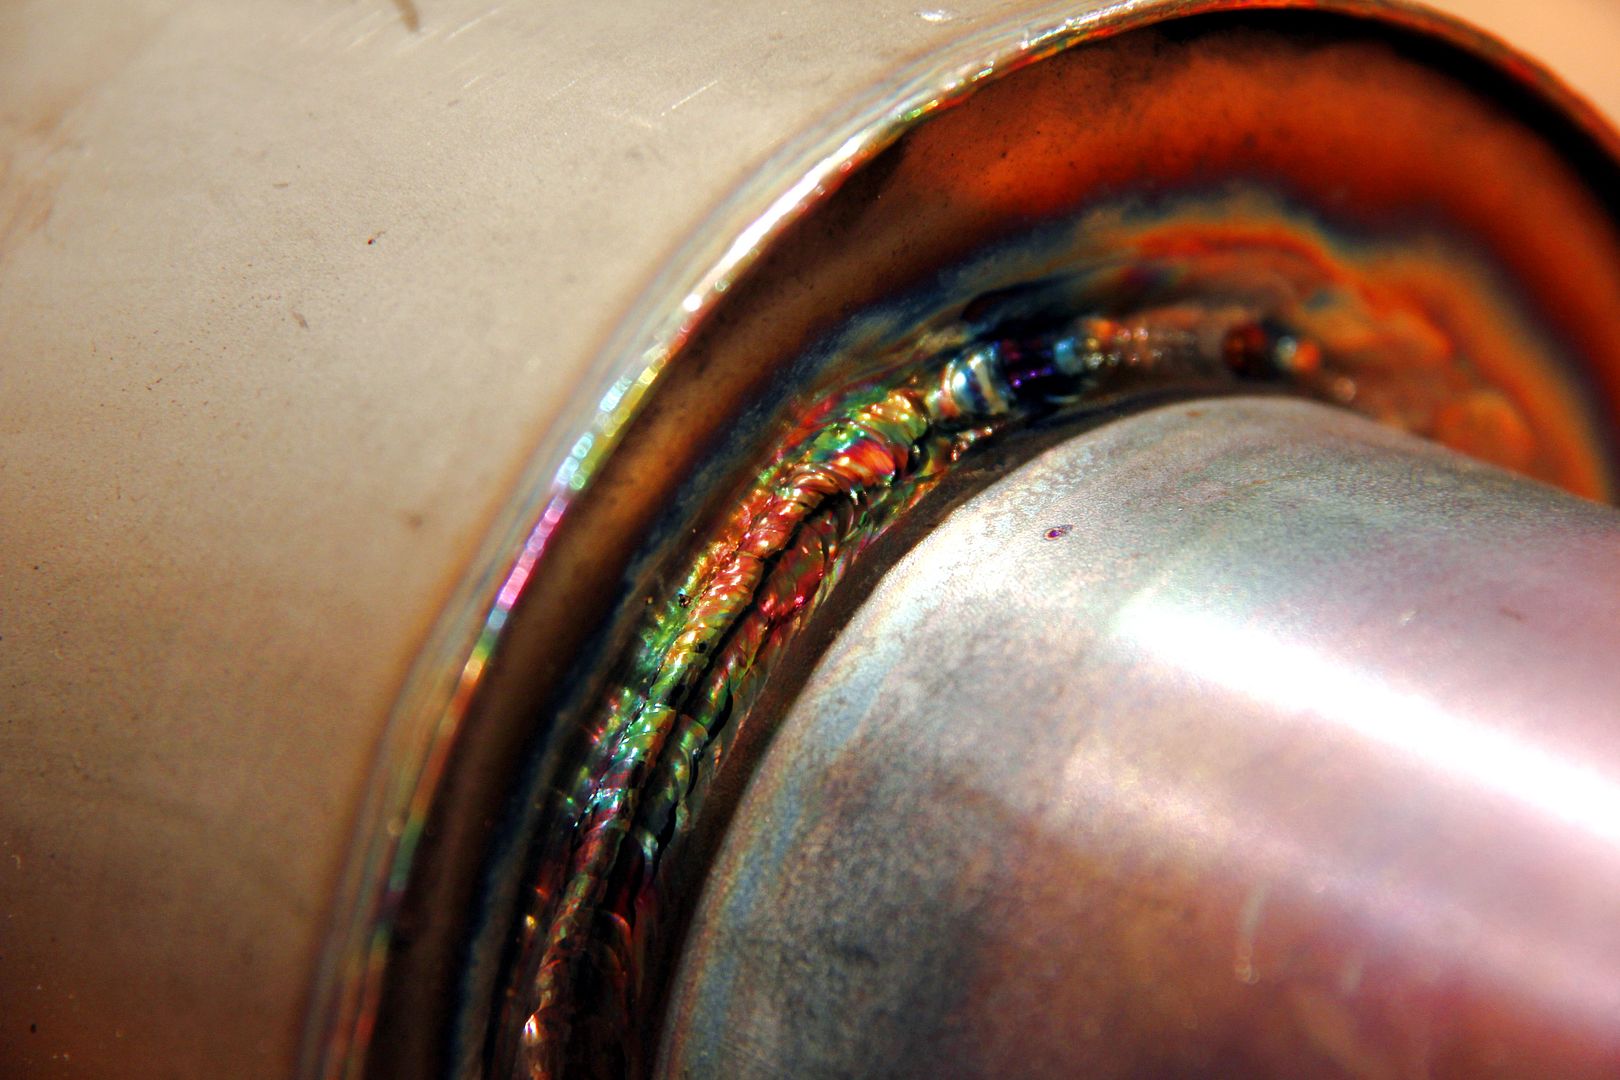 Worth the wait? Ooooooh, yeah. Even better if it makes the car useable again! Oh, and one other reason why a full zorst in titanium made by ARC is for righteous winners only...apart from that it's beautiful... 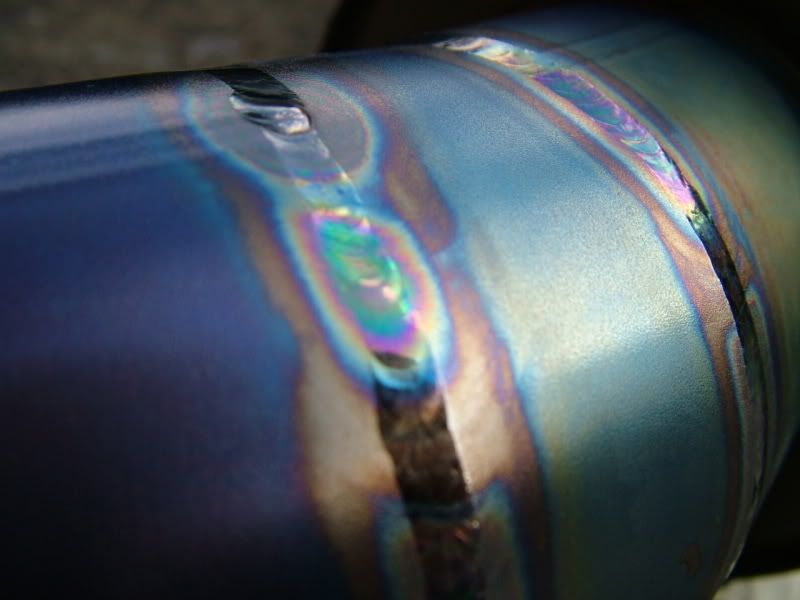 ...is that it has the company motto hand-stamped into a little titanium plate underneath (like, how hard was that to do!) and it's the most wonderful Japlish ever; 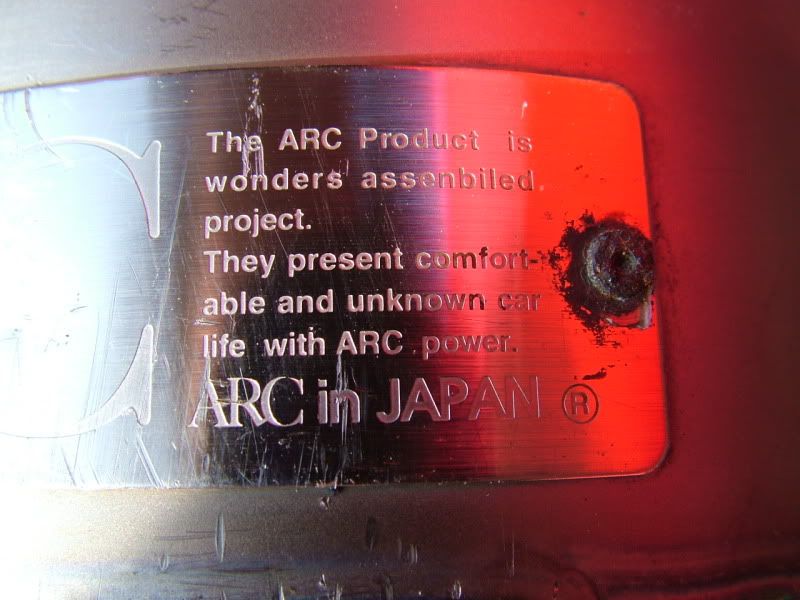 I couldn't wait to get it back on the car, I was looking forward to being able to drive it again without cringing from embarrassment!The urgency was made worse by the fact I'm currently commuting to work in the FD while the FB's in the bodyshop. Can't get in or out of the carpark at work without setting car alarms off from sheer noise This is actually completely true :lol: At first we found the manifold leak was in fact due to the turbo to manifold mounting being loose, the manifold to block being loose, the downpipe to midpipe gasket having blown and the wastegate V-band being loose Errrr, yeah that'd do it then. also... 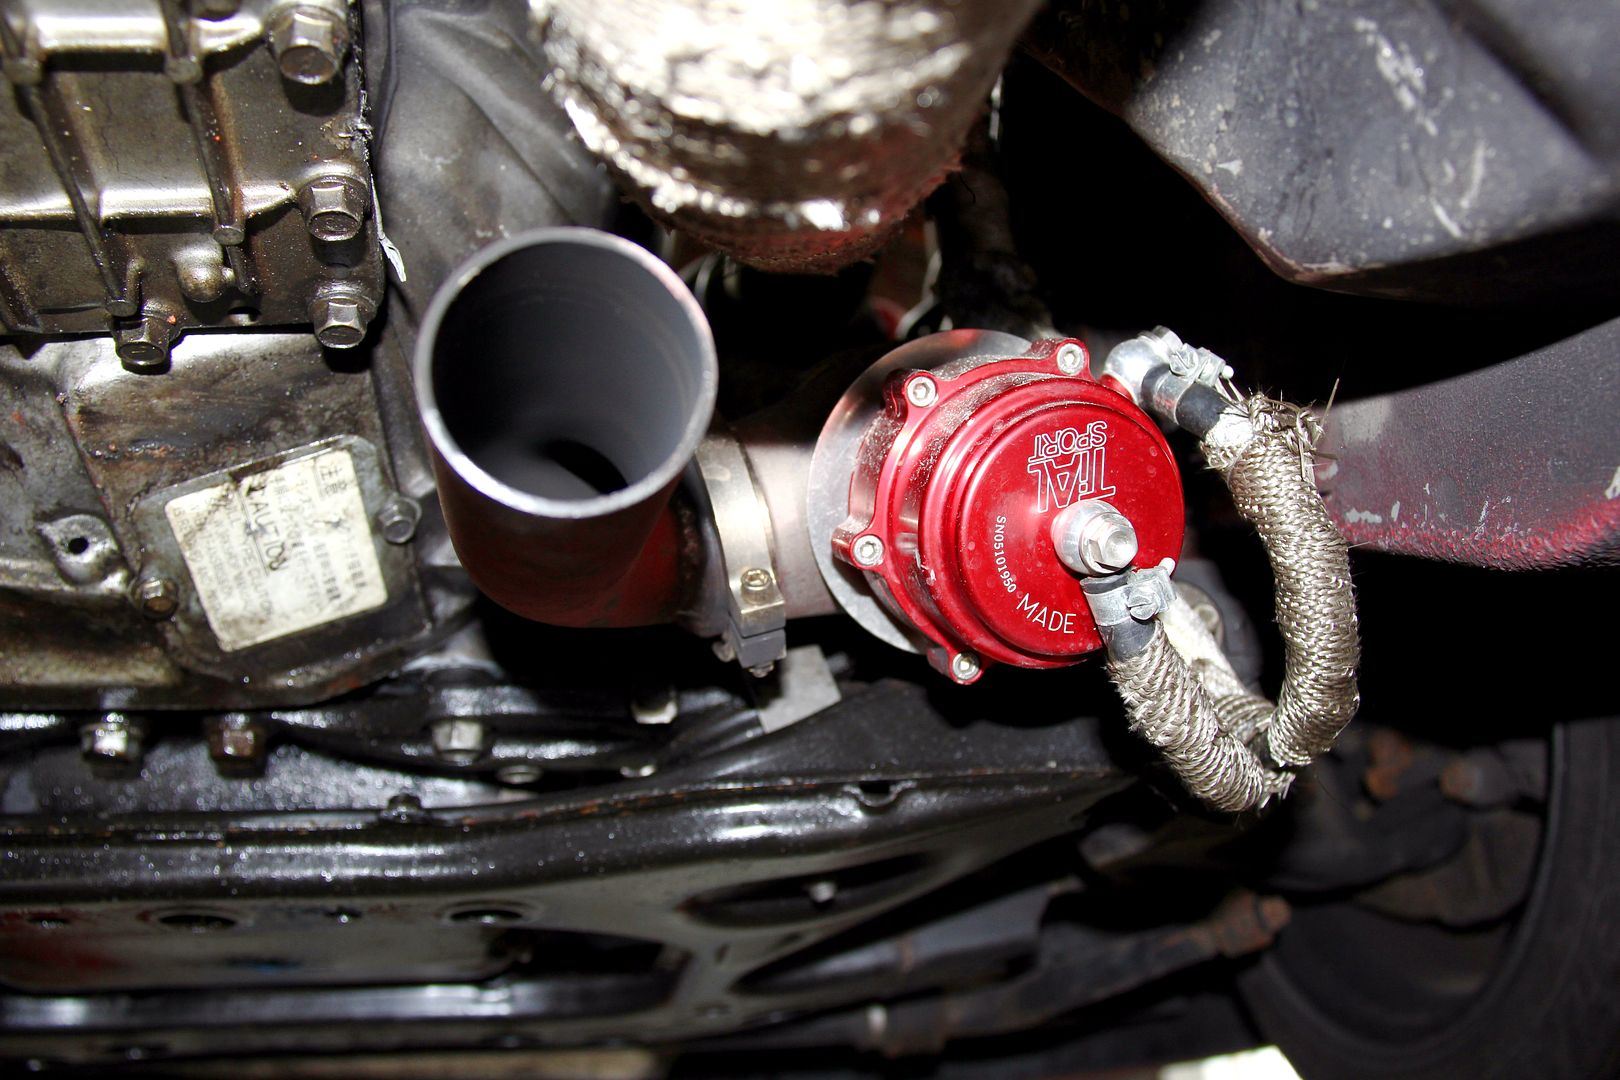 Oil leak from engine. Gear oil leak from gearbox. Coolant leak from radiator. Dang! Looks like the rad is dissolving 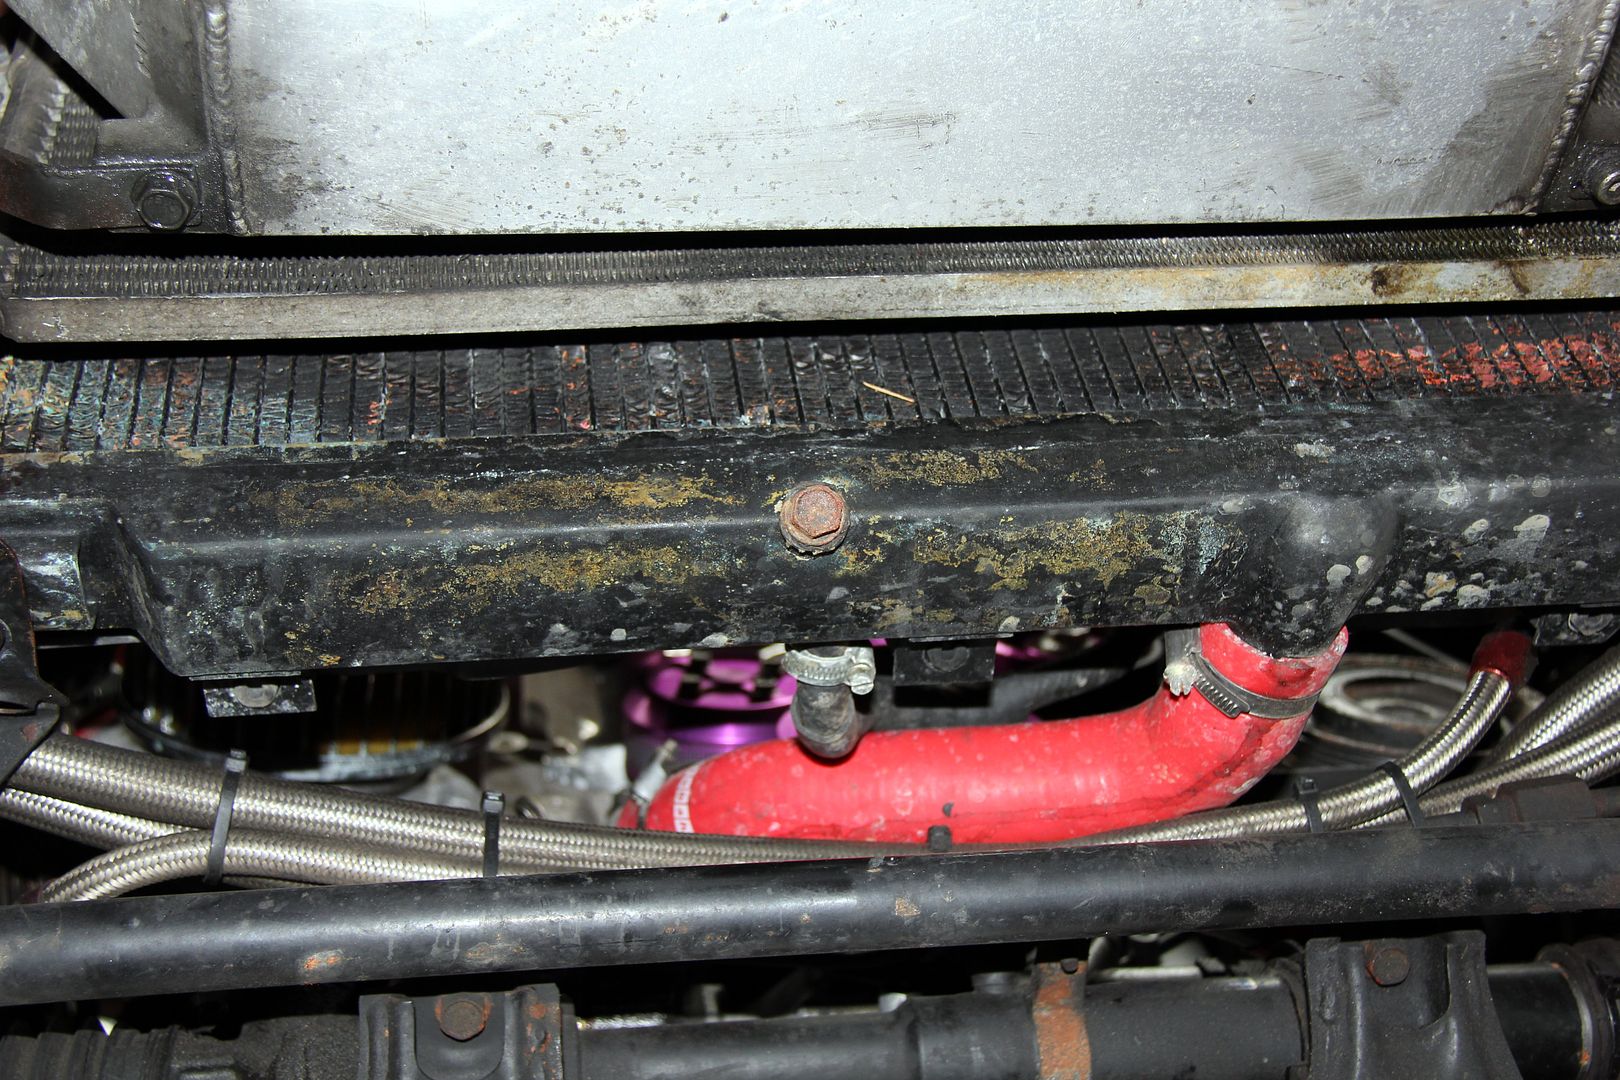 Removal of the manky old zorst revealed war wounds where I hit something in the dark one night and heard it bang around under the car for a bit. Heat shield bears scars testament to it being something quite hard! 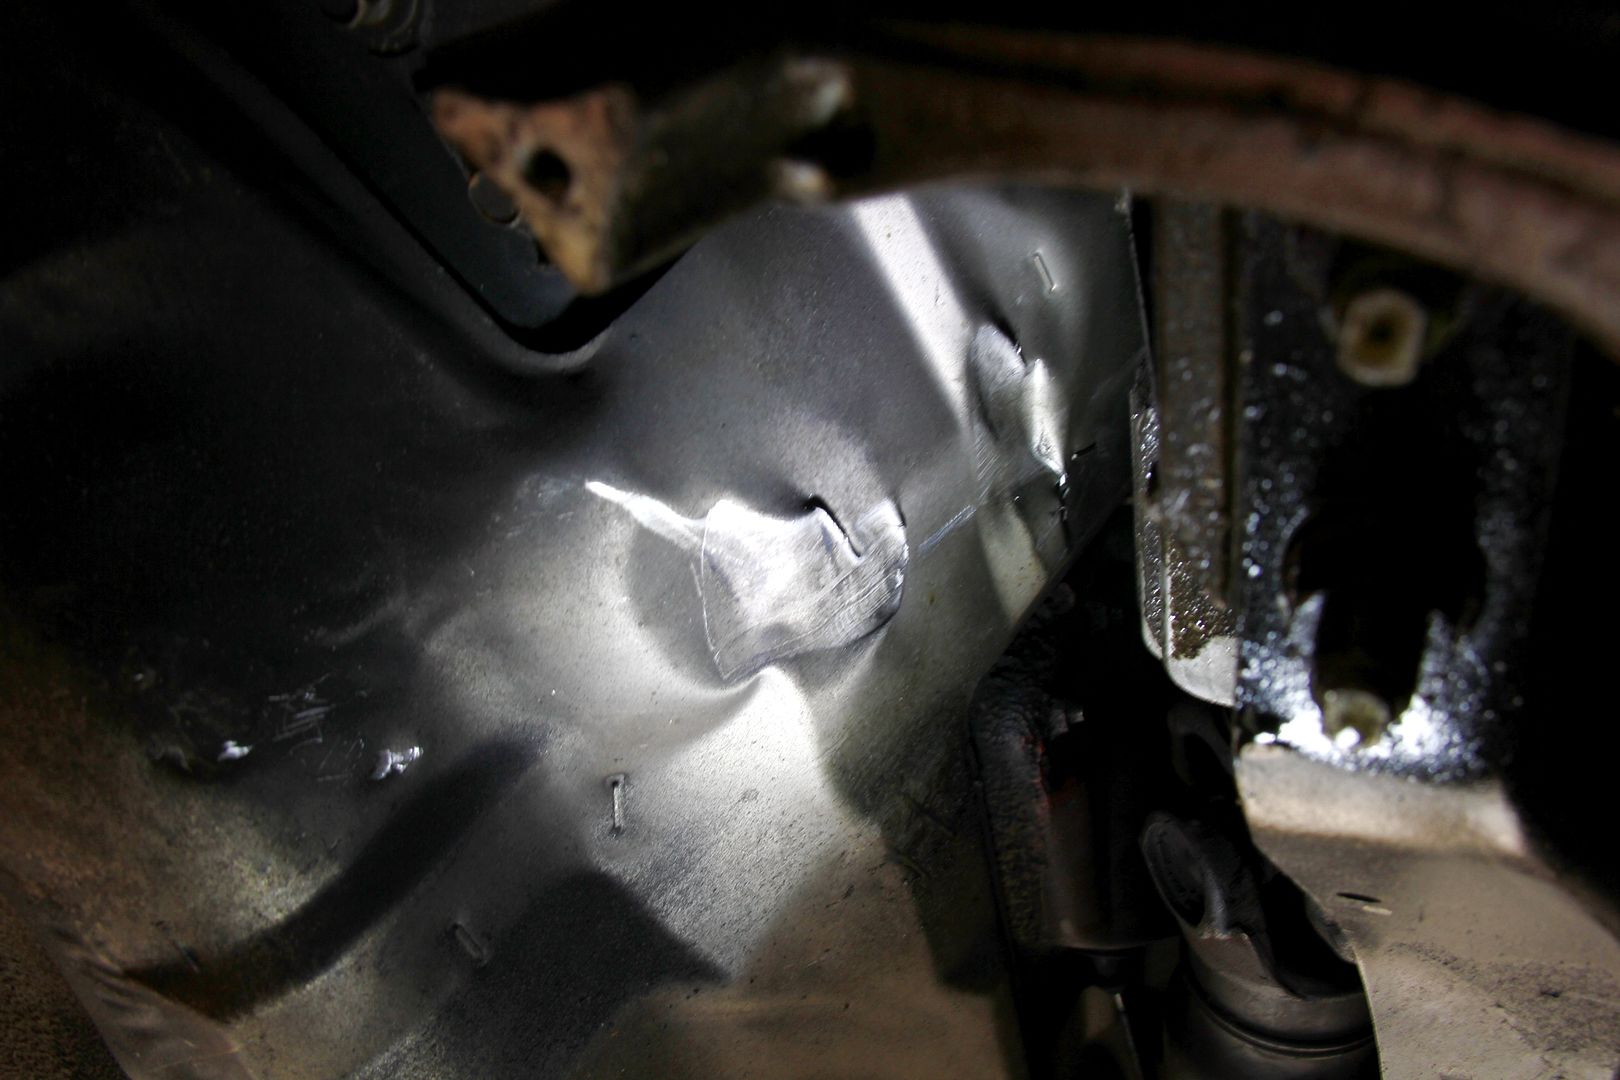 About the only thing that doesn't seem to be leaking is the intercooler. It had just lost all but one of its mounting bolts and was mostly hanging by the couplers I'm a bad parent, that's what I am. Bumper lip bears witness to the fact it may not be the lowest FD in the world, but it's evidently low enough. This is the speed hump on the way into the car park at work... hit it above 0.00005 mph and it bites  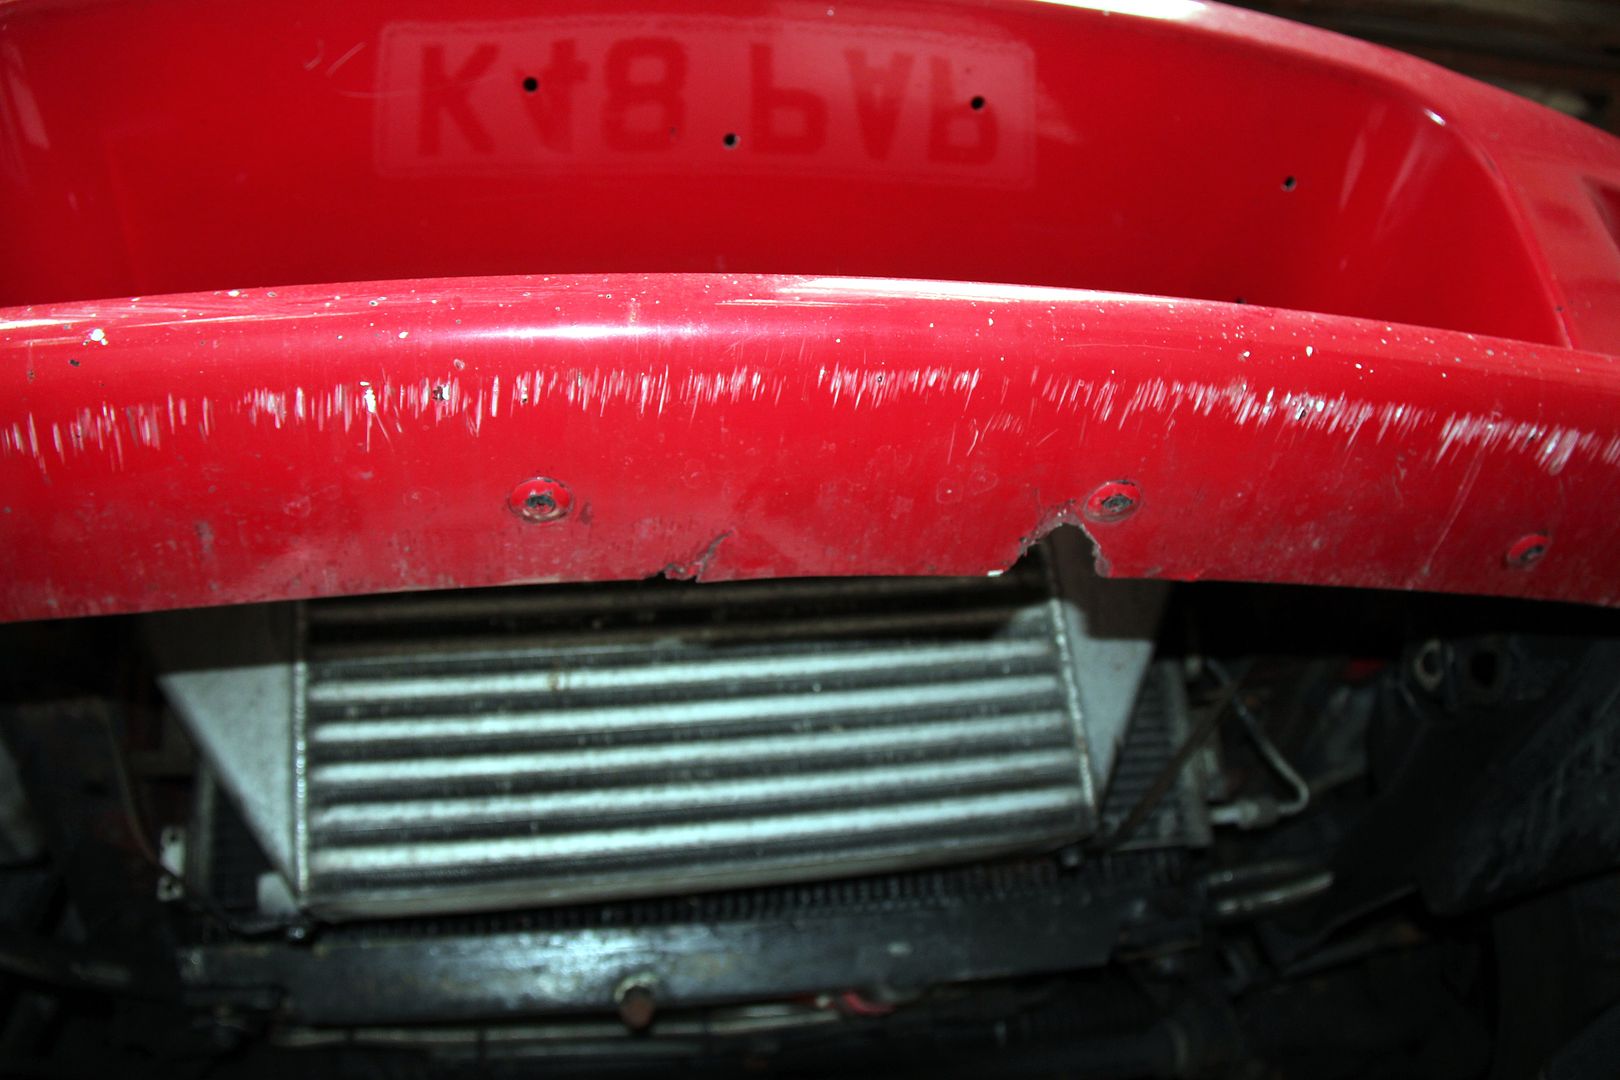 Poor ol' girl, she needed a bit of lurrrrrrve, bless her Pretty much used to this sort of sight by now... 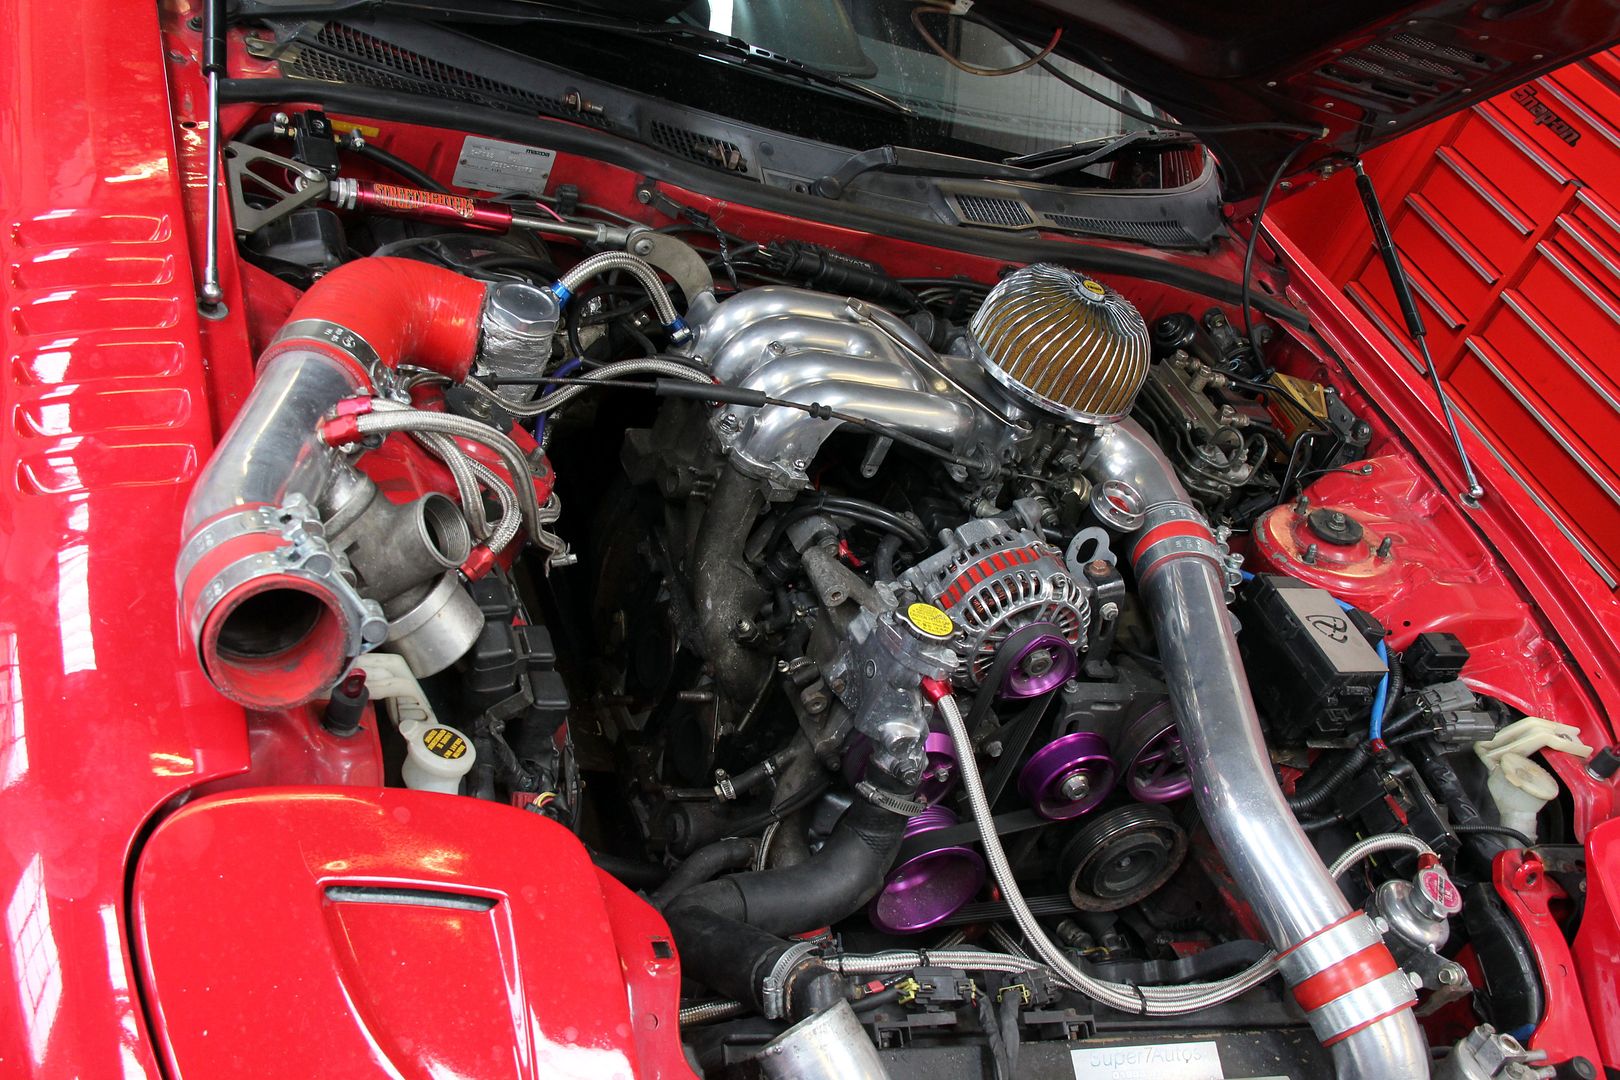 It was weird, no matter how we tightened everything up, the V-band for the downpipe still seemed to leak and it was still making that horrible VW aircooled noise. There was no choice but to keep stripping stuff off until the mystery was solved; 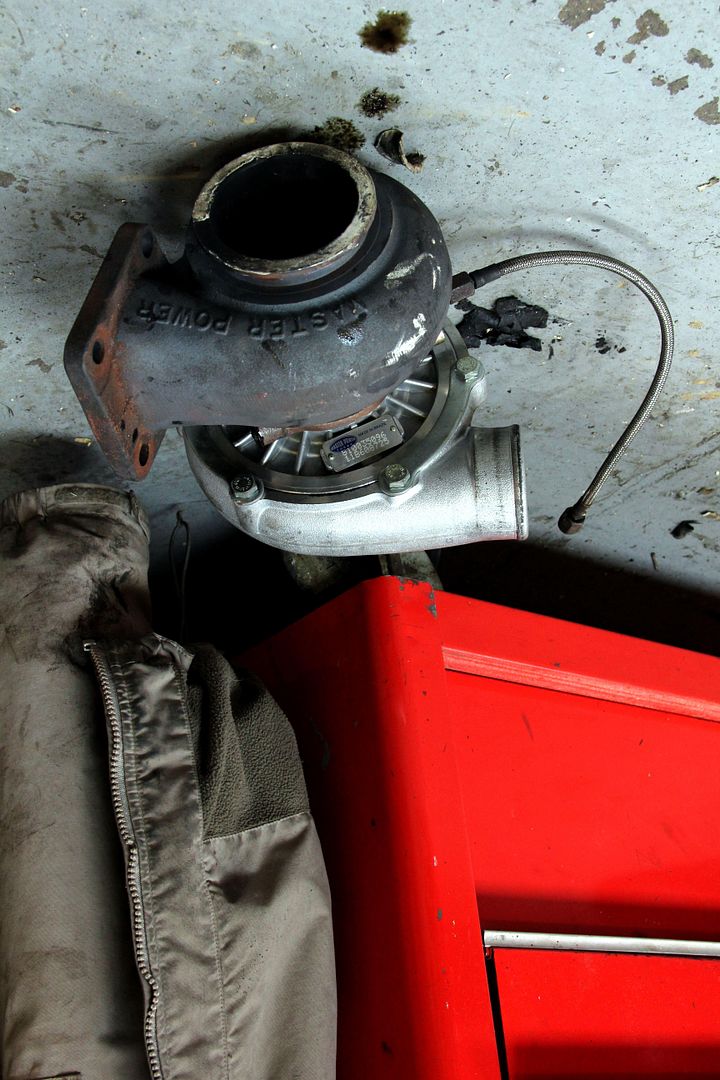 First time I've had to take a turbo off this car without having filled it with apex seals and chipped turbine blades first, lol. This tiny tube is the only part that remains of the ceramic-coated original T04 setup! Seems like another lifetime ago now. 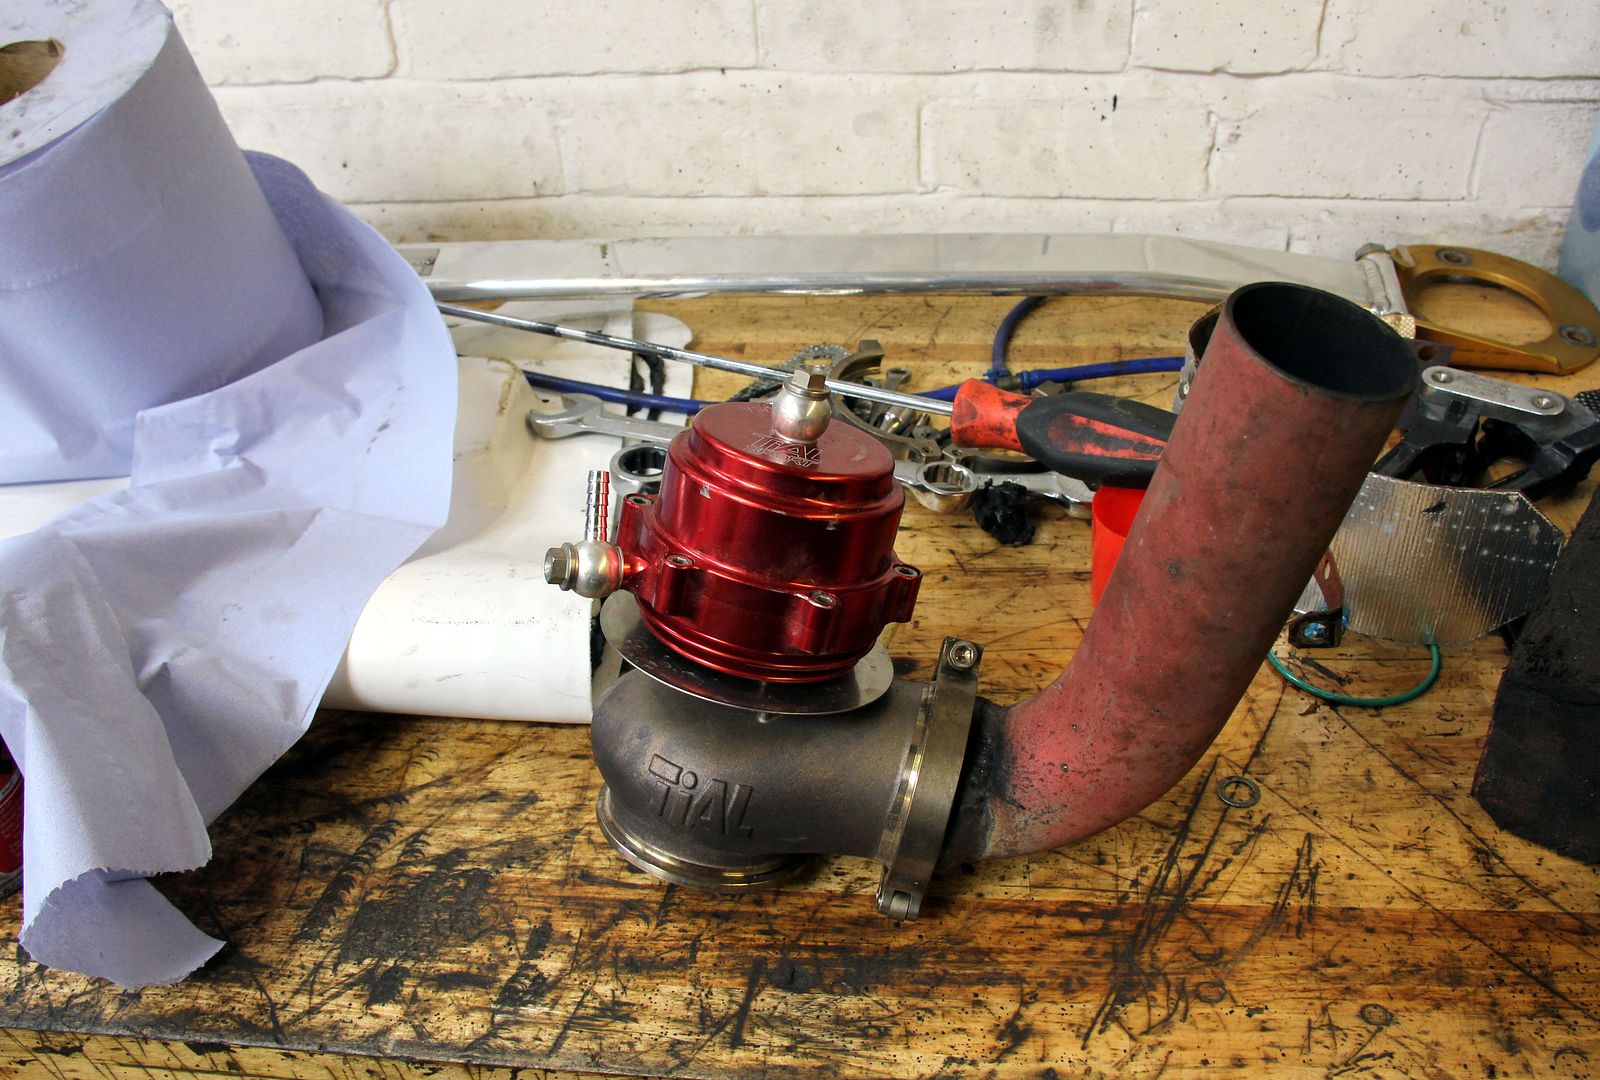 Believe it or not, but the Kakimoto and tiny-silencer midpipe had got so loud it was actually no longer possible to tell if the wastegate was open or not. The screamer was not appreciably any louder than the normal exhaust. Sorry, I like a bit of noize terror as much as the next man, but that just simply ain't right! Anyway, the culprit was finally unearthed after stripping pretty much everything off the block. The reason the V-band wouldn't stop leaking no matter how tight it seemed was that the leak wasn't coming from the junction, it was just blowing past it. Think you probably all knew what was coming next... can you tell what it is yet? 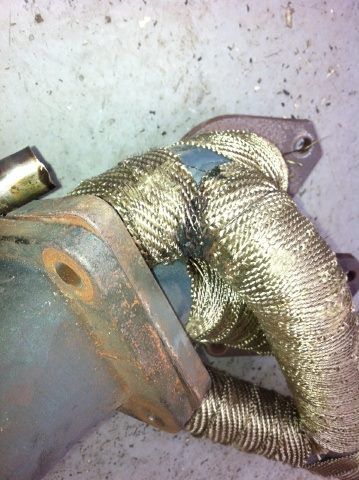 'ssake. Broken another one. Because this is a proper thick-walled Trust manifold rather than a cheap crappy eBaytatsic one, it needed someone with pretty decent welding skills and gear. I was determined it must be fixed though, I'm not throwing another bloody manifold in the bin 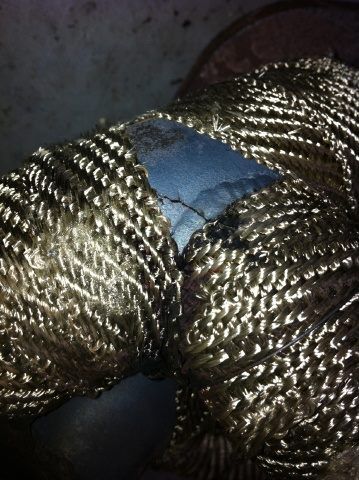 The heatwrap would have been nice to salvage and re-use, given how damned expensive it is, but unfortunately this is the only way it was coming off; 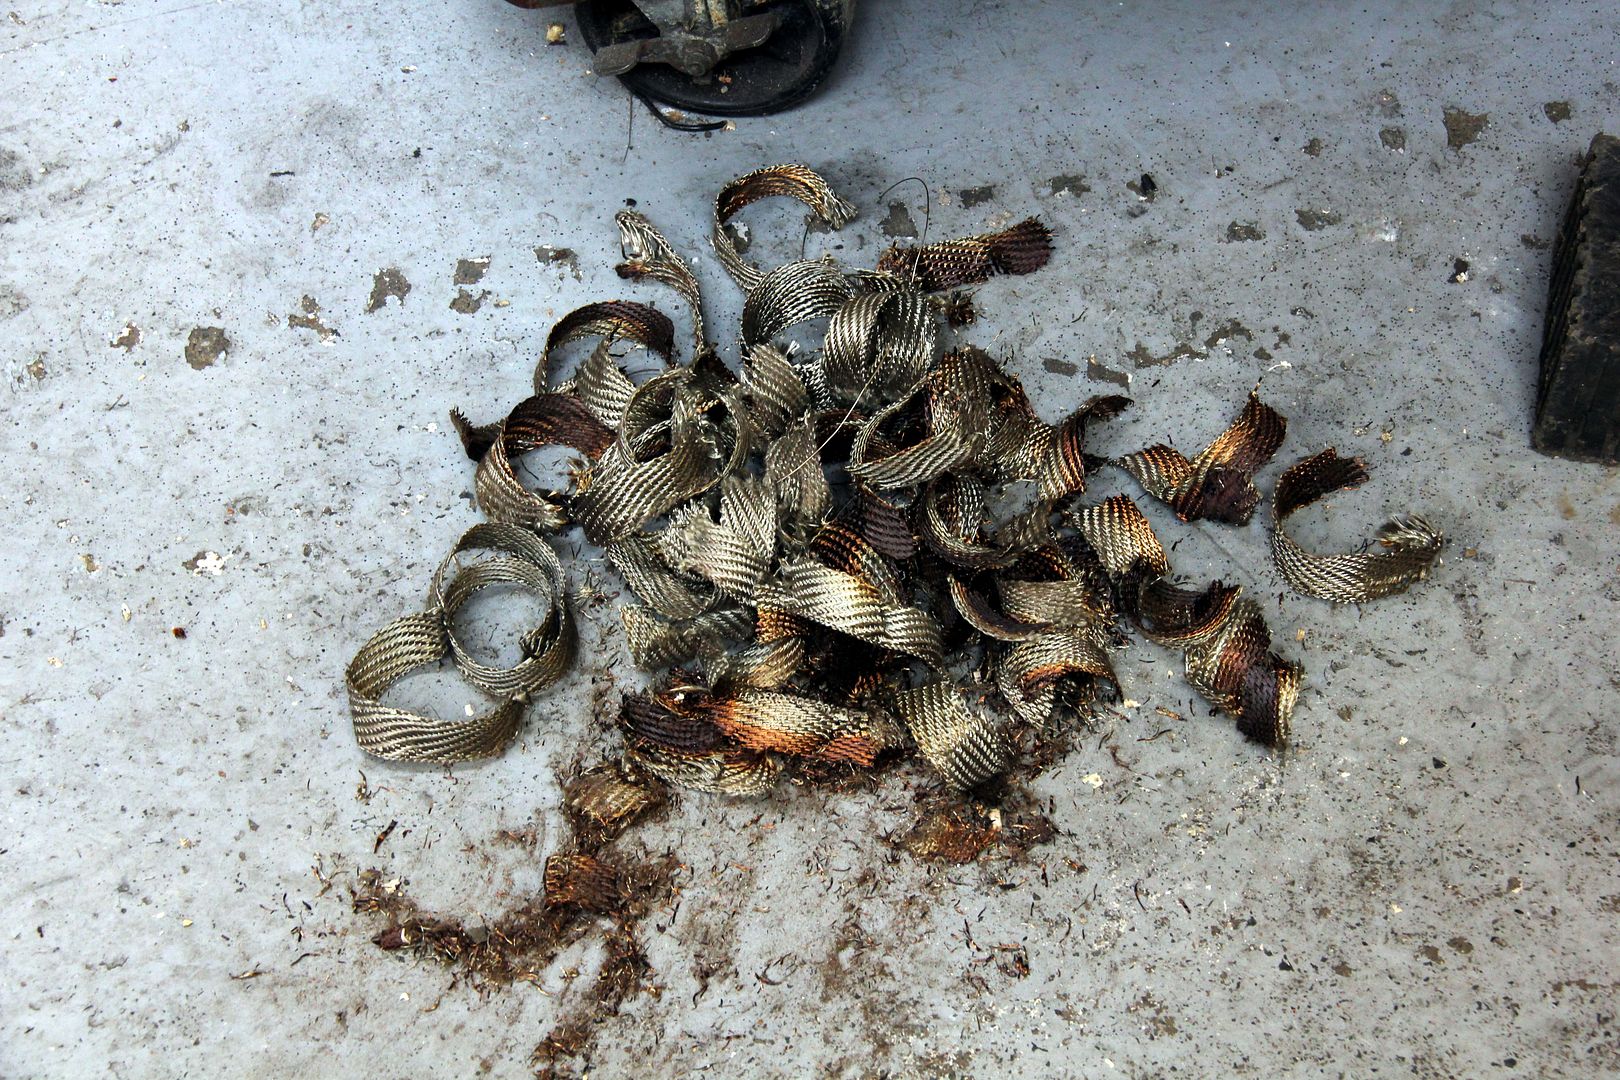 so that was that knackered. Vicious stuff, just go within ten feet of it and you're itching for hours afterwards. Hate to think what it does to you if you breathe it in! Anyway, a week later, the attentions of a cool welder mate (I'm getting to have an encyclopedic knowledge of ace fabricators of the British Isles, lol) and.... Shazam! 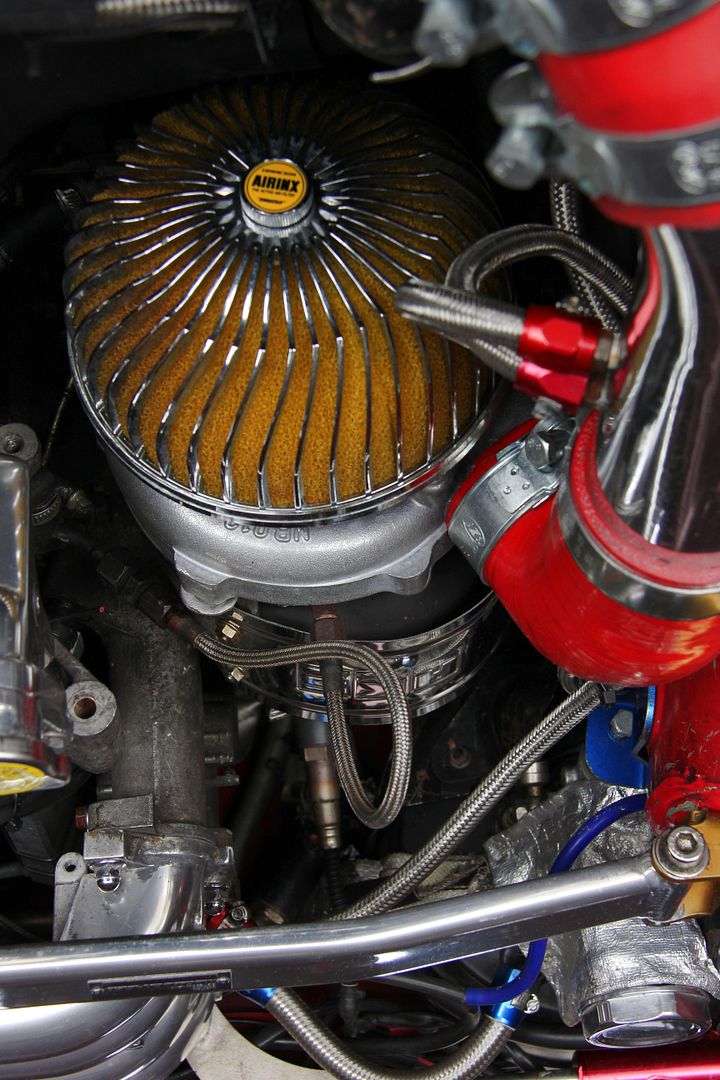 She's all back up together. Hurrah! I even took the chance to swap out the rusty piece of tinware that masqueraded as a heatshield in favour of a nice shiny HKS one that'd been gathering dust and dents in the garage for years. I even celebrated by giving her a bit of a clean and polish ;D 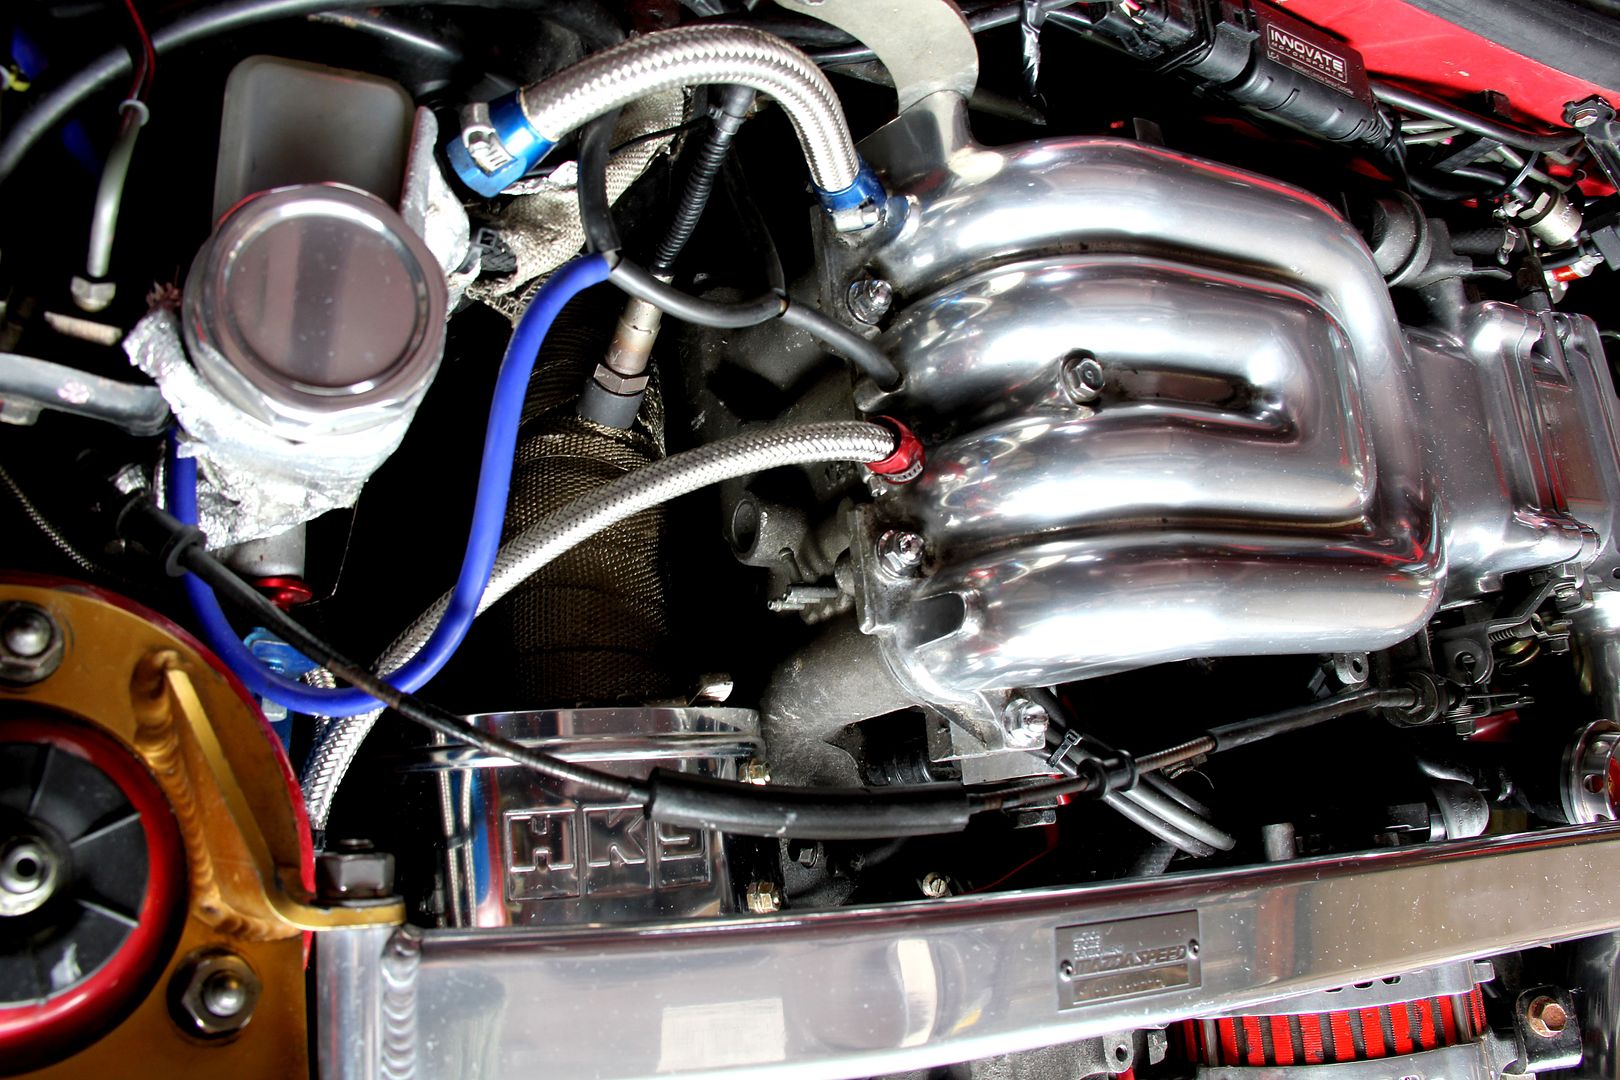 And what a difference! Apart from the fact we've banished all the horrible rubbish-sounding exhaust leak noises, the car is so much more civilised. I can hear myself think again (not that there's much to hear there) but more importantly it just doesn't wear me out like the ridiculous noise used to. The titanium exhaust is pretty quiet in the overall range of FD pipes, and maybe I'm getting old... OK, I am getting old... but is so much better for it. I didn't realise just how obscene the Kaki setup had got until I don't have to listen to it any more. Funnily enough, my neighbours have all been saying how much nicer it sounds, too 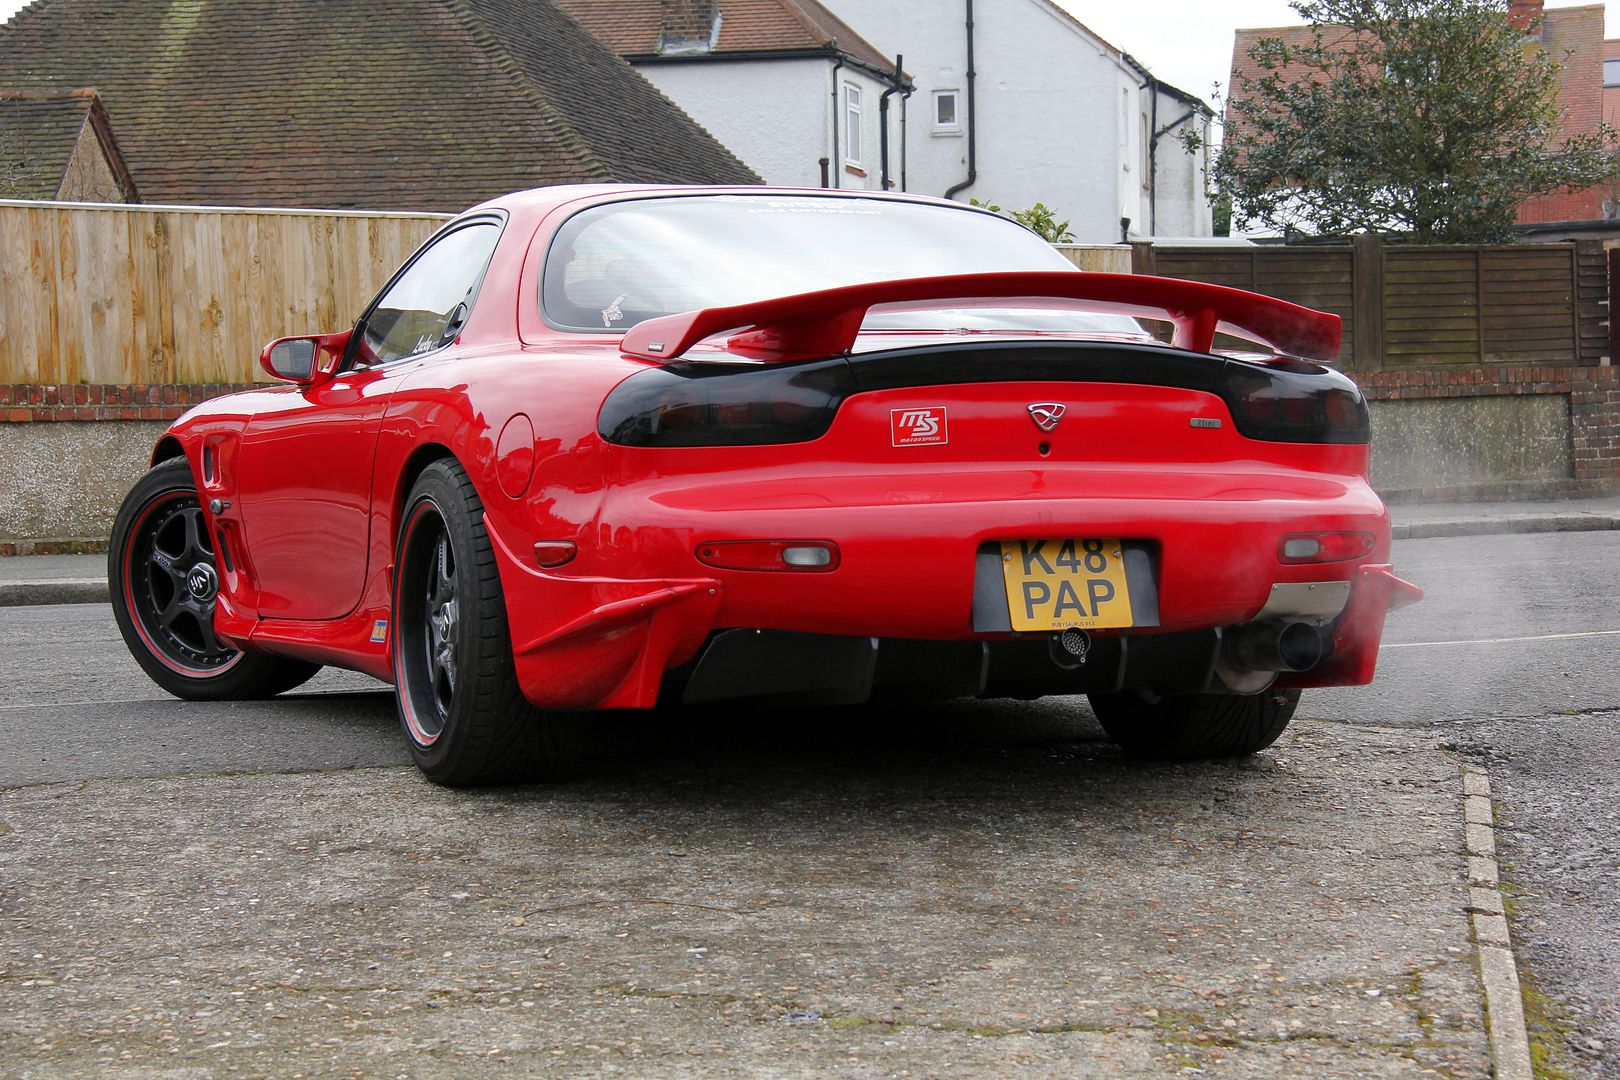 In other news, I seem to have finally given into the relentless peer pressure and stripped off the Monster stickers off the wing. The haters are going to have to find something else to hate on now :lol: |
| |
|
|
|
|
|
Apr 14, 2013 22:42:04 GMT
|
Glad to see this being updated and the fd getting some love. I've missed reading about it  |
| |
|
|
stealthstylz
Club Retro Rides Member
Posts: 14,844
Club RR Member Number: 174
|
|
Apr 14, 2013 22:44:23 GMT
|
|
Looks great. The manifold could have cracked because of the heat wrap.
|
| |
|
|
luckyseven
Posted a lot
Owning sneering dismissive pedantry since 1970
Posts: 3,839
Club RR Member Number: 45
|
|
|
|
Yeah, it may well be a contributing factor. Damned if you do, damned if you don't, without it everything else in the engine bay will roast  The weight of the turbo doesn't help, it's a gurt big thing. I'm going to investigate making a brace to support some of the weight of it, see if that helps |
| |
|
|
LAndy
Posted a lot
Posts: 1,055
|
|
Apr 15, 2013 15:44:10 GMT
|
|
could you not get the manifold ceramic coated?
|
| |
Previous retros: 92 AX GTi 92 Scirocco Scala 94 80 sport 87 Golf Cab GTi Current retro: 1965 Clark Cortez YouTube Website Instagram |
|
luckyseven
Posted a lot
Owning sneering dismissive pedantry since 1970
Posts: 3,839
Club RR Member Number: 45
|
|
Apr 15, 2013 16:58:34 GMT
|
|
If you look back through the murk of this thread, you'll see my last one was ceramic coated, as was the turbine housing and downpipe. I think, to be honest, that the ceramic coating contributed to their demise. Might work OK on piston engines but with the ferocious heat that comes from a turbo rotary, I think it keeps too much heat in the metalwork and they end up cracking. For the money it costs (a lot!) I'm not willing to make the same potentially expensive mistake again.
With that said, it was incredibly effective at keeping under-bonnet temperatures low, and this is my conjecture... I've no proof the ceramic coating was responsible for cracking the housing and mani, so this isn't intended as a criticism of the company who did it or their product. There was plenty not to like about it besides this, but I'd prefer not to air my dirty laundry on a forum and my own experience neede't cloud any one else's thoughts on the subject
|
| |
|
|
duncanmartin
Club Retro Rides Member
Out of retro ownership
Posts: 1,320
Club RR Member Number: 70
|
|
Apr 17, 2013 19:09:05 GMT
|
|
This thread is awesome. Glad you got to enjoy the car for a while (and hope your next rebuild goes smoothly).
|
| |
|
|
tigran
Club Retro Rides Member
In rust we trust. Amen.
Posts: 6,444
Club RR Member Number: 142
|
|
Apr 17, 2013 19:32:22 GMT
|
|
I have revisited this thread again to read the last couple of pages - it's like slipping into a comfy pair of slippers - so good to get back into it.
Cool car to read about and an engaging writing style as well.
Can't wait for more updates (hopefully voluntary ones)!
|
| |
1964 Rover P5 i6
1987 BMW 525e - The Rusty Streak
1992 Micra K10
2001 BMW E46 316i
2002 BMW E46 330Ci
2013 BMW F31 320d
2018 BMW G31 530d
|
|
Colonelk
Posted a lot
Posts: 3,740
Club RR Member Number: 83
|
|
Apr 18, 2013 11:49:51 GMT
|
Awesome Love FDs.  When are the relentless stickers coming then? *awful pun/joke* |
| |
|
|
|
|
|
|
|
Apr 18, 2013 14:04:25 GMT
|
that welding looks amazing. p.s tungsten carbide is 4 times harder than titanium  |
| |
|
|
|
|
|
Apr 19, 2013 20:09:22 GMT
|
|
Would be lovely with a v6 in it......
|
| |
|
|
luckyseven
Posted a lot
Owning sneering dismissive pedantry since 1970
Posts: 3,839
Club RR Member Number: 45
|
|
Apr 19, 2013 22:34:35 GMT
|
*chuckles* I actually find I prefer Rockstar as the energy drink of choice, but I am rather partial to the Monster Rehab iced tea one. Although sadly, I haven't seen any decent stickers of either one yet. Alex, I've already had a Ford with a Mazda V6 in it, and nice though it was and relatively soulful and engaging for a piston engine, I think I'll stick with the unique flava of the rotary for now  Tungsten carbide and titanium are mere souffle compared to the hardest substance known to exist in the entire universe. Which is of course the last sausage roll in the heater cabinet of the only roadside caff open at one in the morning. In more relevant vein, the radiator got pressure tested while it was off and didn't seem keen on leaking, and it appears to be behaving now it's all back together so it might have been something daft like a pressure cap not sealing properly and the fluid weeping down to give the impression of a leak. Fingers crossed, it'd be nice to stumble on an easy (and cheap) fix to something for a change. Gearbox leak seems to be a minor weep from the output seal, so I'm going to keep an eye on it. If it gets worse it may have to be a case of swapping it out, but for the moment I need to keep the car on the road if possible as the FB looks like being more involved a build than first expected |
| |
|
|
luckyseven
Posted a lot
Owning sneering dismissive pedantry since 1970
Posts: 3,839
Club RR Member Number: 45
|
|
|
|
Well, some more minor titivating to report on. I've recently been clearing out the garage since it was in danger of actually turning into a collapsar neutron star black hole under the critical mass of all the mounds of rubbish I'd accumulated. Since I was in real danger of opening the door and eithe rbeing crushed to death under a falling mountain of random car bits or inadvertently crossing the event horizon and getting sucked into some weird trip-out reality like in 2001 A Space Odyssey....My God...it's full of stars!... I thought I'd save a bit of space by getting the tyre off the wheel from my original RX-7 that I crashed rather sternly. Then I could turn the wheel into a nice ornament and reminder of not to drive like a cock. Unfortunately the rim was so mullered there was no way I could get the bead off, ended up having to hacksaw the bloody thing through  Not keen on having to remove tyres like that again! 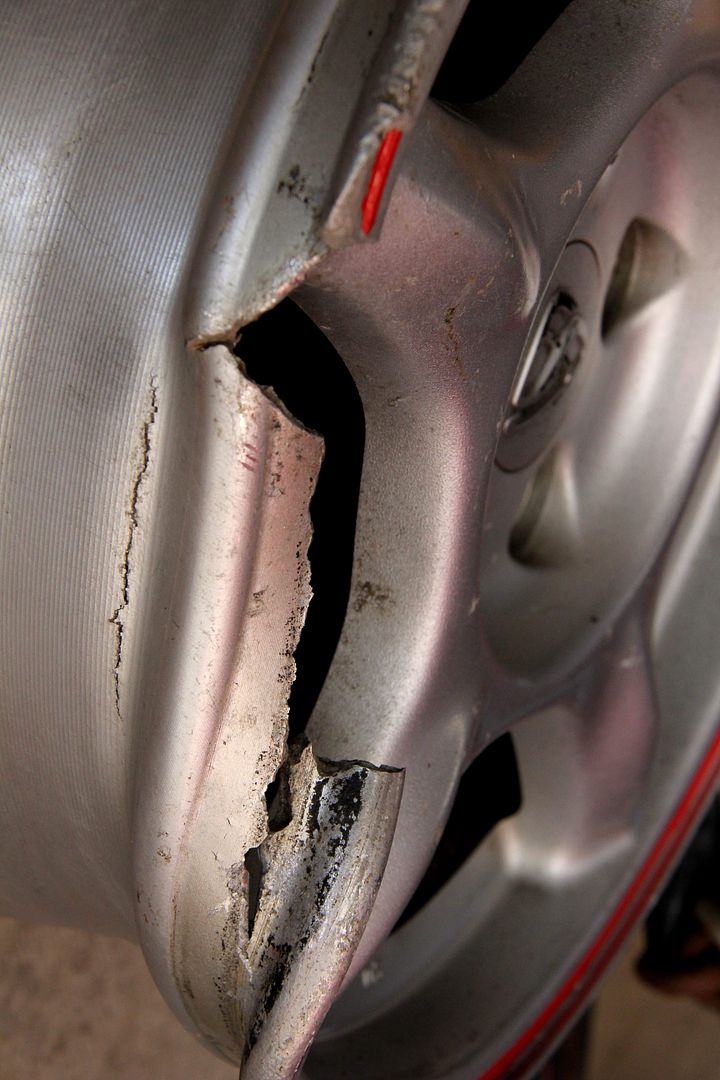 Still, worked out OK in the end. Went out the next day and bought some new cutting discs for the angle grinder, though, lol. Life's better with power tools Anyhoo, instant garage objet d'art and anti-cock reminder device. Complete with Pooh Bear. Awesome 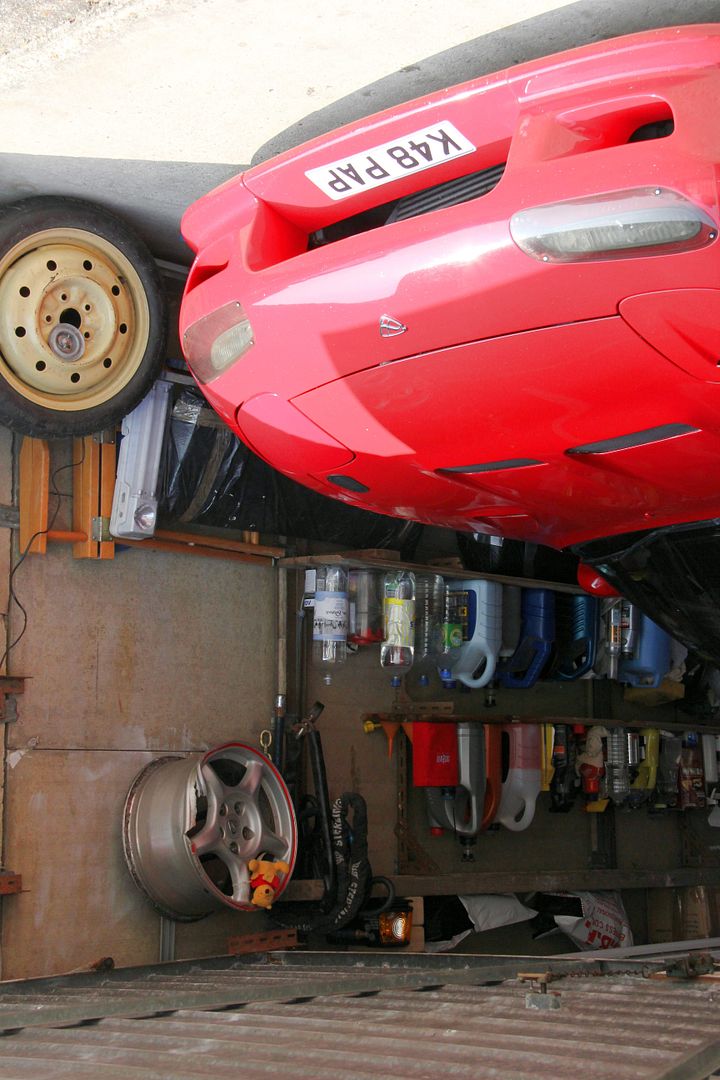 Amazing what you find when you clear out a garage crumbling under the weight of, like, eight years' accumulated RX-7 debris  One of them things what I found was some mats I forgot I had. I dimly recall trying to sell them to Ada-san one time when he was bleating about missing out on another RED carpet. For those who aren't aware, the RED carpet that came in certain trim packages of FD is incredibly rare (mostly because it came on the curse word options like touring automatics with cruise control that no-one bought) These mats sorta weren't red exactly, but I thought, y'know, at least they'll brighten up the coal-hole interior a wee bit. So one can of amazing Foamingjizooom carpet cleaner later (not the actual tradename) and a weekend of periodically sponging, brushing, hoovering and generally performing all the chores I'd usually rather gnaw my own leg off than do around the house, they came up pretty well. They were pretty grisly to begin with, but came up OK in the end. And they are proper tailored mats that actually fit, unlike most in my experience. No idea where the hell I got them from, I suspect Martin at Speedline Imports in a moment of weakness might have foisted them on me, lol. The only J ap mats I've seen previously are those hideous splatter-effect yellow and pink ones, so these are definitely a step up! Anyway, enuff talks. Pics. Before; scabby, not-fituu and blacker than a politicians' soul 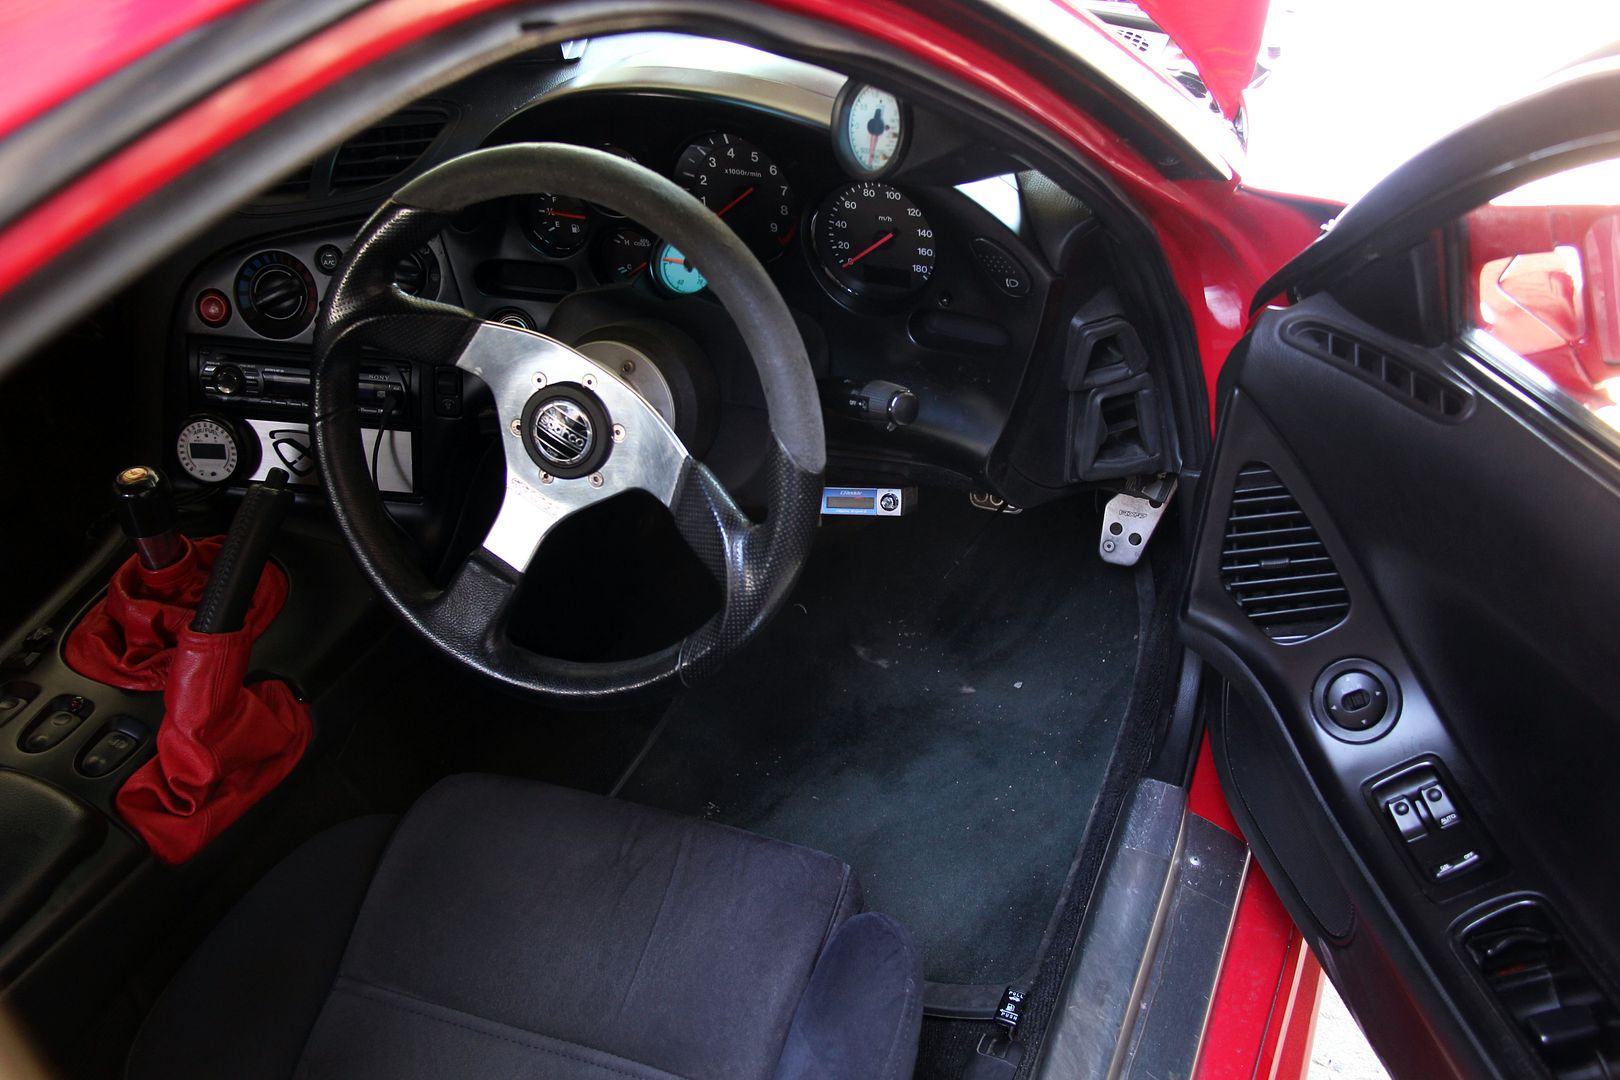 After; fits like a glove. Or maybe even like a mat designed specially for the car. And sorta... well, brown, really. But red if you squint. And are colourblind. Which, sadly, I'm not 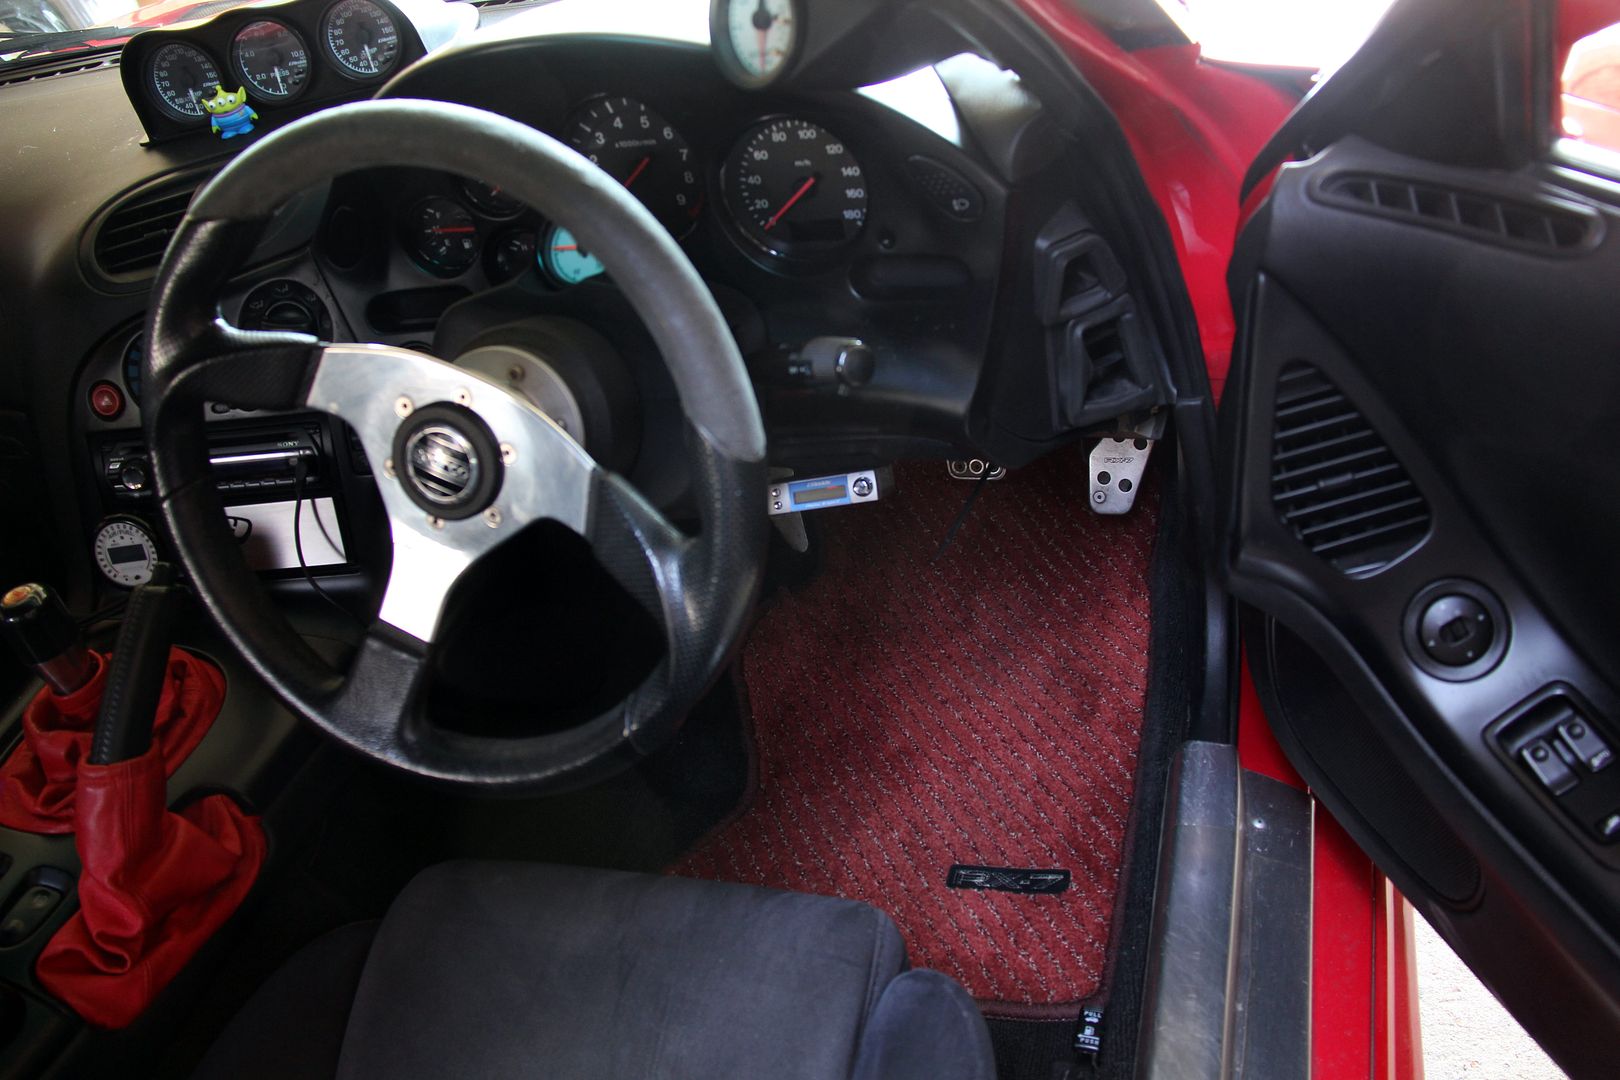 Passenger side is even better cos the RX-7 logo hasn't worn through so badly 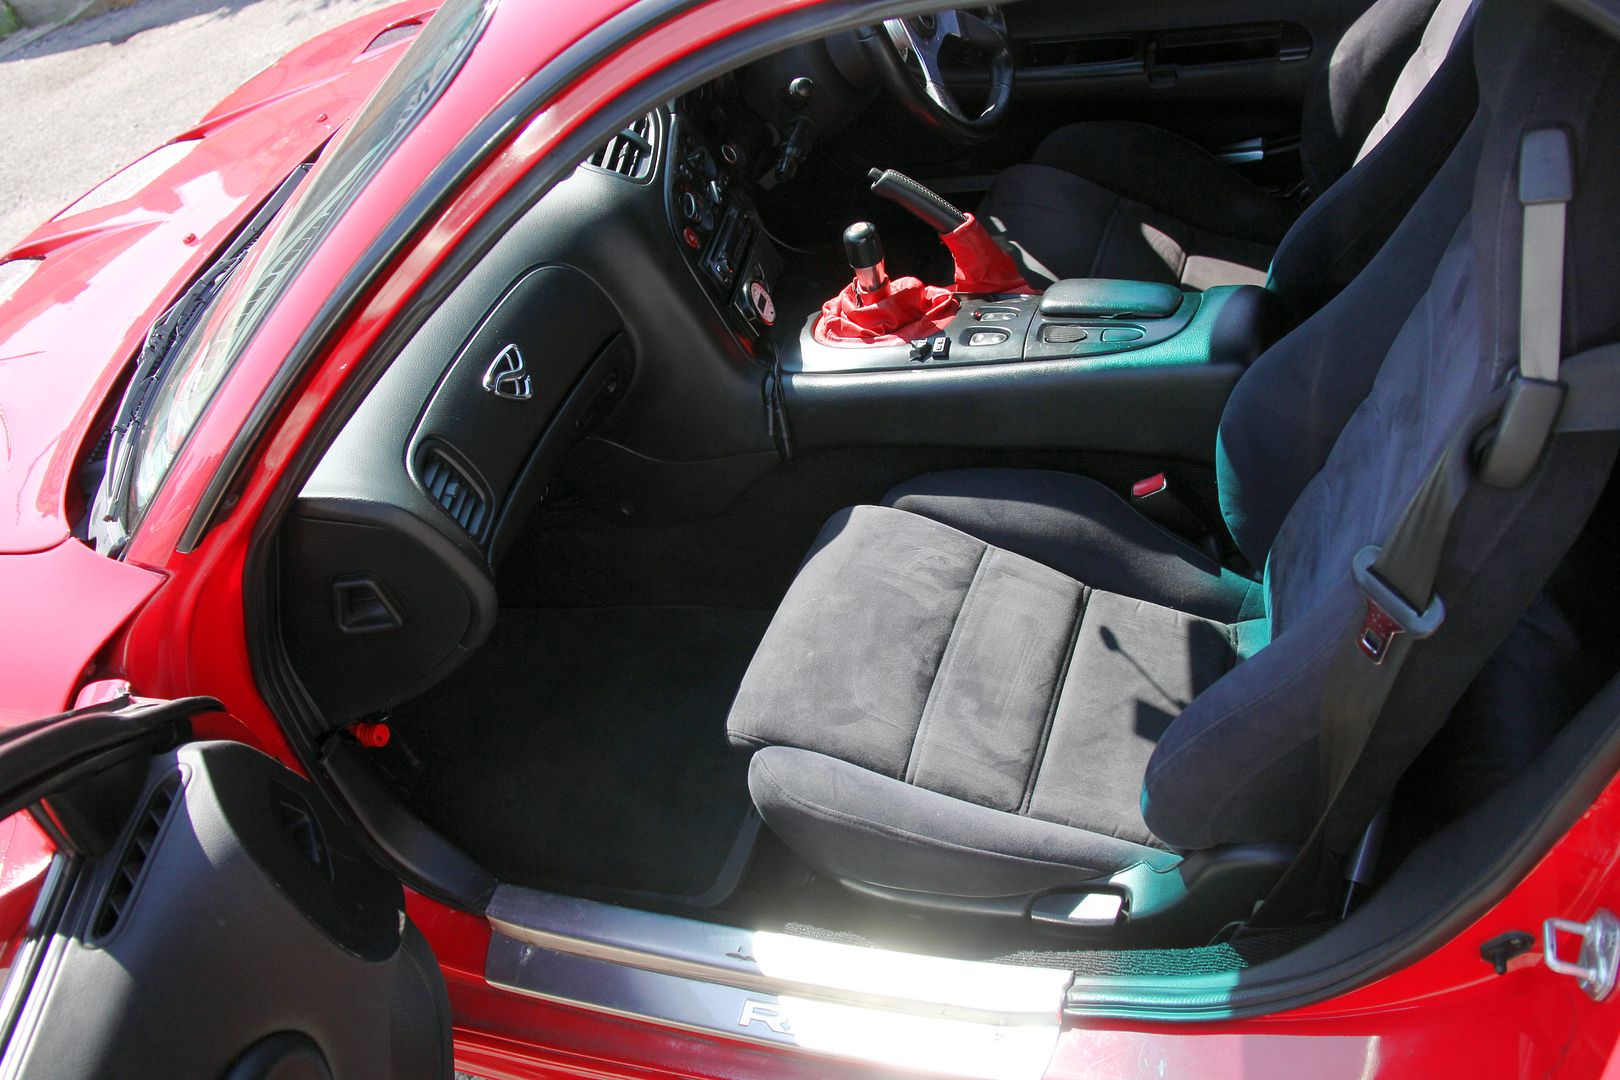 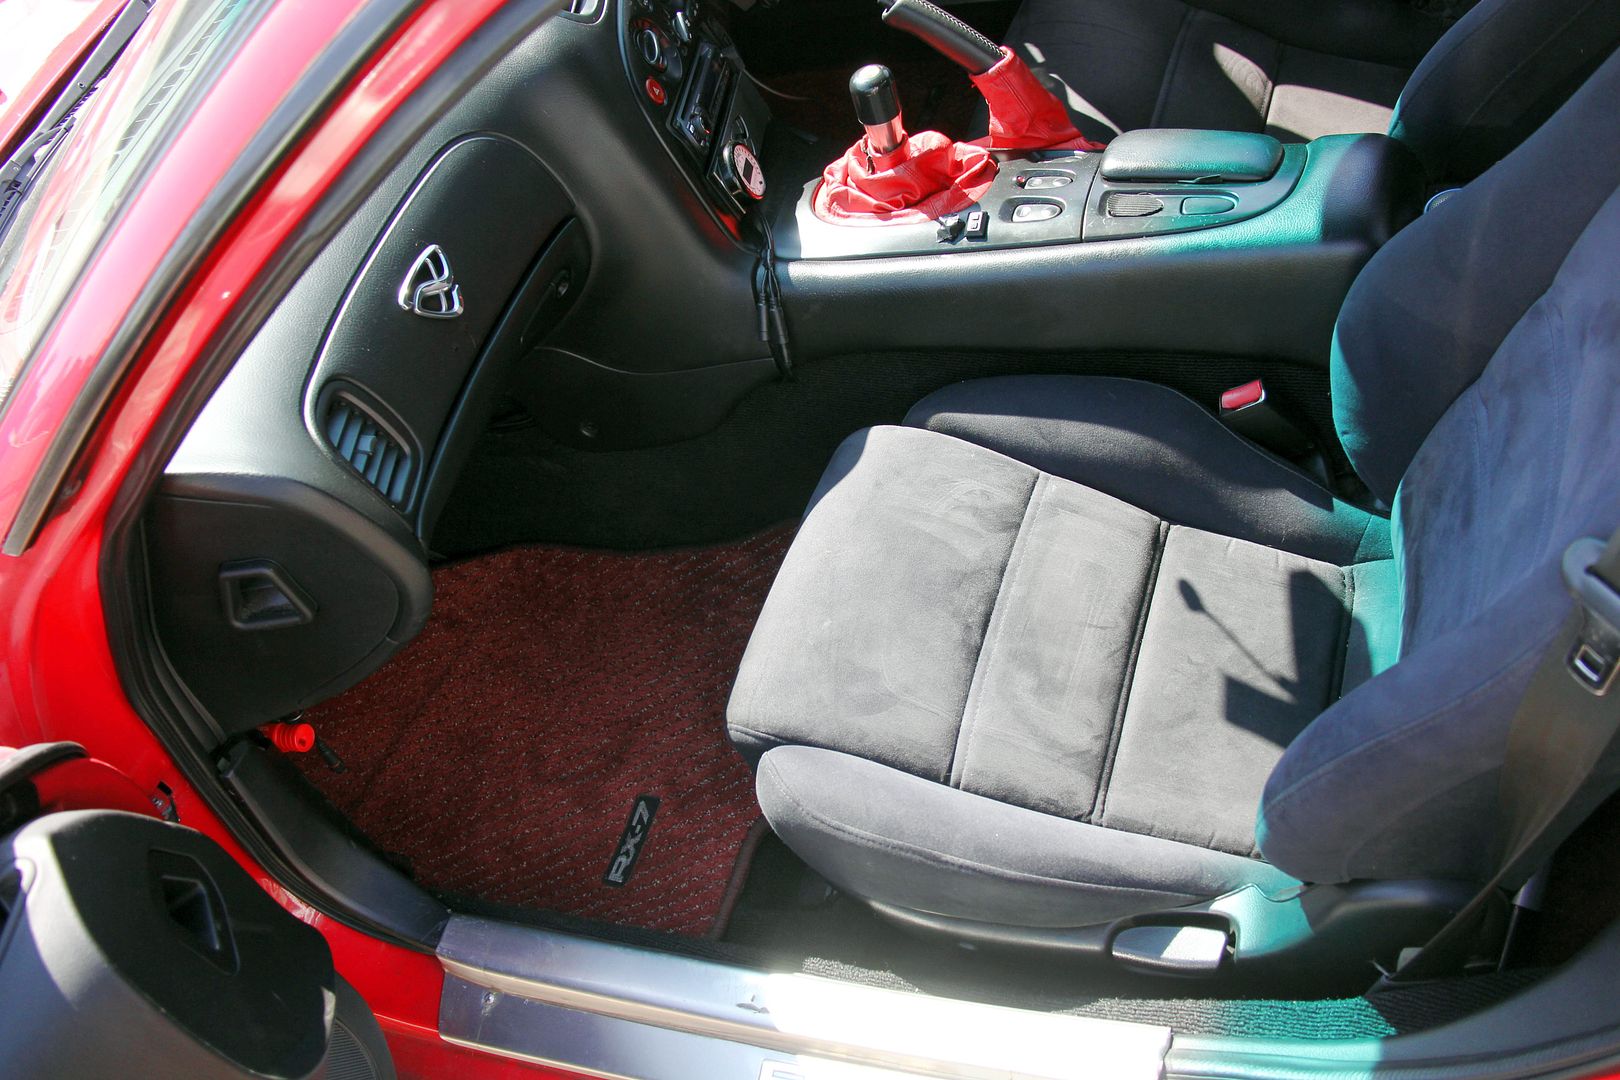 Matching li'l ones for the back, too. Even have little cutouts to go around the seat runners. Sweet! 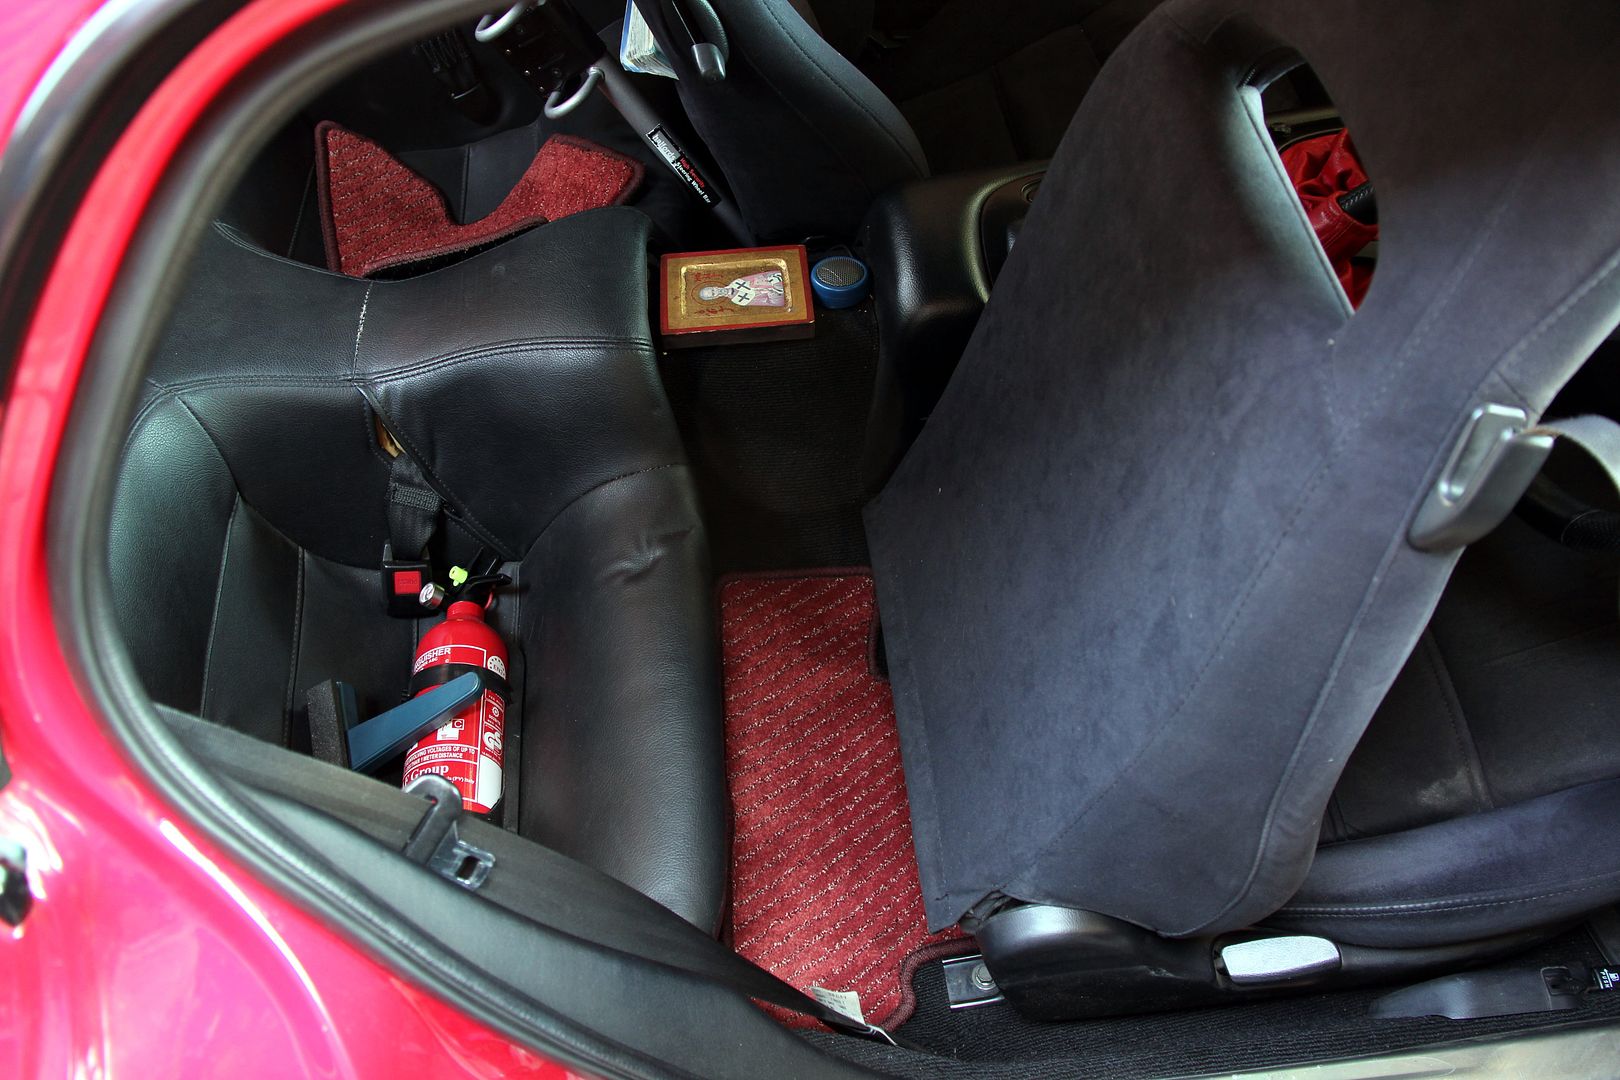 Tell you what, think these must have been quite good kwol once, they've come up really well after three or four cleans with Foamingjizooom. Feel much nicer underfoot than the generic ones that were in before. ...still sorta brown though 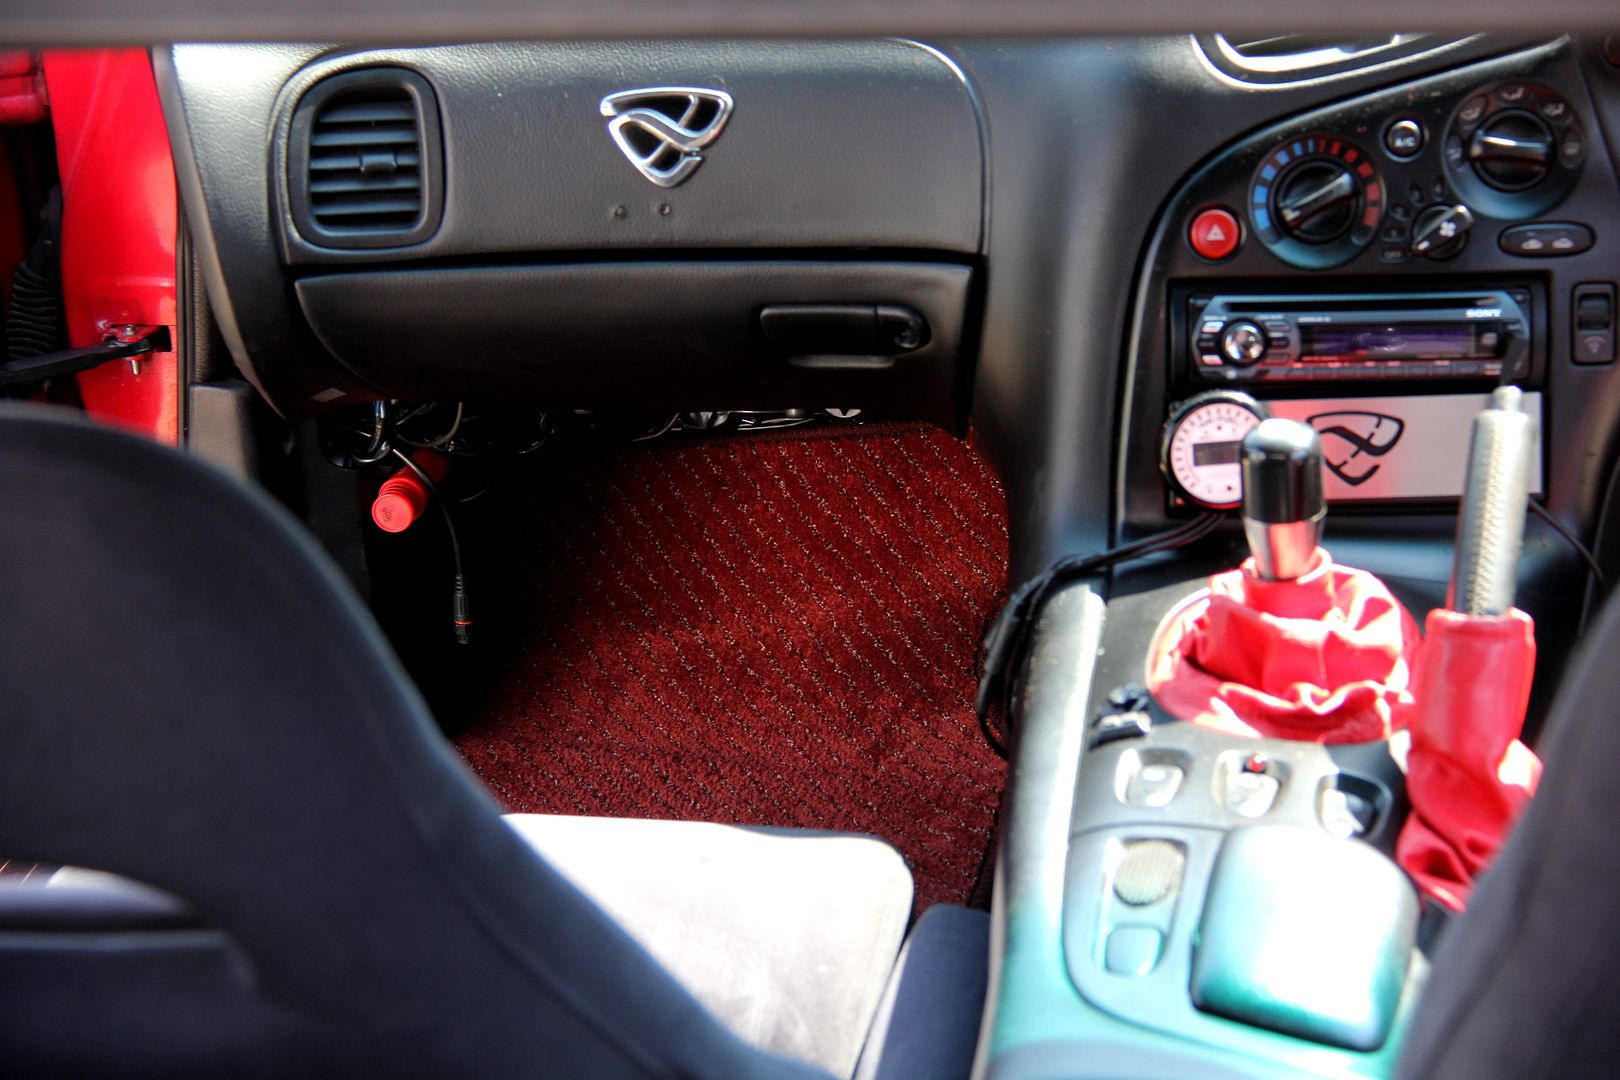 |
| |
|
|
luckyseven
Posted a lot
Owning sneering dismissive pedantry since 1970
Posts: 3,839
Club RR Member Number: 45
|
|
|
|
There were still a couple of major items that needed attention inside, and really when you think they're your interface with the car it's perhaps a bit odd I'd left them so long to get sorted. Namely, the seats and the steering wheel... The steering wheel, if you look back in the last post, was a Sparco Lap 3 that I'd scored years ago from the Evil Bay. The top alcantara section had gone through, and it was, like twenty quid accordingly. I figured "how hard can it be to recover" and found the answer was "*&%$#!ing indescribably impossible". Seriously, trying to get alcantara (non-stretchy in the extreme) to follow the curves of both the circumference and the cross-sectional curve of the wheel and not end up with more wrinkles than Methuselah's ballbag... well, it cost me two entire days of my life and severe stress ulcers, and by the time it was done it was one of those "never, ever, EVER again" jobs. as long as I live I'll never try it again. Nightmare. So, the fact that several years of use and abuse meant the alcantara was getting tatty again and you could feel the glue underneath was giving out, bits of it started moving a bit meant the only real option was to replace the wheel. Fortunately, I'd got a rather nice Nardi from the inestimable Keef on FDUK that was destined for the FB. Since that's still in bits, I simply pinched the Nardi for the FD... the only downside of this being that I now had to buy a replacement Nardi for the FB. All in good time, lol 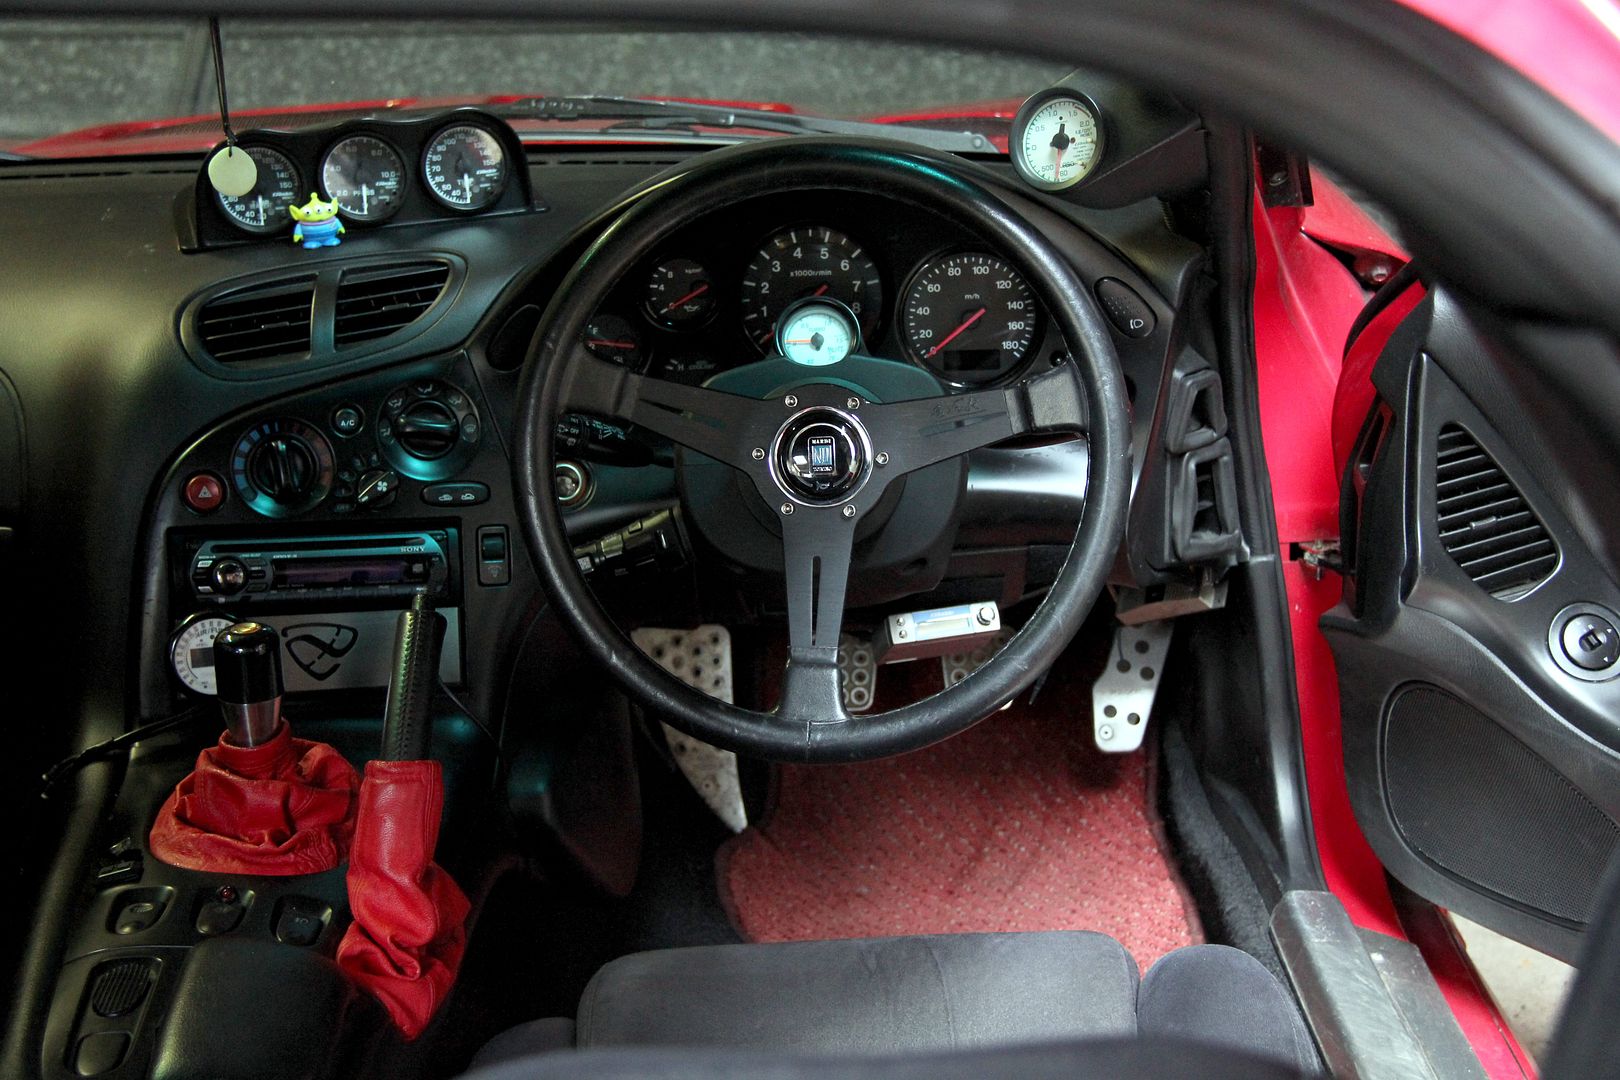 the upside of all this flannel is that I can actually see the clocks again, especially the top of the speedo where the needle spends a lot of its time, lol. Now, the main reason I swapped to a smaller wheel in the first place was the stock bus-sized wheel made it tricky for me to get in and out. Maybe I've got fat legs. This is no longer a problem, because the very same Keef turned up with a snap-off boss adaptor. This is a very tricksy piece of kit, and has the added bonus that I can leave the clublock at home and just lock the steering wheel in my locker when the car's parked at work. Cool beans 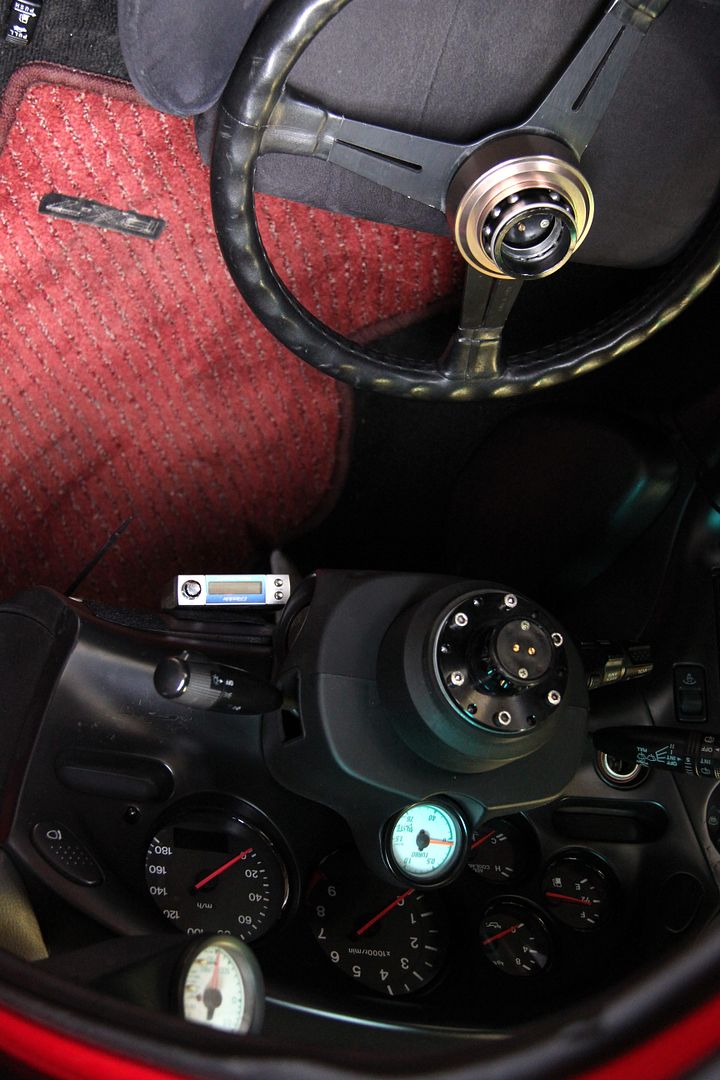 Now, to the seats. I scored a set of deep red leather ones, like about five years ago or something. They were pretty worn in places, especially on the driver's bolster. I tried a bit of leather food in a desultory fashion, but they were too far gone for that so I did the decent thing and gradually buried them under increasingly tectonic levels of curse word in the garage. Well, as I said, the pile of curse word eventually got to the point it was in danger of reaching critical mass so I had no choice but to tidy/clear out the garage. And there, under all the curse word, were the seats I'd forgotten all about. Well, I like a challenge so I set about researching leather renovation and decided they could be saved without having to resort to a retrim. Not just because of the cost, but because I like to at least have a go rather than hand my car to some third party along with my wallet, and getthem back when the former's finished and the latter's empty. It may end up looking curse word, but at least I tried, I figured, and if the worst happens I can get them retrimmed then. So, the passenger seat wasn't too bad, a bit of cracking on the side bolsters and a weird mark of wear where an area the size of a 2p had been totally de-lacquered on the squab (sorry about the "wear where" bit then, appalling English and I'm deeply ashamed  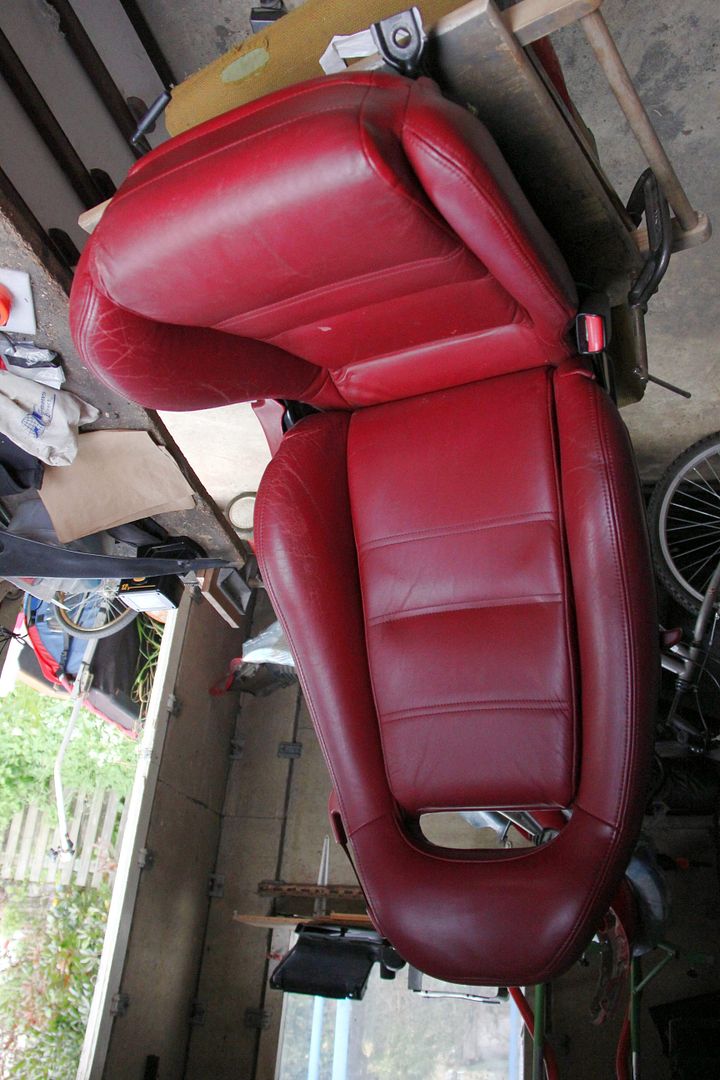 but the driver's side was pretty screwed, to be fair 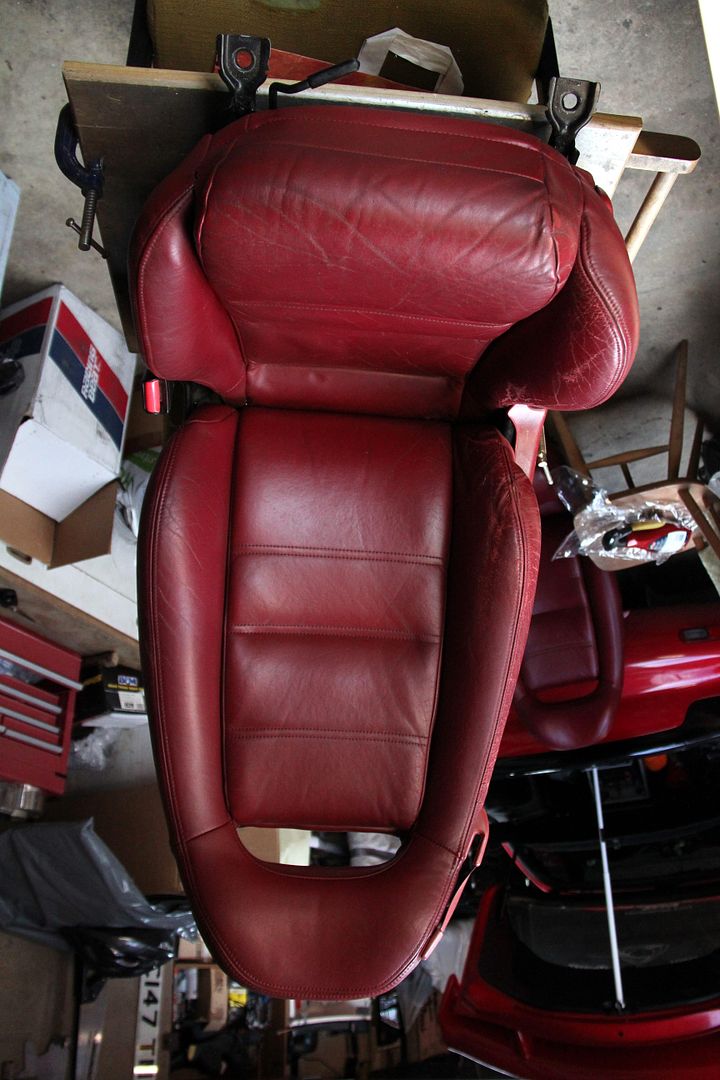 There was a massive split in the vinyl section where the middle squab (bit you sit on) joined to the side bolster, and the leather was worn through and cracked pretty badly in a number of places;  ^^that's what happens when lazy people can't be bothered to hide-food their leather every once in a while, and this vv is what happens when lazy fat people slump out of a car without bothering to use their legs 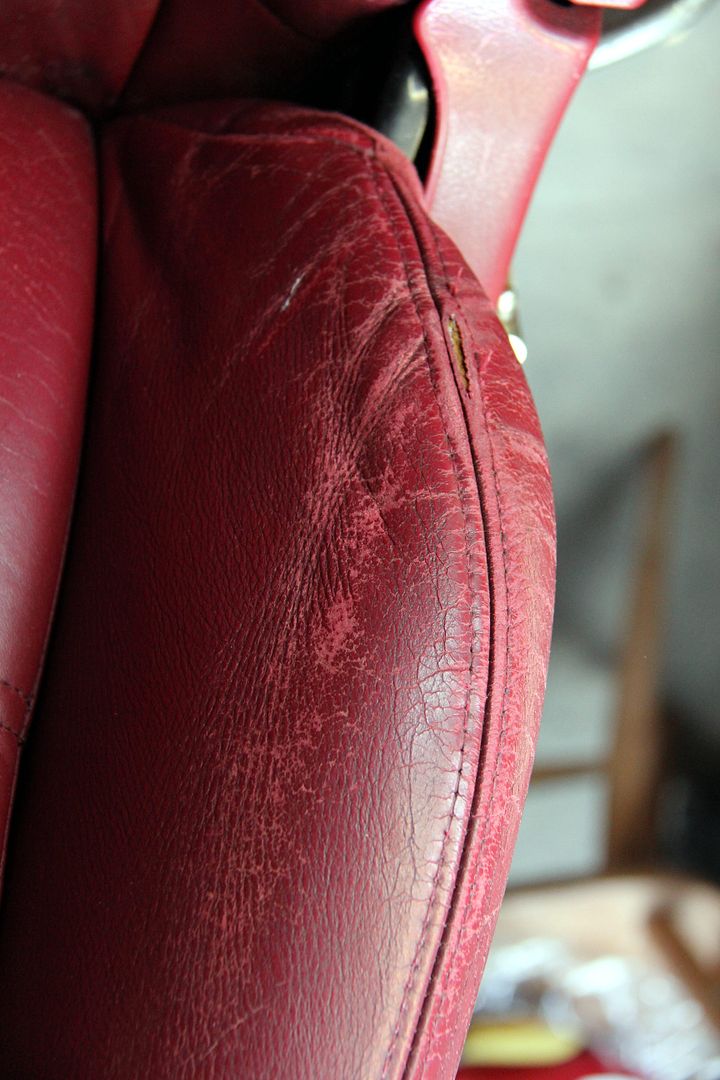 Anyway, the leather can be re-connolised, that wasn't the worry, the splits and cracks however, were. There's no point in spending ages and good money re-surfacing the leather if the actual seat structure is going to fall to bits. And of course, to repair these splits you need to get to them from inside and patch over them. And to do that you need to take the seat to bits. This was another of those "how hard can it be?" moments... 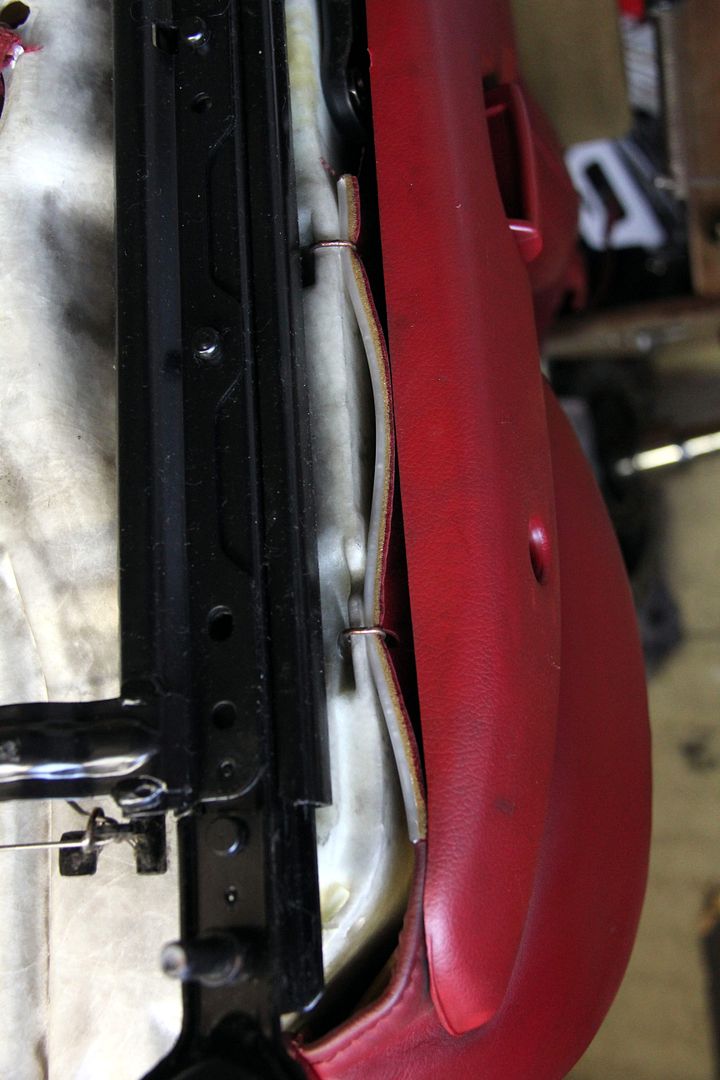 Easy enough to get the rails off, they're just a single bolt at each end. And the plastic trim is held on with three tiny screws, one through the adjustment lever trim. See all those little brass coloured rings holding the actual material on, though? They're the real enemy, we'll come back to that later... Anyway, on the mechanism (offside) once you get the covers off, your left with this; 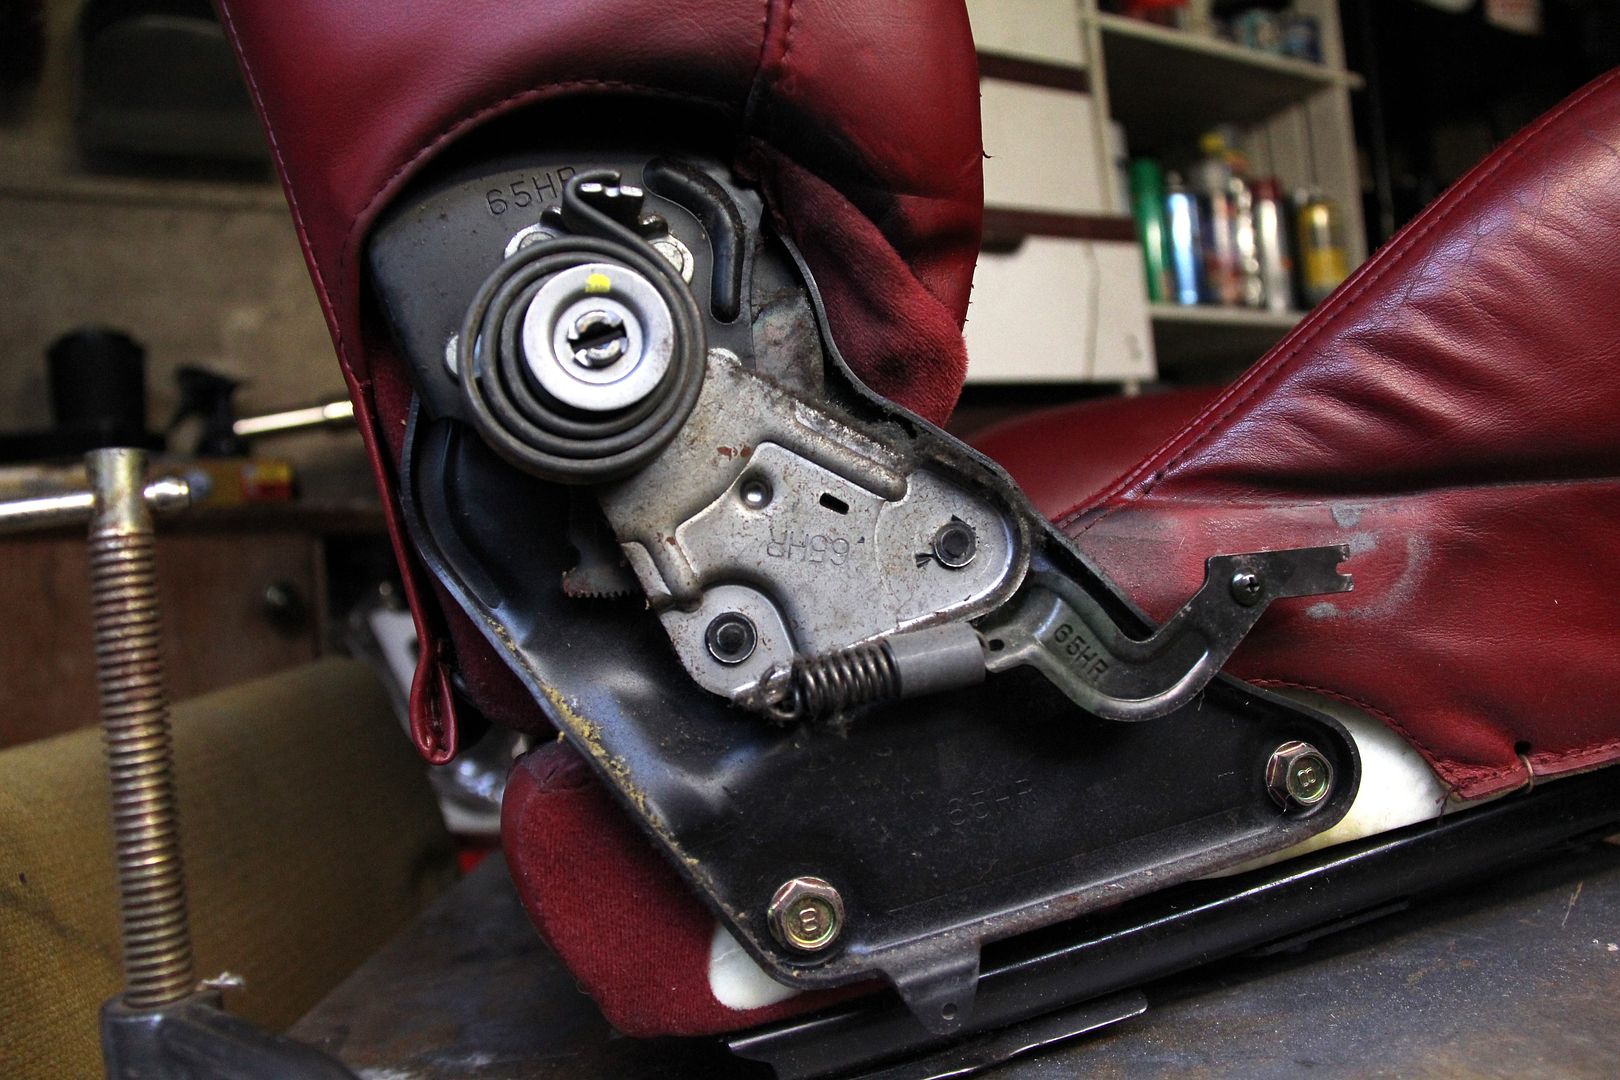 I strongly suggest not screwing with anything here, if that coilspring cuts loose it'll take an arm off, after all it's strong enough to raise the seat back against the partial weight of a fat bloke. Even if it didn't permanently maim you, you would never in a zillion years get it back on again. To disassemble the seat you don't need to monkey with it anyway, just undo the two zinc passivated (goldy) bolts at the bottom that hold the seat base to the back, and the entire mechanism then stays on the seatback quite happily. On the other side, as you can see, you can't actually remove the rail until you undo the bolt holding the seatbelt mechanism to the rail slider. And you can't undo that until you remove the plate holding the two halves of the seat together. This point is a bit nadgery, because the rails are connected by a wire so they release simultaneously, and by now there's only the top bolt on this plate holding the two halves of seat together, so you've got a lot of wibbly-wobbly barely-connected big chunks of stuff all flopping about while you're trying to undo threadlocked and very crusty bolts. Fun 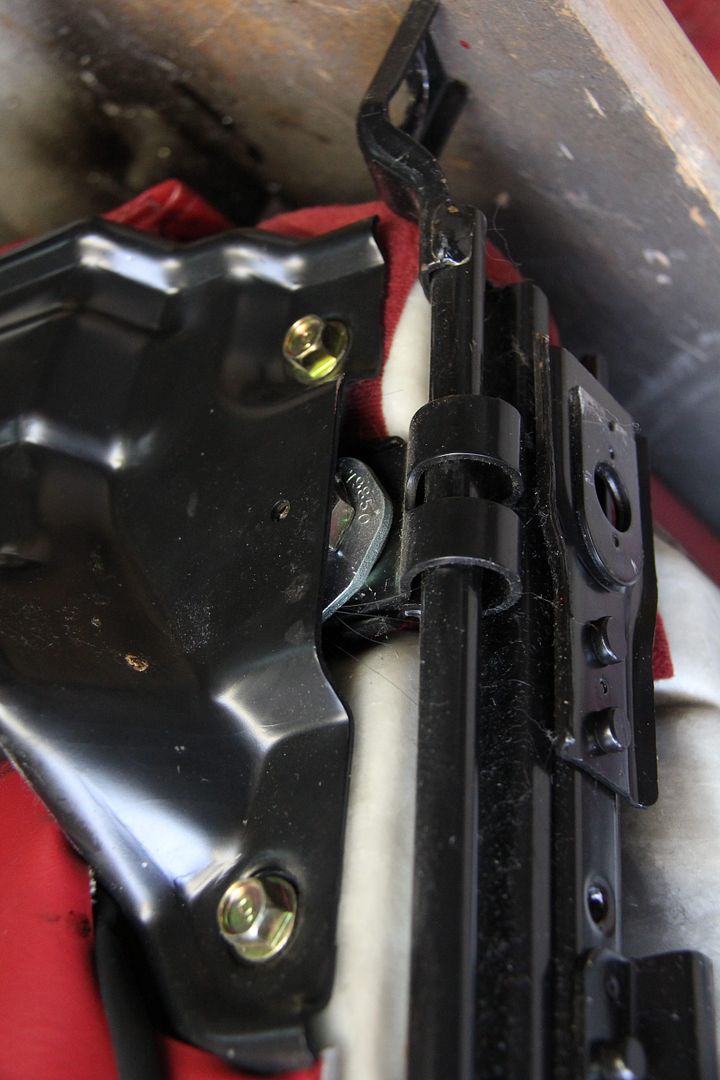 Remember those brass-coloured rings? What a thrice-damned invention of Satan they are! Basically they're now all that holds the cover to the seat frame and foam. But by God, their hold is tenacious. A lot of the time they're crimped through the leather or vinyl, and around a wire inserted into the foam so you can't just pry them open with a screwdriver because they're not held firm enough, they either rotate or just wobble about helplessly. The only sure fire way I found to undo them was two pairs of snipe-nosed pliers, one to hold the ring and one to pry it apart. This is clearly fiddly as hell, especially down in the depths of the structure where you can't even see what you're doing and you're trying to coordinate a pair of pliers in each hand. The only look brass, too, they're actually plated steel so the little %$*#@!"s really take some bending! My initial thought was that I would keep them and re-bend them when reassembling the seat, but this soon showed itself to be impossible. For one they're just as hard to re-bend as the are to unbend, and almost impossible to get straight. For another, they sometimes snap. And finally, it was tricky enough using the two pliers technique to take them apart, there was no way it would work for reassembly. It slowly dawned in my ossified cranium that these little smeggers must have a proper name and purpose, so some Google-fu revealed that they are hogrings. Moreover, you can get special hogring pliers to crimp them with. TBH, unless you're mad into fencing or upholstery, there's no reason you'd need to know this, cos those are apparently the only two fields where they're used. However, ebaytastic set ordered, I continued with the disassembly 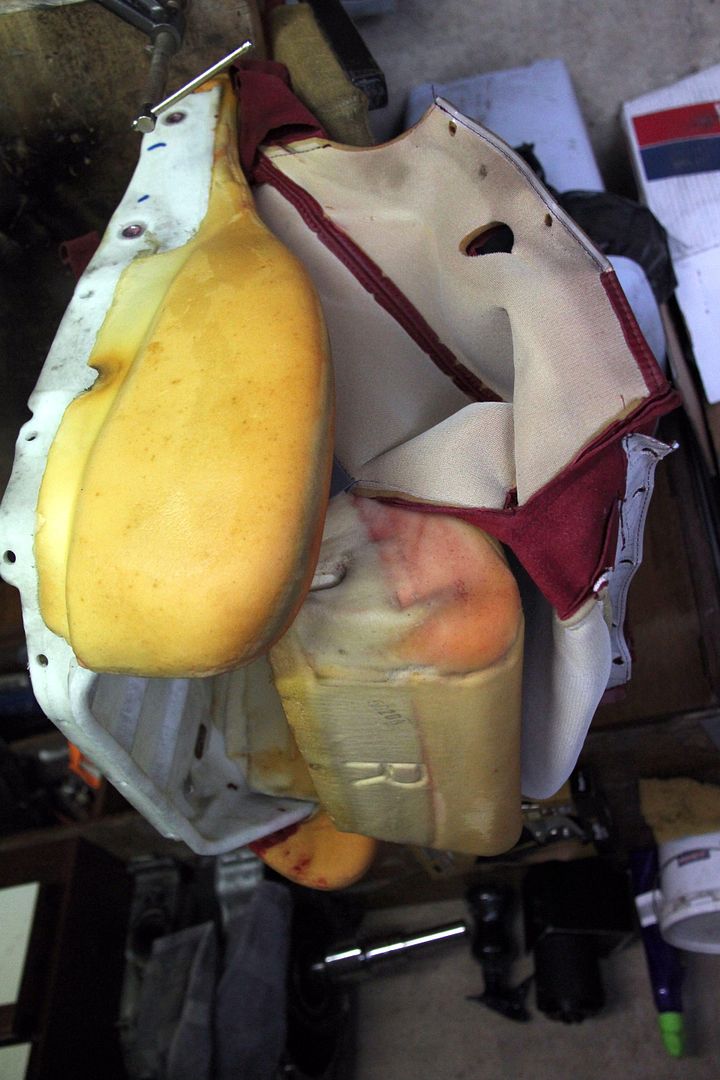 Thats the worst bit, trying to get the central squab foam separated from the baseplate and side foam. Takes about twenty bent hogrings and many skinned knuckles and swearwords to get them apart. Once you do, the central foam is still held to the leather by hogrings down each side and three ribs that correspond to the stitched sections on the seat. 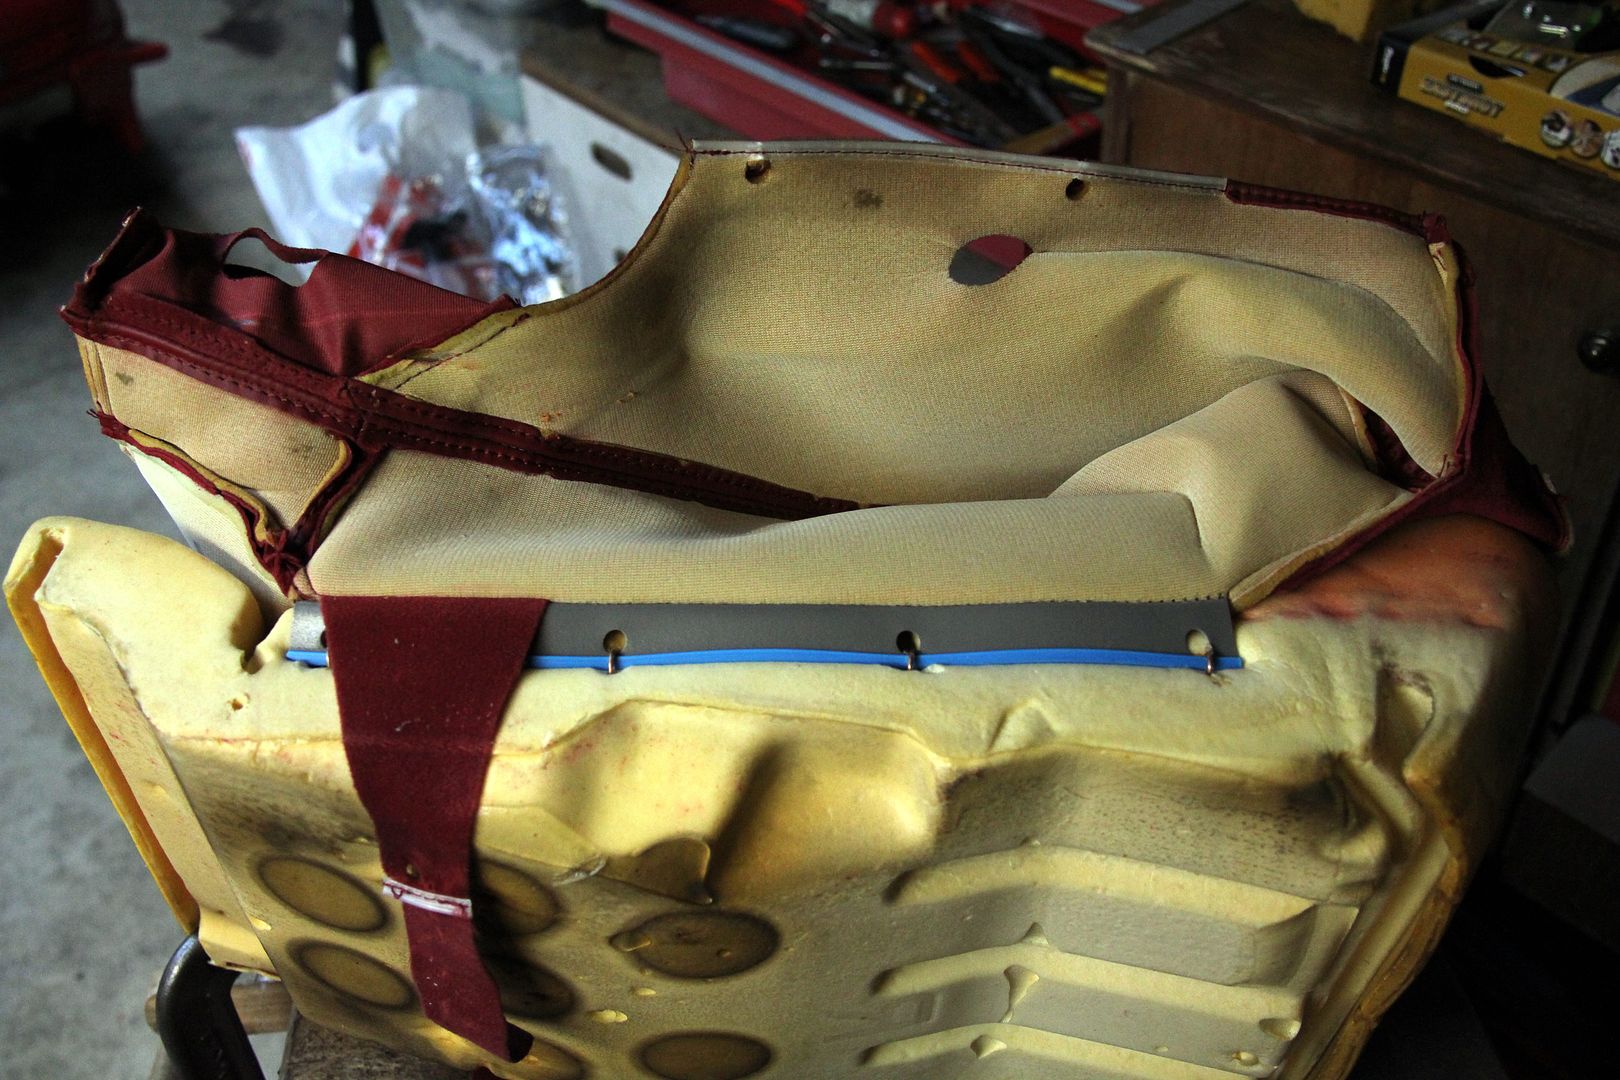 They're a proper PITA but eventually yielded. The seat back is slightly easier than the base to dismantle, though there's a bad moment here when this is as much play as you can get to reach in and remove those hogrings you can just see hidden away in there 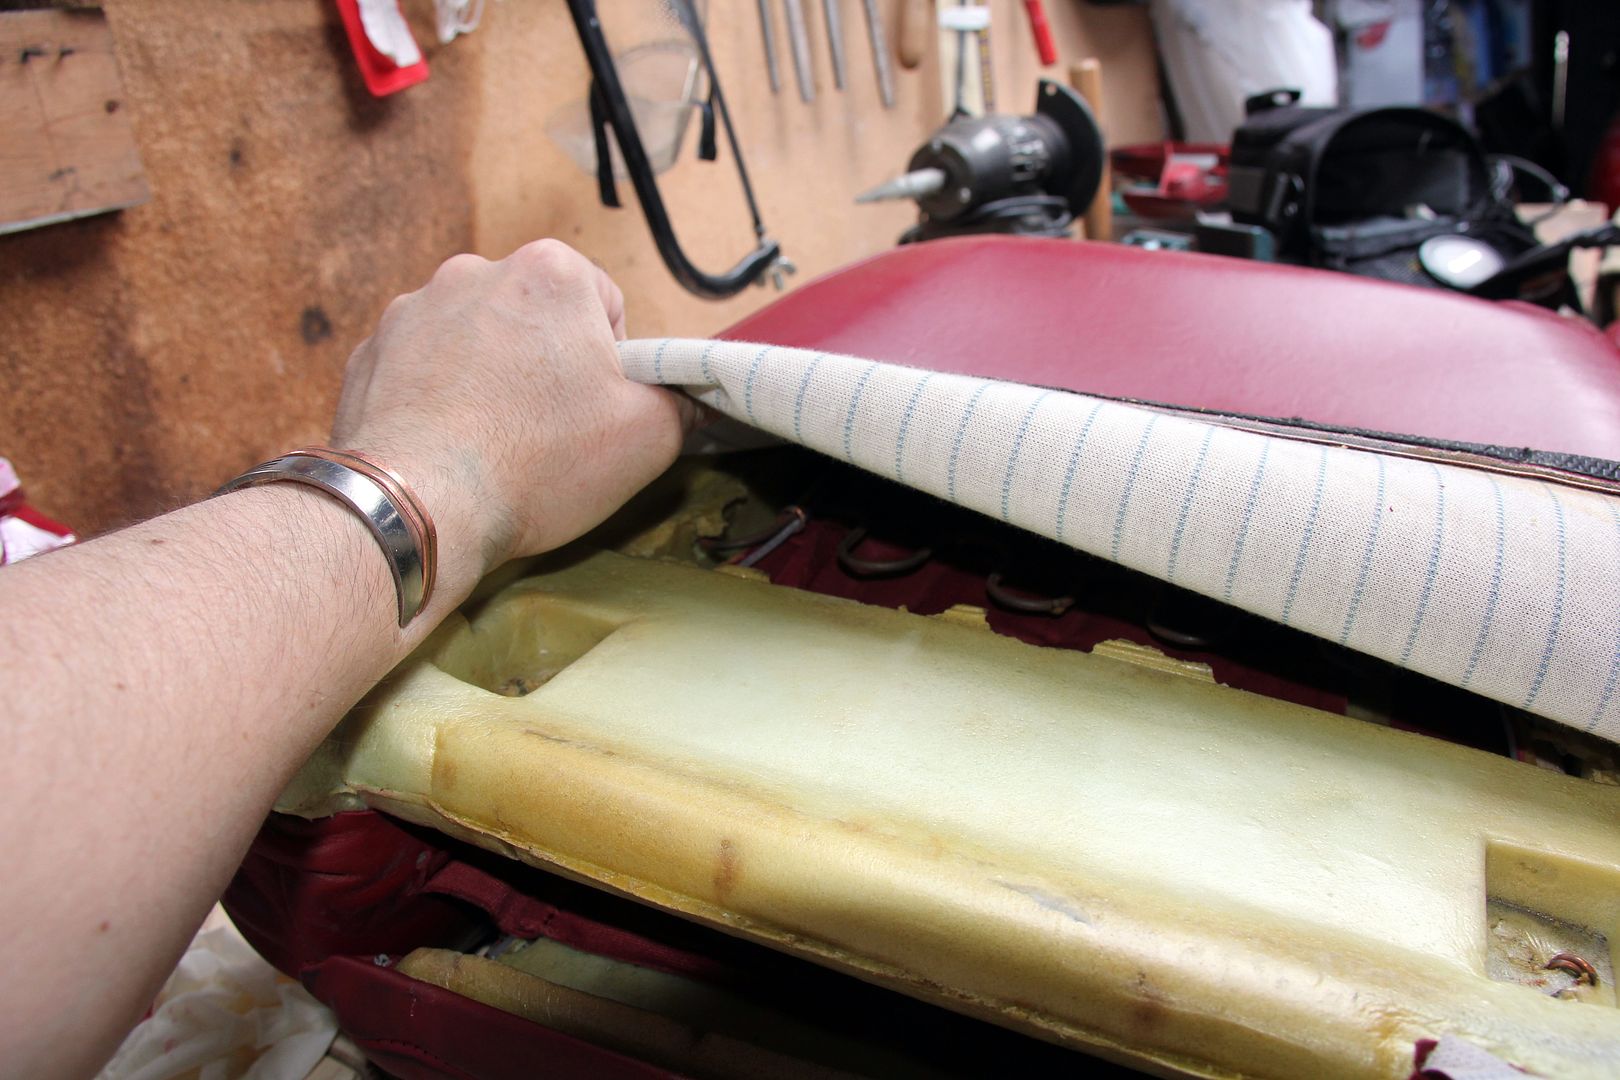 But persistence pays off and it gets easier once past that point. I finally found what the funny zip that seemed to serve no purpose inside the headrest does, as well. I'd wondered about that ever since owning an FD, and it turns out it's because holding the two sections together using hogrings would look really cack and dig into your head 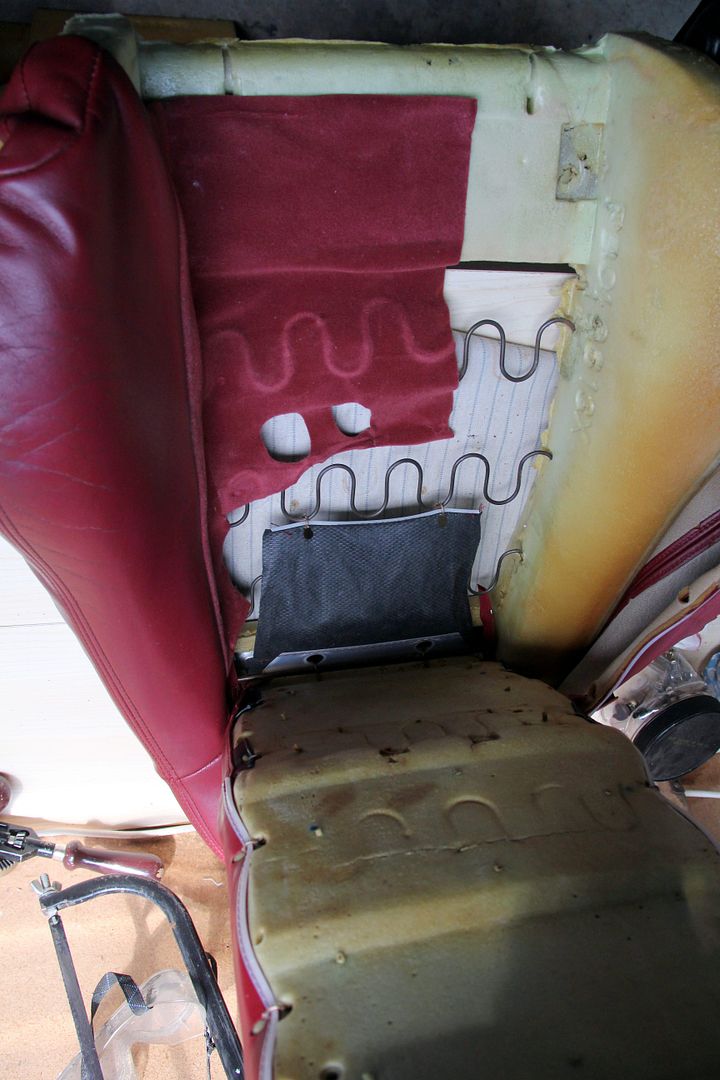 Anyway, eventually I felt like I was actually winning and after much swearing, sweating and wrestling, the evil hogring army was defeated 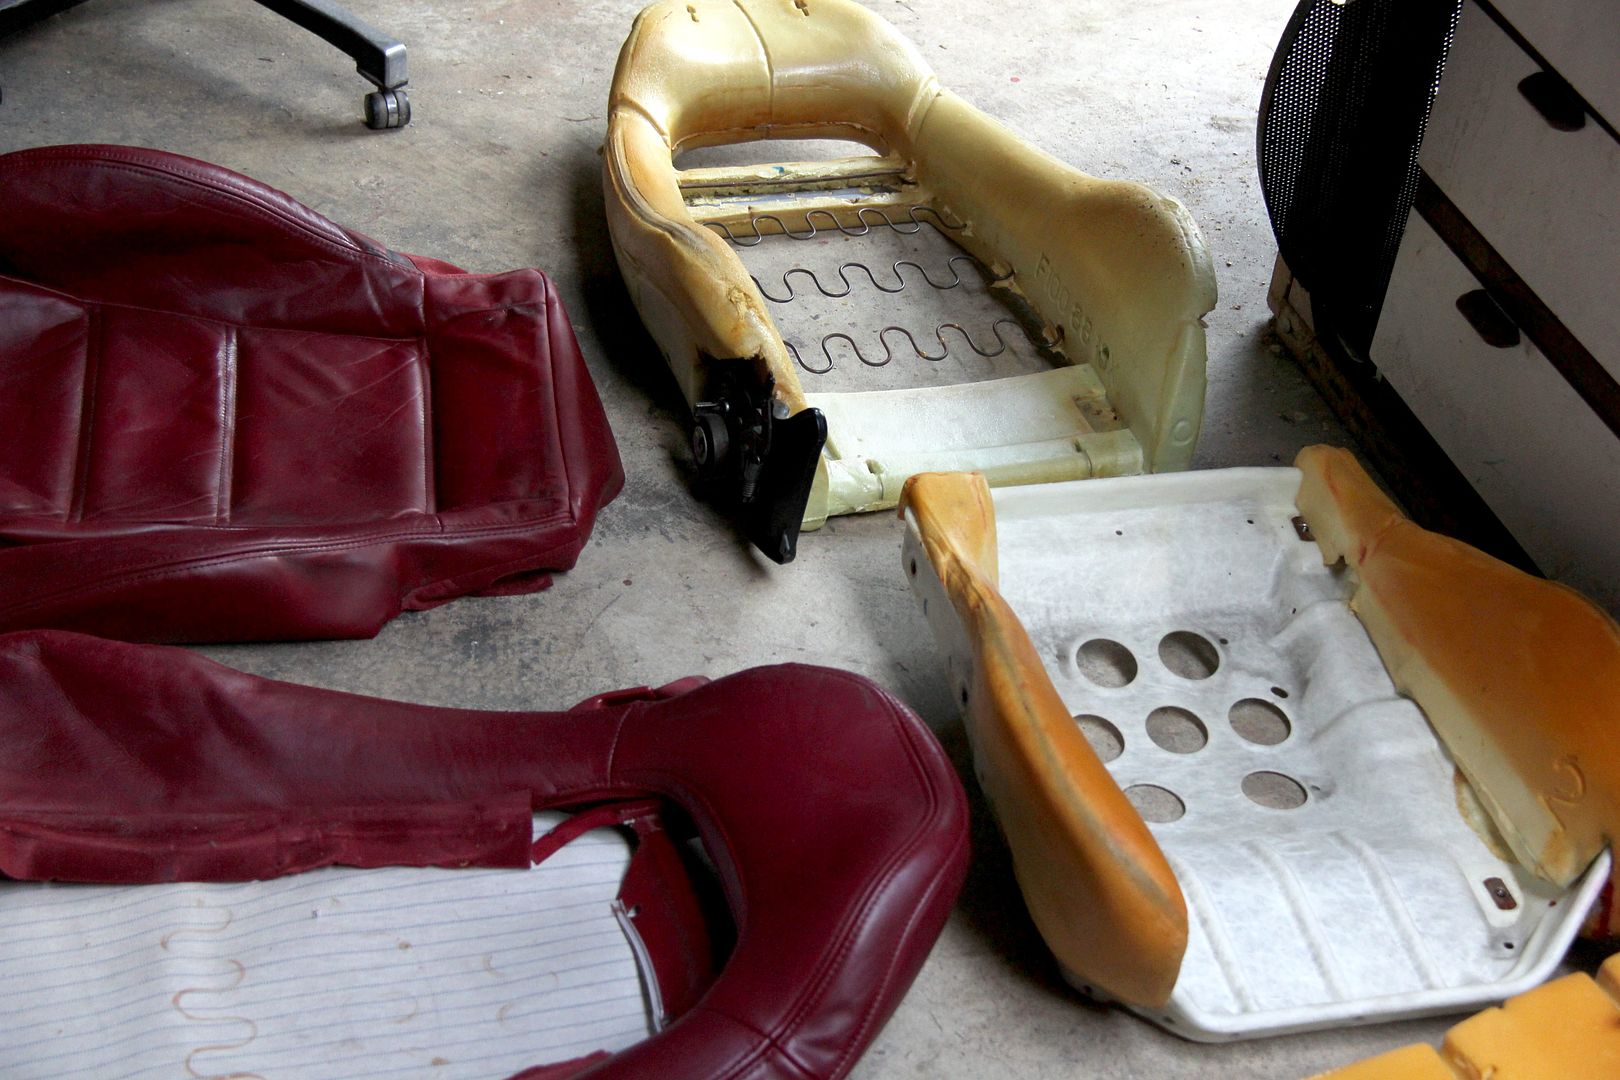 and if you've ever wondered, this is what you end up with when you reduce a seat to its component parts; 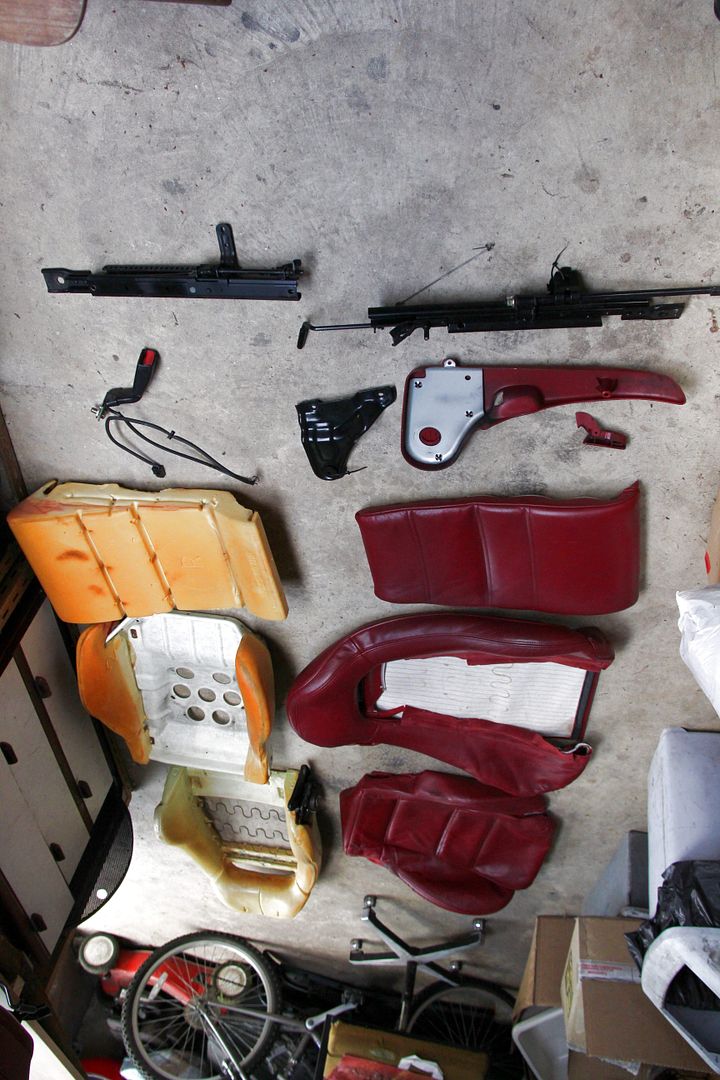 |
| |
|
|
luckyseven
Posted a lot
Owning sneering dismissive pedantry since 1970
Posts: 3,839
Club RR Member Number: 45
|
|
|
|
So, repairs first. The foam was the first problem, as I said it has wires sorta cast into it for the hogrings to crimp around, but in places these had pulled through the foam. Now, foam's a pretty difficult thing to repair, and I didn't fancy trying to carve my own out of huge blocks and getting them the right shape. I titted around with various glues and eventually found one that would hold fabric patches to keep the foam it's original shape and hold in the wire, but also had enough give to flex with the foam. Not pretty, but you don't see it once it's all together. The fabric is an old sheet that was thin but strong, thin enough you won't feel it through the leather 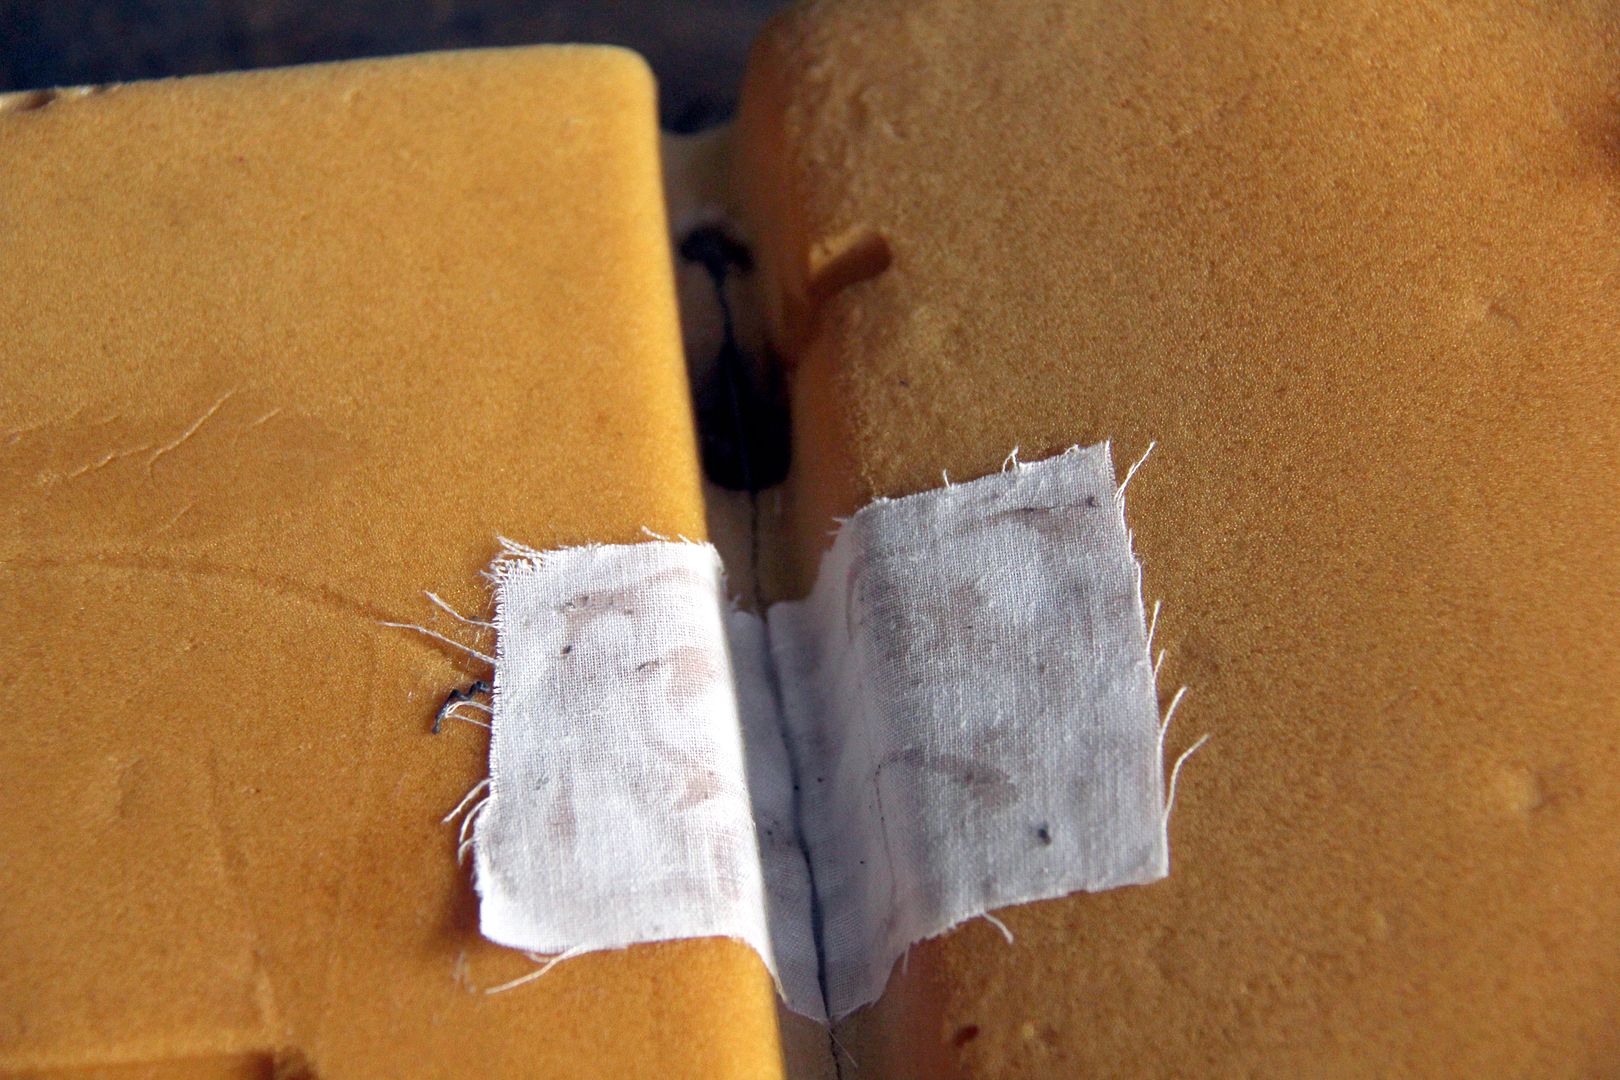 For the big tear in the vinyl I could get quite medieval. Because it's vinyl you couldn't sew it, and experiments with allegedly super carpet tape and stuff proved it stuck well but couldn't cope with any real stress, so eventually I went for massive overkill. Basically ended up with Sikaflex (cos past experience has shown it will stick anything to anything else. Forever) and a tough bit of stretchy material with a good weave (in actual fact, an old work poloshirt!). Because of the location, it didn't matter if it ended quite bulky, because it's between the two foam sections so never gets sat on. It's also the trans tunnel side so you'd have to be on hands and knees in the footwell to see it when the seat's fitted 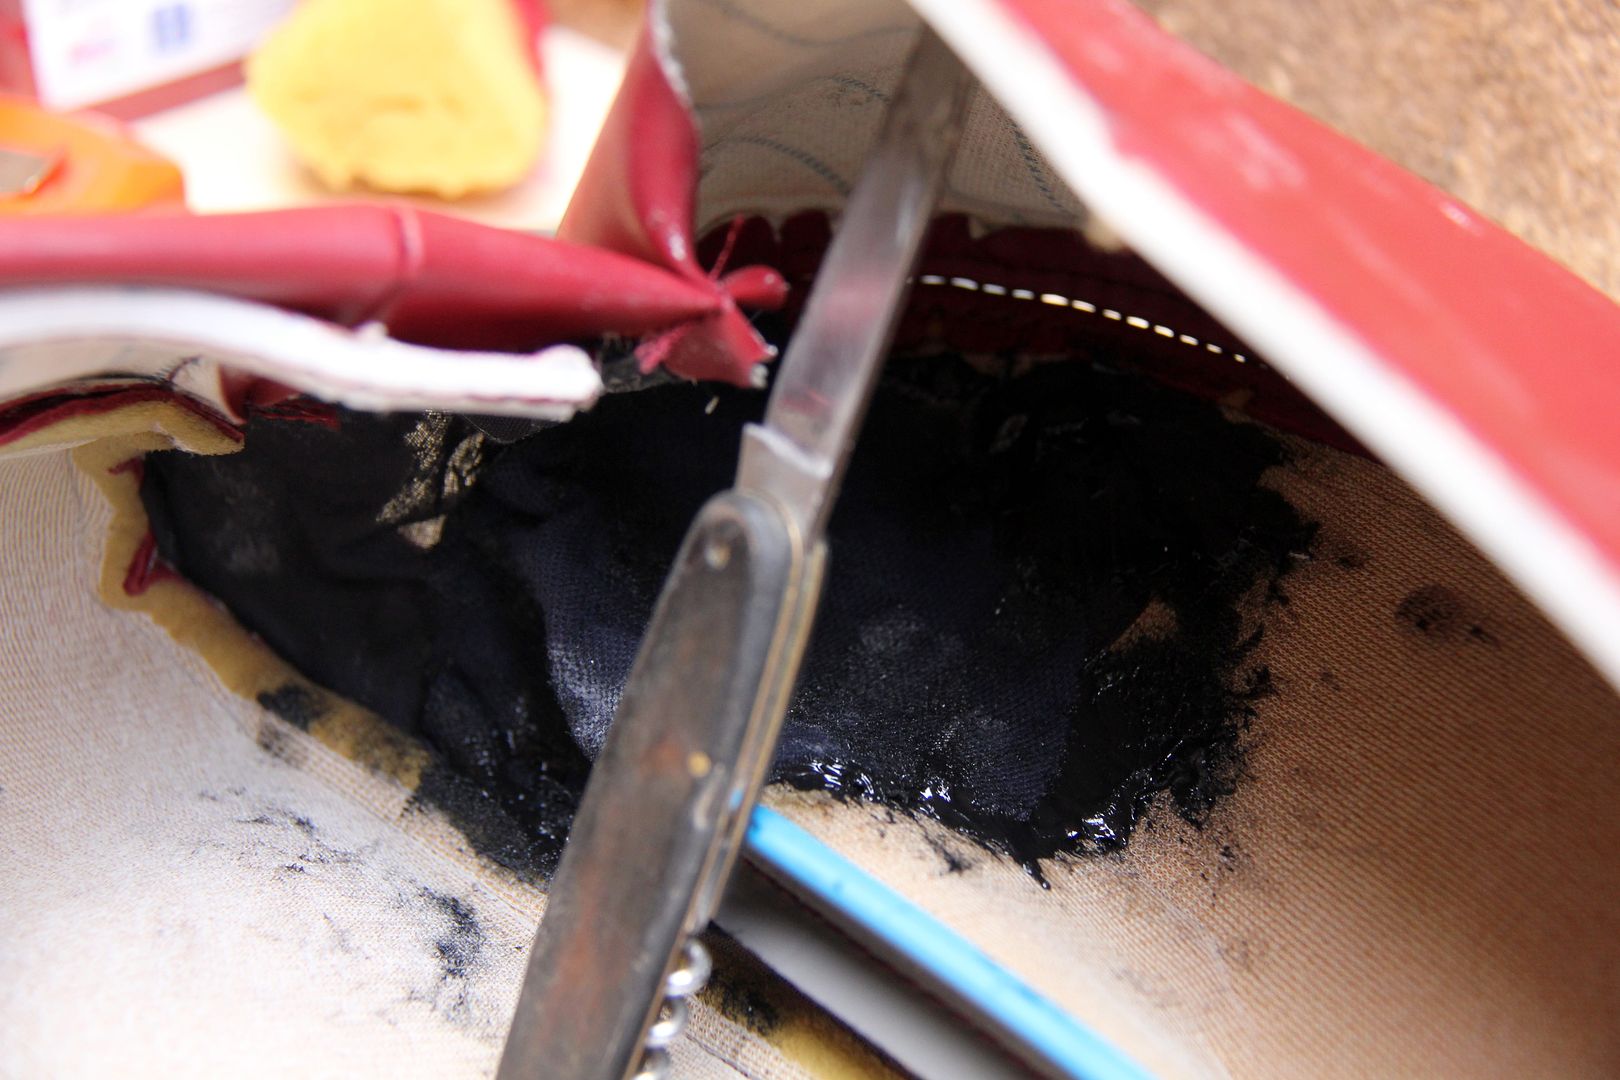 Then it was a case of refitting the cover and gluing again from the outside, and holding it all in place so it set more-or less in the right shape 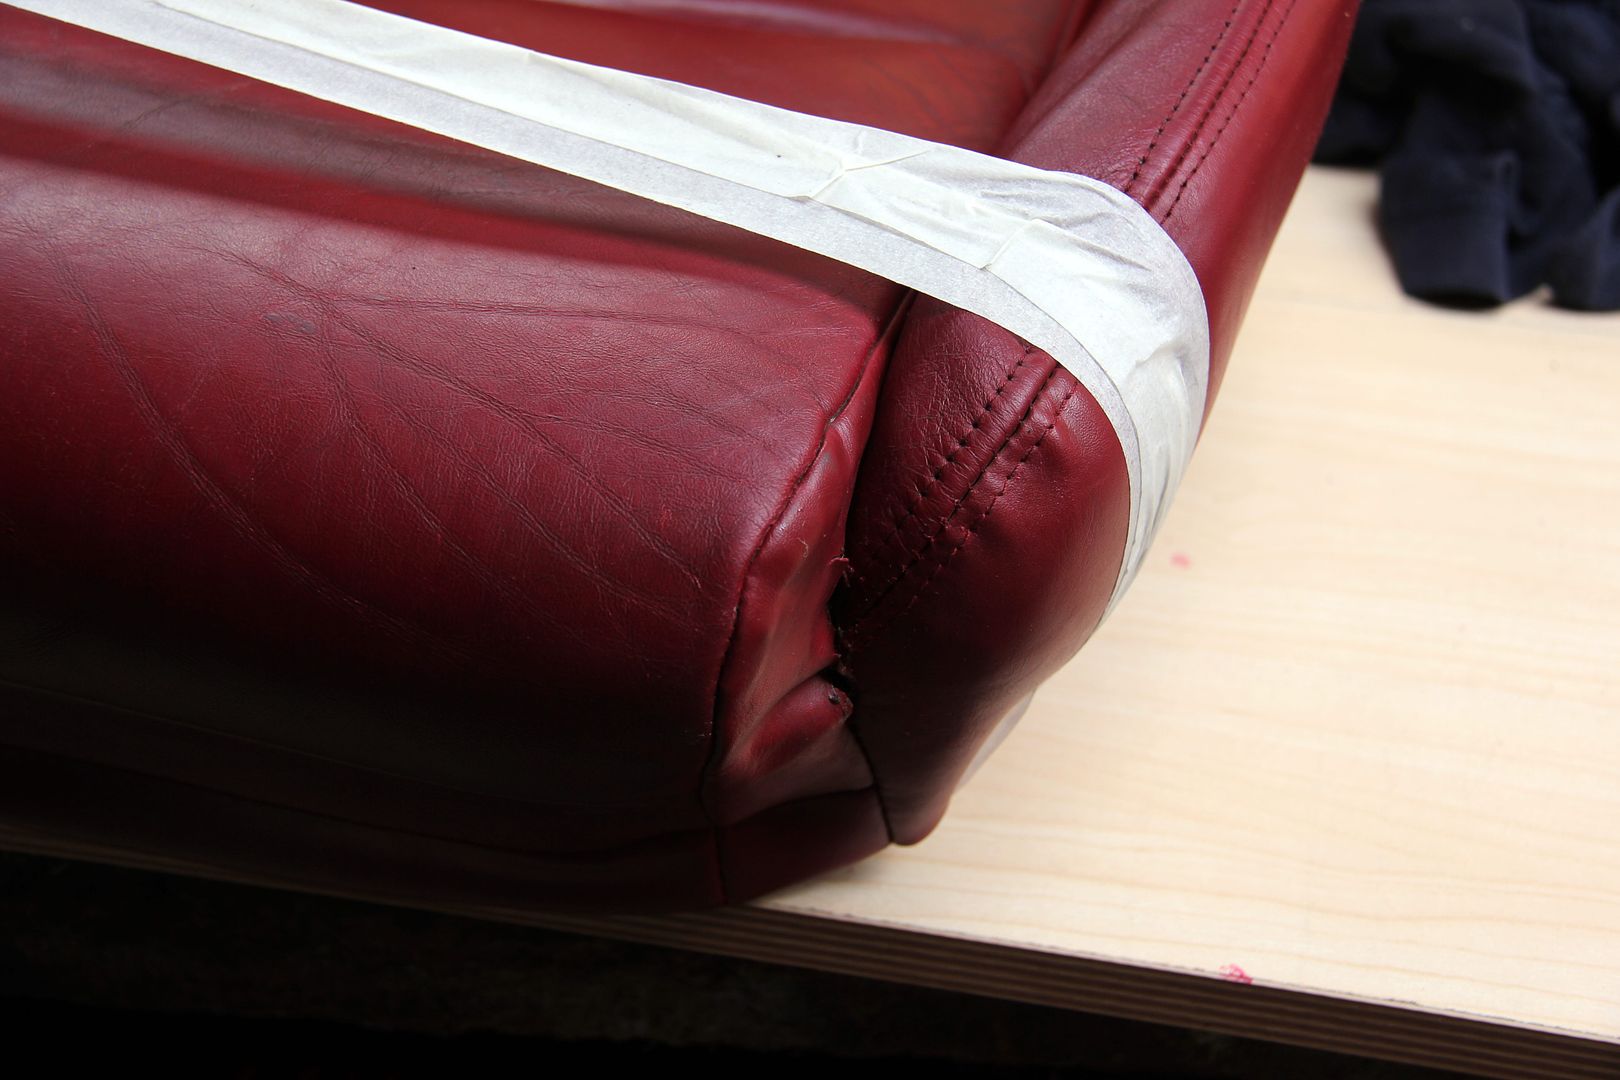 Ideally the whole panel could have done with replacing, but that was time and expertise I don't have... or paying someone to do it, which is contrary to the DIY ethos of the job. It's as tough as Chuck Norris now; might look as ugly as him too, but at least it's not going to rip any more! 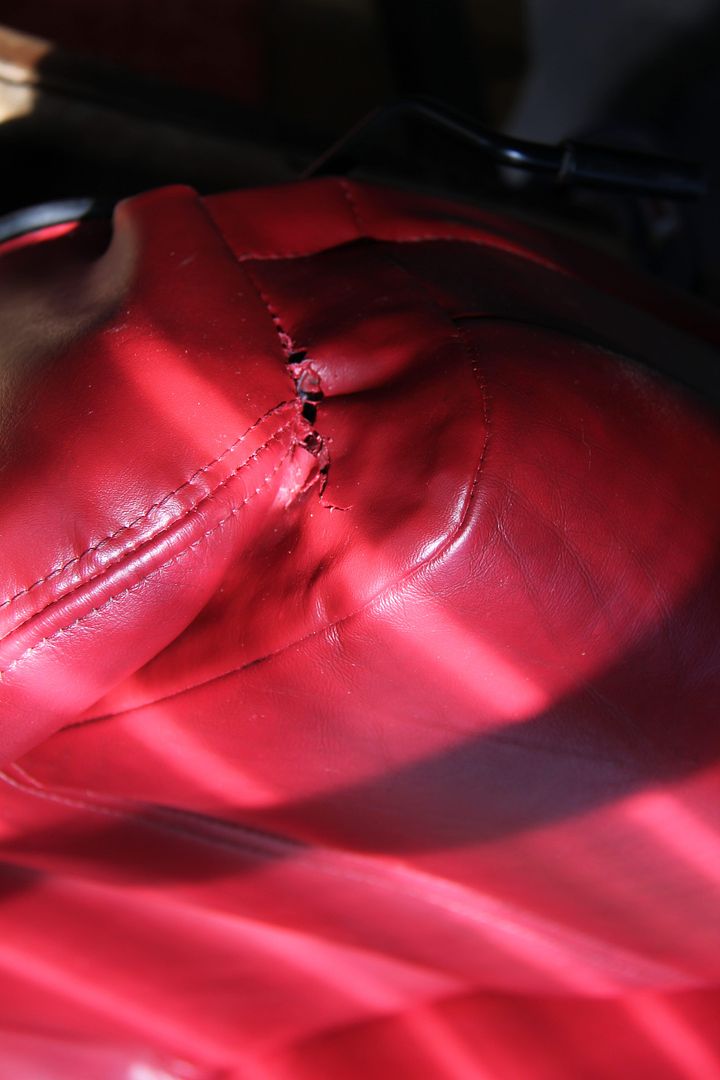 I put patches similar to the linen foam repair on the inside of all the worn-through bits as well, and picked up all the worn bits of stitching I could as well (all those misspent years as a crusty dropout patching jeans weren't wasted, y'see). I bought some proper leather glue for this online, and it worked a charm. With hindsight, I think a hot glue gun would have been the way forward, I'd get one if I was doing it again. I think this would have meant I could have used one glue for everything, and got into inaccessible areas with greater accuracy. Next time.... Then it was down to reassembly. Those hogring pliers, as promised; 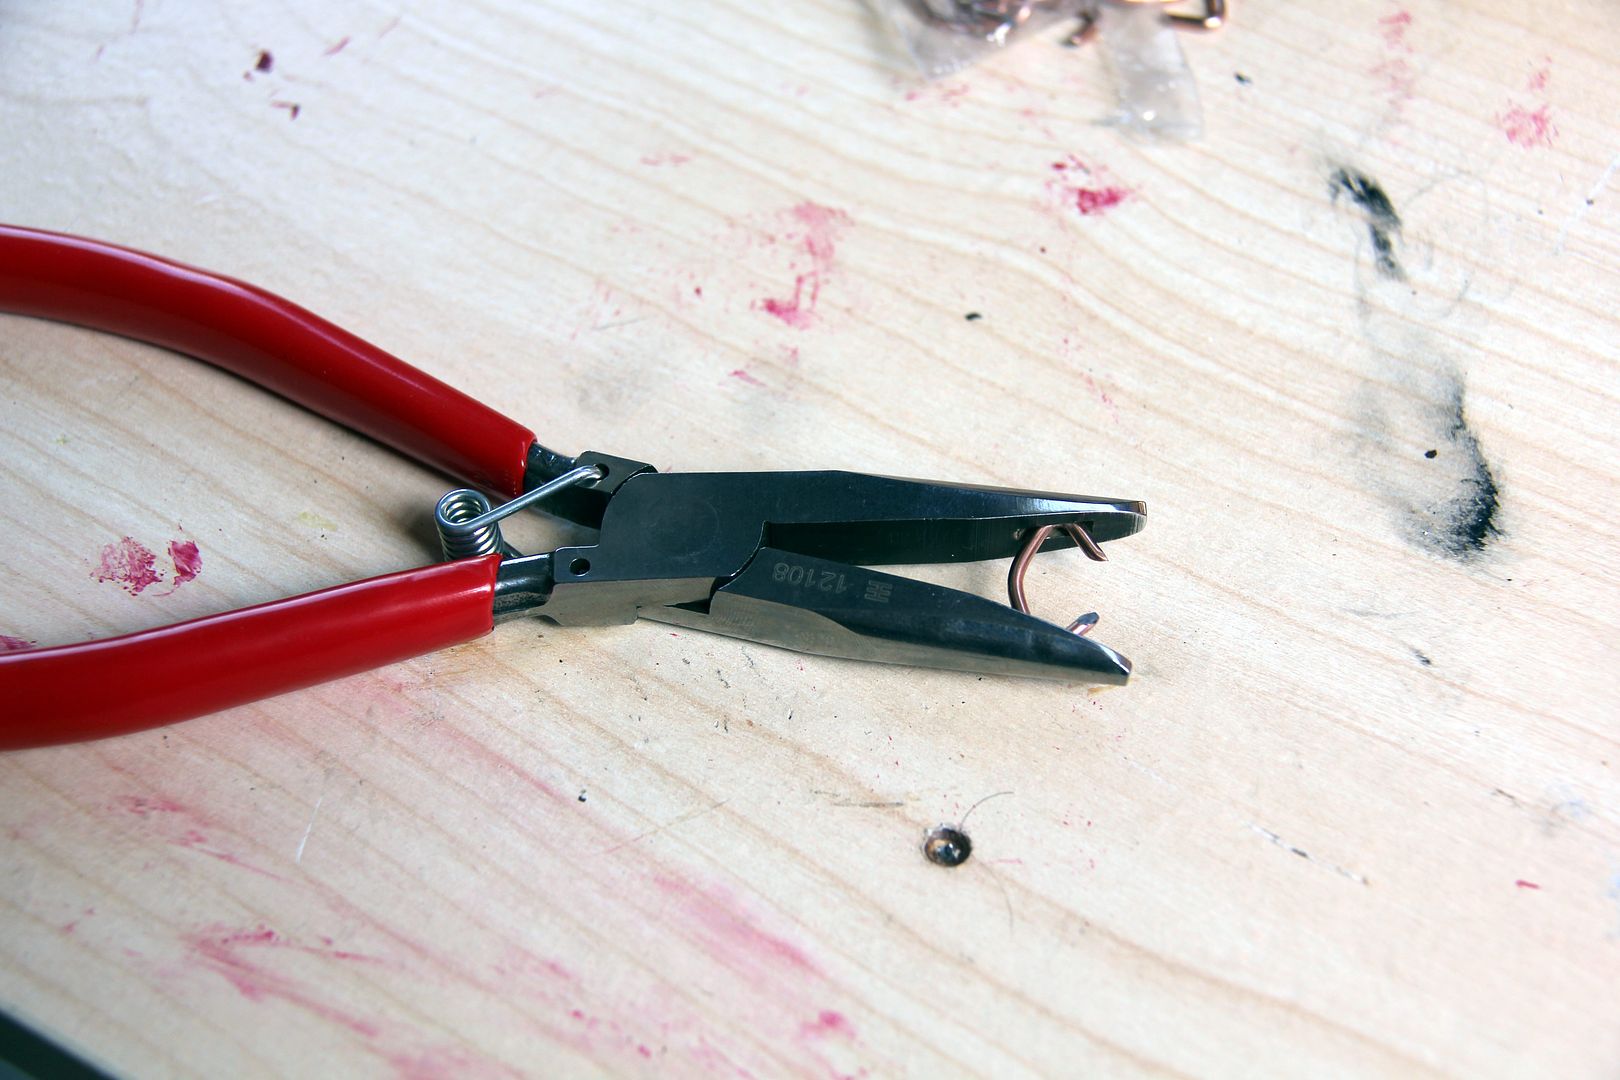 As you can see, they're a clever little doobrie. Basically snipe-nose pliers with a groove machined into the face of each jaw. These hold the hogring in detent so that you can manouevre it exactly where you need to without it dropping out, and the spring-loaded jaws mean it grips the ring securely. The the semi-circular detent makes sure the ring closes perfectly when squeezed. They basically make the job very easy... it'd be nigh-on impossible without them 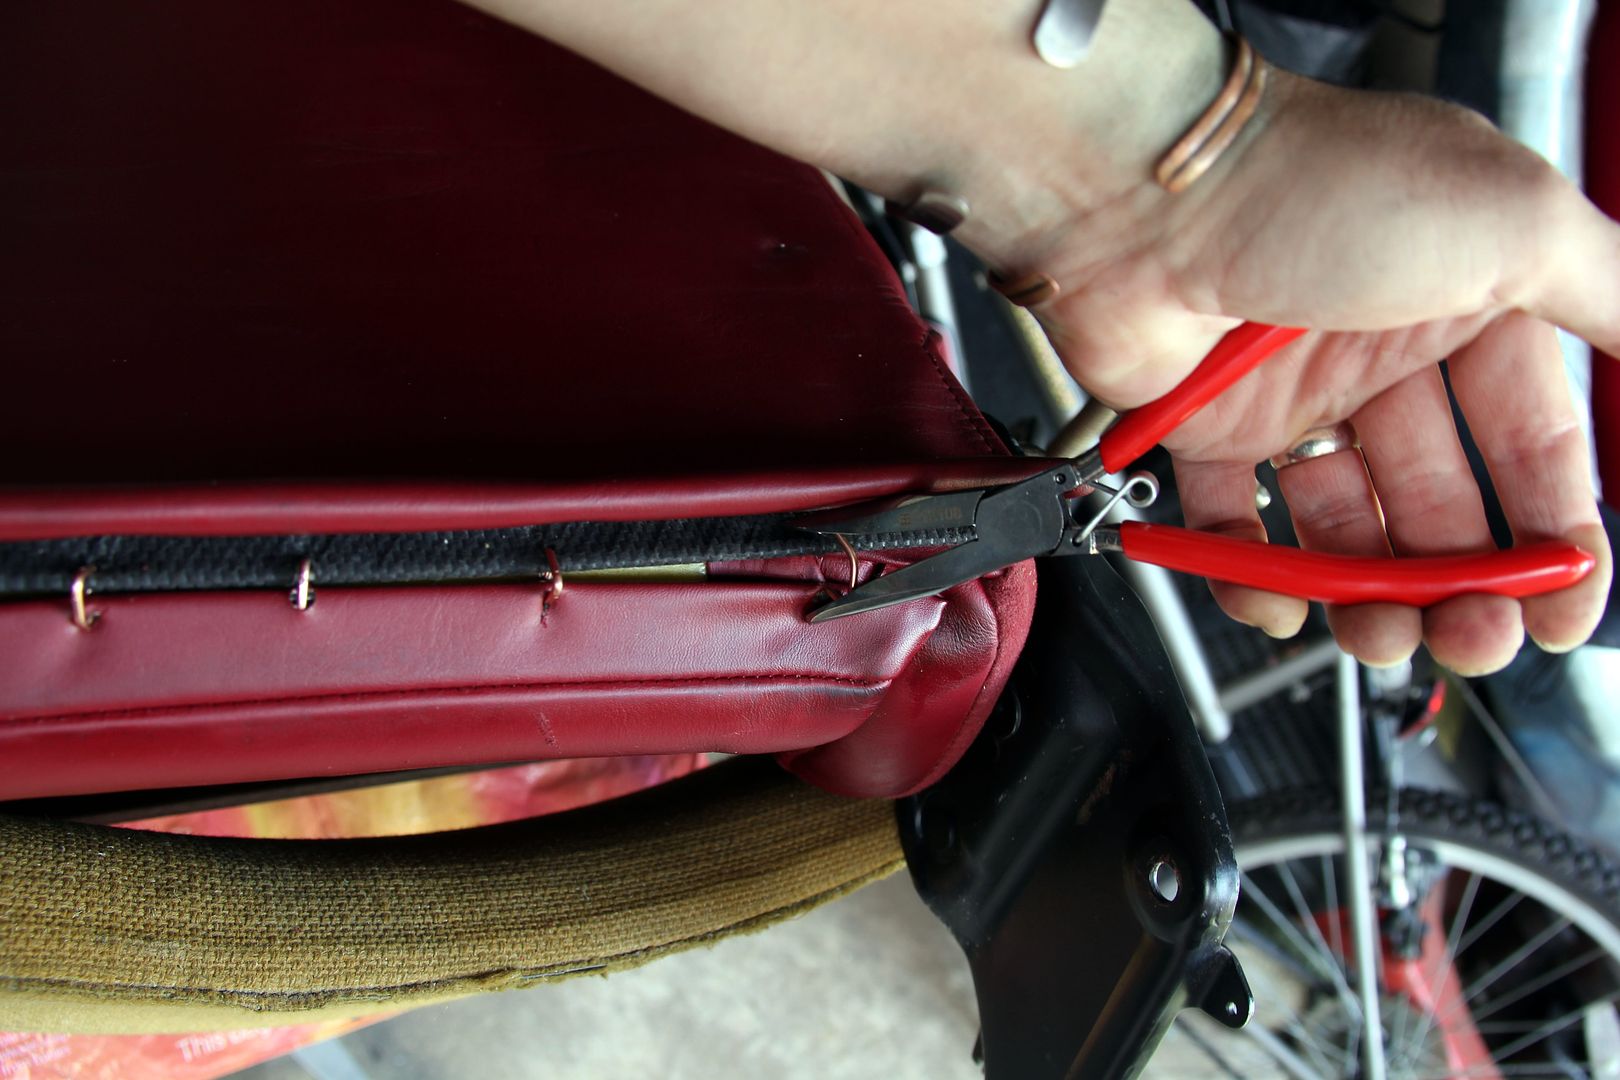 See? can even do it left-handed and operate a camera with the other! Then, the refinishing. I sent a sample section from one of the seats away to Bespoke Leathering (fantastic name that puts me in mind of Miss Whiplash) and true to their word, they colour-matched a bottle of magic stuff to resurface the leather with. Highly professional lot, I'd heartily recommend them and will use them again when I touch up the FB interior. They even kept my sample and sent it back so I could glue it back into the seat! The product is basically a water-based dye and sealant similar to what the leather would have originally been finished with. All you do is blob it on and wait for it to dry, and when it does, it dries smear-free and won't come off on clothes or anything 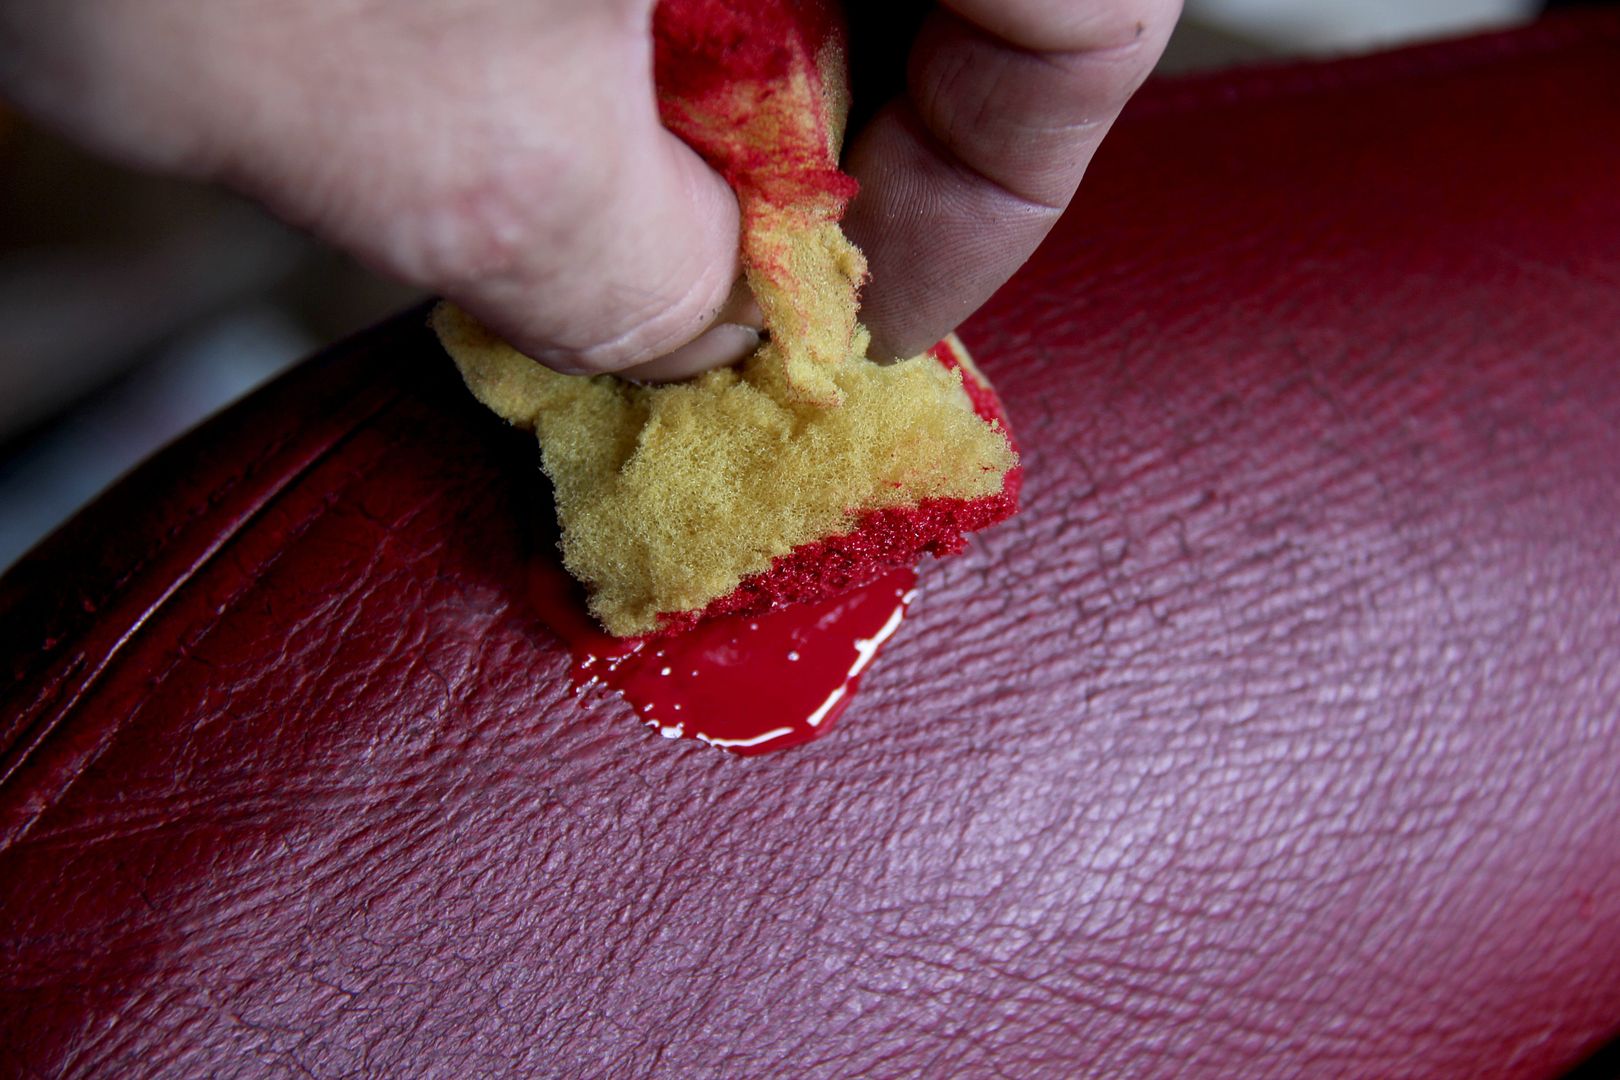 I watched a few YouTube vids on techniques, and learnt a fair bit by just trying stuff, too. I found if you just smear the stuff on, it'll dry with a few streaks and high spots. What you need is to dab it with a sponge so it's quite thin but uniform. Then as it dries the surface tension smooths it out perfectly. 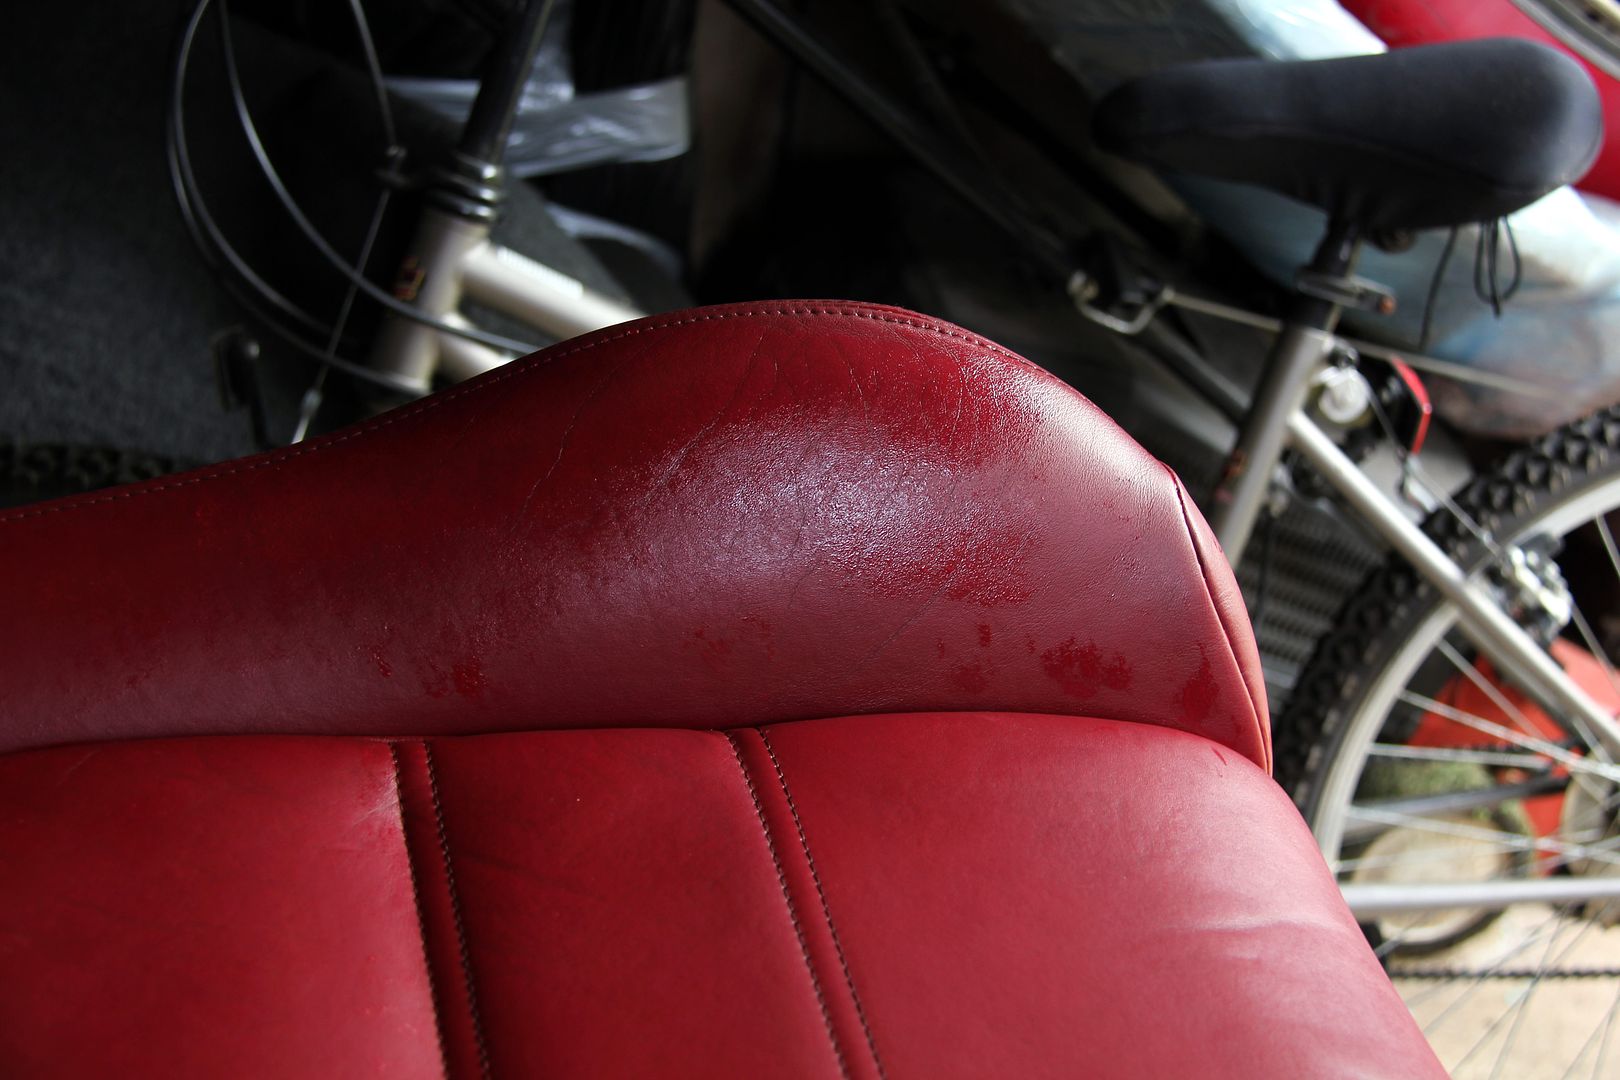 I also found you could get quite aggressive with sandpaper to smooth out areas of really bad wear and gouging. In addition, a mixture of the dye and some PVA-based household sealant made for a compound that both coloured and could be used as a filler to bulk out the worst of the cracks and bind them securely. There's no substitute for many thin coats though on areas that are severely worn and ridged 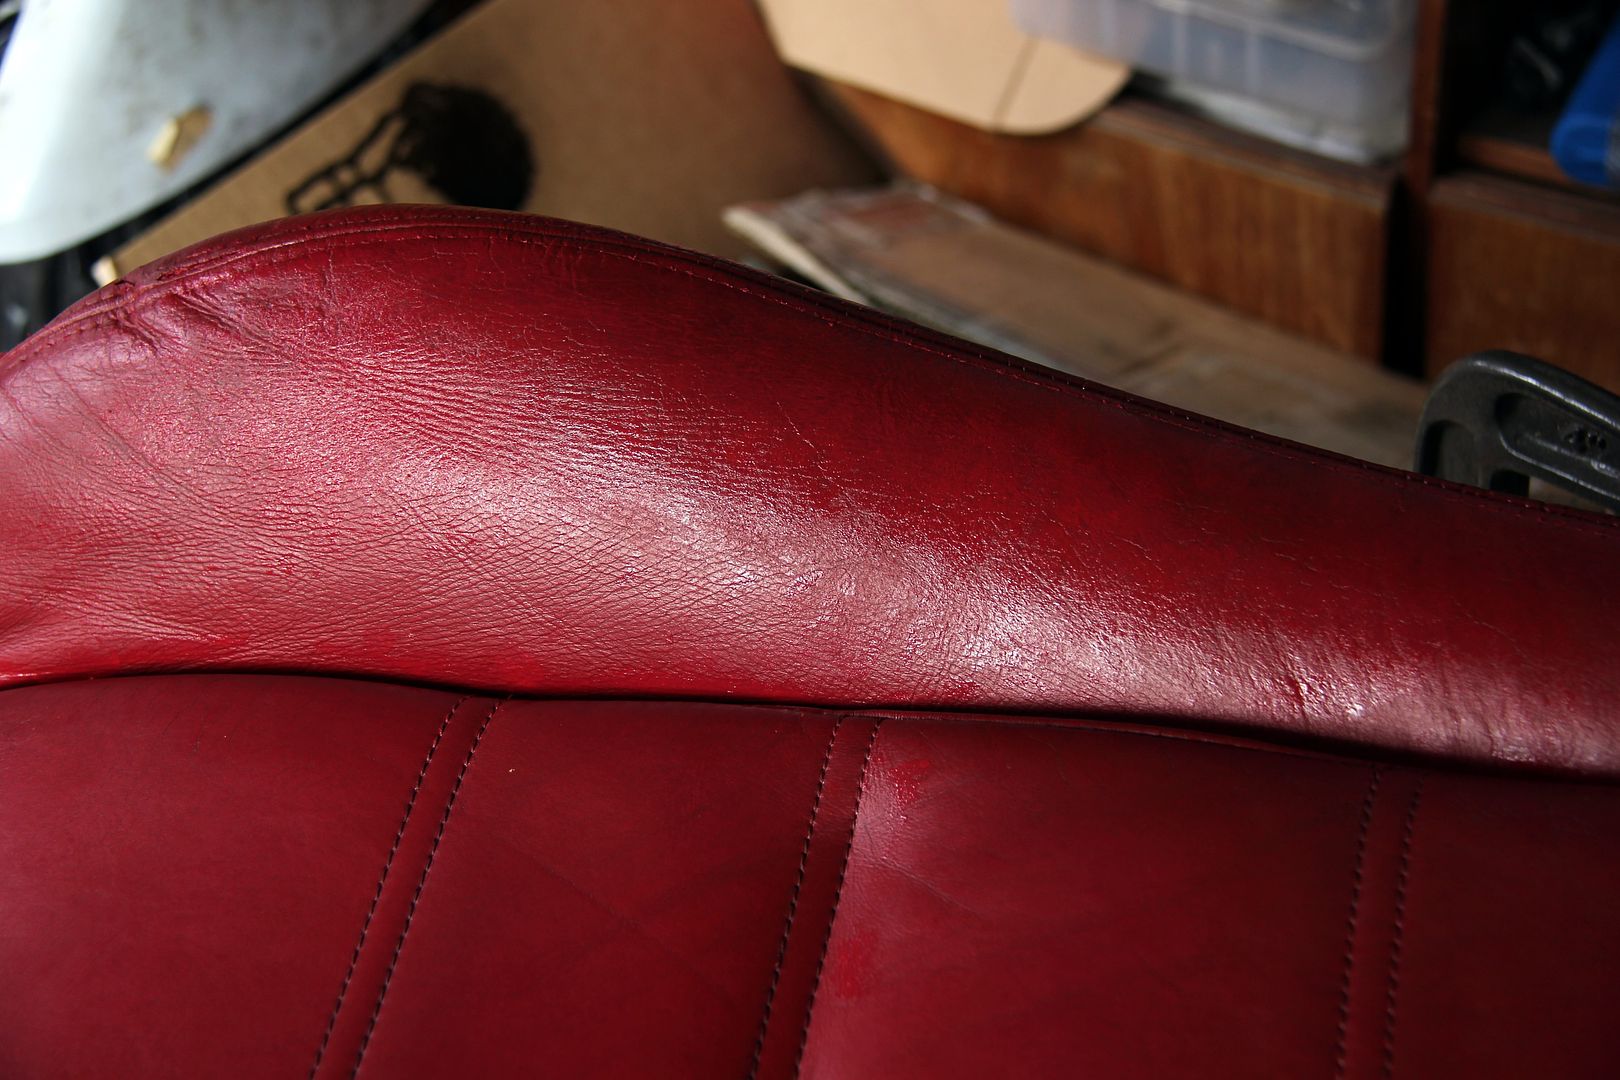 So, maybe it's time for some before and after pics, then? Like I said, the passenger seat was much better than the drivers but there was still room for improvement. Here's the side squab before; 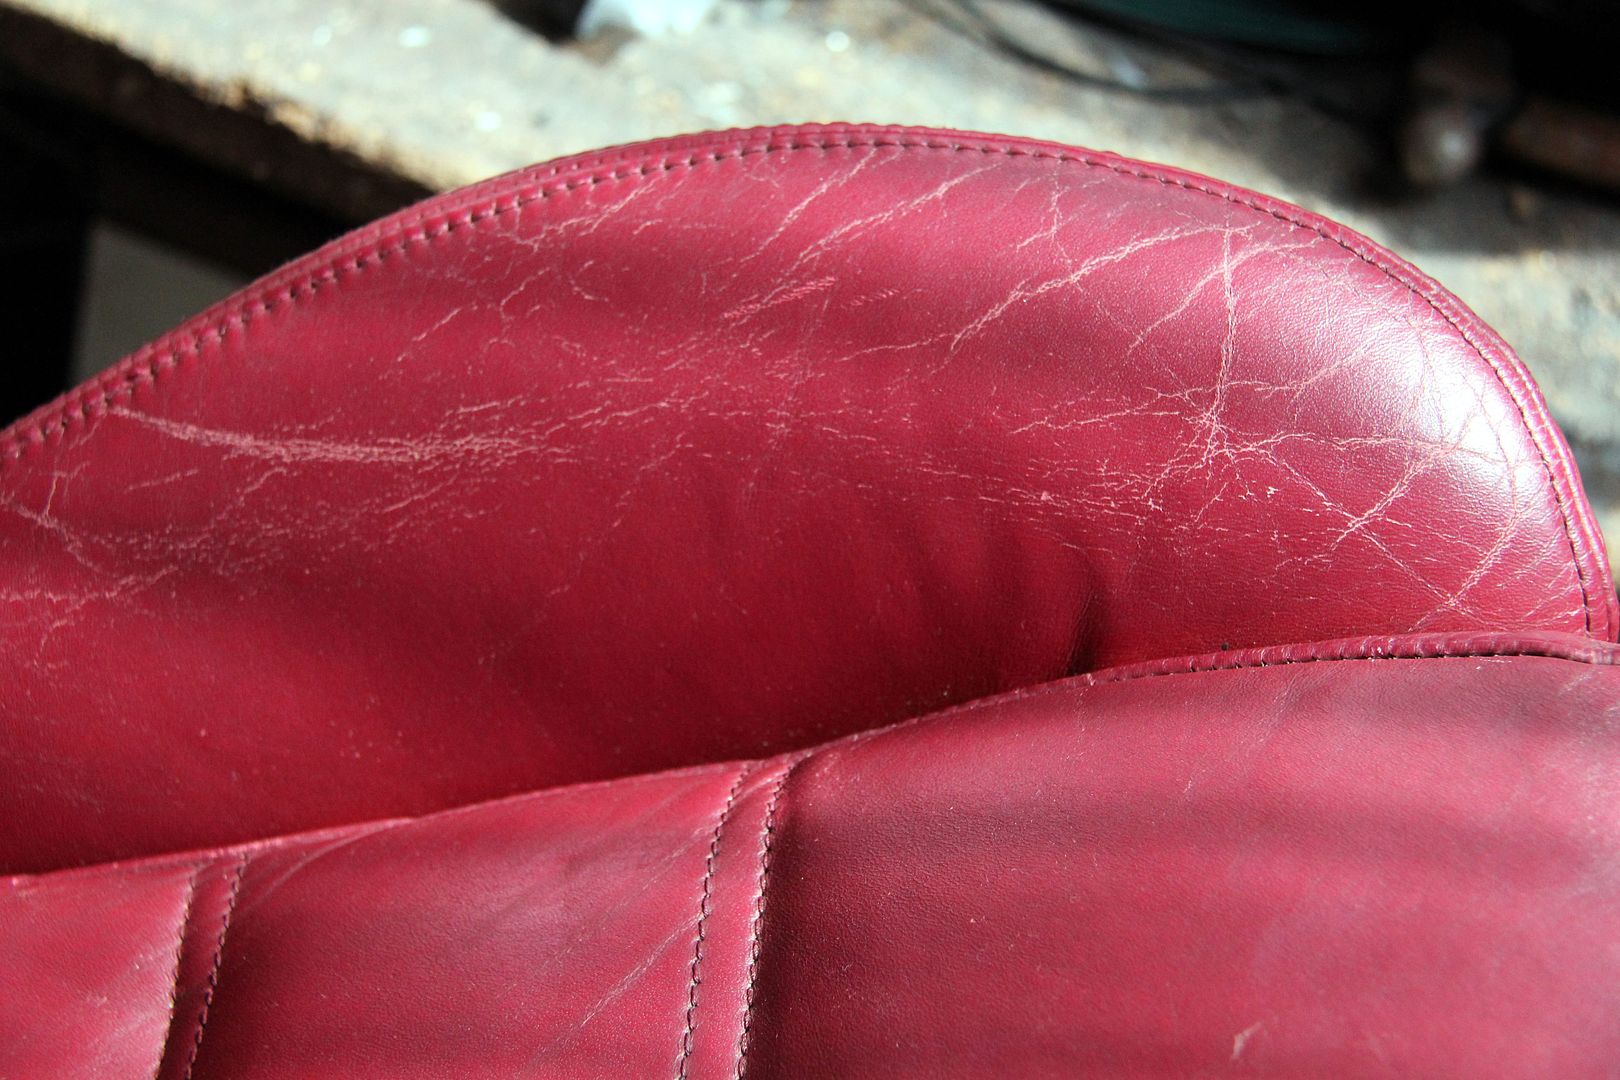 and after; 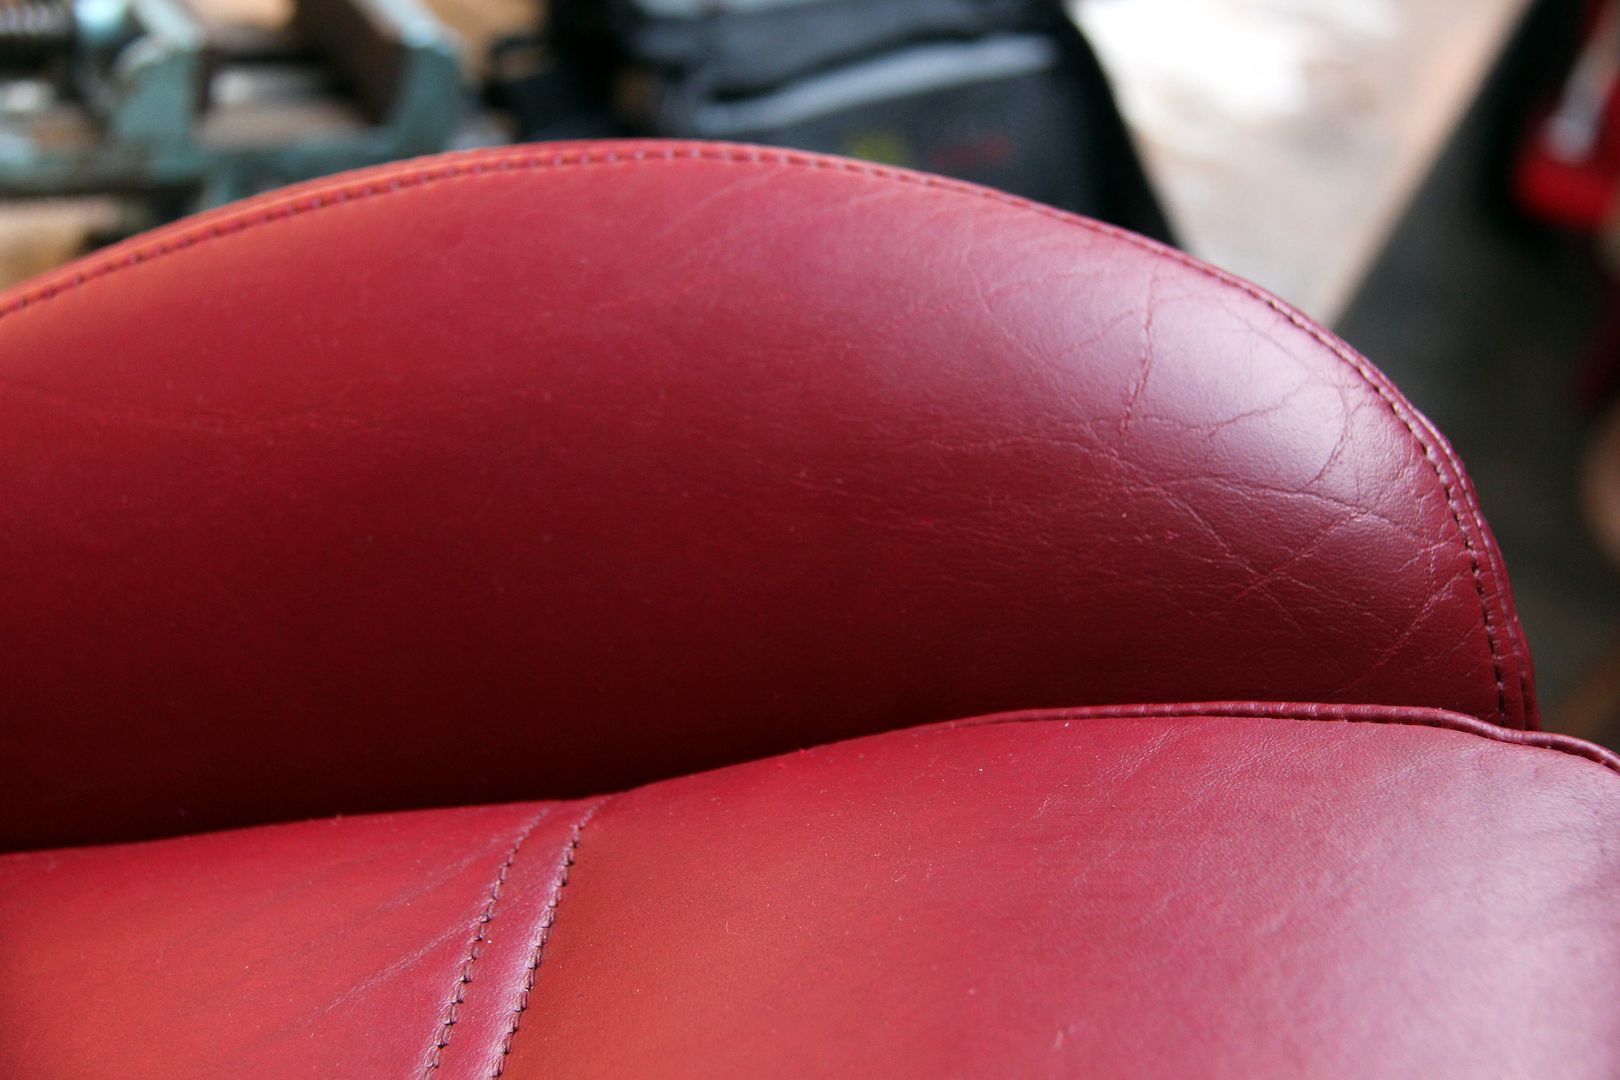 That odd gouge in the squab before; 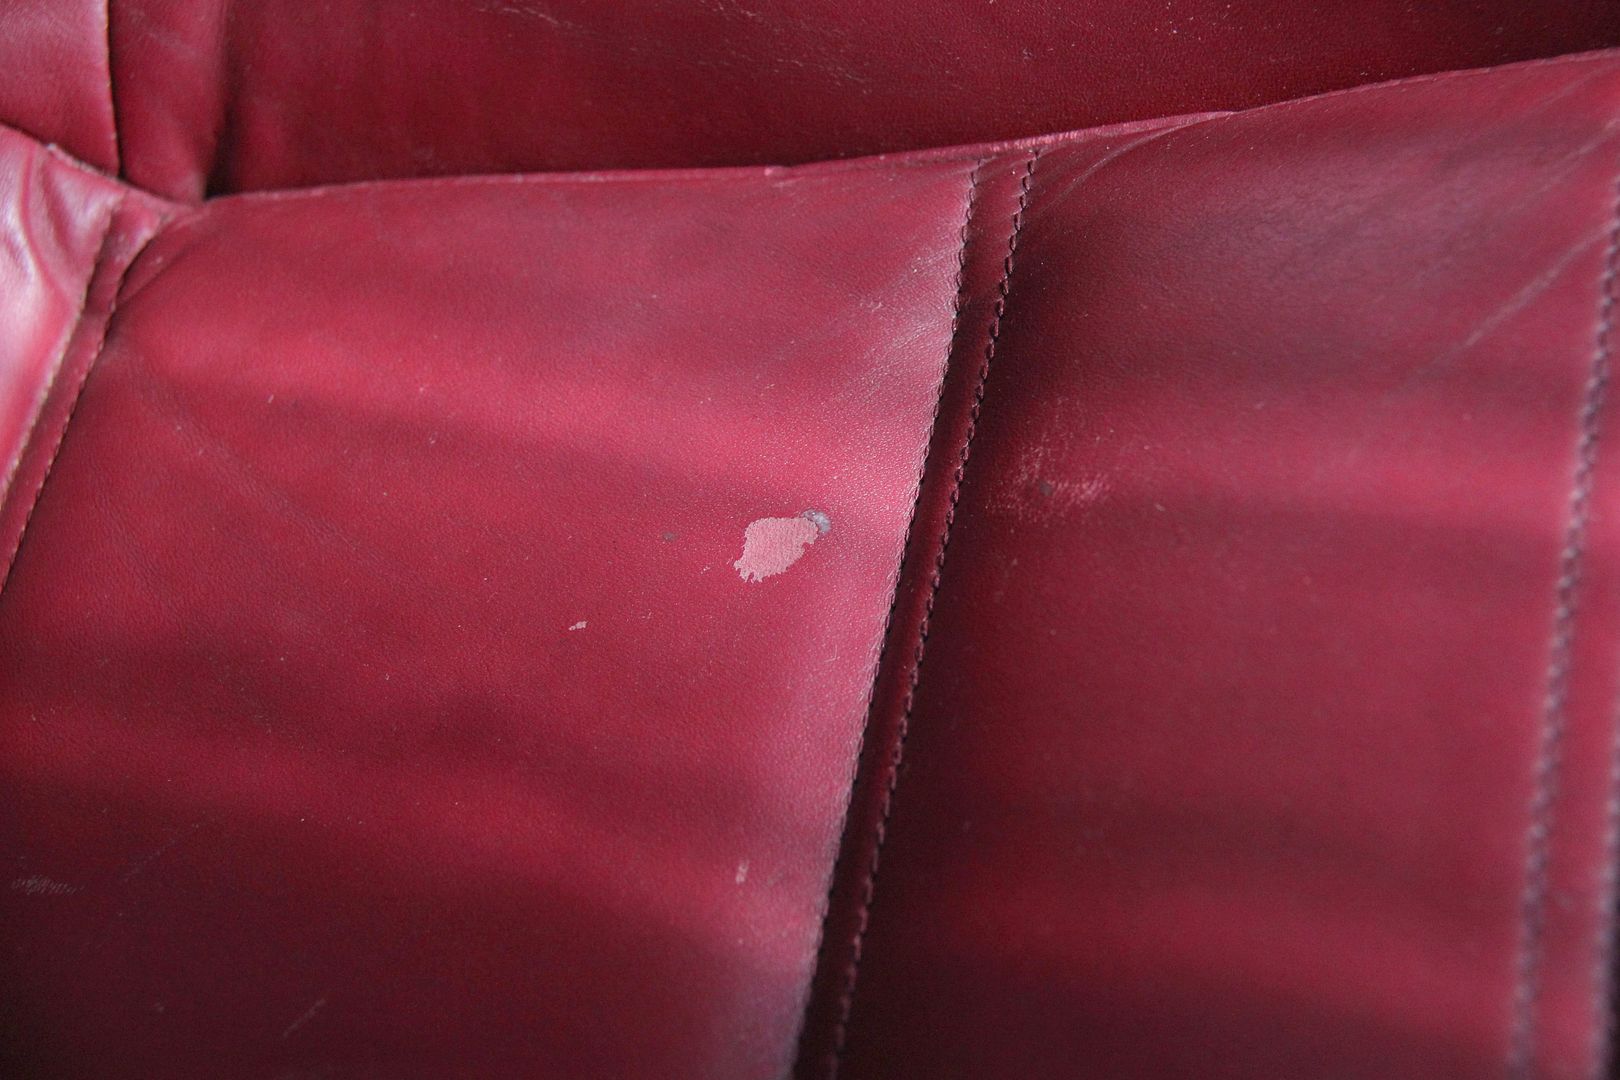 and after: 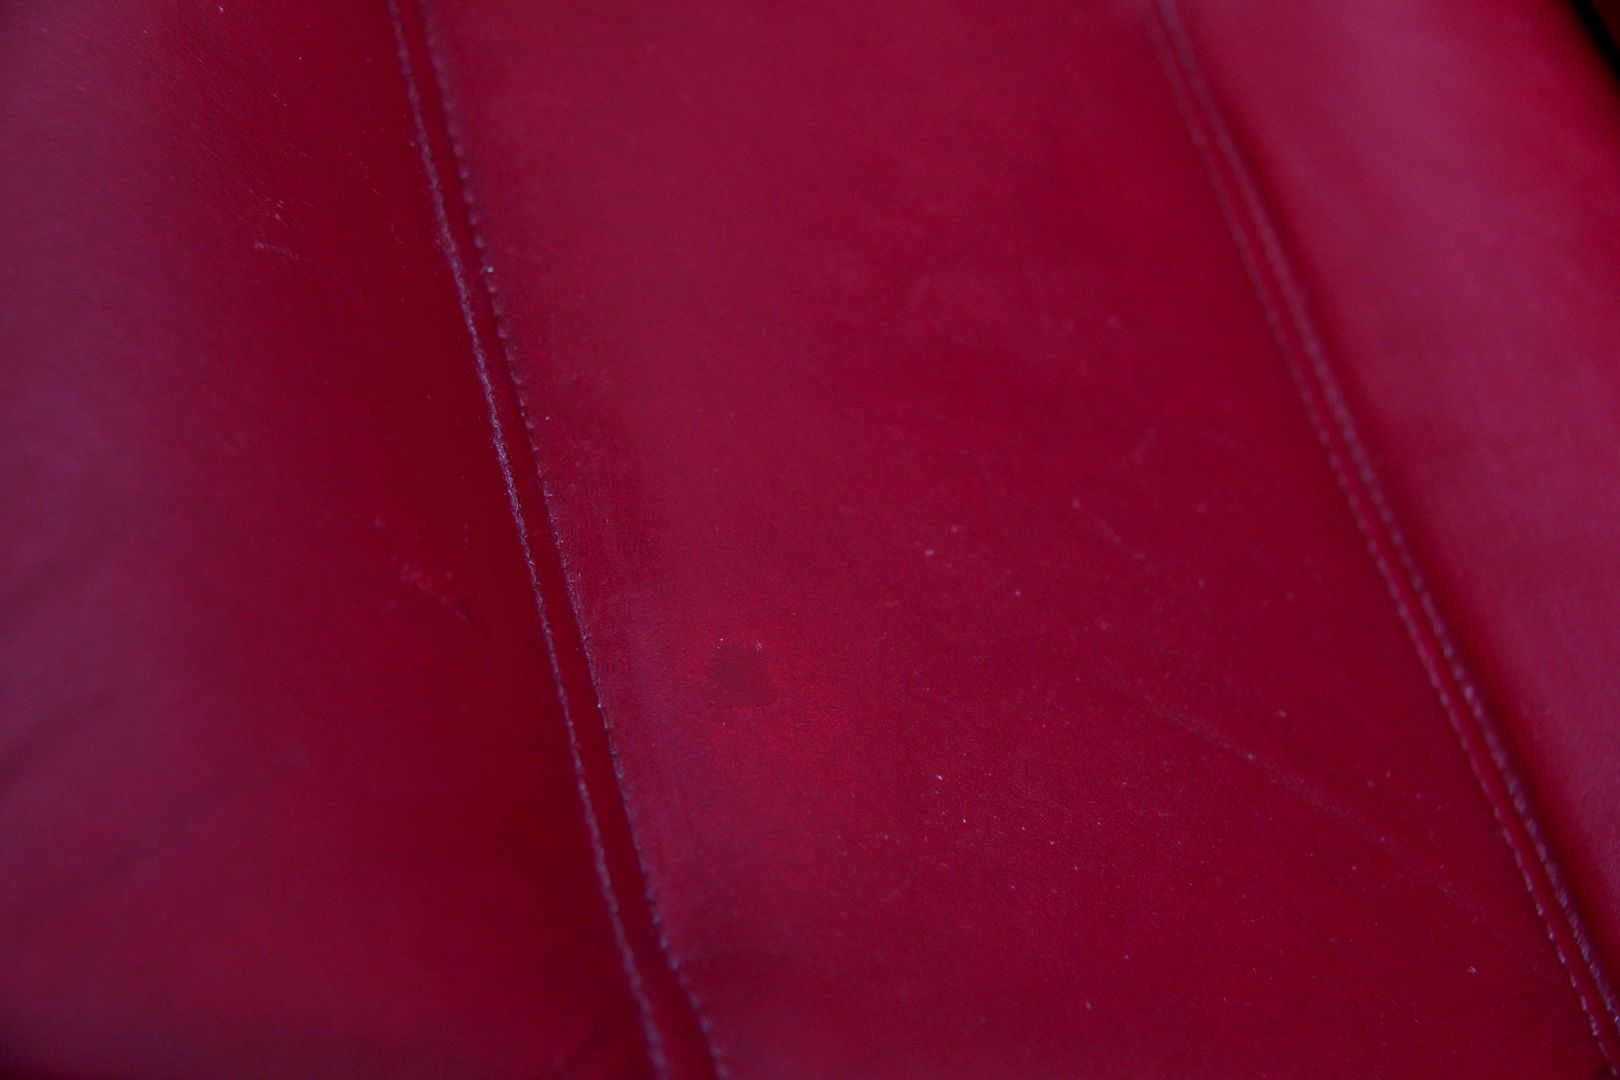 Not invisible, but I don't mind the seats looking used, what I didn't want was them falling to bits. Leather looks much better with a bit of patination and character anyway. Now for the real test, the driver's seat. This was the bolster outside before; and this is it after; 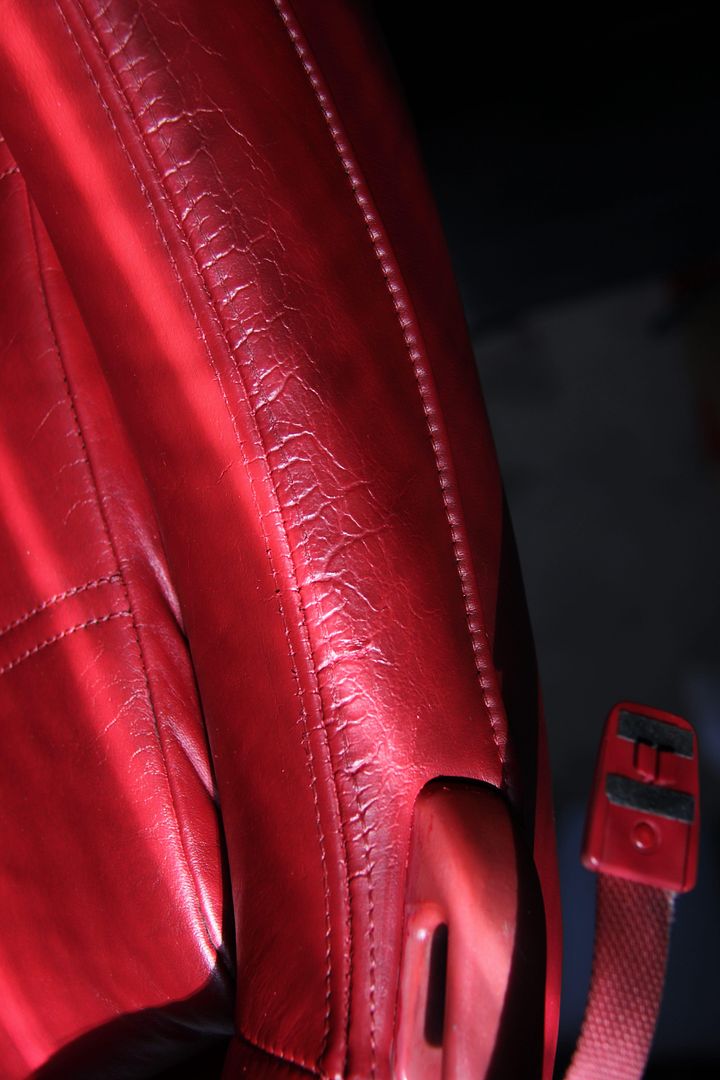 I quite like all the cracks and stuff. If I'd carried on with the filler compound I could have got them even less obvious, but as I said, I think they add a bit of life to the seat. Here's the inside of the bolster before. Mullered! ..and after... 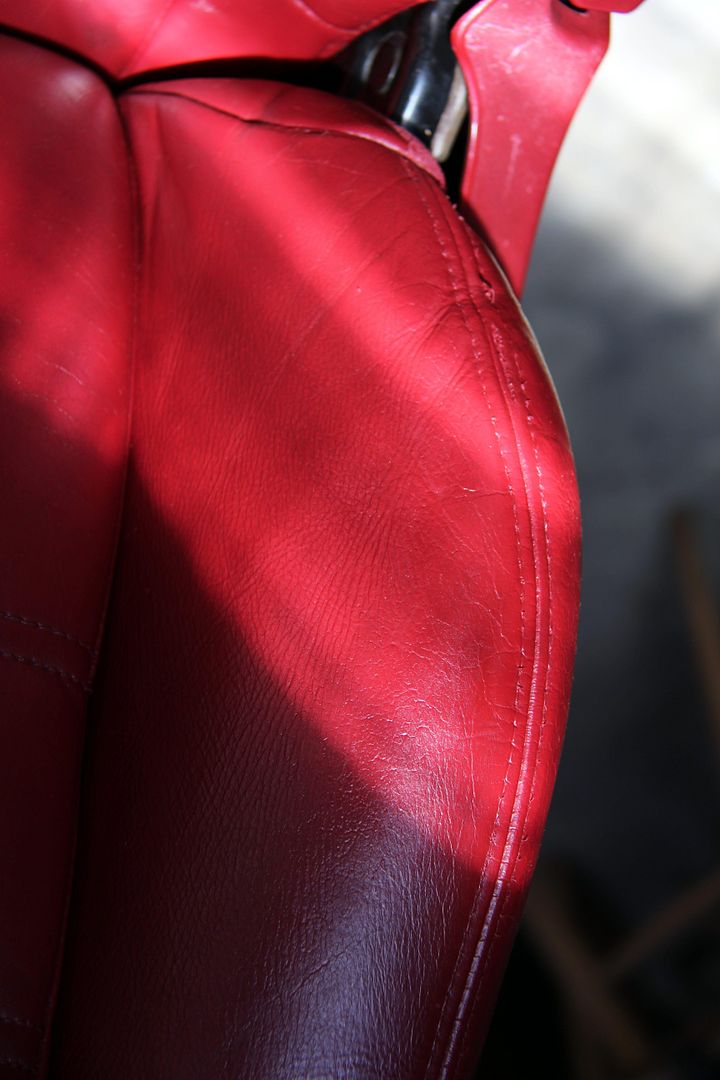 and finally, the side squab, with evidence of meaty thighs rubbing incessantly, ooer; 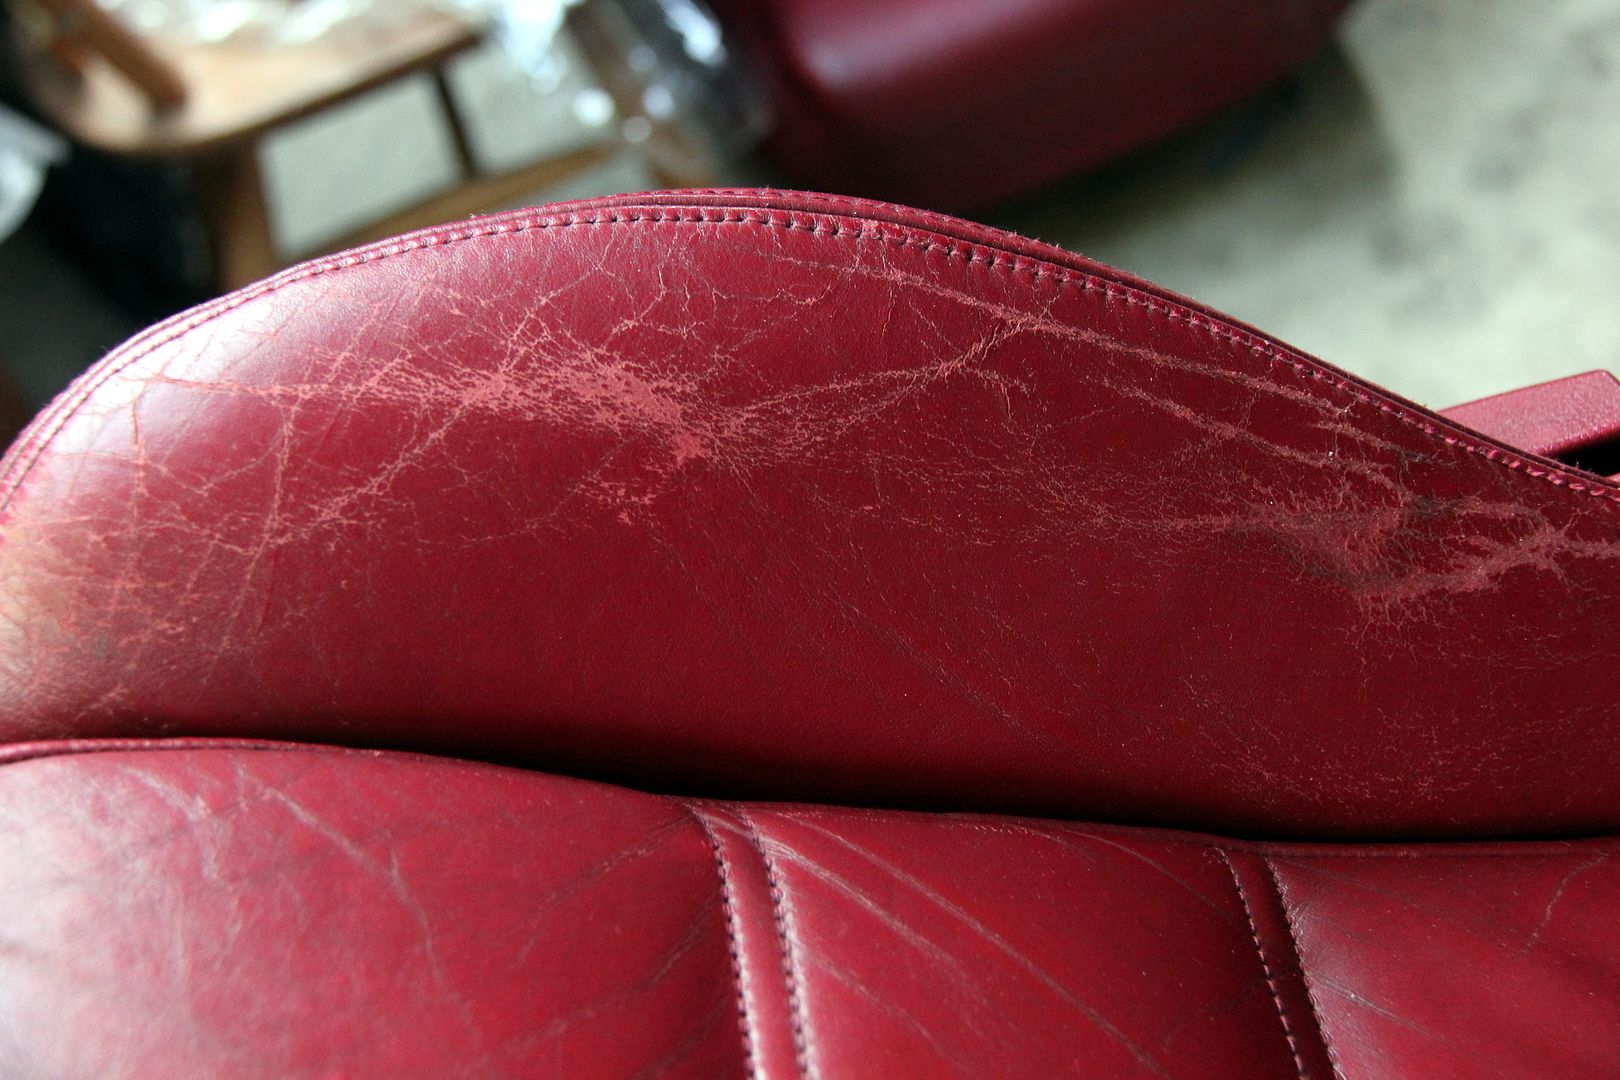 and finished; 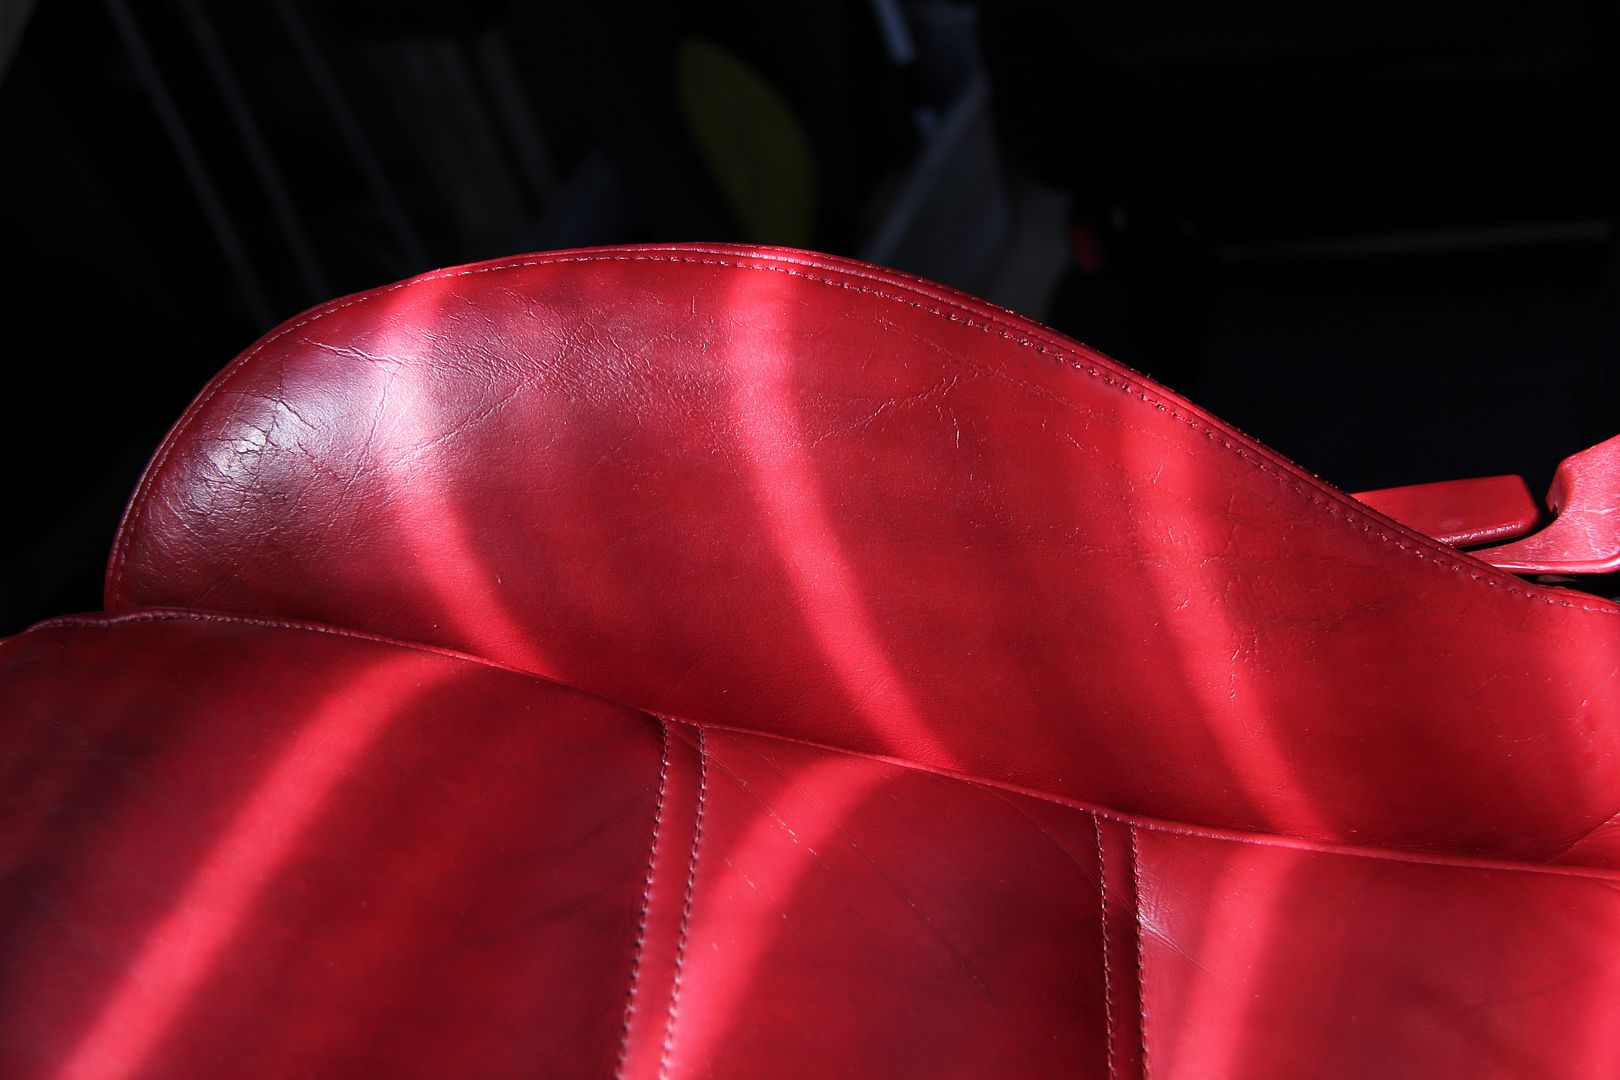 After all these hours of work, false starts and waits for tools I'd never even heard of to be delivered, the actual fitting was a piece of cake. Took a leisurely morning. As a side note, taking the seats out of a car for the first time, you'd have thought you'd make a couple of quid in dropped change at least. Nothing. Nada. Not even a half pence like I got out of the FB. What I did find in the passenger seat rail was a set of keys, clearly from a Honda small motorbike.... but not one I ever owned. No idea, but I guess whosever's they were has adjusted to the loss by now, after all I've had the car over six years now! 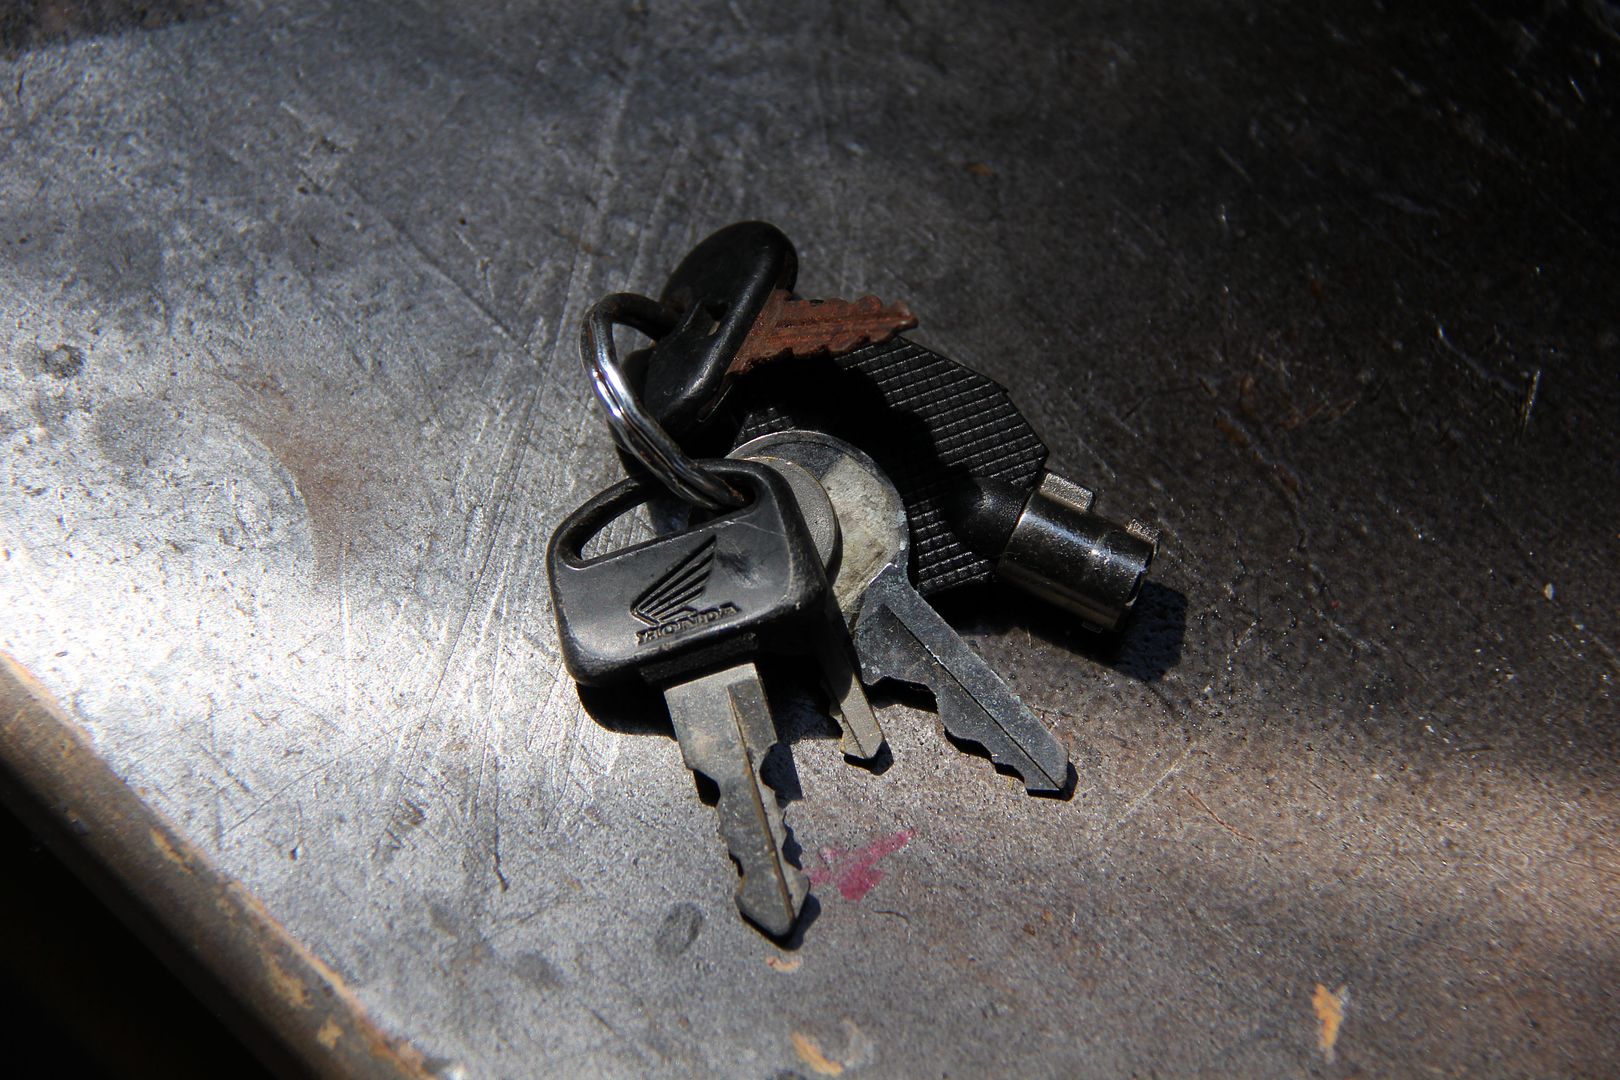 I was struggling with the mod to make the seat runners go further back, having drilled out all the relevant rivets and ground off the dimples, they didn't go any further back than when I'd started. However, when I took the seats out of the car I found the rails hadn't been modded anyway (thought they had, but I must have mis-remembered it. Maybe that was in my old FD). So I didn't bother persisting with it, since the driving position's fine for me, not being freakishly tall. I actually prefer the alcantara finish seats out of all the FD options... even the Recaro RZ seats. The kevlar backs are great but I don't like the acid red upholstery colour. Hate the farbon-effect ones, and black leather is too dour. So, ideally I'd have a set of decent alcantara ones but mine were just getting too worn and tatty, and would soon be through in places. So ne pas possible, and this maroon "Ox-blood" is my second choice. So, worth it? See what you reckon; 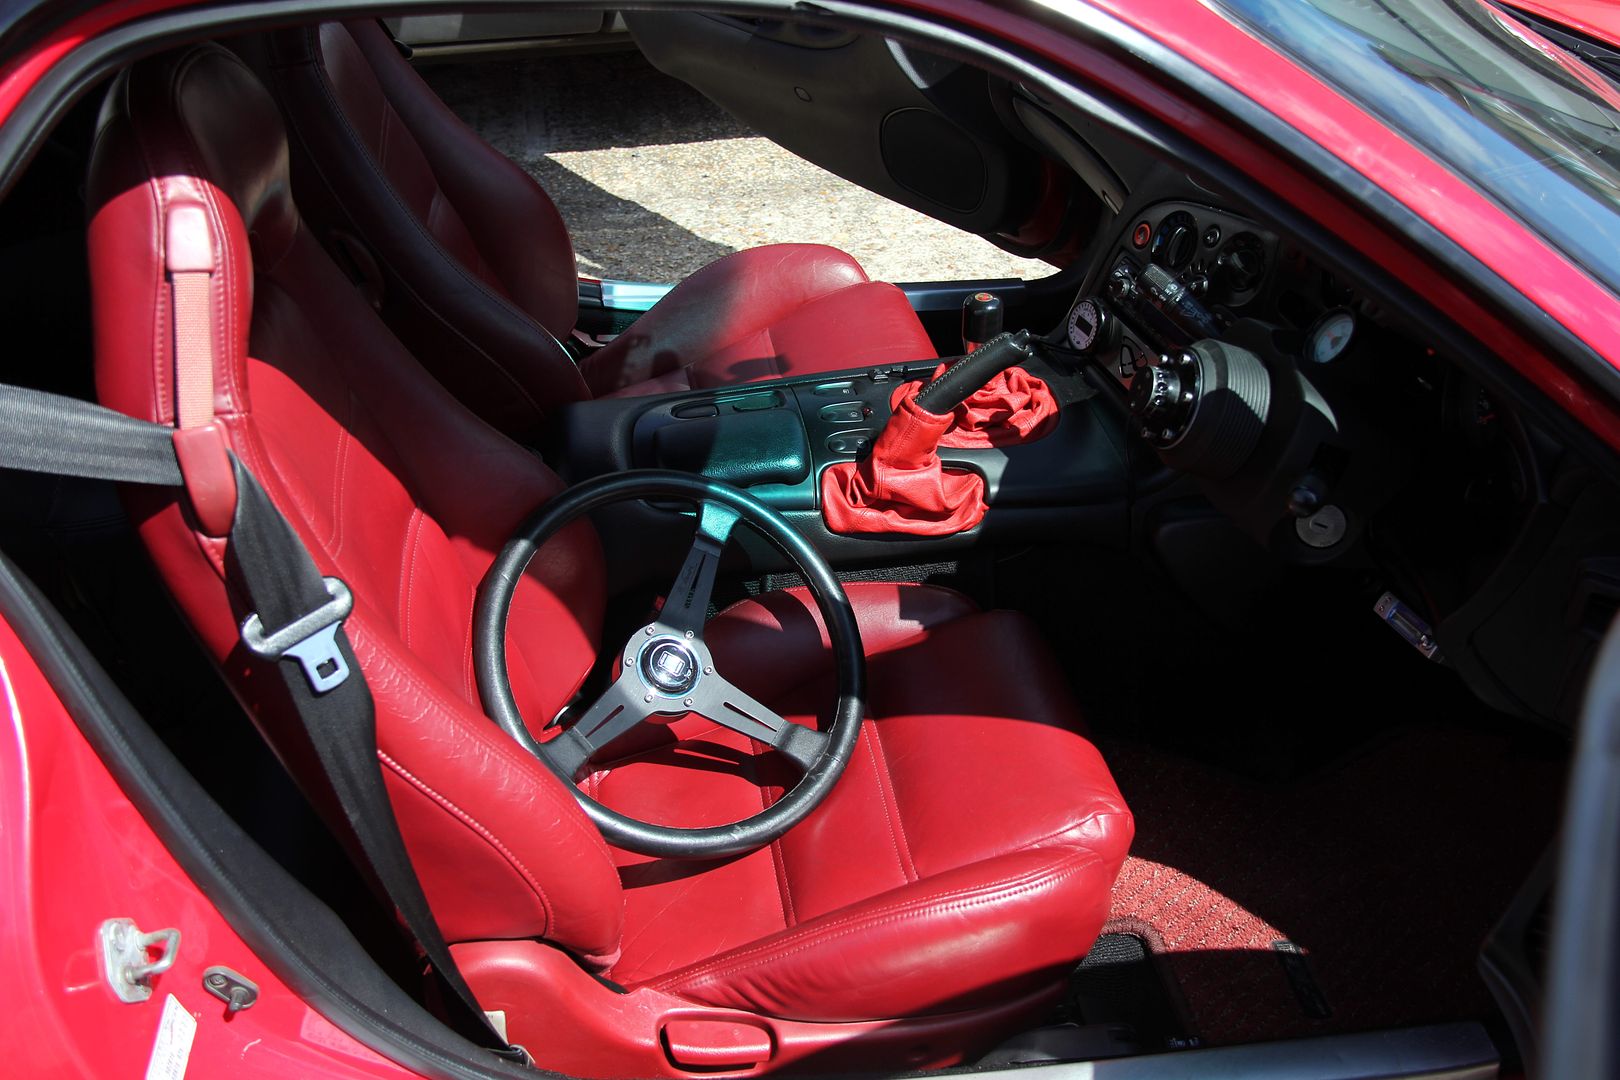 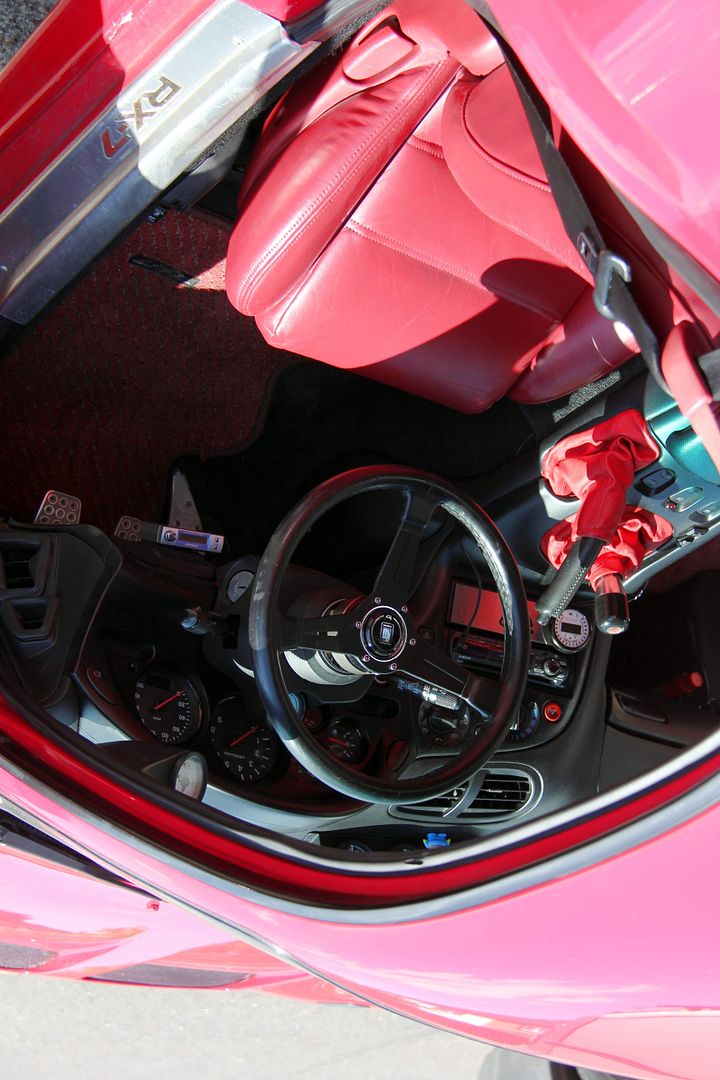 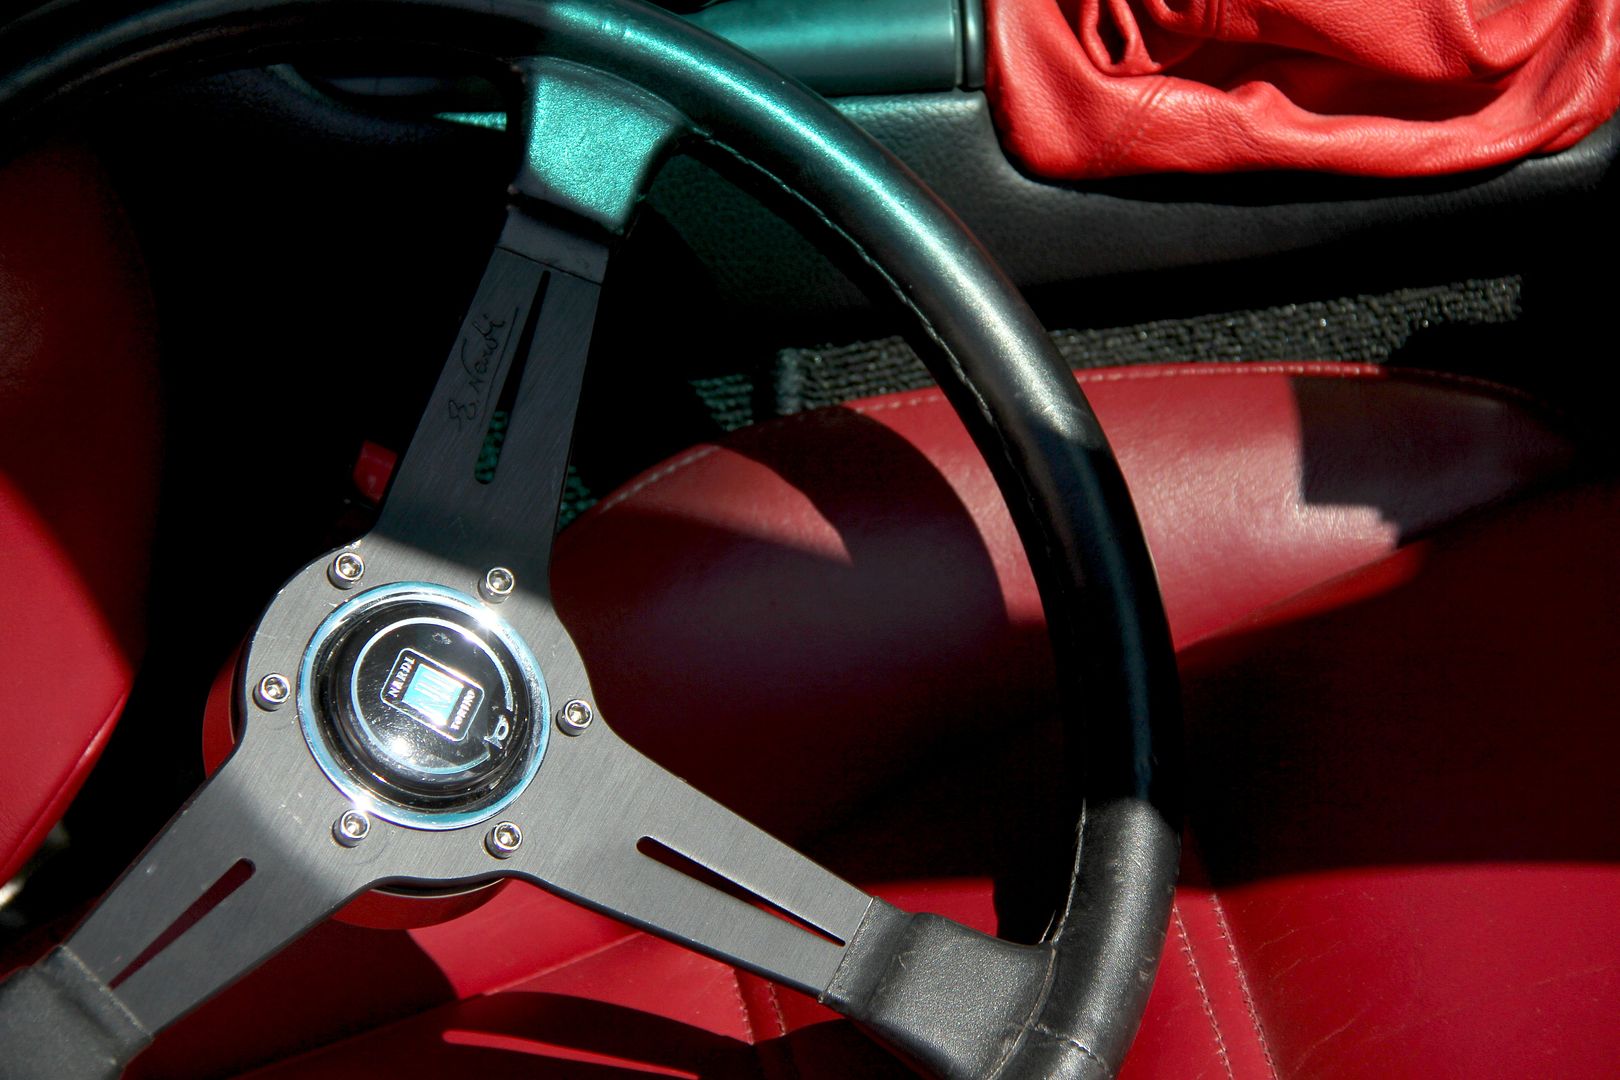 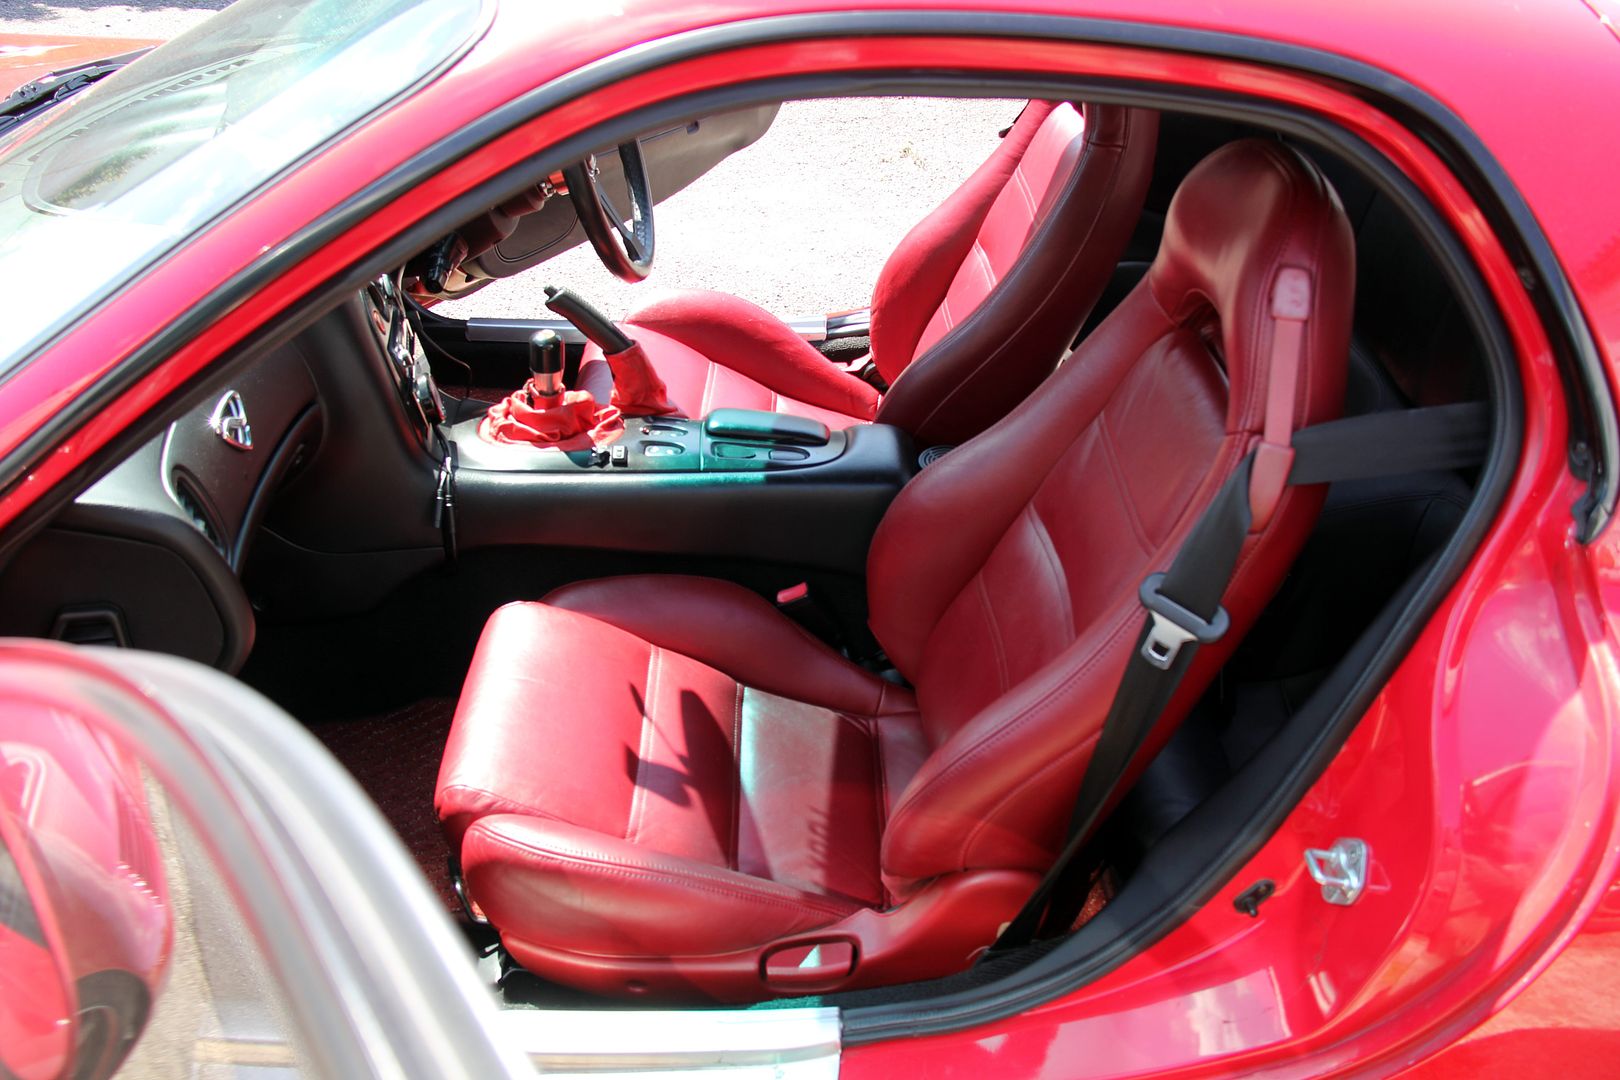 I'm happy. Went out for a monster hoon to celebrate, and they're great. Not at all slidey like I was worried they might be, and best of all, my repairs al held up fine. I didn't end up pink where the sealant wore off either, cos none of it did. Happy days. And as a bonus, the Nardi wheel feels lovely to hold and the re-gained diameter back to stock makes the car feel much more controllable and immediate. Hmmm, maybe Mazda knew something of what they were doin, d'you reckon? Win/win. Me pleased |
| |
|
|
zircon
Part of things
Posts: 327
|
|
|
|
A truly entertaining read. Well done with the seats, I have restored similar leather damage to previous E36's in the past but not to the point of disassembly. I love your description of your heaving garage. Having owned my SW20 MR2 for 11 years now and gone through suspension, engine and interior conversions (together with 6 wheel style options still in ownership) you can imagine just how crammed my 8x10" shed is. What you need to do next is try your hand at an interior colour conversion.....without anywhere under cover to store your car......and in 1 day........ 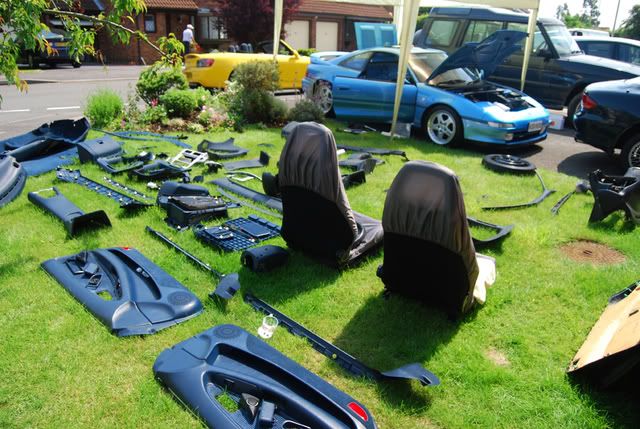   |
| |
|
|
luckyseven
Posted a lot
Owning sneering dismissive pedantry since 1970
Posts: 3,839
Club RR Member Number: 45
|
|
|
|
lol, yeah, that's quite a job. At least your SW20 being a sunroof rather than T-bar model you're a reasonable expectation all your hard work won't be ruined by the leaks from the roof every time it rains. That was a part of MR2 ownership I never quite adjusted to; the sudden cold shower every time you cornered in the rain |
| |
|
|
|
|
|
|
|
|
Thats an awesome bit of seat renovation. Top job on a top car. I do love an FD!
|
| |
1974 Skoda S100 tarmac car
1998 BMW 750 daily
1994 Mitsubishi Evo2
|
|
ChasR
RR Helper
motivation
Posts: 10,197
Club RR Member Number: 170
|
|
|
|
|
Well, this thread had quite a bit in common with a good book. You simply cannot put it back down again! Maybe your witty and bitter posts played a part, maybe it was down the hardship that you have had with the car and with other fools on the road! Whatever the reason was I am sure there have been situations present within this thread that almost everyone on RR can syphathise with, and gives us a little more commitment with the journeys our rides can present us with, much like a horse trying to throw its rider off.
Anyway, thanks for taking the time in creating the thread. What is great to see is that the project seems to have paid off in the end through the cycles of ups and downs with the final incarnation of the car resulting in a truly wonderful beast in terms of its power and current look which has culminated into something rather lovely.
|
| |
|
|
|
|


 It's pretty occult and specialist stuff, and he is a deity of weld!
  Mind you, it was about the time I broke everything else on the car so it seemed about right. I've had a ridiculously loud Kakimoto Red Label pressed into service ever since, but it's finally lost the few vestiges of packing it once clung onto and got embarrassingly loud. Like, madness-inducing, ear-bleeding, involuntary faecal incontinence loud
  Trouble is, the ARC 'zorst was built as a full system, so the backbox will only fit with this exact midpipe. So I had to get it fixed and pronto. The decision was made even more pressing by the failure of the downpipe gasket so the car is not only louder than the entire Apocalypse at the back end, but at the front it sounded like it had an unsilenced VW Beetle trapped under the bonnet.


 The weight of the turbo doesn't help, it's a gurt big thing. I'm going to investigate making a brace to support some of the weight of it, see if that helps


 Tungsten carbide and titanium are mere souffle compared to the hardest substance known to exist in the entire universe. Which is of course the last sausage roll in the heater cabinet of the only roadside caff open at one in the morning.
 Not keen on having to remove tyres like that again!

 One of them things what I found was some mats I forgot I had. I dimly recall trying to sell them to Ada-san one time when he was bleating about missing out on another RED carpet. For those who aren't aware, the RED carpet that came in certain trim packages of FD is incredibly rare (mostly because it came on the curse word options like touring automatics with cruise control that no-one bought) These mats sorta weren't red exactly, but I thought, y'know, at least they'll brighten up the coal-hole interior a wee bit. So one can of amazing Foamingjizooom carpet cleaner later (not the actual tradename) and a weekend of periodically sponging, brushing, hoovering and generally performing all the chores I'd usually rather gnaw my own leg off than do around the house, they came up pretty well.