|
|
|
|
|
|
This may not help as i have no clue about most fords, but for wheel bearing setting i always tighten the nut while spinning the wheel, you can tell when its gone too tight. Then back off the nut until the washer underneath can be moved by levering it with a screwdriver.
I don't know if the washer underneath the nut has enough side to side clearance for that to work or not.
As for grease, ive no idea what would be considered enough grease but i guess the little packets you get with wheel bearings is some kind of indication. I never feel thats quite enough though and tend to use a bit more. Not the half a tub that was in your new hubs though!
I don't think too much would really do any harm, just a messy waste.
Edit...
Thinking about it, I'm sure that wheel bearing technique was probably the book way of setting vw beetles and ive just done similar whenever i could since.
Ive never had a wheelbearing fail though and ive replaced loads.
|
| |
Last Edit: Aug 6, 2019 15:23:58 GMT by VW
|
|
|
|
|
|
|
|
|
|
Very nice work on the car and the house Alex.
|
| |
|
|
|
|
|
|
|
|
If you put too much grease in it will just get messy. It wont hurt it though.
How much thread is available for the nuts? 3mm shorter is not very much. If 3mm was the difference between not enough & enough then the longer ones are still too short, lol.
From memory you spin the wheel while torquing the nut up to about 15Lbs/ft then you back off the nut till you can just push the washer sideways with a screwdriver. Torquing while spinning is just to seat the bearing - not to tighten it.
When the wheel is back on you can try rocking it with your hands at the top & bottom of the tyre - there should be a slight amount of play detectable - if there isnt it's too tight. The slight play is to allow for heat expansion of the bearing.
Never tighten the nut to get the split pin to fit the castellated nut cover- always slacken. The nut cover can be moved around a bit to line up with the pin as the slots are not equally spaced.
|
| |
|
|
eurogranada
Europe
To tinker or not to tinker, that is the question...
Posts: 2,556
|
|
|
|
If you put too much grease in it will just get messy. It wont hurt it though. How much thread is available for the nuts? 3mm shorter is not very much. If 3mm was the difference between not enough & enough then the longer ones are still too short, lol. From memory you spin the wheel while torquing the nut up to about 15Lbs/ft then you back off the nut till you can just push the washer sideways with a screwdriver. Torquing while spinning is just to seat the bearing - not to tighten it. When the wheel is back on you can try rocking it with your hands at the top & bottom of the tyre - there should be a slight amount of play detectable - if there isnt it's too tight. The slight play is to allow for heat expansion of the bearing. Never tighten the nut to get the split pin to fit the castellated nut cover- always slacken. The nut cover can be moved around a bit to line up with the pin as the slots are not equally spaced. I think the amount of grease I put in is ok. I'm just doubting if I got it to go in the rollers well enough. I used the packing method where you put the grease in the palm of your hand and press the outer rim of the bearing into the grease repeatedly to fill it up and come out the inner smaller rim. And I think I'm good, but having thought that the last time too I'm extra careful. I had wanted to measure the stud threads and how many turns the nuts make etc. but got distracted and forgot. Tonight I'll try and measure and also determine what time-sert/helicoil I should get to fix the steering rack return line thread. Need to figure out what size and thread that connection is (it's the larger of the two) The wheel bearing that I fully adjusted is currently adjusted to have a very slight amount of play present. Using basically the procedure you stated. I'll check tonight to see if I can move the washer with a screwdriver as I'd not done that. So I think I'm good this time. |
| |
|
|
|
|
|
|
|
|
Hi Alex,
If you want a second pair of eyes / hands to help set the wheel bearings, you know I am always happy to come over. I'm sure you have it right, but I know what it's like when you just don't have the confidence in your own work.
With the rack, rather than a helicoil would it be easier just to tap it out to a larger size and either use an adaptor or have a new line made up?
|
| |
|
|
eurogranada
Europe
To tinker or not to tinker, that is the question...
Posts: 2,556
|
|
|
|
Hi Alex, If you want a second pair of eyes / hands to help set the wheel bearings, you know I am always happy to come over. I'm sure you have it right, but I know what it's like when you just don't have the confidence in your own work. With the rack, rather than a helicoil would it be easier just to tap it out to a larger size and either use an adaptor or have a new line made up? Thanks Sam, It'll come as no surprise that I had you in mind already if I really did feel the need to have a second pair of eyes look it over. Regarding the rack, tapping out to a larger size fitting would that not require the exact same work as a time-sert/helicoil? Drilling out the current thread and tapping new thread? The line is a formed metal line with a fixed connector and a very specific shape with an o-ring on one end and a bulge on the other end so the rubber hose that goes over it seals well. Hard to explain without a picture. To get a larger connector on it would mean cutting it or creating one from scratch. Seems to be more bother than time-serting or helicoiling the hole. Because of the fluid aspect in this case, I have more faith in time-serts as they are tubes, not single coils so sealing should be easier. |
| |
|
|
|
|
|
|
|
|
For the wheel bearings what you have done sounds fine, if you are not sure it is well distributed spin the wheels for a couple of minutes each with no load on them.
For the studs, the usual rule of thumb for a steel on steel threaded connection is a minimum thread engagement of 1x the stud diameter, for high tensile bolts or alloy use 1.5 x the diameter, I would be aiming for this on a wheel.
|
| |
|
|
eurogranada
Europe
To tinker or not to tinker, that is the question...
Posts: 2,556
|
|
|
|
|
Thanks for that addition regarding the studs. I'll keep that in mind when I measure.
|
| |
|
|
|
|
|
|
|
|
Sorry to hear the health news.
|
| |
|
|
eurogranada
Europe
To tinker or not to tinker, that is the question...
Posts: 2,556
|
|
|
|
Thanks georgeb. It's truly a sad time, but it's all part of life's cycle. Doesn't really make it any easier though. So yesterday I managed to shift my own mood and compel myself to step into the garage and do some measuring. I started with the hubs. The old hubs have studs that protrude 23mm and are just about 12mm in diameter. The new hubs only have 20mm protruding. So with the wheel on, the new hubs at best (was hard to measure ecactly) have 8mm of thread to the rim edge. As the nuts are a conical shape they recess a little further in the wheel so my guess is that there's about 10-12mm of thread being engaged. To put it another way: it takes 7 full turns to go from loose to tight, ready for being torqued to spec. So, is this enough? I doubt it given the info blackpopracing provided. Should I swap the stubs for the extra 3 mm length? With the longer studs I've never felt insecure. I may be overthinking this as well. I mean 7 turns is not just one or two. And a torqued nut should not come loose anyway. Also I regularly check the nuts on the wheels as well. Advice is welcomed! I also turned my attention to the rack threads. I undid the line and took it off the car. The line looks like this, with both ends shaped, which makes me feel it's more work to adapt this than to helicoil or time-sert the rack.  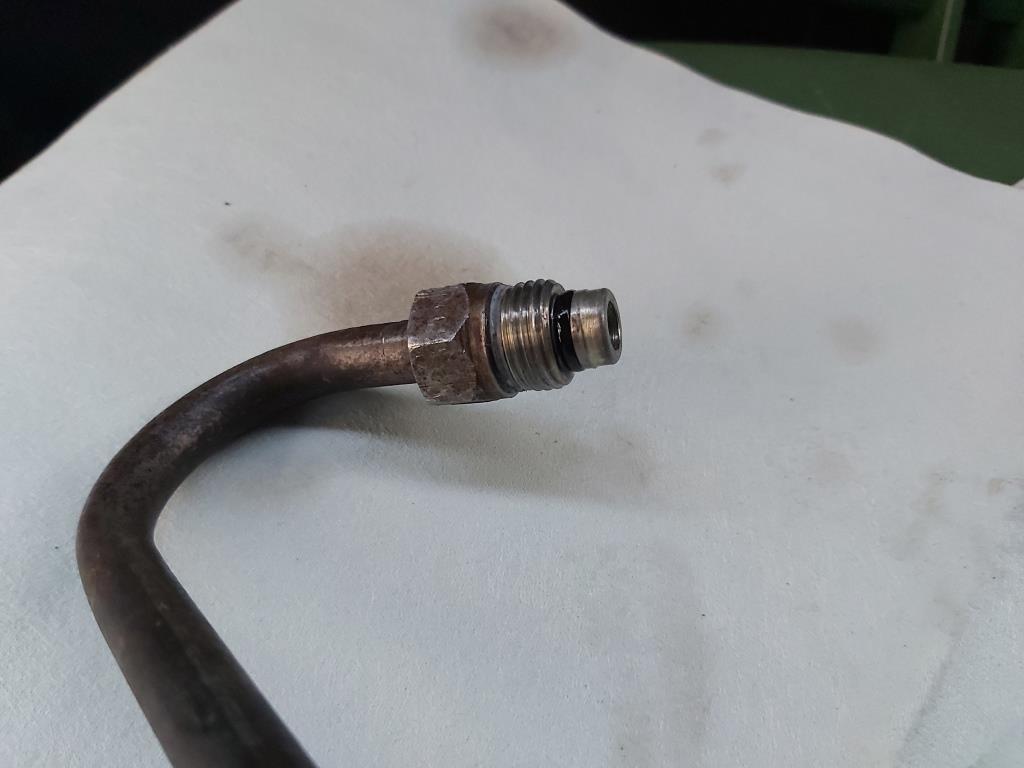 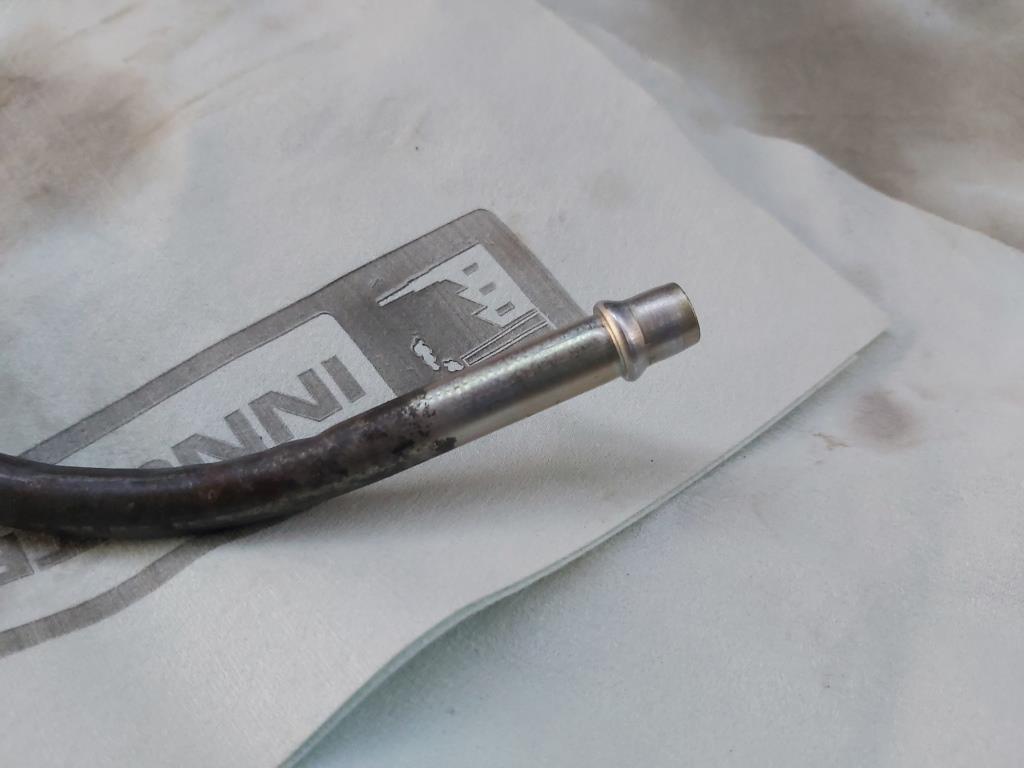 I have two types of fittings I can work with, different shapes, but same thread. I measured the OD of the threads on both as 15.65mm ish. The old type fitting has more threads and a 16mm hex head. The new type fitting has less threads and a 17mm hex head. 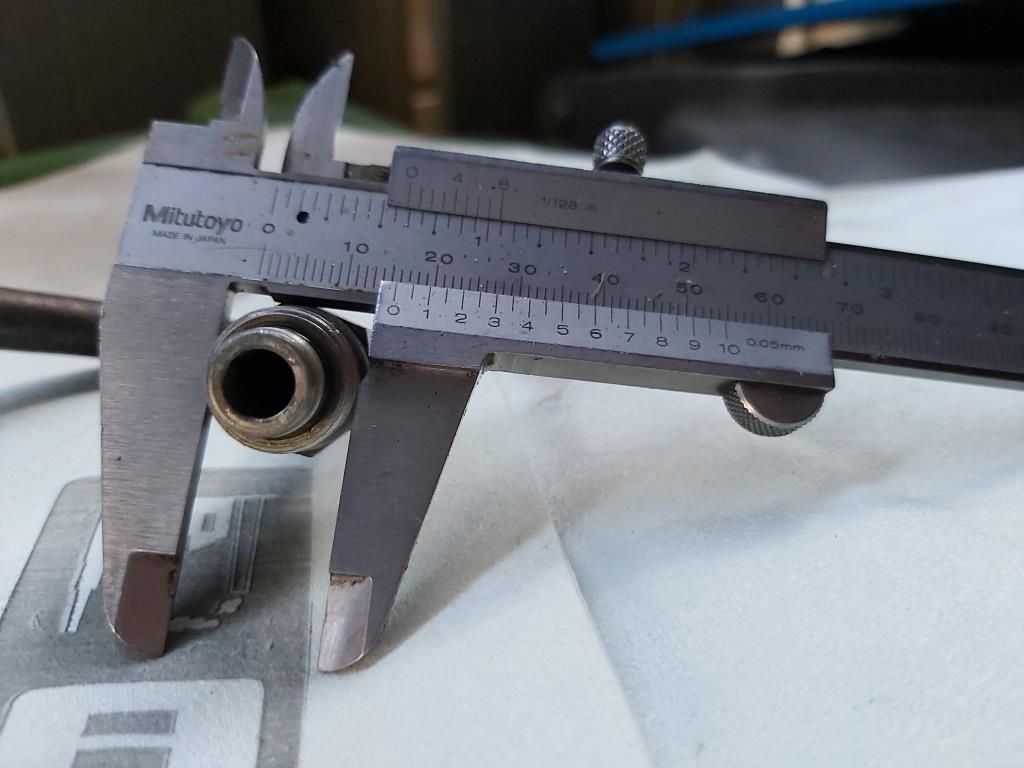 I compared the two types of fittings I had to a actual size scaled chart. 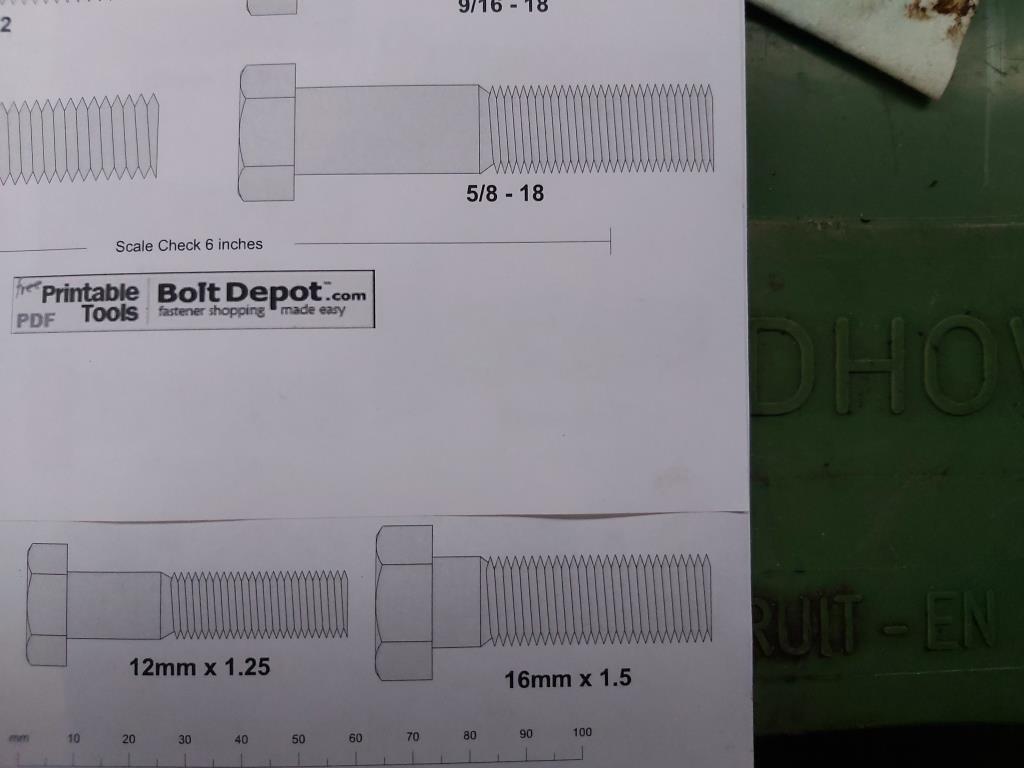 Based on this it could be either the Metric M16 or the US/non metric 5/8th. These seemed very much alike. Teeth seemed to line up pretty well with both. At that point I was still not really sure what to buy so I dug a little deeper. I took out my extensive tap and die set and based on the 15.65mm I took to the M16 section. When measured for diameter it fitted exactly between the prongs of the locked in measurement for the thread outer diameter. Visually it was pretty clear that there was only one pitch that came close to matching and that was M16 x 1.5. I compared it against the threads on the fittings on the lines. Old type with more thread to check 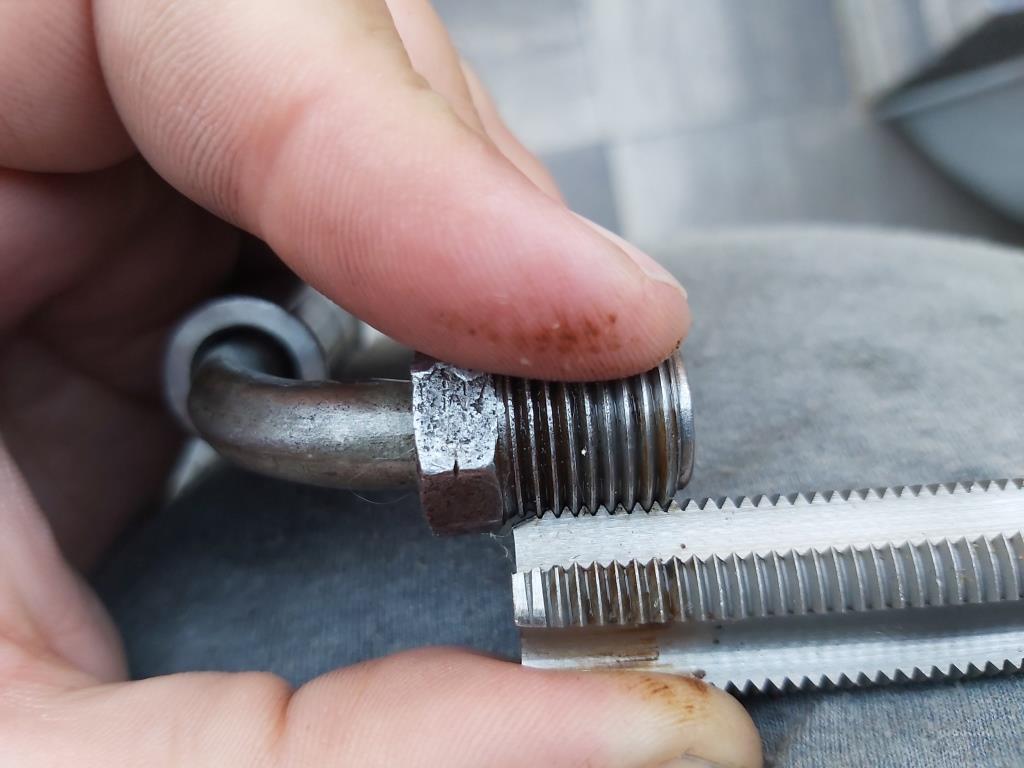 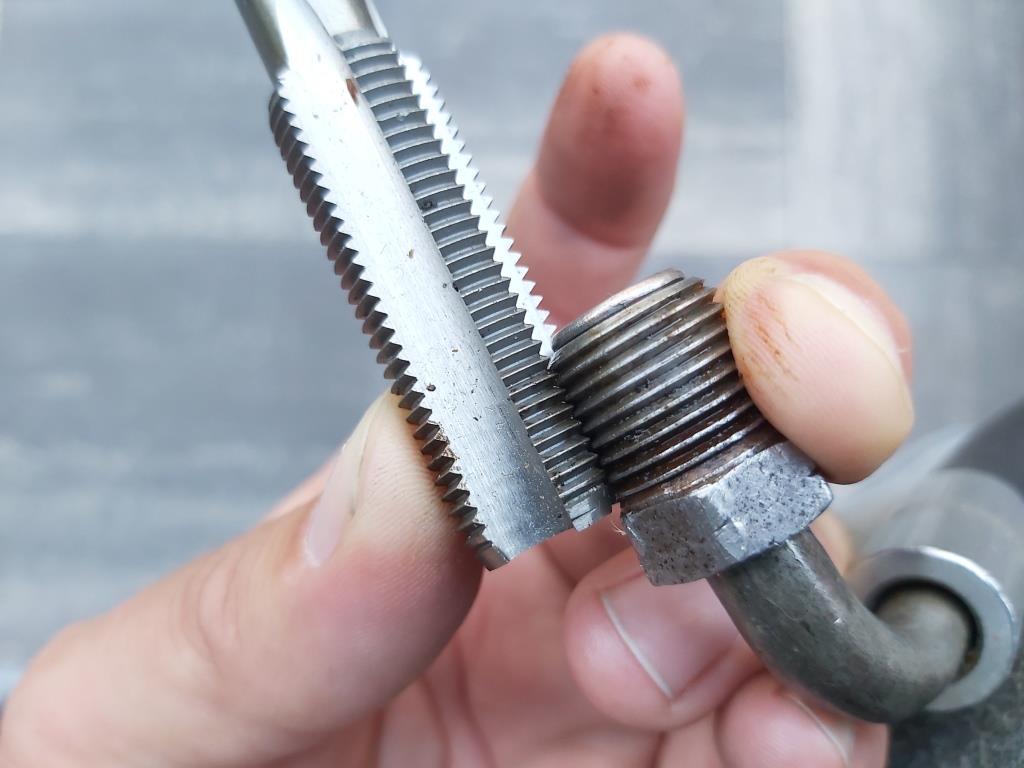 New type with less thread 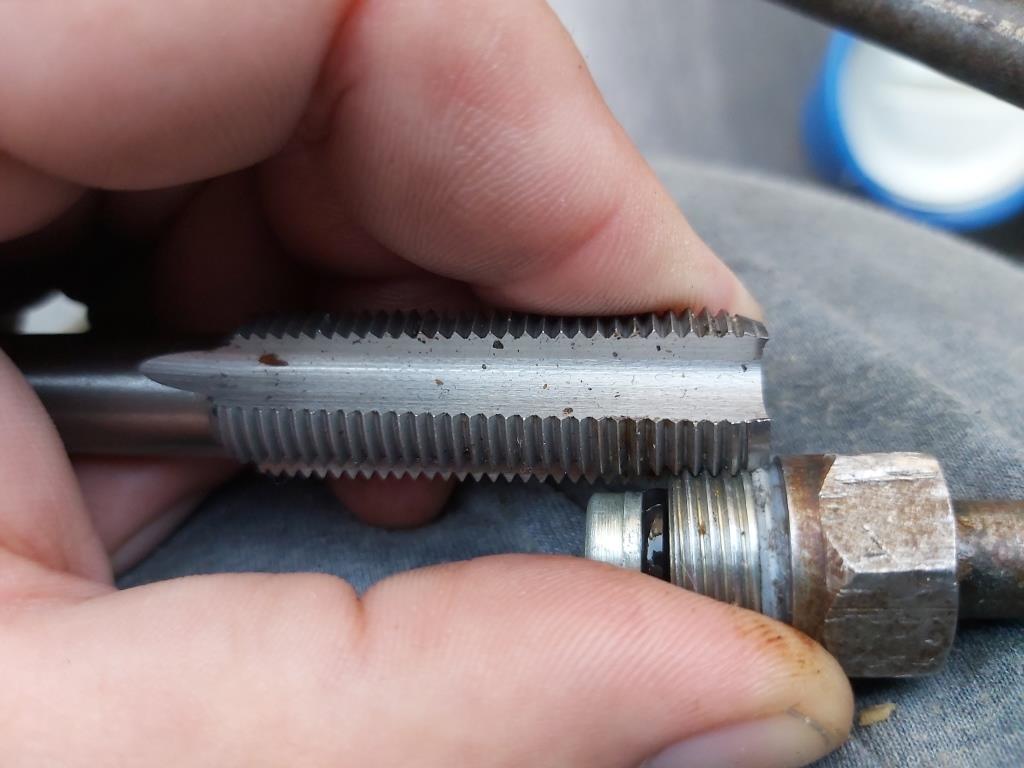 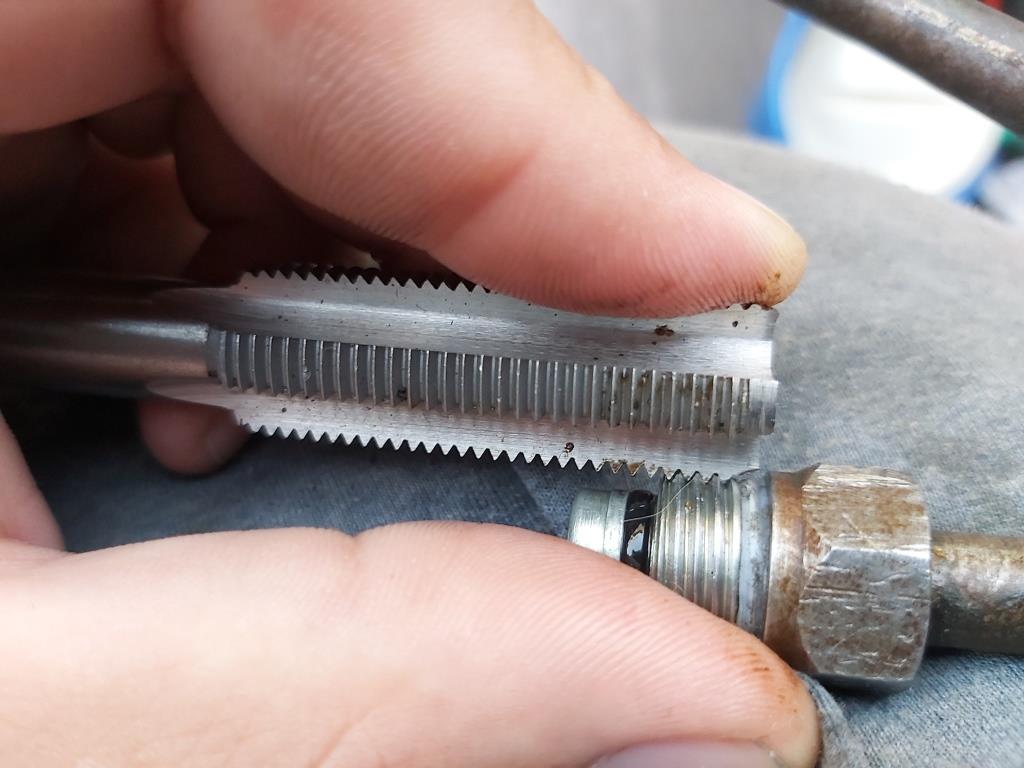 This indeed seemed to come pretty close, but could I be sure? Well at that point I had a look at the original Granada pump and it turns out that the pressured line uses this same fitting. So I undid the one on the pump, tried both lines and they went in smoothly by hand only, all the way to seating. With that known, I ran my M16 x 1.5 tap in the hole on the pump and that just screwed in without any friction as well. It didn't hang, cut or anything. So in conclusion I think I should now be able to say that M16x 1.5 is the thread type of the fittings and therefore threads in the rack. As a final measurement to determine what insert I'd need I measured the depth of the hole on the rack. That came back as 13mm. 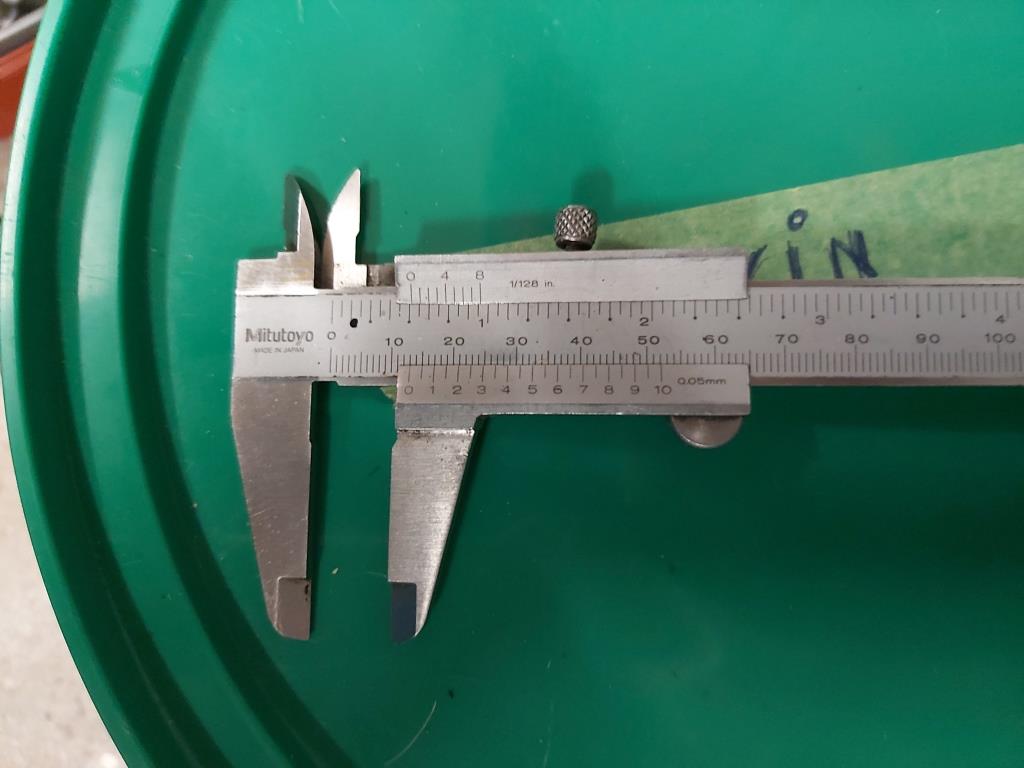 Now the question is this: do I helicoil or time-sert? Helicoil is more readily available and slightly cheaper. But being loose coils, I'm a little concerned about fluid leaks as this is not just a head bolt or exhaust stud but an ATF line. Although the line has an O-ring that should stop things leaking in the first place I'd not put all my trust in that. A time-sert is a little tube, so there's no way for it to leak once fitted especially with a little locktite on the outer rim. Although I'd probably do that on the helicoil as well. There's also the dilemma of the hole depth being shallow. So both types of inserts will protrude and will have to be flatted off. Time-sert states this is no problem on these type of blind holes. Helicoils I presume the same once locked in place. So any thoughts on this before I try and find the right stuff online? |
| |
|
|
|
|
|
|
|
|
Alex - The wheel studs on the hubs look removable / separate to the hub manufacture - on the hubs that you have removed from the car wind a wheel nut on to one of the studs to just a few threads short of being flush with the stud the with the hub stood upright on a firm base / garage floor give the nut a good firm but square whack with a hammer and it will come out - they are on a friction / interference fit with a machined collar to prevent them from turning / lock them into place - you can also press them out if you have access to press at work - just take care not to damage the threads - if you use a nut every time that should prevent this - so if you press them out on both hubs you can simply swop the short studs for the long ones by pressing them back into your new hubs - on the rack I cant really comment much further it looks like you have it figured out and its one of those jobs that you don't know if its going to work until you get on and do it - personally I have every confidence in your way forward - there is only one way to find out - Good luck - Chris
PS - Sorry to hear of the family news
|
| |
Last Edit: Aug 8, 2019 7:14:32 GMT by Deleted
|
|
|
|
|
|
|
|
TBH both length studs are probably OK, ford would not skimp on stud length. Another quick check for you is do one nut up properly and put another on only just enough to engage a thread. Then measure both from the wheel surface and this will give the amount of thread engagement.
My comment about the 3mm difference was not to worry you but to say you were probably over worrying!
If you really want long studs you can buy them easily off ebay or similar and get over length ones.
Rack will be M16 as car is new enough to be past using imperial stuff. If using high strength loctite (there are 3 strengths) either option should work.
|
| |
|
|
eurogranada
Europe
To tinker or not to tinker, that is the question...
Posts: 2,556
|
|
|
|
TBH both length studs are probably OK, ford would not skimp on stud length. Another quick check for you is do one nut up properly and put another on only just enough to engage a thread. Then measure both from the wheel surface and this will give the amount of thread engagement. My comment about the 3mm difference was not to worry you but to say you were probably over worrying! If you really want long studs you can buy them easily off ebay or similar and get over length ones. Rack will be M16 as car is new enough to be past using imperial stuff. If using high strength loctite (there are 3 strengths) either option should work. Thanks for that! I may have taken your comment slightly as a caution, yes... lol. The rack is from '84 as far as I can tell from the labels. On the threads in the rack I'll see what is best available to me and go with that, probably helicoil based then. Locktite has plenty versions, happen to know a bottle number (2700/270 by any chance?)? |
| |
|
|
eurogranada
Europe
To tinker or not to tinker, that is the question...
Posts: 2,556
|
|
|
|
Alex - The wheel studs on the hubs look removable / separate to the hub manufacture - on the hubs that you have removed from the car wind a wheel nut on to one of the studs to just a few threads short of being flush with the stud the with the hub stood upright on a firm base / garage floor give the nut a good firm but square whack with a hammer and it will come out - they are on a friction / interference fit with a machined collar to prevent them from turning / lock them into place - you can also press them out if you have access to press at work - just take care not to damage the threads - if you use a nut every time that should prevent this - so if you press them out on both hubs you can simply swop the short studs for the long ones by pressing them back into your new hubs - on the rack I cant really comment much further it looks like you have it figured out and its one of those jobs that you don't know if its going to work until you get on and do it - personally I have every confidence in your way forward - there is only one way to find out - Good luck - Chris PS - Sorry to hear of the family news Thanks for the vote of confidence! And your sympathy as well. I had not considered your method of stud removal with the nut and hammer approach, but had seen that they should press out pretty easily. I'll do the extra measurement blackpop suggested with one nu tight one just on and go from there. |
| |
|
|
|
|
|
|
|
|
Sorry to hear about your father in law.
I am not sure if fitting a helicoil in the rack will solve the issue as you have to take into account how the connection is designed. The connector with the o-ring has a specified diameter bore which matches with the o-ring diameter and the combination avoids leaks and drilling and fitting a helicoil will disturb this design.
The connector without o-ring meets a kind of conical bore which avoids the leak and this cannot be removed. As far i can see those connection are not interchangable and drilling and fitting a helicoil will kill the design and may cause leaks.
Which line has the problems? The feed or return line?. You cannot bodge the feed line as the pressure is very high. The return line can be bodge more easy as the pressure is low.
I would take it to an hydraulic shop to see what your options are as they must have seen those problems more often.
Peter
|
| |
|
|
|
|
|
|
|
|
Locative normally says high or low strength on bottle.
Studlock is normally the high strength and threadlock low strength.
|
| |
|
|
eurogranada
Europe
To tinker or not to tinker, that is the question...
Posts: 2,556
|
|
|
|
Sorry to hear about your father in law. I am not sure if fitting a helicoil in the rack will solve the issue as you have to take into account how the connection is designed. The connector with the o-ring has a specified diameter bore which matches with the o-ring diameter and the combination avoids leaks and drilling and fitting a helicoil will disturb this design. The connector without o-ring meets a kind of conical bore which avoids the leak and this cannot be removed. As far i can see those connection are not interchangable and drilling and fitting a helicoil will kill the design and may cause leaks. Which line has the problems? The feed or return line?. You cannot bodge the feed line as the pressure is very high. The return line can be bodge more easy as the pressure is low. I would take it to an hydraulic shop to see what your options are as they must have seen those problems more often. Peter Hi Peter, You are, in my opinion, partially right. And in my search for the right stuff to do this job I had actually given this concern a lot of thought. You are right in that I must not disturb the much smaller diameter inner hole that the o-ring seats in!! Even though it's the return line, if it's not the pressure than it's the volume that means this joint needs a decent seal! But I think I can get away with a helicoil style repair here. Bear with me... I have 13mm to drill down to get to the flat part of the hole where the smaller hole is located. There's a considerable amount of flat present. With any kit or drill/kit combo that I find my plan of attack would be: measure the tip of the drill to where the drill starts cutting. Subtract that amount from the 13mm I need to drill down. At that point stop and pull back the drill. Modify the drill by flatting off/modifying the point so it almost becomes a flat drill (sort of like a spotweld drill). Drill the remaining few mm. And then go on with tapping and inserting the helicoil. I don't think it's especially easy, but it's got to be done. Thankfully aluminium is a soft metal. A visit to the local hydraulic shop is a good suggestion and I may do that first. I think I should have the opportunity on friday, but that would mean spending my evening tonight removing the rack again... Doable I suppose. I'm running in to a problem or two though in finding the right stuff to fix this thread. I need a M16 x1.5 helicol repair kit. But any I find over M12 suddenly do not supply a drill. I've found the drill size for a M16 x 1.5 helicoil is 16.25mm. A size that subsequently is hard to find. A 16mm drill is manageable, but in theory, the hole for the tap to run through is .25mm too small which would probably mean cutting thread is harder to do. And that is not to mention the wide range of prices on helicoil kits in this size. Even with a clear path on what to do, it's never simple right? |
| |
|
|
|
|
|
|
|
|
Sorry i cannot help you with helicoil stuff. You need the ,25mm otherwise the tap will not work. Because it is aluminum, you could consider to use a Dremel with a sanding drum- BTW you also need to grind of a piece of your tap as the first piece doe not cut so deep and also use threadlock or some hydraulic glue between housing and helicoil
Peter
|
| |
|
|
|
|
|
|
|
|
2 thoughts, but its been a while since ive helicoiled anything.
It sounds like you will need a tap that will cut a full thread right to the bottom of a blind hole.
Are helicoil taps like this, or do the threads start gradually? You may need two taps.
Secondly, if you helicoil you need to snap the tang off, how easy would it be for that tang to fall inside the rack?
Ive not used timeserts, i assume the tap situation will be the same, but no tang issues?
Edit, i see petervdv had the same thought at the same time!
|
| |
Last Edit: Aug 8, 2019 12:28:38 GMT by VW
|
|
eurogranada
Europe
To tinker or not to tinker, that is the question...
Posts: 2,556
|
|
|
|
Sorry i cannot help you with helicoil stuff. You need the ,25mm otherwise the tap will not work. Because it is aluminum, you could consider to use a Dremel with a sanding drum- BTW you also need to grind of a piece of your tap as the first piece doe not cut so deep and also use threadlock or some hydraulic glue between housing and helicoil Peter No need to be sorry, any input is welcomed, so thank you. I hope to find an actual 16.25mm drill. Sanding with the dremel is doable but always a slight worry in keeping the hole round. It's so easy to end up with something less than perfectly round. Helicoil taps are supposed to be somewhat different from regular taps in both size (as they need to account for the size of the coil in oversize) and cutting surface. The good ones start cutting almost immediately. Although I've seen plenty that did not seem to take this into account still being called helicoil taps. The ones in the good kits seem to do so. But if not, there's an easy fix available with the angle grinder, like you also said. Yes, loctite is absolutely going to be used. I have to check which strength version I have at home or possibley buy new one... But if I do get the rack out, I still very much like your recommendation of going to a hydraulic shop. Maybe they can be of help in ways I couldn't even have thought of. Although sometimes you're met with the attitude that these things are more hassle than they are worth to them and they just send you off. We'll see, we have two nearby so... Again, thanks for your continued reading and thinking with me. |
| |
|
|


