|
|
|
Jul 28, 2013 21:45:36 GMT
|
So, some of you may remember a pretty unique Yamaha L2C-A project I was working on a few years ago. I never quite got around to finishing it as the event I was building it for got canned. Just recently that event got relaunched, so I decided to do something new. I put the Yamaha up for sale as a parts/project and the buyer happened to be involved in an even cooler event, and plans to complete it for that, which is awesome as it will not go to waste! This gave me motivation to start on something I have had sitting around for years: a $20 BSA Bantam D3 frame. I bought the frame bare, and shortly after bought a pair of wheels and front forks that I thought would look cool on it, a pair of simple clip-ons and a rough original tank. then it sat for a couple of years. So I decided to cut and shut the forks to the right length as they suit the frame perfectly (I recon). Then I went hunting for a motor. I wanted a big single or twin and when a $150 Yamaha XT250 came along I couldn't say no. Sitting the BSA frame against the 250 the motor looks plausible  So I ripped the motor out and sat it on top of the BSA frame to get a better look. No way to get it in without some cutting, but suits the space   Next up, lop the bottom off the frame, lop the mounts off the Yamaha frame and try again  Making the mounts work and making sure the BSA frame was still fairly square after all the chopping took a fair bit of work, but after some 'adjustment' it looks pretty sweet so far with the Yamaha back wheel in place. 250cc and the highest point at the moment is 80cm    Pretty happy so far! I really need access to a 1983ish Yamaha XT250 manual and wiring diagrams so that I can work out what wiring I can remove (it has been a bit butchered) and why it's not running (turns over, has spark), if anyone can suggest where I might find one? |
| |
Remade In Australia
thereimaginarium.com.au
|
|
|
|
|
|
|
|
|
theres an xt350 manual here. www.carlsalter.com/yamaha-service-manuals.aspI put an xt250 engine in a kawasaki kdx frame a few years ago and IIRC the wiring needed to make it run was minimal, required no battery etc - pretty much along the lines of the honda 90. there was two multiplugs (4 cables) going to the stator behind the flywheel, one wire going to the coil and the other stopped the engine when you earthed it (ie kill switch. ignition switch earthed it when in the off position) this would make your wiring pretty easy so far as the engine is concerned. there was also a seperate coil for the battery charging which you can just connect your brake light (all that is required by law for a daytime mot) or your head and tail light straight to without fitting a battery. If you get a problem with bulbs blowing fir a capacitor across it. For more advice, mouse or someone similar across at ratbike.org would certainly steer you in the right direction, and again off the top of my head I am sure that nate did something with an xt250 not so long ago. EDIT : Forgot to say, that looks cool! Looking out for a similar frame myself if you happen to have a spare!!! |
| |
Last Edit: Jul 29, 2013 9:37:21 GMT by ax16vts
|
|
|
|
|
Jul 29, 2013 10:03:35 GMT
|
|
No spare I'm afraid, but have seen a few in similar conditon for similar money here in Aus over the last few years. The XT was running without an ignition key or battery when I got it, so figured I could dump a lot of wiring, will take a look on ratbike and see what I can suss out.
|
| |
Remade In Australia
thereimaginarium.com.au
|
|
|
|
|
Jul 29, 2013 16:24:58 GMT
|
|
didnt realise you were in oz. Spoke to my mate, and he confirms what i posted above. 6 wires on the cdi, 4 to the stator via multiplug(s), one to the coil and the other to earth to stop it. Make sure the coil is earthed and it should run with no other wiring.
|
| |
|
|
|
|
|
|
|
A little progress today before the weather stopped play: Added foot pegs near the back axle and a brake lever in the same location. Gear shift will be remote as the BSA is so tiny I'd have to have my head between my knees to ride it with the current handlebar arrangement if the shifter was in the original position.  Also gave the exhaust a first take. Original muffler fitted the frame well but I found I was sitting on it when I trialled a seat on the bike. Considered a dump pipe straight down from the motor, or a pipe running across the head like standard then back out between the frame and back wheel to save my leg, but this option is fairly nice in that it mirrors the line of the original frame.  |
| |
Remade In Australia
thereimaginarium.com.au
|
|
|
|
|
|
|
|
|
| |
Remade In Australia
thereimaginarium.com.au
|
|
|
|
|
|
|
|
Prefer the shape of the BSA tank with the seat forwards, quite like the first and last headlights. Don't think the Yam tank works at all,
Just my opinions though.
|
| |
|
|
|
|
|
|
|
if you're gonna use that seat base then it's set back for me with the bsa tank. With it forward the gap between the base and the rear seat is all wrong. As dodgerover said, the yam tank doesnt work. Re lights, try them the other way up, ie above the yokes, with a set of drag bars... first one with the side mounts welded up, smoothed and bottom mounted would look good i've always fancied building something older with a headlight like the below. depends on the look you are going for.  Personally, id also try a spacer an inch or so thick under the front of the tank to lift it up slightly. as above, just my opinion.... |
| |
|
|
|
|
|
|
|
|
Are you actually even close to fitting on it? If I'm not mistaken that is a really small bike, and with the bars that low you will be scrunched up like a contortionist on it!
|
| |
|
|
|
|
|
|
|
|
Thanks guys,
I tend to agree on the original tank.
Waveman, Fitting is pretty funny. If I was to run standard footpeg position I would have my chest between my knees, so I am experimenting with a drag race style set of pegs and controls near the back axle, which is surprisingly comfortable.
|
| |
Remade In Australia
thereimaginarium.com.au
|
|
|
|
sparko
Posted a lot

Posts: 1,627
|
|
|
|
|
Bsa tank, first headlight and cut the seat down to about half and mount it back = win
|
| |
|
|
|
|
|
|
|
|
|
| |
Remade In Australia
thereimaginarium.com.au
|
|
|
|
|
|
|
|
My word it's low! Looks like a static display bike only.
|
| |
|
|
|
|
|
|
|
My word it's low! Looks like a static display bike only. Grass is deceiving, there is a bit of clearance but not much. Front suspension has been stiffened substantially and rear will be made rigid, so will hopefully get away with a little bit of riding  |
| |
Remade In Australia
thereimaginarium.com.au
|
|
|
|
|
Aug 11, 2013 17:07:45 GMT
|
|
Can that be road reg'd in Victoria? I know nothing about the rules in Aus about modified bikes so forgive me if its a stupid question...
|
| |
|
|
|
|
|
Aug 11, 2013 21:22:48 GMT
|
|
Couldn't be done easily, but with enough testing, lights, exhaust change you could get there.
|
| |
Remade In Australia
thereimaginarium.com.au
|
|
mylittletony
Posted a lot
Posts: 2,337
Club RR Member Number: 84
|
|
Aug 13, 2013 20:09:44 GMT
|
|
I LOVE this. The "too flat" headlight I think suits the stubby nature of the bike, could go for a half fairing for extra race inspiration?
|
| |
|
|
|
|
|
|
|
Still thinking on headlights after another week. In the meantime I have set up the controls on the bars, worked out how to lock the rear suspension to keep the bike from dragging it's  around given how low the motor is, without having to actually weld or modify the suspension, and completed moving the controls back to just behind the motor for ease or access.  Next week I aim to have all the fabrication side of things done so I can start stripping and prepping for paint. |
| |
Remade In Australia
thereimaginarium.com.au
|
|
|
|
|
|
|
Starting to ponder colour schemes and this has really caught my eye:  Also enjoying this  I love the brown/black/dark grey but fear it may be a tad too dark/subtle on such a small bike 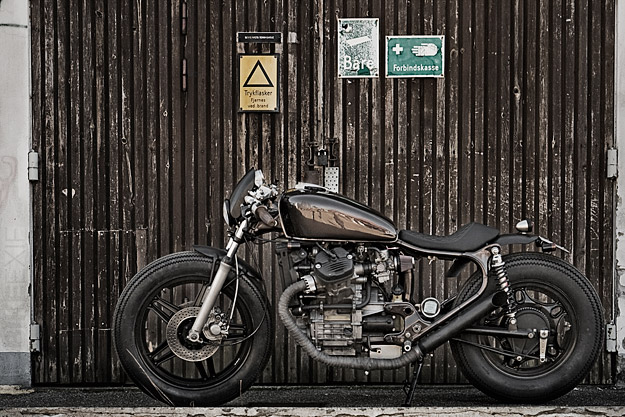 This is probably a little loud:  Or is simplicity king on black?  Very open to suggestions, especially if they come with example pics! |
| |
Remade In Australia
thereimaginarium.com.au
|
|
|
|
|
|
|
 Ok, I need some opinions: I love this hubcap as a racing number plate, but just can't decide if it is too big. Any suggestions on changes greatly appreciated! |
| |
Remade In Australia
thereimaginarium.com.au
|
|
|
|