|
|
|
|
79cord
Posted a lot

Posts: 2,607
|
|
Jun 17, 2019 13:34:58 GMT
|
Love the Montclair, crazy colour schemes like the red & green would be far too tempting... remembering the parody '56 chevrolet from 'Mon Oncle' 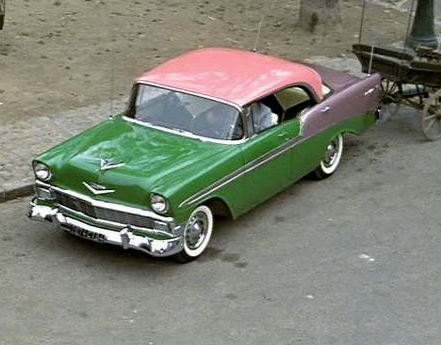 made me want to do something with just the right shades of absurd colours to almost work, like darker green or peppermint with that lavender metallic rear & pearl cream roof? Another bonnet fabrication material I've tried has been thick aluminium foil for house roof flashing which can be nicely stretched & formed by rubbing with the back of a spoon. Have also been tempted to attack one of those Monaco's into a phantom 4-door hardtop & revising it for the much prettier front & bumper styling from other/earlier Dodge & Plymouth variants offered before the later '70's restyles went off the rails. That looks very Blues Brothers, or like it needs a Gun on the floor & Guard dog on the front seat. |
| |
Last Edit: Jun 22, 2019 10:53:26 GMT by 79cord
|
|
MiataMark
Club Retro Rides Member
Posts: 2,961
Club RR Member Number: 29
|
Vulgalour's Small StuffMiataMark
@garra
Club Retro Rides Member 29
|
Jun 17, 2019 13:38:22 GMT
|
|
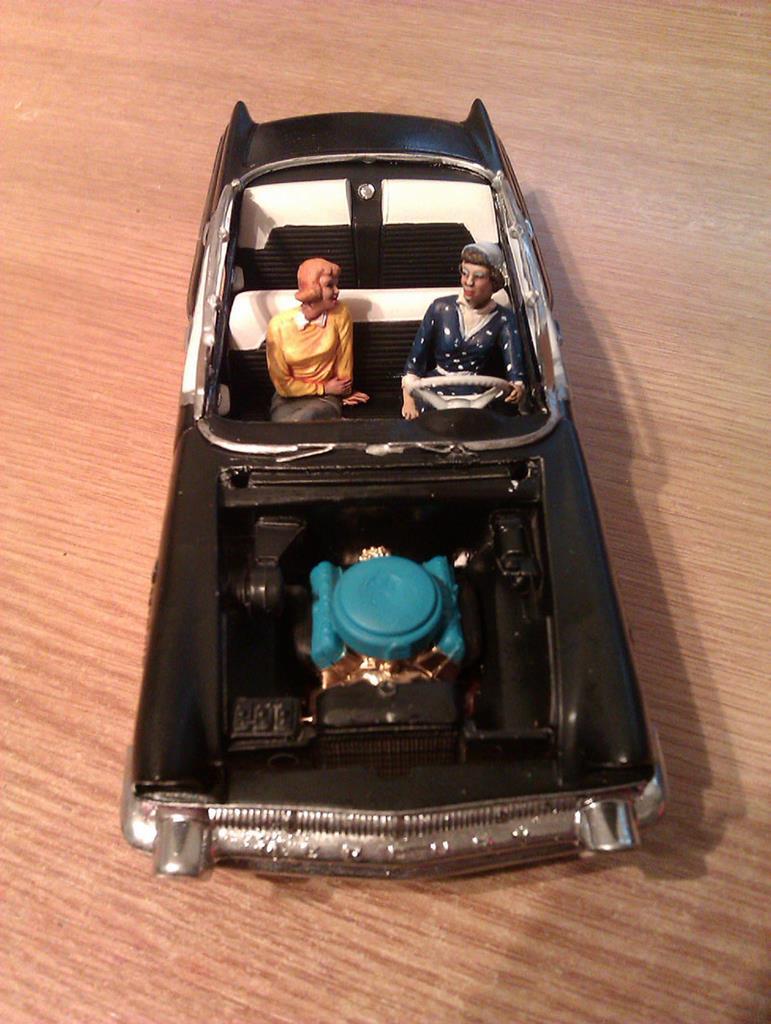
Good job on the Montclair, like the figures adds to the overall effect. Does look like the passenger has said something inappropriate to the driver. (pity the screen got lost).
|
| |
1990 Mazda MX-52012 BMW 118i (170bhp) - white appliance 2011 Land Rover Freelander 2 TD4 2003 Land Rover Discovery II TD52007 Alfa Romeo 159 Sportwagon JTDm
|
|
vulgalour
Club Retro Rides Member
Posts: 7,079
Club RR Member Number: 146
|
Vulgalour's Small Stuffvulgalour
@vulgalour
Club Retro Rides Member 146
|
Jun 17, 2019 15:11:17 GMT
|
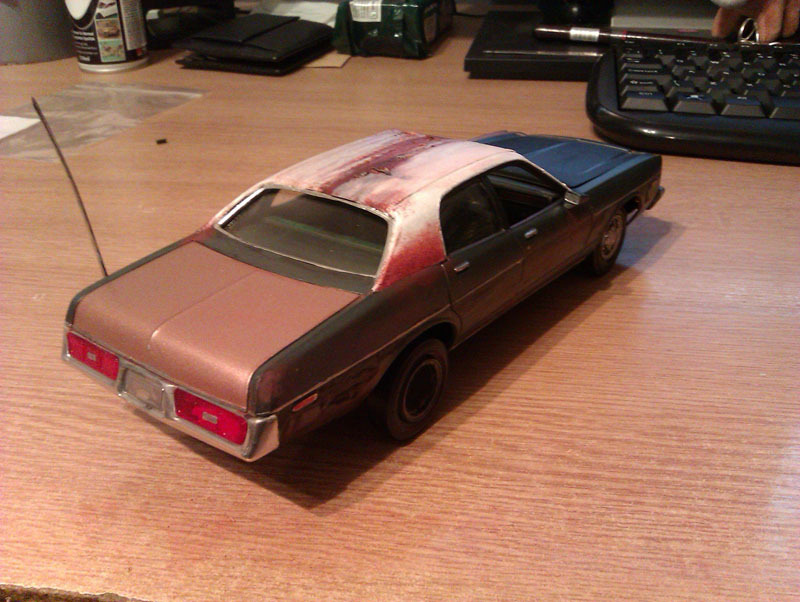
Thanks for the comments  The Montclair doesn't seem to have had screens, all the kits I've seen both poorly and well built from the same era and manufacturer don't have screens at all so I suspect they weren't actually missing. The Monaco is supposed to be more evocative of a first car owned by a high schooler in the 80s, the sort of thing inherited from an elderly relative and thrashed on relentlessly. Doesn't matter what it looks like as long as it looks mean, makes a lot of noise, and goes fast. Opportunistic upgrades like the copper body panels would deal with things like a rotted out boot or a badly stoved in front wing, there's just no need to paint them to match the rest of the car since it's function that's important. |
| |
|
|
|
|
|
|
|
|
In that case, would the 16 year old Brad have painted the tyre lettering white, because NASCAR?
|
| |
|
|
vulgalour
Club Retro Rides Member
Posts: 7,079
Club RR Member Number: 146
|
Vulgalour's Small Stuffvulgalour
@vulgalour
Club Retro Rides Member 146
|
Aug 29, 2019 19:54:11 GMT
|
Started a new kit, this time a Tamiya one. The very first model car kit I ever built was a Tamiya Beetle, about 20 years ago now. Not sure what happened to it as I don't have it anymore beyond a couple of scraps of it in my bits boxes. This time I've got more modelling skills under my belt and I'm finding it a more enjoyable kit to work on. We're also going bright orange, because bright orange is good on a Beetle. The camera has washed it out considerably, it's a proper safety orange I'm using for this. 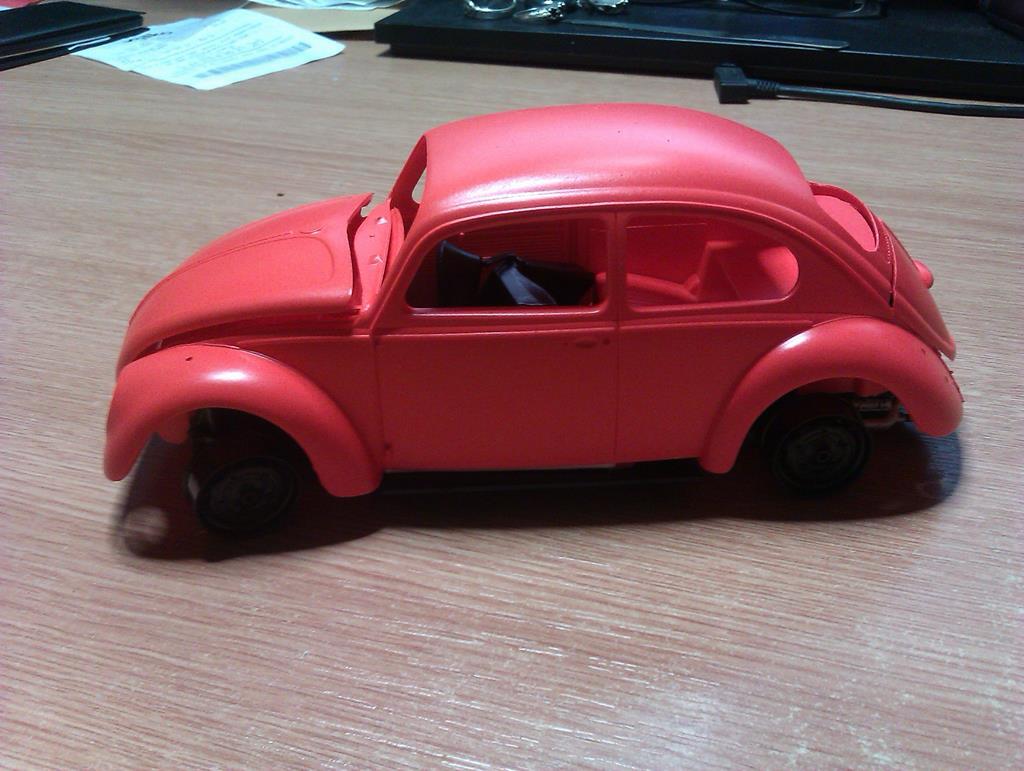 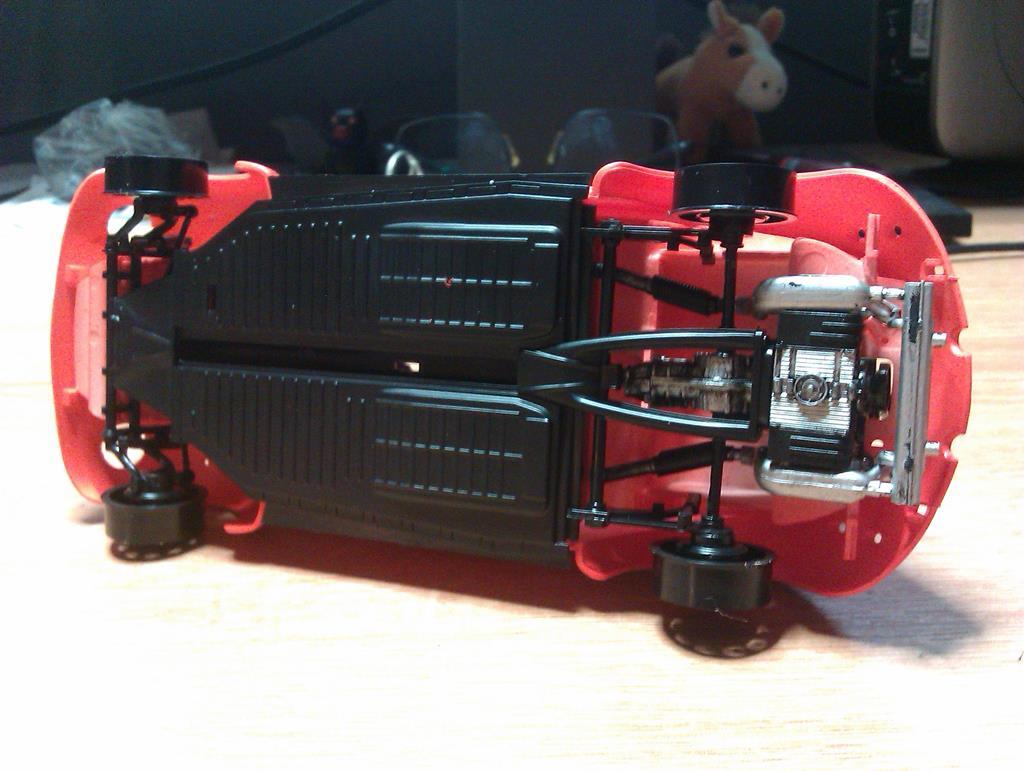 Lots of work still to go. I've also ordered myself a GAZ M20 "Pobeda", which appears to have the FSO Warszawa optional bits in too, the FSO being the Polish license-built version of the Russian original, though I'll likely be building mine as a Pobeda. I got fidgety waiting for that to arrive and impulse bought another favourite from the land of rocket-propelled Ladas in the form of this little Loaf Tin. Smaller scale being 1:43 instead of the usual larger 1:25 or so offerings from Revell, AMT, Tamiya, etc. but still very highly detailed. It looks like it's going to be a really nice kit to build up. I'll be doing this as just a van rather than a fire response vehicle.  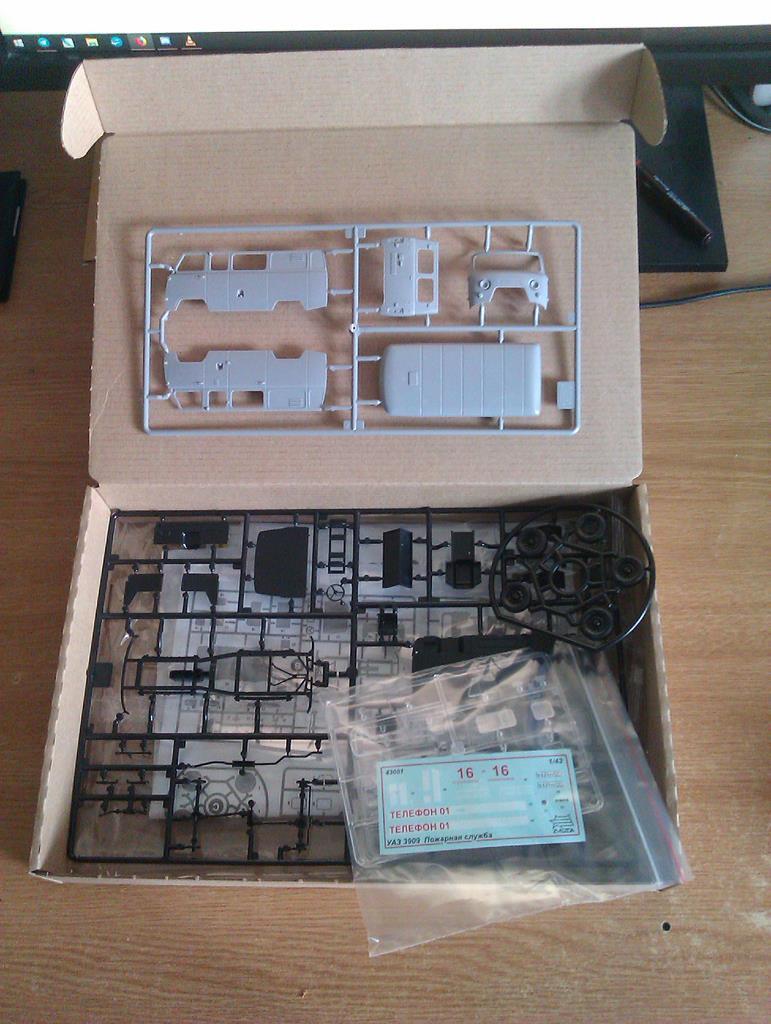 |
| |
|
|
vulgalour
Club Retro Rides Member
Posts: 7,079
Club RR Member Number: 146
|
Vulgalour's Small Stuffvulgalour
@vulgalour
Club Retro Rides Member 146
|
Aug 29, 2019 19:59:38 GMT
|
In other news, the model swap I did with a friend in the states that lead to me making the Gran(dma) Torino and getting back into this sort of model making, actually concluded and I totally failed to upload pictures of his half. Of what I sent, he decided to do the Ford Capri and Ford Mustang and honestly, I need to up my game! He did amazing work on these little guys. Before 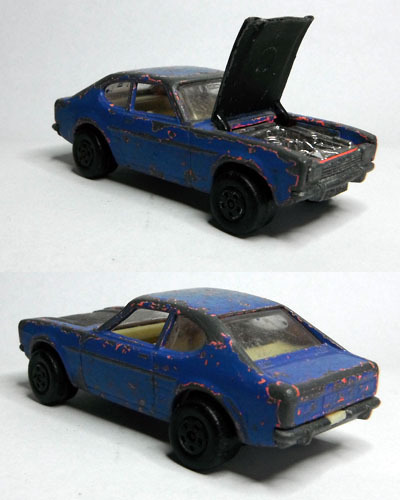 After 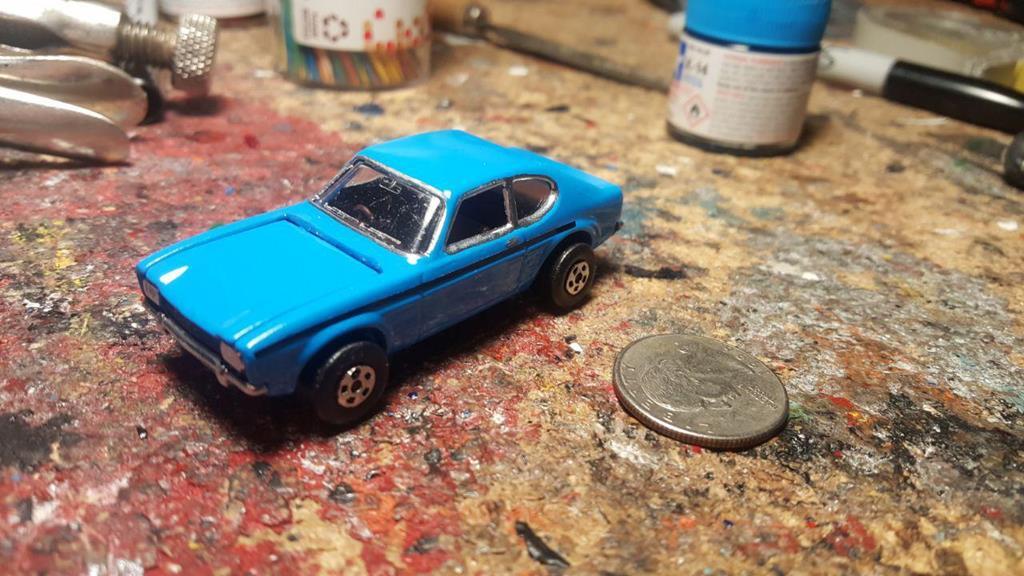 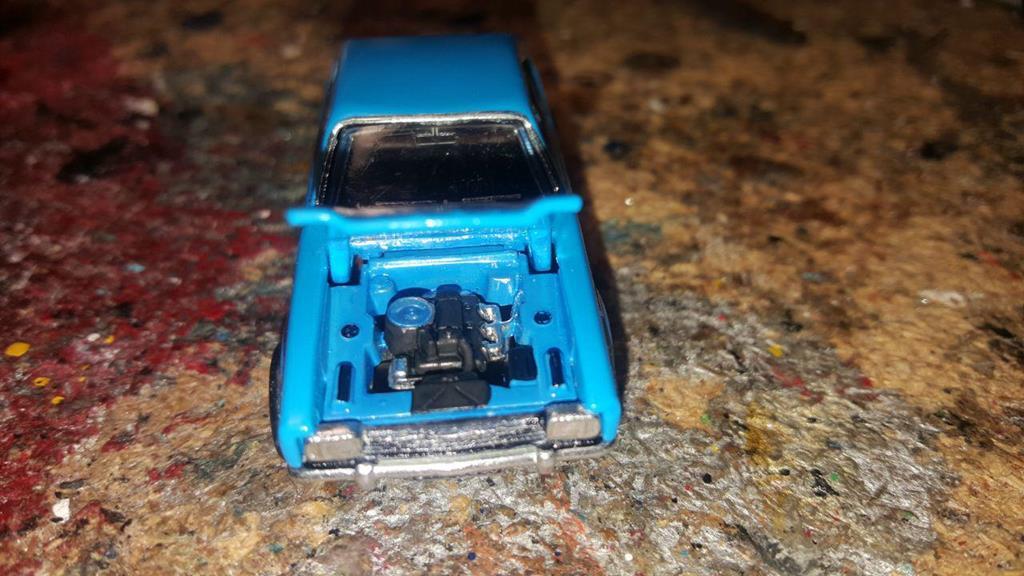 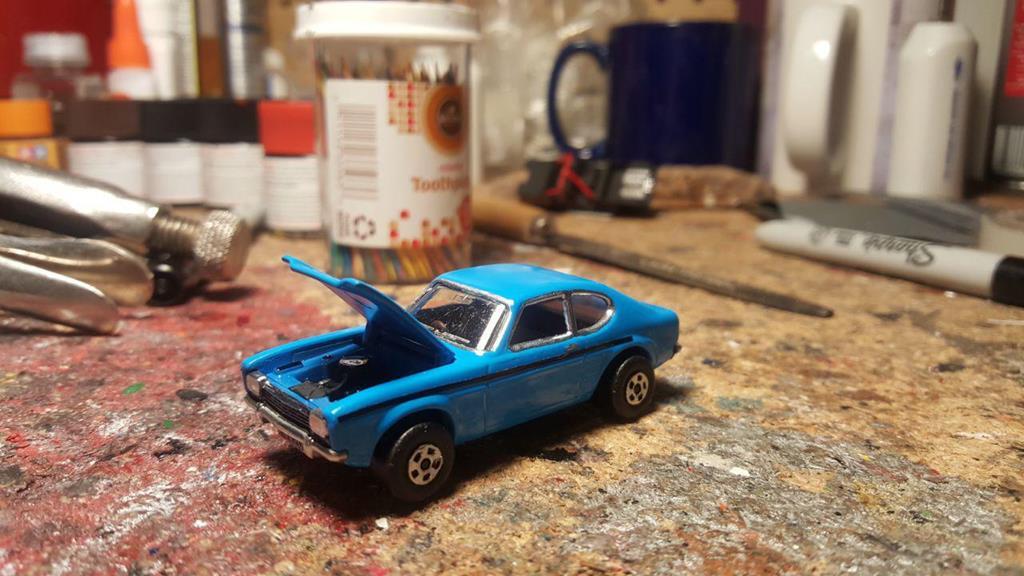 Before 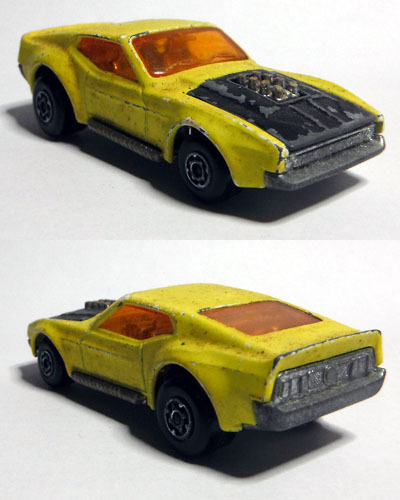 After 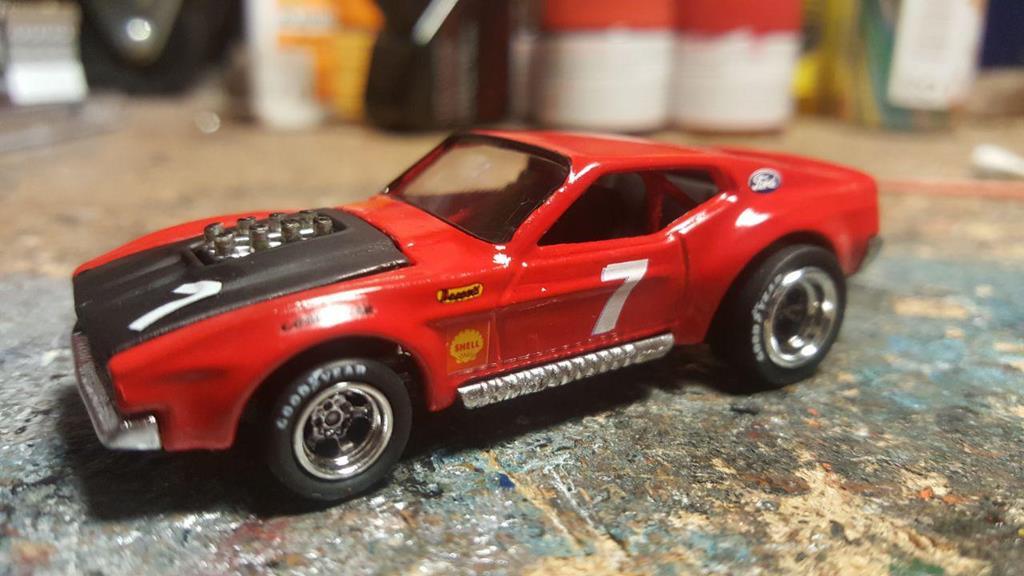 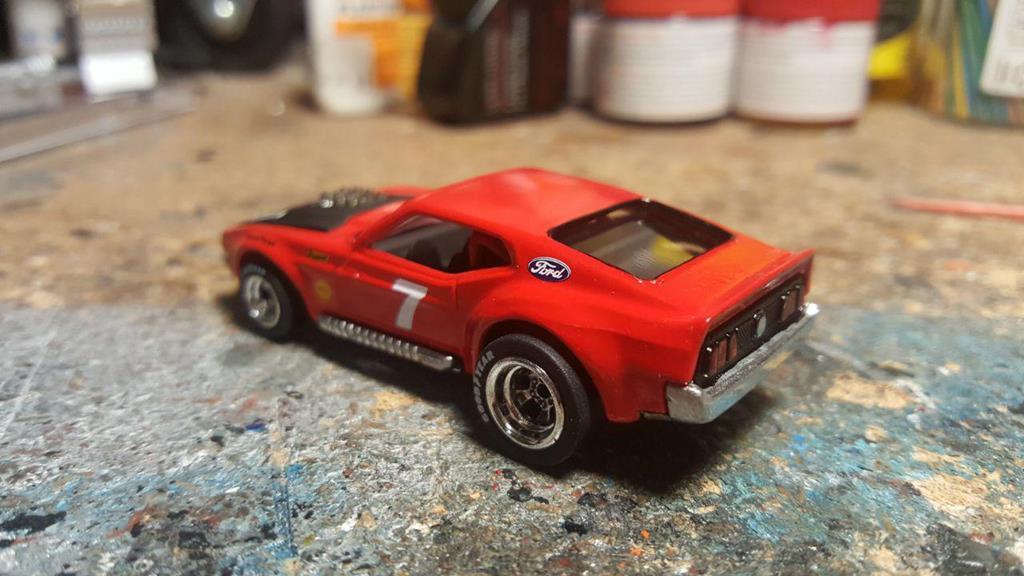 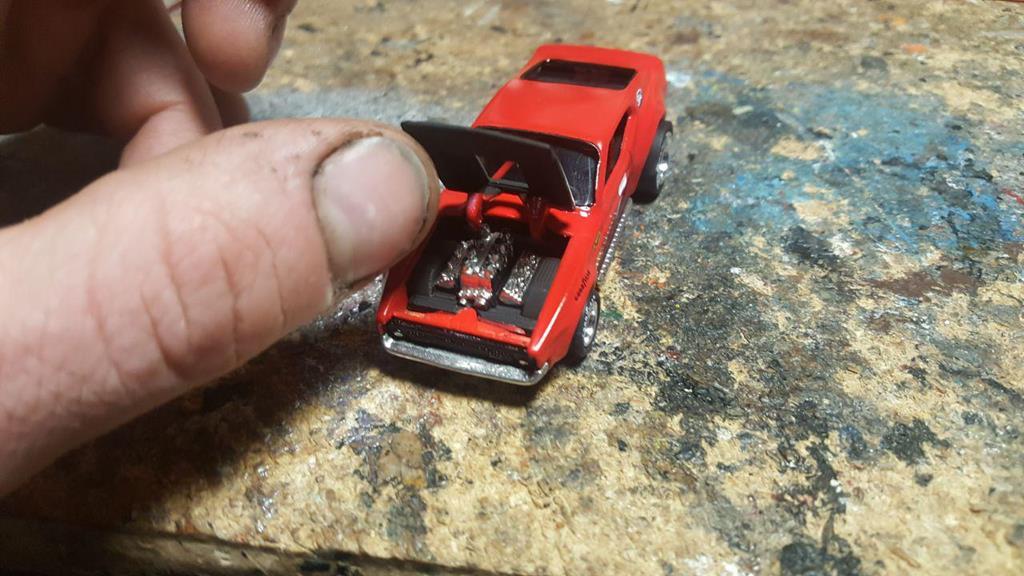 We're hoping to do another exchange at some point in the future, especially since he can get hold of some of the kits I'm after a lot easier than I can, so we'll see what comes of that in the future. |
| |
Last Edit: Aug 29, 2019 20:00:06 GMT by vulgalour
|
|
vulgalour
Club Retro Rides Member
Posts: 7,079
Club RR Member Number: 146
|
Vulgalour's Small Stuffvulgalour
@vulgalour
Club Retro Rides Member 146
|
|
|
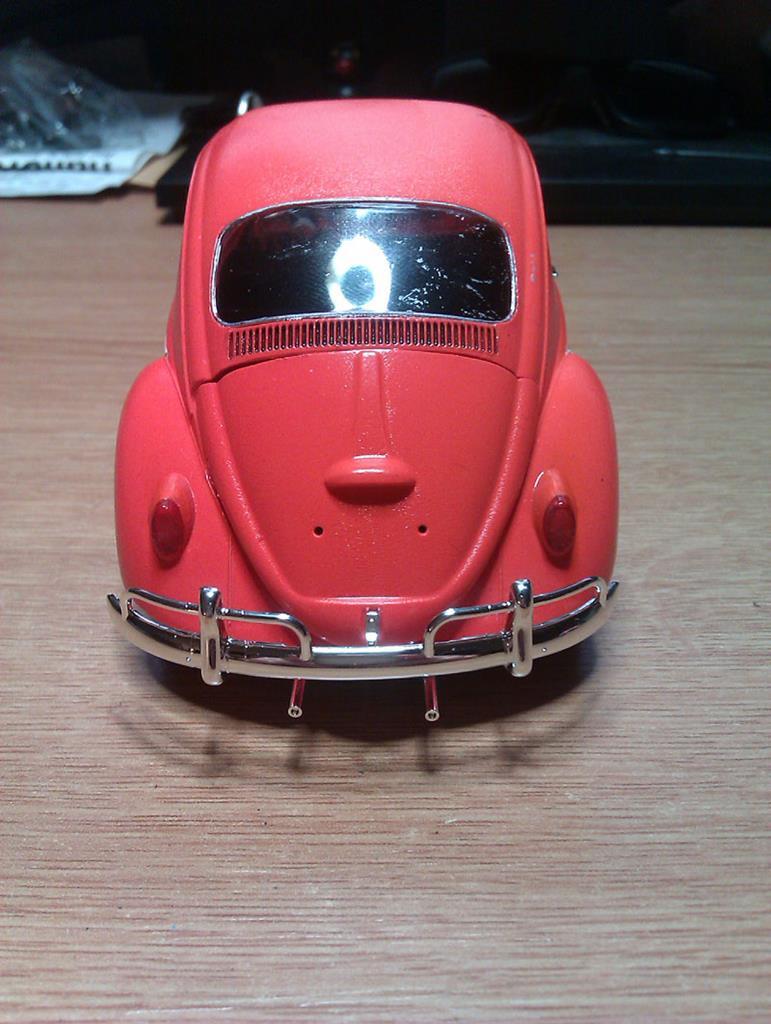
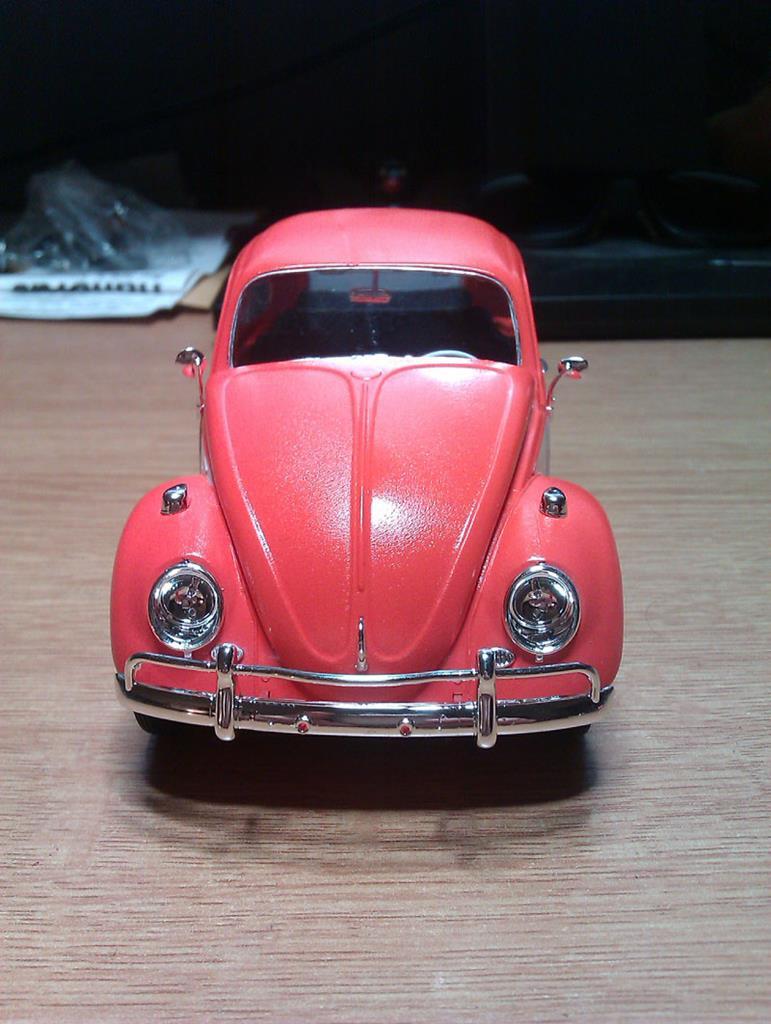
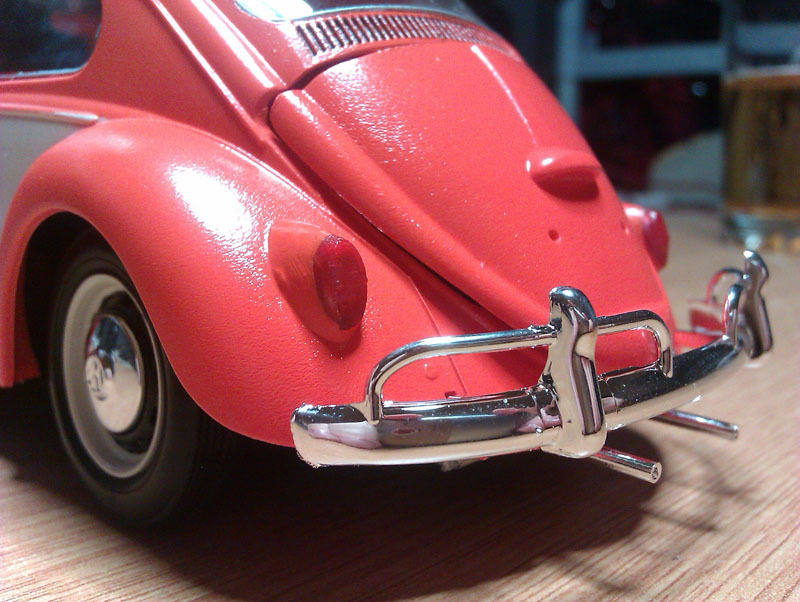
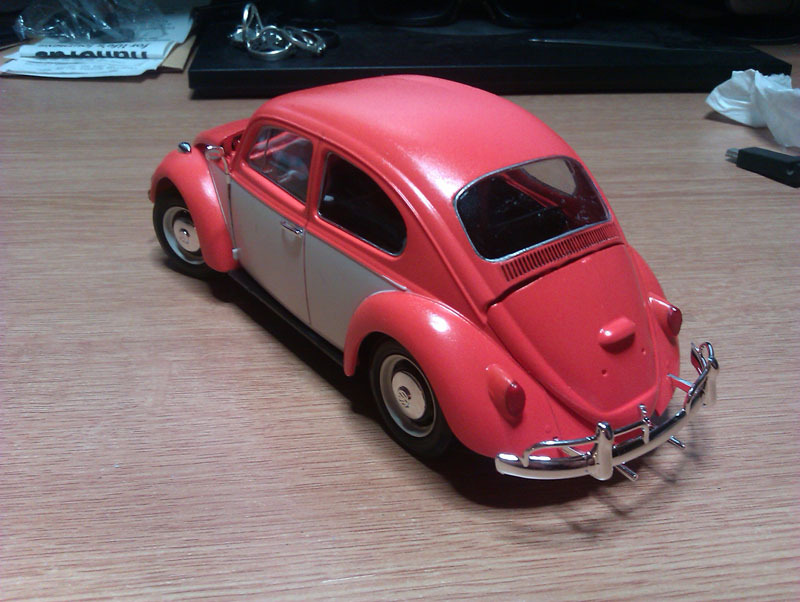
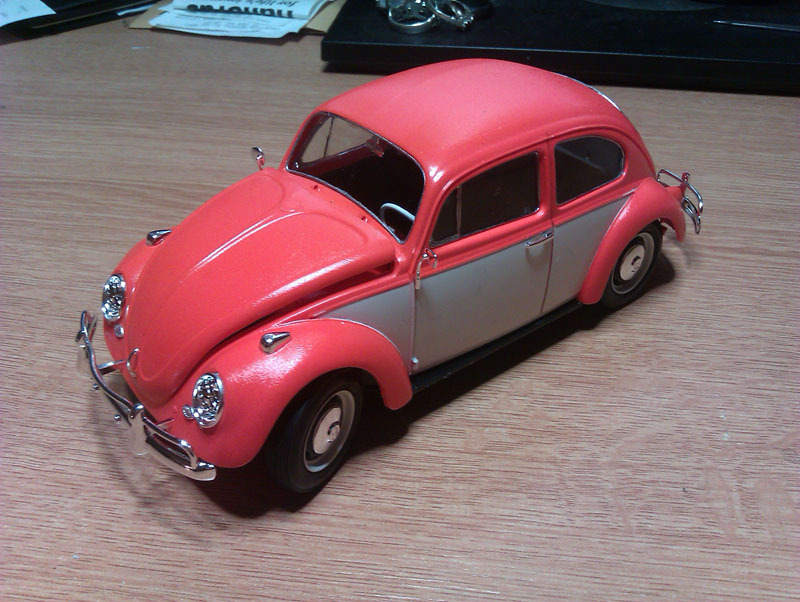
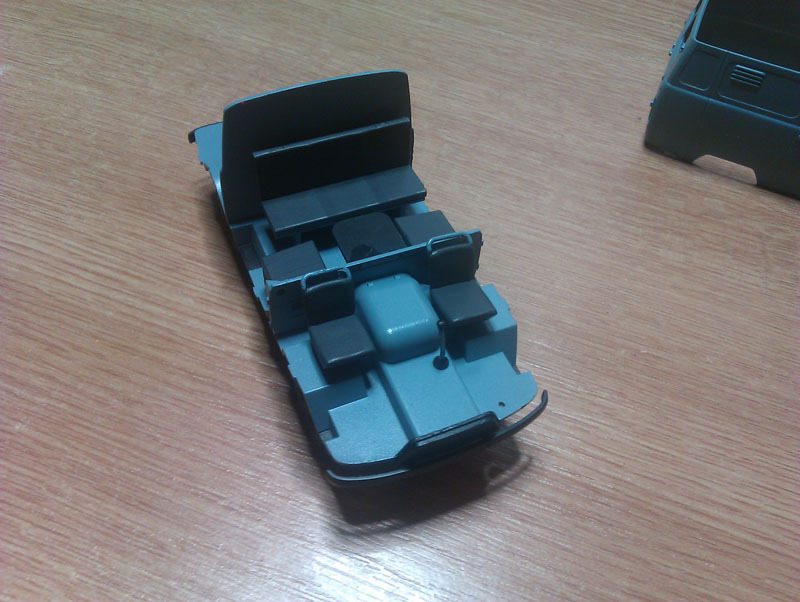
Beetle update. This is a fairly quick kit to build, so it's quite rewarding for what a short amount of time investment returns. Interior is now done, bar any final fettling I might want to do, no point going overboard since the doors don't open and it's fully glazed so you can't really see into every nook and cranny on this one. 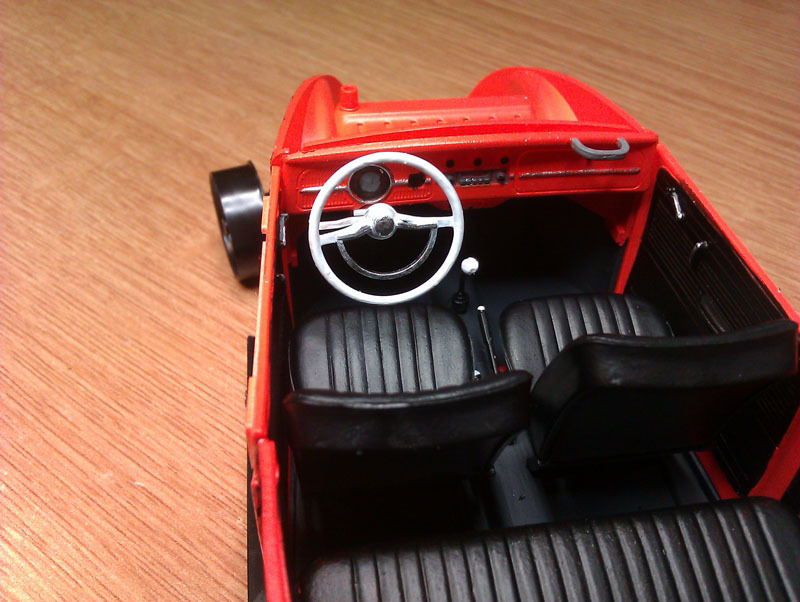 Engine is very nearly finished, all the bits are glued on, I just have a few things I want to tidy up and make a bit smarter like the grey pipes that have those very obvious mould lines that aren't anywhere near as obvious in person. 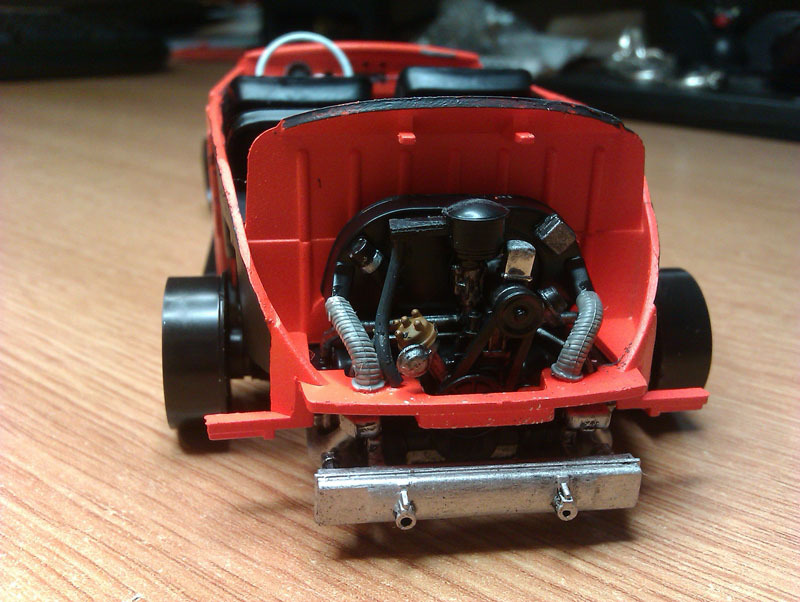 Bodywork is nearly finished too. Rear lights have been chromed internally, glued on and body-coloured externally. I did try painting the inside of the rear lights with clear red before the chrome, but the chrome paint reacted and lifted all the red paint off, annoyingly, so I'll be clear-colour painting the outside of the lenses before final lacquer. Some of the body panel lines where given a little dark brown ink to make the car look a bit more real and less toy-like, brown is better with these colours than black as it's closer to the natural shadow colour. Grey is my choice for white vehicles since it's less stark than black and you can gradually build the tint up with repeated application if you're not sure how dark you need to go. Went for a two-tone since that seems to be the favoured approach with US bugs and this being a US spec kit it made sense. It also looks good and makes the very bright orange seem even brighter. 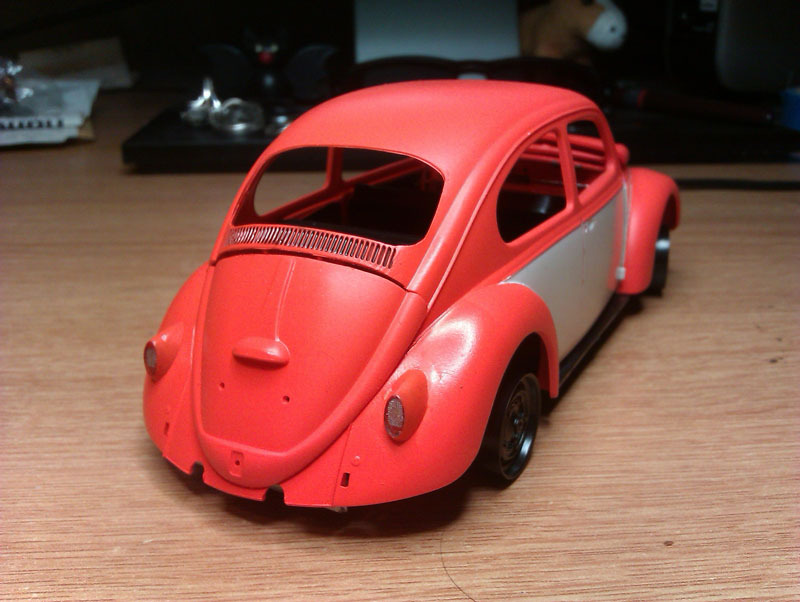 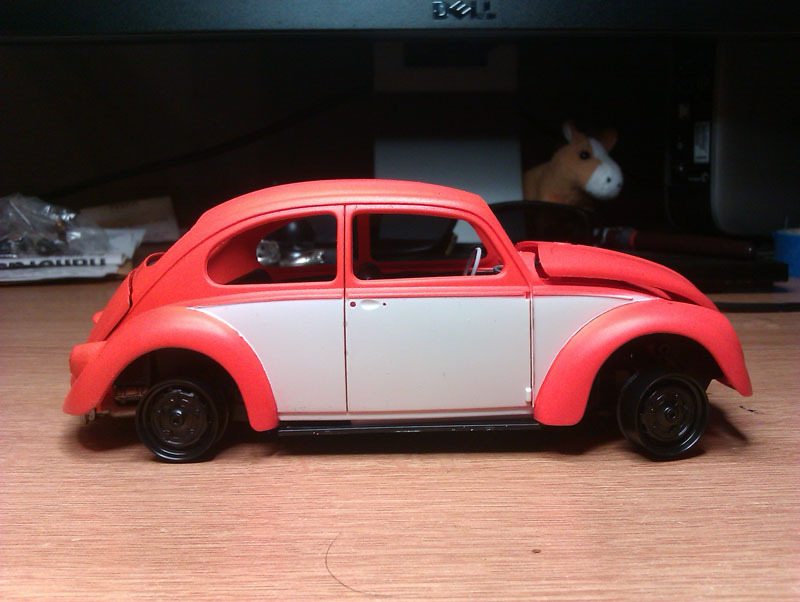 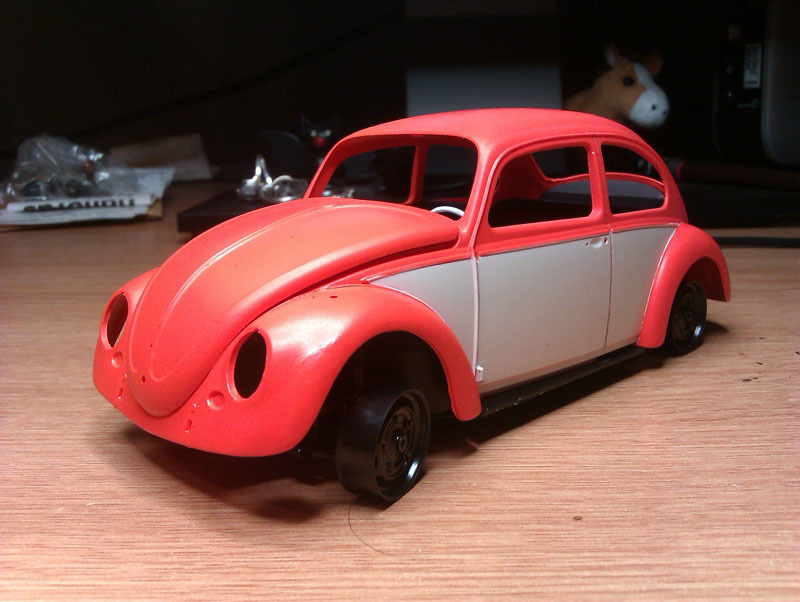 When the chrome detailing goes on it will really come alive. It's a really enjoyable kit to build and I'd recommend it to anyone with a little kit building experience under their belt, there's plenty of scope to do something much more interesting than I am since I shan't even be wheel swapping or lowering this one. |
| |
|
|
|
|
|
|
|
Bug is coming along nicely. I did that kit a good few years ago. I built and modded mine into a proper Cal Looker. Fuchs, lowered front, nerf bars and a 'built' motor with tiny representations of Weber 48s. They took ages to make. Sadly I have no pics and it was dropped and damaged badly when I moved house. Ultimately, I think it got binned. I'll have to see about building another. |
| |
|
|
vulgalour
Club Retro Rides Member
Posts: 7,079
Club RR Member Number: 146
|
Vulgalour's Small Stuffvulgalour
@vulgalour
Club Retro Rides Member 146
|
Aug 30, 2019 12:39:59 GMT
|
|
Cal look was *very* tempting on this one, I've got a really nice pale pastel-y blue that would have done the trick and I was considering a wheel swap, etc. Had I not found the tin of bright orange in my stash, I expect I'd be making tiny little nerf bars and image searching 90s Bugs right now.
|
| |
|
|
|
|
vulgalour
Club Retro Rides Member
Posts: 7,079
Club RR Member Number: 146
|
Vulgalour's Small Stuffvulgalour
@vulgalour
Club Retro Rides Member 146
|
|
|
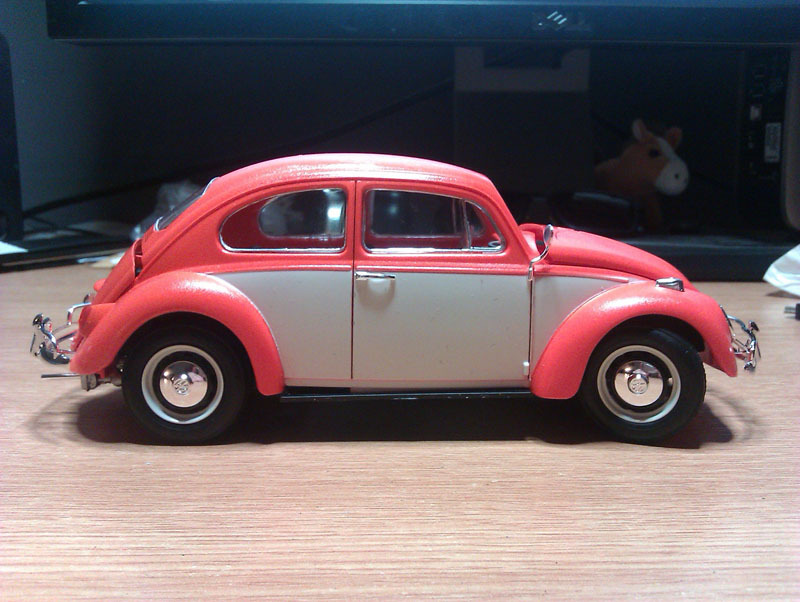
The Beetle had its wheels painted and was varnished today and a couple of bits of chrome attached. The varnish is a bit soft to be handling it too much so I've set it aside until it's toughened up a bit. In the meantime, I got the loaf tin out to see what I was up against and I have to say I'm pleasantly surprised by this Zvezda kit. The detail for such a small scale is quite impressive, with things like the shocks cast separately. The body is of the multi-panel variety and the instructions tell you to build it up in sections over the interior. A dry fit showed that if the roof isn't glued on, you can actually slot the body over the interior, so that's what I've decided to do. That way, I don't risk ruining the paint when trying to glue the corners. The roof panel helps with alignment to keep the body square and while it will be slightly more annoying to fit the glazing now, it will be a lot easier to get a good paint finish on this kit. Amazingly, even though the chassis looks complete here, there's still quite a few small items to fit that I haven't yet because they need painting different colours to black first. I'm really very impressed with how this has gone together so far, providing it continues as smoothly, I'll certainly be checking out what else Zvezda offer.   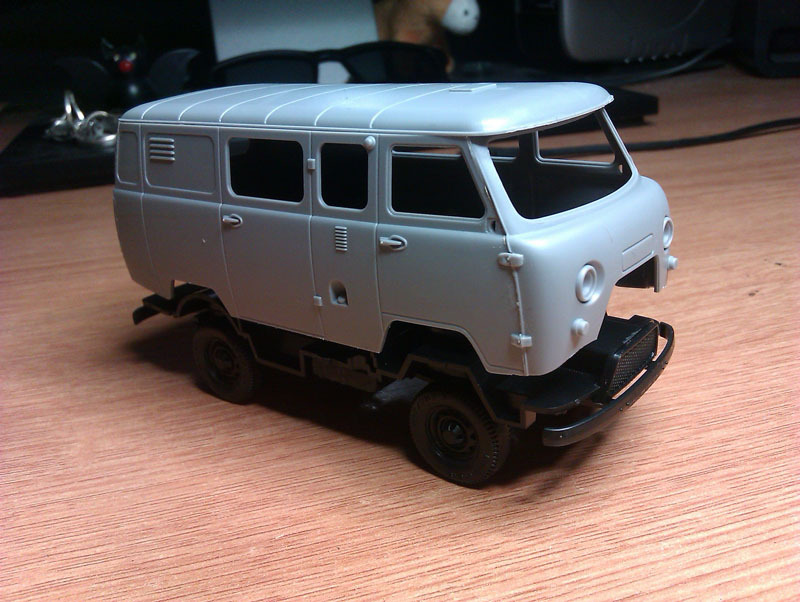 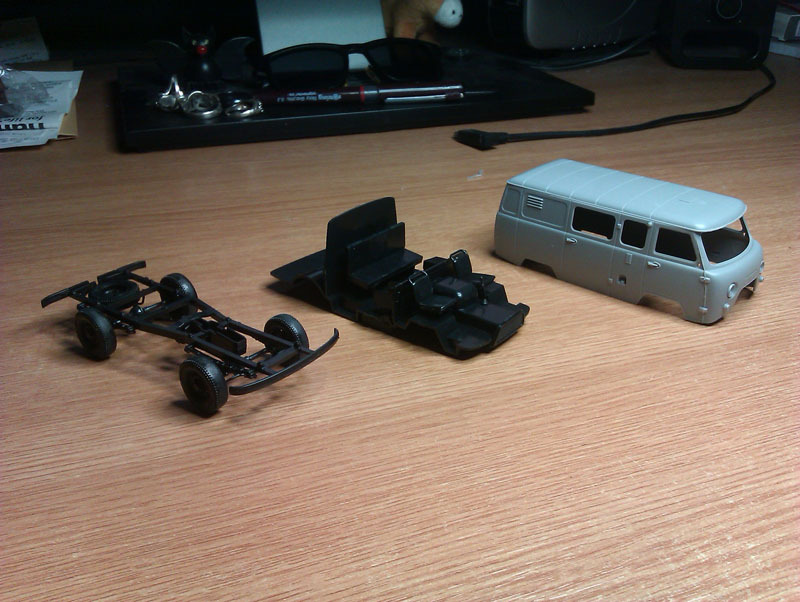 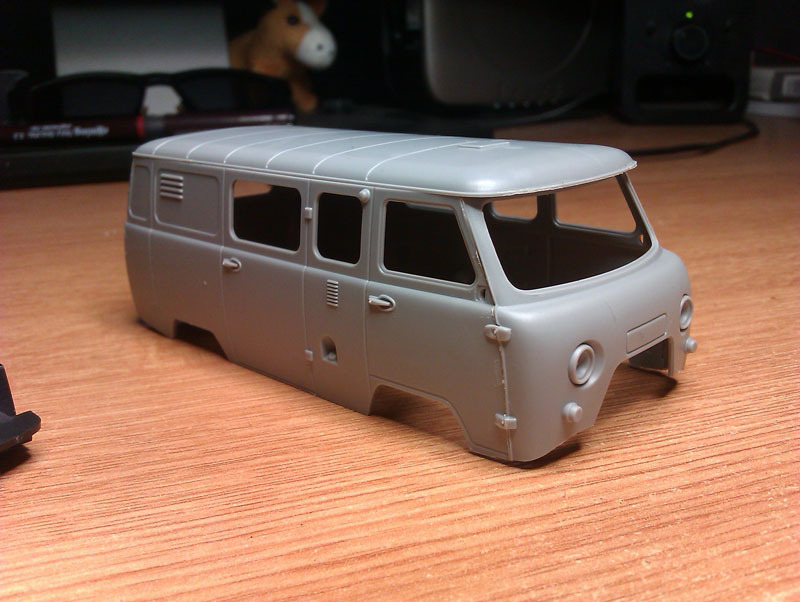 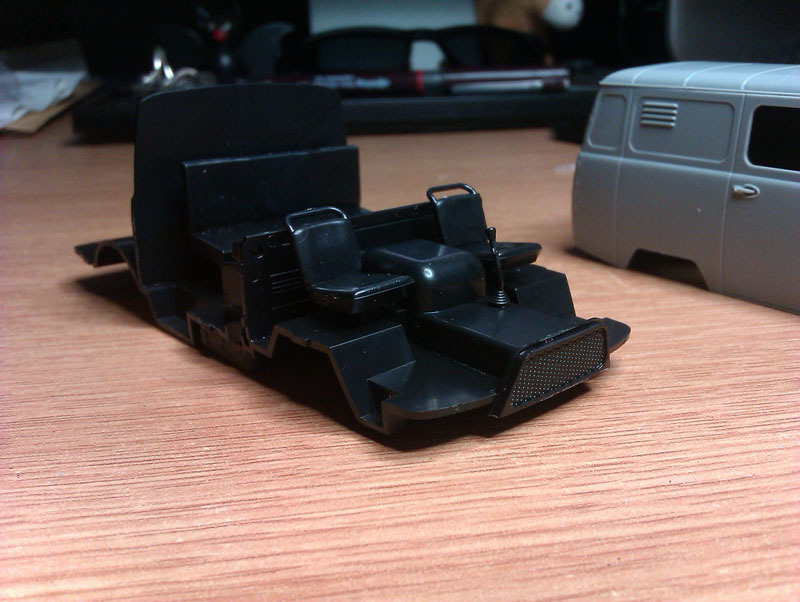 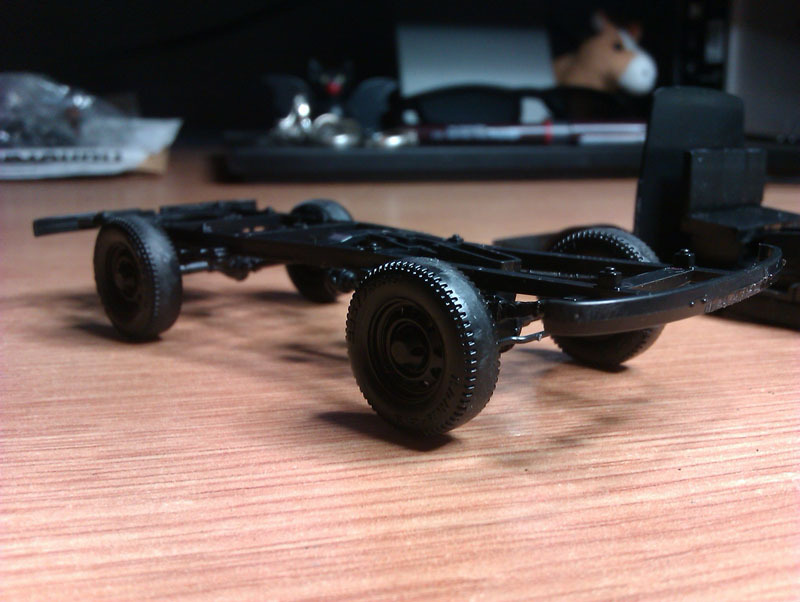 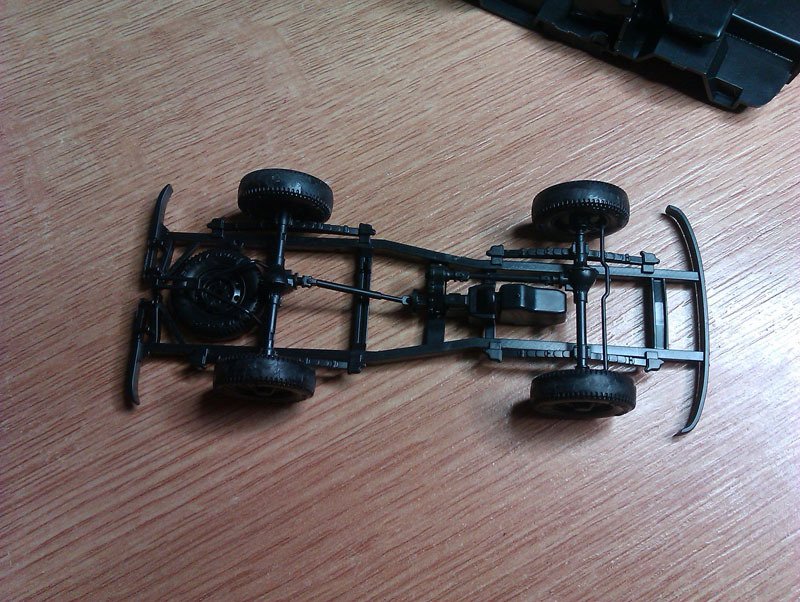 |
| |
|
|
|
|
|
|
vulgalour
Club Retro Rides Member
Posts: 7,079
Club RR Member Number: 146
|
Vulgalour's Small Stuffvulgalour
@vulgalour
Club Retro Rides Member 146
|
Sept 2, 2019 19:08:45 GMT
|
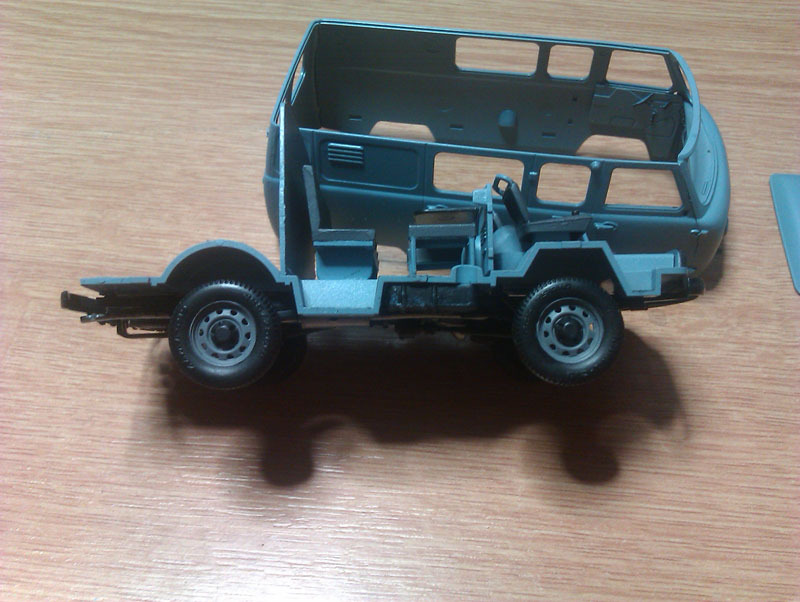
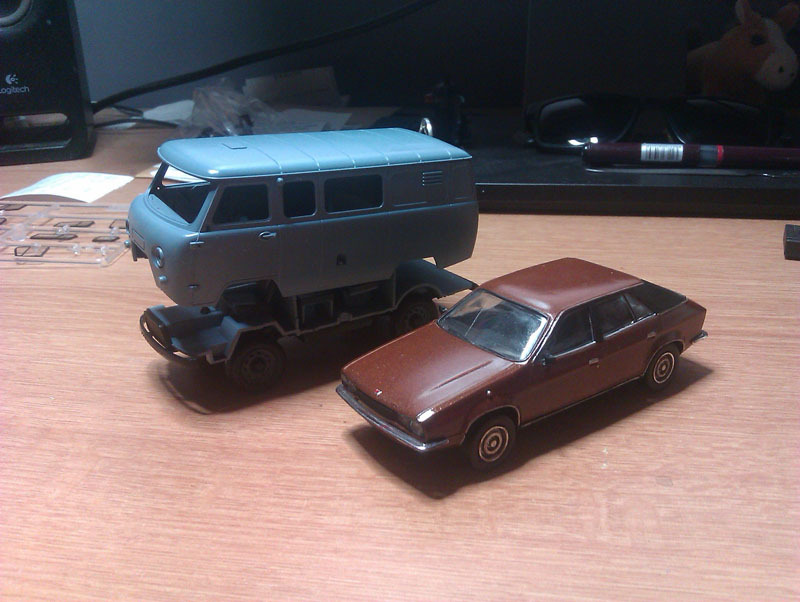
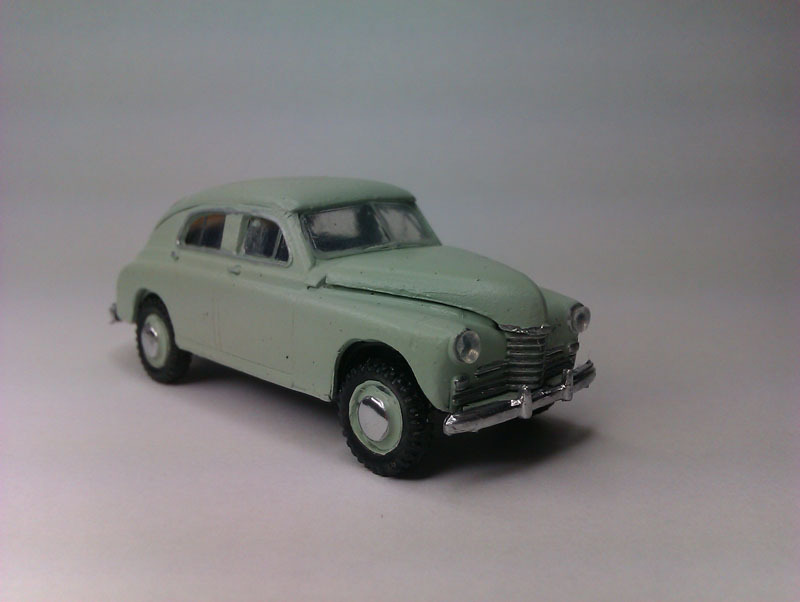
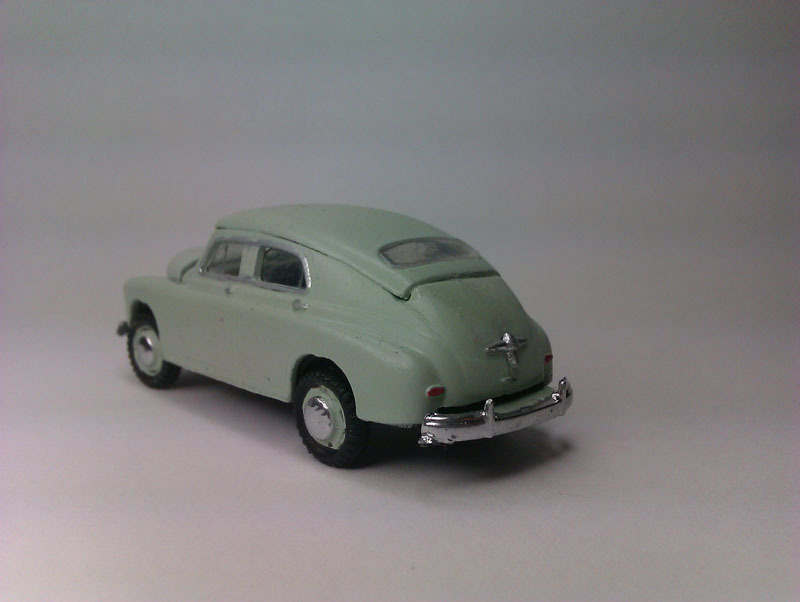
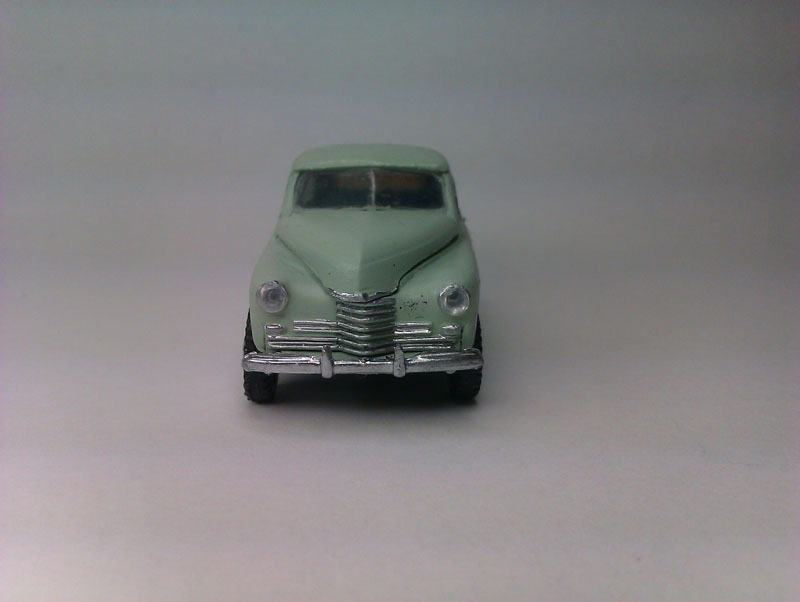
Another day, another kit. This one I ordered a while ago, it just took time getting here from Ukraine. I'm rather fond of the GAZ M20 Pobeda, I'd quite like to own a real one some day. So when I spotted one on eBay while looking for something else, I scooped it up. This is smaller than I usually work and it's going to be a challenge since it's a multi-part body. 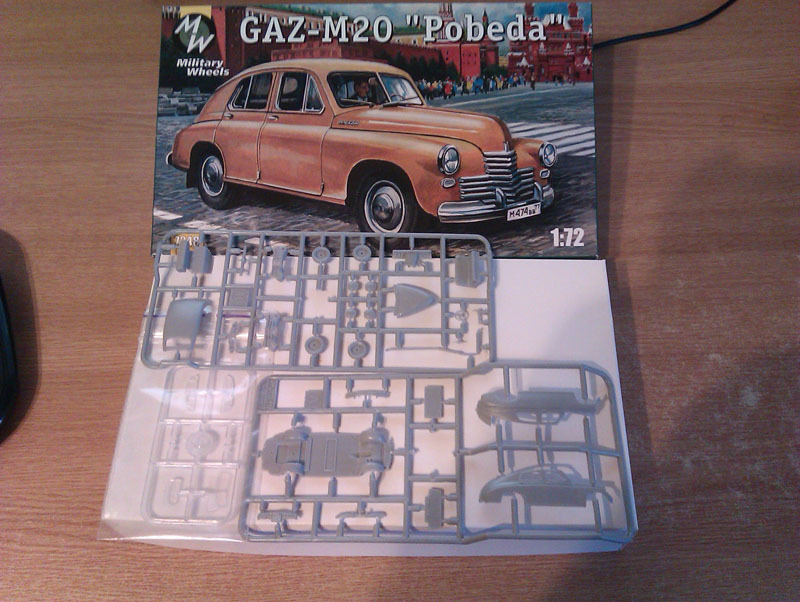 1:43 Princess for some idea of how tiny it is. There's a fair amount of detail all the same, I just hope I don't encounter too much in the way of fit issues. 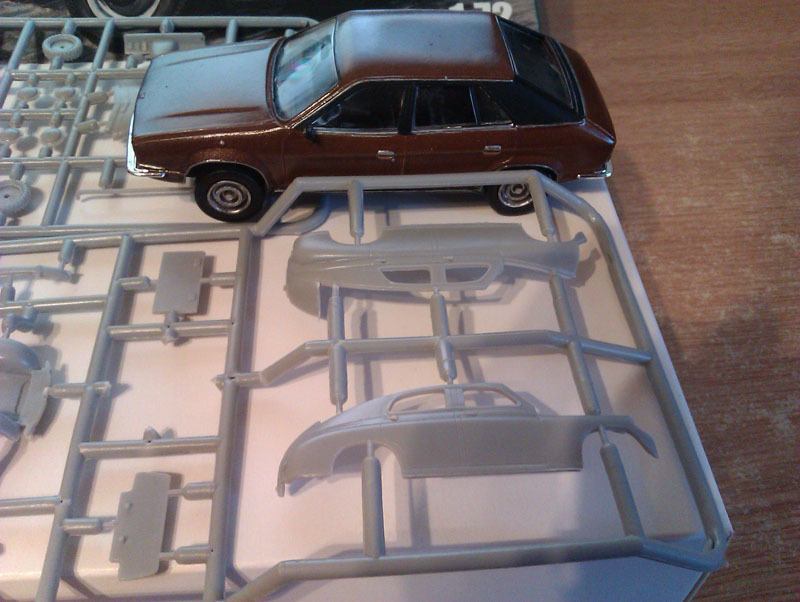 Comes with the optional FSO Warszawa front so I might order another kit in the future so I can build it that way too. Nothing like obscure tiny kits to fill up my space.  |
| |
|
|
vulgalour
Club Retro Rides Member
Posts: 7,079
Club RR Member Number: 146
|
Vulgalour's Small Stuffvulgalour
@vulgalour
Club Retro Rides Member 146
|
|
|
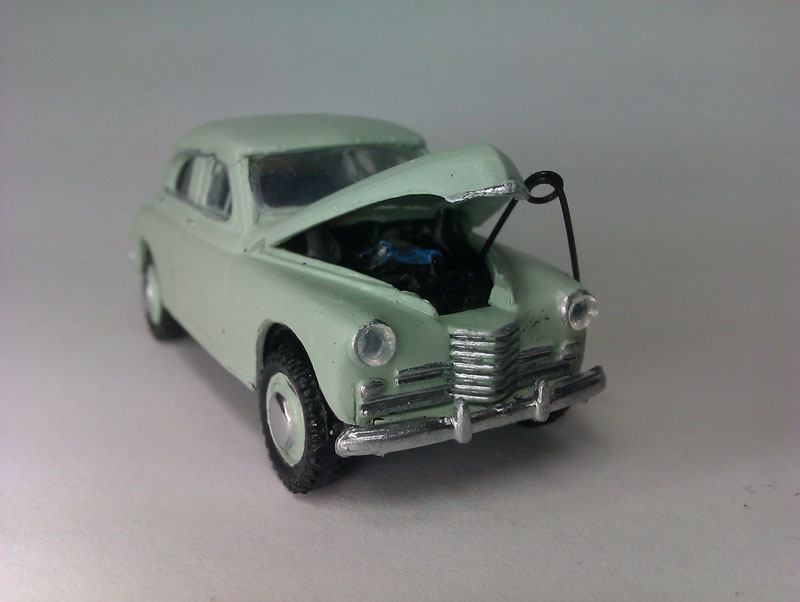
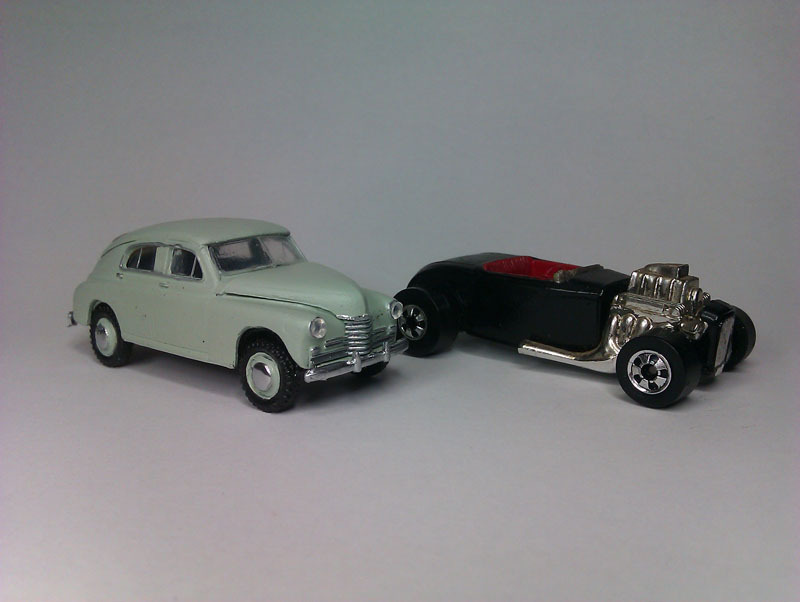
Work has been progressing nicely on the Pobeda. It's incredibly small and while detailed, the casting seems quite prone to warp on the larger parts. To glue the body together I first attached the GAZ front (on the left in the last photo of the previous post) to the body sides and left the rear seam open. Once that was set, I could then glue the rear seam and pull the warp out of the side panels in the process. This unfortunately left quite an ugly mould line down the back which I then had to fill. The kit recommends constructing the separate portions of the body and painting them before assembly and I can't see how you'd do that without ending up with lots of visible join lines where you didn't want them in the end product. Better to assemble the body, deal with any defects, and paint and then fit the glazing etc for a nicer end product. To complicate things further, I decided I wanted to try making an opening panel on this model because I'd not done that before and wanted to give it a go. I really shouldn't have done that, it's made this kit that much harder to work with. Normally, the bonnet is not a separate piece. 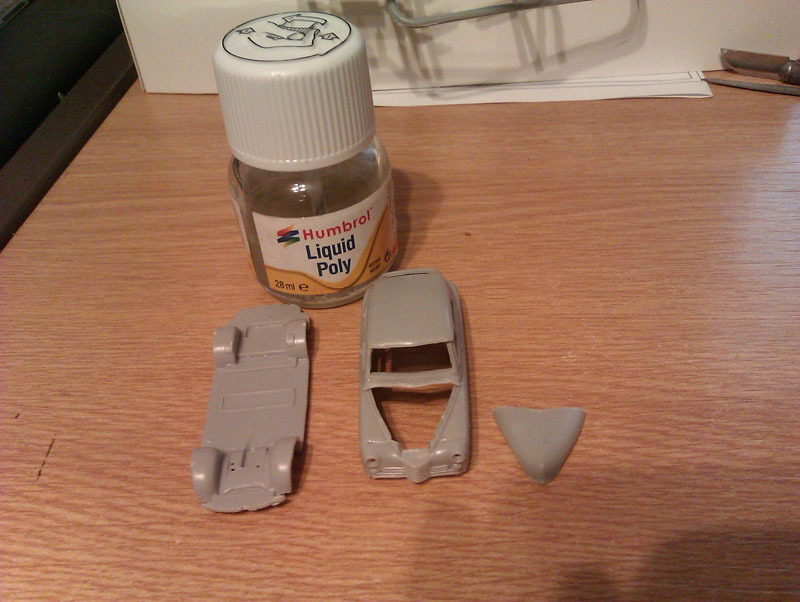 The interior is surprisingly well detailed, with door cards and furniture and even pedals. There's also a separate steering wheel and column and very basic dashboard detailing to represent gauge locations.  The underside too, is nicely detailed. The front and rear axles are separate, as is the simple exhaust system. 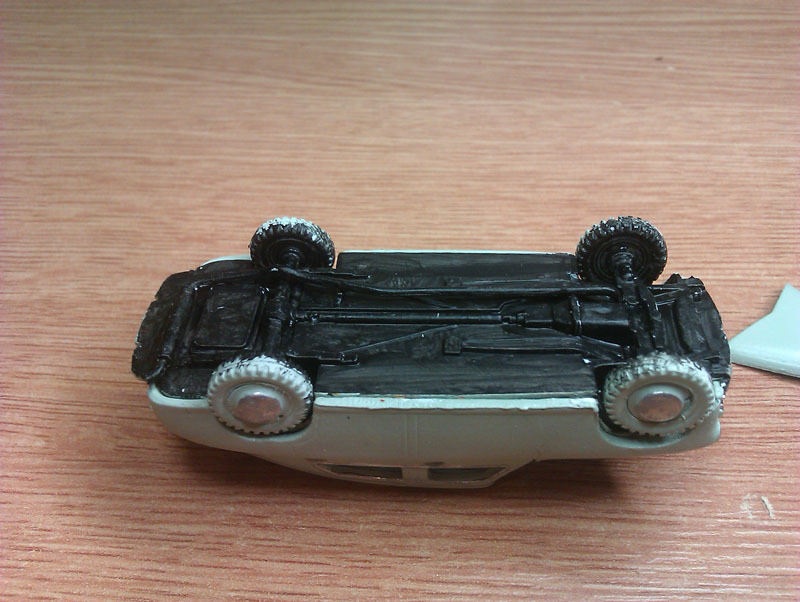 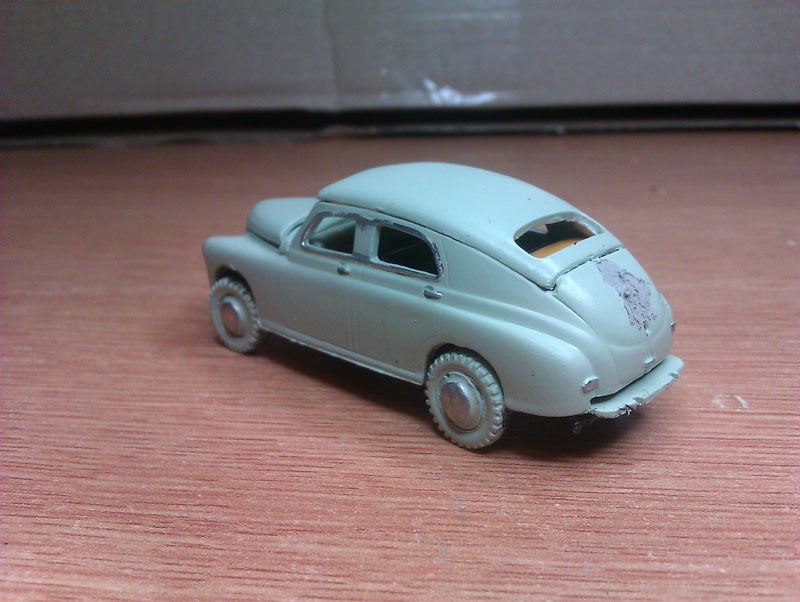 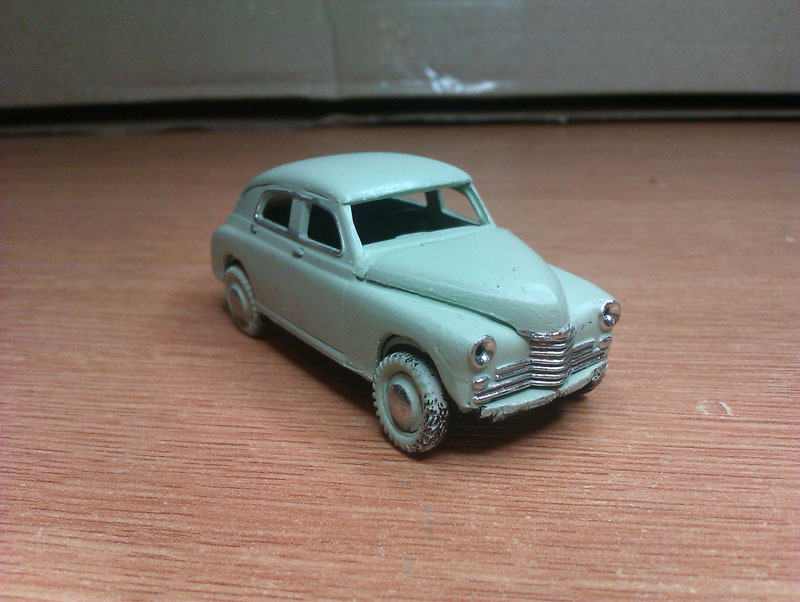 For the engine, I had a look online for something generic at this scale and unless I wanted a big V8 or a massive diesel, I was going to be out of luck. Since the Pobeda just has a four cylinder conventional engine, I wanted something like that, and the only thing I had was hiding inside a Matchbox tanker. It's not the same scale or the right engine but it's close enough for this scale, so I'm casting a new engine using plasticine and epoxy resin glue as I did for the missing parts on the Mercury. The bonnet has had simple hinges added and while it doesn't open wide, it opens far enough to see the engine inside, but not far enough to see that I utterly failed to create a bulkhead that worked and have therefore left it out. Black paint and shadows will fill in where needed and the small scale will help hide this minor shortcoming. 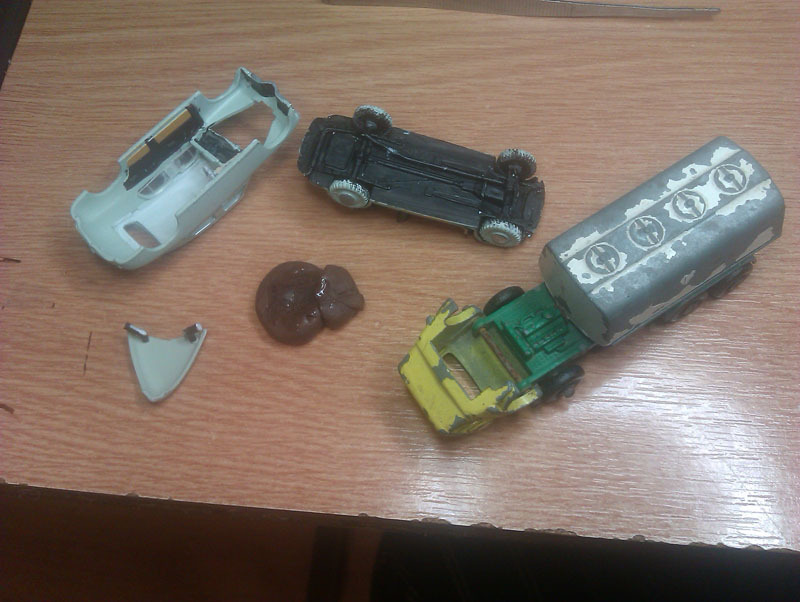 The glazing is installed too. The rear window needed a little filing to get the shape just so, and the side windows needed to be split at the B pillar mount since it was a little bit over-long to install properly. The windscreen dropped in perfectly with no issue. 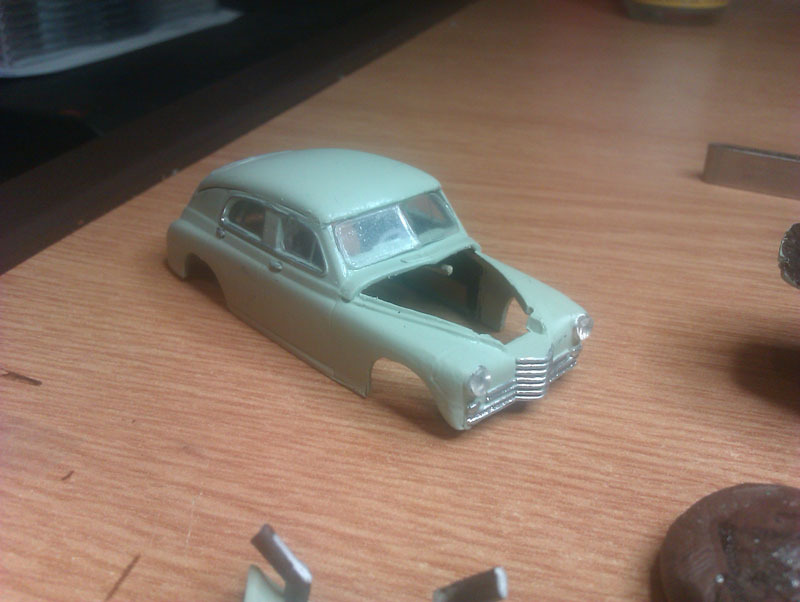 Tomorrow the glue should be dry and the new engine should be set so I should be able to do final assembly. To give you an idea of how tiny this kit really is, here it is next to the 1:43 UAZ and the 1:25 Beetle. 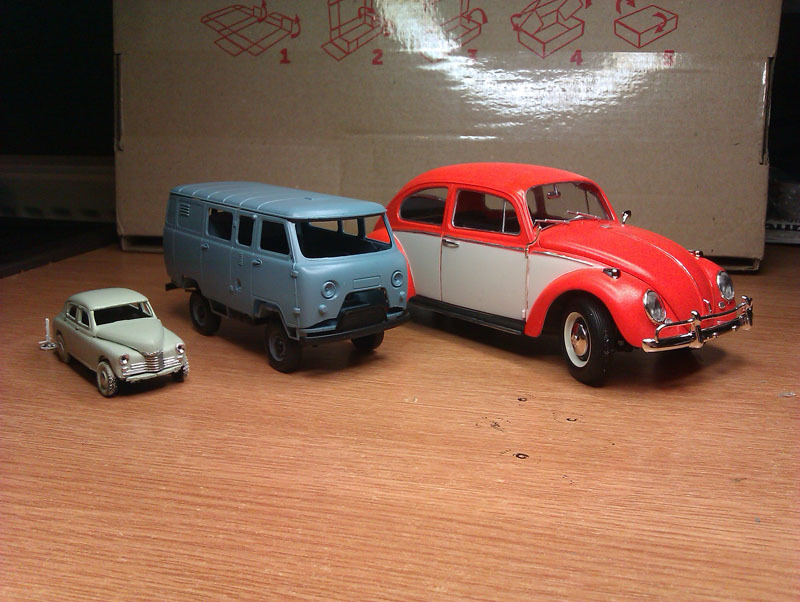 |
| |
|
|
vulgalour
Club Retro Rides Member
Posts: 7,079
Club RR Member Number: 146
|
Vulgalour's Small Stuffvulgalour
@vulgalour
Club Retro Rides Member 146
|
Sept 7, 2019 14:49:08 GMT
|
Pobeda engine casting was a success, I'm holding off on further Pobeda updates until it's finished since it's so close to done now. In the meantime, I acquired a huge quantity of cars after saying I wouldn't buy any more for a while - how does that always happen? - and ended up with four Citroen DS Safaris from Husky. One of them had a squashed roof, so I decided to take two and make a Tissier. I expected all of the Safaris to be ordinary estates, so I was a little surprised when the only estate is the one with the bust roof and glass, while the other three are ambulance variants. That means the rear glazing is blue and is also the interior for the cabin, while the front glazing is a separate clear unit. This isn't actually a problem, quite the opposite, it just meant I changed my original plan of building a four door Tissier and am now building a 2 door triple axle instead. The two I'm not chopping up will become an estate and an ambulance using the bits I've got here, there's enough of the broken estate glazing to splice with one of the ambulance front glazing, hiding the seam with the B pillar. 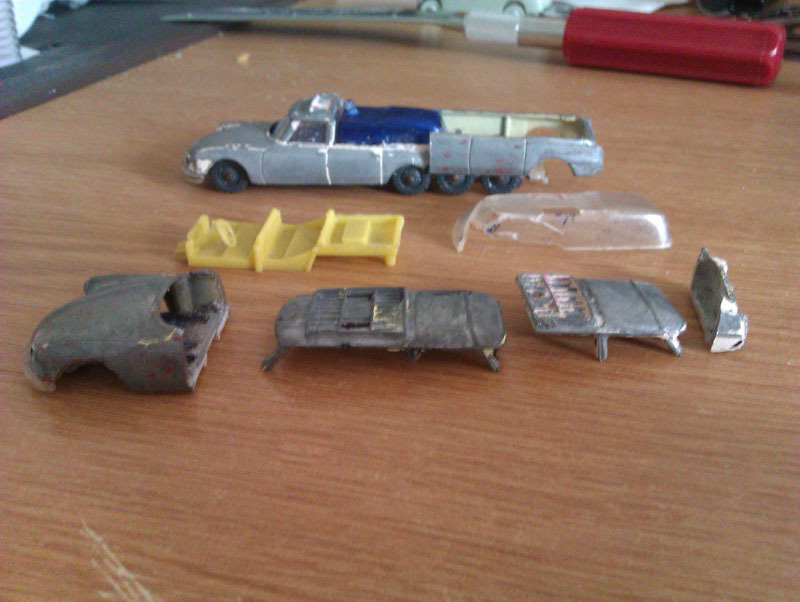 I was going to go for a twin axle originally, the pieces I had to work with meant it was actually easier and would look more balanced as a triple axle, so that's what I've done. The middle axle on the rear is fitted by filing a groove into the rear chassis portion and then glueing the axle down. This actually allows all six rear wheels to roll and while the middle axle on the back doesn't have suspension, the other two do, so I'm pretty pleased with that. For strength, I'll use some epoxy to blend the portions of the chassis together and for the very end extension I'll be using the bit that I didn't stick on that's still attached to the ambulance end unit I chopped off. 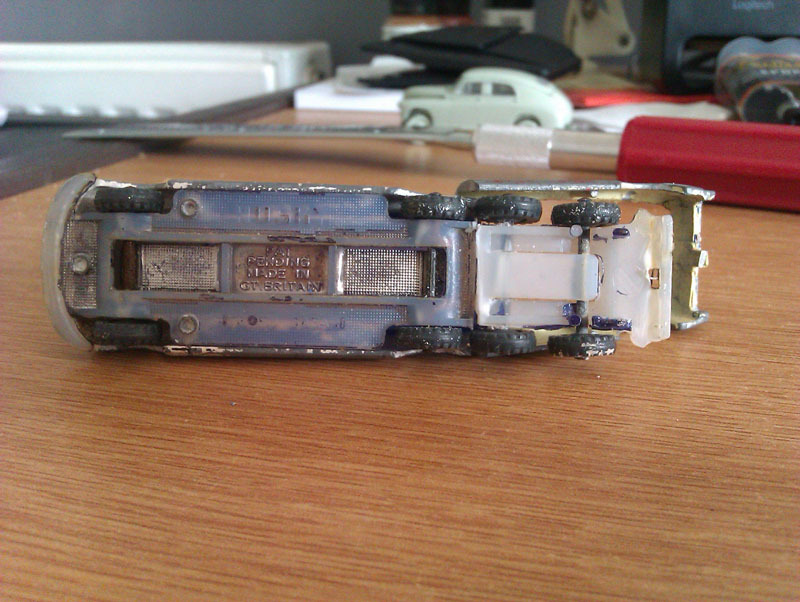 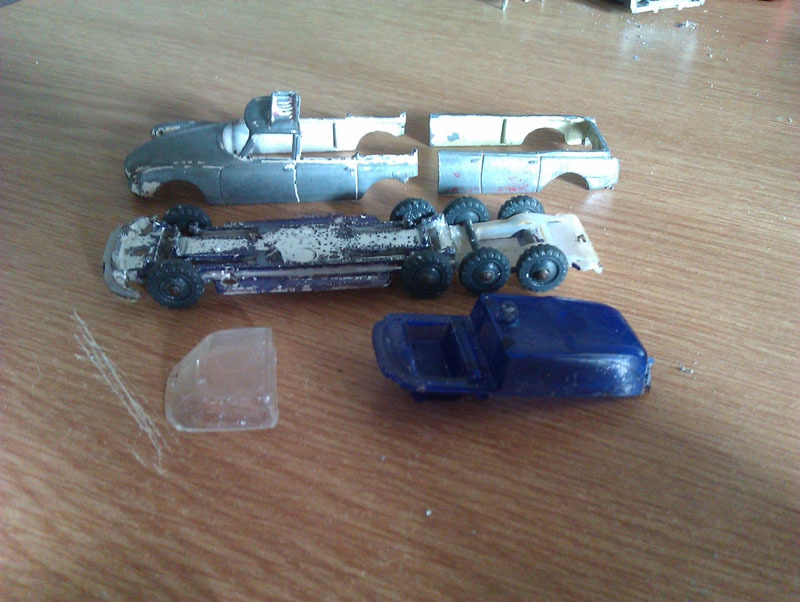 For the blending of the bodywork I've spread the ambulance front end a little and squished the rear estate section a little to get them to match closely. Filler will take care of the rest. I'll also be cutting out a wheel arch so all three wheels are visible on both sides and, of course, filling in the original wheel arch right at the back. Blending the sides is probably the bulk of the work on this one. After looking at several pictures and blogs and videos on Tissiers, it looks like the extension doesn't affect the original wheelbase of the car in most cases, instead having extra subframe/s and bodywork grafted on behind the rear axle, that's what I've done too and the proportions are looking about right. 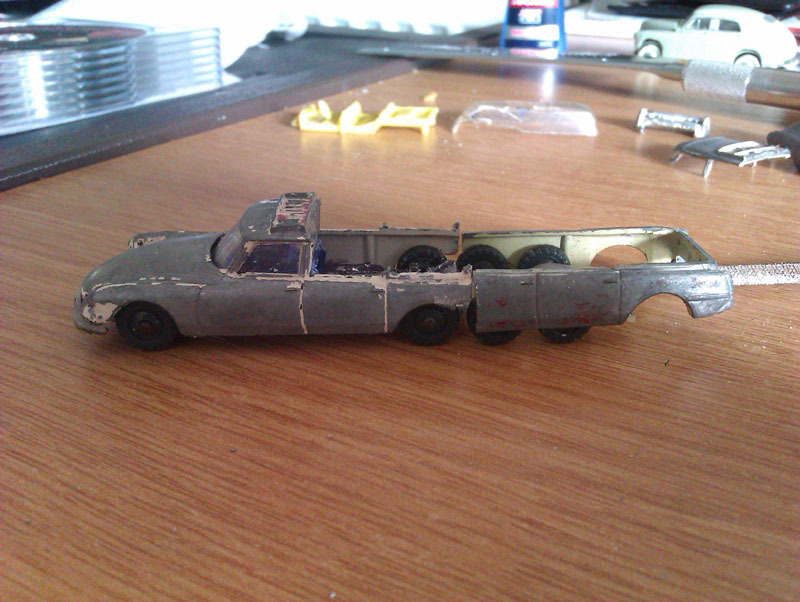 One thing I hadn't been able to figure out was what I was doing with the back of the cab. That is, until I discovered one of the donors for this has separate cab glazing. Because of where I cut the roof it just so happens this forms an almost perfect cab back without any work and even the remains of the roof rack doesn't look out of place. It's nice when you get a bit of good fortune like that. For the flatbed I'm using the broken off end of a top deck from a DAF transporter which I'll section a little to make it the right width since it's ever so slightly too wide in standard format. I also already know this will take one of the other standard DS Safari models, which is likely how I'll display this one. Next up will be stripping the last of the paint off so I can get on with the next stage of assembly and then I'm going to have to figure out what colour I'm doing this one. |
| |
Last Edit: Sept 7, 2019 14:53:17 GMT by vulgalour
|
|
vulgalour
Club Retro Rides Member
Posts: 7,079
Club RR Member Number: 146
|
Vulgalour's Small Stuffvulgalour
@vulgalour
Club Retro Rides Member 146
|
Sept 7, 2019 14:54:06 GMT
|
Put the wrong image in for the cab picture, so here it is. For some reason, I can't edit the post to add it. 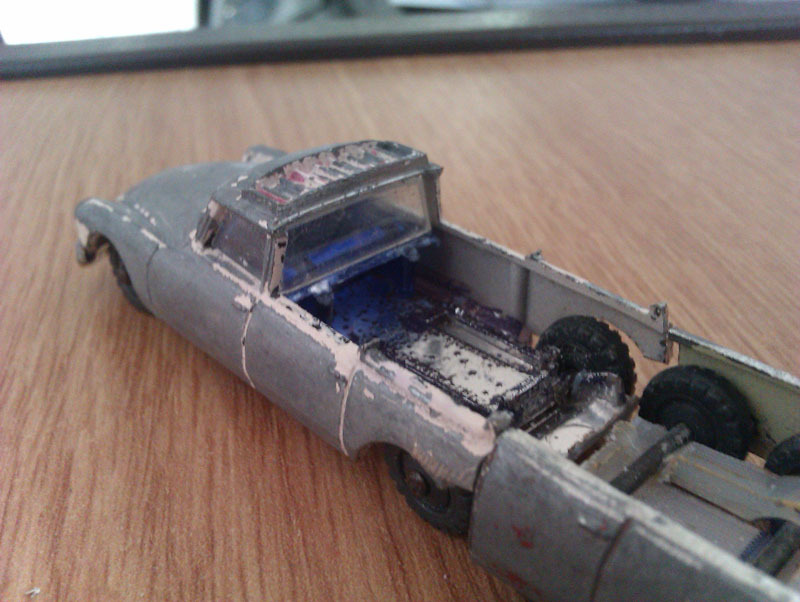 |
| |
|
|
|
|
vulgalour
Club Retro Rides Member
Posts: 7,079
Club RR Member Number: 146
|
Vulgalour's Small Stuffvulgalour
@vulgalour
Club Retro Rides Member 146
|
Sept 11, 2019 23:55:14 GMT
|
Completed one of the three #12 Land Rover Safaris I've got. Shaved the roof smooth since I didn't want luggage on this one, and gave it a slightly too new colour scheme for its age. Still kept it fairly Land Rovery with the colours, all the same. 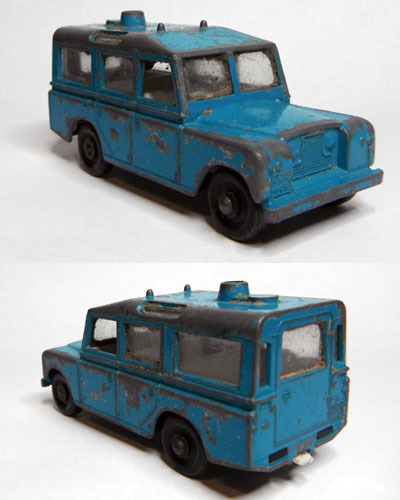 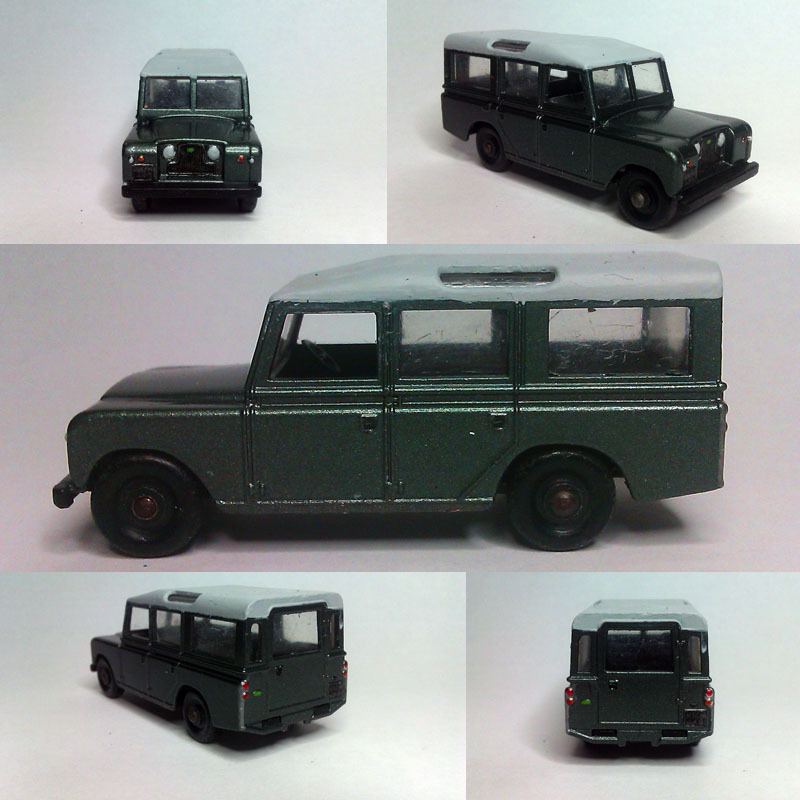 |
| |
|
|
|
|
|
|


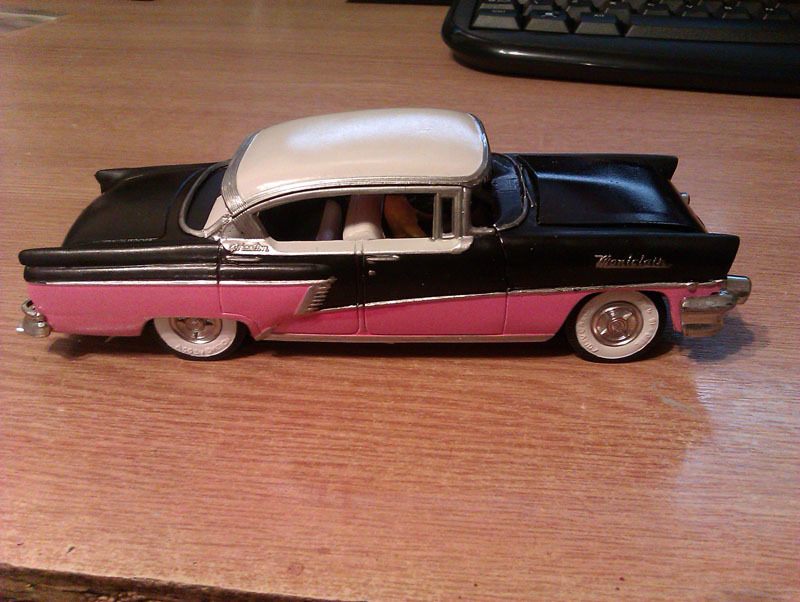


 The Montclair doesn't seem to have had screens, all the kits I've seen both poorly and well built from the same era and manufacturer don't have screens at all so I suspect they weren't actually missing.