|
|
|
Dec 12, 2019 20:12:14 GMT
|
![]() I have not been able to work this out. There are two photographs below. The bottom is the wide view of the boot right hand side of a MK4 boot with the boot lid open. This is the area above the rear lamps. The upper picture with the two arrows is a close up of the area marked with the single arrow in the wide view picture. The close up has two arrows. The one on the right points upwards to show the vertical plane. The second points to water that appears from behind the metal, runs down as can be seen and then drips into the boot. It is a flow of drips. It is dry around the lamp fitting beneath (a usual point of leakage and below the water run). The gutter around the boot lid slam panel looks water tight. The slam panel has two apertures at the top right hand side- the one for the radio arial is sealed. The second for the wiring to the wiper/ heated window although damaged appears sealed, and seems to be out of the way of water. The rubber tube the wiring runs through is dry and I can’t see how water could flow up it into the body. I have tried to find an exploded view of the panel work in this area in case it’s something like to offside rear quarter light leaking around the seal but can find one. I have also tried to find a photograph of a stripped shell and this area to see what the panel work looks like e.g someone’s project but have failed so far. also I can’t understand how the water would travel to the point of entry in the boot. I have also removed the boot lid rubber seal. Whilst it’s wet under the seal I dried the body lip and left it off but the water leak continued. Short of cutting a hole in the bodywork I am at a loss as to where this water flow is getting in. Currently I have a container to catch it. I assume the MK3 was similar in this area making resolution hopefully easier as there are many mor3 cars where someone may have come across this problem. Has anyone had this experience and if so how was it resolved? Thanks in advance. 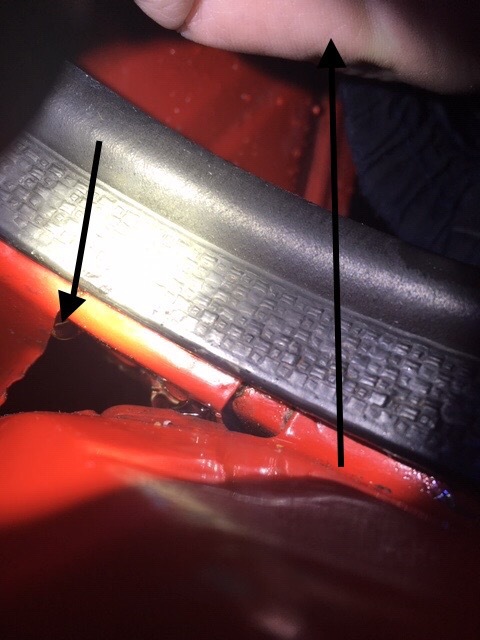 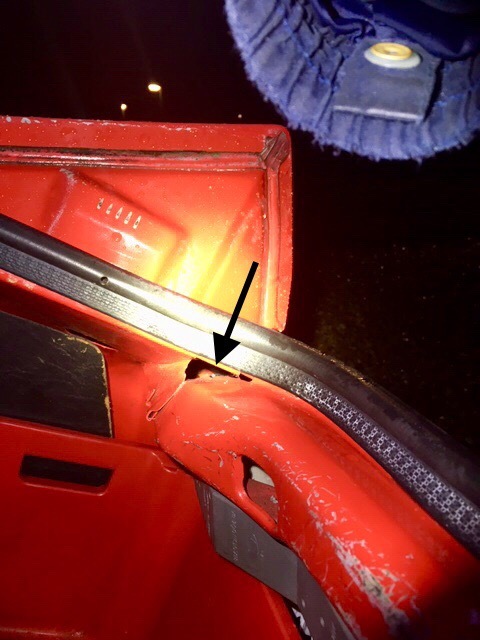 |
| |
Last Edit: Aug 21, 2020 21:31:02 GMT by Deleted: Title update.
|
|
|
|
|
|
|
|
|
|
Best way I've established where water gets in is to get shut in the boot, and get someone to run a hose over the suspect area so you can inspect from inside
Does ot have a sunroof?
|
| |
|
|
|
|
|
|
|
|
Is the washer pipe tube connected and in good condition? That's a pretty common problem.
|
| |
|
|
|
|
|
Dec 13, 2019 17:34:35 GMT
|
comfortablynumbThanks for your reply. No sun roof but you have given me a thought to check the seam seal at the rear of the gutters. The hose idea again thank you- I may have to try that on a dry day; I can then assess how long it takes a drip to appear which is good; sitting in the boot it might be really obvious. xblThanks your reply and for that point. It is connected but hasn’t worked very well recently . I had discounted it because the water dripping is clean and I use blue winter screen wash all year- I will try the smell test though because I have not checked checked the water dripping out properly. I need to get the the bottom of the lack of proper working rear screen wash anyway and need to open up the boot lid: I had been putting that off due to weather, cold and darkness! Thank you again.
|
| |
|
|
|
|
|
|
|
|
Bit of an update. The wiring for the boot lid auxiliaries and radio aerial exit the shell at the offside top of the body shell into the boot lid. The aerial wire has long broken. The resulting hole in the shell was taped over. The other wiring rubber sleeve has split completely and has been taped up before. A check of water flows found that is was imaginable that water could run off the shell (roof, pillar) and course past/ across the hole and taped up wiring. Also whilst cleaning found the tape over the hole to have lifted on the upper end and the tape over the sleeve to have dried out so maybe points where water could enter to body before running down and appearing as above. So have replaced the tape over the hole ( ideally will be grommeted and sealed with something non setting) and retaped the sleeve so it looks sealed.
Now just need the rainfall we had in the winter as a live test, failing that try the hose test. Still need to look into the rear washer issue. That might be as simple as blowing back up the pipe to clear the filter in the reservoir having just cleared something on a modern the same way.
|
| |
|
|
|
|
|
|
|
|
Bit of a tip that you may not know about, and is very useful if the car's in a workshop where you don't want to soak the floor by pouring water everywhere.
If you've got access to compressed air, a good way to test for potential water leaks is by thoroughly soaking the exterior of the car with soapy water then climbing inside, shutting the door/tailgate and gently blowing air, from inside, around areas you may suspect.
You'll see bubbles on the exterior to highlight any areas for further inspection. Obviously, if you go mad with the air pressure you may get bubbles where you'd not actually get water ingress but, with care it'll work really well for you.
I used this method all the time when I worked for MG/Rover in the 90's for identifying duff seals, bad body seams etc (some of those leaked like colanders fresh off the car transporter!) and I use it to great effect now I repair Land/Range Rovers.
Hope this was some help!
|
| |
Al.
|
|
|
|
|
May 26, 2020 22:14:55 GMT
|
Thanks BigDaftAl -always something new to learn. I thought I had it sorted with the deleted holes....that was a good fix but not the one. After the weeks of rain when it dried for a day I took the rubber seal off the body lip. The exposed surfaces were dry but the lip and inside the rubber ‘U’ shape that fits over it wasn’t. Let it all dry our, bit of tidying of surface rust and waxoyled the lip, taking advantage of the hot sun to get it to run. I have seen the discussion elsewhere about its abilities and have learnt there are now better products but it was all I had in stock (sure when it was Finnegans it ran better: memories of it running out of and getting into everything in the 1980s- maybe just enhanced memories). Put the rubber back on and let it rain. Leak still there and the same sort of thing on the near side. Off with the rubber and yes wet under where it fits over the lip. NOS is pricey to say the least. I have looked at various alternatives and need to compare profiles with the original. One other thought is to use non setting windscreen sealant in the ‘U’ shape and then fit the rubber back on the car. Am still thinking on that plus can’t get supplies in for now. Any thoughts welcome. Thank you. |
| |
Last Edit: Jun 13, 2020 8:17:24 GMT by Deleted
|
|
|
|
|
|
|
I have read, in this very parish, of people using ‘Captain Tolleys creeping crack cure’ to seal around windscreens and windows with good results I think Vulgalor used it on one of his cars in his thread from memory. 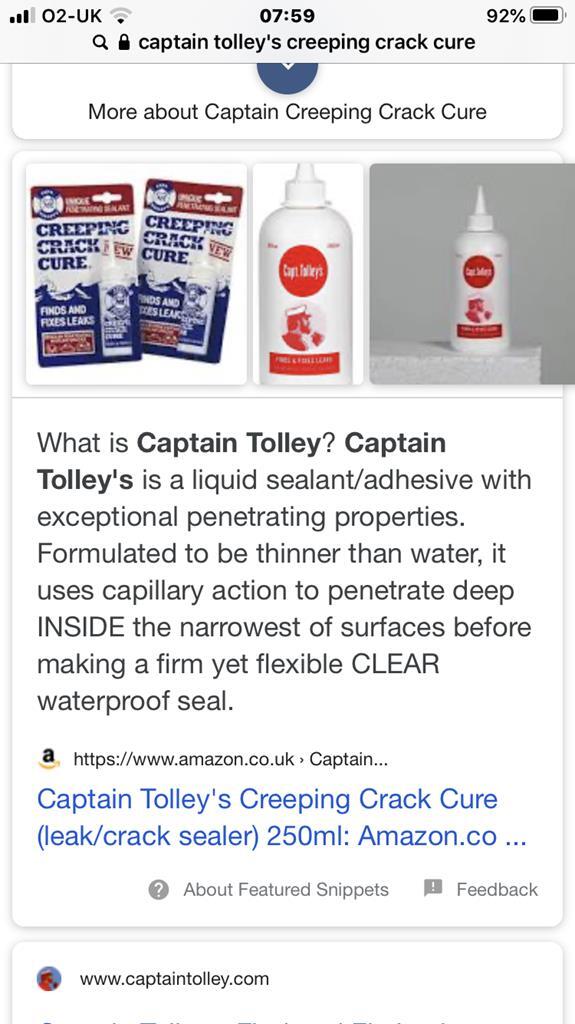 |
| |
|
|
|
|
|
|
|
Thank you johnthesparkyI will add that to the shortening list of options. I took a bit of the rubber off again and had another look. It’s not particularly “springy” and not a very fit to the lip. I have now fitted a new pattern part - this was a much tighter fit over the lip and the boot lid moves off it when the catch is released meaning the lid compresses the rubber: it did that when the car was a lot newer. Looking at the rubbers where they fit over the lip there are small “wings” that I assume are meant to provide a seal- bit like on a windscreen rubber. The old one I am wondering perhaps didn’t make this seal any more as it was a looser fit. Now waiting for rain ( not too soon though) and let’s see what happens. |
| |
Last Edit: Jun 13, 2020 8:15:12 GMT by Deleted
|
|
|
|
|
Jun 20, 2020 21:45:55 GMT
|
|
It has now rained (a lot) since the last post. The boot is dry where before it leaked; the containers placed to catch incoming water are dry. So a success it would seem. Looks like it was the rubber after all. I did a bit of overthinking on this then. Really didn’t expect a rubber leaking to leak as it did- water getting under it and presumably in between a seam and out as in the photos. So have learnt a bit about rubber door/boot seals here: seemingly they need to grip the body lip tightly to give a seal between the metal and the rubber to prevent water getting under the rubber. Also needs some compression so if the rubber breaks down ( looses springiness) that action fails. Thought the job of the seal was to just fill the gap between the panel and boot lid (door). I better have a look at the door seals as they are all the same age. I don’t want the seams corroding away because the rubber seals allow water to be held behind them.
Thank you again everyone for reading this and the useful suggestions. You never stop learning.
|
| |
|
|
|
|
|
Aug 21, 2020 21:36:14 GMT
|
|
So for closure. No leaks with normal rain. There have been a couple of torrential showers and there was some leakage but that was exceptional rather than usual rain. Usual rain all is dry. The dripping in has stopped. Success. I checked before the torrential rain under a bit of the new seal and it was dry. I will double check anyway and also see if I can see why the torrential rain overcame the seal. I still need to look at the door seals. One job done. What’s next. Thank you.
|
| |
|
|


