jamesd1972
Club Retro Rides Member
Posts: 2,922  Club RR Member Number: 40
|
Econo Jag MK2 1967 2.4 Autojamesd1972
@jamesd1972
Club Retro Rides Member 40
|
Oct 11, 2021 21:15:17 GMT
|
|
Looks like sorting out the loom is going to keep you busy !
Not too bad compared to modern stuff but still enough to be interesting…
Thanks for sharing
James
|
| |
|
|
|
|
|
|
|
Oct 11, 2021 21:55:37 GMT
|
Looks like sorting out the loom is going to keep you busy ! Not too bad compared to modern stuff but still enough to be interesting… Thanks for sharing James I've probably spent around 3-4 hours on it so far and its all done, just need to get some more tape to tape it up and it will be ready to fit.
I just hope its right, not just because fixing it when its in will be a pain but also i'm an Electrical Engineer so getting it wrong will be really embarrassing!
|
| |
|
|
|
|
|
Oct 18, 2021 18:55:54 GMT
|
|
Hmm, interesting Homer. My loom was toast too and I kinda decided I'd make my own. I scavenged what I could from the old loom, but there's not a lot of it that's useable. Mine appears to be 50% plastic coated and 50% cotton weave coated. The cotton has become brittle and had to be discarded. Yours however, appears to be all plastic coated wires. Is that the case? If so I'm guessing it's a later loom. I may take a look on Sunday at the Jag Spares Day, see if there's a cheap one.
|
| |
|
|
|
|
|
Oct 18, 2021 21:56:08 GMT
|
Hmm, interesting Homer. My loom was toast too and I kinda decided I'd make my own. I scavenged what I could from the old loom, but there's not a lot of it that's useable. Mine appears to be 50% plastic coated and 50% cotton weave coated. The cotton has become brittle and had to be discarded. Yours however, appears to be all plastic coated wires. Is that the case? If so I'm guessing it's a later loom. I may take a look on Sunday at the Jag Spares Day, see if there's a cheap one. Some of the wires are plastic and some are fabric coated, however, all were in reasonably good condition except for the ones associated with the dynamo (probably gone brittle due to heat from the heavy load) and I stripped those out anyway and replaced with new plastic ones ready for the alternator and PAS conversion.
Making a loom could be fun but I would price it up first carefully as the cabling I bought for mine cost around £20 and it was probably less than 5% of what is in the loom.
You could make it cheaper by saving the front to rear looms and just buting the engine bay/dash loom which is the one that is most likely to be a problem.
I'm going to the spares day this weekend to, you might see me, I will be the one with the annoyed looking wife in tow!
|
| |
|
|
|
|
|
|
|
|
I've found an affordable way of getting boatloads of wiring is heading to a scrappy and pulling it out of cars there. Especially if it's all jumbled up and looks like a complete mess they don't tend to charge much for it.
|
| |
|
|
CaptainSlog
Part of things
 
Posts: 510
Club RR Member Number: 180
|
Econo Jag MK2 1967 2.4 AutoCaptainSlog
@captainslog
Club Retro Rides Member 180
|
Oct 19, 2021 10:32:02 GMT
|
I will be the one with the annoyed looking wife in tow! I think there will be a lot of those about. |
| |
|
|
|
|
|
Oct 20, 2021 10:33:26 GMT
|
I've found an affordable way of getting boatloads of wiring is heading to a scrappy and pulling it out of cars there. Especially if it's all jumbled up and looks like a complete mess they don't tend to charge much for it. Hmm, a very good idea. I'll have to check which local yards allow visitors, as I know they get a bit jittery lately with all the health and safety issues. |
| |
|
|
|
|
|
Oct 26, 2021 11:20:16 GMT
|
Good old ebay, snapped this complete but damaged Mercedes loom for £20. Bargain. ( Sorry to sidetrack your thread Homer, but it's kinda related) Now the hard part!  |
| |
|
|
|
|
|
Oct 26, 2021 17:24:11 GMT
|
I went to Jaguar spares on Sunday and bought a few bits: - New Alloy Radiator
- Front suspension wishbone bushes top and bottom.
- Front suspension bump stops
- Front engine mounts
- Front indicator lenses in white (I just thought they would look nice :-)
- Steering linkage top section as its different on my car to the PAS conversion I have (my car has the type with the CV type joint bu the kit has the type with the rubber isolatiing section and I only have the bottom section.
- 2m of blue vinyl to make interior trim panels.
- 4m of underlay for above the headlining and under the carpets.
- 1 litre of trim adhesive.
The whole lot including entry and two bacon rolls was £235 which I didn't think was bad.
Before the show I also ordered a rebuild kit for the front callipers (jaguar 420) fpr £60 including all new stainless pistons, bolts, seals etc. If they hadn't have been from a supplier i've used before I would have been wary but they have turned up as good as gold.
With a few items from the car i've sold this brings me to around £7,800 so far.
Big items still to do/buy are:
- Rebuild engine
- Rebuild gearbox
- Radiator hoses
- Carpet set
- Boot mat
- Alternator
- Front subframe front mounts
- Front brake discs
- Wood work, either replace or more likely try re veneering it.
- Chrome, sort out what is good and what I need to get.
- Tyres.
- Number plates
- Vinyl paint to recolour door cards for interior colour change (original was tan, replacement seats I have are dark blue).
There will be a few other bits but thats the main stuff above.
I've rebuilt the rear callipers and fitted them, I need to get some photos uploaded but don't have them to hand at the moment.
|
| |
|
|
|
|
|
Oct 27, 2021 22:12:26 GMT
|
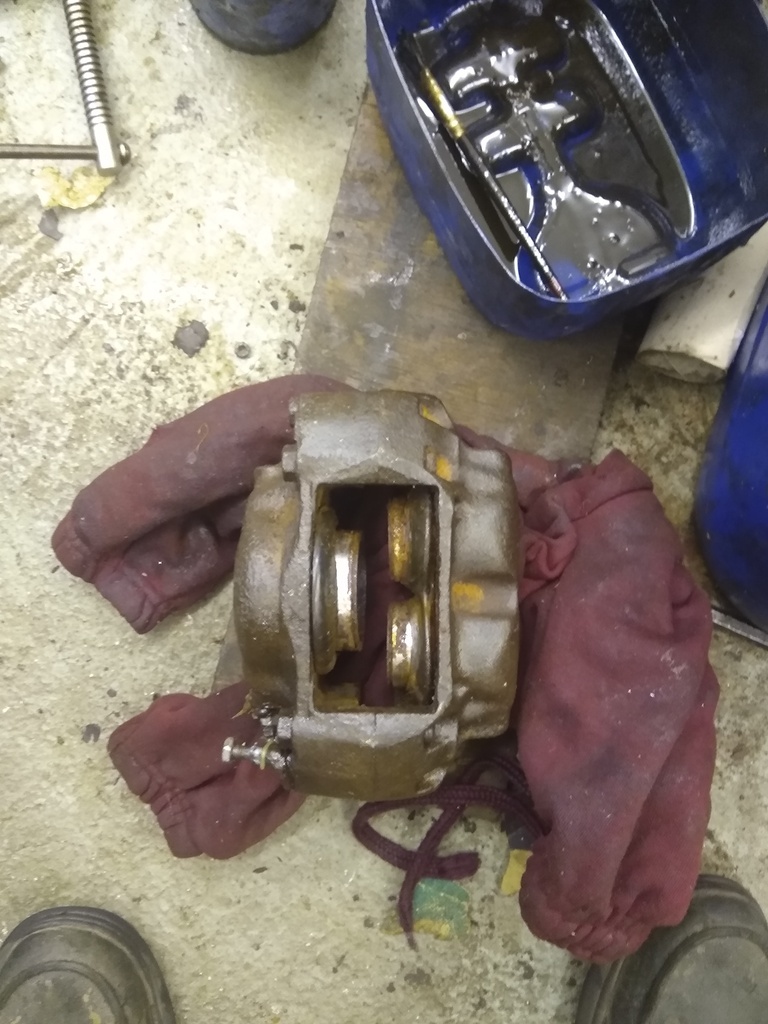
checke the I've been wanting to post some pictures of my attempts at rust removal with citric acid and I also wanted to update with my progress on brake callipers so I thought I would kill two birds with one stone :-) So here is one of the front callipers, its off a Jaguar 420 and for anyone considering the conversion you also need the 420 hub uprights and the steering arms as the calliper spacing is different. The advantage is that they are a three pot design so in theory would have better stoping power, the main advantage for me is tha callipers are of a more modern design so the seal is in the calliper body and the piston moves against the seal as it does in a modern car, the original MK2 ones have the seal on the piston and the seal moves against the calliper body (actually a bolt on wheel cylinder), these are expensive to buy or rebuild so the 420 option was a cheap upgrade for me. To balance the brakes i'm also fitting the 420 rear callipers, these bolt on to the MK2 rear axle but you need to space them over using a couple of washers to centralise them and you need to retain the MK2 handbrake callipers as the 420 ones are different, you need the brass fork/spring from the 420 for the handbrake callipers. Coupled with my X300 master cylinder conversion to dual circuit brakes i'm hoping this will be a much better system without the single point of failure that you get on these normally, that said the other MK2 I have has a totally standard braking system and its more than adequate for the car, certainly the sedate way I drive it anyway!
So here is the patient, its rusted up solid and doesn't look to have been used for many years, the pistons are stuck and compressed air has no effect on them.
Enter the brake fitting tapped for a grease zerk and a few g clamps which hold the pistons when they are nearly out so the others can be freed off.
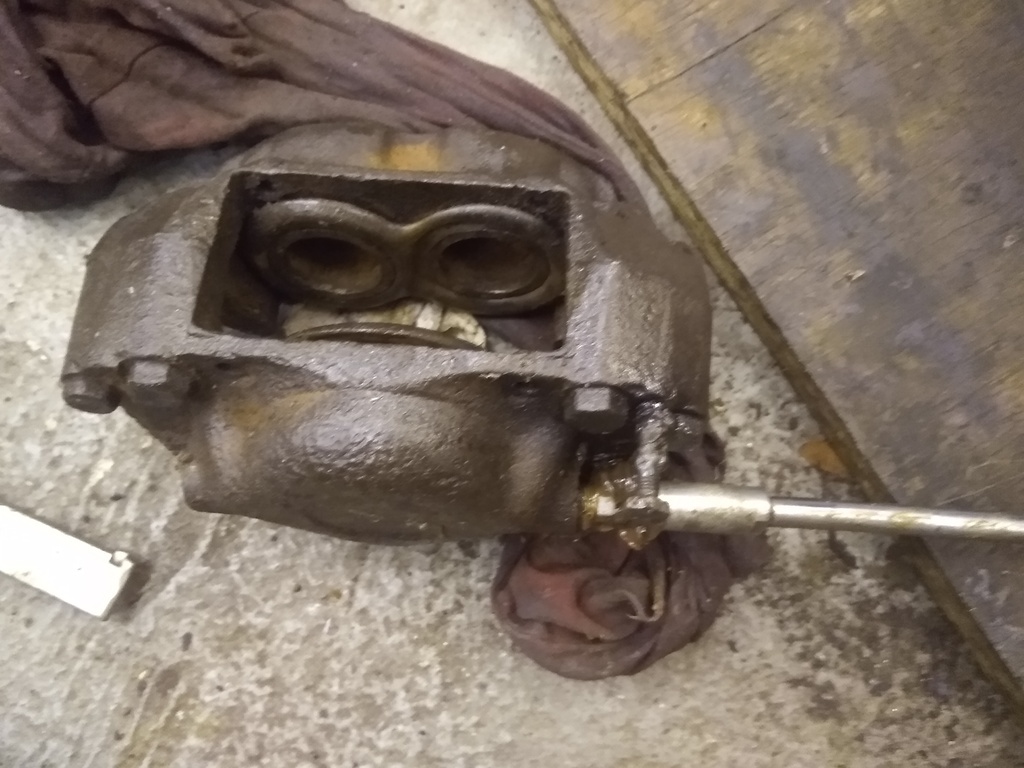
After a bit of pumping the pistons were all pretty much out and I then put the calliper in the vice and split it in two.
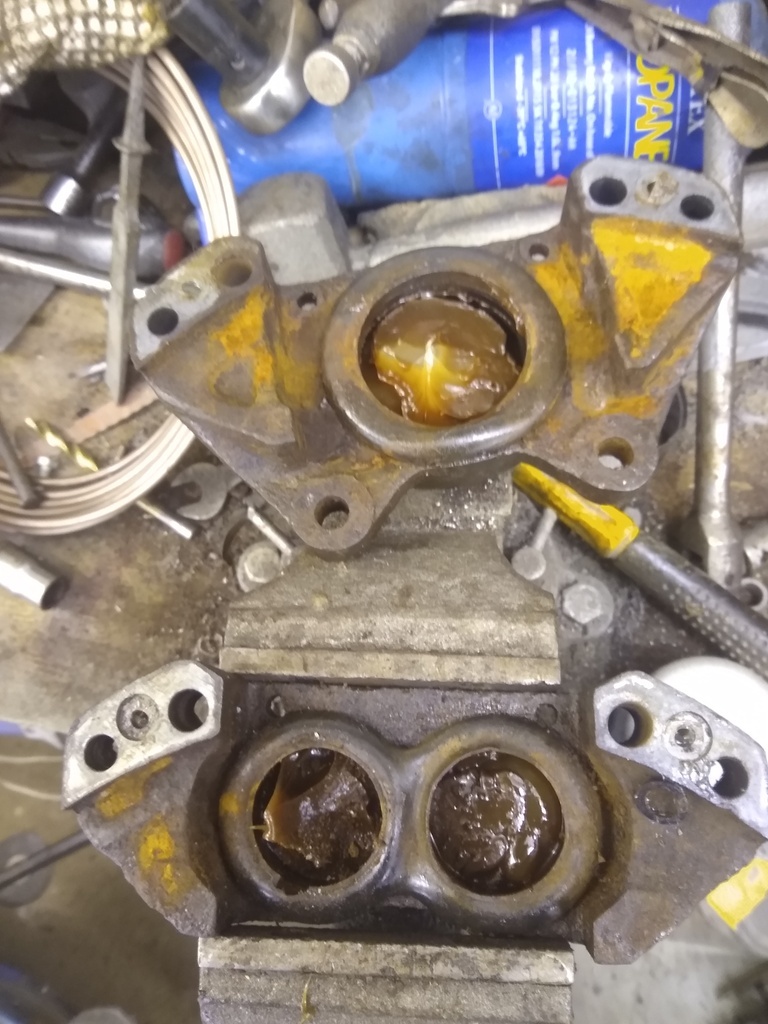
Next the grease is cleaned out and the calliers are then ready for dipping. Because the other calliper has already been split and put in the dip I put a cable tie on each of the two halves to ensure that I put the correct ones back together.
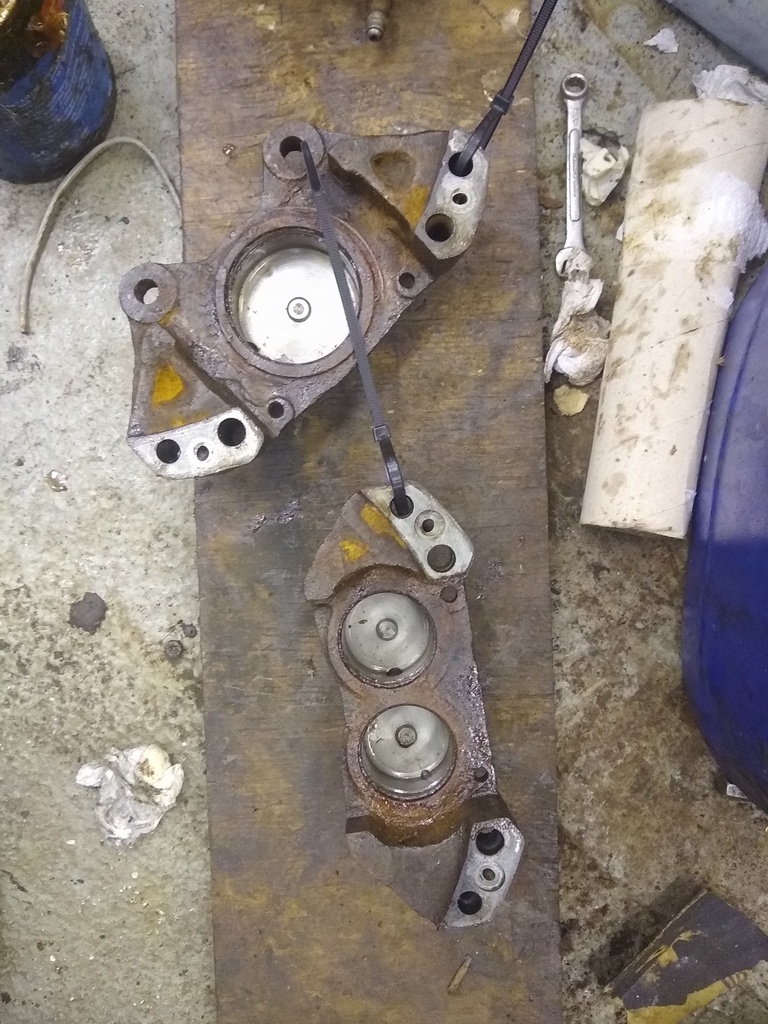
And in true Blue Peter style here is one I prepared earlier, this is the other side.
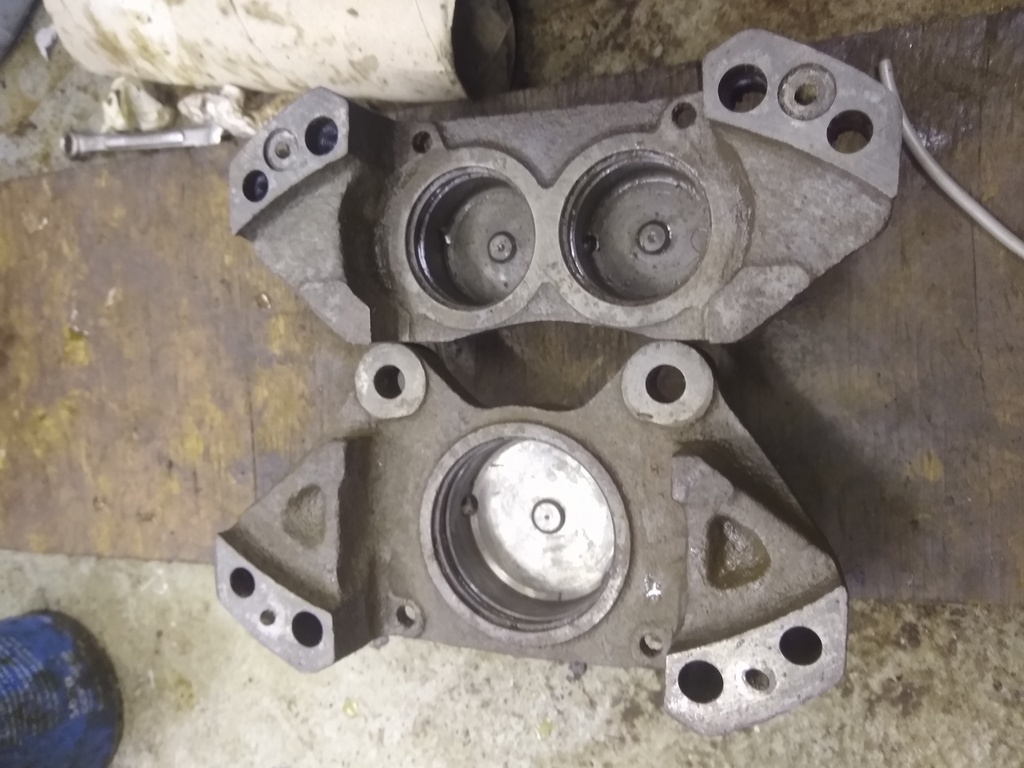
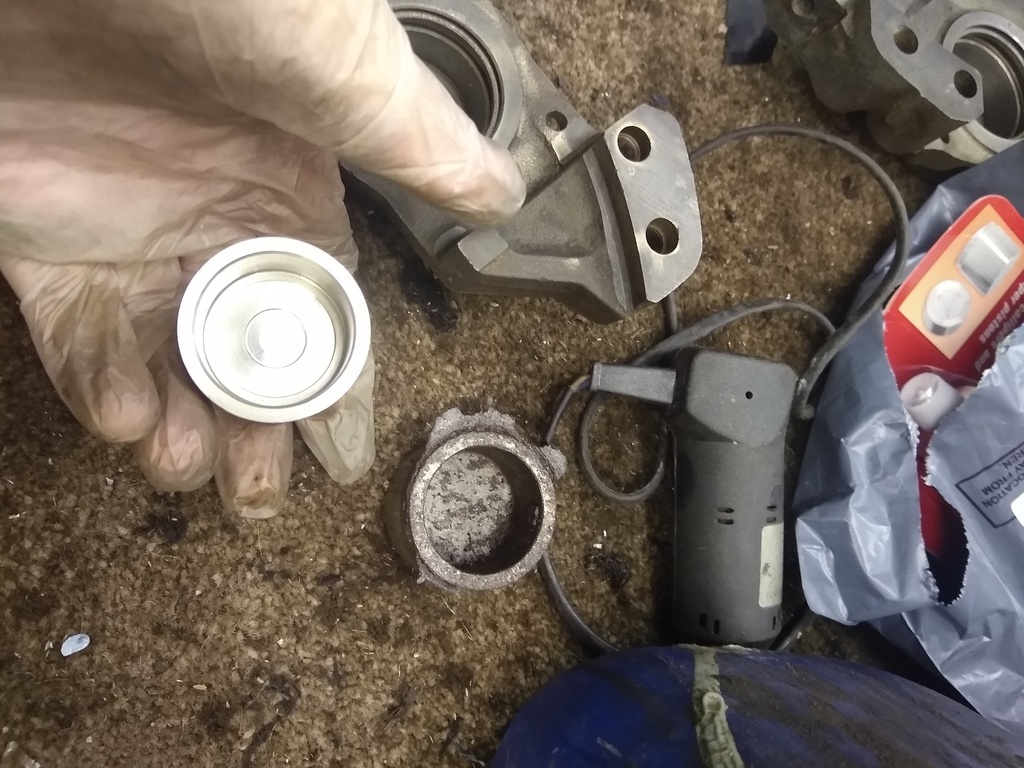
These will then be cleaned up a bit more and I have a small wire wheel on a dremel type tool that I use to clean out the seal groves.
I will then dip them again for a day or so, get them out, wash them in warm water, dry them thoroughly and leave for a few days before rebuilding with the new seals and pistons.
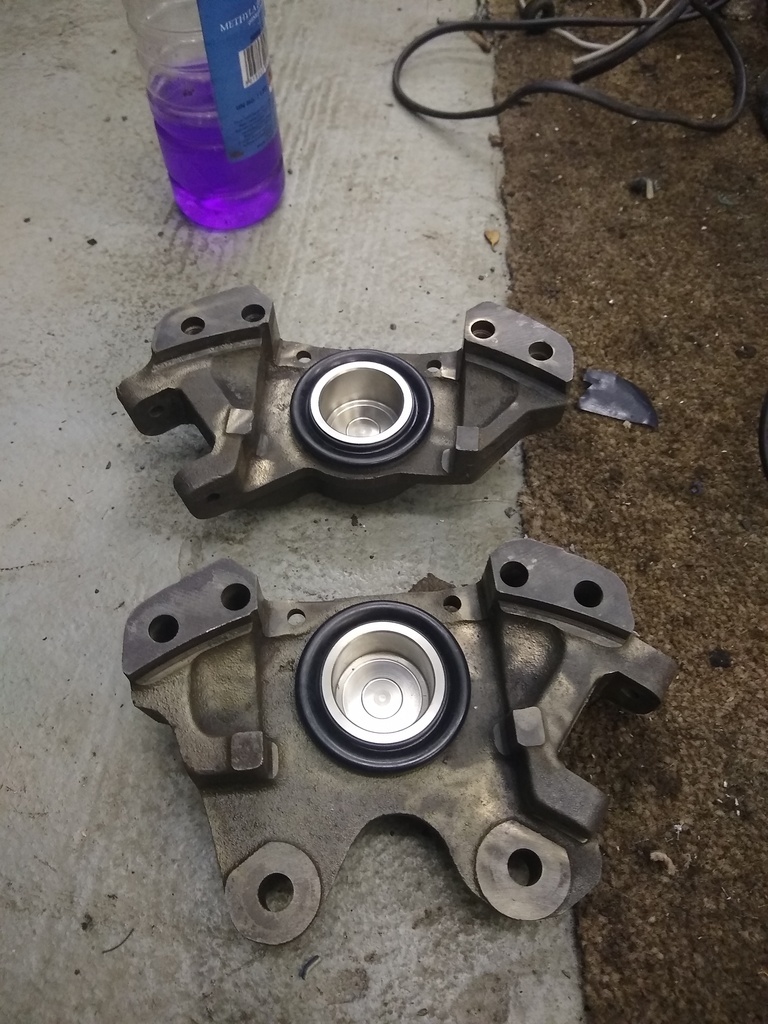
I've already done the rear ones and this is what I did, first i checked and cleaned off the two halfs that were to be rebuilt. I used meths for this as it was recommended to me many years ago, it seemed to work well.
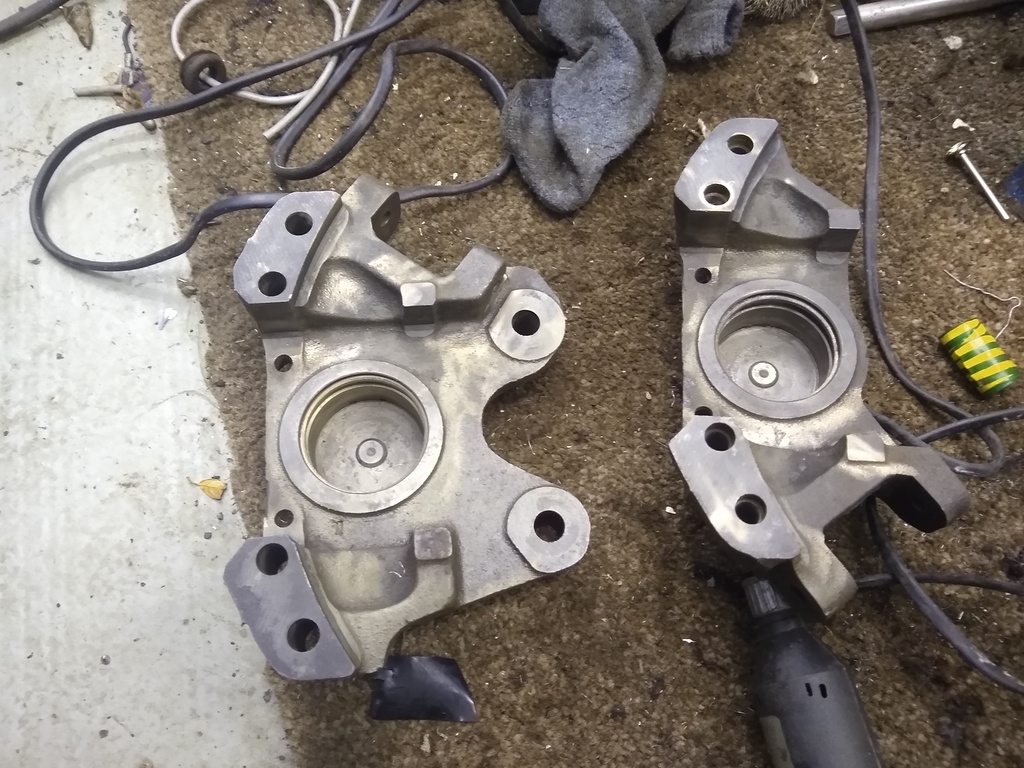
I checked the new pistons against the old and did the same with the seals.
On these the outer dust seal goes into a slot within the calliper bore so has to be fitted as the piston goes in and not afterwards.
The new pistons and seals were then fitted to each half.
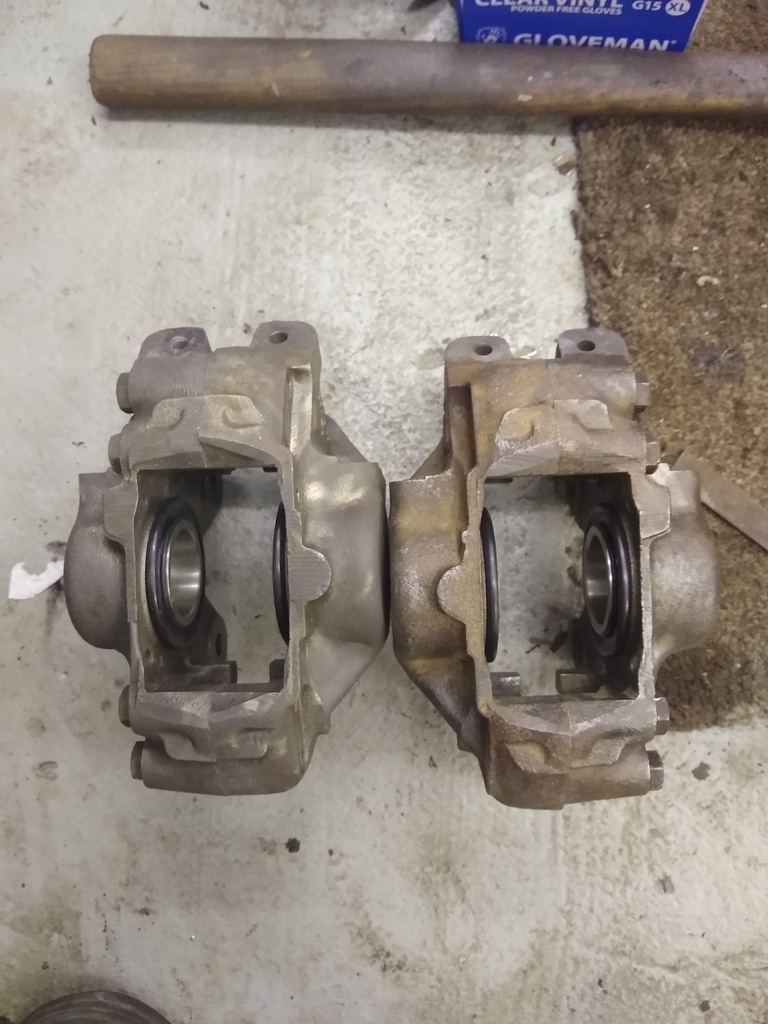
The two halfs were then bolted back together, on these cars there is an external bridge pipe for the brakes so they don't have a seal between the two halfs. I used loctite on each bolt.
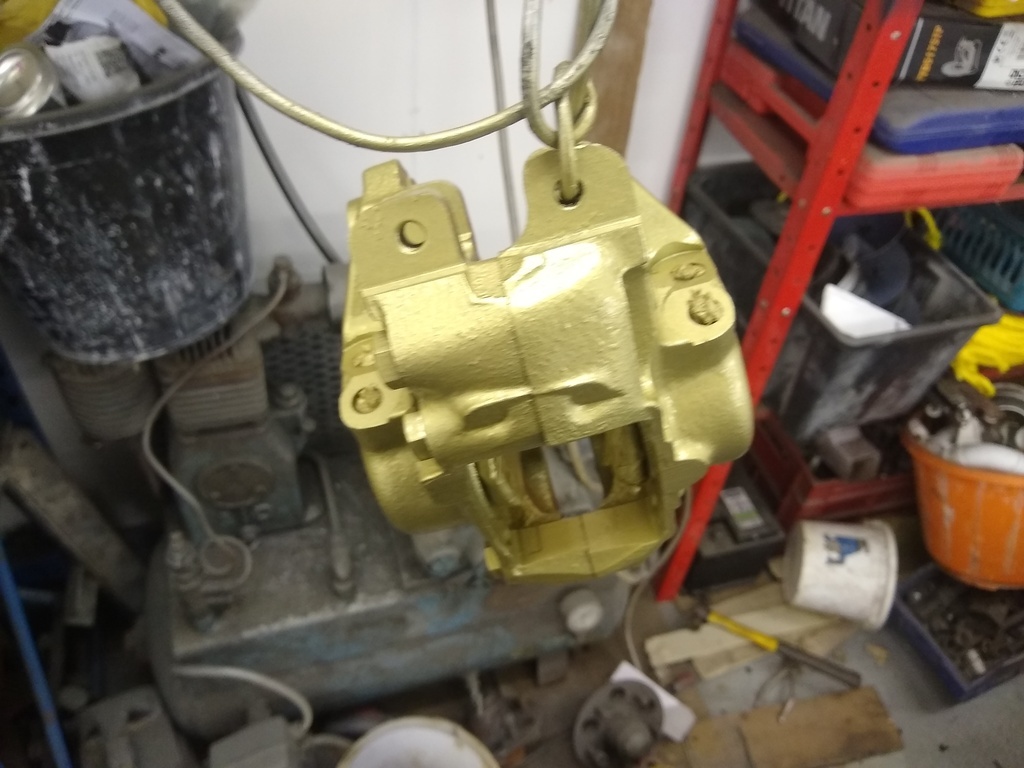
Finally I masked up the new dust seals and painted the callipers with gold spray hammerite. I've used this before and it seems to last well.
 |
| |
|
|
|
|
|
|
|
Oct 27, 2021 22:49:11 GMT
|
|
Are those callipers Girling units? Not sure if they are exactly the same as your Jag ones, however Girling three pot units were fitted to Volvo's Amazon and 1800S, in case that is any help for future parts sourcing.
|
| |
|
|
|
|
|
Oct 27, 2021 22:52:26 GMT
|
|
I forgot to mention that I used red rubber grease on the new seals as well :-)
|
| |
|
|
|
|
|
Oct 27, 2021 22:57:29 GMT
|
Are those callipers Girling units? Not sure if they are exactly the same as your Jag ones, however Girling three pot units were fitted to Volvo's Amazon and 1800S, in case that is any help for future parts sourcing. Thanks Paul, I think they may be the same although there are a couple of versions I believe with vented and unvented discs.
You can also fit some of the Volvo 240 brakes to a MK2 (I think its those for solid discs) although you need to drill out the mounting holes on the calliper slightly (for this conversion you use the MK2 upright) and have the disc machined down in size by a few mm to fit. This has the same effect as the callipers are of the more modern design however, the Jaguar 420 front callipers came up cheap with the hubs (£61 delivered from ebay) and the rebuild kit was £60 so fit a bit of time and a bit of paint I will end up with rebuilt callipers with stainless pistons for around £120 whereas a single wheel cylinder for a MK2 is around £100 these days and there are four on the front.
The 420 rear callipers I already had from a 420 I broke years ago, ironically I sold the front brakes to someone looking to upgrade a MK2 and I think even then (around 15 years ago) I got more than £61 for them!
|
| |
|
|
|
|
|
|
|
|
With the Volvo 240 4 pot fronts to suit the mk2, does it matter what year and whether they're from an ABS car or not?
Is there a part number to look for?
The Volvo 240 aren't common here in NZ but will keep my eye out as I'll have the same dilemma with my Daimler.
|
| |
1964 Daimler 2.5 V8 (project)
2015 Disco 4 SDV6
|
|
|
|
|
|
|
With the Volvo 240 4 pot fronts to suit the mk2, does it matter what year and whether they're from an ABS car or not? Is there a part number to look for? The Volvo 240 aren't common here in NZ but will keep my eye out as I'll have the same dilemma with my Daimler. I think they have to be from an earlier car with the solid discs voucherboy has done this conversion on his Daimler so would be better placed to advise. |
| |
|
|
|
|
|
|
|
With the Volvo 240 4 pot fronts to suit the mk2, does it matter what year and whether they're from an ABS car or not? Is there a part number to look for? The Volvo 240 aren't common here in NZ but will keep my eye out as I'll have the same dilemma with my Daimler. I think they have to be from an earlier car with the solid discs voucherboy has done this conversion on his Daimler so would be better placed to advise. Hey edwagon, as Homer has suggested, the Volvo calipers need to be from an earlier, non-vented disc'd vehicle. The calipers are far better and available new, which is what attracted me to this option. They are available on ebay in the UK here (https://www.ebay.co.uk/itm/223896431302?epid=248956726&hash=item3421446ac6:g:-mYAAOSwqKZgJIRV) but that doesn't help a great deal in NZ I guess. The part number that you need is CA286. They are 'handed' so make sure you get a pair. Rather than sidetrack Homers thread, take a look at my blog (The calipers are at the bottom of this page - www.lootintheboot.uk/running.htm ) If you need any more info, just PM me and I'll help as best I can. 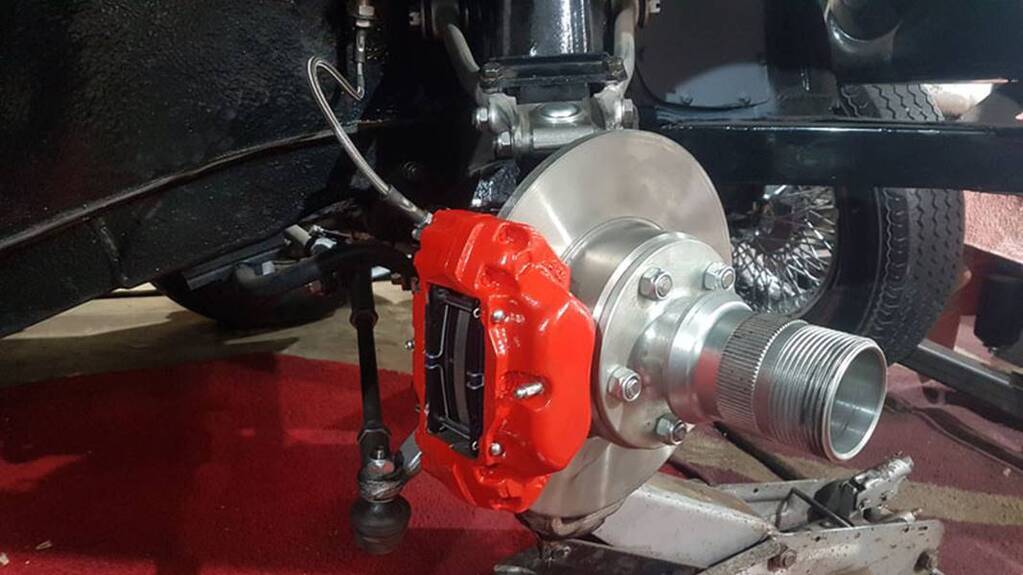 |
| |
|
|
|
|
|
Nov 27, 2021 22:30:02 GMT
|
I've been doing a little bit more with lots of cleaning and painting of odd bits and pieces.
These are the engine mounts and the interior screen vents:
I've also made and fitted the fuel pipe (this is 8mm copper pipe from screwfix bent to shape).
The indicator lamp holders, scuttle vent interior handle, handbrake and part of the gear change linkage (automatic).
Then I turned my attention to a job i've been putting off for a while, the petrol tank.
I tried to find a good second hand one as new ones are a fortune and ended up buying one off e-bay that was sold as immaculate and ready to fit, sadly it was nothing of the sort and it was rusty, the outlet pipe was rotted off, it was holed and had been filled with body filler, it also had a huge dent in the bottom (cunningly hidden in the photos) and one of the sender unit screws was snapped off. The seller refunded me and told me to keep it so I left it outside for the scrap men but they didn't take it for some reason (took the other stuff with it though), after a week and a few funny looks from the neighbours I took it back in and stuck it in the shed.
I kept an eye out for another tank but they were either hugely expensive, in poor condition or both and the experience with this tank put me off and then I started to wonder whether I could repair this, i've only ever done welding on one tank before and it was a minor repair, this one needed major surgery to make it anything like usable.
Having looked on line about how to do it and read the horror stories of people being killed or horrendously maimed trying to repair fuel tanks I wasn't keen but I thought it would be a good learning curve and if I was careful it seemed possible to do this.
First thing was to get the tank back from my mums garage where I took it when we moved house, I stripped it of all paint and filler and assessed the damage, the fuel pipe was rotted off and there were some holes and a previous brazed on repair which looked solid enough.
First thing was to pull the dent out of the underside which I did by using a combinaton of a piece of wood through the tank sender hole and a slide hammer with a hook on the end. I didn't get it all out but it looks a lot better now.
Next thing to do was to remove the old fuel pipe, I drilled the internal bracket out from the top that holds the pipe to the tank and then fished it out, I made a new pipe out of copper and made another internal mounting bracket which I then soldered on to the pipe so it stayed in place when the pipe went it.
I then used a cone drill to make the hole for the pipe a lot bigger (and remove the rust hole) and then with a lot of fiddling got the new pipe in feeding it around the baffles. Being copper helped here as it made it easier to squeeze it in.
I then made a plate to weld to the outside of the tank with a hole drilled in for the new fuel pipe.
Next I get the brass plug that seals the drain hole on the bottom of the tank (this is meant to have a filter mesh on it but this was long gone so I will use an inline filter) and fitted this to make the tank water tight and I then filled the tank with water upto the level of the repair.
I then MIG welded on the repair plate to the tank and welded up some other holes in the same area and then soldered/lead loaded the repairs to make them liquid tight (hopefully!).
Next I drained the tank, filled it with citric acid and water and left it for a few days to try and get rid of the rust inside.
I then drained the tank and as a belt and braces I bought some fuel tank sealant from Rust Buster called Slosh. This came with a tank preperation liquid that I poured in a chucked in some bolts, then sealed the tank holes up and shook it around until my arms ached, then I did it again and again and eventually I drained out the liquid which by now was dark brown with the remaining rust. I then spent another 20 minutes trying to get the bolts that had got stuck behind the baffles out!
I then washed the tank out about 10 times with water to remove the remaining tank preperation liquid and then dried it out using a hot air paint stripping gun on the outside of the tank. I then left it overnight and repeated the process.
Finally the next day I poured in the Slosh, sealed up all the holes again and shook the tank until my arms ached (again) then left it 10 minutes and did it again and finally drained the slosh out and left it.
I again left it overnight and then I put some petropatch fuel tank repair putty over the welds/solder as a final belt and braces and then the next night sanded off the lumps and painted it black.
The fuel tank sender bolt was drilled out and retapped (its 6-40 UNF).
It will be interesting to see if my repair to the tank works as it was generally a solid tank apart from the area around the fuel filler/fuel outlet pipes where I assume that mud gets stuck and sits wet on the tank causing it to rot.
I would urge anyone thinking about this to read up about this and be really careful and if in any doubt don't do it, it was probably a lot easier/safer for me as the tank hadn't had fuel in it for years and had the smell of really old stale petrol (but only faintly), if I had removed if from a working car to repair it would have been a lot more hazardous. Proceed at your own risk!
Inside of the tank after the Slosh treatment:
First coat of paint:
|
| |
|
|
|
|
|
|
|
Another job i've been putting off is the heater, on the two jags I have done before the heaters were both ok and just needed striping, cleaning, painting and new felt/seals. This one on the other hand is rotten and needs a lot of work and it would probably be better to get another one but as this is Econojag and the only one I could find was £80 and still needed to be rebuilt the original is going to have to 'go again'. I stripped the motor and matrix out of it so I could see what I was working with, surprisingly the matrix doesn't look bad on the outside but shaking it the rust flakes are coming out in sheets, I will have to flush it through and try and test it and see if it needs replacing. The motor was a nightmare to remove as the fan wouldn't come off and it took the judicious use of a blowlamp, a hammer and a some pentrating fluid to get it off after which the fan was looking decidely secondhand :-(
The back of the heater doesn't look too bad with just a bit of corrosion around the fan inlet.
The inside looking poor, even the flap has rotted off at the corner.
More rusty carnage
Fan, one careful owner (one not so careful - me!)
Front panel, one of the heater pipes passes through the rust hole normally, added weight reduction! 
The flaps were stuck and rotten, I managed to get them to turn then cut the flaps off and removed the rods.
More rust to repair.
This bit of damage is where I ended up tearing the bracket off the heater when I stripped the car as the nut in the bulkhead was just spining. I had the good sense to cable tie the old bracket to the heater so I still have it to either straighten and refit or make a new one as necessary.
This is how it sits now with all the rusty bits, flaps etc removed ready to be remanufactuered.
Also one more hole in the side that I will need to repair.
If it ever works again it will be a miracle but it is Christmas and Christmas is a time of miracles!
Without wanting to make my life harder I also want to carry out some upgrades to the heater, i've found a few companies who do upgrades but the cost is considerable unless you were going to use the car a lot in the cold/wet weather, that said the original heater is not good and the fan is like being coughed on by a mouse.
As a half way house i'm looking at just replacing the fan (especially as the fan drum or whatever its called is now a bit knackered). Looking on ebay it seems that a lot of modern fans look very similar and i've no doubt that I could make one fit easily by enlarging the holes in the case, however, I need to know the size of the fan and of course its not listed anywhere because its not something people usually need to know. Does anyone have anything like this sitting around that they could measure and let me know what the size is and what its off so I can try and work out what might fit?
|
| |
|
|
|
|
|
|
|
K11 Micra fan is similar design. Perhaps yoeddynz could get you a measurement. |
| |
|
|
|
|
|
|
|
|
The Transit one s also very similar and shifts a fair amount of air to.
|
| |
|
|
|
|


