purplevanman
Posted a lot
   Way too orangey for crows
Posts: 3,830
|
|
Mar 20, 2009 19:27:14 GMT
|
sorry but thats rubbish, it will fall off on the first bump! Should have come here and let me do it, i don't charge too much  no really, that is very good as has been said  Don't think you will have any problem with mot  |
| |
Welder, fabricator, general resto work
|
|
|
|
rtlkyuubi
Posted a lot
   Low and Slow
Posts: 2,922
|
|
Mar 20, 2009 19:30:31 GMT
|
Looks good, as others have said you probably picked the hardest bit to start with! Keep practicing, you'll soon get the 'feel' of it. One small point, if you intend to take the car back for MOT re-test, don't seal the welds or fill over them first, I belive the the faliure sheet should be stamped with a note to the effect that welded repairs should be presented 'naked'. Isnt that just when it fails on rust and comes back for the partial retest? Obviously you can flat them back a little but don't go far enough that your grinding into the sheet metal. But very good 1st attempt and will deffently pass an mot. |
| |
|
|
|
|
|
Mar 20, 2009 19:34:46 GMT
|
Penetration looks good, Great job I recon, needs grinding though.  Ive been on a long welding course and I still cant weld car bodies. Thick stuff is easy, car tinwork is a black art and can be hard to master! |
| |
1987 Maestro 1.6 HL perkins diesel conversion 1986 Audi 100 Avant 1800cc on LPG 1979 Allegro Series 2 special 4 door 1500cc with vynil roof. IN BITS. HERITAGE ISSUES.  |
|
stevek
Yorkshire and The Humber
Posts: 728
|
|
Mar 21, 2009 14:52:37 GMT
|
Wow, so many replies! I cant reply to everyone individually but be assured I have taken notes of all your suggestions. I'm so relieved too that you think I have done OK, when I posted I simply had no idea if I have been successful or failed big time. I got myself on ebay the other night and this arrived yeasterday... 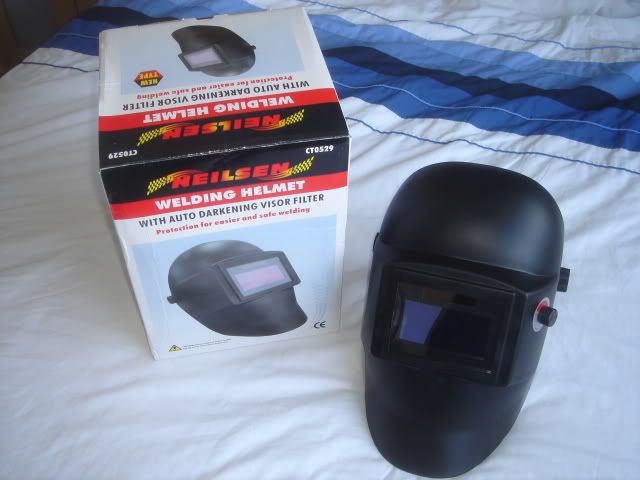 cgi.ebay.co.uk/ws/eBayISAPI.dll?ViewItem&ssPageName=STRK:MEWNX:IT&item=250391638694 cgi.ebay.co.uk/ws/eBayISAPI.dll?ViewItem&ssPageName=STRK:MEWNX:IT&item=250391638694Cheep and cheerful. First impressions are good, just need to try it out. Its got a CE mark sticker stuck on it. Has ANSI Z87 and EN379 printed on the lens unit so hopefully should do the job. I'll let you know how I get on. Thank you all for the advise, encouragement and tips. -Steve- |
| |
|
|
Lopez
East Midlands
Posts: 867
|
|
Mar 21, 2009 15:58:49 GMT
|
|
^^ I've got one very very similar but in red that was about £20 on ebay and it's more than adequate.
|
| |
|
|
|
|
|
Mar 21, 2009 18:04:03 GMT
|
|
I was suppose to be welding up a few holes like that in my sisters Fiesta a few months ago, but I broke both my wrists, so gave my dad a crash course in welding, and amazingly his results look pritty similar and it passed the mot fine. The surrounding metal looks nice and solid, which always helps, but welding upside down is never easy, congratulations.
|
| |
|
|
|
|
|
Mar 22, 2009 10:01:14 GMT
|
Nice one Steve, that looks great. I'm itching to have a go now, might pop out in a minute and spread some salt round my arches to help them along .... (or maybe not). The only problem seems to be wandering off on the flat welds and missing the metal on the bottom lip, both of which will be cured by the auto mask. Since the welding day I've found myself looking at rusty cars thinking how I'd tackle it rather than just being scared off, I bought a book as well which seems quite good, www.blahdvd.com/Books/How-To-Restore-Classic-Car-Bodywork/1903706629/product.htm |
| |
|
|
stevek
Yorkshire and The Humber
Posts: 728
|
|
|
|
So that was the pink fiesta (my housemates), which is still running about fine. Next up under the knife was my daily drive the dreaded p-reg escort. Yup blando maximus base spec little 1.3 rattly HCS engine and with compulsory rust issues. 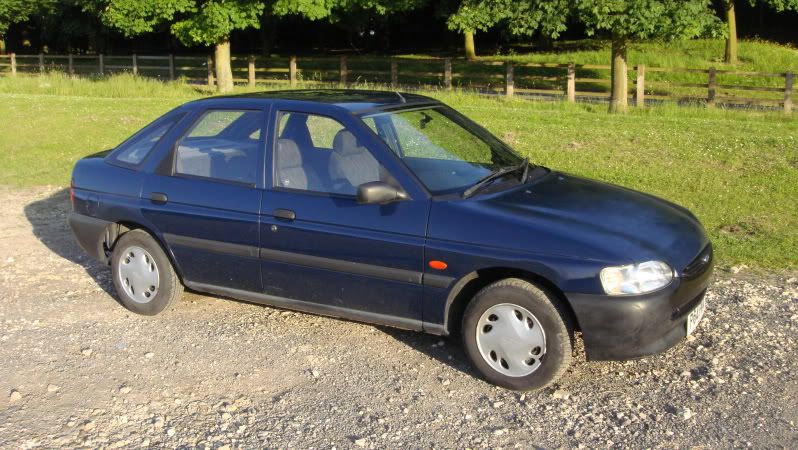 This is some what of a review as this work was done in October 09 but I thought it worth posting up to show how my second welding project went. I put the car in for MOT and Rust on the rear chassis rails and on the passenger sill were the main fail points. In fact the rest of the fails were limited to simple stuff like wiper blades and headlight aim. Oh and I had to clean up the handbrake adjusters in the drums again. I'll start with some before pics of the chassis rails. Left hand chassis rail (under boot floor). 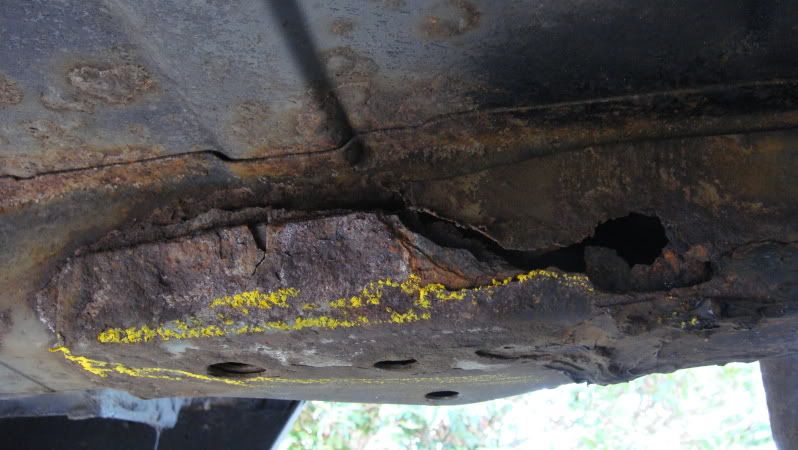 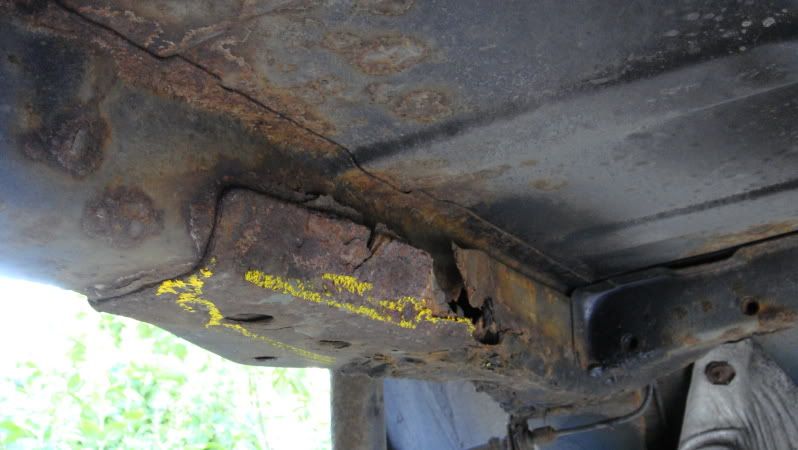 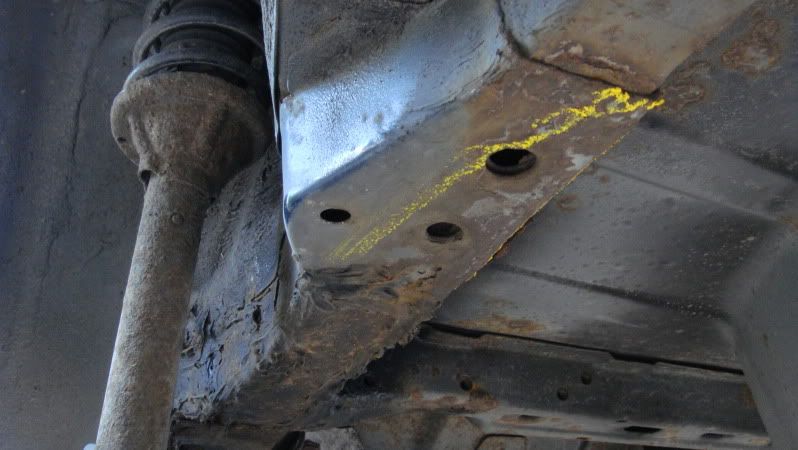 Right hand chassis rail (Mirror off above really but worse!) 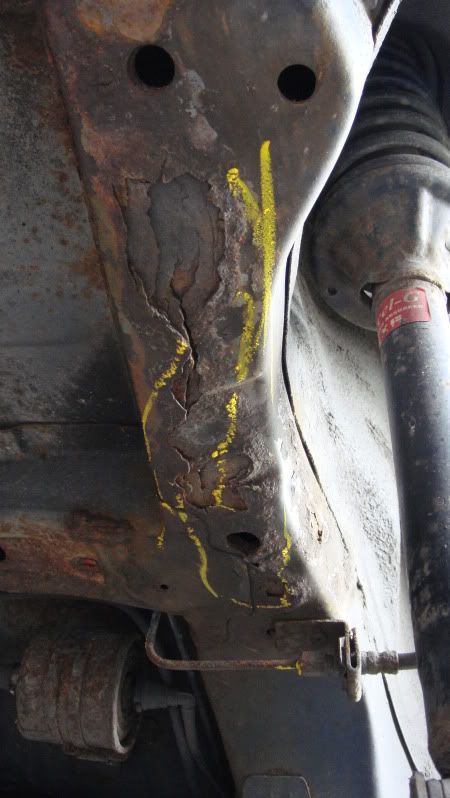 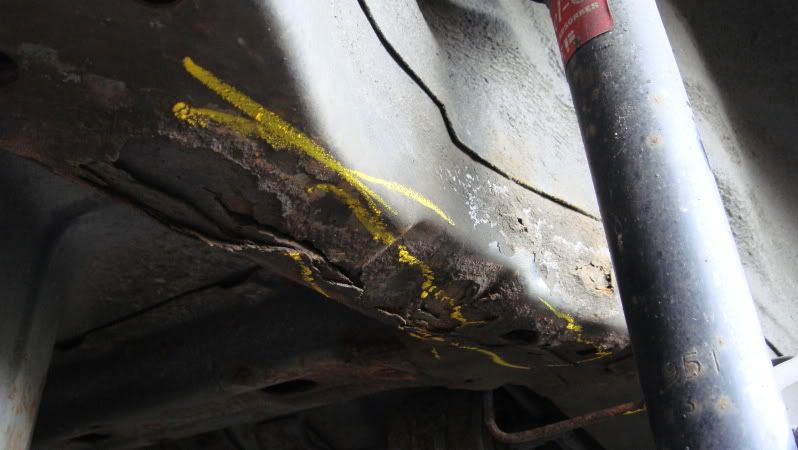 Now I'll admit I was pretty scared of this crust. This time however I had a neighbour with experience advising and encouraging me, though he couldn't get involved under the car dues to knee/back problems. The car was jacked up on axle stands and the boot carpets and trims were removed. The fuel filler had to be removed, note wet rag in petrol tank filler hole. The exhaust back box was removed and later the rear shock absorbers were removed too as they are quite easy to remove and free up space to work. 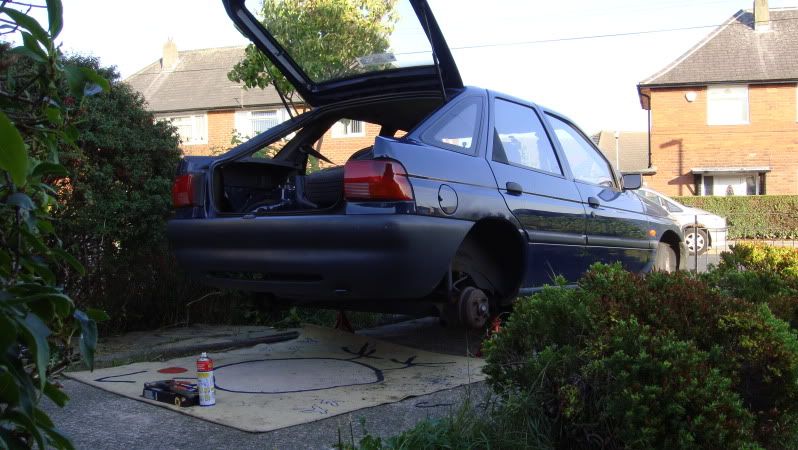 So I set to it with the big screwdriver and stabbed the holes as big as possible, and then used a flat knot wheel in the grinder to get the rest off. I was VERY surprise at how much bigger the holes get. Right hand chassis rail... 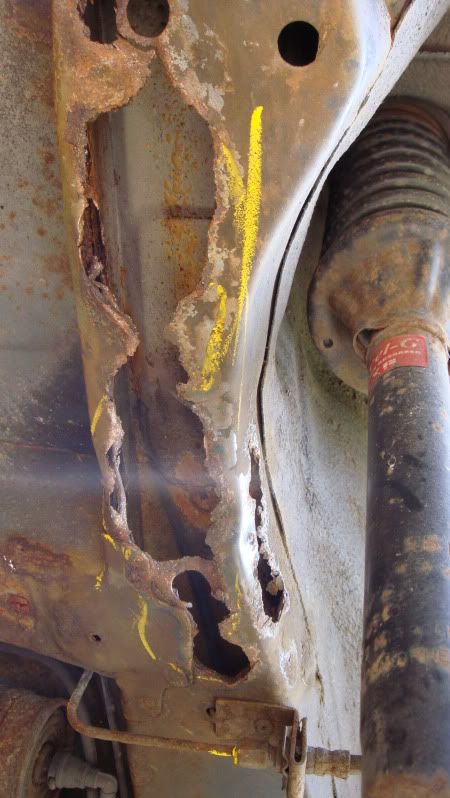 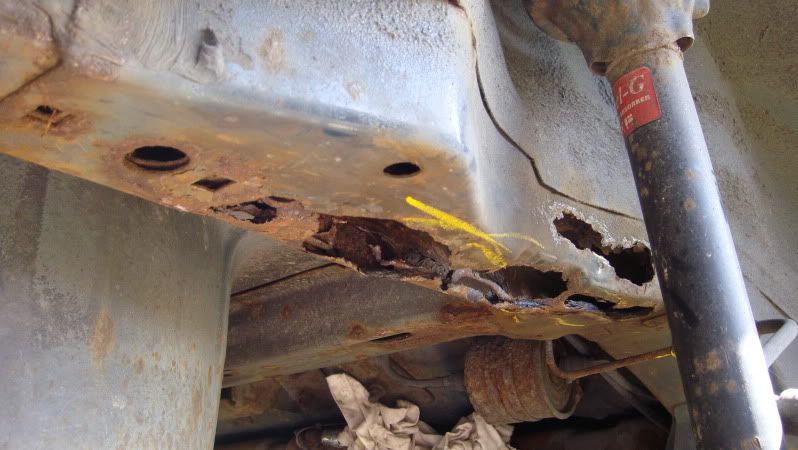 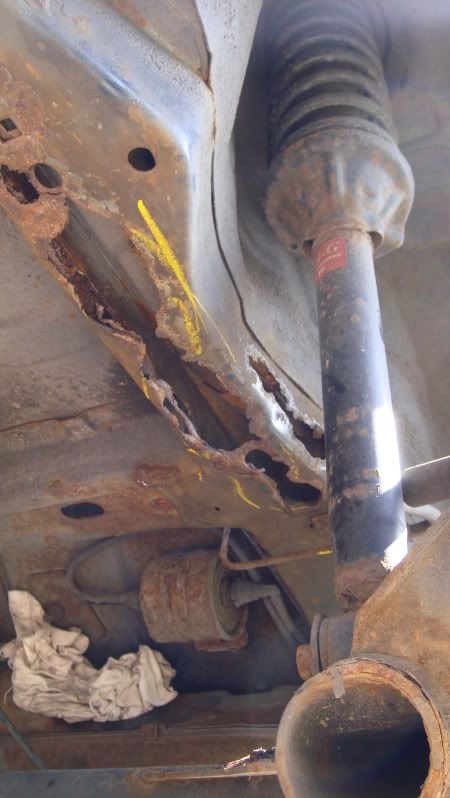 Left hand chassis rail... 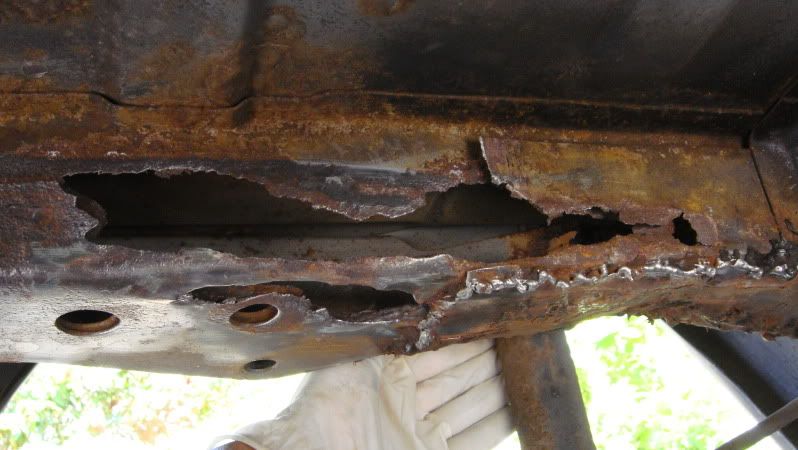 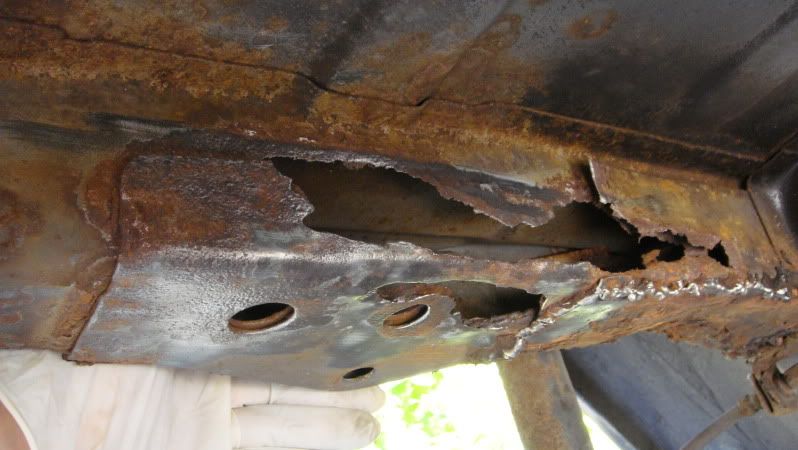 To be continued... |
| |
|
|
|
|
|
|
|
|
strange coincidence, I 'honed' my welding 'car bodywork' skills on a mk3 festy with similiar rot belonging to my bro, even more c0incidenlally used 'donor metal' from his met. blue donor mk3 festy, hacking up the bootlid for patches... car eventually got taken by the travellers to be weigh-in... lots of wax in the sill 'cavaties that is not welding friendly...
Welding looks 'good' for first attempts, as far I am concerned at least...nice work!!
|
| |
|
|
stevek
Yorkshire and The Humber
Posts: 728
|
|
|
|
So the jagged holes were cut straight back to good metal with the 1mm slotting disc in the grinder. Only pics of the right hand chassis rail this time but you get the idea. (the other side is roughly the same) 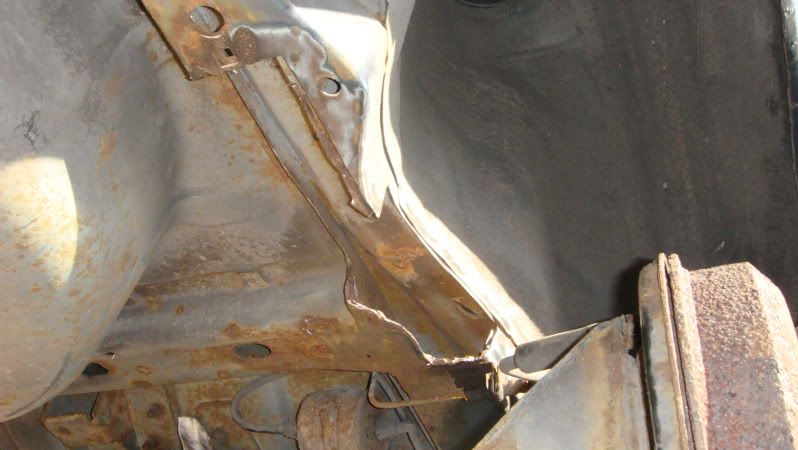 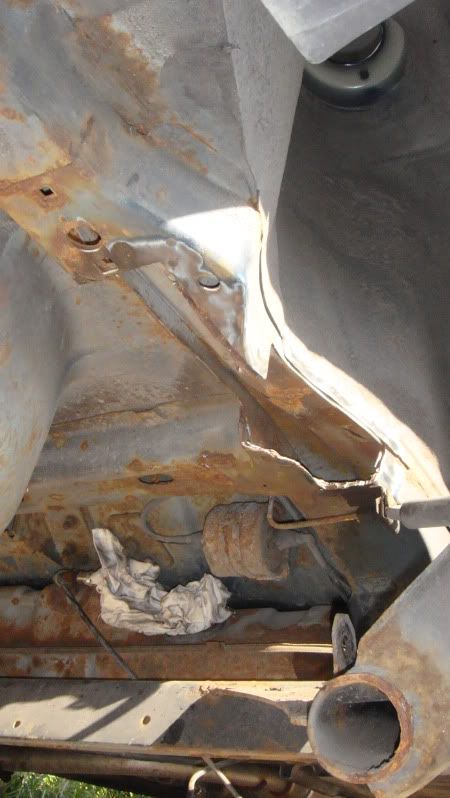 Now to be honest I hadn't imagined cutting such big holes in my car when the MOT man originally chalked a couple of yellow circles, but I was into the job now and need the practice and experience so soldiered on. I think 99.9% of people would have binned this car, and maybe rightly so but what would that teach me? Next on the more complicated Right side a cardboard template was made (no pic unfortunately). On the simpler Left side a lip was made in a piece of sheet cut to the right length which was welded up to the floor. 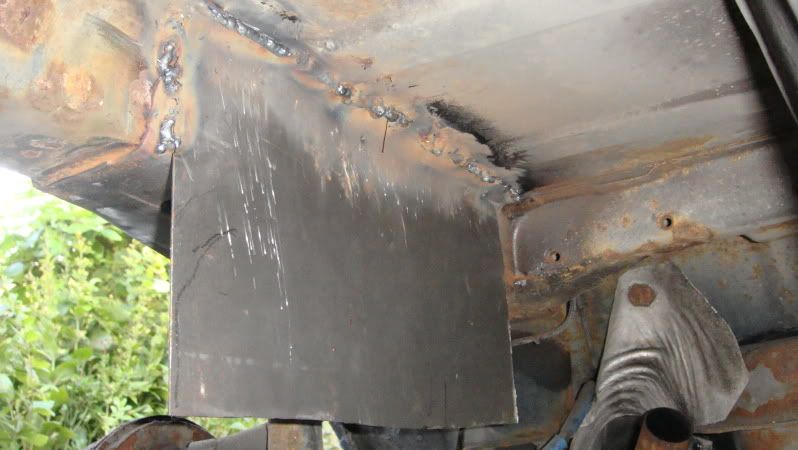 This was then hammered over the rail to form the plate. First when this was attempted the metal wouldn't form the crease line and was making a right mess just bending inwards. But by using a wedge of wood jammed inside the chassis rail and bending over that it started the crease which would then form properly with the block now removed. Once folded over it was relatively easy to trim to size and weld up. 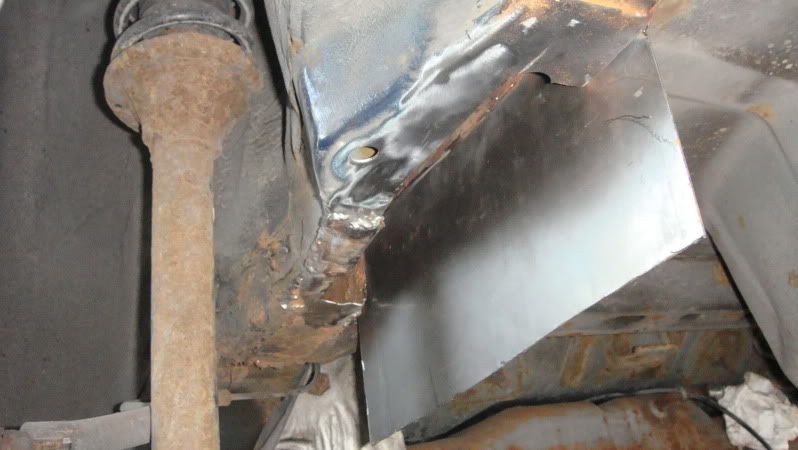 These were then welded up and undersealed. (Should have got some pre underseal pics as it wasn't too bad looking but It was the end of the day and I needed to get the underseal on quick.) Pics of right rail. 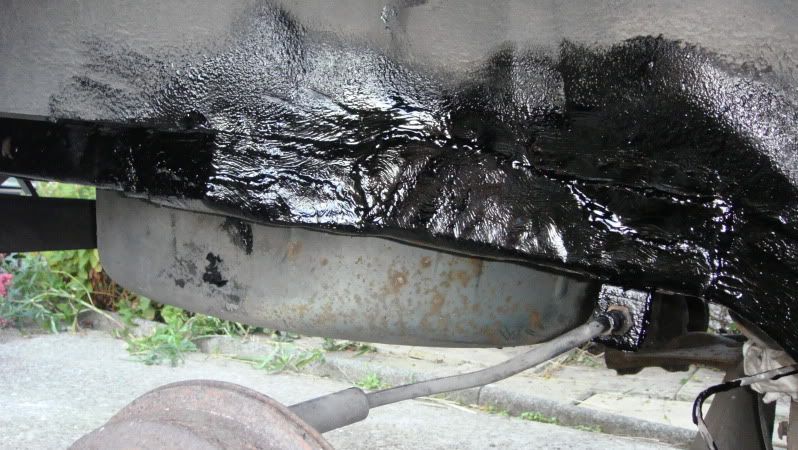 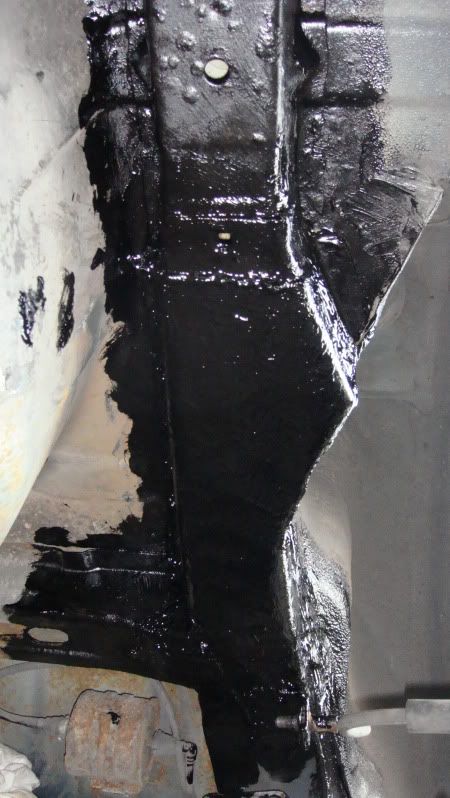 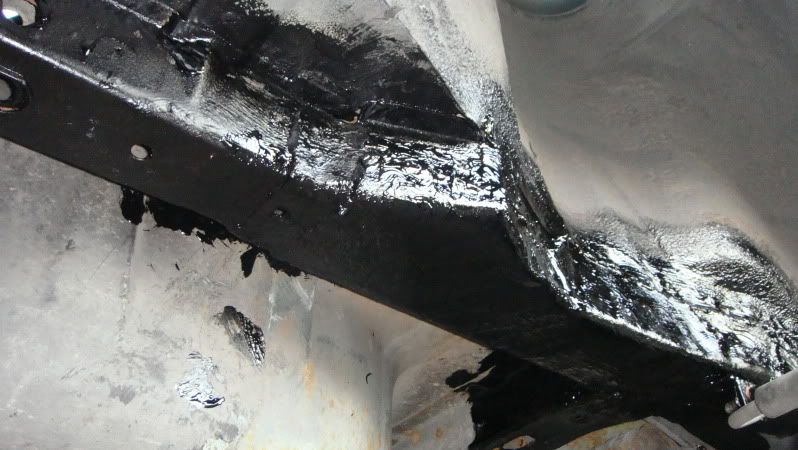 To be continued... |
| |
|
|
|
|
|
|
stevek
Yorkshire and The Humber
Posts: 728
|
|
|
|
Now the sill really surprised me, I had left this as a simple after job ‘If’ I managed to do the chassis rails OK. The MOT man had only chalked two small sections about 1-2” in size and it was thought to be where the cover sill I had had fitted a couple of years ago hadn’t been fully welded. However rust being rust I stabbed the screwdriver and it just kept going and going. In the end a strip of daylight could be seen between the outer sill and the inner floor right from front foot well to the back foot well! Anyway pictures speak a thousand words... 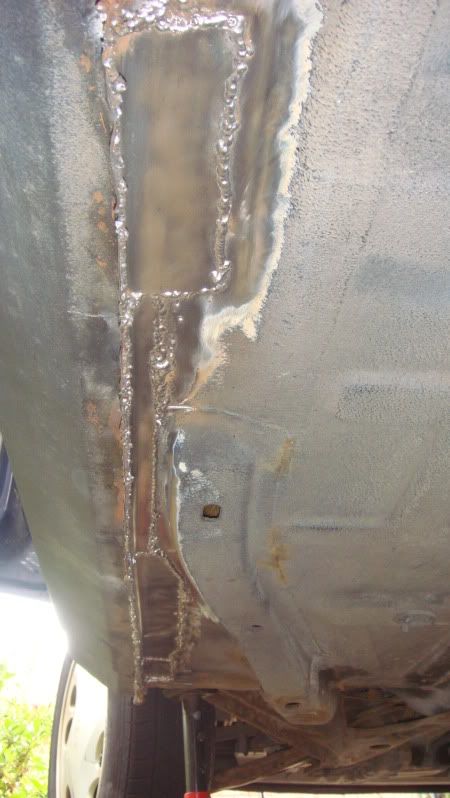 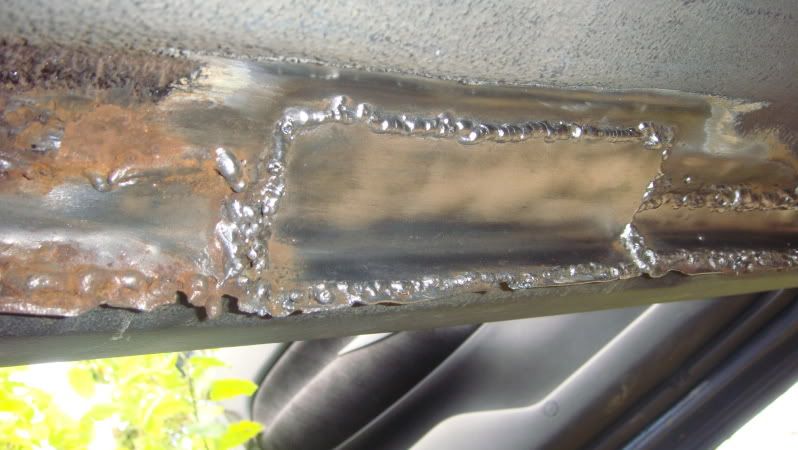 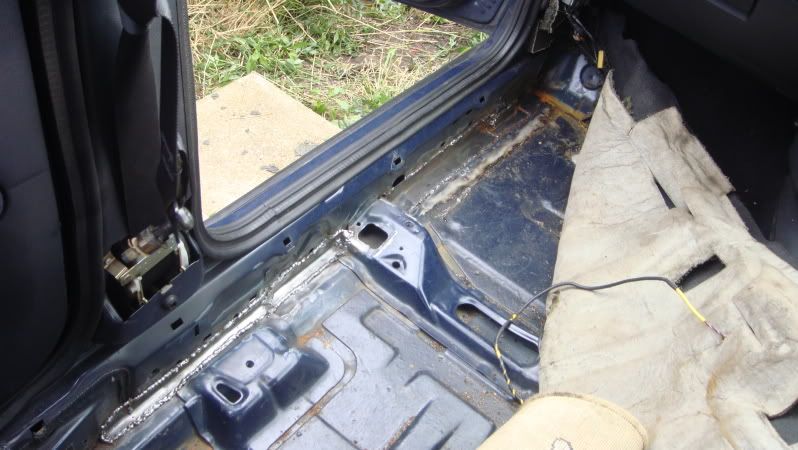 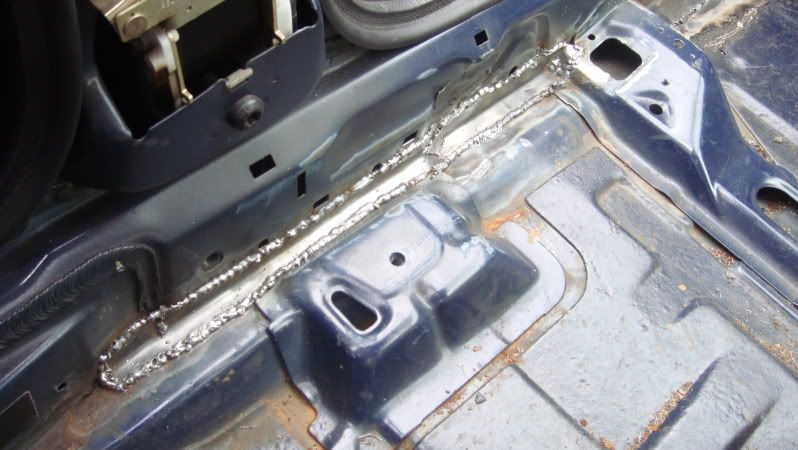 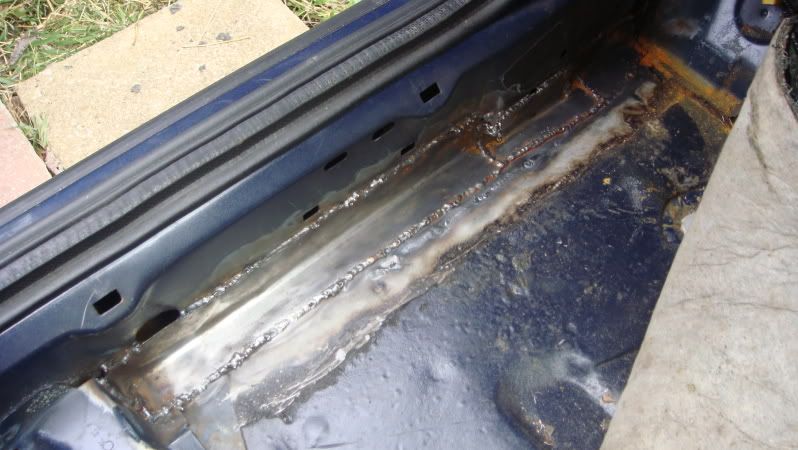 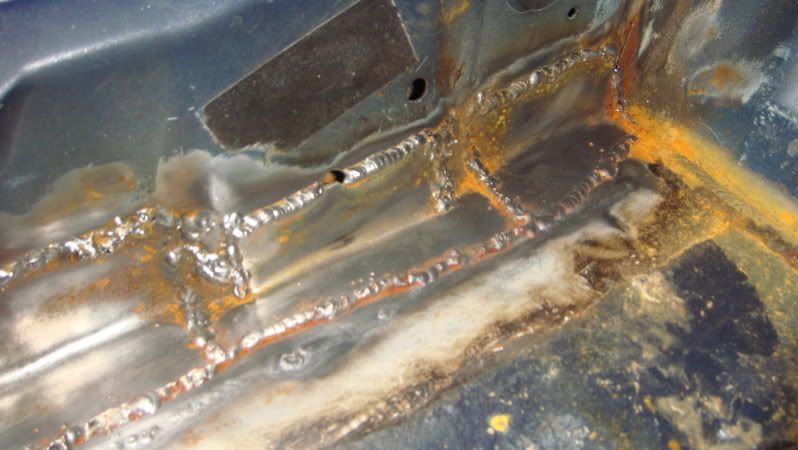 So that was a bit of a marathon in the end and all on a car that means little to me. My neighbour took the car back for its retest as I was working but came back with a big thumbs up from the garage. Good practice all in all, I'm starting to feel I could tackle a retro daily soon. -Steve- |
| |
|
|
|
|
|
|
|
|
Great result mate.
You also saved a lot of pain por the next MOT.
|
| |
|
|
rtlkyuubi
Posted a lot
   Low and Slow
Posts: 2,922
|
|
|
|
|
looking good mate! best way to learn how to weld is practice. Anyway, learnt today off my mot tester that;
If you weld a repair patch onto a sill you need to seam weld it all the way around. That includes the lip where it originaly was spot welded. plug welds are not aceptable unless you replace the whole sill.
|
| |
|
|
|
|
|
|
|
Jaysus, that was more rotten than it looked. Good fixer upper work  |
| |
|
|
|
|
|
|
|
looking good mate! best way to learn how to weld is practice. Anyway, learnt today off my mot tester that; If you weld a repair patch onto a sill you need to seam weld it all the way around. That includes the lip where it originaly was spot welded. plug welds are not aceptable unless you replace the whole sill. thats a very good point, which is whey most places want to see rust repairs not under-sealed because a lot of people just tack patches on coat the lot in seam sealer and under seal, and hope to get a pass |
| |
1984 gtm coupe
1979 mini clubman estate pickup
1990 mini racing green
1996 mini sprite
1992 maestro 500 van
1995 fiat cinquecento
|
|
bortaf
Posted a lot
  
Posts: 4,549
|
|
|
|
Mate I would be over the moon with results like that  although I do prefer to plug weld the lips then they can be ground down super smooth and not pop off cos i've groung too much away TBh i allway lie and tell the tester i use a spot welder on the lip and miged the rest ;D 10/10 mate |
| |
Last Edit: Jan 4, 2010 17:53:54 GMT by bortaf
R.I.P photobucket
|
|
|
|
|
|
|
There is nothing wrong with those welds mate, ive seen "pretty welds" that didnt have any penetration and were shoddy work. One tip you NEED is to use a flap wheel for grinding down the welds, it makes it look like you have been welding all your life  |
| |
|
|
|
|
|
|
|
|
The welds on the escort look nice and tidy and would flat out nicely.
I need to take a leaf out of your book and buy a welder and get on with fixing/making something.
|
| |
|
|
|
|
|
|
|
|
That's a seriously good effort. I've paid for welding to be done to my car that wasn't nearly as good as what you've done there.
|
| |
|
|
|
|


