teaboy
Posted a lot
   Make tea, not war.
Posts: 2,113
|
|
|
|
Hello there. I have been asked about how I apply the expensive paint. I have been using cheap foam rollers.  The ones on the right in the picture above. They give quite a reasonable finish but they don't get along with the epoxy paint at all well and they start to break up after about five minutes so you have to keep an eye on them. As soon as it starts to split you need to do a pit stop for another or it will break up completely and drop bits into your lovely fresh paint. Because of this problem I got some of the furry ones (at left) to try but they are hopeless. They give a rubbish finish and they are not particularly keen to even roll at all. I usually have to do 'things' on the weekends at this time of year but I did manage to get a couple of hours in the tent yesterday evening. It wasn't exciting stuff because I was mostly vacuuming and cleaning out the inside of the car. It is amazing how much detritus there was in there. Once it was out I started sticking masking tape all over the place.  That was it for yesterday. Today's 'things were later on this afternoon/evening so I got a few hours this morning. The reason for the masking tape was because I wanted to get some of this stuff on there.  I am using this stuff as a seam sealer and I have some of this to help with working the stuff once it has been squirted on.  Anyway, I started daubing it all over the place.      I thought that it would be a good idea to practice this on the inside of the car because if I fk it up then it won't be seen anyway. Some bits had a sort of stippled texture and others had a brushed over look. I tried to recreate these finishes as best that I could using a paint brush and the tooling agent.  Some bits didn't look too bad but this area, below, was the most disappointing bit.  The next bit was stippled at one end then brushed at the other, it wasn't too bad.  Same at the other side.  Some bits where I had repaired the floor.    The last bit was the rectangular section in the middle, which is part of the new axle carrier panel.  That is supposed to be stippled at the left and right outside edges and brushed everywhere else. It isn't a brilliant finish but most of that will be covered by the anti-drumming sound deadener. This stuff.  I'll get to that stuff next. Cheers. |
| |
|
|
|
|
|
|
|
|
|
|
I hope you painted a silly face on that trump supporter in the paper.
|
| |
|
|
teaboy
Posted a lot
   Make tea, not war.
Posts: 2,113
|
|
|
|
I hope you painted a silly face on that trump supporter in the paper. If only I had noticed it, I could have done a series of photos of me daubing paint on with a roller and asking, ‘Have you guessed what it is yet?’, like Rolf Harris used to… No, wait… |
| |
|
|
Darkspeed
Club Retro Rides Member
Posts: 4,867
Club RR Member Number: 39
|
|
|
|
Found the same with the standard gloss type foam rollers - The next time I am doing a chassis I am going to try the velour rollers from the glass fibre suppliers - I may include a couple of the nylon rollers as well just to see. www.ecfibreglasssupplies.co.uk/resin-topcoat-rollers |
| |
|
|
teaboy
Posted a lot
   Make tea, not war.
Posts: 2,113
|
|
|
|
Found the same with the standard gloss type foam rollers - The next time I am doing a chassis I am going to try the velour rollers from the glass fibre suppliers - I may include a couple of the nylon rollers as well just to see. www.ecfibreglasssupplies.co.uk/resin-topcoat-rollersThanks, Andrew. I didn't get into the tent last night because Fat Al and the two cats, Winston and Imogen needed to go to the vet for their annual service, or whatever it is that vets do annually so that they can charge you one million dollars. Turs out that Al is still fat, but what can you do? He loves his sausages. When I got back I had to do a repair on the stairs because my diet is obviously not working either, and they had started to give way under the strain of having a fat lad walking up and down them. No such distractions tonight, though. I mentioned that I had some of this sound deadening stuff.  That is the size of the sheets that I have so I have to make the bits out of several pieces. I could have got bigger sheets but I could only find them with like a silver foil top finish with writing printed all over them and I didn't want that. First job was to make a template. I had a roll of brown wrapping paper which I thought would do, so that is what I used. It was a proper faff sitting inside the cab trying to mark it out and I could really have done with that little box full of magnets that I have for such things, but I still haven't found it. Anyway, once I had my template I taped enough pieces of sound deadening together then stuck the template on top of it. I stuck masking tape around all the edges so that I would be able to draw on it and be able to see the lines. Like this. 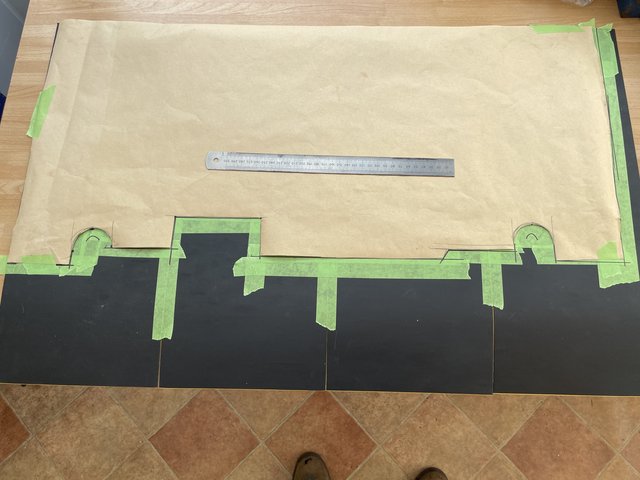 Once the lines were drawn, the template could come off.  Then it was time to cut it out, decent scissors were fine for this. 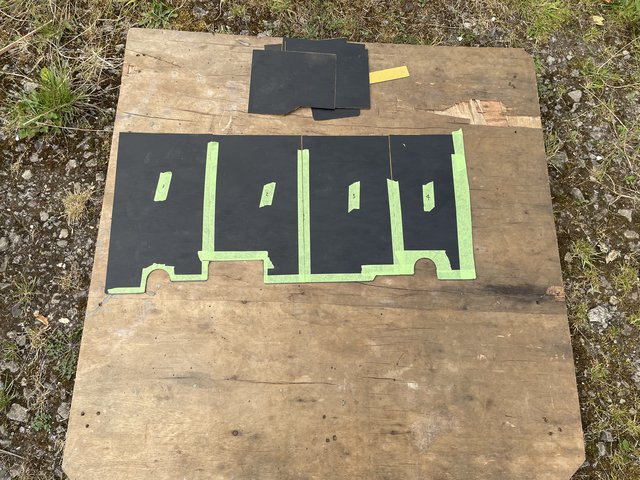 I slit the tape holding the separate pieces together but left the tape on because the markings on there would help me when lining it up.  I had got some of the lowest quality, cheapest rollers that I could find on Amazon to aid in sticking it down. 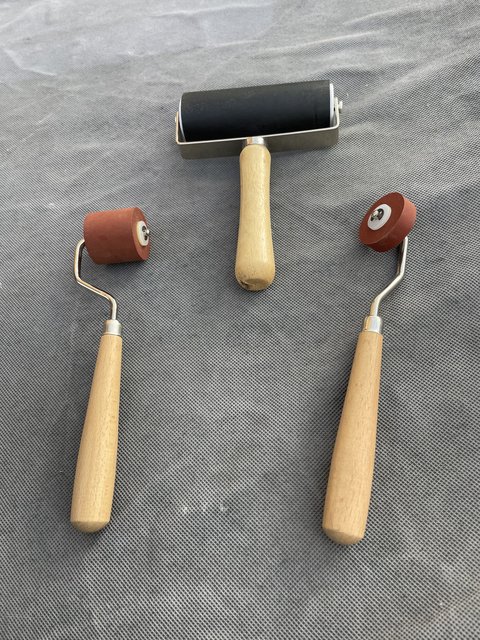 Once I had psyched myself up with a cup of tea I got back inside the cab of a car which was inside a red hot tent and started rollering it down with the help of a heat gun just to make sure that I was as hot as it is possible to get, this side of spontaneous combustion. This is the result.  It looks like an amateur job to be honest, but then I am an amateur after all. Cheers. |
| |
|
|
stealthstylz
Club Retro Rides Member
Posts: 14,950
Club RR Member Number: 174
|
|
|
|
|
I've got some transparent carpet here if you want to show it off. Just 500 shekels per metre.
|
| |
|
|
teaboy
Posted a lot
   Make tea, not war.
Posts: 2,113
|
|
|
|
I've got some transparent carpet here if you want to show it off. Just 500 shekels per metre. I'd like to see that...  The cats don't seem to be performing any better, even after their 12,000 mouse service. This is Winston.   Oh, I forgot to mention that Imogen is also officially a fatty, just Like Al.  Hardly surprising with the amount of excercise she does.  Anyway, tonight was quiz night, so I didn't have long in the tent. I wanted to do the next bit of sound deadening on the rear seat base, but I really needed more time to do that. It is the area at the bottom part of this picture.  Instead, I did this.  I had to scan back through my old pictures to find out what shape it needed to be because any traces of where it was have been painted out. It just needed these two cut outs.  The original would have had a hole where there was a grommet but as we don't have those grommets any more, I didn't bother with that. Oh, it goes here, in the rear footwell.  There was a lot of heat needed to get it to go over all the lumpy bumpy bits and, although I tried to always roller it towards the edges, I did end up with a few air bubbles. I tried to pop them, with a straightened out paperclip actually, and most of them have gone. I'll have another look at it next time to see if it needs any further treatment. I did manage to put a split in it with the roller, which was annoying.  I might try to smooth off the sharp edges on the narrow roller before I do the next bit. Oh, the quiz, we lost on the tie break, which was even more annoying. Cheers. |
| |
|
|
stealthstylz
Club Retro Rides Member
Posts: 14,950
Club RR Member Number: 174
|
|
|
|
This is a 4 foot roll of it. Once payment is completed I can come and fit it for you then you can parade the car down the high street 😂 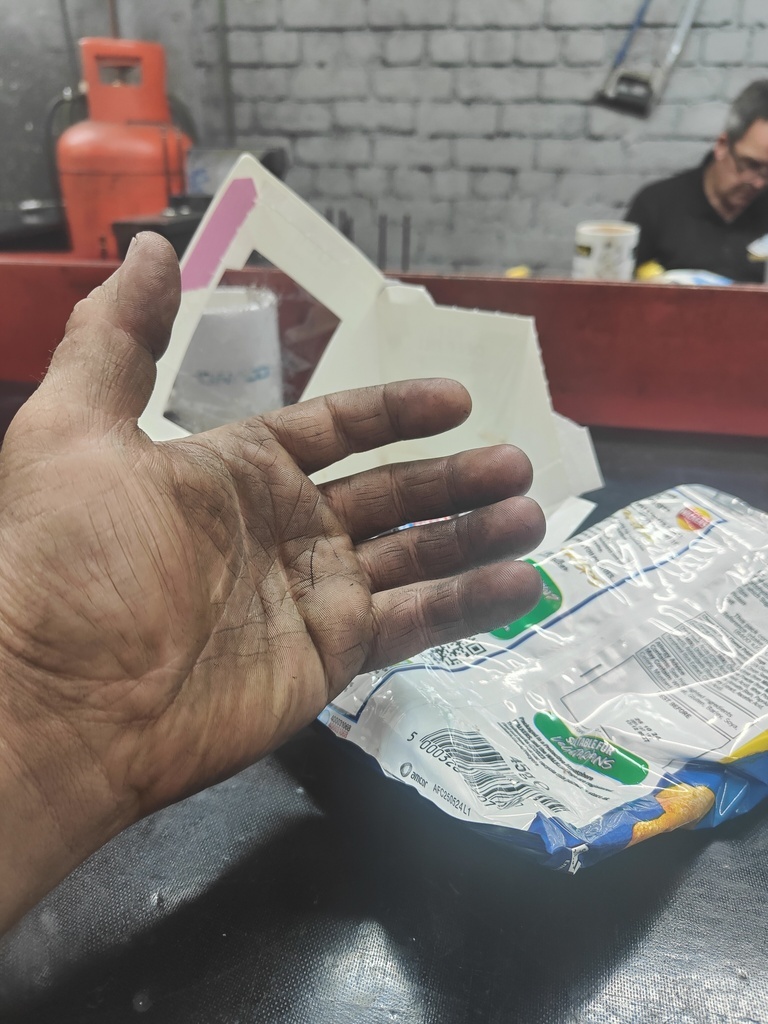 |
| |
|
|
Darkspeed
Club Retro Rides Member
Posts: 4,867
Club RR Member Number: 39
|
|
|
|
A quick warning - Although I have no doubt that what is being presented here by stealthstylz is clearly the 100% genuine article, there is a lot of fake and low quality coverings being passed off as the real thing. They are even faking the Invisicheck TM holograms on the Puraclear labels. That's how devious the counterfeiters are being. The key targets for these scammer are the ever gullible BMW and Porsche owners, especially those who are also getting on a bit. Take a look in the footwell of any Porsche Boxster - mainly the ones with the gold script bootlid text and there is a fair chance they will have fake Wilton Invisipile carpets and mats. A lot of the time it is really easy to see as the fake mats are susceptible to staining by tanning lotions and really attract the spray fibres from Instahair sprays. |
| |
|
|
teaboy
Posted a lot
   Make tea, not war.
Posts: 2,113
|
|
|
|
This is a 4 foot roll of it. Once payment is completed I can come and fit it for you then you can parade the car down the high street 😂  A quick warning - Although I have no doubt that what is being presented here by stealthstylz is clearly the 100% genuine article, there is a lot of fake and low quality coverings being passed off as the real thing. They are even faking the Invisicheck TM holograms on the Puraclear labels. That's how devious the counterfeiters are being. The key targets for these scammer are the ever gullible BMW and Porsche owners, especially those who are also getting on a bit. Take a look in the footwell of any Porsche Boxster - mainly the ones with the gold script bootlid text and there is a fair chance they will have fake Wilton Invisipile carpets and mats. A lot of the time it is really easy to see as the fake mats are susceptible to staining by tanning lotions and really attract the spray fibres from Instahair sprays. I was going to ask for your bank details, SS, but Darkness has put the fear of God into me now. Would you consider cash on delivery? I was totally done in when I got home today, it has been red hot and a proper grueller. Obviously, once I got within fifty yards of home it started to rain so I was half contemplating giving it a miss tonight. That isn't the attitude that is going to get it finished so, after a bit of a sit down and a cup of tea, I forced myself to go outside. I wanted an easy bit to do and that bit is the rear footwell heel panel.  You can see that I didn't remove the top part of the old stuff when I repaired this panel and, now that it is painted, the repair sticks out like a sore thumb. This was because there is a box section behind there so I couldn't get to the back to dress out the bumps at all. Hopefully the sound stuff will disguise it a bit. I started marking out the new stuff.  I was going to just join up to the existing stuff, but when I measured up I could get the whole piece out of one sheet. As this is the first piece that I have got to where I could do it with one piece, it seemed to me to be absurd to put a joint in there, so I set to and removed the remainder of the old stuff.  That was reasonably easy with the heat gun and scraper. The residue came off quite easily with some degreaser.  I did scotchbrite the area to help adhesion, as I have with all the other bits, then I stuck it on.  I am going to have to do the rear seat base at some point... Cheers. |
| |
|
|
teaboy
Posted a lot
   Make tea, not war.
Posts: 2,113
|
|
|
|
Tonight I had a look at the rear seat base area because I need to replace the sound deadening stuff on there.  There is quite an area to cover and when I looked at my stock of stuff, I don't think that I have enough to do it. I was, in a way, pleased about that because to do it will mean climbing in and out of the cab several times and also a lot of kneeling down, which isn't very good for my back legs. I also didn't feel like tackling it after a day at work so I looked for an easy bit to do instead. This area on the tunnel had to be trimmed back when I repaired the floor and I could probably just leave it as is.  Most normal people probably would just leave it as it is but I do struggle to do 'normal'. Anyway, it looks like an easy job and I decided to just patch it up with one of the off-cuts that I have. I marked it out to the width of my off-cut and scribed it with a Stanley knife then deployed the heat gun and scraper. Oh, I protected the new stuff on the floor with Tony the tiger first.  Cleaned off with some degreaser and sanded the paint edge down.  Then it was in with the patch. 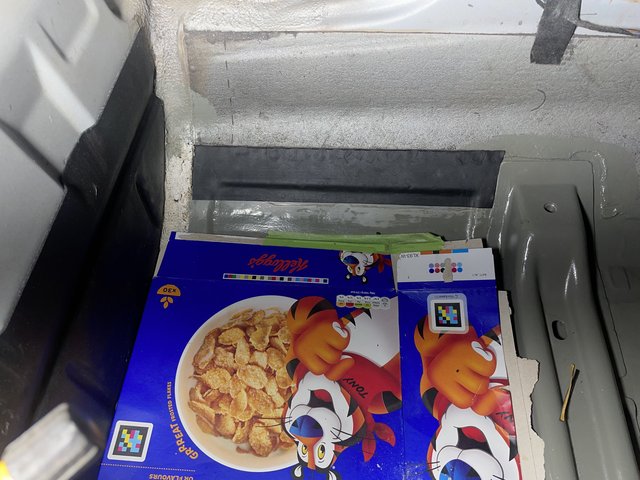 I wanted an easy job and that may well be the easiest piece that I have fitted up to now. I still have enough stuff to do the area under where the driver's seat goes so I had a look at that next.  There is still a bit of the old stuff left on there and I think that it will have to come off to make it a neater job. I had another trawl through my pictures to find out what it should look like but this was the best one I could come up with.  It is partly obscured by the seat mount jig but, with reference to the passenger side which is still intact, I should be ok. I was just starting to repurpose Tony the tiger to protect the plastic heater ducting when everything came to a halt because Fat Al and the Doc wanted to go for a walk and they wanted me to go with them. Cheers. |
| |
|
|
teaboy
Posted a lot
   Make tea, not war.
Posts: 2,113
|
|
Aug 10, 2024 18:18:20 GMT
|
I was contemplating the removal of this old piece of sound stuff last night when my session was cut short.  The first job was to enlist Tony's help in protecting the plastic bits from the heat.  He did a grrreat job, I think.  It was a bit awkward getting the remains off with some degreaser and a toothbrush but we got there in the end. 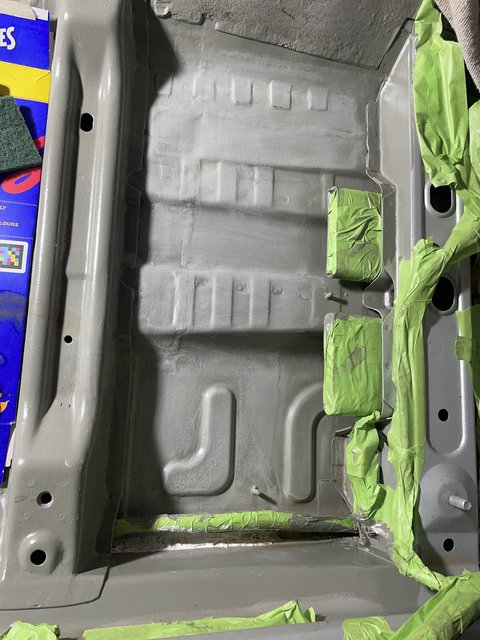 Template next.  Once the template was complete I stuck it onto some of the stuff.  Which then gave me a cutting pattern.  Once cut out, it was just a question of sticking it in place.  It was a bit tricky getting it fed under the main power cable because it wanted to stick down in the wrong place. I could have done with an extra hand to hold the cable out of the way but the Doc had gone into town so I was on my own. It went in quite well, in the end. I thought that it was about time that I unmasked everything before it became impossible to get off.  I'm still contemplating putting a patch in next to the seat crossmember to tidy it up, because OCD.  I've ordered another batch of soundproofing sheets so I still have a few days left to ignore the rear seat pan before it turns up. Cheers. |
| |
|
|
Darkspeed
Club Retro Rides Member
Posts: 4,867
Club RR Member Number: 39
|
|
Aug 10, 2024 20:35:13 GMT
|
|
Top job there Mr Tea' - that's the upside-in starting to look almost as good as the downside-out....
|
| |
|
|
teaboy
Posted a lot
   Make tea, not war.
Posts: 2,113
|
|
Aug 12, 2024 20:03:09 GMT
|
Top job there Mr Tea' - that's the upside-in starting to look almost as good as the downside-out.... Thanks, DS, it is heading in the right direction. I don't know if anyone has noticed a distinct lack of creamy bun cake action of late. The reason for this is that I need to lose some lard. I might have mentioned that I have been invited to a karting event at the end of September and it is happening here.  I haven't had my backside in a kart for years and, being quite a competitive type I don't want to come last, hence the attempt at shedding some timber. There will be 17 people racing and some of them are quite serious, some are serious and thin and some are unknown quantities. I need all the help I can get so I have been doing my research, checking out on-line circuit guides etc but there is only one way to really research the job. I don't want to be learning the track in qualifying so, instead of working on my car yesterday, I booked an open session and went to see if I could still work a steering wheel. I didn't sign on as Tea Boy, they made me use my real name which is Mark.   I didn't do too bad but I am going to have to find a couple of seconds if I want to compete with the serious people. I might have a cake and think about it... That's my excuse for not doing anything on Sunday. Today I was a bit late home from work and it was hot. Hottest day of the year according to the radio, so perfect for working in a tent with a heat gun. I had to patch up that stuff on the tunnel that was damaged by removing and refitting the seat crossmember. I made my patch.  That showed me where to scribe round with a Stanley knife.  After that it was heat gun and scraper time.  Clean up and scuff the surface. 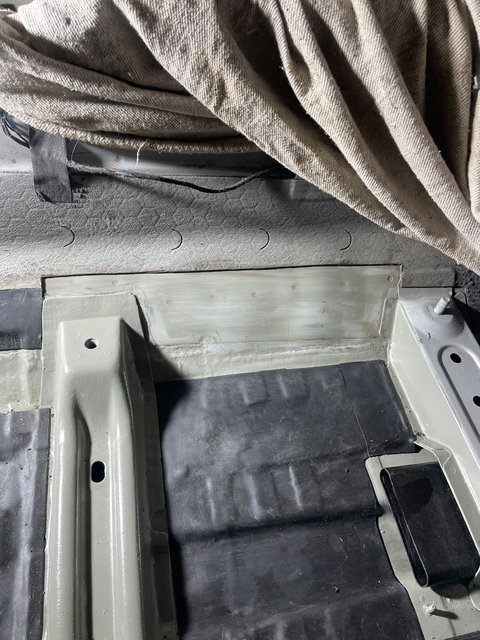 Then stuck the new bit in place and roller it down, using the heat gun again.  After a hot day at work that was enough for me today. Cheers. |
| |
|
|
teaboy
Posted a lot
   Make tea, not war.
Posts: 2,113
|
|
Aug 13, 2024 20:37:04 GMT
|
My new stock of soundproofing turned up today from Car Builder Solutions so I really have no excuse for not getting on with the rear seat area. I had to get inside the cab and mark out where it should go. There were some areas where I could see where the old one had been and there were even a couple of pieces remaining that I hadn't removed previously. The rest, I had to fill in the blanks by looking at old pictures. I thought that I had one picture of the whole area but I didn't so I had to flip between several to work it out. I have now drawn on the outline in felt pen.   I didn't get it right first time so I had to rub out a few lines with thinners and do them again but I'm happy with it now. It was really hot inside there so I thought that I would make myself even hotter by breaking out the heat gun to remove these two remaining bits of the old stuff.   The passenger side piece came out ok.  But the Driver's side piece was a swine because it had been stuck down on top of a load of seam sealer, despite there not being a seam under there.  The first one cleaned up very easily with degreaser but the one on the sealer took multiple attempts using scotchbrite pads soaked in degreaser. A lot of the sealer came off with it but the stuff that didn't I will probably just leave and go over it with the soundproofing.  All this faffing about took far longer than anticipated so I haven't even started making the template yet. Cheers. |
| |
|
|
teaboy
Posted a lot
   Make tea, not war.
Posts: 2,113
|
|
Aug 14, 2024 20:34:09 GMT
|
Tonight I started making the template for the rear seat soundproofing. I have a big roll of brown paper which I laid out in position.  It was a right pain, both literally and metaphorically because the seat base is really concave and also the laid out brown paper was keen to revert to being a roll of brown paper again. I spent ages on my knees in the cab marking up and trimming so my back legs are really hurting.  I had to make a few repairs with tape because at times I would mark it up and cut it but when you press it back down into place it would be too short.  Once I had it somewhere like I laid it out on a new piece of paper and made a new one, which I neatened up a bit. I found a perfect sized dinner plate to draw round for the semicircular cutouts for where the fuel tank access panels go. I couldn't do another test fit because of my knees so I laid it out on some of the sound pads to see if it is going to work.  It looks like six pieces will do it. In other news, I managed to pick up some of those 'prestol cage' thingmys that stick into the chassis underneath.  Hopefully I won't have lost them before I need to use them. Cheers. |
| |
Last Edit: Aug 14, 2024 20:36:42 GMT by teaboy
|
|
braaap
Posted a lot
  
Posts: 2,709
|
|
|
|
|
So don't put those prestol cages where the mini magnets are!
|
| |
|
|
teaboy
Posted a lot
   Make tea, not war.
Posts: 2,113
|
|
Aug 16, 2024 19:54:12 GMT
|
So don't put those prestol cages where the mini magnets are! Wise words, dude. I was hoping to get the seat soundproofing in yesterday but my work day started badly and went downhill from there. I was late home, totally done in and devoid of any enthusiasm. Today was much better so I thought that I should get the template stuck onto the stuff and start cutting it out. I taped the six pieces of soundproofing mat together then thought it best to double check the template before I started cutting. Well, I didn't like the way it fitted, so then ensued two and a half hours on my knees in the back of the car trying to sort it out. I ended up making lots of little sections and taping them together.  It is a totally horrible job, in fact, it was easier to make the metalwork that I am templating off than it is to do this. I have left it still taped inside the car, my knees are busted, again and I've had enough for tonight. A less painful part of the resto was that I had the chance to call in at the vapour blaster to collect the gearbox crossmember.  This is what it looked like before.  There was a bit of corrosion on it, but I think it should be ok.  Anyway, you won't be able to see that bit when it is bolted up to the chassis so we can pretend it isn't there. Cheers. |
| |
|
|
glenanderson
Club Retro Rides Member
Posts: 4,318
Club RR Member Number: 64
|
|
|
|
|
Are you going to paint that crossmember? My experience with vapour blasted aluminium is that it looks fantastic initially, but the removal of the oxide layer makes it go very manky, very quickly if it’s not protected somehow.
|
| |
My worst worry about dying is my wife selling my stuff for what I told her it cost...
|
|
teaboy
Posted a lot
   Make tea, not war.
Posts: 2,113
|
|
Aug 19, 2024 18:37:27 GMT
|
Are you going to paint that crossmember? My experience with vapour blasted aluminium is that it looks fantastic initially, but the removal of the oxide layer makes it go very manky, very quickly if it’s not protected somehow. I hadn't really thought about it, Glen. I'm not that keen to paint it so it has had a squirt of ACF50. I'll have to see how it goes. I didn't get much tent time at the weekend. On Saturday I was forced to do DIY stuff which I really didn't want to do and of course, it didn't go entirely to plan so took far longer than it should have. On Sunday I decided that another karting session was in order because I really need to find some lap time if I am going to be competitive. That didn't go entirely to plan either. I have been on a sort of diet, no creamy bun cakes and I have been having fewer slices toast and bacon at the cafe on a Saturday morning, but it isn't really a fully committed diet in all honesty. Anyway, I didn't go quicker, I went slower which was very disappointing. To console myself I had a bar of chocolate on the way home.  I can pick up the diet again later... With the car, I have been faffing about with the rear seat soundproofing for hours now. It got to the point where I had to stop making more templates and actually start cutting out the stuff. To that end, the current template was marked out onto my six taped together sheets.  When I cut it out it looks like the 'Bat Signal'.  Maybe if I put it in a prominent place, Commissioner Gordon will come to my aid? Instead, I put it in a place that really isn't that prominent, the back seat.  It got a few tiny tweaks until I was happy with it, then I removed all the marking up tape and offered it into position.  With it stuck around the outer edges, there is quite a void underneath at each side, due to the concave of the seat base. I used the heat gun to try to get it stretched in as much as I could.  I wasn't totally surprised that I couldn't stretch it quite far enough and I had expected the gaps to be there. I didn't want to leave it like that because it didn't look right. The fact that I am trying to make something look right, despite the fact that it will never be seen is absurd I know, but I can't help it. Anyway, I stuck a piece in to fill the gap.  I worked reasonably well, so I did the one next to it.  I had managed to get the one at the right hand side closer, as I started fitting from the left and had a bit more of an idea what to do when I got to that side, but nevertheless there was still a gap to fill.  The one to the left of that was the most awkward because the joint was inside that hollow channel.  There is a small gap down the centre joint too, but I think I can live with that.  Overall, it doesn't look too bad. 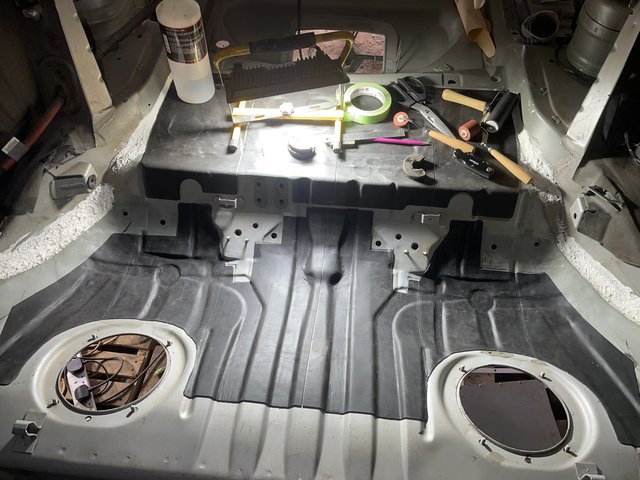 I am reasonably happy with that. Cheers. |
| |
|
|


