|
|
|
Jan 22, 2009 11:41:13 GMT
|
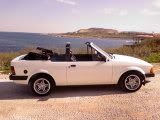
I’d better start at the beginning I suppose. Midway through last year I found myself in the rather nice position of having some money to spend on a new car. I’ve never had an open topped sports car before so quite fancied a “7” style kit car – (very) basic, fast, no frills motoring that I could use on weekends & still pootle to work in when the weather was good enough. Unfortunately I couldn’t find one within my budget so I started to look at alternatives. I thought about an MX5 – cheap, good to drive, tuneable – but I wanted something rarer & more unusual. I looked at GTM Rossa’s (Metro based kitcar) but for whatever reason I wasn’t convinced. A chap at work, knowing of my dilemma, bought an advert in from a local paper for a 1985 Reliant Scimitar SS1 – he’d owned one years previously & had loved it saying that it handled superbly & went well with a bog standard 1600 CVH in it. So I blame him entirely for me buying it!! To be honest I paid too much for it but it did have 12 months MOT so all was not bad ………….. or so I thought! Turns out that the sills are completely rotten - later versions of this car have a galvanized chassis & these don't suffer from corrosion anything like as badly as the earlier non-galvanized ones. Oh well you live & learn  ! Now that I'd bought the thing what was I going to do with it? I did seriously consider breaking it but decided not to as it was (still is in fact) a decent car & drove nicely. So I bit the bullet & ordered 2 new galvanized sills from Graham Walker (Scimitar specialist). I then found a couple of chaps who'd fit them for me, but they were fully occupied with restoring a rare Datsun estate so couldn't do it straightaway. I then started looking on the web & found out that a Zetec engine would (or should) fit in without too much hassle. Hmmmm ..... that sounds like fun! Now where can I get a Zetec engine from? Turns out that my friends cousin had one lying in state at the top of his Mum's drive not 5 minutes from my house! So £100 & 3 or 4 long weekends later I’m now the proud owner of a 2 litre silvertop Zetec from a 97ish Mondeo  In order to stop with the rather more powerful engine I had to uprate the brakes. I’ve bought vented discs (from Graham Walker again) & I found some Metro turbo callipers on eBay. I then decided to strip the front suspension down & fit uprated polyurethane bushes, new ball joints, anti-roll bar links/bushes, track rod ends etc etc etc. This is about where you find me now. I’ve removed the suspension from both sides – which took me ages because I had to hacksaw through a variety of seized bolts  ! I’ve had the upper wishbones strengthened so that I can use coilover shocks on the front at a later date. I’m very nearly at the stage in the project where I can start putting stuff back together & back on the car ;D Given the way these cars can crumble I’ve yet to find any terminal rust on the car. From what I can see the chassis & the suspension mounting points look to be in sound condition, there’s lots of surface rust but nothing too bad. I have found some corrosion to the main chassis rail, on the driver side, which is too close for comfort to the lower rear wishbone mounting point. Hopefully I’ll be able to get this sorted when the car goes in to have the sills done. Anyway here are some photo’s to keep you interested 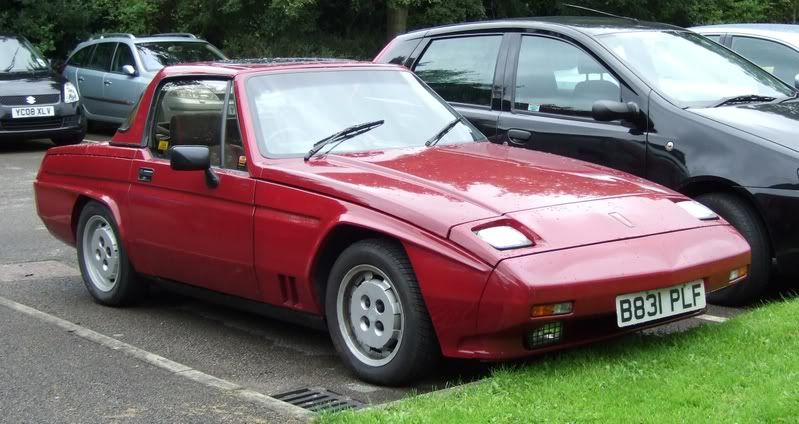 The car in all its glory before I decided to rip it apart! It drove well despite having partially seized front suspension & cream crackered shocks! This says a lot about how good the design of the chassis/running gear must be I think 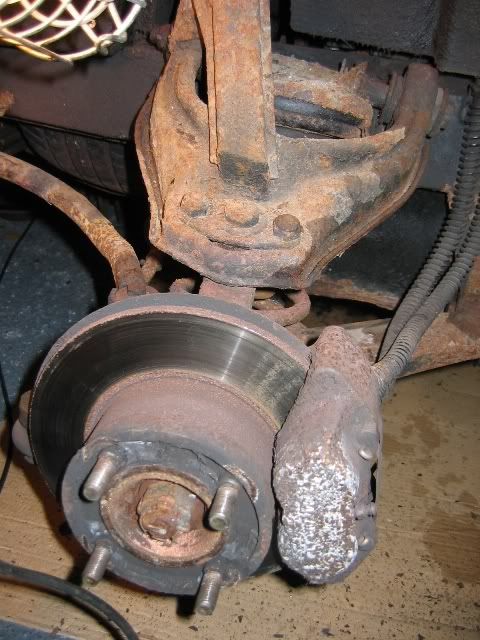 Passengers side front suspension complete before the stripdown started (front of the car is to the left in this pic) - lots of surface rust but everything seems solid. This is good news as the wishbones can rust through &/or crack (note the lack of strengthening bar on the upper wishbone in this photo). Wishbones are available new (or exchange) but they are not cheap!! 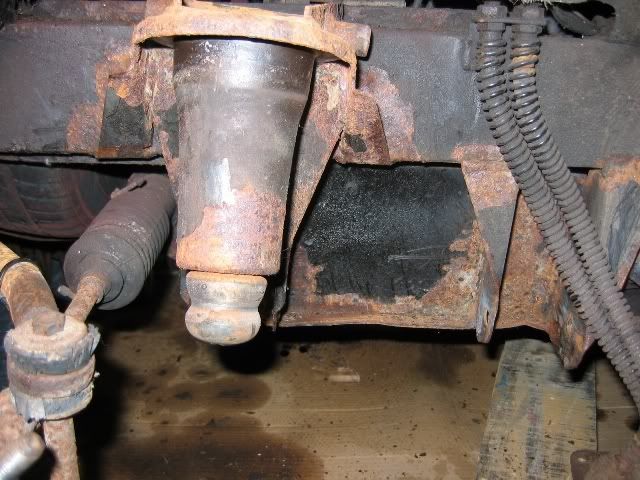 Same side but with all the gubbins removed & ready to be attacked with the strip n' clean discs & the wire brush. Once that's done I'll apply some rust converter, spray the hard (& not so hard) to reach places & then apply liberal amounts of black hammerite. The chassis & mounting points seem sound - which is nice - just lots of surface rust. 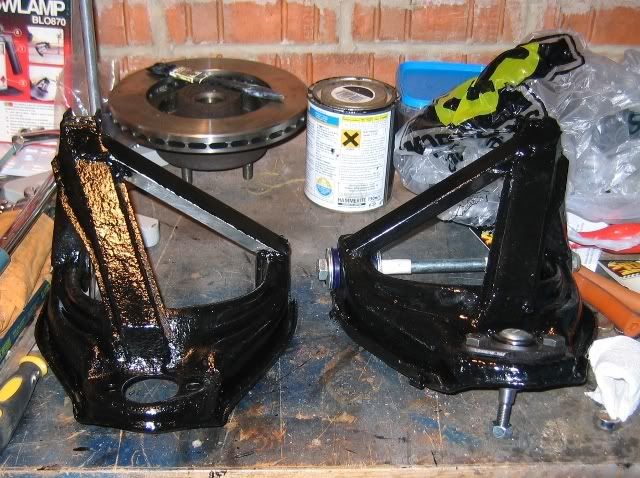 The upper wishbones - again lots of surface rust but no visible holes/cracks & they seem solid enough to me. I've had strengthening arms welded to both of them which should allow me to use coilover shock absorbers eventually (when/if funds allow). The wishbone on the right is built up & ready to go back on the car while the one on the left needs another couple of coats of paint & then building up with balljoint/bushes etc. 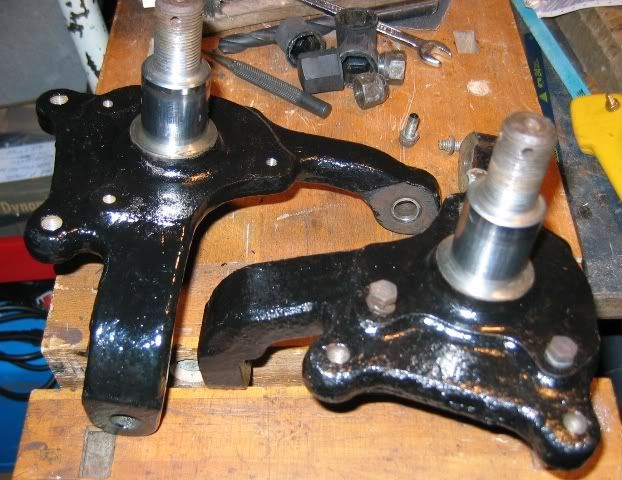 Both front uprights stripped down & given a couple of coats of black hammerite (which looks good but chips easily). The front bearing/hub/disc assemblies fit on the shiny bits so I didn't want to paint those! Also waiting to go back on are the brake disc shields - these are simply flat bits of steel cut to shape so I made these in a couple of lunchtimes at work. 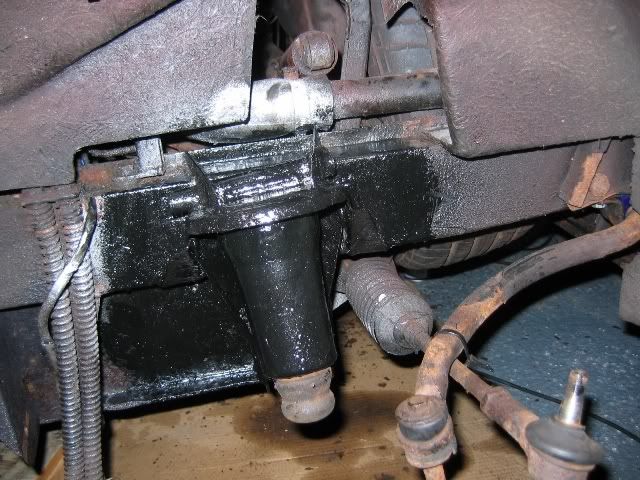 This is the drivers side chassis where the front suspension mounts. Obviously this is after I've stripped it all down. Overall the chassis seemed sound enough with only one area causing any real concern. After stripping as much rust/old paint/underseal off as I could I applied some rust converter (no idea how good this stuff is but it turns rust black & stops it spreading apparently), then some silver spray paint in those hard to reach spots, then good old black hapmmerite in the easy to reach places. After I've put everything back together & torqued everything up I'll apply lots (& lots) of underseal to everywhere I can! In this picture you can just see the end of the inboard shock absorber (just above the silver sprayed (ahem!) radiator hose. You can also see the track rod end & anti-rollbar in the pic - I have new link pins/washers/bushes for the arb & new track rod ends to go on yet. The fun part will be getting the old ones off! |
| |
|
|
|
|
stealthstylz
Club Retro Rides Member
Posts: 14,835
Club RR Member Number: 174
|
|
Jan 22, 2009 12:08:08 GMT
|
|
Some good work there.
Matt
|
| |
|
|
tenman
Part of things
 m00000000000
Posts: 899
|
|
Jan 22, 2009 21:23:33 GMT
|
|
nice... I have a strange soft spot for these odd little beasties...
|
| |
RWD Fanatic...
2003 BMW 320d Wagon (getting old and boring)
1996 Mini Kensington (SWMBO's)
|
|
chaz
Part of things
Posts: 403
|
|
Jan 22, 2009 21:32:24 GMT
|
|
I like this car, definetly worth the work
you doing to it mate.
Keep us posted with your progress please
|
| |
|
|
|
|
|
Jan 22, 2009 21:38:07 GMT
|
|
And to think, a lot of people insist that the MX-5 relaunched the small sports car!
Nice project. Should be plenty pokey! Later ones of these used the 1.4 K-Series engine. Imagine one with a VVC! Zetec should be rapid too mind.
|
| |
1986 Citroen 2CV Dolly Other things. Check out my Blog for the latest! www.hubnut.org |
|
|
|
|
Apr 22, 2009 11:55:15 GMT
|
It Lives Again ............................... sort of!! Since my last update (which was ages ago) I've managed to get a fair bit done on The Reptile. It's now back on 4 wheels & starts/drives but there's still a fair bit to do. I've replaced the hubs with a set that contained a known ggod set of bearings (which saved me having to fork out £170 + delivery + vat for a new pair) & thes have no play at all in them unlike the examples originally fitted. The brakes have been properlly bled & work well now - but I still need to fit my new pads! I bought a set of used (but good) coilover AVO shocks (minus the springs) from an SST owner - the SST is a restyled & turbocharged (nissan Silvia engine) version of the SS1. These shocks are fantastic & should be infinitely superior to the worn out ones that were fitted to the car when I bought it. They really should transform the car. The only trouble being that the new front end rather shows up the old original/rusty back end so when the car's back from having the new sills fitted I'll start doing up the back end of the car (bushes/bearings/brakes/shocks etc) ..... meaning that it'll be up on axle stands again for weeks/months no doubt! I've also started doing stuff to the Zetec engine - I've changed the sump for one that should make it easier to fit the engine in the SS1 & is also more suited to a rear wheel drive layout. Fitting the new sump also meant that I had to fit a new windage tray, oil pump pick-up pipe & dipstick too. I still need to buy/fit new sump/cam cover gaskets & I'll get a new cambelt fitted soon too (though the cambelt fitted looks fine so this is more for peace of mind than anything else). So that's where I am so far - now I'm just waiting for the chaps fitting the new sills to say that they're ready for the car. No idea how long that'll take but once I've got the back from them I'll start sorting out the rear end of the car & once that's done I'll seriously start to think about getting the Zetec installed. The car drives well & should be a belter with the Zetec (130ish bhp) ;D Hubs all back together with replacement hubs & braided brake hoses fitted 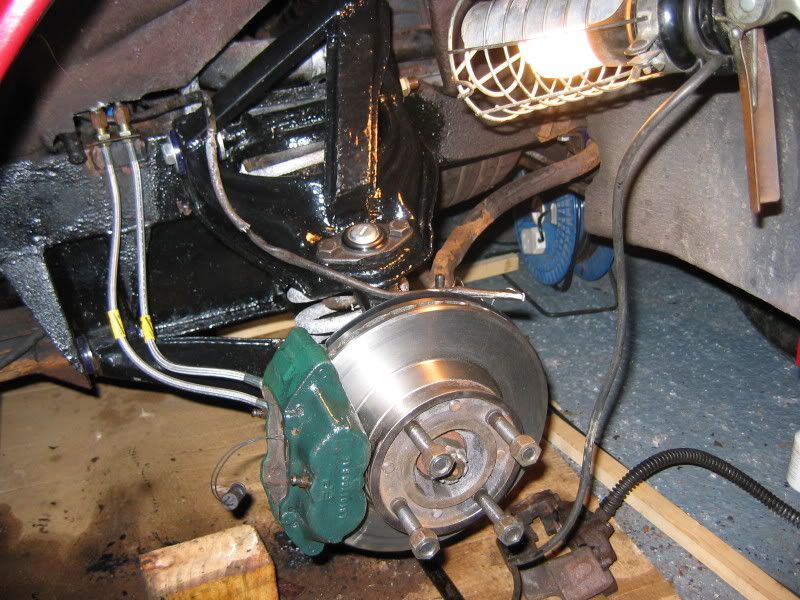 Back on 4 wheels & mobile again for the first time in months. Also hard top removed & soft top fitted with one of my new alloys (no tyres for them yet) offered up for effect . 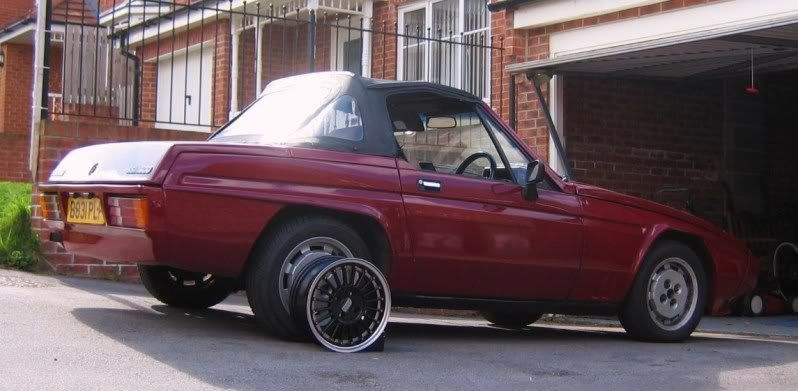 Old shock absorber - rusty, knackered & yucky! 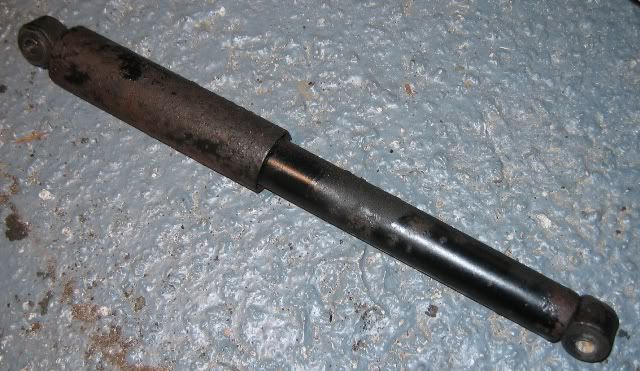 New AVO's fitted  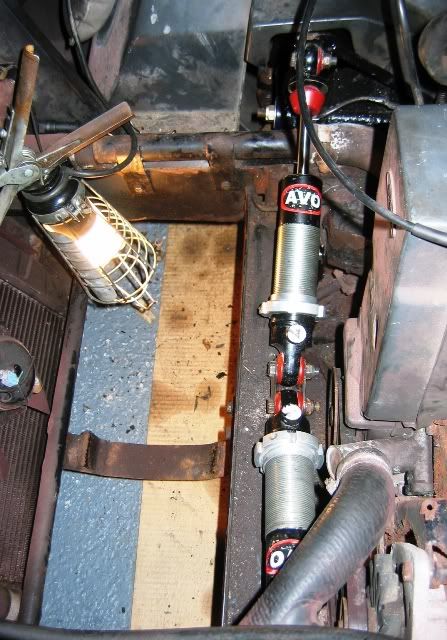 That's all for now |
| |
|
|
|
|
|
Jul 23, 2009 13:49:26 GMT
|
More ....... lots more! About a month ago I dropped the car off at the welders so that they could replace both sills & do any other repairs to the chassis as necessary. 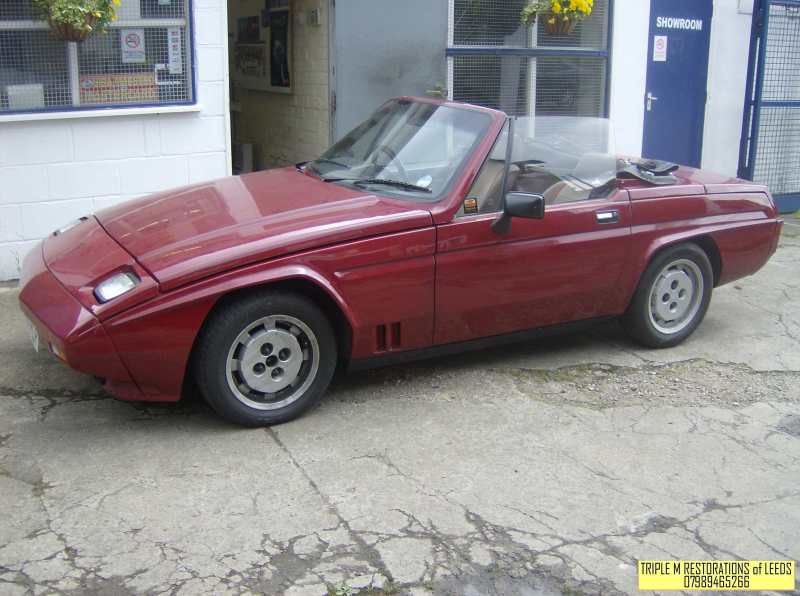 Here's the car pre-stripdown ¡t doesn't look too bad does it? 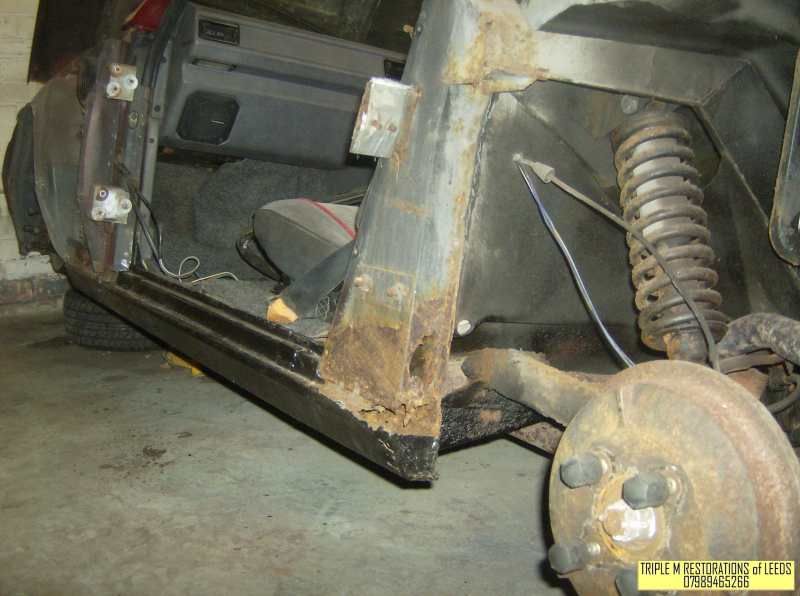 Here's a shot of the passengers side sill after the door & both wings have been removed ¡t doesn't look too good does it? 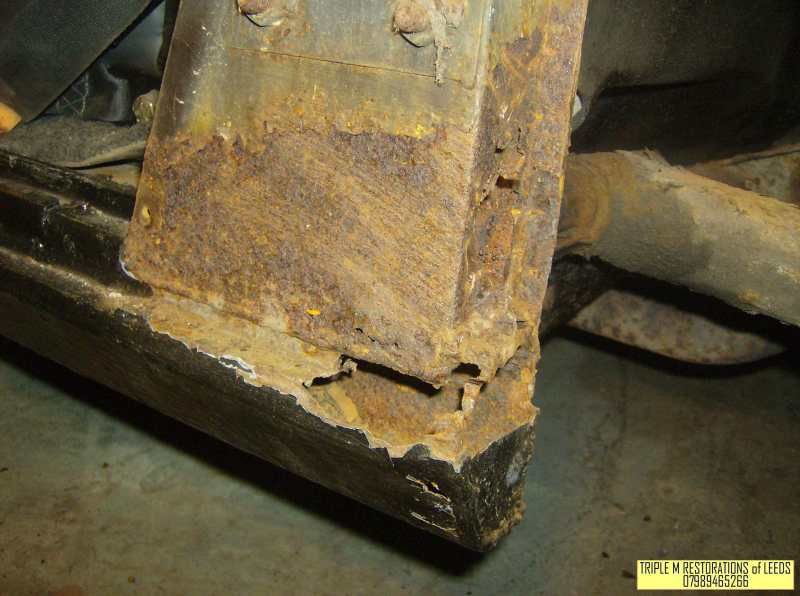 Oh dear oh dear! Close up of the rear of the sill - showing rust in the sill section & also part way up the B post. 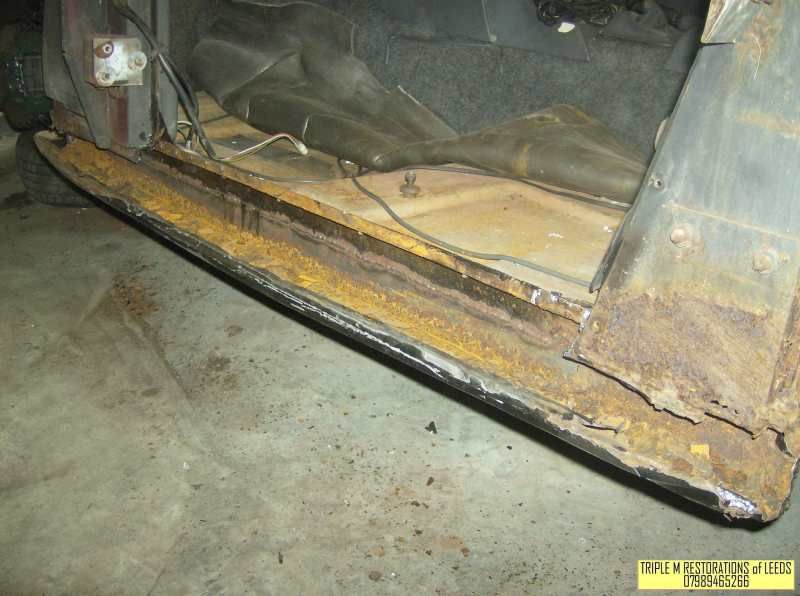 Sill partially stripped off the car ¡t's rusty along its entire length  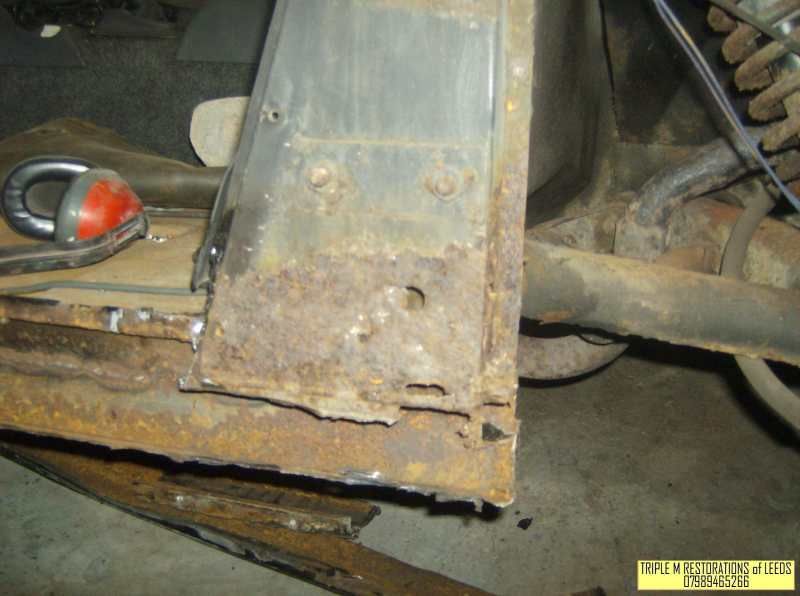 Shows the rust in the B post more clearly - the reel for the seat belt mounts to this!! 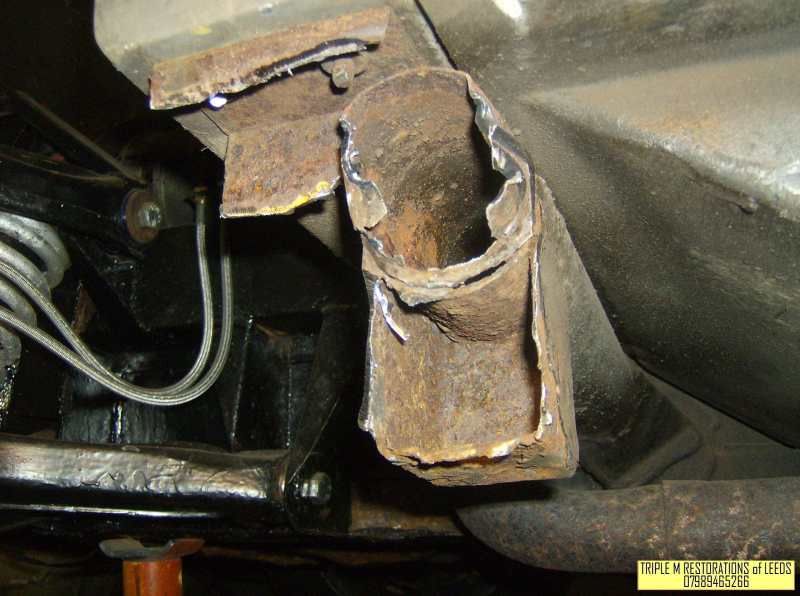 Shot showing the front outrigger & jacking point on the passenger's side - they've started cutting the rot out in this pic. The two bolts at the top of the pic mount the body tub to the chassis. 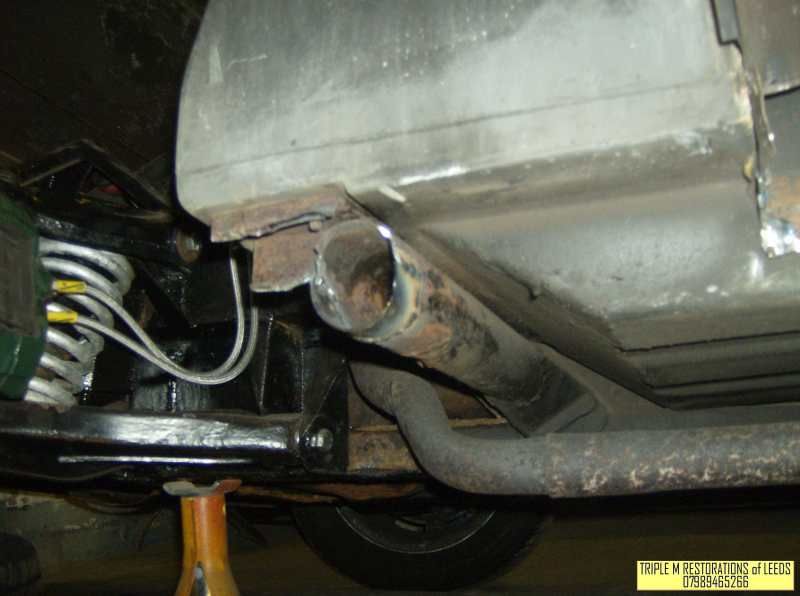 The front outrigger again but this time with new metal welded in & the old jacking point removed. 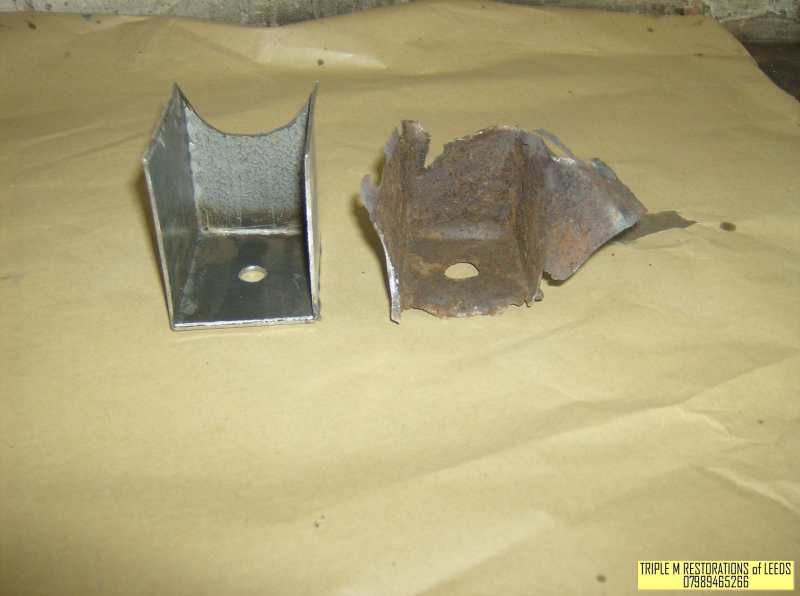 Old vs new - here you can see the state the old jacking point was in! I jacked the car up on this many times without any problems, I'm glad that I never used the jack alone & always added an axle stand under the front outrigger. 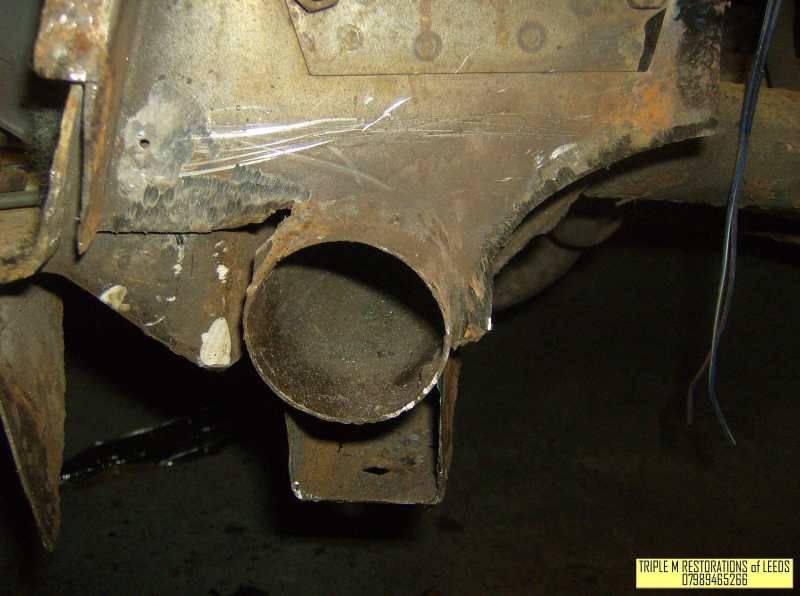 Shot showing the rear outrigger/jacking point - part has had to be cut away to remove rust. 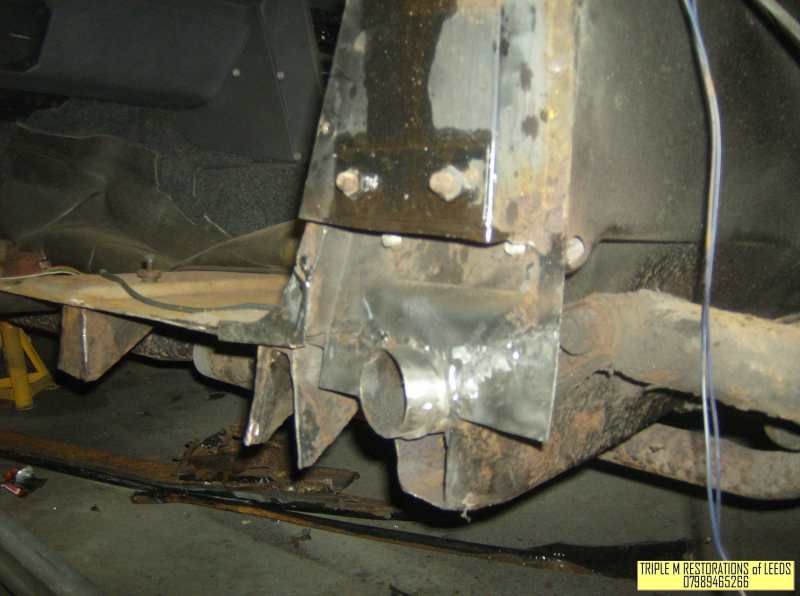 Rear outrigger rebuilt with new metal - old jacking point still there at this point. 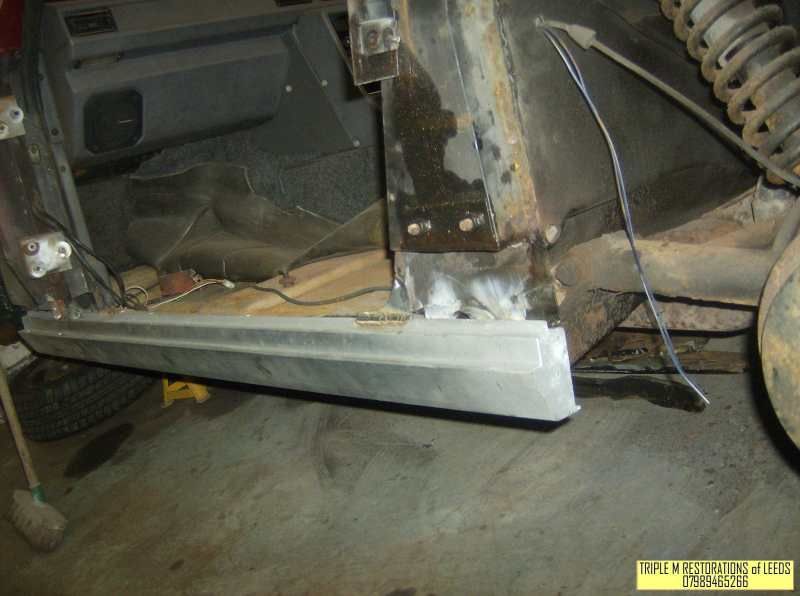 One shiny (well it's not that shiny actually because it's galvanised) sill section in place. The old rear jacking point can still be seen just behind it. 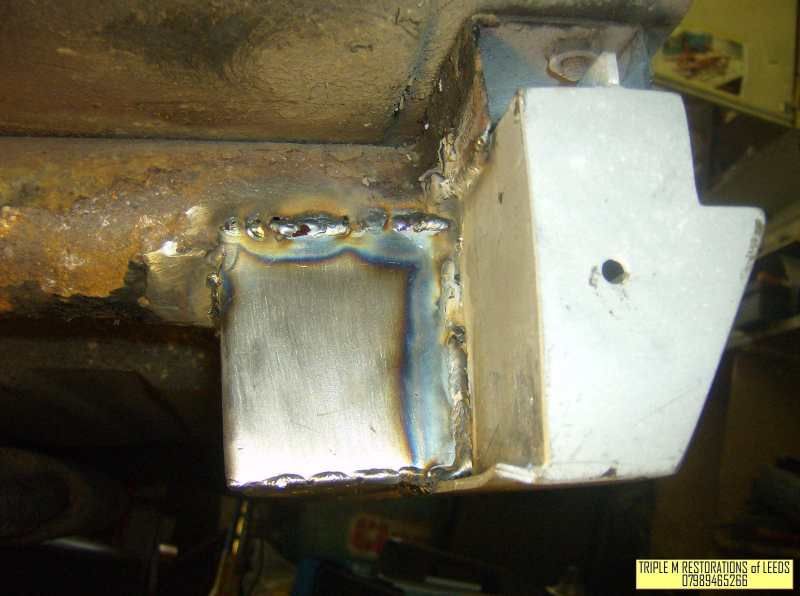 View from the front - showing the new sill & the new shiny jacking point 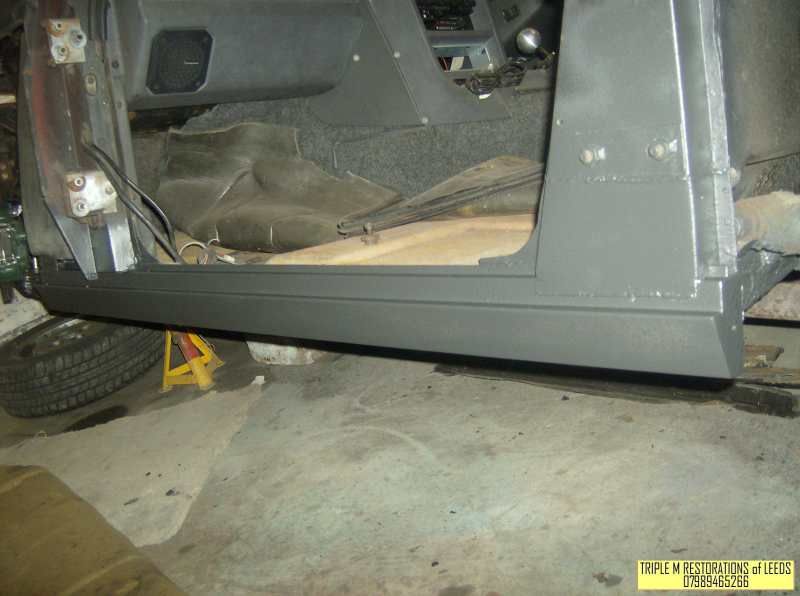 Here's the new sill sprayed up & painted - looking very good. Right all that's left to do now is post some pictures of the same treatment being dished out to the driver's side & the rear of the chassis! I'll post that little lot when I've managed to upload them to Photobucket!! Many thanks for looking |
| |
|
|
|
|
|
Sept 23, 2009 13:07:37 GMT
|
Time for an update! As I'm planning to fit a larger engine into my SS1 it seems sensible to make as much space as possible in the engine bay. The driver’s side of said engine bay is very crowded as the battery, brake servo/master cylinder & carb/inlet manifold are all situated on this side. Of the three essential items mentioned above the battery is, by far, the easiest to move. The SS1 boot has a false floor hiding a deep well which presumably is used to carry all the spares/tools you'll need on any sort of journey - it's also known as the "drug compartment"! It's pretty useful really & is an ideal place to re-site the battery. So I spent all day Saturday moving the battery from under the bonnet to the boot. Not a particularly difficult job - more fiddly & time consuming than anything else. On with the pics: I used a junction box in the engine bay to connect the original battery positive cable to the new length of cable which will run to the back of the car. 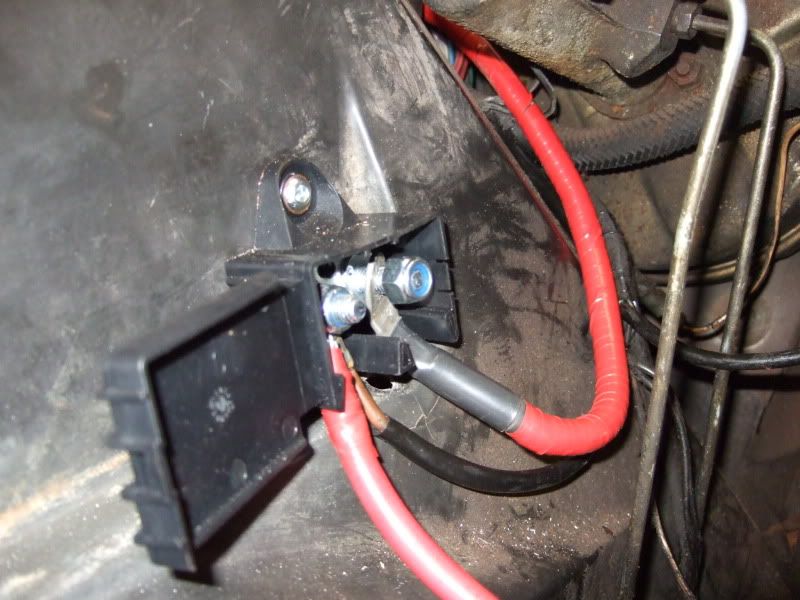 I ran the new cable under the fuse box & through the big bulkhead grommet that the main loom passes through. 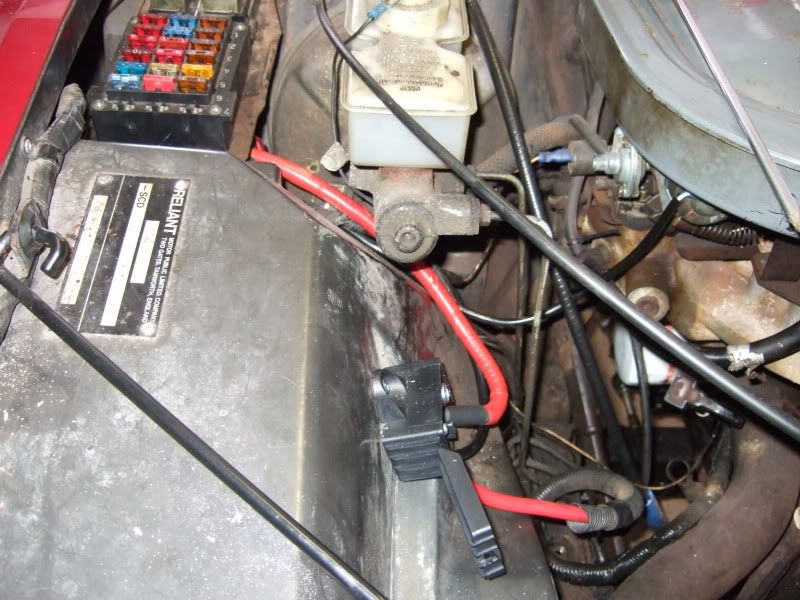 Here's the new cable passing through the bulkhead grommet (you'll have to turn the picture through 90 degrees), I've run it down the bulkhead to the right of the pedals & then along the base of the bulkhead under the pedals & then along the base of the transmission tunnel. I've secured it with plastic p-clips along its whole length. 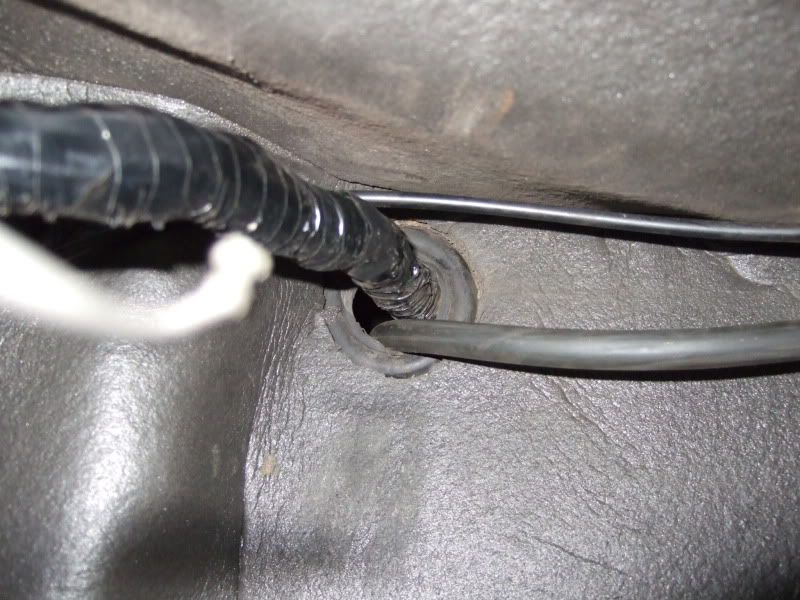 I didn't order enough cable so I've had to join two lengths together - here's the brass connector prior to the next length of cable being fastened to it - the connector comes with a length of heat shrink which I haven't shown.  This shot hopefully shows the route of the cable through the car - it also shows the p-clips I used to fasten the cable down. 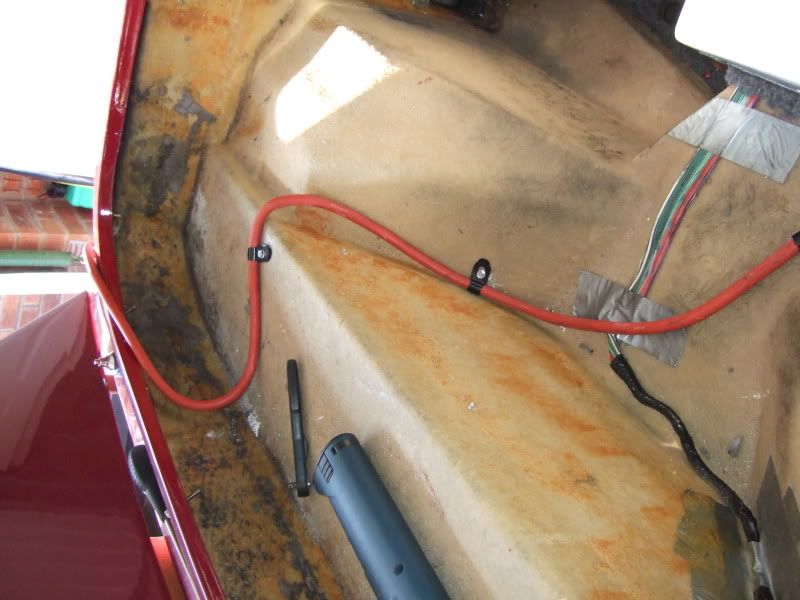 The rear bulkhead caused me a problem as it was too thick for any of the grommets I had, so I made a little metal plate (thin enough to take the grommet) to pass the cable through. I then ran the cable down the left hand tank strap, protected it with some heater hose & secured it to the strap with a couple of cable ties. 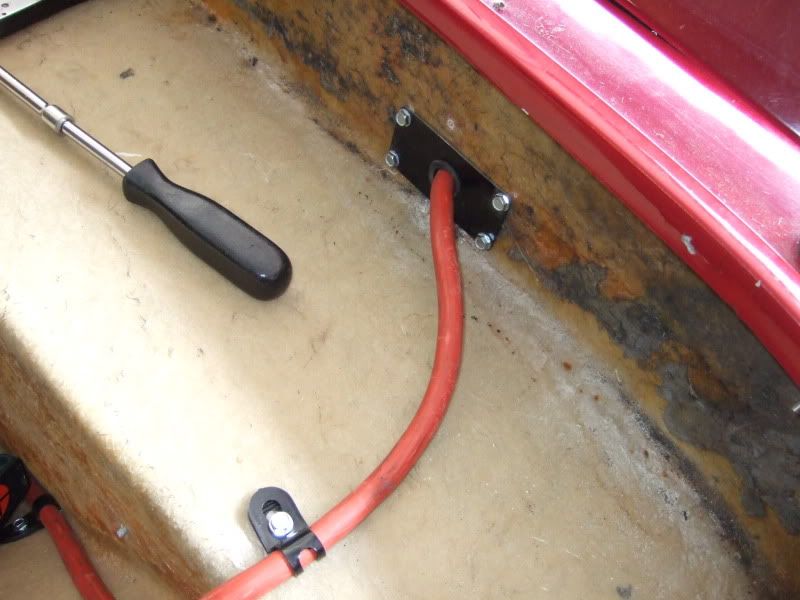 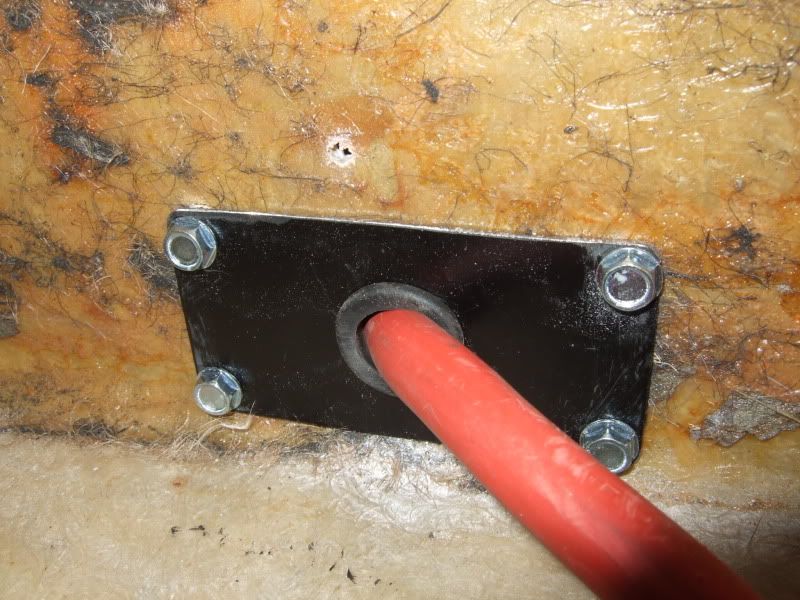 I secured it to the chassis to the rear of the diff with a p-clip & then passed it through a hole I drilled in the boot liner. Again I didn't have a suitable grommet so used a length of heater hose to protect the cable (I'm not sure how legal this is so I may have to change it later) I've fitted cable ties either side of the boot liner to stop the cable, & hose, pulling through the hole. 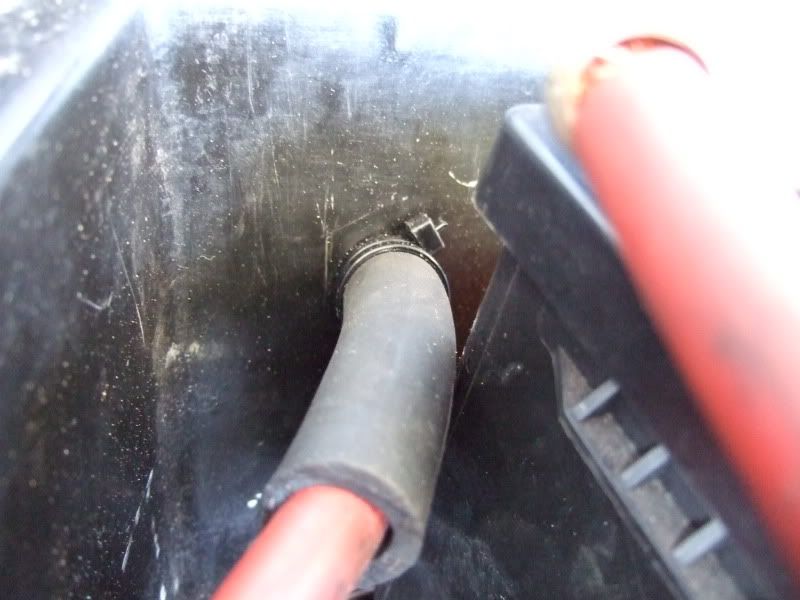 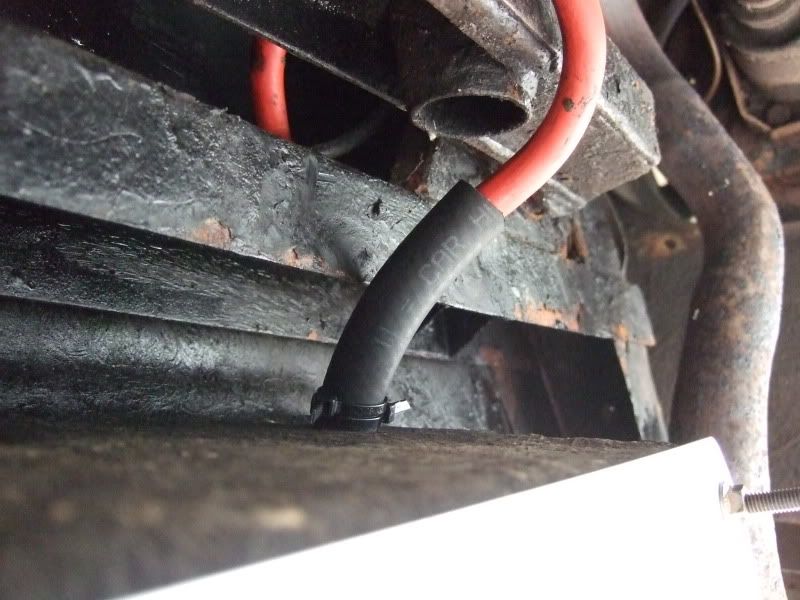 I also made a strengthening plate to fit under the boot liner & bolted it up to the car using the bolts I've used to secure the battery tray inside the boot (it's the original Reliant battery tray - as mounted in the engine bay - but with the legs cut off). Best to ignore all the trial holes I made before realising that measuring twice & cutting once is good advice  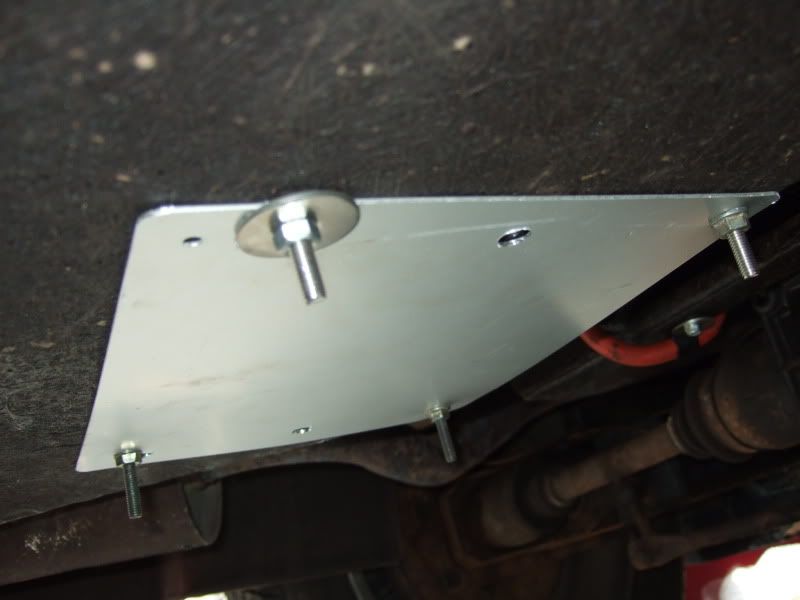 The earth cable was next on the agenda - pretty easy to do & wonder of wonders I found a grommet that I could use - I've bolted it to the drivers side rear chassis member after I'd cleaned all the underseal/rust/curse word off. 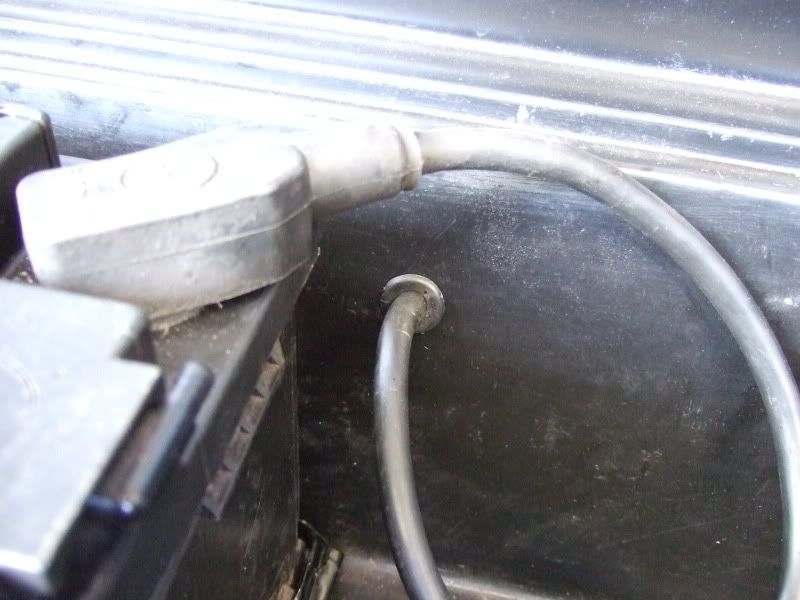 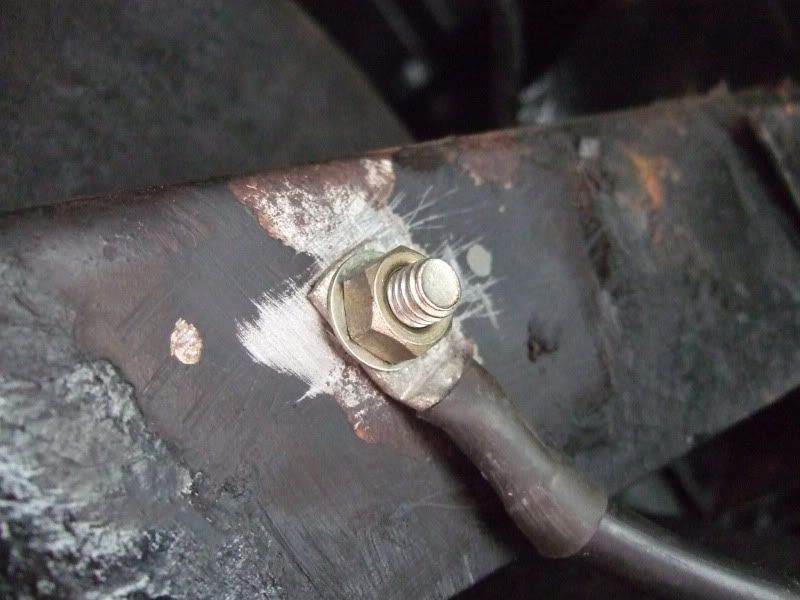 Here it is all finished – I don’t have a picture of it but I’ve since made a false floor for the boot out of wood which hides the battery.  |
| |
|
|
|
|
|
Sept 23, 2009 13:22:37 GMT
|
Yet then another update!! I've been told that the SS1 engine mount brackets would fit the Zetec block but not without some modification. I wanted to see what modifications were needed for myself & I also wanted to get the mounting brackets modified before fitting the Zetec - so that I wasn't pulling the engine in & out all the time while I modified the brackets that are currently fitted to the CVH engine (they're in a lousy state so replacing them isn't a bad idea anyway). I bought some mounting brackets through a Scimweb forum member & they arrived in excellent condition - already cleaned & primed for painting! It looked as if the water pump side mounting would fit the pre-tapped holes on the engine block but that the alternator mount was in the way - so this had to be cut off. Here's the bracket with the alternator mount cut off. I'll keep this bit but I'm not sure if I'll have a use for it or not. 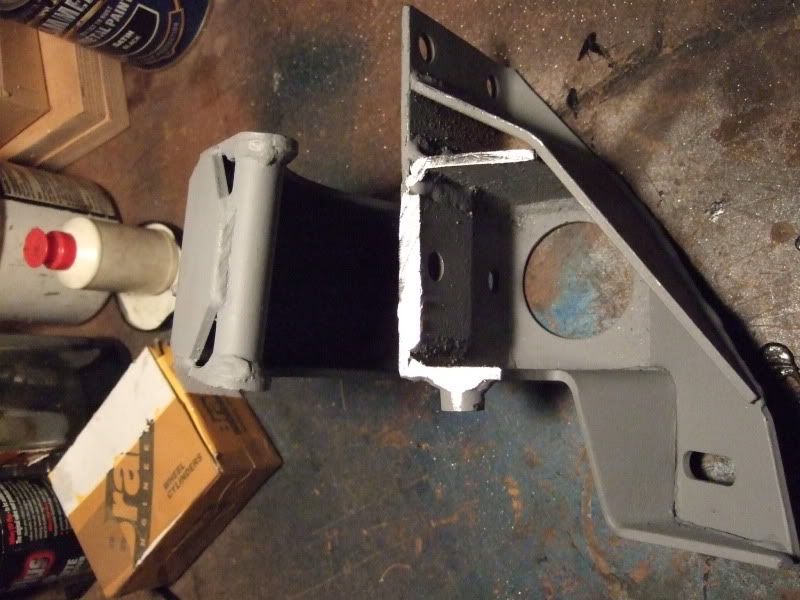 Here's the bracket fitted to the Zetec block - no problems at all - the water pump outlet can be seen above it & there looks to be plenty of clearance for the radiator hose ..... which is good! 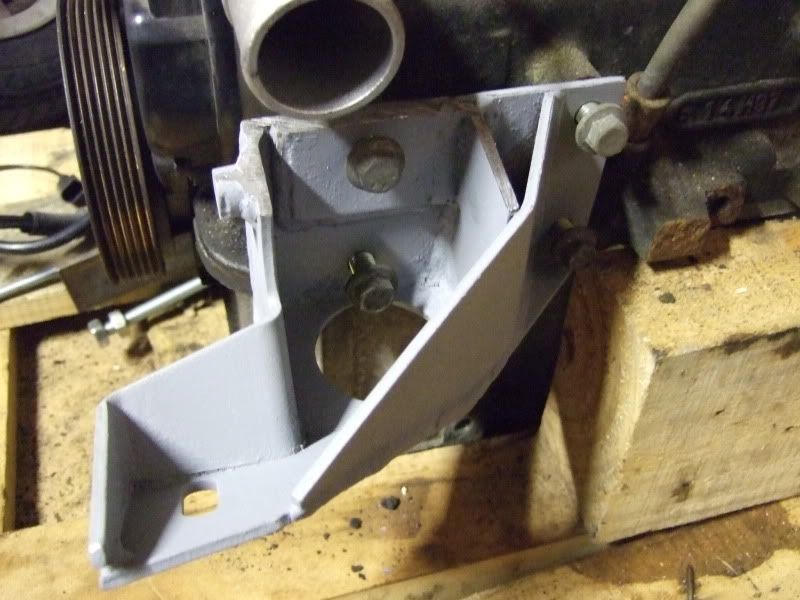 Here's the other bracket fitted - 3 out of 4 holes lined up without any problems. The 4th hole isn't a million miles away though so it should fit after I've drilled/enlarged the hole in the bracket a bit. 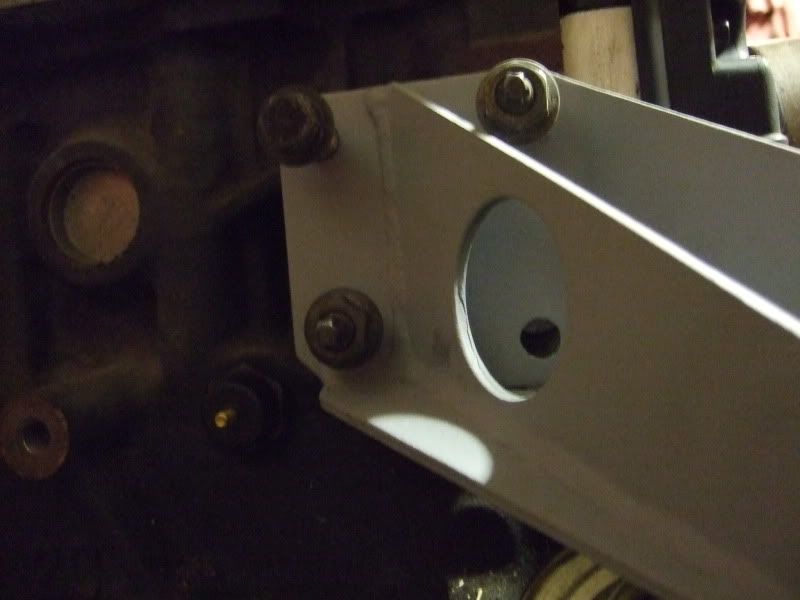 Here we can see the clearance (or lack of) between the bracket & the oil filter housing. I'm planning to elongate the holes in the bracket so that it can be moved up slightly, or the engine can be dropped down slightly. I don't need much clearance (only a couple of mm or so) but some clearance would be nice! I was planning to use a remote oil filter anyway - looks like it'll be essential now! 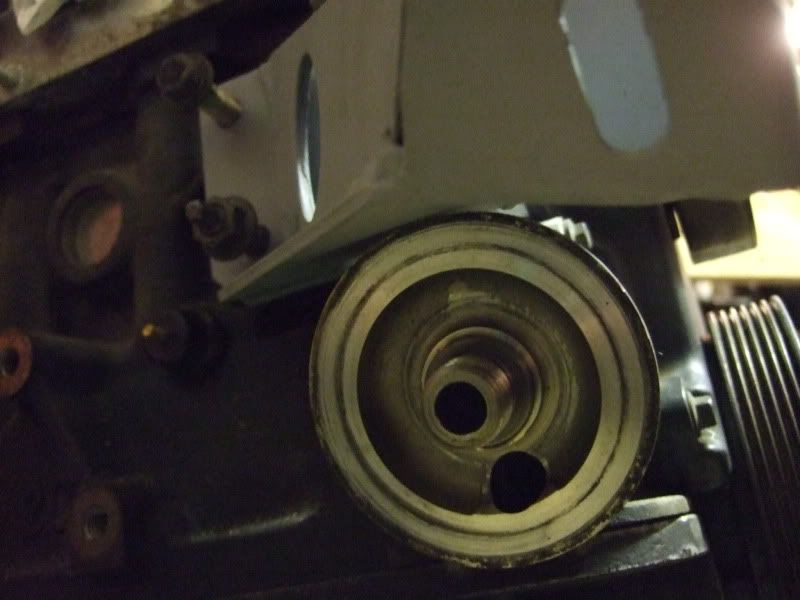 As for the alternator well a search of the kitcar manufacturers (many of whom fit the Zetec engine in their cars) turned up Tiger Racing & this natty little alternator mount. I'll purchase one of these next week .... after payday! 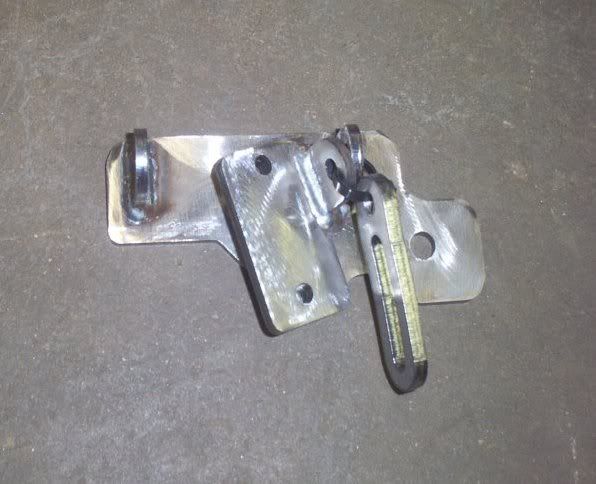 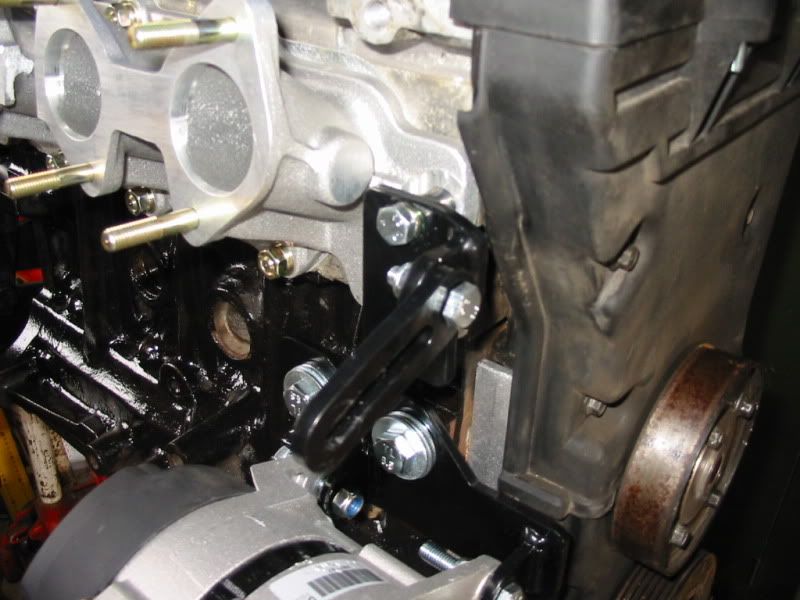 That's all for now but I'll post some more when I've done some more  |
| |
|
|
|
|
|
Sept 23, 2009 14:38:26 GMT
|
|
Great work there, and an interesting car which I've never heard of before. Well done, and please keep it up! Will be watching the updates on this one.
|
| |
|
|
|
|
conrad
Posted a lot
Here to fix your cabin.......
Posts: 1,678
|
|
Sept 23, 2009 16:08:24 GMT
|
|
nice to see another odd old car being saved. kinda remind me of boats these do. What are they like to drive? I'm guessing fun
|
| |
|
|
|
|
|
Sept 24, 2009 7:42:40 GMT
|
|
Good work old bean. These SS1's are so much fun. I had a 1600 ss1, gold with leather and electric windows!! Not galvanised though (twin wipers) so snapped in half going to fuel up!! Got it fixed though! The handling is superb on them, so good in fact that my windscreen popped out when I put my tax disk in it. I managed to fix its winky eyes and patch up the hood as it was ripped as well as get the chassis welded so think I left a good mark on it! I would have kept it longer I had plans of cherry bombs and wider wheels before the snapping in half incident, then I left my mojo with it a bit. Yours looks like an excellent project dude!
|
| |
|
|
|
|
|
|
|
Time to resurrect this thread with a long overdue update - wooohoooo!!! This weekend I made a concerted effort to get something done on the Reptile. The Zetec engine has been patiently waiting in the wings for a while now! New timing belt & tensioners fitted? Check. Water pump changed for one that rotates in the correct direction? Check. New sump, pick-up pipe, gasket etc fitted? Check. New flywheel & clutch fitted? Check. So this weekend, with the help of a borrowed engine hoist & 3 willing helpers, I removed the original smoky old donkey so that I could clean up the engine bay in readiness for the shiny, new (well still quite old actually) 2 litre Zetec lump. It all went pretty smoothly really. We did think we were going to have problems clearing the front cross-member but we then realised that it was removable (thank you Reliant!) which made the job much easier. Once the cross member was out of the way it was all plain sailing & engine was out in about 15 mins. Biggest job after that was getting rid of the old exhaust. I did want to trial fit the new engine but there really wasn't any time (or light) left so we called it a day. The engine bay is filthy so I could really do with cleaning & painting it before the new engine goes in. I've bought some Gunk so I'll have a go with that tomorrow evening (it was too cold last night)! More pics as & when Here we can see my friend Mohammed (he's car mad!) bent double over the front of the car spannering away like a good'un! 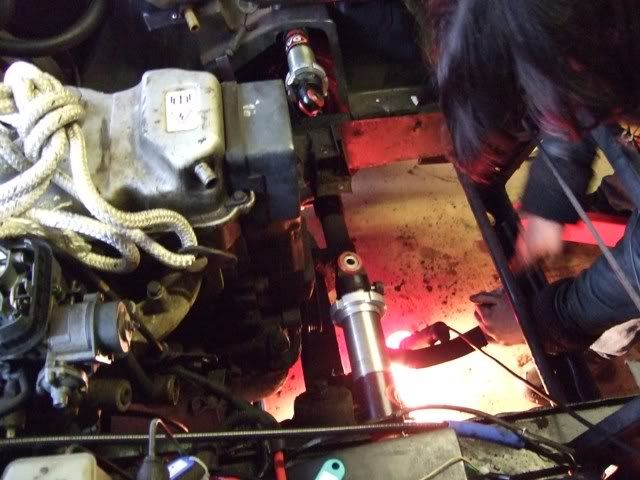 Another shot of Mohammed still spannering away (on the same bolt no doubt)! 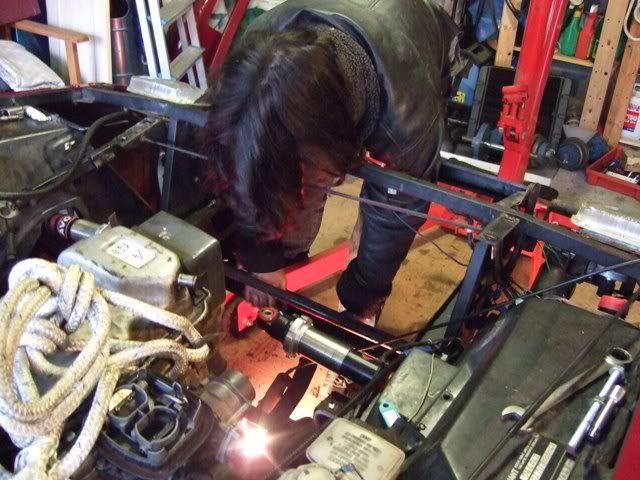 Here's a shot of the CVH lump - rope for hoisting duties is attached but the hoist isn't. No shots of the engine being actually hoisted I'm afraid as it took all 4 of us to guide it out of the engine bay! Mohammed at front of shot again - he get's everywhere! 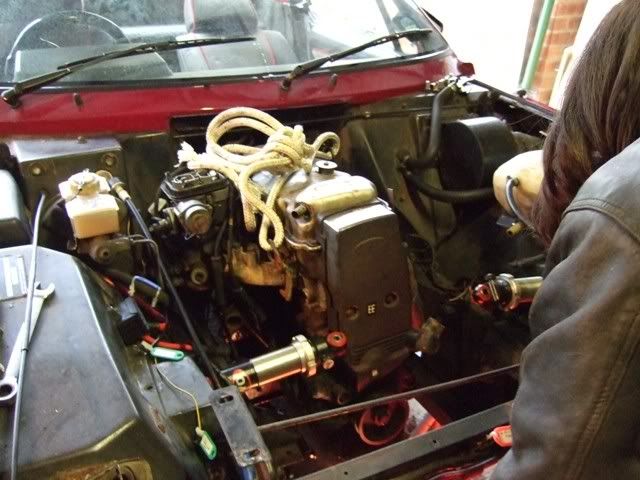 Engine removed & this is the hole left behind, just begging for to be filled with 2 litres of throbbing Zetec ;D Engine bay definitely needs cleaning up somewhat - after 24 years on the road it's a wee bit grimy! 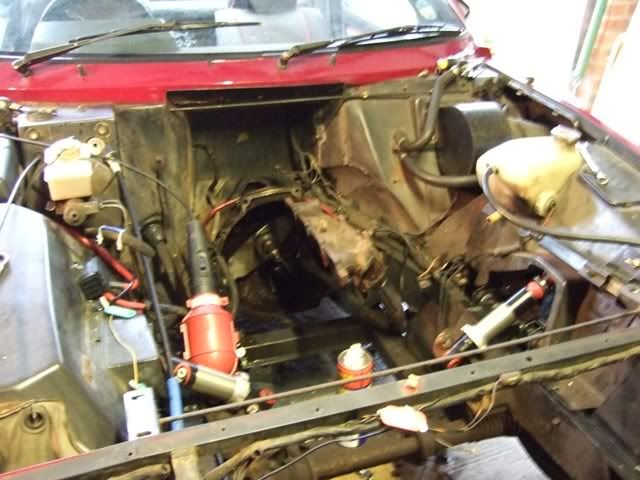 This rather boring shot shows the threaded hole left by the passengers side engine mount. This was easily removed with an oil filter chain wrench - unfortunately the drivers side mount was seized so had to be cut away leaving the backing plate (which has the stud that screws into the threaded hole welded to it). 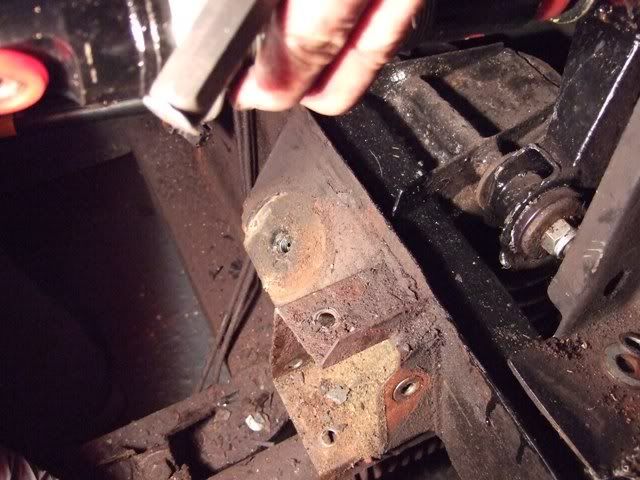 Here's a shot of yours truly (that's my arm!) applying a bit of brute force (& ignorance) courtesy of a cold chisel & lump hammer to the aforementioned backing plate. It gave up without too much of a fight so I'm now left with a totally engineless car which is, at least, easy to push in & out of the garage! 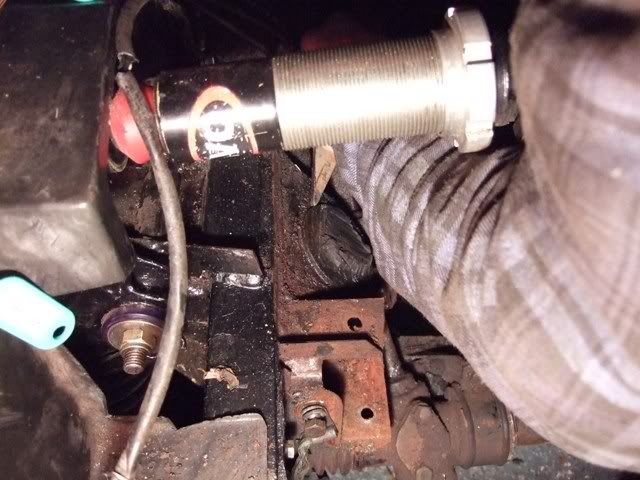 That's all the pics for now - apologies for them not being very good but I had other things on my mind. I'll post some more when I've cleaned the engine bay up which will be a filthy horrible job I was beginning to lose my mojo for the project a bit but I'm glad that progress has been made & I'm still keen to get the car back up & running |
| |
|
|
Speedle
Posted a lot
Need a Country Rock band in the Hampshire Area? https://www.facebook.com/DirtRoadDiaryUK
Posts: 2,221
|
|
|
|
|
great to see more on this! love the build and cant wait to see that zetec in there! awesome!
|
| |
|
|
|
|
|
|
|
In the early 90s a colleague bought one of these. C plate 1600 CVH. Had a newish MoT and he paid quite alot for it. After a couple of weeks he started complaining of strange handling..... he wasn't kidding - it was trying to get in the left hedge under power and the right hedge under braking and the rear end was horribly wriggly all the time. I made the mistake of allowing it into my garage for inspection where we found the rear cross rail completely detached from the sill due to rot  (car only about 8 years old). I got landed with repairing it...... this is what it looked like  I'd suggest sticking to the later galvanised ones. Back then you could still buy the complete (galvanised) chassis new - he didn't want to pay for one though. Nick |
| |
1967 Triumph Vitesse convertible (old friend)
1996 Audi A6 2.5 TDI Avant (still durability testing)
1972 GT6 Mk3 (Restored after loong rest & getting the hang of being a car again)
|
|
|
|
|
|
|
In the early 90s a colleague bought one of these. C plate 1600 CVH. Had a newish MoT and he paid quite alot for it. After a couple of weeks he started complaining of strange handling..... he wasn't kidding - it was trying to get in the left hedge under power and the right hedge under braking and the rear end was horribly wriggly all the time. I made the mistake of allowing it into my garage for inspection where we found the rear cross rail completely detached from the sill due to rot (car only about 8 years old). I got landed with repairing it...... this is what it looked like I'd suggest sticking to the later galvanised ones. Back then you could still buy the complete (galvanised) chassis new - he didn't want to pay for one though. Nick That's terrible!! How do you even go about repairing something as bad as that? Had my car been anything like as bad as that I'd have broken it for spares! The galvanised ones seem to last well though & they're a fun car to drive |
| |
|
|
|
|
|
|
|
|
Yes it was a most unpleasant thing to repair. We used a new sill assembly but the B pillar had to be constructed from guesswork and imagination and the tube/jacking point had to be re-created too. Then there was the small matter of repairing the main chassis where the cross tube movement had caused flex and cracking......
Oddly the other side was absolutely fine. If it had been mine I'd have gone after the vendor and MoT garage - the thing was lethal!
Nick
|
| |
1967 Triumph Vitesse convertible (old friend)
1996 Audi A6 2.5 TDI Avant (still durability testing)
1972 GT6 Mk3 (Restored after loong rest & getting the hang of being a car again)
|
|
|
|
|
|
|
I spent New Years Eve working on the car with a couple of friends, the intention being to get the Zetec installed after I’d made an unsuccessful attempt (with another friend) earlier in the week. I just thought that it’d be nice to finish the year off with a major part of the project accomplished. This time we were successful but there are still a few problems to sort out. The main one being that due to the front crossmember getting in the way the engine wouldn’t go in with the sump fitted. Once we’d removed the sump it went in without too much drama. The problem then was that I couldn’t refit the sump with the engine in place because it catches on the (bloody) front crossmember! If I had an extra inch or so of clearance it’d fit fine! So I’ll either have to modify the crossmember (my first choice), the sump or buy another sump which does fit – the trouble being that I don’t know which sump to buy as I thought I already had the correct one The other problem is that the Ginetta fuel injection manifold (that I bought ages ago) won’t fit with the engine in place either – there’s just not enough room between the engine & inner wing Not sure what I’m going to do now but I may try & use the CVH inlet manifold/carb with an adaptor plate, or I could try & go down the bike carb route. I was a bit down after we’d finished working on the car yesterday as I was hoping to get the complete engine in I.e. with sump attached! But I’m feeling more positive about it today as the engine is finally in & neither of the above two problems should be insurmountable. So here’s to me making further progress in 2010 Here’s the engine waiting to go in – not too much to say really other than it’s complete at this stage with sump attached: 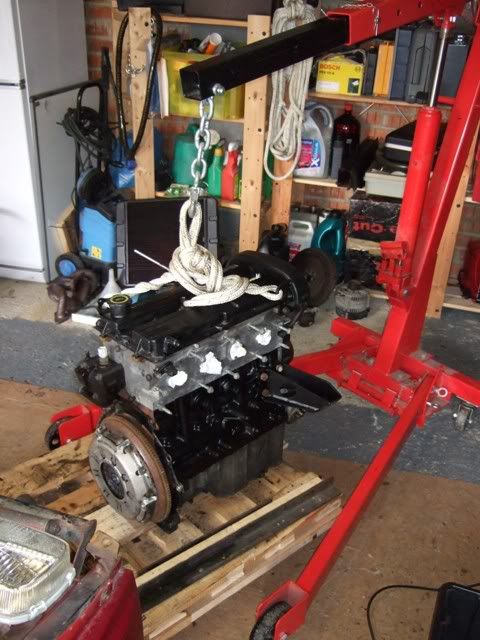 Here’s the engine being lowered into position – sump off at this stage: 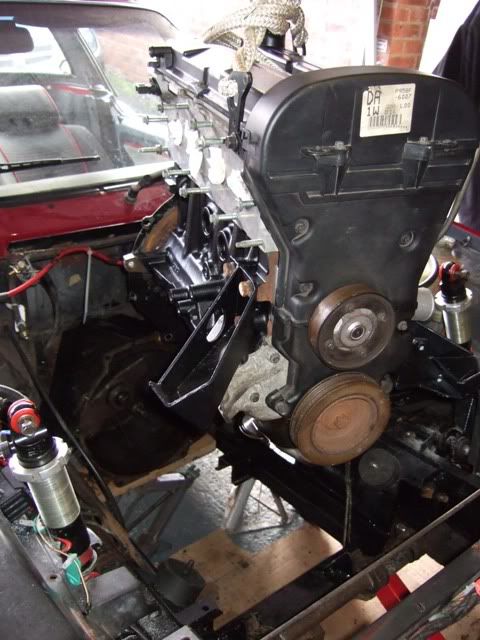 Here’s the best shot I have of the engine fitted – sorry it’s a bit naff but we were all completely frozen by this stage & more than ready to stop & thaw out indoors with a nice cuppa: 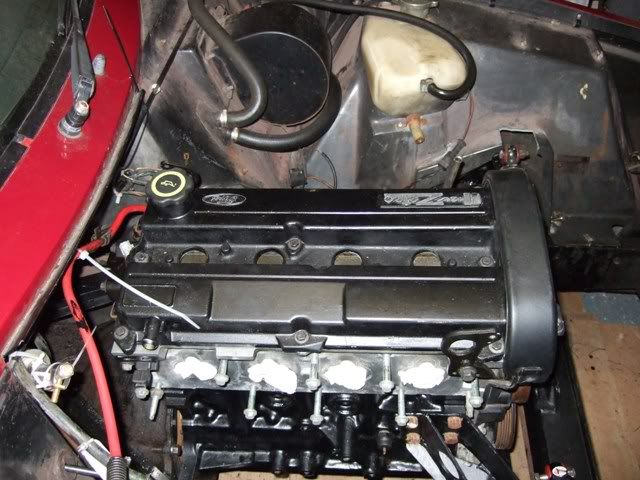 Hope everyone has a great 2010 & many thanks for the support |
| |
|
|
|
|
|
Mar 29, 2010 14:54:35 GMT
|
Aye up chaps – just when you thought it was safe to go back in your garage here comes Paul with another SS1 (Reptile) update!! Due to other committments I’ve not had much time to spend on the car so progress has been slow. I did take a couple of days off work during March & used these days to try & fit the roll bar that I bought from a seller on the Scimweb forum. Late last year I fitted the hard top - mainly to free up some space in the garage - but having it in place didn’t exactly leave me with a roomy working environment. It’s too big/heavy for one person to remove so I was stuck with it! I'd already taken the passenger’s seat out of the car so decided to take the drivers seat out as well to maximise the available space – it would have had to come out soon enough anyway as I had some MX5 seats that I wanted to fit (more about these further down). The roll over bar went in the car no problem & using some pointers I'd printed off the aforementioned Scimweb forum I started the job! The first mistake I made was that I didn't mark where the feet of the bar went when the carpet was in place . So once I'd fitted & bolted the bar in place without the carpet in the car I realised that it'd all have to come out again so that I could refit/mark/cut the carpet!! Do I feel a numpty? Yes I do I have a non-galvanised car so I wasn't sure whether the captive nuts for the roll bar feet bolts - as fitted to some (all?) of the galvanised cars - would be there or not. It turns out that they aren't fitted to my car so I had to drill some 10mm holes to accept the bolts that had been sent with the roll bar. Unfortunately these bolts weren't long enough so I had to make a quick trip to Screwfix (there's a branch close to our house) to get some long enough bolts & also some nyloc nuts. This is turning into a longwinded way of saying that the bar fits fine & feels reassuringly solid when it's all bolted up. It feels as if it should increase the strength of the car quite a lot even though it is only bolted in place. I suppose that welding it in position would be better but I'm not sure how I'd do this given that there's a layer of glass fibre between the rollover bar feet & the actual chassis & I have no great wish to take the car to bits any more than it is already! The bar is also held in place by three bolts at each of the B-posts, as well as the three M10 bolts that hold each of the feet down, so it’s held in position by 12 bolts (6 per side) in total. It feels as solid as a solid thing & should increase the strength/rigidity of the car quite a bit. I have been told that the strength of the actual bar can be increased by welding a diagonal bar across it - I have suitable bit of bar but I’m not sure if it's really necessary or not. Anyway here are a few pictures of the job – the first pic shows the roll bar foot & the three M10 bolts that hold it in position. I’ve used thick washers/spreader plates & nyloc nuts to secure them. Access was a complete pig & I had to remove the rear shock absorbers to give me more room – even then the rear suspension arms got in the way & I ended up using just about every extension I had in my socket set to reach the nuts. Pig of a job & the bar's in for the duration now!!! 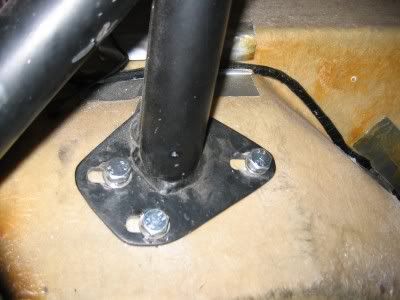 This pic shows the roll bar in position - all holes have been drilled & the bar's partly bolted in. This is the stage I was at when I then realised that it'd all have to come out again so that I could fit/mark/cut the carpet 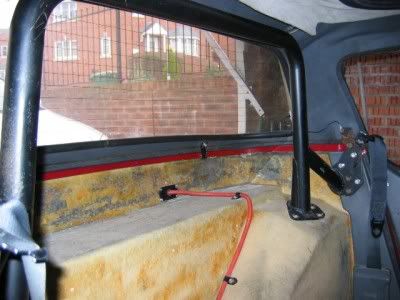 This photo shows the clearance between the roll bar & inside of the hard top (it also shows that my hard top needs retrimming - yet another job for yet another day). Clearance with the hard top fitted is fine, so it should be ok with the soft top fitted, but I'll just have to wait & see. The soft top's pretty much shagged out & could really do with replacing so I'll probably end up using the car with the hard top fitted most of the time - which sort of defeats the point of having a soft top car doesn't it  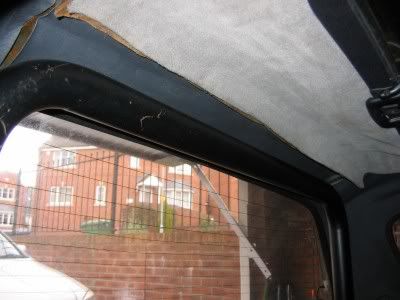 And here we have the finished installation - carpet fitted & cut, roll bar in position & all bolts tightened up. I like the way it looks & it feels proper, & I mean PROPER, solid & I'm chuffed with it. I'm not sure I'd want to do the job again anytime soon though!! 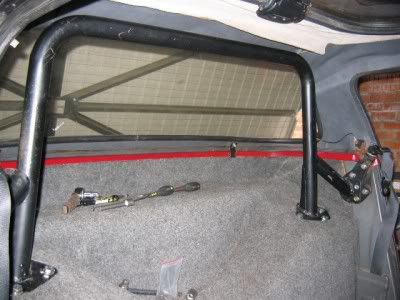 After fitting the roll bar I had a few days off the car but got the urge to work on it again this Saturday .... which I spent hacksawing, drilling, tapping, sweating, straining & swearing as I adapted the Reliant seat runners to fit the pair of MX5 seats I mentioned earlier. The seat blet mounting points are part of the original seat runners so I thought it best to use them if possible! I'd already fitted the passenger’s seat once but removed it so that I could copy the adapters I'd made for the seat runners. I made the adapters out of some thick (10mm or so) iron plate I had in stock – my idea being to bolt these adapter plates to the MX5 seat bases using the old bean holes already tapped into them, I'd then bolt the Reliant runners onto the plates into which I’d tapped another old bean hole. I didn't take any photo's of the adaptors I'm afraid (sorry about that) but they seem to do the job well enough. They were fiddly & time consuming to make though - the worst part being hacksawing through the 10mm plate! Both seats feel very secure & still move forwards & backwards - the drivers side is a little reluctant to move though! The seats themselves are much comfier & more supportive than the originals (which were flat, soggy & knackered) but they also felt overstuffed ..... almost as if you were sitting on top of them rather than in them (if that makes any sense?). So I removed the seat covers & attacked the seat foam with an electric carving knife (as you do ) to try & reduce the height of the seat cushion but while still keeping the same(ish) profile. It seems to have worked well enough & both seats (the drivers side especially) feel much more “buckety” than they did whilst still being comfortable to sit in. The seats do sit a bit higher than the originals though. This shouldn’t really be a problem for me & Gillian as we’re both 5’7”ish but it probably will be a problem for anyone much taller than us as I can see heads hitting the hard top & knees attached to long legs getting in the way of the steering wheel. The seat rails can be lowered which means doing a bit of cutting & welding & then re-fibreglassing the floor! It’s not a massive job (apparently), & plenty of people have already done it, but it’s not really something I want to start right now. So that's the interior more or less sorted, next on the agenda is to try & get the engine running. I need to pull it out again so that I can fit a new clutch release bearing - I should have fitted one when the engine was out but, like a plonker, I forgot! The lack of a sump is still a problem but I’m hoping that it’ll be sorted soon! Then I'm probably going to have to leave the car for a bit until I can scrape the funds together for a fuel pump, carb(s)/manifold, megajolt ecu, starter motor, alternator mount/alternator, exhaust etc etc etc! I'm getting married at the end of July ;D, and then I’m off on honeymoon for 2 weeks ;D ;D, so it looks as if life may well get in the way of the project for a while. Anyway here are a couple of not very good pics of the seats installed. Ta for all your support & I'll update the thread when I've got more to show - opinions welcome as always 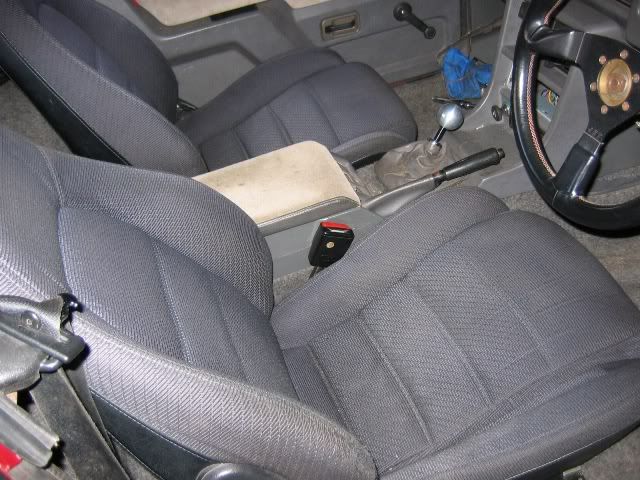  |
| |
|
|
Ruki
Part of things
Posts: 480
|
|
Mar 29, 2010 15:34:42 GMT
|
|
Really looks well with those seats in.
Keep at it, will be a beauty.
|
| |
|
|
|
|


 !
!
 ! I’ve had the upper wishbones strengthened so that I can use coilover shocks on the front at a later date. I’m very nearly at the stage in the project where I can start putting stuff back together & back on the car ;D


 (car only about 8 years old). I got landed with repairing it......