|
|
|
|
|
Ok so it's not new but managed to get a hood frame, only need a replacement bracket but no one want to sell me just the bracket  only a complete hood! only paid 10 quid for it but shipping is a wopping 30 quid but need must. A bonus is that it comes with the chrome strips which go for silly money and the header is still attached ! so that one may be better to rescu rather than mine as it broken off completely. ] Chasing Caterham for the alloy hubs which l want to get but they have been out of stock for ages they are not cheep 300 quid , want to go for these as they come with upgraded bearing which will be better for the heavy alloy wheels and wider tyres, Canley have them but only with original bearings so best l could do would be to upgrade to vitesse bearings, oh and you can get them in ford stud patern and M12 studs ;D ![]() .jpg[/IMGThis weekend l hope to get the old girl out and turn it around so l can fit the TR3 fuel tank  Cheers |
| |
Last Edit: Oct 14, 2015 14:59:48 GMT by Deleted
|
|
|
|
MiataMark
Club Retro Rides Member
Posts: 2,963
Club RR Member Number: 29
|
1969 Triumph HeraldMiataMark
@garra
Club Retro Rides Member 29
|
|
|
|
|
| |
1990 Mazda MX-52012 BMW 118i (170bhp) - white appliance 2011 Land Rover Freelander 2 TD4 2003 Land Rover Discovery II TD52007 Alfa Romeo 159 Sportwagon JTDm
|
|
stevea
Part of things

Posts: 281
|
|
|
|
{snip} Chasing Caterham for the alloy hubs which l want to get but they have been out of stock for ages they are not cheep 300 quid , want to go for these as they come with upgraded bearing which will be better for the heavy alloy wheels and wider tyres, Canley have them but only with original bearings so best l could do would be to upgrade to vitesse bearings, oh and you can get them in ford stud patern and M12 studs ;D{/snip} Canleys do sell them with the Caterham uprated stub axle and larger bearings Uprated Front Hub and Stub Axle Kit |
| |
|
|
|
|
|
Apr 20, 2012 12:00:56 GMT
|
Thanks chaps, didn't know canley could supply the uprated bearings that's good to know, looked on his web site but found it not very easy to navigate  and he's 10 ponds cheaper ;D |
| |
Last Edit: Apr 20, 2012 12:03:47 GMT by Deleted
|
|
|
|
|
Apr 23, 2012 10:36:06 GMT
|
Did manage to get her out and turn it around with help from the kid's and the wife ;D Didn't have time to take any photo's because of hoffing black cloud over head just got everything back in before it hammered down , garage nice and clean now for a while so l thought l would strip the paint off the rear deck so l can cut the hole for the fuel filler, started with wire brush attachement in the grinder and was enveloped in a cloud of filler, didn't want everything covered in dust so went back to paint stripper and scrapper  , there was a thin layer of filler and very thick paint hoping underneath is not to bad, oh well it will only be more rust Inside cleaned up and given a protective coat of paint, the fuel tank fits like a glove aswell  Just got email this morning Caterham will have stocjk of hubs this week but l'll get them from Canley's ;D |
| |
|
|
|
|
|
Apr 23, 2012 11:54:43 GMT
|
Wife just phoned my hood has turned up ;D just have to wait all week until l can open it at the weekend but will have a 4 day weekend beacuse it's a german holiday here on tuesday and everyone takes the monday off as a bridging day |
| |
|
|
|
|
|
|
|
So more progress over the last few weekend's means that my new TR3 tank is in and is looking good, finaly removed all the old paint and filler on the rear deck there was an 1/8 inch layer across the whole rear deck , and yes there was a bit of rot which l will have to deal with  The hole was quite easy to cut in the end and ligned up nicely with a hole in the centre brace under the deck The surports for the tank also had a benefit of beafing up the deck so it doesn't flex as much as it did, all l need to do now is clean up the tank and decide how l'm going to get the fuel to the engine Moving the tank meant l was able to tidy up the rear chassis as the current set up was visible from the rear valence so a quick chop abount and out with the angle grinder, l was also able to lose some wieght which is good as all l keep doing at the moment is making the bloody thing heavier l'll take some pictures when l take the buck off, anyway l got a set of twin tail pipes sitting in the back of the garage my dad gave me and l've been itching to get them on so here goes, first l had to fit the rear valence and side quaters so l knew the hieght then cut some drop bracket to mount the exhaust, this was cut from a bit of the old escort l still had, don't throw anything away ] |
| |
Last Edit: Oct 14, 2015 14:41:08 GMT by Deleted
|
|
|
|
|
|
|
......following on from yesterdays update, l decided to fit one of my stoneliegh purchase, which was a reversing light, decided to fit one of these after trying to reverse an XK150 we hired in the dark!, so for stymetry l decided to fit it in the middle just about here.... Now l keep looking at it and can't make my mind up as l'm not sure whether it looks ok there or if l should mount it off centre, what do you think?? I've decided to tackle that horrible job of getting herald panels to fit properly First was the sill panels l got from Mr speedy ;D as you can see it needs a bit of work, l offered up the door skin and that didn't even fit in the opening so went back to the boot lid, thats got to be prity close surely!! wanted to fit the hinges but could only find one our family has a saying for stuff that you can't find we say it's lost in the mooretex!! Anyway the boot fitted ok a bit tight along the sides and it didn't follow the lamps at all and had a huge gap along the bottom, so bit off bending and the fit was better  This fitting of the panel and getting everything ligned up is going to be a ball ache l can see a long year ahead and lots of washers, moving from the weld-a-thon to the fit-a-thon! |
| |
Last Edit: Oct 14, 2015 15:00:10 GMT by Deleted
|
|
|
|
|
May 14, 2012 14:57:33 GMT
|
A spending spree of 14 pounds got me this from minispeed ] Happy with that job l continued with the body mounting, drilled hole for the B post bolt to pull that down, also drilled hole to pull front A pillar forward using spacers which meant that the door skin would fit in the hole ;D The sill will have to be trimmed so it Finaly the order from Gavbiz defunked website turned up after a few phone call's to radical supplies which has taken over their business ] |
| |
Last Edit: Oct 14, 2015 15:00:34 GMT by Deleted
|
|
Em
Part of things
Fuel Injected? Carb Infested!
Posts: 601 
|
|
May 14, 2012 16:36:15 GMT
|
… and yes there was a bit of rot which l will have to deal with  Call that a rotten rear panel, Rob?! THIS is a rotten rear panel!  Good progress mate! I’ve got the same problem with the rear wings having closed up around the boot lid aperture, although in my case it’s probably because I’ve welded it up incorrectly… Nothing a Porta Power won’t cure, I’m sure! |
| |
|
|
|
|
|
|
|
|
|
|
wow EM what are you goint to do about that? at least your's wasn't covered in filler, don't think they make a replacement panel for that do they?
|
| |
|
|
MrSpeedy
East Midlands
www.vintagediesels.co.uk
Posts: 4,786
|
|
|
|
|
That tank sits in rather nicely. It's always annoyed me how the Herald/Vitesse tanks sits at the side and intrudes in the boot space.
|
| |
|
|
|
|
|
|
|
yer speedy, recon l could get a set of competition golf cubs in there now if i was into that! could have fitted further foward but l've added a brace across the top of the coilover top mounts to the body Think the TR3 tank is bigger aswell ;D |
| |
|
|
|
|
|
|
|
|
Hi Rob. Your making great progress mate. Things are coming together very nicely. That new camera is a big step up from the old photo's. Very clear. Keep up the excellent work and keep loading the photo's.
|
| |
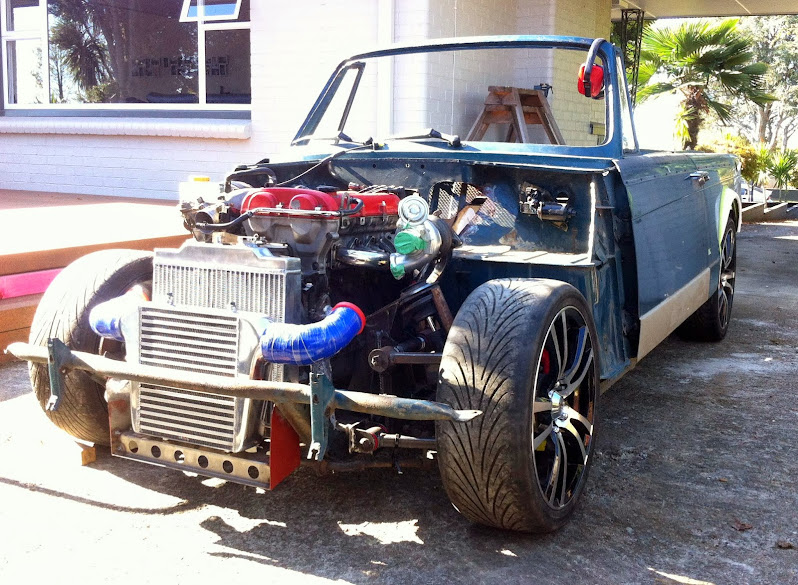
69 Herald 13/60 with Turbo 1600 MX5 engine, Lexus 5 link rear end, 17in wheels,300mm ventilated disc's and subaru 4 pot calipers
|
|
|
|
|
Jun 18, 2012 14:49:58 GMT
|
Well it's been age's since l've added an update, home life taking up the time and other stuff, l've been doing the doors, l had already stripped the outer panelf off but hadn't checked them over so was supprised by the state of the insides they had little to no paint on the inside and l was surprised as how well they had survived considering the lack of corrosion protection!! I've cleanned up one and left the other as is so l've got an idea how it's all fixed together. Was going to by a door bottom repair panel but it was really only the front corner and and hem flange that was gone so would end up cutting over 50% off seamed a waste of money so l fabricated the front section and then bought a 1mm thick angle peice from b&q, put the joggle in it and welded it in place being carefull not to over heat it and warp the curse word!!, ended up very happy with the result Even managed to adjust the body so the door would fit in the gap! Next job was to fit the escort latched so l could have a more secure locking oh and central locking! I added a reinforcement plate on the inside and cut an apperture for the stricker to fit. The latch just fitted around the glass run and l breathed a sigh of relief! I wanted to keep the Herald interior door handle so had to mate it upto the cable from the latch, so cut a slot in it and hammered it around a bar so the barrel on the end would be located, l then made a small bracket that would hold the cable outer and hey presto the inside handle now unlocks the door and locks it as the movement for the herald matched the escort as they say result! Not a huge amount done as you end up thinking a lot and holding variuos bit up metal upto the door and try and fathom a was to fix stuff!!! but l was happy with that  |
| |
Last Edit: Oct 14, 2015 14:41:21 GMT by Deleted
|
|
|
|
|
Jun 19, 2012 16:21:00 GMT
|
next problem was the escort latch was actuated with a lever from the handle pushing this down l've still got the lock barrel to fit but l moved onto the electric window mech, now the escort glass is curved so the electric window runner was curved also but the herald glass is flat so used the vice and a bit of gental bending and managed to straightened it out thought it was going to buckle and do so was well pleased with the result ;D ] next l need to make brackets to fix it in, the bloody motor was riveted in so going to have to come up with some way of fixing that in |
| |
Last Edit: Oct 14, 2015 15:00:42 GMT by Deleted
|
|
|
|
|
Jun 19, 2012 22:42:47 GMT
|
|
those rubber bobbins on motor unscrew & are I think M6 or M4 thread, some have thread on both sides.
use them in cortina's.
|
| |
theres more to life than mpg & to much power is just enough.
|
|
Em
Part of things
Fuel Injected? Carb Infested!
Posts: 601
|
|
|
|
Central locking?! Electric windows?!?  That's not really in the Triumph spirit, is it now Rob...? Nice work inside the door on the button/lever conversion! |
| |
|
|
|
|
|
|
|
Bookmarked my own thread now as it took me bloody age's to find it Project still coming along just changing jobs so l've not had a proper computer but now got one and my own login I'll do some post next week with picture's as been finishing off the door which is fiddle with the electric windows mech, and stripping paint which is messy and dirty blum'un job Did manage to get a bargain steering boss from fleebay for 99p so l can fit my retro look steering wheel inplace of the escort one ;D |
| |
|
|
|
|
|
Aug 15, 2012 11:08:59 GMT
|
The slogg to remove paint contiunes this small pile is a very small amount compares to what has been removed from just one rear quater, the paint was very thick especially the final coat which could be peeled off in some places where it hadn't keyed properly lol Also got the rubber mounts for the motor so that can be mounted now Done some other random stuff but haven't took any photo's yet |
| |
Last Edit: Oct 14, 2015 15:00:33 GMT by Deleted
|
|
|
|


 only a complete hood! only paid 10 quid for it but shipping is a wopping 30 quid but need must. A bonus is that it comes with the chrome strips which go for silly money and the header is still attached ! so that one may be better to rescu rather than mine as it broken off completely.


 and he's 10 ponds cheaper ;D
 , there was a thin layer of filler and very thick paint hoping underneath is not to bad, oh well it will only be more rust