Tepper
Part of things

Posts: 381
|
|
|
|
Sadly due to starting a new job I've had less time to spend on the '7 than I'd like. Have been stockpiling parts and also trying to learn how to weld. Some practice on a rusty Golf wing:  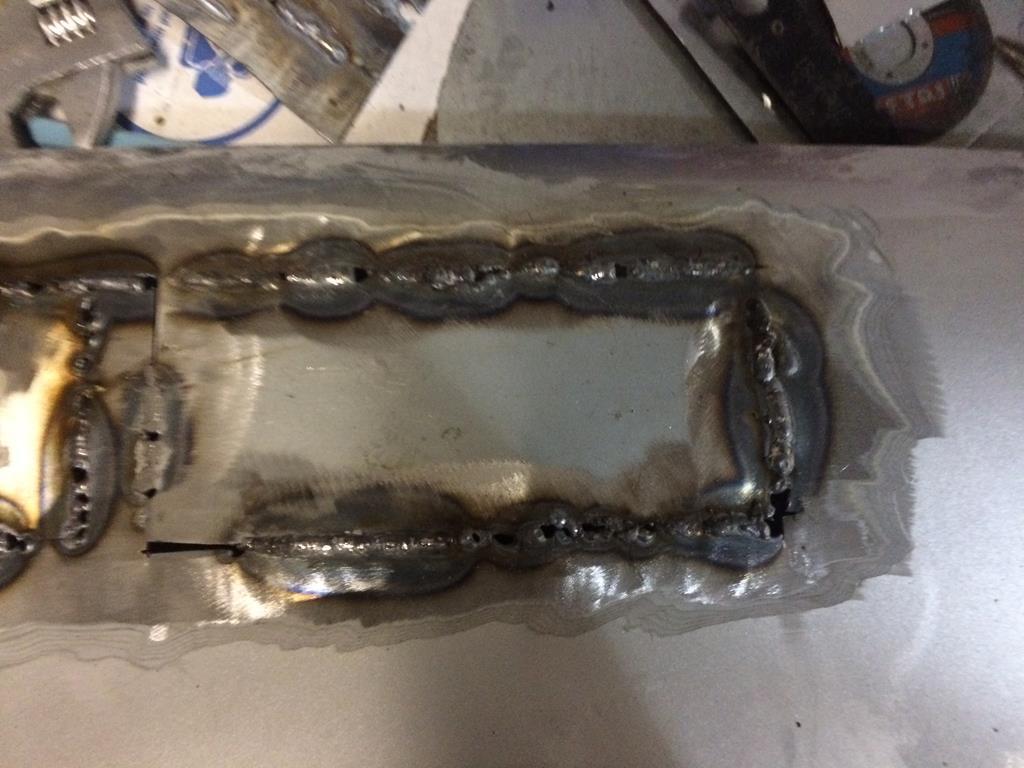 It's harder than it looks! Getting the fit exactly right is proving to be crucial as any gap results in me blowing holes and I am finding it tricky to walk the line between holes and good penetration. Maybe I should look at putting a block of copper or ally behind the weld? There are some sections that I'm happy with but a lot of it looks pretty awful - I was hesitant to spend a lot of time getting the fit exactly right just on practice pieces but it probably would've resulted in a much better weld. More practice needed... |
| |
1989 Peugeot 205 GTi - stolen!
1983 Mazda RX7
1968 Rover P6 - also stolen.
|
|
|
|
|
|
|
|
I have found the block of copper helps a great deal, yes...
that and improving/discovering new techniques to help with challenges like end of weld blow through, or occasional blow through...
JP
|
| |
I know its spelled Norman Luxury Yacht, but its pronounced Throat Wobbler Mangrove!
|
|
Tepper
Part of things
Posts: 381
|
|
Apr 16, 2018 13:10:13 GMT
|
|
|
| |
1989 Peugeot 205 GTi - stolen!
1983 Mazda RX7
1968 Rover P6 - also stolen.
|
|
|
|
|
Apr 16, 2018 18:40:32 GMT
|
|
Are you trying to do continuous runs with the mig? One you get to really thin steel, especially unsupported panel steel, that will always be tricky. Instead you should try using the mig welder like a tig welder and do short sharp zaps with more heat. It takes longer to do a run but you have more control and should get a flatter topped better penetrative weld. Much easier for butt welding.
Youll need to get used to doing long sections in small stages anyway so to avoid warping.
|
| |
Last Edit: Apr 16, 2018 18:43:10 GMT by yoeddynz
|
|
Tepper
Part of things
Posts: 381
|
|
|
|
Are you trying to do continuous runs with the mig? One you get to really thin steel, especially unsupported panel steel, that will always be tricky. Instead you should try using the mig welder like a tig welder and do short sharp zaps with more heat. It takes longer to do a run but you have more control and should get a flatter topped better penetrative weld. Much easier for butt welding. Youll need to get used to doing long sections in small stages anyway so to avoid warping. I've been trying to do it the way that you describe, using short bursts to make up a 2cm-ish stitch then moving onto another area. I had a go at running a continuous bead and like you say, it was very difficult to control. To be honest I haven't been paying too much attention to warping at this stage just so I can get more practice in, as my technique starts to improve I'll start to look at trying to control it and I realise it's going to be important on the car. Looking at the welds pictured do you think I could use more heat? Thanks for the advice! |
| |
1989 Peugeot 205 GTi - stolen!
1983 Mazda RX7
1968 Rover P6 - also stolen.
|
|
|
|
|
Apr 20, 2018 20:57:49 GMT
|
|
Yeah with a good bit of heat and a short zap you'll get a nice flat weld with penetration right through the other side. Obviously totally dependent on steel thickness. Your welds in that above photo really don't look too bad at all. Just turn the steel over and have a look on the back if its gone right through fusing it together completely.
No matter what you do with a Mig you'll always need to grind it down unless its somewhere you cant see of not bothered about. So concentrate more on the fusion because once you grind the tops off it'll be the penteration thats left holding the steel together.
Grinding mig welds down is boring and can tricky because the weld is harder than the parent metal.
This is one reason Tig and gas welding is used- with the correct filler rods the welds are softer and easier to grind or file down. But then that's a whole load more cost and skills set to learn ( my thin steel tig welding skillset certainly aint good enough for me to confidently go near thin panel steel yet )
|
| |
|
|
Darkspeed
Club Retro Rides Member
Posts: 4,682
Club RR Member Number: 39
|
|
|
|
|
For the brown residue order yourself a peashooter flow meter so that you have the sheild gas flow correct - depending on the type of nozzle being used adjust the gas flow up and down a few litres -torch angle is also key, move your head to view the weld pool rather than laying the torch over. Once you get the power level about right make small adjustments in the wire feed speed to 'tune' using a heat soak (copper block) behind will certainly assist.
|
| |
|
|


