|
|
|
Dec 31, 2013 13:56:03 GMT
|
|
Your approach to car cleaning astounds me...!!! What an amazing way to ensure everything is as it should be and gets kept that way if it is.
I just wish I could find my cleaning mojo as I seem to have lost it over the years!!!
This is nothing short of amazing and I will be keeping a close eye on this so do keep it up...
|
| |
***GARAGE CURRENTLY EMPTY***
|
|
|
|
|
|
|
|
|
Cheers mate. It could still be cleaner, but this is probably the cleanest it will ever be as it will be my daily driver, and only car once my polo sells. Though I will try to keep it as clean as I can.
Managed another arch yesterday. Left rear has now been cleaned out:
Before:
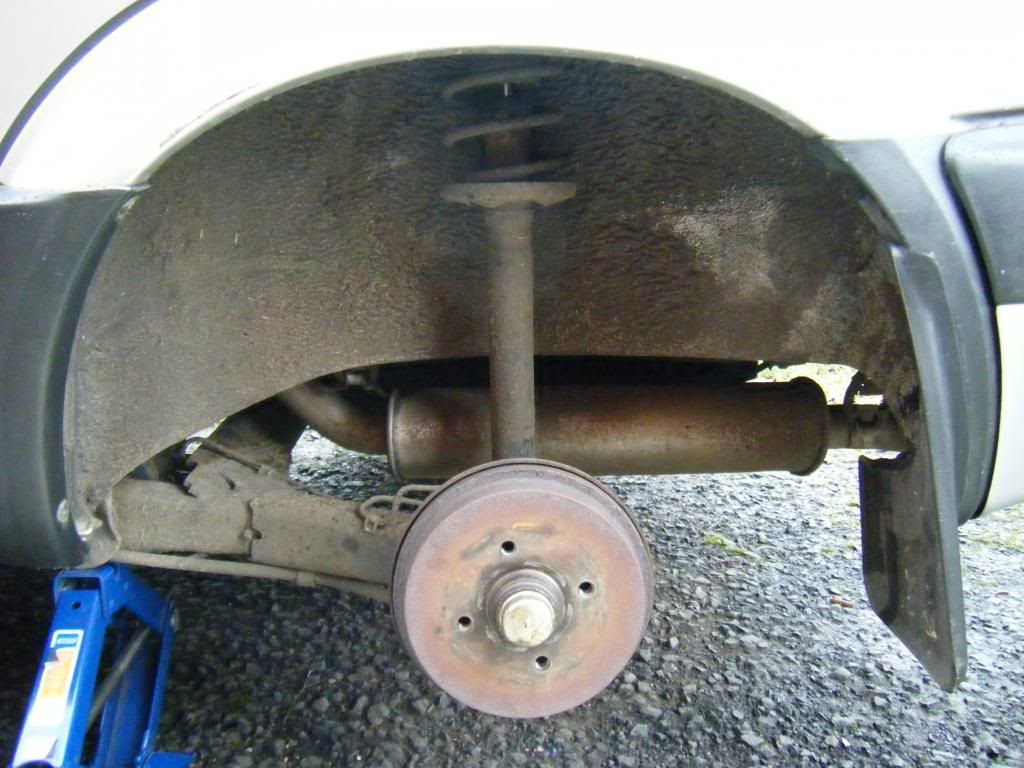
After:

Looking good. But I thought for about half a day I had found some rot...
The (badly) circled area below was/is soft and felt like its only the underseal and paint and a hole underneath, although no rust was visible and it didn't feel crunchy around it?:
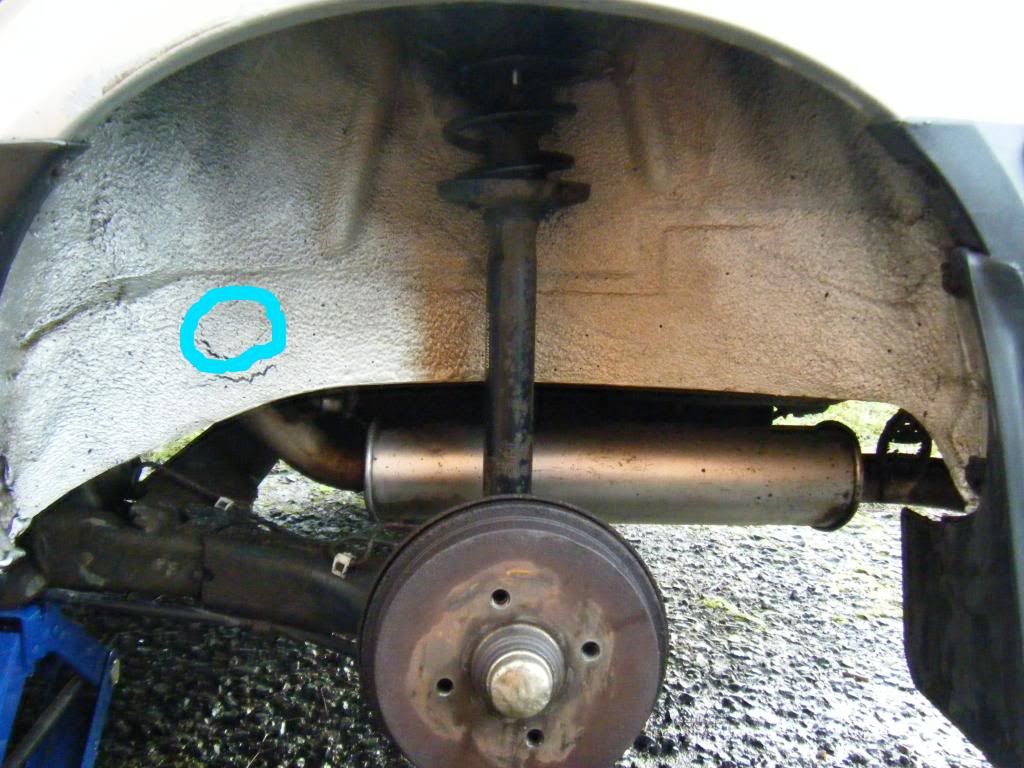
After a short panic over what to do, I headed over to the MK2 Golf owners club, where I also have a thread. I was glad to be informed that there is a factory hole in that place, that sometimes is blanked with a rubber bung, but sometimes with a piece of tape, which is then undersealed/ painted over.
phew! Rot free status retained  |
| |
|
|
|
|
|
Jan 10, 2014 22:34:26 GMT
|
Sorted myself a stereo. Spotted it on ebay. Picture was blurred, but I was sure despite it's mid 90's origin, it had an AUX input. Searched the model number and I was right, the thing that looked like a 3.5mm AUX input, was. Then I forgot to bid on it  . Messaged the seller, and bought it for £15 posted. It turned up today and it not only has the AUX input, but it has an amp preout to run a sub. Bonus Also it has a removable faceplate. Made in Germany too so know its good quality. Here it is. Its a 1995 Panasonic R525LEE. Standard fit stereo is a Panasonic too, so seems right to upgrade it with this: 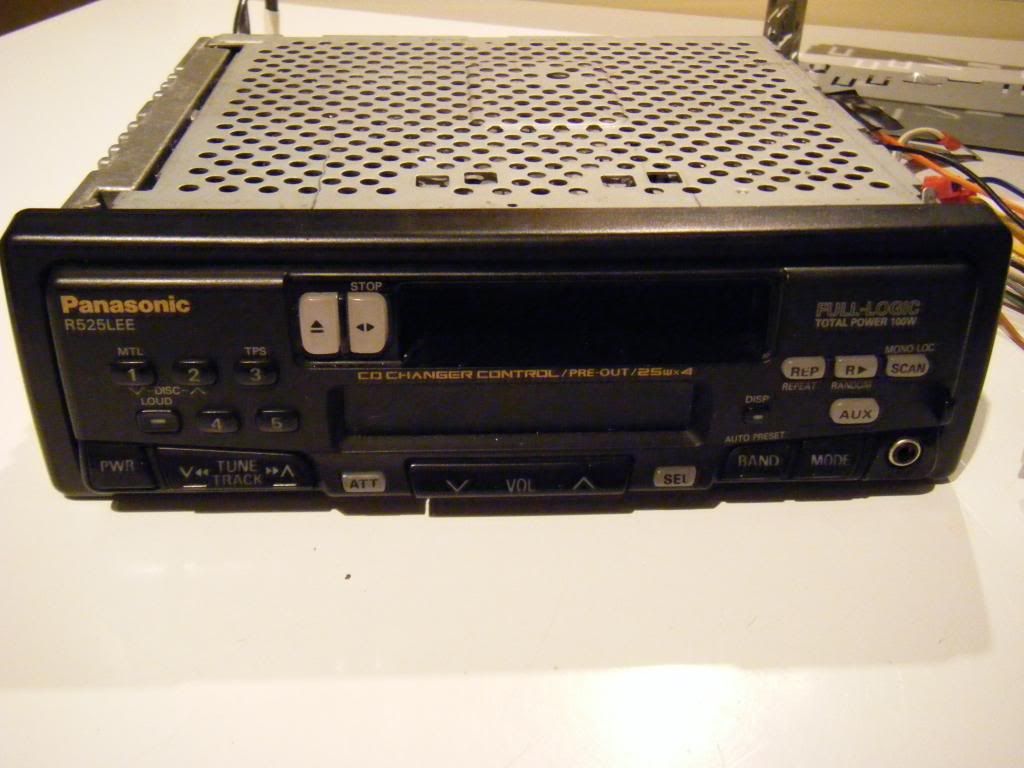 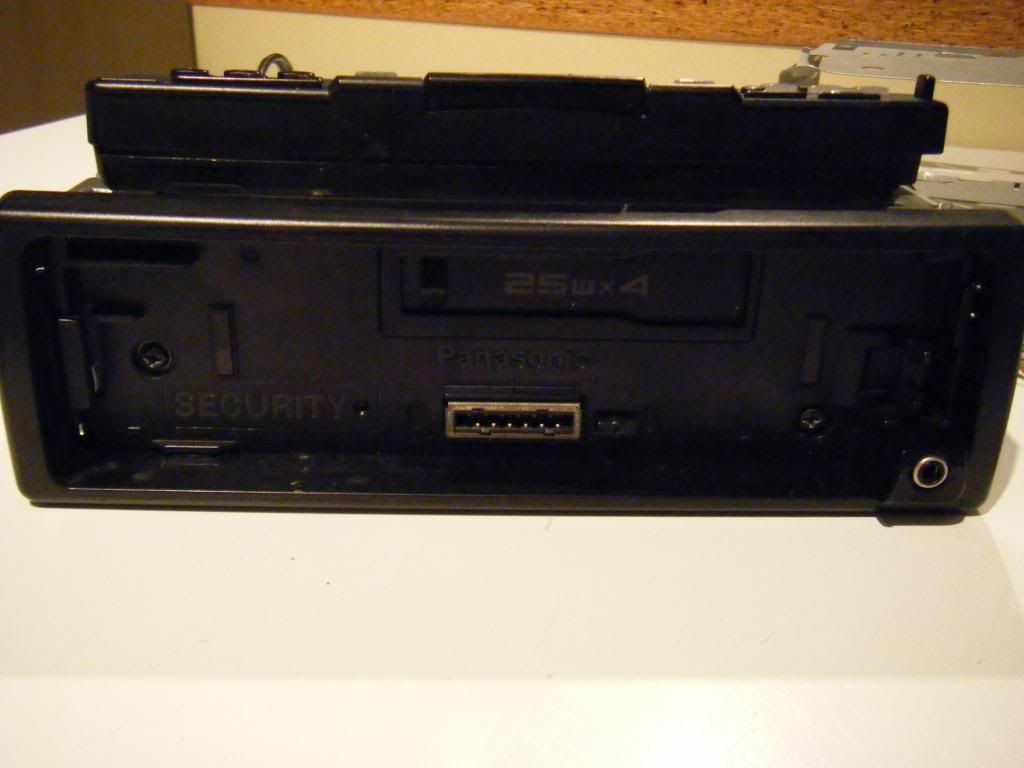 The all important AUX socket: 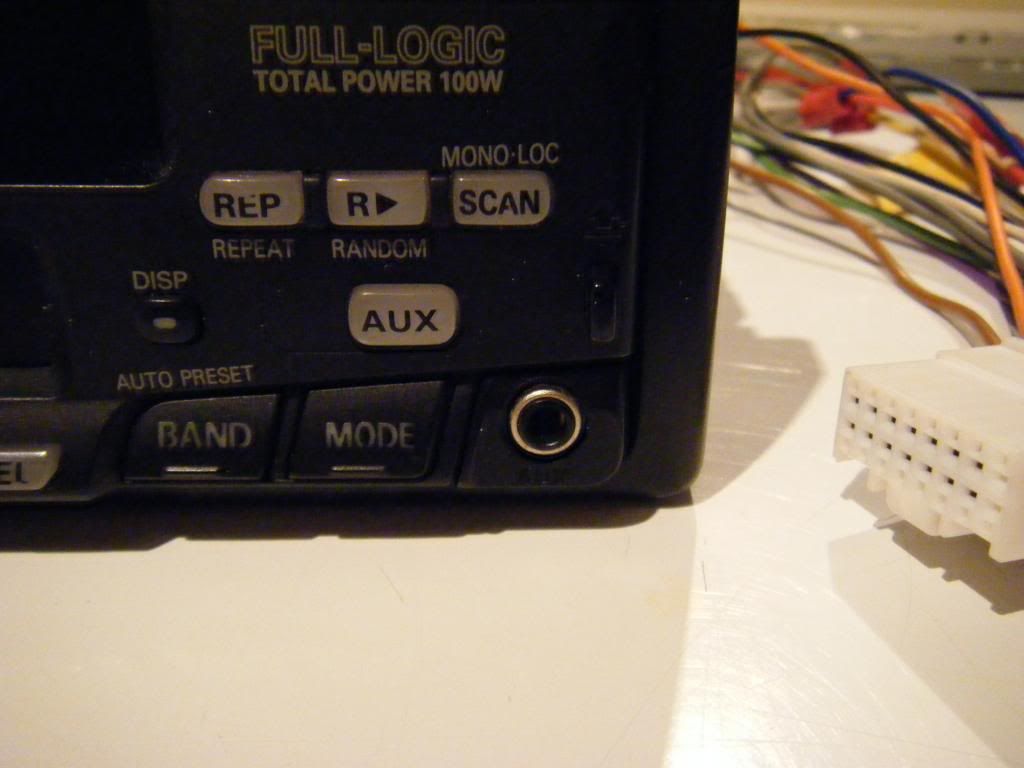 Preout: 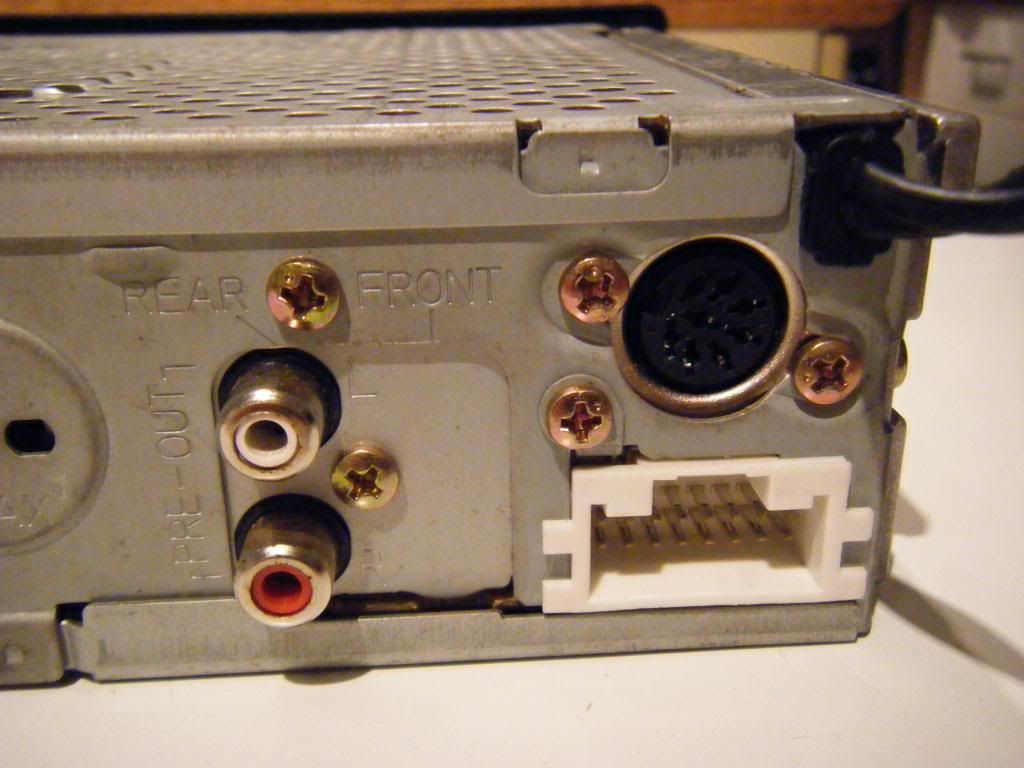 Pretty pleased with it as its suitably retro, in near mint condition and I should be able to listen to my MP3 through it and run a sub. I just need to do some repairs to the wiring and then I will see if it powers up and works, seller assured me it does. Hoping the backlight is green too. Almost forgot I had these. Yes they really are OEM  :  Had the day off Tuesday, and hoped to get on with a few bits of cleaning on this but it poured with rain most of the day. Did get a bit of paint restoration done on the left rear quarter though. Before. C pillar Looked like someone had sanded it down for some reason:  After. Used G3 scratch remover to polish out the scratches as well as I could. Then G3 paint renovator, clay barred and polished. Not perfect but a lot better:  Below the pillar had plenty of scratches, as has the whole of this side, like its been run up against a hedge: 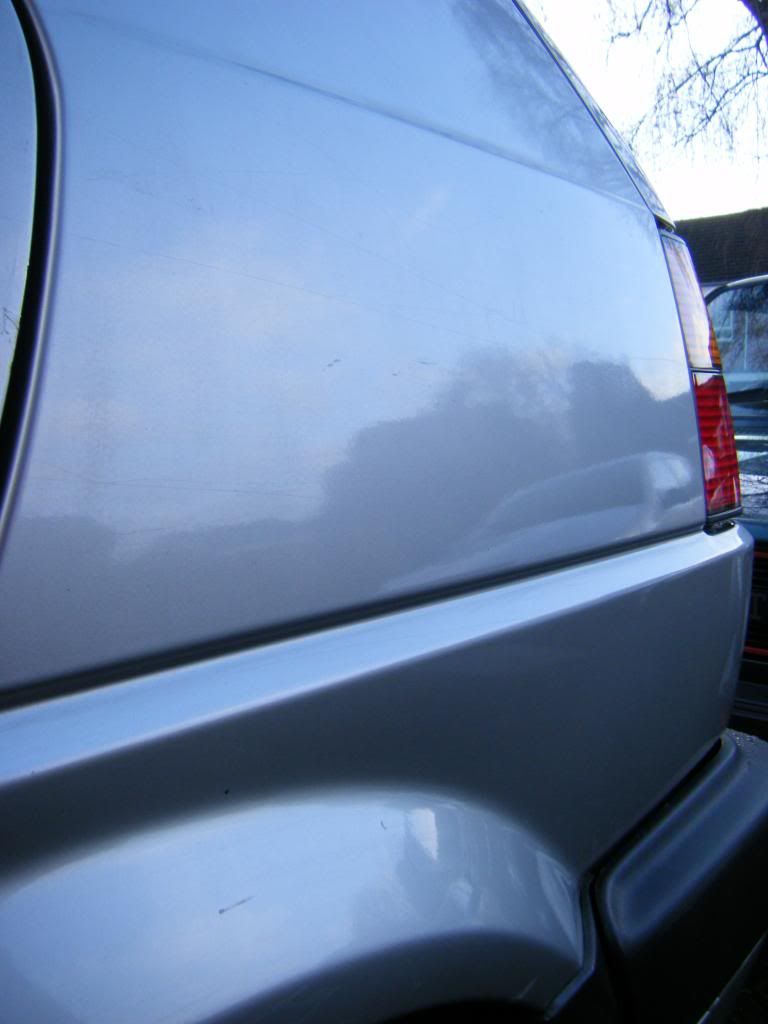 After. Same process as above: 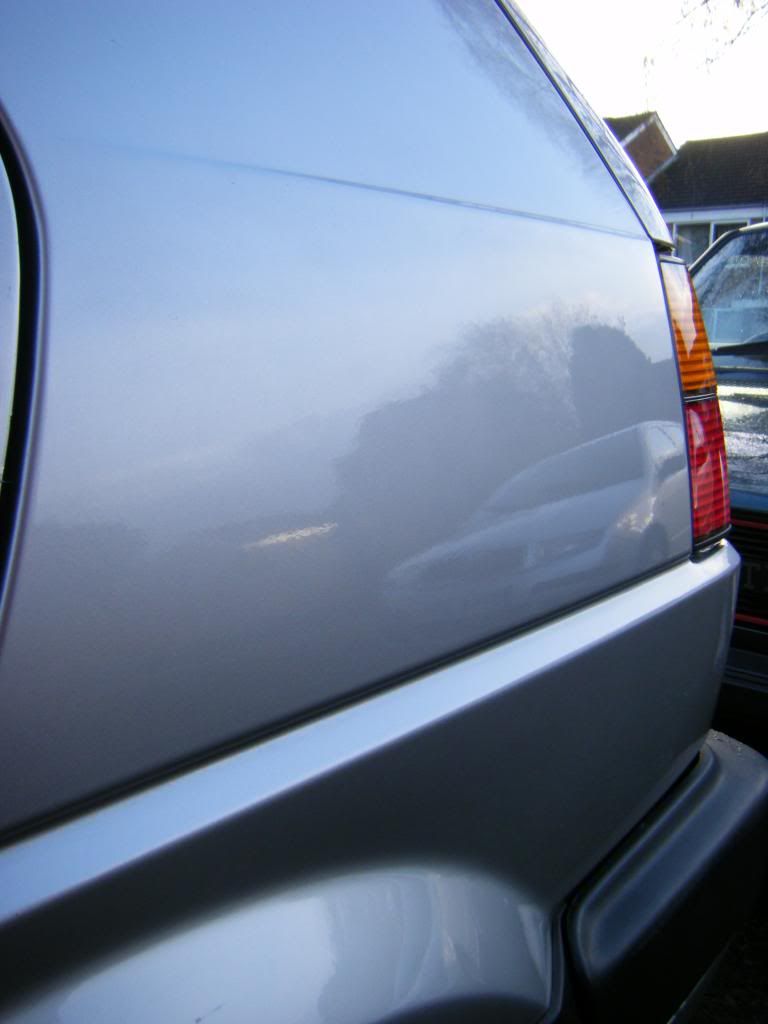 Don't know whats caused this, but its too deep to polish out and is on the rear door too: 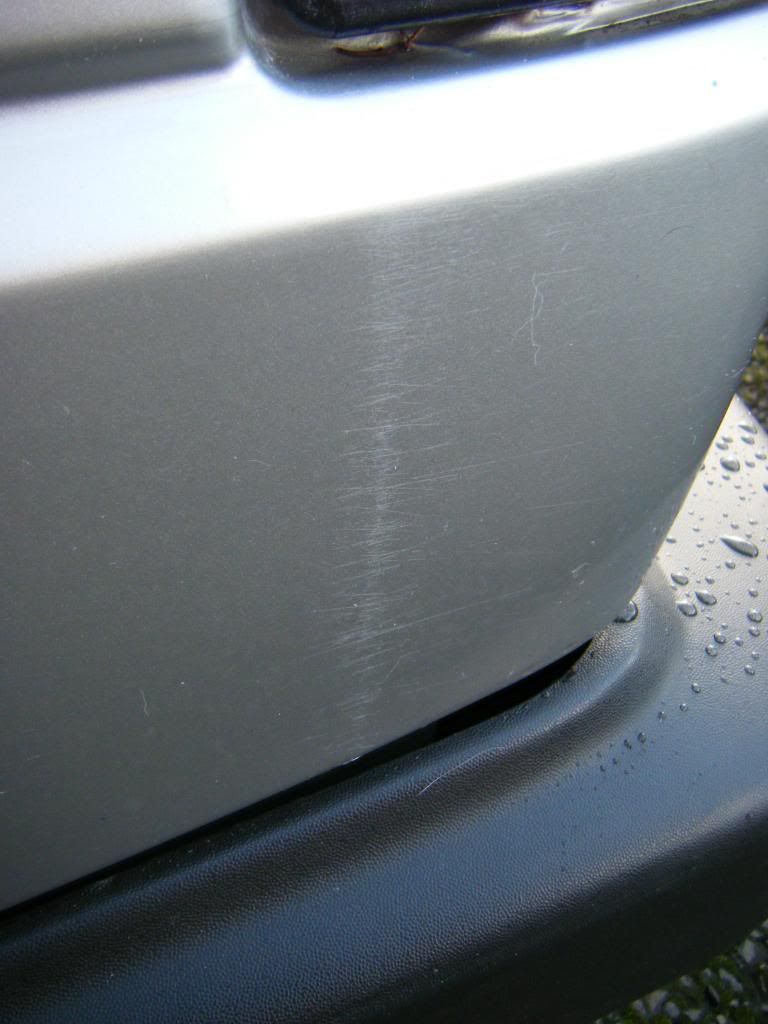 Best I can do. I'm going to paint this whole quarter anyway, along with the rear door, as the rear arch has the scrape: 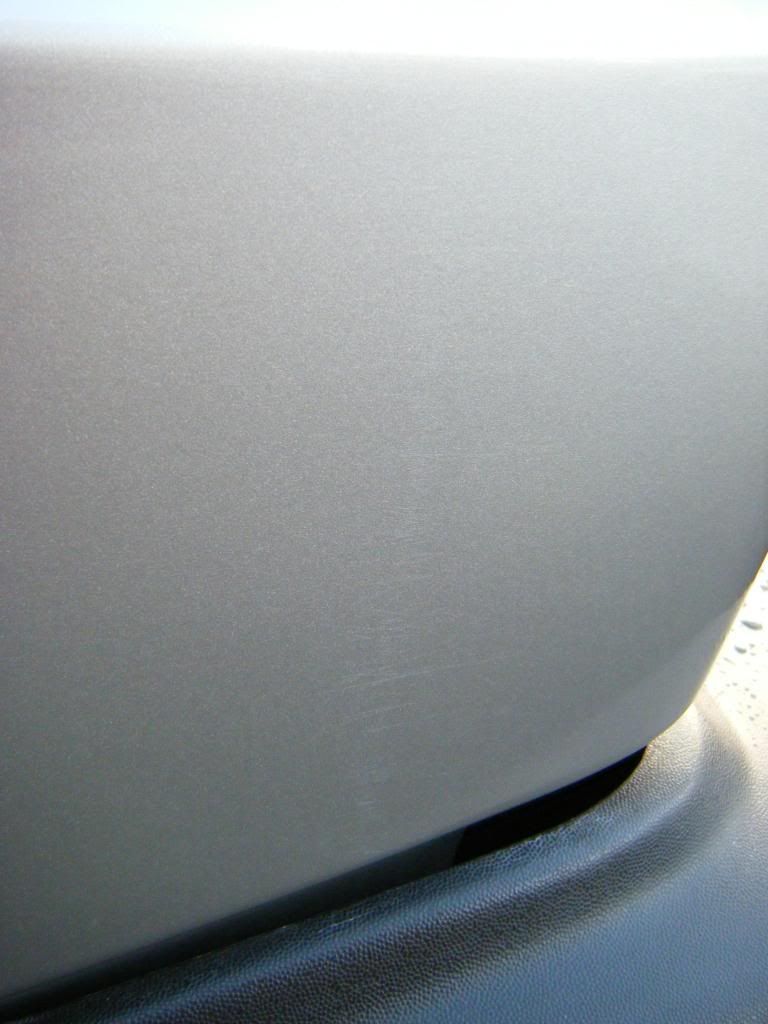 Tedious task for Wednesday night was fitting ISO plugs to the wiring for my stereo. Much wire cutting, stripping and connector crimping. Only finished the speaker plug and didn't even bother getting a pic of it finished: 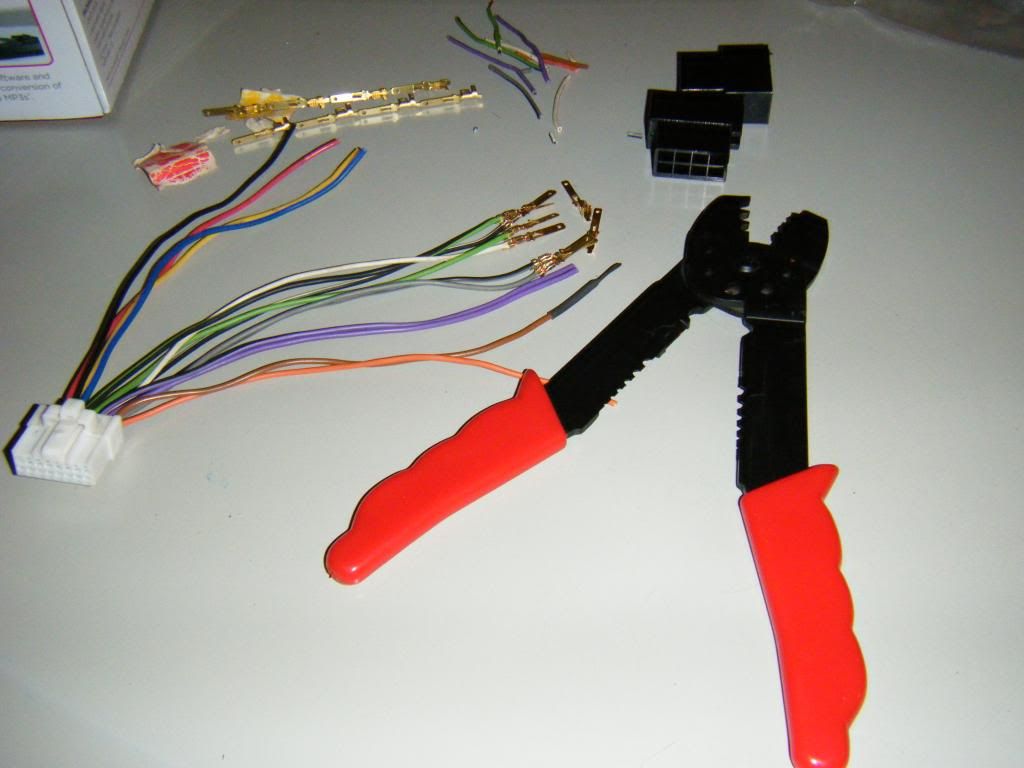 Also ordered a few things from VW Heritage. New window scrapers, well three, as one rear is out of stock, came yesterday. Nice flexible rubber is much better than the shrunken old rotten ones on the car: 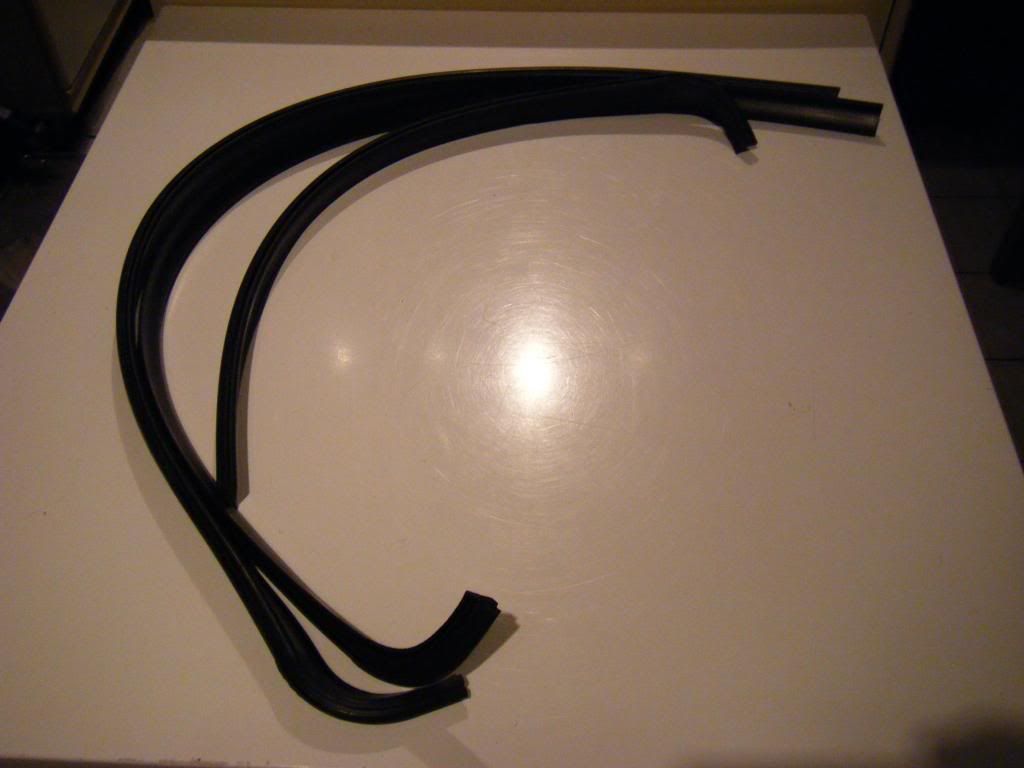 Also ordered a brand new set of teardrop wheels (hopefully, as they don't actually know exactly how many are left) from classic parts in Germany . Just need to get some centres refurbished as they are obsolete, and hope the finish will match. Wheels are an absolute bargain really, at less than £50 each for Genuine VAG. Much better than any aftermarket 'Calibre' or similair curse word that corrodes in a year and half the price. |
| |
|
|
stonio
Part of things

Posts: 626
|
|
Jan 15, 2014 18:16:56 GMT
|
WOW your attention to detail is amazing, full respect to you.. l love the oem look but l know l would become obsessed so l think l will leave it to you haha.. You should become a detail specialist.. Ive bookmarked this thread looking forward to the next installment  |
| |
|
|
|
|
|
Jan 28, 2014 19:26:58 GMT
|
Cheers mate. I am a Valeter and my boss is always telling me to hurry up as I take too long and do too good a job!
Overdue an update here. A few things have been bought. Also dumped photobucket as I reached my band width limit 
Been parts hunting at my favourite scrap yard again, no MK2's had arrived since last time and the one from last time was pretty much stripped. Even the filler flap panel was cut out.
Found a couple of bits that sell well on Club Polo though, so will make me a bit of money for MK2 stuff.
Then went digging through all The VAG cars for OEM stereos and to see if anything could be used on the Golf. Found an Audi 80 B4 Avant and spotted the door latches. They looked almost the same as MK2 ones, but were shiny and chrome, with stainless bolts, so out came the allen keys. Took one off and went over to the MK2 on the other side of the yard. Took its door latch off and the Audi one bolted straight on . Went back to the Audi and had the full set off. For these and the bits I bought to sell on I paid £15. Here they are after a clean up :

DSCF1247 by daniel5fuller, on Flickr

DSCF1248 by daniel5fuller, on Flickr
The backs have a nice rubber seal, and the mechanisms are mostly the same as on the Golf. A part of the mechanism (part bottom right in pic) is different to the golf though. But I think I can make them work:

DSCF1249 by daniel5fuller, on Flickr
Managed to jump on a complete headlight washer kit. An ultra rare OEM item. I was first in line for once, as I usually miss things like this. Went to collect it a few weeks back and handed over some cash. Very happy with my purchase as I've always wanted a set for my polo but never managed to find one, so a kit was high on my wants list for the Golf. It is complete and very little is damaged or broken. I have one broken wire to repair and one plastic elbow for connecting the washer to the tube to replace (already sourced a pair that are from a small bumper kit, but should do the job). Also need some way of attaching them to the bumper as the old fixings had rotted away. I also took the front bumper they were mounted to, bumper itself is scrap, but is good for measuring the hole position from to mark up where I need to drill my NOS genuine bumper  ! Washer bottle needed good clean too. ! Washer bottle needed good clean too.
Jets and all important relay 33:

DSCF1262 by daniel5fuller, on Flickr
8 litre bottle:

DSCF1261 by daniel5fuller, on Flickr
Tubing and pump:

DSCF1260 by daniel5fuller, on Flickr
Complete un-cut loom/ rats nest:

DSCF1259 by daniel5fuller, on Flickr
Well there it is. OEM awesomeness. Cant wait to get it fitted and working! Dash has to come out for the wiring job though!
Had a go at cleaning up the 8L washer bottle.
Before:

DSCF1263 by daniel5fuller, on Flickr
After. Still needs more cleaning as not happy with it:

DSCF1268 by daniel5fuller, on Flickr
And Thursday morning a couple of boxes turned up, with another couple of boxes inside each of them:

DSCF1264 by daniel5fuller, on Flickr
And inside those boxes:

DSCF1266 by daniel5fuller, on Flickr

DSCF1267 by daniel5fuller, on Flickr
They've arrived . My brand new set of teardrops. The first new set of wheels I've ever had, just a pity the centres are obsolete. They look so much nicer in the metal, pics don't do them any justice at all. I'm now a winter wheel man. These aren't going anywhere near salt!
Forgot I had some teardrop centres in the house. They are rather odd though. No part numbers on the back, or anything at all and in place of the usual grey painted recess with cast in Volkswagen script, there is no paint and an aluminium sticker with Volkswagen screen printed onto it. Never seen another set so probably quite rare. Just need to get them refurbished to original finish and somehow replace the stickers as one is bent.

DSCF1270 by daniel5fuller, on Flickr

DSCF1271 by daniel5fuller, on Flickr
Decided to have a play with stereo wiring at the weekend.
Managed to remove my original pull out stereo from the dash, as it WAS stuck. A few sharp tugs on either side saw it out. Then removed its cage and wiring:

DSCF1275 by daniel5fuller, on Flickr
This however revealed a problem. The car and stereo ISO wiring weren't the same. The car wiring was nothing like what I had seen before as everything else has always matched up with the ISO cable. Confused, I tried to find an answer to what should connect where. Posted a question up on MK2 owners club, but decided to go ahead with what I thought it should be like as it could only go two ways.
The car wiring looked like this:
Red (constant live), Brown (ground), Red/ brown (had no idea but now know it is ignition live), Yellow/white (speed sensor?), blue/ grey (illumination):

DSCF1272 by daniel5fuller, on Flickr
The stereo wiring like this:
Red (ignition live), Yellow (constant live), Black (Ground), Blue (Antenna feed)

DSCF1274 by daniel5fuller, on Flickr
I wired black to brown and both the red and yellow to the cars Red wire. Ignored the others as didn't know what they were/ thought they weren't needed.
Connected it up, switched it on and......
It powered up and worked perfectly
Connected my MP3 player and blasted out some of my favourite tunes to make sure all was well.

DSCF1276 by daniel5fuller, on Flickr
A new problem has come from this though as the unit illuminates orange which obviously doesn't match with the MK2's green dash lighting and wont do at all. It has to be changed to green.
I decided to open up the stereo faceplate to see if it was possible to change the colour of the lighting. Inside there are 4 little bulbs, each wearing a little orange rubber cap, which can be removed and swapped for green. Unfortunately, though 2 are easily accessible, the other 2 looked impossible to get to without removing the LCD screen from the circuit board and risking damaging one or both of them, which would be a disaster. I then looked closer and they can be removed by de-soldering 4 points, then removing the plastic that contains both bulbs from the back of the circuit board, replacing the caps and then re-soldering it. Simple 
Couldn't find any of the little bulb caps in the right size from the UK, so had to search foreign ebays. Came up trumps on Australian ebay, from a Hong Kong based seller! Illumination will be changed when they turn up some time next month. |
| |
Last Edit: Jan 28, 2014 19:29:39 GMT by polodan
|
|
jpsmit
Posted a lot
Posts: 1,260
|
|
Jan 28, 2014 19:38:27 GMT
|
|
Sweet! As mentioned, your attention to detail is astonishing! Would you be willing to share how you got the washer bottle as clean as you did? Thanks!
|
| |
|
|
|
|
|
Jan 28, 2014 20:00:37 GMT
|
|
Soak it with Autoglym engine cleaner and a lot of scrubbing is your answer. Still not happy with it though and still got to clean the inside of it. Will be soaking it in water and washing up liquid over night to soften the dirt, draining it, then putting dry rice inside and shaking it like mad.
|
| |
|
|
jpsmit
Posted a lot
Posts: 1,260
|
|
|
|
|
Thank you would not of thought of that!
|
| |
|
|
|
|
|
Jan 29, 2014 19:47:55 GMT
|
|
So much 'WINNING' for this golf, I miss my mk2 gl.
|
| |
1976 Triumph TR7 v8
2003 Mg zr 105 daily driver
|
|
|
|
|
Jan 29, 2014 20:12:19 GMT
|
Cheers mate. Another minor update, but no pics I'm afraid. Made an enquiry on the MK2 Golf owners club to see if anyone still had their original dealer stickers for my supplying dealer, Drift Bridge Garage Epsom, still in place. Happy to say someone did. Not only the sticker, but also the plates, tax disc holder and a service sticker for the front windscreen. I will be getting all of them reproduced and the plates made up in period correct font to boot |
| |
|
|
|
|
|
|
|
|
|
Another find from the loft. NOS Original VAG Votex hatch spoiler. Unlike the Heckblende I decided to fit this one . Fitted it this morning as it was a nice sunny day and dad was home to give me a hand. Measured up where the brackets need to be, only roughly as can be adjusted later. And then forced the three brackets under the rubber, by lifting the rubber with a screwdriver. Pushed them up until they hooked over the edge of the glass. What a pain in the backside that was:  DSCF1278 DSCF1278 by daniel5fuller, on Flickr  DSCF1279 DSCF1279 by daniel5fuller, on Flickr Then placed the spoiler onto them and centred it on the car, to see how far out the brackets were. Tapped them across by a few mm to line them up better. Then fitted the speed nuts to the fixing points on the spoiler and placed it on the car. Pressed down on it to bond the sealant to the tailgate and then screwed it on. Done :  DSCF1280 DSCF1280 by daniel5fuller, on Flickr Certainly gives a different look to the back end of the car:  DSCF1281 DSCF1281 by daniel5fuller, on Flickr  DSCF1282 DSCF1282 by daniel5fuller, on Flickr  DSCF1283 DSCF1283 by daniel5fuller, on Flickr It also came with this brake light. But I personally think it is rather ugly and the spoiler was never originally designed for it. The LED's are rather out of period anyway and a hole is needed to be drilled for the wiring. Which is never going to happen to a rust free tailgate:  DSCF1284 DSCF1284 by daniel5fuller, on Flickr Should compliment the Votex VW design wheels rather well. Looks slightly odd being the only mod at the moment. Need a Votex Sport sticker made up now |
| |
|
|
|
|
|
|
|
Well that was quick! Green bulb caps arrived today and were waiting in the mail box for me when got home from work. Was surprised as didn't expect them until near the end of the month. Went straight to work swapping them in to the stereo. Stripped down, orange caps removed and green ones fitted. Also de-soldered 2 of the 4 points where the bulbs for the screen went to and managed to wiggle them out without disturbing the other 2 :  DSCF1288 DSCF1288 by daniel5fuller, on Flickr Green cap:  DSCF1289 DSCF1289 by daniel5fuller, on Flickr Comparison of the orange and green. Orange ones are taller as they go right down into the bulb housing. Green ones cover only the part of the bulb that's visible:  DSCF1293 DSCF1293 by daniel5fuller, on Flickr Back together and working fine. It survived! :  DSCF1298 DSCF1298 by daniel5fuller, on Flickr And a picture of the orange again for 'before and after' purposes: DSCF1276 by daniel5fuller, on Flickr Could have been factory :  DSCF1296 DSCF1296 by daniel5fuller, on Flickr Pretty chuffed with that. Was an effort to get to this stage, but the green illumination makes all the difference Just unfortunate that I cant change the colour of the ridiculously tiny bulb in the power light. Its still orange, but its not noticeable really and doesn't bother me. |
| |
|
|
arf333
Part of things
Bacon
Posts: 128 
|
|
|
|
wow great thread. loving this... good to see a standard looking mk2! looking forward to updates youre not far from me, find a standard 5 door, silver mk3, 4, 5, 6 and 7 then we got a good photoshoot!!! scott |
| |
Last Edit: Feb 4, 2014 20:00:24 GMT by arf333
|
|
|
|
|
|
|
Good idea mate! We could even replicate this official VW photo. Silver MK1 GLS and silver MK2 GL at the end. Just need high spec, standard/ near to, non GTI MK3-7 in silver :  golf generations golf generations by daniel5fuller, on Flickr |
| |
|
|
arf333
Part of things
Bacon
Posts: 128
|
|
|
|
|
other way round though, retro cars up front!
|
| |
|
|
|
|
|
|
|
|
Love the attention to detail on this. When I had my own car I loved changing all the little bits to make things perfect, returning the car back to as new as possible. No one cares for cars as well nowadays and it's a shame.
Love the Hella catalogue cars, it would be fantastic to source a whole cars worth of their accessories.
|
| |
The Millenium Volcon"Get yourself a Volvo if that's what you really want, you might be dead next year. In the meantime, you could be going sideways in a gigantic land barge."
|
|
|
|
|
Feb 14, 2014 20:03:07 GMT
|
So I got a better, rear passenger door to replace the rotten one.
It was a bonus being silver and original paint too.
Got it home Saturday afternoon and began the strip it down as the glass was clear and didn't match my green tint:

DSCF1300 by daniel5fuller, on Flickr
Stripped it down and put it on the sofa. Stacked all the bits in the corner:

DSCF1303 by daniel5fuller, on Flickr

DSCF1307 by daniel5fuller, on Flickr
Little bit of rust. Will get it painted below the side trim:

DSCF1304 by daniel5fuller, on Flickr
Polished it up:

DSCF1309 by daniel5fuller, on Flickr
On to Sundays shenanigans. Woke up to sunshine so decided to get the new door on the car:
Reason for ditching the original door:

DSCF1319 by daniel5fuller, on Flickr

DSCF1312 by daniel5fuller, on Flickr

DSCF1313 by daniel5fuller, on Flickr

DSCF1314 by daniel5fuller, on Flickr

DSCF1316 by daniel5fuller, on Flickr
Actually poked a hole through this part:

Discovered the door has had a replacement skin. The reason for it rusting:
Dodgy sealant:

DSCF1317 by daniel5fuller, on Flickr
Not painted inside and VAG part sticker for the skin still visible:

IMG_0190 by daniel5fuller, on Flickr
So stripped it of the interior trim and pulled the membrane off. Its not cut or torn (apart from where I had to cut round the door card clips) So if anyone wants one.....

DSCF1320 by daniel5fuller, on Flickr

DSCF1321 by daniel5fuller, on Flickr

DSCF1311 by daniel5fuller, on Flickr
Also had a locked up window reg. So had to remove in the fully up position and wriggle it free. Just dropped the glass into the door:

IMG_0199 by daniel5fuller, on Flickr

IMG_0200 by daniel5fuller, on Flickr
Then stripped everything off the old door:

IMG_0201 by daniel5fuller, on Flickr

IMG_0202 by daniel5fuller, on Flickr
And good bye. The weather took a turn for the worse and decided this would be the right moment for some heavy rain. Just as I'd made a massive hole in my car:

IMG_0205 by daniel5fuller, on Flickr

IMG_0204 by daniel5fuller, on Flickr
Hello new door:

IMG_0206 by daniel5fuller, on Flickr
Internals built and glass/ rubbers in. Chose the best of each rubber/ metal window trim from the 2 doors and used those. Annoyingly ran out of tape for the top of the membrane. But no water should be able to leak through there anyway. Bottom and sides are the important bit.

IMG_0208 by daniel5fuller, on Flickr
Fully built. Still needs some adjustment but it went dark so will have to do that another day. Also get a better final pic as this ones a bit rubbish.

IMG_0210 by daniel5fuller, on Flickr
Had a play about with the door fitment yesterday. Got it lined up a bit better. Still not perfect, but its the best its going to be. Also decided to remove my front door pocket speaker to see if my JBL's would fit. JBL's didn't fit as tweeter housing touched on the speaker cover. Was surprised how good condition the original Nokia (thought they made phones!) speaker was. Looked almost new, so put it straight back in. Then played the stereo loud to listen for crackles from the OEM speakers. Was sure I could hear sound coming from the dash top, so investigated. And I was right! OEM tweeters in the dash locations. Very surprised as would never have thought a car this old would have them
Decided to stick with the OEM speakers for now as they appear to be working fine and sound okay, though I think rears are a bit crackly. May fit one of those under seat subs for a bit of stealthy bass
|
| |
Last Edit: Feb 14, 2014 20:07:34 GMT by polodan
|
|
|
|
|
Feb 15, 2014 12:18:31 GMT
|
|
Still absolutely loving your thread, really inspiring me to get back to my OCD ways of cleaning my car! ... Just don't ever have time! (Or hose pipe!)
I have to say the under-seat sub is a very good investment if your able to fit it to your current stereo! ... It's not going to have amazing bass, (like if you fitted a big boot sub and amp) but fills In the gaps and adds some punch to the standard speakers! I've got one in my 309, I'm still running the original speakers, and even at the level I put my music at, it still sounds good!
Keep up the great work!
|
| |
|
|
|
|
|
Feb 15, 2014 15:19:50 GMT
|
|
Loving what you're doing with this car.
|
| |
Jaguar S-Type 3.0 SE
|
|
|
|
|
Feb 23, 2014 23:40:24 GMT
|
Went to Dubfreeze last weekend hoping to pick up a few MK2 based bargains. Was disappointed as it was pretty much all air cooled stuff. Did manage to find a NOS Relay 33 (Headlight washer relay) though. Will do as a spare and nice to have the VW box to keep it in:  DSCF1386 DSCF1386 by daniel5fuller, on Flickr Had a parcel wednesday morning all the way from Lithuania. Headlight level switch with plug and loom :  DSCF1384 DSCF1384 by daniel5fuller, on Flickr Which I think completes my setup, along with NOS, Boxed, motors and some adjuster screws and plastic clips. Rest of the loom is apparently already in the car:  DSCF1385 DSCF1385 by daniel5fuller, on Flickr Not much actual progress lately though as I had been fighting a particularly bad cold that felt like it was trying to kill me. Made a lot of progress putting my polo back to standard and removing any special bits on Saturday. Its off to the paint shop Monday morning for dent repairs then will be up for sale, so hopefully I will be in the MK2 soon One of the parts I removed from the polo was this Hella brake light. It was NOS 2 years ago and cost £1. I will have to replace the sticky foam that held it on, but already sourced some almost the same. Should look pretty cool sat up top of the screen, in the shadow of the spoiler :  DSCF1391 DSCF1391 by daniel5fuller, on Flickr It seems VW really thought about how to accommodate aftermarket accessories when they built the MK2. In the polo I had to cut into the brake light wiring to fit the third brake light. In the MK2 a bit of multi-meter testing found me a spare male spade connector on the back of the rear light bulb holder, with a power feed from the brake lights, to plug straight into, which was something I was rather pleased to find ('B' in the picture):  DSCF1392 DSCF1392 by daniel5fuller, on Flickr The Porsche first aid kit also migrated from the polo. Another bargain at just £3. Unopened contents too:  DSCF1393 DSCF1393 by daniel5fuller, on Flickr Not wired in yet, but will be soon. For now, it just looks better than a blank :  DSCF1394 DSCF1394 by daniel5fuller, on Flickr Low res copies of the designs for the reproduction dealer sticker set have landed in my inbox too. Look identical to the originals so I've approved them and they should be made up and ready for collection by the end of the week |
| |
|
|
|
|


 . Messaged the seller, and bought it for £15 posted. It turned up today and it not only has the AUX input, but it has an amp preout to run a sub. Bonus


 :
:


 ! Washer bottle needed good clean too.


