duncanmartin
Club Retro Rides Member
Out of retro ownership
Posts: 1,320
Club RR Member Number: 70
|
Removing embedded screws duncanmartin
@duncanmartin
Club Retro Rides Member 70
|
May 25, 2014 21:45:35 GMT
|
I attempted to remove the hatch pins on my 924. But the screw heads were mangled, and the screw remover ended up just cutting the head off. Which would be normally be fine, but they were countersunk, so I've just transferred my problem. So how do I remove these screws? 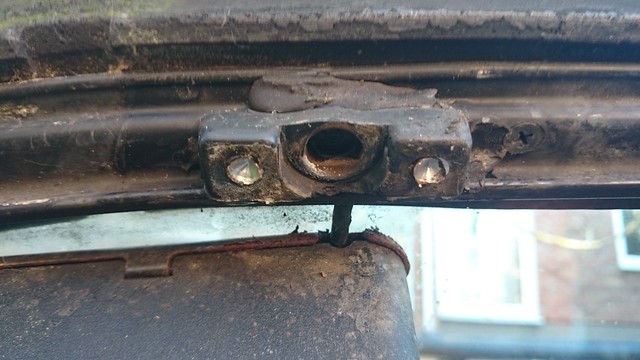 Destroyed screws Destroyed screws by duncancmartin, on Flickr It's part of the hatch, so I don't want to do some mad heating/cooling stuff. I'm not sure I have any cutting tools small enough that will allow me to create a screw slot (my dremel will cut a slot, but it will also slot the surrounding material). Do I need to weld a nut to the end of the screw? Can I drill it out until I can clear the threads? Neither appeals. |
| |
|
|
|
|
|
|
|
May 25, 2014 22:16:20 GMT
|
|
I would and have previously drilled stuff like this out.
As you drill it gets hotter and usually starts to move, then quite simple to remove.
Take your time and make sure you have a sharp drill bit to do the work.
|
| |
|
|
|
|
|
|
|
|
Use a LEFT HAND drill. The biting of the bit into the metal will turn out the screw.
|
| |
|
|
|
|
|
May 27, 2014 18:37:14 GMT
|
|
Is that the boot shuts on a Porsche 924/944?
|
| |
|
|
duncanmartin
Club Retro Rides Member
Out of retro ownership
Posts: 1,320
Club RR Member Number: 70
|
Removing embedded screws duncanmartin
@duncanmartin
Club Retro Rides Member 70
|
May 27, 2014 19:09:11 GMT
|
|
Yes, I've got new hatch pins, and the old ones are knackered, but fitting then has been a nightmare (and I'm not done yet!).
|
| |
|
|
kev13s
Part of things

Posts: 96 
|
|
May 28, 2014 21:27:46 GMT
|
|
I know that feeling, it's the feeling that you knew you were going to do damage but still wouldn't stop.
I can't offer any advice just my sympathy.
|
| |
|
|
|
|
|
May 29, 2014 14:54:20 GMT
|
|
Start with a really small drill in the centre of the drilling and once it bottoms out the bottom of the screw, use some penetrating/freeing fluid down the hole. It will help the thread out by working from the inside out. Then try any of the methods above.
Mike
|
| |
Life without spanners is no life!
Rover 414 SLI
|
|
93fxdl
Posted a lot
Enter your message here...
Posts: 2,000
|
|
May 29, 2014 16:37:41 GMT
|
|
Most countersunk screws have a 90 degree head but most drill bits have a different angle. My way of removing fubarred screws, is a small pilot drill to centre a drill the size of the screwhead which is ground to 90 degrees. Then carefully remove the head and pull the bracket off, leaving a stub to be removed with grips. If the bracket gets damaged, just recut the seat with a larger 90 drill or countersunk.
Ttfn Glenn
|
| |
|
|
RobinJI
Posted a lot
"Driven by the irony that only being shackled to the road could ever I be free"
Posts: 2,995
|
|
May 29, 2014 17:32:48 GMT
|
Most countersunk screws have a 90 degree head but most drill bits have a different angle. My way of removing fubarred screws, is a small pilot drill to centre a drill the size of the screwhead which is ground to 90 degrees. Then carefully remove the head and pull the bracket off, leaving a stub to be removed with grips. If the bracket gets damaged, just recut the seat with a larger 90 drill or countersunk. Ttfn Glenn Yep, just drill it out. Personally I'd just go carefully with a drill-bit the same size as the thread. When you hit the base of the head the outer portion of the head will fall off. So a 6mm drill if it's an M6. |
| |
|
|
duncanmartin
Club Retro Rides Member
Out of retro ownership
Posts: 1,320
Club RR Member Number: 70
|
Removing embedded screws duncanmartin
@duncanmartin
Club Retro Rides Member 70
|
May 29, 2014 18:11:02 GMT
|
|
Apparently it's an M8. Someone on the 924 owners club forum drilled it and ended up helicoiling it, so that seems like a reasonable emergency backup of the drilling out goes wrong. I'll try to do it tomorrow evening or over the weekend, so will report back!
Cheers
Duncan
|
| |
|
|
|
|
duncanmartin
Club Retro Rides Member
Out of retro ownership
Posts: 1,320
Club RR Member Number: 70
|
Removing embedded screws duncanmartin
@duncanmartin
Club Retro Rides Member 70
|
|
|
I drilled a pilot hole and started working my way up the sizes, but I made the hole a bit oval shaped!  I guess I need to try helicoiling it now! There are lots of different kits at different prices - is it worth paying extra for a brand name? Cheers Duncan |
| |
|
|
|
|
|
|
|
|
Sorry , wont help your problem but did you try a impact driver in the first place ? If not it might be a worthy acquisition to your toolbox.
|
| |
|
|
duncanmartin
Club Retro Rides Member
Out of retro ownership
Posts: 1,320
Club RR Member Number: 70
|
Removing embedded screws duncanmartin
@duncanmartin
Club Retro Rides Member 70
|
|
|
|
Yes, I tried an impact driver. I've only ever had success with it when I can solidly mount the object I'm hitting. Working upwards on a hinge mounted hatch has too much flexibility...
Cheers Duncan
|
| |
|
|
|
|
|
|
|
|
I'd have just found another catch secondhand and just cut straight through other one ,giving you access to the two seized studs . Welded a but on and removed them then replace with new catch an new bolts
Save hours of messing about drilling
Drastic I know but quick
|
| |
|
|
|
|
|
|
|
|
The hatch is alu and the steel studs seize in proper solidly, not many people are that successful removing them unfortunately.
|
| |
'73 Commer Campervan under full restoration, '83 VW T25 Doka under partial restoration to become rolling project, '04 Saab 9-3 Vector Sport modified and certainly not finished...
|
|
marinacoupe
Part of things
Marina Coupe, Triumph Stag
Posts: 178
|
|
|
|
|
As suggested earlier, use fairly large drill to remove the countersunk heads. The catch should then pull free leaving two stubs. Apply a little heat to the stub ends, it will travel down the stub to the aluminium frame and break the steel/ally fusion. Then grip a stub a wiggle it until free :-) If you bu**er the thread it's the ally frame which will need helicoiling to take new c/s screws.
Chris
|
| |
|
|
duncanmartin
Club Retro Rides Member
Out of retro ownership
Posts: 1,320
Club RR Member Number: 70
|
Removing embedded screws duncanmartin
@duncanmartin
Club Retro Rides Member 70
|
|
|
|
The helicoil worked. If I have to do this on the other side, I'm not going to bother messing about with trying to save the screw holes, I'm just gonna helicoil it!
Cheers
Duncan
|
| |
|
|