|
|
|
|
|
|
Hello guys, right I got myself a clarke 130EN turbo to learn to weld, but I can't weld, I have used gas and solo wire
I have used gasless flux core wire I have even honked the mig forum but still having difficulty. So just want to get some idea on what I can be doing wrong I am using
Fluxcore at the moment and the way I'm welding is
Straight in and just zap zap zap zap, and all I'm getting is lots of spots of welds thrown everywhere which doesn't even tack what I have welded down, so any ideas what's wrong and like with setting I have 2 switches which are 1-2 and min and max and a knob for wire speed, I'm practicing on old car wings so it's thin metal the fluxcore I'm using is 0.9, so I appriciate all help in advance
|
| |
|
|
|
|
|
|
|
|
|
|
could be anthing from dirty metal, bad earth, gas flow not regulated, wrong wire, damaged tip, incorrect wire speed. goto the mig welding forum for a beginners guide
|
| |
|
|
|
|
|
|
|
|
It's difficult to help without pictures and some idea of the settings you are using. If you can get someone to come round and advise whilst you are welding then that is the best way to learn; that and lots of practice. Online videos and forums are a great help, and you can also make things easier by practicing on clean, relatively thick steel - say 1.6mm - and then just systematically altering the settings, and your technique and seeing what happens. When you hit on a good set up, write it down and work from there. Just lay beads down and don't try to join anything at this stage. Also, fluxless is notoriously splattery and horrible; argon 5% CO2 mix is best for thin sheet work. I'm not saying that it can't be done fluxless or with pub CO2, it's just that you are making things harder for yourself when you are starting out. Also, make sure that the welder is in good condition if it is secondhand. New tips and liners will help, and also make sure that the roller tension is sufficient, but not excessive. Basically, you are trying to create a little pool of molten steel and move it along without it dropping through the sheet (too much heat per mm of weld), or solidifying too soon (too little heat per mm of weld). Welding thin bodywork is tricky anyway so start with something where you can build some confidence.
|
| |
V8 MGB GT sprint and track
V8 Ford Pilot Woodie project
1971 Early Bay VW camper
|
|
|
|
|
|
|
|
Thanks guys, I did have someone come and help me which was good, he told me my earth was not good ( it's a second hand mig) so I need to sort a new clamp for that, saying that would a jump lead clamp be ok, also I realised looking For clamps they have amps for example 200 amp or 400 amp etc etc, what would be good for my welder or would it be a case of any clamp will Do regardless of the amp, also was told to move slowly and not like I was zapping away at the metal, and also was told to do half moons when welding, he said the welder I had was good and also to if I can use my welder plugged directly to the home socket and try to not involve extention wires, lol well I had 20 meters of extention wire when I was practicing before so a good few tips I got so far
|
| |
|
|
|
|
|
|
|
Here is how I teach people how to weld sheet-metal. Never tried with a flux core welder, but if it is going to work, the technique should apply Buy the Lincoln wire. Cheap wire is made from curse word they sweep off the floor and it sucks. Buy the small spools and if you don't use it quickly, buy a new role or at least remove and store in a bag with desiccant pouch. To adjust your rig: Point it at the butted up seam and pull the trigger, Count to two. If it made a hole, either lower the juice or count to one. If it did not blow a hole, raise the juice and count to three. Your perfect setting is somewhere between the two numbers and settings. The small weld dot that you are aiming for should look the same from both sides of the panel. Now, all you do is move the tip over 1/2 of the dot diameter and repeat. The ideal timing is to do a dot, move over half a dot and just as the red-glow is going away, hit it again. You will soon figure out that you can do more of an elongated dot if you move the tip a small amount, but regardless it involves a lot of trigger pulling to weld tin with a Mig. I fit panels with zero gap if at all possible. I never understood the gap thing since all it will do is introduce warping as the bead shrinks when it cools. Here is a picture of what you are aiming for: ( you can actually tell that the trigger was pulled 12 times to achieve that bead) 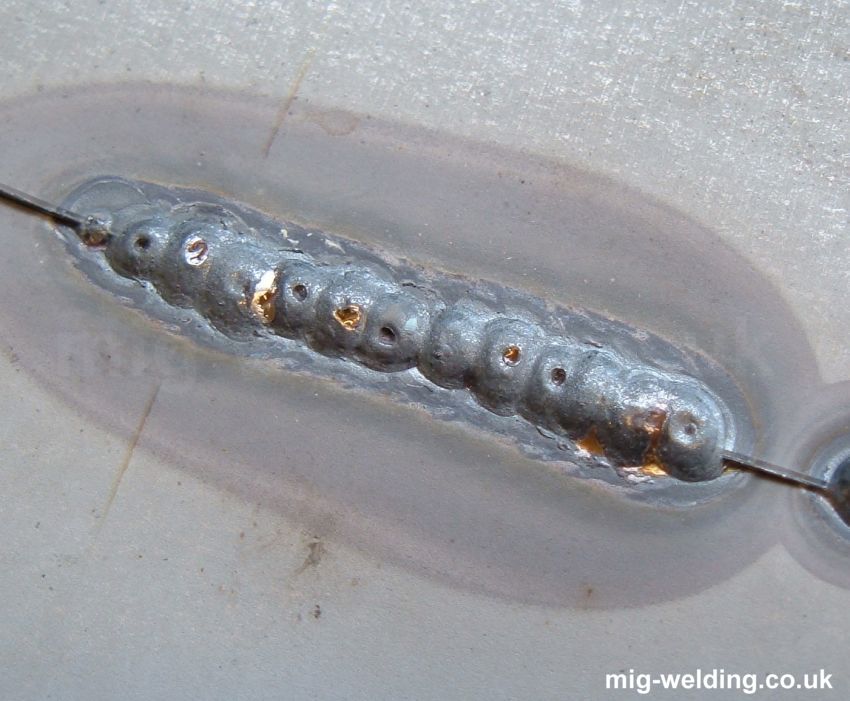 If the heat is set right, the backside should look almost the same as the top side. The picture shows a lap joint, but it works just as well with a butt-weld and that is my preferred method. |
| |
|
|
|
|
|
|
|
|
Practise practise practise.
|
| |
|
|
|
|
|
|
|
Practise practise practise. While that is true, I find that withing an hour, I can teach someone to replicate the process I use. Note that I call it a "process" because it does not make you a welder. Just a trick to get consistent sheet-metal welds by eliminating all the variables. It actually lets you weld when you don't have a clue how to weld. If you follow the process enough times, you start to figure a few things our on your own based on having some success and will keep improving, so yeah..practice is the key to proficiency but yo need to get started somewhere and get the job done. One thing I did not go on about was the importance of clean metal. That means no paint, rust or grime in the weld area. Front or backside of either panel. Rule of thumb for me is 1" from weld zone should be clean metal. That includes so called "weld thru primer" nasty stuff for welds. |
| |
|
|
|
|
|
|
|
Thanks guys, I did have someone come and help me which was good, he told me my earth was not good ( it's a second hand mig) so I need to sort a new clamp for that, saying that would a jump lead clamp be ok, also I realised looking For clamps they have amps for example 200 amp or 400 amp etc etc, what would be good for my welder or would it be a case of any clamp will Do regardless of the amp, also was told to move slowly and not like I was zapping away at the metal, and also was told to do half moons when welding, he said the welder I had was good and also to if I can use my welder plugged directly to the home socket and try to not involve extention wires, lol well I had 20 meters of extention wire when I was practicing before so a good few tips I got so far Usually, the earth clamps are generally sold in 'amperage' as it denotes a rough guide to the size of cable you use. A good earth cannot be underestimated,i have a 'hobby' mig, and the standard earth clamp was rubbish! So got some thicker cable and a better earth clamp from ebay. Oh and gasless wire isn't the best stuff....... |
| |
|
|
|
|
|
|
|
|
Another thing to consider is that flux core and gas shielded MIG welding have opposite polarities. Google up "flux core MIG polarity."
|
| |
|
|
goldnrust
West Midlands
Minimalist
Posts: 1,872
|
|
|
|
I echo what the other guys have said in terms of techniques and tips to make it easy to learn. I learnt to start with from the tutorials from www.mig-welding.co.uk , they were really helpful to see what it should look like and to get an idea of what I was meant to be doing. The technique they recommend works well for the slightly thicker steel that's easy to learn on, but for the thinner car bodywork steel, such as the wings you mention you have to practice with, then the technique bjornagn suggested is more applicable. I only have experience with gassed MIG, never touched flux core, but I have a similar Clarke welder so can hopefully help a bit with settings. The switches control the voltage, Min + 1 being lowest, followed by Min + 2, then Max + 1 and finally the highest voltage is Max + 2. For normal bodywork Min + 2 would be where I'd start. For 0.8mm wire I'd have the wire speed around 5, for 0.6mm wire around 6, on the wire speed. As I said those are a really rough baseline for using with gas, you'll need to adjust them to find what suits your exact set-up but its a start. |
| |
|
|
|
|
|
|
|
|
i use a gasless mig mainly because i do so little welding. you can achieve vaguely pretty welding if everything comes together but it does, as standard, produce a lot of splatter. however, the main issues i've found with gassless are:-
a) cheap branded wire
b) wire thats been exposed to air for a long time.
both these issues will make it harder to get a good weld. you also struggle with very thin metal. most gasless set-ups are too powerful even on the lowest setting for thin bodywork, so doing very short bursts limits blow-through
|
| |
|
|
|
|
|
|
|
|
Something else to consider is whether the used machine you have bought is actually working as it should. MIG welding is not that hard and working on clean metal scraps it should be possible to get something resembling a weld after just a few minutes practising.
MIGs can be temperamental, especially cheap ones. Clarke are usually not too bad. I have fond memories of my Clarke 100E..... However, the wire feed mechanism, especially the plastic liner that the wire runs up to get to the torch and the torch itself can get worn and/or bunged up with cack causing the wire feed to become unsteady and erratic. You can usually get some idea if this is a problem by setting the wire speed quite low, pulling the trigger and just watching the wire come through - it should move steadily, without hitching or jerking and the tone of the motor should be steady. Turn the speed up and obviously the speed should increase and remain smooth and steady.
Another point to bear in mind is that cheap MIGs need a decent power supply. They don't like extension leads, especially long ones. Also, if you are welding in your garage at the bottom of the garden connected to the house by 50m of wet string - it's not going to go well either, even if it's plugged straight into a socket there.
Finally, old MIGs can have internal contact issues. I recently returned to car bodywork welding after a few years of doing very little and hauled my elderly SIP Autoplus 160 out of semi-retirement. It's been used occasionally for heavier stuff in the meantime but no light stuff. It was rubbish. At first I thought it was me, but then I noticed that it worked ok on high settings but got worse the lower I went. Haveing recently fixed another welder for someone which had had a broken earth cable, I fitted a new one, but while doing that I noticed that there was a big "terminal block" - basically 3 big loops of fat aluminium wire held together with a bolt which looked like it had been getting hot. The bolt turned out to be loose and the washers between each loop (why washers?!!) were heavily corroded. Dismantled it, slung the washers away, cleaned up the wires, reassembled nice and tight with a new bolt and - wow! Like a new welder - better than ever - will even weld on the lowest setting, which it had never done before in my ownership. So may be worth checking out. Obviously you don't want to be poking around inside it unless it's unplugged!
Good luck
Nick
|
| |
1967 Triumph Vitesse convertible (old friend)
1996 Audi A6 2.5 TDI Avant (still durability testing)
1972 GT6 Mk3 (Restored after loong rest & getting the hang of being a car again)
|
|
ChasR
RR Helper
motivation
Posts: 10,195
Club RR Member Number: 170
|
|
|
|
Alot of good stuff in this thread. I reckon with the above it should get you closer to a good result, especially if someone is willing to show you the ropes  . For me the following helped: -Changing the wire liner in the gun - It never worked right with the orignal liner and it was splatter ahoy -Buying proper welding wire, not the cheap stuff from Halfords ; it seems tarnished welding wire is never all that great -Going from CO to Argon bottles from the likes of BOC etc. This is easier now than it was before, but this really made the welds far tidier IME. FWIW my welder is not even that much cop. It's a humble Sip MIGMate 105. Despite splashing out on the above I reckon I have probably saved a good few hundred pounds on the cars I have welded up including: -MGB rear sill repairs -MGB chassis leg repairs and modifications for rubber bumper fitment -Dolly Sprint Floorpan repairs and chassis leg repairs -Triumph Stag floorpan repairs -MG Midget rear boot floor repair panels and floorpan repair. That got me a good chunk tidier at welding even for upside down stuff where the welds were at least solid but messy. What got me tidier still was getting an auto dimming mask - I was no longer having to guess where to weld or keep an eye on what was still glowing. |
| |
Last Edit: Dec 9, 2015 0:00:24 GMT by ChasR
|
|
|
|
|
|
|
|
I bought a second-hand 90EN that had a similar problem, which turned out to be a bad connection inside the machine. I took the sides off (with the power disconnected, obviously) and undid a few connections one at a time to clean them, and it's been fine ever since and has done all the welding on the car in the photo to the left.
|
| |
|
|


 .
.