Darkspeed
Club Retro Rides Member
Posts: 4,695
Club RR Member Number: 39
|
|
|
|
Engine now looks like 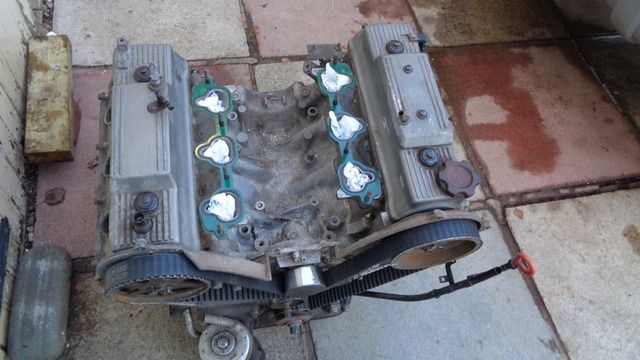 The original Weber air horn plates have been replaced with these - 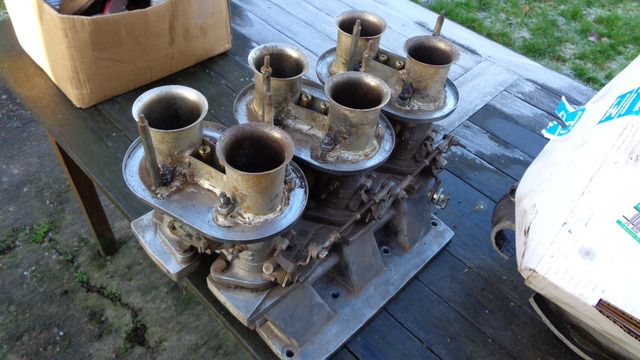 They are rather crude but serve a purpose by provide a far longer inlet tract, they are also quite tall for fitment under the filters and would be a little restrictive at full flow - Chokes are smaller than I expected at 32mm so would be for bottom end torque. I will get a couple of 34mm chokes to see how they look, and will give the air horn fabrication a make-over. The Grasser chassis now takes up a lot less space than ever did ..... |
| |
|
|
|
|
Darkspeed
Club Retro Rides Member
Posts: 4,695
Club RR Member Number: 39
|
|
|
|
|
I also know why you use DCNF's and not IDF's on a V6 - It's about the way that the all the jets and idle adjuster screws are positioned.
The IDF screws are ideally positioned for horizontally opposed engines - the screws and jets are positioned 90 degress to the throttle shaft - easy to get at when positioned toward the centre of the engine. The DCNF is ideal for a V6 as the idles and jets are either in-line with the shaft pointing outward or are at 45 degrees to it pointing out so you can get to them.
Yep IDF on a V6 means you cant easily change the idle/ progression jest or set the idle fuel or air bleeds - LOL
|
| |
|
|
flyingphil
Posted a lot

Posts: 2,343
Member is Online
|
|
|
|
|
Thanks for that insight Darkspeed. I have been using Webers/Dellortos on V8, V12 and flat fours for many years but always DCOE/DHLA/DGAS/IDF types - now I know what the others are for! (My Alfa Busso V6 was fuel injected....)
|
| |
|
|
|
|
|
|
|
|
Very interesting project, I didn't know the difference between IDF and DCNF. I read one that IDA are race carbs that don't idle as well on as IDF, hence's IDA are more suitable for the track
|
| |
|
|
sonus
Europe
Posts: 1,386
|
|
|
|
|
DCNFs are smaller than IDFs in size aswell. DCNFs don't like to be installed along the car axis due to the construction of the float chamber (f.ex each side of air cooled VWs). I was trying to install four DCNFs across my Daimler V8, but they became too long even if I stacked them as close together as I could by removing the choke mechanism. I am now looking into fitting four IDFs, but they are quite a bit larger so we'll see if they'll fit.
|
| |
Current
1968 TVR VIXEN S1 V8 Prototype
2004 TVR T350C
2017 BMW 340i
Previous
BMW 325d E91LCI - sold
Alfa Romeo GTV - sold
Citroen AX GT - at the breakers
Ford Puma 1.7 - sold
Volvo V50 2.0d - sold
MGB GT - wrecked by fire
MG ZT 1.8T - sold
VW E-golf Electric - sold
Mini Countryman 1.6D -sold
Land Rover Discovery TD5 - sold
|
|
|
|
Darkspeed
Club Retro Rides Member
Posts: 4,695
Club RR Member Number: 39
|
|
|
|
IDF's on a V8 would go fine with the all the adjustment screws pointing out. They would be mounted as opposing synchronised pairs which is the way they would mount on the downdraft manifolds I have for my V8 (Rover) 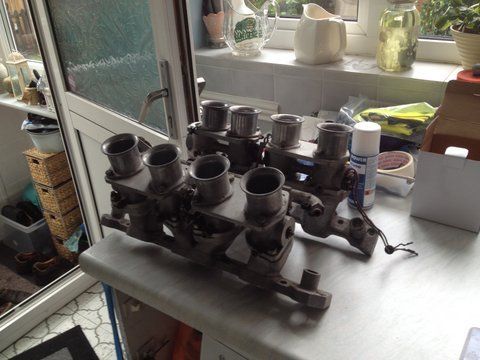 Scrap man trundled past this morning so no more grasser on the grass.... |
| |
|
|
sonus
Europe
Posts: 1,386
|
|
|
|
Problem with IDFs on a Daimler V8 is that the engine is rather small   |
| |
Current
1968 TVR VIXEN S1 V8 Prototype
2004 TVR T350C
2017 BMW 340i
Previous
BMW 325d E91LCI - sold
Alfa Romeo GTV - sold
Citroen AX GT - at the breakers
Ford Puma 1.7 - sold
Volvo V50 2.0d - sold
MGB GT - wrecked by fire
MG ZT 1.8T - sold
VW E-golf Electric - sold
Mini Countryman 1.6D -sold
Land Rover Discovery TD5 - sold
|
|
Darkspeed
Club Retro Rides Member
Posts: 4,695
Club RR Member Number: 39
|
|
|
|
Problem with IDFs on a Daimler V8 is that the engine is rather small They fit though  - Or trade up to the 4.0L version there may be more space |
| |
|
|
Darkspeed
Club Retro Rides Member
Posts: 4,695
Club RR Member Number: 39
|
|
|
|
Rover V8 lightweight race flywheel to suit 184mm clutch  Oh so tempting - I am sure that twin plate clutch would not be easy to live with on the road though - then again if stuck in traffic I can always get out and push |
| |
|
|
Darkspeed
Club Retro Rides Member
Posts: 4,695
Club RR Member Number: 39
|
|
|
|
DCNFs are smaller than IDFs in size aswell... I suspect that because IDF's are available in a 48 and the DCNF only a 44 that Lancia had the car built with the IDF - It may be that the homologation regulations allow a larger size of the same carb type, and they thought why restrict themselves to a carb that only has a 44 as a max. 48's having the capacity to feed the 2.4 engine as much air as is will possible need. 40's with 32mm chokes will give the stock 2.7 Honda engine plenty of air and 34's will shift a bit more although I doubt in stock trim it will need that. |
| |
|
|
Darkspeed
Club Retro Rides Member
Posts: 4,695
Club RR Member Number: 39
|
|
Feb 15, 2017 21:52:19 GMT
|
Thread detour Need to stop cluttering up others threads and give my own the attention it needs. So, whilst we wait for some stuff to arrive for the Strato's its time to focus ona Ginetta thats in the way and get it out of the way. Ginetta G15 - Kind of like them - Have owned a really nice one: Here it is at the NEC restoration show 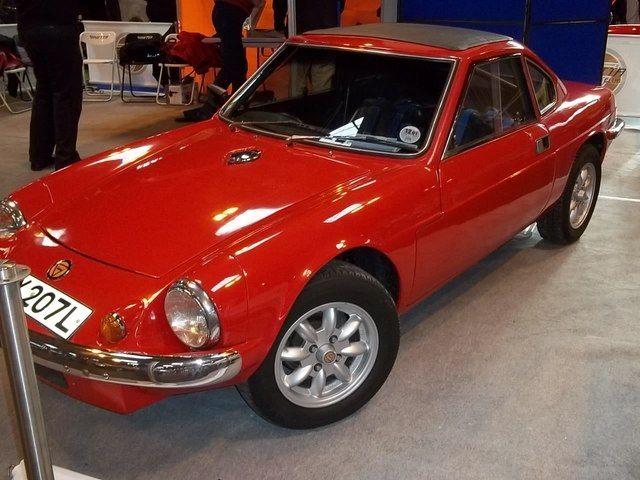 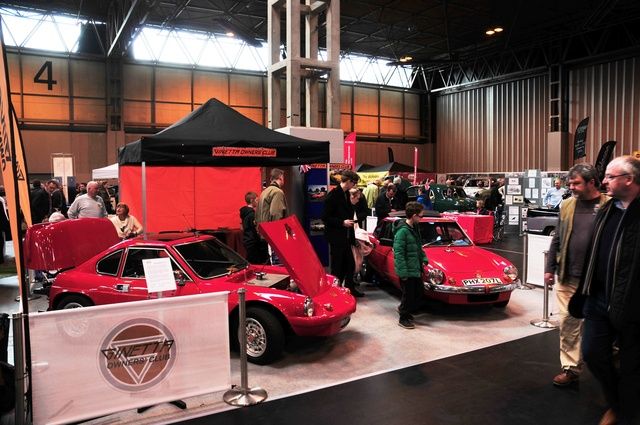 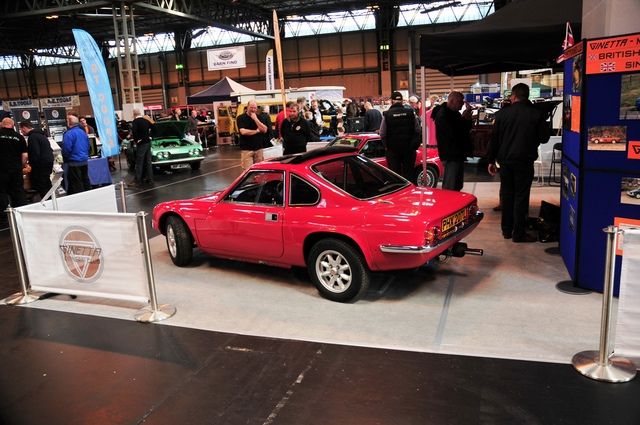 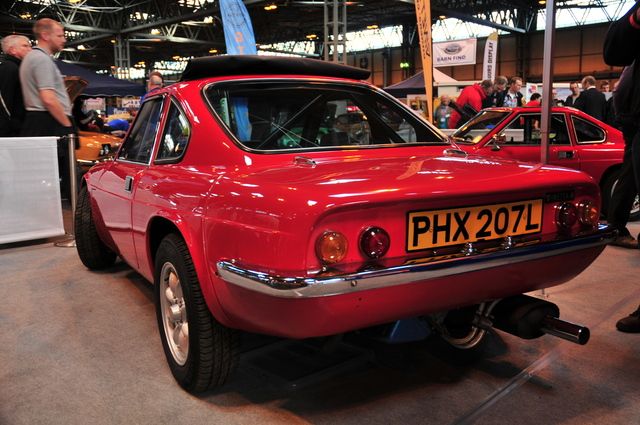 And now its being rallied by its new owner in the HRCR - I have a load of work to do on this this summer to get it ready for some serious rallying at the end of the year. 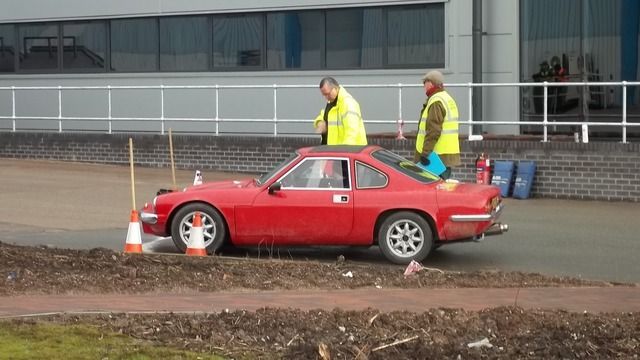 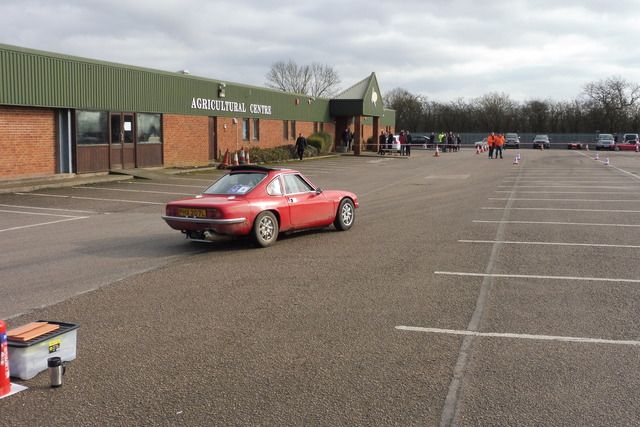  The new owner really enjoys putting it through its paces. |
| |
|
|
Darkspeed
Club Retro Rides Member
Posts: 4,695
Club RR Member Number: 39
|
|
Feb 15, 2017 22:18:56 GMT
|
My two are currently waiting for me to pull my finger out and get to work on them - but the Strato's is in front of them and I have another GOC members G15 getting in the way of some of the work I want to do on the Strato's and my G27. It's a nice specification car being an original rare G15S. The 998 engine'd S types made up about 10% of the total production, and this particular car came out the factory with a high specification on the options, as well as being an S. This G15 has been with me for about 3 years now, on and off, with a ground up rebuild of a ground up rebuild redoing other peoples poor work. the latest which has been painting the rear hubs...... How to paint the rear hubs of a G15. Firstly, start off with a pair of special build finned alloy hubs and notice that they do not rotate correctly. Secondly note that they foul on the hubs studs that also look ....bent! Take a close look and you note that the studs protrude from the hub - and some do more than others and the diameter of this shank is fouling the alloy drums. 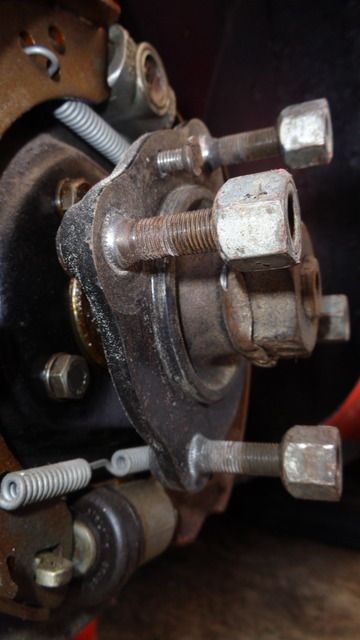 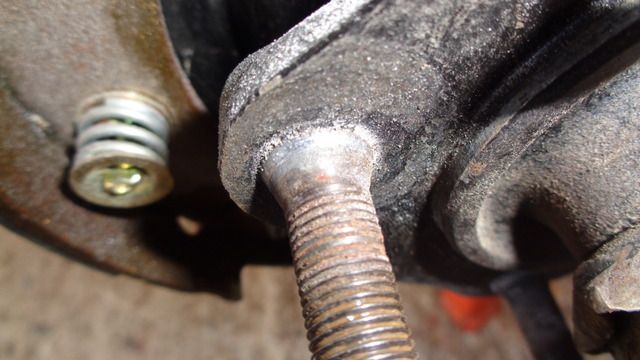 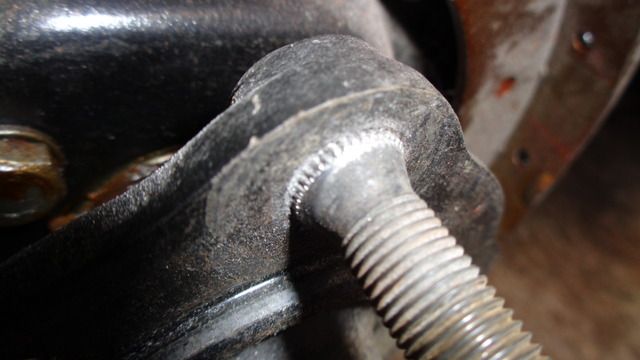 I also noticed that someone had swapped out the original 7/16" Imp studs for 3/8" triumph studs - the trouble with this is that the Triumph has 1/2" shanks where the Imps have 7/16" shanks so not only do we have smaller studs to hold the wheels on the shanks stick out and foul the drum and cause it to wobble. Different stud types in the hub and hubs drilled out to much for standard studs 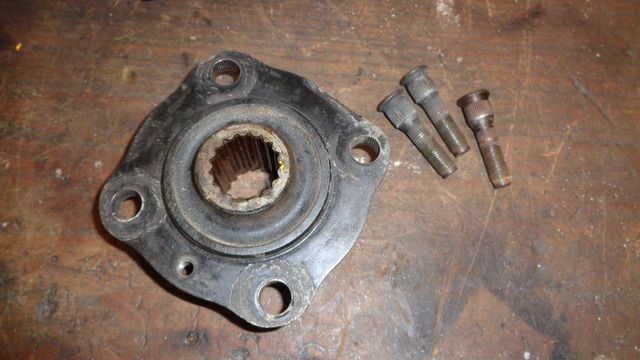 The studs on an Imp not only clamp the wheels onto the hubs they also centre the wheels which is why Hillman used large 7/16" studs on such a light car changing to 3/8" studs is not a performance improvement and this car has a engine with a bit of go. 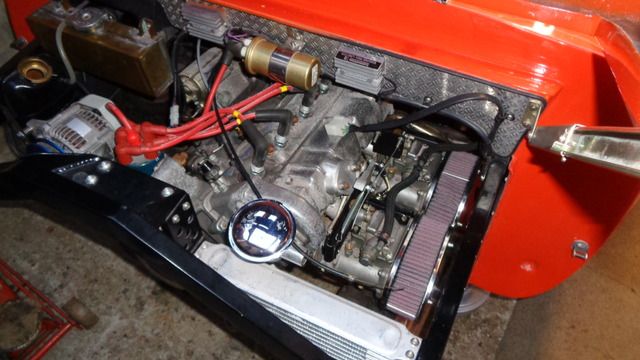 |
| |
|
|
Darkspeed
Club Retro Rides Member
Posts: 4,695
Club RR Member Number: 39
|
|
Feb 15, 2017 22:30:17 GMT
|
Lets compare a stock hub with these "performance" modified hubs and studs 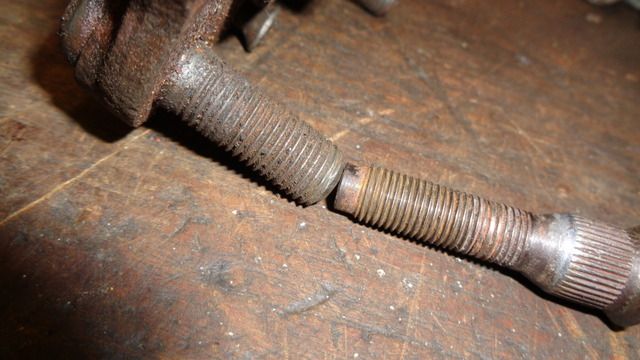 A plea on the Imp Club website was answered by a thoroughly nice gent sending me these - I good original pair of hubs. 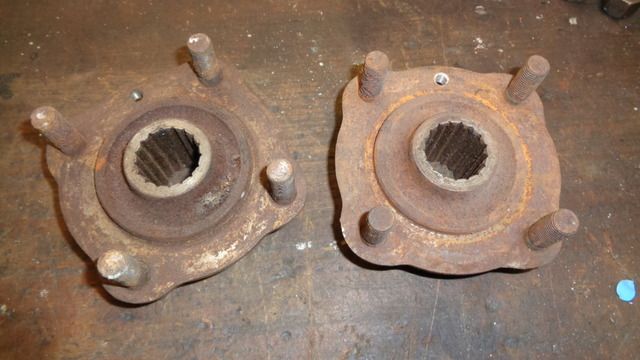 So let's paint them First off get a bucket and wire it up for cleaning duty and drop in the hub 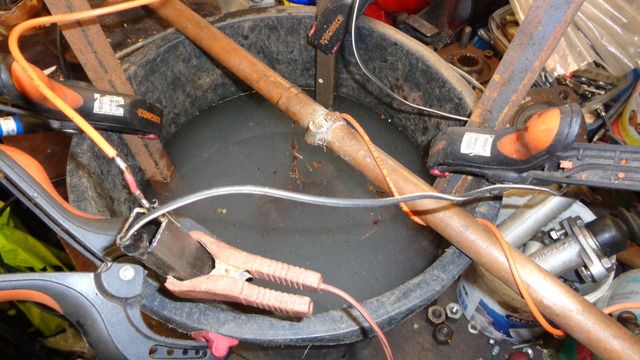 Turn it on and leave it over night 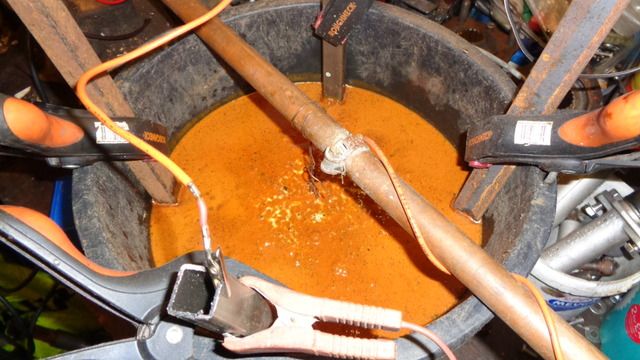 Take the part out - give it a wire brush and then put it back in again 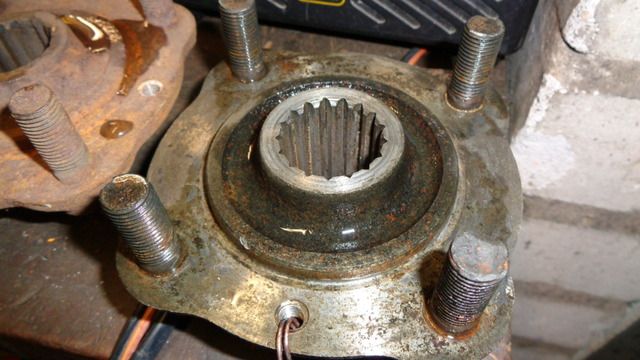 Rinse and repeat until it looks all nice and shiney 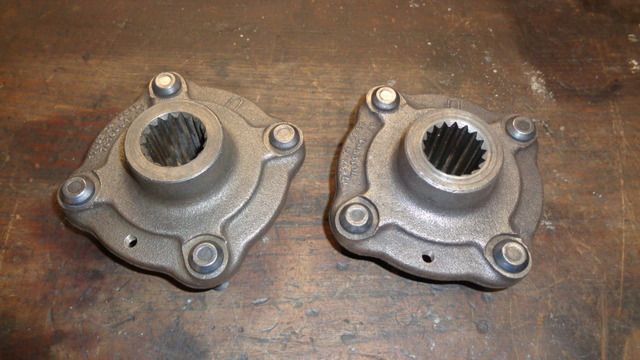 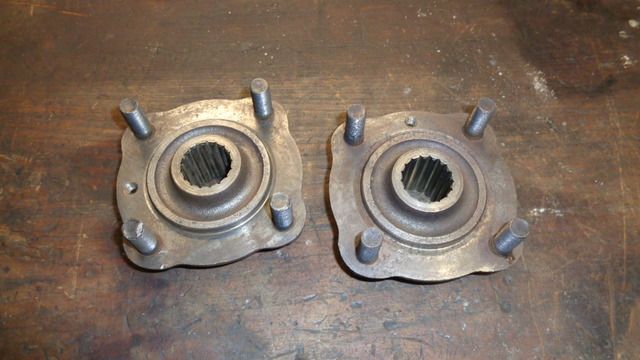 And then prep for paint 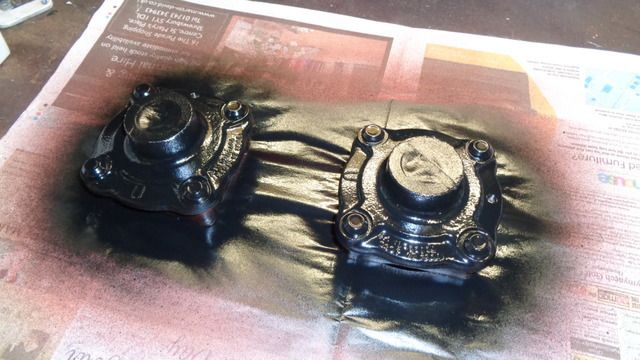 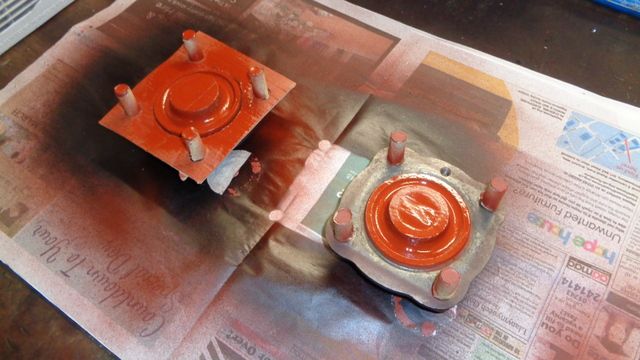 And put them in the oven  Once dry they can be refitted - and this time the hub nuts can be tightened to the correct torque instead of the hand tight that was found when the tabwasher was unfolded from the hub. How to paint G15 rear hubs ! |
| |
|
|
Darkspeed
Club Retro Rides Member
Posts: 4,695
Club RR Member Number: 39
|
|
Feb 15, 2017 23:29:58 GMT
|
What do you do when a good mate of yours has a problem after removing the 30 year old wheel arch flares from his 1968 Ginetta G15 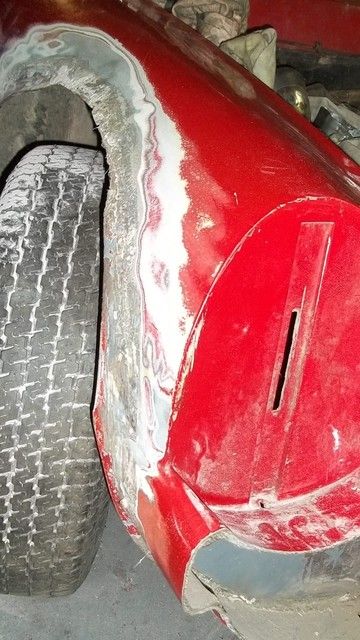 Compounded by the front end being removed for replacement.  You do the only sensible thing when you have a G15 in the garage doing not much and take a pot of PVA 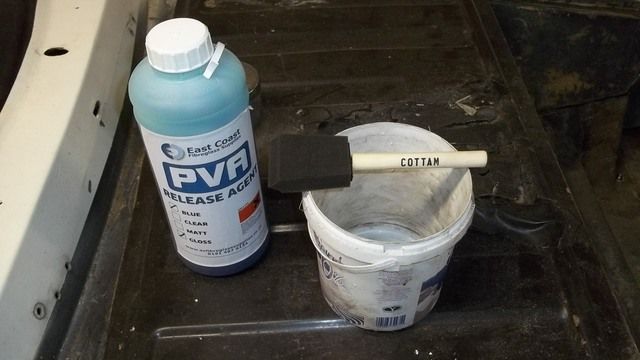 And you paint the wings of your original 1970 G15 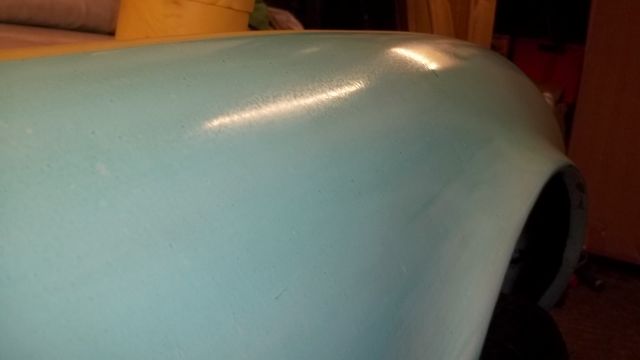 |
| |
|
|
Darkspeed
Club Retro Rides Member
Posts: 4,695
Club RR Member Number: 39
|
|
Feb 15, 2017 23:43:02 GMT
|
|
|
| |
|
|
Darkspeed
Club Retro Rides Member
Posts: 4,695
Club RR Member Number: 39
|
|
|
|
|
|
| |
Last Edit: Feb 16, 2017 0:14:10 GMT by Darkspeed
|
|
Darkspeed
Club Retro Rides Member
Posts: 4,695
Club RR Member Number: 39
|
|
|
|
At some stage in its life, this early G15 had a few mods done to its front end after a bit of a front corner nudge - Some different fibre arches had been grafted on, and a new from air dam built at the front. As the car was being rebuilt, it was decided that it would be worth while returning the car to more standard appearance. A new front end repair section was obtained from a Ginetta specialist and yours truely provided the arch repair moulds. 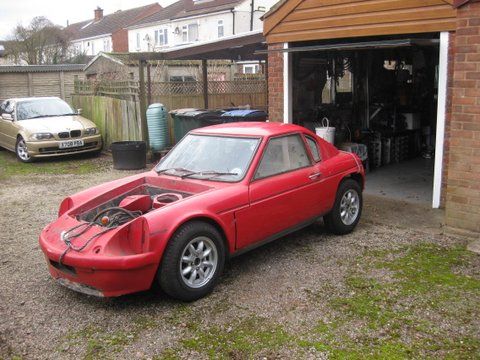 Glass fibre wheel arch repair on a G15. Rip off the old arch(es) 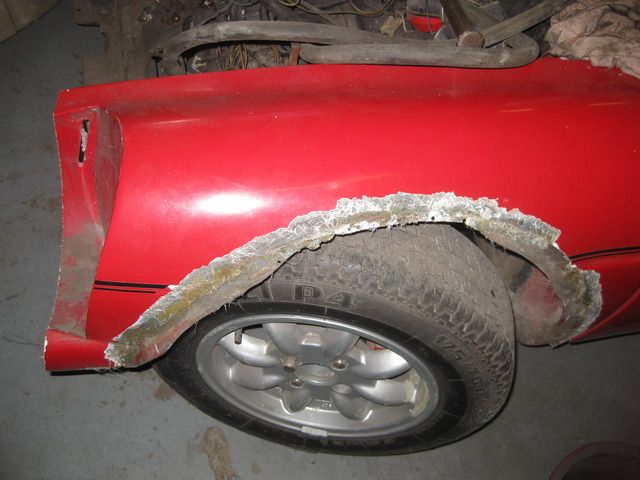 Have a discussion with the owner and tell him to clean up the "inner" part of the arch with the die grinder to prepare the surface. Return to find the outside of the arch prepared..... 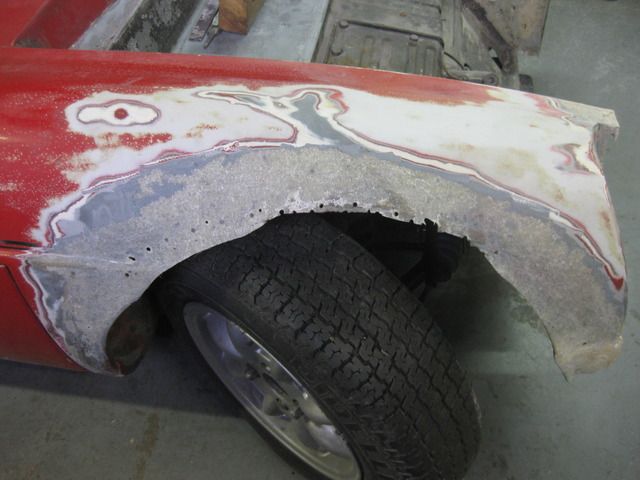 Draw on some outlines and cut lines to remove the incorrectly prepared section 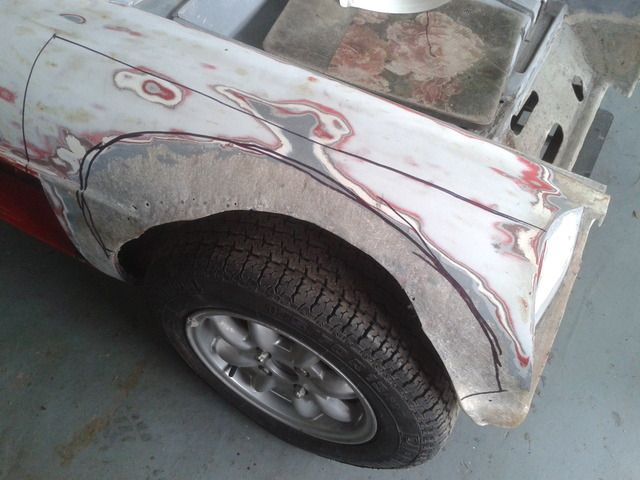 And remove 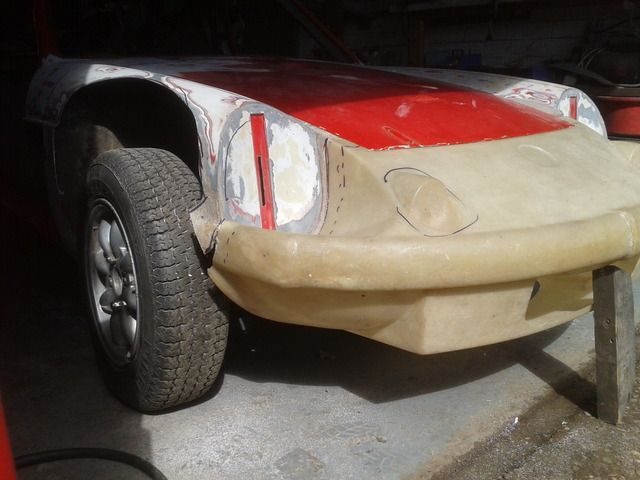 Turn the body upside down and tell the owner to get in there with the die grinder 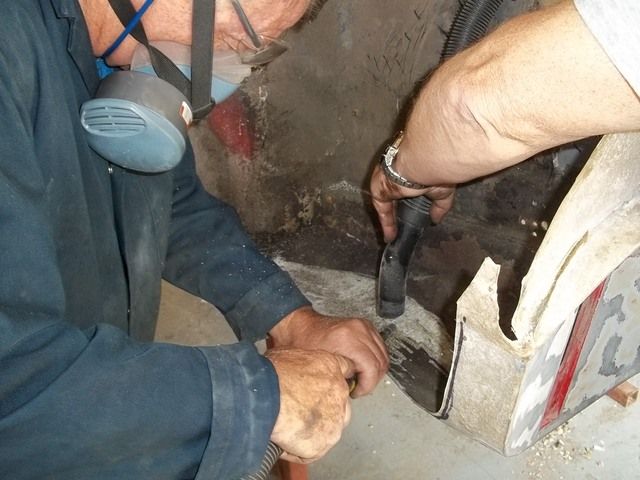 Prep the mould with PVA and a good few coats of release wax. 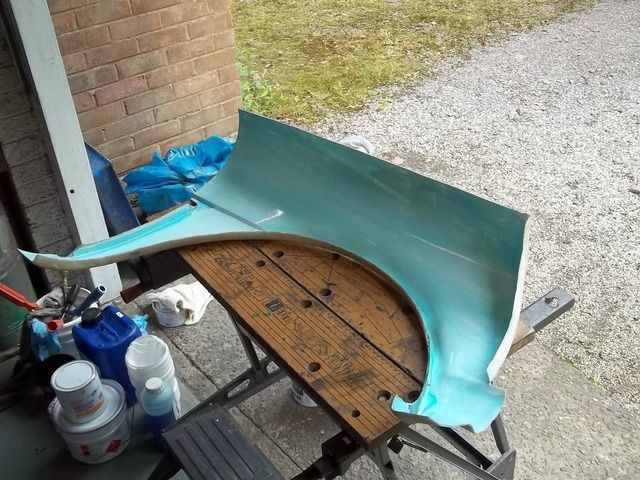 Fix in place with a bunch of wax dipped stainless steel self tappers. Noting the extensively prepared inner suface of the wheel arch in which we found loads of horror repairs that took hours to cut back and prepare for more repairs 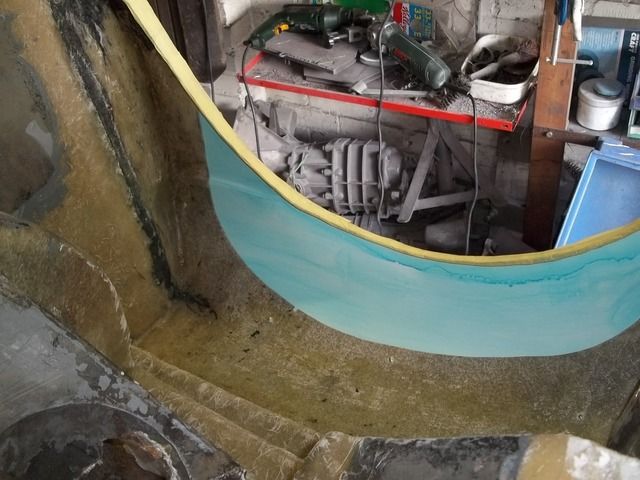 This is where the step by step stops and we go straight to the completed works, but it goes something along these lines. Cut surface tissue and the weights of chopped strand mat that you wish to use, into the correct shapes for the repair. Weigh the material for calculation of the resin required Work out the approx area of the repair for calculation of the amount of clear gel coat required. Measure mix and apply the gel coat - Have a cup of tea or go and work on your Hi-Po V8 that's sitting behind the G15 Once the Gel has cured mix up a batch of resin and then prepare to work quickly as when doing this it was 24 degrees outside. Suface tissue, four layers of CSM and plenty of roller consolidation and resin wicking out later. 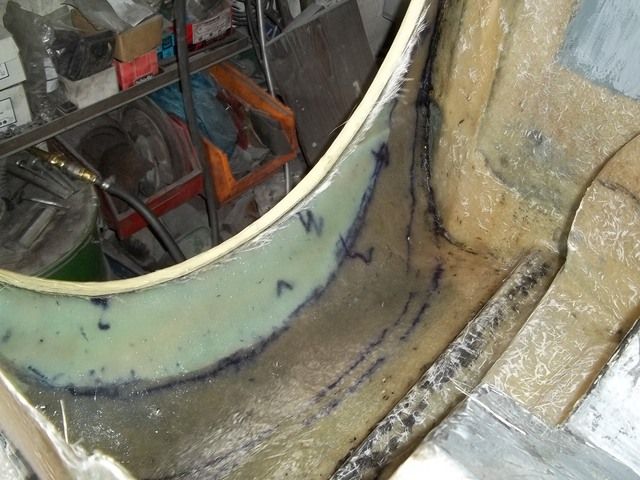 The layers build up the thickness of the repair whilst overlapping each other on the tapered prepared main body suface. The roller consolidation removes all the air and the wicking out removes excess resin so that the resulatant laminate is as light and as strong as it can possibly be. Repeat for the other side. 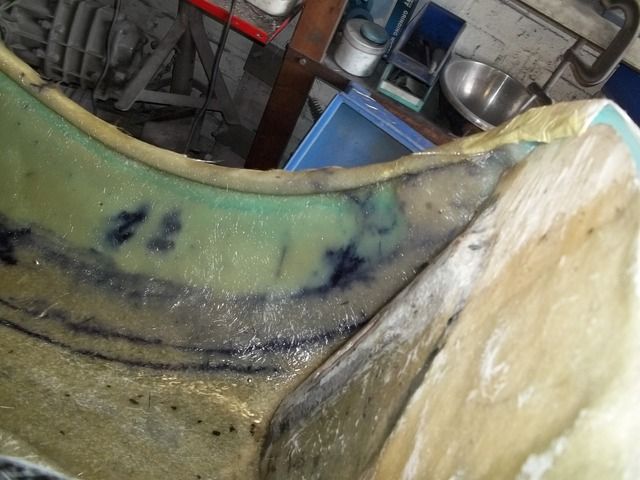 More tea. |
| |
|
|
alecf
Part of things
Posts: 424 
|
|
|
|
Rover V8 lightweight race flywheel to suit 184mm clutch Oh so tempting - I am sure that twin plate clutch would not be easy to live with on the road though - then again if stuck in traffic I can always get out and push Ive just taken delivery of a 184mm AP racing twin plate 6 paddle clutch, I will let you know how it goes |
| |
|
|
Darkspeed
Club Retro Rides Member
Posts: 4,695
Club RR Member Number: 39
|
|
Feb 16, 2017 10:54:59 GMT
|
Ive just taken delivery of a 184mm AP racing twin plate 6 paddle clutch, I will let you know how it goes That would be great if you would. A bit of feedback on the operation and feel would be great - The G15 rally car has a single plate sinter and needs a careful left foot of the mark in normal use. In competition it's great as it just bites and goes - but it's roughly 1/3 the power 1/5 the torque and the same weight as the G27! Trouble is, that with spending out on that wheel and clutch assembly, I would then have to fit a camera and LED lighting in the bellhousing, plus the screen on the dash for the passengers |
| |
Last Edit: Feb 16, 2017 11:09:29 GMT by Darkspeed
|
|


 - Or trade up to the 4.0L version there may be more space


