|
|
|
Apr 11, 2016 17:54:55 GMT
|
|
Unfortunately, for some reason, no hammers at the bootsale.
There is always a box of hammers on nearly every stall, I always look and I always pass up the body hammers, but this week there were none.
Ill probably get a cheap set at newark next weekend.
|
| |
|
|
|
|
|
|
|
Apr 12, 2016 11:48:02 GMT
|
|
I bought a set of hammers and dollies for under a tenner at an autojumble. Predictably they're not all that good - the dollies are usable but both the hammers have snapped - the heads, not the handles. I'd say I probably got a reasonable amount of use out of them first, though, so probably not bad for the money. When you compare a proper dolly with the ones in the set, though, you can see why the price is so low.
I always find the odds of something being on a boot sale are inversely proportional to how badly you need it. I've been looking for a plumbers soldering iron to try to repair a fuel tank, there's "always" one in the bottom of the box of rusty old tools, but nothing so far. Still, they're still getting under way around here after the winter break.
|
| |
Last Edit: Apr 12, 2016 11:49:28 GMT by droopsnoot
|
|
|
|
|
Apr 19, 2016 16:54:57 GMT
|
I stripped the paint from the damaged areas and started trying to straighten the skin out. Its lots better, but alot of work still to do. Its deffinately going to want some filler ,)  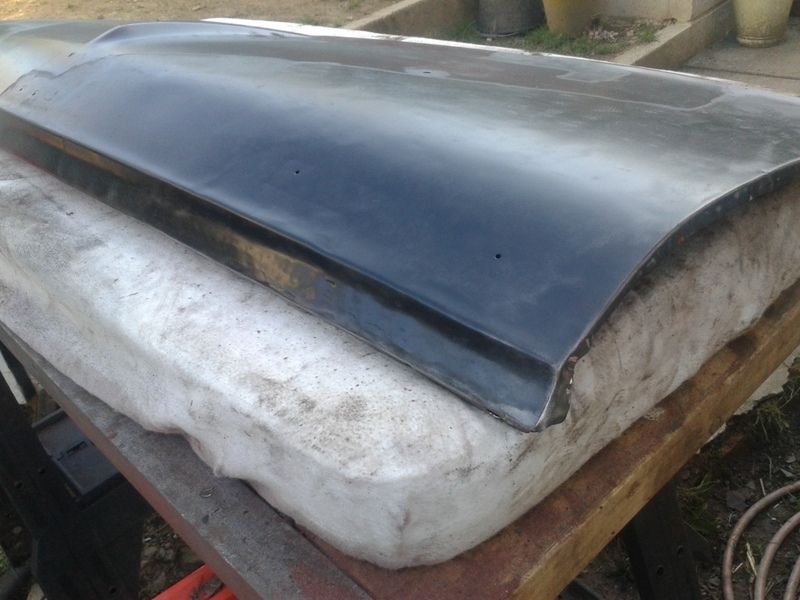 I put some satin black on it so I could see where I was at. Illhavee another go another day when I can come back to it fresh as I was starting to just hit it for the sake of it. Trying to sort out the front edge is hard as all the edges and contours were gone. Did alot of the flatter area with a rubber hammer. Ill get it near enough eventually. Id have made this more if a 'how I'm doing it' type thread but ive abandoned official techniques and am just hitting it where I think it needs hitting so not much 'how to' to share. |
| |
|
|
eternaloptimist
Posted a lot
 Too many projects, not enough time or space...
Posts: 2,578
|
|
Apr 19, 2016 20:03:42 GMT
|
|
Have a look at Artur Tussik's you tube channel. Some utterly brilliant panel reshaping.
|
| |
XC70, VW split screen crew cab, Standard Ten
|
|
|
|
|
Apr 19, 2016 21:02:58 GMT
|
Looked him up and watched one on a citroen. He sanded the wagg off (he's fixed this before then lol) beat it out then wagged it up again. I seem to be doing what he is but without the fancy pullers (I don't need them for this anyway). I spent alot of my early teens in an accident repair shop watching people fix traders cars and bent race cars. Wish id paid more attention  Ill make some formers tomorrow to help me get the shapes right and even along its width. |
| |
|
|
|
|
|
Apr 23, 2016 15:54:06 GMT
|
Well, as mentioned earlier, easy to get it close but hard to get it perfect. I'm living with close. I got the skin a bit better then fiyted the frame to the van and tweeked it to fit. I then tweeked the skin to fit the frame. Weld through primer on the lips, then etch, ehite prime and topcoat the inside of the frame and skin so there is some paint in the hidden areas. I welded it back together and put it back on the van. Some bodyshop style smacking about and shutting it on hammer handles etc got it to this.  It fits the hole well and in general is the right shape, its just not smooth. A skim will sort it and shouldnt be any more than 1mm of filler in the worst areas. I need to finish stripping the outside first though. Currently trying to decide if I should pit some seam sealer between the frame and skin or not. |
| |
|
|
|
|
|
Apr 23, 2016 16:14:13 GMT
|
|
I wouldn't get to miffed about not getting it 100% . Without some pretty serious hammer skills it may not be possible or even with them possible due to the metal stretching .
It does look bloody good to me and a skim of filler is what its for really , just taking out the imperfections .
You should be rightly proud of what you achieved , you have learnt a new skill which seemed impossible to you to start with .
|
| |
|
|
|
|
|
Apr 23, 2016 16:27:10 GMT
|
|
Thanks.
I'm figured I should be able to do it but was always prepared for it to end up as scrap.
I'm quite pleased with it but I'm not allowing myself any self congratulating untill its filled, primed and guide coated so I know for sure its not too wobbly.
Its nice knowing there is no rust hiding in it any more.
I welded some pin holes in the frame but thats all.
Ill waxoil in the seams when its painted.
|
| |
|
|
sb
Part of things
Posts: 725 
|
|
Apr 23, 2016 16:50:56 GMT
|
|
Looks really good! Better than my attempts.
|
| |
|
|
|
|
|
Apr 29, 2016 16:21:42 GMT
|
Final conclusion. After lots of blocking and priming I threw some paint at it. I paid no attention to finish or dust or runs, I just wanted some protection on it while it sits in storage. Black rattle can with rattle can clear as A. Thats what I had and B. So I could see how it looks. Its ok, straight enough for an old van. 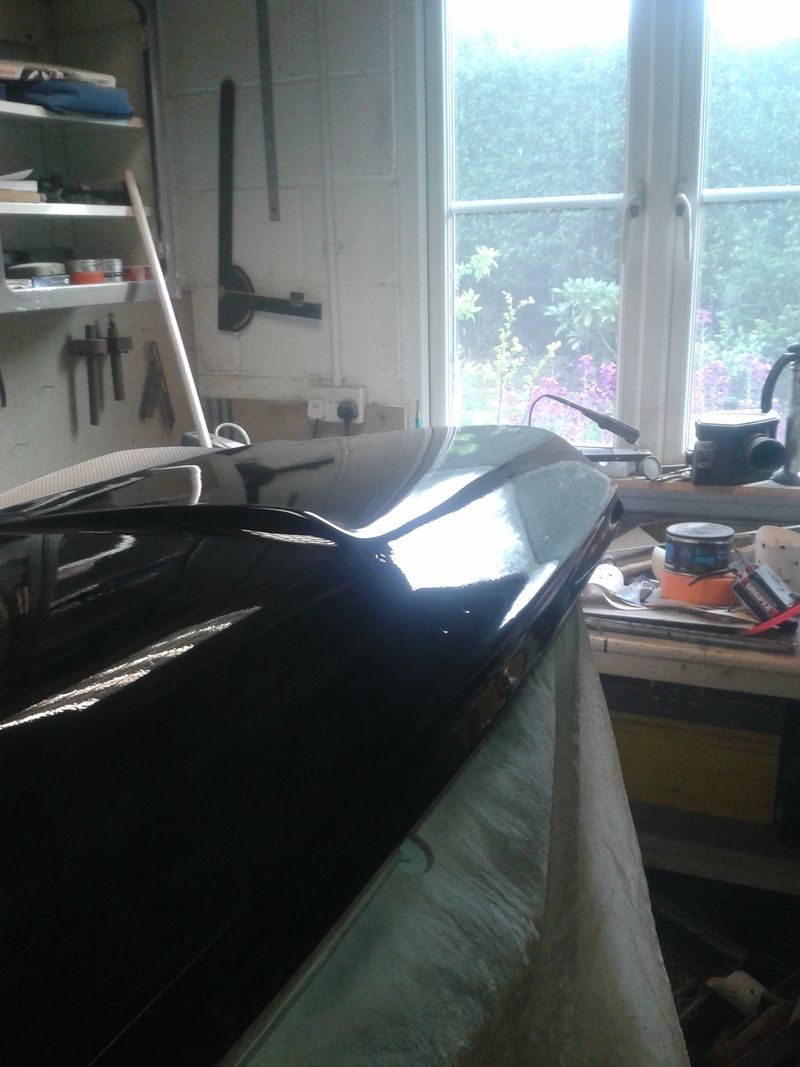 |
| |
|
|
|
|
eternaloptimist
Posted a lot
Too many projects, not enough time or space...
Posts: 2,578
|
|
Apr 29, 2016 17:22:00 GMT
|
|
Looking good!
|
| |
XC70, VW split screen crew cab, Standard Ten
|
|
|
|
|
Apr 29, 2016 17:45:11 GMT
|
|
They should sell car paint in cheap tester size cans, say £2 a pop. Enough to paint 12" square.
Then I could try a few ice blues on the bottom edge like my avatar.
Havent yet seen one thats just right.
|
| |
|
|
|
|
|
|
|
Final conclusion. After lots of blocking and priming I threw some paint at it. I paid no attention to finish or dust or runs, I just wanted some protection on it while it sits in storage. Black rattle can with rattle can clear as A. Thats what I had and B. So I could see how it looks. Its ok, straight enough for an old van. 'Tell you what, that looks very good indeed. I'd be well proud of that, especially as it's the first time you say you've done anything that needed quite this amount of work. Well done mate, keep going. |
| |
|
|
|
|
|
|
|
|
Thanks.
the front 1.5" strip below the swage is a little wobbly but that area will be light blue anyway.
I will probably high build and block it again when its painted for real. Each time I paint and block it it gets a little flatter (and a little bigger lol).
|
| |
|
|
|
|
|
|
|
|
Hi VW
Great Work.
There is a metal shaper who taught at Colchester Institute , re- Classic Car Restoration, called David Gardiner. Check him out on his Hot Rod and Classic works from his website classicmetalshaping.co.uk. Hope this helps, I think I may have a copy if you would like it. Keep up the great work, Best, Jim
|
| |
|
|
Dez
Club Retro Rides Member
And I won't sit down. And I won't shut up. And most of all I will not grow up.
Posts: 11,714
Club RR Member Number: 34
|
|
|
|
|
a bit late to the game to help you, but id guess the reason they all rot out is that they're spotwelded in the first place. these days a panel like that would just be tigersealed (other polyurathane sealants/adhesives are available) together. as well as sticking the two bits together, it provides a good seal to stop condensation sitting between the two skins and causing future rust issues. you also don't get welding distortion with it!
|
| |
|
|
|
|
|
|
|
|
I did toy with bonding the skin on but would have wanted to weld too.
Its a toss up, the welded seam isnt as tight any more so will hopefully drain. If id sealed/bonded and not got it 100% I could have created more traps.
There is no hidden rust now and all inside is painted so I'm going to waxoil inside the frame, let it run through the seams, and hopefully it will last.
the front bottom lip returns upwards vreating a nice cup all the way along for water to sit in. Nit a great design. Ill put some drain holes along the front edge I think.
|
| |
|
|