|
|
|
Feb 23, 2020 21:06:40 GMT
|
|
argh! when buffing the bonnet, ive gone threw the lacquer, so i started to sand it back with the da, and there must have been muck on the disc, and its put big deep scratches on the bonnet. Ive already painted it once, so it has 2 layers on it, should i spend lots of time now sanding it all back, or can i prime it again with a high build?
thanks
|
| |
|
|
|
|
|
|
|
|
|
Chris, Dinitrol question. I have a freshly restored Triumph GT6 Mk3, which is painted body colour underneath (Bilt Hamber electrox primed mostly apart from the wheel tubs which were etched then stone-chipped, followed by two coats of brushed synthetic, ) and I'd like to add some further protection For underbody protection I know you favour 4941. This issue I have with it is that it is black and lumpy. I see Dinitrol also do a clear underbody wax (doesn't seem to have a number) and was wondering if you've ever used that? Car will get used in the wet but I'll try to avoid salt. Thanks Nick  |
| |
1967 Triumph Vitesse convertible (old friend)
1996 Audi A6 2.5 TDI Avant (still durability testing)
1972 GT6 Mk3 (Restored after loong rest & getting the hang of being a car again)
|
|
|
|
|
|
|
Chris, Dinitrol question. I have a freshly restored Triumph GT6 Mk3, which is painted body colour underneath (Bilt Hamber electrox primed mostly apart from the wheel tubs which were etched then stone-chipped, followed by two coats of brushed synthetic, ) and I'd like to add some further protection For underbody protection I know you favour 4941. This issue I have with it is that it is black and lumpy. I see Dinitrol also do a clear underbody wax (doesn't seem to have a number) and was wondering if you've ever used that? Car will get used in the wet but I'll try to avoid salt. Thanks Nick Nick - Dintrol 1000 (used to be called penetrant) its a clear wax - can be applied by either shultz type gun or by aerosol and will do the job - but you probably need to check / retreat areas at the end of season dependant upon usage / mileage www.dinitroldirect.com/product/dinitrol-1000-1-litre-vehicle-cavity-penetration/?add-to-cart=1447I note that they list the aerosols by the box but you should be able purchase these individually if you shop about a little - I think Frost Restoration Products stock the Dinitrol range - aerosol is a neater application process - any excess an be wiped off whilst wet or with a spirt wipe once dry An alternative is Bilt Hambers Dynax UC www.bilthamber.com/corrosion-protection-and-rust-treatments/dynax-ucAgain a clear wax in aerosol format Both products are field & laboratory tested - sold as cavity waxes but perfectly capable of doing the job you want from them - both go on very well and quite flat when compared to the 4941 (which can & does cover a multitude of sins buts that's not my reasoning for using it) - funny enough I have a job with the same spec later this year / into next year that requires a coloured stone chip underside finish and will apply the clear wax over this one - its all down to spec - what the client wants & what the car will be used for - please advise if you require any further info - Chris PS - Nice motor in the right colour - always fancied one |
| |
Last Edit: Apr 2, 2020 21:35:21 GMT by Deleted
|
|
|
|
|
|
|
|
Thanks Chris.
I've used Dinitrol products before but cavity waxes (ML 3125 IIRC) and the insides of that car are pretty well coated!
Have bought from Rejel before. They have an offer on at present so probably will again!
Still some finishing off to do on the GT6. Mostly interior. Not my favourite part....
Nick
|
| |
1967 Triumph Vitesse convertible (old friend)
1996 Audi A6 2.5 TDI Avant (still durability testing)
1972 GT6 Mk3 (Restored after loong rest & getting the hang of being a car again)
|
|
|
|
|
|
|
I made plenty of notes / measurements prior to pulling the defective panels off the assembly 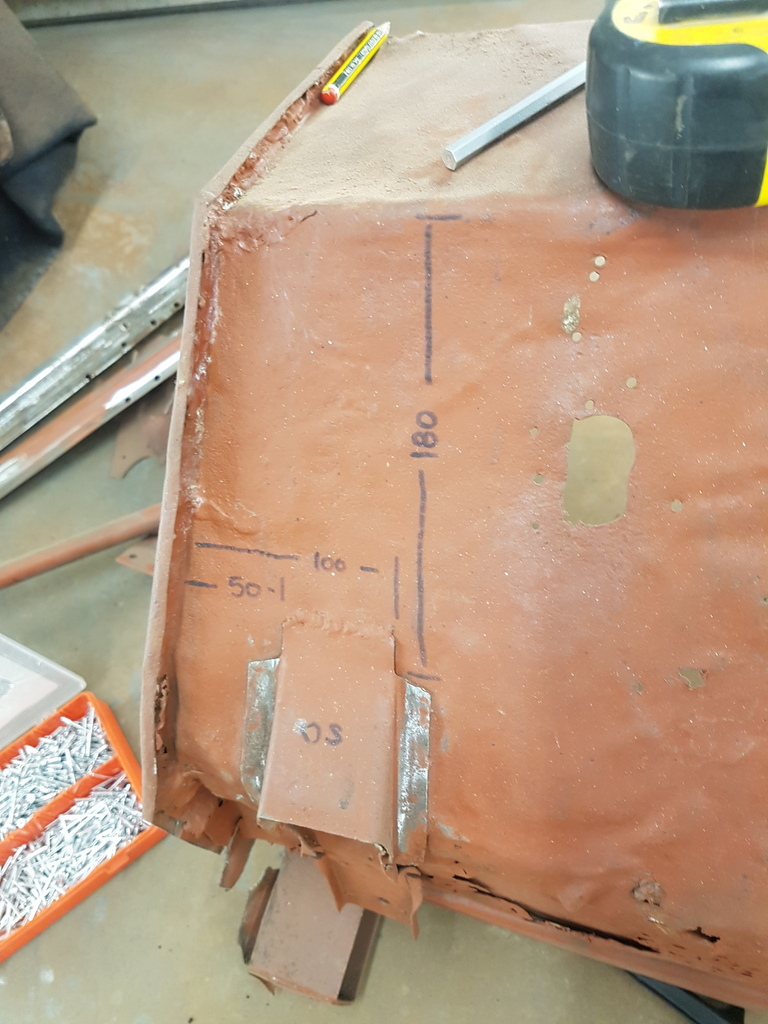 Just a quick question if I may, I thought I'd do it here rather than derail the thread. I see you have some clear marks and measurements, but how do you know which "end" of those pen marks you measure to? The mark is clearly more than 1mm thick as it's something like a Sharpie pen, is it just a case of you remembering that you always measure to the inside, or outside, or something more involved? I have trouble measuring stuff and then being able to duplicate it, sometimes because of the thickness of the marks, and sometimes because the bend is not a square corner. For example I've been making some chassis rail sections, just an inverted "top hat" section, but of course the corners are slightly rounded because of the bending process. Marking and bending another one to end up the same always seems to involve some crossing of fingers, which I'm sure isn't the right way to do it. |
| |
|
|
moglite
Part of things

Posts: 815  Club RR Member Number: 144
|
Body & Paint Threadmoglite
@moglite
Club Retro Rides Member 144
|
|
|
I have trouble measuring stuff and then being able to duplicate it, sometimes because of the thickness of the marks, and sometimes because the bend is not a square corner. For example I've been making some chassis rail sections, just an inverted "top hat" section, but of course the corners are slightly rounded because of the bending process. Marking and bending another one to end up the same always seems to involve some crossing of fingers, which I'm sure isn't the right way to do it. Measuring around bending radii is an art, almost a black art. With flat panels it tricky, but with something like a roll cage it is brain melt territory for me anyway. Two things that have helped me. 1) Do a test piece. Put a bend in a piece of stock 100mm long, and put the bend in the middle of it and see how you need to compensate.
2) Do the bend on something that is only rough cut to size, then cut to size after the bending process
Hope that helps and makes sense without pictures. |
| |
1967 Morris Oxford Traveller
1979 Toyota LandCruiser BJ40
1993 Daimler Double Six
2007 Volvo XC70 2.4D
|
|
|
|
|
|
|
I made plenty of notes / measurements prior to pulling the defective panels off the assembly Just a quick question if I may, I thought I'd do it here rather than derail the thread. I see you have some clear marks and measurements, but how do you know which "end" of those pen marks you measure to? The mark is clearly more than 1mm thick as it's something like a Sharpie pen, is it just a case of you remembering that you always measure to the inside, or outside, or something more involved? I have trouble measuring stuff and then being able to duplicate it, sometimes because of the thickness of the marks, and sometimes because the bend is not a square corner. For example I've been making some chassis rail sections, just an inverted "top hat" section, but of course the corners are slightly rounded because of the bending process. Marking and bending another one to end up the same always seems to involve some crossing of fingers, which I'm sure isn't the right way to do it. I always go from the physical flange / swage edge to the flange / swage edge & not the marked line unless I detail it otherwise - in which case I would add a note or draw a arrow - loads of pics and quite often of what the physical measurement actually is - Hope this helps |
| |
|
|
|
|
|
|
|
For example I've been making some chassis rail sections, just an inverted "top hat" section, but of course the corners are slightly rounded because of the bending process. Marking and bending another one to end up the same always seems to involve some crossing of fingers, which I'm sure isn't the right way to do it. Would a former help? Doesn't have to be fancy, you could just cut two blocks of wood to the required width (the measurement you want inside the 'U' channel) and shape the corners with the right radius on one of them. Bend the 'U' over the shaped former, then put the plain former into the channel and bend first one, then the other flange outward over the shaped former. That way all four bend radii should be consistent and repeatable. Anyway, that's what I'd do. Hopefully someone with a better suggestion will come along shortly. Good luck. |
| |
Last Edit: Apr 7, 2020 11:00:25 GMT by daklone
|
|
|
|
|
|
|
1) Do a test piece. Put a bend in a piece of stock 100mm long, and put the bend in the middle of it and see how you need to compensate.
2) Do the bend on something that is only rough cut to size, then cut to size after the bending process
Hope that helps and makes sense without pictures. I have tried the first of those, and it has sort-of helped. I can't get away from the idea that I've been lucky rather than skilled, though. One of the pieces I am making has to fit snugly inside another piece that I've already made, so if I make it 1mm too wide, it won't go in, and if I make it too narrow by more than one or two mm, it'll be obviously wrong. I have done the oversize option on this piece and cut the outer flanges down to size, but I'm a stickler for trying to reduce waste, and I've still got a measurement challenge to get the top bits bent into the right place. I'm not entirely sure, I'd have to look at that. I'm bending 1.2mm steel, though, and I wonder whether it might be a bit too much for bending around wood. I haven't been focused on the bend radius itself, as long as I can get the outer dimensions correct. I'd love to get details like that right, but I doubt anyone would notice. I've got a manual folder that is reasonably helpful, and I suspect once I've got used to the relationship between where I fix the piece into the jaws and where the bend actually appears, it'll probably be OK. I've had to make a new top clamp piece for it because the proper one that came with it is too wide to do any more than the first bend. I was lined up to get a local fab company to bend me a 1.5m length of it, and they're obviously much more experienced with their machinery and 1.2mm is really thin to them. But I don't think they're open at the moment, and it's not really a visit I want to make. |
| |
|
|
|
|
|
|
|
I always go from the physical flange / swage edge to the flange / swage edge & not the marked line unless I detail it otherwise - in which case I would add a note or draw a arrow - loads of pics and quite often of what the physical measurement actually is - Hope this helps I think I see. I was looking at that line marked "180" that runs up to the top bend really, and wondering how you decide which part of the curved bit is your mark. And in fact for the bottom, it's clearly in the corner of that pressing spot-welded on, but that's a curved corner as well. I imagine the answer is that it doesn't matter, as long as you know. And still know when it comes time to put it all back together. |
| |
|
|
|
|
|
|
|
|
|
I'm not entirely sure, I'd have to look at that. I'm bending 1.2mm steel, though, and I wonder whether it might be a bit too much for bending around wood. I haven't been focused on the bend radius itself, as long as I can get the outer dimensions correct. I'd love to get details like that right, but I doubt anyone would notice. I've got a manual folder that is reasonably helpful, and I suspect once I've got used to the relationship between where I fix the piece into the jaws and where the bend actually appears, it'll probably be OK. I've had to make a new top clamp piece for it because the proper one that came with it is too wide to do any more than the first bend. I was lined up to get a local fab company to bend me a 1.5m length of it, and they're obviously much more experienced with their machinery and 1.2mm is really thin to them. But I don't think they're open at the moment, and it's not really a visit I want to make. OK, just a thought. I use 1.2mm and haven't had much trouble using wooden formers, just took it slow and tapped it round rather than whacking it. |
| |
|
|
melle
South West
It'll come out in the wash.
Posts: 1,983
|
|
|
|
One of the pieces I am making has to fit snugly inside another piece that I've already made, so if I make it 1mm too wide, it won't go in, and if I make it too narrow by more than one or two mm, it'll be obviously wrong. The worst that can happen is that you'll have to do it again. That's how you learn I'm afraid. |
| |
www.saabv4.com'70 Saab 96 V4 "The Devil's Own V4" '77 Saab 95 V4 van conversion project '88 Saab 900i 8V
|
|
|
|
|
|
|
|
I'm really just asking because everyone has their own ways of doing things, and sometimes something will come up that is a better way of doing it that I've been on so far. Sometimes it's just the case that there is a correct way of doing stuff like this and I just don't know what it is - I didn't think there was anything special about using tinsnips until I saw a recent video someone had posted elsewhere, and all of a sudden the problems I've had with using snips to cut steel went away.
The wooden former bears some investigation as 1.2mm is what I'm using. I'm all for trying these things out to learn, but just trying to minimise the "error" part of "trial and error".
Thanks for all the responses.
|
| |
|
|
melle
South West
It'll come out in the wash.
Posts: 1,983
|
|
|
|
Sorry, hit the wrong note. Just meant to say keep at it.  |
| |
www.saabv4.com'70 Saab 96 V4 "The Devil's Own V4" '77 Saab 95 V4 van conversion project '88 Saab 900i 8V
|
|
|
|
|
|
|
|
I've cleaned up the front wishbones which are made from aluminium on my project car.The cups that locate the anti roll bar rubbers were full of white corrosion which I have been able to remove. I'm now looking what options are available for refinishing them. Would I be correct in thinking that an etch primer is wher I should be starting? What do I need to apply for the top coat that comes in a rattle can? I don have a spray gun & am not looking get one unless absolutely essential.
|
| |
Last Edit: Apr 8, 2020 9:35:34 GMT by 51rider
|
|
|
|
|
|
|
|
|
droopsnoot - Things that may make life a little easier for you - measurement wise - would a scriber that scores the metal in a thin more defined line work better for you - engineers blue is another option for you (very thin / quick drying surface colour that you can then scribe through) - I quite often use masking tape though to define a measurement edge or you can use masking tape and then a thin pen tip on the masking tape to aid the visual aspect - working under stronger or a more dedicated light may work too - Dez recently posted on another thread something called 'Welders Pencils' that would be worthy of investigation - apparently the red one works better. On your metal forming / folding you need to allow for the radius edge when folding - hence your top hat section that you describe - the sides need to slightly longer than what they physically need to be to allow for the material taken in the fold edge - a reasonable guide is to allow the thickness of the steel that you are folding in addition to the length that you actually need i.e: If you are folding a 10mm side / leg with 1.2mm thick steel - your side measurement prior to folding needs to be 11.2mm Hope this helps - Chris
|
| |
Last Edit: Apr 8, 2020 7:41:54 GMT by Deleted
|
|
|
|
|
|
|
Sorry, hit the wrong note. Just meant to say keep at it. Not at all, I know what you meant. droopsnoot - Things that may make life a little easier for you - measurement wise - would a scriber that scores the metal in a thin more defined line work better for you - engineers blue is another option for you (very thin / quick drying surface colour that you can then scribe through) - I quite often use masking tape though to define a measurement edge or you can use masking tape and then a thin pen tip on the masking tape to aid the visual aspect - working under stronger or a more dedicated light may work too - Dez recently posted on another thread something called 'Welders Pencils' that would be worthy of investigation - apparently the red one works better. On your metal forming / folding you need to allow for the radius edge when folding - hence your top hat section that you describe - the sides need to slightly longer than what they physically need to be to allow for the material taken in the fold edge - a reasonable guide is to allow the thickness of the steel that you are folding in addition to the length that you actually need i.e: If you are folding a 10mm side / leg with 1.2mm thick steel - your side measurement prior to folding needs to be 11.2mm Hope this helps - Chris Cheers, I do sometimes use a scriber instead where it's an option, but haven't tried engineers blue - when I'm marking an outer panel I'm a bit reluctant to scribe a mark in it as I have nightmares of it showing through a paint finish. I bought one of those welders pencils, but I got the silver one as the red ones were out of stock, and it's not really much better than a normal pencil in terms of how readable it is - I expect the main advantage is drawing on oil and other dodgy surfaces, I'll keep a look out for a red one. But that gets on to your other point, that of light, and I suspect that's one of the key issues that I need to address, which isn't easy in the shed I work in. If all else fails I'll just have to use a hand-held light of some sort, given that Mr Pritchard has all but ruined the chances of picking up cheap anglepoise lights out of skips now. I think you're right on the folder, and as moglite said earlier, I think I need to do some test bends and mark up some sample steel pieces - I have done some before, but foolishly on plain steel so now the steel is getting surface rust which is obscuring the marks. The radius varies for each different thickness of steel, and the replacement top piece that I made is round-edged box section anyway, so that brings another difference. Thanks for the ideas. |
| |
|
|
|
|
|
|
|
|
|
| |
Last Edit: Apr 8, 2020 9:54:32 GMT by 51rider
|
|
|
|
|
|
|
|
Anyone got any recommendations on a good paint stripper, Bonnet on my TR7 is looking like crazy paving and given I have time on my hands it looks like the ideal time to strip an paint it, as far as I can make out it is the original TPA paint, a second coat of 2 pack then a final coat of cellulose.
|
| |
|
|
|
|


