|
|
|
|
|
Ive fitted a lucas style dynamator in my fulvia see thread retrorides.proboards.com/thread/187827/fulvia-1200-coupe and have got some of the way through the wiring. The original dynamo had 3 wires to it; fairly thick earth , a wire to the light on the dash , and a thicker red wire to the battery. the original dynamo put out 30amps peak and all went through a voltage regulator which is toast and has been removed. 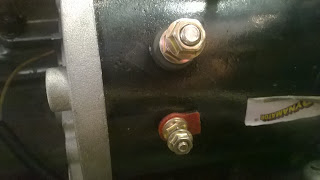 Ive got these terminals on the dynamator a smallish one with a red tag and a larger one with a black base. The original wiring instructions that came with the dynamator are not not for this model ....don't know why .... and show a large tag on the back plate and a small tag on the edge of the back plate. So before I put the wires on these terminals and ruin it or worse set it on fire. Ive trawled the net and sent the company an Email but no joy.
I think I should have a large 40amp cable to the battery and a thinnish wire to the dash light and ignition and I thought a fairly fat earth wire on the case of the dynamator? The dynamator gives a very small voltage about 1 volt from both these terminals when the engine is running.?
Any help thanks, Luke
|
| |
fulvia series 1 1200. rolling restoration
fulvia series 1 1300. definitely in bits
golf Mk4 v6 4motion. weekend fun
T4 transporter. daily
|
|
fad
Posted a lot

Posts: 1,781
|
|
|
|
|
Are you sure they are the only connections? If so, best guess, small lug goes to your dash light, large to battery. Earth is just through the body on the block.
|
| |
Last Edit: Jul 2, 2017 18:19:50 GMT by fad
|
|
rollingcoal
Part of things
we can engineer a way around that, maybe
Posts: 193 
|
|
|
|
|
when I did mine on the Cambridge I had to use a pulley from an alternator as the dynamator was not going fast enough with the dynamo pulley on (low voltage). as fad said there should be a spade connector on the rear of the dynamator ? I think it can just be seen on the picture but it's not very clear
|
| |
A55 Austin Cambridge 1961
Triumph Spartan 1965
mk1 Ford Escort 2 door 1968
Peugeot 406 diesel estate 1998
Citroen Xsara hatchback diesel 1999
|
|
|
|
|
|
|
Are you sure they are the only connections? If so, best guess, small lug goes to your dash light, large to battery. Earth is just through the body on the block. I'm sure theres no others.  thats my best guess too. There is (when I tested with a voltmeter) 12.5 volts through the small wire that goes to the dash light/ignition when the engine is running After some research the later fulvias that did have an alternator had an earth strap to the body though as far as I can tell were isolated from the block with rubber. This dynamator seems to be earthed through the body. So I could use the earth onto the body of the dynamator but it still leaves which is the main supply to the battery. Either the smaller one with the red tag or the bigger one with no tag?? ? |
| |
fulvia series 1 1200. rolling restoration
fulvia series 1 1300. definitely in bits
golf Mk4 v6 4motion. weekend fun
T4 transporter. daily
|
|
|
|
|
|
|
when I did mine on the Cambridge I had to use a pulley from an alternator as the dynamator was not going fast enough with the dynamo pulley on (low voltage). as fad said there should be a spade connector on the rear of the dynamator ? I think it can just be seen on the picture but it's not very clear I did use the pulley from the dynamo as its a double one. So I may have to find a smaller one that runs faster. Theres nothing at the back to connect to. No bolts or spade connectors.  |
| |
fulvia series 1 1200. rolling restoration
fulvia series 1 1300. definitely in bits
golf Mk4 v6 4motion. weekend fun
T4 transporter. daily
|
|
fad
Posted a lot
Posts: 1,781
|
|
|
|
|
So, you have two terminals on the unit and nothing else, and you have two wires, one that goes to your dash light (which has 12v on it?) and one that goes to your battery? And absolutely nothing else?
So, an alternator requires a 12v feed to make it work (an exciter voltage) in order to start the charging process. This comes from your dash light, which is why the light is on when it is not charging, because there is 12v on one side of the light (from your ignition) and 0v on the other side (the alternator), essentially it see's an earth. Once the charging process starts and the engine is running, this puts out 12v on the cable going to your light from the alternator where there was previously an earth, so the light goes out because there is now 12V on either side of it.
With that in mine, your alternators output for charging must carry lots of current, the charge warning light carries only a small current. Therefore your larger terminal will be your battery feed, the small one charge warning.
As for earthing, don't worry about it, it will earth through the body of the alternator.
The terminals that are there, are they labelled?
|
| |
|
|
|
|
|
|
|
So, you have two terminals on the unit and nothing else, and you have two wires, one that goes to your dash light (which has 12v on it?) and one that goes to your battery? And absolutely nothing else? So, an alternator requires a 12v feed to make it work (an exciter voltage) in order to start the charging process. This comes from your dash light, which is why the light is on when it is not charging, because there is 12v on one side of the light (from your ignition) and 0v on the other side (the alternator), essentially it see's an earth. Once the charging process starts and the engine is running, this puts out 12v on the cable going to your light from the alternator where there was previously an earth, so the light goes out because there is now 12V on either side of it. With that in mine, your alternators output for charging must carry lots of current, the charge warning light carries only a small current. Therefore your larger terminal will be your battery feed, the small one charge warning. As for earthing, don't worry about it, it will earth through the body of the alternator. The terminals that are there, are they labelled? Thanks thats a good sum up of what Ive got. There are no labels on the terminals other than a red tag on the smaller of the two terminals. I wanted to make sure that I had correctly understood what I was doing as it could ruin the dynamator or a fire. When I tried to see if there was any voltage from either of the terminals there were no wires connected so theres no exciter voltage. Thats why very little voltage came from either of the terminals with the engine turning the dynamator .So ive got a new piece of 45amp cable to go from the dynamator to the battery. The old fulvia wires don't seem to be beefy enough to take that higher current. The dynamo was at 25 to 30 and now 45amps Thanks for your help. |
| |
fulvia series 1 1200. rolling restoration
fulvia series 1 1300. definitely in bits
golf Mk4 v6 4motion. weekend fun
T4 transporter. daily
|
|
|
|
|
|
|
|
Thanks for the help guys. The dynamator is charging and seems to be good. Big 45amp new wire fitted from big terminal to battery. Smaller gauge wire from ignition and warning bulb to smaller terminal with red tag so that provides excited voltage. Then the original earth wire fitted from the body and then to the case of the dynamator. 14.4 volts to battery when just over idle . All seems good.
|
| |
Last Edit: Jul 8, 2017 10:02:29 GMT by lukestew
fulvia series 1 1200. rolling restoration
fulvia series 1 1300. definitely in bits
golf Mk4 v6 4motion. weekend fun
T4 transporter. daily
|
|


