820
South East
Posts: 790
|
|
Nov 18, 2022 20:27:17 GMT
|
I did this about 15 years ago while jacking the car up with a scissor jack in the rain, didnt know I had missed the jacking point till it was to late and the car began to lower itself as the sill deformed.  I cant get to it from inside or from the end so I was looking at the spot weld and slide hammer tools on ebay. Has anyone used these? do they work or just make a mess? linkOr is there a better way to do it? any tips or advice would be appreciated, thanks |
| |
|
|
|
|
|
|
|
Nov 18, 2022 21:14:51 GMT
|
|
If it were mine I’d cut out the damaged section and replace with either a section from another sill or make a piece. By the time you’ve banged, pulled, ground,welded, stressed trying to get that bit back to shape, it would take a lot more time than just replacing it.
|
| |
|
|
slater
Club Retro Rides Member
Posts: 6,390
Club RR Member Number: 78
|
|
|
|
|
Pull the worst out then filler it?
I think if I wanted a minter I'd cut it out and replace the section as its virtually impossible to shrink the stretch out but if I just wanted it to look respectable I'd just filler it.
|
| |
|
|
madmog
Club Retro Rides Member
Posts: 1,153
Club RR Member Number: 46
|
|
Nov 19, 2022 16:43:02 GMT
|
I used one of these weld on key dent pullers. www.ebay.co.uk/itm/204050230089I can only find one picture at the moment but I'm sure I have others somewhere. I welded on a lot more 'nails' than these and it took a good few hours pulling a bit on each nail but eventually go it to a point where a skim of filler was enough to make good. 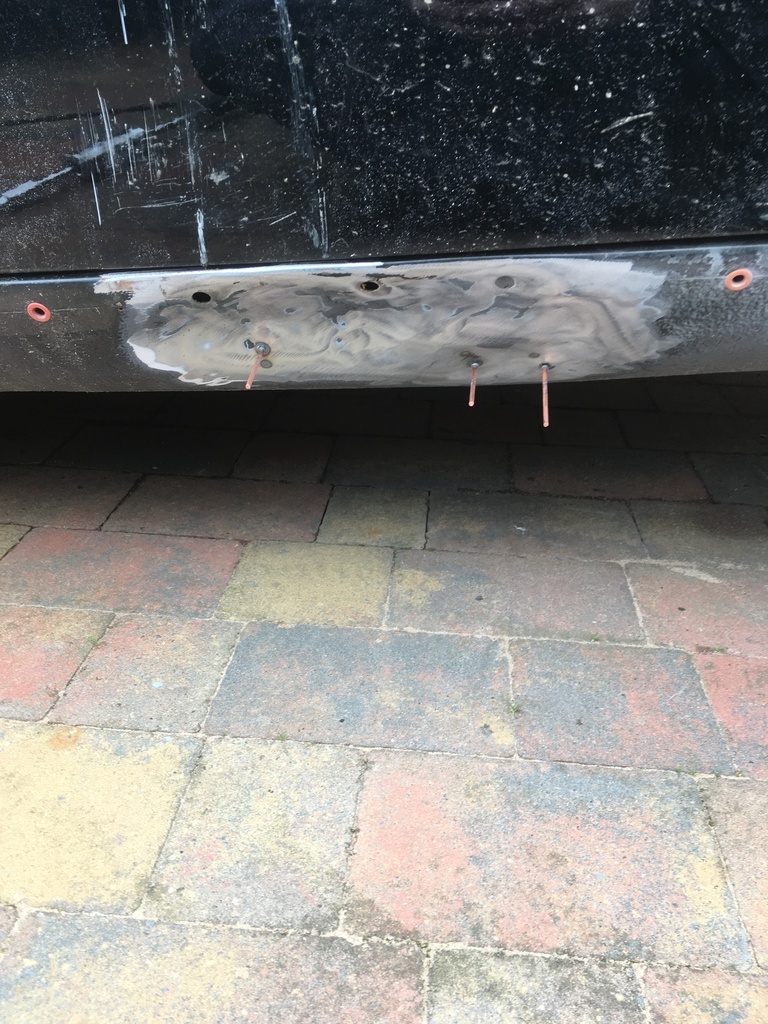 |
| |
Last Edit: Nov 19, 2022 17:14:35 GMT by Rich
|
|
820
South East
Posts: 790
|
|
Nov 19, 2022 17:01:13 GMT
|
If it were mine I’d cut out the damaged section and replace with either a section from another sill or make a piece. By the time you’ve banged, pulled, ground,welded, stressed trying to get that bit back to shape, it would take a lot more time than just replacing it. Pull the worst out then filler it? I think if I wanted a minter I'd cut it out and replace the section as its virtually impossible to shrink the stretch out but if I just wanted it to look respectable I'd just filler it. Thanks for your replies. I wanted to avoid cutting it out and replacing it, main reasons are the welding, I can weld on a bench but at my skill level I would have no chance welding the underside with my TIG and then making a perfect replacement panel as new sills are not available might be difficult The car is not mint but has no welds or filler or any body repairs so wanted to keep as close to that claim as possible, time taken is no issue I spend far to much time on this car. I really appreciate your time taken to reply and may find I have no choice to go that route, thanks |
| |
Last Edit: Nov 19, 2022 17:12:21 GMT by 820
|
|
820
South East
Posts: 790
|
|
Nov 19, 2022 17:10:21 GMT
|
I used one of these weld on key dent pullers. www.ebay.co.uk/itm/204050230089I can only find one picture at the moment but I'm sure I have others somewhere. I welded on a lot more 'nails' than these and it took a good few hours pulling a bit on each nail but eventually go it to a point where a skim of filler was enough to make good. That very useful, thanks. I looked at those pin types but my first thought was the after a few goes the puller would slip off the nails. Were there any issues with the tool? or any tips for using it? That is what I had in mind, a slow process with as many nails fitted as possible, starting at the deepest area first. Then just a skim of filler. Thanks |
| |
Last Edit: Nov 20, 2022 11:23:29 GMT by 820
|
|
|
|
|
|
|
You can buy glue dent puller kits aswell. Pins will pop off on both you can’t get everyone perfect but you just put another one on. Smaller piece of kit to store and same end result. If you was to cut it out and weld it you can just do fast dots instead of trying to do 1 solid weld that’s just a carryon on jobs like that loads of quick dots joined will give 1 solid weld and alot less to grind back www.google.co.uk/search?q=glue+dent+puller+kit&ie=UTF-8&oe=UTF-8&hl=en-gb&client=safari |
| |
|
|
820
South East
Posts: 790
|
|
Nov 20, 2022 11:21:56 GMT
|
|
I looked at those but doubt the glue gun kits would work on this dent, its quite a small area and pretty solid, Is the glue any different to normal glue sticks? I tried sticking different hooks and washers to the bench with my glue gun but there was no where near enough adhesion.
With the welded pin or hook type I can put a lot more in an area and feel sure they would be better fixed to the panel.
Good tip for the welding, thanks. I quite like the idea of trying to make a repair section by hand just for the challenge whether I use it or not.
What gauge steel is the sill likely to be?
|
| |
|
|
|
|
|
Nov 20, 2022 11:54:03 GMT
|
Personally I would opt for the glue as the weld on pins burn the inside of the outer sill and will corrode from the inside out if you can’t get any cavity wax inside. The metal depends on what the car was made of I would guess about 1.5mm for a sill on them but could be way off on that. Plenty people on here to straighten that out though. Are there any blacksmiths/engineers around where you live? You may be able to get a free bit out of the scrap skip because of the size rather than buyin a piece of sheet www.ebay.co.uk/itm/361467603377 |
| |
|
|
93fxdl
Posted a lot
 Enter your message here...
Posts: 2,000
|
|
Nov 20, 2022 13:10:59 GMT
|
|
Another option to consider, cut an access hole in the top or the inside of the sill, then you can use drifts to hammer it out, then weld up the access hole and refinish
Ttfn Glenn
|
| |
|
|
|
|
820
South East
Posts: 790
|
|
Nov 21, 2022 11:16:24 GMT
|
I did consider the glue gun option first because it would be the cheapest but unless they supply araldite strength glue sticks with them I am pretty sure it wont work. Perhaps araldite might work though. Will do test with and M5 bolt aradited to sill see how well it holds. This is a picture of the other side when the wings were removed recently.  There is access to the end of the sill through a grommet where I can spay some rust prevention and wax after the repair. This also got me wondering about Dent repair specialists and the types of tools they use on door skins and other large panels. Are there any dent repair specialist reading this? could you get most of that dent out using that grommet hole. But saying that, from memory I think the access to the dented section is limited for tools as there might be a flat panel at the end of the box section. I need to get the arch liner off again and take a look behind the grommet. I know I did try to get a pry bar in there but couldnt so thats probably not a option. I also looked at ways to get through from inside the footwell or the top of the sill but there is a inner sill box section running the full length of the outer sill blocking any access that way. |
| |
|
|
|
|
|
Nov 21, 2022 12:18:03 GMT
|
|
Looks like the kind of area/access a paintless dent person may have success with
|
| |
|
|
|
|
|
Nov 21, 2022 17:07:38 GMT
|
|
The metal is creased so the paint will crack when the dent is pulled and prying it from the back will push it out too far as the metal has stretched so would need beaten back wrecking the paint anyway, if you could get a pry bar in but imo by the sound of it anything small enough to fit through that hole will just bend when pressure is applied. Pry bars tend to be flat for more rounded dents where there’s no creases and no cracked paint. You’d be looking at £50-75 per hour for a smart repairman. I’m not sure what glue the puller kits use but I’d imagine it’s 2k and very strong. Genuine headache that one to fix without major surgery hope you find a solution that works soon 🤞
|
| |
|
|
|
|
|
Nov 21, 2022 18:17:20 GMT
|
|
I managed to get something similar (stump of broken gatepost) out of our mx5 by welding approx 15mm wide strips of steel on with a couple of tacks them pulling on them with a slide hammer finaly cutting the strips off when finished. took a while but got it within a couple of mm after paint it got a good internal waxing.
|
| |
|
|
820
South East
Posts: 790
|
|
Nov 22, 2022 10:54:32 GMT
|
I managed to get something similar (stump of broken gatepost) out of our mx5 by welding approx 15mm wide strips of steel on with a couple of tacks them pulling on them with a slide hammer finaly cutting the strips off when finished. took a while but got it within a couple of mm after paint it got a good internal waxing. I like that idea, should be quick to move from one tag to the next so it can be done very gradually too. As said above I really appreciate all the advice it is very helpful. It might be a few weeks till I can get started on this. After a mad couple of lockdown years working on it continuously I have not been able to spend any time on it this summer, cant wait to get started again. |
| |
|
|
|
|
|
Nov 23, 2022 22:57:12 GMT
|
|
A few ways to do this:
'miracle pull' spot weld based dent puller as shown to tug it out from the bottom. It already needs re-stonechipping and painting so I would clean off the stone guard and pin it out. There's about 2 to 3 hours work to get it ready for paint. Failing that, use a mig to tack on some steel nails and then whizz them off with the grinder. As others have said, good blast of cavity wax when you're done and you'll have no issues. This would be mine and just about any other panel beaters chosen method.
Or:
Make yourself a strong hook shaped tool from some half inch round bar which you can poke through the bunged hole in the front of the sill and poke it out from the back. Avoid using a straight bar or prybar type tool and prising off the bottom of the A-post as you will distort the hole for the bung and you'll end up dressing that up too and it looks pretty original so i'd avoid this route, personally..
You could get a paintless dent guy to look at it, you're essentially asking him to rough it out so you can fill/sand/paint as required so the same level of finesse isn't required meaning it's faster and cheaper. I would imagine you're looking at £50 to £75 including VAT to get that wiggled out..
Personally, I would urge you NOT to chop it out and weld in a new section. All you are doing (aside from hurting the originality) is introducing more places for corrosion to get hold. Plus it's a whole lot more time and materials intensive than carrying out a filler repair.
|
| |
|
|
820
South East
Posts: 790
|
|
Nov 24, 2022 20:37:46 GMT
|
A few ways to do this: 'miracle pull' spot weld based dent puller as shown to tug it out from the bottom. It already needs re-stonechipping and painting so I would clean off the stone guard and pin it out. There's about 2 to 3 hours work to get it ready for paint. Failing that, use a mig to tack on some steel nails and then whizz them off with the grinder. As others have said, good blast of cavity wax when you're done and you'll have no issues. This would be mine and just about any other panel beaters chosen method. I think this is what I wanted to hear and had my mind set on trying to pull the dent out from the start just needed to know the alternatives and anyones experience with those ebay spot weld tools. I put it off for 15 years because you couldnt see it, but its about time I fixed it. Thanks for the excellent advice |
| |
|
|
|
|
|
|
|
|
No experience with the rothenberger type ebay dent pullers but you should still have decent success welding on some pins etc.
I never got round to it but I wanted to try cutting a slot in the contact tip of my MIG to see if I could spot weld on a washer to pull on to make a poor man's version of this:
You could just MIG tack on some washers for the same effect I suppose.
|
| |
|
|
madmog
Club Retro Rides Member
Posts: 1,153
Club RR Member Number: 46
|
|
|
|
I used one of these weld on key dent pullers. www.ebay.co.uk/itm/204050230089I can only find one picture at the moment but I'm sure I have others somewhere. I welded on a lot more 'nails' than these and it took a good few hours pulling a bit on each nail but eventually go it to a point where a skim of filler was enough to make good. That very useful, thanks. I looked at those pin types but my first thought was the after a few goes the puller would slip off the nails. Were there any issues with the tool? or any tips for using it? That is what I had in mind, a slow process with as many nails fitted as possible, starting at the deepest area first. Then just a skim of filler. Thanks Apologies, I've been off the forum. Tips: put on lots of nails and don't pull any of them too many times in a row. Ie keep working around the nails doing a few pulls at a time. If it was a perfect round dent you would be doing more pulls in the centre than near the edge but you will se the metal move and get a feel for it. You want to minimise distortion and stretching so try to make it all move a bit rather than pulling one bit proud of the rest. As someone above said it's at least a few hours work. That's because you have to disconnect from one nail and then connect to another. It's physical but careful work. Also the nails sometimes come off so you re-weld a new one. Also sometimes the nails make a hole in the metal when they pull out. Yes the puller slips off the nails. You spend a lot of time removing and refitting the puller regardless. When done, get some cavity wax in the sill. |
| |
Last Edit: Dec 2, 2022 16:45:30 GMT by madmog
|
|
|
|
|
|
|
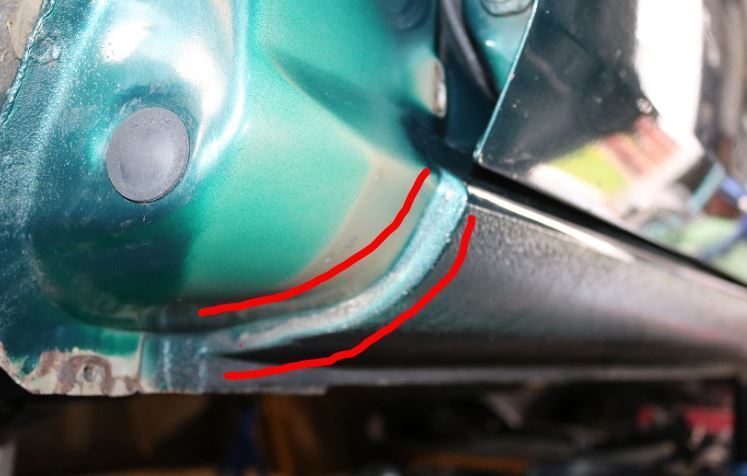 Now I'm at my PC I can reply to this in a bit more depth and use MS paint to your advantage! Due to the return (recess bit) for the wing, the section highlighted in red is the strongest part of the panel. First thing is to weld on a thin bit of plate steel, maybe about an inch wide, at the deepest part of the dent along the outer (visible) radius and tug that down until the fit to the wing is more or less where it needs to be then work the rest of the 'long' part of the dent with the pin-puller. You may need to cut it off and re-position it a couple of times. Reason for this is that if you pin-pull the shallow part and hope to bring the return with it you're gonna be there ages and pull the dent all over the shop before it looks something like it's meant to. This wastes time and makes your life more difficult (especially if you're new to this kind of repair) and the likely-hood is that you won't get it all out. See point number 2... The pin-puller is unlikely to have the balls to pull that return edge out and will either keep slipping off or pull a bunch of holes in the sill which will need MIGing up afterwards. The other thing is that the force required to pull the panel back is concentrated on the point of the pin which will put a series of nipples in the panel before it brings the whole lot out (if it ever does). And as the Rothenberger type dent pullers like you see on eBay don't allow you to pull multiple pins at once, you're effectively using the wrong tool for the job as you need to bring that wing return edge out all together as pulling the metal uniformly leaves a better foundation for the filler work on top. Once you have the deepest strongest bit dealt with, work your dent puller in a spiral around the dent working inwards. As the metal has stretched, by pulling the outside of the dent you are gently shrinking the shallow edges of the dent bit by bit meaning your metal is as close as possible to it's original shape. By the time you get to the centre of the dent it will have disappeared to a point where you can flash over it with a 120 grid DA pad and apply some filler. You may notice in the video I posted earlier that the tech is tapping around the dent with tension on the pulling rig? The reason for this is that he is releasing the tension in the panel caused by the damage when it is held in the right shape by the puller. One last tip is to keep running your hand over the shape of the repair with your fingers together and feeling for the overall shape of the metal (make sure you remove any burrs from the pins first). If you have the flat portion in the right shape and the front of the sill is sitting nicely with the wing profile when fitted then the curved, more visible part of the sill will be fairly easy to get right, even for a beginner. Hopefully this has given you a bit of confidence with which to attack it. I've tried to give enough detail to not be vague but not too much as to make you over think it. Not easy teaching panel beating by remote! |
| |
|
|
|
|


