


Hey, new on here so hello!
I’ve got a few threads going on Fiesta forums but thought I would get it on here 2!
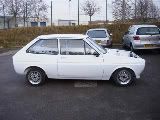
I’ve had my fiesta for about 3 to 4 years now, when bought it was a pretty much standard 1.1L base model with just some Ford Ka alloys, Corbeau seats and a KnN air filter. The body work was mint no rust and shinny paintwork!


After a while I got bored and started tinkering with it, as you do! First off were the standard shocks and replaced with a set of uprated System 2 ones, Next the exhaust was replaced with a peco item. Handled good, sounded ace just lack one thing... POWER!
I got a fairly low millage xr2 engine, I fitted a BVH, Kent BCF2 cam, KnN filter and an Ashley exhaust system, gave it a clean up and a lick of paint and bolted it in...


Just what it needed, ran perfect, decent power 2 could keep up with saxo boyos haha!
I had some oz superleggeras that I was going to use on another car but never did so I tried them on the fiesta one day and they ended up staying on, handled stacks better...


Think I used the car for about 6 months after fitting the wheels then I took it off the road before charismas 2006. The back arch started to rot and I wanted to tidy up a few bits on it.
Although the engine was pretty good I fancied something else... a turbo lump. I saw a few conversions with the rst engine and zetec but it didn’t appeal! I wanted to keep it old skool! So I had the crazy idea of turboing a small x/flow engine!
2 and half years later I'm still at it now but the cars had a fair bit of work!
Basically it’s a 1300 supersport engine bored out to 1360, Audi tt turbo, injectors and lots of custom bits made by myself and my bro (mainly bro lol)
After gather lots of info about turbo conversions etc I began work...
The block was sent off to be bored and acid clean which I then painted up and fitted new core plugs


I also sent the crankshaft away at the same time to be reground + bearings to match

The pistons are 1600 ones instead of 1300, this will help lower compression as the 1600 pistons have a larger bowl then the 1300 ones. If I could go back to the stage where I was building the bottom end I would have used forged pistons but I will see how it runs on the cast ones first.


High pressure oil pump and covers fitted

The sump originally had this tube coming out for the oil return which was later changed to a threaded hose connector

Copper head gasket fitted, should be stronger than normal gaskets and they also help to disperse heat quicker

Chambered cylinder head fitted with steel rocker gear for extra strength!


Burton cover fitted

My bro made an inlet (which he’s currently changing) and I mocked up the engine


Because the car will be running on injectors and different ignition a bracket, sensor and toothed wheel need to be fitted to determine when the engine need to spark


With the engine pretty much ready to be bolted in work on the car started!
Because it was sat on my drive for some time it started to get cruddy in places so decided to give it a full strip down and paint!
First my bro seem welded some of the engine bay and engine mount bracket for extra strength


The car was them moved into are unit, put on axel stands and underneath fully stripped off.


The cruddy rear arch was cut out and replaced


Crawling round under the car wasn’t fun so we had a plan! We made a spit...

Now I could turn the car on its side and attack the underneath with a wire brush


Cleaned and rust treated

Primed, painted and off spit back onto axel stands


The engine bay then got a coat of primer and paint


With the bay and underneath painted I could now start fitting it back together
New steering rack

I shot blasted the axel, arms etc and bought a load of new bits


I blasted and painted the rear shoe holder and fitted new shoes and cylinders


Various arms where painted and new poly bushes fitted


I painted and rebuilt all the axel and tret myself to a set of gaz coilovers!


I got a pair of xr2 brake callipers which I rebuild and fitted new green stuff pads

With the axel complete it was ready to be fitted


The engine cradle was shot blasted painted and new bushes fitted

Gearbox had a quick paint

I fitted the box and cradle to the engine and finally got it bolted up into the bay


All the front drive gear was blasted and painted and new bushes fitted, I also fitted some drilled and grooved discs


[IMG i21.photobucket.com/albums/b283/Howie2k5/DSC00191.jpg[/IMG]
Finally the car was rolling again!!


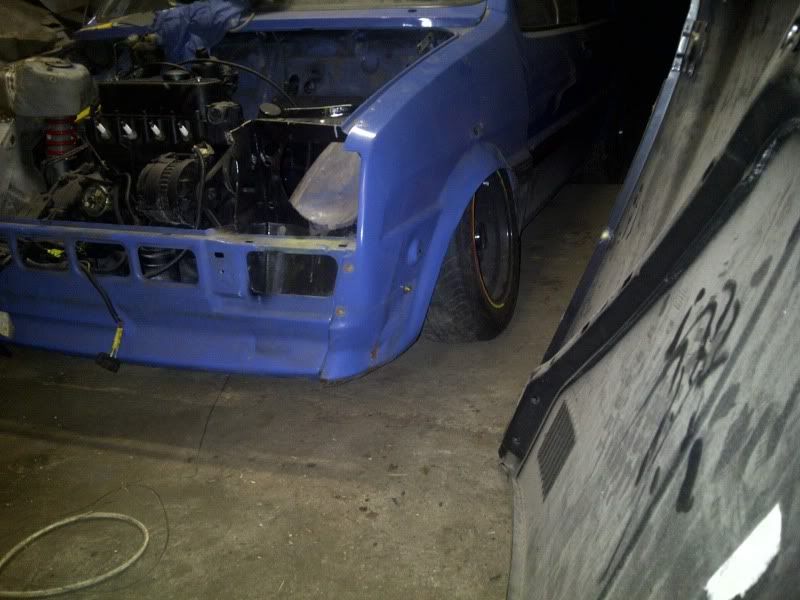
I started mocking up the engine in the car.. A few things had to be modified for the alternator to fit and not foul the inlet for the turbo


Because of lack of space infront of the engine ive decided to mount the intercooler sidewards above the gearbox, I will be running a cooling fan and also on strip/track I will take the headlight out and have a cold air feed


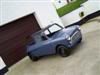
I managed to get the car outside for a proper look in daylight!


Due to lack of space at the front we made an exhaust that would go over the gearbox and behind the engine


I also made some gaskets to suit.. Took ages but turned out or8!

Heat wrapped and fitted

I also gave the inside a quick paint


With the body work repairs done and engine bolted in place it was ready for some paint!!
2 weeks later I picked it up....


I fitted the windows and a few other bits


My fav bit heheheh!

I brought the car home just before Christmas last year, took theses photos last week
Bumpers, lights, wipers etc all fitted


The wiring looms fitted along with an alarm and central locking
The oil side of the engine is complete, oil cooler, turbo pipes fitted etc


Sump return

Oil temp sender in sump plug

Turbo oil feed

Some of the interior is now fitted


Things left to do...
>Fit fog lamp when I get new gasket!
>Fit adjustable pan rod
>Completely fit the fuel system!
>Completely fit the brake system!!
>Completely fit the cooling system!!
>Finish the ECU
>Modify and flock or paint the dash + console
>Fit Gauges
>Fit new inlet
I’m hoping to get it finished for the classic ford show, I need to crack on!
More updates soon
Alex
I’ve got a few threads going on Fiesta forums but thought I would get it on here 2!
I’ve had my fiesta for about 3 to 4 years now, when bought it was a pretty much standard 1.1L base model with just some Ford Ka alloys, Corbeau seats and a KnN air filter. The body work was mint no rust and shinny paintwork!
After a while I got bored and started tinkering with it, as you do! First off were the standard shocks and replaced with a set of uprated System 2 ones, Next the exhaust was replaced with a peco item. Handled good, sounded ace just lack one thing... POWER!
I got a fairly low millage xr2 engine, I fitted a BVH, Kent BCF2 cam, KnN filter and an Ashley exhaust system, gave it a clean up and a lick of paint and bolted it in...
Just what it needed, ran perfect, decent power 2 could keep up with saxo boyos haha!
I had some oz superleggeras that I was going to use on another car but never did so I tried them on the fiesta one day and they ended up staying on, handled stacks better...
Think I used the car for about 6 months after fitting the wheels then I took it off the road before charismas 2006. The back arch started to rot and I wanted to tidy up a few bits on it.
Although the engine was pretty good I fancied something else... a turbo lump. I saw a few conversions with the rst engine and zetec but it didn’t appeal! I wanted to keep it old skool! So I had the crazy idea of turboing a small x/flow engine!
2 and half years later I'm still at it now but the cars had a fair bit of work!
Basically it’s a 1300 supersport engine bored out to 1360, Audi tt turbo, injectors and lots of custom bits made by myself and my bro (mainly bro lol)
After gather lots of info about turbo conversions etc I began work...
The block was sent off to be bored and acid clean which I then painted up and fitted new core plugs
I also sent the crankshaft away at the same time to be reground + bearings to match
The pistons are 1600 ones instead of 1300, this will help lower compression as the 1600 pistons have a larger bowl then the 1300 ones. If I could go back to the stage where I was building the bottom end I would have used forged pistons but I will see how it runs on the cast ones first.
High pressure oil pump and covers fitted
The sump originally had this tube coming out for the oil return which was later changed to a threaded hose connector
Copper head gasket fitted, should be stronger than normal gaskets and they also help to disperse heat quicker
Chambered cylinder head fitted with steel rocker gear for extra strength!
Burton cover fitted
My bro made an inlet (which he’s currently changing) and I mocked up the engine
Because the car will be running on injectors and different ignition a bracket, sensor and toothed wheel need to be fitted to determine when the engine need to spark
With the engine pretty much ready to be bolted in work on the car started!
Because it was sat on my drive for some time it started to get cruddy in places so decided to give it a full strip down and paint!
First my bro seem welded some of the engine bay and engine mount bracket for extra strength
The car was them moved into are unit, put on axel stands and underneath fully stripped off.
The cruddy rear arch was cut out and replaced
Crawling round under the car wasn’t fun so we had a plan! We made a spit...
Now I could turn the car on its side and attack the underneath with a wire brush
Cleaned and rust treated
Primed, painted and off spit back onto axel stands
The engine bay then got a coat of primer and paint
With the bay and underneath painted I could now start fitting it back together
New steering rack
I shot blasted the axel, arms etc and bought a load of new bits
I blasted and painted the rear shoe holder and fitted new shoes and cylinders
Various arms where painted and new poly bushes fitted
I painted and rebuilt all the axel and tret myself to a set of gaz coilovers!
I got a pair of xr2 brake callipers which I rebuild and fitted new green stuff pads
With the axel complete it was ready to be fitted
The engine cradle was shot blasted painted and new bushes fitted
Gearbox had a quick paint
I fitted the box and cradle to the engine and finally got it bolted up into the bay
All the front drive gear was blasted and painted and new bushes fitted, I also fitted some drilled and grooved discs
[IMG i21.photobucket.com/albums/b283/Howie2k5/DSC00191.jpg[/IMG]
Finally the car was rolling again!!
I started mocking up the engine in the car.. A few things had to be modified for the alternator to fit and not foul the inlet for the turbo
Because of lack of space infront of the engine ive decided to mount the intercooler sidewards above the gearbox, I will be running a cooling fan and also on strip/track I will take the headlight out and have a cold air feed
I managed to get the car outside for a proper look in daylight!
Due to lack of space at the front we made an exhaust that would go over the gearbox and behind the engine
I also made some gaskets to suit.. Took ages but turned out or8!
Heat wrapped and fitted
I also gave the inside a quick paint
With the body work repairs done and engine bolted in place it was ready for some paint!!
2 weeks later I picked it up....
I fitted the windows and a few other bits
My fav bit heheheh!
I brought the car home just before Christmas last year, took theses photos last week
Bumpers, lights, wipers etc all fitted
The wiring looms fitted along with an alarm and central locking
The oil side of the engine is complete, oil cooler, turbo pipes fitted etc
Sump return
Oil temp sender in sump plug
Turbo oil feed
Some of the interior is now fitted
Things left to do...
>Fit fog lamp when I get new gasket!
>Fit adjustable pan rod
>Completely fit the fuel system!
>Completely fit the brake system!!
>Completely fit the cooling system!!
>Finish the ECU
>Modify and flock or paint the dash + console
>Fit Gauges
>Fit new inlet
I’m hoping to get it finished for the classic ford show, I need to crack on!
More updates soon
Alex


 The wheels are orion 1600e, they put them on the escort cabs aswell... mirrors are Vitaloni ones from demon tweeks


