Dez
Club Retro Rides Member
And I won't sit down. And I won't shut up. And most of all I will not grow up.
Posts: 11,712
Club RR Member Number: 34
|
|
Jun 23, 2012 12:36:37 GMT
|
oh, and as the battery is going in the boot, i sized up this to run the power up front-  its from an mx5, and once the extra guff is stripped out, its perfect. ive stripped it back to the main feed wire and the splice off from the starter which is the perfect length to run to the alternator, going round the back of the motor to avoid any spinny wirry bits. ive not even had to change any of the terminals, they're all the stock mazda ones! just got to decide what battery box I'm going to use and thats about it. |
| |
|
|
|
|
Dez
Club Retro Rides Member
And I won't sit down. And I won't shut up. And most of all I will not grow up.
Posts: 11,712
Club RR Member Number: 34
|
|
Jun 23, 2012 22:25:30 GMT
|
more done today. first job- remove this-  its more or less brand new, reconned a few hundred miles ago, but I'm rack converting due to space restraints so it will be for sale shortly. then, slap some degreaser around the engine bay, drag out the steam cleaner, fill with MOD-spec detergent and crank up to 11, and half an hour later its looking a LOT better-   cant beleive how clean its come! i still need to grind down the old spotwleds and put some paint on them yet though. next, take a mk2 golf manual steering rack, degrease that too, add polybushes, then make up some beefy mounts made out of 4mm thick 60mm box section-    they were made overly long so they could be trimmed down a little as i offered it up to the crossmember, as the backside of the crossmember isnt straight so its hard to mark up from. trimmed down and mocked into place-   you can see here, it doesnt stick down below the subframe at all. positioning was dictated by inner end of old trackrods, it sits at the same height and distance from the subframe. it even looks though the steering might line up without gratuitous floor hacking-  oh, it does. how handy! thats a 1303 beelte steering link and UJs, shame one end has been hacked up so i will have to source another. length is perfect though!  i will have to add a spherical bearing to the bottom of the column (bolted to the floor/bulkhead), but then it will all link up pretty easily. quite chuffed with that, i was expecting it to a multiple UJ nightmare! |
| |
|
|
Davenger
Club Retro Rides Member
It's only metal
Posts: 7,272
Club RR Member Number: 140
|
|
Jun 23, 2012 22:29:44 GMT
|
|
Looking good dude
|
| |
|
|
|
|
|
Jun 23, 2012 23:51:04 GMT
|
|
Brilliant!!!!!
|
| |
1974 Lancia Beta Saloon
1975 Mazda 929 Coupé
1986 Mazda 929 Wagon
1979 Mazda 929 Hardtop
1982 Fiat Argenta 2.0 iniezione elettronica
1977 Toyota Carina TA14
1989 Subaru 1800 Wagon
1982 Hyundai Pony 1200TL 2-dr
1985 Hyundai Pony 1200 GL
1986 Maserati 425 Biturbo
1992 Rover 214 SEi 5-dr
2000 Rover 45 V6 Club
1994 Peugeot 205 'Junior' Diesel
1988 Volvo 760 Turbodiesel Saloon
1992 Talbot Express Autosleeper Rambler
2003 Renault Laguna SPEARS OR REAPERS
|
|
|
|
bstardchild
Club Retro Rides Member
Posts: 14,891
Club RR Member Number: 71
|
|
|
|
you made that look so easy  Certainly did Dez the bit I'm unsure about is I didn't see a picture of the old set up with the link bar but I'm guessing you've mounted the rack to replicate the same original position?? |
| |
|
|
Dez
Club Retro Rides Member
And I won't sit down. And I won't shut up. And most of all I will not grow up.
Posts: 11,712
Club RR Member Number: 34
|
|
|
|
|
cheers dave/bol.
tony-
it was really! definately a lot easier than i was expecting. the brackets were a bit time consuming but it really was quite straightforward.
B.C.-
yep, thats pretty much it. if you look at the pic of the engine bay before cleaning, you can just see the steering box pitmann arm peeking into the engine bay next to the chassis rail. its the lower hole on this that the trackrod attaches to (the upper one is for the draglink), so thats what i based the positioning from. its the same distance back from the subframe, and the height is the same too. pretty lucky cosidering the constriants of the floor being at the bottom of the subframe, and the sump being at the top of it!
|
| |
|
|
bstardchild
Club Retro Rides Member
Posts: 14,891
Club RR Member Number: 71
|
|
|
|
cheers dave/bol. tony- it was really! definately a lot easier than I was expecting. the brackets were a bit time consuming but it really was quite straightforward. B.C.- yep, thats pretty much it. if you look at the pic of the engine bay before cleaning, you can just see the steering box pitmann arm peeking into the engine bay next to the chassis rail. its the lower hole on this that the trackrod attaches to (the upper one is for the draglink), so thats what I based the positioning from. its the same distance back from the subframe, and the height is the same too. pretty lucky cosidering the constriants of the floor being at the bottom of the subframe, and the sump being at the top of it! Hmm I keep looking at the monza and tinking about junking the PAS recirc ball set up!! But its tight 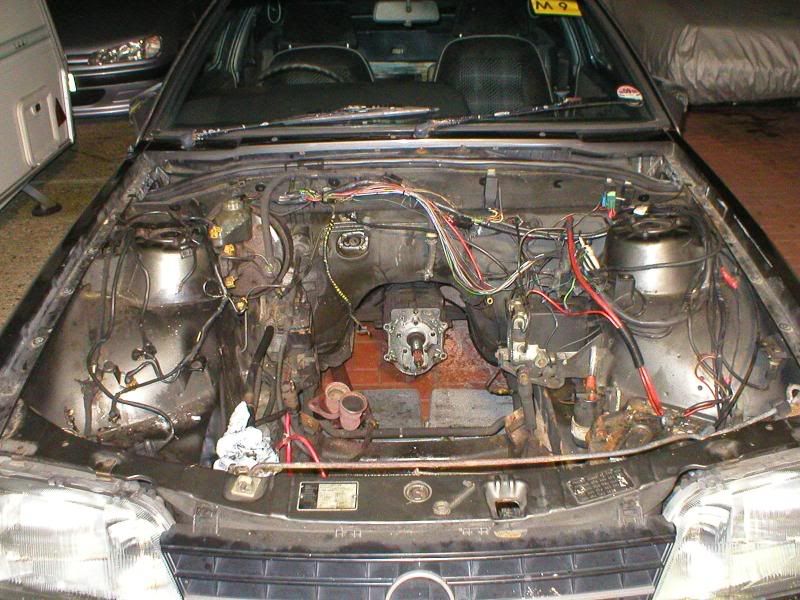 |
| |
|
|
|
|
|
|
|
|
I never fail to be impressed by the quality (and speed!) of your builds. Everything looks fantastic!
On a personal note, I'm surprised to see how well the 165/65s sit on the 7J rims. I too want a bit of sidewall, so will offer up the same combination on mine.
|
| |
|
|
|
|
|
Jun 24, 2012 14:47:33 GMT
|
5 or 6 years ago one of my friends did the same steering rack change. Golf2 rack is perfect for Lada ! Only one thing why i don't have it's because local MOT rules  ... Can you pass MOT in UK with other engine and steering rack? |
| |
|
|
|
|
Dez
Club Retro Rides Member
And I won't sit down. And I won't shut up. And most of all I will not grow up.
Posts: 11,712
Club RR Member Number: 34
|
|
Jun 24, 2012 15:01:25 GMT
|
|
BC,
I recon you could probably squeeze one in there, remember the pitman arm and idler swings in an arc as you steer, so the draglink moves backwards and forwards a bit effectively making it bigger than it is, so there should be a little more space than you think under there.
redtop,
thanks!
and yeah, I'm pretty happy with the size of em, tricky bit now is getting the back looking right in comparision.
motorhead-
i think it might have been your mates car i saw with it, on a hungarian site maybe? everyone was saying i should go for the fiat 131 rack, but i couldnt find anyone who had done it, whereas his was tried and tested- oh, and the parts were much easier and cheaper to get!
yeah, itll pass an MOT fine. over here, you can have something radically modified with nothing other than the original shell with an all new chassis and different running gear and it'll still pass. they're not looking for modifications, just thats whats there is 'safe' and not worn out, etc.
the department that deals with the legalities of identity/modifications is seperate, although you can get referred to them by an MOT tester if he doesnt like your car/thinks the modifications compromise the identity of it.
but I'm well within our points system, so I don't have to worry.
|
| |
Last Edit: Jun 24, 2012 15:06:22 GMT by Dez
|
|
|
|
|
Jun 24, 2012 18:16:13 GMT
|
|
Sounds really good and easy. We have a lot of trouble with any kinda swap. If it's not from original manufacturer than it's implant and you have to pass expert tests. It's expensive and hard to pass, because everything has to be done just like it is from factory. I know that if you want to put a other engine it can not be more powerful than 20% comparing with one you have in a car. It's just stupid...
|
| |
|
|
Dez
Club Retro Rides Member
And I won't sit down. And I won't shut up. And most of all I will not grow up.
Posts: 11,712
Club RR Member Number: 34
|
|
Jun 24, 2012 18:21:49 GMT
|
bloody good job we don't have that here- I'm planning to go from a stock 79hp to around 145.  tbh though, i think this rack conversion will look stock by the time I'm done. id put money on my tester not picking up that its been done anyway  |
| |
|
|
froggy
Posted a lot

Posts: 1,099
|
|
Jun 24, 2012 18:26:49 GMT
|
|
got to be ten years since i last tested a lada ,il show our youngest tester a pic in the morning see if he knows what it is
|
| |
|
|
Dez
Club Retro Rides Member
And I won't sit down. And I won't shut up. And most of all I will not grow up.
Posts: 11,712
Club RR Member Number: 34
|
|
|
|
a little more done. first, i bought this lot, mostly for the engine-  water pump, cambelt and tensioner (tensioners are very hard/expensive to get!), plugs, a stainless pipe to make a new water outlet, a mg midget thermostat to convert it to thermostat in-head rather than the funny external fiat ones, and a new clutch slave. turns out it was a mini one as i thought just got to fit it all (and do the fuel pump shaft mod whilst the cambelt is off) then the engine is ready to go in. i bought a HBOL too for the 132 to assist/hinder me in ding the belt change. oh, and the spherical bearing and housing for the bottom of the steering column came in from mcGill motorsport too, forgot to take a pic of that. means i can finish the top half of the rack conversion now. in other news, i scored a complete mk2 escort rear axle, 53" wide, with a 3.89:1 diff. nice and cheap too. my plan was to fit the shafts and diff to the lada casing, cos the interwebz says its possible, and it would give me a choice of easily obtainable diff ratios, and the right PCD for the new wheels, so i wouldnt need adapters or redrilling. may as well chuck a cheeky fiesta/sierra based disc converion on there whilst I'm at it too so, best take it all apart to see if the web was telling the truth. had to balance one of the new rims on there once id got the ATS and adapters off though. this is gunna be awesome-   not too much poke either. excuse the shonky angle it was literally hung on there. the arches are currently stock, only folded under, not pulled at all-  so, a bit of disassembly later-  lada halfshaft on left, scrote on right. the bearings are different, as are the retainers, but the bearing ID is the same so i can literally press off the ford bearing and retainer, and swap the lada one on and it will bolt straight up! the lada shaft is 1/4" longer than the ford one, but judging by the witness marks on the splines (which are the same profile) the lada splines pass through the spider gears slightly, so the last 1/8" if not slighlty more isnt meshing anyway. the bearing to hubface measurement is identical on both shafts, so the hubface will sit in exactly the same place. ive still got to investigate the diff swappage, but apparently they share the same pcd, but the ford diff needs a 3mm spacer between the carrier and the axle housing to correct the axle centreline to fit it in the lada axle. then, i will just do a fiesta disc/sierra caliper disc conversion, as theres room for the calipers in front of the axle it seems (panhard is in the way at the back, spring platforms in the way above). ile have to make the brackets myself rather than buying cheap off the shelf ones though, as the bearing retainer pcd on the endcastings is bigger. overall, this has turned out to be a pretty simple job so far to make this hybrid axle! |
| |
|
|
MrSpeedy
East Midlands
www.vintagediesels.co.uk
Posts: 4,786 
|
|
|
|
|
Always impressed with the stuff you do. This is going to be one very well sorted Lada by the time you've finished (if you ever do) with it
|
| |
|
|
qwerty
Club Retro Rides Member
Posts: 2,410
Club RR Member Number: 52
|
|
|
|
|
Love your threads Dez and this is no exception. Love the work and this is going to be awesome!
|
| |
|
|
|
|
|
|
|
Love your threads Dez and this is no exception. Love the work and this is going to be awesome! ^Couldn't have put it better myself^ Such a great read, things happening at a fast pace, awesome ideas becoming reality...what's not to like? I can't wait to see and hear this when the engine is done and the wheels are on. Epic stuff Dude. ;D |
| |
|
|
|
|
|
|
|
|
This thread makes me strangely happy that we couldn't quite agree a deal for me to buy it - great to see it evolving like this, and it's going to be even more mega.
|
| |
|
|
FIAT
Part of things
Posts: 149
|
|
|
|
|
Love the rims !
Nice and deep.
|
| |
|
|
|
|


 ... Can you pass MOT in UK with other engine and steering rack?


 [*]
[*] [*]
[*]


