|
|
|
Nov 30, 2013 14:20:06 GMT
|
Rear fender flair sheet metal was cut out slightly oversize and clamped to to get an idea where and how much it needed to be formed. Using the buck as a tracing guide, the inside face of the panel was marked up in preparation for shaping. 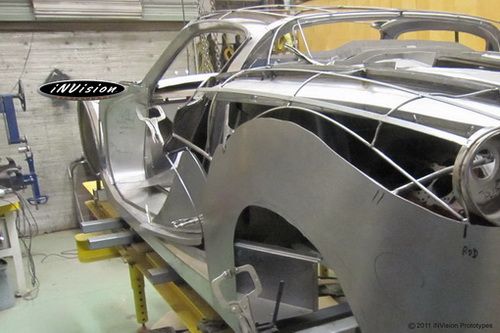 Rear fender flair wheeled to give it a subtle swell and top edge tipped with a soft radius die. The shape was tweaked here and there a little so that it sat relaxed while I created the wheel well lip. Since it's sitting almost on it's own on the buck only a few clamps are required to hold the panel in place. The wheel well lip can now be rolled rolled using the buck as a hammer form. Thinking whether or not to add an additional tapered feature just above the wheel opening. I prefer clean lines and feel that the added feature to make the rear too busy. We shall see. 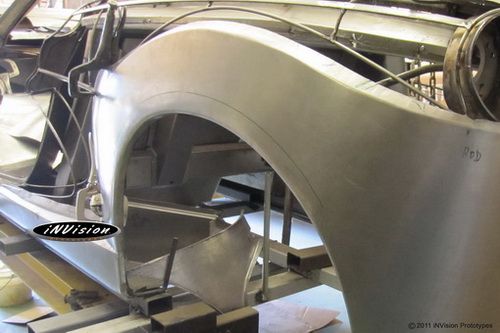 Now it's onto the passenger side...same thing, just a mirror opposite. |
| |
Last Edit: Nov 30, 2013 15:07:11 GMT by invision
|
|
|
|
|
|
|
Nov 30, 2013 14:23:23 GMT
|
It's a mountain of metal work to tackle - with about 74 exterior panels and just about as many structure components. Some are straight forward while others take some thinking to determine an approach that eliminates welding pieces together .... not that there is something wrong with welding panels. So, getting on with the build - with the rear 1/4 pieces taking shape it was time to move onto the rear bottom fascia. Using the buck as a template, sheet metal pieces were cut to the approximate dimensions required. Adding too much material would hinder the shaping process and result in more waste. Here is a progress comparison. Yes, the left piece started out just like the right one...just forgot to take a picture of it. 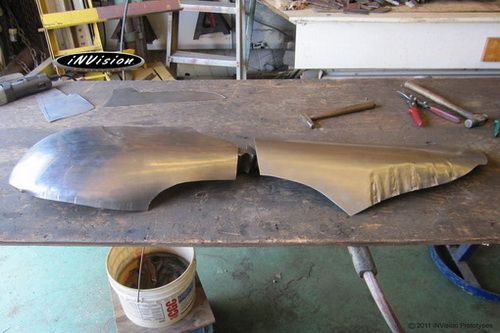 Bottom left rear fascia piece all smoothed out and ready for trimming. 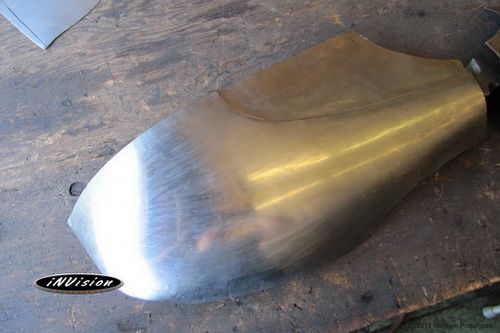 Tuck shrinking of the right rear piece completed to help with the curved profile and ready for some english wheel shaping. 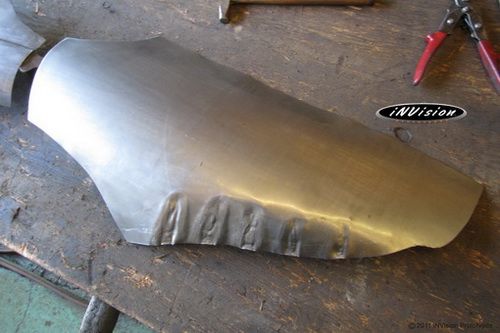 Both sides almost completed ... need to trim up the perimeters and install them for scribing. 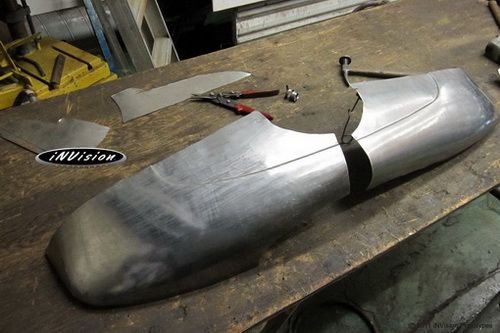 Pieces clamped in place and scribed. Once the remainder of the body panels have been shaped the huge job of trimming, fitting, and welding will begin. 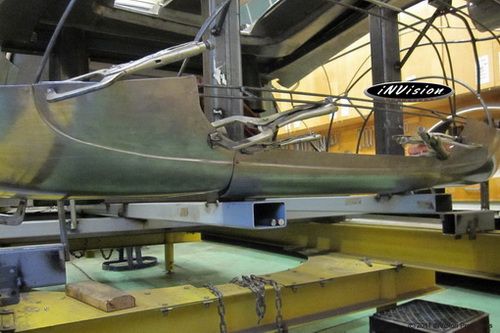 Front fenders are coming next. Thanks for looking. |
| |
Last Edit: Nov 30, 2013 15:09:11 GMT by invision
|
|
|
|
|
|
|
|
this awesome and very inspirational. Keep up the posts. I cant wait till we have our own workshop- i wanna get into this. such fun. I need to some how convince my boss that he doesnt need his english wheel...
|
| |
|
|
|
|
|
|
|
|
The word 'genious' is bandied about quite a bit nowadays but you sir are just that....AWESOME!
|
| |
|
|
eurogranada
Europe
To tinker or not to tinker, that is the question...
Posts: 2,556
|
|
|
|
|
This is just sooo impressive!
|
| |
|
|
|
|
|
|
|
Thanks again Gents! No genius here though. As I mentioned before it's just a lotta learnin' by doin'... I keep hammering away at something till I'm happy with the results. I had a few questions about that orange machine I roll panels in. It's called an English Wheel... or if you're across the pond from me ... a 'wheel'  . It creates compound(3D curves) by compressing the metal. You can stretch metal(thin out the sheet metal and increase surface area) as well as shrink metal(hammer metal into itself, making it thicker, thereby decreasing surface area). That particular wheel I build myself. Here's a little back story. After what seemed like an eternity of planning the type and size of wheel to suit my requirements ... I decided to jump in with both feet and built an English Wheel. The overall design is quite simple...consisting of two 1/2" plates welded to a rolled 4"x3/8"tk flatbar set between the C's. The frame is 52" high with a 31" throat(from the anvil centre) and a 8.5"spine...which has resulted in a very rigid unit. Here are the lower anvils, the bling of metal shaping and the only part I didn't get involved in fabricating. When they arrived...it was like Christmas ... in July! Here's a shot.  The 1/2" steel plate C's were ordered from the local steel supplier who laser cut them using the CAD drawings I provided. I also asked them to weld the unit together since. This is what the unit looked like when it arrived.  I wanted to minimize it's footprint, yet ensure that it would remain vertically solid so we used rear hub that had the lug holes worn out. Once the centre of gravity was determined(with the additional weight of the adjuster and anvil weights taken into account) a flange was created. As for a comfortable wheeling height, I'm 6'2", a lower roller from my tipping machine was clamped temporarily into place then the frame was positioned so that when wheeling, the imaginary sheet was around the level of my sternum. The vertical heavy-wall pipe was then cut to length and welded into place.  To get an idea of the lower anvil location and alignment some remnants of 4"x4" box tubing were clamped between the plates. This wasn't the final setting...as it was kinda difficult to set the pieces in place without a 3rd hand. The next step will be to create the upper adjuster utilizing an Acme thread.  The frame was painted and upper adjuster assembled from the top with a cover plate that bolts down and encloses the thread.  Unit all assembled with the upper and lower anvils trued with each other.  I also decided to mount the anvil holder on the side that I'll be using the wheel the most. I've seen some placed on the back, but if the unit is back up against the wall most of the time as in my case ... I felt it would make it more of a challenge to get to them. You may also notice the flange plates that join the base to the C frame - they're adjustable to move the centre of gravity if required at any point in time.  I've been using the machine since December of 2011 and am extremely happy with the results. With the acme thread, the pressure adjustment is very sensitive...but since I haven't used any other machines I've gotten used to it and don't mind. The machine doesn't wobble...much less move.  I'm not sure who here has had an experience using an english wheel. But, during the wheeling process I listen to what the wheel is telling me, seriously... The wheel emits a particular frequency - something compared to that of a tuning fork as the metal takes shape. When the sheet is fresh, ie. not wheeled, you get a dull drone. As the shaping progresses you begin to hear a more defined ring from the wheel. Then when the pressure is backed off and you start washing the panel, the panel itself starts to tighten up and develop it's own ring. Finally, once I hear a particular ring - the panel is ready to serve.  |
| |
|
|
|
|
|
|
|
I have never tried working on an english wheel, and I'm dying to try. Never asked my mate's dad to try though (he has one). That wheel looks superb, but I could never trust that rim's footprint with all that weight so high up. I KNOW it's never going to fall over, just no matter how many times I'd put it on paper i still wouldn't be able to trust it  |
| |
Last Edit: Dec 3, 2013 17:09:08 GMT by wheeler
|
|
|
|
|
|
|
I have never tried working on an english wheel, and I'm dying to try. Never asked my mate's dad to try though (he has one). That wheel looks superb, but I could never trust that rim's footprint with all that weight so high up. I KNOW it's never going to fall over, just no matter how many times I'd put it on paper i still wouldn't be able to trust it  Hehe!   Thanks wheeler! That's the typical first reaction students and people get who visit the shop and see the english wheel.... until they get to use it. With no "feet" in the way, they find it a real pleasure to use and find it exceptionally solid. By the way, you've got an appropriate handle for this post.  |
| |
|
|
|
|
|
|
|
|
Hah! Didn't even think about my nickname.
Just wondering - would a single grownup be able to tip it over? also how much from vertical does it need to lean before the center of gravity is no longer over the foot?
|
| |
|
|
|
|
|
|
|
takes bout 1* from TOC   Honestly, never been that curious to see if I can push it over. Saying that, I do 'walk' it across the shop from time to time depending on what's going on and where I need it. Great exercise! I can hear the comments now..."OMG that bloody fool!"  |
| |
|
|
|
|
|
|
|
|
|
|
years ago i bouth the wheels but never comlete the building of it but i think this is the time
sorry for the bad englis :-)
i am from holland
gr john
|
| |
|
|
|
|
|
|
|
|
such a shame tools that don't get used :-(
je mag ze ook aan mij verkopen John :-)
regards
mitch
|
| |
|
|
eternaloptimist
Posted a lot
   Too many projects, not enough time or space...
Posts: 2,578
|
|
|
|
|
Good grief, what a build!
|
| |
XC70, VW split screen crew cab, Standard Ten
|
|
|
|
|
|
|
years ago i bouth the wheels but never comlete the building of it but i think this is the time sorry for the bad englis :-) i am from holland gr john No worries buddy! I'd be very interested in seeing your wheel once complete.  |
| |
|
|
DMS
Part of things
 
Posts: 57 
|
|
|
|
such a shame tools that don't get used :-( je mag ze ook aan mij verkopen John :-) regards mitch Ik dacht precies hetzelfde  . |
| |
|
|
DMS
Part of things
 
Posts: 57 
|
|
|
|
I don't know about the built quality but those english wheels can be had fairly cheap: expensive modelCheap modelI'm guessing for a propper pannel beating you need all tools but what would your advice to get first: A wheel or bead roller? |
| |
|
|
|
|
|
|
|
I don't know about the built quality but those english wheels can be had fairly cheap: expensive modelCheap modelI'm guessing for a propper pannel beating you need all tools but what would your advice to get first: A wheel or bead roller? Both of those wheels will have considerable flex in their spines that will reflect directly into the quality of one's final work. Only difference between them, other than price, is size of panel you can work. Before pulling the trigger on a wheeling machine I would suggest one considers a few things. First, how much shaping one would be doing - answering this question will tell you whether this style of machine will work as is, with additional reinforcement, or if you need to move up to a higher price range. Secondly, how large of a panel one would be shaping and available space. Panel beating can be accomplished with simple tools. If you have a selection of hammers, dollies, slappers(spoons), a rubber mat, chisels, metal snips, steel work surface, a pipe flange, ... well you get the idea... you'd be well on your way. A wheel and bead roller just speed up the process. I don't like creating links between threads, but here's one to the first car I built without an english wheel nor bead roller to show that it is possible. retrorides.proboards.com/thread/149540/60s-rhythm-invision?page=1 If you scroll through it you can see some of the processes used In the background of this photo you can see a steel bench with a series of hammers hanging up. All of Rhythm's panels were created by hand and that was were most of the magic happened.  With respect to acquiring a wheel or a bead roller, that is a difficult question for me to answer. You will need to ask yourself whether the majority of your work will consist of exterior panels or structural components. |
| |
|
|
|
|
|
|
|
|
hello DMS
the name says it all HBM Hobby Bob Machines
they are rubbish
to much flex in the frame
for a good one you need a kendrick or something like it with a cast iron frame
or make one yourself like on here
these hobby wheels are curse word and only good for if you want to use them once
the wheels are to soft and they will mark if you try to wheel out the welds
if you want to use the wheel more often than expect to pay a bit more but you'll have fun a lot longer
wheel or bead roller what to buy first .....invision already sayd that it depends on the work you want to do first but both are great tools to have
regards
mitch
|
| |
|
|
|
|
|
|
|
|
What if you were to gusset the everloving peep out of those wheels in the link? I've been thinking of making one somewhere down the road, surely getting some decent thick walled tubing and adding a lot of gussets should do the trick?
|
| |
|
|
DMS
Part of things
 
Posts: 57 
|
|
|
|
What if you were to gusset the everloving peep out of those wheels in the link? I've been thinking of making one somewhere down the road, surely getting some decent thick walled tubing and adding a lot of gussets should do the trick? Initially I was thinking the same thing but apparently as broadspeed said the wheels (apart from the frame) are to soft too. As usual if you want to get quality you'll have to pay-up or make it yourselve. I've bought some things from that shop before and they work great when you modify a few things. But I'm in no way making a living out of these machines. I just make some stuff now and then for a hobby. I didn't post them because I was interested in buying them only for the sake of arguement. There are budget solutions but you get what you pay for. It's nice to get the opinions of people who really know this stuff. Thanks guys. |
| |
|
|
|
|


 . It creates compound(3D curves) by compressing the metal. You can stretch metal(thin out the sheet metal and increase surface area) as well as shrink metal(hammer metal into itself, making it thicker, thereby decreasing surface area). That particular wheel I build myself. Here's a little back story.


