|
|
|
Jun 17, 2015 22:15:16 GMT
|
I just read through the whole thread. First, AWESOME car. Great work. Two years solving problems and making things work, getting it running and driving, passing the MOT- serious accomplishments. Congratulations, it was and is, a joy to watch you solve design issues with the car. Second thing is,I love the sound. These have always been one of my dream cars. We don't really get the Rover engines over here, but they're based on an older version of a Chevy engine, so who cares, it's a V8! In another post about a lowered silver Esprit, I commented that it was ruined because it was lowered. I was wrong. Seeing what it took to make it happen and the fact that you used air so it can go up and down correctly- I concede they look freaking awesome and if I see that thread, I'll apologize to the guy. They're super cool and that's it. Your car and your work are inspiring to many. Not everyone can take something and change it into what they want it to be. Again, great car, bitchin' sound and great thread. thanks dude, its good to be back in the saddle and getting it done |
| |
|
|
|
|
|
|
|
Jun 17, 2015 22:23:21 GMT
|
I just read the entiore thread also. Very cool build, I'm now googleing Lotus Esprits..... Regarding your over heating issue, first thoughts are: The rad needs a clear airflow path designed. Otherwise at speed,air may completely stagnate around the core, note the fans should only be required when stationary. I would suggest a duct / scoop made from sheet aluminium mounted underneath to direct air from under the bumper up through the core. Then seal off any front bumper/bonnet air holes, and venting the post-radiator air towards the rear of the bonnet. Unless I misunderstand the design and airflow enters the rad though the bonnet & exhausts under the car? In which case I'd still sugest some ducting around the rad core. Damn Esprits are expensive on the eBay¬?!  thanks, yes it does have a large duct to direct air into the rad just not fitted it yet or shown pictures, and yes fans are just for when needed in traffic jams etc the rear hatch glass is also going at some point and I am fitting a polycarbonate vented louvre |
| |
|
|
|
|
|
Jun 17, 2015 22:27:22 GMT
|
While I was in the mood for painting things satin black, I wanted to refresh my door frame trims. The door cap/seal was pitted with rust so I decided to remove it to do a better job as it’s hard to paint it in situ with the rubber glass seal, as it also had a few areas that needed paint under the seal. The trim is held in place with 3 nuts, very small and a weird size (1/4) if you have a socket set with a small socket that you have never used with ¼ wrote on it now you know what it fits! Ah but you can not get it on because of the angle of the stems and the glass being in the way! Lucky for me I had a small ring spanner also in my arsenal. The threaded stems are rusty and just from the look of them they look like they will snap at the first tweak of trying to undo them! I squirted a good dose of WD40 and commenced the attack. I know why Lotus chose ¼ because that’s all the room you have to undo these sods ¼ turn, spanner off ¼ turn, spanner off ¼ turn, etc you get the idea! They are also fine tread and long fooken stems! You also have to remove the outer handle to get a very ridiculous chance of even reaching that end one. No doubt there is a easy way of doing this and me being a complete tool did it the hardest way possible. If you had small child’s hands and thin arms like sponge bob then it’s probably very easy. Ok after hours I relived them on their resting ground for most likely the last 30 years, drilled out the pop rivets removed the rubber seal and sanded them down and also the rear retaining plate. Painted them in black etch primmer and left them over night. Painted them satin black the next day, why is it when you spray with an aerosol can it will always splatter at some point and ruin the job? So had to wait again for them to dry, sanded back the ruined areas and painted again, Job done! then left them for another day for the paint to set nice and hard. When I started to fit the rubbers I found they had shrunk? They were now a good inch shorter than when I took them off? So you have to start at one end with a pop rivet, stretch the rubber to align the next hole and the again and again for each hole until complete. Then stand back and admire all your hard work with a rubber seal fitted all rippled and lumpy and looking like the tread of an old tyre rather than a smooth crisp black rubber trim I had envisioned. First tip of the day I forgot to mention you don’t have to remove the nuts completely just undo until close to the end, as you can remove the trim due to the door tops just having slots and not holes as the mounting points. You only find out when removed! So refitting is again a painfully slow process, and now they just don’t fit as good as they did, so a crappy couple of days wasted. Second tip of the day don’t remove them just paint in situ!  (Yes this pic has been nicked from another thread but its me in cartoon so had to have it!) The rear quarter trims got painted in situ! |
| |
Last Edit: Jun 17, 2015 22:28:52 GMT by espritv8
|
|
|
|
|
Jun 17, 2015 22:59:50 GMT
|
I have modified the lower air shroud/duct to fit the new rad, just used sheet alloy and pop rivets. Fits snug around the rad, and also found some front turbo brake ducts and fitted them as well, can now route some tube to the front brakes or into the car for free air con!  Not pretty but will help duct the air to the rad, once painted black should look ok ish. Well no will still look curse word! But it can not be seen unless you’re under the car so if I run you over keep your eyes shut as the duct is going over you! and be a good chap let me know if you scratched the paint off…….. |
| |
|
|
|
|
|
|
|
|
Haha, I know all about those bloody window trims and seals, I did that job on my esprit! Luckily enough I do have hands like a child and arms like sponge bob so I was able to to the fwuckers out, I also discovered the slotted door panel after unwinding those tiny little nuts on those oh so rusty and fine threaded bolts! Mine did go back quite nicely though as I had bought new rubbers which even though had a slight ripple looked a billion times better than the dried out old ones.
|
| |
|
|
|
|
|
|
|
Haha, I know all about those bloody window trims and seals, I did that job on my esprit! Luckily enough I do have hands like a child and arms like sponge bob so I was able to to the fwuckers out, I also discovered the slotted door panel after unwinding those tiny little nuts on those oh so rusty and fine threaded bolts! Mine did go back quite nicely though as I had bought new rubbers which even though had a slight ripple looked a billion times better than the dried out old ones. and I will have to do it again when I buy new rubbers! DOH! |
| |
|
|
🇿🇼Kingludba🇬🇧
Part of things
  If in doubt... flat out !
Posts: 975
|
|
Jun 18, 2015 14:15:02 GMT
|
omg that is extremely cool, top work, how much are those airbag kits? The air bags are £330 a pair! no kits available you have to make them fit yourself or pay someone thousands to do it for you. As soon as my Lotus is done I am doing my transit, and yes Its also getting a V8! mid engine jaguar 4.0 supercharged. I have a busy year ahead....... If your lotus is anything to go by then this will be one hell of a TRANNY! Eagerly awaiting its build thread. I am really digging the hose clamps you used when fitting the cossie radiator. Where did you get them from? Good work guy  |
| |
`99 BMW 528i auto - current `01 Merc C320 - Gone `01 Forester S-Turbo - Sold `89 BMW 320i Convertible - Sold(shoulda kept it  ) `88 Toyota MR2 T-Bar - Sold `89 BMW 325i touring - Sold `89 BMW 535i - Let her go too early `85 BMW 320i 2 door - Rust = character `00 Subaru Impreza Turbo wagon - Sold (engine failure) `93 BMW 325i - Sold |
|
|
|
|
Jun 18, 2015 14:27:33 GMT
|
The air bags are £330 a pair! no kits available you have to make them fit yourself or pay someone thousands to do it for you. As soon as my Lotus is done I am doing my transit, and yes Its also getting a V8! mid engine jaguar 4.0 supercharged. I have a busy year ahead....... If your lotus is anything to go by then this will be one hell of a TRANNY! Eagerly awaiting its build thread. I am really digging the hose clamps you used when fitting the cossie radiator. Where did you get them from? Good work guy  Thanks bud, the hose clamps I got on ebay they are called Mikalor and are made of stainless steel. |
| |
|
|
|
|
|
Jun 18, 2015 14:27:55 GMT
|
Rad duct fitted with grill, just need to fit the front spoiler to complete the front under tray.  |
| |
|
|
|
|
|
Jun 18, 2015 15:56:44 GMT
|
Front spoiler back on!  Back on the ground! has been on axle stands for months.  |
| |
|
|
|
|
|
|
|
Jun 18, 2015 19:39:08 GMT
|
Took the door panels off to fix the central locking and found the material coming unstuck. The foam degrades to dust and it all starts to fall apart. 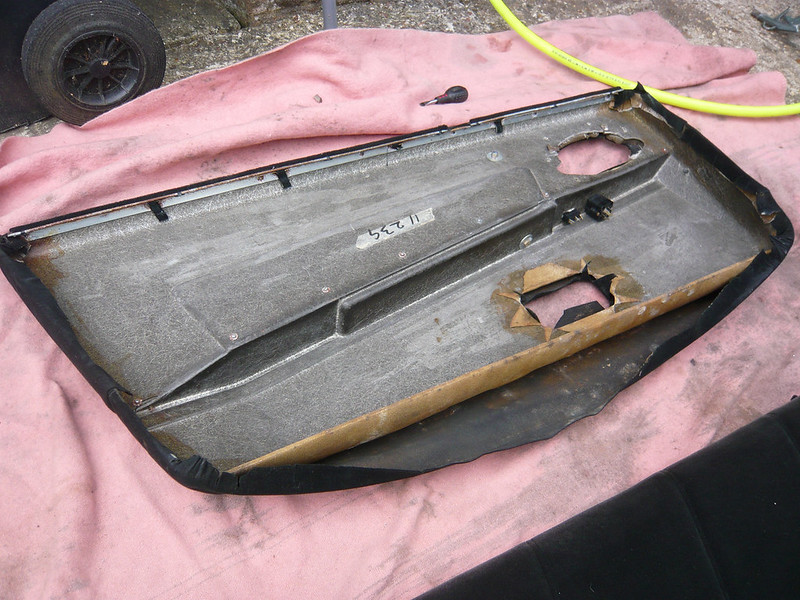 I found an air line is good for blowing away all the dust and Evo-Stik timebond good at gluing it back down. It’s a little tacky and awkward to apply but works quickly and I also used it on the carpets. It allows you to move it around to get it into position unlike the contact version which was very awkward to place items together perfect first attempt. 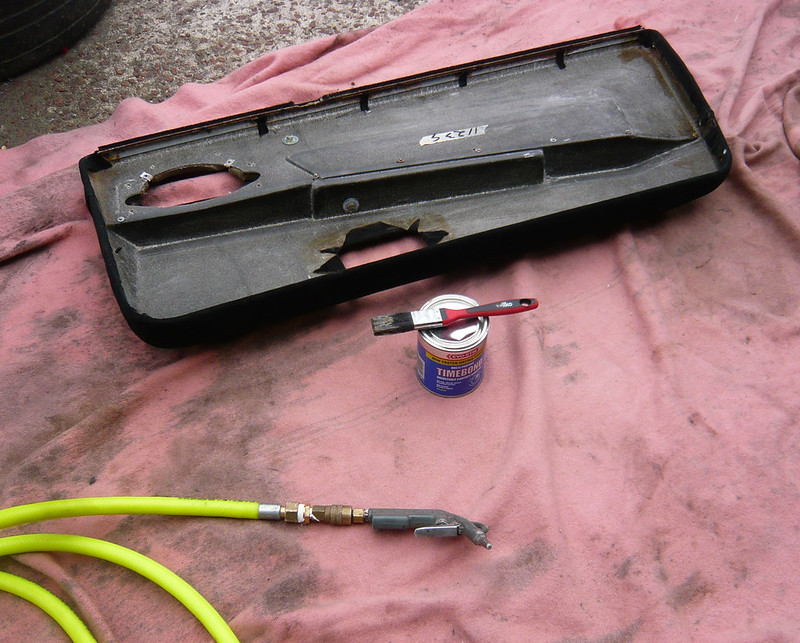 |
| |
|
|
|
|
|
Jun 18, 2015 20:33:33 GMT
|
sorry the car is dirty inside not had chance to clean it yet, so excuse the dusty pics. I am using the Dakota digital quad air pressure and tank gauge kit, this I brought from the USA, nice bit of kit it moniters the pressure of each air spring and compressor tank. I might move it up in the roof panel in place of the digital clock. This was bloody expensive with import duty and the rip off parcel force handling fee! The doomsday switch next to it is the compressor override off switch, or it might be the ejector seat trigger! So don’t mess around with my switches and buttons! 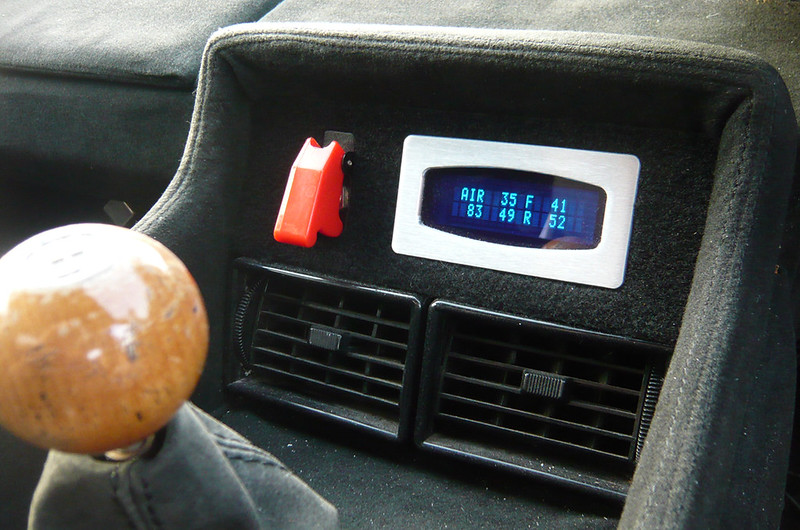 Here is my e-level control pad, again nice bit of kit also from the USA! You can buy them in the UK and is probably the most used system for air ride installs when you start going into high tech and want full control and ease of operation. I can set 3 ride heights into memory, and also control it from a remote key fob. The ECU monitors each ride height sensor and can adjust it automatically to keep your ride height consistent. Not cheap but I couldn’t live with the manual switches I had before. I could not get consistent ride height by just checking air pressure. 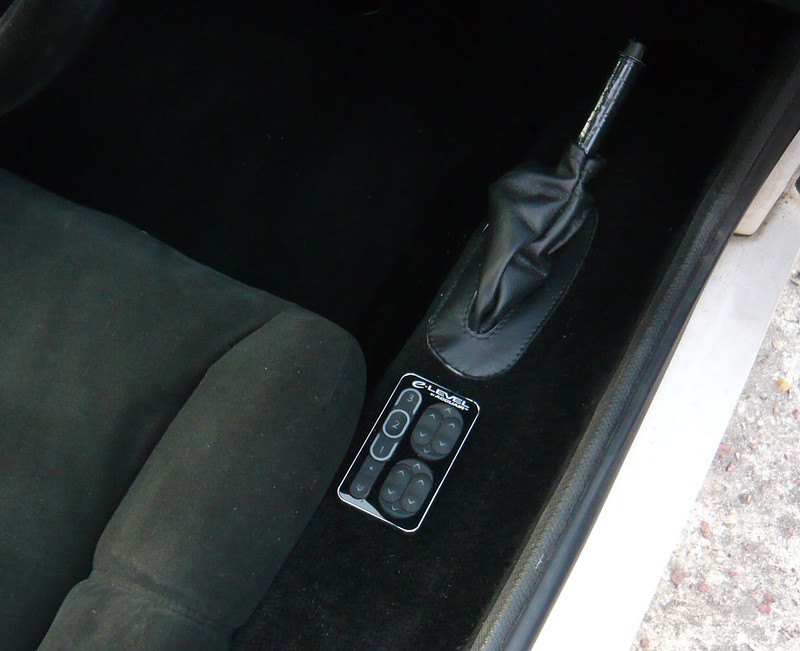 The rats nest has changed! Now running twin alloy tanks and of course the e-level system, lots of air lines and wires! Work still to do tidying this area and still have to finish the rad/fans, I plan to box it in and have a vent outlet via the bonnet. The arrow is to show the location of the other air tank this fitted a treat between the light pods and saved a lot of space. 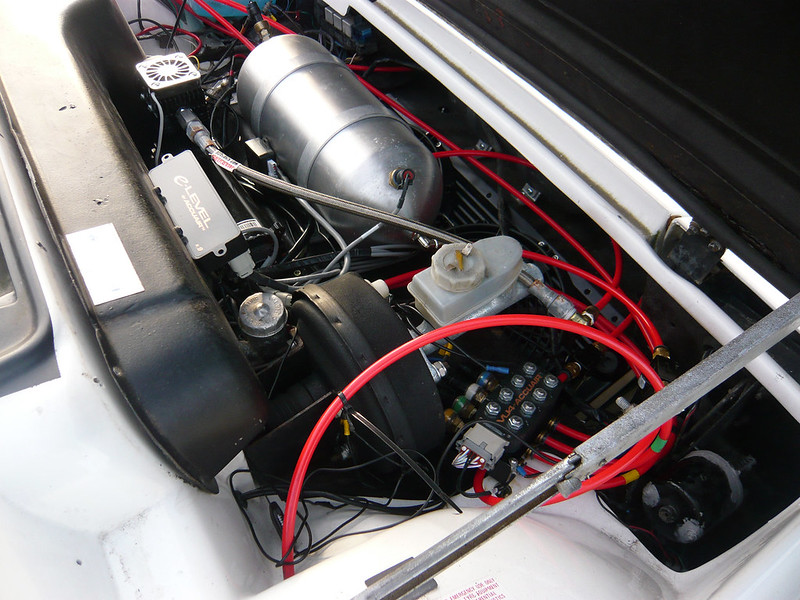 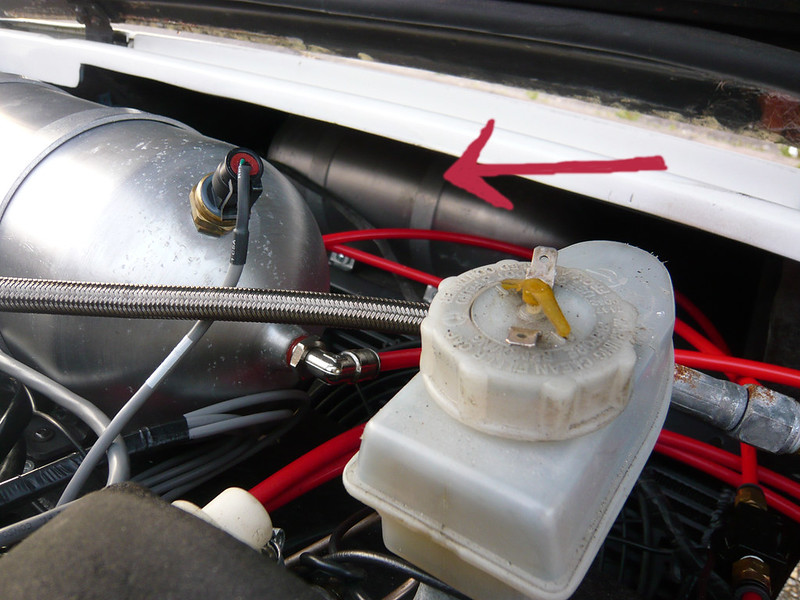 Wow mammoth amount of updates these last few days! Nearly made up for the long time away. Hope to keep going and thanks guys for all the positive support. |
| |
Last Edit: Jun 18, 2015 20:54:06 GMT by espritv8
|
|
adam73bgt
Club Retro Rides Member
Posts: 4,998
Club RR Member Number: 58
|
|
Jun 19, 2015 10:19:31 GMT
|
Glad to see you back on this, its a truly awesome car and seems to be only getting better  |
| |
|
|
|
|
|
Jun 19, 2015 21:00:39 GMT
|
|
Thanks adam, yes really cracking on with it now!
|
| |
|
|
|
|
|
Jun 20, 2015 11:52:19 GMT
|
|
well took it for a spin around the block twice as all was working fine! thought lets go around again glanced at the temp gauge and see its at meltdown! prayer mat must have been wrong today! bloody thing seems worse now? got it home let it cool down checked everything water flow, rad fans coming on etc and its all working but just wont keep it cool! I need to redo it again, header tank has a very small inlet so could be causing a bottle neck and slowing the flow too much? going to look into changing that and also fit a swirl pot (I have it anyway so might as well use it)
|
| |
Last Edit: Jun 20, 2015 11:54:45 GMT by espritv8
|
|
|
|
|
Jun 20, 2015 13:49:57 GMT
|
|
Does your expansion tank have a overflow pipe to the rad? When my elite was overheating I discovered that I had inadvertently forgot to join that pipe back upto the rad which I was told is there to help stop airlocks. As soon as that pipe was back on I haven't had the faintest of problems with overheating. Also are you sure you are getting enough airflow around your new rad location, does seem to be a touch too flat no?
|
| |
|
|
adam73bgt
Club Retro Rides Member
Posts: 4,998
Club RR Member Number: 58
|
|
Jun 20, 2015 15:59:58 GMT
|
|
Looking at the tanks and stuff under the bonnet, could it be that the air is able to get to the radiator but can't really get through the other side very efficiently?
|
| |
|
|
|
|
|
Jun 20, 2015 21:27:43 GMT
|
|
While at work tonight I had an epiphany yes 2 of my brain cells worked together and I may have worked out the overheating issue!
I fitted a small booster pump on a T-piece some time ago and I realised now this may cause a problem and reverse flow the water around the engine against the other water pump, the main water pump is at the front near the rad and the booster pump is at the engine end so it just circulating the water in the engine and not to the rad! I got on it when I came home and have ripped out all the hoses around the engine and going to do a fresh install tomorrow and simplify all the connections and routes and look into mounting the pumps the same end. The booster pump is going on the heater matrix circuit as that is what I originally brought it for but ended up using it as a booster for the main pump due to air locks. Yes I was a total plank! and feel foolish for making a stupid mistake but at least I hope to have sorted it now.
|
| |
|
|
|
|
|
Jun 20, 2015 21:29:14 GMT
|
Does your expansion tank have a overflow pipe to the rad? When my elite was overheating I discovered that I had inadvertently forgot to join that pipe back upto the rad which I was told is there to help stop airlocks. As soon as that pipe was back on I haven't had the faintest of problems with overheating. Also are you sure you are getting enough airflow around your new rad location, does seem to be a touch too flat no? have updated with a new post, no overflow pipe |
| |
|
|
|
|
|
Jun 20, 2015 21:31:35 GMT
|
Looking at the tanks and stuff under the bonnet, could it be that the air is able to get to the radiator but can't really get through the other side very efficiently? have updated with a new possible cause, I don't think the rad is the problem |
| |
|
|
|
|


