glenanderson
Club Retro Rides Member
Posts: 4,319
Club RR Member Number: 64
|
|
Jul 26, 2022 21:57:41 GMT
|
That does look a bit.. crispy, though considering its age, and how its been stored etc, its not *too* bad, have definitely seen way worse on far newer trucks, boy those Iveco eurocargos didn't half like to rot. Hopefully its fairly straightforward to repair, hard to tell in the photos but is the hanger riveted on? and if so are you going to replace it in same way? Going to have to do some of those on my Internationals frame (not for rust reasons...) so been trying to track down a rivet gun to do it.. which is proving to be harder then i thought it would be. Yeah, the DAF chassis was rotten beyond salvage and it was over thirty years newer. The vertical two fixings are rivets, the two in the bottom flange are bolts. I’m not sure whether to try riveting them back on, or to just use good H/T bolts. I’ll probably bolt them given that I’m taking them both off and so they’ll look the same both sides. Today has been generally successful. I picked up the seats without any drama. I tried one out for size, and it should be ideal. I then put them out of the way in the back of the lorry before I realised I’d taken no pictures of them. Oh well, you’ll have to take my word for it for now. 🤣 I had a bit of a sort through my pile of salvaged DAF bits and dug out the engine and gearbox mounts. I’m undecided whether to use the Austin ones at the front, which look very much identical to Land-Rover ones, or to use the DAF ones that don’t look any more substantial, but are ten times the price. The rear ones I’ll probably use the stock DAF ones as I’m not sure that I can get new rubbers for the Austin type. After offering up the engine on Saturday, and realising that I’d have to relocate the turbo, I spotted a tractor version on the dreaded eBay on Sunday. I made a cheeky offer that was accepted, and it was delivered today. You can see just how much difference it will make. 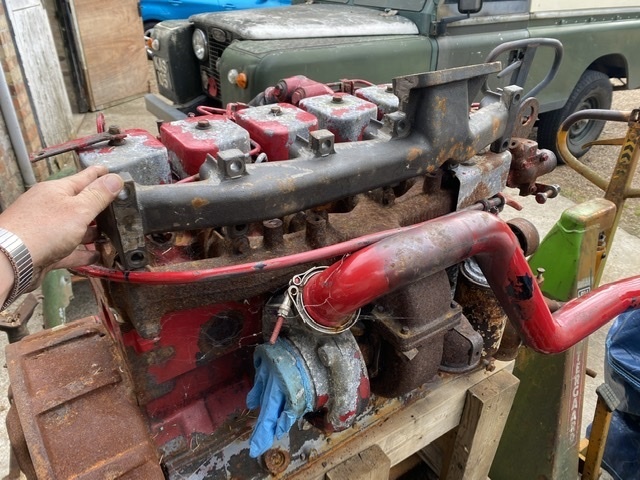 My current turbo is of the non wastegated variety, so pretty massive. It’s a common upgrade to swap them out for a wastegate type, which gives better response and is physically smaller, so that’s probably another thing that I’ll be forking out for no doubt. I then got the front end up in the air and supported on stands. Whilst arranging the stands I noticed this fairly significant crack in the main web on the driver’s side, so that’s another thing that is going to need stitching up.  So that’s as much as I got done today. Hopefully a full day on it tomorrow if the rain stays away. |
| |
My worst worry about dying is my wife selling my stuff for what I told her it cost...
|
|
|
|
|
|
|
|
|
Thanks again to everyone for the words of support. 😀👍 The lorry list, for the time being, consists of repairing the front chassis rails, then sorting out engine and gearbox mounts. I’m not looking beyond that at the moment. I didn’t get much done today, because although I’m officially on holiday, the current industrial relations situation at work means that, as an ASLEF officer, there’s quite a bit of stuff going on at the moment. I did get to spend some time this afternoon though, having a poke about and a proper think about the chassis repair situation. The good news is that there appears to have been very little further deterioration in the structure in the time it’s been sat here unloved. There’s about 24” (600mm) of chassis rail on the passenger side that’s very crispy along the bottom, and both passenger and driver’s sides are quite pitted for the front 12” or so ahead of the spring hangers on the vertical and top faces where they’re exposed to the elements. What little paint was ever applied has long gone. I dug out the front leg that I salvaged from one of the Lincolnshire hulks. It’s pretty bad, but I thought it was worth getting for its bumper bracket and that the spring hanger might be salvageable. From what I’ve seen the front parts of the chassis are the most vulnerable. All three of the Lincolnshire ones were really bad, as was JOY and, obviously GUG too. 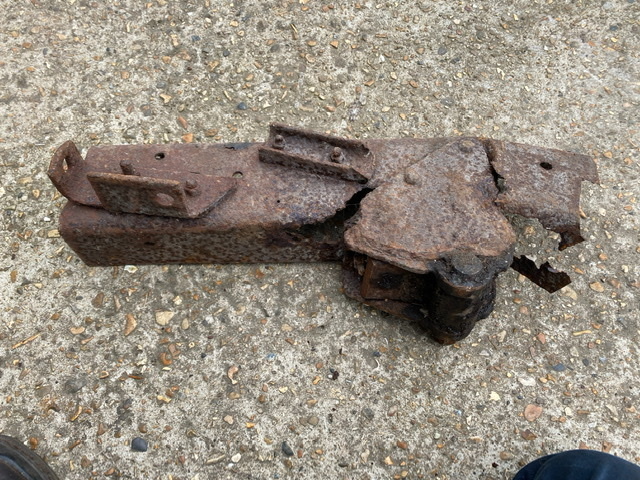 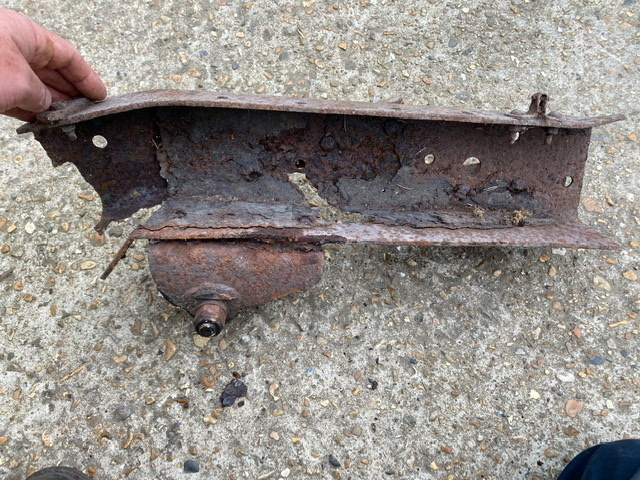 As you can see, it’s even worse than GUG’s one. Then I dug out the front sections of chassis that I’d kept from JOY. 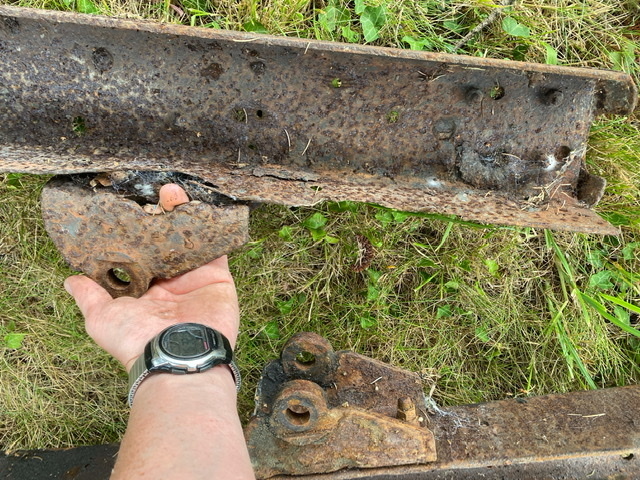 And that’s worse again; even the spring hanger is rotted through on this one, which was one of the main reasons for deciding to look for a better vehicle as a starting point. The chassis is about 9” deep in the centre between the axles, and narrows at the front to about 4” deep. The top rail also narrows down towards the front. Fortunately, the rearmost parts of the rails that I have kept are in good enough condition to yield repair sections of the correct profile and material that I should be able to make an invisible repair. This is important, because commercial MoT standards don’t allow for the kind of “slap a plate on it” repairs that you can get away with on cars. I had hoped that I would be able to carry out the repairs without disturbing the front spring hangers, but sadly both sides have some deep pitting immediately next to them on the outer sides of the vertical faces and they’ll be really visible if they don’t look right. The spring hangers are bolted through the bottom flange, and riveted through the side one. Taking the hangers off should allow me to keep the side holes original, and hide at least part of the welded join behind them. Plan is to do it in sections on the passenger side, first the bottom edge and side that’s really bad, then the top. The driver’s side should be more straightforward. That is in much better condition, both on GUG and on the salvaged part from JOY. I should be able to cut a section from the outer and top part of JOY’s old chassis, and let it in with the welded join largely hidden behind the spring hanger once it’s refitted. 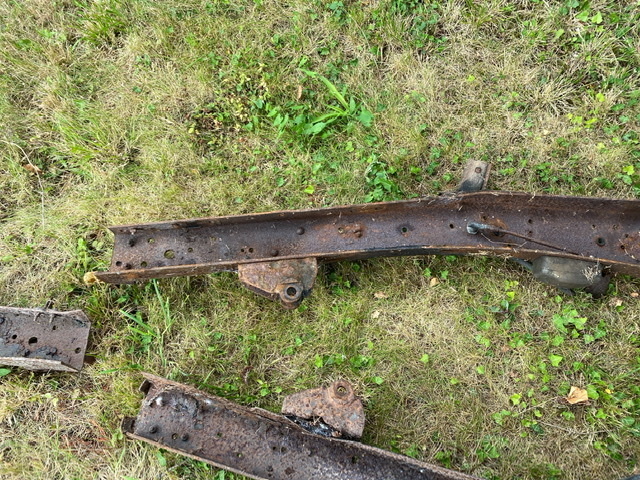 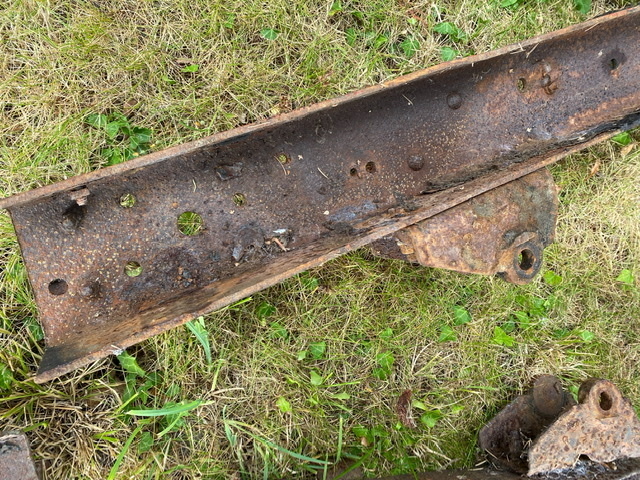 I have a trip out tomorrow morning to collect an eBay win of a pair of Land-Rover front seats that I’m going to be using in the Austin. The existing driver’s seat is from something else and has just been wedged into place. Having the same type of seats in both vehicles makes things a more straightforward, as getting Land-Rover bits is easy, and I know they’re comfortable. Traffic permitting, I’ll be home by lunchtime and able to make a start dropping the front springs out of the hangers. Great seeing you getting on with all of this build Glen. Remember as always…… Progress is Progress. |
| |
|
|
|
|
|
Jul 27, 2022 10:42:25 GMT
|
... Its in Tennessee so alas wrong side of the country, thanks for the offer though  The title was lost at some point, and as it was in Georgia whose gov doesn't issue replacements for older vehicles I'm having to use some.. registration quirks to get a replacement, it's going to cost, but as its a relatively rare truck and i got it cheap its still in budget. Will explain more in detail when i start a thread as its been an interesting endeavor for sure. Not to continue the sidetrack, but I'm in Tennessee myself if you do need any assistance... Glen, I'm really glad you're getting around to this. Looking forward to following along! |
| |
|
|
glenanderson
Club Retro Rides Member
Posts: 4,319
Club RR Member Number: 64
|
|
Jul 27, 2022 10:54:26 GMT
|
 Hijacks are good.
|
| |
My worst worry about dying is my wife selling my stuff for what I told her it cost...
|
|
jamesd1972
Club Retro Rides Member
Posts: 2,916  Club RR Member Number: 40
|
|
|
|
|
Hi Glen, glad you're back on this, is the chassis channel all the same basic shape ? Wondering if getting a length folded up by a local company would be worth the effort ?
On the turbo might be a nice to have in the future, looks like enough to spend on at the moment...
Anyway that manifold looks like it will do a good job.
Keep the work and updates coming.
James
|
| |
|
|
glenanderson
Club Retro Rides Member
Posts: 4,319
Club RR Member Number: 64
|
|
Jul 28, 2022 10:14:49 GMT
|
|
Yes James, the channel is the same profile, in terms of the radius of the curve. It does change depth quite dramatically over the axles, but fortunately I have enough salvaged from JOY to be able to cut repair sections to splice in.
One plan that I’m going to have to revise is that of reinforcing the chassis around the engine and gearbox. I’d originally thought that I’d be able to just box it in with a simple plate down the open side, most likely cut from the old front legs; but there are three issues. The first is that it would mean losing the protected space that the wiring and front brake lines run in, and the second is one of adequately protecting the inside of that box from future corrosion. Finally, and most importantly, lorry chassis are actually designed to be able to flex. Boxing them in puts stresses elsewhere, and only boxing it partially might make it actually more likely to have problems than less. Having given the issue much thought over the last couple of days while clambering all around it, I’ve decided that the best course of action will be to cut two strengthening plates from the old chassis’ web, that will run between the front and rear engine mount areas, and bolt them directly to the vertical webs each side. That should impart a great deal of extra strength without reducing flexibility too much. By doing it that way I can ensure both parts are well painted and protected before assembly. Also, as I’ve said before, “The Ministry” look very dimly on any welding work on commercial chassis, so keeping it looking factory is paramount.
|
| |
My worst worry about dying is my wife selling my stuff for what I told her it cost...
|
|
|
|
|
Jul 28, 2022 10:17:04 GMT
|
Hi Glen, glad you're back on this, is the chassis channel all the same basic shape ? Wondering if getting a length folded up by a local company would be worth the effort ? On the turbo might be a nice to have in the future, looks like enough to spend on at the moment... Anyway that manifold looks like it will do a good job. Keep the work and updates coming. James I used this company to make me some top hat sections for the chassis rails on my MK2 jag www.ebay.co.uk/str/gdiproducts they were really reasonable and made exactly what I wanted. It might be worth asking them if they can bend something of the thickness you require. |
| |
|
|
Frankenhealey
Club Retro Rides Member
And I looked, and behold, a pale horse! And its rider's name was Death
Posts: 3,881
Club RR Member Number: 15
|
|
Jul 28, 2022 12:59:23 GMT
|
If it's the same size as my donor DAF then that's still hanging around. Also, you & me + Santa Pod for a truck-off as soon as you're ready  |
| |
Tales of the Volcano Lair hereFrankenBug - Vulcan Power hereThe Frankenhealey here |
|
Darkspeed
Club Retro Rides Member
Posts: 4,867
Club RR Member Number: 39
|
|
Jul 28, 2022 14:46:38 GMT
|
Mr akku has been about visiting bus a garage with one of these things in it 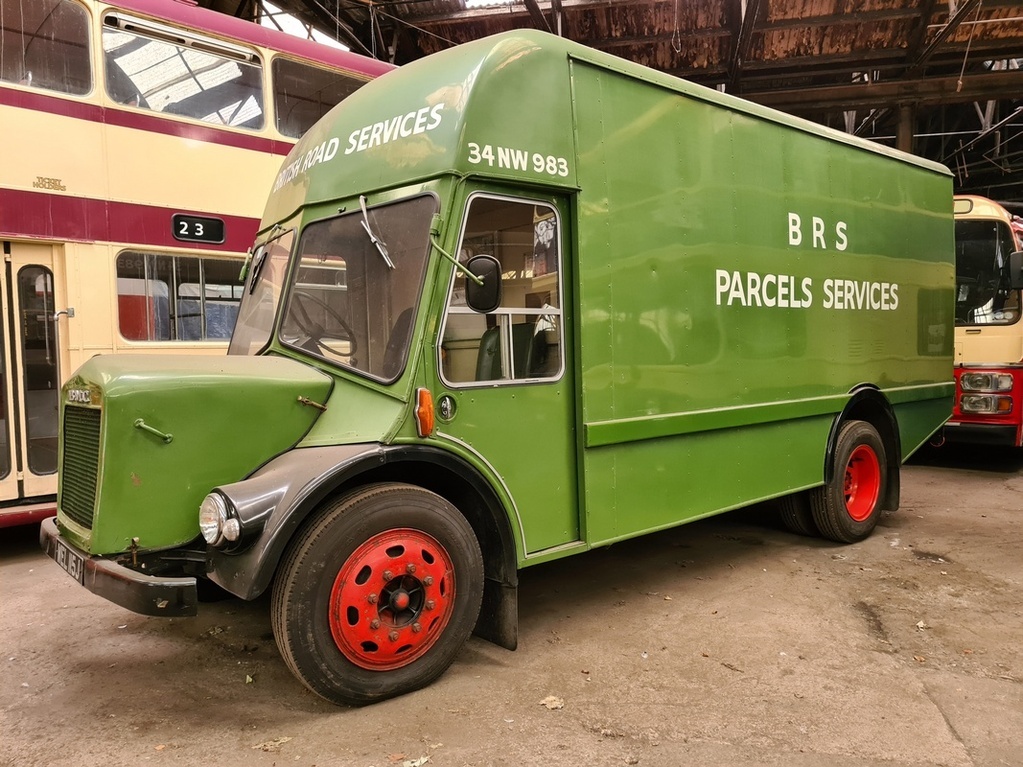 Turns out its the same one in the very first post of this thread. |
| |
|
|
glenanderson
Club Retro Rides Member
Posts: 4,319
Club RR Member Number: 64
|
|
Jul 28, 2022 15:26:14 GMT
|
|
Keighley Bus Museum. We have friends that live near there, but I have yet to get time to go see it. 👍
|
| |
My worst worry about dying is my wife selling my stuff for what I told her it cost...
|
|
|
|
|
|
|
Jul 28, 2022 15:58:52 GMT
|
If it's the same size as my donor DAF then that's still hanging around. Also, you & me + Santa Pod for a truck-off as soon as you're ready  I have this mental image of y'all both white-knuckle grip on the steering wheels, clouds of black clag, neck to neck at 35 mph down the quarter. Like a movie. Gritted teeth, shaking camera, shifting gears at the extreme of your machine's limits! Pan to outside and there's a couple trucks pulling away in a genteel fashion from the tree... |
| |
|
|
glenanderson
Club Retro Rides Member
Posts: 4,319
Club RR Member Number: 64
|
|
Jul 28, 2022 16:49:05 GMT
|
|
Ha!
Where’s the “blowing a raspberry” emoji?
🤣
|
| |
My worst worry about dying is my wife selling my stuff for what I told her it cost...
|
|
Frankenhealey
Club Retro Rides Member
And I looked, and behold, a pale horse! And its rider's name was Death
Posts: 3,881
Club RR Member Number: 15
|
|
Jul 29, 2022 18:34:31 GMT
|
Also, you & me + Santa Pod for a truck-off as soon as you're ready  I have this mental image of y'all both white-knuckle grip on the steering wheels, clouds of black clag, neck to neck at 35 mph down the quarter. Like a movie. Gritted teeth, shaking camera, shifting gears at the extreme of your machine's limits! Pan to outside and there's a couple trucks pulling away in a genteel fashion from the tree... .... and we'll do it for pink slips (whatever they are?) And no Steg's Supplies fuel pins  |
| |
Tales of the Volcano Lair hereFrankenBug - Vulcan Power hereThe Frankenhealey here |
|
glenanderson
Club Retro Rides Member
Posts: 4,319
Club RR Member Number: 64
|
|
Jul 30, 2022 23:45:16 GMT
|
Okay. Where were we? Oh yeah, crispy chassis… With the engine and gearbox finally out of the way, I pulled the pins out of the front spring hangers and took all the weight off the front of the chassis, then I could break out the needle gun and pummel the front leg to see where the sound metal started. Quite a long way back it turns out.  I took the spring hanger off too, and luckily that turned out to be ok under the layers of paint and scale. The bottom flange was pretty bad all the way to the bump stop. So, I took a deep breath and some careful measurements, and sliced a long section out of one of the chassis cuts from JOY, then a corresponding chunk out of GUG’s chassis. I left the side web intact as far as the original hanger mounting holes so they could act as a datum.  With the repair section offered up: 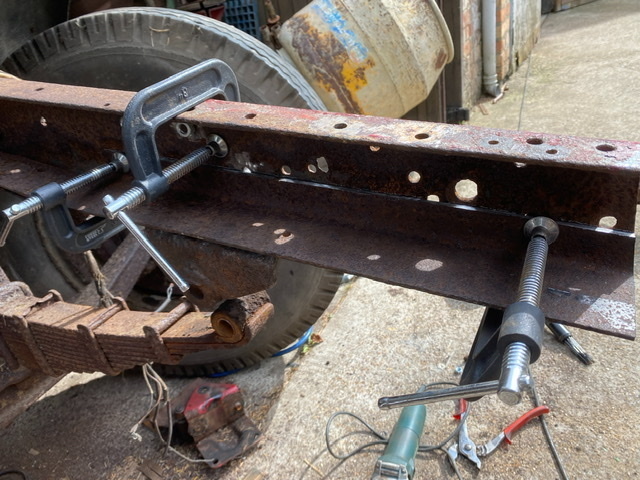 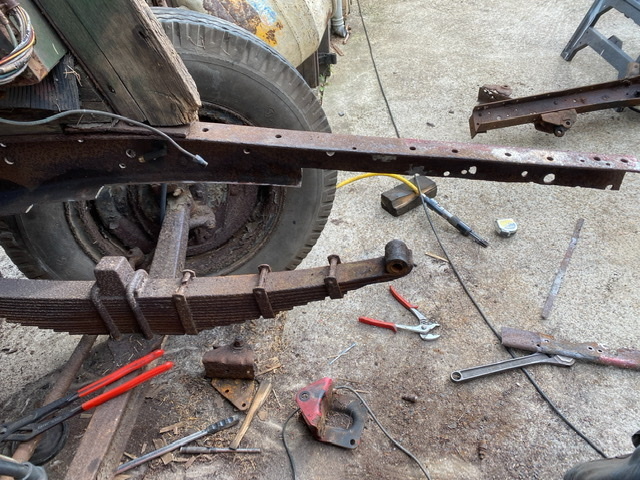 There then proceeded to be a bit of mucking about as I played with the welder’s settings and my technique to get things stuck back together again. Some pitting here got welded up and dressed back: 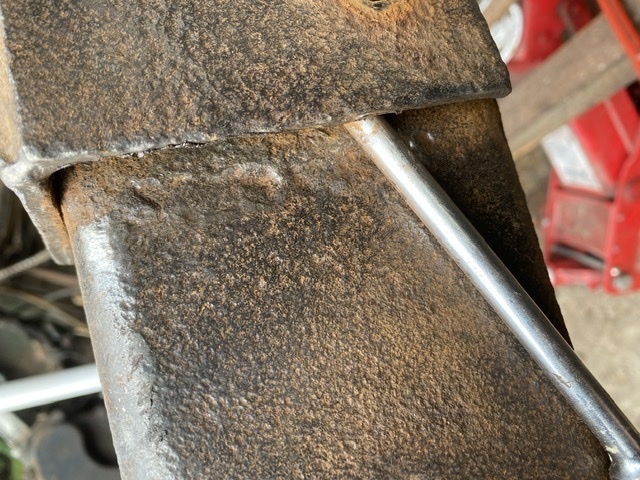 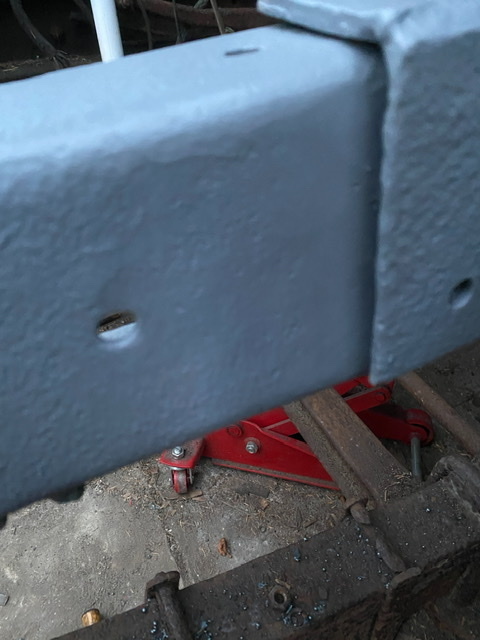  Then it was time to chop the top bit off.  You can see how pitted it was. 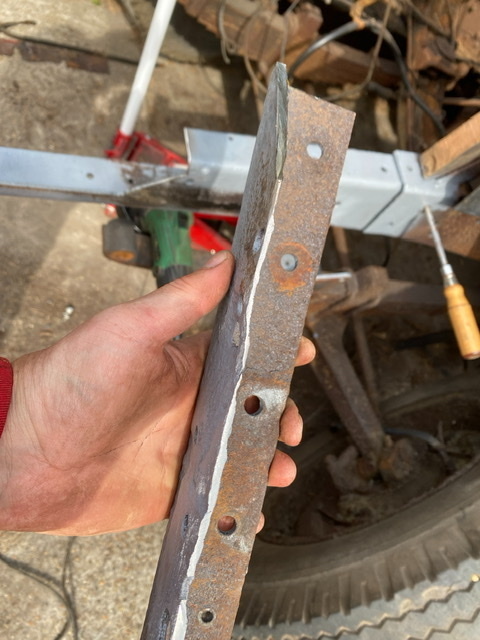  Then offer up a new bit, and weld it in. 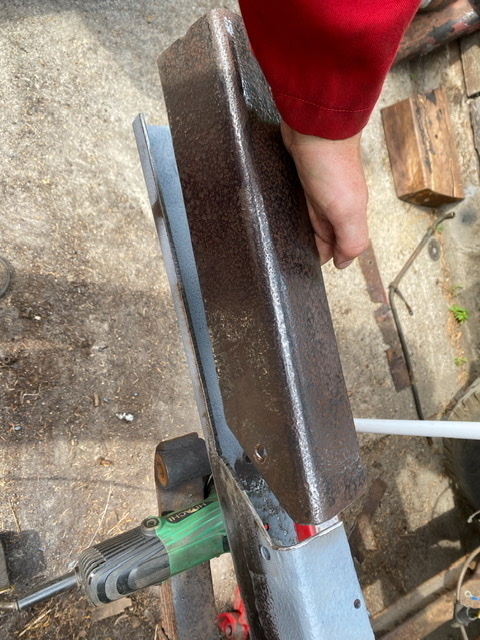  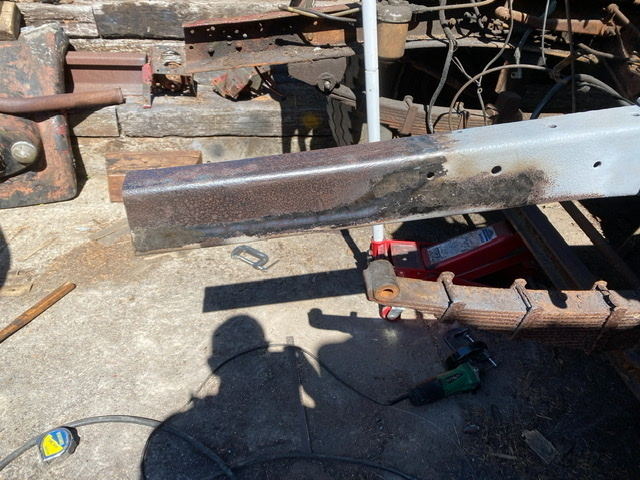  Dress back all the welds, a quick squirt of etch primer to protect it in the short term, then back together with the spring hanger temporarily bolted into plates and drop it back on the floor.    That’s the passenger side back to being solid, which is a big weight off my mind. Before I move to the driver’s side I want to strip all the extraneous stuff off the engine and from around the engine bay, so that I can offer up the engine and gearbox and work out where the mounts are going to want to sit. I want it as far back as practically possible, to ensure there’s room for the radiator and intercooler at the front, and it might mean moving the crossmembers back to get them in line as that’ll be a better solution engineering wise than convoluted bracketry to make them work otherwise. The driver’s side is much more sold than the passenger one, but does have some significant pitting where it has sat exposed for so long, as well as that big crack. 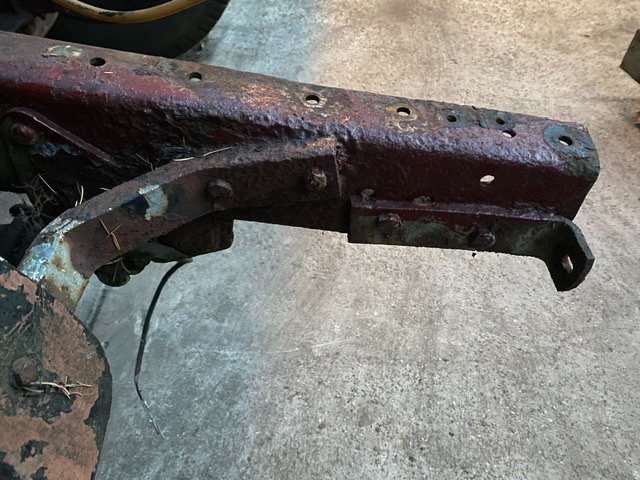 I spent most of today on a picket line, but got an hour or so once I got home to start pulling stuff off the engine. First off was the oil filler pipe, which is getting replaced by a cap on one of the rocker covers, so the resultant hole got blocked off with a core plug. 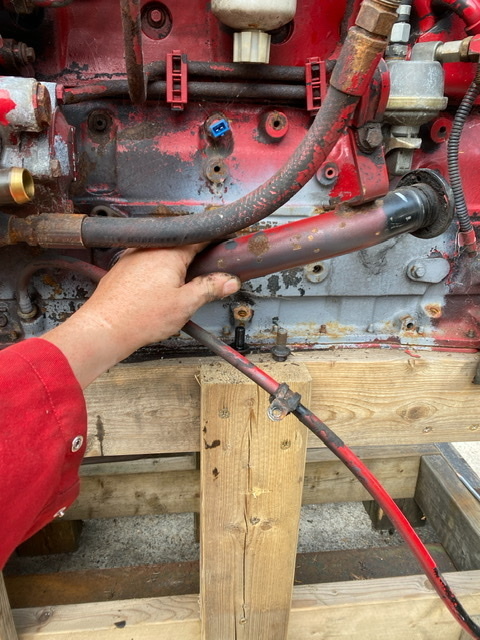 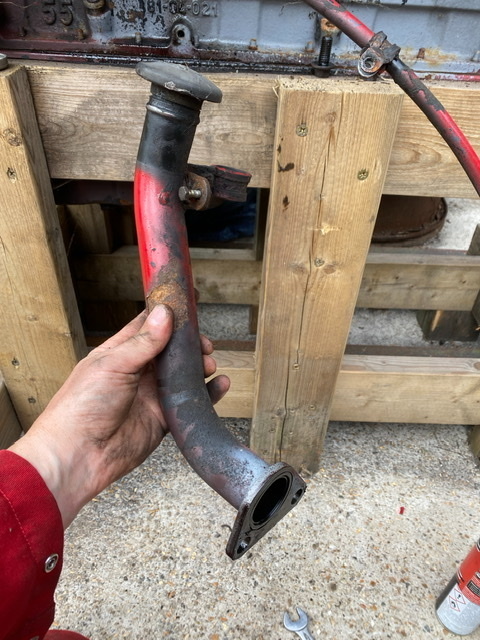 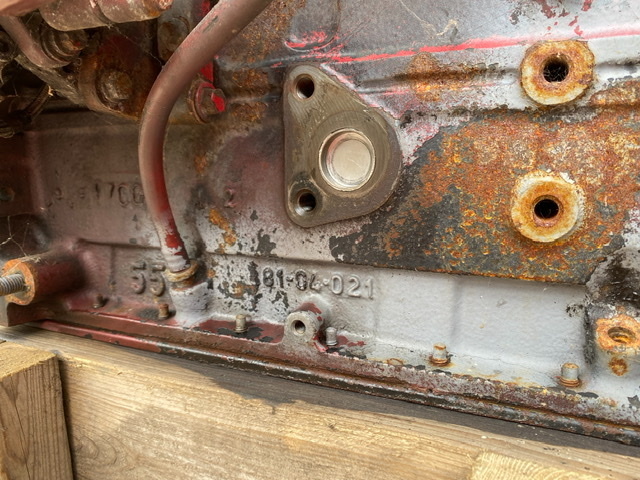 Then I took the compressor and power steering pump assembly off. 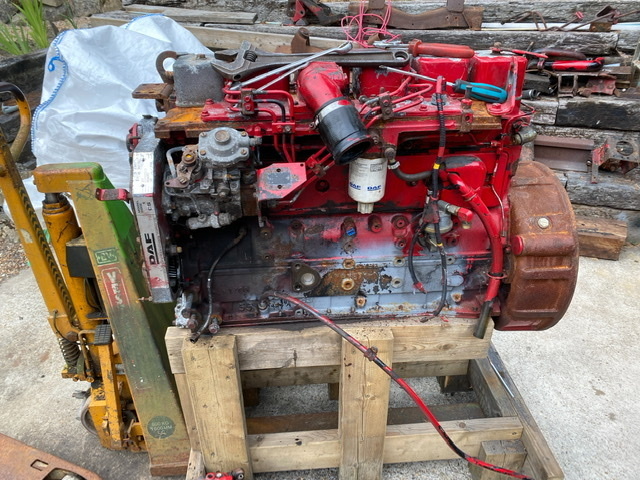 Tomorrow I’ll take the turbo and exhaust manifold off, and give it a scrub up and a quick coat of paint. |
| |
My worst worry about dying is my wife selling my stuff for what I told her it cost...
|
|
|
|
|
|
|
|
The repaired chassis leg looks excellent,
Core plug is a great, neat solution,
Stupid question, do the "bolt holes" go into the oil galleries ?? (As in the same way that on some engines the water pump bolts enter the water jacket and need sealant ??)
Nigel
|
| |
BMW E39 525i Sport
BMW E46 320d Sport Touring (now sold on.)
BMW E30 325 Touring (now sold on.)
BMW E30 320 Cabriolet (Project car - currently for sale.)
|
|
glenanderson
Club Retro Rides Member
Posts: 4,319
Club RR Member Number: 64
|
|
|
|
|
Thank you. 👍
The core plug is a factory solution for all the engines that don’t need a remote filler and the bolt holes are blind. 😀
|
| |
My worst worry about dying is my wife selling my stuff for what I told her it cost...
|
|
|
|
|
|
|
|
That is a very good looking repair Glen.
I think it looks invisible now, and that is a great result.
Of course most of this is way over my head engineering,,but love it regardless.
|
| |
|
|
oto67
Part of things
 
Posts: 68
|
|
|
|
|
I like your rail repair/replace Glen, it looks great. When you cut the upper bit off did you cut on your weld or above/below ?
Genuine question as i cant quite see an its a technique i may well ponder copying on my Hilux chassis.
Just out of interest what welder are you using ?
|
| |
|
|
glenanderson
Club Retro Rides Member
Posts: 4,319
Club RR Member Number: 64
|
|
|
|
I like your rail repair/replace Glen, it looks great. When you cut the upper bit off did you cut on your weld or above/below ? Genuine question as i cant quite see an its a technique i may well ponder copying on my Hilux chassis. Just out of interest what welder are you using ? Thanks. When I welded the bottom part on, I only welded as far forward as the sound metal allowed, so when it came to cutting the upper part out I only had to make a small vertical cut. There’s effectively one long seam horizontally, and a short one vertically. I have a Kemppi Minarc Mig Evo 200. An indulgence purchase two years ago and quite possibly the best bit of kit I own. 👍 |
| |
My worst worry about dying is my wife selling my stuff for what I told her it cost...
|
|
oto67
Part of things
 
Posts: 68
|
|
|
|
Ah yeah i see now, Thanks. Time for some new glasses me thinks  |
| |
|
|
|
|


 Hijacks are good.


