|
|
|
|
|
Caution : Modern'ish content follows / user discretion is advised  As some folk already know, I mix my time between Retro stuff and new-fangled gadgets. One of my "new" gadgets is a modern'ish BMW, fitted with stuff I'd not even heard about (I normally drive a 70's Hunter as a daily so it's bit of a technology jump  ) One of the neat things on the BMW is rather posh back lights - fitted with a mix of traditional bulbs and "everlasting" LED strip lights  The bulbs cost £1 each and can be swapped in minutes, the LEDs are soldered on a circuit board - then put inside the sealed light cluster and sold as a complete unit. Can anyone see where I'm going with this yet  BMW in their wisdom have decided industry standard LEDs (5mm diameter, never known to fail) are not suitable so have used their own design (4.2mm, tapered, many fail within 10 years)  Continuing their "it seemed a good idea at the time", if / when a LED fails, the others near it stop working (they go out in moral support?) There are a few potential solutions : Check the car wiring to make sure the lights are getting 12 volts - you don't want to go any further if your problem is a blown fuse ! Pretend you've not noticed half the lights at the back of the car aren't working (not easy in the dark winter nights) Fit a "good used" 2nd hand unit ( then demand a refund when you discover the LEDs on the new unit don't work) Buy a new light cluster from a BMW dealer (cost was £180 each side when I asked !) Get creative and improvise (tenous link to this thread title)  Step 1 : use some kind of cutter ( multi tool or Dremel) to cut the red lens off the light cluster. img.retro-rides.org/i/v/nomad/0cba22cc2870.jpgStep 2 : forcefully remove the inside "cage" without breaking it, so you can unclip the LED circuit board. 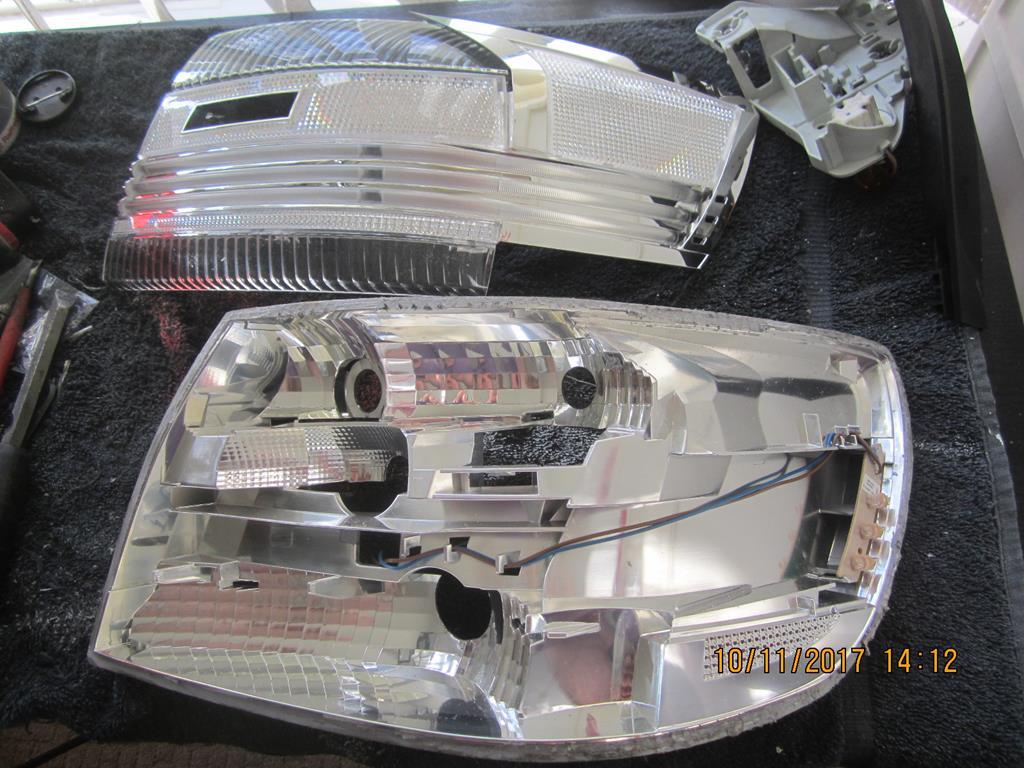 Step 3 : identify which partcular LED(s) have failed. Options : connect a 9 volt battery, short out each LED in turn, when you do the faulty one, the other 2 will light up (assuming only 1 has failed) connect a 9 volt battery and measure the voltage across each LED, working ones show 2 volts, the failed ones show 6 volts.  Step 4 : replace the LEDs, retest using your 9 volt battery. Tip : a solder sucker is invaluable for removing the old LEDs img.retro-rides.org/i/v/nomad/b388a48f0798.jpg img.retro-rides.org/i/v/nomad/8d6bc3d12699.jpgStep 5 : glue the red lense back in place, go to the pub and start spending the £100 you've just saved (fix the other side next weekend for another £100 saving ) 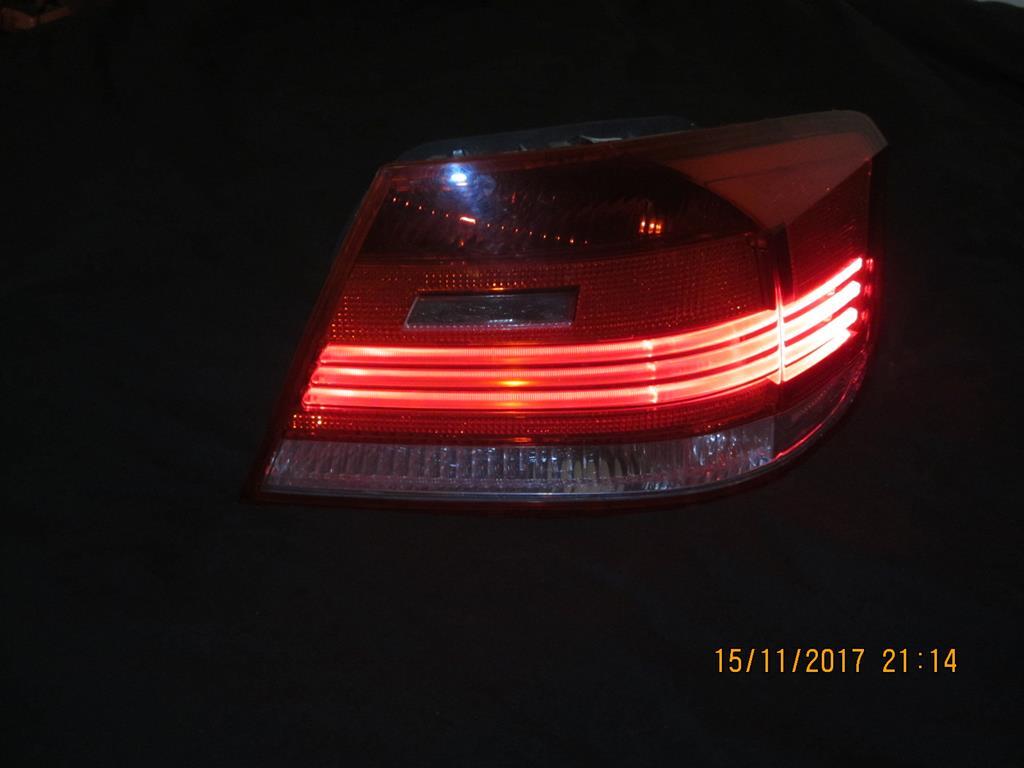 Total cost of the repairs ? Total cost of the repairs ?LEDS £1.30 (including postage for a pack of 20, I used 6), "5mm high-intensity red", Glue. Time for each light : 1 hour strip/rebuild + 1 hour finding the dud LED and soldering. Note : If anyone local needs LED lights repairing, let me know and we might be able to work something out As this is a "non-Retro" update, now is good time to mention I also bought a £30 BMW-specific "C110" OBD2 code reader, very impressed with it. It gives the fault codes recorded by the car, so you can trace faults and identify failing/failed parts. The bad news is it flagged a faulty £90 fuel pressure sensor so the BWM dealer soon got most of the £100 I'd saved by fixing the lights  More OBD code reader info forum.retro-rides.org/thread/201100/obd2-scanner-review-come-eventually "BMW - the greatest driving machine" ... I wouldn't know, all I've done for the last 3 months since I bought it is try to fix one problem after another Normal service should resume in the in the next episode, expect Retro and / or other interesting content 
|
| |
Last Edit: Nov 25, 2017 1:20:34 GMT by nomad: typos..
|
|
|
|
turbom
Part of things

Posts: 393
|
|
Nov 25, 2017 10:33:09 GMT
|
|
Feels good to save a few quid.
So are you putting led lights on the hunter then???
|
| |
|
|
andy-v
Part of things
i like cookies :D
Posts: 358 
|
|
Nov 25, 2017 10:50:14 GMT
|
been following this thread for a while, forgot to like as time went on, so ya got em now |
| |
|
|
|
|
|
Nov 27, 2017 17:08:52 GMT
|
^ The Hunter already has a couple of LED striplights in the boot - great for moving tat on dark winter nights. I had some cheap LED stop/tail bulbs but for some reason they didn't make good contact in the Hunter so got removed  ^^ feedback is always welcome, nice to know some folk find it odd / unusual / interesting  |
| |
|
|
|
|
|
Nov 27, 2017 17:27:08 GMT
|
Modern technology is not making me happy this month Once again, a new item on the "fix this ASAP list" changed the plans for today. Many years ago I bought new laptop (the only time I've bought new), one of my main "wants" at the time was a big screen so I could watch movies etc when I was touring. Since buying it, I've replacd the screen twice ( a visiting parrot killed one, I drop-tested the next one - it failed!), fitted a big hard drive (1Tb to replace the 120mb it had originally), battery life is now about 2 minutes, and the latest fault is the large screen is loose at one side I'm curious - what do people normally do in cases like this? I decided to remove a few covers and found the rivits had snapped on the screen hinge, drilling them out and bolting should have worked but I decided to go another route A quick MIG session fixed the break - but when I tried there was still a click somewhere - more checking showed a nearby pair of rivits were loose but not yet snapped  More mig, and everything is as it should be. If you don't have a mig set - get one ! The plan for tomorrow? Make a start on the jobs that should have been done today 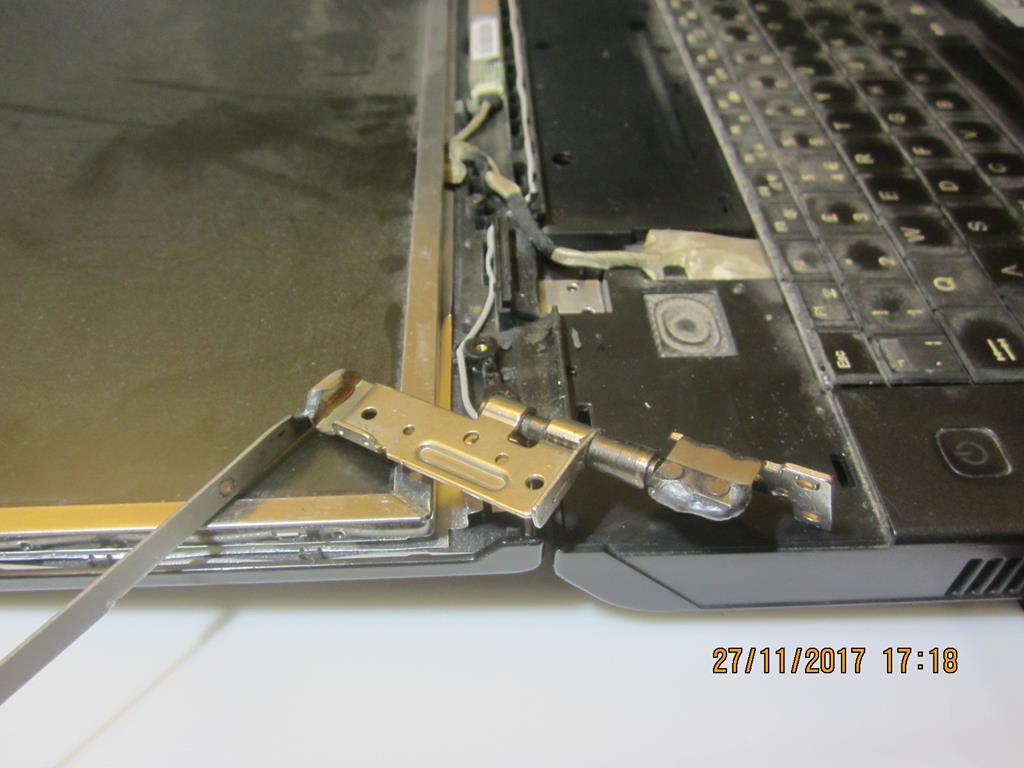 |
| |
|
|
jpr1977
Club Retro Rides Member
Posts: 656
Club RR Member Number: 18
|
|
Nov 27, 2017 18:05:44 GMT
|
The plan for tomorrow? Make a start on the jobs that should have been done today That sounds like my day every day lately... Keep up the good womble-ing |
| |
Last Edit: Nov 27, 2017 18:06:06 GMT by jpr1977
|
|
lightyearman
Part of things
GYJDM - Grimsby based Japanese car club - Find us on Facebook
Posts: 639
|
|
Nov 30, 2017 20:18:55 GMT
|
|
Really enjoyed this thread, inspirational.
Bookmarked
|
| |
'89 Honda CRX siR Glassroof Flint black fully restored track beasty
'90 Nissan S13 Pignose - pass the mig wire
'86 Mini - matt orange, 13" Wellers, Project 2018
'97 LDV Convoy home built camper/tramper van
'04 Saab 9-5 Aero HOT. Anyone want it?
'91 Honda VFR400 NC30 17,000 km from new
'87 Honda XR80 4 stroke baby crosser
'03 Mini Cooper S - honestly, they are fun...
'15 VW T5.1 LWB daily brick
|
|
|
|
|
Nov 30, 2017 23:25:21 GMT
|
|
With laptops, it's a hard call.
I've loved my little netbooks for travelling (10" screen) merely as a way of dumping/backing up my photos, so most have been upgraded with a 1TB hard drive and a bit of RAM.
But when it gets to the point that they aren't running well, body parts/hinges are broken (not happened to me, but as an example) and batteries no longer hold charge and the charge cable is quite frayed, it gets to the point where it's going to cost more to repair it than it is for a new/near new replacement, so at that time, I pull the RAM and hard drive out and get another one.
As an aside, my brother just gave me a 15.6" laptop that was running terribly. The 500gb hard drive was definitely on it's way out, so the hard drive from my old netbook made it in there and it lives to fight another day.
|
| |
|
|
|
|
|
|
|
Our topic today is "improvisation" - as the washing machine made the usual clunks and other noises but there was no running water Loosening the feed hose behind the machine showed we had good incoming water pressure. Removing the top cover (2 screws at the back then slide off) showed it has 2 identical solenoids to control the water (let's call 1 "main", the other "fancy stuff like pre-wash" ) A test-lamp showed the common white wire had power and the black & blue signal wires were ok, so a faulty solenoid looked likely. Swapping the signal wires changed the "main" solenoid to the extra one, and the other became "main" - unclipping the water pipes from the solenoids and swapping them completed the job Total time : about 5 minutes Cost : £ free Once again it's working fine for my needs ("quick wash" & " wash" ), assume the fancy programmmes won't work - but as I've never used them I won't miss them The machine looks less than 3 years old and has had very little use. Once again - modern technology fails to deliver  Overview img.retro-rides.org/i/v/nomad/7dfa1c5bdff9.jpg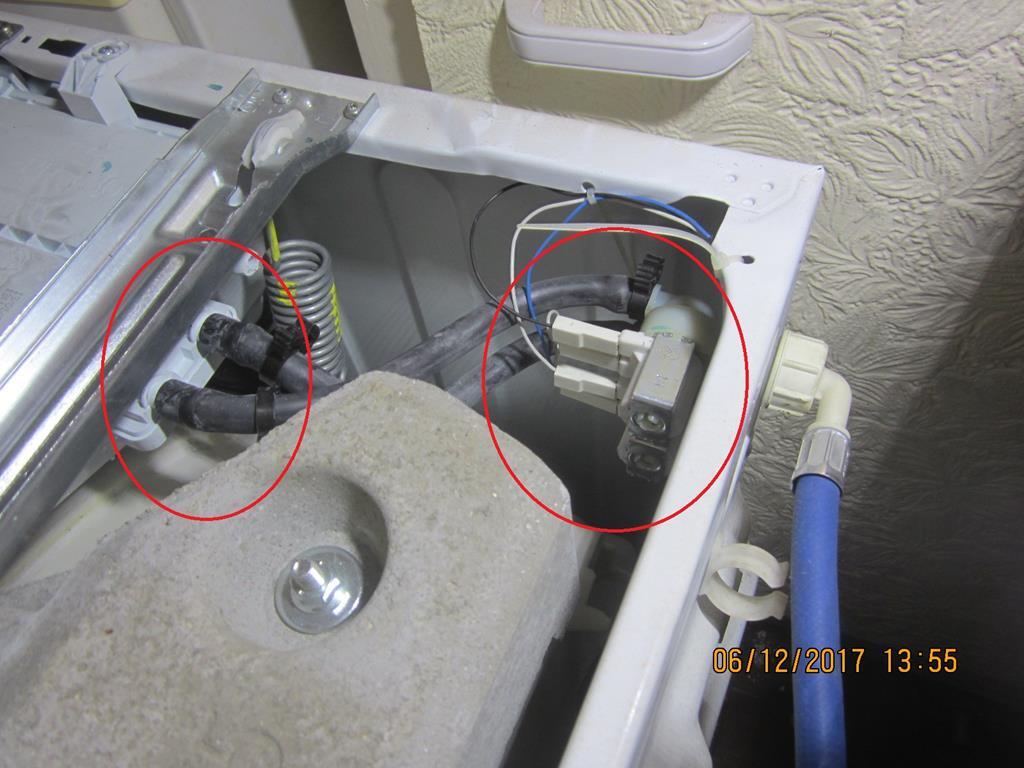 "Plans are for other people" "Plans are for other people" |
| |
|
|
|
|
|
|
|
Good work. As you say, blokes never use the fancy stuff anyway. However, our spin dryer is a bit beyond that level of repair. Last week I was sitting quietly when there was a huge bang and a scream from upstairs. Rushing up I see Madam in one corner of the washing area and on the other side, the spin dryer which had reduced itself to its vital components. Seems it was going full chat and with a full load, when the drum broke loose from its moorings and literally exploded out of the casing, scattering sharp bits of flying plastic everywhere. Luckily she wasn't hurt, but it'll take more than a solenoid swap to deal with that one! |
| |
Last Edit: Dec 6, 2017 23:43:24 GMT by georgeb
|
|
|
|
g40jon
Posted a lot
Posts: 2,569
|
|
|
|
What to do with the elderberries? Ice cream is the first thing that springs to mind, either as a ripple or mixed properly as a flavour and colouring. You could also try making jam with a kick? You need to be a bit careful with elderberries, unripe fruit contain a toxic alkaloid and the stems, leaves and seeds contain glycoside which can form into cyanide and thus result in poisoning. Make ure you do lots of research on how to prep correctly and the berries can be used to make jams etc |
| |
|
|
|
|
|
|
|
What to do with the elderberries? Ice cream is the first thing that springs to mind, either as a ripple or mixed properly as a flavour and colouring. You could also try making jam with a kick? You need to be a bit careful with elderberries, unripe fruit contain a toxic alkaloid and the stems, leaves and seeds contain glycoside which can form into cyanide and thus result in poisoning. Make ure you do lots of research on how to prep correctly and the berries can be used to make jams etc I never knew that! Who'd have though that a car forum could be so useful for other information! And who'd have thought that fruit could be so dangerous! |
| |
1968 Cal Look Beetle - 2007cc motor - 14.45@93mph in full street trim
1970-ish Karmann Beetle cabriolet - project soon to be re-started.
1986 Scirocco - big plans, one day!
|
|
|
|
|
Dec 20, 2017 18:32:42 GMT
|
Tyne Tunnel pic dump / history lesson Most drivers have heard of the Tyne Tunnel (located at the mouth of the Tyne, the alternative route is to drive 12 miles up river and use one of the bridges at Newcastle) The tunnel now in use (TT2) was opened in 2011 and replaced the original tunnel which opened in 1967. A hidden gem not well known even by locals is the pedestrian tunnel, it opened 1951 so workers could cross the river to the shipyards in the post-war years. It is still in use and is well worth a visit if you are in the area The 1940s tiles are still in place and are authentic Retro I was often going through on a push-bike and got stopped one time by full-on WW2 German troops who were filming in the tunnels It was a very surreal experince ! The tunnels also have the longest remaining wooden escalators in Europe (they are not normally in use, options are to walk up them or use the elevator) img.retro-rides.org/i/v/nomad/ce6b538de1ac.jpgMany of the railway routes in the area have had the rails removed. The gravel tracks remain and form a large "Waggonway" network which is great for cyclists. Expect some odd sights along the way img.retro-rides.org/i/v/nomad/478b4999c6a3.jpgThe 1951 pedestrial / cycle tunnel under the Tyne : 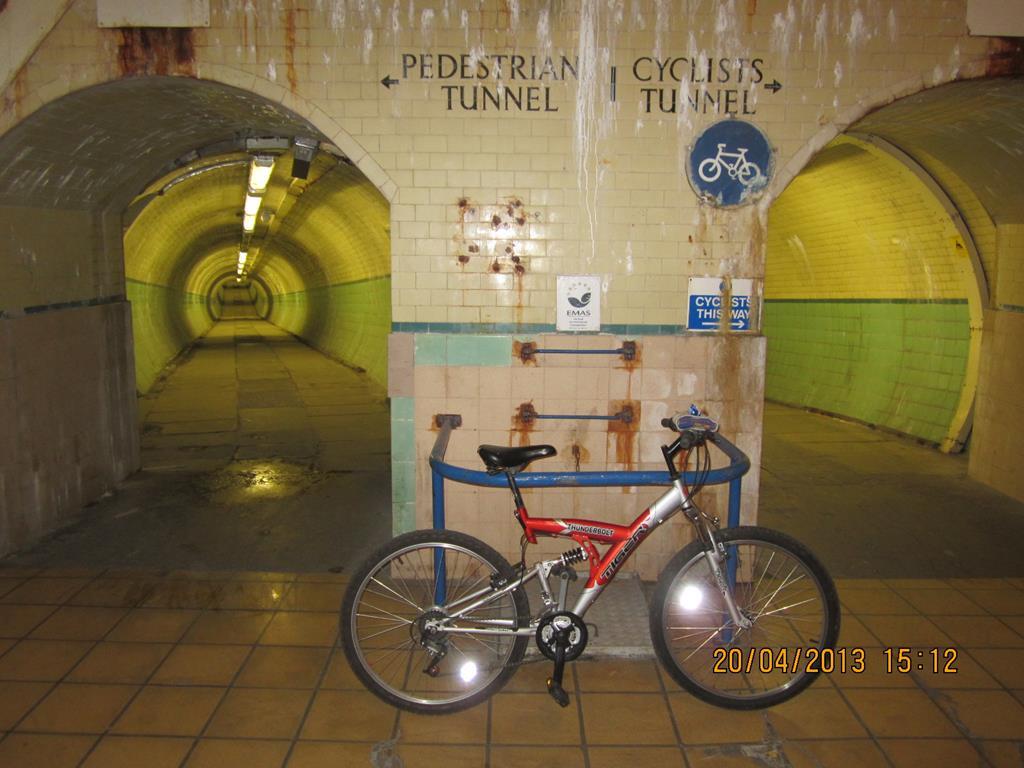
|
| |
|
|
|
|
|
Dec 20, 2017 19:40:03 GMT
|
I'm still finding pics from older cameras - including a Retro "Godin" stove installation, this truly a thing of beauty Some background info forum.retro-rides.org/thread/138937/retro-french-multifuel-stove-tellThis started with an unusable coal fire in an 1840'ish miners cottage. First steps were to remove the modern wooden fireplace, the tiled back, and fit an inspection hatch in the flue at loft level so we could drag about 7 bags (60 years ?) of jackdaw nests and junk out of the chimney to unblock it ! img.retro-rides.org/i/v/nomad/55c4bb1b9516.jpgAn idea of how much we had to raise the top of the opening It's not easy to tell from the photo but the right hand side of the fireplace was made of brick while the left side was a lovely stone lintel. Odd img.retro-rides.org/i/v/nomad/8d151b60d2f8.jpgI moved house about a year before starting this project, and the place I was leaving had a "standing stone" in the garden. SHMBO decided the stone would look better at hers, so her garden soon looked like this  Some nearby angle iron was usd to make a 3D "picture frame" to go around the new opening. Great fun was had making a frame to go "across - down - then back" 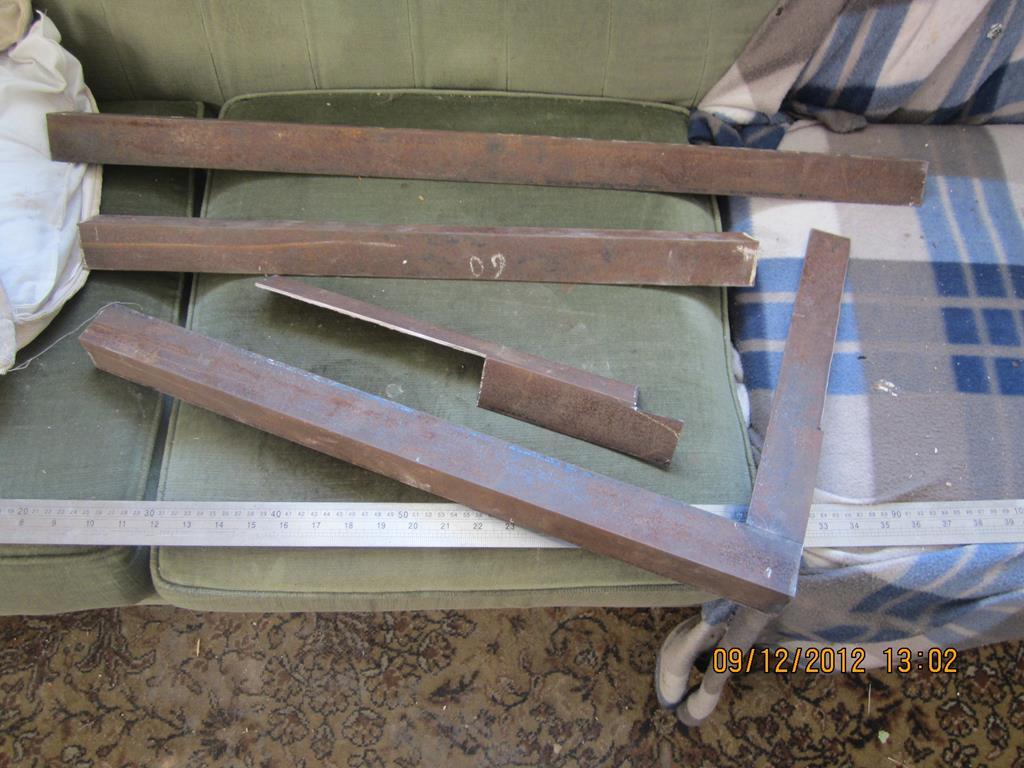 The main ingredients : Godin multi-fuel stove (brought back from France by a local chap - who then decided not to use it. I suspect what we paid didn't even cover his costs to collect it ) Original left-hand lintel + wombled right-hand "standing-stone" Wombled angle iron Flue pipe was made to order (bought !), it's a neat job and cheaper than I could buy the materials so I didn't mind paying 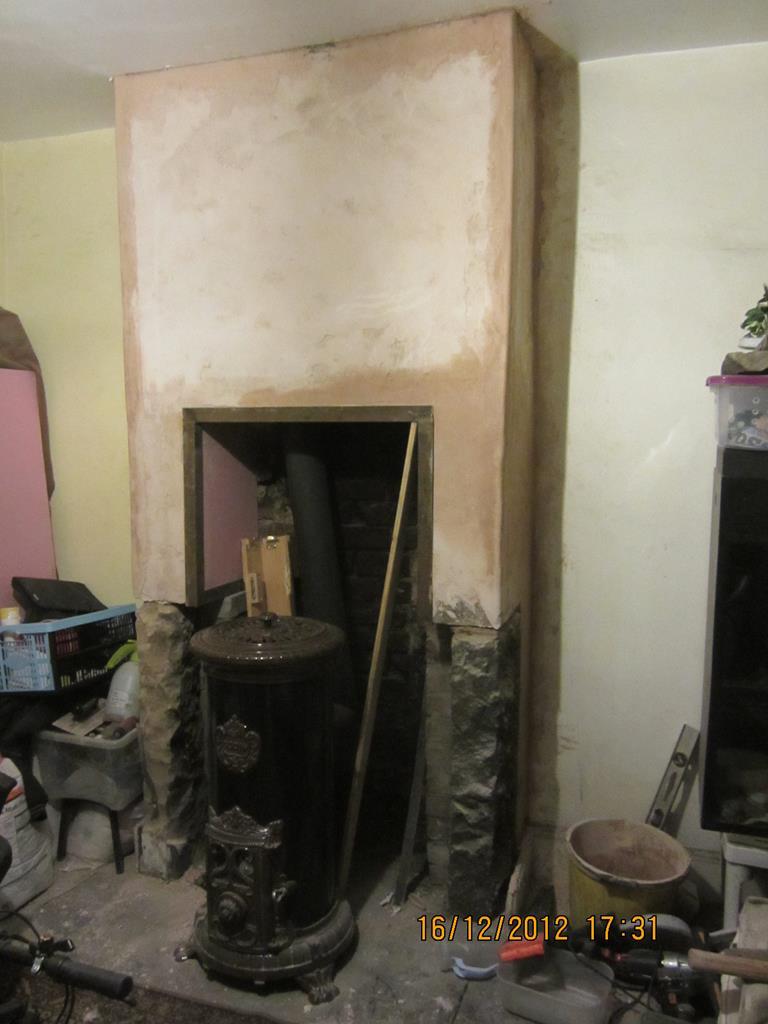 I love the way a dated fireplace has turned into a practical feature in the room, and SHMBO likes the end result which a big bonus ! A quick qestion if you have read this far ... the vibe I get is some folk enjoy these random projects, others would prefer car-stuff-only. - are more pics better? or just a few pics + links to extra pics? Sugestions & feedback welcome, I'm happy to adjust the way I do things if there's a better way  |
| |
|
|
|
|
|
Dec 20, 2017 20:17:33 GMT
|
Back to wombling & improvisation stuff One of the better-known car alarm makers from the past is/was Waso, this one turned up a while ago when I was looking for something to tinker with. These are secure as all wires are black so they defeated the typical "hotwire both red wires together to start the car" villans of the time 99p for an unused keyless alarm/immobiliser (complete with no box & no instructions !) sounded like a chance worth taking Then you *just* need to work out what each of the 15+ identical black wires do, and mark them as you go Drill out the pop-rivits to remove the back from the case and get to the circuit inside. The 2 big black cubes are relays and those wires are easy to trace. One of the tracks (see screwdriver) had 3 connections, an educated guess says this wiil be the earth circuit. Keep working through the remaining wires and eventually (with good luck and / or good management) it will all make sense. It turned out to be a very neat system and is still in use today. A good result for 99p 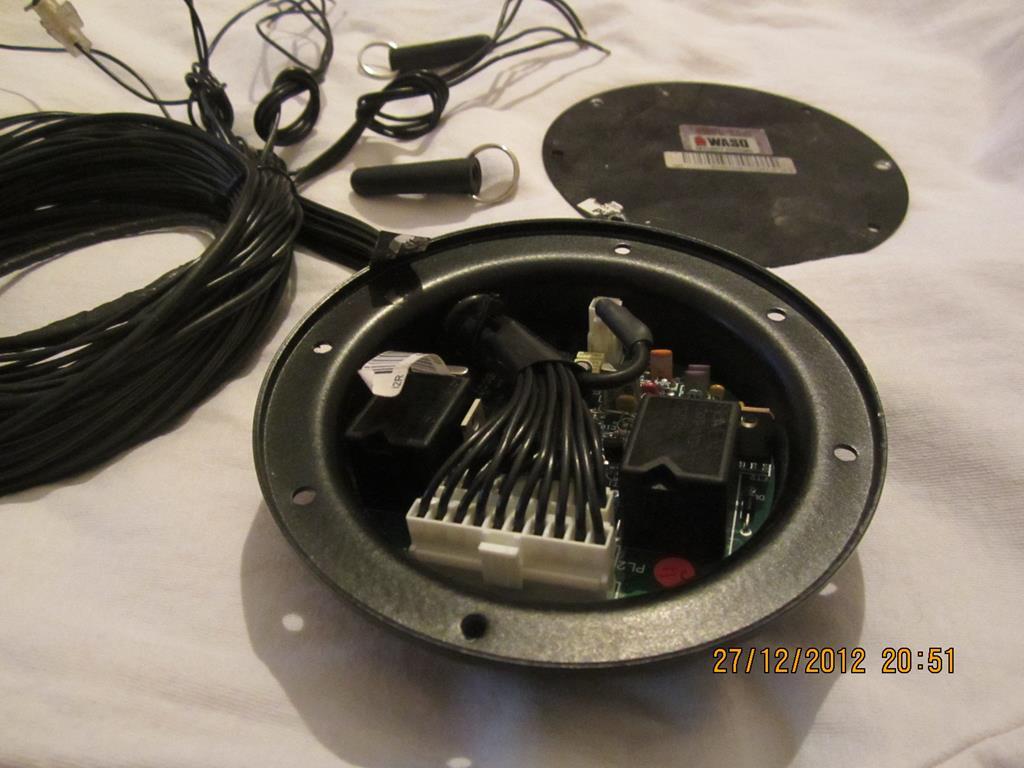 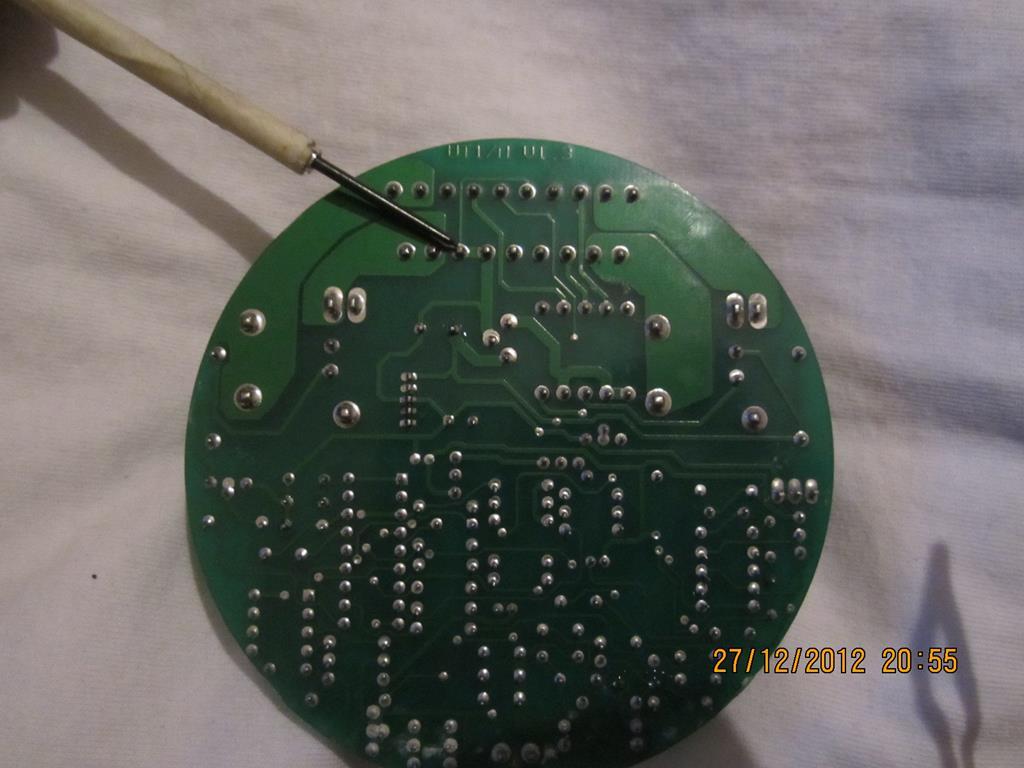 This turned up a while ago as a freebie and is a lovely piece but it's just collecting dust. Size is approx 6" diameter. It's untested but if anyone has a use for it let me know. Warning : Daft offers / part-ex may be taken seriously & accepted ! 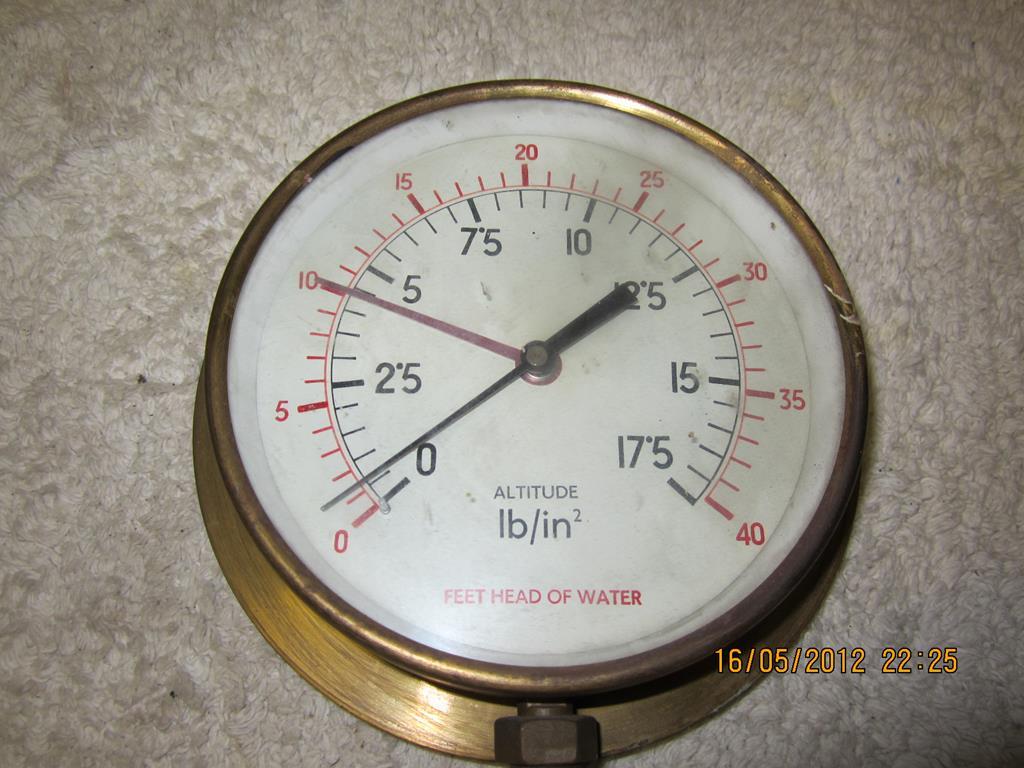 |
| |
|
|
Kron
Part of things
Posts: 260
|
|
Dec 20, 2017 23:53:29 GMT
|
[quote author=" nomad" A quick qestion if you have read this far ... the vibe I get is some folk enjoy these random projects, others would prefer car-stuff-only. - are more pics better? or just a few pics + links to extra pics? Sugestions & feedback welcome, I'm happy to adjust the way I do things if there's a better way [/quote] Personally I think it's great, I learn lots and get inspired by ideas I couldn't begin to imagine, and to get an insight into the lives of others is equally fascinating. 're the picture, more is better and less links, I read the forum on my phone and clicking through to pics and then navigating back is an inconvenience. |
| |
|
|
|
|
|
|
|
Personally I think it's great, I learn lots and get inspired by ideas I couldn't begin to imagine, and to get an insight into the lives of others is equally fascinating. Exactly what he said! Mind, given how I ramble on, you'd kinda expect that, wouldn't you? |
| |
|
|
|
|
|
|
|
|
I love these random threads. Makes me wish I could go the whole hog instead of the normal 9-5 and moonlighting mechanic at weekends
|
| |
|
|
|
|
|
Dec 30, 2017 17:35:58 GMT
|
More "fun", this time repairing a split crankcase breather hose. Dealer prices are £££ (£60 ? ) and as the parts are made of lightweight heatshrink tubing - then fitted next to a hot engine - they soon turn brittle  A stupid design, but not a problem until you need to remove / refit them to do some unrelated work An offcut of Hunter heater hose, a couple of jubilee clips, and some silicone sealer soon fixed the problem I did consider removing the old pipe from the moulded ends, and fit new pipes. It would give a neater result but new pipe isn't something I keep in stock 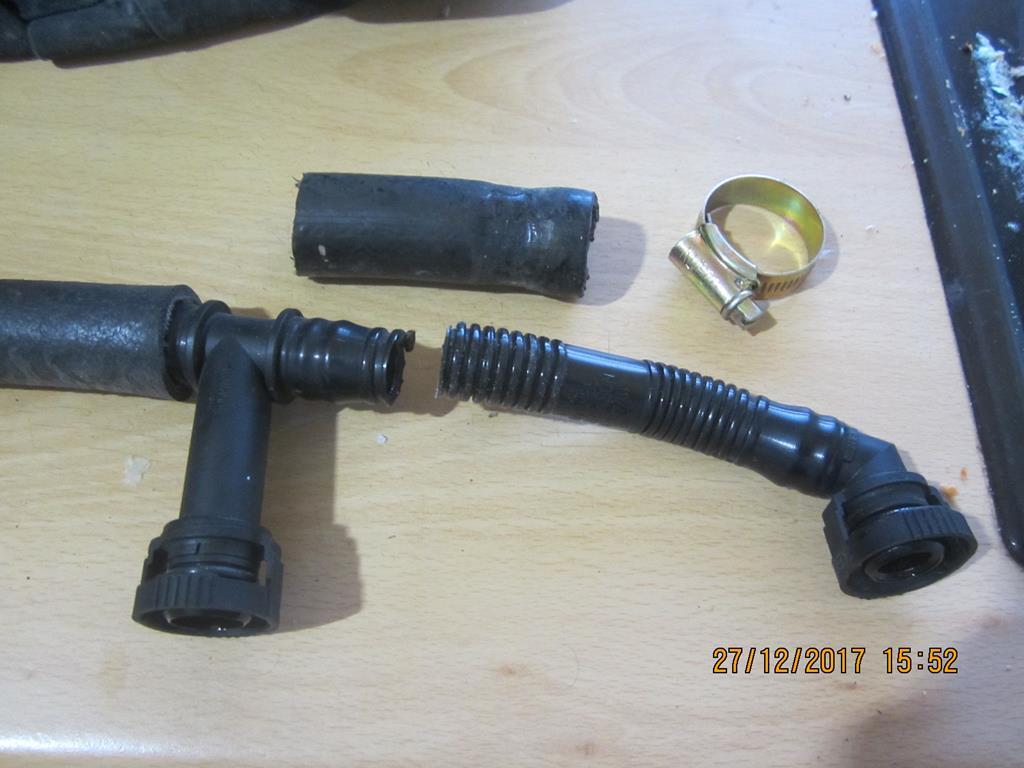 |
| |
Last Edit: Dec 31, 2017 2:44:59 GMT by nomad
|
|
|
|
|
|
|
I have an awful habit of hoarding VW parts from every car I replace bits on, just in case like kind of thing. Mate of a mate had a grenaded engine - no problem have an engine sat here because I couldn’t be bothered to advertise it - took it out a year ago for a more powerful unit. Nice few hundred quid for that, and why not do a belt etc while you’re at it. And fit my new EGR delete. Except it comes with none of the pipes to delete the cooler. Went around to the pile of parts left over from the 2003 TDI engine that went in bare (ooh-er missus!) and lots of pipes, metal, plastic and rubber of various diameters. Twenty minutes of cutting and joining various bits of VW coolant pipe work and now he has a cooling system sans-EGR cooler that is OEM looking, on a Saturday night for no cost. If I can reuse something and not pay for it I will. Hence why the good clutch and flywheel setup that was removed from his car in lieu of a solid conversion while the engine was out (chasing power), this will go in my girlfriends MK5 Golf when the mapped TDI finally makes the clutch slip more than once in a while. I often hold onto half-worn bits and pieces as I’m always buying and selling 10-15 year old Volkswagens. Lots of crossover in parts and the Irish roads (and owners) take their toll on cars very quickly. Bought an A4 recently, chronically warped front discs. Had a root around in my barrel full of discs, came up with 2 pairs of 288mm front discs. Clean up with a flap disc and on they went. Saved fifty-sixty quid on a car that’s very much a temporary daily driver and not worth spending a fortune on for someone else to end up knocking me down on in 3 months anyway. Plus I’m a Yorkshireman so I’m tight as anything! I get a kick out of reusing decent secondhand parts scavenged from other cars to keep various old nails going. If nothing else its testament that I bought a hundred squid rust-related test failure Focus as a donor for my parents old TDDi estate. That donor was mechanically perfect and gave: 5 tyres front shocks brake shoes front pads and discs 2 hub wheel bearings grille headlight switch radio window regulator battery hub caps side skirt covers If I had to buy all those bits new throughout the 3 years they had it it would have come to the bones of a grand. Car cost nothing to run. Just waiting on a rotten Rover 75 CDT Tourer to come round. Like poor quality wobbly children's play pony poop unfortunately, so all the parts have to come from evil bay. Rant over Just another lad who gets the same kick out of it as a lot of people on this forum. Only forum I actually use nowadays! |
| |
|
|
|
|


 )
)


 A stupid design, but not a problem until you need to remove / refit them to do some unrelated work