|
|
|
|
|
Thanks for all your reactions! For the hubcaps I was indeed going for a look as found on earlier Jags, but also 60's Mercedeses and Rollers. For those of you wondering why I went for a red accent on the caps: this will now be explained. Now the exterior is pretty much there I decided to tackle the interior. The original one was a very worn version of the very common beige leather, which looked and smelled like your grandma’s hearing aid. It was a nice contrast with the black but nearly every bit was worn through, sun damaged, or dirty beyond cleaning. This was pretty much fine until the exterior looked as good as it did. Here's a picture of how it was: 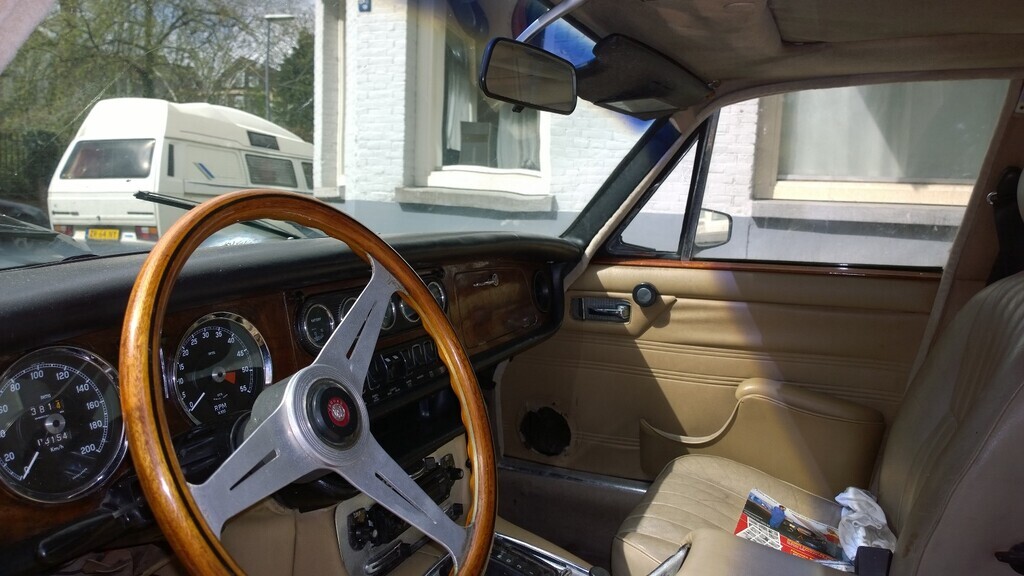 As luck has it, I’d found a better interior from a poverty-spec car, which meant tidy Ambla vinyl instead of the inevitably cracked and torn leather nearly all other XJs have. Moreover, it had one other trait which made it perfect for my car: 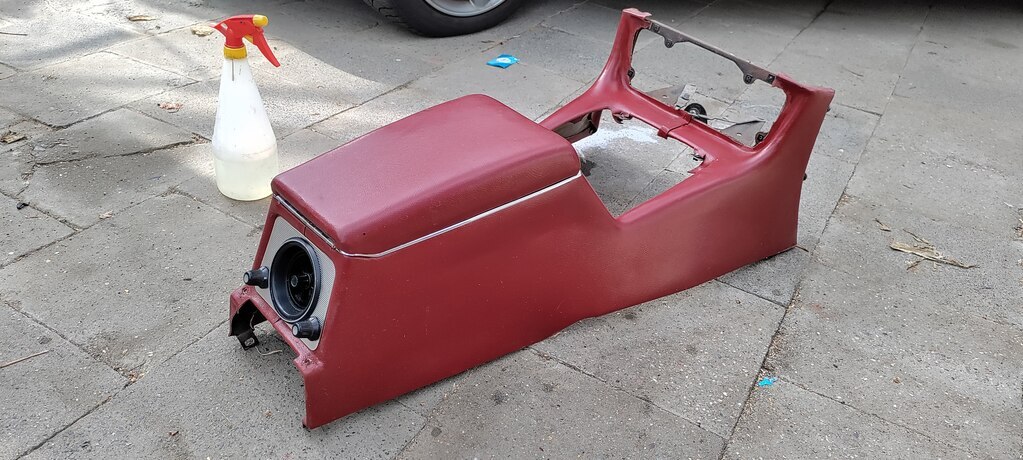 It was red. I’m a sucker for black over red and was determined to have my XJ look that way too. The center console here was a matter of redoing, reglueing and touching up. Redoing the rest of the interior sadly wasn’t as easy as taking the old one out and putting the new one in. Years of moisture ingress had turned the door cards into moldy oatmeal, as evidenced here. 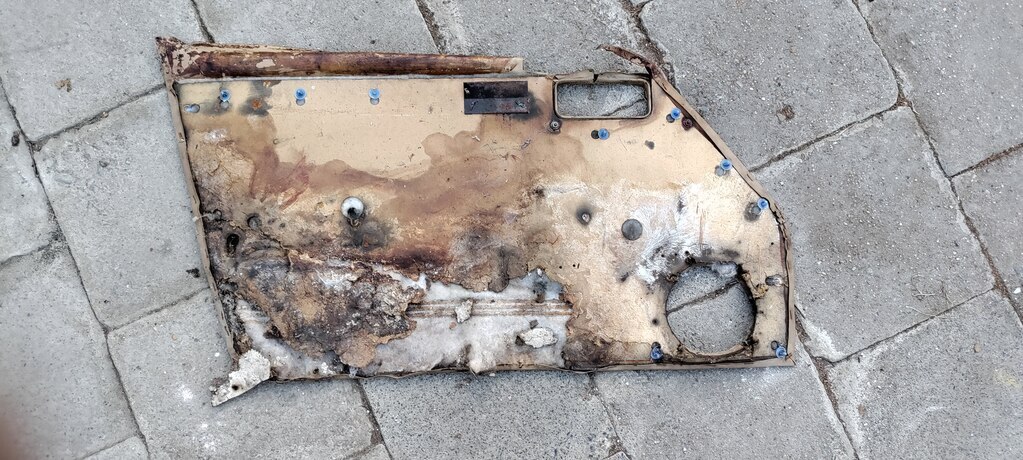 So new water-resistant boards were made for all 4 doors and covered with the original vinyl. As the red interior door cards had holes for the keep-fit windows, which my fine automobile didn’t need, I used the beige originals and recolored them with 5 layers of Angelus Crimson Red vinyl paint. 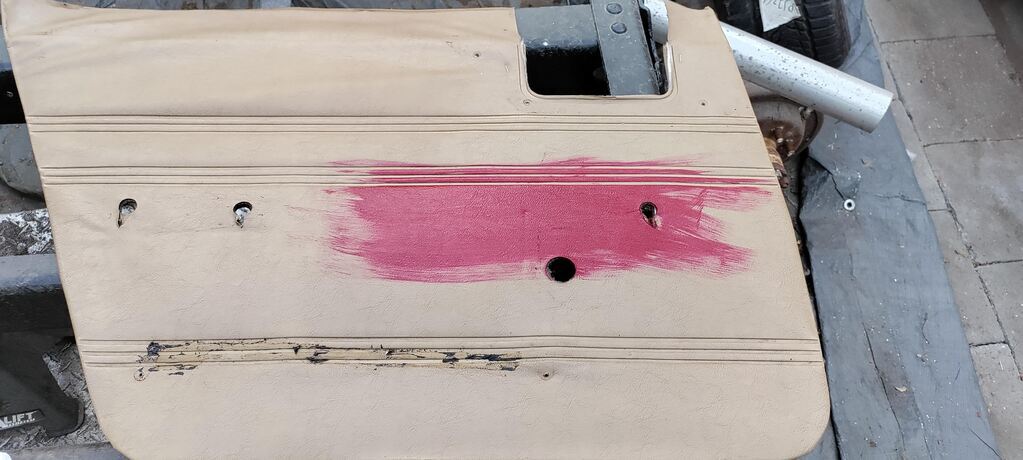 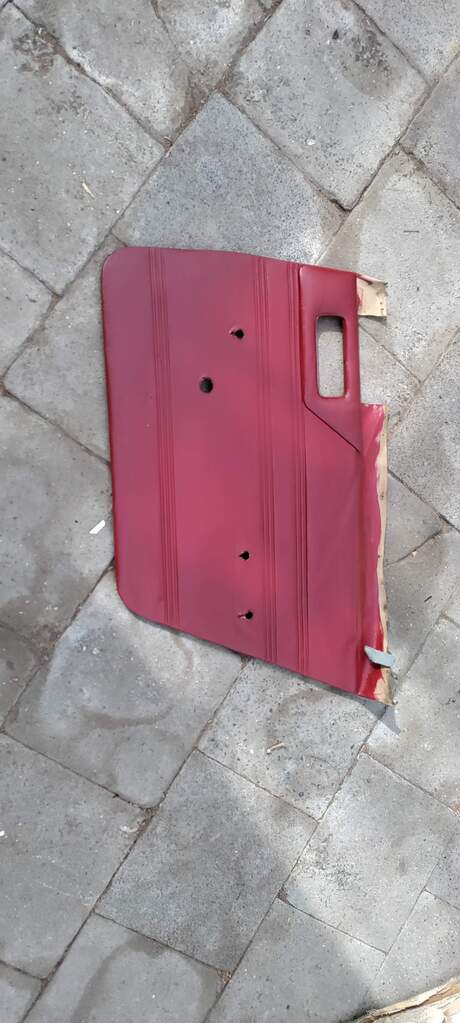 Here can see the new boards being test fitted to ensure they don't rub: 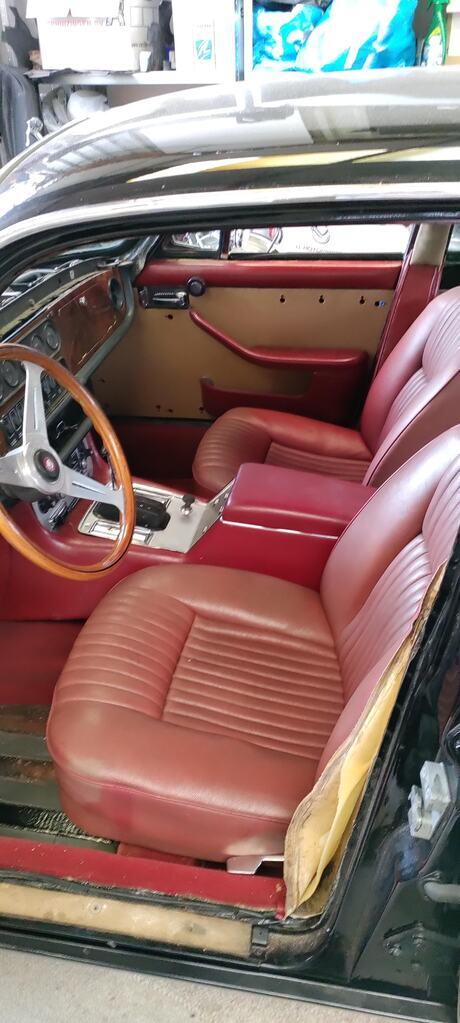 The doors themselves were effectively silenced with some strips of 2mm butyl sound deadening on the marked places, and closed cell foam to prevent the cards vibrating. The interior of each door was rustproofed with Fluid Film and cavity wax. They now give a very satisfying thud when closing them. 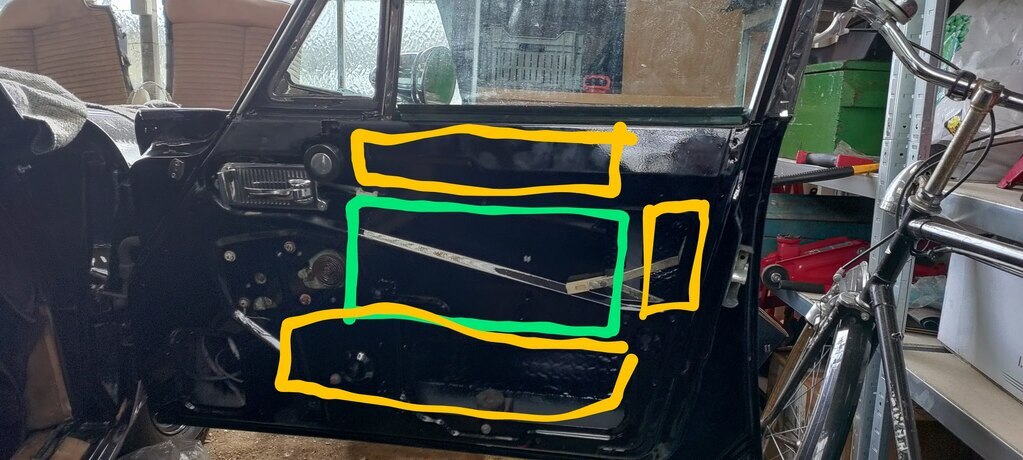 All doors then received a new moisture barrier to keep the new cards fresh.  And on went the new door panels. I’d adapted these to use Series 2 front door pockets because they look better and have a handy grab handle to close the door that my Series 1 items strangely missed. 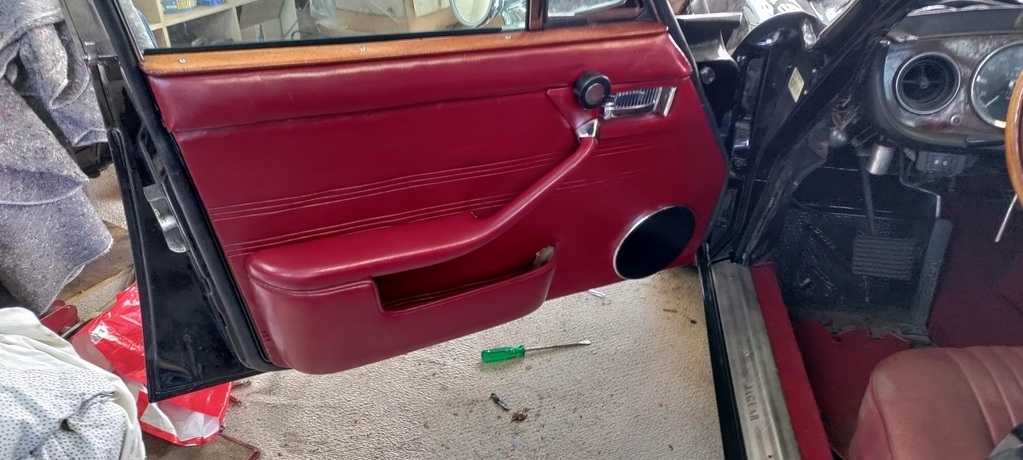 At the rear I chose Series 2 pockets as well for the integrated speakers, which I modified to also hold the S1 window switches. 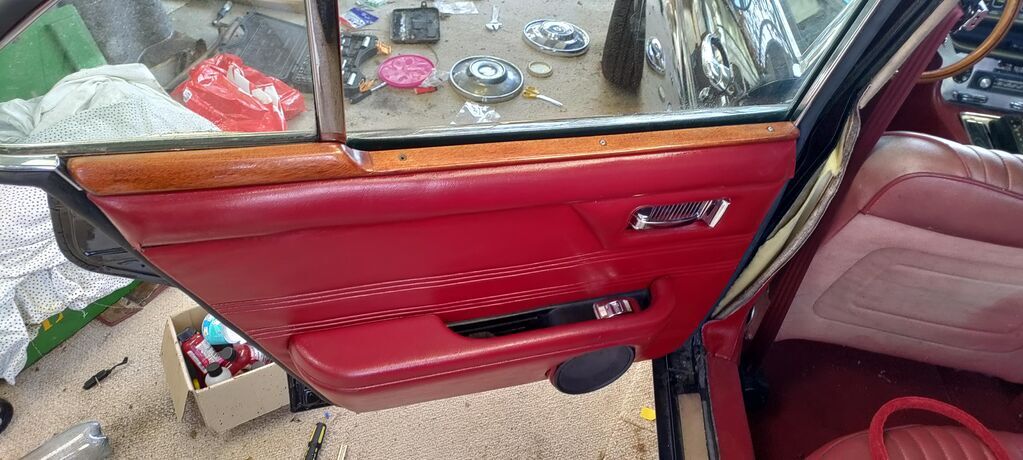 The board for the parcel shelf was equally destroyed. These are always black originally, regardless of interior color. I preferred to keep the interior theme so a new one was cut out of the same board as the doorcards and covered with new red vinyl. After testing it in the sun I've found that the red doesn't cause any annoying reflections in the rear window. 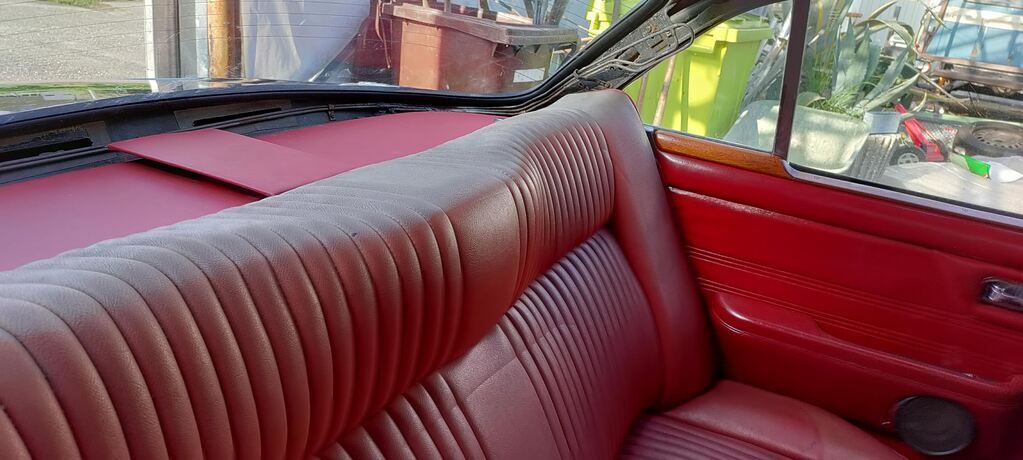 The floors and roof (like the rest of the car) were rustproofed with Owatrol and painted over with Hammerite, and sound deadened in the same manner as the doors.  The seats went in as well as a new set of seat belts. The originals were frayed and black, so I opted for some luscious burgundy seat belts with chrome buckles from the USA, which look and feel great. Ditto for new the red Furflex around the door openings. 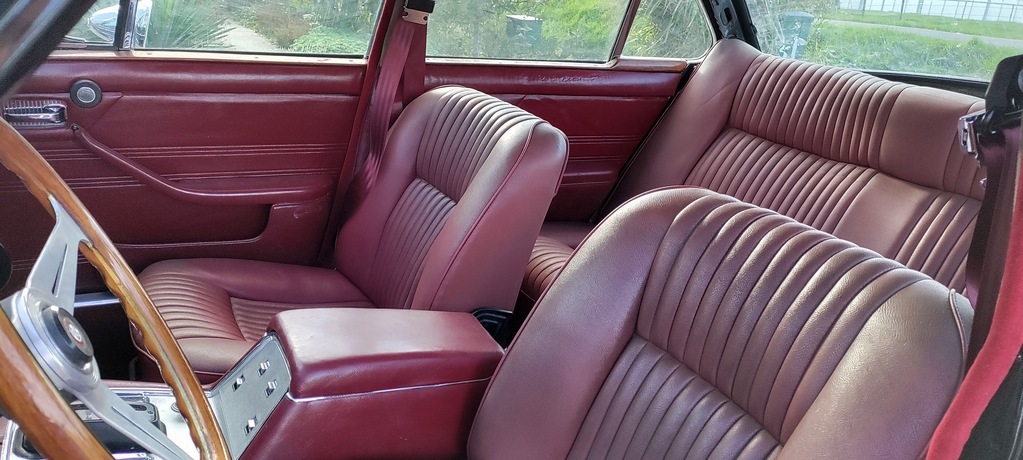 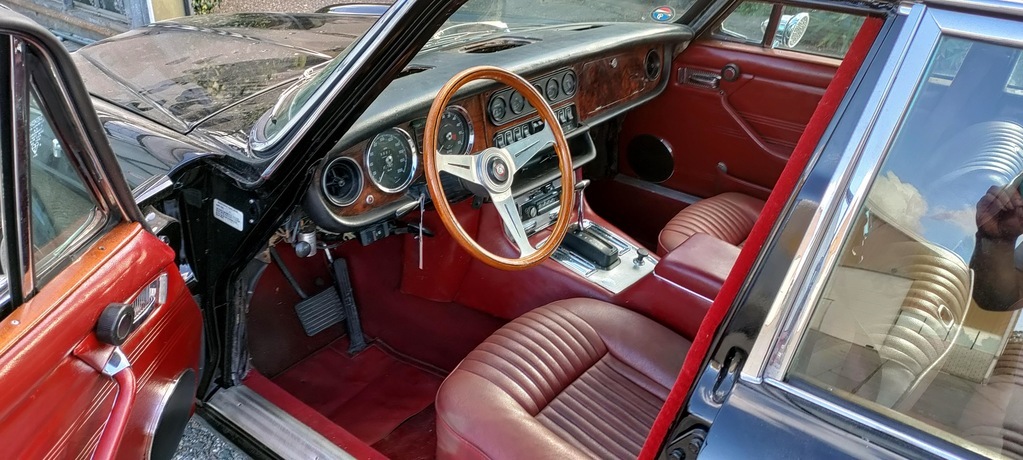 I’m very pleased with the result. Going from grubby beige to sumptuous red makes all the difference, don’t you think? |
| |
Last Edit: Jun 19, 2023 7:59:37 GMT by mkickert
|
|
|
|
|
|
|
|
|
|
Wow. I REALLY love that red. I'm imagining The Krays rolling up to their Mums house for Sunday lunch in this. It is fantastic.
|
| |
Last Edit: Jun 19, 2023 9:41:47 GMT by motardman
|
|
|
|
|
|
|
Jun 19, 2023 10:16:56 GMT
|
Wow. I REALLY love that red. I'm imagining The Krays rolling up to their Mums house for Sunday lunch in this. It is fantastic. Clarkson claims Jags are caddish. I'd be inclined to agree more with your take. It is a proper villains car with the new interior.
Your car is classy. Free lunches and tables at the front ala Goodfellas.
|
| |
|
|
|
|
|
|
|
The interior wasn’t quite done yet though. When the car was converted to a sunroof 52 years ago the original headlining was removed and replaced with a single covering. This looked and smelled like the Marlboro Man’s lungs, so I wasn’t too sad binning it when I cut out the sunroof. This did mean that I need to find a new way to cover the inside of the roof. The original Jag headlining consisted out of 2 pieces along the left and right cantrails and 2 pieces along the front and rear windows which enclosed a fibreboard ‘biscuit’. I suspect they call it that because like all biscuits it gets soggy and crumbly, depositing crumbs of headliner down the back of your neck. Here's an example of a good original one. 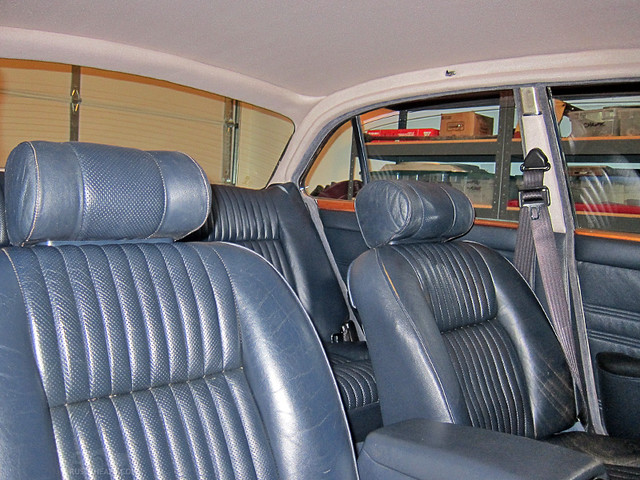 I owned none of the required pieces, so some were sourced from donors whilst I had to make the others from scratch. Whilst original Series 1 headliners are all grey or beige I decided to fit in more with the rest of the interior by using a dark red Alcantara (fake suede) material with a 3mm foam backing. 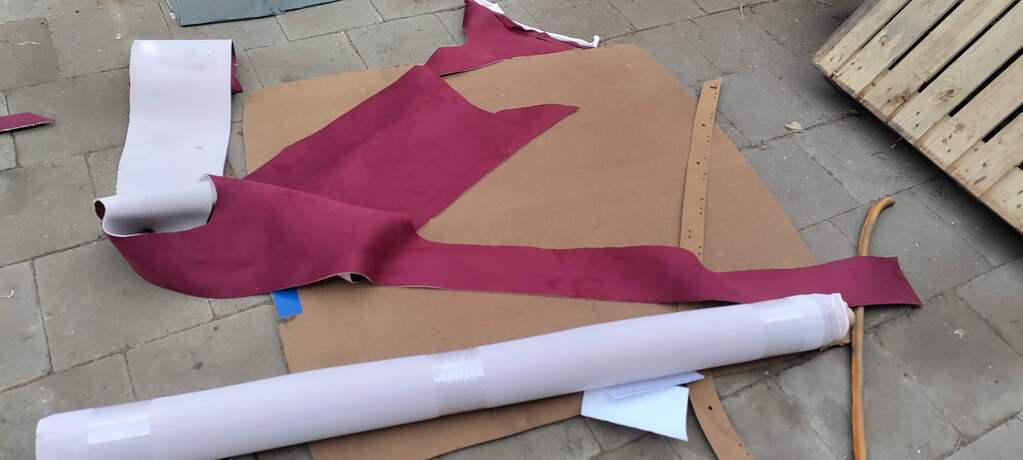 I decided to test the material on the B-pillar coverings to confirm that this was the look I wanted. These pieces consisted of a steel backing plate covered by mostly disintegrated foam and covered by velours. 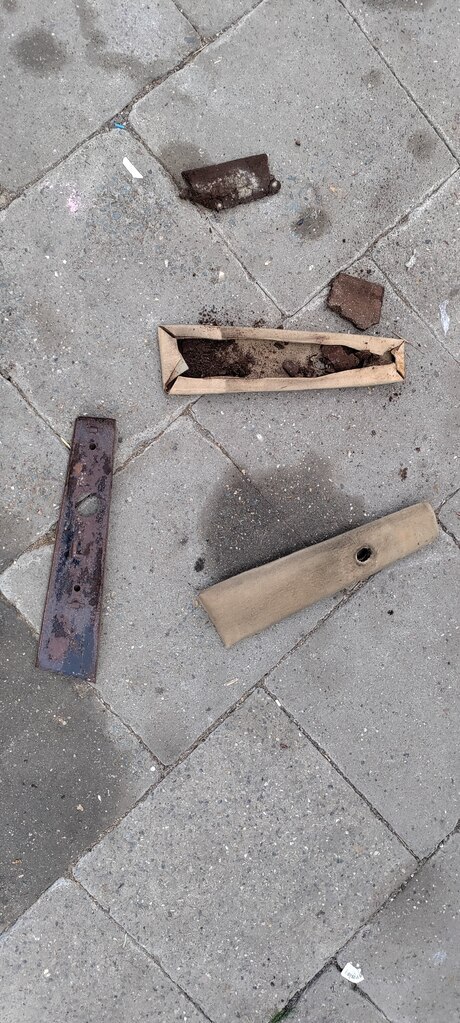 The plates were derusted, painted, and built up with new foam layers. 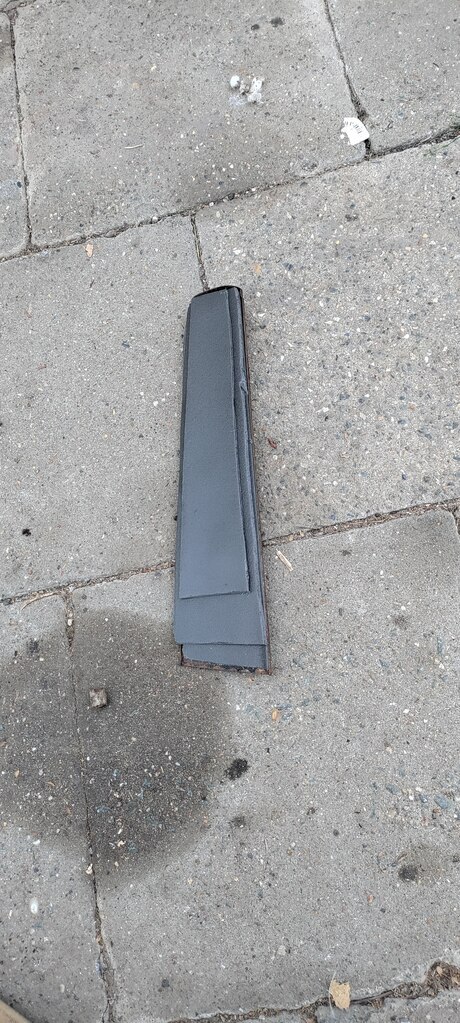 Some high temperature spray adhesive was used to tighten the Alcantara over the piece, resulting in a very lovely little piece. The texture of the material and how it caught the light was exactly what I wanted, so I decided to press on. 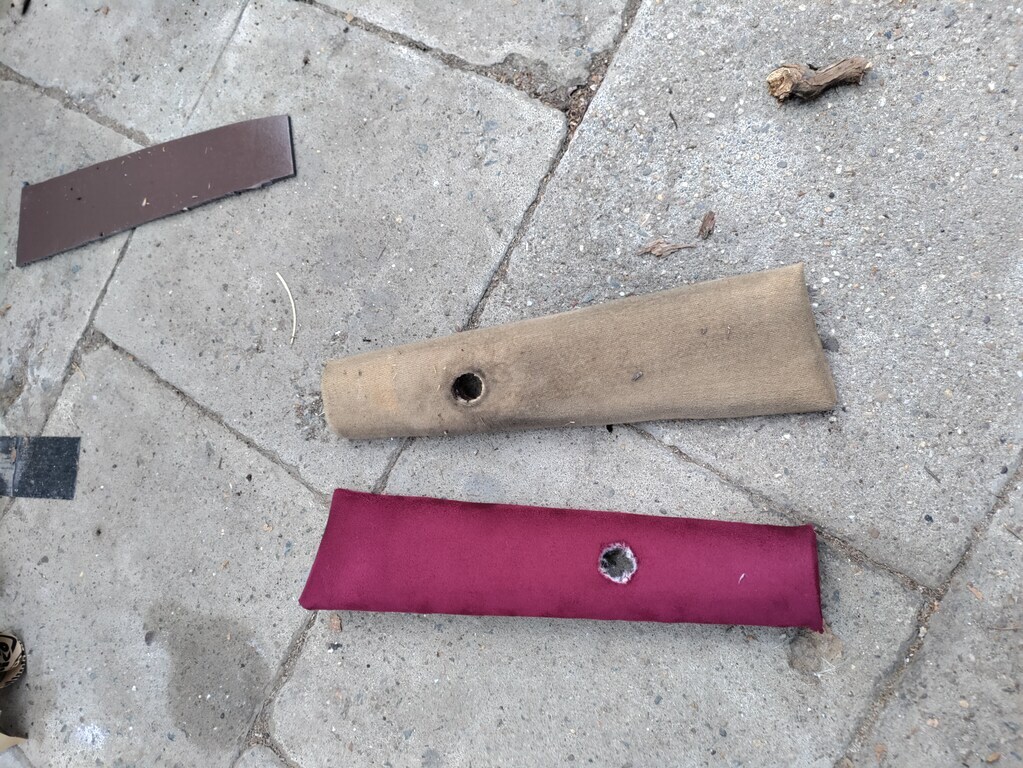 I remade the 2-piece cantrails using a weathered original to transfer the shape to new fiberboard, covering it in a similar way to the B-pillar trim. 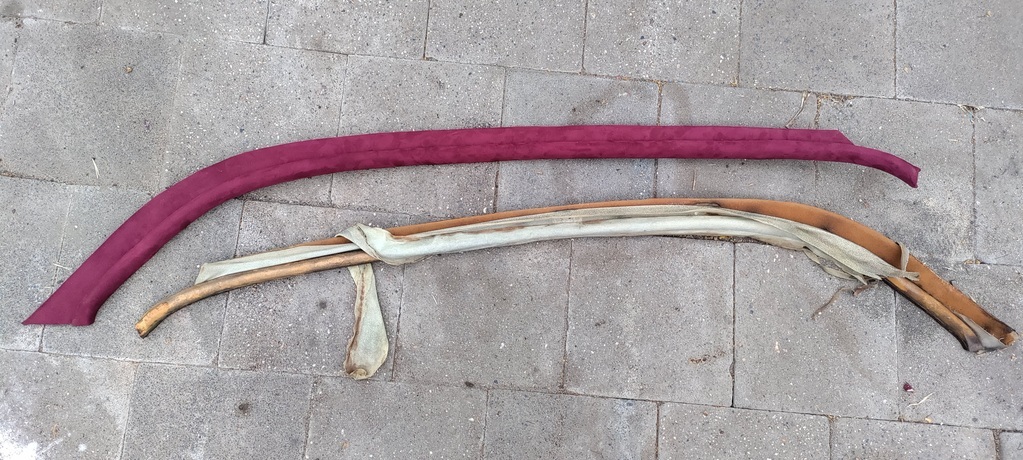 The Alcantara has quite a bit of stretch, which makes covering trim a doddle. Even this compound shaped piece, which goes under the rear window and parcel shelf was covered with ease. 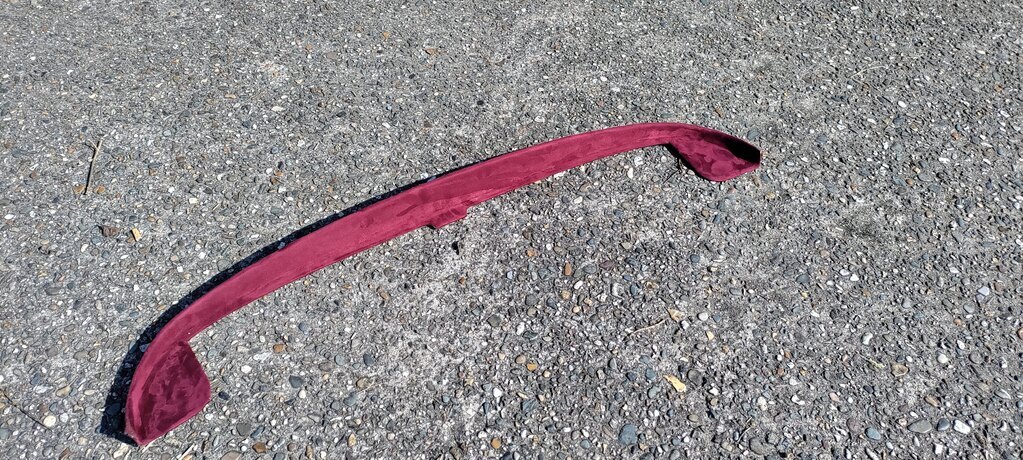 The transverse metal pieces around the front and rear window were derusted, painted, and recovered in the same manner. 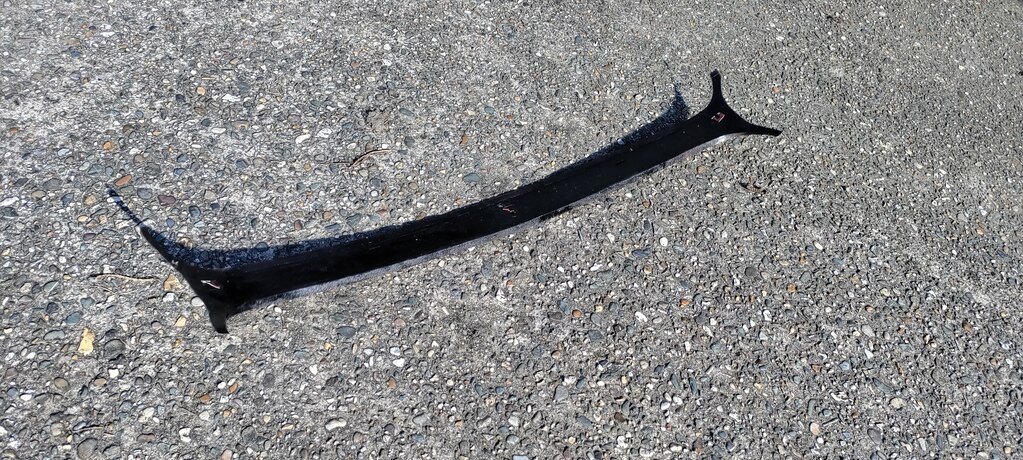 When the bodyworker closed my sunroof he used some metal strips to keep tension on the roof, which meant an original headliner biscuit wouldn’t fit. Here's a reminder of how it looked after sound-proofing. 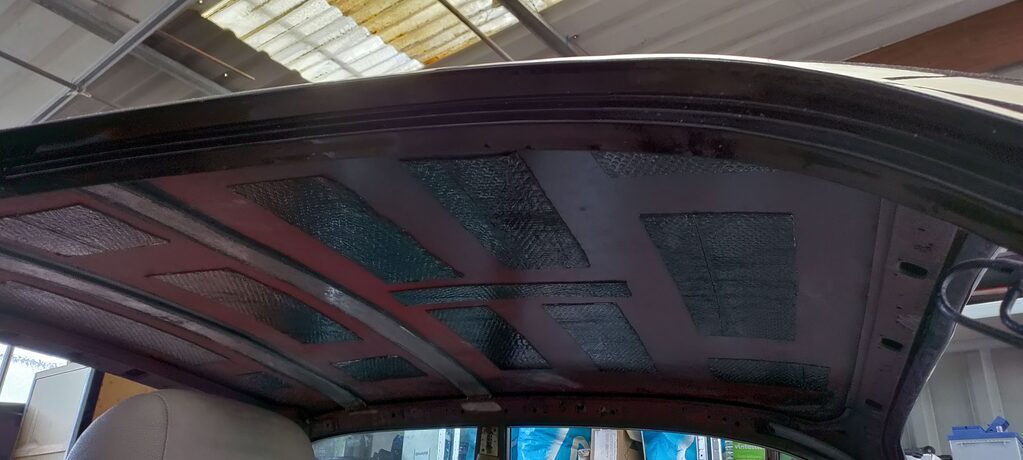 I first attempted to recreate the biscuit out of the same 3mm waterproof fiberboard I used for the door panels and parcel shelf, but this did not feel inclined to support its own weight. I’ve decided the way to go is redoing the soundproofing to an even layer and sticking the headlining material straight to this. I haven’t gotten round to this yet, so that will be a problem for future me. I hope this won’t create issues with condensation and such. I'll make some pictures when everything is in. This pretty much brings us up to where I am with it today. It looks great and is working just fine, so what’s left to do but enjoy it? |
| |
Last Edit: Jun 20, 2023 10:32:22 GMT by mkickert
|
|
79cord
Posted a lot
  
Posts: 2,617
|
|
|
|
|
Perhaps the formed fiber-board from a modernish car could be trimmed down to suit?
Though so many suffered problems with failing adhesive &/or foam to which their fabrics were stuck.
|
| |
|
|
|
|
|
Jun 20, 2023 10:12:08 GMT
|
|
|
| |
|
|
|
|
|
Jun 20, 2023 10:24:44 GMT
|
|
Just gone through this.
What an amazing job you all did to end with this result.
|
| |
|
|
|
|
|
Jun 20, 2023 12:25:11 GMT
|
It might not be quite as cheap as making one yourself, but I've got a Myrtle ltd replacement headlining in my XJ40 and it looks like they do one for the XJ6 too. They're fibreglass backed and fold really well so they were dead easy to get into the car. It came in a box folded in half  Little more affordable than the chaps Westbay linked to, and seems good quality so far! |
| |
Last Edit: Jun 20, 2023 12:26:13 GMT by biturbo228
|
|
|
|
|
Jun 20, 2023 17:24:22 GMT
|
|
Thanks for the tips! The biscuits are pretty expensive though (especially shipped to Holland!) And as said they won't fit my car because of the extra roof supports so I'll just have to figure it out myself, which I hope will come out fine.
|
| |
|
|
|
|
|
|
|
Jun 20, 2023 17:50:21 GMT
|
|
myrtle and jaguar headlinings are the same company
|
| |
|
|
|
|
|
Jun 22, 2023 17:19:02 GMT
|
The car had one small problem. It runs and drives like it should. But I don’t want it to run and drive like it should. I want it to run and drive better than that. I want it to be a comfortable, reliable, and characterful car to take me across Europe. As you may recall from my earlier post I’d originally found three things to be in the way of that goal: 1. Firstly, the steering did not inspire confidence. 2. Secondly, the three speed BW66 gave the combination of sluggish shifts and high motorway RPMs. 3. Thirdly, a top speed run revealed that a considerable part of its 170 emission-controlled ponies had gone off to pasture over the years. Now the first part was mostly addressed by the partial suspension refresh, but the second and third points remained even with the taller diff I fitted improving things a bit. I took a look at the powertrain. The 4.2 XK that’s in it runs smoothly, especially after converting it to HS8 carbs and electronic ignition with a Powerspark kit. Compression is great but it doesn’t provide the punch I’d want, plus I’m tired of the horrendous fuel economy and constantly chasing leaks. The gearbox with its direct drive in 3rd didn’t help the package at all. So why not improve both? 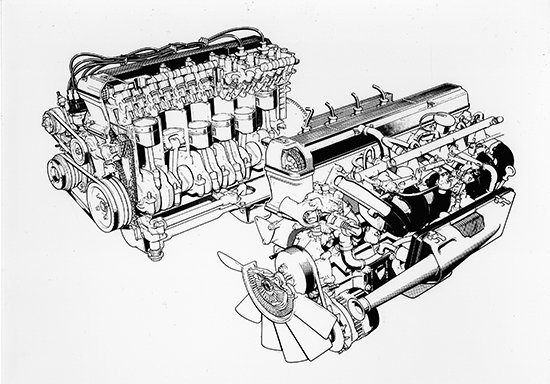 The obvious choice for this is the later Jaguar AJ6/AJ16 engine. They’re powerful, reliable, and plentiful. Most of these engines live in XJ40s and X300s which have very little to do technically with my Series 1, but they were also available in late XJS cars which essentially uses a SWB Series XJ chassis, making it a relatively easy and well documented swap. They’re fully aluminium engines with timing chains. The larger versions make between 220 and 245 bhp (which is a welcome step up) and feature a 4-speed ZF 4 speed auto with 0.73 overdrive and lockup, which makes high speed travel much more appealing. I’d been looking out for an AJ6, as the later AJ16 is more complicated electronically and aren’t that much better. Up came a complete engine, box, and loom that was already fitted to an XJC. The previous owner had bought the car like that and was removing the engine to fit an AJ16S Supercharged from an XJR. Here it is fitted in the Coupe. 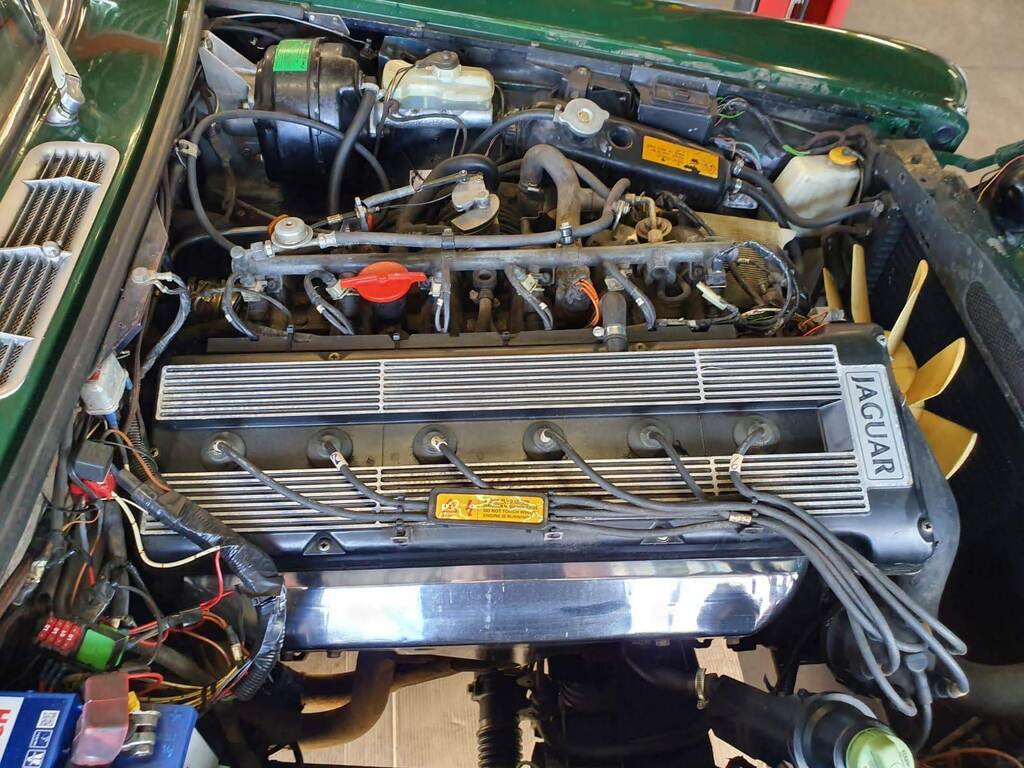 This meant I got to drive it to ensure it was a good one. There were no oil leaks, everything looked tidy, and the test drive proved it to be smooth, powerful, and silent. Whilst the original conversion hadn’t been done as neatly as I’d have preferred it’s hard to beat a complete ready-to-fit package. The only downside was that while advertised as a 4.0 some measuring of the stroke turned out it was a 3.6 – which was used as leverage to talk the price down. So a deal was made and I was ready to collect the engine. |
| |
|
|
|
|
|
Jun 22, 2023 17:25:40 GMT
|
The car had one small problem. It runs and drives like it should. But I don’t want it to run and drive like it should. I want it to run and drive better than that. I want it to be a comfortable, reliable, and characterful car to take me across Europe. As you may recall from my earlier post I’d originally found three things to be in the way of that goal: 1. Firstly, the steering did not inspire confidence. 2. Secondly, the three speed BW66 gave the combination of sluggish shifts and high motorway RPMs. 3. Thirdly, a top speed run revealed that a considerable part of its 170 emission-controlled ponies had gone off to pasture over the years. Now the first part was mostly addressed by the partial suspension refresh, but the second and third points remained even with the taller diff I fitted improving things a bit. I took a look at the powertrain. The 4.2 XK that’s in it runs smoothly, especially after converting it to HS8 carbs and electronic ignition with a Powerspark kit. Compression is great but it doesn’t provide the punch I’d want, plus I’m tired of the horrendous fuel economy and constantly chasing leaks. The gearbox with its direct drive in 3rd didn’t help the package at all. So why not improve both?  The obvious choice for this is the later Jaguar AJ6/AJ16 engine. They’re powerful, reliable, and plentiful. Most of these engines live in XJ40s and X300s which have very little to do technically with my Series 1, but they were also available in late XJS cars which essentially uses a SWB Series XJ chassis, making it a relatively easy and well documented swap. They’re fully aluminium engines with timing chains. The larger versions make between 220 and 245 bhp (which is a welcome step up) and feature a 4-speed ZF 4 speed auto with 0.73 overdrive and lockup, which makes high speed travel much more appealing. I’d been looking out for an AJ6, as the later AJ16 is more complicated electronically and aren’t that much better. Up came a complete engine, box, and loom that was already fitted to an XJC. The previous owner had bought the car like that and was removing the engine to fit an AJ16S Supercharged from an XJR. Here it is fitted in the Coupe.  This meant I got to drive it to ensure it was a good one. There were no oil leaks, everything looked tidy, and the test drive proved it to be smooth, powerful, and silent. Whilst the original conversion hadn’t been done as neatly as I’d have preferred it’s hard to beat a complete ready-to-fit package. The only downside was that while advertised as a 4.0 some measuring of the stroke turned out it was a 3.6 – which was used as leverage to talk the price down. So a deal was made and I was ready to collect the engine. You can't leave it there! You catty tease! Come. On.;-) |
| |
|
|
|
|
|
Jun 23, 2023 11:57:36 GMT
|
I took the ancillaries and wiring out of the car myself, which allowed me to photograph and mark everything to ease assembly. I ran out of time to pull the engine itself, which the PO did. It was only after collection that I realized during removal he’d badly cracked the aluminium sump, which he’d poorly patched with some chemical metal. Great. Here's a view from the inside: 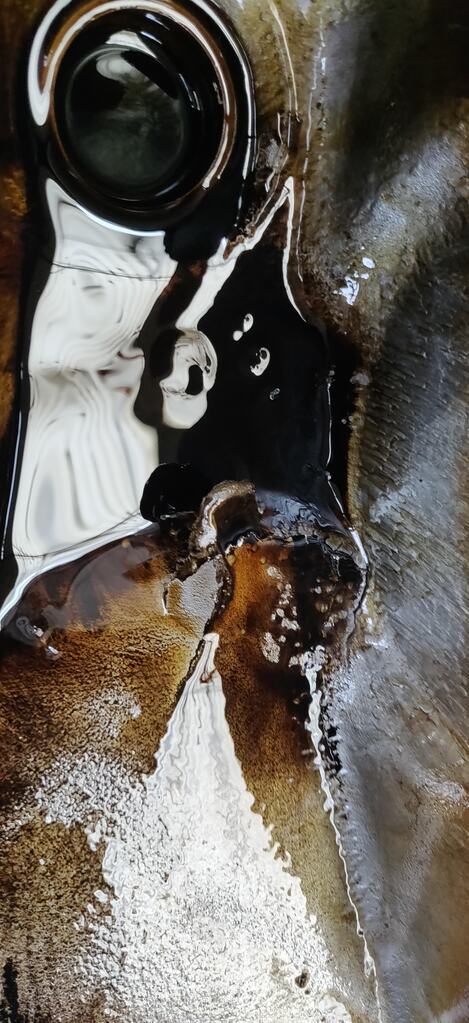 A different sump was sourced and mounted. 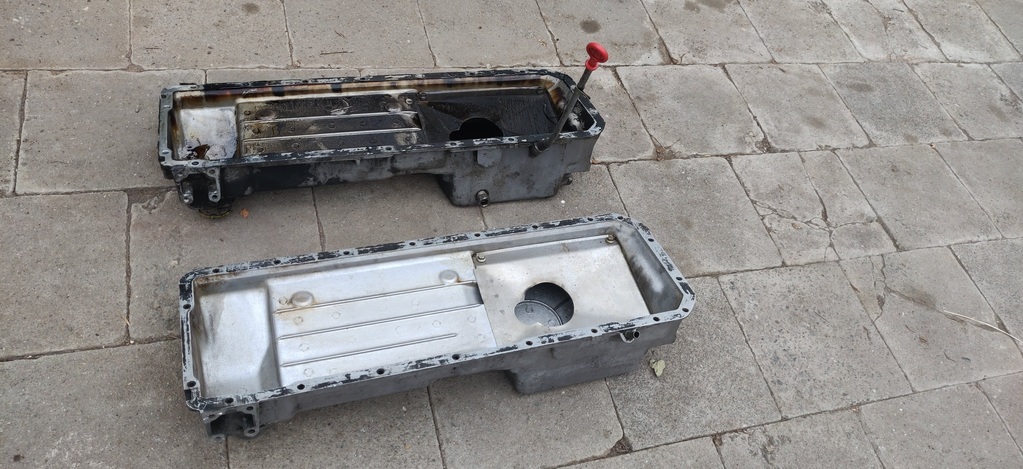 I also gave the engine a good clean, as well as working through the wiring. The AJ6 has a separate engine wiring loom with some minor electrical differences from year to year. Mine was an ’88, so I removed all the unused wiring from the engine loom. I rewrapped the thinned-out loom in new 3M tape. Here's the original diagram. 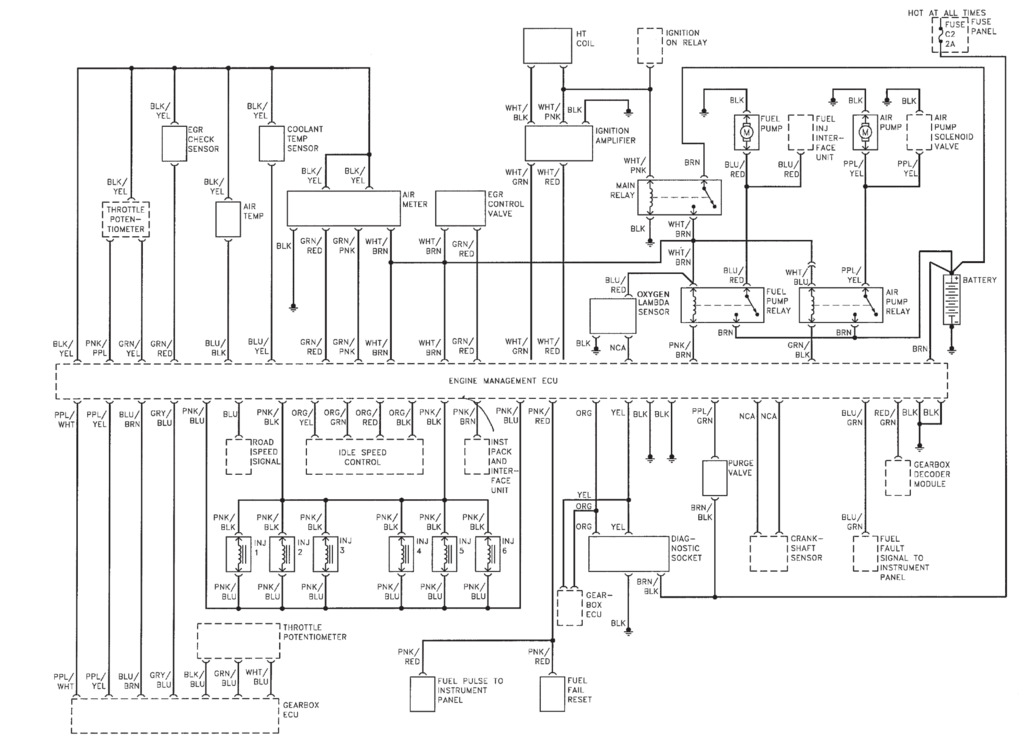 And here's what I ended up with. 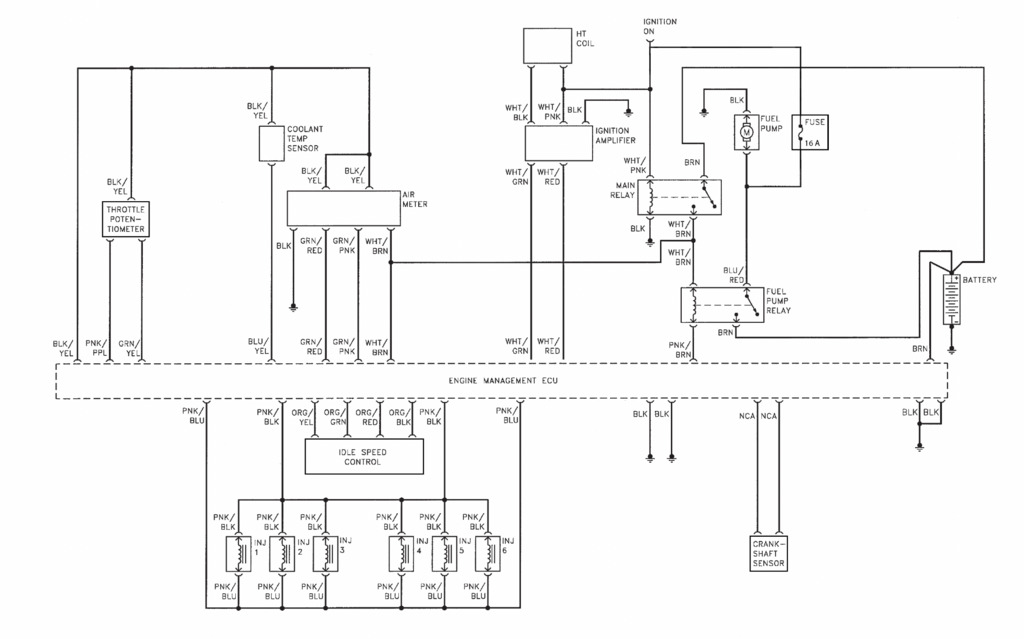 I made one last video of my 4.2 XK running, before tearing into the car. A friend helped me remove the surprisingly heavy bonnet. A nice thing about the Series XJs is that the whole front comes apart, making engine swaps considerably easier. 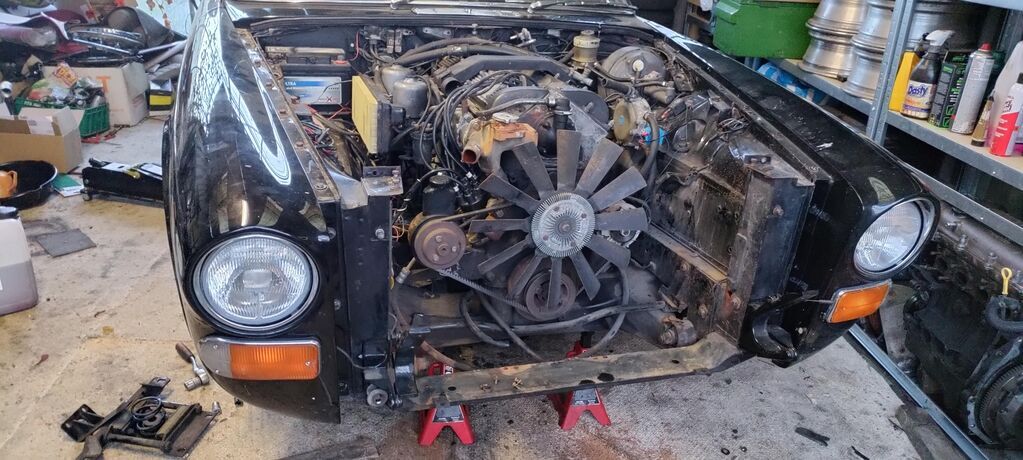 Removing the radiator revealed a rust-free radiator support, which was a happy surprise. 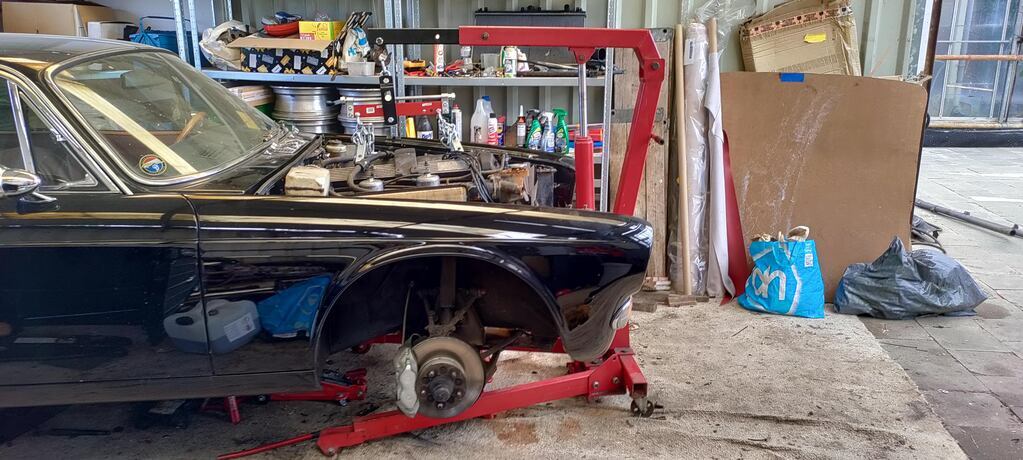 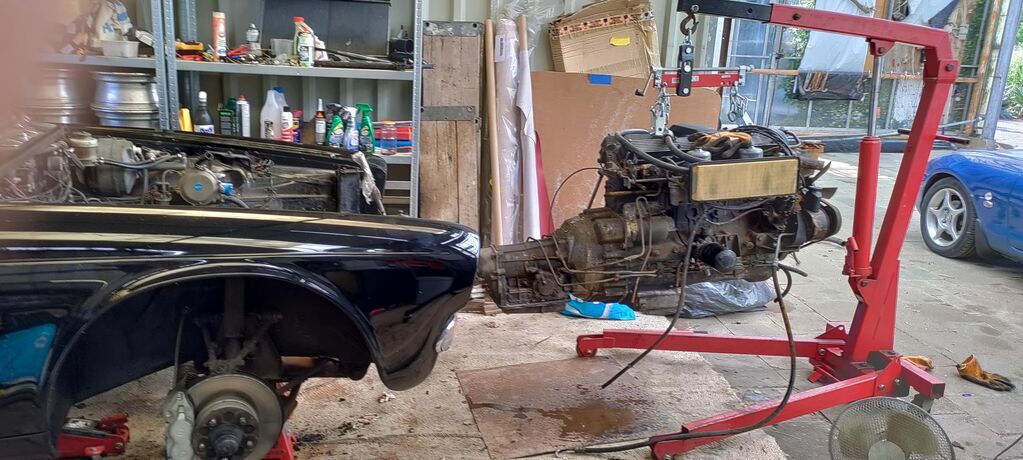 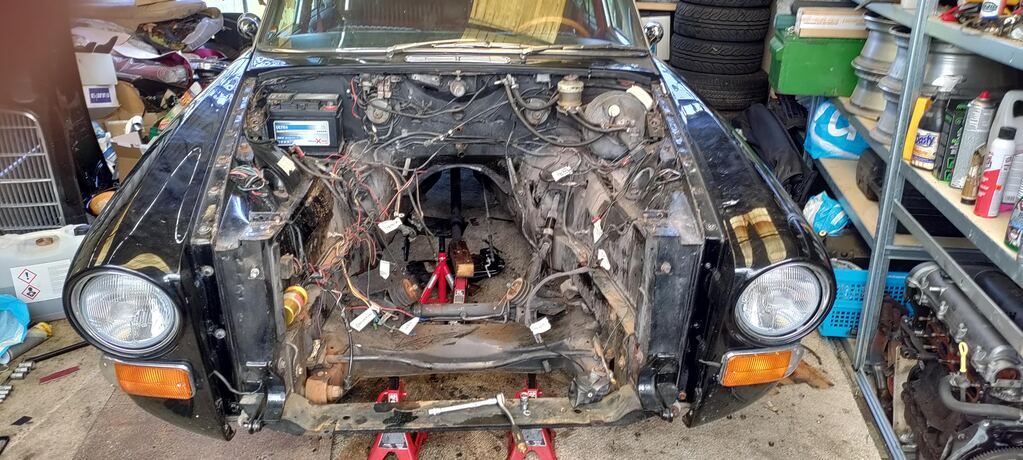 Out with the old! I removed the LPG condenser for now as well - I do intend to refit LPG at some point but I’m unsure which system I’ll use. The engine bay was grimy, but a deep clean revealed very solid metal. I took the opportunity to fill up some unused holes and give the bay a quick respray. No use sticking a nice engine in a tired bay, right? 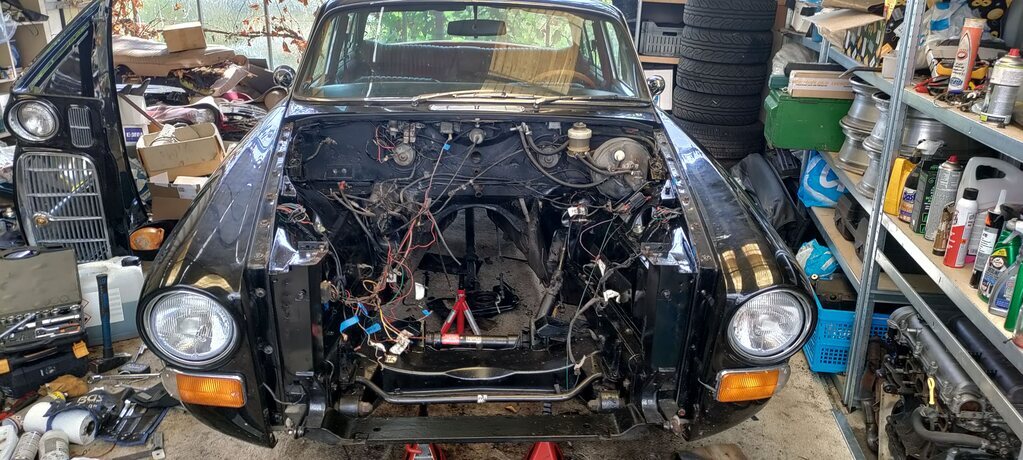 It looks like a mess still, but for a reason. I started thinning out the original wiring (which had many faults and breaks), but decided to finalize and wrap all of that when the new engine is running and I'm sure everything works ok. |
| |
Last Edit: Jun 23, 2023 14:35:25 GMT by mkickert
|
|
Clement
Europe
ambitious but rubbish
Posts: 2,095
|
|
Jun 23, 2023 12:01:43 GMT
|
|
Such a satisfying thread to follow, it all looks easy whereas I’d be terrified of tackling all of that myself!
Please keep at it, and tell us when you’ve turbocharged it or whatever else you have planned for it next.
|
| |
|
|
gazzam
Part of things
 
Posts: 741 
|
|
Jun 23, 2023 20:37:51 GMT
|
|
Just read right through this. One helluva transformation.
Particularly like the red interior.
And lots of bonus points for all the rust repairs, I don’t envy you there. Very nice job you made of it though.
Is the new engine much lighter?
|
| |
|
|
|
|
|
Jun 25, 2023 18:35:10 GMT
|
Just read right through this. One helluva transformation. Particularly like the red interior. And lots of bonus points for all the rust repairs, I don’t envy you there. Very nice job you made of it though. Is the new engine much lighter? Thanks! The AJ6 engine is quite a bit lighter even, being all aluminium. It's mainly due to the original being roughly the weight of a black hole. It's why I wanted to tackle the front suspension at this moment: because the AJ6 is significantly lighter than the original XK you need to lower the front to avoid a very gasser-like nose-up stance. First matter is removing the springs. There's not enough space to use traditional spring compressors so I made my own compressor following a design by Bernard Embden. I used this to drop the spring pans in order to decompress the springs. Be aware that even using the right tools this is quite a lengthy job. 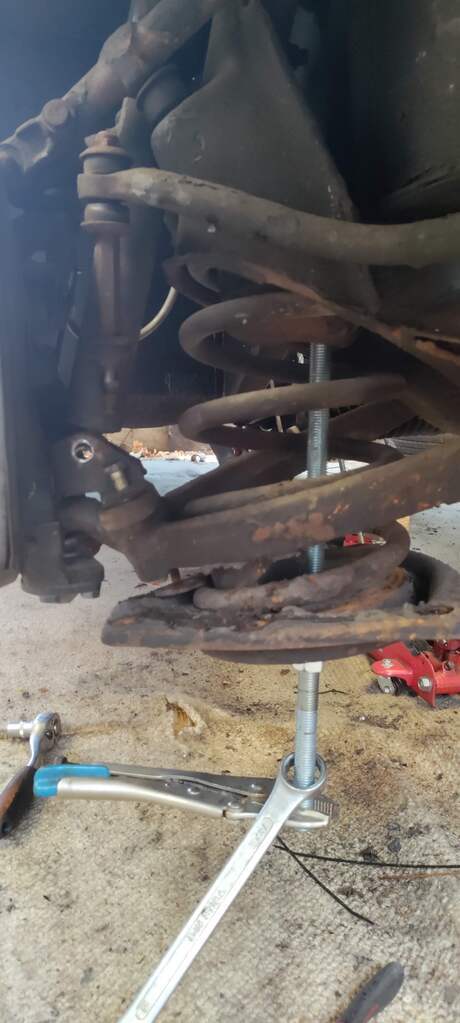 The inner lower wishbone rubbers were replaced with Superpro polyurethane as a matter of course, together with the lower ball joints. This means that now every single rubber and ball joint in the front suspension has been refreshed. You can see here from this side-by-side of the old wishbones with the new ones the old rubber was quite perished. 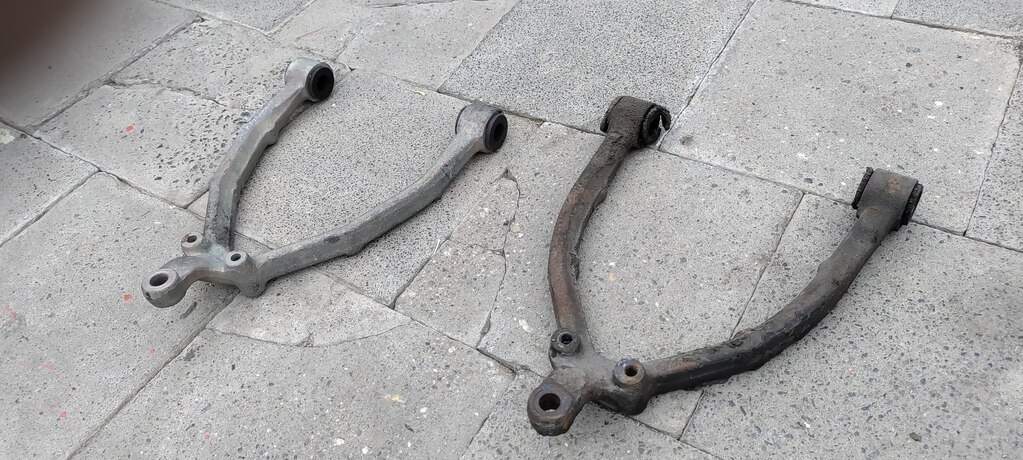 The new lower wishbones I'm using are Series 3 ones which increase caster a bit. Be mindful when fitting these that, unlike early XJ ones, they’re handed – the offset for the ball joint needs to point to the front of the car. At the time I didn’t realize Series 1 and Series 3/XJS springpans are slightly different, so as the pic shows the mounting holes don’t line up. I'll need to get the right spring spans to finish the job right. 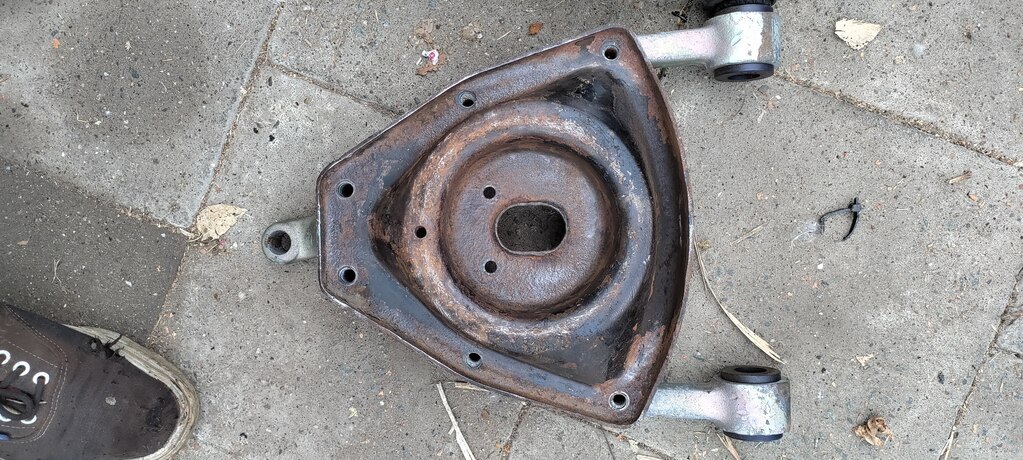 The Eibach lowering springs I got are a bit shorter, they're the same as what's on Harry Metcalfe's XJ Coupe.Whilst I was there I decided to also change my original 5/8" sway bar for the thicker 7/8" one off a V12 XJ-S, here seen together. My goal for this isn’t to pull 3G on the skidpad, but just to reduce body roll a bit for spirited driving. Later on I’ll also fit the rear sway bar off the same donor car to balance it out again. 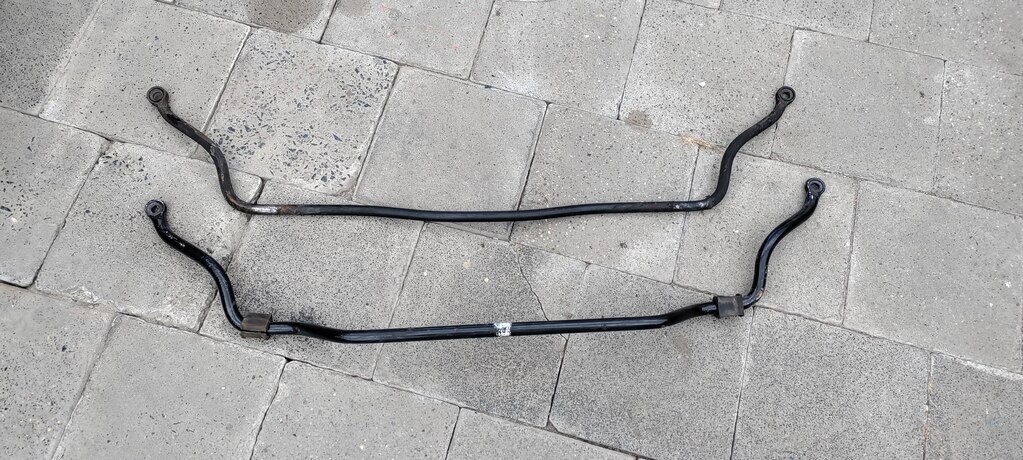 |
| |
|
|
|
|
|
Jul 15, 2023 20:30:22 GMT
|
I didn't have a lot of time to work on the Jag the past few weeks, but managed to get a full day in today. This means the front suspension is now all bolted up and ready. I decided to also change the shocks for GAZ adjustables so I can match them to the stiffer springs. All that's left to do is mount the sway bar and tighten the wishbone nuts, but that has to wait until the car is back on its wheels. 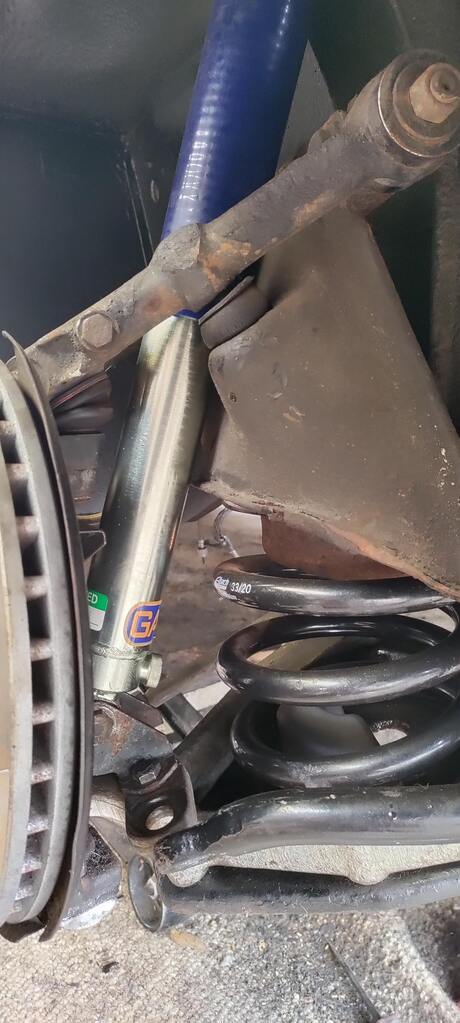 Whilst I had the space I decided to change the very rotten subframe rubbers, 52 years of oil spray had not done them any favors. 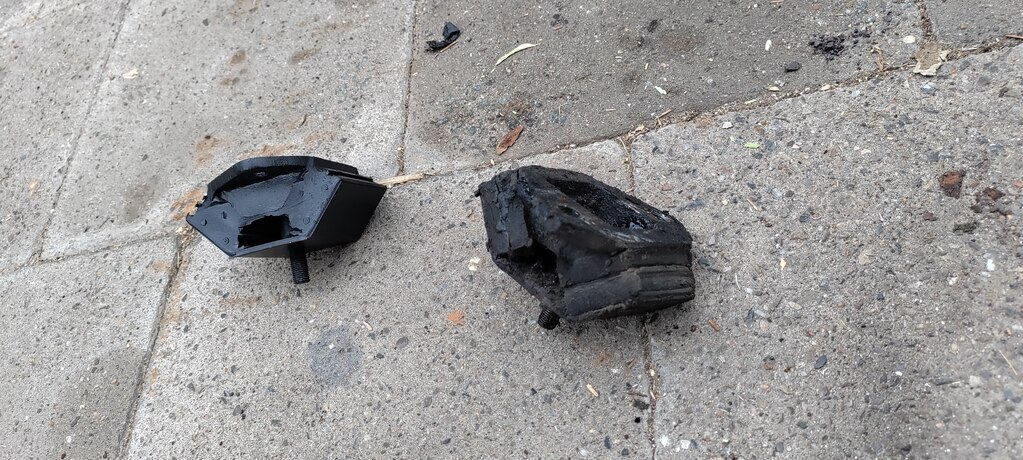 Also I put the new engine in a while back, this was much easier than the old one due to it being so much lighter. When it was in happiness ensued of course. 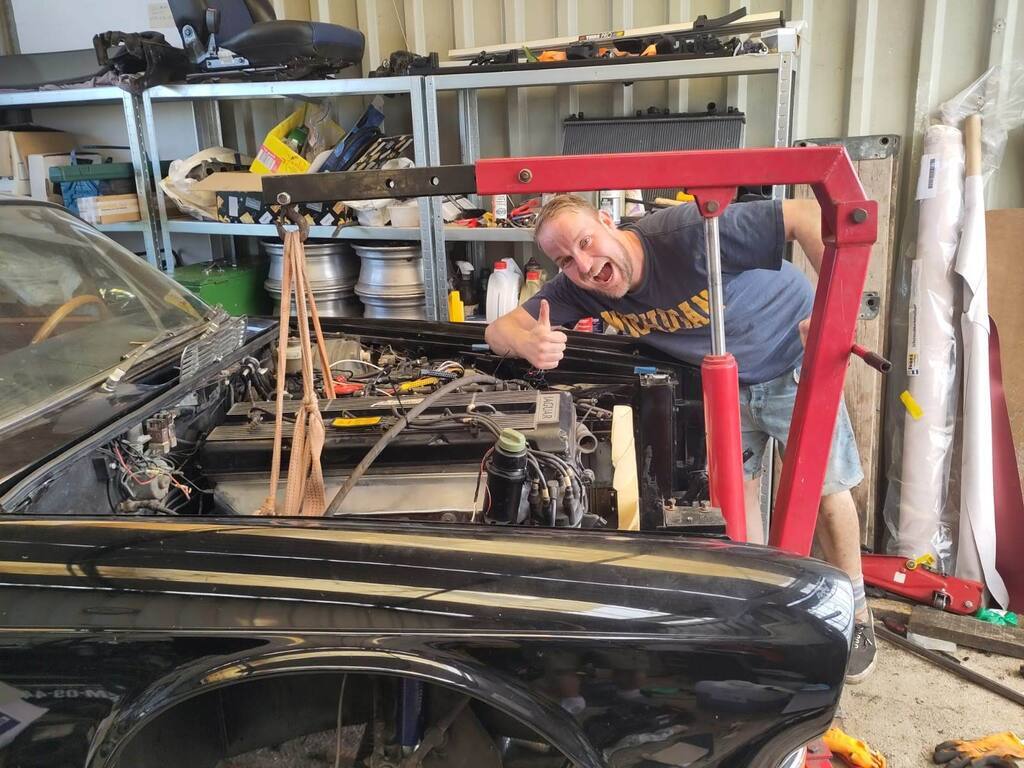 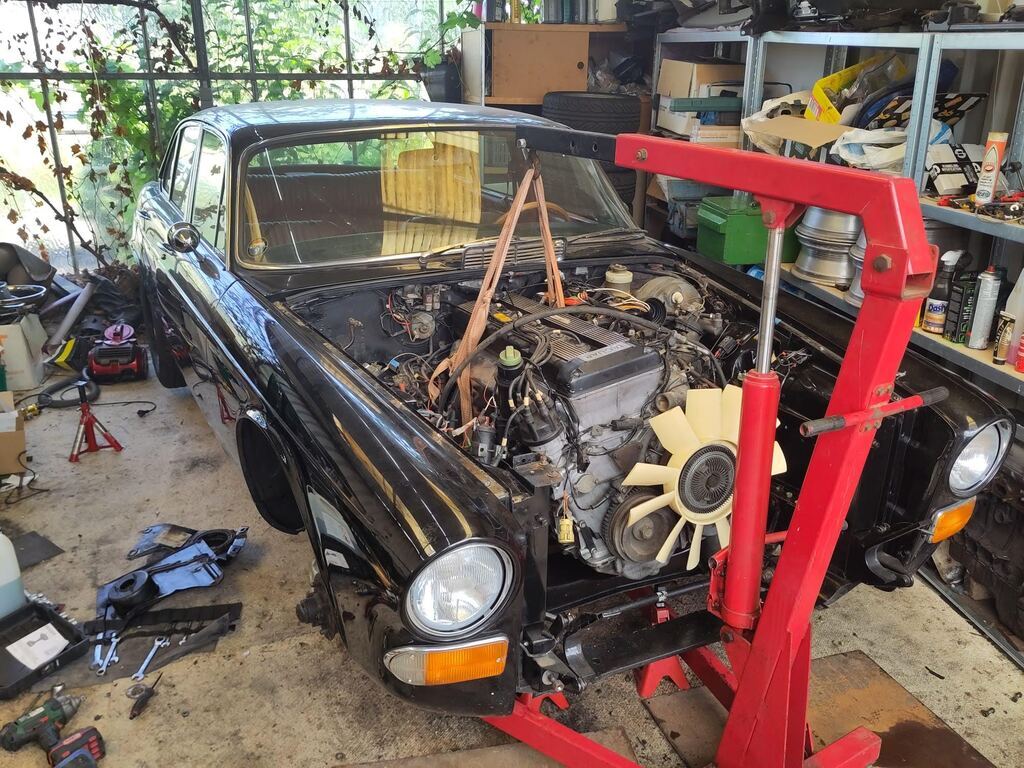 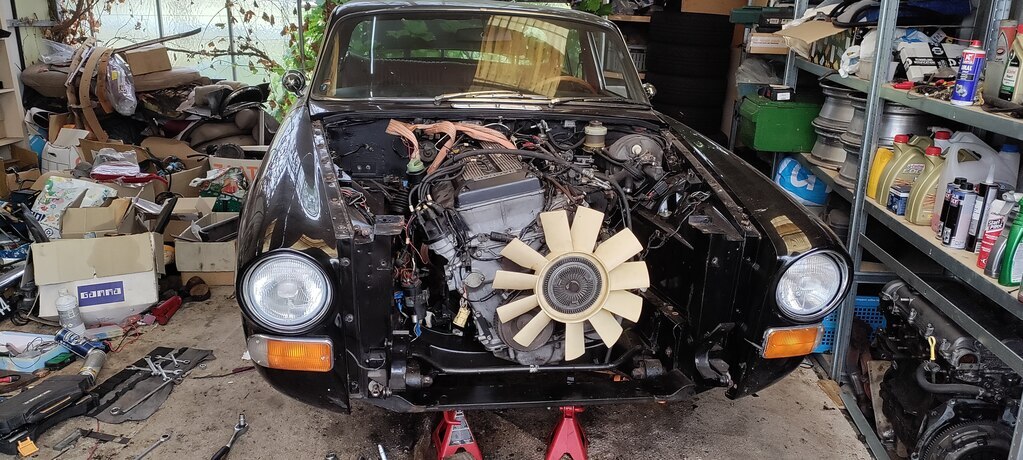 Sadly even though it came out of a Series 2 the front mounts didn't line up well. Series 1's have slightly different bolt pattern for the mounts, so I made up some new ones in the front. 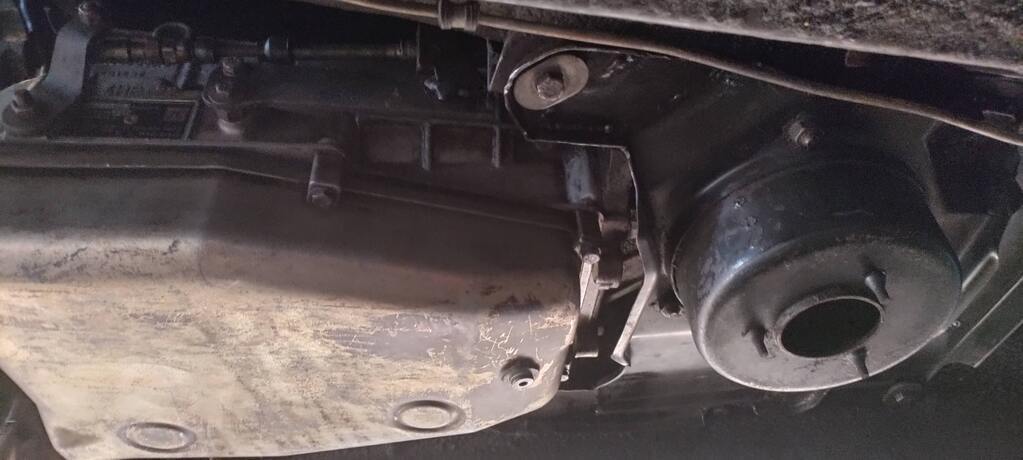 The rear mount from the XJ Coupe was poorly made, so I combined the XJ40 mount with the Series 1 mount to avoid having to grind or drill new holes in the body. I want the conversion to be fully reversible should the need arise, so the mount had to be adapted. Also sort of visible is the new shifter cable, which sadly required quite a bit of interior to be removed to fit it. Anyway it's in now, selects all the gears, so I'm a happy man. I still need to adjust the orginal Borg Warner shift quadrant to match the ZF's gear position, but that's a job for another day. I've earned my beer tonight I think. |
| |
|
|
kh97
Part of things
 
Posts: 25
|
|
Nov 11, 2023 14:08:30 GMT
|
|
Impressive work
Cheers from hoogeveen!(holland)
|
| |
|
|
|
|
|
Nov 19, 2023 19:37:06 GMT
|
I’ve been chipping away at the AJ6 conversion over the past months. It’s easy to think, like me, that because a lot of people on the internet have done an engine conversion it should be easy to do for anyone. This, of course, turned out to be total bull. I made a big effort to prepare my engine swap well: I gathered documentation, prepared the right parts, and gotten some pre-converted parts. But even then there’s still plenty of things that can cause issues. Case in point: Engine mounts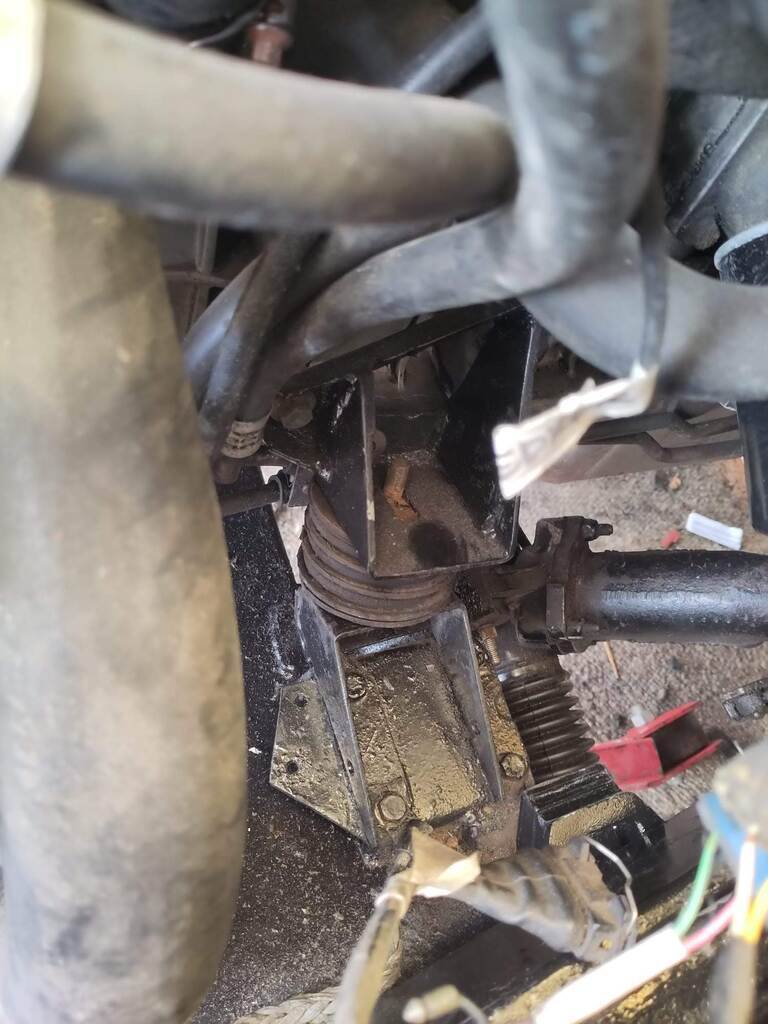 The mounts I used originally were basically hacked up XJ40 mounts from an already AJ6 converted XJ Coupe. They didn’t quite fit without some modification. But hey, the engine was in, right? 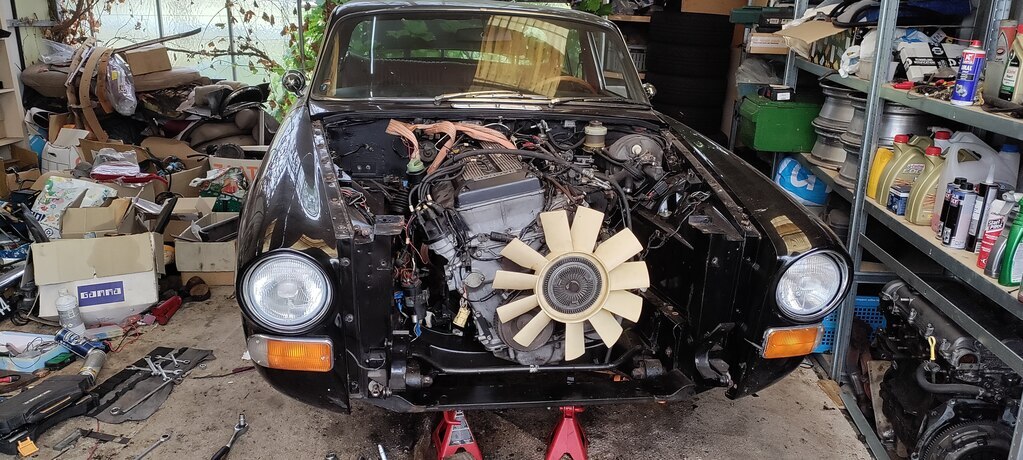 Yes and no. Remember this picture? I looked back at it and thought “Hey that’s odd, the crank centerline doesn’t appear to be centered with the XJ12 ARB”. Annoyed that I’d messed up mounting the ARB I took out my measuring tape to check, and was relieved to find my ARB was perfectly centered. This relief ended when it dawned om me that this meant that my engine was sitting about 22mm to the right of where it was supposed to. Spurred on by this discovery I measured some more to find what else was wrong. 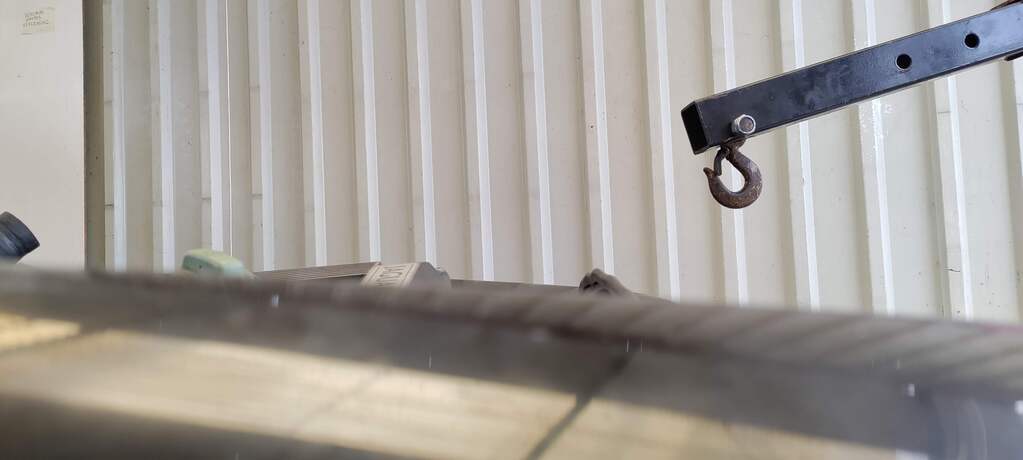 The above picture was taking straight across the wing tops, and clearly shows a bit of cam cover sticking out. In hindsight the engine must have always been sitting askew in the donor XJC, with the height issue exacerbated in my car by the new engine mounting rubbers I fitted. I decided to go for the proper solution and find the right mounts, OEM ones from an AJ6 or AJ16 XJS. 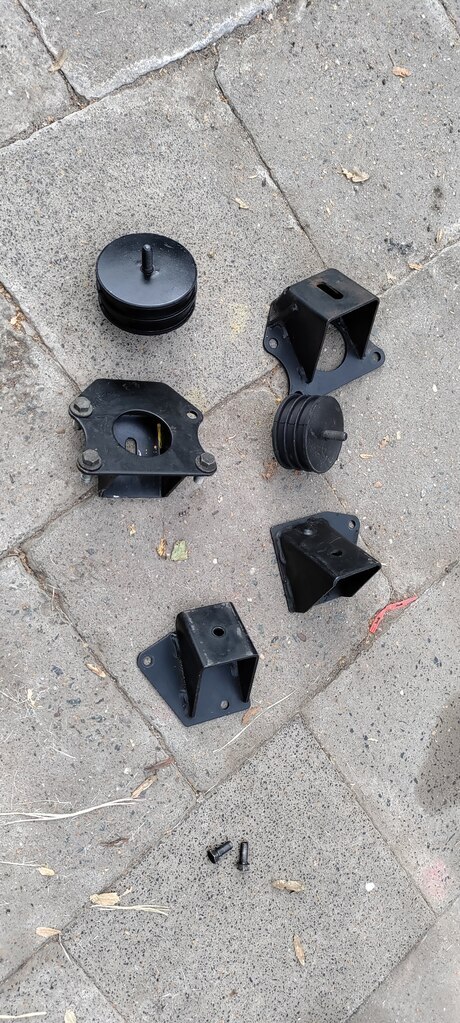 These are the ones I found after some searching. I also bought yet another new engine mounting rubber (left and right XJS mounting rubbers are different from each other for reasons only mid-80s Jaguar engineers will ever know), and got them mounted. The result made it all worth it. 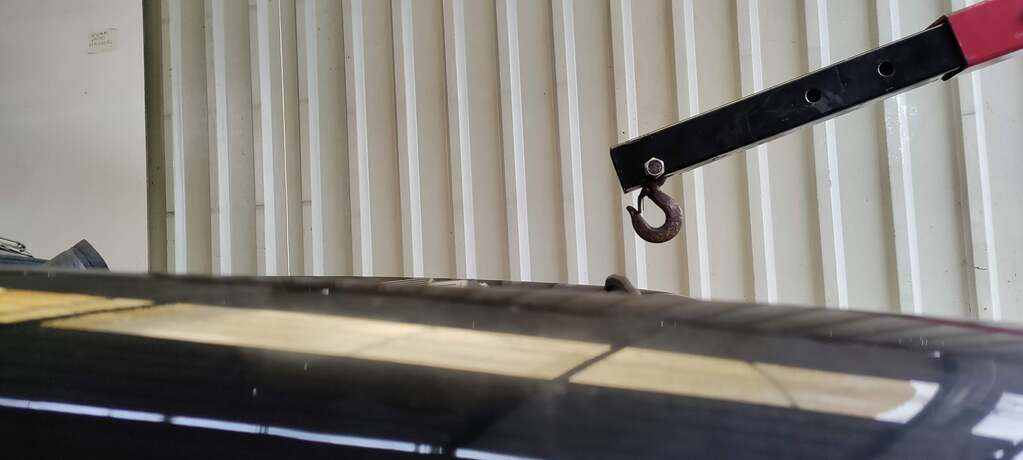 The engine now sits considerably lower, and perfectly centered in the car. Happy days. Lesson learned: even though an engine swap might be well documented you still need to do your own thinking – even the previous owner might not always have been right! |
| |
Last Edit: Nov 19, 2023 20:05:41 GMT by mkickert
|
|
|
|


