|
|
|
|
|
|
~Looking good, but will it be ready?
Also what total length of copper pipe are you using for the rad?
At £22 for 3 meters i don't want to buy too much!
|
| |
|
|
|
|
|
|
|
|
|
|
Ive decided not to use copper as galvanic corrosion can occur between the pipe and the engine block. Ive got two lengths of ally tube 1", and about 4M of 1" ID rubber hose. shhould cover me!
I hope it gets finished other wise no retro cars for me!
J
|
| |
|
|
Saru
Part of things
 No Brand Loyalty
Posts: 460
|
|
|
|
|
Only just saw this thread.
Simply awesome.
...wanders off muttering about S/Cing the Mazda...
|
| |
1974 Saab 99 EMSI bought a new car. It's 35 years old. My friends said I was mad. We'll see.
|
|
|
|
|
Jun 22, 2006 20:25:30 GMT
|
Day 15 – Fight fight fight! Well yesterday I went out for my graduation present, learning how to drift in a caterham 7! Super duper fun, I came second out of 21, considering that I’ve never done any performance driving its not too bad!   I also got my degree mark today, I am now James Hill Beng Hons Motorsport Engineering, I got a 2:1 so I’m jolly happy! As for the car progress today has had a few up and downs, this morning I was fuming at the stupid car (silly little curse word!), it is jolly old and so nothing is easy to get off. I needed to change the front wishbones and suspension, but I ended up taking everything off the front of the car, mega headache! I even had to take the rear mounting plate off too, as the bolts would only come off if this is removed aswell, stupid rootes designers  . Also one of the bolts was rusted to a bush so that was proper stuck, I ended up cutting it and pulling the whole thing out, was proper curse word! After removing the old wishbones I realised why I needed to put new ones on – 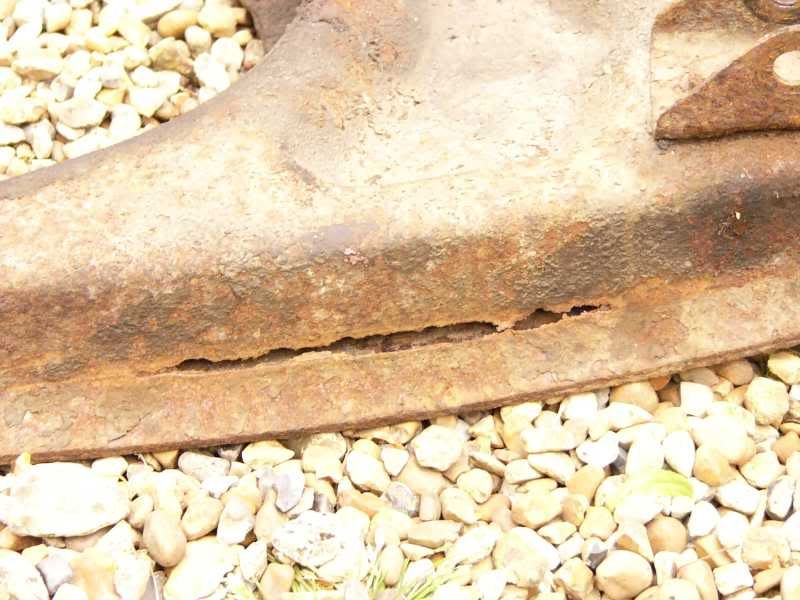 Uh oh that was lucky! The hole is about 5” long! All the front end off - 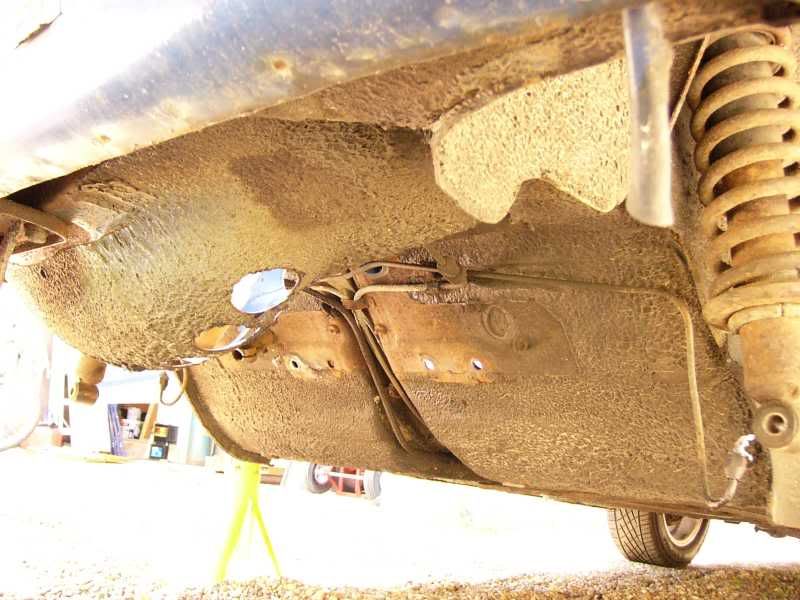 Wishbones thrown as far as I could manage  – 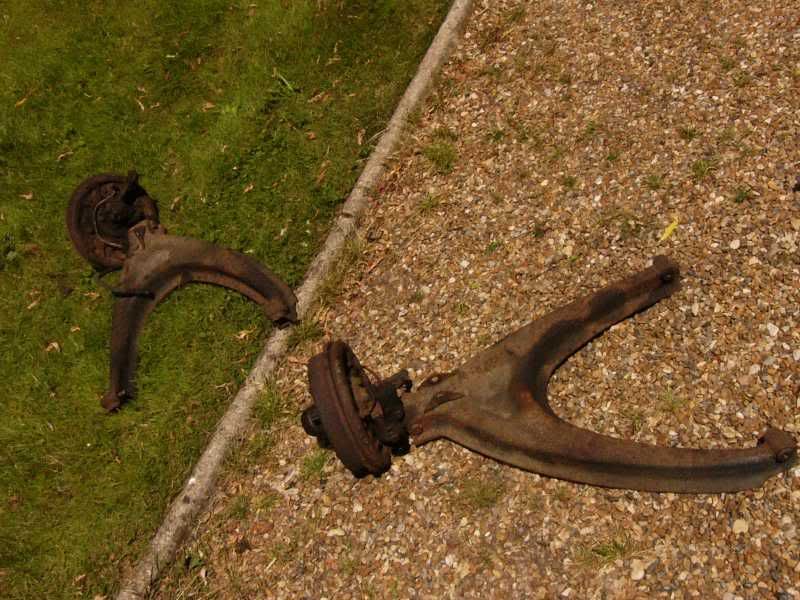 Rear suspension mount – 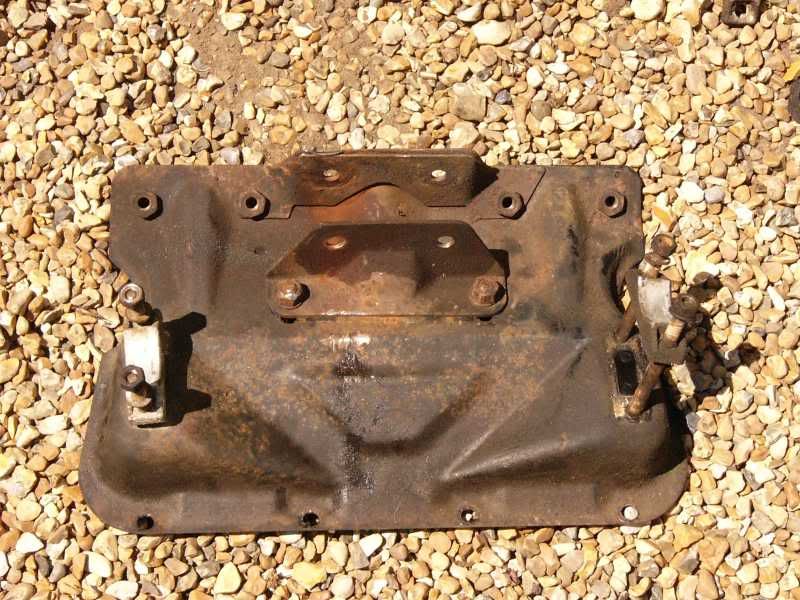 Once that was all off I had to rebuild the front hubs, pack them with grease, and then torque the bearings in correctly. As the car is pretty low now the front negative camber is unacceptable (I never thought I would say that!), to fix this I modified the kingpin carriers where they mount to the wishbones. 1/8th of an inch was removed from the top surface and then an 18th washer tacked on to the bottom, this removed about 3 degrees of the negative. Hub rebuilt – 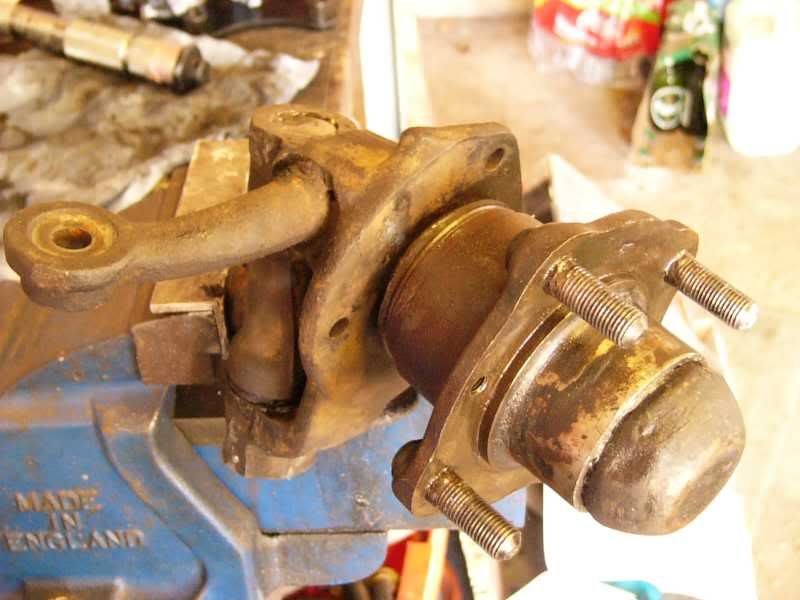 Measuring the mounting thickness, so I could take the right amount off -  Before filing down – 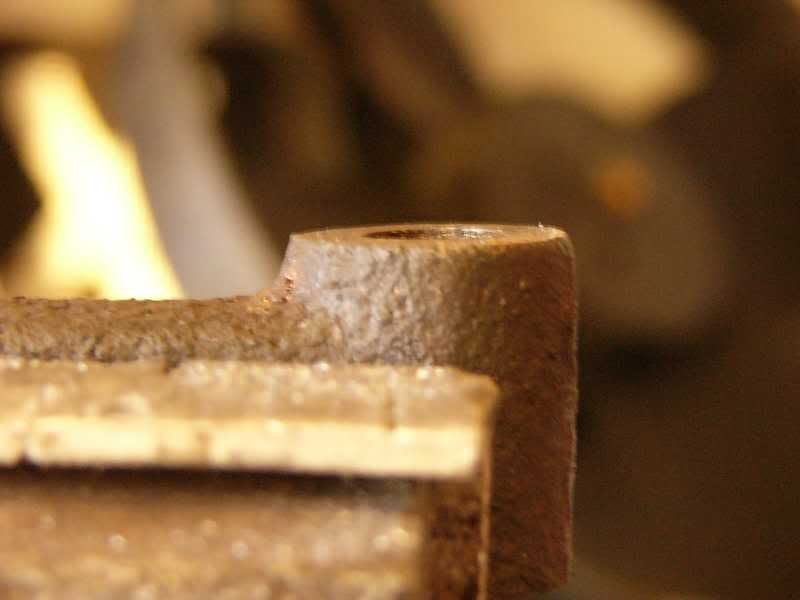 After filing – 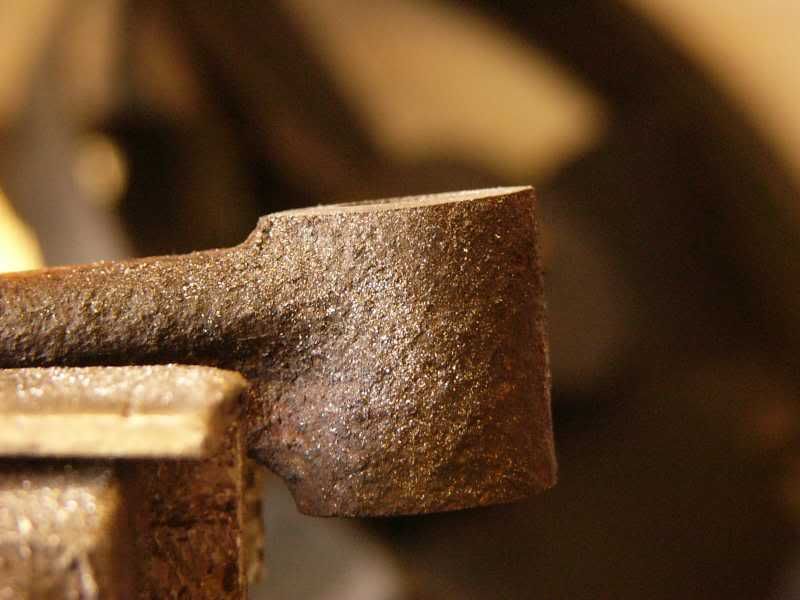 Washer tacked on to bottom surface – 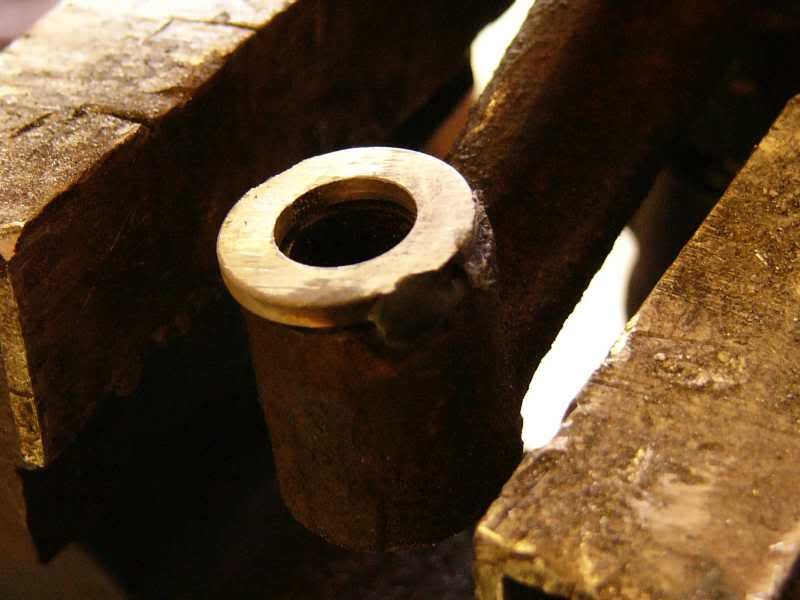 Next on my list was to build up my new disk kit, this is the fiesta conversion from Colin Valentine, I was really impressed with the quality of the kit and all the components. I also obtained reconditioned callipers, as this is a safety critical part I didn’t want to cut corners! Disk kit – 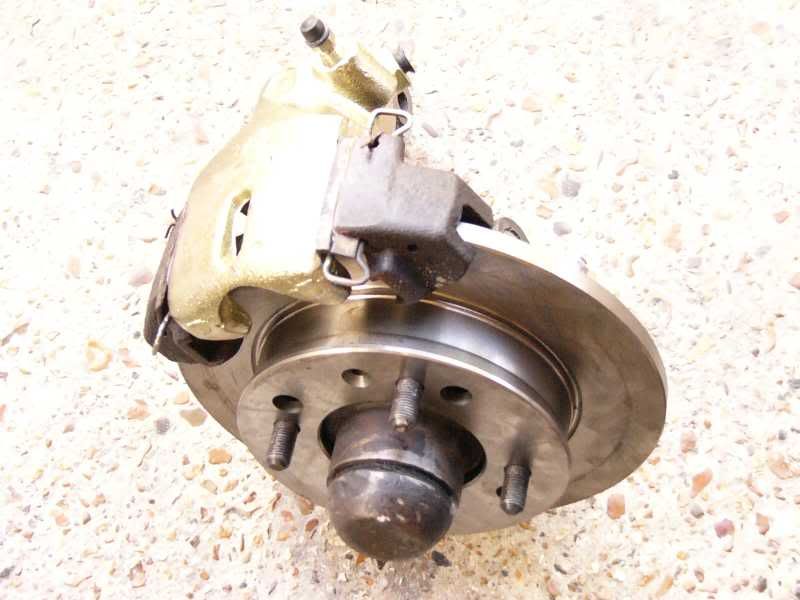 Disk kit - 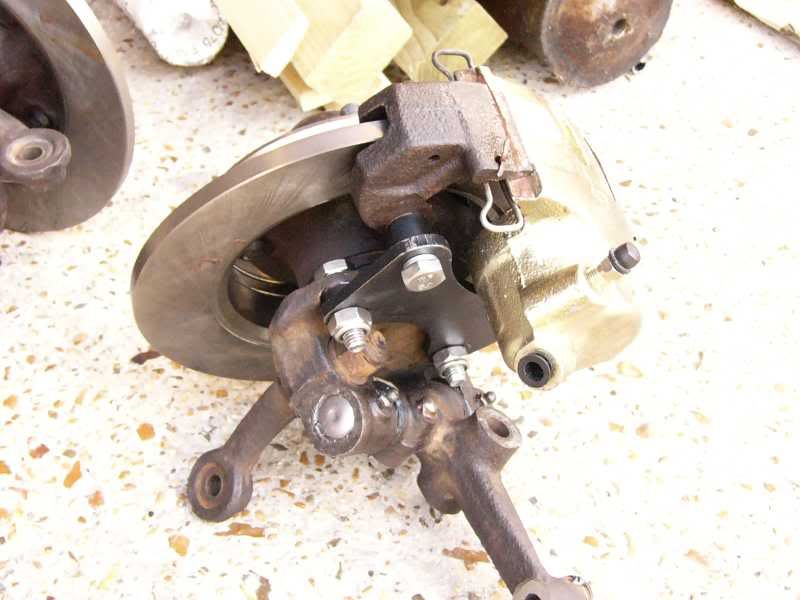 Then all of the new components were ready to go back on – 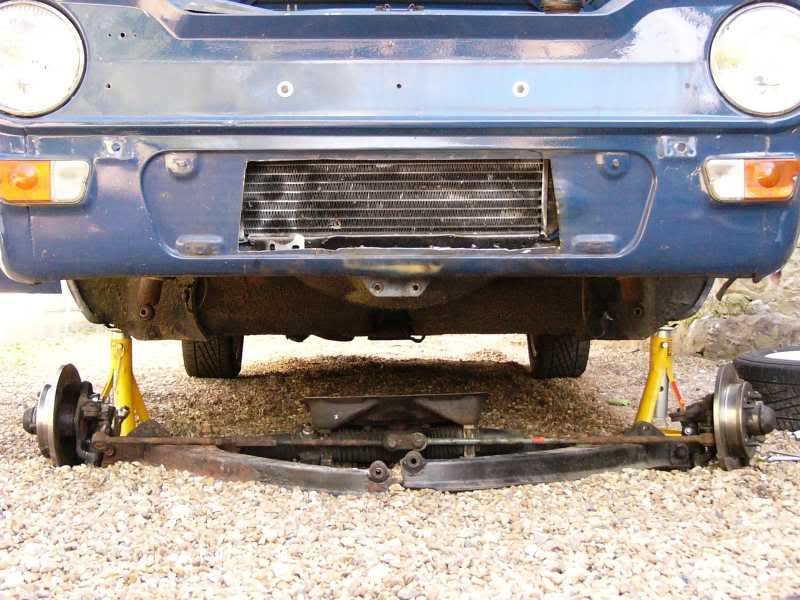 The new kingpins with added positive camber! 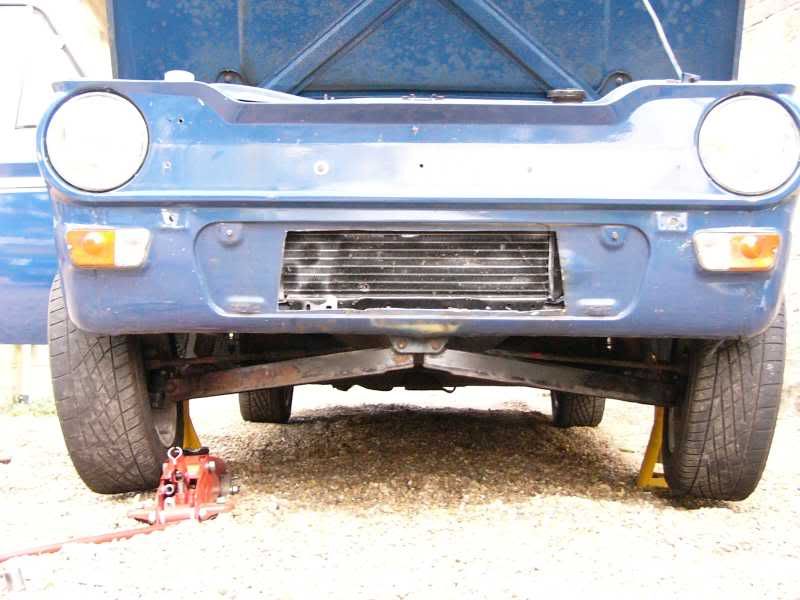 New disks in and ready, ooohhhh yeah, hopefully better than drums 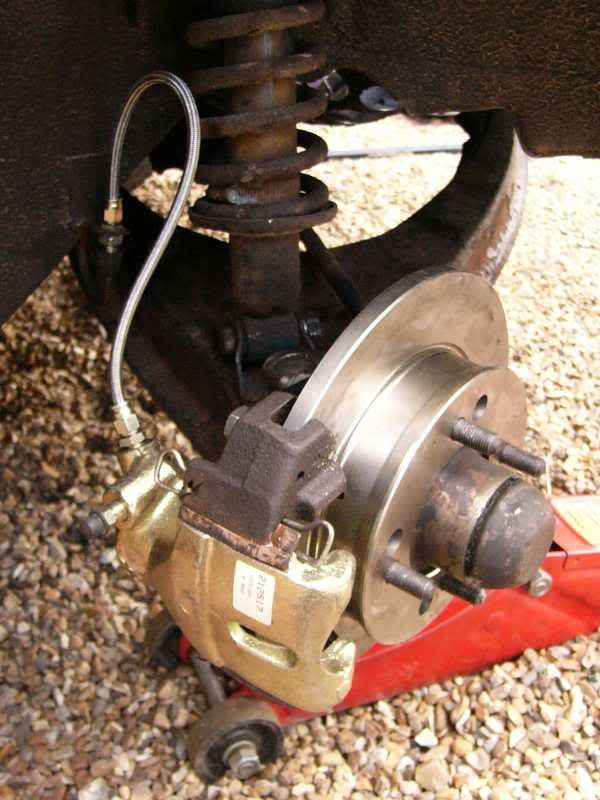 And the camber before and after the kingpin modification –  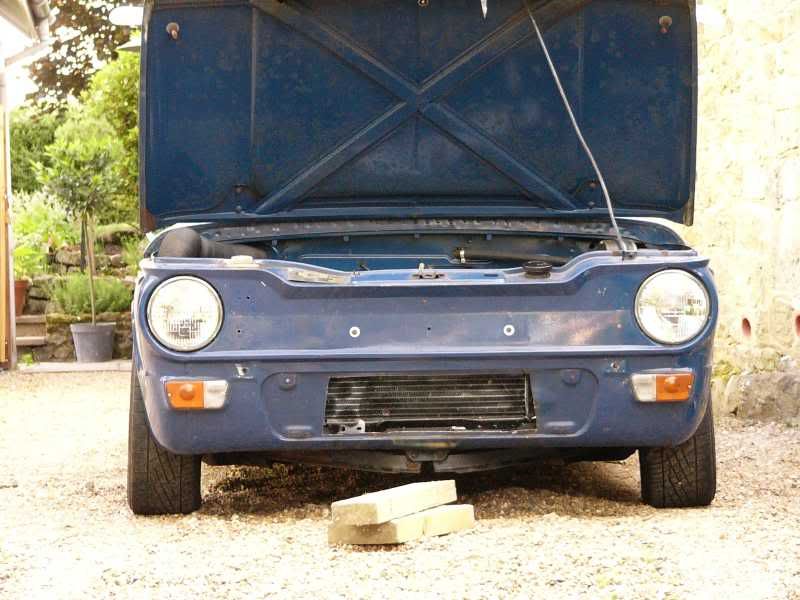 That’s it for today, tomorrow my manifold is arriving hopefully (the guy posting it is being a bit of a retard ) So that will be modified to fit up to the imp manifold ready for welding. If I can get hold of an M5 tap set then I can fit the blower pulley on to the blower, and fabricate the mounts for it, if not then I can still make up all the flanges ready for the tubes to be welded on. I am going to have another go at the front rad conversion too I think, get it all fitted up and see how it goes. I can also run the fuel and boost lines front to rear ready for the injection. Only 6 days to go, oh my will it be driveable? More tomorrow guys and gals J |
| |
|
|
racer86
Posted a lot
'76 Toyota KP30 / '73 BMW 2002 / '93 Mini
Posts: 2,183
|
|
Jun 22, 2006 21:12:20 GMT
|
|
more ace work Jim Bob! hope we can get them to CaRS!!
Just out of interest how did you get your degree mark? i tried on the net but have forgotten my password - doh!
|
| |
|
|
|
|
|
Jun 22, 2006 21:49:45 GMT
|
|
Thats exactly how i did it! Fortunatly just before i left i had to get on the computers, so i changed my password, and so i now remember it!
Ill be there, there isnt that much to do now, just a lot of wiring!
J
|
| |
|
|
|
|
|
Jun 25, 2006 17:22:15 GMT
|
Day 16 / 17 / 18 Well I’ve got a bit done over the past few days, all of the sensors for the ECU are in and ready to be connected up, the blower has its pulley bolted on (albeit with only 2 of the 6 bolts!) and the loom I received with the ECU has been paired back to the essential wires. On Friday I stated by looking at the fluid transfer lines, I am trying to get rid of jubilee clips and joins, so all the fuel hose and boost lines are going to be this stuff – 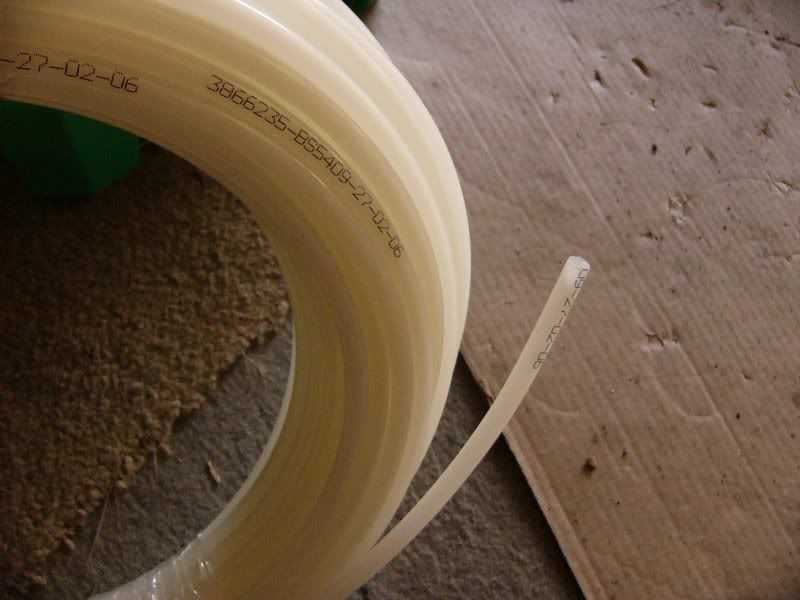 It is superflex nylon air hose, this is resistant to most fuels and oils and good for over 10bar pressure, should be fine with my Bosch pump then! All of the fittings that the hose is joined with are nickel plated brass, they use no o-rings just the design to seal the hose. 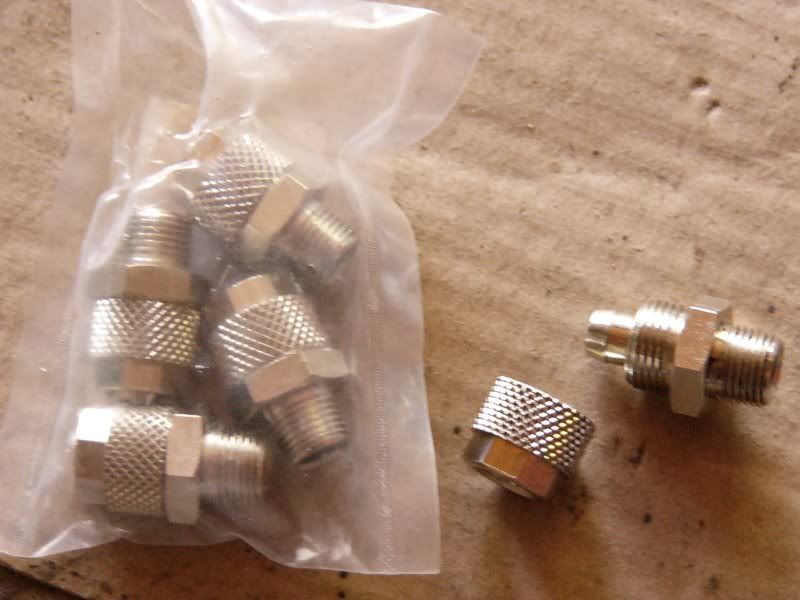 The fuel pressure regulator I purchased came with barbed fittings ready to receive rubber pipe and jubilee clips (god damn jubilee’s!), I removed all of the barbed fittings and tapped the holes to 1/8th BSP to take the nylon pipe fittings, 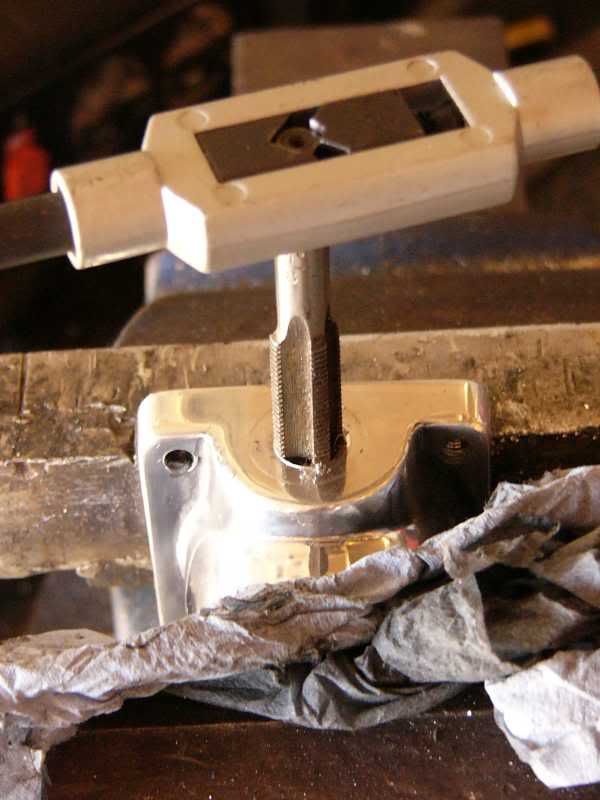  Fitting for the fuel rail as stock – 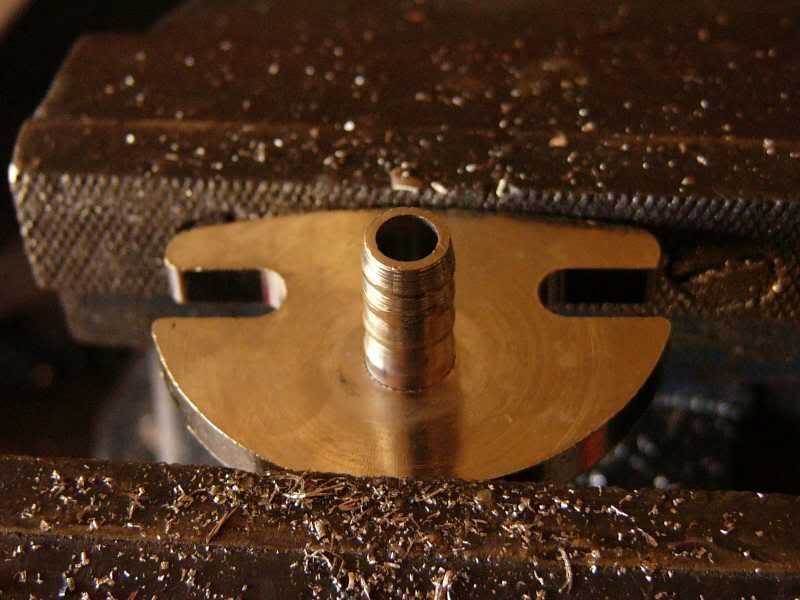 Barbed fitting cut off, drilled, and tapped – 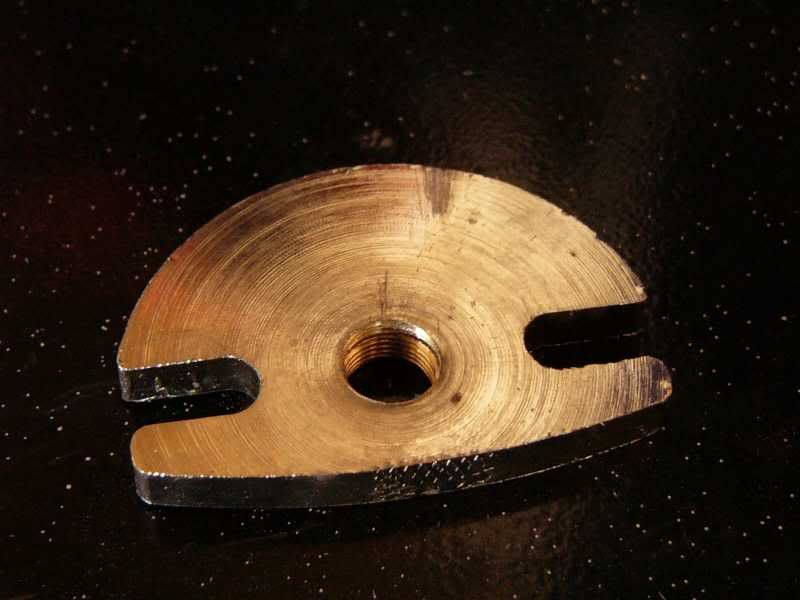 Nickel brass fitting in place of barbed fitting – 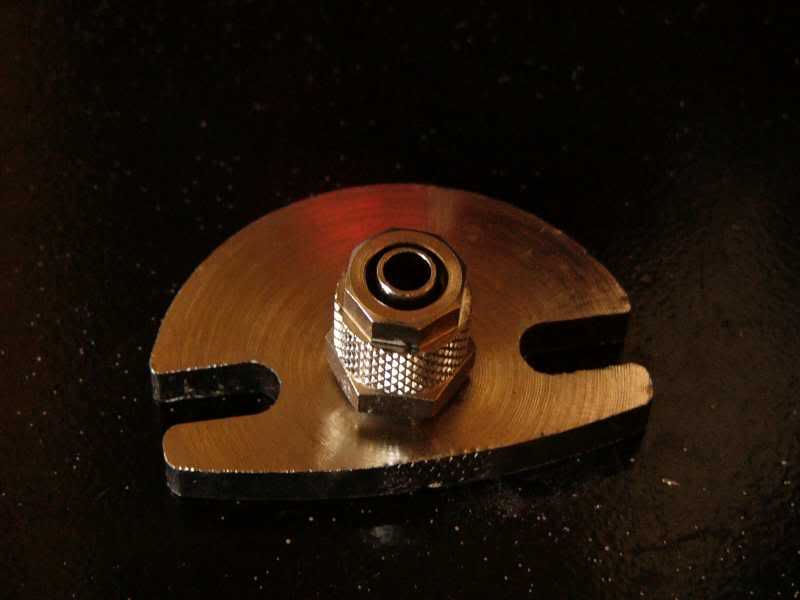 Then the manifold that I purchased from fleabay arrived, this was from a 1.4 K-series engine, it came with the injectors, throttle body, the whole sherbang! And all for 99p, booya I jumped straight on it, cutting the imp manifold up to salvage the flange ready for welding – 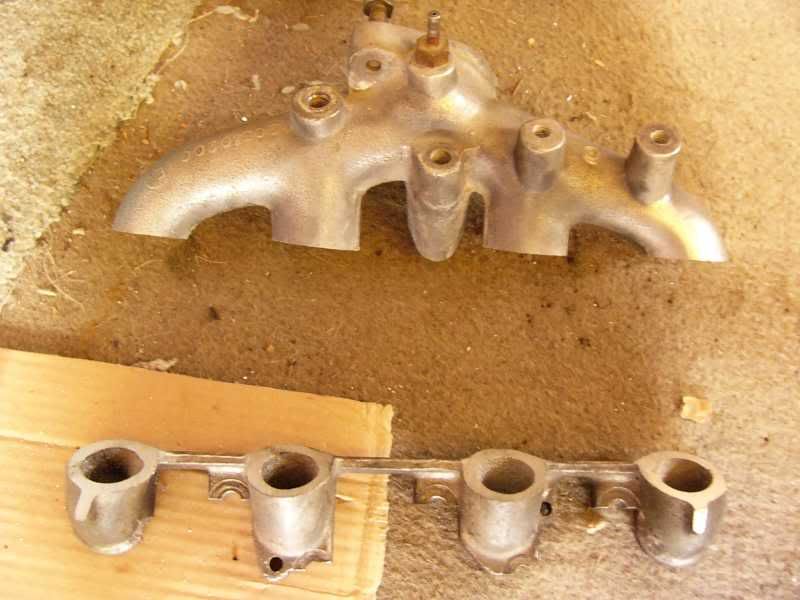 This was then offered up to the k-series manifold to start making the adaptor – 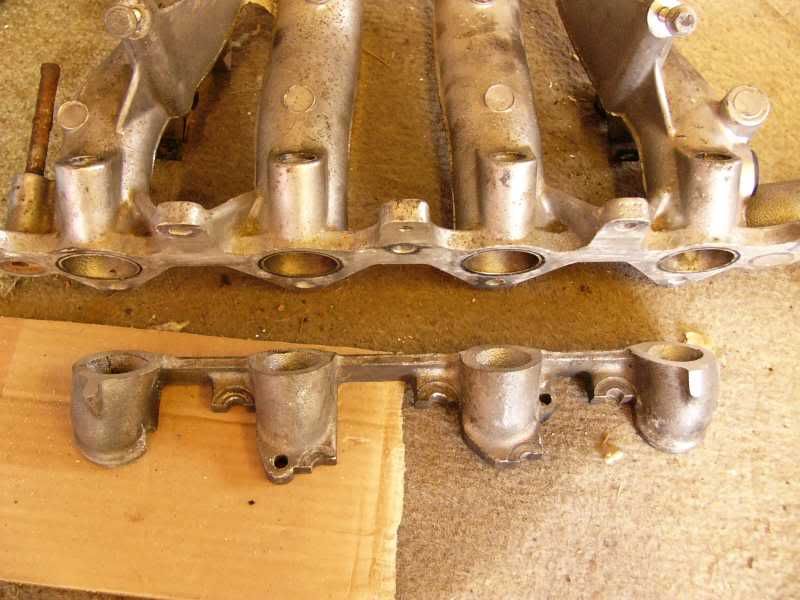 The two center ports are spot on and straight, but the two outside ones are about 30mm off, so angled adaptors will be made up. Here is a part way shot – 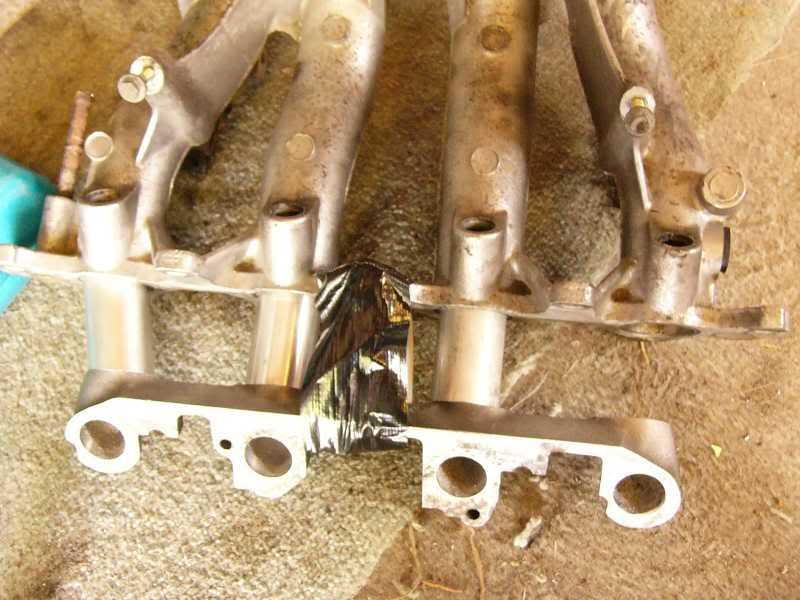 Eventually I am going to make up my own manifold in stainless steel, with a proper plenum chamber and trumpets etc. To ensure I wasn’t barking up the wrong tree I offered it up to the engine that is currently in the imp, it fits like a glove with about and inch spare all round! 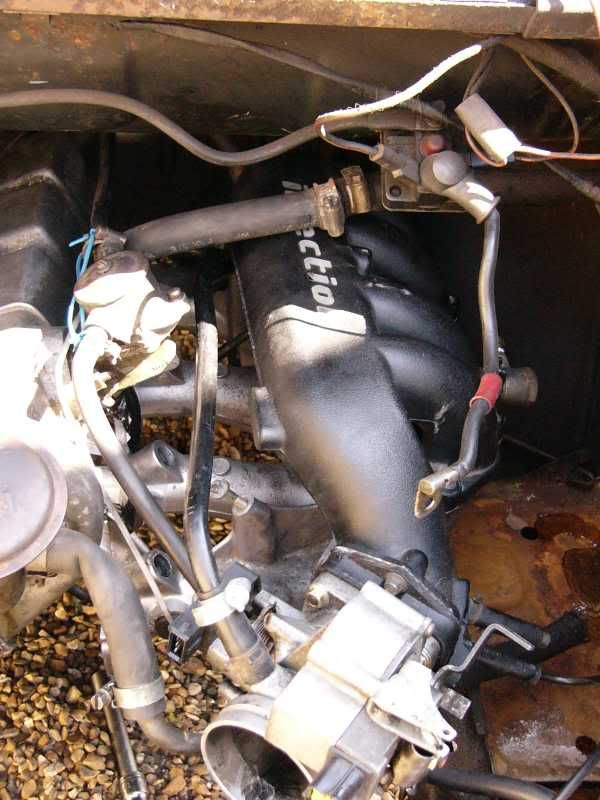 Next I decided to organize the water temperature sensor, to mate this to the imp head I used an old imp water temperature sensor, this was drilled out so that the centre of it could be tapped to take the ford sensor – 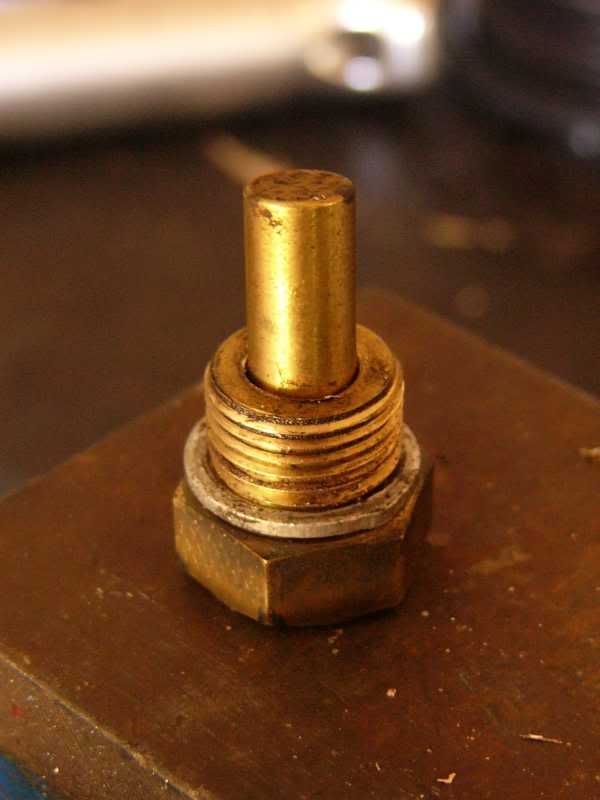 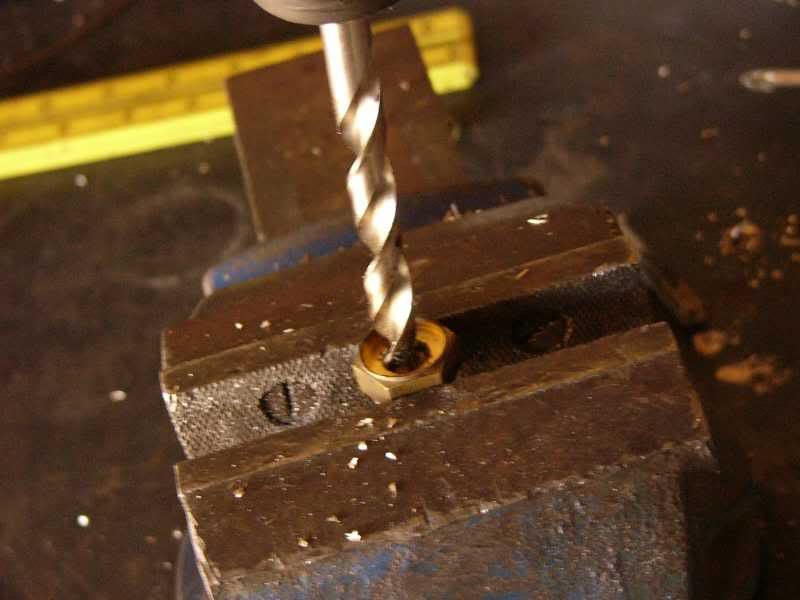 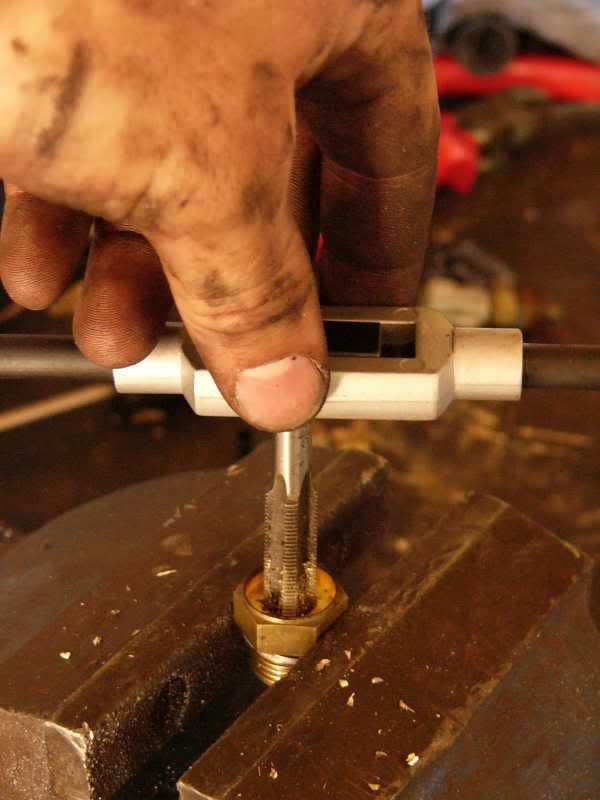 The finished adaptor and sensor looks like this – 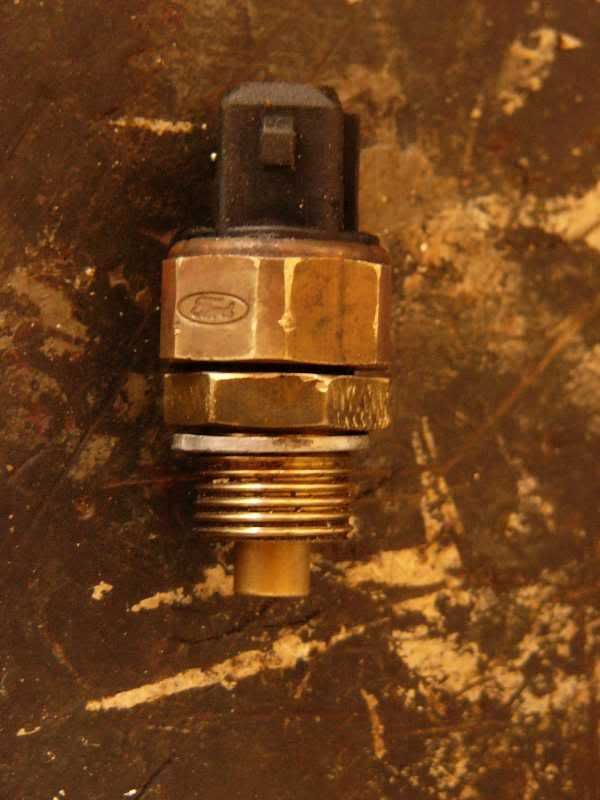 Next on my list was the air temperature sensor, there was a fitting in the plenum of the k-series manifold, this was slightly smaller so I could just tap it out to the correct size for the sensor. 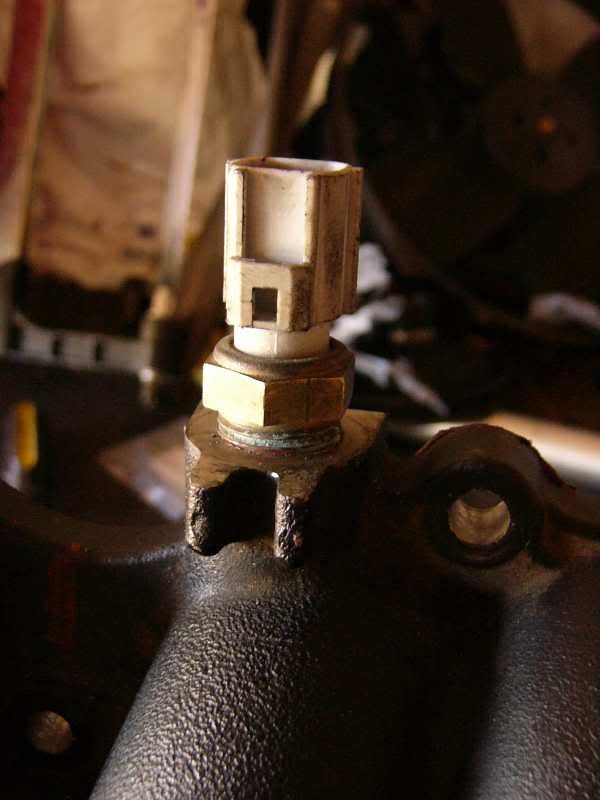 finally for the mechanical stuff I organized the mounting for the blower pulley onto the blower, I have used 12.9 cap head plain shank M5 bolts, these give a safety factor of around 6, should cover me I drilled the flange using the pulley as a guide, and then tapped the hole out ready to receive the bolts. Unfortunately I seem to only have two of these bolts, so tomorrow I will be getting four more for the other holes!  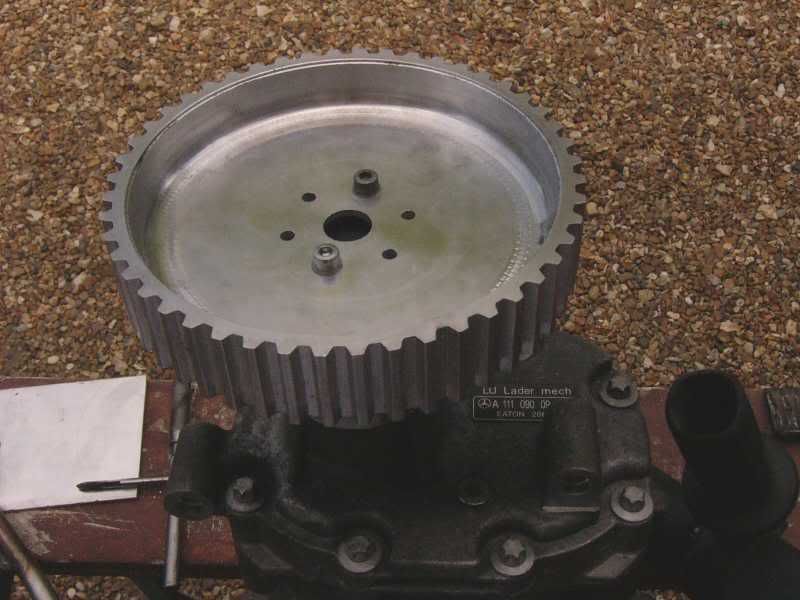 This afternoon was spent stripping the wiring loom down to the bare essentials, there was far too many wires and electrical tape, made the whole thing jolly messy! So I cut trimmed and peeled my way down to about ¼ of the original wiring, everything is much simpler now. Tomorrow I am going to get some aluminium stock to finish the manifold adaptor, and the necessary bolts for the blower pulleys. I will also be putting my trigger wheel onto the crank pulley and mounting the VR sensor. I can fit the wide band O2 boss into the exhaust ready for the sensor, and finalise the wiring loom ready for braiding and heat shrink. Once the blower pulleys are mounted correctly I can finally get the blower mount together and order up the belt ready. Once the blower is on the tensioner can be fabricated. More tomorrow Cheers J |
| |
|
|
|
|
|
Jun 25, 2006 17:46:54 GMT
|
|
Fantastic stuff! What loom did you start with?
|
| |
1972 Fiat 130 1985 Talbot Alpine 1974 Lancia Beta Saloon 1975 + 1986 Mazda 929 Koop + Wagon 1982 Fiat Argenta 2.0 iniezione elettronica 1977 Toyota Carina TA14 BEST CAR EVER!!!!!!!! 1979 Datsun B310 Sunny 4-dr 1984 Audi 200 Quattro Turbo 1983 Honda Accord 1.6 DX GONE1989 Alfa 75 2.0 TS Mr T says: TREAT YO MOTHER RIGHT! |
|
|
|
|
Jun 25, 2006 17:50:12 GMT
|
I think its from a ztec or something, its been chopped and bodges by the previous owner. It is making me wonder about the ECU, i hope its ok as i havent tested it J |
| |
|
|
|
|
|
Jun 25, 2006 17:50:39 GMT
|
|
So what ECU is it?
|
| |
1972 Fiat 130 1985 Talbot Alpine 1974 Lancia Beta Saloon 1975 + 1986 Mazda 929 Koop + Wagon 1982 Fiat Argenta 2.0 iniezione elettronica 1977 Toyota Carina TA14 BEST CAR EVER!!!!!!!! 1979 Datsun B310 Sunny 4-dr 1984 Audi 200 Quattro Turbo 1983 Honda Accord 1.6 DX GONE1989 Alfa 75 2.0 TS Mr T says: TREAT YO MOTHER RIGHT! |
|
|
|
|
|
|
Jun 25, 2006 18:34:59 GMT
|
Its megasquirt, so the zetec loom had been hacked about right royally. Ive got rid of all the detritus now, and i can make my own loom with no insulation tape J |
| |
Last Edit: Jun 25, 2006 18:38:25 GMT by Blown_Imp
|
|
|
|
|
Jun 25, 2006 19:42:44 GMT
|
 staggering stuff ;D you ARE a geneious! (sp!) |
| |
|
|
|
|
|
Jun 25, 2006 19:59:34 GMT
|
|
Looks good. I like what you are doing with the manifold. Did you have any idea of the size of the K series manifold before you started?
Is the black part of the inlet painted aluminium or plastic.
|
| |
|
|
|
|
|
Jun 25, 2006 20:05:44 GMT
|
 Lost for words...stunning progress, and done properly too I've just spent about half hour reading this thread, and am totally in awe!
|
| |
|
|
|
|
|
Jun 25, 2006 20:49:02 GMT
|
|
This is one of the best threads yet, I am loving it. More q's:
What supercharger are you using, is it an Eaton M62? What speed are you going to run it at (at max power)? Looking at the size of the pulley i'm guessing its going to turn 'fairly slowly', which I suppose is what you want on an engine that small... Whats the efficiency like at the speeds you are aiming for?.... is your imp 1000cc? THAT IS ALL
|
| |
1972 Fiat 130 1985 Talbot Alpine 1974 Lancia Beta Saloon 1975 + 1986 Mazda 929 Koop + Wagon 1982 Fiat Argenta 2.0 iniezione elettronica 1977 Toyota Carina TA14 BEST CAR EVER!!!!!!!! 1979 Datsun B310 Sunny 4-dr 1984 Audi 200 Quattro Turbo 1983 Honda Accord 1.6 DX GONE1989 Alfa 75 2.0 TS Mr T says: TREAT YO MOTHER RIGHT! |
|
|
|
|
Jun 25, 2006 21:15:31 GMT
|
Cheers guys, i wouldent say I'm a genius bay far, just quite motivated, and a lot of impetus from a local engineer whos work i aspire to. My blower is an eaton M45 from a mercedes, ive got it spinning at 0.75 crank speed as its puts out 750cc of air per revolution and my engine takes in 375cc per revolution, this gives 9psi of boost hopefully! Here is the calculator that i made to work out the boost and basic temperature rise, power etc etc us.f13.yahoofs.com/bc/449efa40_15cb/bc/turbo+stuff/calculator+-+supercharger.xls?bfT7vnEBliscHSxrumm the imp is 930cc, yeah fairly slowly at the moment, the efficiency is around 70% where I'm running it there is going to be around a 40 degree rise in the outlet temperature. the max speed is 5625rpm cheers J |
| |
|
|
|
|
|
Jun 25, 2006 21:27:21 GMT
|
|
Fantastic stuff. Where does the 375cc per rev figure come from? I'm guessing you are assuming an 80% VE. Or have you measured/calculated that?
|
| |
1972 Fiat 130 1985 Talbot Alpine 1974 Lancia Beta Saloon 1975 + 1986 Mazda 929 Koop + Wagon 1982 Fiat Argenta 2.0 iniezione elettronica 1977 Toyota Carina TA14 BEST CAR EVER!!!!!!!! 1979 Datsun B310 Sunny 4-dr 1984 Audi 200 Quattro Turbo 1983 Honda Accord 1.6 DX GONE1989 Alfa 75 2.0 TS Mr T says: TREAT YO MOTHER RIGHT! |
|
|
|
|
Jun 25, 2006 21:37:34 GMT
|
|
sorry bit of brain fade its 465cc per rev, olny stopped working on the car at 10!
J
|
| |
|
|
|
|
|
Jun 26, 2006 20:30:51 GMT
|
Day 19 – Oh iss ooown! Well today was a full on 12 hour slog, I’ve been on the engine all day, but it was worth it, as the blower is mounted up! I started out at 8am by going to a couple of places to pick up some nuts and bolts, all duly collected ready for various different areas of the engine. As soon as I got back I started getting the crank pulley mounted up, this involved pulling the pulley from Maynard’s apart. 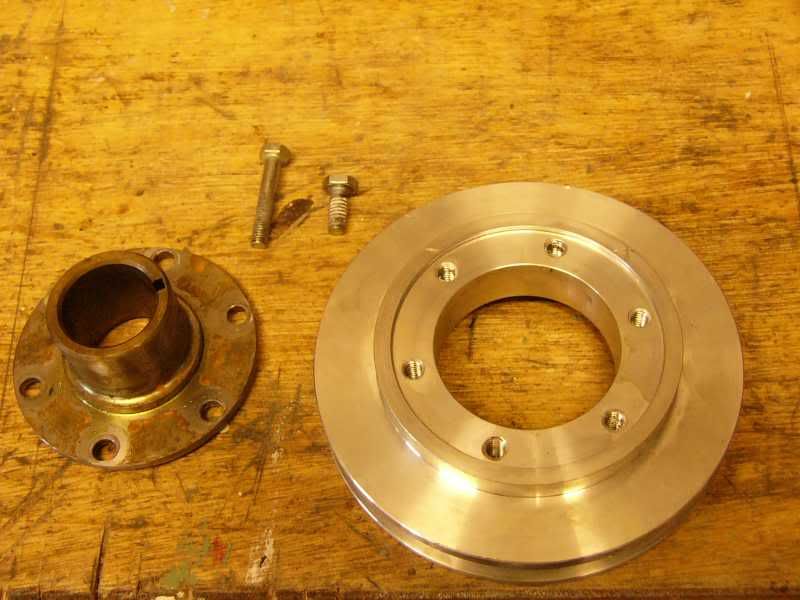 The threaded holes were drilled out ready to receive the plain shank bolts, this pulley will be sandwiched (mmmmmm sandwich) between the blower pulley and the steel mounting boss. Once drilled the bolts were trimmed down to size, I then ran a die down them to clear the threads and put a drop of loctite on. This whole caboodle was then bolted on to the crank. Pulley assembly on the crank – 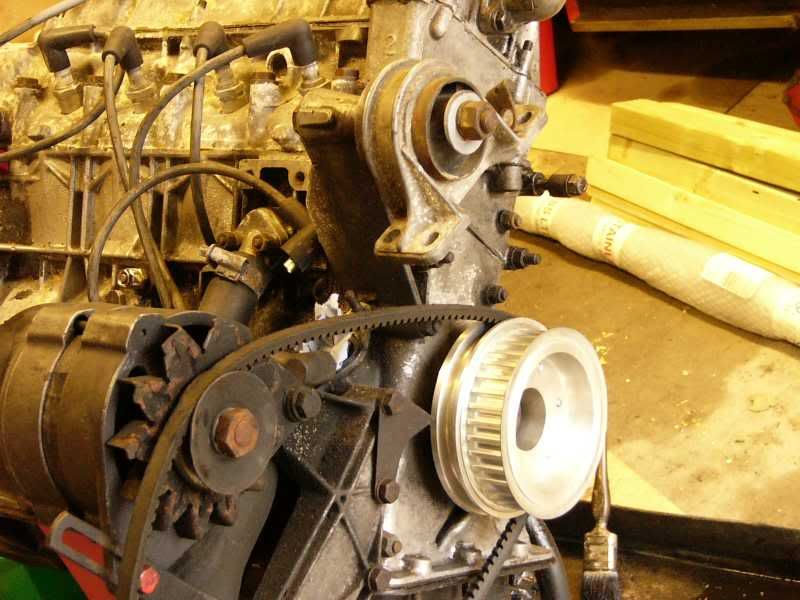 Once this was completed I could use the crank pulley to line up the blower, initially I made up a right angle bracket to support the nose of the blower, this bolted on to the water pump, and could be moved in the x and z plane. 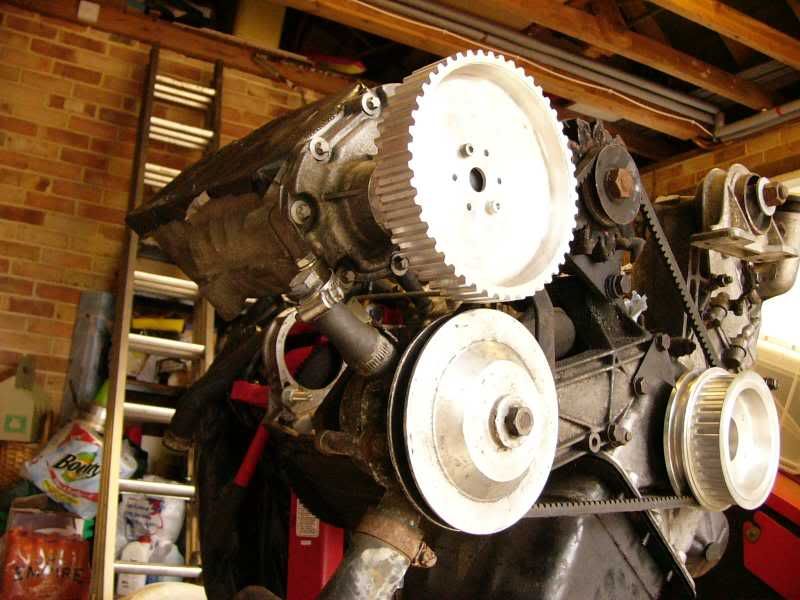 I then cracked out a nice bit of kit, a laser level! With this I could line up the blower pulleys almost spot on, and the last bit would have to be done carefully by hand. 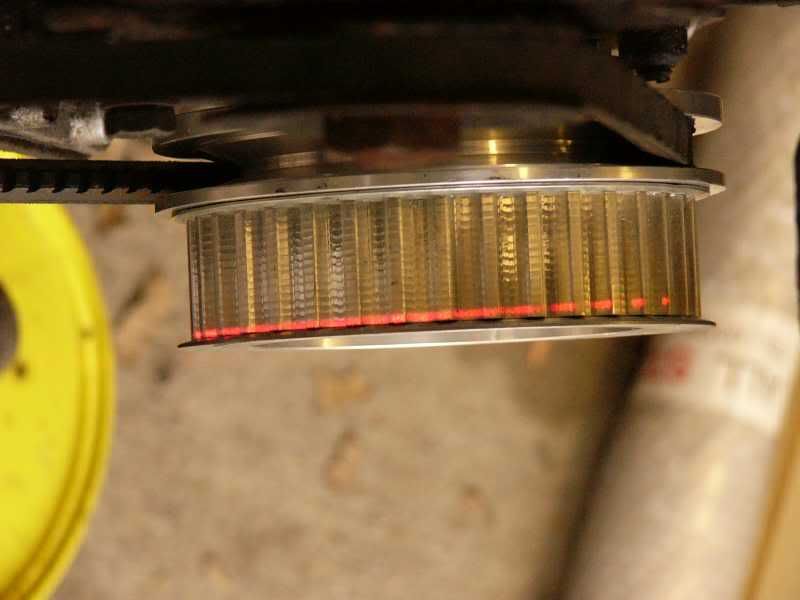 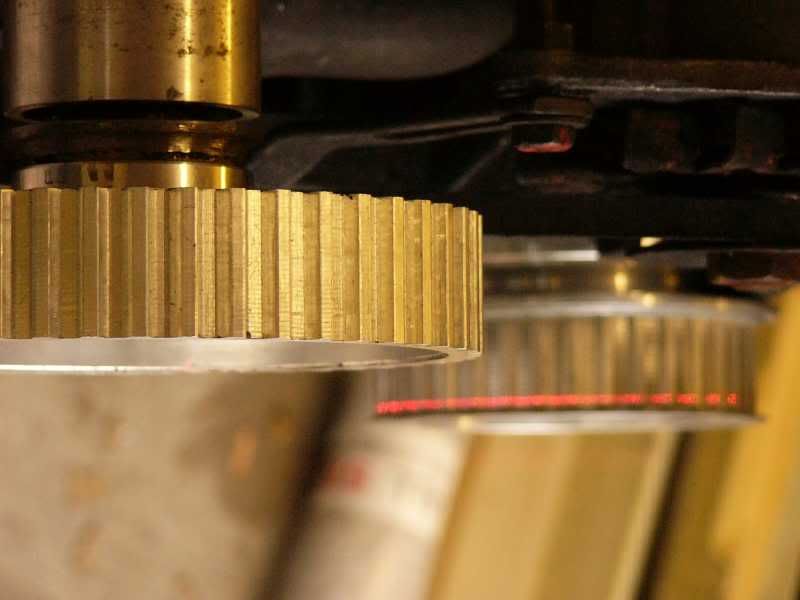 Once it was close I tightened up the bracket on the nose and started to make up the other supports that became the blower spaceframe. The first blower mount – 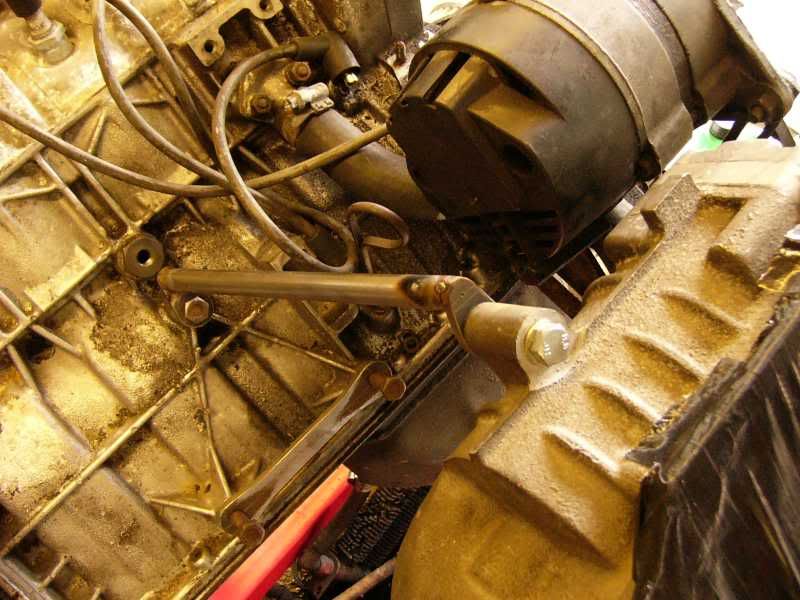 I carried on and made up all three other mounts and got the mounted up, the blower can have its position fine tuned using washers between the mounts and the blower itself. 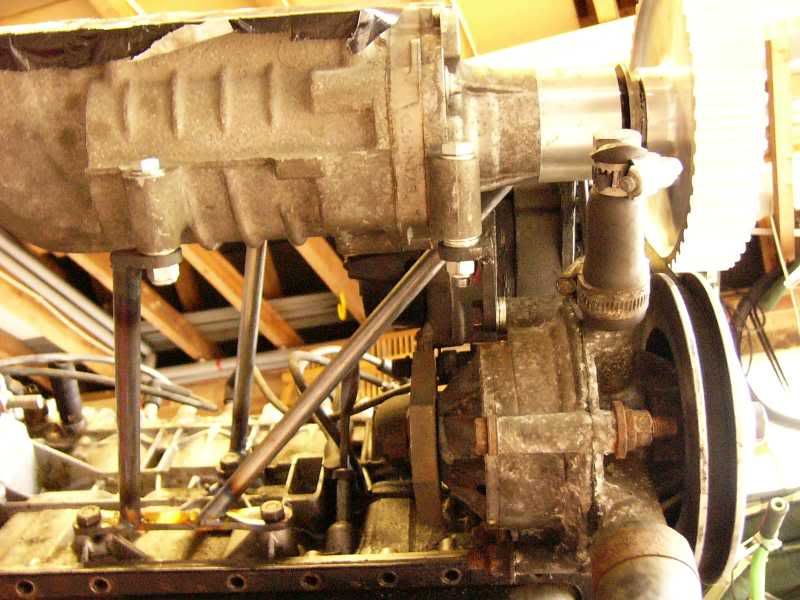  I decided to knock up the crank trigger mount next, I decided to make this from my parents stainless kick board from the kitchen, I don’t think they wanted it anymore, did they? Anyways I cut out a template from card and then marked it up on the stainless. 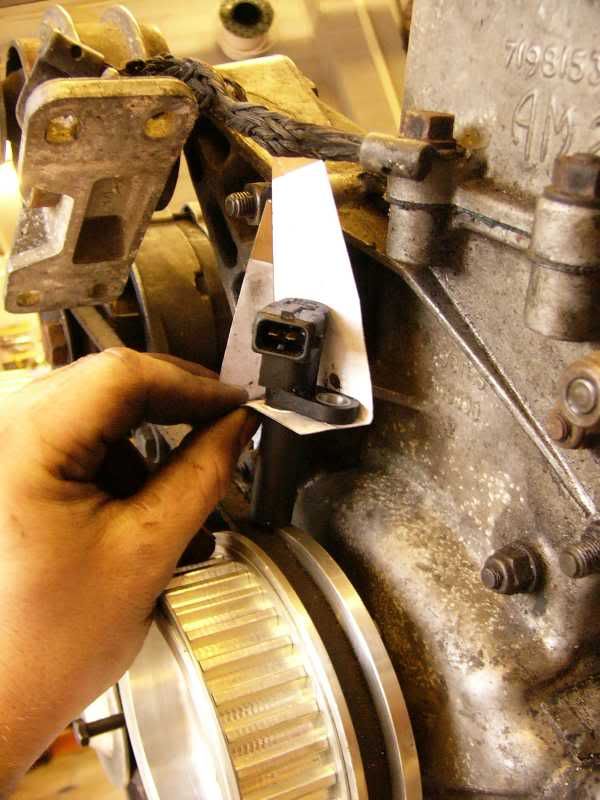 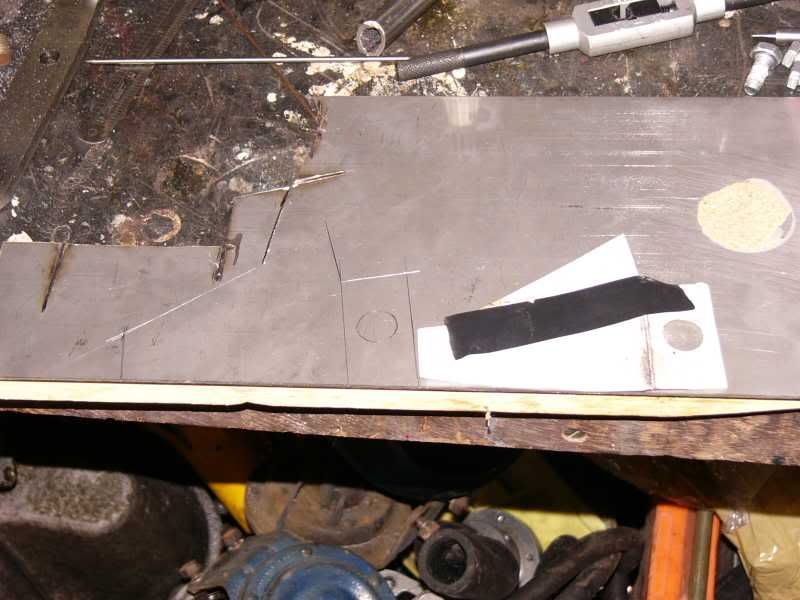 This was then drilled and cut to shape 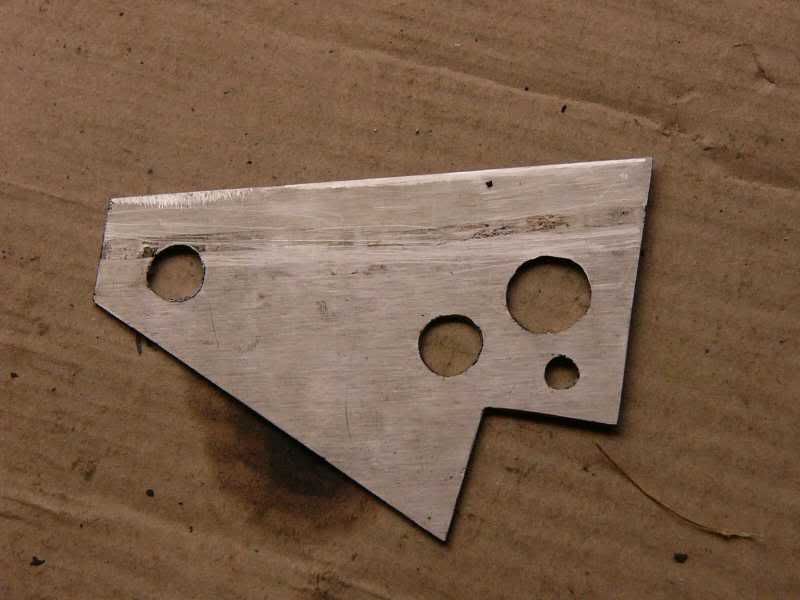 At this point it should be bent to resemble the card template, what I did was fold it the wrong way, swear a bit, and then start from scratch, its much easier second time round! After re scribing, drilling, cutting and folding this was the result –  I also received some new donuts through the post today, nice lotus ones mmmmm. My car appears to be fitted with the SUK ones that are only meant as emergency spares! Will all be fixed soon 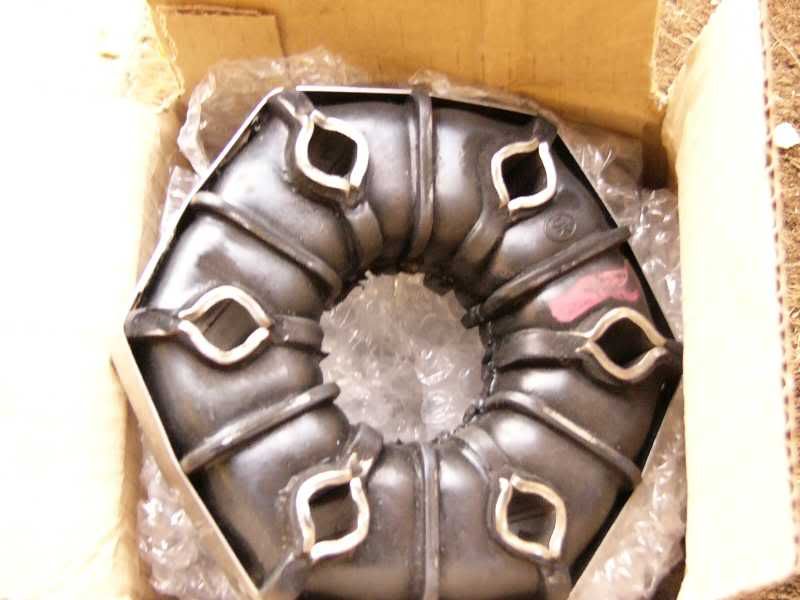 Tomorrow I shall be finishing the blower mount and crank trigger mount. I will re shim the tappets and re torque the head bolts, and then the engine can go into the car! Whoop whoop! Cheers guys and gals |
| |
|
|
Seth
South East
MorrisOxford TriumphMirald HillmanMinx BorgwardIsabellaCombi
Posts: 15,514
|
|
Jun 26, 2006 21:46:12 GMT
|
AWESOME!!!!!!666!!!!!!!!! Even if it never runs* it will have been worth it to stick this photo on the wall! *not that I doubt it for a second  |
| |

Follow your dreams or you might as well be a vegetable. |
|
|
|


 [*]
[*] [*]
[*]

 . Also one of the bolts was rusted to a bush so that was proper stuck, I ended up cutting it and pulling the whole thing out, was proper curse word! After removing the old wishbones I realised why I needed to put new ones on –
 –
–


 staggering stuff ;D
 Lost for words...stunning progress, and done properly too


