|
|
|
|
|
Haha.. Maybe it's because I'm a northsider, but everytime I drive into Bogan (whether it's for part deliveries or otherwise), I feel the overwhelming urge to lock my doors, get stuff done and get out as soon as possible. I had to pick up a vice from Crestmead on Monday, but the house/neighbourhood I picked it up from was less than stellar. The type of area where the people have more tats than teeth. If you have access to an oxy cutter, see if you can make a couple of anvils out of it... I'd venture down and grab it if that were the case  |
| |
|
|
|
|
|
|
|
|
|
|
no may be just it gets by passed
|
| |
|
|
|
|
|
|
|
Haha.. Maybe it's because I'm a northsider, but everytime I drive into Bogan (whether it's for part deliveries or otherwise), I feel the overwhelming urge to lock my doors, get stuff done and get out as soon as possible. I had to pick up a vice from Crestmead on Monday, but the house/neighbourhood I picked it up from was less than stellar. The type of area where the people have more tats than teeth. If you have access to an oxy cutter, see if you can make a couple of anvils out of it... I'd venture down and grab it if that were the case To be fair, most of it isn't too bad. I'm just on the edge of the Woodridge Triangle. As for the anvil, I was planning on oxy'ing it down to size. Was going to recoup some of my losses by weighing the rest in with the bits of Pintara, but I could probably arrange a bit to make another anvil. |
| |
|
|
|
|
|
|
|
Well, it's been a busy week! Haven't had much time to do anything, and then Monday rolled around and a mixture of lack of motivation and fear of the unknown kept me at home playing Fallout 4 instead of working on the car. I made a bit of effort today, though, I swear! First I measured all the bits that I think will be crucial when putting the new legs back on. This involved having to backtrack to work to buy a tape measure as I'm not sure where mine went. It was interesting to see how much play the metal edge has that holds the tape in place. There was almost 4mm of movement on some of the tape measures. I ended up with one with only 1mm or so of movement. When I got back to the shed I measured it and when it's full pulled back it's accurate. Which means all my measurements with the edge butted up against stuff will be off! As long as I remember that, I should be okay, I guess.  Anyway, all the faffing about ended up with this:  It has as many measurements as I could think of that might be useful in making sure the car is straight and the new legs/rails are in the right place. Then I spent HOOURRRS screwing around with a spot weld drill bit, and an angry grinder and occasionally a cold chisel and hammer to end up here. 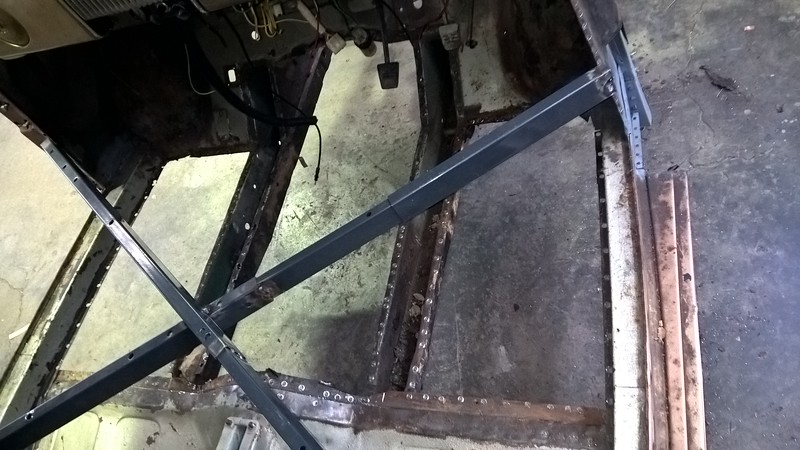 Yay! All the front floor is out! I still need to remove the bit of edge that joins to the outer sill on both sides but that will need the car tipping over. I'm still afraid of doing that! In theory I've braced all the right bits, and I had a third set of eyes look it over today and he seemed to think it would hold as well. So I guess I should just man up and pull the rest out! Getting this last third of the floor out was a slow and painful process, but I got there in the end! Next step will be to unstitch the rails from the firewall bracing and along the engine bay. Looking at the engine bay, I'm not sure how much floor I should bother leaving in. :\ It's kinda curse word anyway and if I'm going to be patching it back in, why not just let in a whole panel? All this because the legs are knackered! Here is why it's being replaced, I'm not sure if I've taken any decent photos of how bad it is yet.   Perfectly adequate way of ensuring the steering rack clears the rails, mmmyes.....  And the rails also have some plated patches like so...  So by the time I sorted that lot out, I might as well have fresh shiny STRONGER ones, and thus solve my future bendy problems from too much power at the same time! At the other end, the crossmember through the middle has this on both sides. 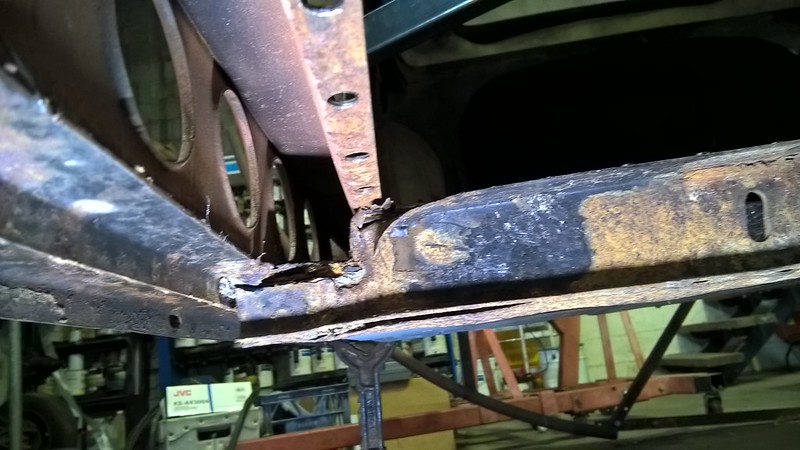 Sorry. Apparently my phone decided to potato. Anyway, where the crossmember meets the inner sill/floor pan/outer sill it's all a crusty mess. And the bottom edge of the crossmember you can sort of see is blowing apart. So it makes sense to build a new, bigger one instead of patching this. Unsure at this point whether to try and keep the original shape, or redo the crossmember and thus the floors in a more boxy, easier to fabricate shape. It's not like this is very original anyway.  Speaking of large boxy fabricating. Finally got a hand dragging this out of the back of my car! Now I can hoon about without having to worry about it going through the rear wing/hatch!  1.4m long, about 25cm tall. 10mm I beam.  Should be alright to make an anvil, I think? Anyway, that's all for now. Hopefully I will be motivated enough to get down there again on Friday and start attacking the front of the legs. May just cut the bottom of the engine bay out with them, then it's less screwing around and will save cutting it out later! Cheers, Matt |
| |
|
|
|
|
|
Jan 10, 2016 21:05:35 GMT
|
|
I thought I should spend some time over Christmas reading some other threads. You've been bookmarked now! Apparently I get enjoyment from seeing people cut rust from their cars. Can't imagine why.
Your mechanicals have taken me back a few years too. My first car was a KE30 Corolla and at all looks very familiar. Great engine the 3K. A massive 1.2 liters of raw power shocking noise. A few pages back you wondered what it sounded like with just the down pipes on. Well, if you didn't find out for yourself, it sounds like a World War One biplane. The only time the our Corolla came home on a truck was when the exhaust fell off at the first silencer. It was frighteningly loud for a little saloon car.
What's the front suspension off? I'm sure you mentioned it in the thread somewhere but I can't find it again.
Great work old chap (you need to read that with a British accent for the full effect). Keep it up!
James
|
| |
|
|
|
|
|
Jan 10, 2016 22:19:40 GMT
|
|
I made new chassis legs and front cross member for our minor from square box section, worked a treat and looks very close to original.
|
| |
|
|
|
|
|
|
|
I thought I should spend some time over Christmas reading some other threads. You've been bookmarked now! Apparently I get enjoyment from seeing people cut rust from their cars. Can't imagine why. Your mechanicals have taken me back a few years too. My first car was a KE30 Corolla and at all looks very familiar. Great engine the 3K. A massive 1.2 liters of raw power shocking noise. A few pages back you wondered what it sounded like with just the down pipes on. Well, if you didn't find out for yourself, it sounds like a World War One biplane. The only time the our Corolla came home on a truck was when the exhaust fell off at the first silencer. It was frighteningly loud for a little saloon car. What's the front suspension off? I'm sure you mentioned it in the thread somewhere but I can't find it again. Great work old chap (you need to read that with a British accent for the full effect). Keep it up! James I find I enjoy watching people cut rust out too. It's therapeutic. I sometimes wonder if youtube videos of cancer surgery would give me the same feels. Probably not, but I'm not that keen to find out, either! Well it was almost running without anything past the down pipes before, as there was a hole larger than the diameter of the pipe just after the 90° bend! Didn't sound too obnoxious then! But I wasn't in the car for a few hours, either. The front suspension is off I think ~'78 Gemini. It seems to look about right, and other bits match up. It is back there somewhere. As for accents, I read most of everything on this forum with a proper British accent! I made new chassis legs and front cross member for our minor from square box section, worked a treat and looks very close to original. That's basically my plan, as well. 75x75 box and some 10mm plate for the crossmember (the middle crossmember that is). Will add in some added strength similar to the traditional bracing system used while I'm at it, I don't think it'll need it with the bigger box, but it surely won't hurt! Thanks for the interest guys.  I will be back on to it shortly. I need to go buy the metal and I just spent all my pay last week converting to Yen at an appalling rate for my upcoming trip.  Also been flat out at work but have a few days off coming up. So will hopefully see an update of some kind by the end of the week. Which reminds me, I need to update the Down Under spot thread. Seen some beauties recently. Cheers, Matt |
| |
Last Edit: Jan 11, 2016 8:04:50 GMT by varelse
|
|
|
|
|
Jan 31, 2016 12:23:58 GMT
|
Okkaaay. Finally managed to coordinate with Jono and have a look at the Minor and start pulling it apart. Started by removing the spot welds on the interior of the firewall where the braces on top of the rails are. Can kinda see where in the photo above if you follow the rails up. To get at the spot welds on the drivers side we had to remove the rest of the pedal box and the steering column bracketry. Once that was out, figured we might as well strip the entirety of the wiring loom out. If you could call it that.  Surprisingly, what ever the hell was going on here was enough to start the car and even make some of the gauges kind of work! I think I'll just start again, though... Anyway, firewall unstitched, I cut the rails of close to the crossmember and then turned my attention to the front. As I'm going to replace most of the engine bay anyway I figured I'd save some time and just cut it out in one big chunk instead of unstitching the rails and then cutting it out later. So to do that, We jacked up the front and removed the front rocker and eventually got the grill off with a combination of spanners, sockets, and angry grinders. I'm not that concerned about the grill as I'm going to try and fit a louvre front to it anyway. Pulled the radiator support off as well which left the front a little less sturdy but I added a few more welds to the bracing to make sure it didn't go anywhere as it was no longer tied in at the front. Cut the legs out.   Look mum! No legs! Actually surprisingly sturdy. Has a little bit of sideways movement but not much, and I have measurements of all the important dimensions. Legs.  Can see where we slit the drivers side one to see how much the car would move before we chopped it all out. Was barely any movement with me jumping on the front so figured it should be ok. You can see the front 'crossmember' that was in behind the grill. I'm actually not sure if there is meant to be one there on the original set up or not? Tacked in on top...  Hanging loose underneath. Structural! Pretty good indication of the level of structural engineering for most of this build. Anyway, that's all out now! Going to try hunt some metal down tomorrow and/or wednesday, but I fly to Japan on thursday morning, so the car will be staying as is for almost two weeks. Hopefully it won't bend out of shape. o.O Seems to be okay, though. Had a talk about what order to do things, and this is the general consensus. 1. Remove middle crossmember. 2. Replace middle crossmember. 3. Replace chassis rails. 4. Tie in to the front of the car temporarily so that bracing can be removed. 5. Sort out where the seat will be. Partial/complete floor. 6. Once seat is sorted, work out where the pedal box will be. 7. Get rear axle in location and work towards the front of the car to make sure engine mounts are in correct place still (I have a bit of leeway here so can shift as necessary). 8. Position engine, and then slot all the front suspension in and work out where it needs to be. 9. Rebuild front suspension as something that would pass a roadworthy. 10. Rebuild firewall using up a fair bit of wasted space behind the original steering box so I can fit aircon, etc. 11. Profit? That's about it for now, might update if I get steel, but probably not as it won't be particularly exciting until I start making new bits. 4 days until Japan! I promise video of me dying/injuring myself/doing mad flips when I get back. Cheers, Matt |
| |
|
|
|
|
|
Jan 31, 2016 16:26:26 GMT
|
|
Scarey big space left after all that metal/rust/fresh air removal!
|
| |
|
|
|
|
|
Jan 31, 2016 21:41:36 GMT
|
|
Yeah, it's a little concerning, I'll admit.
Looking at it, there isn't much in the way of strength at the front of the car so was trying to work out how to add a bit of impact resistance back in to it.
At the moment the front is basically just one big crumple zone...
|
| |
|
|
|
|
|
|
|
Jan 31, 2016 22:16:46 GMT
|
|
To add impact resistance you want to strenthen the passenger compartment, the bit sticking out the front wants to crush. From looking at ours I would suggest sills, B pillar and windscreen pillar, something like a welded in cage Would work.
|
| |
|
|
|
|
|
Jan 31, 2016 23:02:03 GMT
|
|
The play in the tape measure is to allow for the thickness of the end piece, not 4mm of play though....
|
| |
|
|
|
|
|
Jan 31, 2016 23:33:21 GMT
|
kevins I know I want it to fold up so that I don't, it just doesn't seem to have much stopping it from caving in at the slightest touch, haha.
dodgerover Yeah I am aware of the allowances, 4mm seemed a bit excessive, though.
Got called in to work so no chance of hunting for steel today, now. Managed to waterproof my boots for the snow though so that's one job done. Gotta go find some new jeans on Wednesday now I guess. |
| |
|
|
|
|
|
Feb 24, 2016 22:59:35 GMT
|
Well, sorry it took so long to update and you were all stuck waiting in suspense. But I found some new jeans, and they fit fine, thank you!
Japan was amazing, as usual. Some cool roads.  A fair bit of this.  A little bit of this. (can't get video to link from Flickr still) Backside Board (oops, wrong video!)
Not particularly amazing, I know, but it took a while to get accustomed to my new setup. I can do most of a front flip now, though! Anyway, that over and done with, I came home again too soon. Proceeded to get sick. And then have had a tonne of work.So now I've managed to get some time to myself, it's time to invest some of it in to the Minor.Went out hunting yesterday in the 30° heat for steel. Found steel. Took it back and got some money back because they'd overcharged me.Headed down the shed. It was a mess!Things have been moved out of one of the other units so it can be rented out, so there was cars everywhere, including some new ones!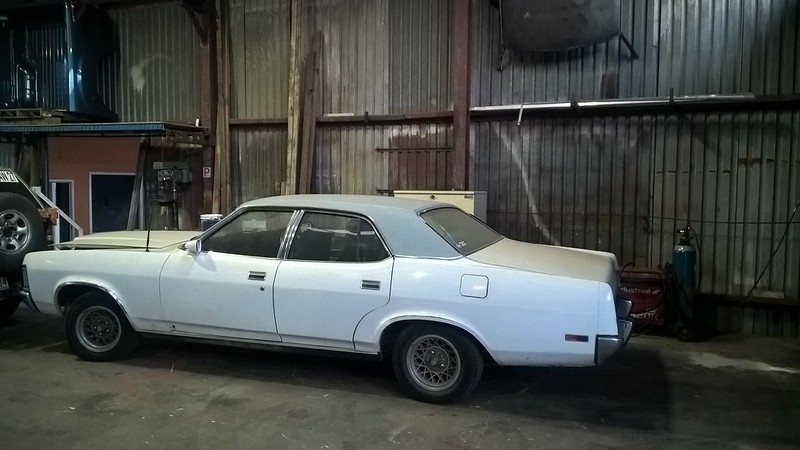 Unfortunately, the Fairlane is in the way of where I normally roll the Falcon so that it's out of the way and I can work on the passenger side of the car. But hopefully it'll be in the next unit down shortly so I won't have to worry about that for long. Which is good because I need to do some welding on that side.Apart from more cars, this was shunted down to the unit. Unfortunately, the Fairlane is in the way of where I normally roll the Falcon so that it's out of the way and I can work on the passenger side of the car. But hopefully it'll be in the next unit down shortly so I won't have to worry about that for long. Which is good because I need to do some welding on that side.Apart from more cars, this was shunted down to the unit. It was surplus to requirements at work, and seeing as I already have two at home, I figured one down at the unit would help with space. And it has! Gotten rid of lots of boxes already. It was surplus to requirements at work, and seeing as I already have two at home, I figured one down at the unit would help with space. And it has! Gotten rid of lots of boxes already. So, a bit of space made, I drilled out the spotwelds on the crossmember and then using a chisel we knocked out the stitch welds holding the tunnel on to it. No wonder I couldn't find any spot welds, it was all stitch welded on the underside! Thus:  And then we discussed the best way to put it all back together again. I need to repair the floor/sill where the crossmember is tied in on both sides first, as all the layers of fun have rotted each other out. Then I can fabricate a new member and put that back in. Then time for rails! That was all that got done, apart from drinking beer. We did come up with a plan for this:  And this:  Which will probably come in to fruition on friday evening when everyone is down for a bbq, etc. Seems like a communal kind of job! Anyway, that's it for now. I will be heading down later today to clean up the underside of the tunnel of stitch welds and make a start on patching the sill. Cheers, Matt
|
| |
Last Edit: Feb 25, 2016 1:02:17 GMT by varelse
|
|
|
|
|
|
|
Woah! Two small updates in two days! That's almost one whole update! Trundled down the shed this afternoon to get some work done on the Minor. This bit in particular was my focus.  Might be a bit hard to work out, but that's the floor pan/what constitutes the rear chassis rail on the passenger side, right under where the crossmember was. Not much point trying to weld a new crossmember to that, now, is there? So off it comes.  The extra long bit is the remains of the front floor pan as I was more interested in speed when I took the floor out. The floor pan ties in to the outer runner rail bit, and in this case was barely tacked in (I think from factory, too, looking at the welds). So instead of screwing around with drilling out spot welds, and then having to grind it all back, I just drifted the two bits apart with a cold chisel and hammer. Most of the welds came apart with one hit, so they weren't really doing much! That left me with this.  So I ground down the spot welds, cleaned up the area and beat the panels back in to shape. Then I started some CAD, and transferred to metal. And then made it again because I made the first patch out of Pintara bonnet and when held up the finished article to the car, I noticed that the floor was a fair bit thicker. -_- So I made it again out of shelving, which required the pan brake to get my folds right. But looked better the second time anyway!  It looks better than that in real life, honest! Anyway, I managed to burn my fingers by picking up the patch just after I had trimmed a bit off it. Derp! Slightly discouraged, I went to drill out the holes for plug welds, only to discover that the drill bit in the drill press has be swapped out for a timber bit, and the chuck key is no where to be found! So I called it a night and closed up. I will stop by Trade Tools tomorrow and try and obtain a larger than normal chuck key as the universal one I got from work is way too small. Welp, that's it for now! Cheers, Matt. |
| |
|
|
|
|
|
|
|
For those interested, I have undertaken mead adventures again. |
| |
|
|
|
|
|
|
|
|
jesus when i look at what your at i got away light lol, work level i excellent ,
|
| |
|
|
|
|
|
|
|
Hey varelse Was that the tunnel to Hoppo Onsen (Shiga Kogen) in those pictures? If so, I hate you. |
| |
|
|
|
|
|
|
|
Hey varelse Was that the tunnel to Hoppo Onsen (Shiga Kogen) in those pictures? If so, I hate you. No, it was a loooong way from there. It would have been about... HERE... On our way to Rusutsu. If you look at the satellite view of Rusutsu it's pretty crazy to think that the whole area is a ski resort, and all the amusement park stuff is slapped in the middle, haha. |
| |
Last Edit: Mar 8, 2016 23:12:00 GMT by varelse
|
|
|
|
|
|
|
]No, it was a loooong way from there. It would have been about... HERE... On our way to Rusutsu. If you look at the satellite view of Rusutsu it's pretty crazy to think that the whole area is a ski resort, and all the amusement park stuff is slapped in the middle, haha. Then I don't hate you as bad... still hate you because I can't make it there this year, but if you had gone to Shiga, which is my favourite place so far, then I would have just cause... |
| |
|
|
|
|


 Should be alright to make an anvil, I think?


