JJ0063
Part of things

Posts: 76 
|
|
Jul 23, 2015 18:32:12 GMT
|
Hi guys So my 309 is my first proper retro ride & I'm having a bit of bad luck with rust now. Ive stripped the rear out and have discovered this after a poke around:   I'm no mechanic or bodywork expert but where I've poked, as pictured is pretty much the edge of the rust & I'm hitting metal again. In terms of rust does this look awful? It looks bad to me but I don't know how bad it gets before its time to scrap it. I want to get it sorted but I don't know what a body shop will charge & I can't afford to spend much. Any thoughts appreciated. Jordan |
| |
|
|
|
|
|
|
|
Jul 23, 2015 18:42:38 GMT
|
|
Buy yourself a mig welder and teach yourself to weld. It does look too bad to repair and most of it will be hidden anyway
|
| |
|
|
Fungus
Part of things
Posts: 960
|
|
Jul 23, 2015 22:22:35 GMT
|
|
As above.
Take it slow, clean the areas really well so it's all bare metal surrounding the rust. Make templates for repair panels using cereal boxes and work through it nice and thoroughly, shouldn't be too bad.
|
| |
|
|
taurus
Posted a lot
Posts: 1,084
|
|
|
|
Those areas aren't bad and aren't hard to repair. But before you begin check the rest of the bodyshell thoroughly, especially the sills, suspension mount areas and the seatbelt mount areas. If they are solid then you're only dealing with non-critical areas so you can have a go at it. If you have a go with a MIG on bits of scrap just bear in mind that it's actually easier welding on the car itself - the size of what you're working on tends to dissipate the heat better. Get a decent welder and avoid gasless, if you need to use an extension power lead make sure it's a heavy duty one, ensure you've got a really good earth connection on the bodywork, disconnect the battery before welding (belt & braces - I had an ECU get fried during welding despite people saying it can't happen), have a look at this website www.mig-welding.co.uk/forum/When you start do a series of tacks about an inch apart. Then weld between tacks, but not from adjacent tacks, the trick is to go from one side of the area to the other so that heat doesn't build up in any one place. Once you get the hang of it you'll find it strangely addictive. And move anything which can catch fire! |
| |
|
|
gavs1
Part of things
Posts: 571
|
|
Jul 24, 2015 19:49:17 GMT
|
|
Would you like a quote?. Best get a comfy chair, you would assume but to be fair I really can't see why it would be expensive, for the price of a descent welder that can be sorted
|
| |
|
|
JJ0063
Part of things
Posts: 76
|
|
|
|
|
Thanks for the replies guys, I will get some quotes first as id rather a decent job. I did a welding course 6 years ago but I wouldn't be confident doing this especially near the fuel tank.
Il see what prices I get from a couple of places & if they're that high I will have no choice but to try.
Cheers
|
| |
|
|
|
|
|
Jul 25, 2015 15:53:47 GMT
|
|
couple of things, what reg is the 309? early ones weren't galvanised well. welding would be easier if it wasn't galvanised.
if you do it yourself, make the new panel larger than the hole (common sense but catches people out), tack it into place, it would be easy for when you are learning to just keep tacking it, doing opposites like doing a wheel up. as said keep away from gasless, if you don't plan on welding again get hobby gas then return it when done. its only a little bit of welding, nothing structural.
make sure all metal is properly clean, try and get metal the same thickness, no thinner.
when it has been welded, i'd recommend properly painting it inside and stone chipping the underside to keep it safe.
|
| |
|
|
|
|
|
Jul 25, 2015 16:53:16 GMT
|
^ as taurus  Oops! Looks nasty but should be ok to fix up, decide if you want "solid MOT pass" repairs or "factory finish" (I'd go for cheap MOT-pass, others will cost lots!) Get it checked to see if anywhere alse needs welding. Check mig-weld forum, either ask on there if anyone local wants to quote for the job or is selling a decent used mig set  Cheapest will be if you can get a welding set and patch it up yourself. Expect scary big quotes as there are a quite a few bits that need doing. The good news is most will be hidden so untidy patches will be ok as long as they're solid Hope you get it sorted, I had a 309 daily years agod and found it slow but great fun  |
| |
|
|
|
|
|
Jul 25, 2015 17:49:29 GMT
|
|
that lot is to the rear of the axle so well away from the fuel tank.
|
| |
|
|
|
|
|
Jul 30, 2015 22:55:57 GMT
|
|
I mostly agree with others, relatively easy repairs but may still cost a lot to pay a garage by the hour.
I don't agree with making the patch bigger than the hole, it looks like a bodge and increases the chance or corrosion. In my opinion take a bit of time to make the patch a very good fit and butt weld it, with a bit of care and dressing back afterwards it could look very good indeed.
This is the kind of thing that you can do with time taken to practice and learn, if you plan to continue to own old cars your new skills and equipment will save money many times over after this project has saved enough money to cover the costs.
Browse through threads containing welding in readers rides and also on the MIG welding forum to see how others do it and which ways work.
|
| |
|
|
|
|
|
|
|
Jul 31, 2015 17:58:58 GMT
|
|
|
| |
|
|
|
|
|
|
|
|
when welding its always worth having another set of eyes about to watch for fires! if you don't have a weldinging budy weld a bit then stop and have a good look around, car fires are the worst as there is loads of flammable stuff about including brake fluid!
|
| |
|
|
hario
Part of things
S202 C300STD
Posts: 421
|
|
Aug 28, 2015 12:43:52 GMT
|
when welding its always worth having another set of eyes about to watch for fires! if you don't have a weldinging budy weld a bit then stop and have a good look around, car fires are the worst as there is loads of flammable stuff about including brake fluid! I actually set my mate on fire while doing that before... |
| |
*S202 C300TD Wagon*
Installed:
OM606 & 722.6, Evo6 IC, S600AMG callipers & 345mm rotors. No catz. Leatherish seats.. Rust..
Future:
DIY manifolds & turbo compound build.
Built IP, & some kind of software. Less rust..
|
|
|
|
|
Aug 28, 2015 17:28:45 GMT
|
|
One of the first proper jobs I can remember actually doing rather than hindering was fire watching inside various cars armed with a squeezy bottle refilled with water!
|
| |
|
|
froggy
Posted a lot
Posts: 1,099
|
|
Aug 28, 2015 19:15:17 GMT
|
|
It was all gas welding when I started so fire watching was a must . It's worth going the extra mile and doing a proper let in repair as you know the edges are going to be good metal and it always looks better especially when it comes to sell on ,
|
| |
|
|
|
|
|
Sept 3, 2015 15:50:14 GMT
|
|
when you start cutting, keep the cut outs to make a template out of cardboard. Remember to make the cutout larger than needed by about 1mm all the way round at a minimum. (as you loose some material when you cut out the piece in the first place)
Proceed to try and bend the cardboard to the shape needed on the car - and cut it where needed to make it easier.
Thats the 1st step to start learning fabrication!
Its easier when you have something you can manipulate rather than try to do it all in steel then realising you cant get the correct shape without cutting and re-welding, or bashing the steel with a hammer!
Measure twice, cut and weld once!
|
| |
ClassicResto.co.uk - Restoration and maintenance of classic cars - Wolverhampton.
2002 Mercedes E320CDI Estate
1998 Mercedes C240 Sport
1995 Mercedes SL500
1993 Mercedes 500 SEL
1993 Mercedes 500SL - Sold October 2022
1989 Mercedes 300 CE
1985 Mercedes 500 SEC
1985 Porsche 911 Carrera - Sold March 2022
1983 Porshe 944
1978 BMW 1602
1973 Mercedes 350SL
|
|
|
|
|
Sept 3, 2015 18:39:37 GMT
|
Don't know if the OP is still around, but universal advice: Stop cutting stuff out. Fix one area and move to the next. Buy repair panels where possible. Cut them off scrap cars if need be. If you need to make a patch for an area, slather masking tape over the area, trim to suit the hole you are filling and use this as the pattern to cut the repair section. It is no harder to butt-weld a repair than it is to do a lap joint. Lap joint are less likely to invite rust later on and can be made invisible for a proper restoration rather than repair. Here is a welding method that I use to teach complee newbies how to weld. Takes about half an hour to get it down. Cut and pasted from a previous post: NOHOME said: Buy the Lincoln wire. Cheap wire is made from curse word they sweep off the floor and it sucks. Buy the small spools and if you don't use it quickly, buy a new role or at least remove and store in a bag with desiccant pouch. To adjust your rig: Point it at the tin and pull the trigger, Count to two. If it made a hole, either lower the juice or count to one. If it did not blow a hole, raise the juice and count to three. Your perfect setting is somewhere between the two numbers and settings. The small weld dot that you are aiming for should look the same from both sides of the panel. Now, all you do is move the tip over 1/2 of the dot diameter and repeat. The ideal timing is to do a dot, move over half a dot and just as the red-glow is going away, hit it again. You will soon figure out that you can do more of an elongated dot if you move the tip a small amount, but regardless it involves a lot of trigger pulling to weld tin with a Mig. I fit panels with zero gap if at all possible. I never understood the gap thing since all it will do is introduce warping as the bead shrinks when it cools. r 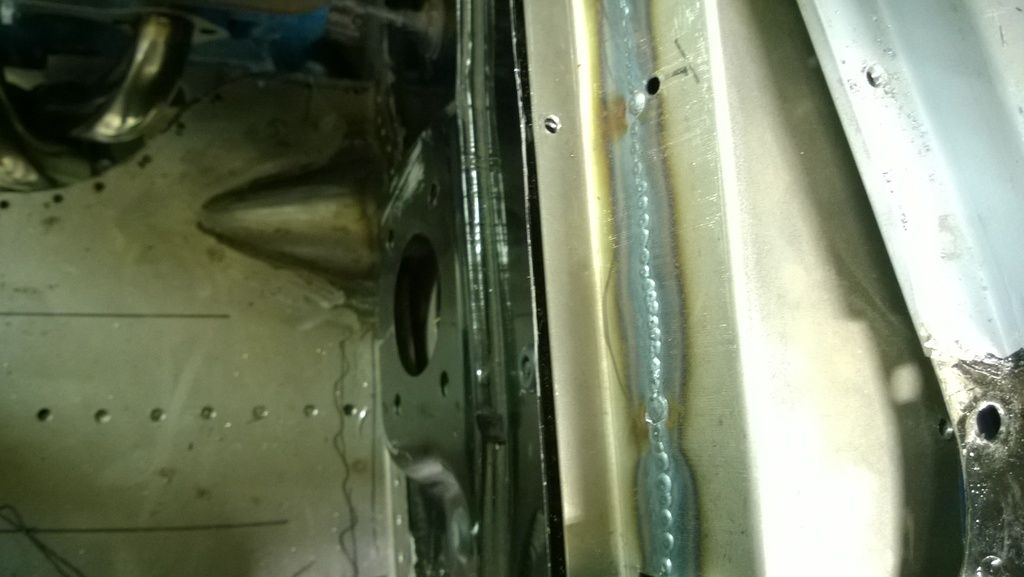 Here is an example from a firewall I am fabricating. The panels were butt welded with zero gap and the welder fired at the seam for a count of 1. Then I moved over and just as the red glow faded away, hit it again. And again, and again and so on. This is the backside of the weld showing good penetration. The front looks much the same. There is NO SKILL in this method, it wont make you a welder, but it will get your panels stuck together. Finished product: 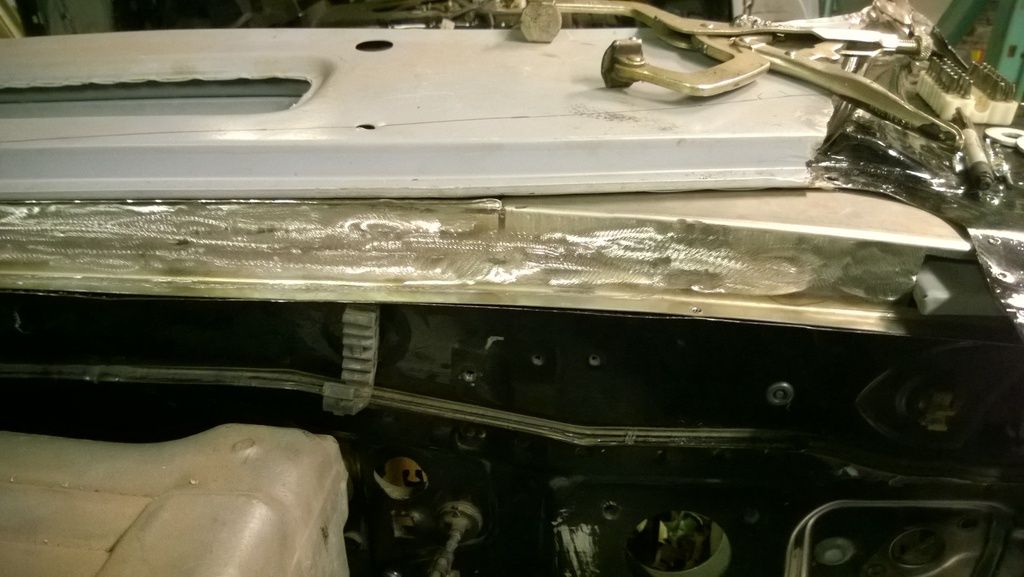 |
| |
|
|


