Dez
Club Retro Rides Member
And I won't sit down. And I won't shut up. And most of all I will not grow up.
Posts: 11,715
Club RR Member Number: 34
|
|
Jan 31, 2008 20:48:40 GMT
|
|
looks a pretty tight setup.
what weight coils you got in there? gunnabe a hopper or a scraper, or a bit of both?
I'm about to start redoing the install on my pontiac cos ive bent all my donuts too... have you had any experience with using accumilators, or powerballs to mount the bottom of the rear rams?
|
| |
|
|
|
|
|
|
|
|
|
|
Hello fella - looking good there matey. Adding any sparky metal do-dads to this one then ?
|
| |
Bouncy Bouncy ;D
|
|
|
|
|
|
|
looks a pretty tight setup. what weight coils you got in there? gunnabe a hopper or a scraper, or a bit of both? Cheers Dez. The chrome coils going in are 2-tonne - should be enough for a small hop without completely destroying the ride quality. It's a tricky thing to get it to hop, and go very low at the front - hopefully a compromise can be found. Hello fella - looking good there matey. Adding any sparky metal do-dads to this one then ? Ah, Mr J. Sparky do-dads? ... Oh, almost certainly  |
| |
There is nothing more expensive than a cheap Mercedes
|
|
|
|
|
|
|
02.02.08 - Groundhog Day... The other side is now turreted and strengthened. So much easier working under cover. One slight error in that I dropped a coil on the old inspection lamp. Very dead. I can now highly recommend those LED inpection lamps. Rechargable with a big magnet, so you can stick it anyware. Good purchase.   Oh, taking of dead stuff - 24 cutting and 2 grinding discs to date... |
| |
There is nothing more expensive than a cheap Mercedes
|
|
|
|
|
|
|
Looking lovely! Welds or beautiful  |
| |
1997 TVR Chimaera
2009 Westfield Megabusa
|
|
linesy
Part of things

Posts: 59
|
|
|
|
|
coming along nicely ;D
|
| |
 Now driving 1990 GOLF 1.3 CL MK vag, KEYNE-ON-DUBS MEET, LAST SUNDAY OF EVERYMONTH NOW FROM 12PM AT THE CALDECOTTE ARMS |
|
|
|
|
|
|
03.02.08 - Paint, polish and bolts. Productive day today. Finished the drivers side front, made stuff and painted other stuff. This side looks a bit neater due to daubing underseal over everything, rather than just the bits I've disturbed. Will probably touch up the other side tomorrow.  Whilst waiting for the seam sealer to dry, I kept myself busy by painting the rack (purely to stop it rusting, as it will be hidden). Brown and gold seemed to be the first two half-full rattle cans to hand. That'll do then.  Also whilst waiting, I made this sign for the gate to show our house name. Quite pleased with this:  Will bleed the brakes tomorrow, then turn the car around in the barn to start the boot install. Should make for more interesting photos and talky bits on here  Ideally, I would have liked to have done the rear rams first, but several of the required components are currently with the powder coaters. Behold the mess that is the barn of many daft creations...  |
| |
There is nothing more expensive than a cheap Mercedes
|
|
|
|
|
|
|
Thats not messy old chap !  |
| |
|
|
|
|
|
|
|
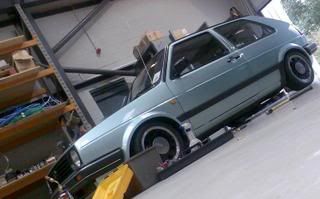
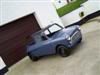
06.02.08 - More boot install. Stripped rear suspension. Had fun since the last report! Stuey came over for the day again yesterday (once again thanks for all your help Stu), and we build the sub section to the boot framework:  The two white panels with holes either side are to mount the hydraulic hoses that go to each corner. I plan to use bulkhead connectors with either stainless hardline or braided hoses visible in the boot. Should look pretty good. Had a big change in ideas too in so much as it would be a huge amount of work to re-upholster the whole boot in leather as originally planned. The original molded carpets are in great condition, and they all still fit (excluding the rear panel), so I am now just going to bolt everything through the original carpets for now - may update this at a later stage, but it will do for now. Stuey came up with a great idea for the back panel (where the sub goes), so I will write about that next week if it works. Spent today stripping down the rear suspension. I don't intend to let the front go too low, as I want it to hop, however, the rear will go as low as I can possibly get it! Photos below show full lift and full drop. It may lift a little further yet, but in the 'low' photo below, the wheel is still nowhere near rubbing the inner arch. Hurrah!   |
| |
There is nothing more expensive than a cheap Mercedes
|
|
|
|
|
|
|
|
Flippin' hell, that's crazy! Ace ;D
|
| |
|
|
|
|
Foxy
Posted a lot
Making pink manly in the north!
Posts: 1,913
|
|
|
|
|
That Is Sex On A Stick Man!!!
|
| |
I'm the handsome fella with the cheesy white specs or is that the cheesy fella with the handsome white specs?
|
|
|
|
|
|
|
|
Bah, stop it....I might do something like that to the E28. :-o
|
| |
|
|
J.P
Posted a lot
I like to eat ice cream and I really enjoy a nice pair of slacks.
Posts: 1,175
|
|
|
|
|
Brilliant work, welding is top notch too!
By the looks of the rear 'low' picture you must when its done, slam it on the rear diff cover and lift the wheels into the arches so they spin helplessly for comedy factor.
|
| |
|
|
Rob
Posted a lot
You know, for kids!
Posts: 2,515
|
|
|
|
Fabulass. Really like the "just whack it in there" talking coupled to great fab skills... It makes it sound like i could just bang some rams on the wife's golf tonight... (does that sound a bit wrong ?) |
| |
|
|
|
|
|
|
|
Bah, stop it....I might do something like that to the E28. :-o Pah! e28 is a big hydro no-no! 'Orrible angled struts dear boy... Did try to phone you a few days ago - will try again soon. |
| |
There is nothing more expensive than a cheap Mercedes
|
|
|
|
|
|
|
I could just bang some rams on the wife's golf tonight... (does that sound a bit wrong ?) Pffft. Yes  ;D |
| |
There is nothing more expensive than a cheap Mercedes
|
|
|
|
|
|
|
|
i'm going with JPs comedy idea ;D
|
| |
|
|
sparko
Posted a lot
Posts: 1,627
|
|
|
|
|
hmmm the words 'not goin too low on the front' sound a bit wrong here but i will put faith in you
awsome build so far, keep it up
|
| |
|
|
|
|
|
|
|
Fantastic work! This is going to be an immense car! |
| |
|
|
Ether
Posted a lot
Posts: 4,450
|
|
|
|
Daaaaaaaaaaaaaaaaaayum!!! looking' fine, bro |
| |
|
|
|
|


 Ideally, I would have liked to have done the rear rams first, but several of the required components are currently with the powder coaters.


 ;D
;D