adam73bgt
Club Retro Rides Member
Posts: 4,866
Club RR Member Number: 58
|
|
Apr 13, 2020 20:55:22 GMT
|
I'm currently working on this 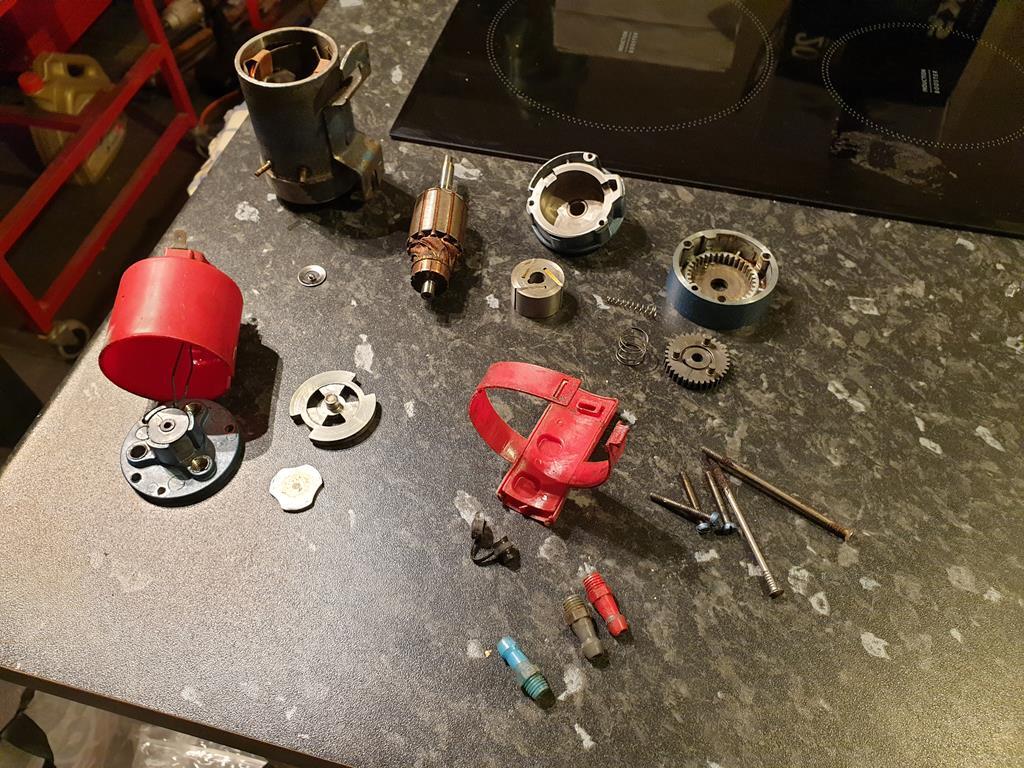 which is a compressor for a set of Maserati air horns that I've had sitting about for years now, finally getting round to making them work! |
| |
|
|
|
|
adam73bgt
Club Retro Rides Member
Posts: 4,866
Club RR Member Number: 58
|
|
|
|
|
Thats a very good point, certainly my MGB came apart more easily than this! The rusted suspension arms I've been removing do have some remnants of OE Honda part numbers on them so as you say, the bolts will have been on there for the past 26 years or so without having been disturbed!
|
| |
|
|
adam73bgt
Club Retro Rides Member
Posts: 4,866
Club RR Member Number: 58
|
|
Apr 11, 2020 21:41:10 GMT
|
This is one of those cars that likes to fight me.. Since the last update, I managed to get the split pin out of the drivers side upper control arm ball joint, but it came out in multiple pieces.. and the nut itself is pretty stuck. Today however, the tap sockets I ordered arrived. quick test fit on the spare ABS bleed screw I have showed that it did fit over it, so I prepared the area on the car just in case brake fluid went everywhere 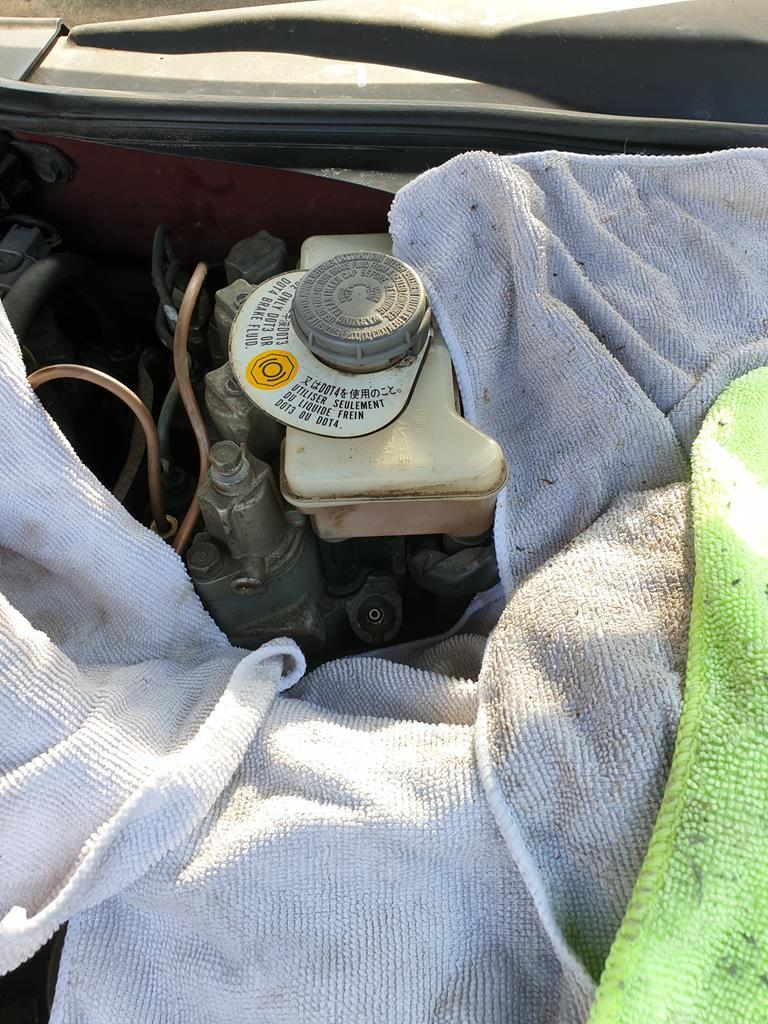 Only to find that that the socket didn't fit over the bleed screw thanks to the boss on the ABS modulator body.. So I'm basically just going to have to risk taking it off without bleeding the pressure, if the pump truly isn't working, I think it will be low risk. To that end, I carried on taking off bits around the ABS pump ready to remove it. Got two screws out of the heatshield that protects it from the nearside exhaust manifold but its still secured somehow. The Honda manual recommends removing this from the bulkhead 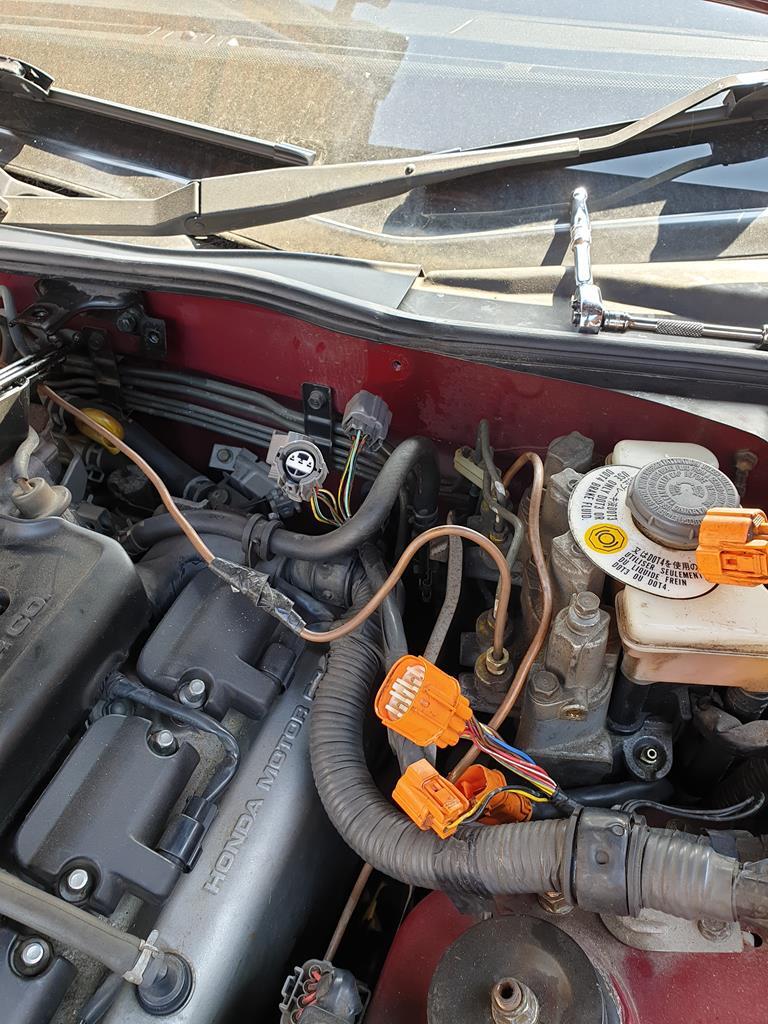 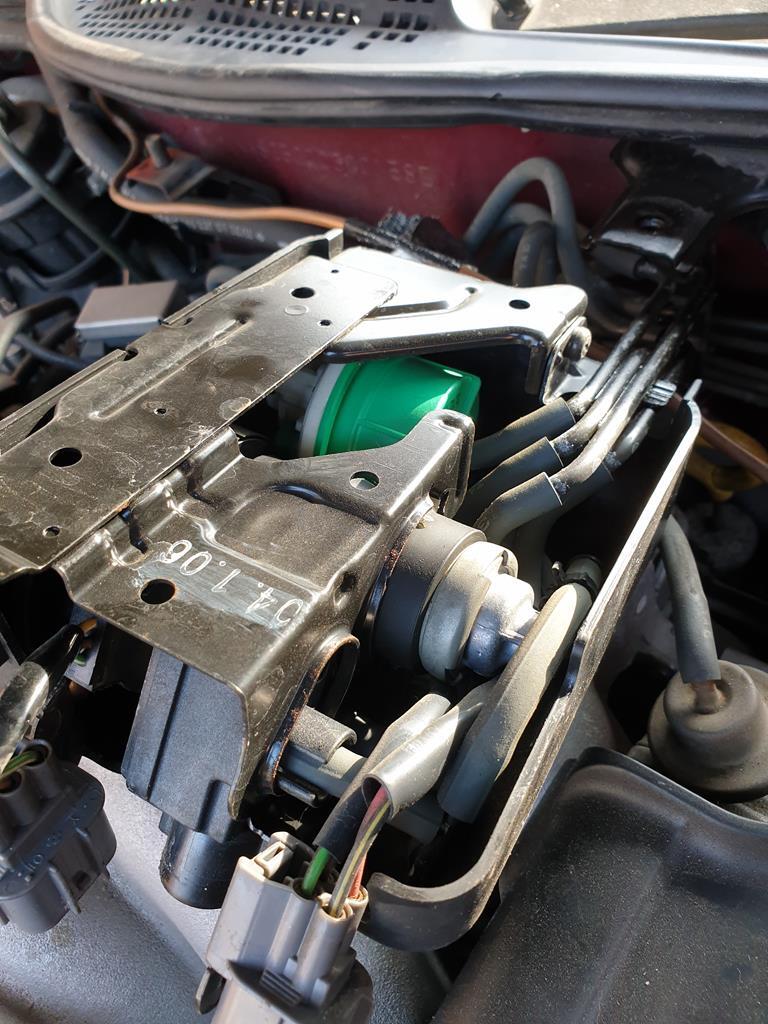 Its a control unit for a few of the emissions systems on board the car, EGR and the like. It reminds me of my RX7 in that theres a lot of vacuum hose and solenoids which just looks untidy and nasty to me, but theres no point in me trying to delete any of it. The guys in the US running Acura Legends do seem to note issues with the EGR system blocking up and leading to head gasket failures so that might be something for me to look at in the future but not a priority. Anyway, with that removed, it still wasn't looking particularly easy to access the lower bolts for the ABS unit, so I gave up and targeted some other "easy wins" while under the bonnet. I've had a fuel filter ready to be swapped on for a little while now, and thankfully it is actually easy to access on the Legend 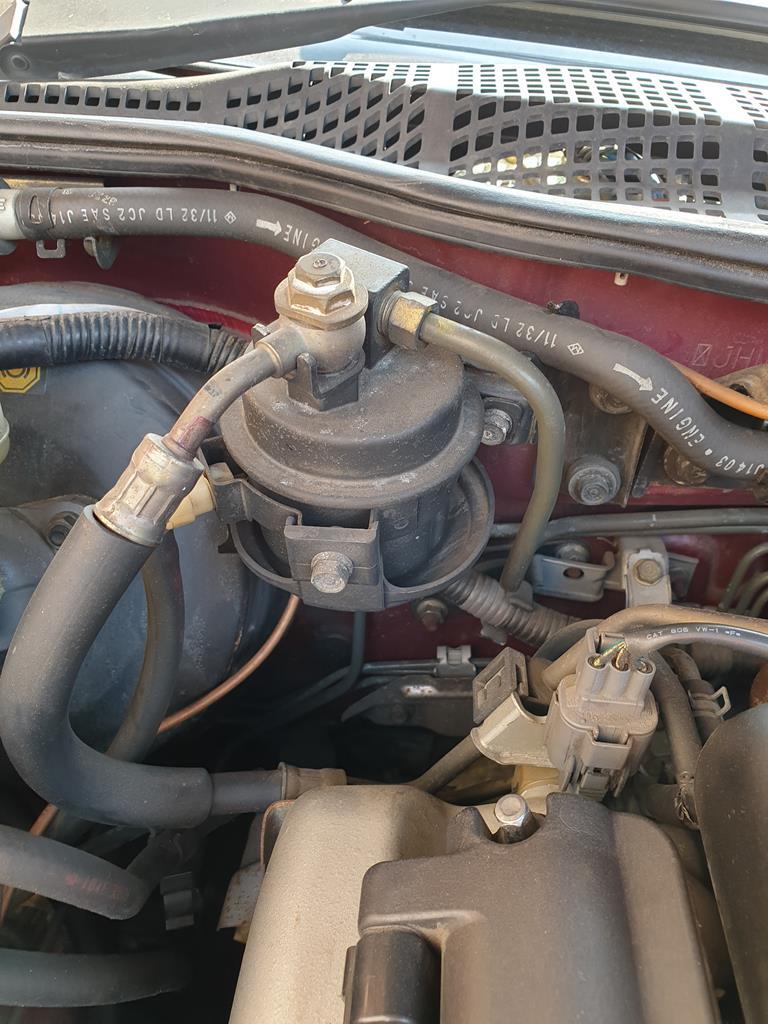 The little bolt in the top of the banjo bolt is for relieving the fuel pressure, I needn't have worried as nothing came out when I undid them! The banjo bolt came out fine but the other connection on the filter is reallly tight (I did say the car was fighting me right?) tried a few things but no movement, I've just kept spraying penetrant at it in the hope it will come undone easier tomorrow. Given that fail, I moved onto another couple of jobs which have been on my list for a while. A while back I took a load of the window trims off the car to clean out the gutters of tree detritus from the time the car had been sitting. When I put the windscreen trims back on, they didn't quite fit right as some of the clips had broken so they were due to come back off as I had replacement clips ready to go 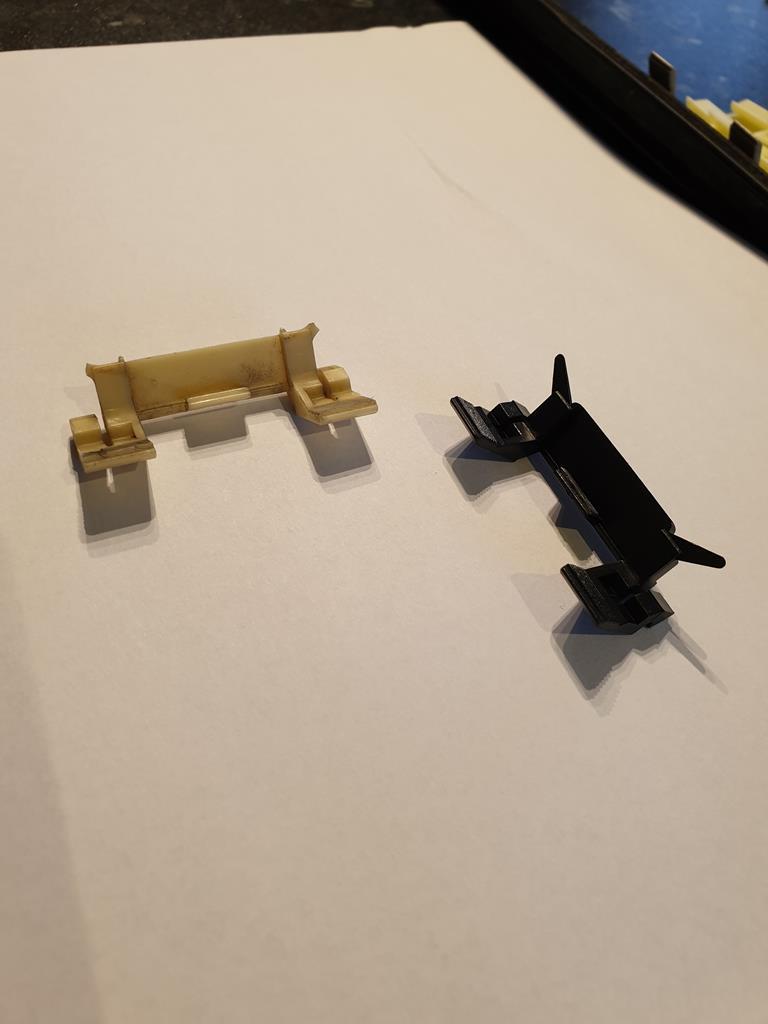 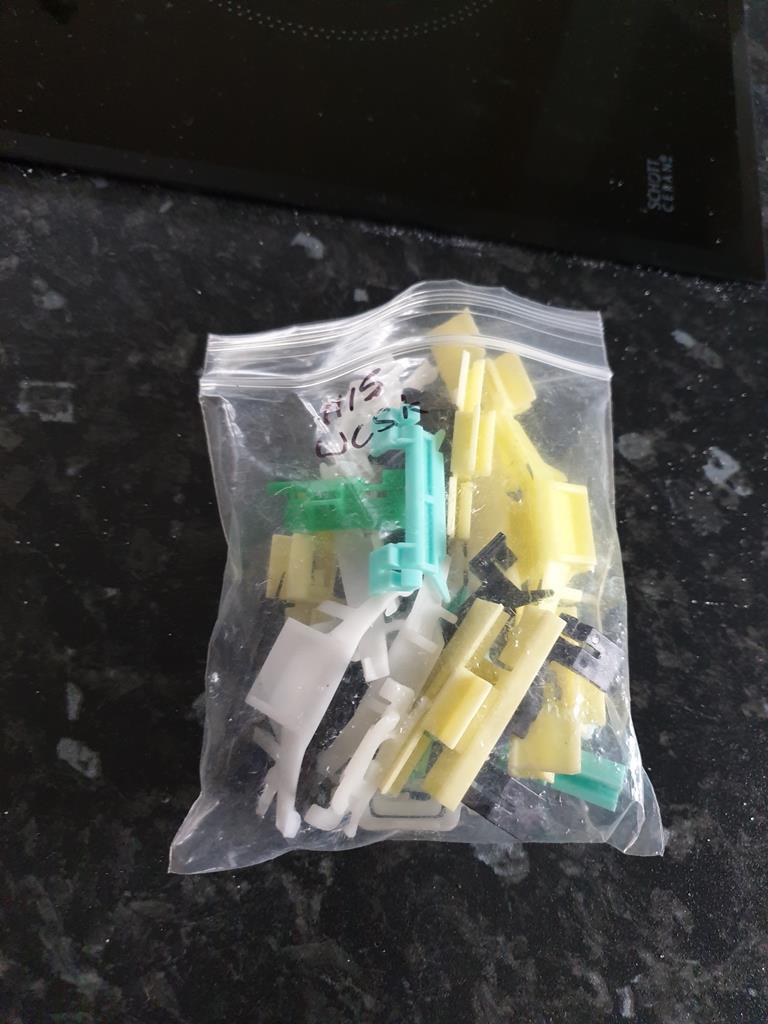 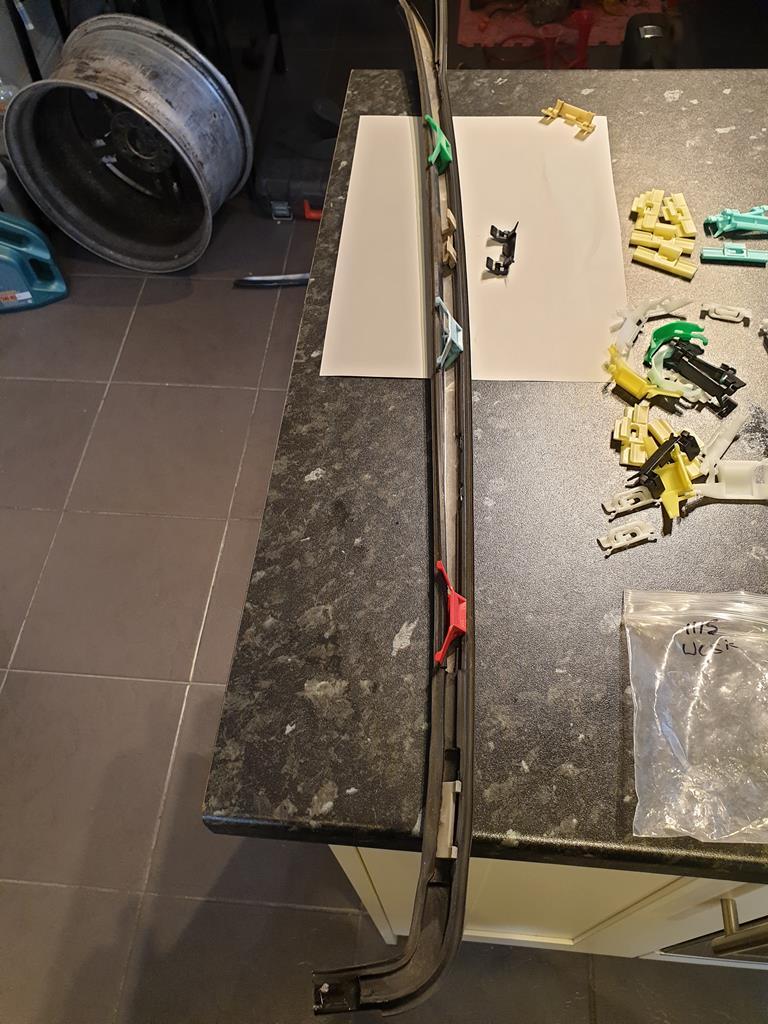 Another point is that the wiper arms had the black paint coming off and the underlying metal showing through, so they came off also  (Using some tape to help me get the arms back on in the right orientation) I'd also wanted to get the scuttle panels off as I knew there was more tree debris hiding under there. The first panel is like a finishing trim for the bottom of the screen which was clipped in   As you can see, lots of mud and pine needles hiding under that. The lower scuttle panels are in two parts, the drivers side is plastic and clipped in pretty simply  Noticed that there is a drain hole in it which was completely plugged with mud 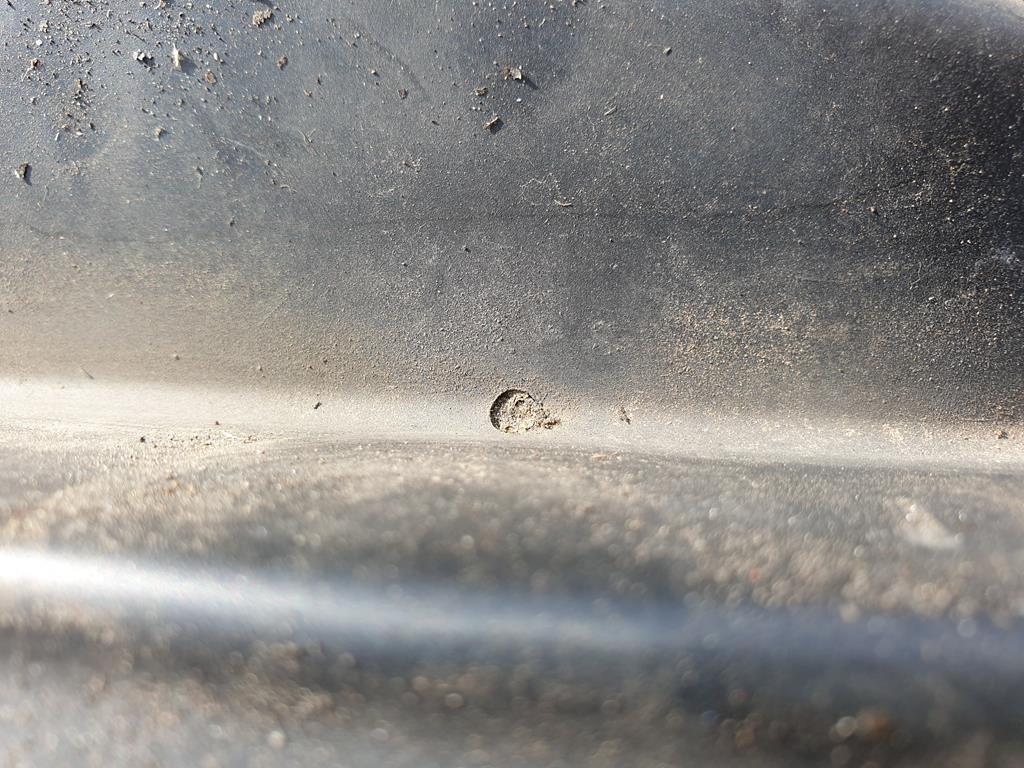 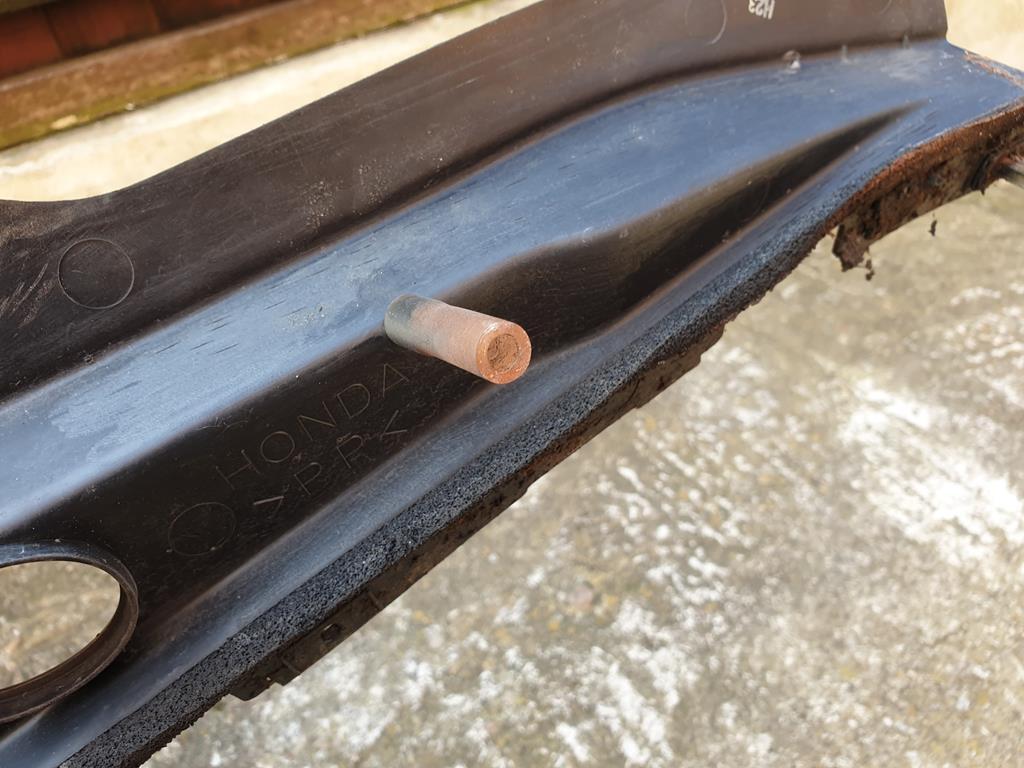 Which was easy enough to sort. The Wiper motor and linkage was hiding under that 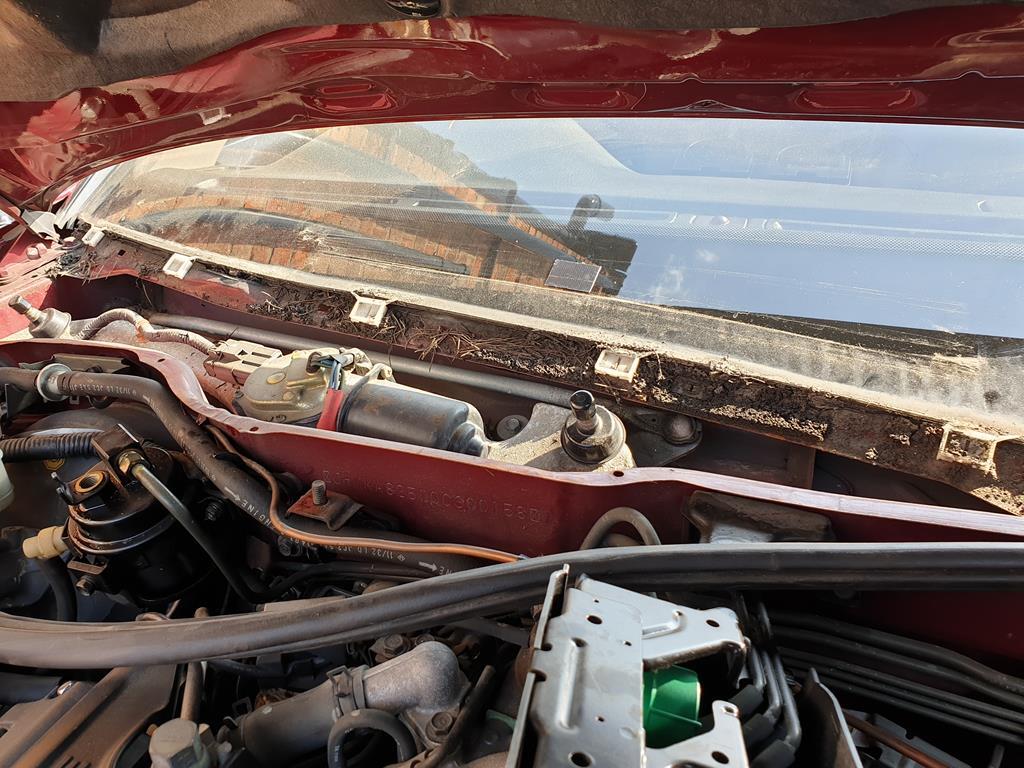 In and around the motor and linkage was other bits of tree. The other bit of the scuttle on the passenger side is steel and is also clipped in aside from where the bonnet gas strut mounting point goes through it 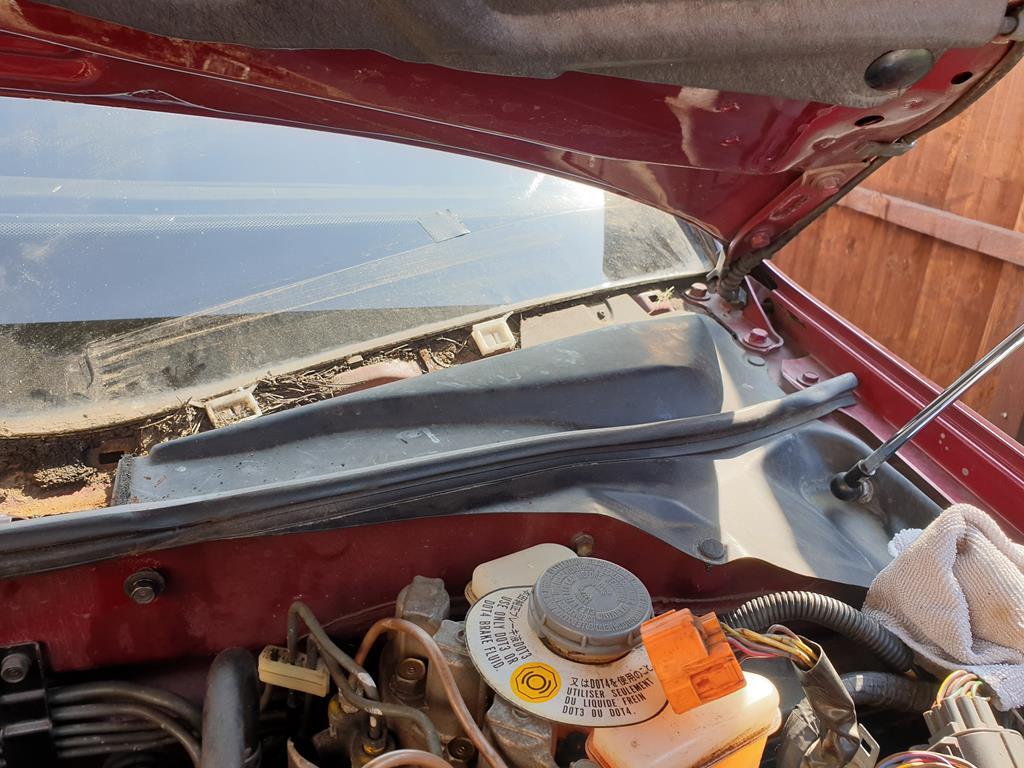  It's probably a good job I did tackle this now, as the mud and rubbish sitting on the scuttle panel had started to rust it out  So I've been wire brushing and sanding that back ready for some etch primer and satin black.   (Doing the wiper arms as well) It won't be the neatest job in the world but it should tidy things up quite nicely. I've also been getting as much of the tree curse word from out of the scuttle area as possible before I put it all back together. So yeah, lots of words but not necessarily that much achieved, but working on a few different jobs at once seems to work for me  I've got this whole week off basically so I'd like to get the jobs on the car all sorted but we'll see how much it wants to continue fighting me! |
| |
|
|
adam73bgt
Club Retro Rides Member
Posts: 4,866
Club RR Member Number: 58
|
|
Apr 11, 2020 19:26:53 GMT
|
How about a carbon effect vinyl wrap, but have it just lifting in a couple of places, passers by will think "ha its just a wrap" but little do they know... |
| |
|
|
adam73bgt
Club Retro Rides Member
Posts: 4,866
Club RR Member Number: 58
|
|
Apr 11, 2020 18:03:19 GMT
|
|
Maybe its the chrome outer trim on the XJ6 that makes the silver steel look better?
|
| |
|
|
adam73bgt
Club Retro Rides Member
Posts: 4,866
Club RR Member Number: 58
|
|
Apr 10, 2020 21:09:22 GMT
|
Wiring loom you say... I was half planning on getting rid of the old loom in mine at some point It's funny that you're sorting out your MG parts, I've been doing a similar thing over the past few days, theres so many bits I'd forgotten I had. I had two sets of front crossmember polybushes for a start! |
| |
|
|
adam73bgt
Club Retro Rides Member
Posts: 4,866
Club RR Member Number: 58
|
1973 MGB GT- Wings 29/5adam73bgt
@adam73bgt
Club Retro Rides Member 58
|
|
|
You are absolutely right, but I'm also lazy and couldn't be bothered to re paint that bit after grinding it out |
| |
|
|
adam73bgt
Club Retro Rides Member
Posts: 4,866
Club RR Member Number: 58
|
1973 MGB GT- Wings 29/5adam73bgt
@adam73bgt
Club Retro Rides Member 58
|
|
|
If you've got some nasty old stripper in gel form, lay it on and throw the whole lot on a garbage bag for a while. Just don't breath in when you open it up afterwards. I think it not being old and nasty is part of the problem it seems a bit new and weak! A bit of perseverence with my new sander and also some scotchbrite pads got me something looking about ready for paint 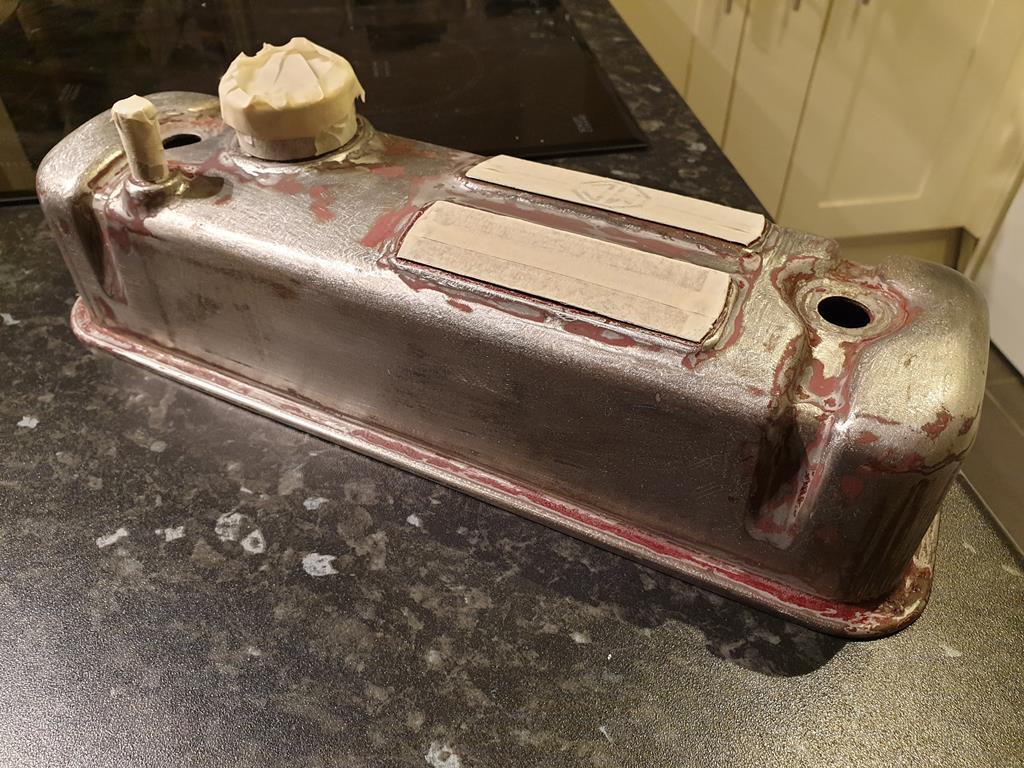 I put some etch primer on it (which wasn't really necessary but oh well) and got it ready for some black VHT paint 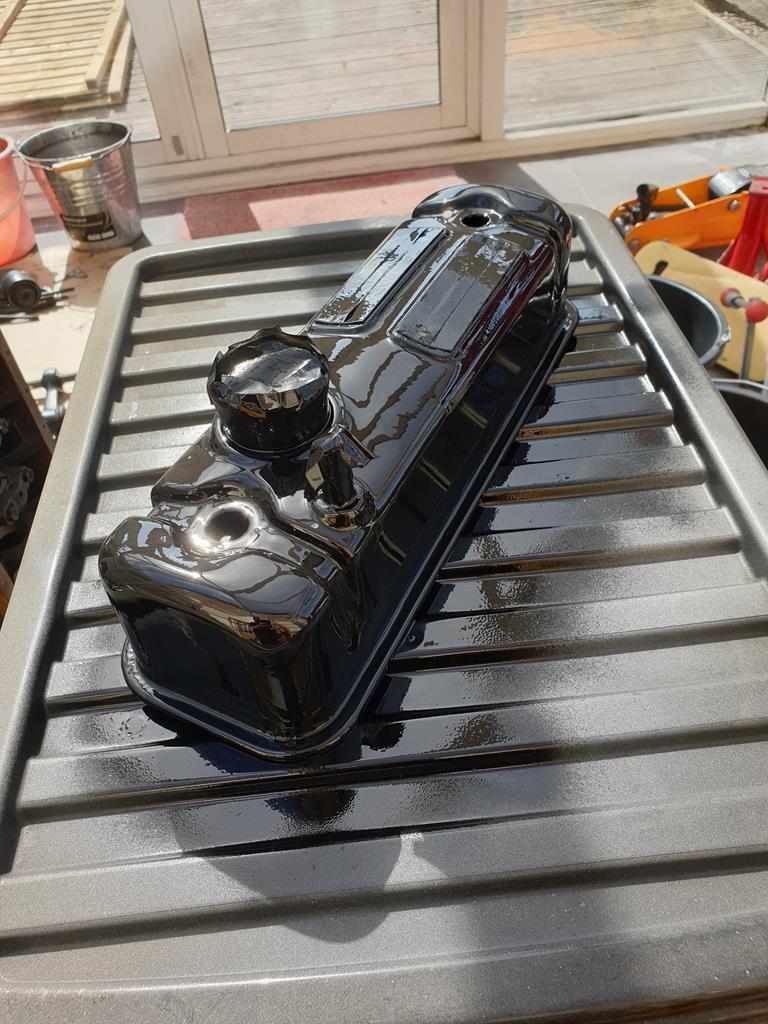 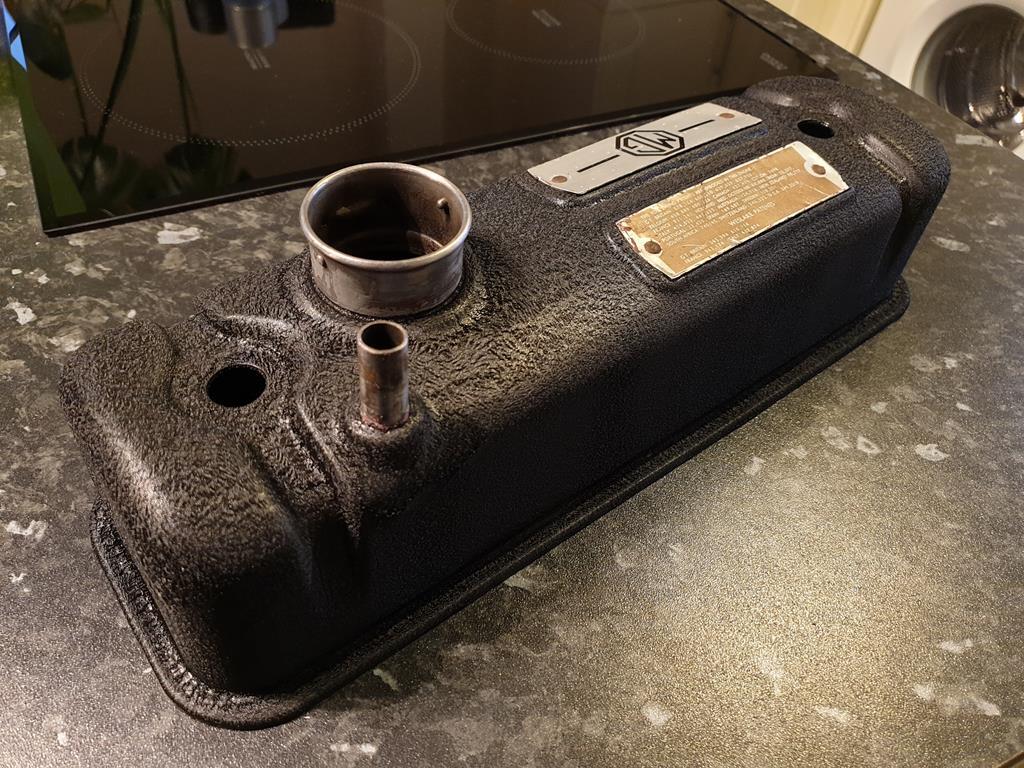 Difficult to photo but its a wrinkle finish which looks quite cool, at some point I'll get a chrome cap and all the tarty up bits for it as well Back at the grotty end of the scale, I've got this delightful sump to clean up 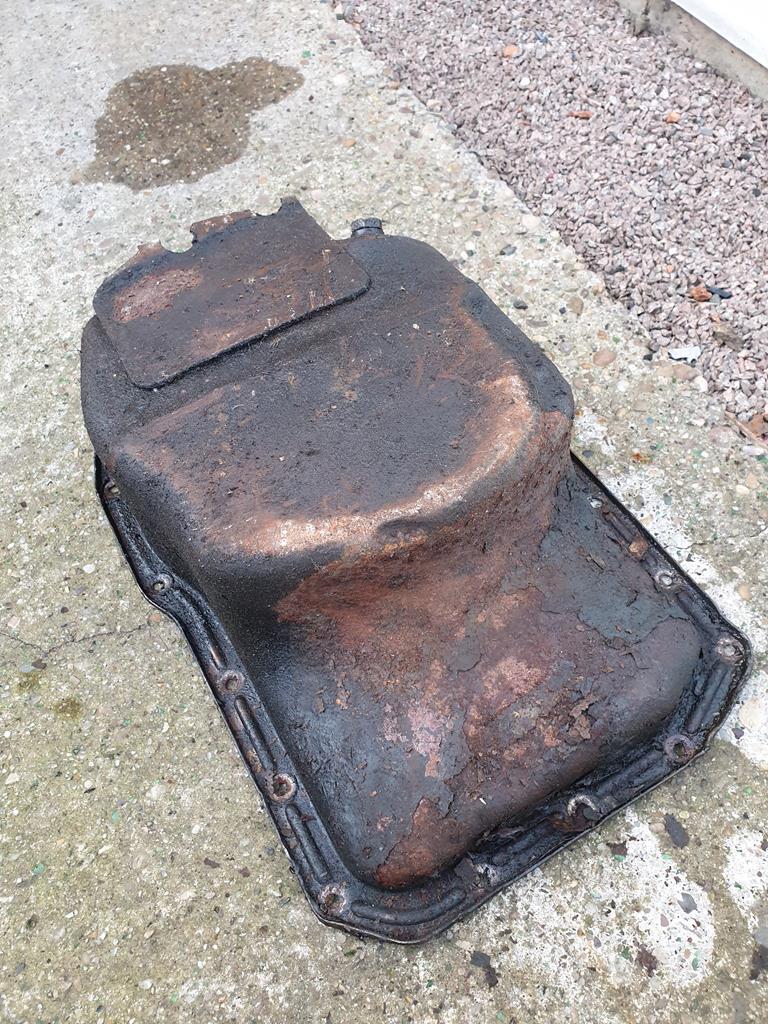 Cleaning, sanding, painting is pretty much the order of the day  |
| |
|
|
adam73bgt
Club Retro Rides Member
Posts: 4,866
Club RR Member Number: 58
|
|
|
|
Ebejeebies you do make a lot of sense, I did message one of the Legend breakers on fb about an arch/rear wing but they didn't get back to me, I'll keep trying a few georgeb I'll probably give the pedal a good few pumps anyway in case it helps, although if the pump has been at fault, it may not have much pressure in there anyway as its not been running... Did a little bit more fighting with the lower control arm this afternoon, as with much of the suspension it is all very corroded which makes getting things apart a pain. The cable for the ABS sensor is clipped into a metal conduit which bolts to the LCA, both the conduit and the bolt heads were so rusted I just broke it off   A bit of careful prising (while trying not to cut myself on the rusty metal) and I got the cable free  The new arm has the bosses on it for the screws so I'll probably use a couple of P clips or similar to secure the cable to it. The next bit to detach is the drop link for the ARB. The bolt head on this was rusted but also quite rounded  To my surprise, the nut on the ball joint end came undone easily enough 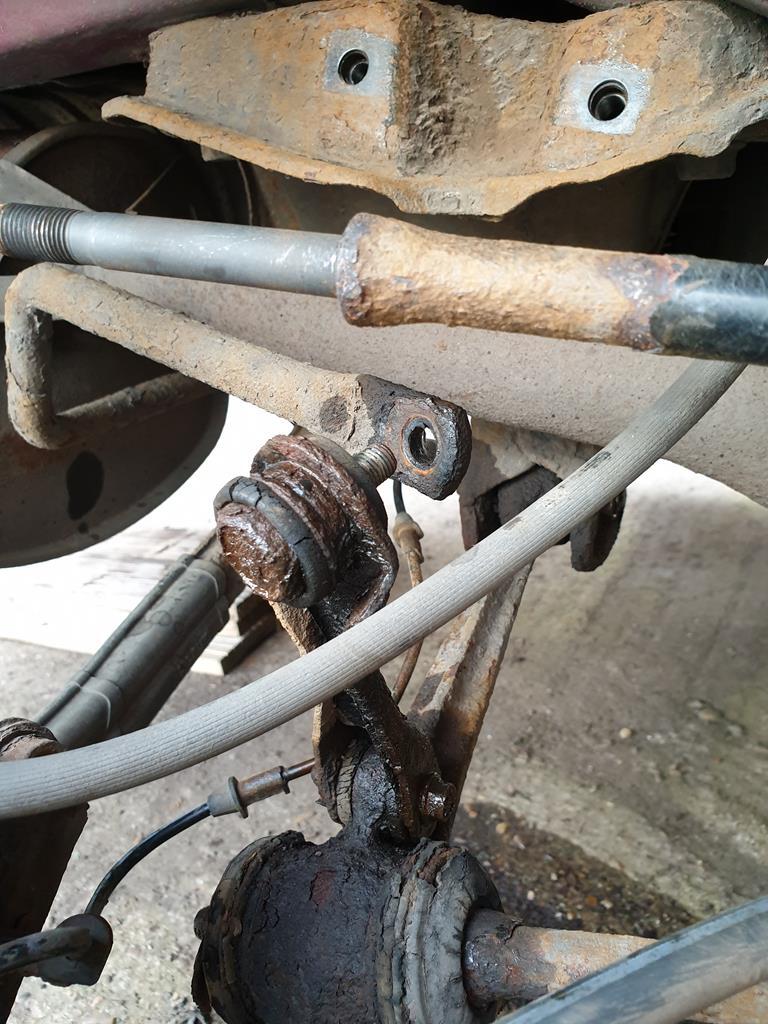 So I can at least try and separate the drop link from the arm on the bench. The link is rough, and they are still available via Rockauto in the States, but they seem to come without the ball joint bit at the top, if I can find a complete link somewhere I may buy some to replace these, or I'll just have to clean this up as best I can I'm currently stuck trying to get the nut on outer ball joint of the LCA undone. It took a fair amount of hacking to get the rusty split pin out and now its just a case of battling with rust and lack of access 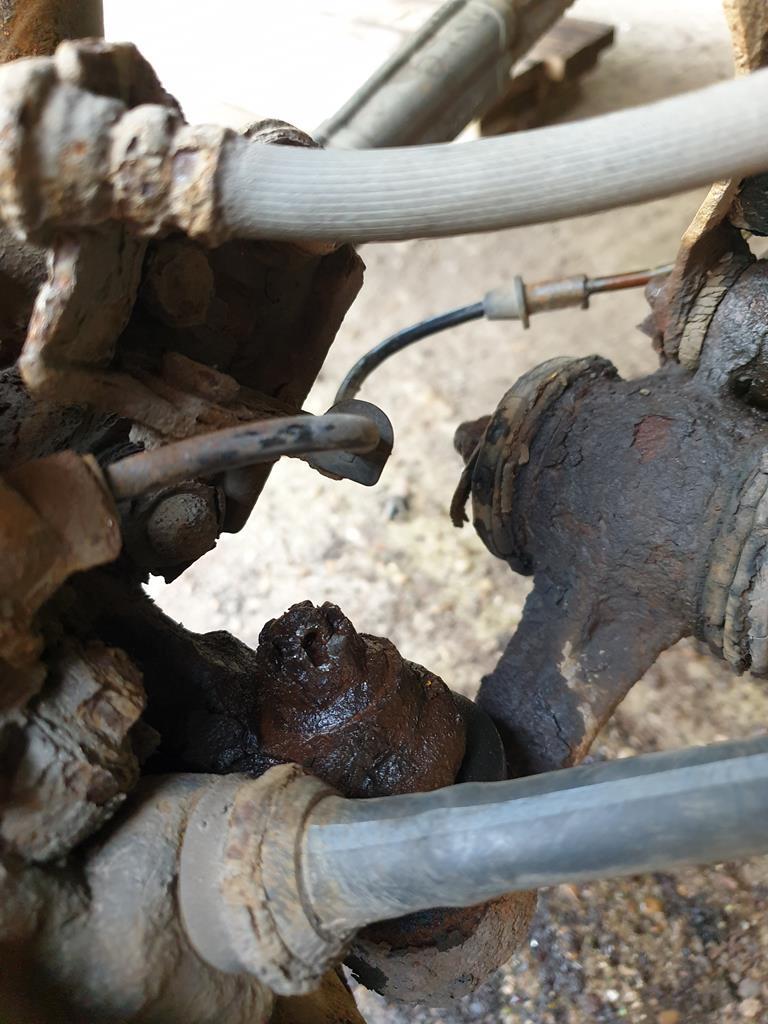 Annoyingly I could do with a 17mm ring spanner, as the body of my ratchet spanner is a little too big to fit and the open end tends to want to round the nut. One thing about this lockdown is that it's making me notice the tools I'm missing To help hold the knuckle in place while I try and undo the nut, I did loosely attach the UCA 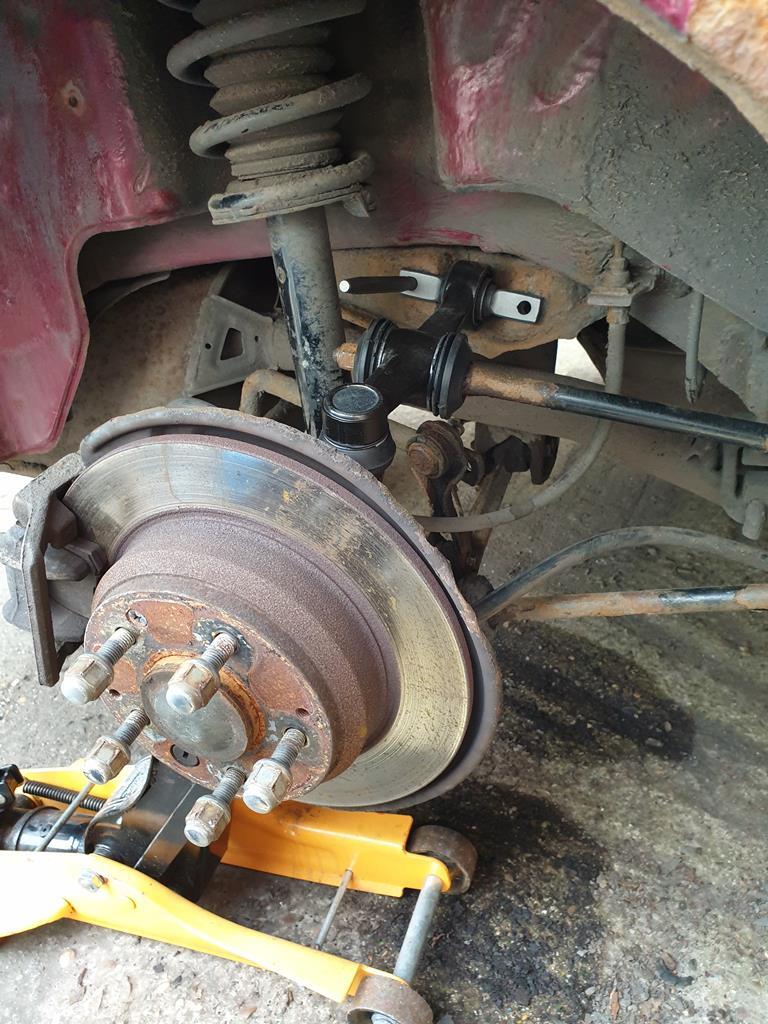 Here shown with a punch in one of the mounting holes to help locate the bolts mounting it to the subframe. Went on fairly easily except for being a bit of a pain to get on the radius arm, there's a crush tube within the big bush in the middle of the arm which needed tapping on with a socket and a hammer. Bit more fighting and the LCA should come out then it should be straightforward. I'm trying to hold off the temptation to lop a coil off the rear springs as sometimes it sits a little high in the rear end... Then will just be a case of repeat on the other side, I did pull back the arch liner on that side to have a look at trying to remove the bumper again, happily whatever coating Honda used on the petrol filler neck did the job as it looks brand new  So ending on a high note this time at least
|
| |
|
|
adam73bgt
Club Retro Rides Member
Posts: 4,866
Club RR Member Number: 58
|
|
|
|
Ah thats a good shout, I've got one of those but on a T handle type thing 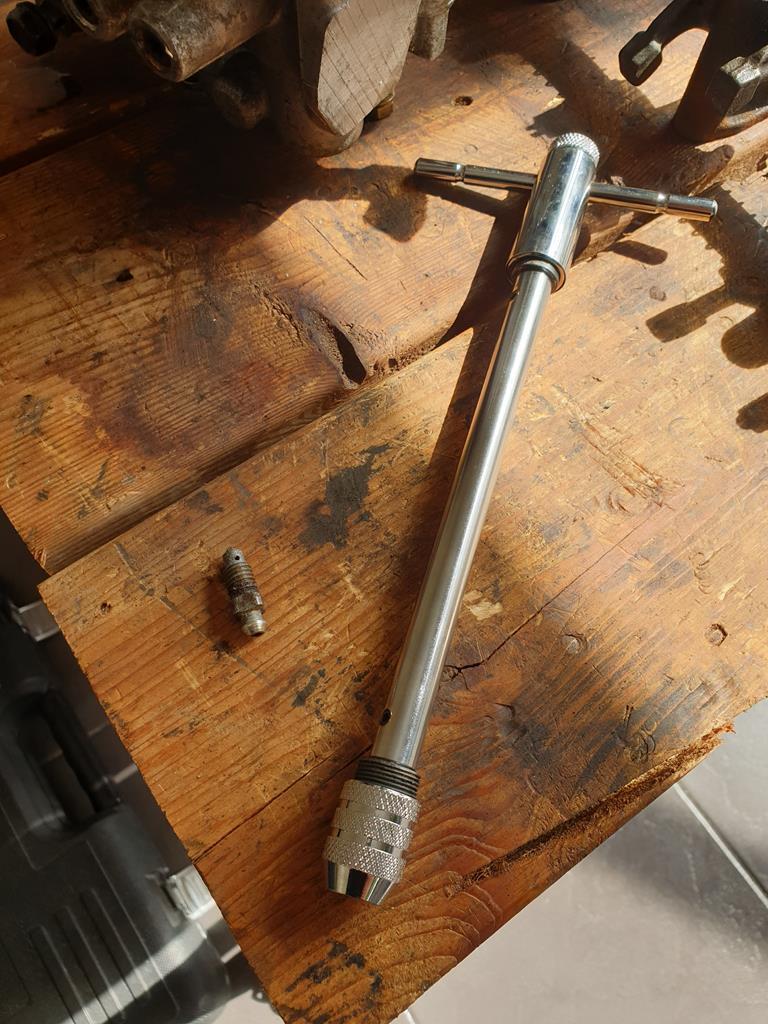 It wasn't quite big enough but looks like I've got the smaller of the two, I'll have to give the larger size a go |
| |
|
|
|
|
adam73bgt
Club Retro Rides Member
Posts: 4,866
Club RR Member Number: 58
|
|
|
|
Well things have changed just a bit since my last update! Working from home has meant I've got plenty of Legend off the road time to get on with some of the above jobs, and the weather is even playing ball as well The first job I started on was sorting out the ABS light which has plagued the car ever since I bought it. I did a "code read" way back when which indicated that the ABS pump itself was at fault, so I bought a second hand unit which has sat doing nothing for about a year now... I got it out and got it a bit more ready to fit in the car 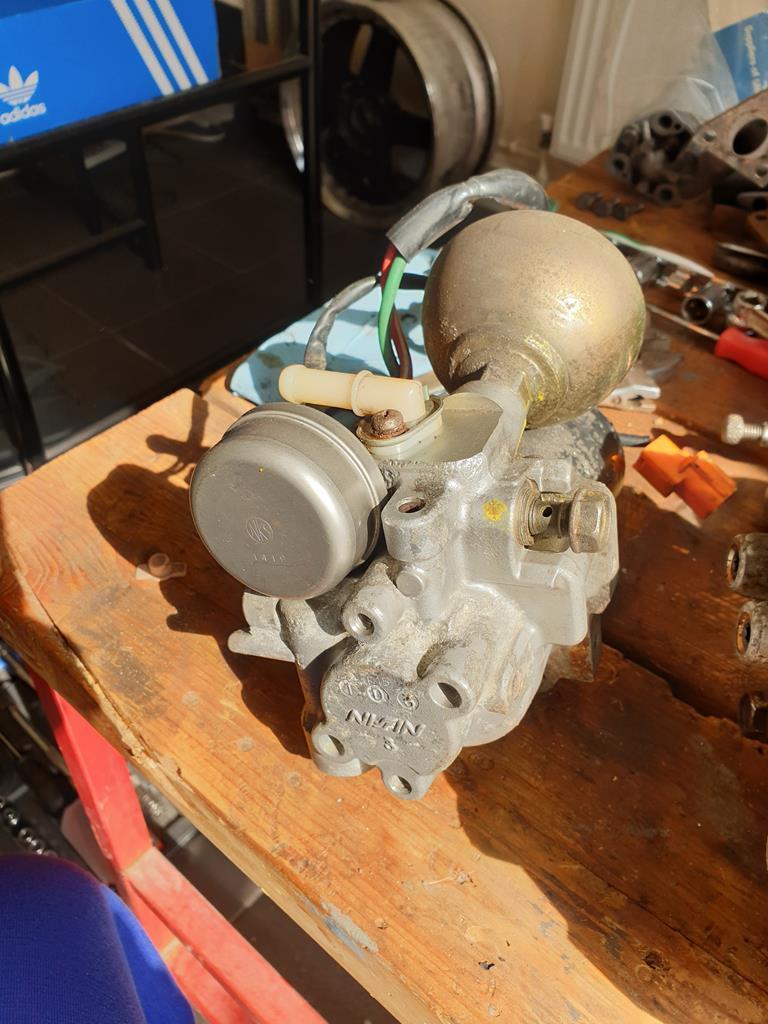 Now being an early-ish ABS system, the Legend has a separate pump and modulator, the modulator sits above the pump right up in the top corner of the engine bay near the scuttle panel. I had quite a bit of a fight getting the eletrical connectors all apart as I suspect 26 odd years of engine bay heat had got them pretty much welded together, but I got there eventually. Next, the manual suggests to relieve any pressure from the modulator using a special Honda service tool and the bleeder screw on the modulator. The tool is long since NLA.. Looking at the spare modulator I have on the bench, you can see that Honda chose to use a bleed screw with a square rather than a hex shape? 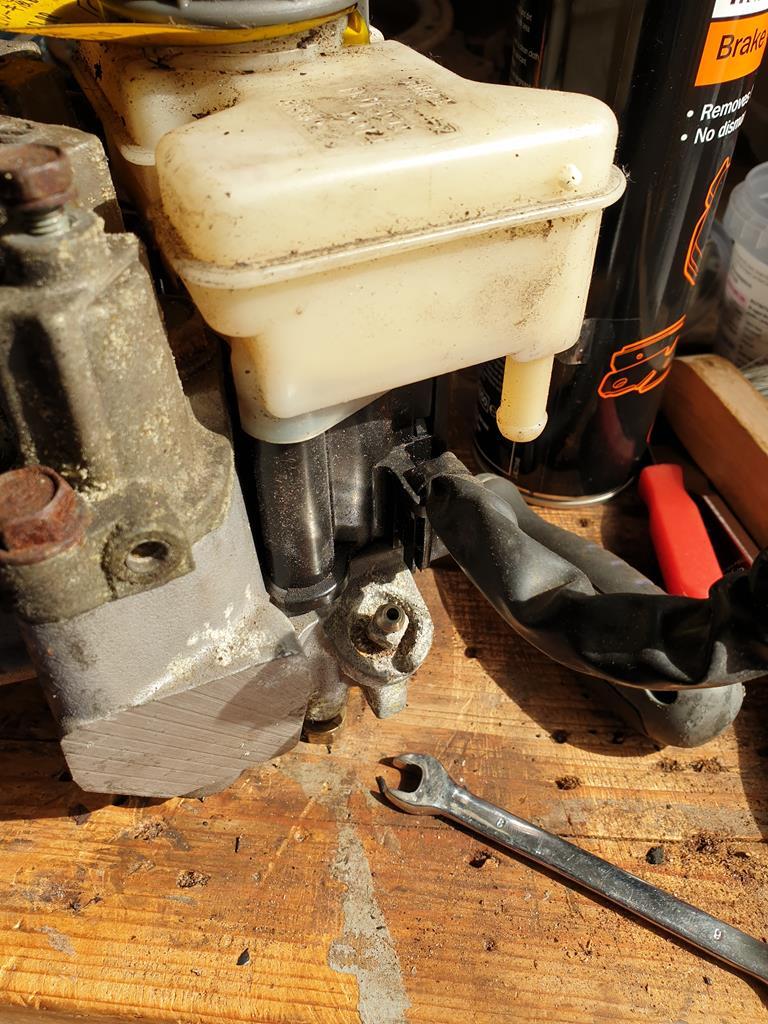 I can get it undone using an open ended 8mm spanner, but with the modulator in place on the car, there is no way to do this as the spanner hits the suspension turret.. So not quite sure what to do there! If I can get a socket with an 8mm square end, then I could crack the bleed screw off, then put a tube on and use a spanner or mole grips to open it fully perhaps While I consider my options there, I decided to get on with the rear suspension, more specifically the upper control arm 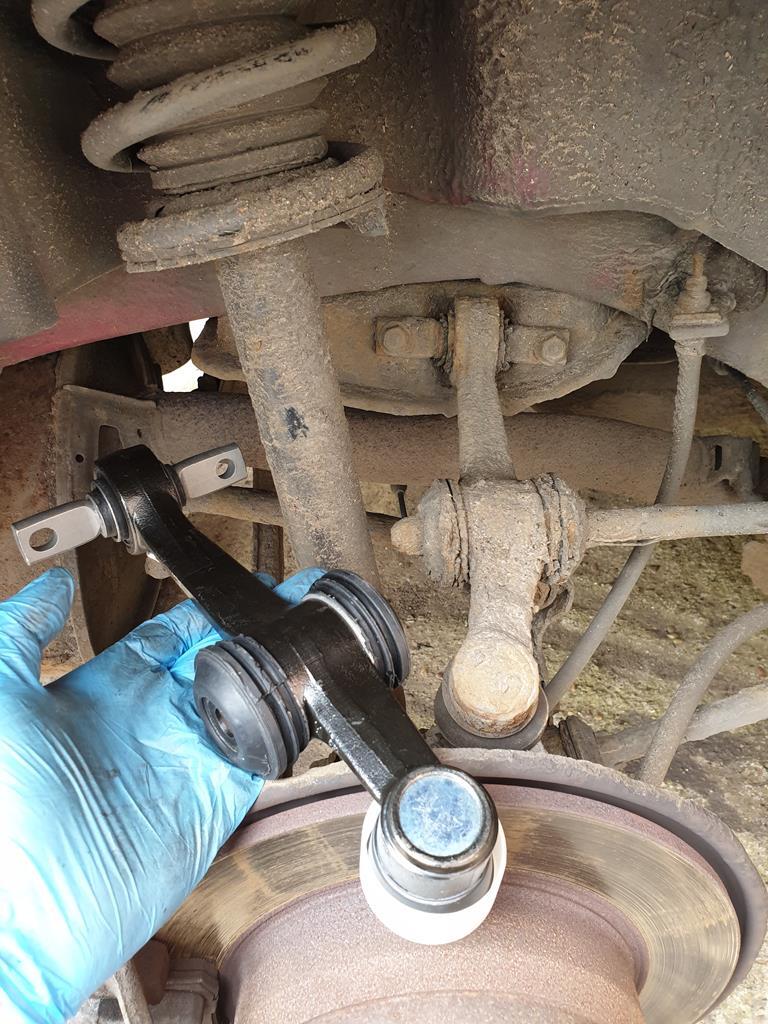 Old one was still very crusty. To remove, first I had to undo and remove the bottom bolt for the suspension strut so I could move it out of the way a bit. Then it was a case of removing the very rusted split pin at the ball joint end (I butchered it out with a selection of chisels and punches and loosening off that nut. I then was amazed that the bolt on the end of the radius arm came off with a mix of breaker bar and impact gun, I then used a ball joint splitter to get the ball joint out of the knuckle, and undid the two bolts that hold the arm to the subframe and the whole thing came off.   I haven't put the new one on just yet as I got distracted poking at the rust again.. 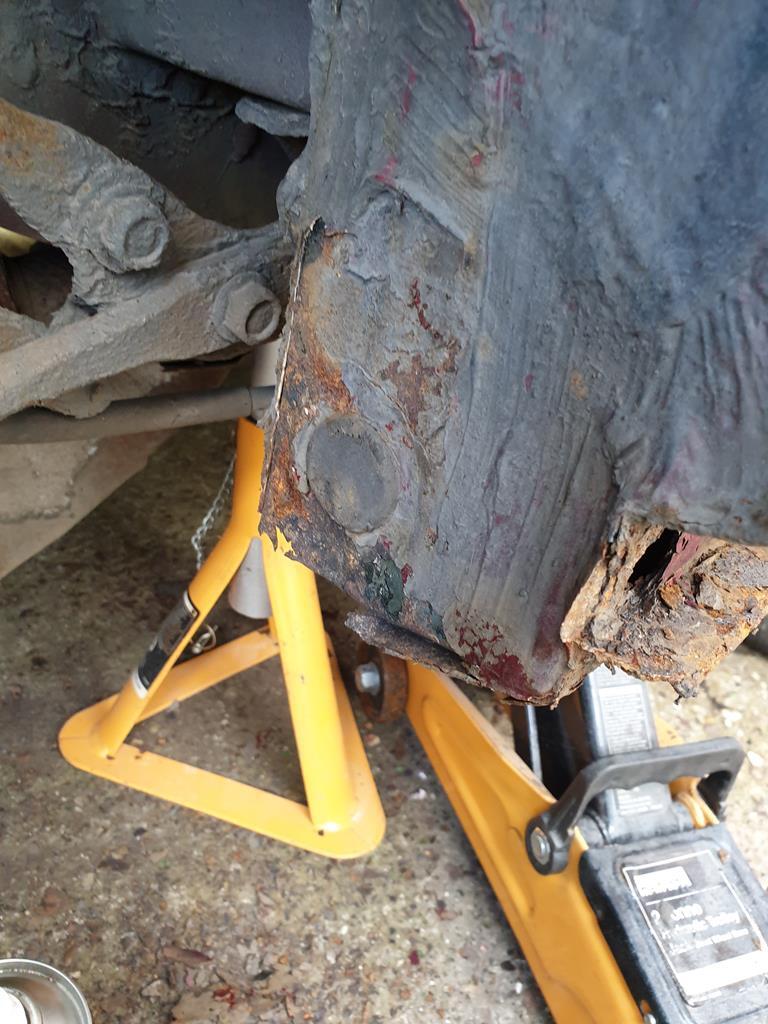 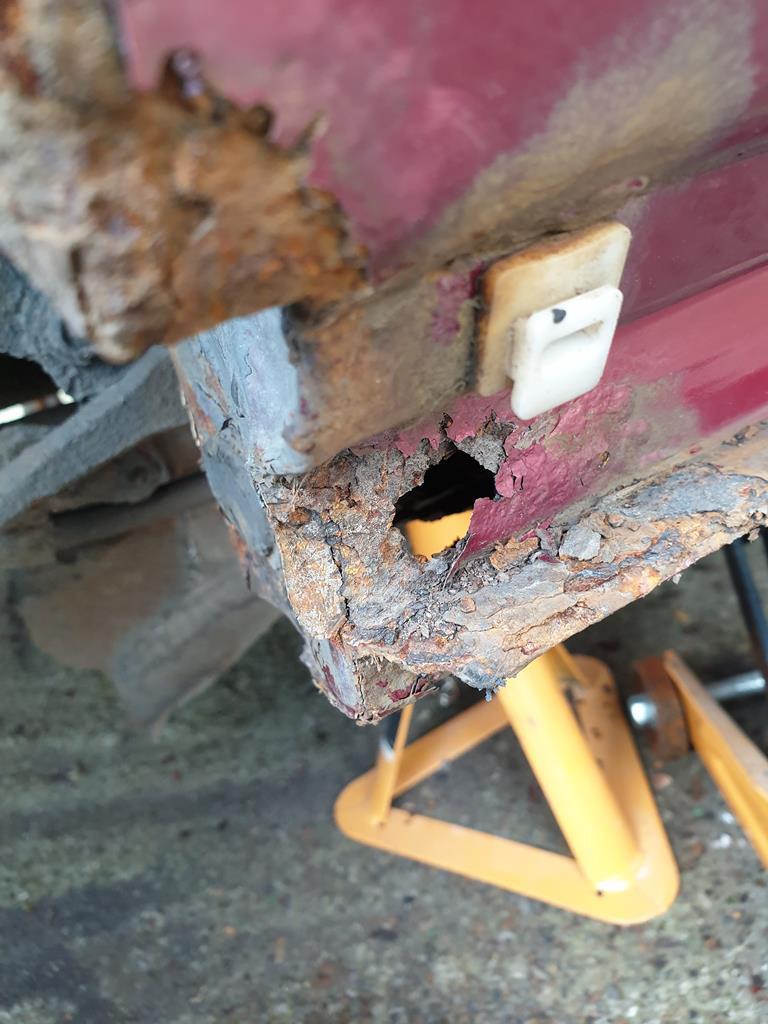 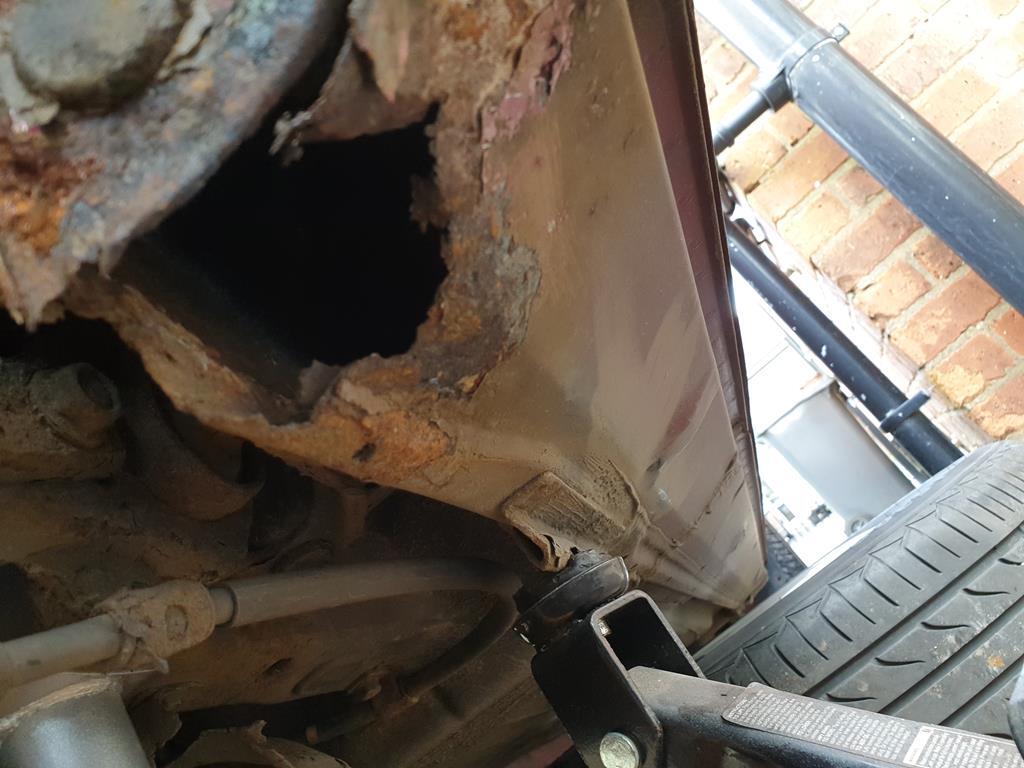 I had wanted to get the rear bumper off to check there wasn't any rust hiding behind it but when it came to undoing the mounting nuts on the side, one bracket had rusted off and the whole nut and stud was rotating on the other... the rear inner arch behind the liner did look alright though..  The rust is really the limiting factor on what I end up doing with this car. Ultimately I'm also a bit limited by the Lockdown in what I can do about it also, so I've got a few options I think: 1. I could finish all the jobs I can do with the parts I have, and sell the car as is (after the lockdown) and get something else because the cost of the welding may well outweigh whatever I could get for the car once repaired. 2. I could finish all the jobs with the parts I have, then pay to get the rust sorted after the lockdown, which is going to cost £££ and will mean that I'll have to keep the car for a while longer for it to make any financial sense 3. I could use this time at home during the lockdown to get a mig welder and learn to repair it myself. Would still need to get the paint done professionally so it looks alright and there's absolutely no guarantee I could even fix it semi-decently, being an arch lip that also curves inwards and I don't think any panels are avaialble for these... For now though, I may as well chuck on the suspension parts, fix as many of the issues with the car that I can and then see where I am on the rust |
| |
|
|
adam73bgt
Club Retro Rides Member
Posts: 4,866
Club RR Member Number: 58
|
1973 MGB GT- Wings 29/5adam73bgt
@adam73bgt
Club Retro Rides Member 58
|
|
|
Been keeping myself busy with engine part cleaning, using this bucket of murky misery  Its just a mix of TFR and water but actually does a pretty good job of getting the oil off the engine internal parts. This is the first lot of parts that came out     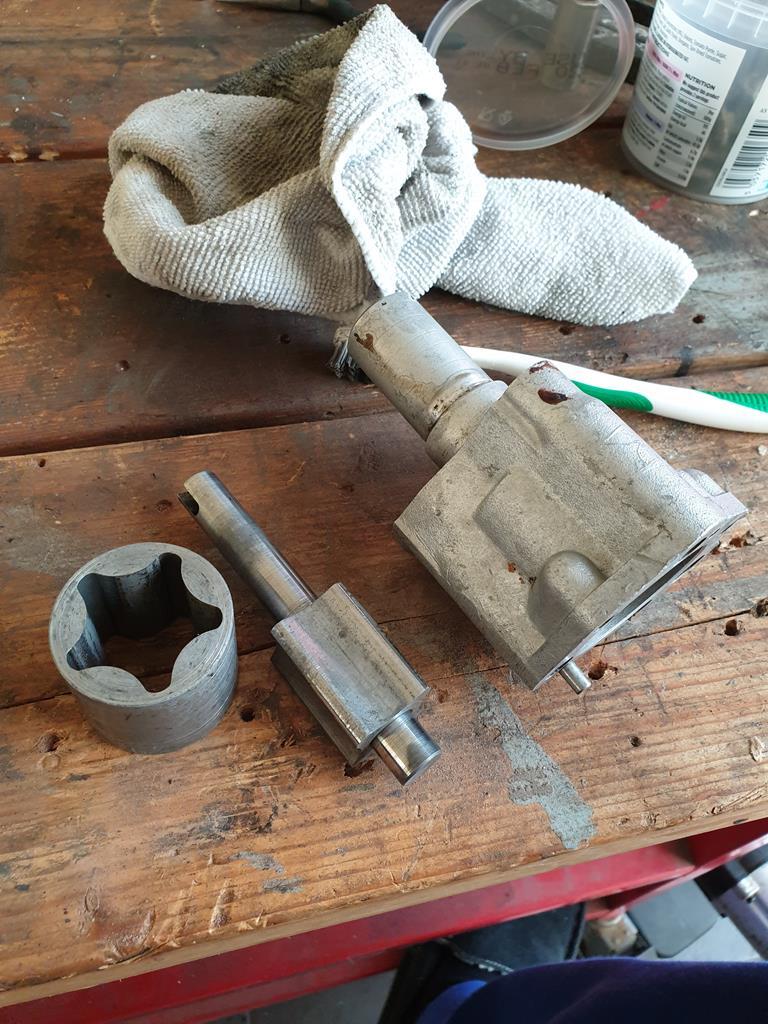 As you can see, the oil pump strainer is oddly collapsed and looking a bit second hand so that will get replaced. The oil pump cleaned up nicely but after checking it with a feeler gauge and looking at the rotor surfaces, I think it will get replaced with a new one anyway. The timing cover is a bit rusty but will clean up, as it so happens, the socket for the crank pulley nut is the perfect size for pressing out the front seal  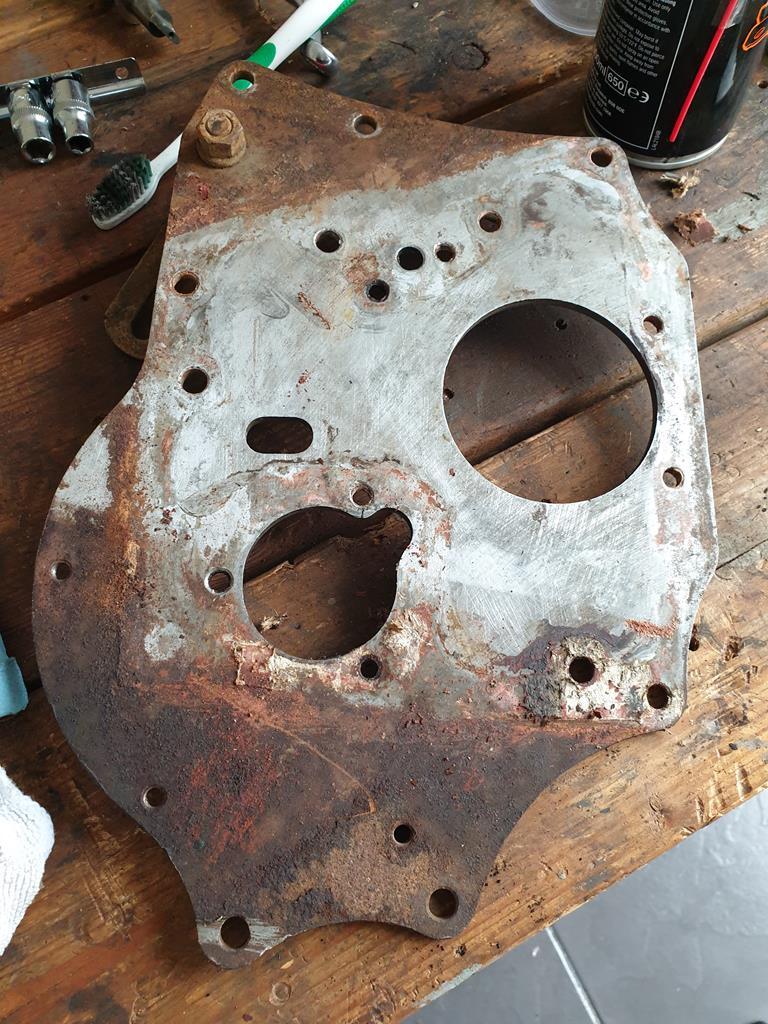 The front engine plate is getting cleaned up as well which is a pretty straightforward job. Going back to the carb quickly, I got my thackery washers and was still having issues getting the carb to seal to the manifold with the gasket, worked out why.. 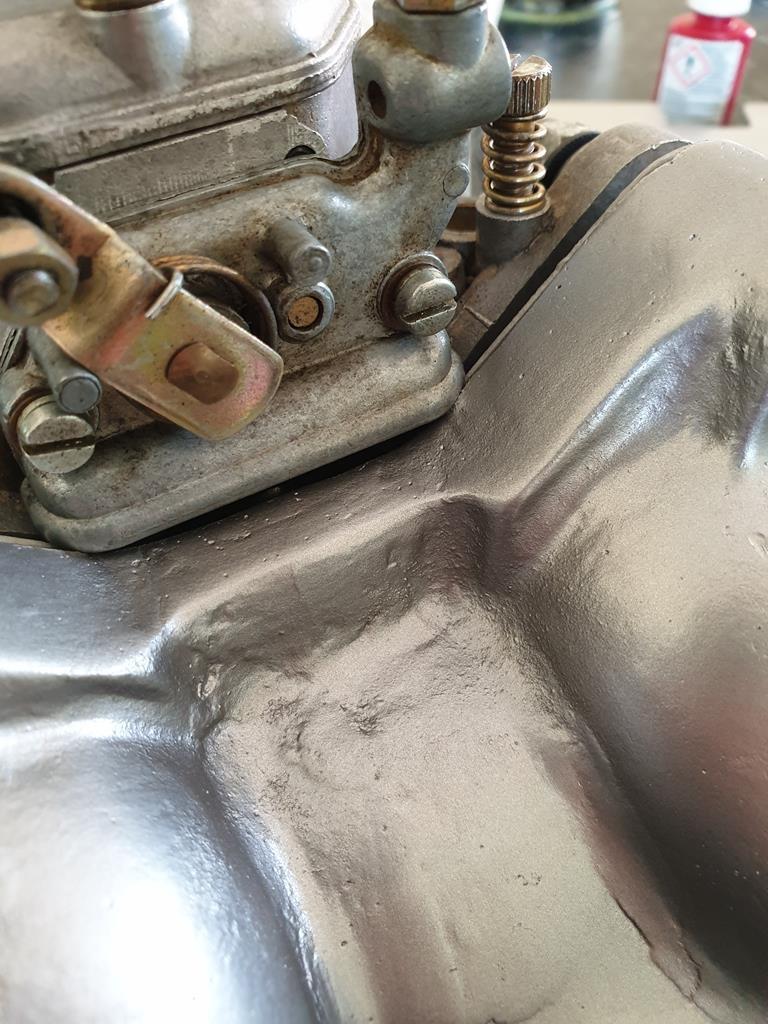 The choke mechanism is hitting the manifold. I did have some spacers that came with one of the carbs but I threw them out as I assumed the rubber O rings were all compressed and old etc... So some more parts to get there. Back on engine internal parts, I got to cleaning up the rods and pistons 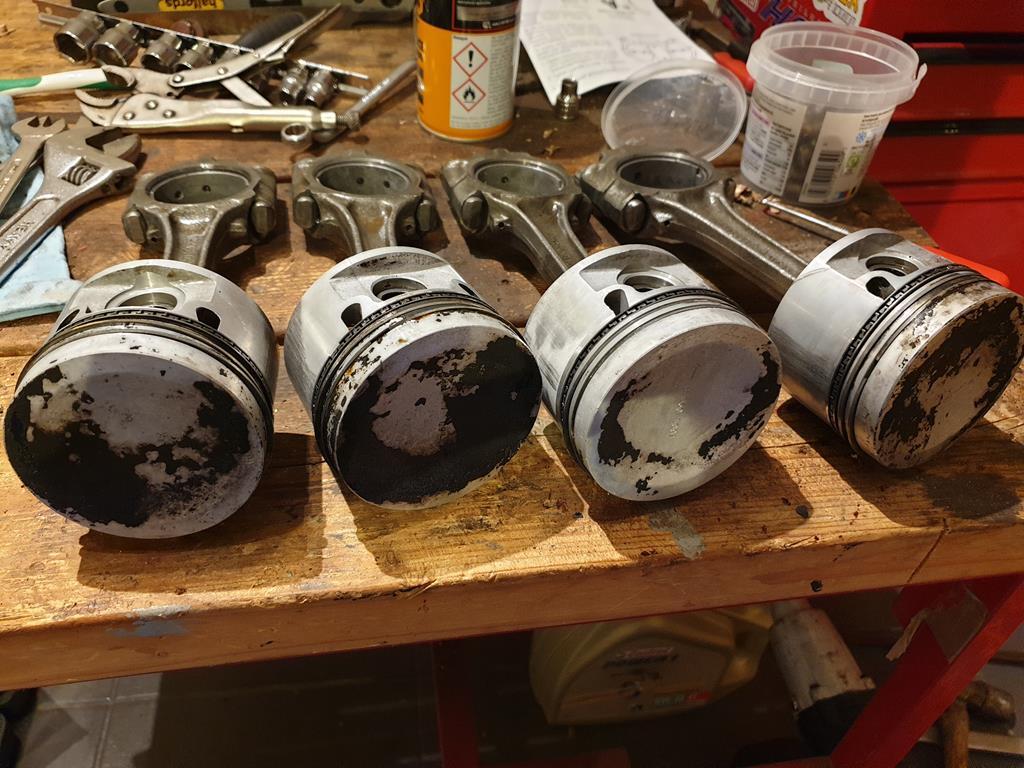 I can't remember if I've mentioned before but they're +.060 overbore which is about the biggest overbore you can do on a B series without getting into sleeves etc. I had thought about getting new pistons and getting it bored and sleeved to get to 1950cc but I don't think the extra outlay is going to be worth it, so as long as the current bores can be honed up nicely I'll stick with the current pistons which gives me 1868cc anyway. While cleaning the carbon off the tops of the pistons I did notice something a bit curious 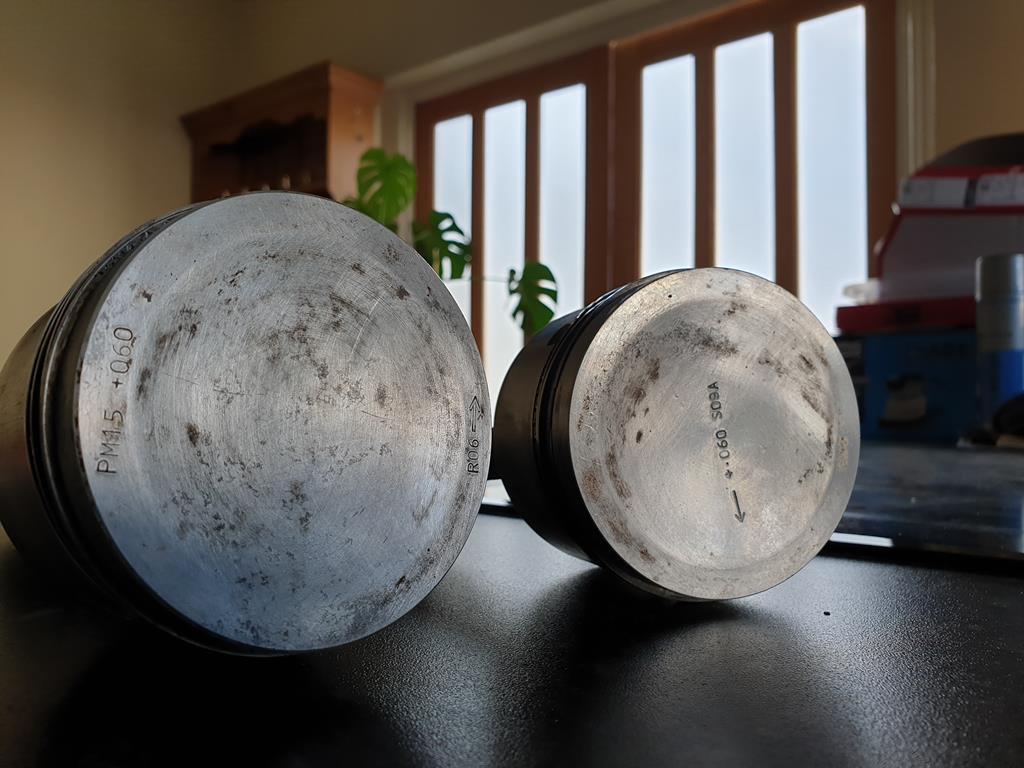 They're all the same size and design as far as I can tell, but the tops are marked differently, two are like the one on the left and two like the one on the right. I don't really think it affects anything, but just odd that they're not all the same. One last thing I have been doing is cleaning up the rocker cover ready for paint 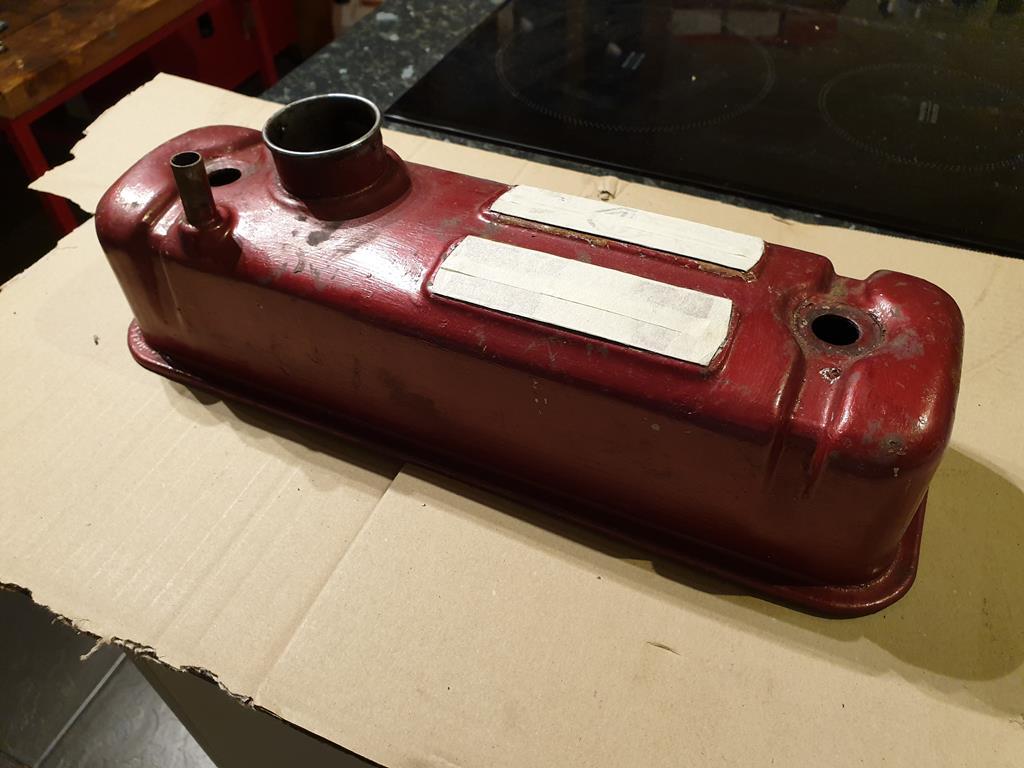 I gave some Nitromors a go but it didn't really do anything, after a couple of applications it finally started to peel in a couple areas 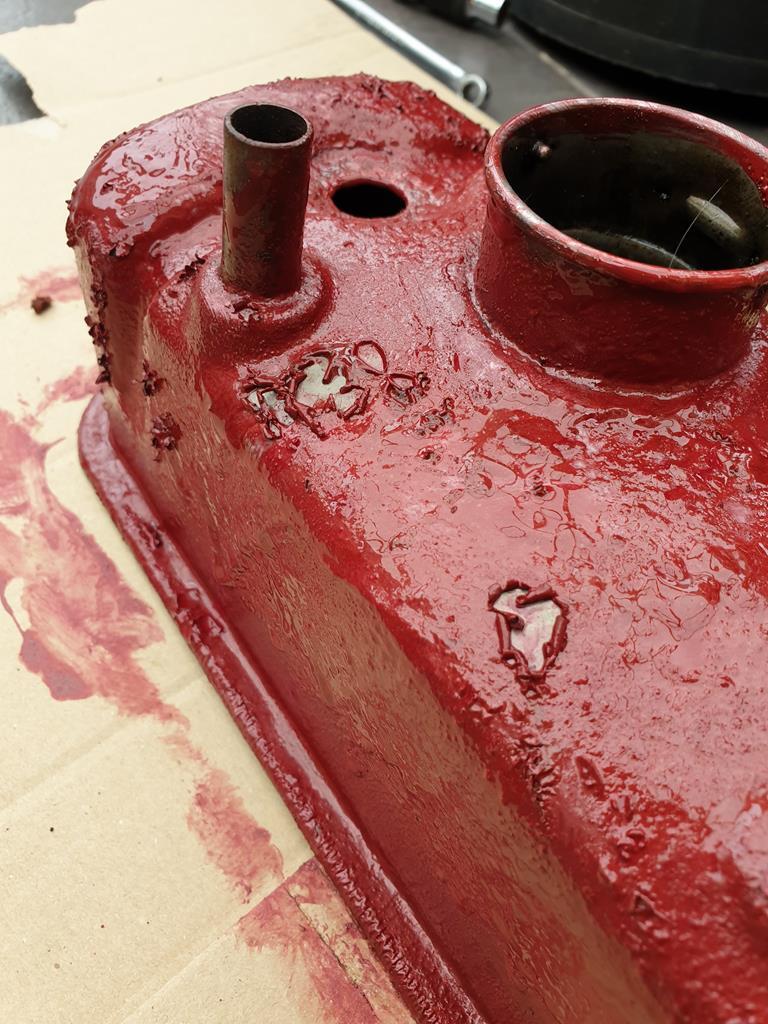 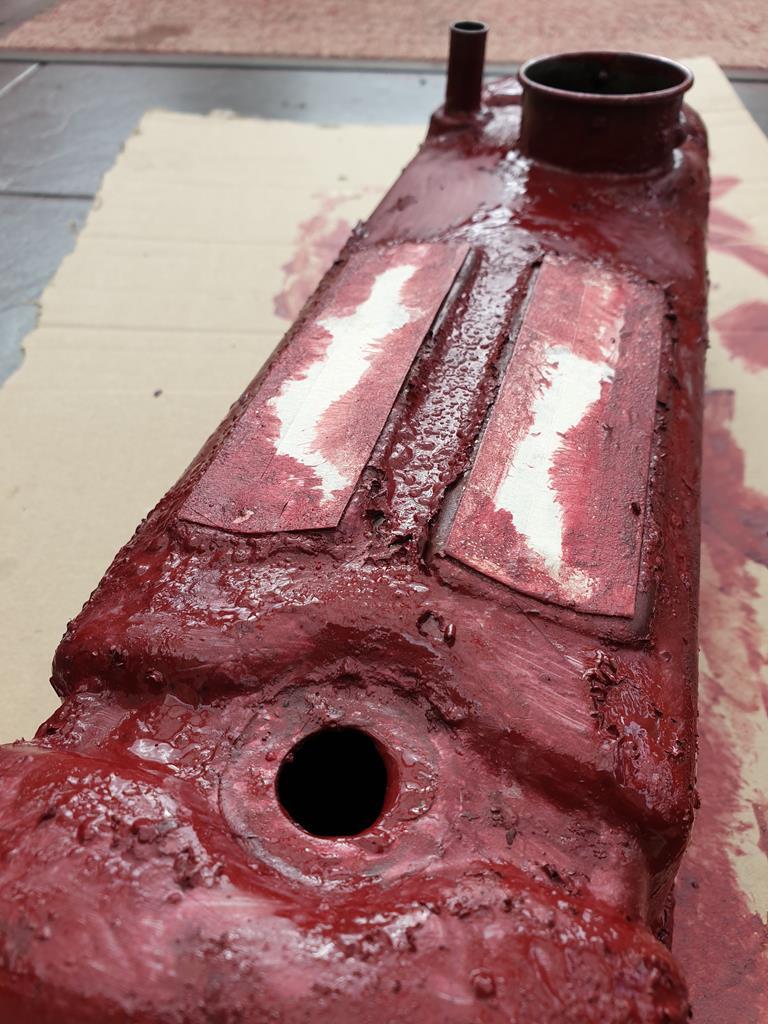 I got bored and hit it with the pressure washer which helped 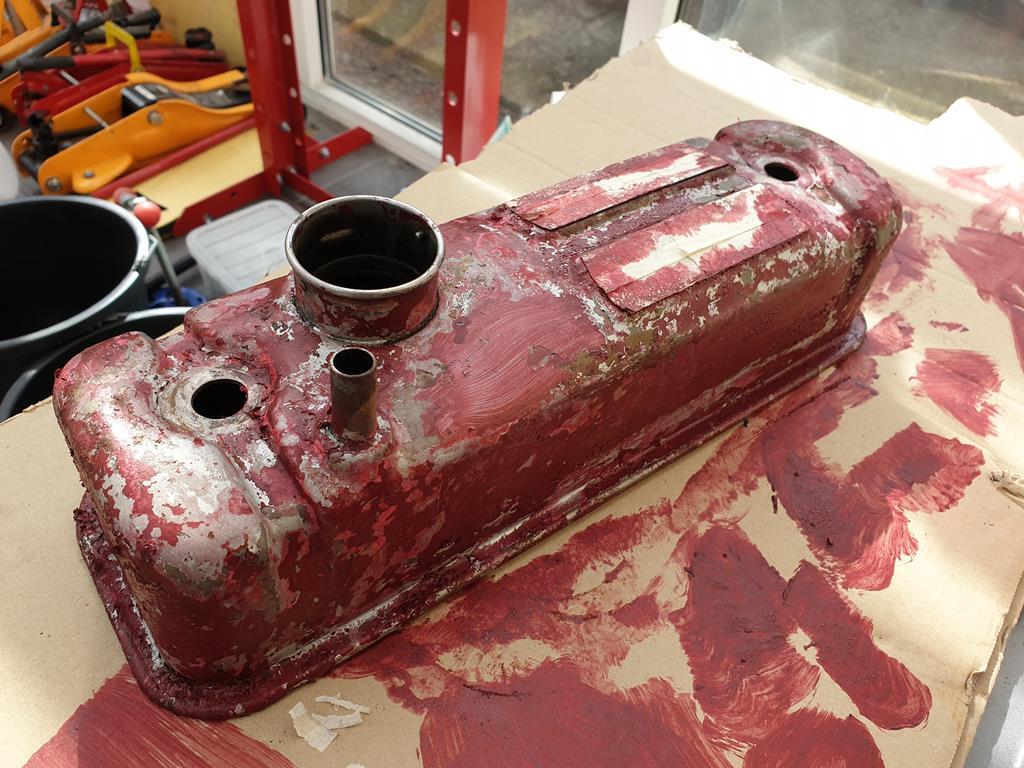 Since then I've been going at it with a sander and finally getting somewhere with it. And thats about all I've been doing to keep myself busy! I'll probably spend a bit of time getting the rocker cover looking nice, I'm also trying to spend a bit of time fixing up the daily instead as it has been a bit neglected of late! |
| |
|
|
adam73bgt
Club Retro Rides Member
Posts: 4,866
Club RR Member Number: 58
|
|
|
|
That was a fun day, even if the Saab had some odd boosting issues that I think in part resulted in that beastly torque figure, the big puff of smoke as it hit the limiter always makes me laugh as well The kit car belonged/belongs to my mate Zach, he's since ditched the MX5 engine in favour of a 2.5l Mazda KLV6 which gives it a fair amount more shove, and hes planning on turbo'ing it now haha! |
| |
|
|
adam73bgt
Club Retro Rides Member
Posts: 4,866
Club RR Member Number: 58
|
Car part finds on walks adam73bgt
@adam73bgt
Club Retro Rides Member 58
|
Mar 30, 2020 19:22:59 GMT
|
D'oh I thought it was one or the other! Need to brush up on my BL general knowledge |
| |
|
|
|
|
adam73bgt
Club Retro Rides Member
Posts: 4,866
Club RR Member Number: 58
|
Butty Run 2019adam73bgt
@adam73bgt
Club Retro Rides Member 58
|
Mar 27, 2020 19:24:07 GMT
|
Nice pics Chas, I must have driven past this place so many times, when we're all allowed out of our houses again I must get along to a meet there one day |
| |
|
|
adam73bgt
Club Retro Rides Member
Posts: 4,866
Club RR Member Number: 58
|
|
Mar 25, 2020 10:57:09 GMT
|
Live from : Wednesday 18/03/20 to Friday 20/03/20 ...Is it over already then? |
| |
|
|
adam73bgt
Club Retro Rides Member
Posts: 4,866
Club RR Member Number: 58
|
1973 MGB GT- Wings 29/5adam73bgt
@adam73bgt
Club Retro Rides Member 58
|
Mar 24, 2020 23:20:44 GMT
|
Aha thank you! As it so happens, refurbing a set of wheels (not for the MG) is also on my list of car based Lockdown chores |
| |
|
|
adam73bgt
Club Retro Rides Member
Posts: 4,866
Club RR Member Number: 58
|
1973 MGB GT- Wings 29/5adam73bgt
@adam73bgt
Club Retro Rides Member 58
|
Mar 24, 2020 19:30:54 GMT
|
I hadn't seen that I don't think samta22 I'll have to have a look out for that, I've got a few manuals and have been reading lots online as well so plenty of info out there thankfully Ah nice, should be a breeze for you  As I'm going to end up down a bit of a dead end on the engine work currently, I think I'm going to have to turn my attention back to the bodyshell again, or possibly get the rear axle/suspension removed... |
| |
|
|
adam73bgt
Club Retro Rides Member
Posts: 4,866
Club RR Member Number: 58
|
1973 MGB GT- Wings 29/5adam73bgt
@adam73bgt
Club Retro Rides Member 58
|
Mar 24, 2020 12:23:19 GMT
|
Thanks guys, well all this virus stuff has limited what I can do on the car as I needed external help on a few jobs. I've been keeping busy with doing stuff that I can get done here though. Starting off with sorting out the intake manifold for the carb. 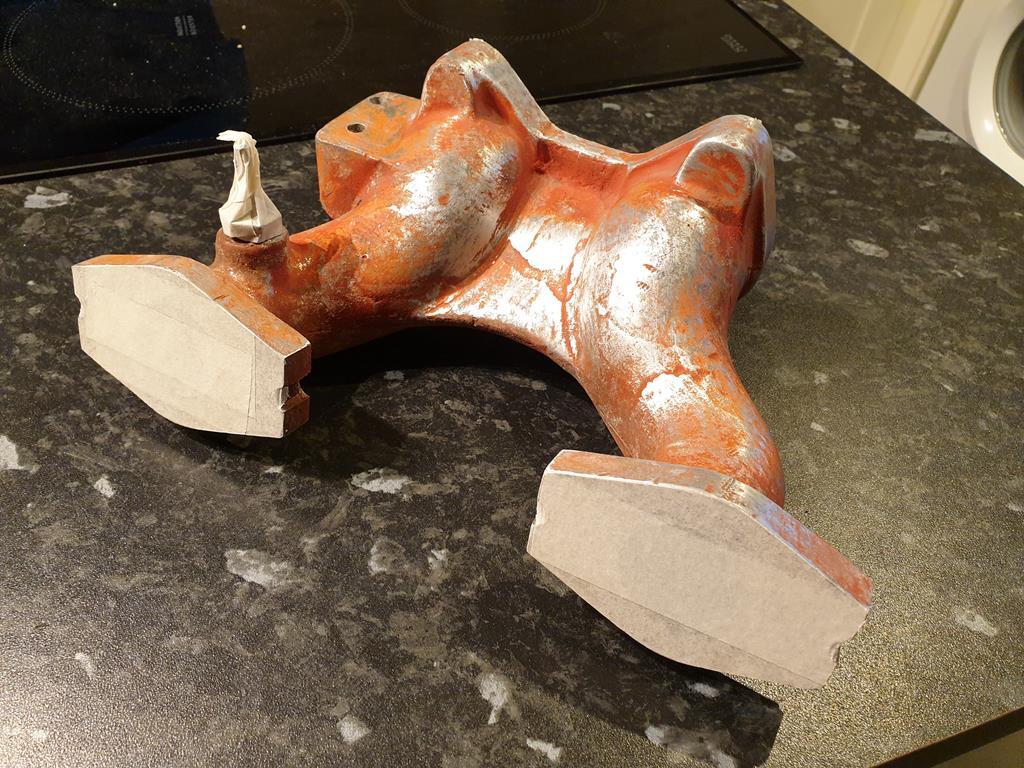 Nitromors had zero effect on the paint, so I gave it a bit of a sand all over ready for paint. The only stuff I had in was some Halfords Wheel paint "steel" colour but it came out alright. I couldn't find my etch primer until I'd already painted it but it seems to have covered the red fine. 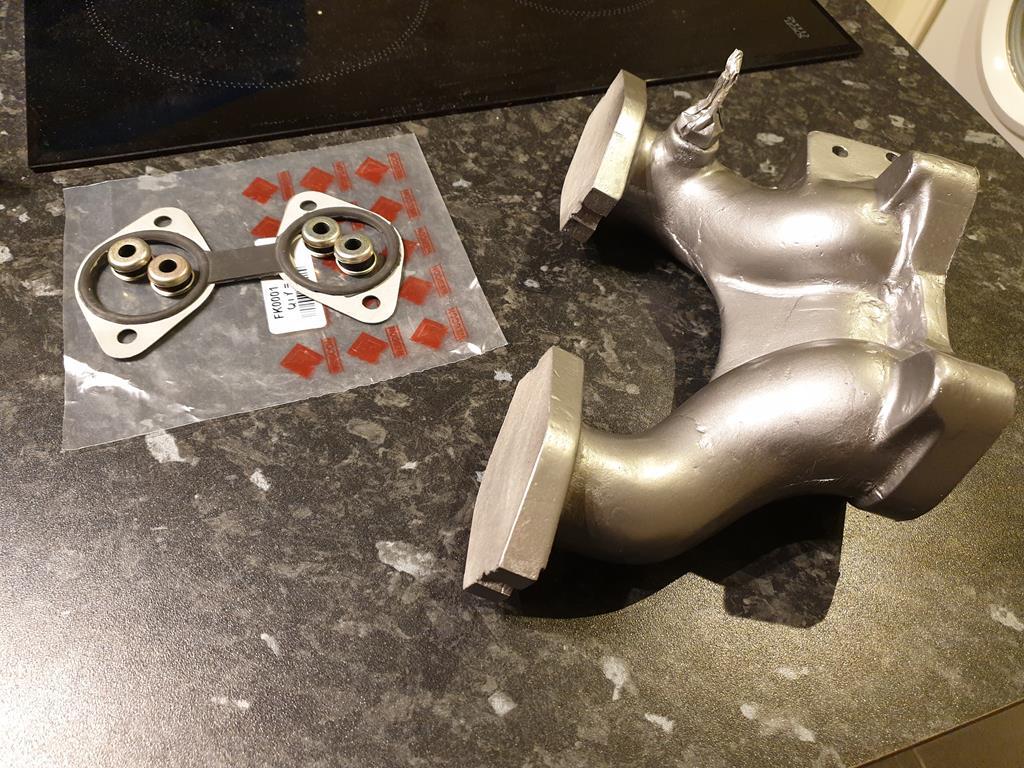 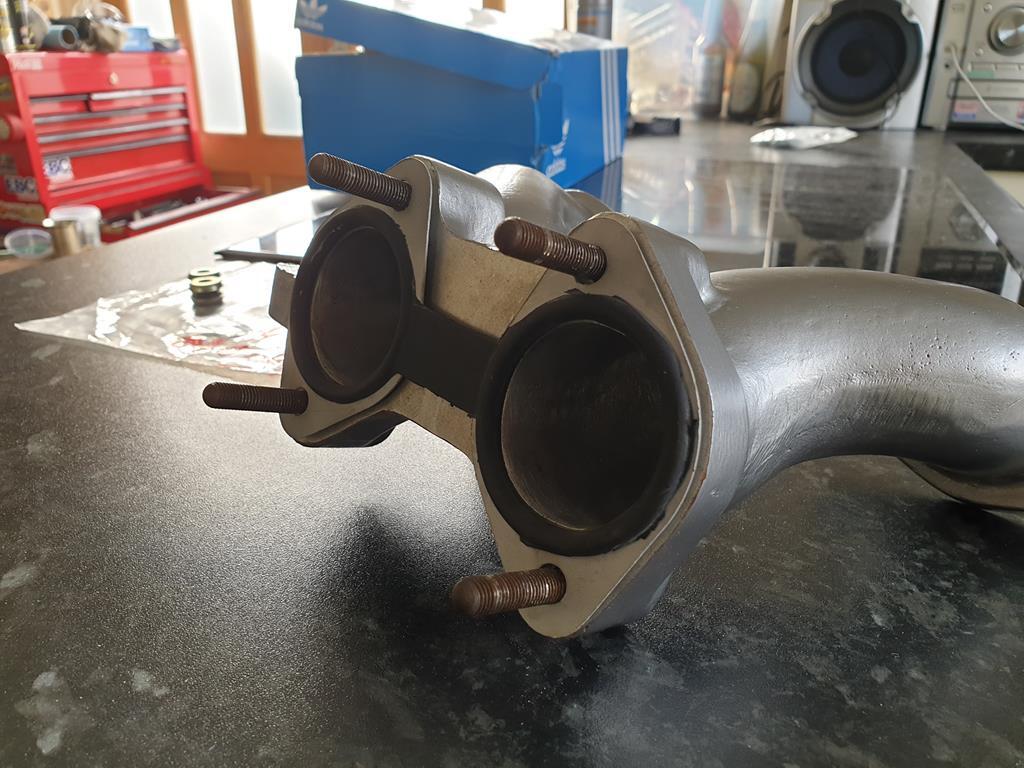 I did start using the rubber mounting kit that was incorrectly sent to me, but it didn't seem to work all that well, tightening the nuts just compressed the rubber isolators rather than closing the gap between the caliper, gasket and manifold. So I've got some new thackery washers coming instead. Given that we had some actually decent weather over the weekend, I decided to do a bit of spring cleaning in the garage  This allowed me to dig out the remains of the B engine. I'd stopped on stripping it previously as I had no way of removing the crank, I since got the right impact socket and with a bit of leccy gun action it came right off 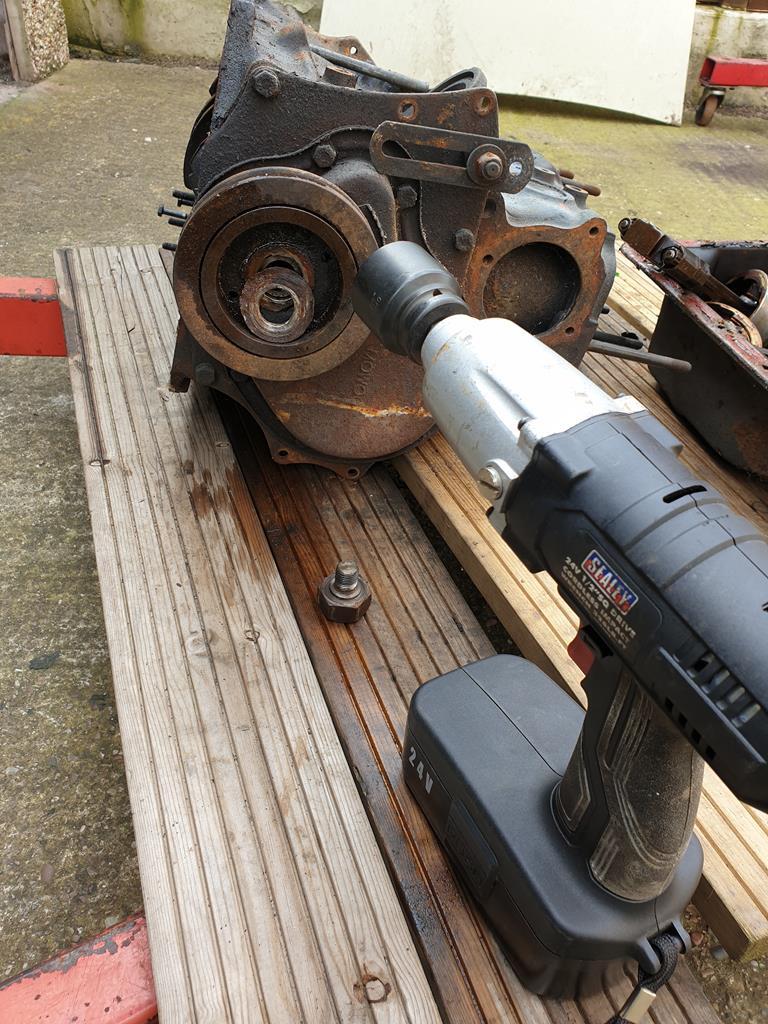 Pictures might get a bit sporadic as it was all very oily and I got on a bit of a roll Timing cover and chain came off easily, my engine has the single row timing chain which I'll probably replace with the double row chain. 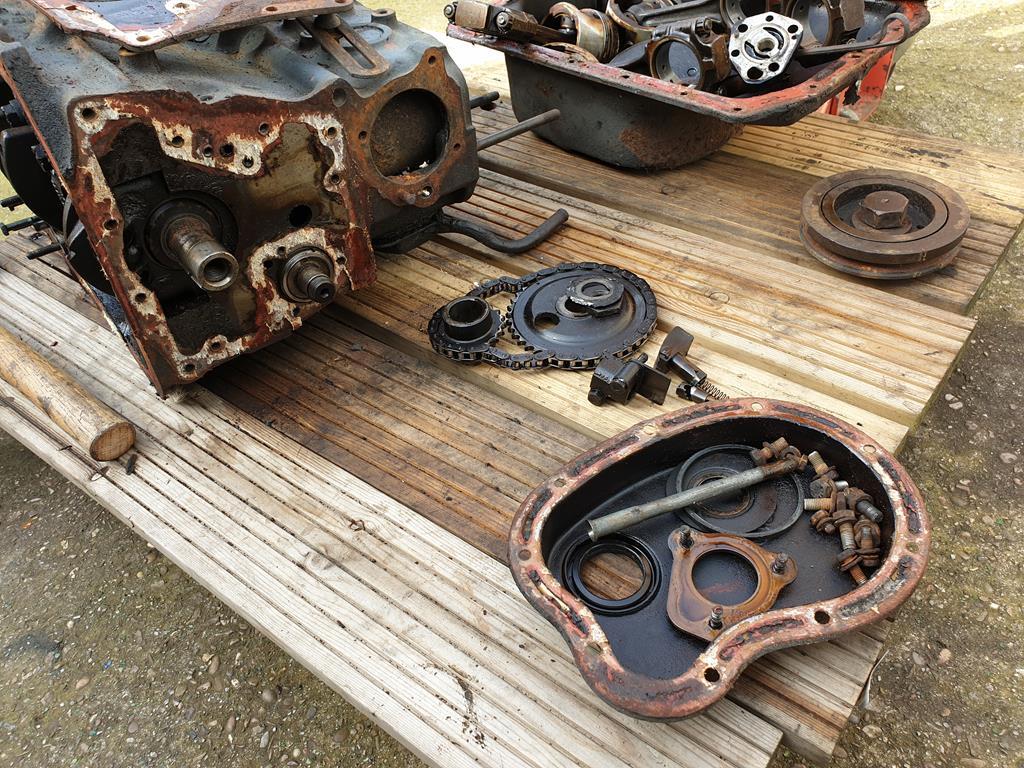 The crank main caps were a bit of a curse word to get off, they have threaded holes in them for putting in one of the main bolts to aid removal of the caps but the end ones in particular were very stuck in place. 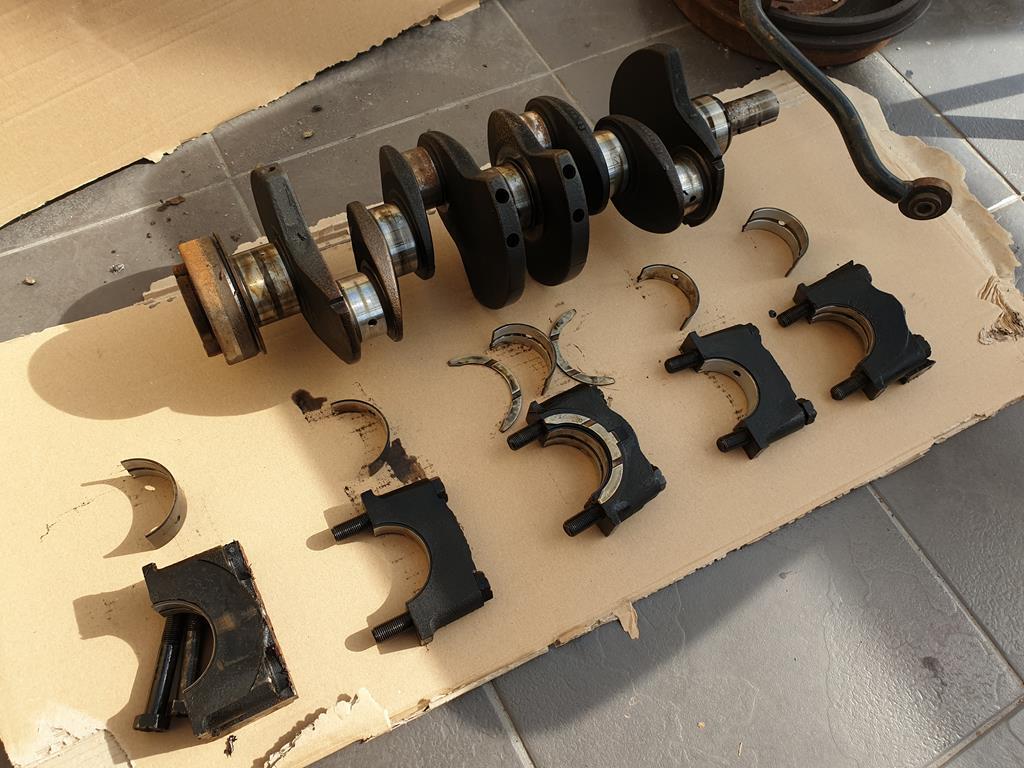 The good news though is that the bearings all looked in good condition, not that I was expecting them to be bad as the engine had always run pretty well. The bad news is that from leaving it in the garage, the big end journals have a little surface rust... so will need some attention at some point. Some bits of the block did fight me a bit, and the stud extractor set did see some use, firstly to remove the remains of this water pump stud 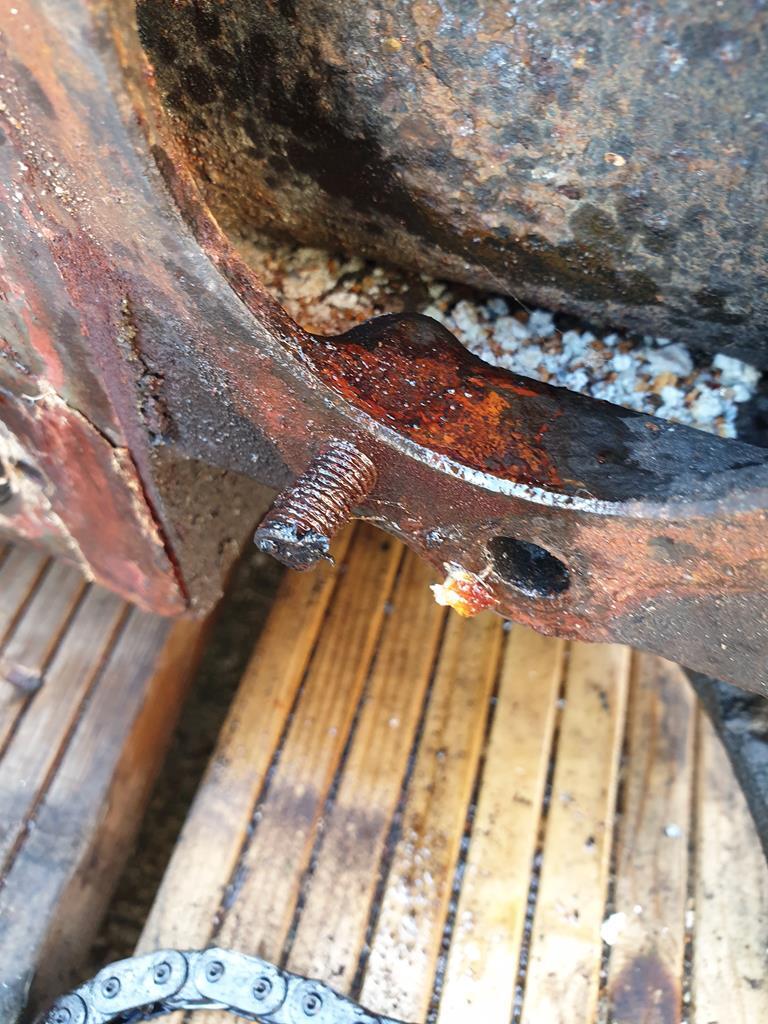 Which thankfully came out in one piece. The oil pump housing didn't want to come out so I took the studs out which finally allowed me to tap it free 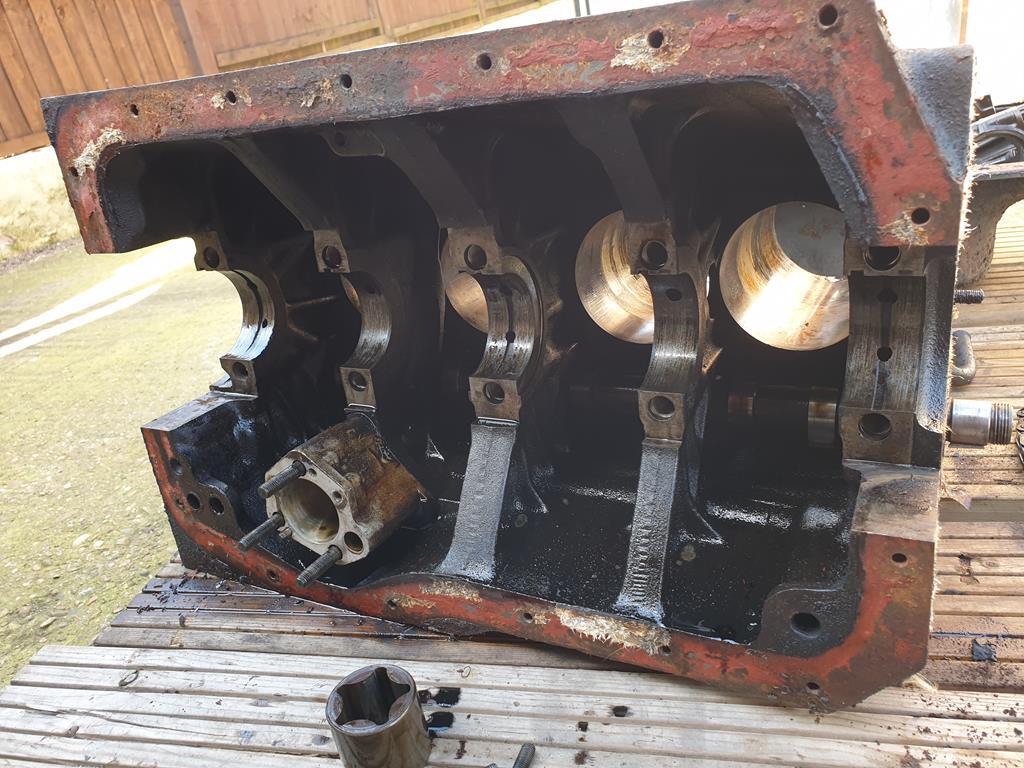 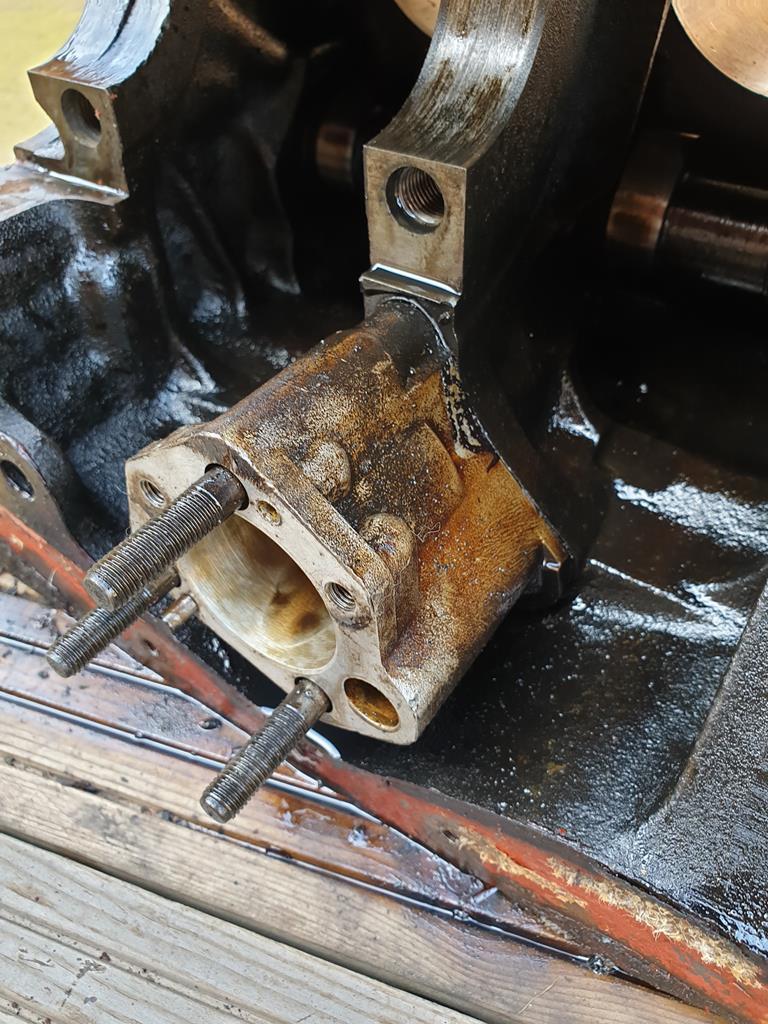 Then it was on to removing various other fittings, an oil gallery plug and oil pressure relief valve 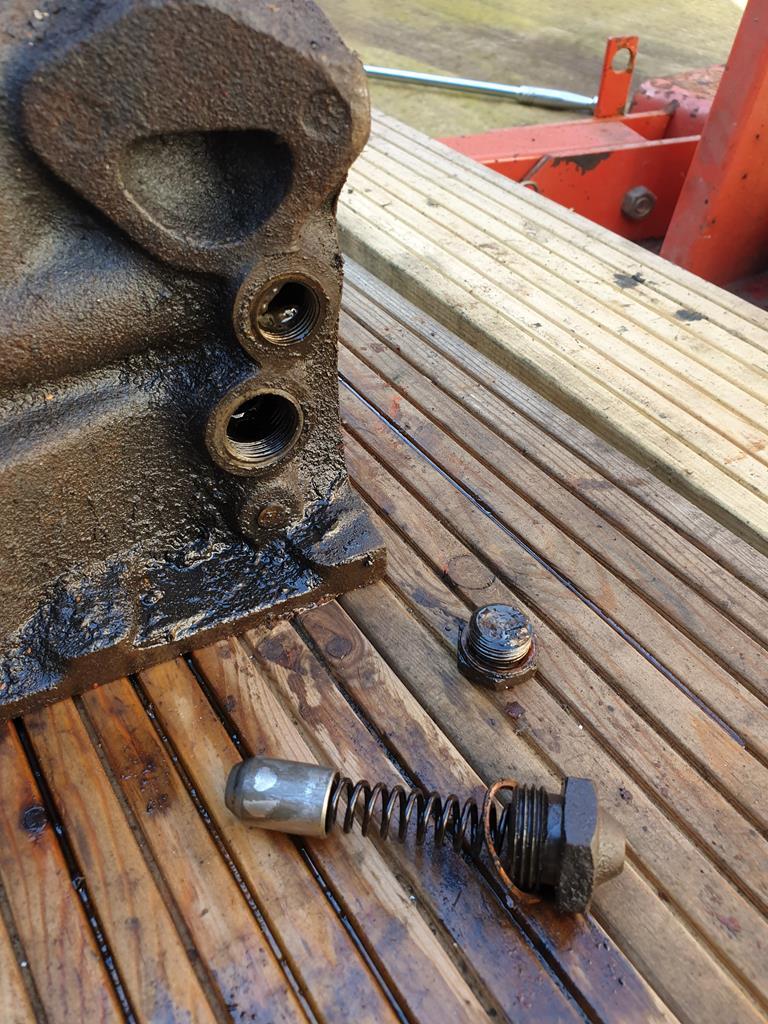 And on the other side of the block, the fitting for the oil pressure sender and a coolant plug which had a lot of silt built up behind it 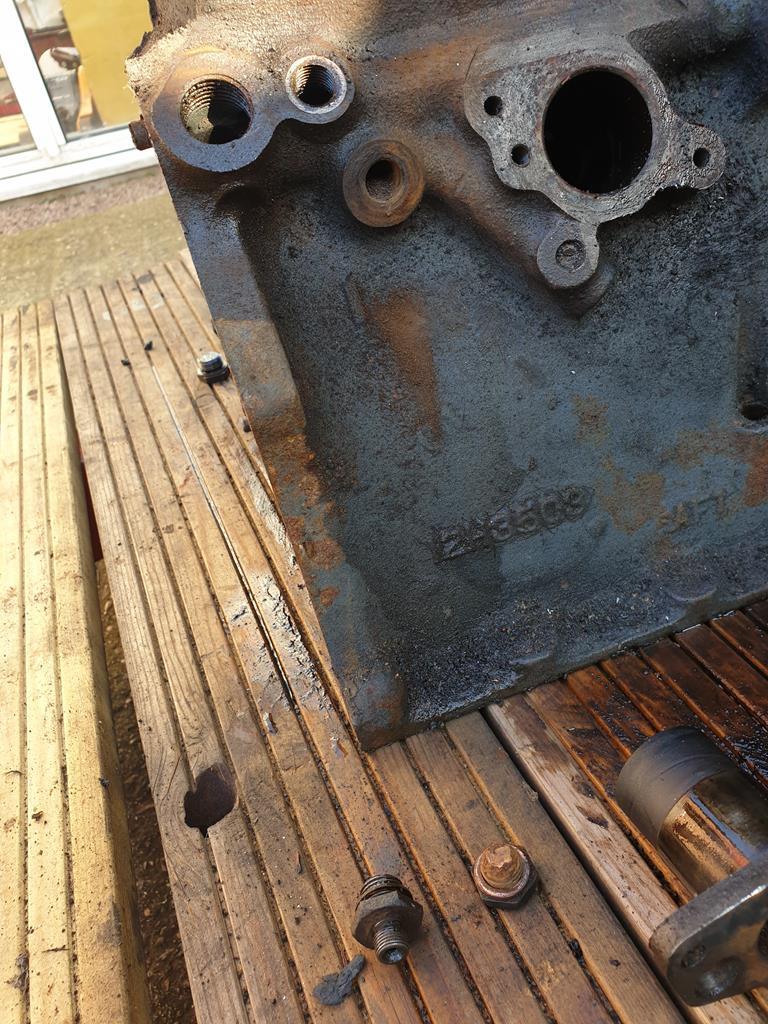 I then spent a while trying to remove the distributor drive gear so I could get the camshaft out before realising that the distributor base plate was still in place... 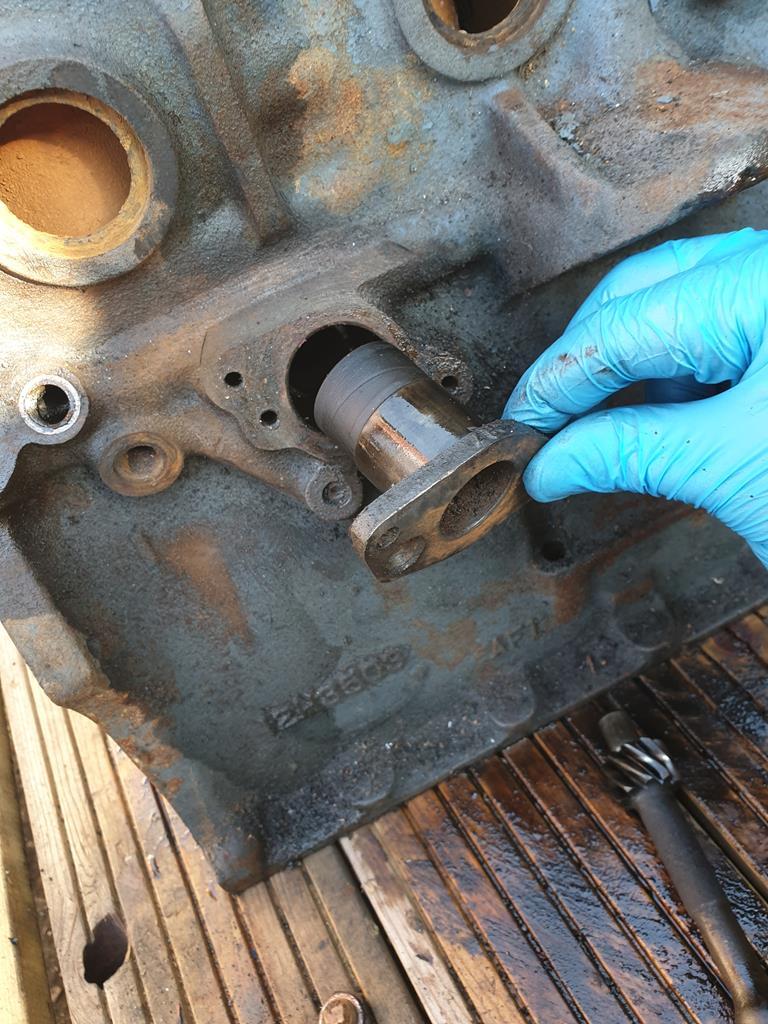 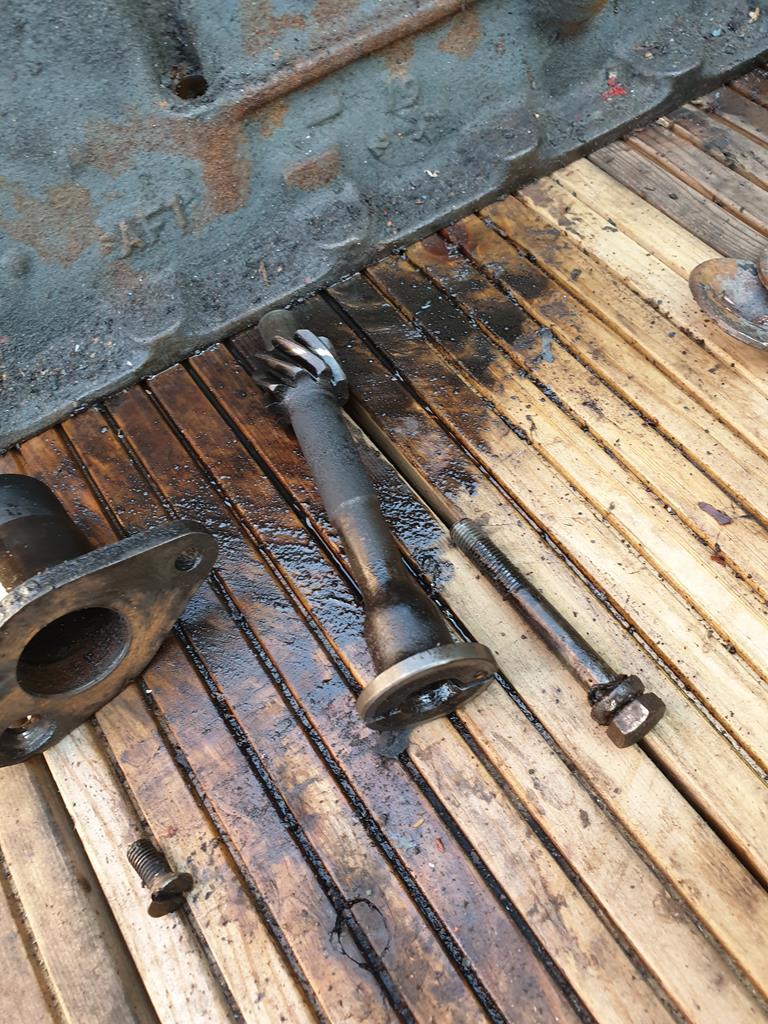 With that removed, the gear came out and the camshaft came out easily as well 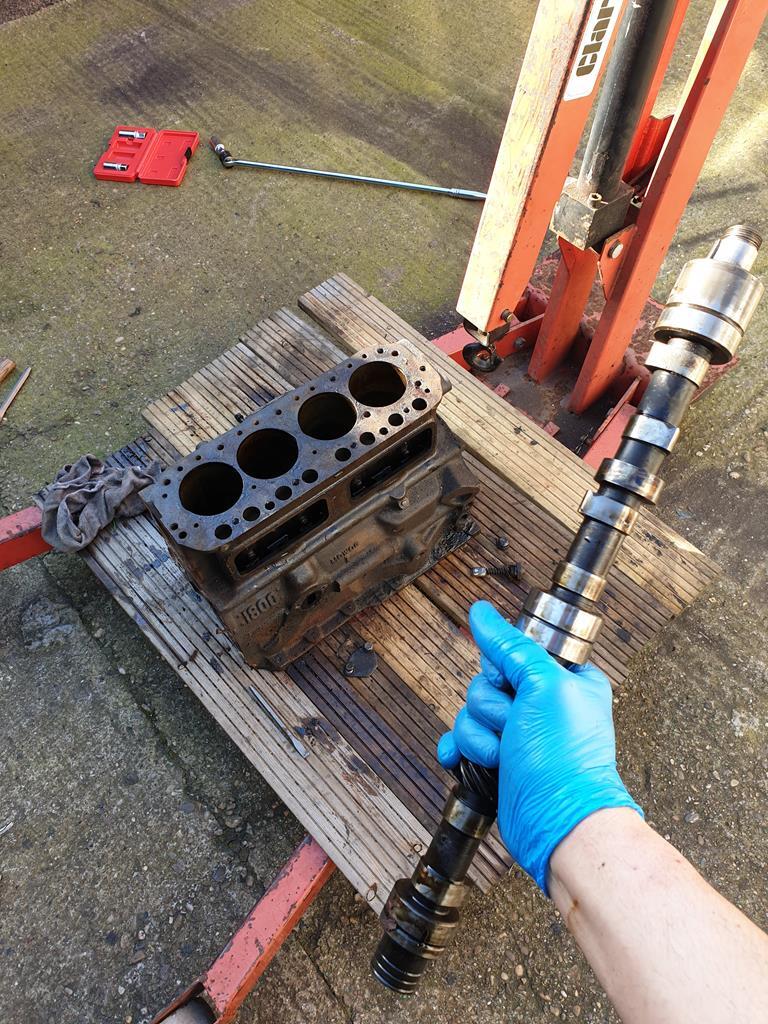 I knocked out the core plugs using a chisel and hammer then liberally coated the block in TFR and left to soak before jet washing it to get rid of most of the gunk, I also made sure to jet wash inside the coolant jacket as well. There are a couple of bronze oil gallery plugs which I haven't removed yet so this was more of an initial wash, it'll get a proper caustic tank dip whenever I'm allowed to take it to a machine shop In the meantime, while we're locked down, I've got a lot of parts cleaning to be getting on with and planning what bits I'll need to add to the shopping list 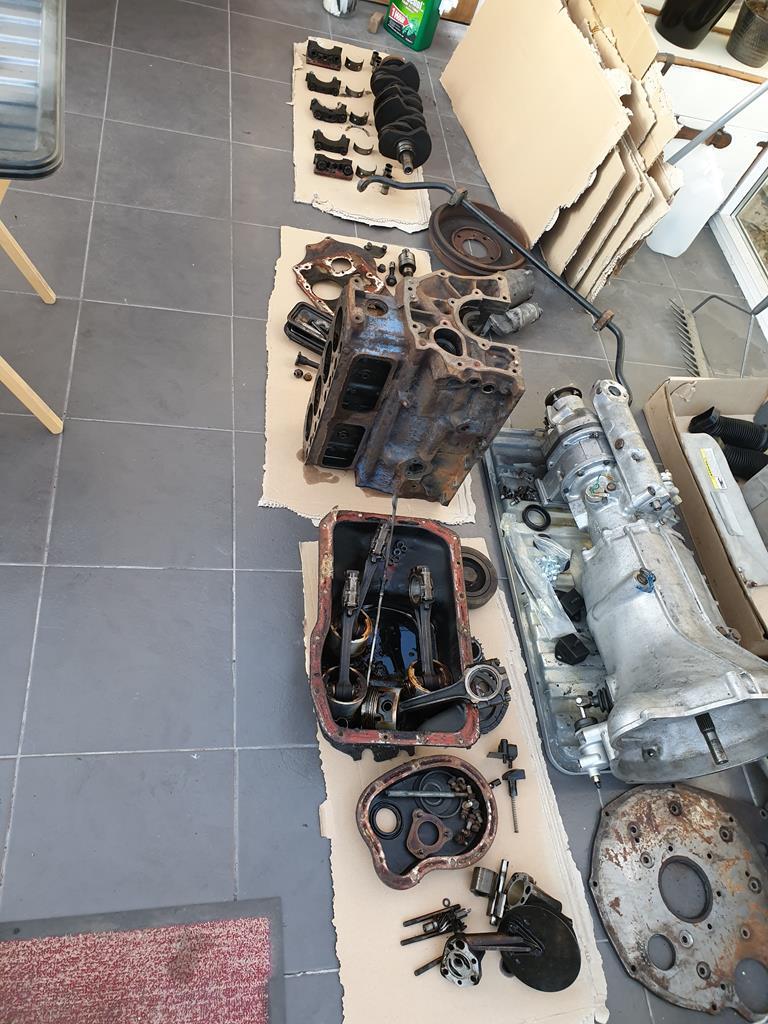 |
| |
|
|
|
|


 I've got this whole week off basically so I'd like to get the jobs on the car all sorted but we'll see how much it wants to continue fighting me!


 As I'm going to end up down a bit of a dead end on the engine work currently, I think I'm going to have to turn my attention back to the bodyshell again, or possibly get the rear axle/suspension removed...