79cord
Posted a lot

Posts: 2,609
|
|
|
|
Painted the bumpers & rear hatch next. An intensely sunny, still winter day helping to show if my colour application was too thin & show why I chose this colour over the original factory blues. Recent cold has eliminated most of the flying bugs thankfully. 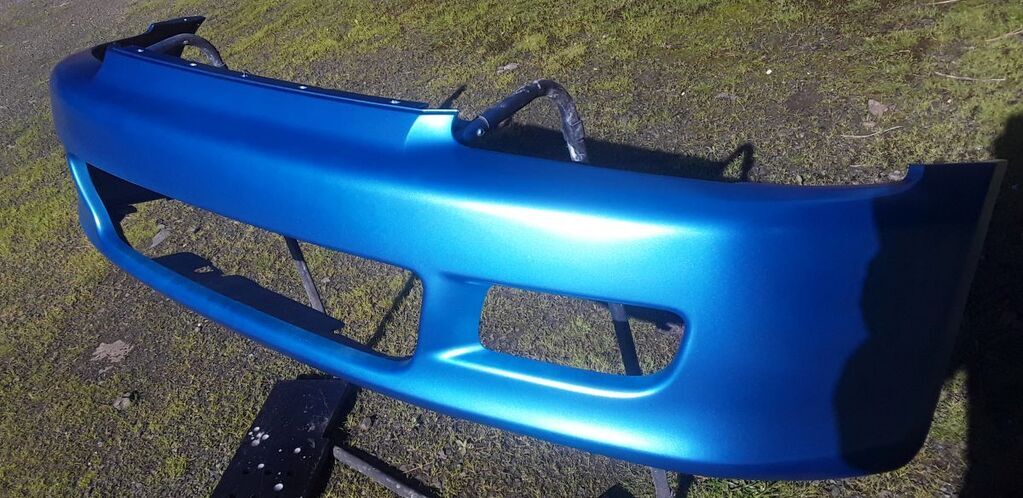 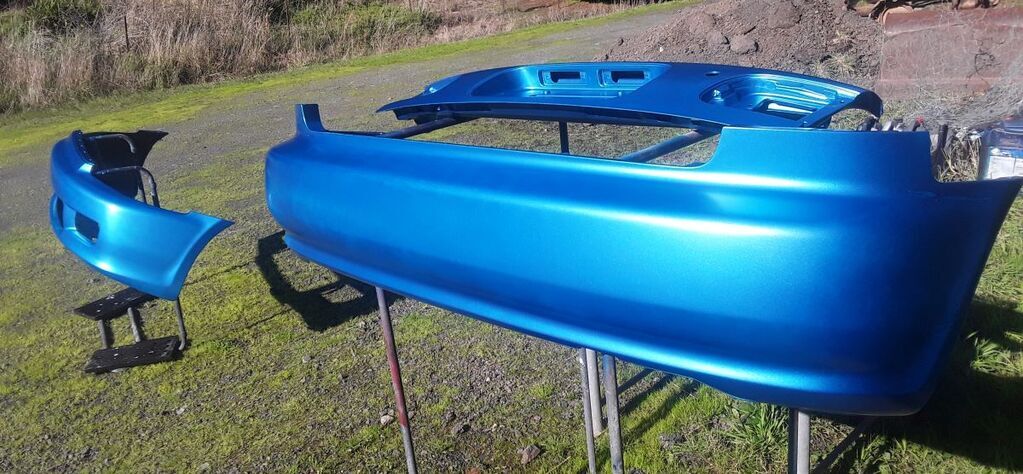 Not without another obvious run upon the front bumper I let dry, sanded back & re-painted before clear. 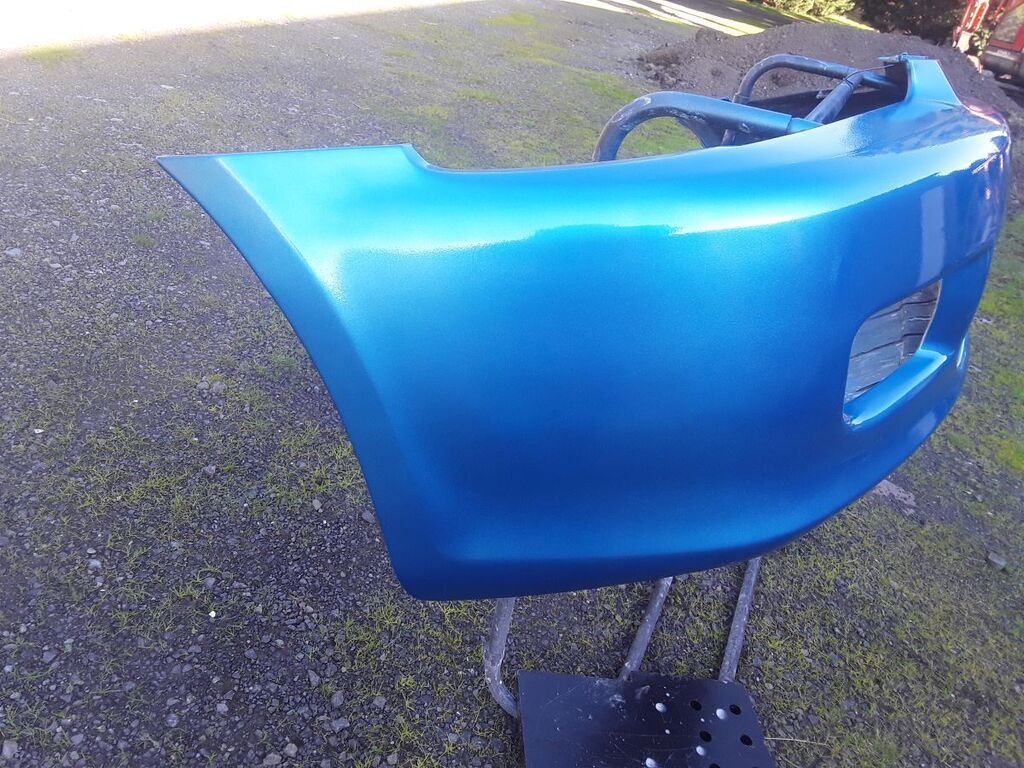 Some silver striping obvious on the front corner of the front bumper here I will have to scuff down again & try to do better next time. Not a forgiving colour/paint, & I had probably got my spraygun settings wrong, though doubtlessly my painting technique & discipline could also be much improved since I haven't painted metallic much & that a long time ago. 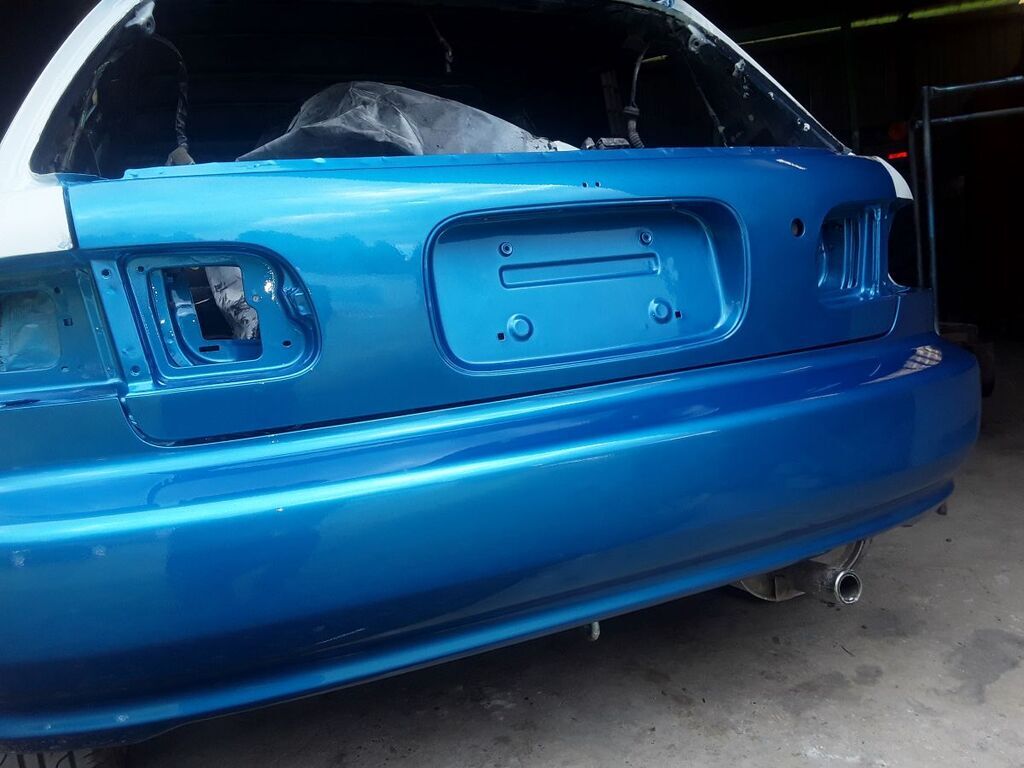 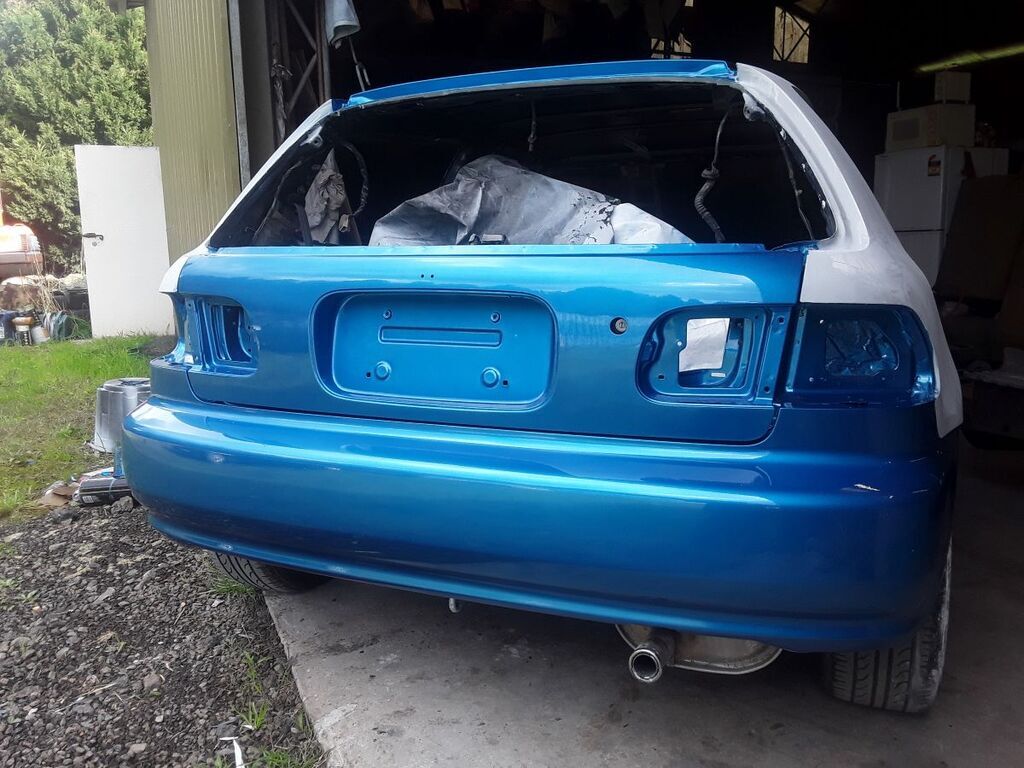 Remounted rear tailgate & sat rear bumper in place to make me feel better. More orange peel to smooth out later though.  |
| |
Last Edit: Jun 2, 2023 10:56:28 GMT by 79cord
|
|
|
|
79cord
Posted a lot
Posts: 2,609
|
|
|
|
|
I suddenly thought of the blue zebra stripes for some reason. Must have remembered MaxPower!
|
| |
|
|
79cord
Posted a lot
Posts: 2,609
|
|
May 28, 2023 12:39:26 GMT
|
Painted roof top next, figuring it was separated from the rest of the bodywork by the weld recess trims anyway & would require me higher & over it more than the rest of the body, risking damage to fresh body-side paint if done at the same time. Also figured flat horizontal panel would mean low risk of runs; I managed one anyway with base-colour so waited 1/2h for it to dry, sanded it down & gave it another coat before moving on to clear. I think it came out well without metallic colour variations, though more orange peel than I would like. At least that can be sanded & polished smooth if I don't rub through. I'll leave it to harden further & admire shiny-ness until then. 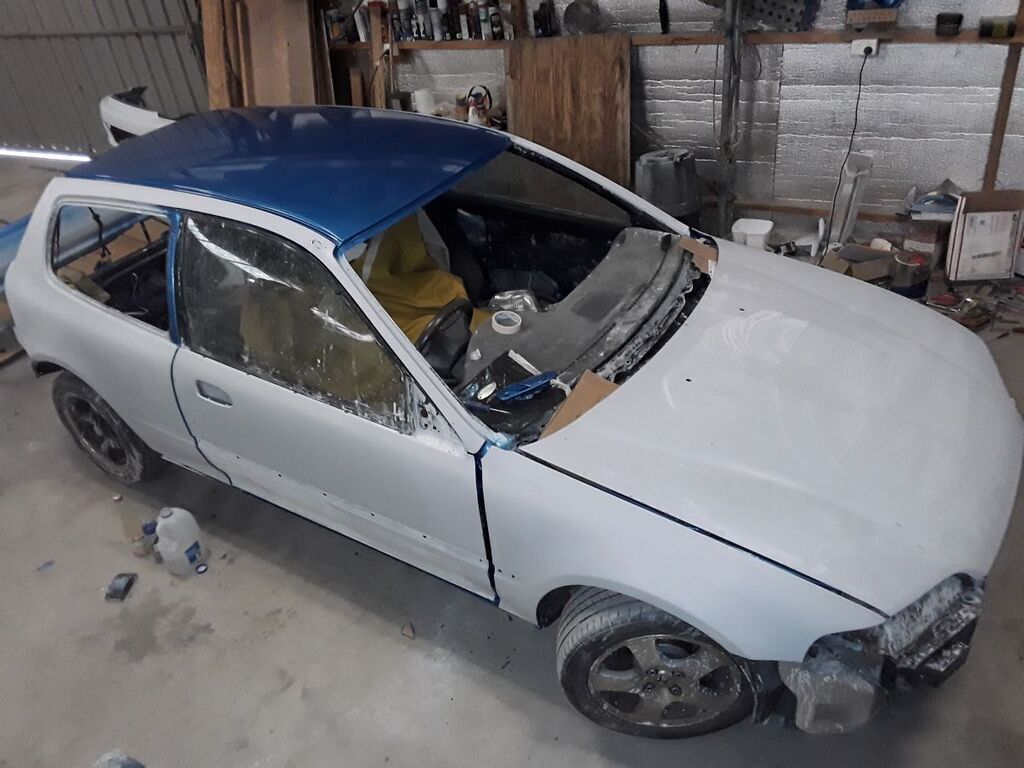 roof Hoped to do rear bumper though found wax&grease remover hadn't worked well enough so gave up on that straight away & will try again another day. Pre-painted door handles & mirrors with a small hobby air-brush I thought might be better for small details & tight crevices requiring less paint, which it did well, but came up more silvery than it should have with more of the metallic particles on the surface, not so nice. I suppose I always expected to go over them again to match anyway but hoped I wouldn't have to. Remounted doors but STILL have slight ripples to sand out before I can paint more. Decided I wanted to go extreme with some yellow fabric to try on extra Japanese seats that need retrim....  Grey on grey is just....grey ; The Yellow interior was probably a pretty rare choice for Yellow painted Civic hatchbacks in Japan, so it seems mythical to most apart from internet pictures. 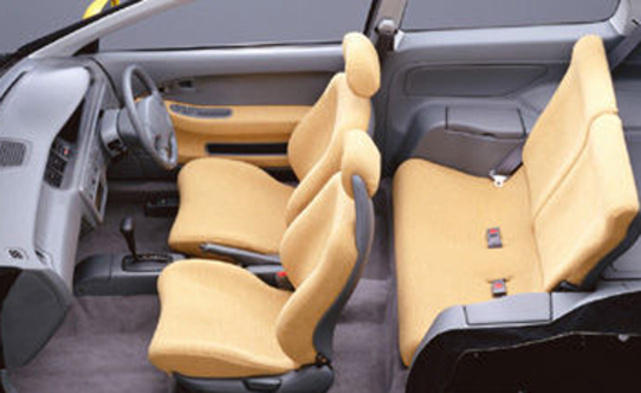 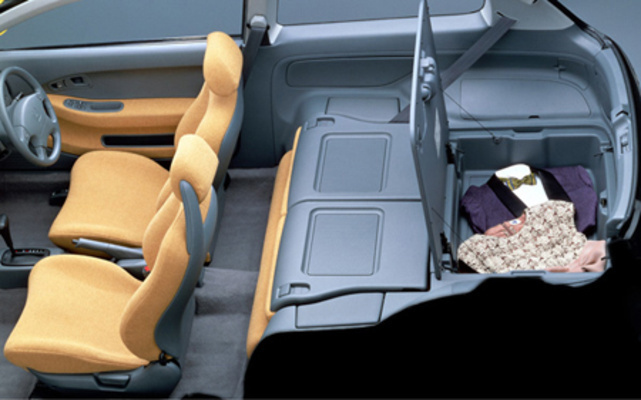 This Japanese interior also differed from the normal Civic hatch as it was designed for it's appearance with the seats folded down, rather than up like most. As such it abandoned side trims that curved around to meet the seat backrest and provided mounting for a luggage cover, and the cover itself behind that backrest. Instead it raised the pivot point of the backrest and provided a false compartment floor for a storage box beneath atop the (spacesaver) spare wheel. Ironically this actually reduces it's storage capabilities since the standard interior was well thought out to begin with. Never offered here it's quite a rarity regardless of colour & would garner interest. However I'm still hesitant about these JDM rear seats, which require cutting previous seat mounting and latching points from the body & cannot be removed as easily nor fold down as low... Perhaps I could come up with a creative solution for mounting them that allows removal without tools like the standard seats, not so simple when it incorporates the backrest locking mechanism without normal latches & striker. I'm also missing the storage box and it's false-floor lid, and the rear right storage/armrest lid... and a lot of the plastic is badly scuffed & discoloured... I saw some yellow fabric rated for 'domestic' upholstery 30% off at a local fabric retailer & bought 4m @ $11p/m. 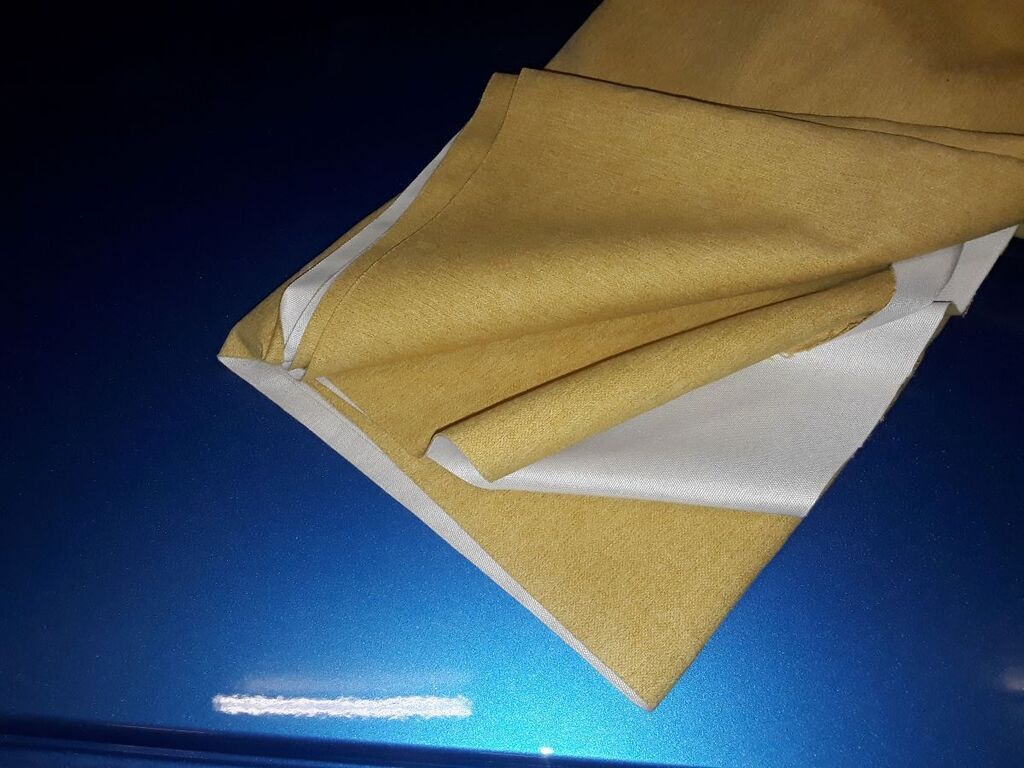 fabric 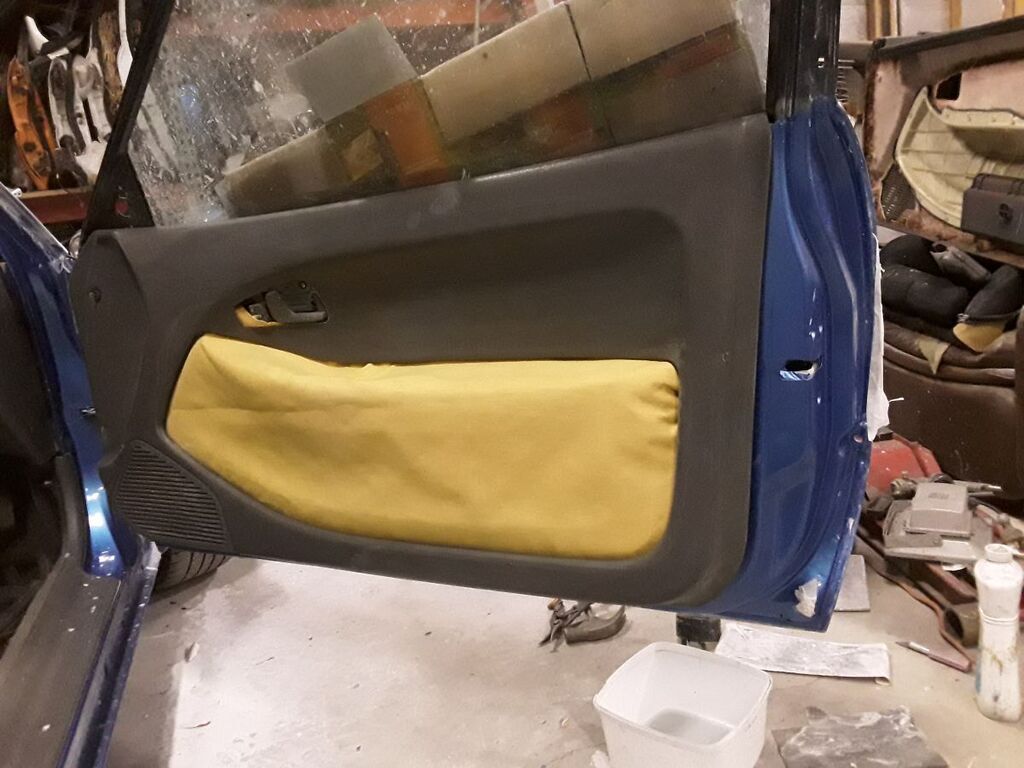 fabric test Tested some of the fabric upon the Civic's door trim which immediately launches it into 'show car' territory, at the risk of getting dirty just as quickly! Glad I've got the grey interior, rather than black often offered elsewhere. Yellow with black would be more than I could handle! But then spotted a slightly different fabric for sale at twice the price & thought it looked brighter & softer, & the backing looked like it might breathe & conform to shapes better...  So I've also ordered 4m of this chenille polyester tricot... |
| |
Last Edit: May 29, 2023 10:36:17 GMT by 79cord
|
|
79cord
Posted a lot
Posts: 2,609
|
|
|
|
Just sad that modern marketing thinks it's a Puma!  When few even bother to offer a 2-door hatchback. Can't really call them practical either with their compromised packing to consider 4wd (even when not offered), big wheels & small rear hatches, so they are mostly all about 'the look'. |
| |
Last Edit: May 26, 2023 6:10:12 GMT by 79cord
|
|
79cord
Posted a lot
Posts: 2,609
|
|
May 25, 2023 21:42:44 GMT
|
|
Yes, it really needs to be treated artisticly as a sketch of the car, highlighting shapes, perhaps doubling up in error or emphasis.
I think the vertical lines suggest scuff and scrapes or vibration (or even cruumpled paper) and should be used with restraint.
Also like the white BMW.
|
| |
|
|
79cord
Posted a lot
Posts: 2,609
|
|
May 24, 2023 21:14:42 GMT
|
|
MUCH better seeing horizontal 'speed' lines. The vertical lines do my head in!
|
| |
|
|
79cord
Posted a lot
Posts: 2,609
|
|
May 24, 2023 11:14:29 GMT
|
|
That rear transaxle looks pretty amazing even by microcar standards!
Transaxle in my z360 almost looked big as it's engine!
|
| |
|
|
79cord
Posted a lot
Posts: 2,609
|
|
May 24, 2023 10:09:31 GMT
|
Looks to be a current TikToker trend as 'Anime style'  Looks really interesting on the blue Micra with the extra effort put into shading & other colours. Can't say I like it when it loos like lots of insulation tape holding pieces on... I definitely prefer it with several colours like black line work with a white, and/or lighter shade as a highlighter adding 'shine'. |
| |
Last Edit: May 24, 2023 10:22:48 GMT by 79cord
|
|
79cord
Posted a lot
Posts: 2,609
|
|
|
|
Finally after another prime & sand for all the areas I'd rubbed through I decided I was about ready to apply some colour. (Well not the doors; STILL trying to eliminate subtle ripples). 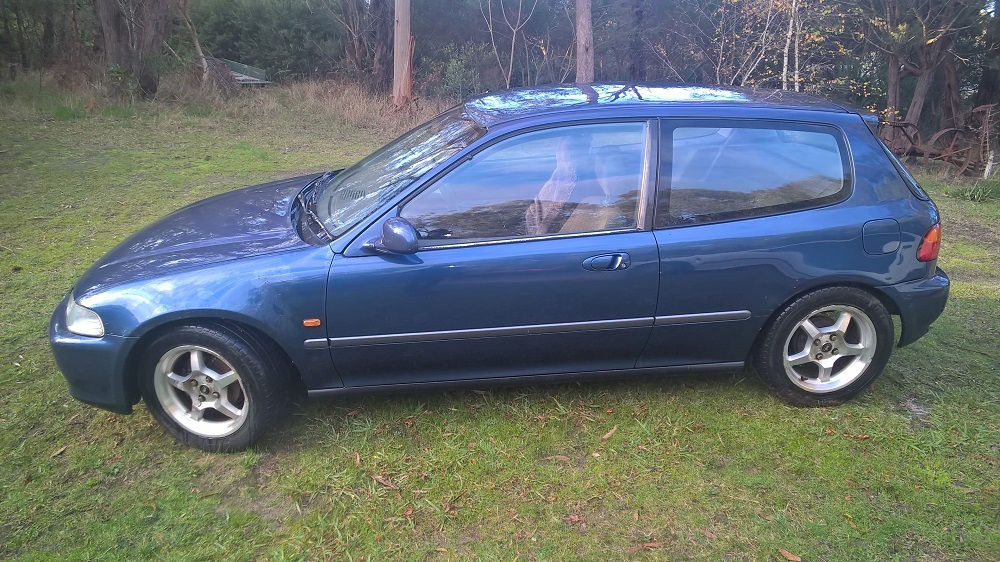 I suppose the original Harvard blue pearl could have looked good once, but obviously by now most of it's clearcoat had thoroughly expired. But after seeing it at it's worst I was tempted by the earlier, brighter Captiva Blue also offered upon these Civics, though that was still fairly dark.  So I decided upon Honda's BG53M Cerulean Blue pearlescent metallic, as used on 2008- Jazz, Civic & Insight.  A shade lighter & brighter. And I'm biased towards a lighter blue since I still want a B7M Nice (Niece) blue Accord. 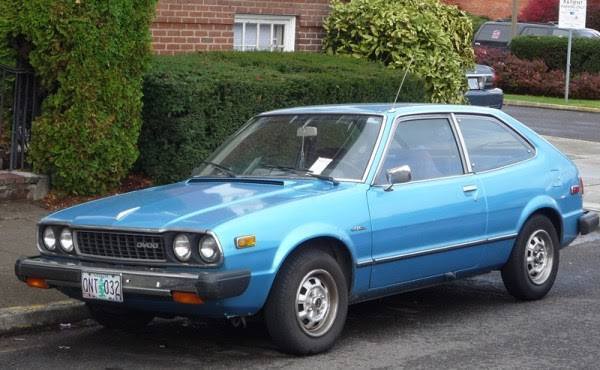 Much money spent upon the colour and clear paints, I thought I'd better upgrade my spraygun & ordered this: 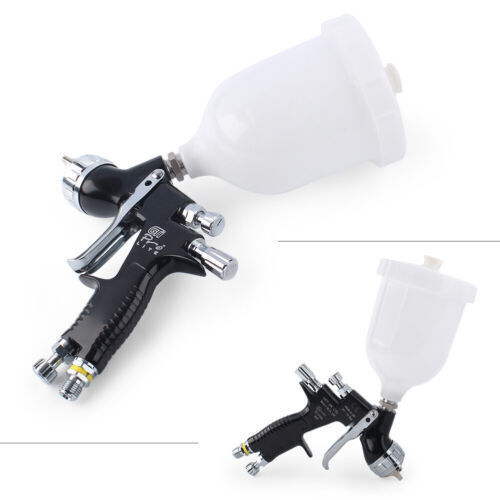 EBay knockoff too often advertised or even sold as a MUCH more expensive Devilbiss sometimes complete with branding... Mine might have 'made in UK' Printed on the side; which I wouldn't believe for a second, but was at least branded as a 'ROIKETU'..Not the cheapest but some reviewers liked them if they weren't sold as the real thing. And since that took time to arrive I got impatient & also bought this one for less that I could pick up straight away : 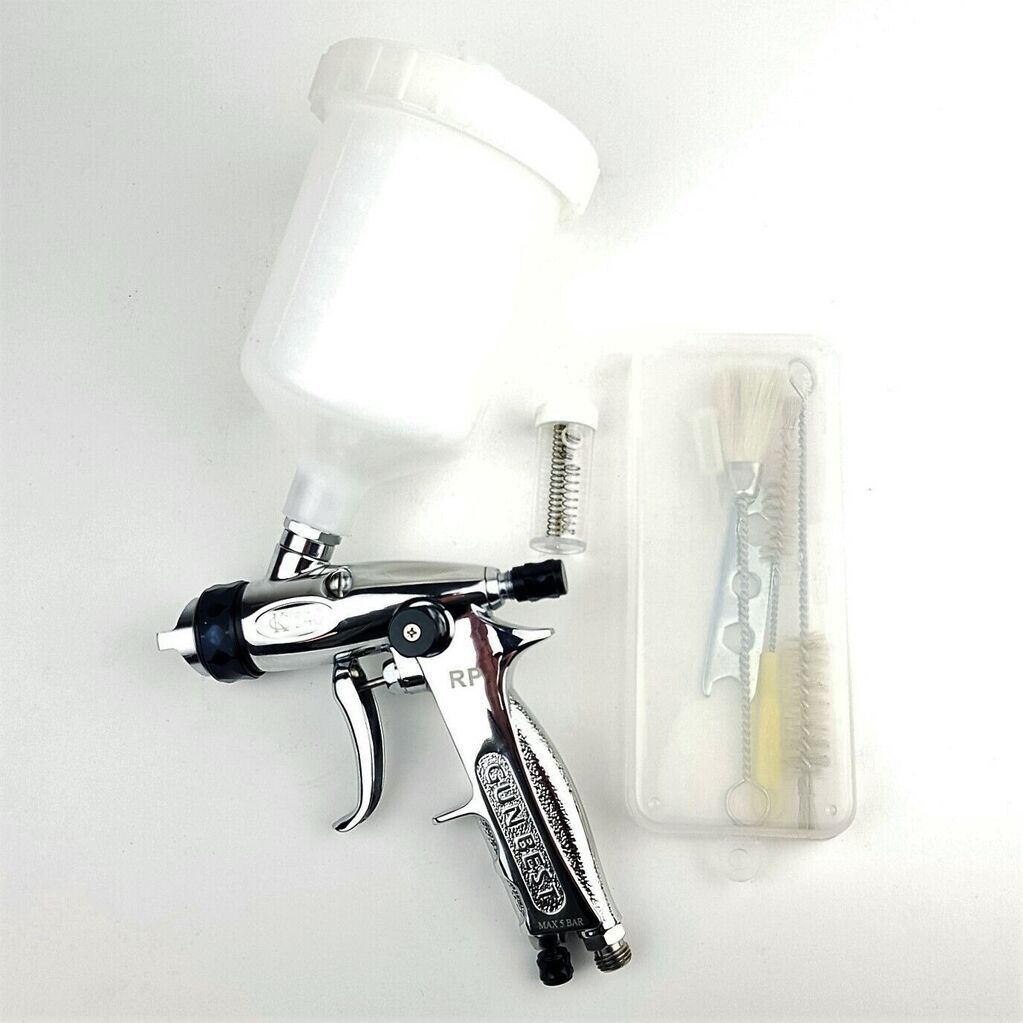 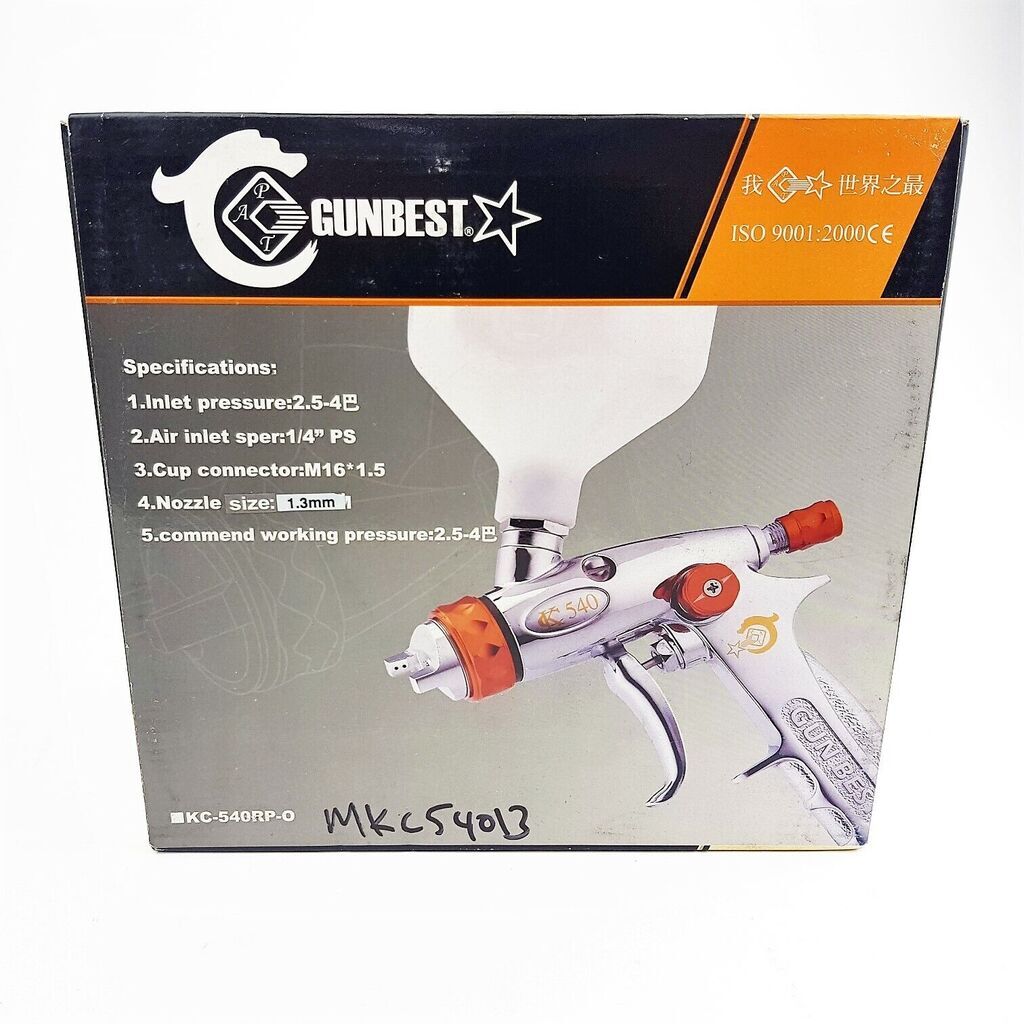 A gamble on quality perhaps, but I thought the design looked interesting! Then realised my little compressor might not be able to keep up with the demands of a High volume, Low pressure spray gun so bought: 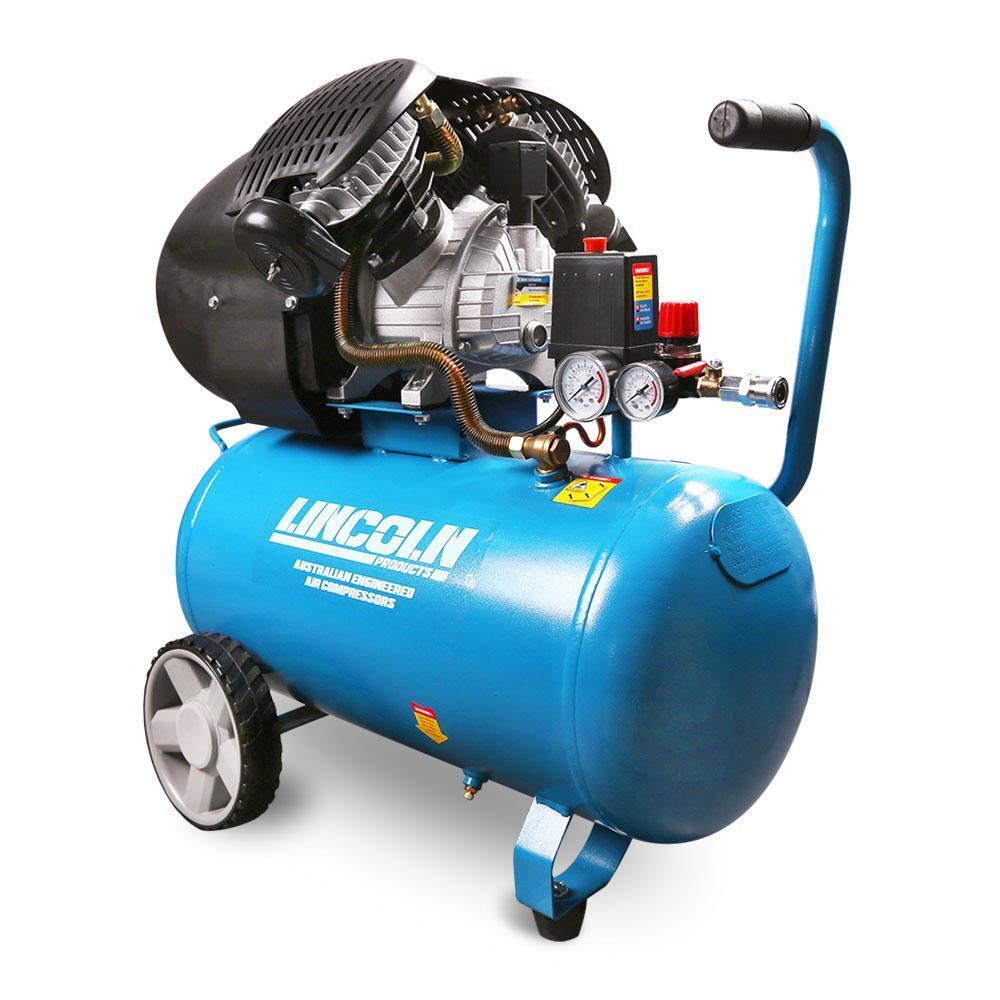 lincoln-LV30 50l, 3hp 220lpm compressor Then after more sanding started painting the bits that didn't matter terribly: insides of the bonnet, rear hatch, doors & door jambs. 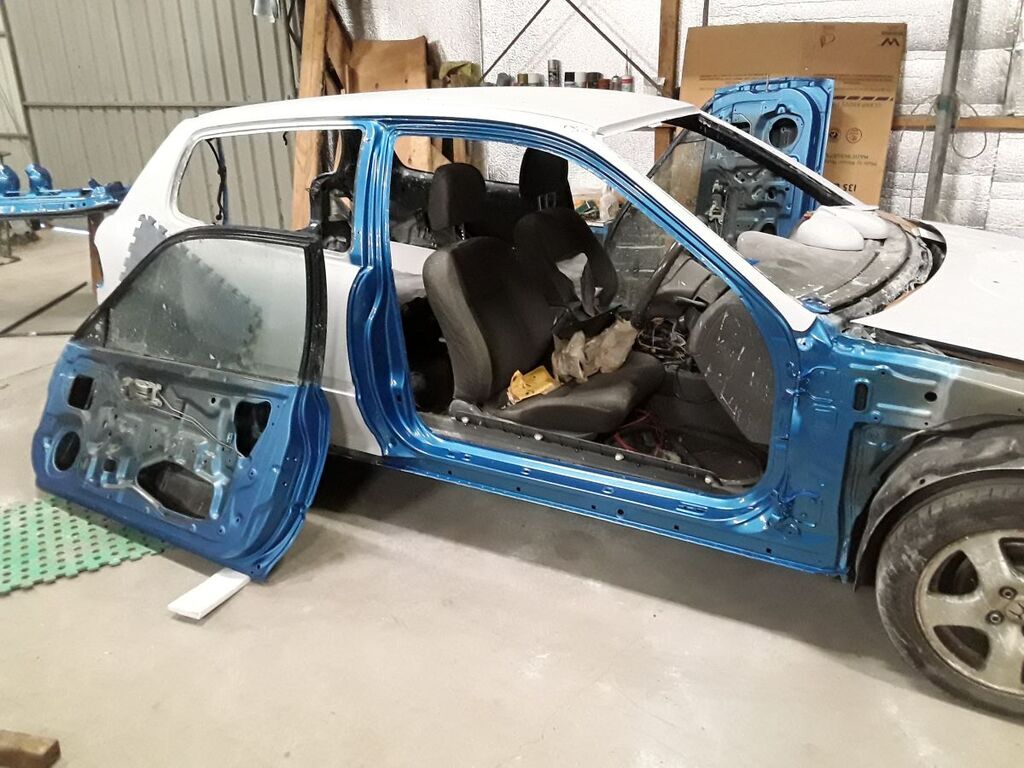 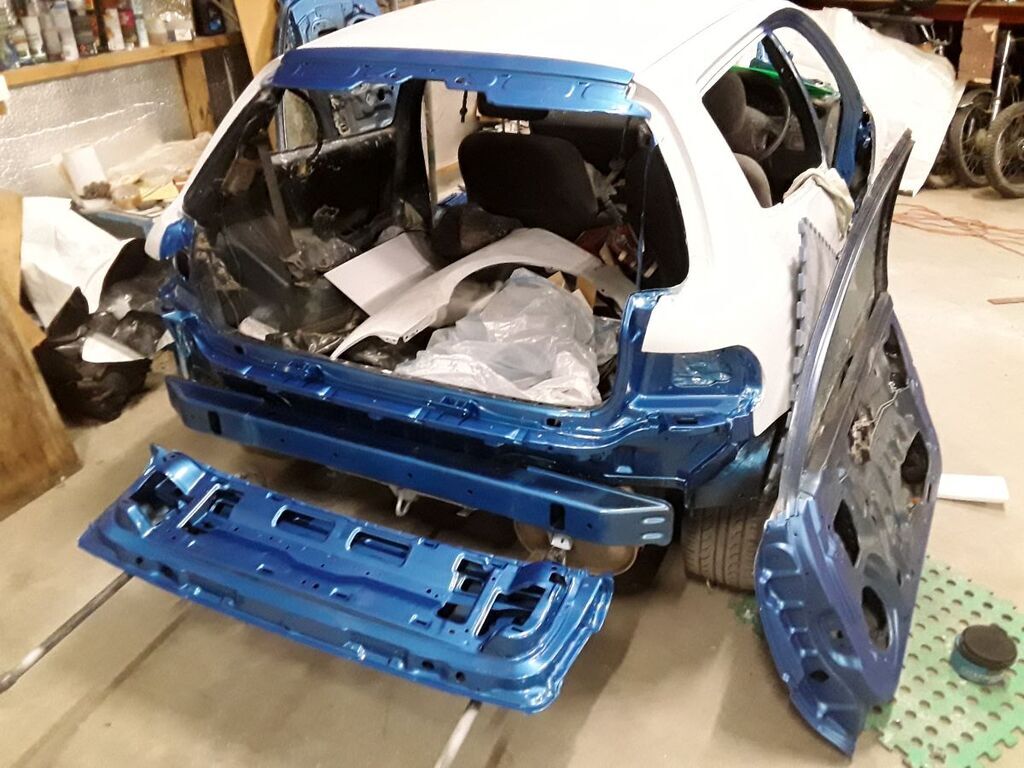 I'm not terribly worried about painting the interior or engine bay since it is still a blue... Though the underside of the bonnet needs serious polishing as the cold night left the clearcoat a satin finish. A lot of it is covered by insulation pad, though that could be bigger. |
| |
Last Edit: May 26, 2023 16:49:04 GMT by 79cord
|
|
79cord
Posted a lot
Posts: 2,609
|
|
May 21, 2023 11:13:53 GMT
|
More primer, guide coat & sanding  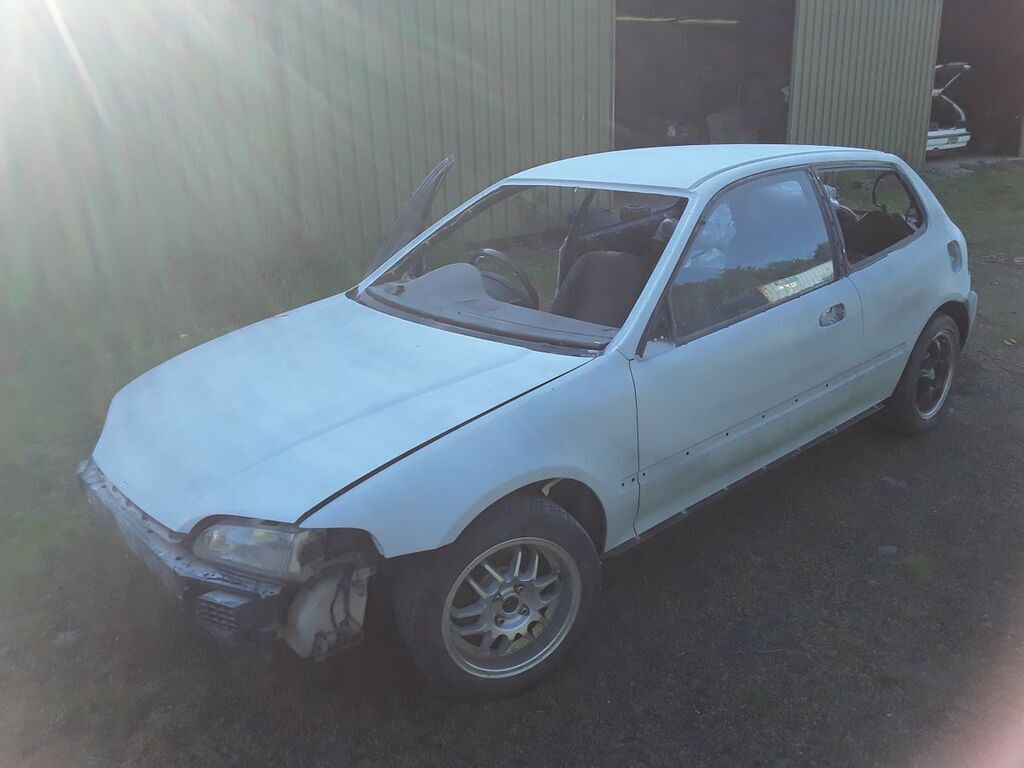 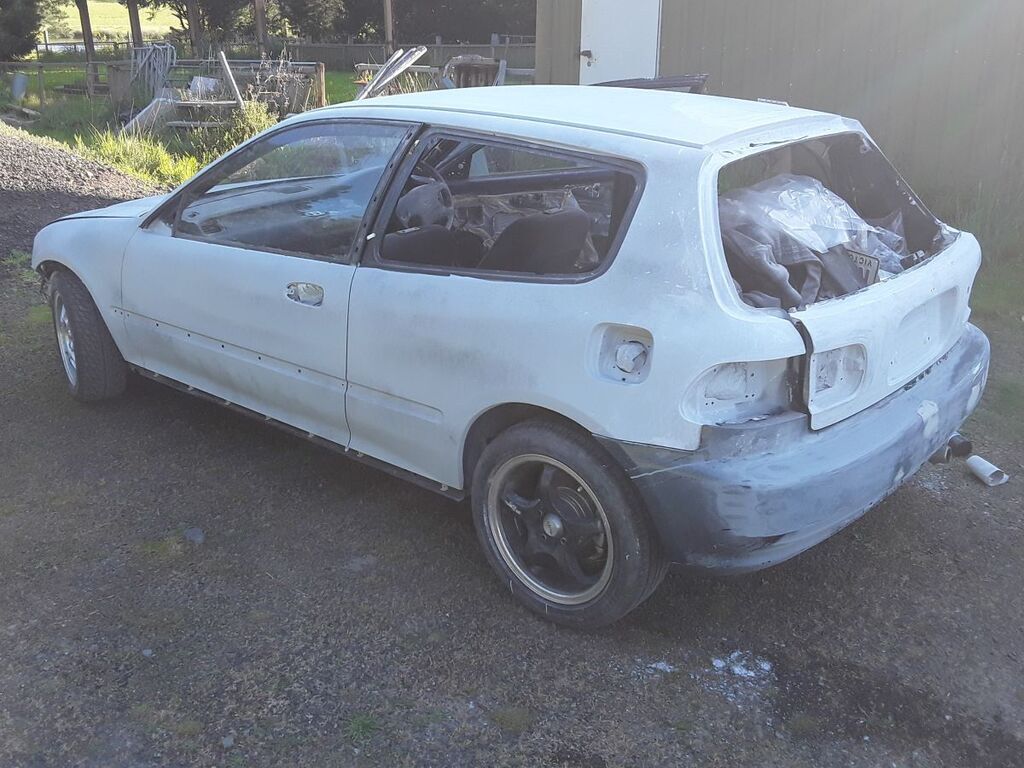 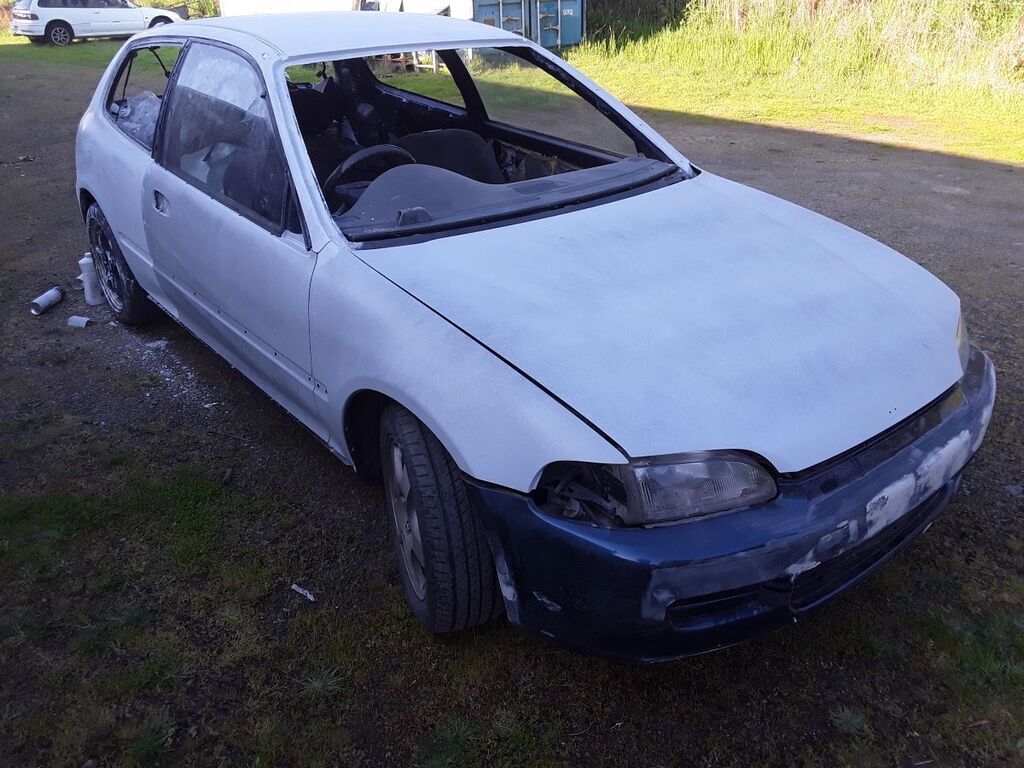 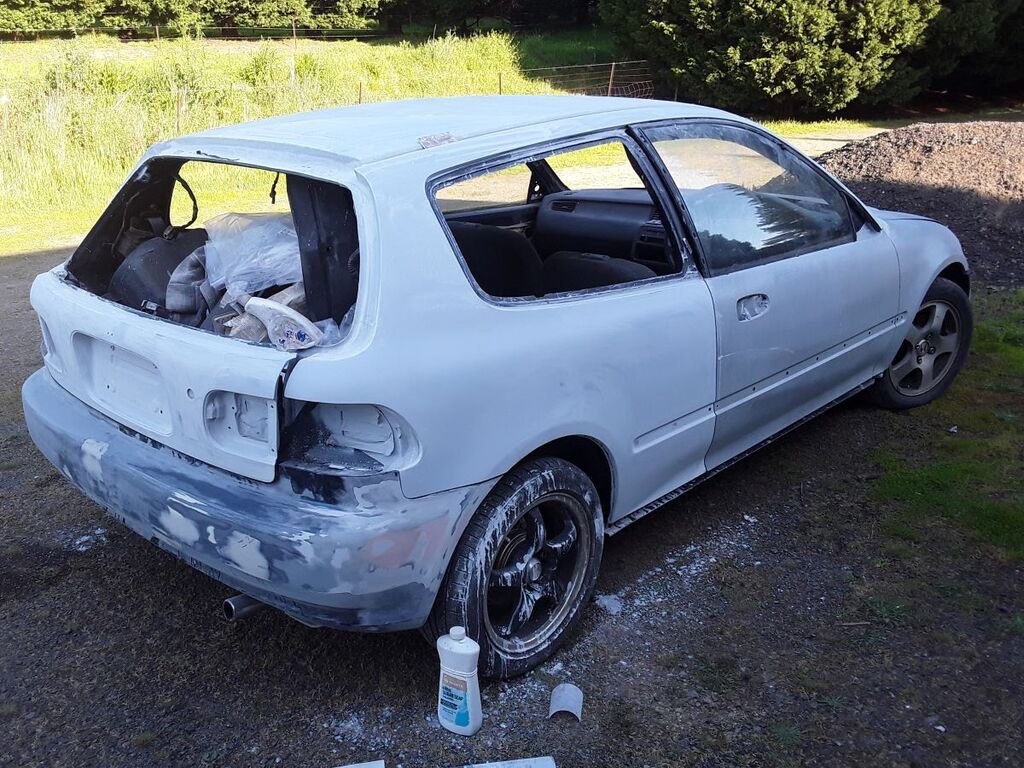 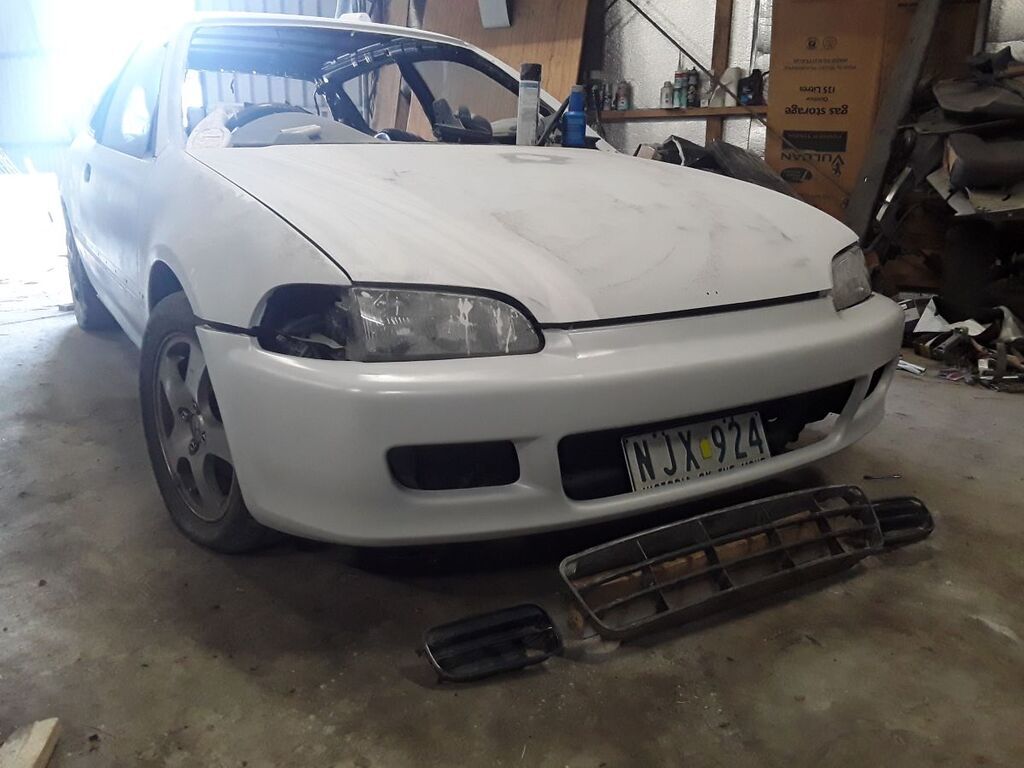 The bumpers side vent 'grilles' had been painted blue, & main grille would need masking to avoid the hassle of sanding primer when I'd also want it black anyway, so I decided to cut them free of the bumper instead. I could plastic weld some tabs on to them to refasten them from behind once everything's painted... But I am tempted to remake them with new grille bars recessed more deeply into a body colour opening. With supplimentary LED strip indicators/park lights as bars in the side vents with additional LED fog/driving lights.... Bumper's so much cleaner & smoother without the number-plate holes & the plate in front of it, I'd like to relocate the No. plate into the grille opening, Probably offset to the left/curbside, since radiators on the right side of the car. You can also see just how far the epoxy primer can be sanded to a shine to see flaws, though I think it was also wet in this picture after wiping off the sanding dust. 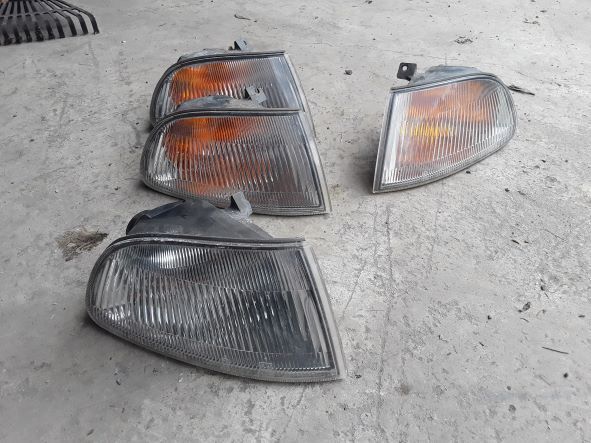 Have a spare R front turn indicator so thought I'd remove it's Amber inner lens to be replaced with orange LED globe for the clearer look. Broke the inner lens free & crunched it into small pieces with needle-nose pliers to get it's remains out the globe hole... just need a LEFT one if I still want to keep a pair original, or commit to the clear? I'm not having much luck finding another indicator for a reasonable price since hatchback indicators; like the bumper, bonnet, tail-lights & front guards are all different to the sedans (by absurdly small degrees that become obvious only when you try fitting them). |
| |
Last Edit: May 21, 2023 12:16:16 GMT by 79cord
|
|
|
|
79cord
Posted a lot
Posts: 2,609
|
|
May 20, 2023 19:13:01 GMT
|
|
Great to see it again.
Wish I'd got photo's of a US PT-Cruiser Los Vegas gathering I saw cruising in traffic whilst on holiday when these were still almost new. Far too many creatively customized examples were about for it to have been anything else!
|
| |
|
|
79cord
Posted a lot
Posts: 2,609
|
|
May 19, 2023 21:34:48 GMT
|
|
Exciting to see the colour go on, even if I'm a bit sad to see that distinctive copper brown go. I have no doubt it will look great in the red.
|
| |
|
|
79cord
Posted a lot
Posts: 2,609
|
|
May 19, 2023 11:40:31 GMT
|
 Yes, dents in the roof, on both sides.  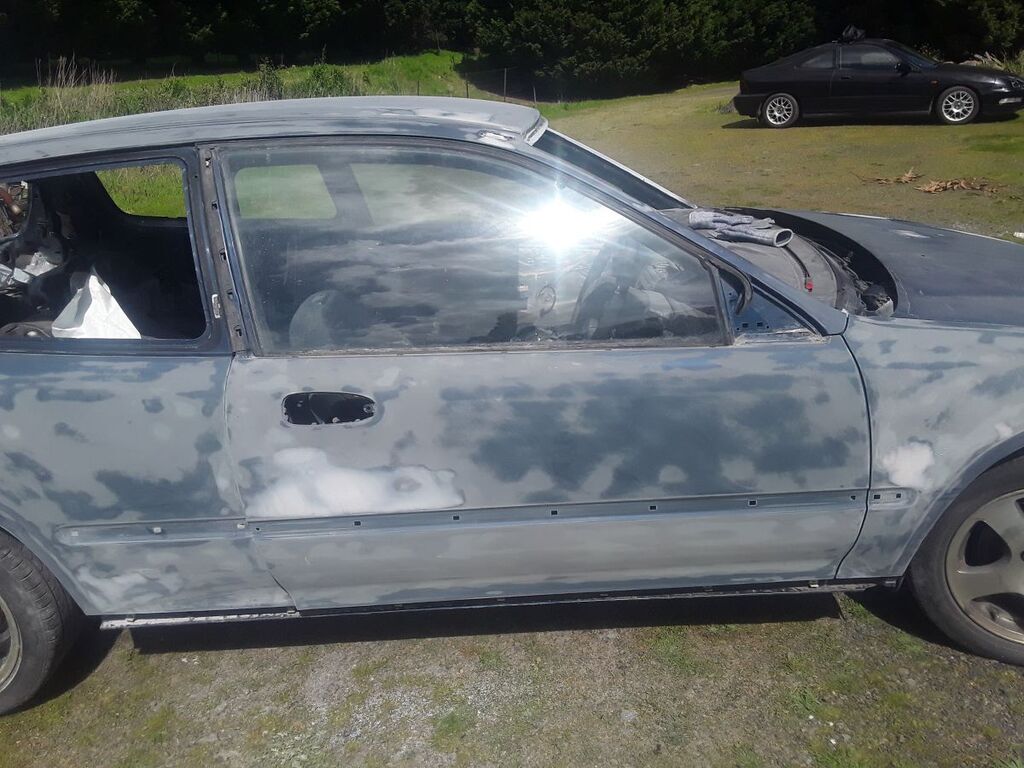 Note the evenly spaced spots a along the door above the side trim recess; that's where flexible urethane adhesive was used by Honda to bond the door skin to the side-intrusion bar, this introduced ripples to the sanded doors that were to drive me crazy trying to eliminate them for perfectly straight doors. Still not completely gone, but I think I give up after priming & sanding them 4 times with the biggest sanding blocks I could devise! 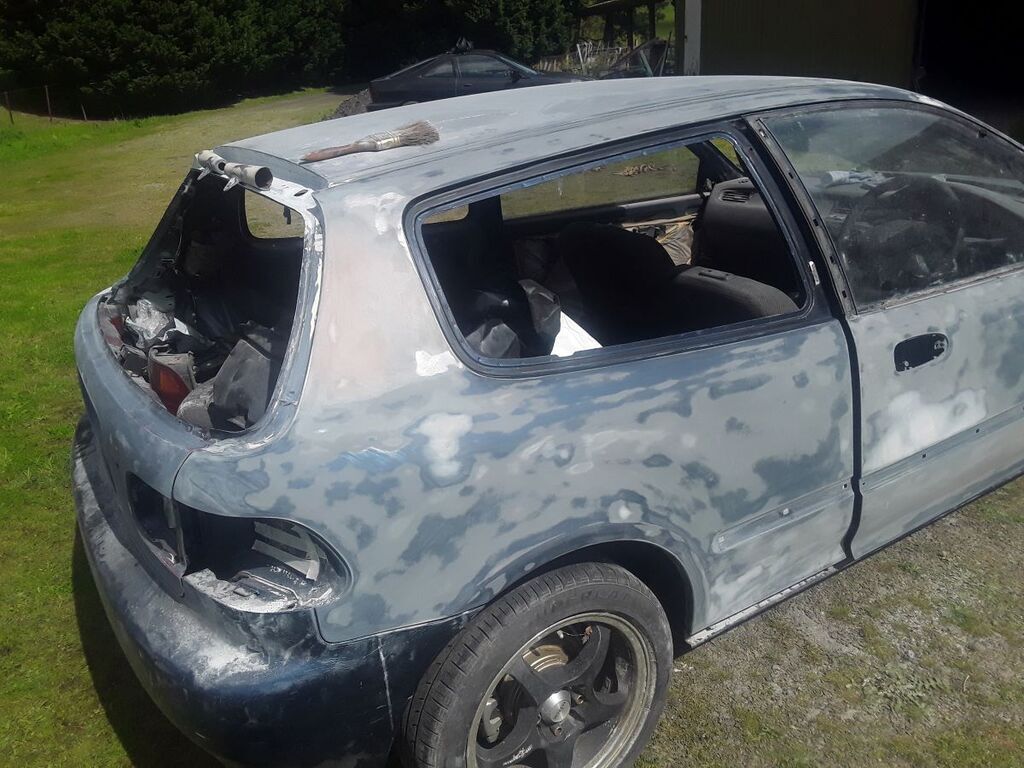 And a dent high on the rear pillar that had already been previously filled & was also cracked and falling out. 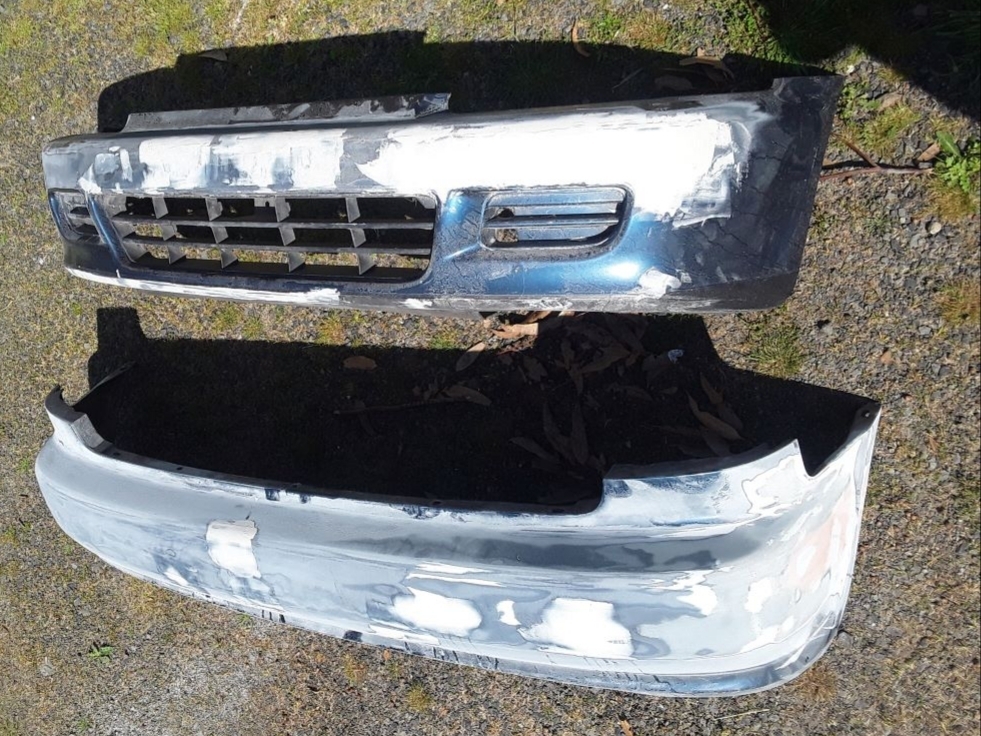 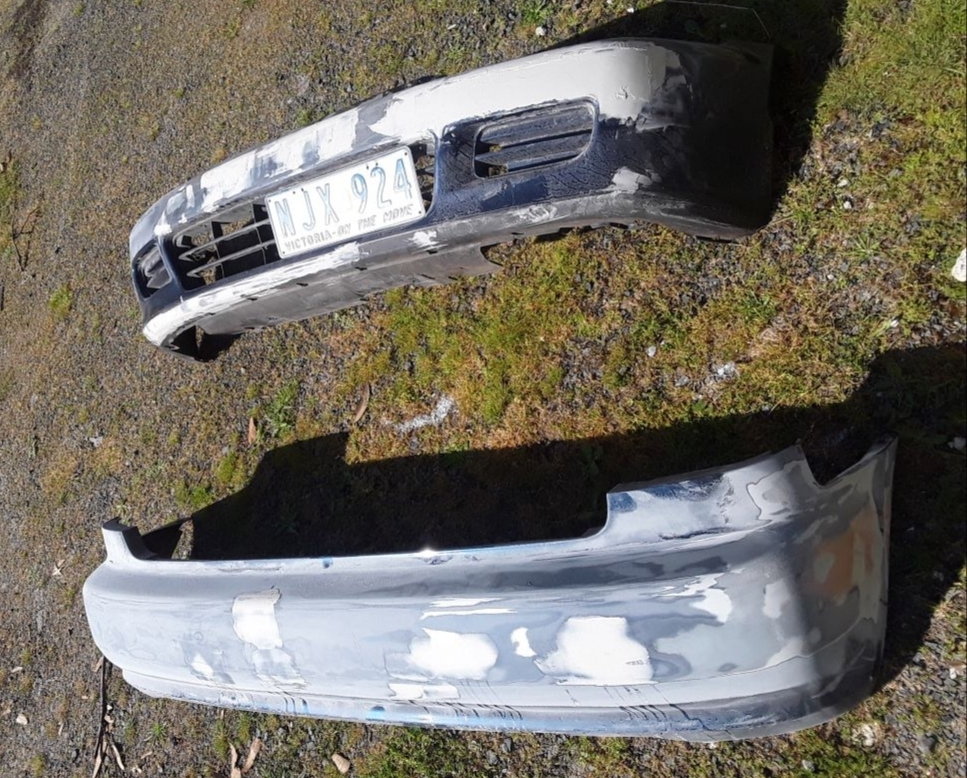 Bumpers needed a lot of work as well. A more flexible 'plastic & bumper' filler bought & used upon them.. After I'd used a soldering iron & black polypropylene plant-pots to weld the 3" tear in the lower edge of the front bumper, & smaller ones at the mud-flap mounting holes of the rear. Rear having been filled before, while front had been stretched slightly against the reinforcements behind. And I decided to fill the number plate mounting holes whist attending to the impression the plate had left once pressed into the bumper... |
| |
Last Edit: May 21, 2023 11:31:55 GMT by 79cord
|
|
79cord
Posted a lot
Posts: 2,609
|
|
May 19, 2023 11:17:43 GMT
|
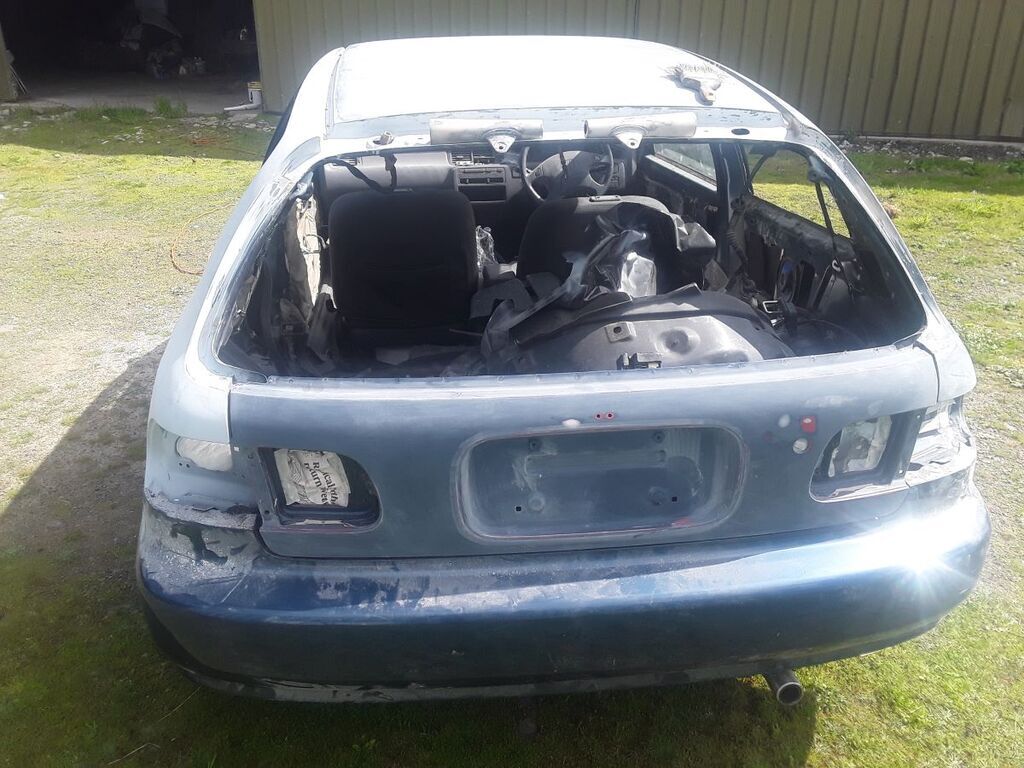 Rear tailgate had been replaced before; previously red, but still had very minor dings to fill. 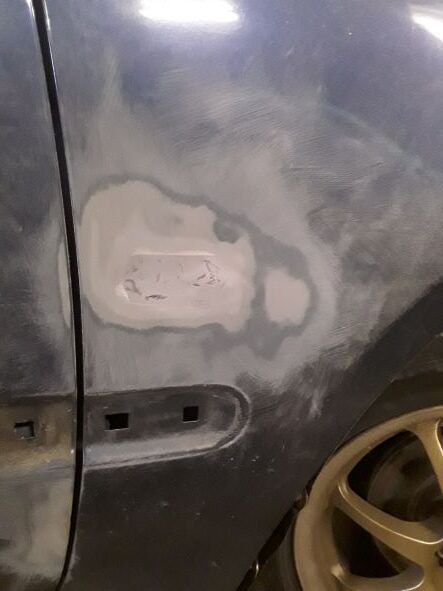 JB weld Metal filled epoxy used to bond steel (with a lighter backing plate), into the original indicator holes in the front guards, indicators to be relocated downward & incorporated into the side trims. Last time I welded plates into the light gauge metal of these panels it did not end well, distorting badly. I'd rather risk a faint outline of the patch! But don't expect one.  Didn't want to dig into the filler on the frt guard I'd replaced as it looked sound, but tried to get back to the factory base-coat or primer otherwise. Bonnet had not been repainted before but had it's share of minor dings.. with more found once primed & I started sanding away a guide-coat.. More spread over a large area from being pushed shut or sat upon.. Ended up applying much more filler across the entire front of the panel & sanding it all away until primer started to show again. 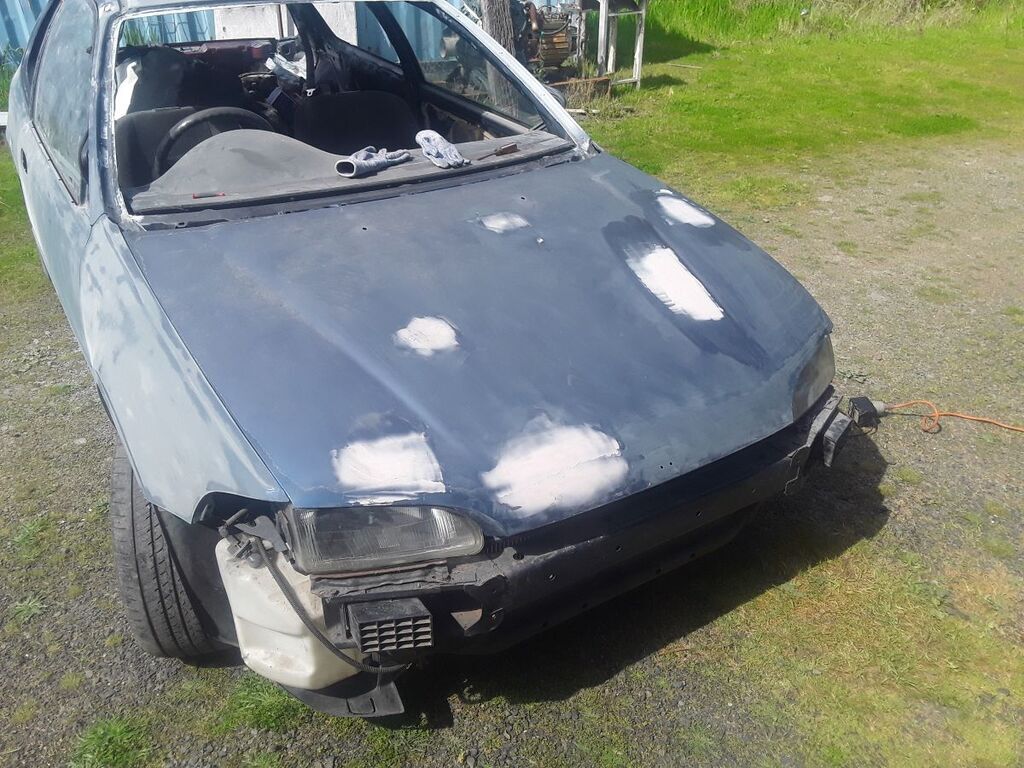   More sanding back to factory base-coat & primer. Adding filler to the numerous door dings. Despite the long absent clearcoat I trusted the original factory primer not to retain moisture & cause further problems later... after a few months in the shed to dry out & sanding back the surface... |
| |
Last Edit: May 21, 2023 11:30:32 GMT by 79cord
|
|
79cord
Posted a lot
Posts: 2,609
|
|
|
|
Unfortunately having revealed that despite its large area & excessive use, the layer of filler actually wasn't really obscenely thick I chickened out of cutting off and replacing the entire rear corner of the car. If I'd had a rust repair patch panel available affordably I probably would have used that, & perhaps I could have tried making my own. But as I said I chickened out & decided to reapply filler correctly (if that's possible with such use). Epoxy primer was sanded for adhesion & filler re-applied... 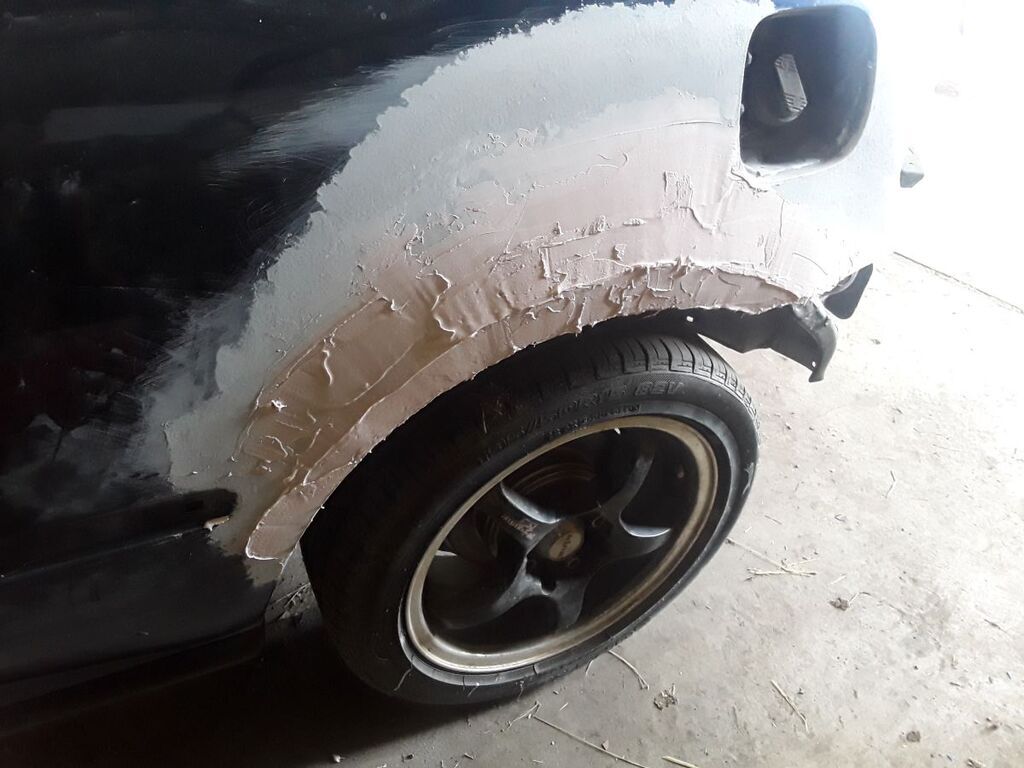 And sanded, and shaped. 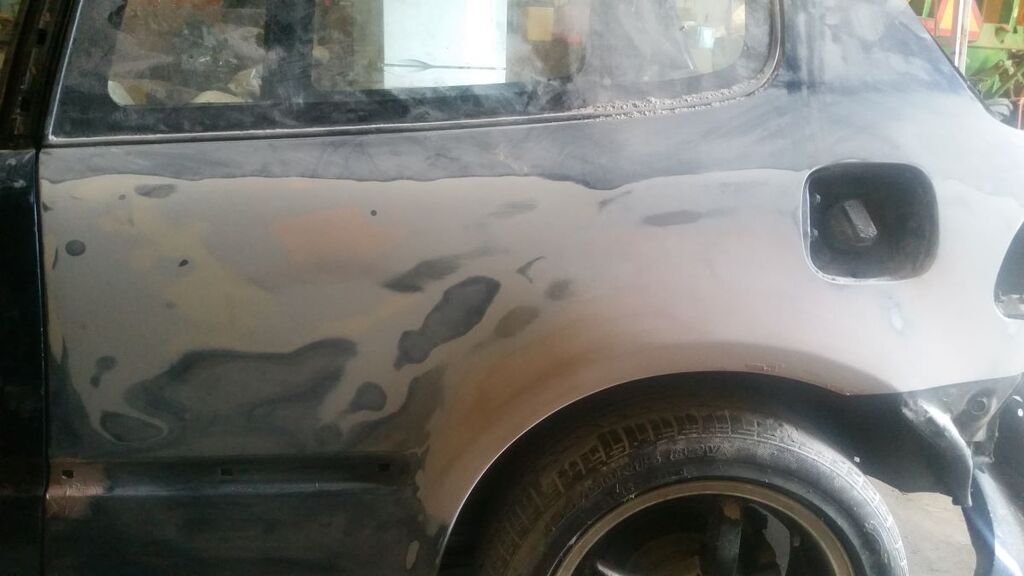 And re-applied, and sanded, and shaped. 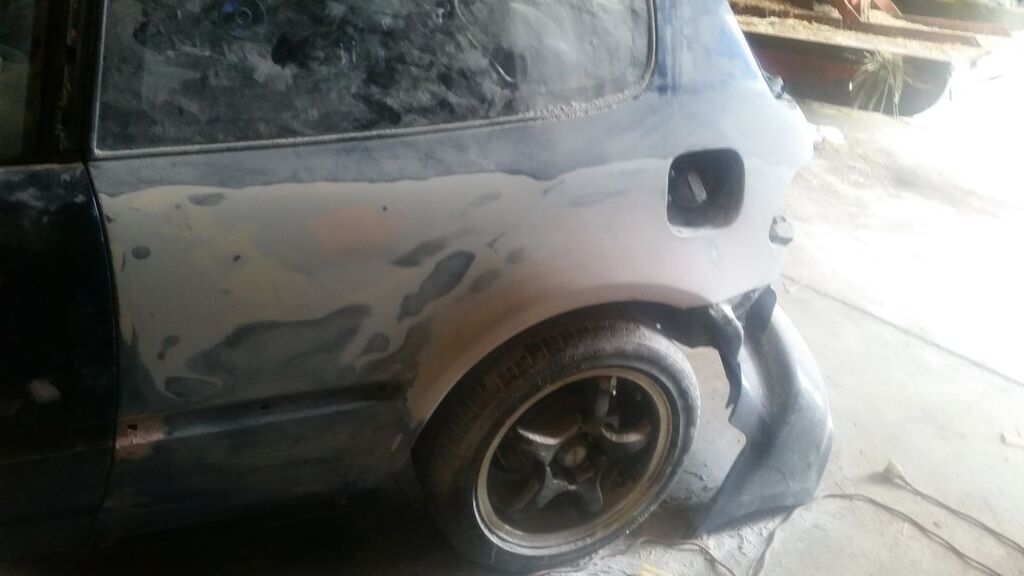 And re-applied, and sanded, and shaped. 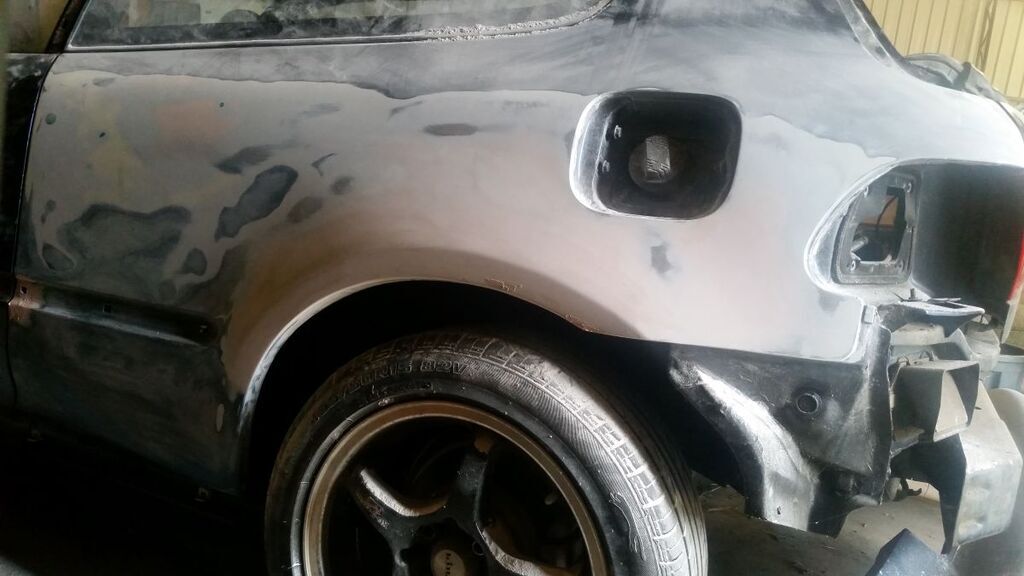 And re-applied, and sanded, and shaped. 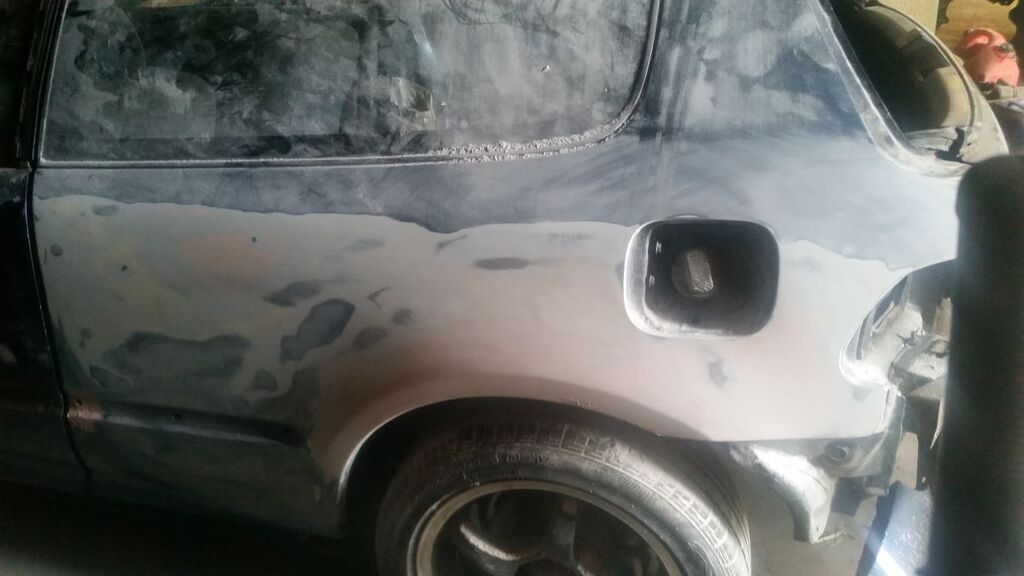 Until I thought I was happy with the shape. Sanding also showed there was enough spray filler in the rest of the panel to still fill small door-dings elsewhere on the panel as it was removed. At least it seemed to have been a 2k paint used previously that sanded well, unlike some older paints I've had to sand on other cars. The small spot of rust found around the side-trim hole near the door can also be seen. Sanded more excess spray filler from the passenger door until I found the factory primer, and Epoxy primered it and the filled rear 1/4. 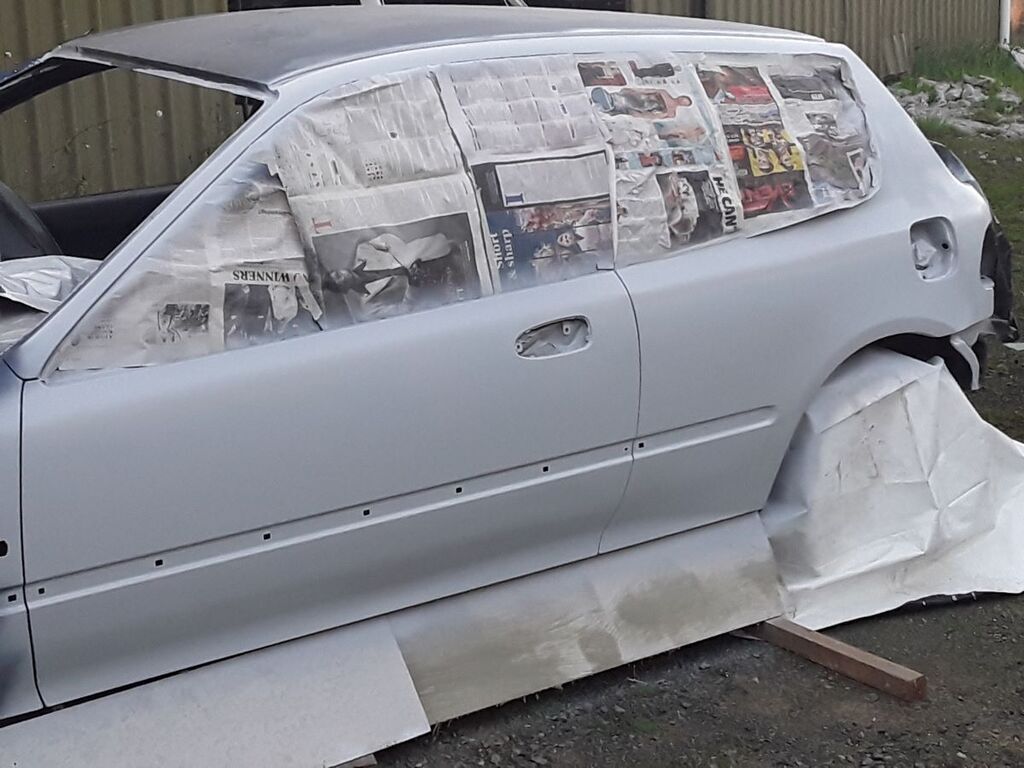 Revealing my wheel-arch crease was too sharp & wandered off target a little, requiring more filler shaping. 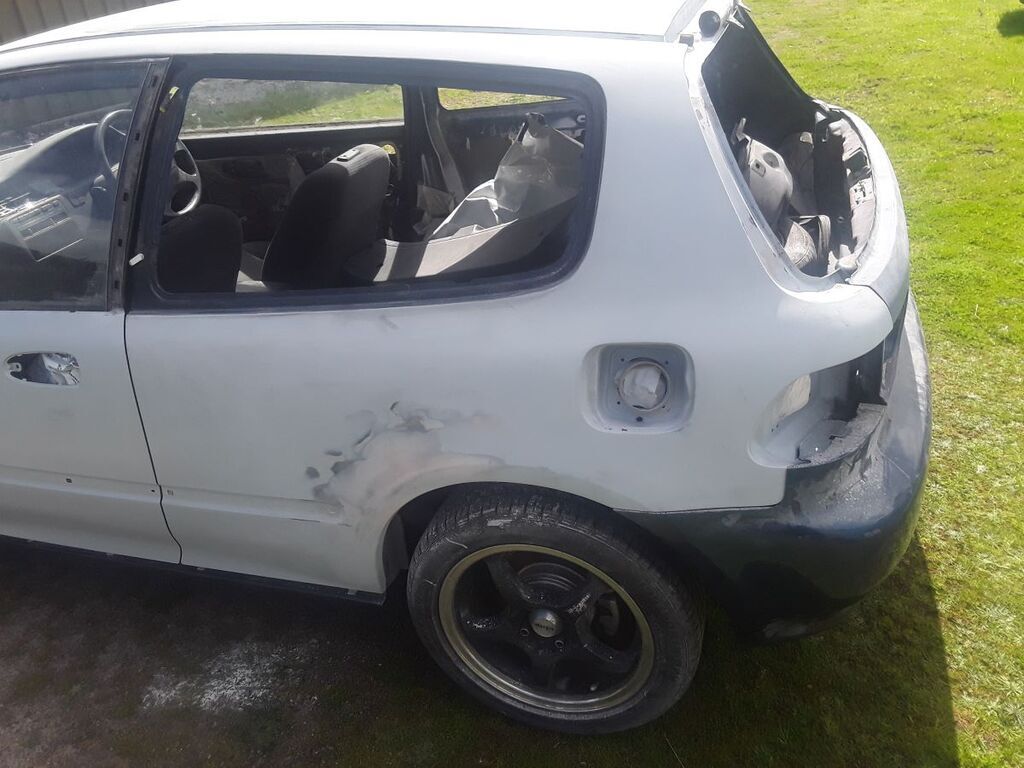 |
| |
Last Edit: May 17, 2023 9:18:20 GMT by 79cord
|
|
79cord
Posted a lot
Posts: 2,609
|
|
|
|
So... about time I dug into that miss-shapen filler in the Left rear.. Could have looked good once,at a glance,   But definately too much 'product' to achieve shapes like that around the filler door. And it had been scraped again towards the front of the wheel-arch cracking the filler so needed tending before moisture & rust encouraged the whole lot to fall off.  And obviously a professional effort to have the equipment to pull out the damaged panel that way...  Started at the 'fresh' scrape with a stripping disc revealing only surface rust thankfully. But once the edge of filler was removed I actually removed most of it with a paint scraper! Obviously adhesion to the bare metal wasn't great. Revealing the true state of the rear 1/4.  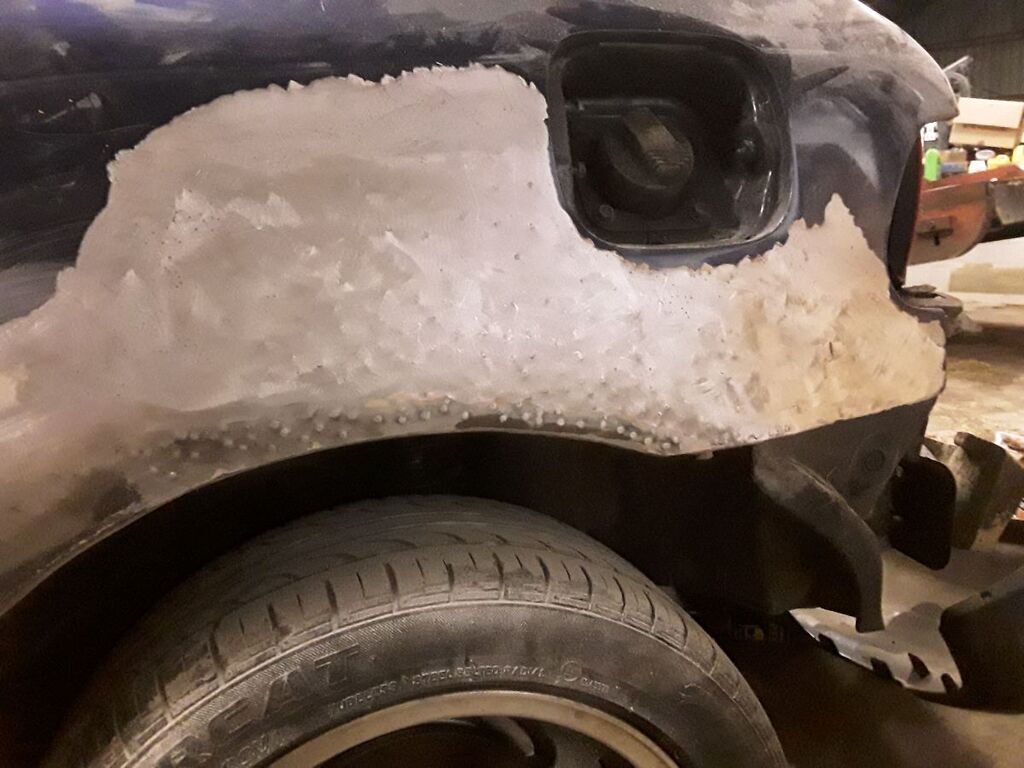 Looks like a plucked chicken, but amazingly the filler wasn't massively thick, at most 3-4mm thick with too much applied and almost none of the wheel-arch crease remaining to work from to recreate the proper shape, though amazingly the arch lip itself looked good. 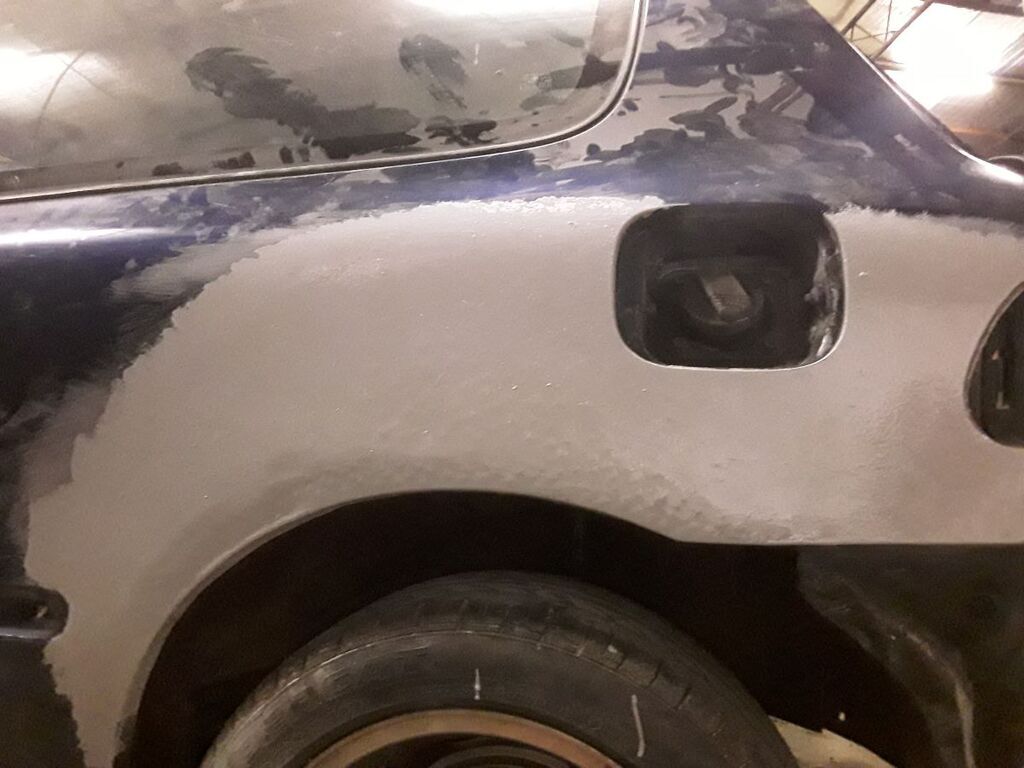 2K Epoxy primer applied with a roller after I'd removed a bit more from the edges. Somewhat expensive, but non-porus to seal against moisture & minimal shrinkage as it sets make it well worth it. Admittedly it can clog sandpaper but can be wet sanded with appropriate coarse paper. |
| |
Last Edit: Jun 16, 2023 23:50:32 GMT by 79cord
|
|
79cord
Posted a lot
Posts: 2,609
|
|
May 16, 2023 10:47:50 GMT
|
Gorgeous,  but...  |
| |
|
|
79cord
Posted a lot
Posts: 2,609
|
|
May 16, 2023 10:25:05 GMT
|
I think the Lonsdale was the Australian assembled version of the Gallant, may have been imported to avoid limits on import numbers for Japanese cars, these limits were (I think) voluntary. POSSIBLY! That'd be a facelift Mitssubishi Sigma in Australia, quite successfully assembled & sold with 1.6-2.6 4cyl in Australia after the Chrysler Valiant's size fell out of favour. Obviously sold as Galant elsewhere & Galant Sigma in Japan. Didn't think it massively revised locally beyond colour & trim, & probably suspension tuning until they widened the next fwd Galant 65mm & kept the 2.6 to create the Magna that fared even better. Hadn't heard of exports to the U.K. but probable. Lonsdale is the South Australian Suburb where the factory was located. But isn't rarest SUCCESSFUL car most telling, not counting obscure variants! |
| |
Last Edit: May 16, 2023 11:01:44 GMT by 79cord
|
|
79cord
Posted a lot
Posts: 2,609
|
|
|
|
Suspension needed some work & I wanted to upgrade to rear discs and rear anti-roll bar.. 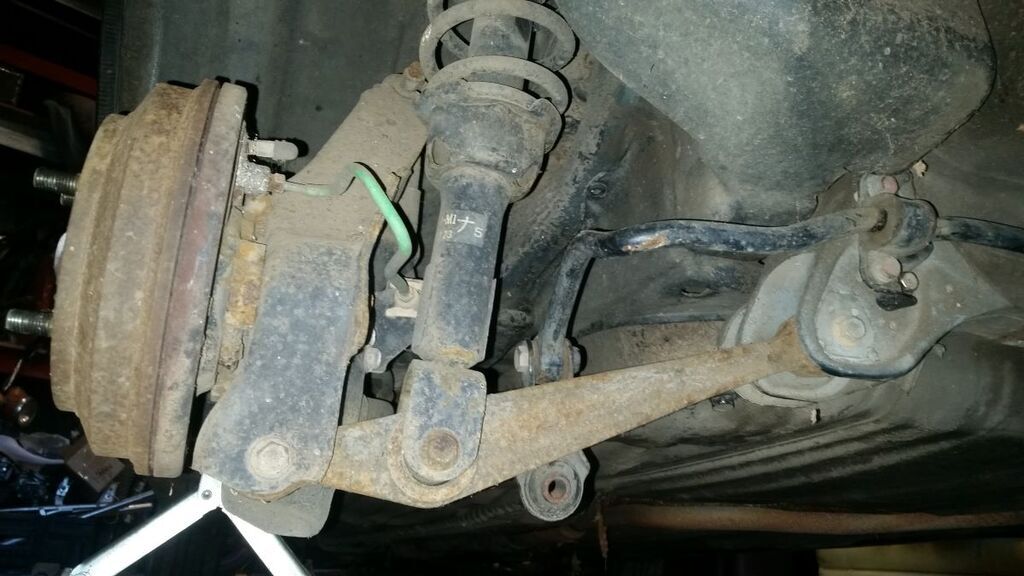 Original brake drums & lower arm without mounting for the Integra rear anti-roll bar I wanted to use. 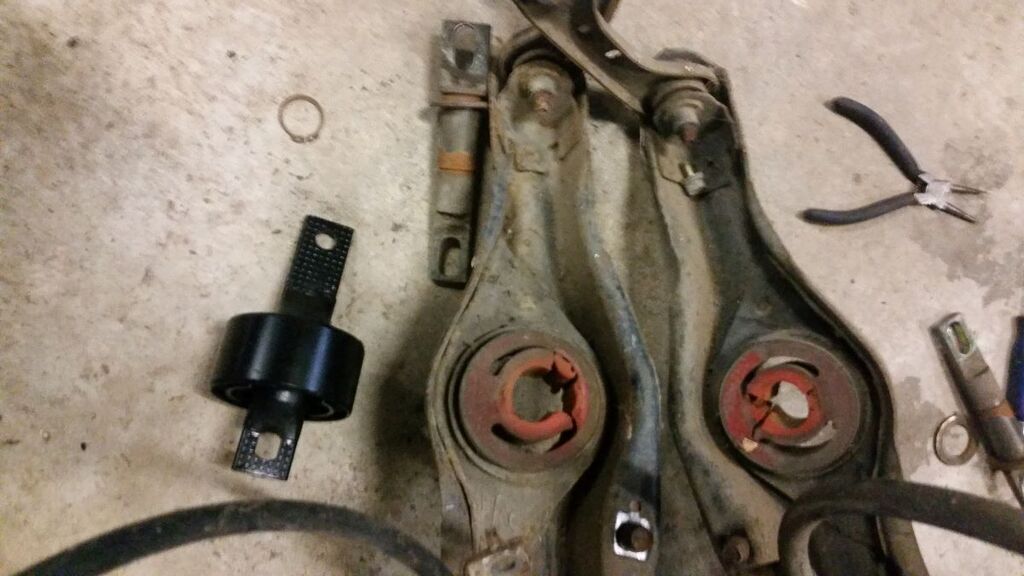 Looks like aftermarket polyurethane bushings don't last well ! 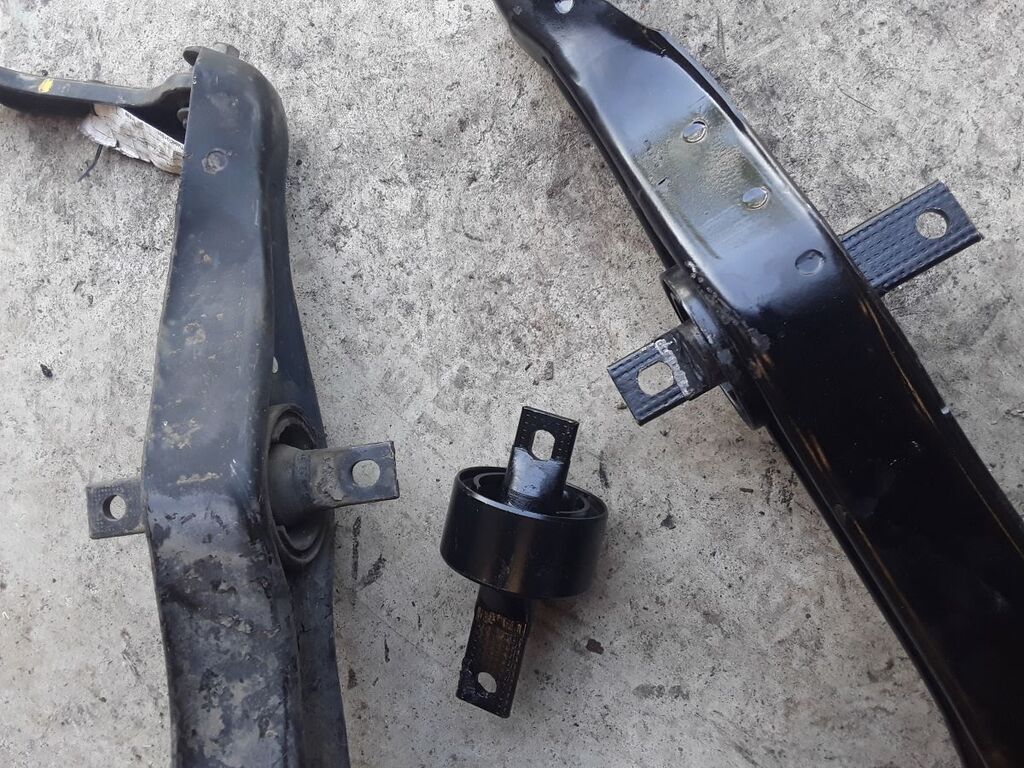 Fitting new bushes. After Integra I found it was best to mount cheap replacement bushes based upon the distance of the mounting holes to the suspension arm. NOT the outer mounting ring of the new bush.... looks like some products don't position the mounting bar properly before they mold the rubber over them.... Unless it was a change Honda made to later models & parts suppliers standardised the later design? Seems unlikely to me, I had to trim rubber away from the mounting holes to bolt it to the chassis !. 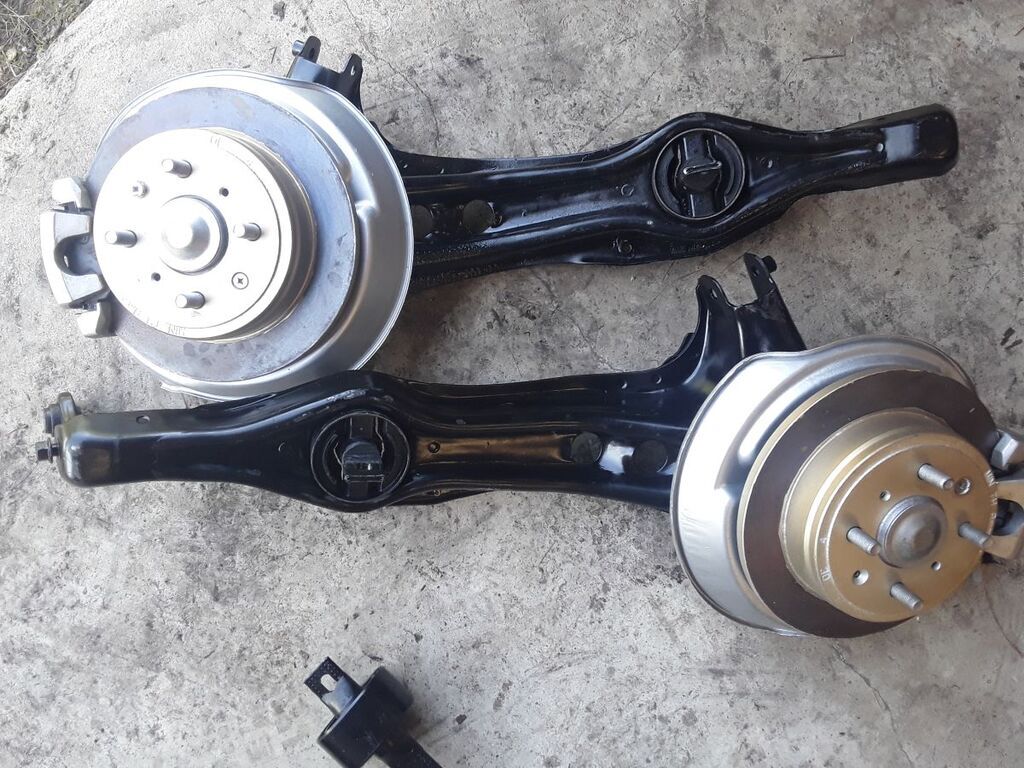 Painted and ready to go on with the new disc assemblies, including rear hub & handbrake cables, bolted to the old trailing arms. And the front. I wanted to upgrade from the basic 240mm diameter front discs to the larger 260mm as used on the top-spec B16a powered models, and Integra, and needed their revised front knuckles to do it as it mounts the caliper 10mm outward to suit the larger disc rotor, though both are now largely absent from wreckers.... The later EK Civics also had similarly revised knuckles on upper spec. models so I bought a pair of those... however these are apparently 20mm? Shorter to suit the EK's revised top wishbone mounting.... Not sure precisely how that may affect suspension geometry giving slightly less angle to the upper wishbone of a lowered car it might be an advantage? Will be keeping an eye out for the Integra parts anyway... But in the meantime.. 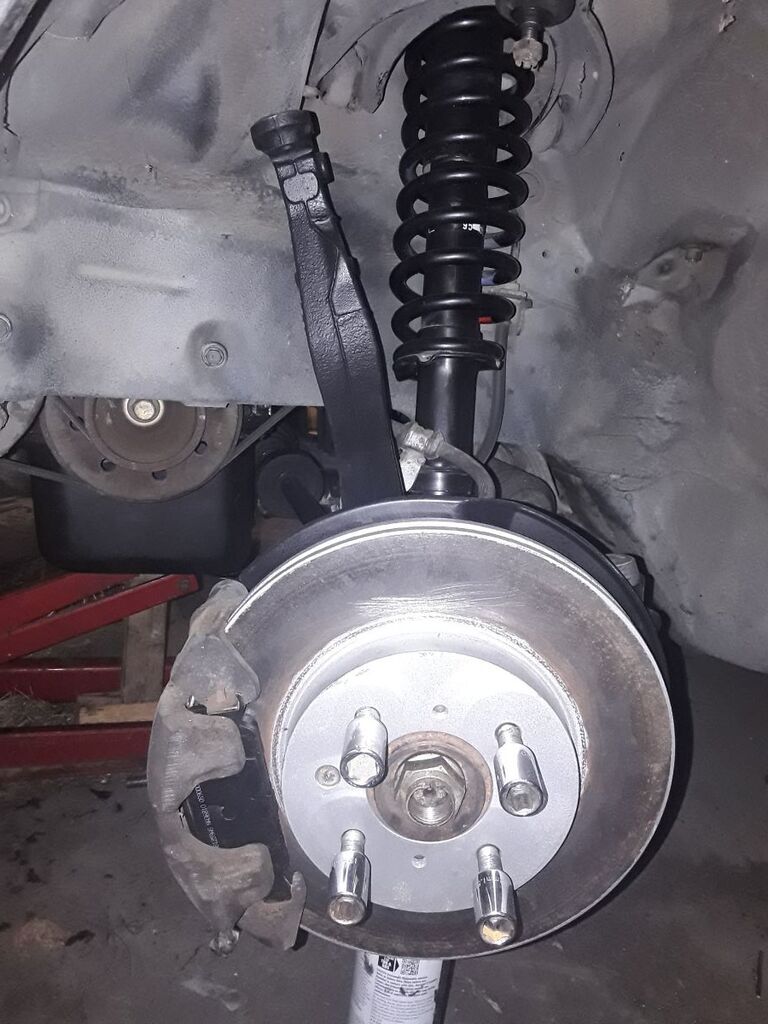 Despite having the larger Integra calipers that Honda would have used for these brake discs, and a pair of the even larger early CRV calipers as used on the Integra Type-R to fit 280mm discs I realized both were significantly heavier, I think it was 250g & 500g each respectively (unless it was 500g & 1kg!), and having larger wheel cylinders would also mean fitting the larger matching master cylinder and changing brake booster, proportioning valve and brake line positions to match... I compared my existing brake pads to the Integra ones and decided to retain my existing calipers with the larger discs.... 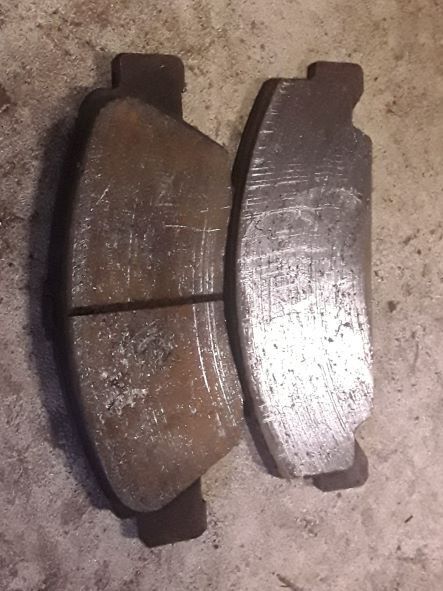 Checking parts books it appears early Honda Odessey also used these calipers with the 260mm discs... |
| |
Last Edit: May 15, 2023 10:44:22 GMT by 79cord
|
|
79cord
Posted a lot
Posts: 2,609
|
|
|
|
Spotted a good rear 1/4 panel at a wreckers & spent a few hrs removing rear side window & hacking off the complete corner with hack-saw, hammer & chisel in anticipation of the horror that might lurk under the body-filler & paint. 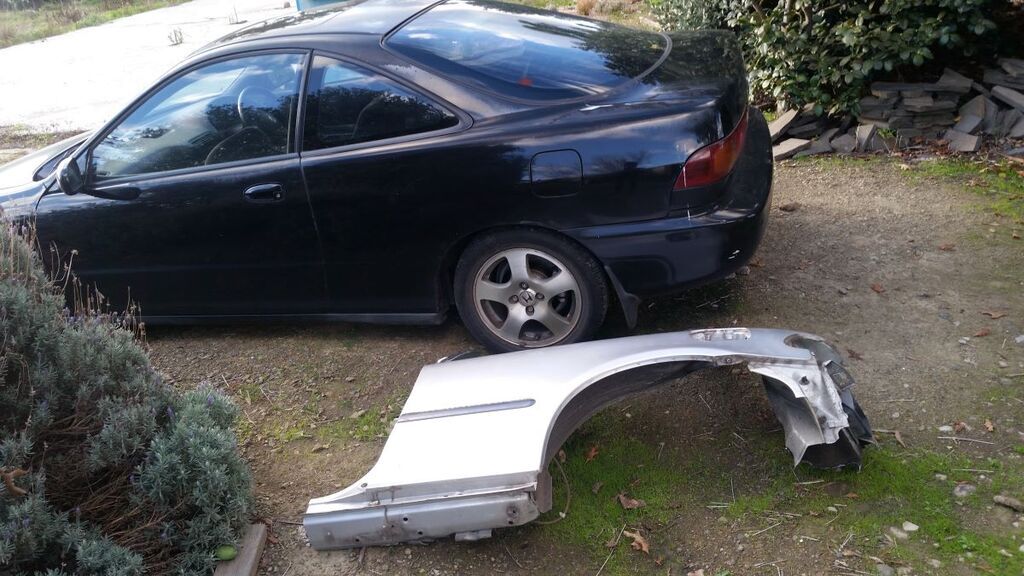 Extra bulk of the Integra & it's huge rear hatch come in useful again. Don't think I could live with a sedan or proper coupe. 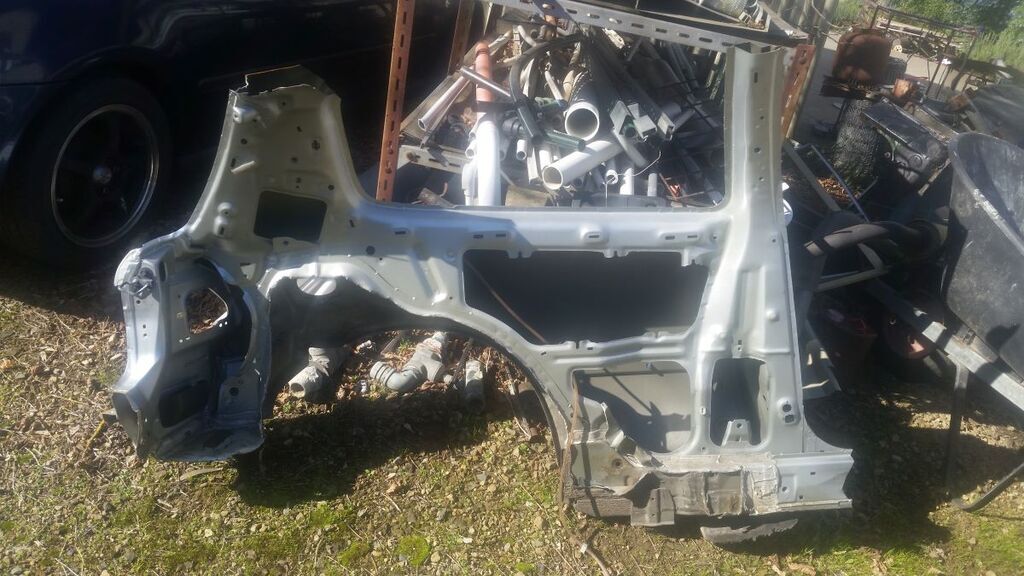 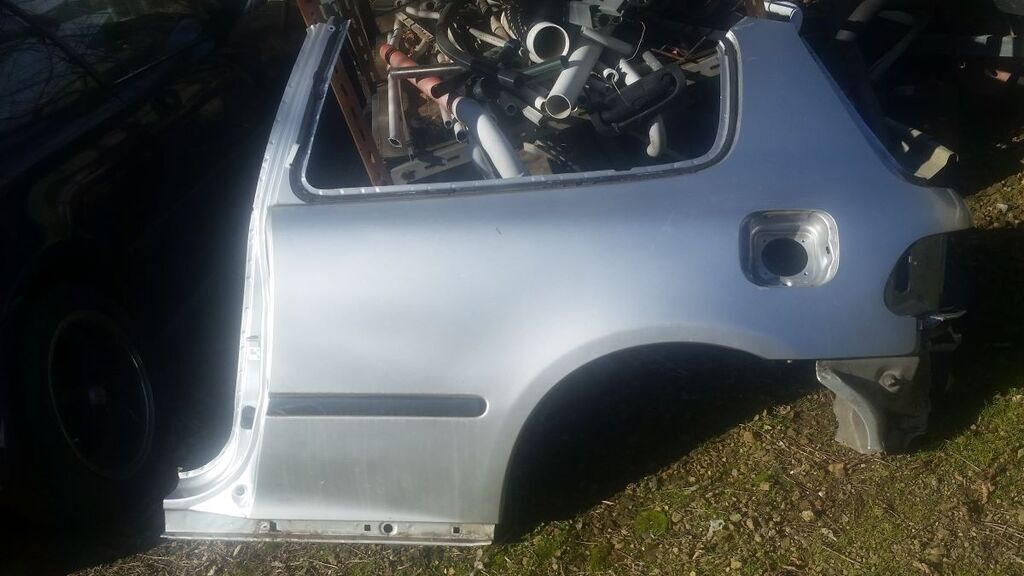 Even if I didn't need it, I think I'd be waiting a VERY long time if I wanted another! Then it was time to do something about the slipping clutch; might as well fit that engine at the same time! 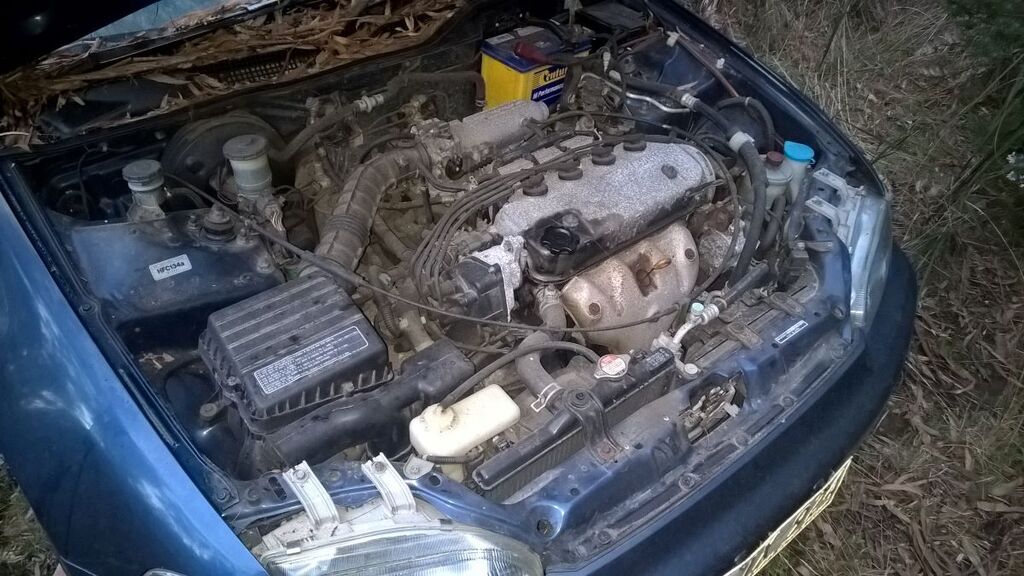 I could fit the much more powerful B18c drivetrain complete and running out of the blue Integra.. But I still know someone with a decent, or at least salvageable Integra body gutted for it's drivetrain & brakes if I was ready for another, & already had my DC2 Integra to know what it was like (same w-base, suspension & floorpan as EG Civic with longer overhangs and a bit more weight in its drivetrain, options & glass)I also have the old, seized B18c to rebuild I could also fit, perhaps even fit that to a 2.0l CRV block if it were too far gone. Though I'm still on the lookout for an ECU for it. But I thought the D16y1 should be fun enough, remembering a brief drive of one & it's extra little buzz of power at higher revs once the wilder vtec cams engaged, and it weighs less than the B18 drivetrain (25-30 kg I think between heavier engine, transmission & equal-length driveshafts) nothing signifigant in any particular area, but it all adds up... So new clutch, lightweight flywheel & timing belt bought & fitted.  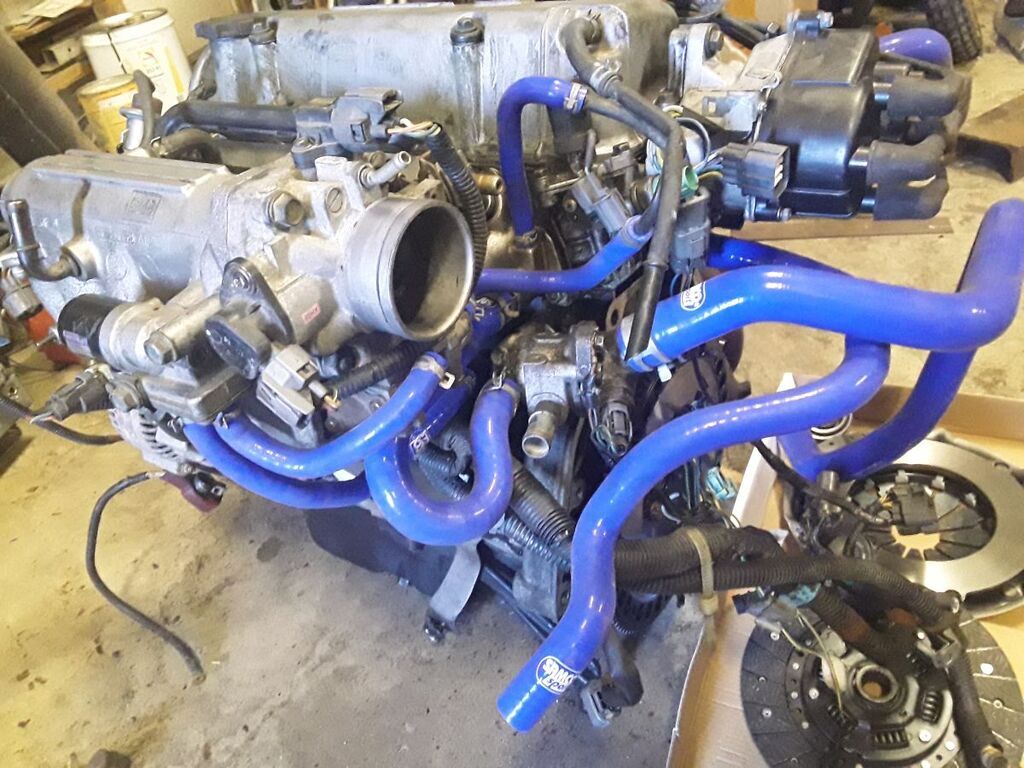 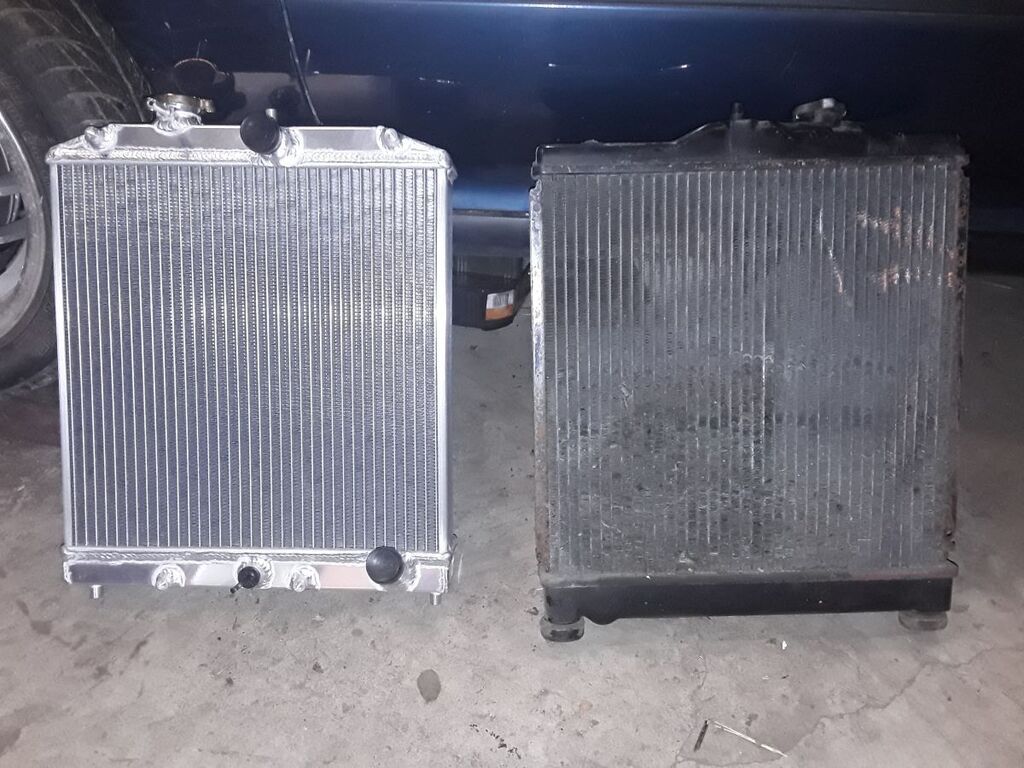 And new, slightly thicker aftermarket aluminium radiator & gaudy silicone hoses that came with it, as the original radiator was looking well past it's prime, and many distrust the fragility of old plastics header tanks & their hose necks.... Also bought aftermarket adjustable timing gear & clear belt cover since these aftermarket accessories simply won't be available (or so cheaply) for long really. 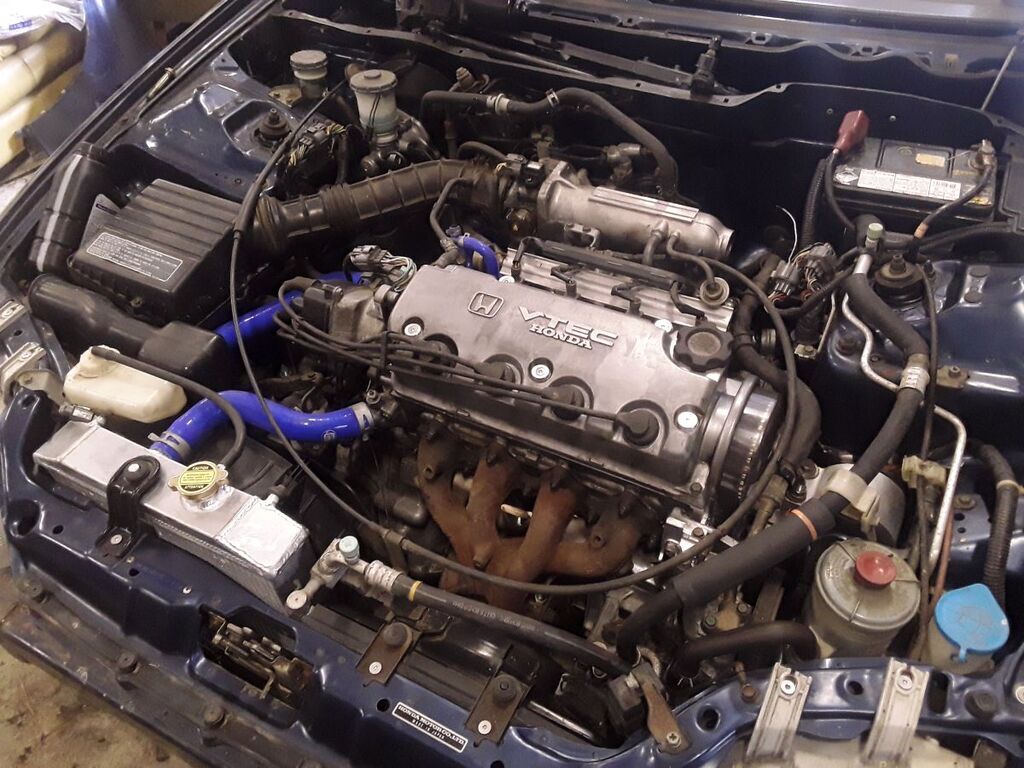 Clear timing belt cover clearly designed for the EK & later derivatives of the engine & needed minor cutting & sanding to fit, & found a similar problem with the water-pump pulley that came with my timing belt kit not fitting under the original cover, obliging me to source another water-pump (it was a VERY cheap belt kit though, making it worth buying the kit intended for EK/HR-V). Still need a heatshield for the D16y1 exhaust manifold (4-2-1 compared to D15 4-1), but will probably fit lighter aftermarket tubular manifold eventually anyway (& have to make heat-shield for that too). Also replaced suspect brake booster & master cylinder. And after all that the wrecker engine seems to rum well but perhaps a bit smokey with only a few brief drives up & down the drive..... Compression test seemed ok I thought, so will try replacing valve seals before I worry too much! . |
| |
Last Edit: May 20, 2023 1:24:41 GMT by 79cord
|
|
|
|