bazzateer
Posted a lot
 Imping along sans Vogue
Posts: 3,653
|
|
|
|
I have a trailer tent available which requires some work, a little damp on the canvas has caused some black mould marks but should clean up and be OK after re-proofing. Only one mattress. Has a sink but no cooker, I got one from Halfords for about £30. It's a braked trailer and the brakes work fine. Includes a nice big awning. I was going to turn it into a box trailer but never got around to it. Pics here on page 4. retrorides.proboards.com/index.cgi?board=readersrides&action=display&thread=69579&page=4Can even deliver it to Winchester on one of my many trips to Fareham. Looking for £75 delivered to Winchester. PM if interested. Baz |
| |
Last Edit: Jan 1, 2013 20:57:48 GMT by bazzateer
1968 Singer Chamois Sport
1972 Sunbeam Imp Sport
1976 Datsun 260Z 2+2
1998 Peugeot Boxer Pilote motorhome
2003 Rover 75 1.8 Club SE (daily)
2006 MG ZT 190+ (another daily)
2007 BMW 530d Touring M Sport (tow car)
|
|
|
|
|
|
|
|
|
I have a trailer tent available which requires some work, a little damp on the canvas has caused some black mould marks but should clean up and be OK after re-proofing. Only one mattress. Has a sink but no cooker, I got one from Halfords for about £30. It's a braked trailer and the brakes work fine. Includes a nice big awning. I was going to turn it into a box trailer but never got around to it. Pics here on page 4. retrorides.proboards.com/index.cgi?board=readersrides&action=display&thread=69579&page=4Can even deliver it to Winchester on one of my many trips to Fareham. Looking for £75 delivered to Winchester. PM if interested. Baz PM on its way |
| |
|
|
|
|
|
|
|
January Update........ disconnected the wiring and marked up all the wires.  cut away most of the cab, and removed it off the chassis  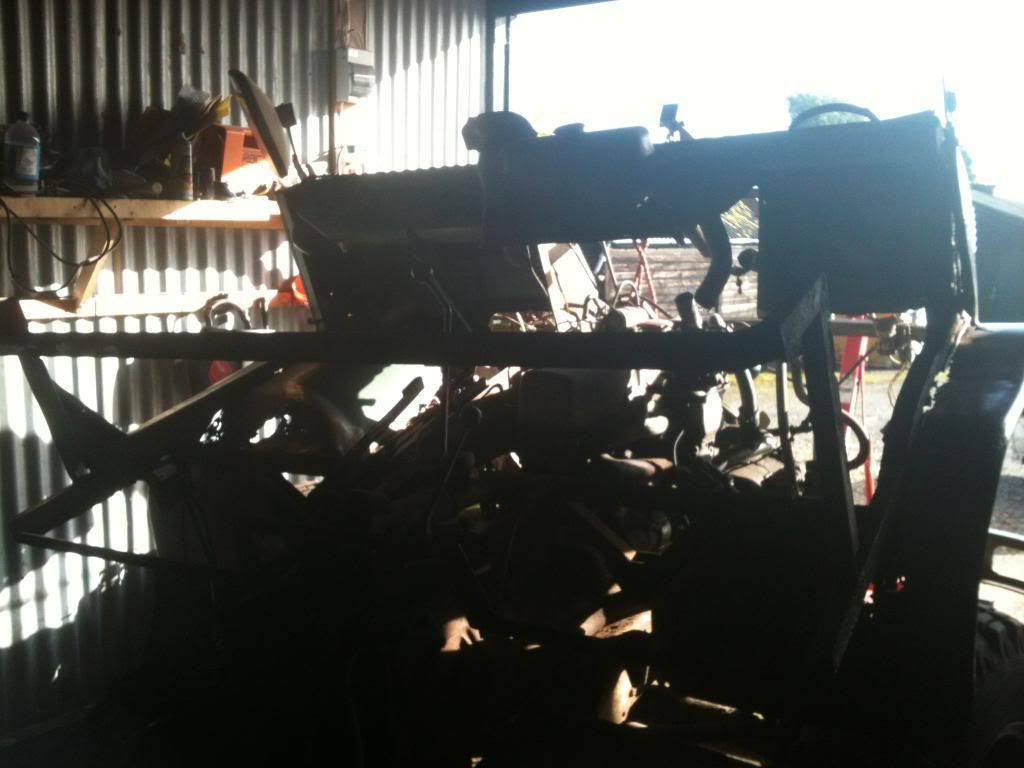  on the same day decided as the engine hoist was in the right place, I might as well get the engine out, to make life easier sorting the brakes out and cleaning and painting later on.   made some room to put the old cab section on the floor in the workshop, its surprising how much room the cab and engine take up when they are out of the chassis. The next stage is to change the brake master cylinder - once I save up for it - its the next BIG expense on the project, and get the brake system working. then start to fabricate the cab and inspect the engine. thats it for january now, the next lot of work its pretty uninteresting, so will update when there is something to show. |
| |
|
|
|
|
|
Jan 27, 2013 12:28:41 GMT
|
|
Looking good!
|
| |
1971 Range Rover
1977 Jeep Cherokee
1982 W123 Merc 230CE
1992 Peugeot 405 TD Saloon
1995 Peugeot 405TD Estate (having a rest)
1990 Peugeot 205 CJ - For Sale
1985 Peugeot 305 GTX
1979 Honda Accord MK1
1995 BMW E34 TDS
1994 BMW E34 TD
1998 Mercedes 320 CLK
|
|
|
|
|
Jan 27, 2013 15:12:24 GMT
|
|
Some heavy lifting there!
|
| |
Club Retro Rides Member
|
|
Sven
Part of things
Posts: 341
|
|
Jan 27, 2013 21:03:44 GMT
|
|
Show us her tits ... err ... engine ...
|
| |
Last Edit: Jan 27, 2013 21:04:07 GMT by Sven
1969 Chevrolet 4x4 C10 Pickup
1969 VW extended cab pickup (doka)
1980 Volvo 240DL
1995 Mazda Miata MX-5
2007 Toyota FJ Cruiser
2007 Dodge Ram 2500 Cummins Diesel
2011 MK Indy R (building)
|
|
bazzateer
Posted a lot
Imping along sans Vogue
Posts: 3,653
|
|
|
|
|
Good to meet you on Saturday Dave, I see you finally got that bolt out!
|
| |
1968 Singer Chamois Sport
1972 Sunbeam Imp Sport
1976 Datsun 260Z 2+2
1998 Peugeot Boxer Pilote motorhome
2003 Rover 75 1.8 Club SE (daily)
2006 MG ZT 190+ (another daily)
2007 BMW 530d Touring M Sport (tow car)
|
|
|
|
|
|
|
right then its been a little lacking in updates the past few months, basically I had nothing decent to show for it. the main things that have been done in the last batch of work removed engine, checked and adjusted valves etc, remade some fuel pipes - the ones on it a furred up inside almost completely blocking the fuel, how it got enough to keep running I don't know?  I have removed the cab, knowing it was very rusty, only hadn't counted on it being as rusty as it was........ I collected some new wheels and tyres and aspare engine and gearbox for it from a very nice chap who was very close to me (25 miles away) at the time he had a very nice condition cab he was using on his mog - waaaay nicer than mine, long story kept short is Ii now own that cab, and have fitted it earlier on today to my chassis.  it has saved me weeks of work trying to make a silk purse out of a sows ear so to speak. other things I have done, fitted a new master brake cylinder imported from germany - a tad expensive but needs must, also made up a few brake lines, which are an odd size? 1/4 pipe with metric m12 brake unions painted the chassis in gloss black. thats about it, but getting ever nearer to being able to drive it out at least. next update is building the rear section of the cab to add the extra row of seats....... |
| |
|
|
|
|
|
Jun 15, 2013 21:16:07 GMT
|
|
major leap forward this month......
well the last couple of months have been spent on family things and no work was done on the mog at all, my mate needed a load of welding on his vw t4 camper project so I have been helping on that, I finally got round to doing some work on the mog, mostly to get some forward motion, and also as my mate needs to paint the camper van, the mog needs to move under its own steam to get out of the barn, as, so the electrics were re wired, with new fuse boards and modern fuses etc. the original wire was in sound condition which saved a job, the dizzy was rusted through so I rebuilt it with new internals. the HT leads were all shot so I made some new ones using the original screw fittings. a temporary fuel supply was installed and the wiring completed to the starter motor.
Who would have thought that at the first attempt it fired up - albeit briefly as there was no exhaust at all, so it was some what louder than you might expect!!!
The mog now moves under its own steam, with a pin pric hole in the radiator which is annoying as it must have picked it up during storage over winter, all the coolant hoses are new. the master brake cylinder is installed but I forgot to bring the new fluid to the barn to bleed them through, so I gingerly moved it out of the barn and parked it round the back using 1st gear and no brakes again!! plus I have to use the throttle linkage on the carb as the throttle peddle is not attached yet.
the videos shows it starting up and moving for the first time , and the very slow drive 200 yards to it temporary resting home whilst painting commences on the camper
this is moving it from the barn....
this is moving it round the back, not much going on as I had to drive really slowly due to lack of brakes, parking in a car spot round the back it challengin and a little tiring on the arms with all the steering wheel turning.
|
| |
|
|
jpsmit
Posted a lot
Posts: 1,254
|
|
|
|
|
Love this project and love love love the dangling tail lights! keep us posted
|
| |
|
|
|
|
Tim
Posted a lot
Posts: 3,340
|
|
|
|
|
Nice one Dave. Thats fantastic progress
|
| |
|
|
|
|
|
Jun 29, 2013 21:08:56 GMT
|
didnt get too much done on the truck today, I was working on my bosses rally car after he ran over a rather large rock and punctured the passenger foot well. Welded up some seat bases for Mikes camper van project (its in the background of some of the photos) then when all that was done I moved the Mog round to start work....... I cut and welded the rear frame of the cab together at fixed it to the uprights of the front part, It has to fixed in a diamond shape as the chassis flexes when offroading, if It was fixed in the corners the cab would flex and pop the doors open amongst other things. so I made a chassis mounted 'bracket' to fix the rear end to. I primed the master brake master cylinder, as I still have no brakes, unfortunately another brake pipe had a pin prick hole in it, So the floor ended up with brake fluid spraying out, that means another brake pipe making session. some pictures of todays frame building..... 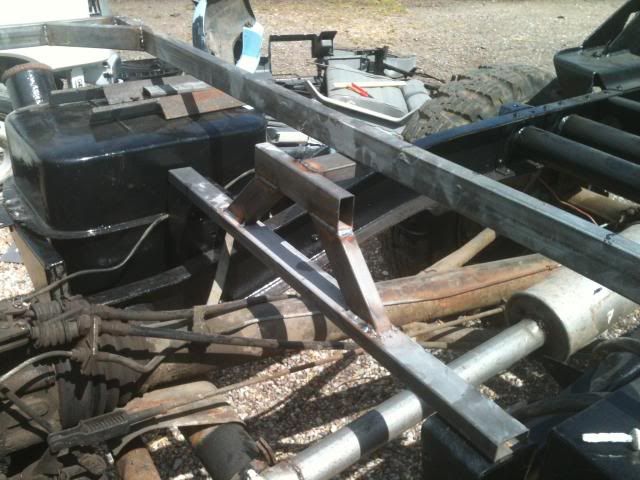 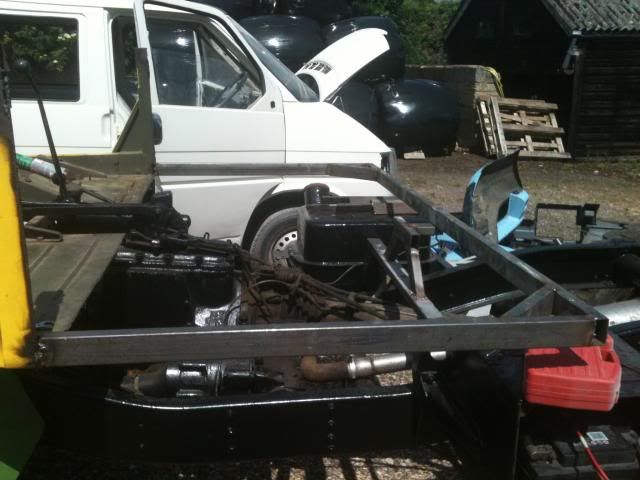 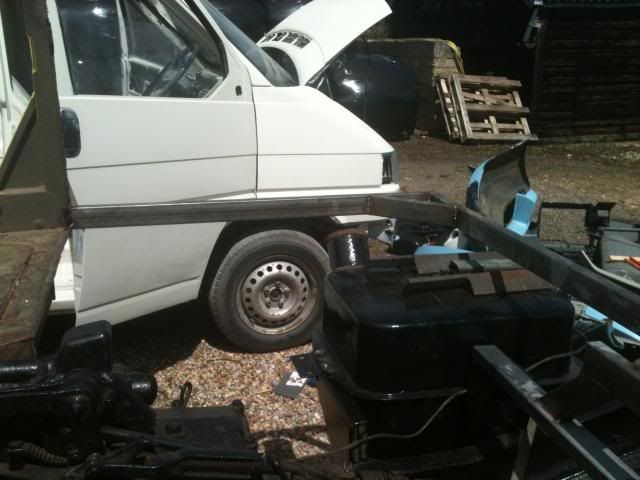 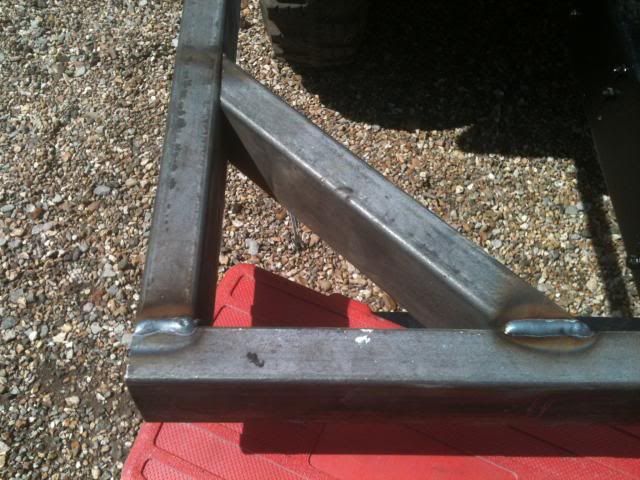 |
| |
|
|
|
|
|
Sept 16, 2013 19:27:17 GMT
|
|
|
| |
|
|
eurogranada
Europe
To tinker or not to tinker, that is the question...
Posts: 2,487
|
|
Sept 17, 2013 8:23:55 GMT
|
|
Very cool project. Nice to see some progress!
|
| |
|
|
|
|
|
May 11, 2014 17:27:48 GMT
|
Well its been more than 6 months since the last update.... To be honest is doesn't 'look' that much different, but a load of work has gone on underneath and with the engine and running gear. It had a temperamental misfire and bogged down under load, so checked and rechecked everything, eventually turned out to be one of the floats in the carb filling with fuel, and also catching on the float chamber wall. I haven't had much chance to get to the workshop over the last 6 months, what with second child, new job working away fairly often etc etc. I got a little side tracked by purchasing another project(BMW e30 touring turbo project) but the Mog is getting to a point where I will be able to drive it on the road outside the farm soon. I have it insured (£120 with recovery) I made the rear flat bed the other week, its 6 feet square. I have added some photos below of where it is at the moment. I hope to get some more time on it, as its needed at my brothers place to clear some fallen trees, and needs to earn its living too!! 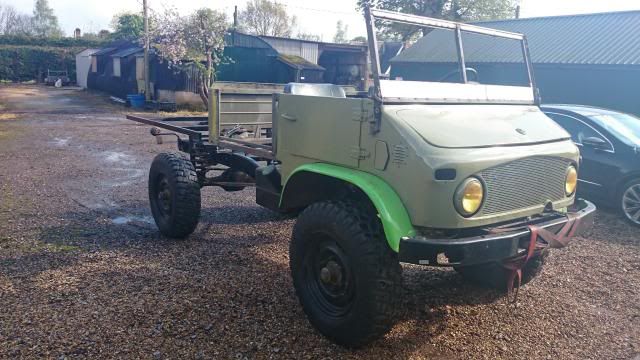 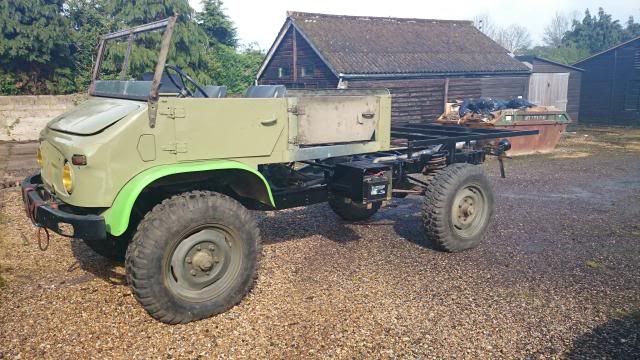 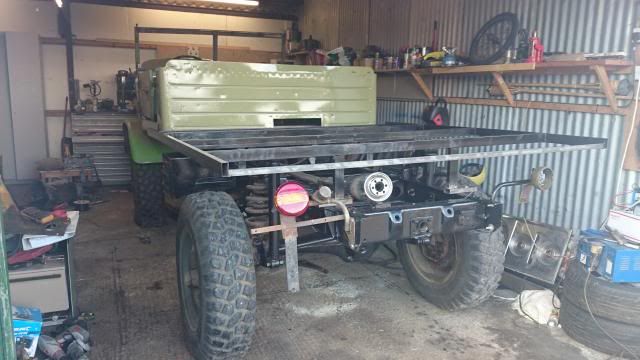 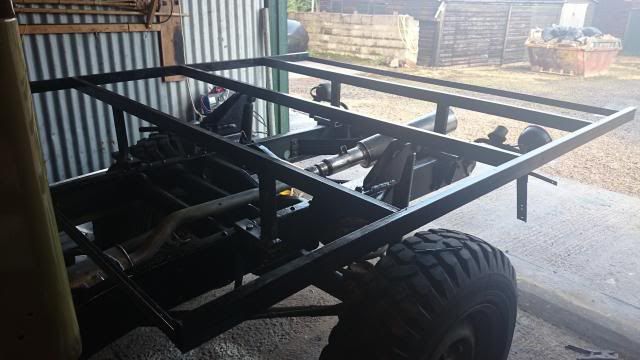 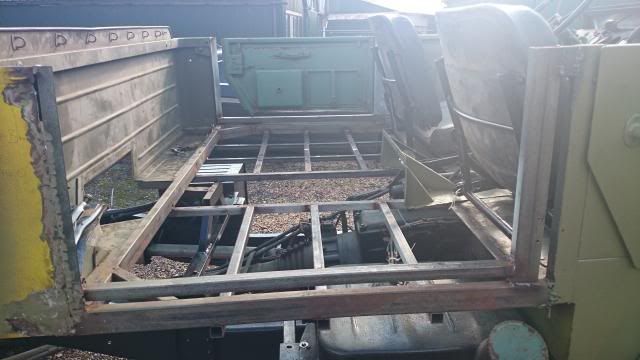 |
| |
|
|
|
|
|
May 11, 2014 21:12:35 GMT
|
|
Nice project keep up the good work.
|
| |
|
|
|
|
|
Apr 22, 2015 20:53:19 GMT
|
Well after a rather long break from doing anything of note on the Unimog, I have something worth reporting. I removed all trace of the old petrol fuelling system, the tank, pipes, filter, mechanical fuel pump, and carb and replaced it all with a full propane conversion kit. I have to say that the transformation is nothing short of spectacular!! it is like a different truck, it idles perfectly, starts on the button, and has power to spare. no over fuelling on what, no enriched black smoke out the exhaust, It couldn't be smoother running if it ran on the blood of the Hoff!! the story goes that I was searching ebay for Unimog parts on the off change something came up that I needed, and there it was a LPG propane kit off a Unimog 404, it took me all of 10 seconds to wack a bid on, three days later I won it for £255 and all I had to do was drive from Southampton to Sheffield and back on a Sunday morning to collect it. (500 mile round trip) Brian who I collect it from was an exceptional guy, I didn't have long to chat as I needed to get back to Southampton for something. The drive back was somewhat hairy, as although I had taken reasonable precautions I was still carrying pressurised fuel cells in the boot. anyway a nicely uneventful drive back to the barn I dropped of the kit, which I have to say is very heavy, as both tanks were full. and set off for some work, I went back to the barn on the Monday and decided it was the motivation I was waiting for to get the Mog back out, the kit took 1 1/2 hour to install, including taking off the old kit, I temporarily fitted the tank in the cab and ran the pipe under the floor to the vaporiser, refilled the radiator and fitted two fresh batteries, I turned the ignition, and to my surprise the engine fired up immediately, no hesitation, no nothing, it idles perfectly, and I was well happy!! so Drove it to the barn and fitted the proper tank to the chassis, conveniently the previous owner thought it wise to use existing bolt mounts, so I didn't even need to drill a single hole!! the kit runs off a valve on the tank, no solenoids or electrics are needed, its great, I now have a fuel system that has no moving parts, and no electricals to go wrong. the tank has its own fuel gauge too! It runs so well that I forgot to turn the gas on, and it was able to start drive round the farm, and get halfway through reverse parking before it needed any fuel from the tank, it has increased fuel efficiency from about 4 MPG to at least 16MPG. And it has a rapid throttle response too!! Here are some pictures of the fitting of the kit. Here is the engine bay kit ready to go in. 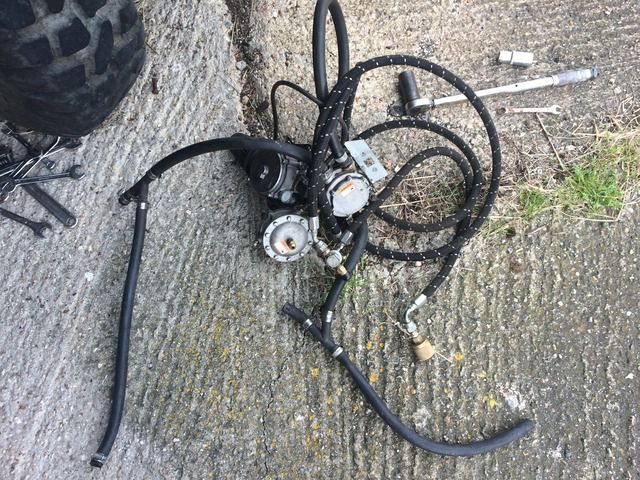 Here's the original zenith NDIX32 carb and inlet 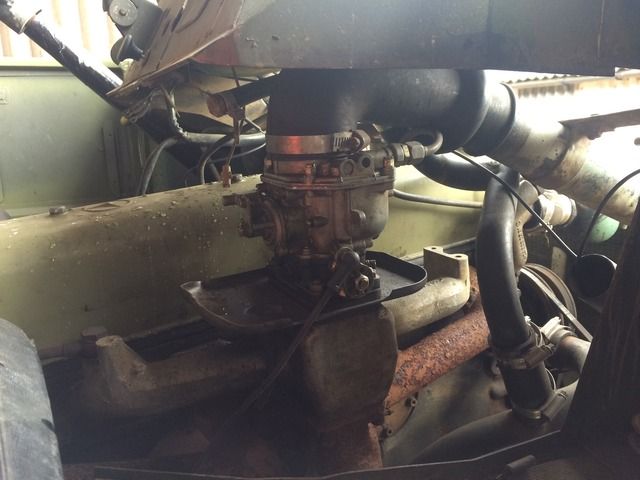 Here's the new Impco 100 series propane carb in its place 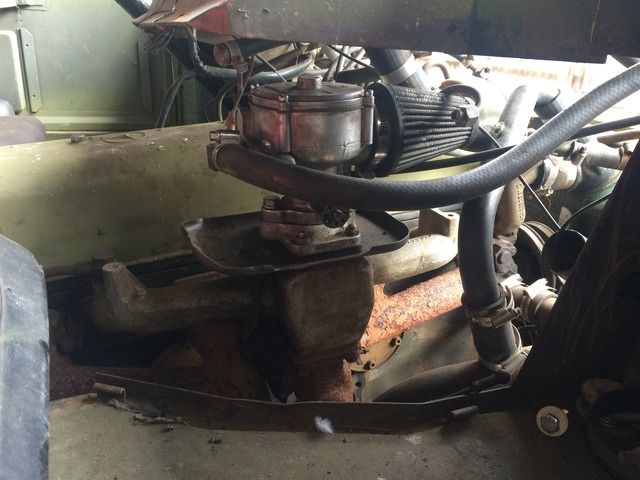 Here's the vaporiser and pressure reducer thing, mounted where the oil catch intake filter housing would normally be. 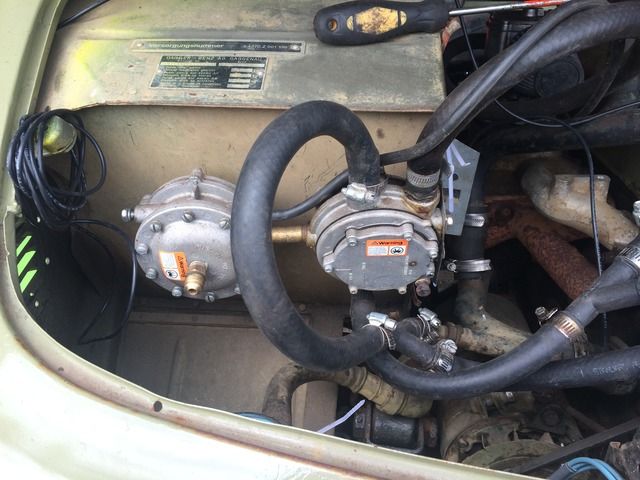 Here's a video of it running for the first time, genuinely just moved it out from the storage barn to stop and film the engine running for the first time in about 8 months or so... I am really motivated to get some serious work done on the Unimog, and get to use it this summer, I have a summer fete a work colleaugue would really like it to attend early June, so there is a deadline to have it up and running and road legal for then. I will try and put some more regular updates on progress from now on, as I will be doing it in between the day job, and family responsibilities. regards Dave |
| |
|
|
|
|
|
Apr 22, 2015 21:18:26 GMT
|
|
what I think is brilliant is the "club cab" idea....very cool...are you still going to put a tent trailer on the back? We have had a "pop up" camper for years...grafting one of those back there would be very cool...You can even put a worm drive electric lift on it...some of the newer ones have those....
looking forward to more progress!..
JP
|
| |
I know its spelled Norman Luxury Yacht, but its pronounced Throat Wobbler Mangrove!
|
|
|
|
|
Apr 22, 2015 21:42:24 GMT
|
|
I HAVE A PAIR OF UNIMOG nos WIPER BLADES IN THERE ORIGINAL PACKS IF YOUR INTERESTED
|
| |
|
|
|
|
|
Apr 22, 2015 21:50:24 GMT
|
|
Impco LPG gear is great but please for your own sake get some electronically operated shut off valves fitted to the system, if its as you describe it then if you have a crash and the engine stalls then the gas will still continue to flow, likewise when you turn off you'll need to manually shut off the gas.
There's going to be very little cost involved, the dearest bit is the sensor switch which determines if the engine is running/ cranking or not and allows power to the gas solenoids - there should be 2; one on the multivalve of the tank and another at the vapouriser.
|
| |
|
|
|
|