|
|
|
Feb 25, 2024 22:41:26 GMT
|
Operation ‘Up Yours Ratty’ continues at considerable pace. The humongous pile of sand in the middle of the floor… 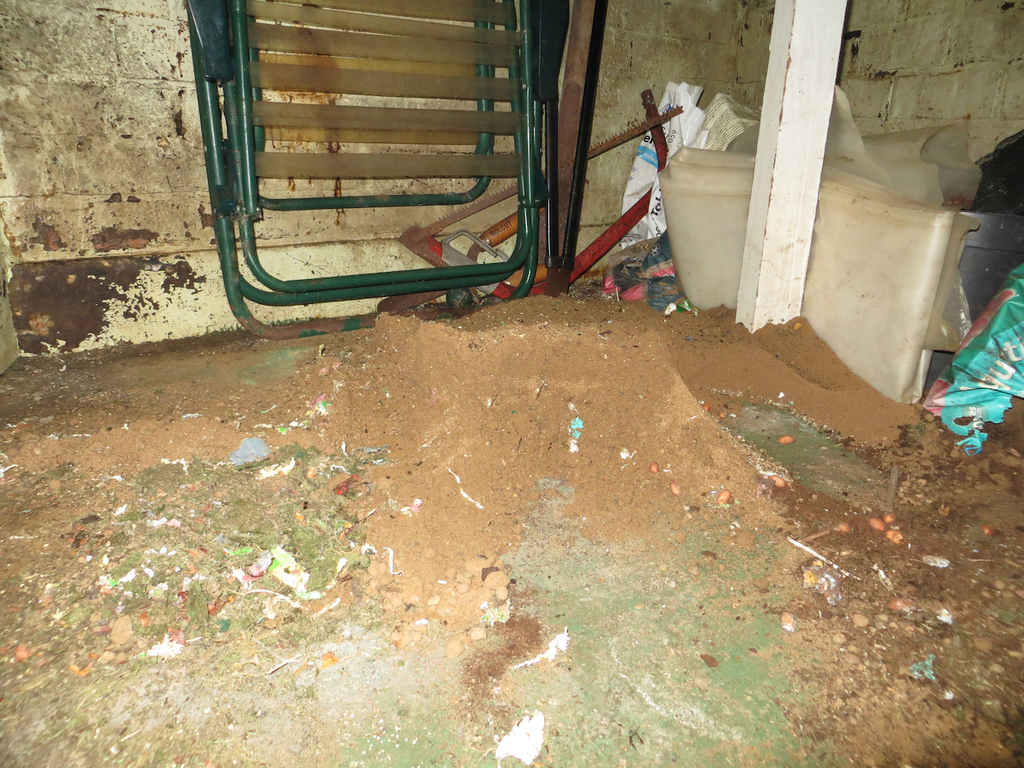 …Actually came from a couple of bags under the shelf off to the right. That means Mr Ratty moved it half way across the shed. I have to admit I’m very impressed with rats. Incredibly clever and incredibly industrious. Can you imagine how much I could achieve if I was a rat instead of a lazy doofus. No matter how impressed I am with Mr Ratty he’s still not living in my shed. We dug all the stuff out. 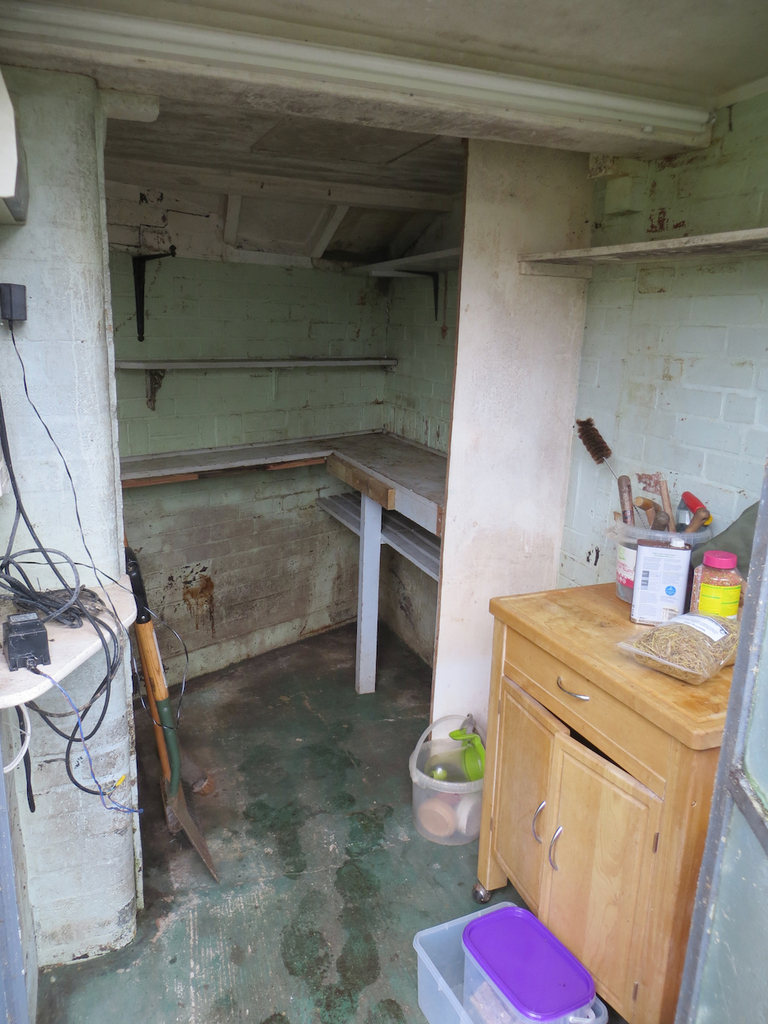 No sign of an occupied nest but there were a couple of piles of peanuts stored for a midnight feast and one spot where I think he could have been planning a cozy home. In the back corner of the shed was a hole big enough to chuck a dog through (assuming it was a small dog and you were a reasonable aim) so that got cemented up on both sides. 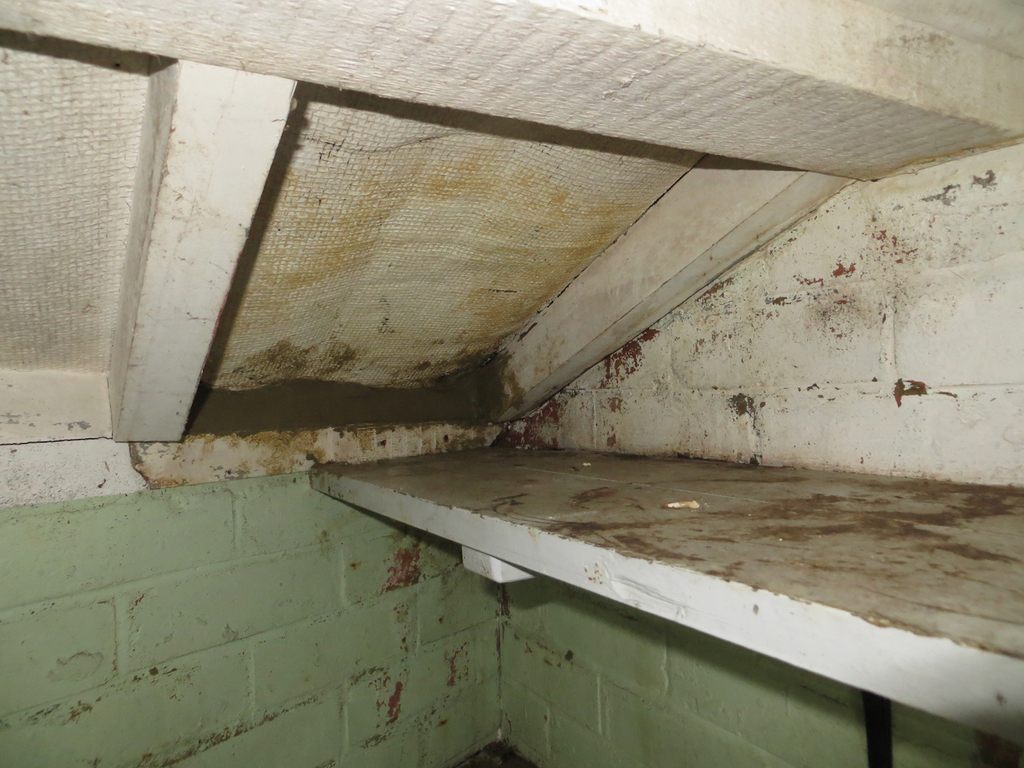 Speaking to Mrs Sweetpea I think we might take the opportunity to paint the interior to clean things up. That means giving it a damn good wash down first. I got the jet wash out and went to town.  I’m not sure what the health and safety people would say about jet washing your electricity while standing in a puddle of water. I actually teach an electrical safety course at work and nowhere does it say you can’t jet wash your electricity while standing in a puddle so I guess it must be ok. Right? And, anyway, nobody wants dirty electricity do they? James |
| |
|
|
|
|
|
|
|
Feb 25, 2024 21:53:42 GMT
|
Well hello apprentice bus mechanics! Sorry, I didn’t see you there, you caught me by surprise. During the last visit Ian had filled the differential and gearbox with oil.  It seems the diff has let a fair amount of the oil onto the garage floor. It’s not quite the Exxon Valdez down there but there is a fair puddle. Ian reckons it’s the pinion oil seal. It’s actually a worm drive and the input is underslung. If the input shaft seal is leaking it’ll leak most of the contents out eventually. Looking at the diagram below I’m not even sure what the pinion oil seal actually is.  Some sort of spring loaded thing? Ian said, “Being a Bristol the drive flange will be almost impossible to get off”. So that’ll be fun. While Ian started adjusting the brakes I thought I’d fit the speedometer. Five minute job right? Wrong.  When the cab was rebuilt there is now a structure that slightly overlaps the hole so the speedo won’t go back far enough to fall down the afore mentioned hole. As you can see it’s only about 4 or 5mm (less than a quarter of an inch in old money) but that’s too much. The troublesome part is this bit under the windscreen.  It’s a folded aluminium part that’s screwed to a piece of wood behind it. I unscrewed it and used the Powerfile to make a right mess in the cab cut a reveal in the wood so that the speedo would drop into the hole. 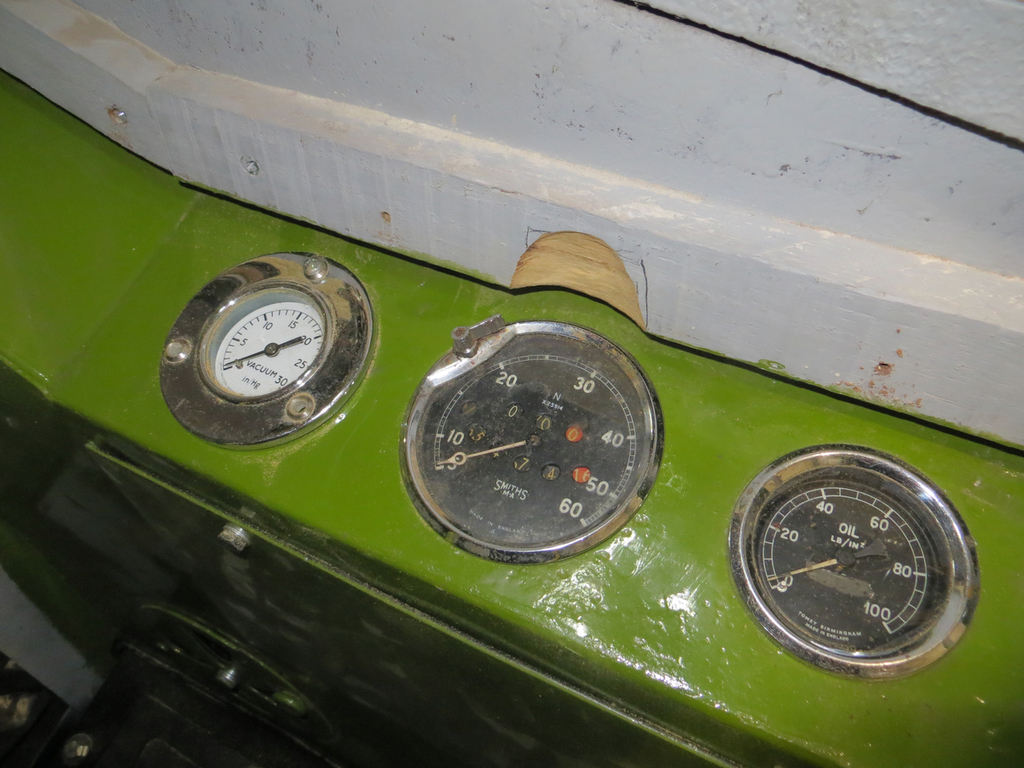 We considered bashing a reveal into the aluminium cover so that the speedo could be removed and replaced at will. But I didn’t want to make a bodge of it so I’ve decided to leave it alone. There’s only 7 or 8 screws so I can remove it in a few minutes. If it turns out to be really annoying I’ll give it a thumping with a planishing hammer some other day. Next we need to contemplate, restore, and rewire the dashboard illumination system. It’s a terribly complex system comprising of 2 12V lamps in 2 standard bayonet lamp holders. 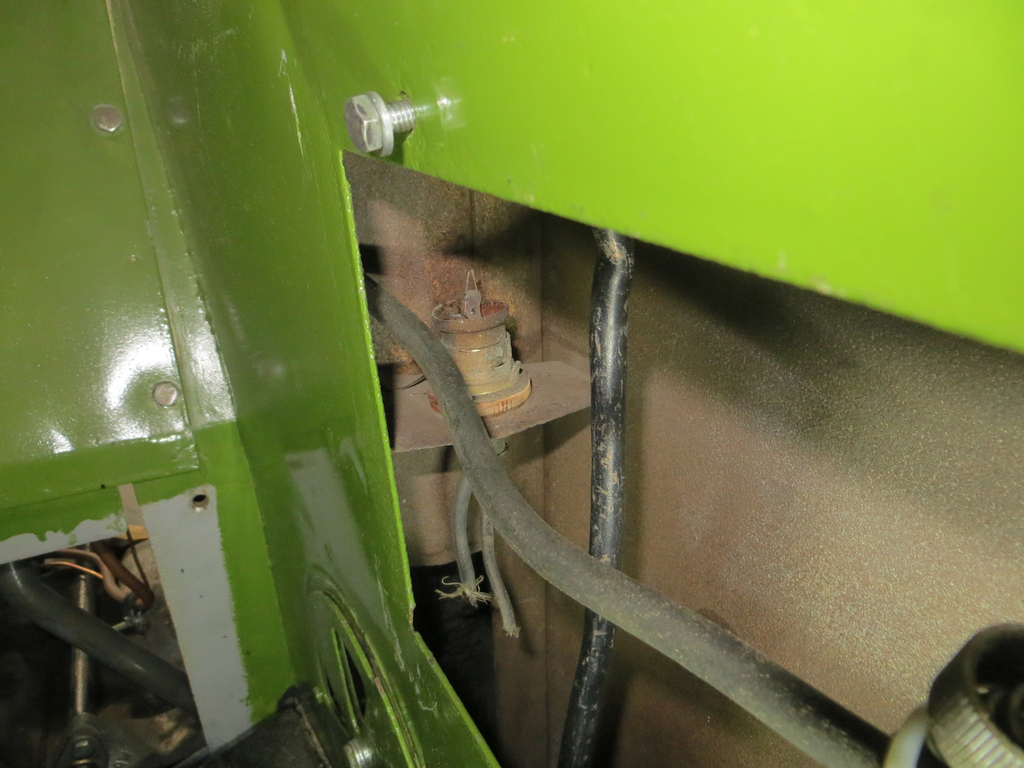 Both of them need to come out to rewire them but, let’s be honest, they aren’t going to come out in one piece. Predicting that this would be the case I had already bought some new ones and just cut the shade ring off the old ones with the powerfile as I had it there. 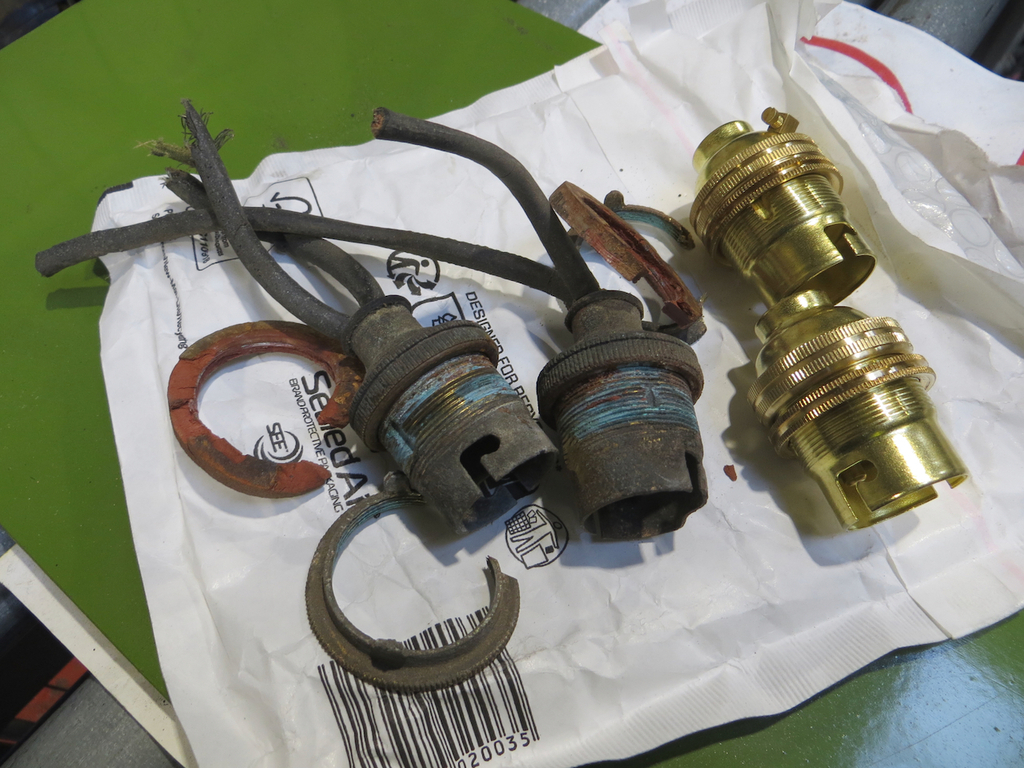 Easy when you have the tools. 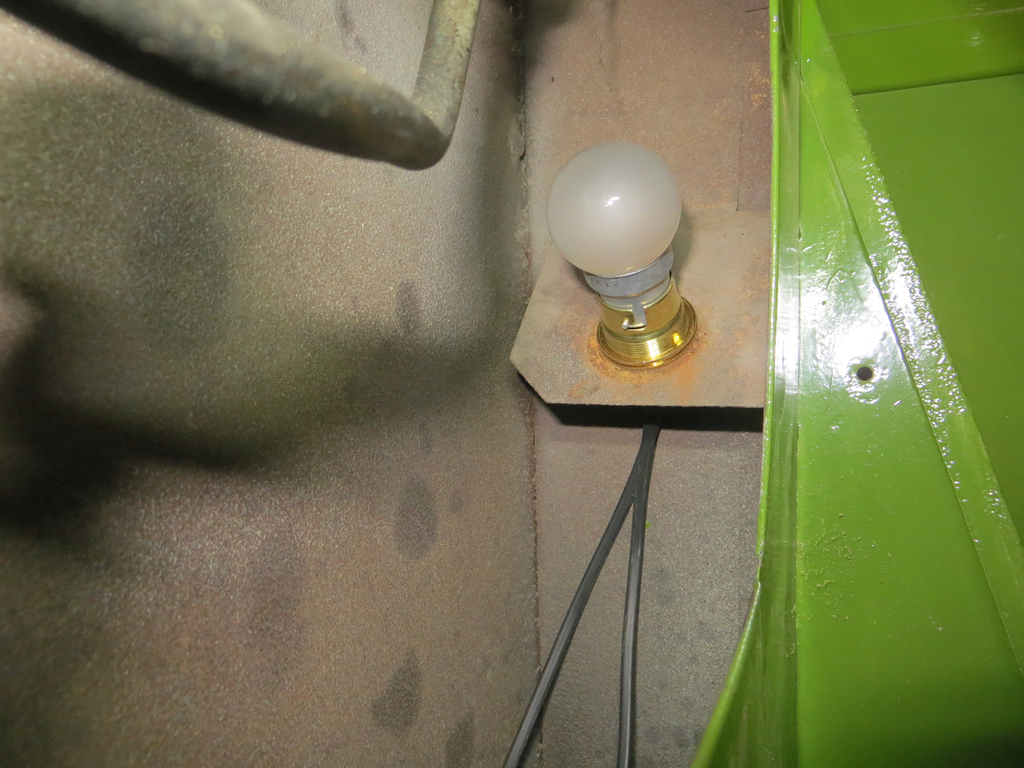 I wonder if they actually work? That means grabbing the battery off the shelf and connecting it up, then just turn on the sidelights. 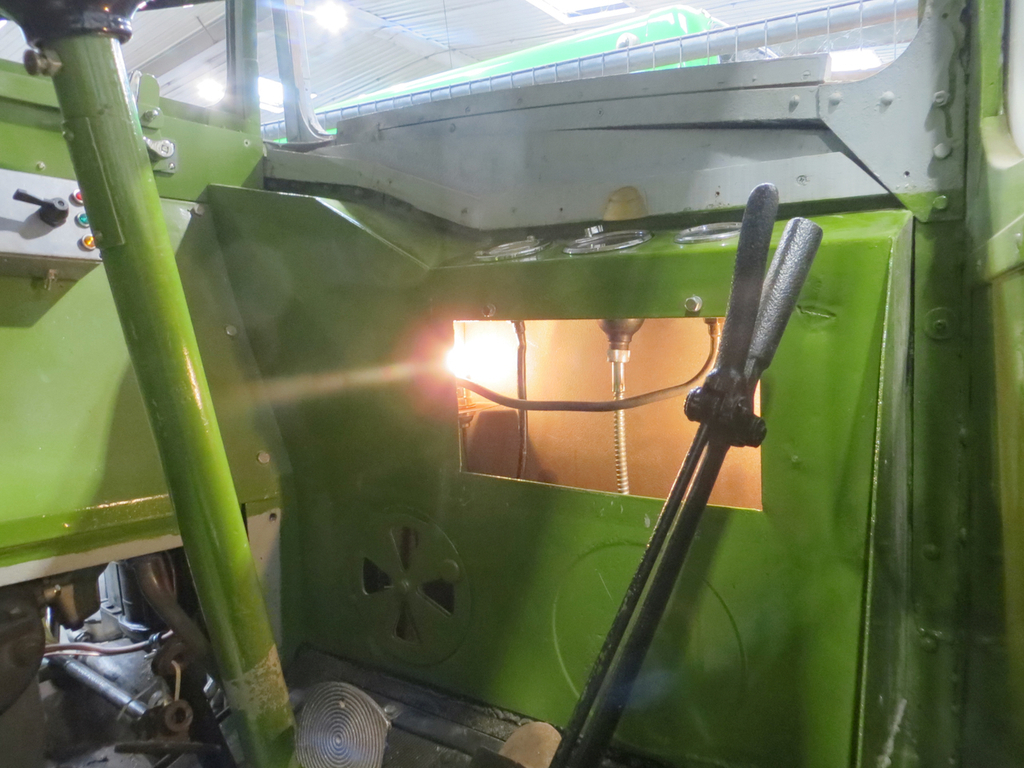 Yay! That’s all done then… Well, not quite. We are missing the bracket that clamps the speedo in the hole. As I didn’t want to lose any of the bits I screwed it all back together and basked in the glory of my accomplishments. 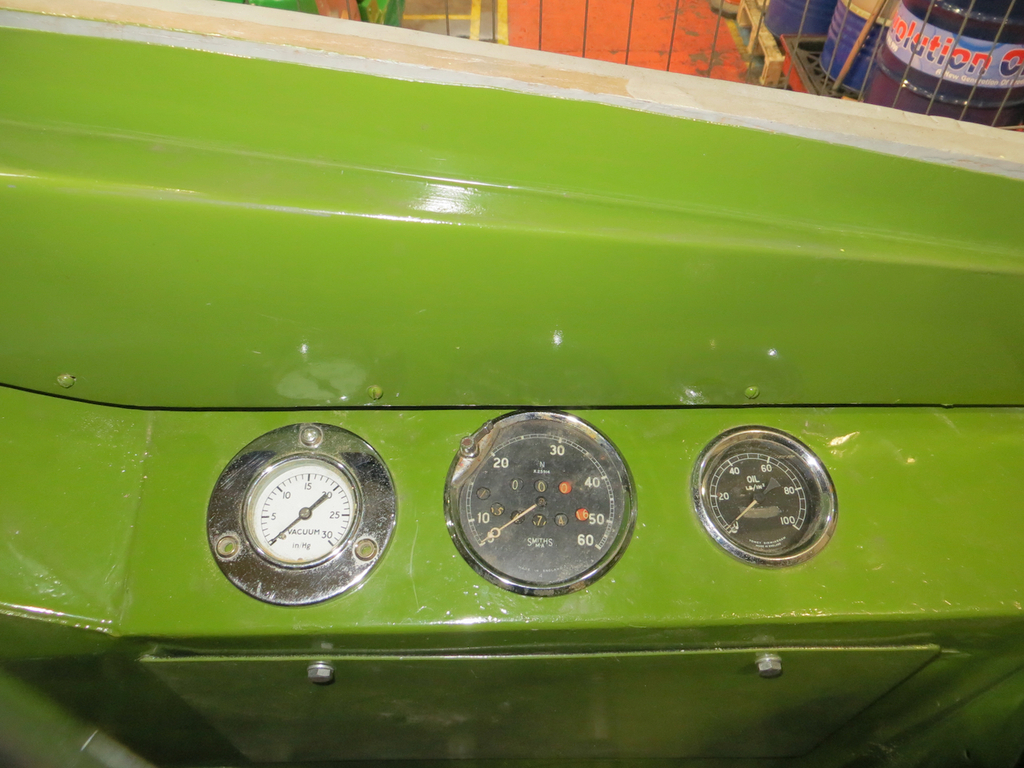 Now, you know I said that I’d grabbed the battery to test the lights? Well, we’d never actually put the battery on the battery tray. As it’s heavy I thought I’d fit it and clamp it down so I didn’t have to hump it around anymore. The battery trays are new so this is the first time they’ve had a battery on them. 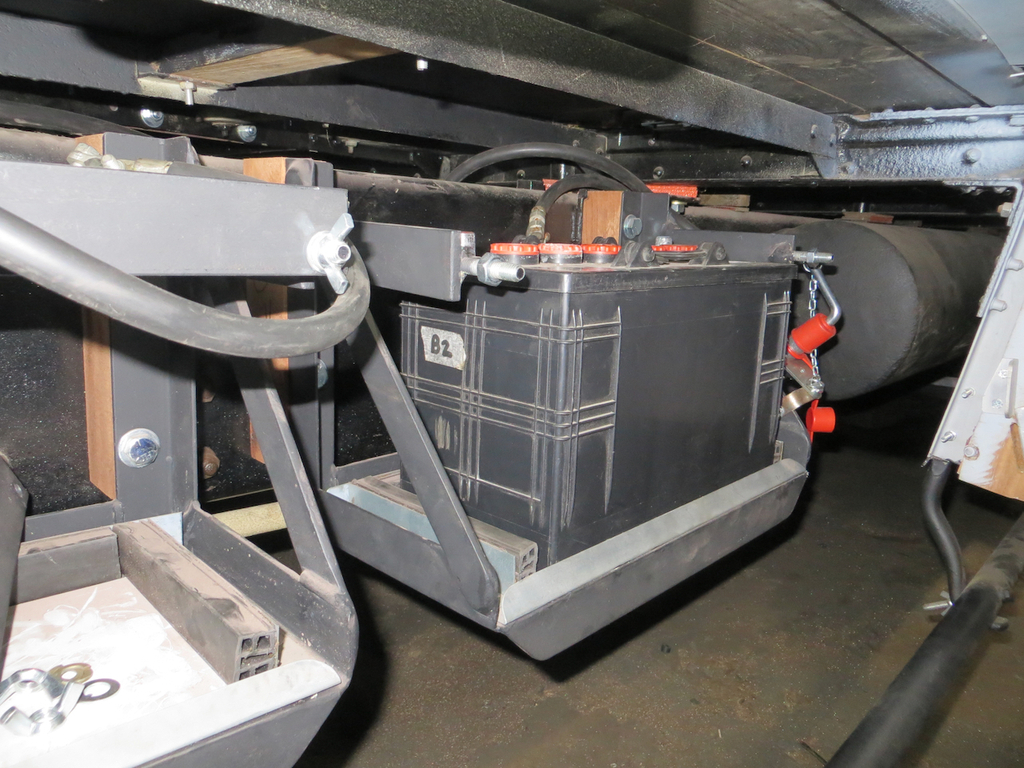 How long does it take to fit a battery to a bus? Five minutes? I think we all know how this is going to go don’t we. It turns out that there are a couple of problems. The general arrangement of the contrivance is like this. 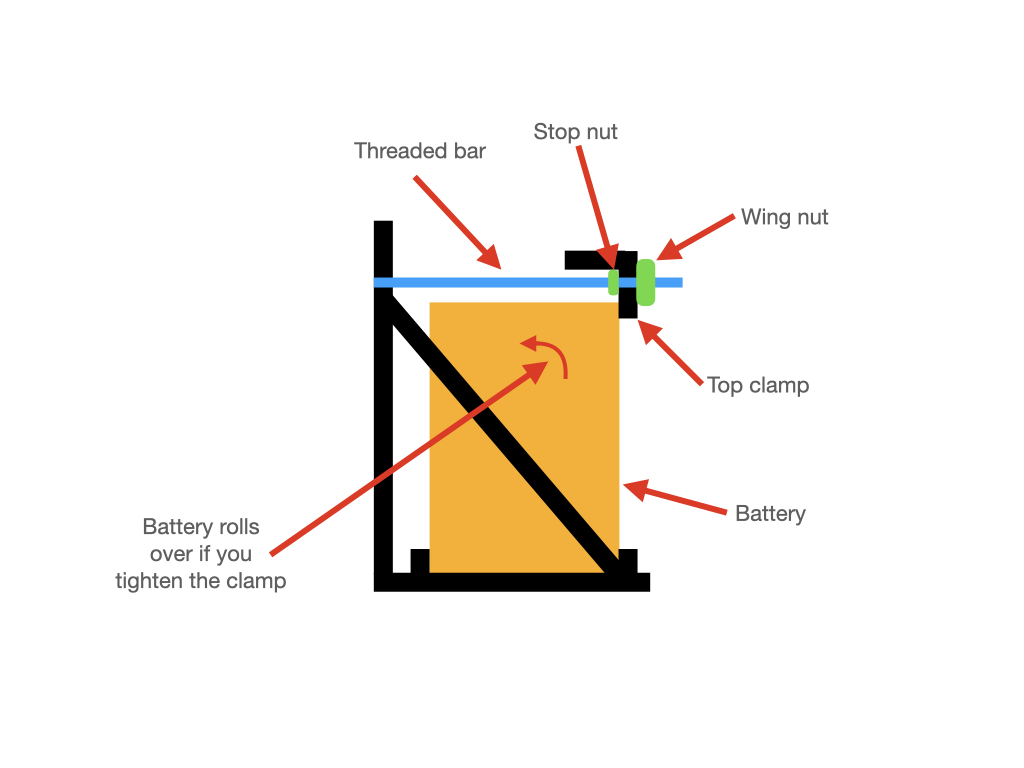 The problem is that the threaded bar is welded horizontally so it can only work with one height of battery. The one we have is slightly short so if you nip the top clamp in the ‘correct’ place (as shown above) the battery can just bounce around. If you back off the stop nut and try and tighten the wing nut it just rolls the battery onto its back because there is no top rail for the clamp to pull against. Ideally it needs the top clamp to pull down towards the opposite corner so it pulls the battery against the rail at the bottom. And if the clamp could swivel a little it could accommodate different heights of battery. If that’s as clear as mud, don’t worry. I have one of the battery trays back in my garage where it can be reimagined into something that works. All will become clear at some point in the future. Probably in tedious and needless detail knowing me. Now we can probably guess an answer to that question I asked earlier - ‘How long does it take to fit a battery to a bus?’ About a week by the time I’ve finished messing about. Maybe two. Anyway, while I was mucking with the batteries and after Ian got as far as he could with the brakes he started refitting the dampers.  It’s getting there. Just slowly. James |
| |
|
|
|
|
|
|
|
Cards on the table… My latest excuse is that I went on holiday. Mrs Sweetpea fancied some winter warmth and it seemed a bit silly to stay at home working on the MR2 so I, begrudgingly, went with her. The idea of not keeping in touch with you all was more than I could cope with so after a harrowing day lounging on a golden beach I did write a couple of the MR2 posts. Anyway we are back now. If you are a long time reader of this thread you might remember that back in 2018 we had a rat make it’s home under the decking just by the patio doors. This was a bit close for comfort and a bit annoying to hear it gnawing at the joists so I decided that I’d put it out of my misery. Well look, I’m a 6 foot monkey with opposable thumbs and a huge brain and it was a stupid rat. Just bait a couple of traps, leave them lying around in critical places under the decking and Mr Ratty was bound to stick his head in one of them and get squashed. Easy win. Apparently not. The war culminated in Mr Ratty stuffing loads of leaves in the trap until he set it off thereby diffusing it.  You have to be impressed by that. Eventually Mr Ratty just moved house. I guess he figured that the afore mentioned 6 foot monkey was so dismally thick that he went to find some more intelligent neighbours. I don’t know where he went, he didn’t keep in touch. Back to now… When we got back Mrs Sweetpea went down to the shed (a brick structure at the bottom of the garden) to do something with the bird food and discovered that the bottom of a wooden cabinet had been gnawed. Well that’s a pain in the biscuits. Especially when I lost the last round because that rats are hugely intelligent and I’m as dumb as a goat. I set up a couple of traps knowing full well that Mr Ratty wasn’t going to stick his head in them. So far I haven’t proved myself wrong. There are no squashed rats in the shed. Not to worry I have another plan… Chemical warfare. I’m told rats don’t like things being moved around and don’t like human or chemical smells. So for a few evenings this week I’ve filled the shed with fly spray which has a very chemically perfumed smell that hangs around for ages. And for the last couple of nights I’ve watered down some bleach (still pretty concentrated) and squirted it all around the shed. The intention is to drive him out if he happens to be living there (or stop him thinking of setting up home). I’ve found where he’s getting in. The back wall of the shed is actually the garden wall. They put a wooden wall plate on top of the wall to take the rafters of a small pitched roof. Well that’s rotting away and much of it has been patched with cement. The very end has now rotted away so when Mr Ratty runs along the fence top he gets to a nice hole leading to a warm shed. I haven’t blocked it up yet because I don’t want to trap him in there - but it will get cemented like the rest. Today I started the ‘disturbing things’ phase of Operation ‘Up Your’s Ratty’ and dragged out the jet wash, the lawn mower and a load of bags of stuff that were under a shelf. I’ll do some more tomorrow. Now here’s the thing I don’t understand. Round the deck plate of the lawn mower and across the floor of the shed Mr Ratty has created a pile of sand about 4 inches high. I mean, like, there’s most of a 20Kg bag of the stuff on the floor. But I can’t see where it’s come from. I don’t know that there was a bag of sand in there and certainly not just above where it is now. 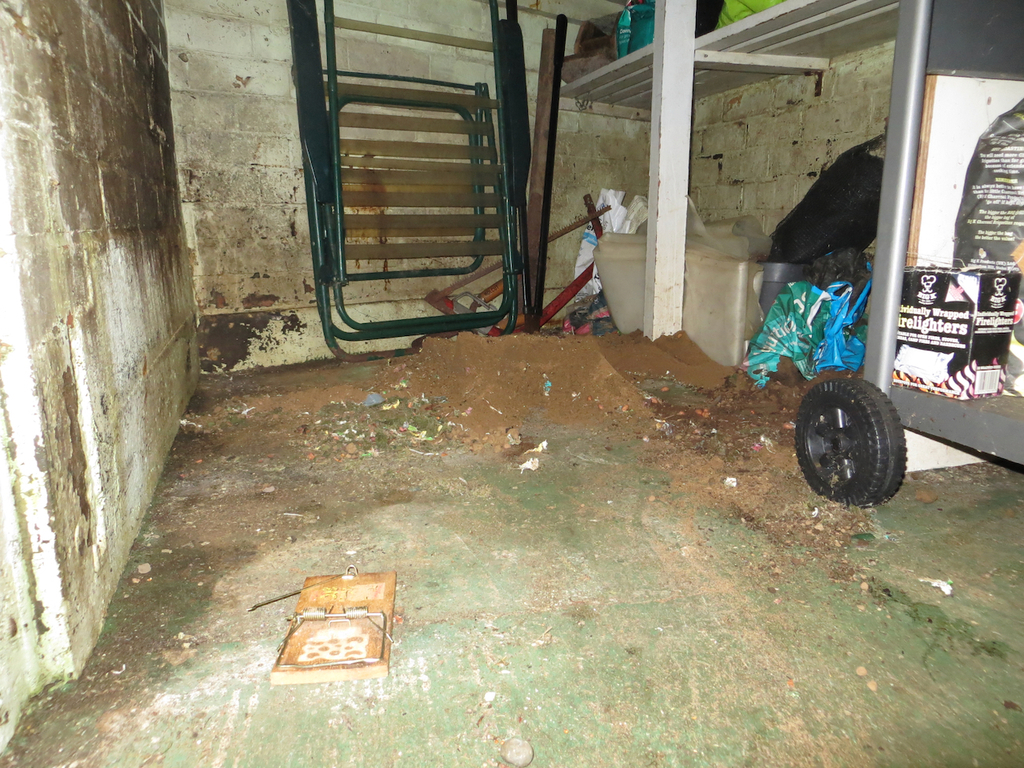 This was taken just after I pulled the lawn mower out. See what I mean? Has this rat got a bloody JCB in there that I haven’t found yet? I don’t understand. The broken rat trap in the foreground of that photo… Well I wasn’t going to drag the mower out by hand and find that Mr Ratty’s extended family was living under it. I’d have screamed like a little girl and beaten Usain Bolt over 200M. So I tied a rope to the handle and pulled it out from a considerable distance. Well the trap attempted to squash the mower. It was a valiant attempt by the plucky little trap but it didn’t survive. Never mind, the rat isn’t daft enough to stick his head in it so it doesn’t really matter that I’m one trap down. James |
| |
|
|
|
|
|
Feb 16, 2024 21:29:58 GMT
|
Oh, well that's interesting. Somehow I managed to post this twice. Who knew that was possible? If you've already read this I wouldn't bother reading it again. It's not going to get any more interesting the second time through. PS, I did fix a typo in the other version so if you really can't sleep I guess you could try and find it. Tank full of fuel is less explodey than a more empty one with more fumes I was led to believe  Very nice progress otherwise  I believe you are probably correct. But, logical or not, I couldn't bring myself to fill it up for 'safety'. I guess my thought process was that if it did go horribly wrong having a couple of litres of bunting petrol on the drive was going to be better than having a tank full. Fortunately the pump failed and I had to take the tank out anyway. Lucky me! Has the expensive fuel pump been persuaded of the error of its ways? Or to put it another way did a clout sort it out? James Well... The original pump sat in rotten crappy old fuel for years and was perfectly fine. I used it to pump the dead fuel out of the tank. Only when it was uncovered did it get stuck. When I took it out of the tank it was seized rock solid. I was afraid the same had happened this time but actually I was in luck and it spun freely when I pushed the impeller round. I think what had happened is that commutator got tarnished due to moisture in the tank. As soon as I disturbed it it ran fine. I pumped a load of fuel in a loop back into the tank for a few hours to make sure it was ok. It was fine so I then pondered storing it under fuel on a glass bottle or something. Or blowing WD 40 through it? In the event, I couldn't make a decision and dumped it in a plastic bag in a box on the attic. I'll make sure it works before I put it back in. And I'll keep running it. And I'm going to use expensive fuel with less ethanol from now on. Not because I want to protect my precious Toyota but just because I'm dead posh innit. James |
| |
Last Edit: Feb 16, 2024 21:36:52 GMT by Sweetpea
|
|
|
|
|
Feb 16, 2024 21:29:44 GMT
|
Tank full of fuel is less explodey than a more empty one with more fumes I was led to believe Very nice progress otherwise I believe you are probably correct. But, logical or not, I couldn't bring myself to fill it up for 'safety'. I guess my thought process was that if it did go horribly wrong having a couple of litres of bunting petrol on the drive was going to be better than having a tank full. Fortunately the pump failed and I had to take the tank out anyway. Lucky me! Has the expensive fuel pump been persuaded of the error of its ways? Or to put it another way did a clout sort it out? James Well... The original pump sat in rotten crappy old fuel for years and was perfectly fine. I used it to pump the dead fuel out of the tank. Only when it was uncovered did it get stuck. When I took it out of the tank it was seized rock solid. I was afraid the same had happened this time but actually I was in luck and it spun freely when I pushed the impeller round. I think what had happened is that commutator got tarnished due to moisture in the tank. As soon as I disturbed it it ran fine. I pumped a load of fuel in a loop back into the tank for a few hours to make sure it was ok. It was fine so I then pondered storing it under fuel on a glass bottle or something. Or blowing WD 40 through it? In the event, I couldn't make a decision and dumped it in a plastic bag in a box in the attic. I'll make sure it works before I put it back in. And I'll keep running it. And I'm going to use expensive fuel with less ethanol from now on. Not because I want to protect my precious Toyota but just because I'm dead posh innit. James |
| |
Last Edit: Feb 16, 2024 21:34:23 GMT by Sweetpea
|
|
|
|
|
Feb 15, 2024 21:21:21 GMT
|
In the last post… Hang on, isn’t ‘The Last Post’ some geezer with a bugle? Anyway… In the last post I suggested that we might like to deal with the fuel tank. The affirmative response from the amassed readership was, er, none existent. Well, we are dealing with the tank whether you like it or not. Sorry. Mostly because at the time I suggested that we might think about doing it, in truth, I’d already done it. Let’s recap. I’d removed the tank (again) because the fuel pump had got jammed (again). The pump is on a bracket in the tank. The pump was replaced after the first time it jammed with a new and very expensive genuine Toyota one. After that incident I’d sworn that I would always leave the tank full so the pump was under fuel. But because the tank was empty and I was welding near the filler neck I decided to leave it empty for a bit of safety. I hadn’t anticipated that the car would be standing for 3 years and the pump got stuck (again) so the tank had to come out (again). The tank is in really good condition with just some surface rust so while it was out I decided to clean and paint it in the hope that it’ll stay in good condition.  The first job was to take all the old paint and rust off with a knotty brush in the grinder. 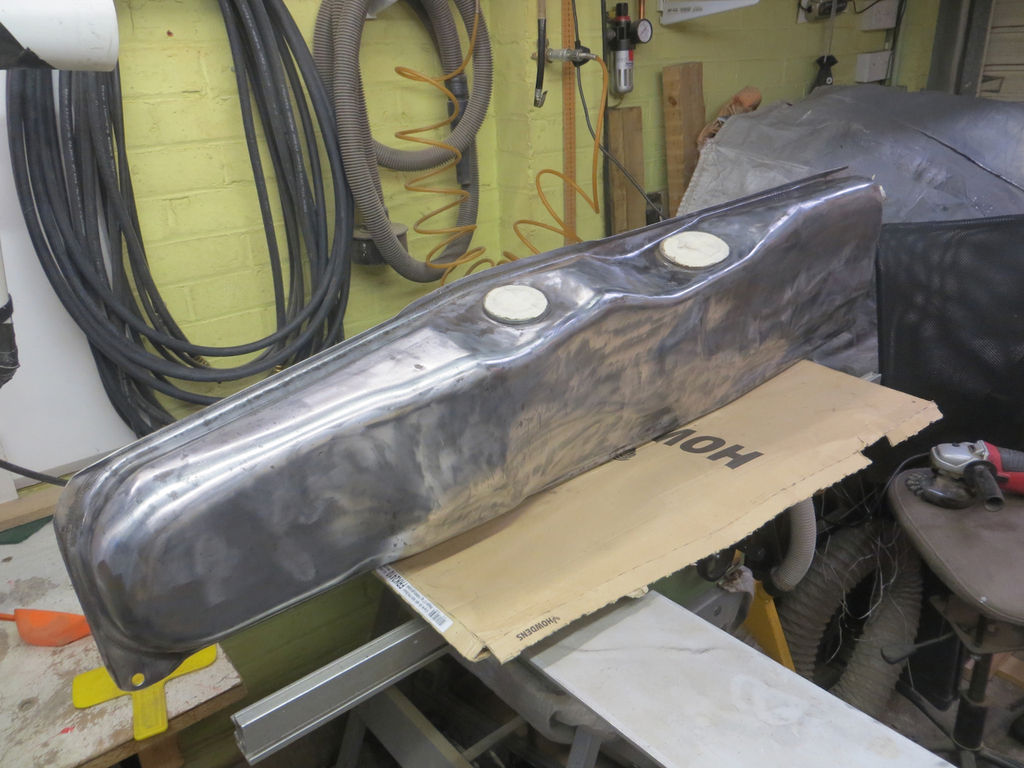 That left a clean tank with rust in the deeper pits. I wasn’t planning to do anything further for some time so in order to treat the rust and stop any more developing it got a couple of coats of Hydrate 80. 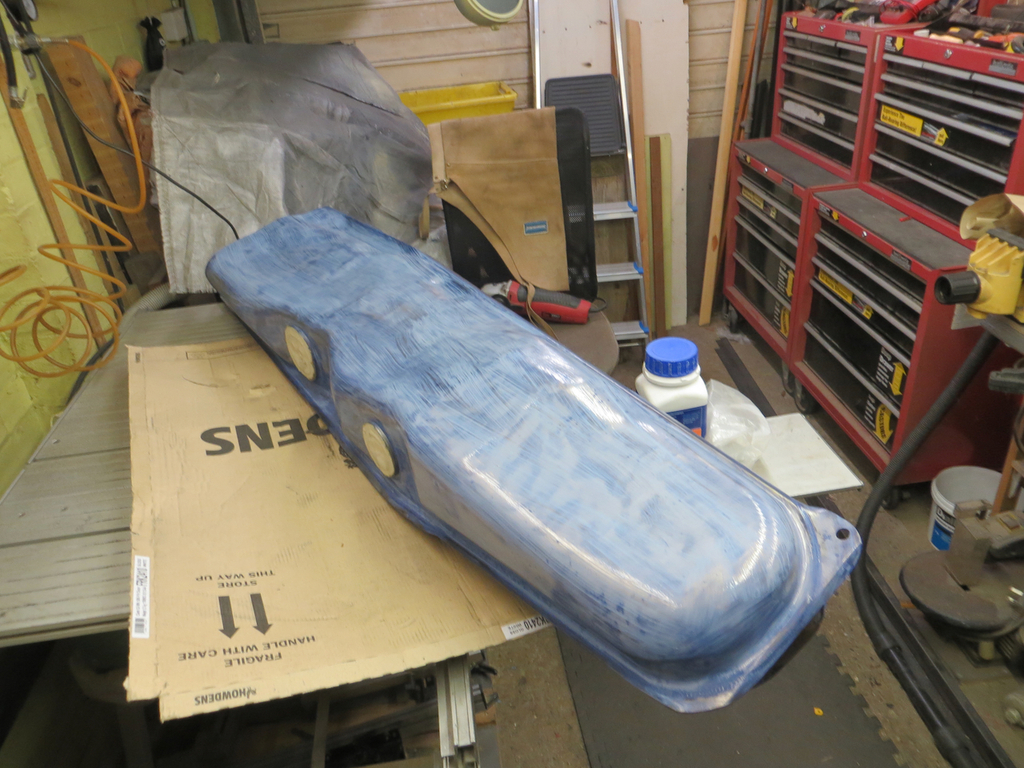 And then it was chucked in a corner of the garage and left in peace for months. The plan was to (eventually) epoxy prime it and over coat it with black. I had a question over whether to remove the hydrate 80 so the epoxy could key onto the metal as it’s intended to do or to key the Hydrate 80 and hope the epoxy sticks to it. There were stories of Hydrate 80 coming off in sheets so I thought I’d sand it off with 40 or 80 grit. Nope. Wouldn’t touch it. The knotty brush in the grinder will make short work of it though. Confidence was high but misplaced. It did start taking it off but it was stupidly hard work. I concluded that it could stay right where it was and I’d just key it. I did redcoat the bit that I’d removed and left it several more weeks. That was just how things panned out. I have an unproven theory that if you leave Hydrate 80 for a long time so that it fully cures then it’s very tough. But until then it might be pretty vulnerable. It’s a theory. Perhaps I should read the instructions on the tin? So, I keyed it and gave it a good couple of coats of epoxy. 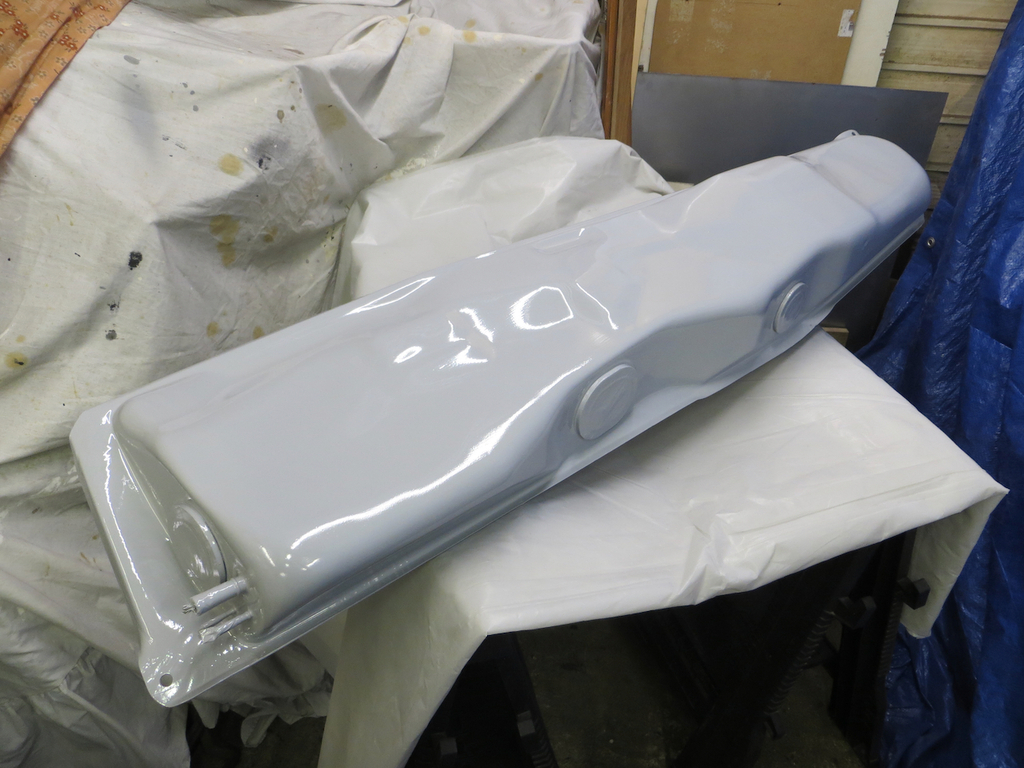 There were a couple of brackets from under the car that needed doing too. I’d already sand blasted them so they got blown over while I had the primer in the gun. 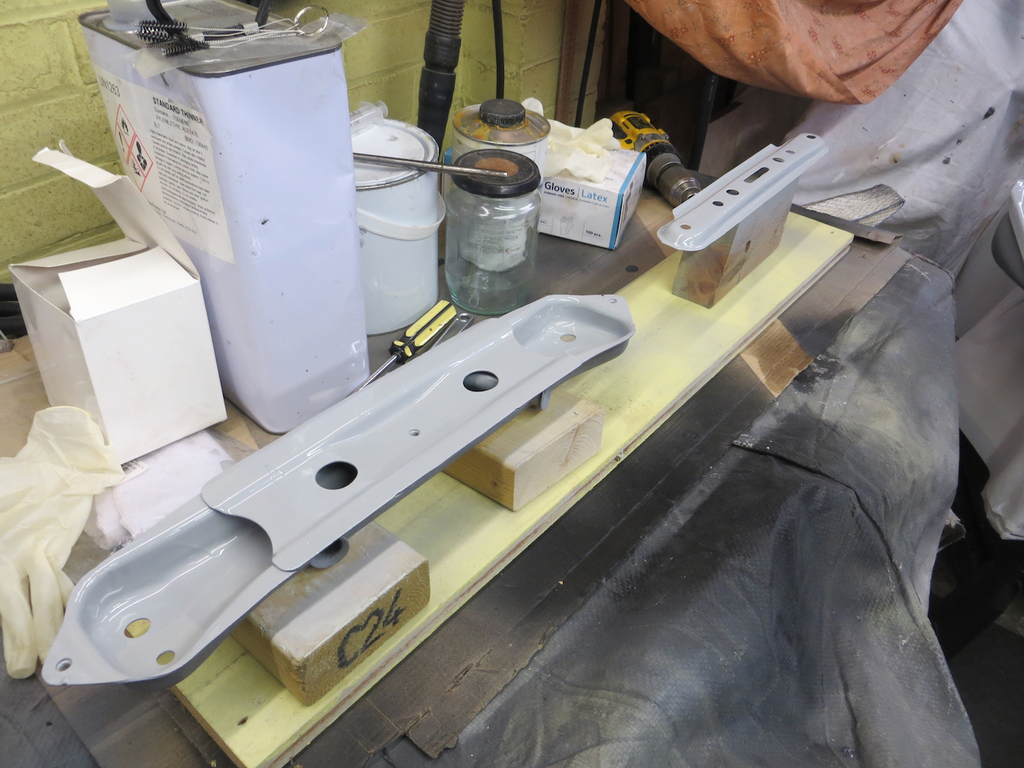 Just needs a black overcoat now. Normally I’d do that with rattle cans but this is big enough to warrant buying a tin of black ‘tractor paint’ and putting it through the spray gun. In fact I’m sort of thinking of using the spray gun in place of rattle cans completely. Even for small stuff. I quite like the gun because I can control the paint delivery and where it goes. I get less runs with the gun than with rattle cans. The biggest problem is that I have to clean it afterwards and that’s a fair bit of work for a small paint job. 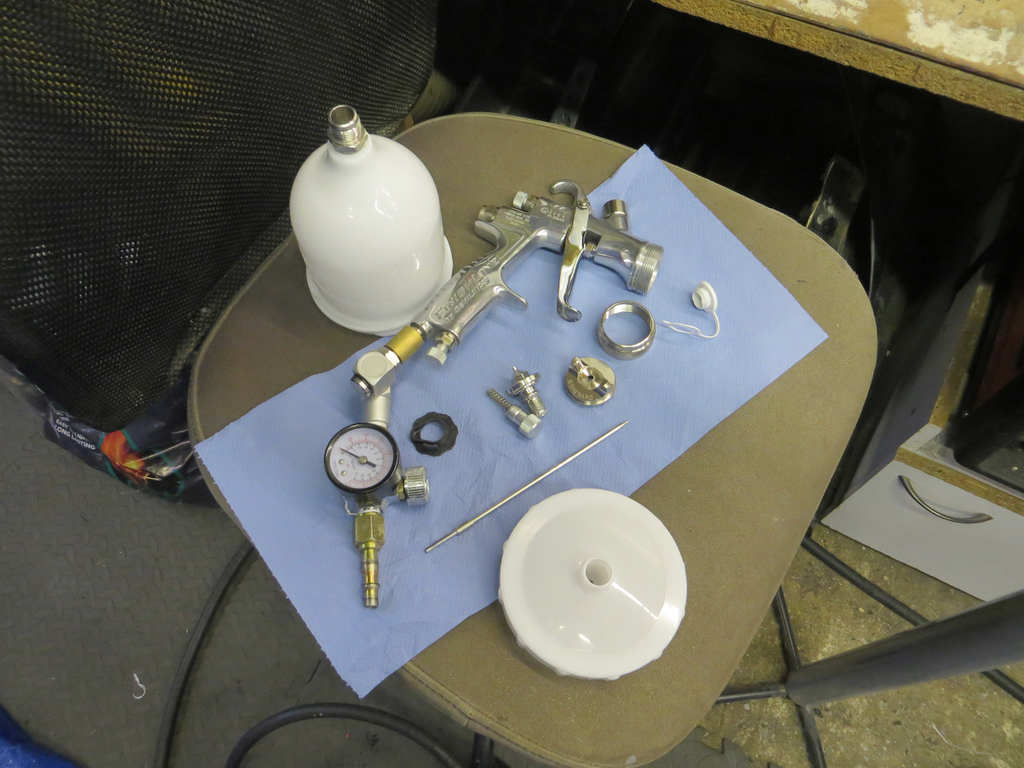 The brackets came out like this… 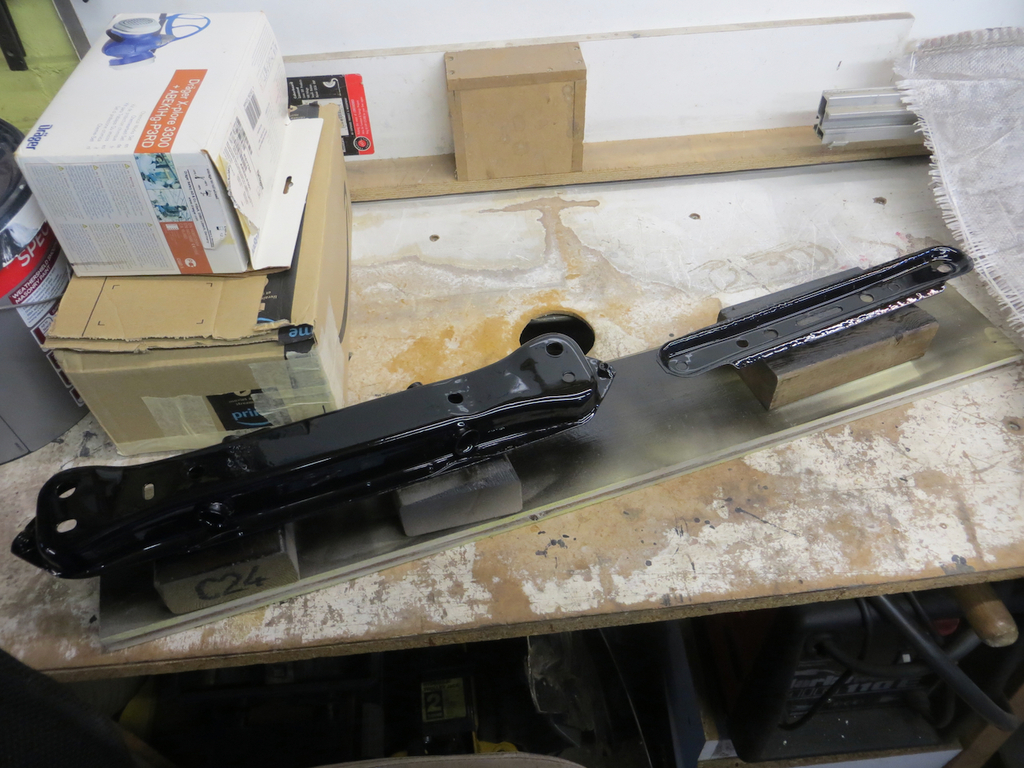 And the tank looks like this… 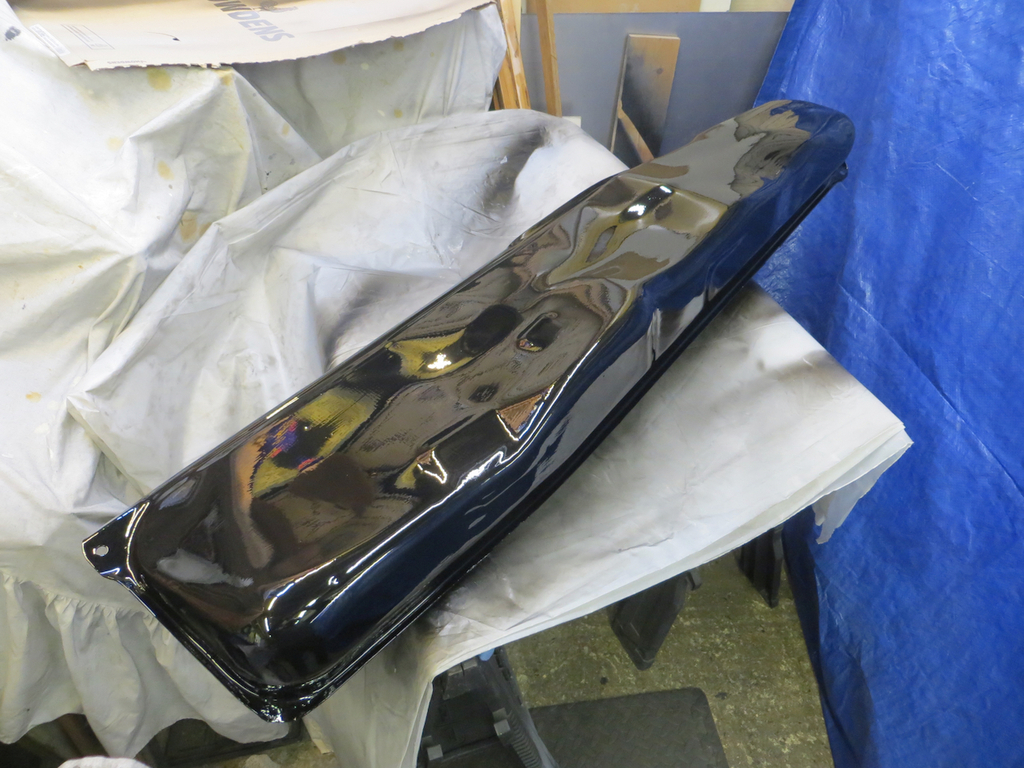 Not bad for some dozy beggar in a shed. If we are being strictly honest I had to spray one side, let it dry and then do the other. That’s left some dull overspray on the first side because I didn’t bother to mask it off. Bloodly amateur. It’s just not good enough. Look, it’s under the car and behind plastic splash shields. The only person who’ll ever see it is me the next time I leave the car low on fuel and have the pump stick (again). I suppose I just need a nice day and I can get it back on the car. Except… James |
| |
|
|
|
|
|
|
|
jimi, I didn't know the 1b had different mirrors. You never stop learning... Anyway, I'm glad you asked that... It's a very good question which, in the fullness of time, no doubt, there'll be an answer. I just don't know what it is at the moment. The cast base needs paint as it's worn off and is returning to the aluminium colour. The actual mirror housing I'm not sure about. I remember somebody flatting and polishing them but I can't remember who. The plastic bit on the back of the car where the number plate bolts on really needs something doing and I don't want to paint it. I'll probably try and flat and polish that and then do the mirrors if that turns out well. Wish I could remember who tried polishing the plastic mirrors in the past... Think it was on the Mk1 forum. I might have to do some searching. James
|
| |
|
|
|
|
|
|
|
In the previous exciting and intriguing episode we were intrigued and, might I say, excited by the tarting up of the windscreen trim. With that done there is only one piece of trim that’s letting the car down. It’s this bit… 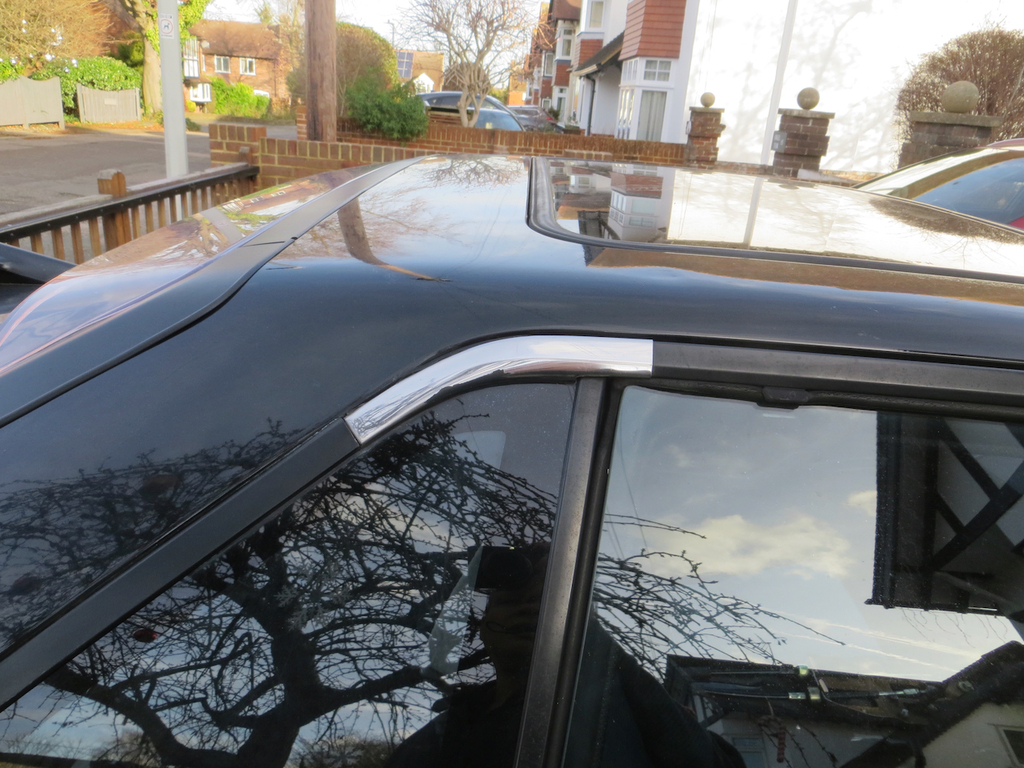 That’s actually a part of the trim that runs down the back edge of the quarter light. Needless to say we’ll have to remove the trim and do a proper job of it. Like hell. We’ll mask it up on the car, scotch bright it and blow it over in situ.  Much better don’t you think? I actually got a small run in it because I’m an idiot but if I don’t mention it you won’t notice so I’ll just keep quiet about it. Then I put it all back together and glooped the top windscreen trim in using the method mentioned previously.  To be honest it’s only the door mirrors that need some love now. Good heavens, sometimes I surprise myself by how brilliant I am. Yeah… We’ll see how that goes… You see, there may be a small problem. Just a petite annoyance. On the passenger side there is a small gap between the the trim and the glass. If the air flow gets under it it’ll try and pull the trim out. I think the glass clips would have had dents in the glue that holds the glass down. But the clips can move a little and I suspect they didn’t drop into their little homes on the left side of the car. I hadn’t thought of that when I came up with my little plan in the previous episode. Hmmm. I’m not sure if I should remove it and try again or hope that it’ll be fine. What I don’t want to do is destroy the trim because I doubt if they are available. Moving on, I’ve been gathering a pile of plastic that I had salted around the house.  That all got cleaned up and reinstalled in the car. I think I’m missing the lower B pillar trims but they’ll turn up in a box somewhere. Oh and the knob off the gear stick, but again it won’t be too far away. Since I had some cloth tape I used some of it on the back of some of the trim pieces to stop them rattling.  A completely futile thing to do because you can’t hear anything rattling with a little twin cam motor screaming right behind your lug ‘oles. The gear stick bolts to the top of the ‘transmission tunnel’. It’s not the transmission tunnel because that’s all behind you, it actually has the fuel tank under the hump. Except on my car where the fuel tank is positioned in the garage so I can paint it. Where was I? I got bit needlessly accurate there and lost my train of thought. Oh yes, Under the gear stuck there is a divot in the top of the tunnel where the mechanism can wiggle around. Well in the various leaks and cleaning and swilling down that has wound up full of water. I tried to poke some rag in there to mop it up but it wasn’t working. So I just took the gear stick mechanism off and dried it out that way. Well, having taken the gear stick mech off it’d be rude not to clean all the stiff old grease off and lubricate it with some new stuff. 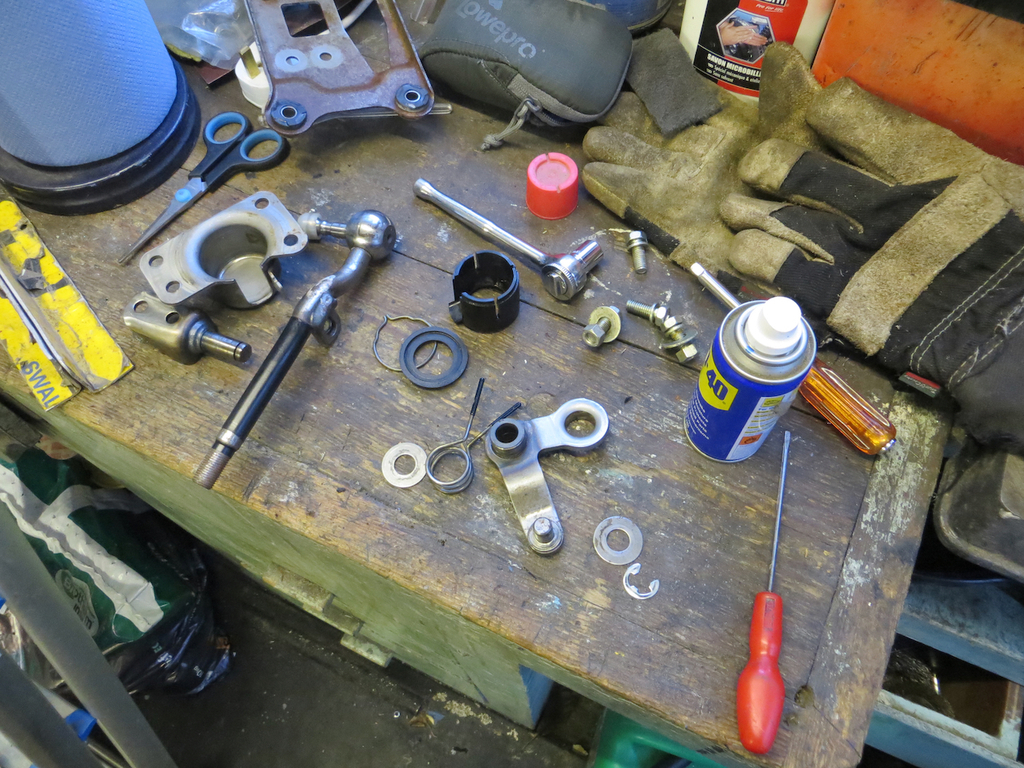 Don’t worry, I didn’t lube it with WD40, that was just to dissolve the old grease. Some time later and it was back in the car and working beautifully.  ‘Brumm brumm’ as people with no fuel tanks have to say because their engines don’t work. Fuel tank… Maybe that’s next on the list to deal with? What do you think? James |
| |
|
|
|
|
|
|
|
i'd bet a shilling some of the blackness in the used vax water will be degrading scrim foam between the board and cloth. despondent daz strikes again. although i would take it on the chin if my cynicism stopped getting proven  Aye up Darren, How's life? There isn't any evidence of foam between the cloth and the board thankfully. And not because it's all disintegrated either. When Mrs Sweetpea cast her eyes over my work she commented that somebody had probably been a heavy smoker in the past. She may well be right because there is an odd burn in the seat cloth too. James |
| |
|
|
|
|
|
Jan 19, 2024 21:21:45 GMT
|
There are some subtle differences between the two tyres… Yeah, one of them is full of really heavy air for a start! Mitas, very difficult to get hold of! Let me know if you need any more. Keep checking in on this and always entertaining. Took me a moment to realise you were referring to the tires! I got there. I don't know anything much about the group getting the tyres. They just appeared on the bus one day. I did wonder if they were a difficult size to get though. They seem very narrow compared to a modern tyre. I keep meaning to look into it but haven't got round to it. |
| |
|
|
|
|
|
|
|
Jan 17, 2024 22:50:58 GMT
|
We are back on bus duty you lucky people. We’re livin’ the dream chaps, livin the dream. After last time I had a little homework to do. This is the shaft that drives the dynamo.  It normally lives here, on the side of the engine.  It’s almost in the photo. Enough to give you the idea. Anyway, it came home, had a trip through the sand blaster, and then got painted.  I don’t have a photo of it fitted to the engine because I didn’t think to take one. Muppet. But before we did that Norman, the garage owner, turned up with cake.  Back at the garage this time and I’m afraid there was no cake for us. Booo! Norman did bring some interested visitors for a look around GKE though. We had a lovely chat with them and then, in lieu of cake, ate them with some fava beans a nice Chianti. While Ian was doing, er, actually I don’t know what Ian was doing. I know he fitted that dynamo shaft because I gave him a hand with that. Well, it was an opportunity to sprawl myself seductively on the wing like Helen. She looked quite passable and I thought I could too. Moving on… While Ian was doing stuff I was in the cab again. We have a speedo and vacuum gauge to fit. 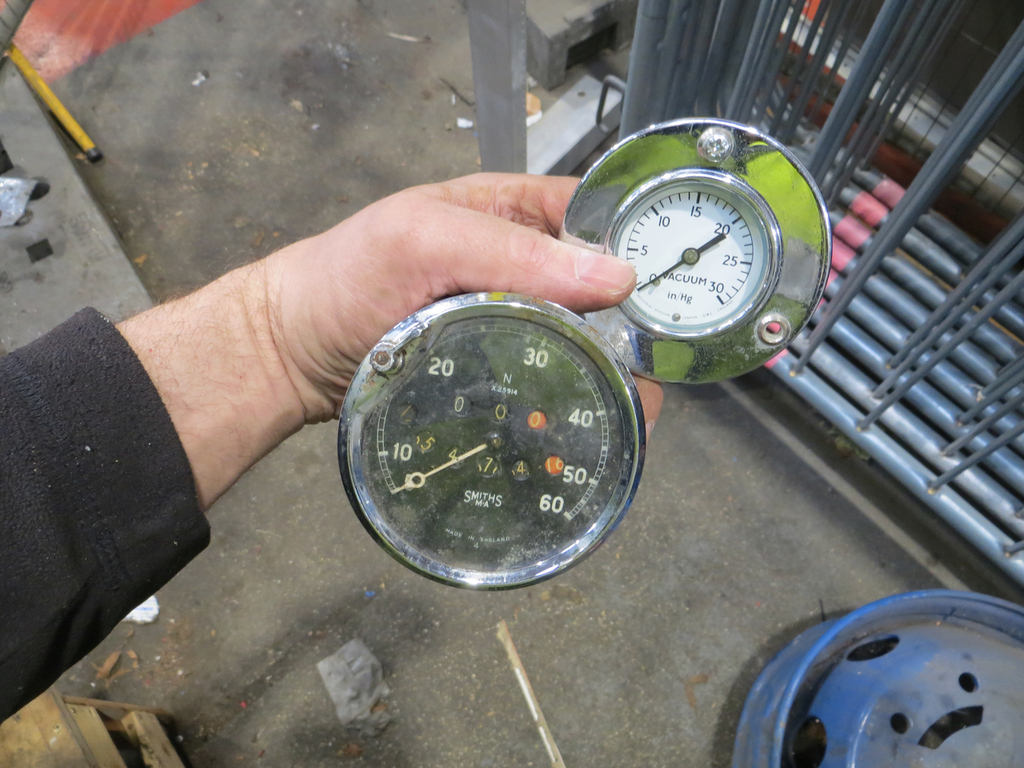 I believe 60MPH gives quite a safe margin over what it’s actually capable of. By a factor of two or so. To go with that we have the last piece of vacuum piping. 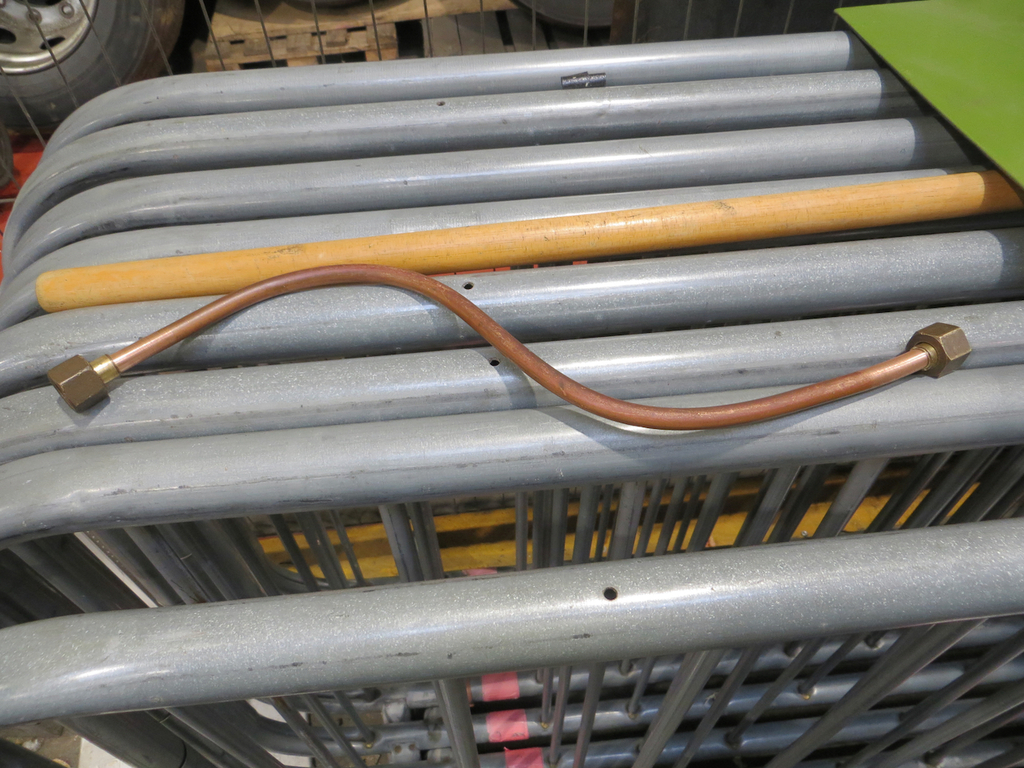 I also had to reroute the front section of vacuum pipe as it got way too close to the engine fan blades. And we have a brand new speedo cable.  Here they both are, sometime later, under the back of the cab floor. 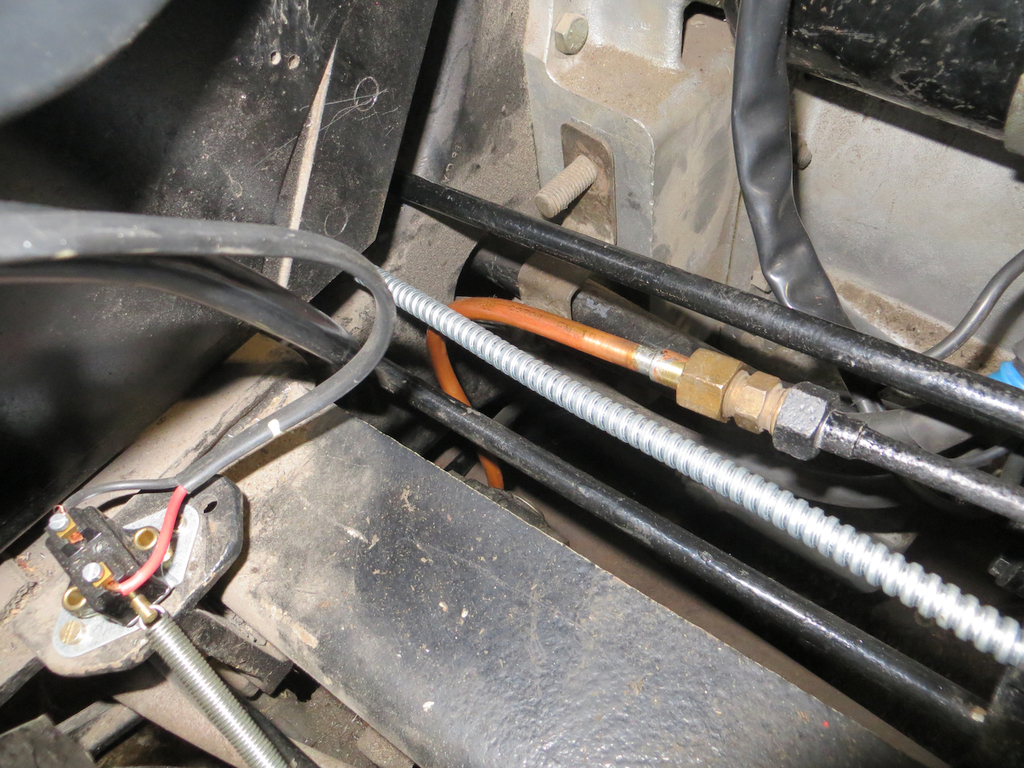 We need some P clips to carry the speedo cable under the saloon floor. At the moment it’s tie wrapped to a brake rod and that’s not going to fly. 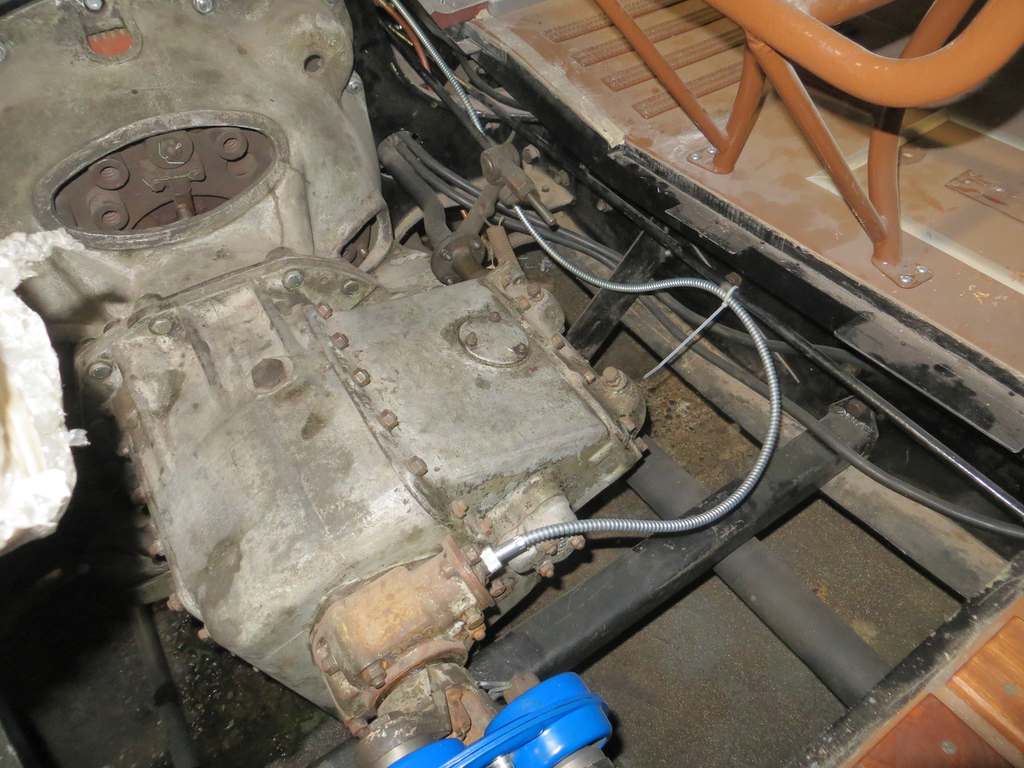 In the cab all the gauges are fitted into the dash. 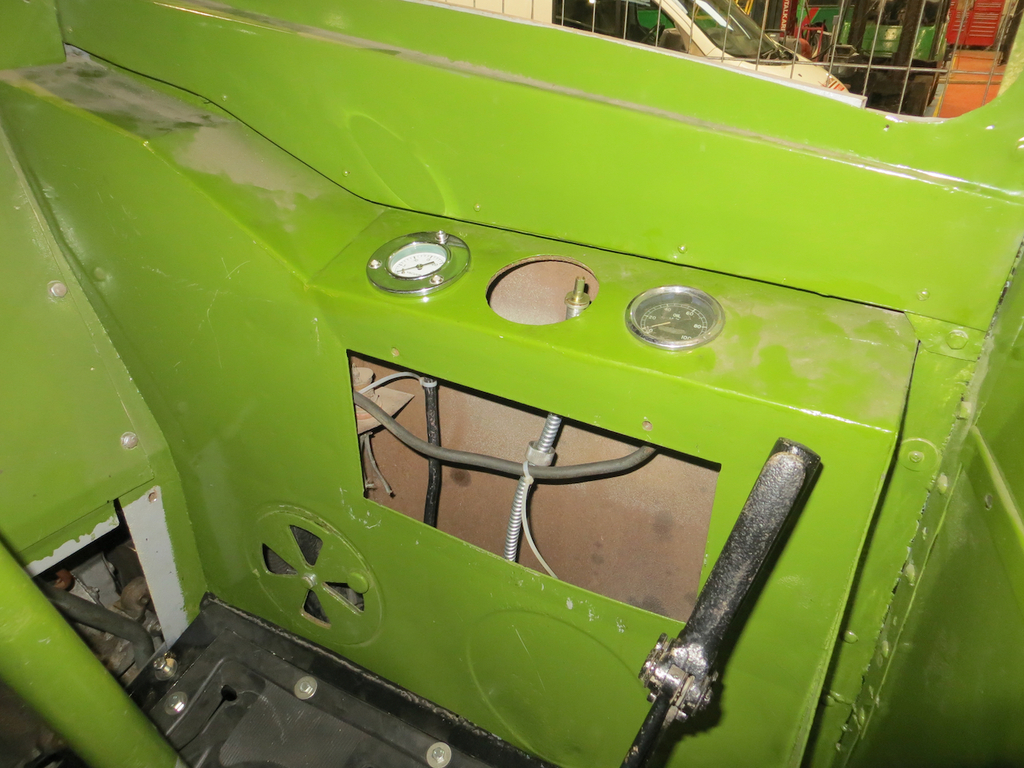 Well, not quite all. We seem to be 33% deficient in the gauges department. Although the speedo fits in the hole, it’s the right diameter, you can’t actually get it in the hole. The cab has been rebuilt. The green bit above actually overhangs the hole slightly (although it doesn’t look like it in the photo). That means you can’t get the speedo far enough forwards to fall into the hole. I think we are going to have to strip the bottom of the windscreen frame out and form a relief into it which is going to take some time and trash the paint work. Next I put the floors back in and fitted the steering wheel. 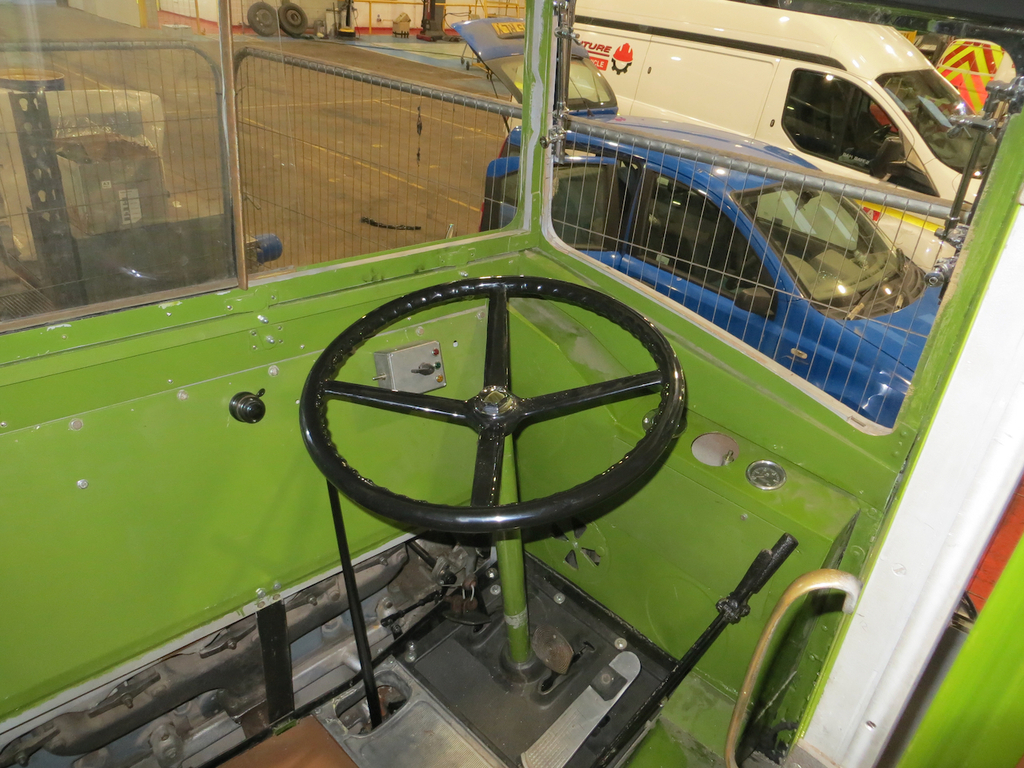 What!? Are we done? Is the bus finished? No chance. We aren’t even done under the floor, so why did I bolt it all back in? Well, these are some new road springs for the rear.  And these are the refurbished rear dampers. 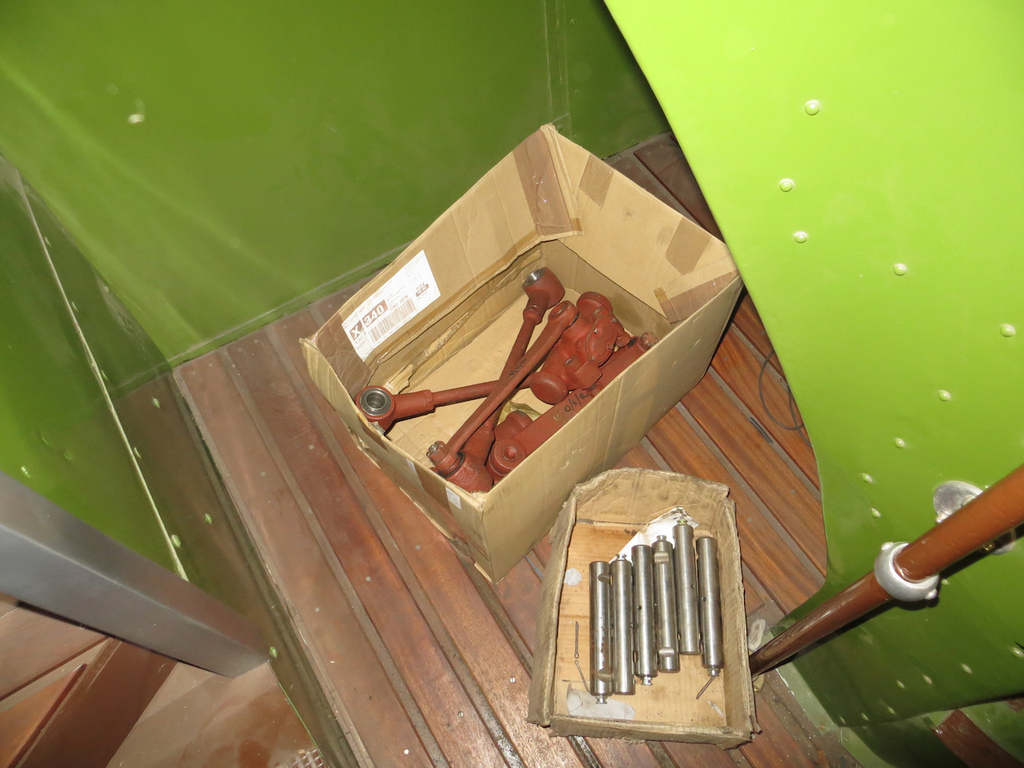 It won’t be a surprise to hear that changing the road springs means dropping the axle. As it happens putting the dampers back on also means breaking down the spring U bolts. The linkage on the near side gets tied up with the diff you see. Ian has changed the road springs on something similar before. He was of the opinion that he wasn’t attempting it again for all the tea in China and that, also, hell would have to freeze over. One of the mechanics at Nu-Venture, where GKE lives, knew of a company who might take the job on. With a bit of cajoling it seems that they are going to have a go so we needed to get the bus ready to be towed round the corner. Hence the cab floor, steering wheel and a load of stuff Ian had been doing. I think Ian is secretly disappointed and was looking forward to the extreme challenge. I don’t think he’d admit it though. Finally I had a sweep up because I was fed up of working in a bog hole. Only a little sweep mind. Just enough to make me feel better. Seems we have a couple of spare tyres ‘cos I had to move them during my sweeping. 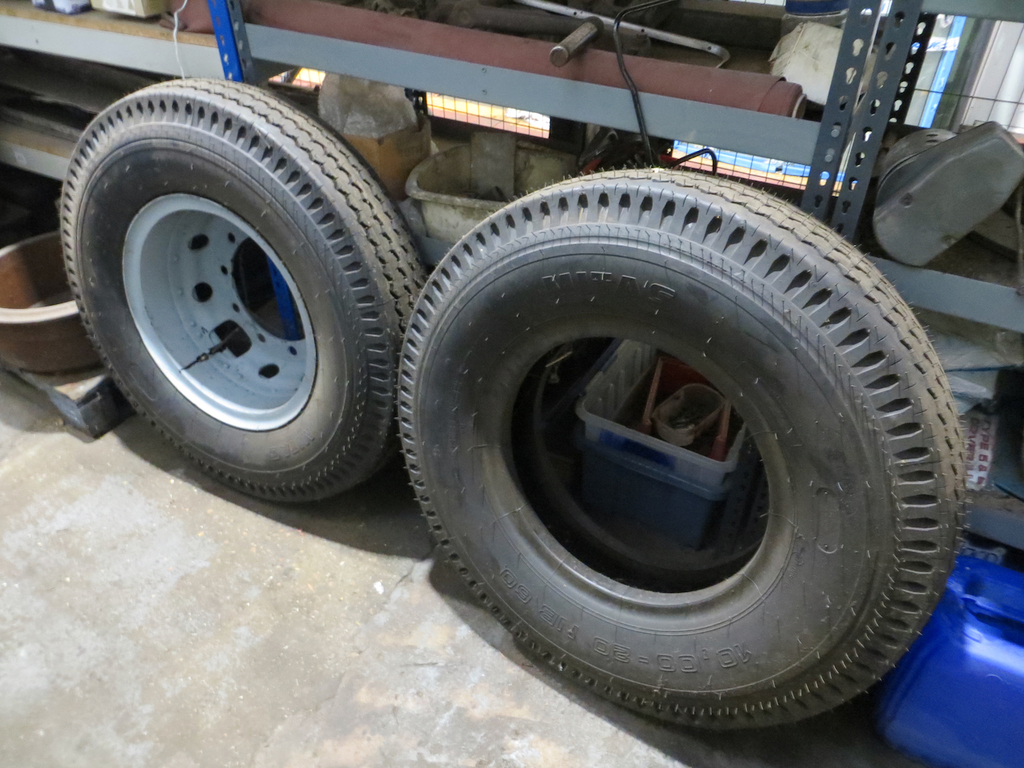 Interestingly, the one on the left is fully inflated and it weighs considerably more than the one on the right. I can only believe that compressed air is very heavy… Who knew? James |
| |
|
|
|
|
|
Jan 15, 2024 20:39:50 GMT
|
I used some 3M 08509 to seal a leak on the bonded rear window of my T4 over a year ago. It worked so well I did the same on the front windscreen when that started leaking a few months ago. Everything is still dry at the moment so should be ok on your MR2. Well that's excellent news. I'm hoping it'll only need to last a year or two but the way I work it might have to last a decade or two. The way I work it might have to last a lifetime or two. |
| |
|
|
|
|
|
Jan 14, 2024 21:37:16 GMT
|
Friends, Romans, countrymen, lend me your peepers. I think I started these posts by misquoting people. We seem to have gone full circle and still not completed the car. Hey ho… In order to fix this leaking windscreen (by which I mean ‘bodge this leaking windscreen’) I had to take the side trims off. Here’s a photo of the car from a wee while back to show you the problem. 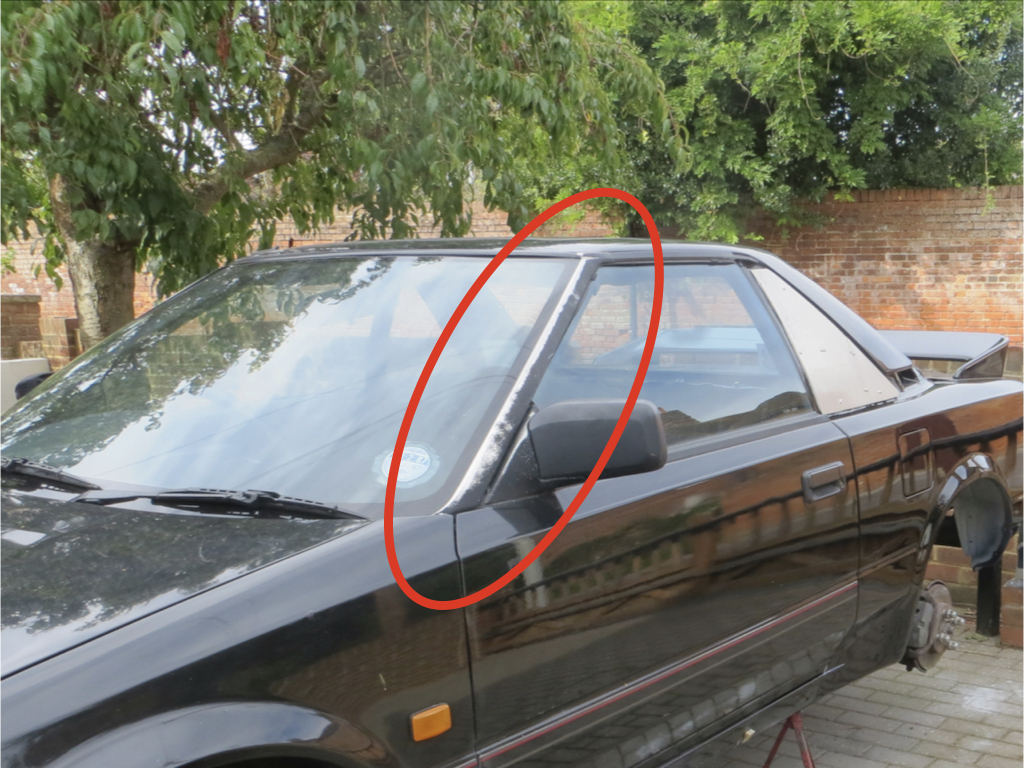 I mean, look at the state of that! I can’t put that back looking like that. It’s a right mess, and as you all know the rest of the car is almost pristine. Very nearly concours condition. I think it was powder coated but decades of grit in the wind have done it no favours. Strangely the one on the right side was in somewhat better condition but needed some titillating. So the old powder coat was sanded off. Here we have one of them back to the stainless steel and the other one partly there. 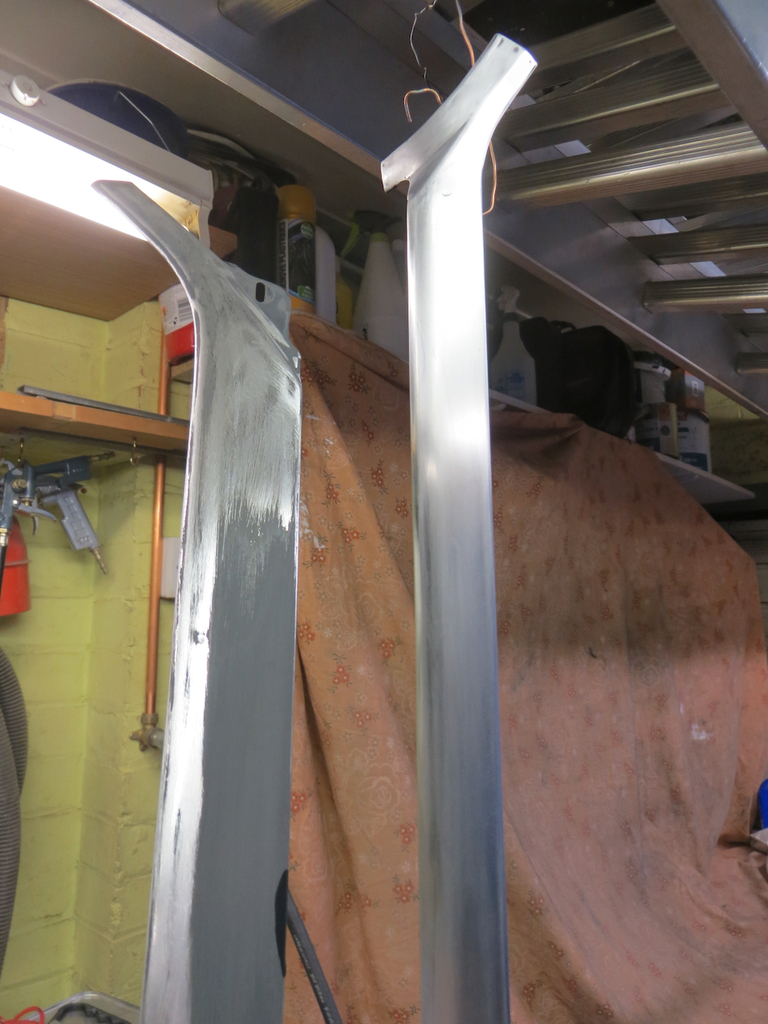 I think I’d hung them up to see if that would work for painting them but concluded that they’d swing around all over the place. Eventually I screwed them to a block of wood. Next a coat of etch primer… 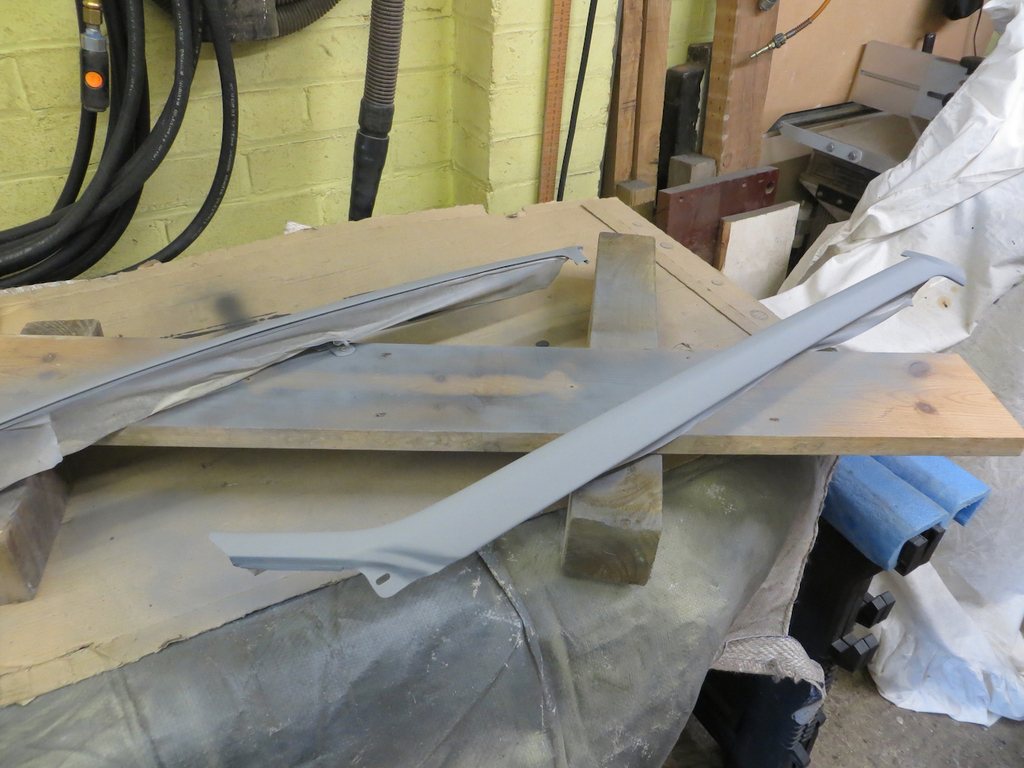 And then a few coats of satin black to match the rest of the trim. 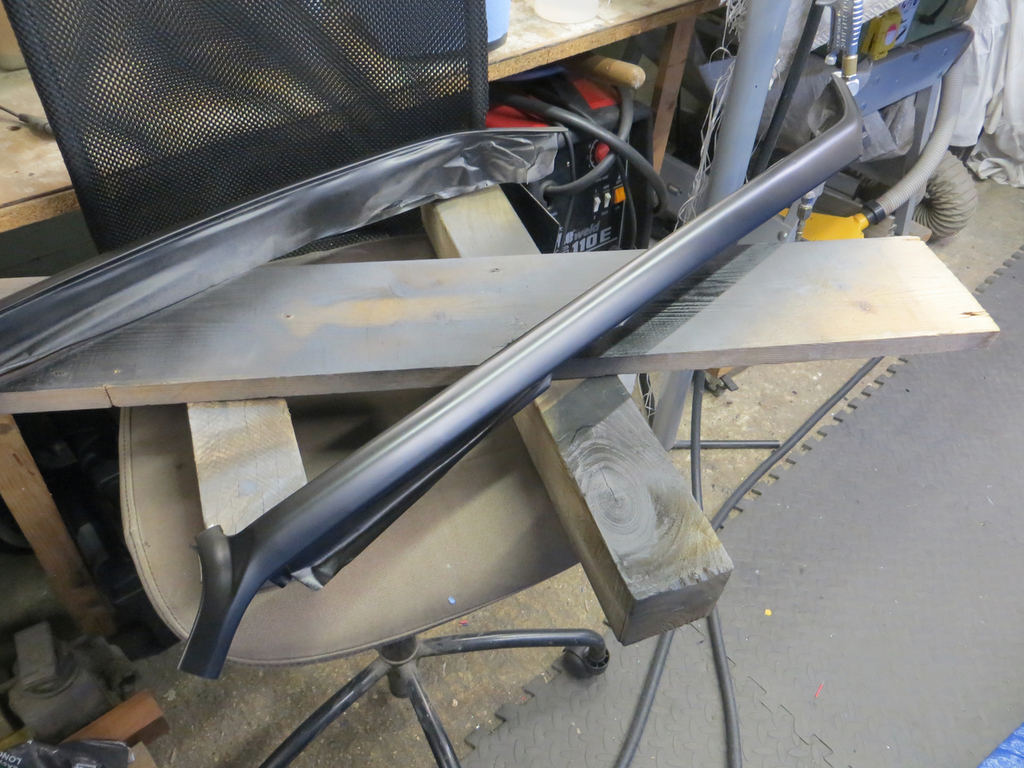 Followed by being left alone for a week or two to dry off. Good, they look better. Ready to go back on just as soon as I work out how to attach the top trim. Back to the job of gumming up the windscreen surround, I’d tidied up the metal that I could get access to but there was a fair chance that rust had got under the bonding glue in places and was likely to leak a bit. Or at least continue rusting. If I ever crash this thing I suspect the windscreen will just keep going without the rest of the car. Yes, I know that being a bonded windscreen it adds a load of strength to the car. It really does need removing and fixing properly at some point. Anyway, back to gumming it up. Alistair at work had donated a tube of 3M 08509 to the lost cause. 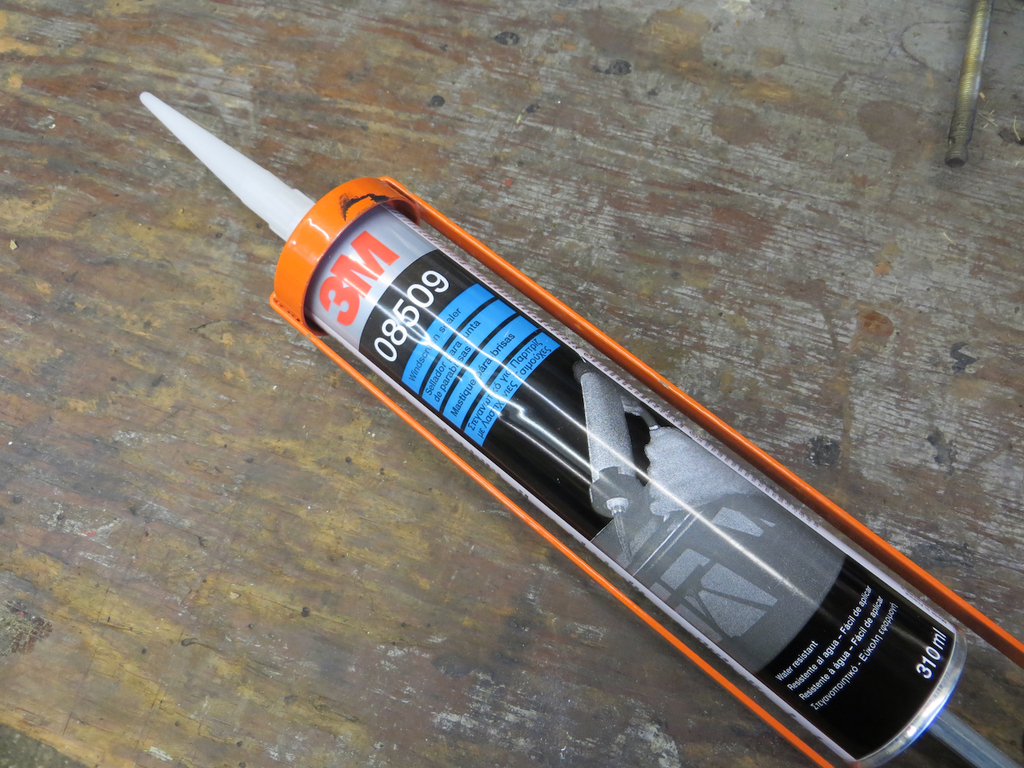 This is intended to seal old school rubber mounted screens not for bonding them in. The data sheet suggested that this stuff skins over but doesn’t really go solid. It suggested that it remains very flexible. Well that’s ideal to run a bead along the top edge of the glass to stop water getting under the glass. So that’s what I did. Rather like this… 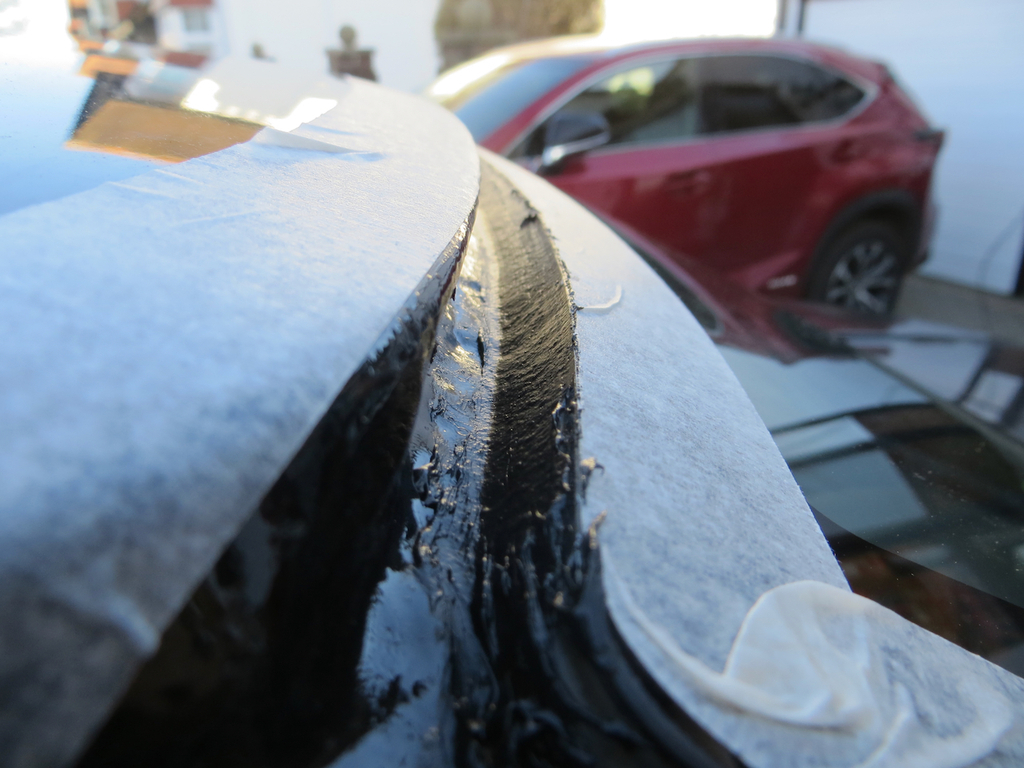 When I poked it a week later it hadn’t gone off so that turns out to be true. Now that’s perfect because it provides me with an opportunity for fitting the top trim. Along the front edge of the trim are some clips that hook under the windscreen glass. They all still exist. 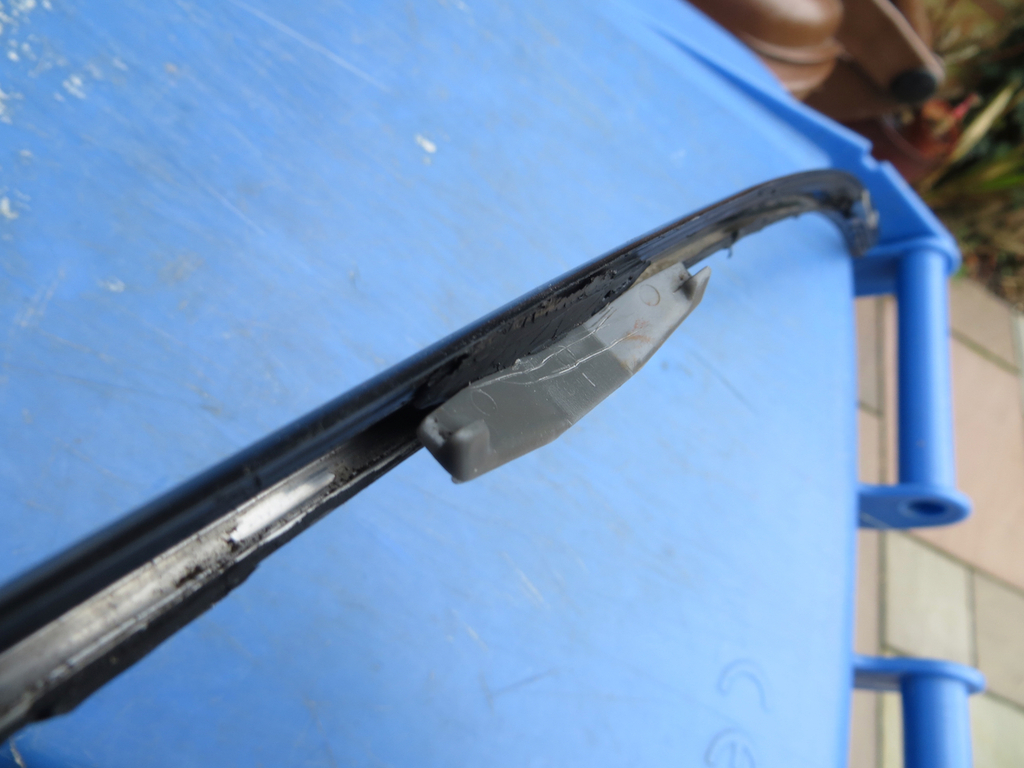 I can use them to hook under the glass because they’ll push the 3M gloop out of the way. Yay! The back edge clips are all missing. To be honest I can’t get my head round how they are supposed to work even if I had them. Anyhoo, since I can use the existing clips to hold the front down I just need a bead of neutral cure silicone along the back edge and we are golden. Like this… 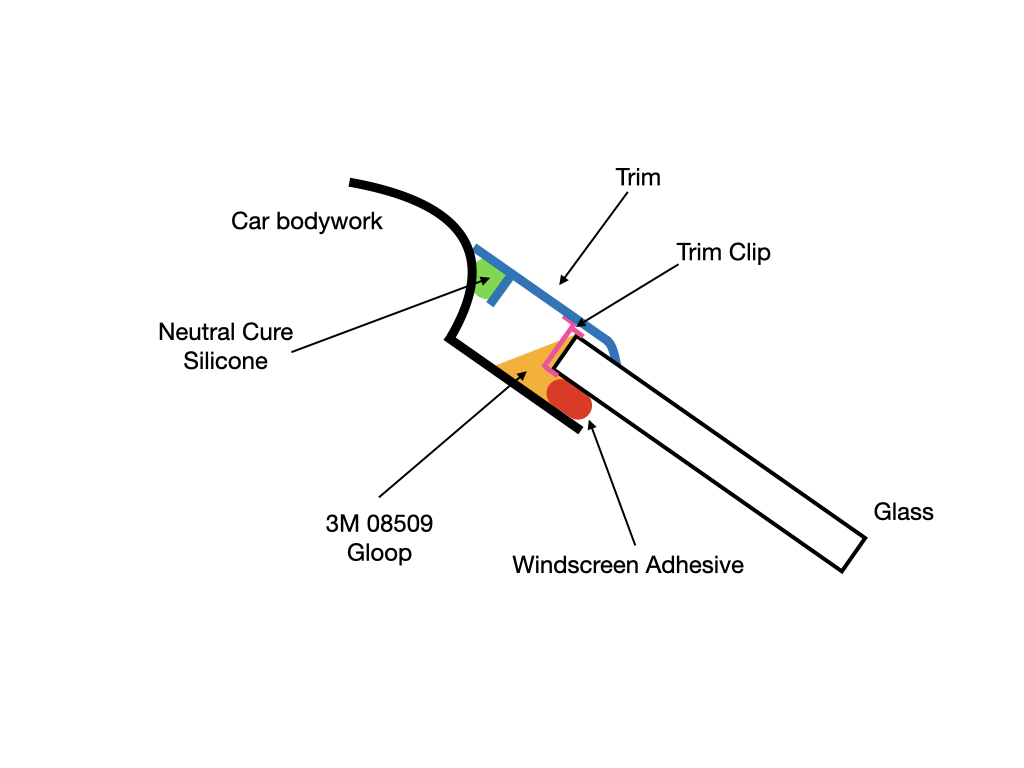 No big blobs of gloop damming the channel. It can drain just as it was designed to. Good heavens, sometimes I surprise myself by how brilliant I am. Yeah… We’ll see how that goes… James |
| |
|
|
|
|
|
|
|
Woop woop! We're back! Well done and thank you Mr HoTWire. Although it did just chuck a java error... We'll gloss over that and pretend we didn't see it. Of course this all leaves me a huge amount of reading to do because I haven't been keeping up with your threads. And I now have a load of writing to do because things have moved on. Spoiler alert... The trim is back in. But you won't find out how I did it for a few posts because my past is your future. We can start by cleaning some stuff. I said I’d taken the headlining out when the rain got in. I did say that didn’t I? Well, I took the headlining out when it got wet. There are two bits to it on a sunroof MR2. The headlining itself and a panel that clips over the sunroof glass. The headlining is shaped fibreboard with cloth glued over it. When that got soaked the first thing to do was dry it out for a week or so before it fell to pieces. The sunroof cover is actually plastic covered with cloth and is pretty sturdy. Unfortunately he sunroof cover has spent 30 odd years chucked in the frunk with the spare wheel so it’s absolutely filthy. It’s so bad there is no chance of it coming clean.  The headlining has been safely in the car for 30 odd years so it’s… It’s… It’s absolutely filthy. It’s worse than the carpets. It’s like somebody walked on it with muddy boots. 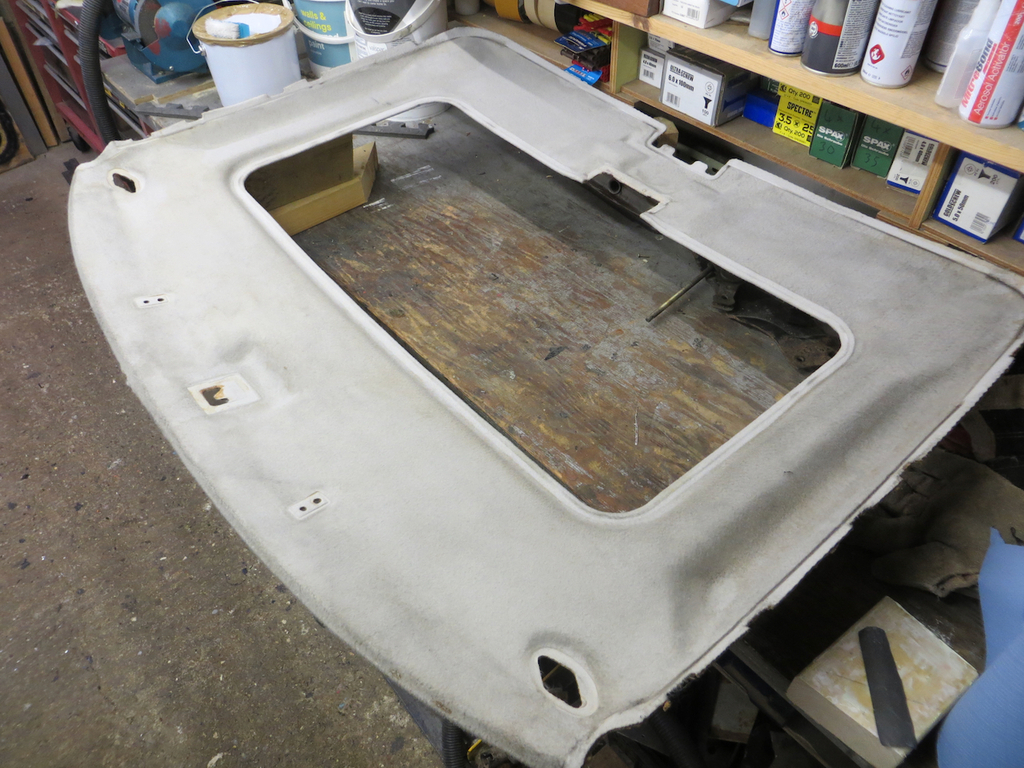 How does something on the ceiling get in that state? I don’t understand. Round the edges of the hole is some push on trim. 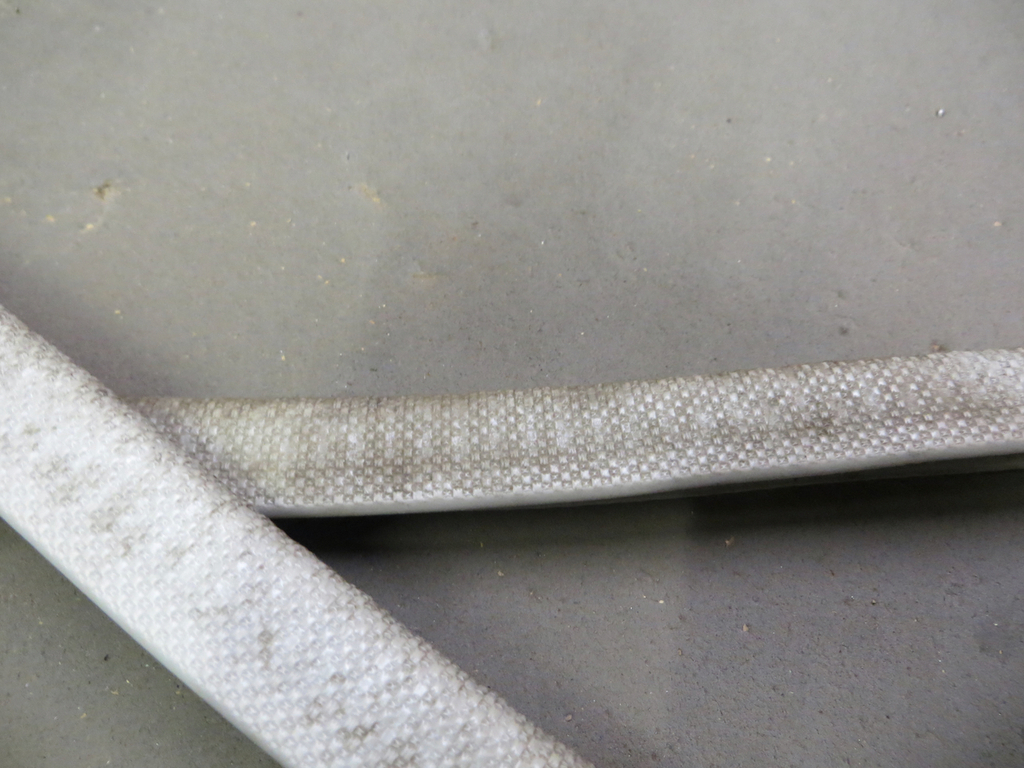 The bit underneath hasn’t been cleaned, the bit on top has. Not that you’d know it. Toyota, bless them, heavily embossed a pattern into it and I couldn’t get the dirt out. Finally I hit it with the steam cleaner and a tooth brush. It took ages but it did get them clean. 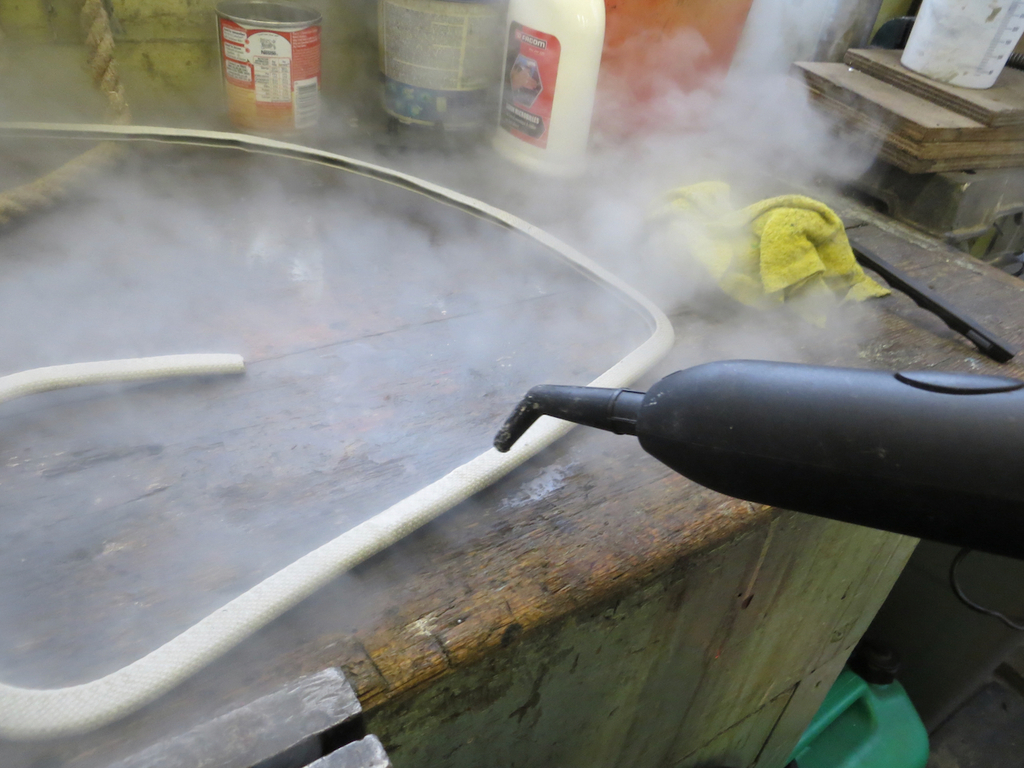 The headlining and sun roof cover got Vax’d. More than once. The sunroof cover didn’t come clean. That was predictable. 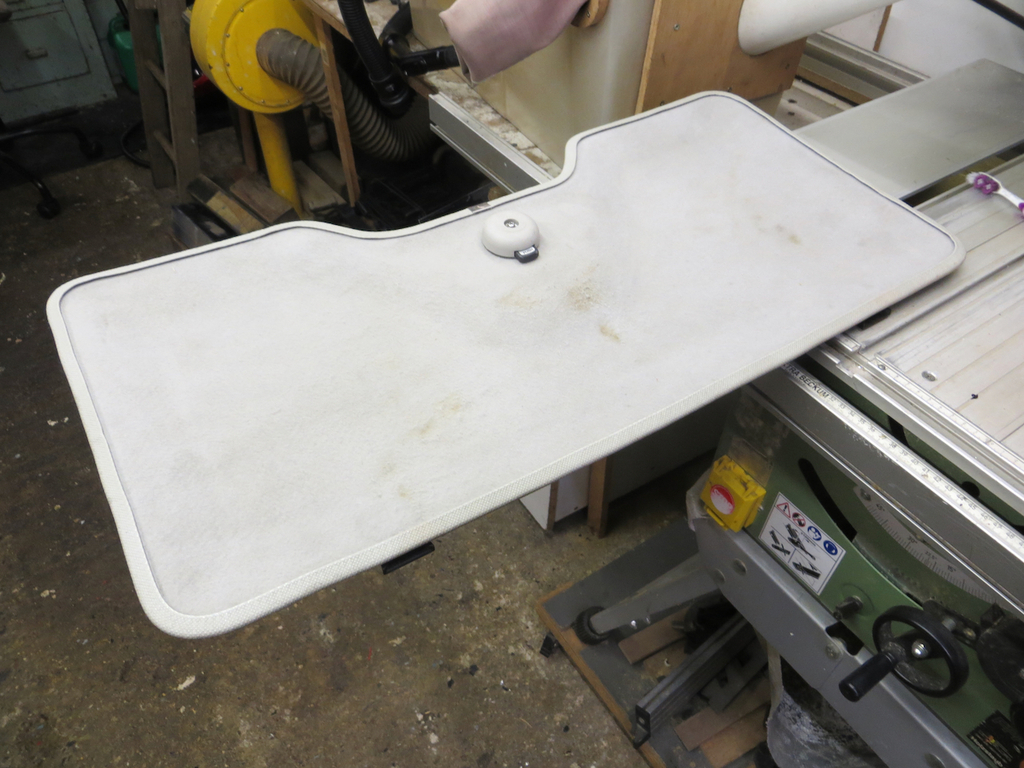 It’s a lot better than it was but far from perfect. It’ll do. There are other bits of the car that are in much worse condition. The first Vaxing of the headlining created water that looked it had been dredged out of the local duck pond. 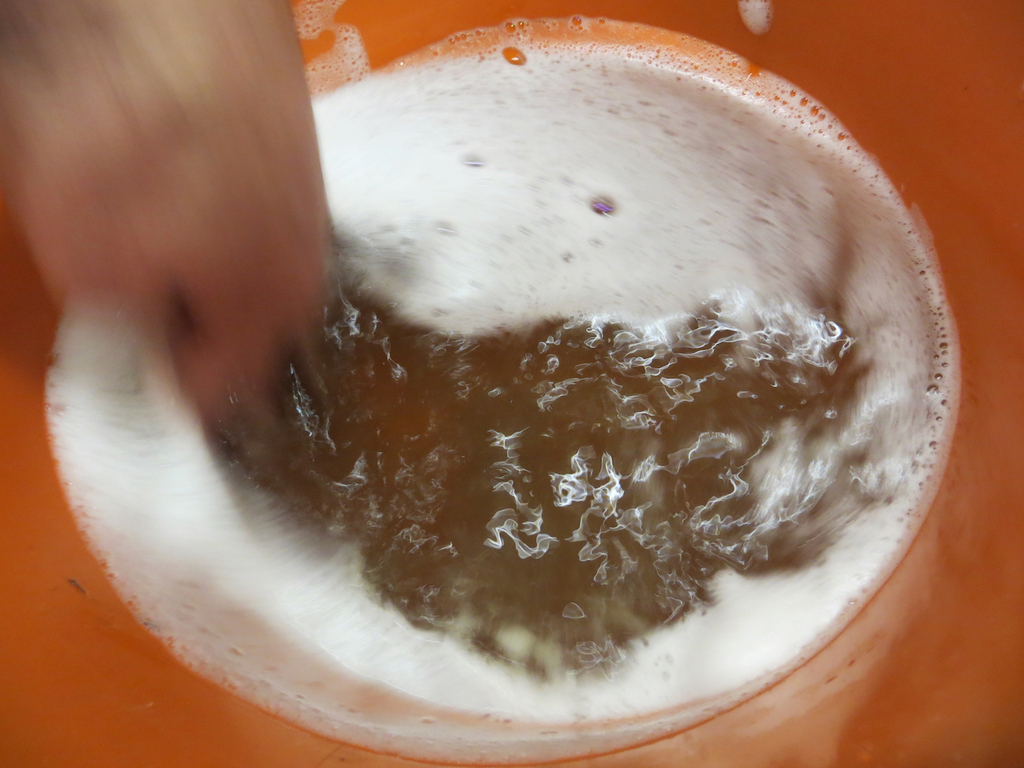 However muddy that looks in the photo it was worse in real life. How could that much dirt be in such a small headlining? After a few cleanings it’s looking much better. 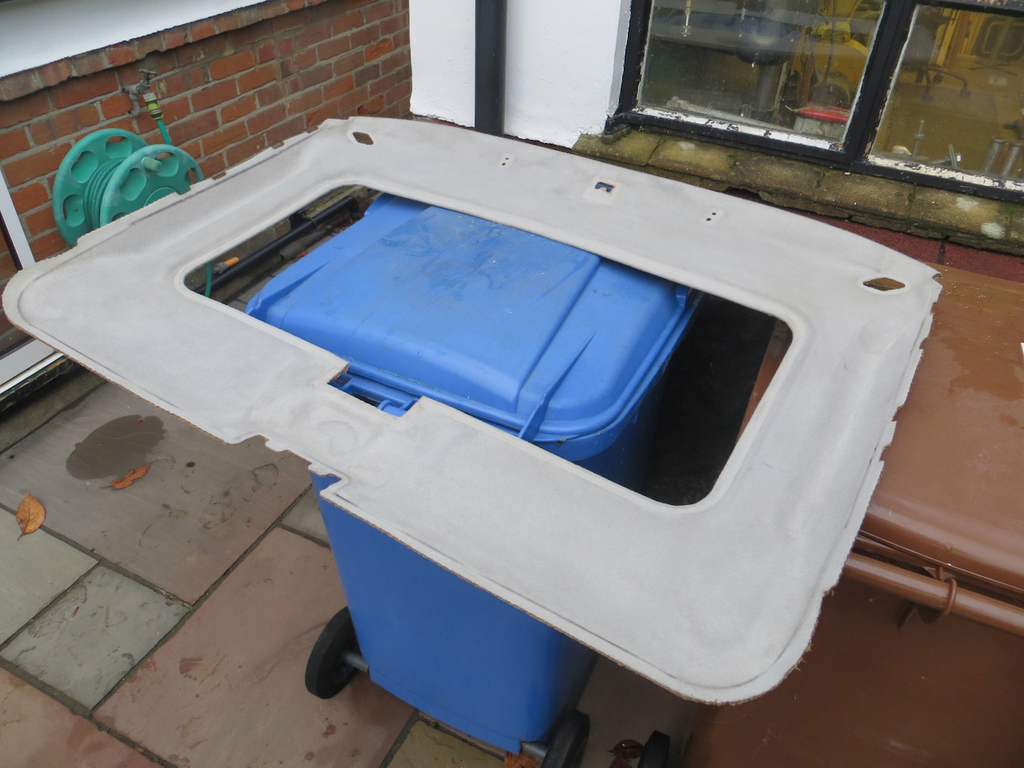 Again, not perfect but it’ll do. Very considerably better. Of course I was worried about the fibreboard saturating and falling apart. Especially along the front edge where it had been wet from the leak. So after each cleaning it sat by the radiator for a week to dry out. It’s back in the car now. James PS, Oh, and, yes, it’s staying dry so I think we’ve fixed the holes in the windscreen surround. Well done chaps! Couldn’t have done it without you! |
| |
|
|
|
|
|
|
|
Hurray, we are working again. Well done Mr HoTWire, and thanks! James |
| |
|
|
|
|
|
Dec 27, 2023 20:40:18 GMT
|
|
Good grief Penfold! It's let me in.
I think this is browser two in naughty mode. Or possibly browser three in normal mode. Browser one let me in in porno mode about a week ago. I thought 'great I'll do some posts later'. When later came it had changed its little computerised mind and told me to sod right off after all. God help us all if the human race ever comes to rely on Artificial Stupidity.
Well anyway, while I'm briefly here I'll stop moaning (even though I'm really good at it due to having many decades of experience) and take the opportunity to hope you all had a crackin' Christmas and wish you all a really brilliant New year.
Take care folks!
James
|
| |
|
|
|
|
|
Dec 12, 2023 22:20:49 GMT
|
Not a lot has happened. Well, a bit has happened but it’s happened over several weeks. There are a few reasons for this. One being that it won’t stop raining or drizzling and it’s hard to get time when the car is dry enough to do anything useful. And the other big reason being that it’s Christmas again so there are lights to go up and trees to decorate and stuff like that. I mean look at this.  That’s not even all of it. Right, enough excuses. Let’s get back to that hole in the windscreen that we are doing a bodge job on. When we last saw it I’d got a coat of epoxy on it for protection. What I needed was a piece of milk bottle (or similar) to stick over the hole. I mulled it over for a while and remembered this… 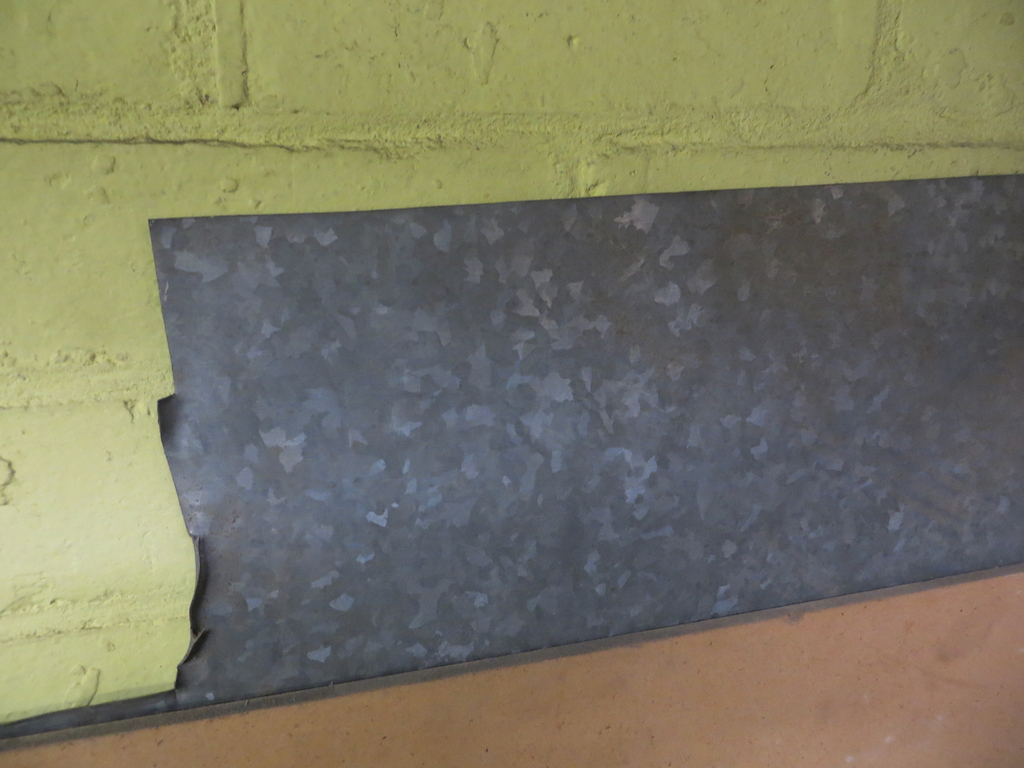 It’s a piece of galvanised steel sheet. My dad got this probably back in the ‘80s. I can’t remember why but we’ve used bits of it ever since. You’d think it’s be ideal for car repairs but it’s only about 0.5mm thick so it’s not. It is ideal for this little job though so a bit got snipped off, shaped and blown over with a bit of etch primer. 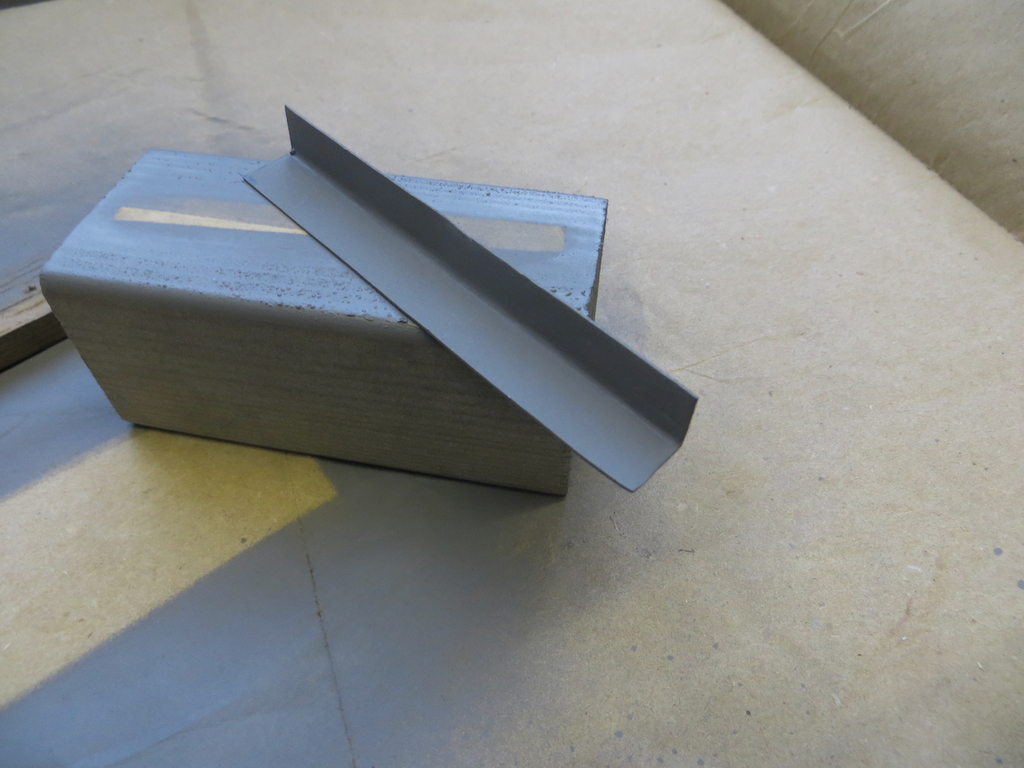 The next question… What adhesive shall I use to glue it to the car? It had to be something that I have, something gloopy, something that will go off pretty solidly, and something that I can over paint. How about seam sealer? That stuff is pretty tuff. 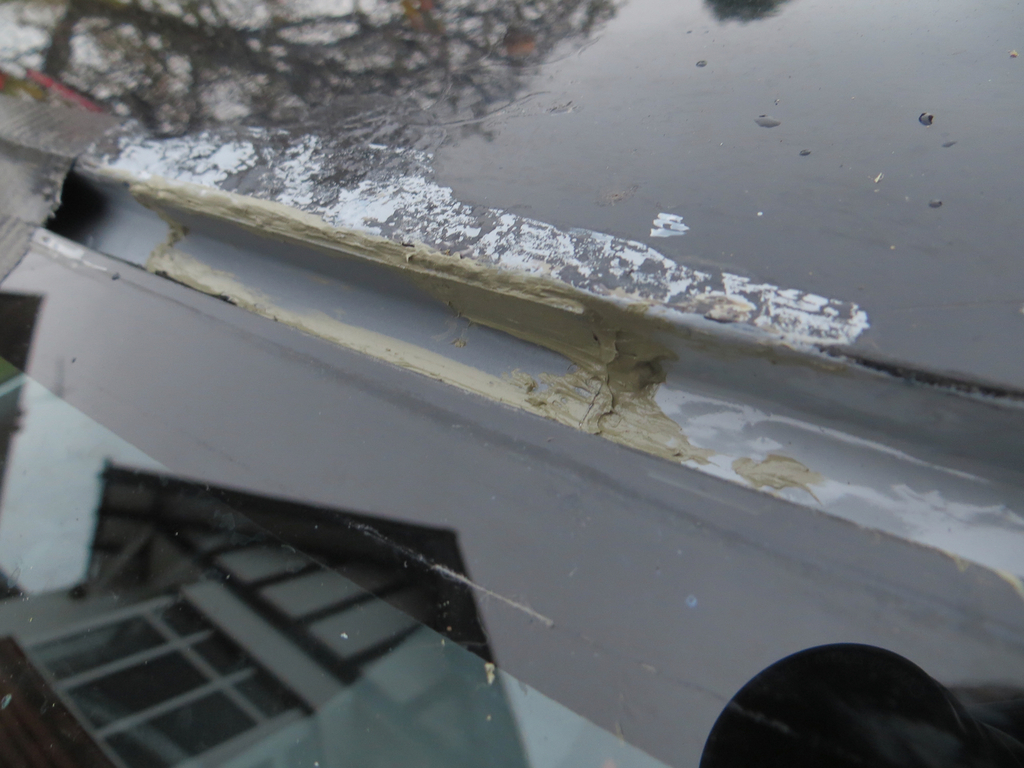 Done! The last job was to tidy it all up with a coat of black paint. 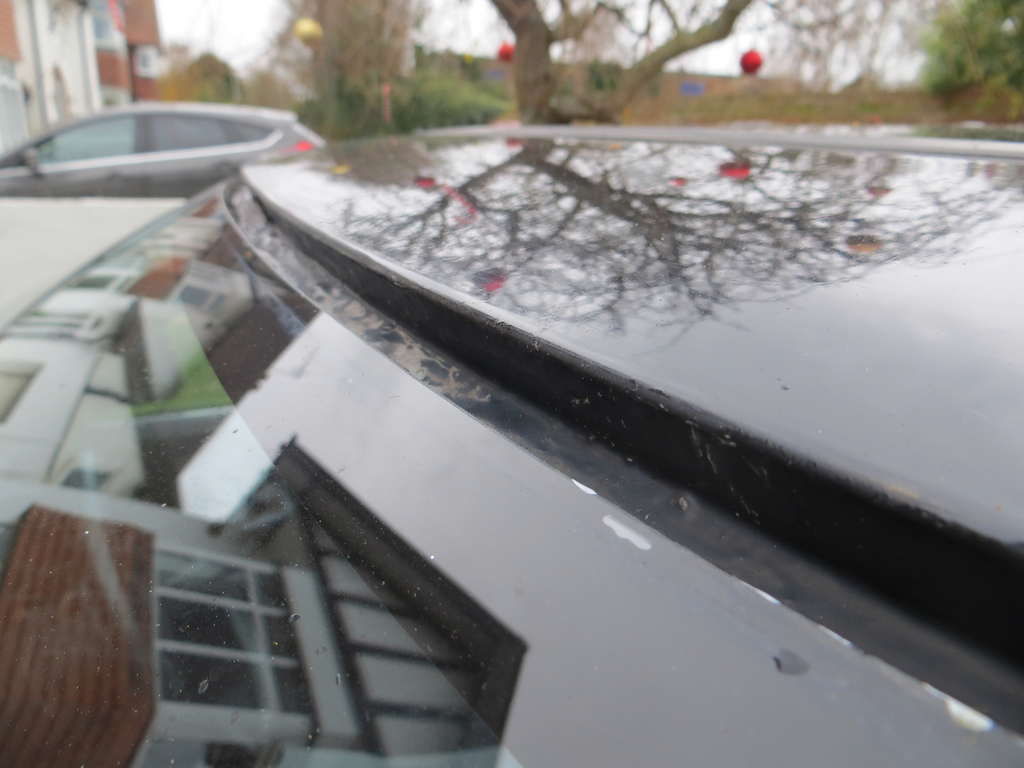 The black paint is a new tin of tough random black tractor paint stuff. The intention is to use it to spray the fuel tank and brackets under the car. I concluded that using spray cans was going to get expensive. The tank and stuff will get epoxy primed first by the way. There is another job (several actually) to do before this is put to bed. I don’t know if rust has got between the glass adhesive and the car. If it has it’ll get back in and eventually leak. Alistair at work donated a tube of windscreen sealer to the lost cause so I’m going to run a fillet between the top edge of the glass and the surround. Hopefully that’ll go some way to keeping the water out. I’m also going to use it to ‘glue’ the piece of adhesive back in down the left side. I’ll show you when I do it and it’ll make sense then. Lastly I have a dilemma that I’m pondering. The clips are missing that hold the top trim in. The previous bodger, sorry, glass installer filled the channel with glass bonding gloop and stuck the trim into it. I might have to visit Mr Toyota and ask if the clips are still available when I do the job properly but for the moment it’s probably getting glued back in. I’m not sure the original clips would work at the moment as the glass is cattywampus in the hole. Anyway, filling the channel with gloop probably didn’t help the rust problem. Once water got between the gloop and the metal it would be trapped there. So I’m thinking that I do 5 or 6 blobs across car. The ends of the top trim are held down by the side trims and they are screwed to the car. However… If I put five blobs of adhesive across the car I make five little dams that will definitely stop the water getting out. So how do I allow it to drain? James |
| |
|
|
|
|
|
Dec 10, 2023 21:15:38 GMT
|
Discounted to $25,500! Well, I mean I would but I'm not sure my little compressor would cope. |
| |
|
|
|
|
|
|
|
Sorry if this has been mentioned before but I've just had a read through the thread and can't see it. I think this "We can't find the page..." thing is stopping me from logging in. When I fill in my username and password (it autofills from a password manager but I don't believe that's relevant) and press the return key I get this.  The only way I'm logged in now is by switching to a Private Window and then logging in which gets me the magic...  ...page. But at least I can get passed that. It's been going on for a few days, maybe a week or so. Only just worked out how to get past it. I'm on Safari on a Mac but the way. Oh, and thanks to whoever suggested Private / Dark / Naughty mode somewhere above. James |
| |
|
|
|
|
|
Nov 28, 2023 11:38:39 GMT
|
She’s still a saucy little minx. John Quite right. Helen's not looking too bad either. |
| |
|
|
|
|


