|
|
|
Nov 27, 2023 22:00:19 GMT
|
Ian doesn’t look like that when he’s ‘polishing the wheel arch’. Well, that sent me on a personal voyage of internet discovery for a while. And when I’d done that I looked into the bus. See what I did there?  Anyway, It’s not as irrelevant as you might think. The bus, Helen and GKE68 have a few things in common. Firstly, and most importantly, they all seem to be still around. All three are ‘getting on a bit’ although the buses both have the edge over Helen. And they all have a Gardner 5LW engine. Er, well, maybe not Helen so much… I was scraping the barrel a bit there. The bus is BHW432. It’s a Bristol J from 1935. It was originally fitted with a petrol engine but got the Gardner in 1946. When it ended its passenger days it was bought by a showman and converted into a living van. I think I read somewhere that it had a generator fitted too. Looking more closely at the photo generallee posted (and I have inspected bits of it in some detail)… 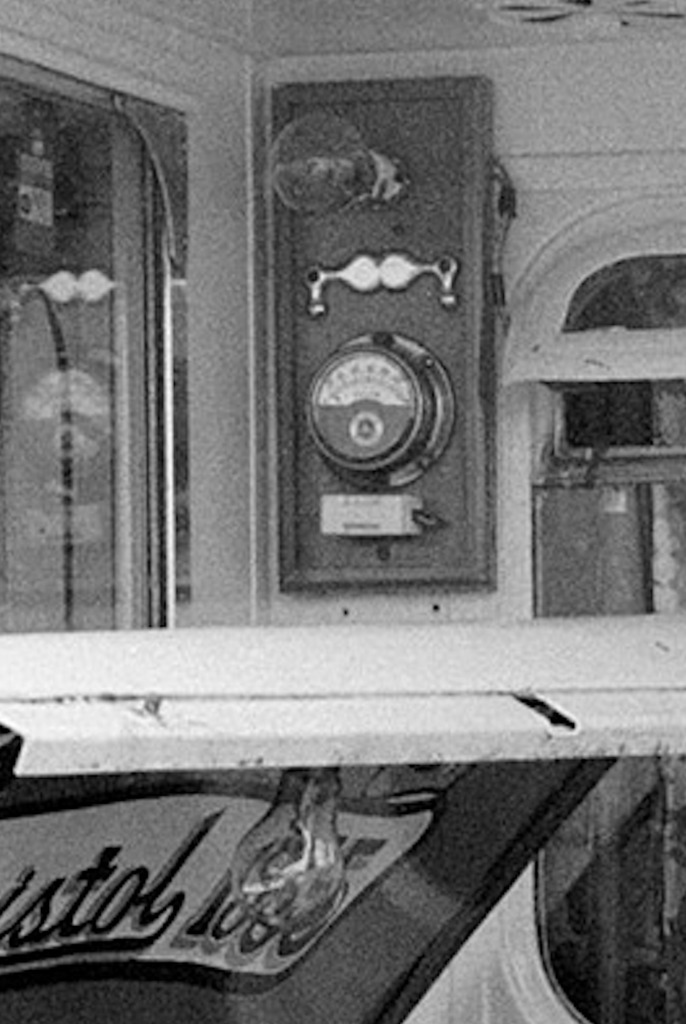 …that looks like a lamp and voltmeter by the saloon window and there is a lamp under the bonnet too. The wires sneak through the front window into the saloon. I wonder if they used the engine to drive the generator via some sort of PTO. If the car is contemporary I’d guess this was taken in the ’80s. 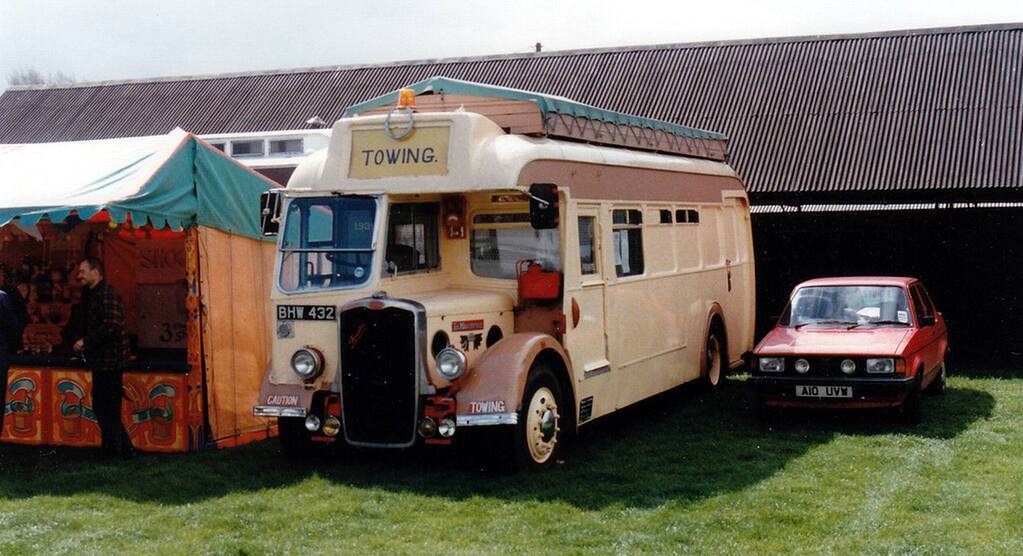 In the mid ‘90s it went into preservation but still as a showman van. I think this next photo was taken at Blists Hill Victorian Town near Telford which is well worth a visit if you are in the area. I seem to remember seeing that the photo was taken in the early 2000s. 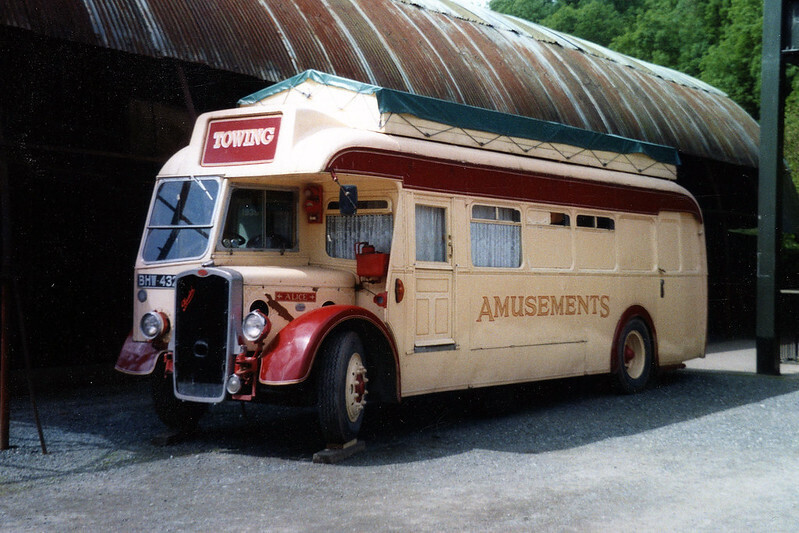 Some time around 2010 she went off for some refurbishment work. Here is a link if you want. busworks.blogspot.com/2010/03/bristol-l-bhw432-for-body-overhaul.htmlAnd finally here is its life history on Bristol Vehicles website. www.bristolsu.co.uk/j/operatordetails/bristoltramways/bhw432.htmInteresting little thing don’t you think? And the bus isn’t so bad either… James PS. I can’t quite believe that I saw a photo of a girl in stockings sitting on the wing of a bus and I write a post about the bus. There’s no bloody hope for me. |
| |
|
|
|
|
|
|
|
Nov 25, 2023 22:07:14 GMT
|
What, no left hand thread on the left side? The wheel nuts are cack handed but the hub nut is standard thread. I think the only practical way the hub nut would unscrew is if the outer wheel bearing seized and spun the inner race on the axle. I could imagine that might break the pin and screw the nut off. I've not heard of many 3 wheeled buses around during the war so it probably wasn't a common problem. James |
| |
|
|
|
|
|
Nov 25, 2023 21:55:35 GMT
|
I have a garage full of trim. It needs to be on the car. As much as anything it needs to be on the car so that it’s not cluttering up the garage. I wish I could remember what order it goes back though. First thing to go on are definitely the vents at the bottom of the C pillars. But they need fitting back together.  There was a rubbery flappy thing in them that made a sort of a one way valve. After several decades the flappy bits became detached and fell off so I made some new ones. I think out of thin pond liner. Anyway, I never put them back together so that was the first job. Next there is a rubber trim that runs along the top and bottom of the vents where they touch the body. I still had the bits but they were pretty stiff. There is a similar arrangement along the top of the side skirts and I’d bought some rubber strip for that job. It turned out to be smaller than the rubbers for the skirts but was exactly the same as the stuff on the trim. A happy accident that. 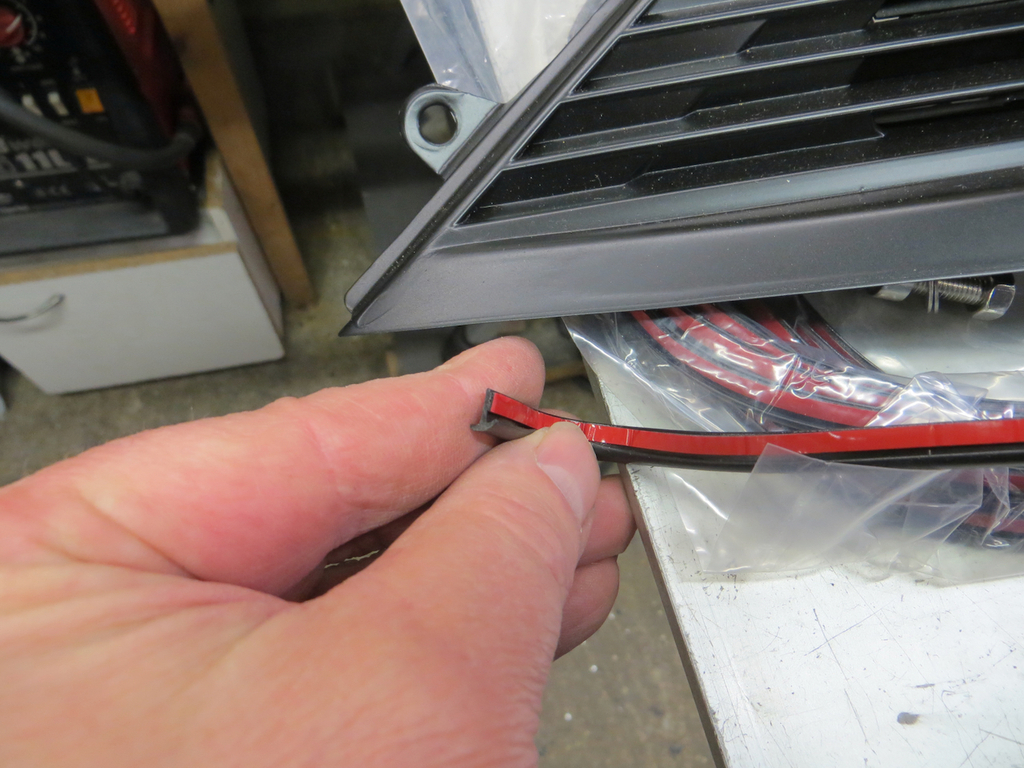 It’s also used round the trim that goes down the back of the C pillars and across the top of the rear window. 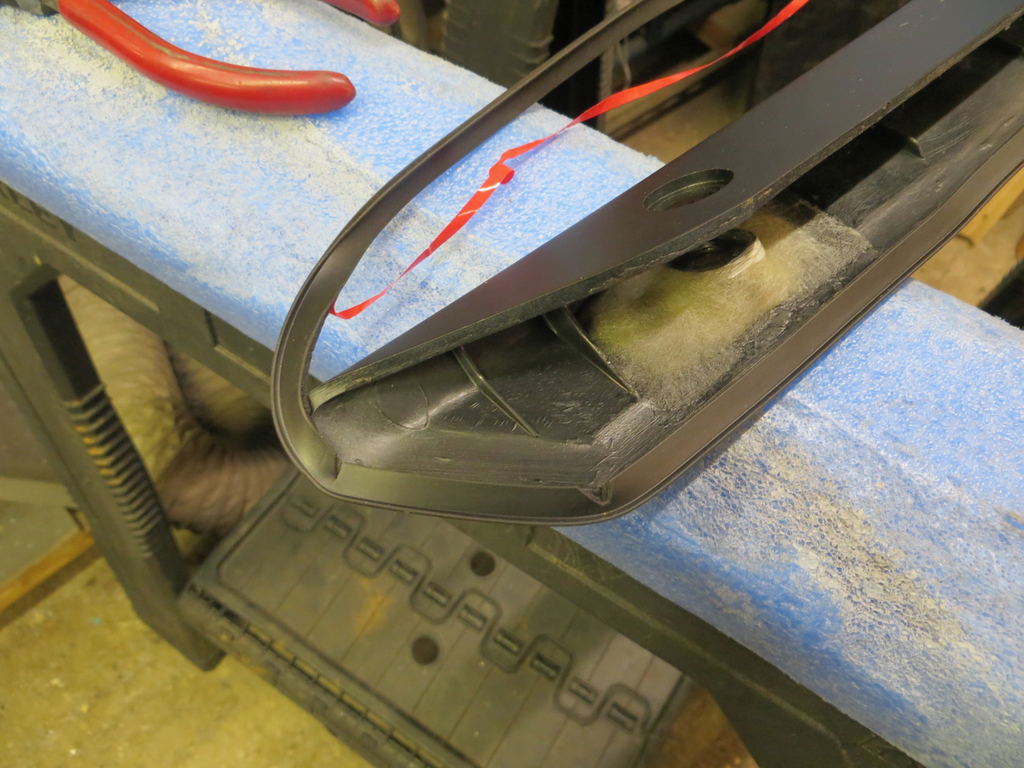 Good job I bought a couple of lengths of it. Some time later I’d found all the parts, all the screws and bolted it back together. Unfortunately, as happens at this time of year, it was pitch black outside as a result of the sun having cleared off. But a few days later I got a snap. 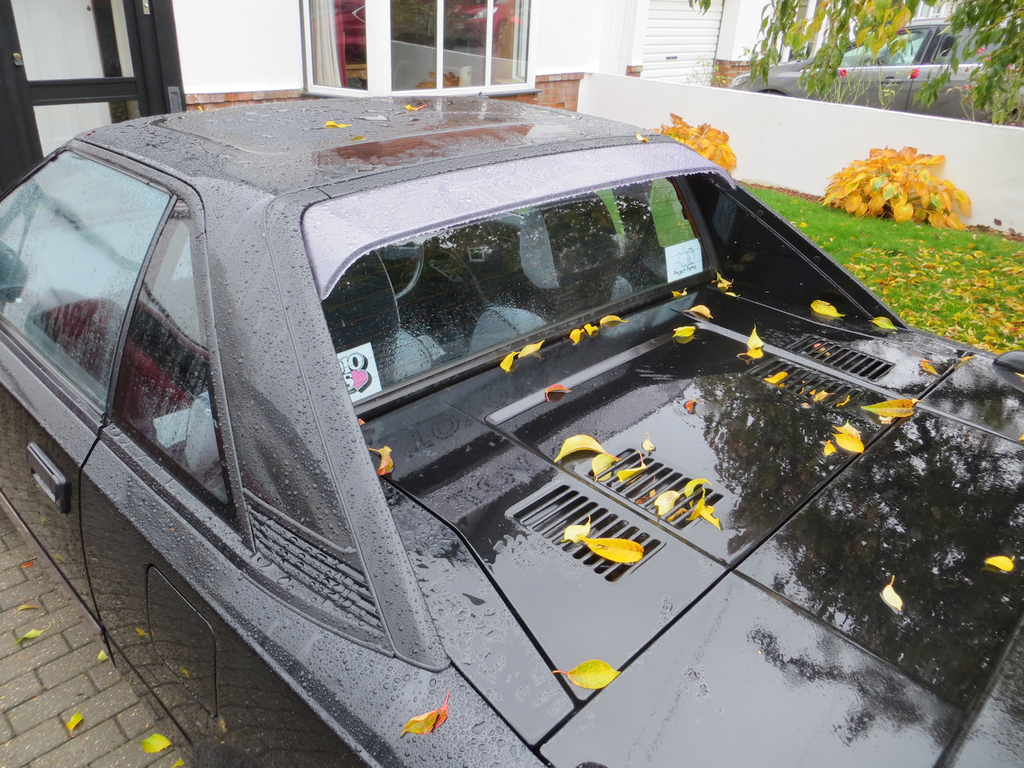 It’s looking more like a car again. Flushed with success I bolted the rear bumper back on.  It’ll have to come off again to finish a bit of paint on the right side but at least it’s not cluttering up a bench in the garage. The other thing that was cluttering up the garage is the side skirt for the left side. So I found the fixings and bolted it back on too. 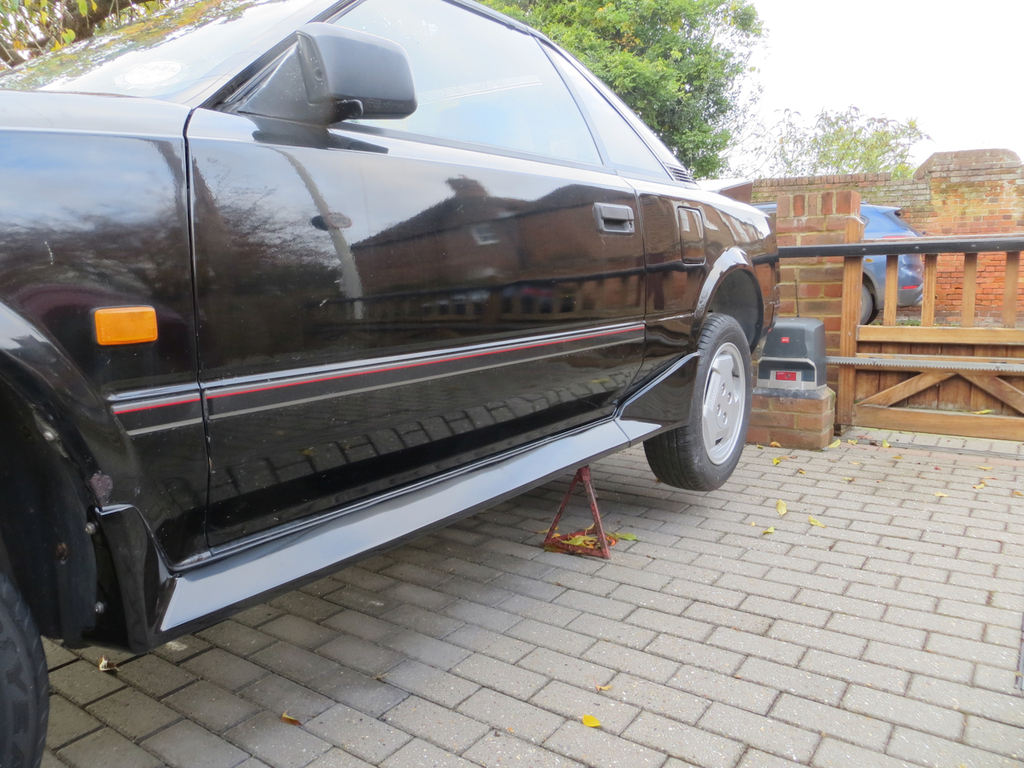 I used the slightly small rubber strip on it as the original stuff was spanked. It’ll do for the moment. Possibly for ever. I have to admit that when the windscreen surround started letting water in I was a bit hacked off with the old car. I was very hacked off if I’m being honest. But getting the trim back on did make me smile quite a lot. Maybe the car and I have been going through a rough patch. I’m sure we’ll get over it. James |
| |
|
|
|
|
|
Nov 25, 2023 21:51:44 GMT
|
I don’t know about tiger seal but if you made a repair section and used panel glue you could call that a permanent repair. I mean if you can glue a whole Lotus together with the stuff then a little repair like that would be no problem  I don't know but think the rust will have got under the gloop that's bonding the windscreen to the car. It's probably not as well glued in as it should be. Well, it definitely isn't because the left side is barely glued to the car. James |
| |
|
|
|
|
|
Nov 25, 2023 20:45:44 GMT
|
|
There aren't any torque settings in the Bristol manual, well none that I've ever seen. I guess you just used your intelligence.
Problem is that I don't have any intelligence and tighten things until the thread strips, then back it off a bit.
That nut is torqued to more ugga-duggas than my ugga-dugga will do. Ian and I talked about the air impact as it happens. The really tight stuff I don't think it'll get undone. I doubt it'd get the wheel nuts off for example. And the smaller stuff is fine with a spanner. Interestingly, for such a bit vehicle there isn't much room to work in a lot of places. It can be hard enough to get a spanner in let alone an air impact.
That hub nut is tightened as hard as you can reasonably do it and then a pin on a spring clip pins it to the axel tube. But as Ian points out if anything did go wrong that's the side where the wheel rotation would screw the nut off and you'd lose the wheel set, hub and drum in one go.
James
|
| |
|
|
|
|
|
Nov 24, 2023 20:00:51 GMT
|
I'd form a steel repair piece paint it in epoxy and glue it in place with tigerseal or something similar, I would though treat the rust under the paint on the roof, that's only going to spread and lift the epoxy you have applied Steel? You do know that plastic milk bottle is more traditional for this car? Seriously, yeah, I think that's the plan. I did have some Tigerseal but the tube went hard. I mean, it had only been open 6 or maybe 7 years. Things don't last these days. Buying a new tube, using a small squirt and letting the rest go off feels a bit wasteful so I'm just pondering what I can use as an adhesive. I kindly chap at work (hello Alistair) donated a tube of windscreen sealant to the cause but I'm not convinced it'd work as an adhesive. I do have plans for that though so it's not going to waste. As above. Or if you are braver then with a dremel & a mini cutting disc you could chop it out to an oblong and then carefully weld in a folded peice of steel. I'm not that brave! I wouldn't want to weld that close to the glass and the edge of the roof is badly pitted so it's just going to blow through no matter how careful I am. i am guessing there may be some pin holes under that roof scab  That roof scab isn't as bad as it might look. Ok, it was worse but I did scrape it back, rust treat it and epoxy it before the car decided to fill with water. It's got a bit of black paint brushed on it just so it doesn't stick out like a sore thumb. It's badly pitted and it'll need to be cut out but it's not holed (yet). Think you are procrastinating and delaying the envitable ... sorry ... You are absolutely right. That's exactly what I'm doing. Deliberately. I'm working outside, it's cold, dark and it won't stay dry for more than a day. There is no way I'm taking the screen out now. It's just not happening. I also have a ton of other stuff that I need to crack on with. If I can keep the car dry for a year or three and slow down the damage I'll be very happy. The car had a nasty rust blister on the roof long before I owned it. I've always known the screen has to come out. Just not today. The fact that it's filling the car with water is no surprise. In fact I'm more surprised it's taken this long. I just wish it'd done it a week before I put the carpet and seats back in rather than a week after... Some times the devil just wants to take a wee wee in your gazpacho. James |
| |
Last Edit: Nov 24, 2023 21:39:46 GMT by Sweetpea
|
|
|
|
|
Nov 23, 2023 22:22:52 GMT
|
Let’s have a quick update on the windscreen saga shall we? We all know that poking the rusty thing always improves matters and it’s never as bad as you think it is. That’s the case isn’t it? So I poked it. Actually I put a little grinding disk in the air tool and attacked it with that. 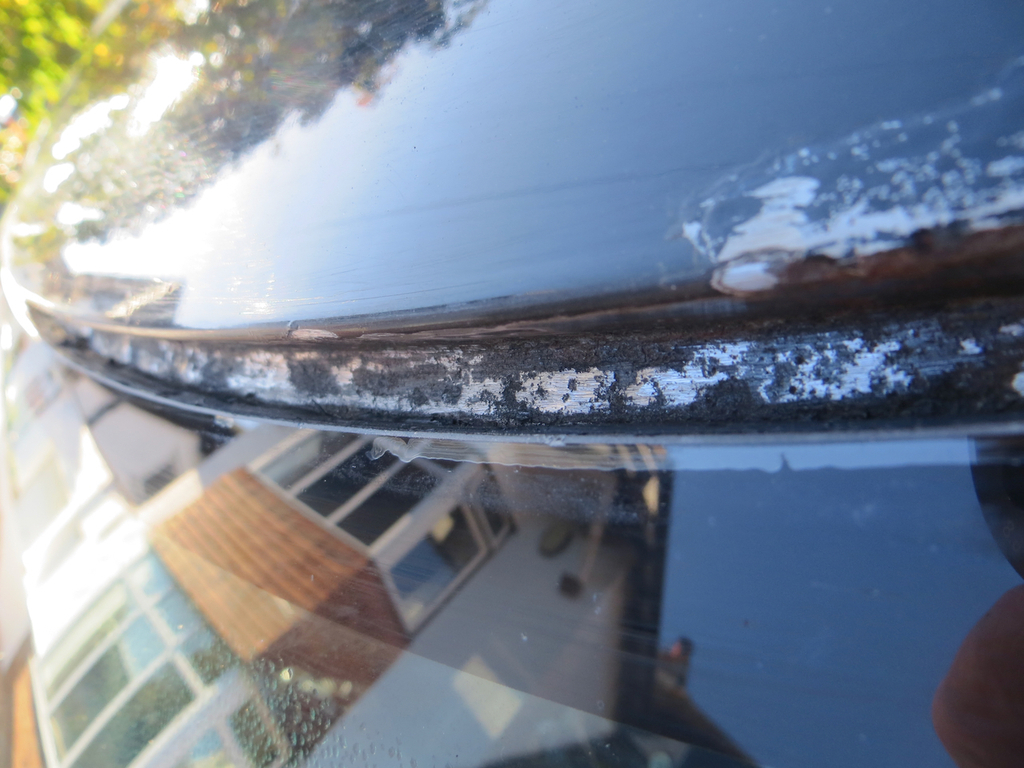 I didn’t go mad but I wanted to get the thick flakey stuff off and get down to something a little more solid. Then it got a couple of coats of Hydrate 80 and I left it for a week or so to do its thing. 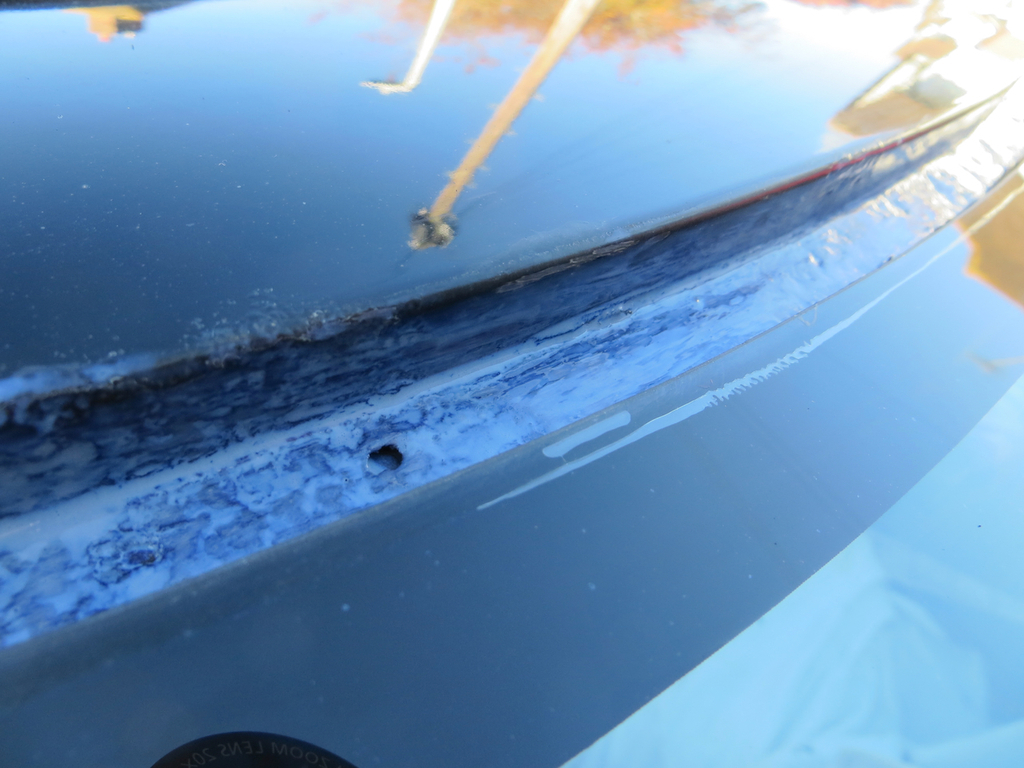 As you can see, that huge hole actually turned out to be tiny! Hurray for me! Oh, no, sorry. That’s a different hole. The huge hole got much worse when I poked it. 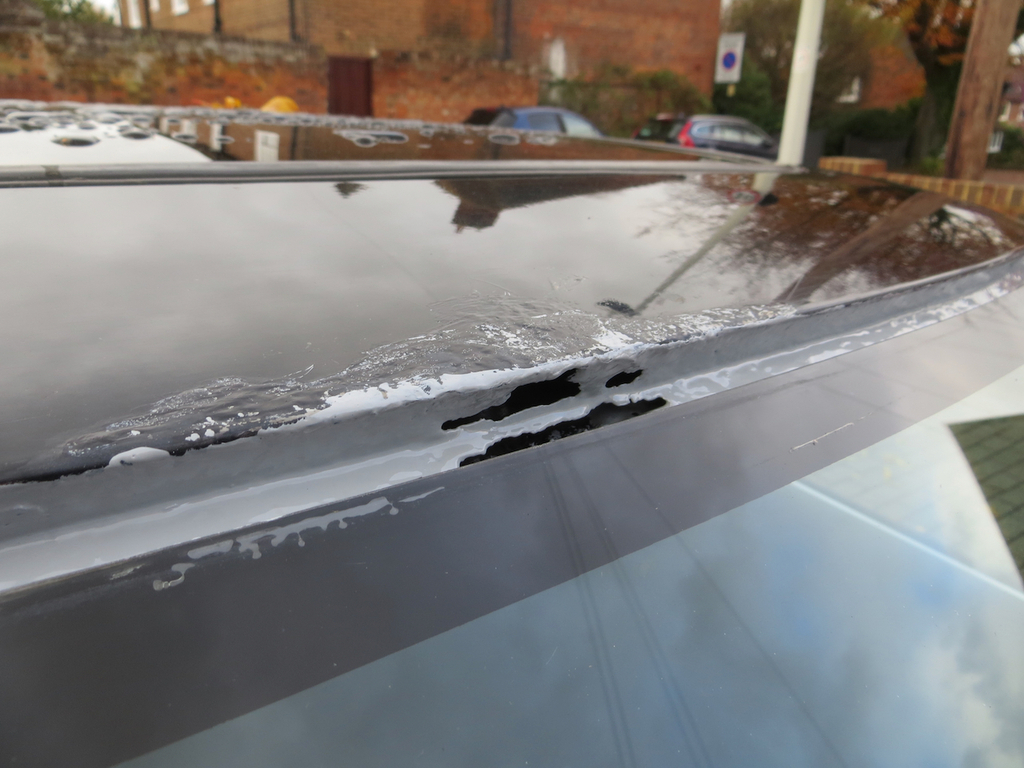 How is that a thing? Rust always gets better when you poke it. That’s right isn’t it? I’ve remembered it correctly haven’t I? The grey is a couple of coats of epoxy primer. Just the one shade of grey rather than the full compliment of 50. I guess I’m not so adventurous after all. I’m pondering exactly what to do with this now. Back shortly with something completely different. James |
| |
|
|
|
|
|
Nov 23, 2023 20:06:23 GMT
|
I got a bit of homework after the last time I was at the garage. This is the vacuum pipe that runs under the cab floor to the gauge. 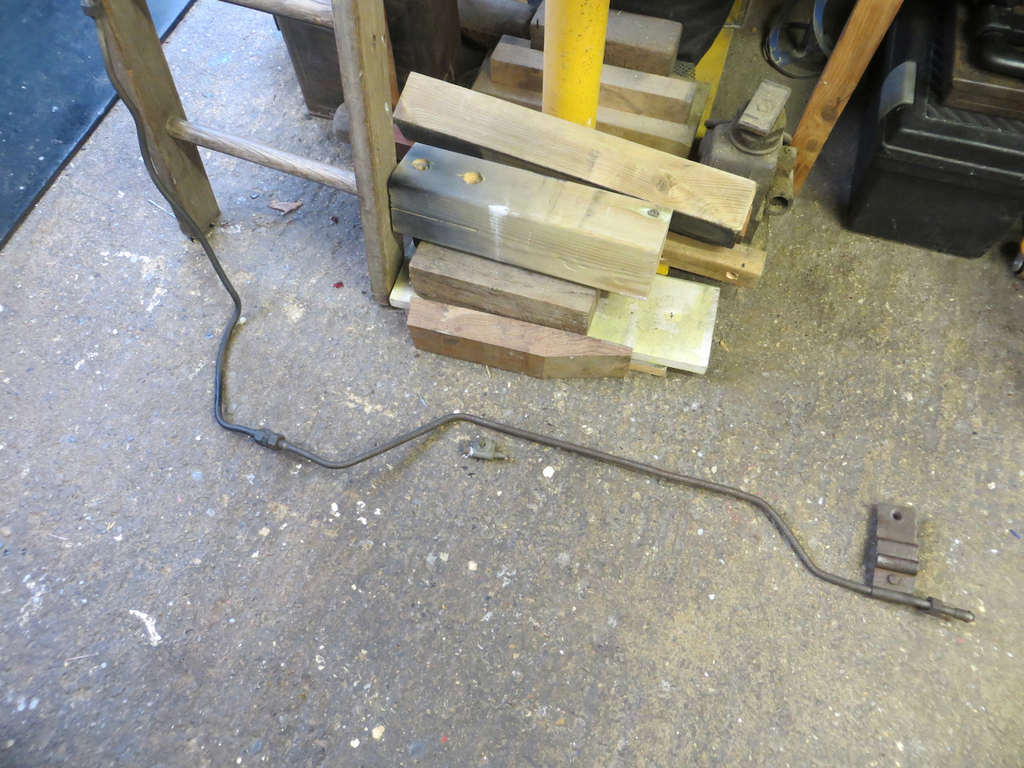 Also present is the chassis bracket and a set of clamps to go under the cab floor.  They needed a bit of heat to get them off the old stud. Anyway, after a bit of cleaning and sand blasting and polishing and stuff I painted them. 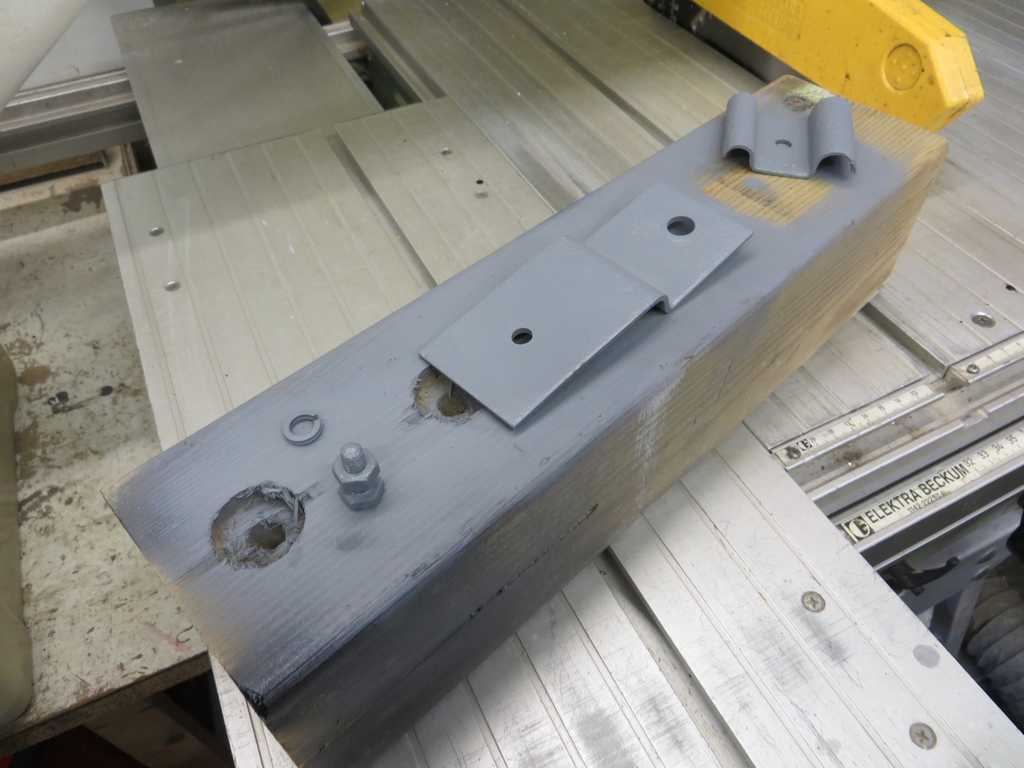 Have an arty shot of bits hanging from the ladder. 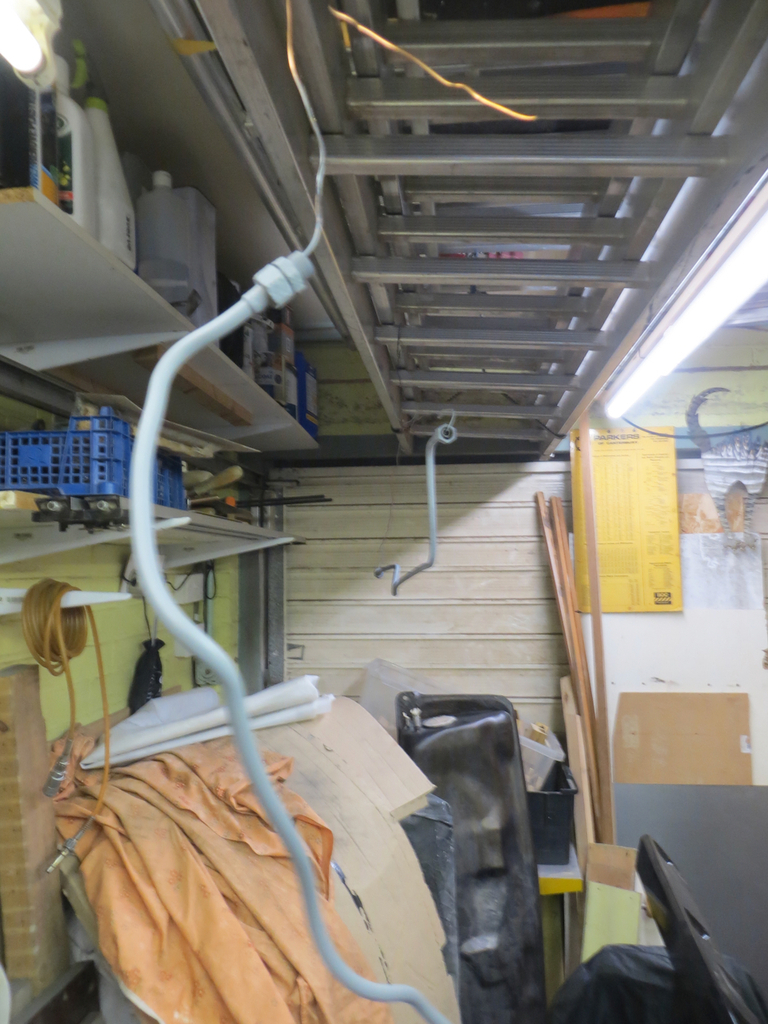 Is that arty or did I just take a rubbish photo? Hard to tell really. Eventually they wound up painted black. Back at the garage I got to fit the pipes again. It’s the one indicated by the red arrows. It took me ages to get those red arrows to hang there in mid air. 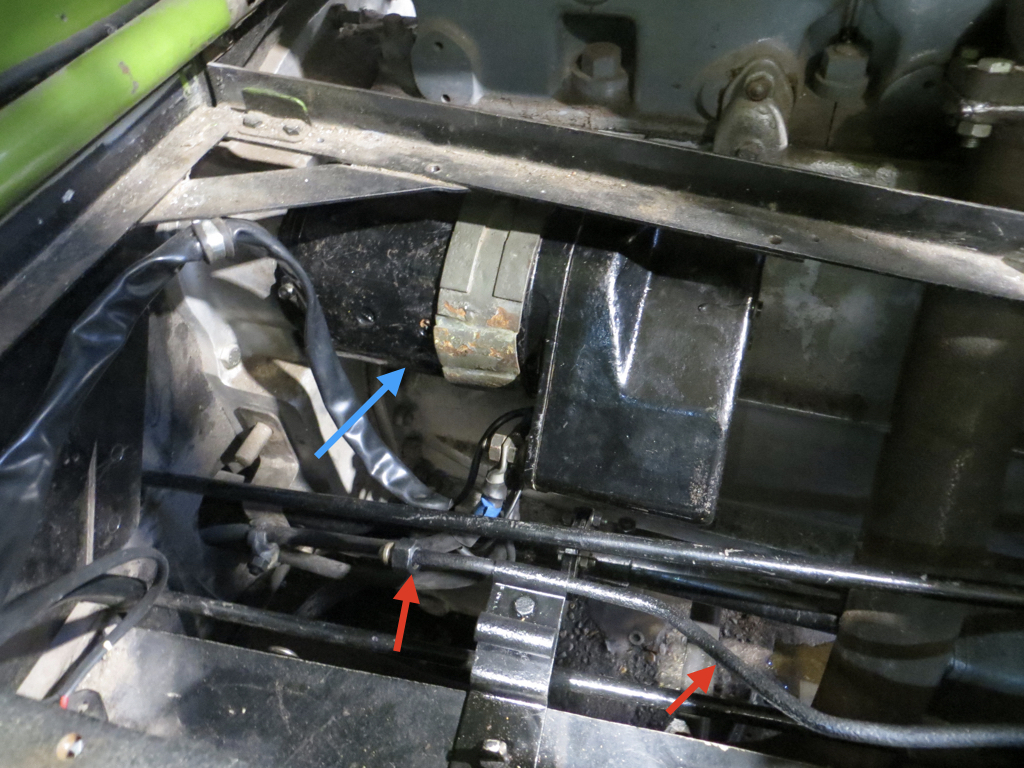 The blue arrow is the starter which we’ve also refitted. If you recall it wasn’t working properly. Ian took it home and ‘did something’ and now it seems to work. I’m not sure I understand exactly what Ian did to it. I’m not sure Ian understands exactly what he did to it. Well, it’s working. You take your wins when they come along and don’t ask too many questions. Back to the vacuum pipe… The front section that runs up to the gauge has a minor problem in that it occupies the same space as the fan blades. 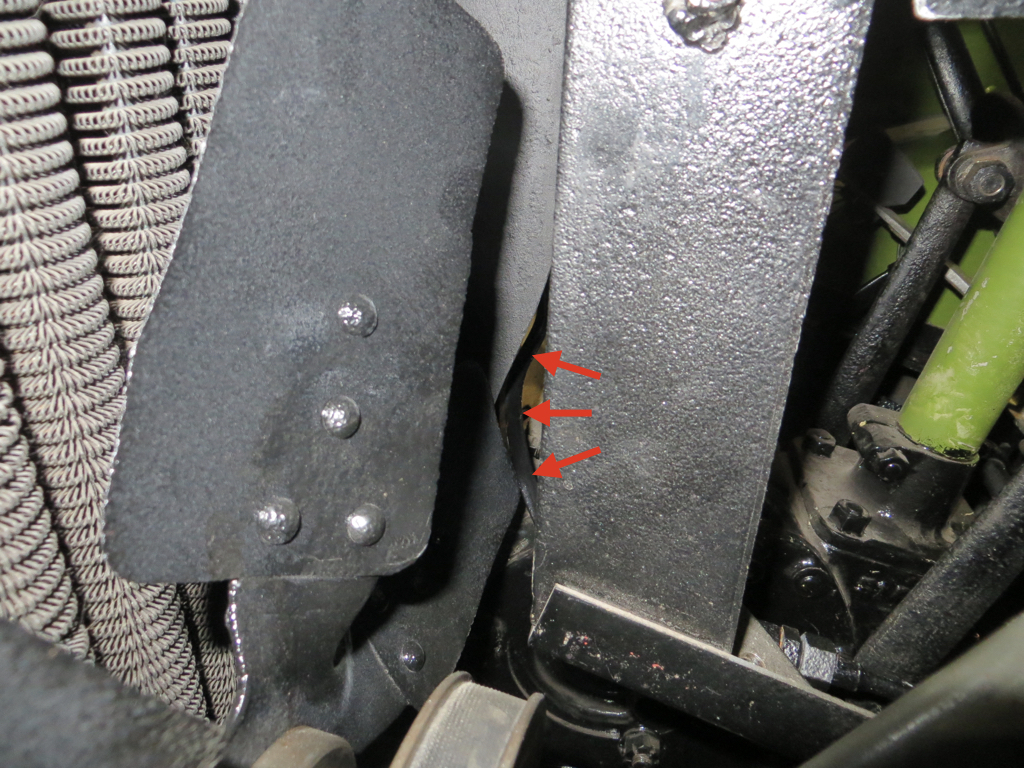 It’s only copper and is likely not original. I’ve started dressing it into a position where it won’t get clattered by the fan but it quickly became, what we restoration people call, ‘home time’ and so we wen’t home. But... Before that job we had to strip the rear hub to replace that brake spring. But before we did that Norman, the garage owner, turned up with cake. 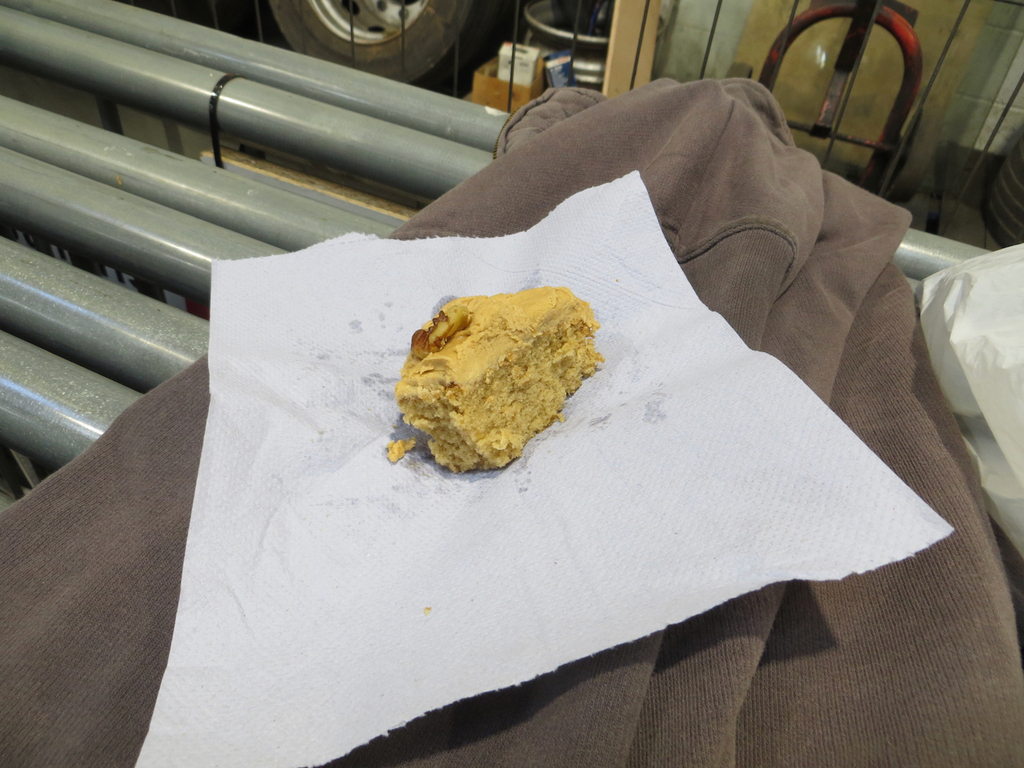 I’m not as disciplined as teaboy and I ate most of it before I remembered to take a photo. I’m not sure what the occasion was but thank you Norman. It was a lovely treat. Wonder if he takes requests for next time? This rear hub… When the bus was reversed into its parking space it spat the end of a mangled spring out of the hub and dumped it on the top of the road spring. Ian happened to find it. 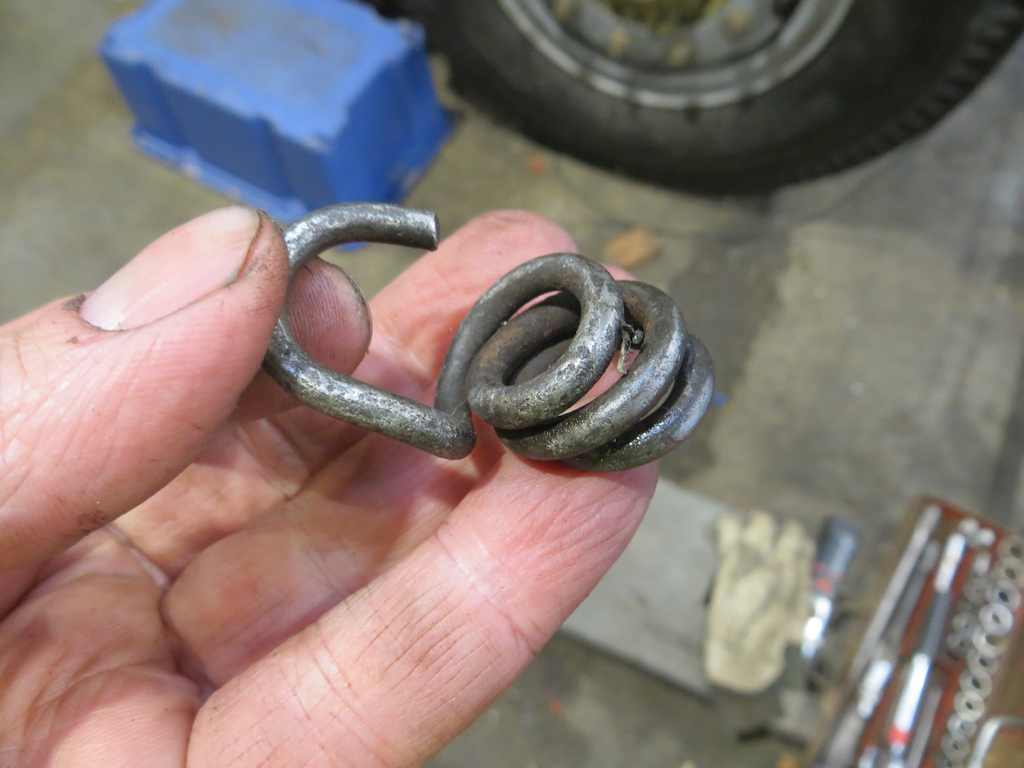 Pound to a penny it was one of the springs that pulls the shoes off the drum but the only way to find out for certain was to strip the hub and drum off. The other question was whether the spring got between the drum and the lining. And if it did, how much damage did it do as it went through. The hub and drum is a right pain in the biscuits to remove simply because it’s sooooo heavy. 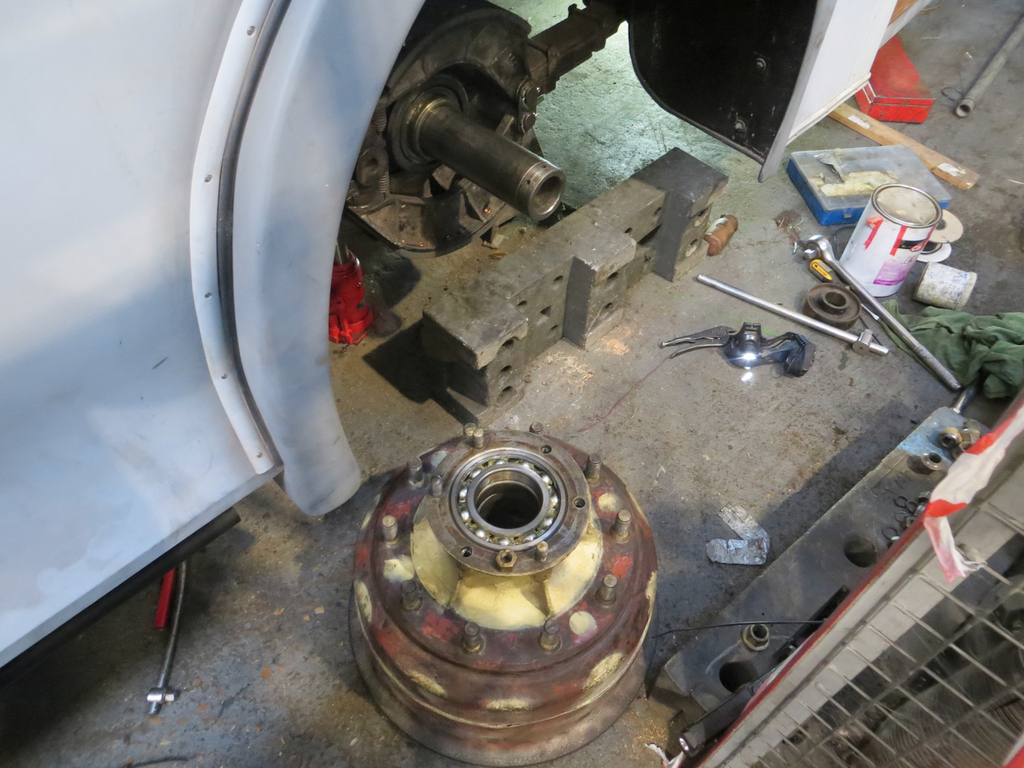 It’s a two man lift which would be ok except you can’t get two men in the wheel arch. It’s especially hard when one man is Ian who’s about 8 foot 3 tall so doesn’t fit in the arch and the other man is me who drives a computer keyboard for a living so I’m not built like Arnold Schwarzenegger. As expected it was one of the shoe springs. 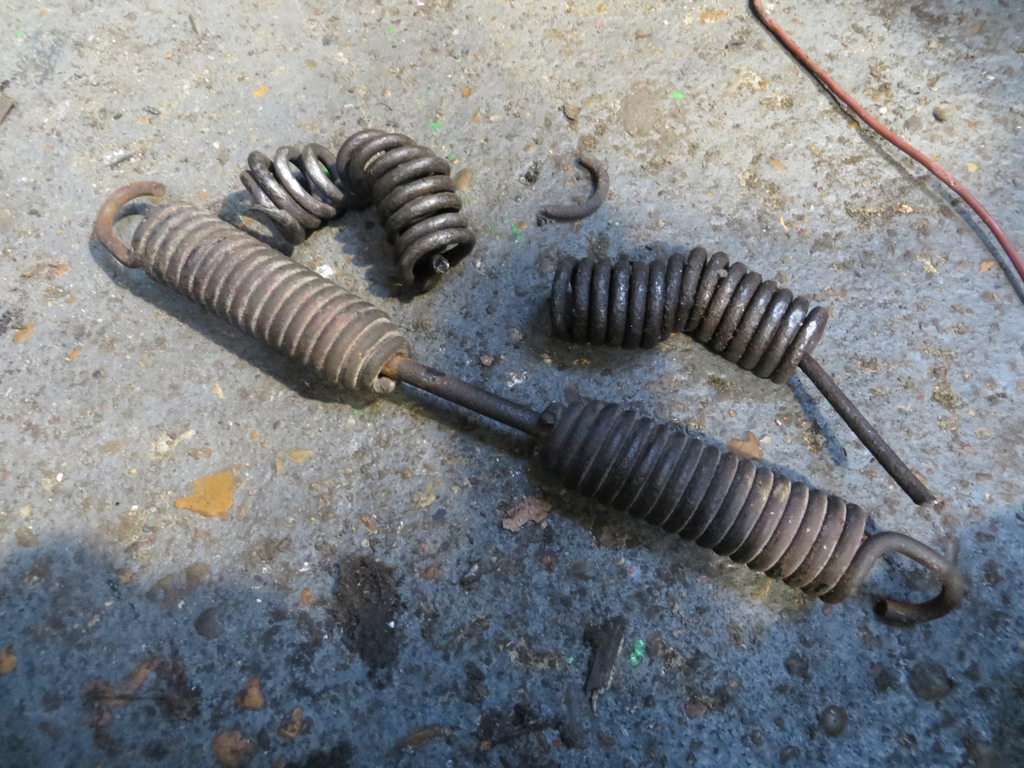 The top one should look like the bottom one. So we swapped the shoes top to bottom… 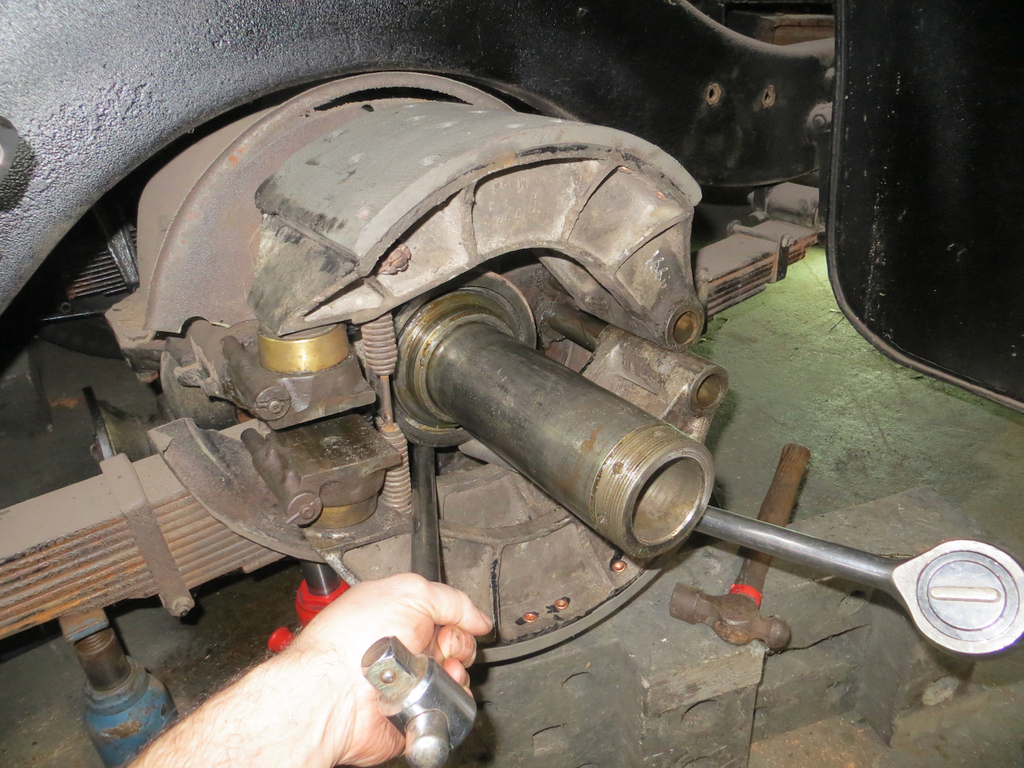 …which puts the new spring on the inside where it won’t get hooked off by the hub. How much damage did the spring do to the linings? Almost none at all. It took a small corner off one of the linings.  It’s a tiny piece compared to the size of the linings and it’s at the hinge side of the trailing shoe. Lastly we slid the drum back on - which was a massive problem because it was dragging slightly on the top shoe. Then we did the hub nut back up using the hub nut spanner we made a while back. 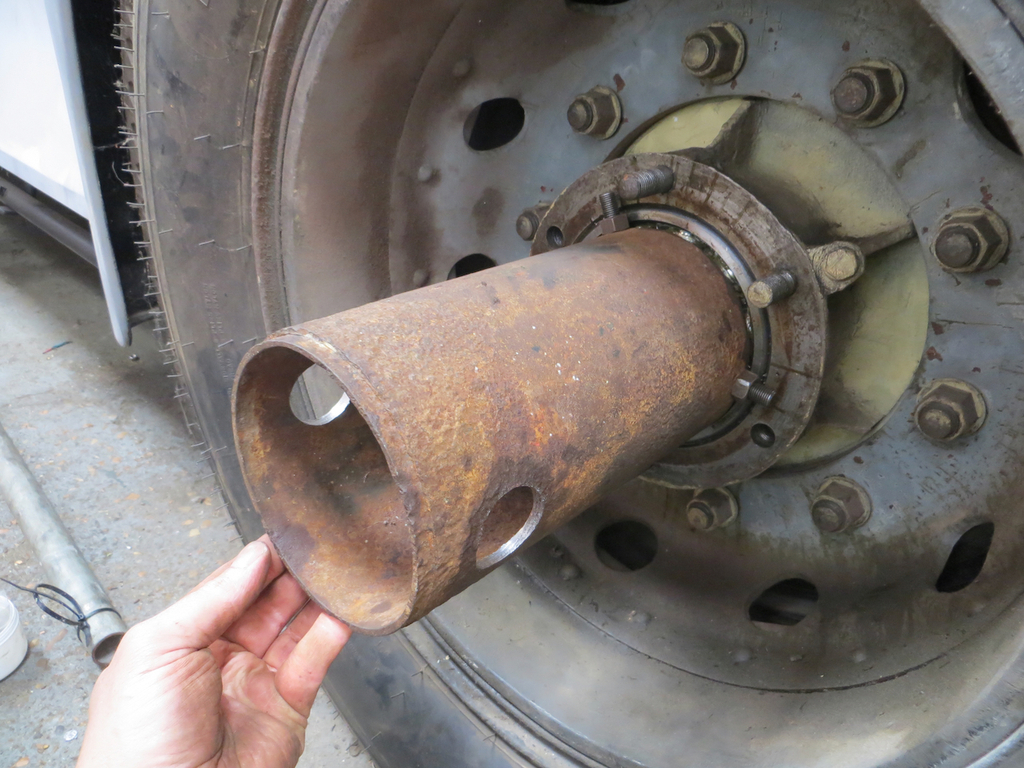 We torqued it up to the factory spec of 6 Ian / ft or about 1.8 Ian / Mtrs if you work in metric. (That’s one Ian hanging on the end of a 6 foot bar.) Now a different story that might be of interest. Normally the London bus companies feed buses into the second hand market where they are picked up by the smaller operators. Transport for London specify what should be run on each route in terms of double or single deckers, how many doors they should have, that sort of thing. Well, not surprisingly, TfL want to see battery electric buses these days so that’s what’s being bought. But there isn’t the charging infrastructure in many of the garages to keep enough battery buses on the roads. And even if there was it’s debatable if the grid can provide enough power to some of the buildings. Not without major upgrades anyway. So this means that the London garages are having to hold onto their diesel buses to keep the routes running and, as a consequence, there is a lack of second hand vehicles for the smaller operators to pick up. Apparently the second hand market is very strange at the moment. I’ve heard this story from a couple of sources now. Hmmmm. So much for going electric. James |
| |
|
|
|
|
|
Nov 12, 2023 18:41:28 GMT
|
|
Big red hooks. Hmmmmm. What's not to like!
(You going to paint them black too?)
|
| |
|
|
|
|
|
Nov 10, 2023 14:18:23 GMT
|
|
Big red crane. Hmmmmm. What's not to like!
|
| |
|
|
|
|
|
|
|
|
|
Thanks for the thoughts and support folks. I was going to answer individually but I’ll just tell you all what I’m thinking in a moment. A couple of messages first though… Whatever you do, don't poke it! Oops, I poked it! jimi , Thanks for the offer of the side trims. I think mine are ok apart from needing paint. (I’ve not looked closely yet.) I’ll let you know if I do need them. The British Isles are a difficult place for cars. The sight of that wet rusty gully and the hole is tough to behold. John I watch a couple of PooTube channels form US mechanics in the rust belt. We don’t do so bad! 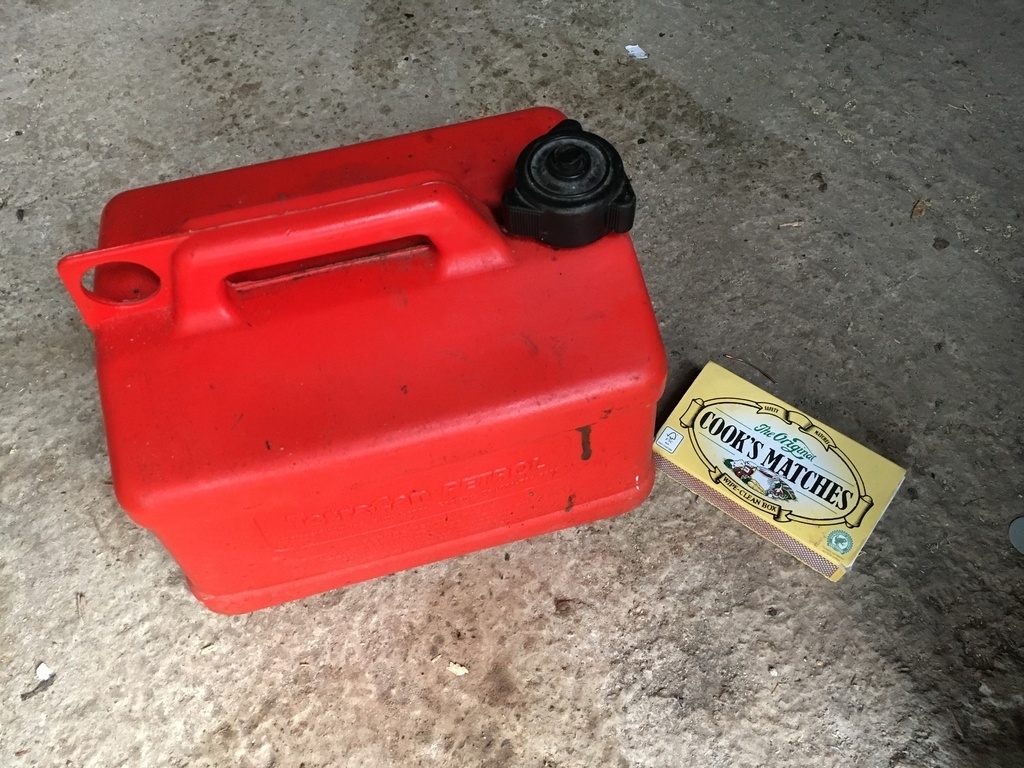 James.  Don’t tempt me. In truth I couldn’t do that. The can of petrol is worth more than the car. Let’s take stock of things. A leaking windscreen isn’t going to fail the MOT. Being bonded in means it’s a semi structural part of the car so it’s not ideal that it’s not properly glued down the left side but that’s not changed in a couple of decades. However this might fail the MOT one day… 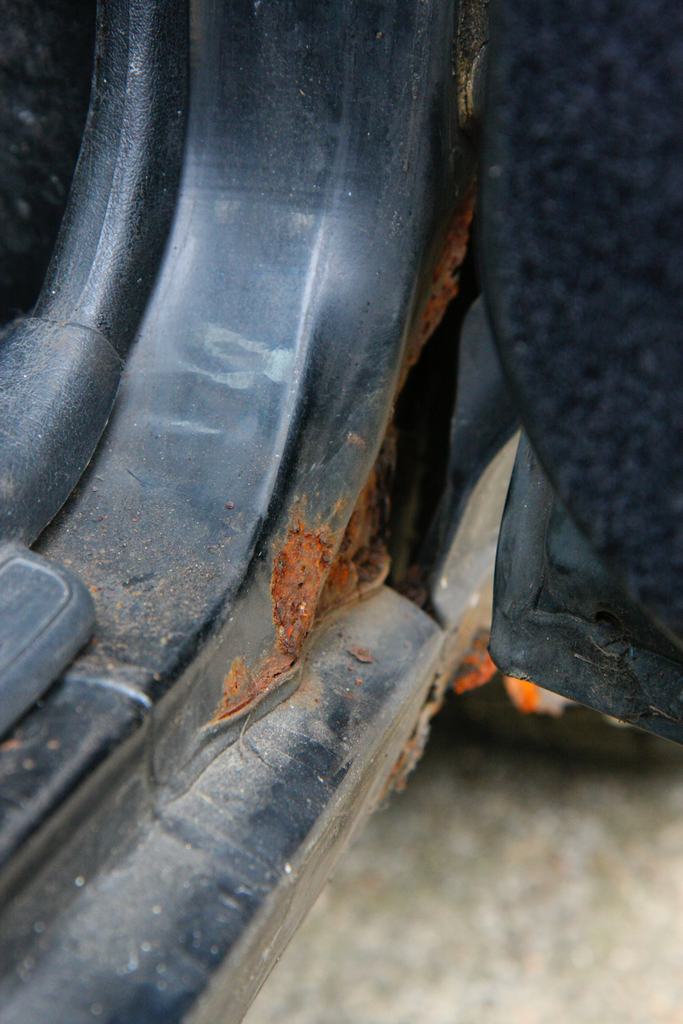 It’s rust in the bottom of the A pillar. I believe that it’s just in the outer skin and there is a load of thick steel forming the structure behind it. Not hard to fix but it means taking the wings and doors off. I don’t want to take the wings off because they look like this… 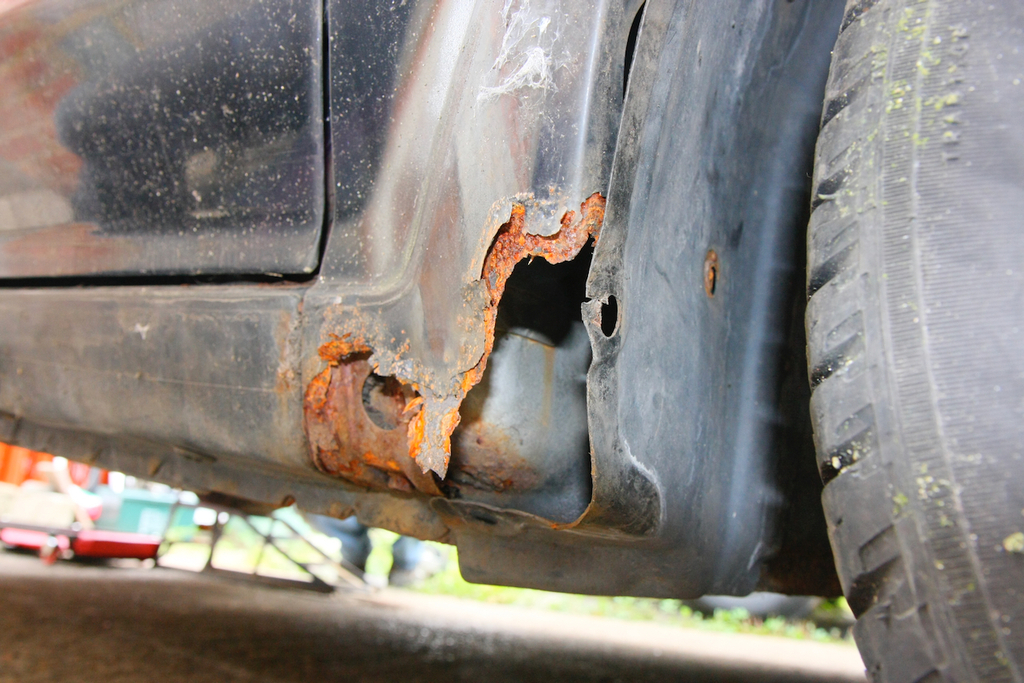 And I want to get some structure and shape back in there before I disturb them. The other thing that might fail the MOT is the suspension. There is one damper that started to weep. Again, swapping dampers isn’t a big job but I’ll want to refurbish everything and polybush it while I’m doing the job. So there are a couple of jobs that take priority over a leaking windscreen. Actually more than a couple because I also need to make some architraves for the hall and finish decorating it. Mrs Sweetpea has been very tolerant of my waisting time on the car this year so I really need to get the hall finished. The problem here is that when I say ‘make’ the architrave I mean purchase some rough cut oak, run it through the thicknesser a few times, and then though the spindle moulder. That means I need space to get the machines out. Space that is currently taken up with bumpers, trim and a fuel tank that needs painting before it can go back on the car. Pratting about with the windscreen ain’t a thing that my diary can cope with at the moment. Repairing it properly certainly isn’t happening. Another wee problem is that the weather looks like this a lot of the time.  Rainy, wet and miserable. It’s not the time of year to be taking the windscreen out for a few weeks. Oh, it’s a sunroof car and the paint on the roof and C pillars needs doing anyway. When I do this it’s getting the full monty and, knowing me, that’s not going to be quick. This weekend (if the weather is passable) I’m going to get the stiff wire brushy thingy in the drill and carefully clean the channel out. Then we’ll think again and see if everything I just wrote still stands. If it’s so bad that the windscreen comes adrift and slides down the bonnet I might have to reconsider. I knew from the day I bought the car that I’d have to take the screen out and do the aperture. There’s always been a blister on the roof. But I really could have done without this problem just now. If anybody tells you it’s really cool to own a classic car, tell ‘em from me to f&@$ right off! Ok… Sometimes it is really really cool, and sometimes it’s utterly infuriating. Again, thanks for the thoughts and support. |
| |
|
|
|
|
|
|
|
You’ll have to forgive my lack of action over the last few weeks. It’s not that I’ve been doing other things. I’ve been doing nothing. I was in work a few weeks ago and came home with what turned out to be Covid. No great surprise. It’s the beginning of the flu season and sickness is running high at work. Anyway, Covid for me was just a nasty cold this time but it did knock my stamina and general motivation back a bit. It’s probably one reason I’m a bit down on the car. Ok, so let’s investigate this leak. I want to confirm that it really is the windscreen aperture and I want to know how bad the problem is. You see, to fix this properly means taking the glass out and I’m not doing that coming into a stormy and unsettled winter. In fact I want to get the car back on the road so I can recover my relationship with it a bit. Ideally I want to stabilise whatever the problem is and buy myself a couple of years. The windscreen is bonded into the hole and some trim makes it look pretty. To get a look I need to remove the trim. 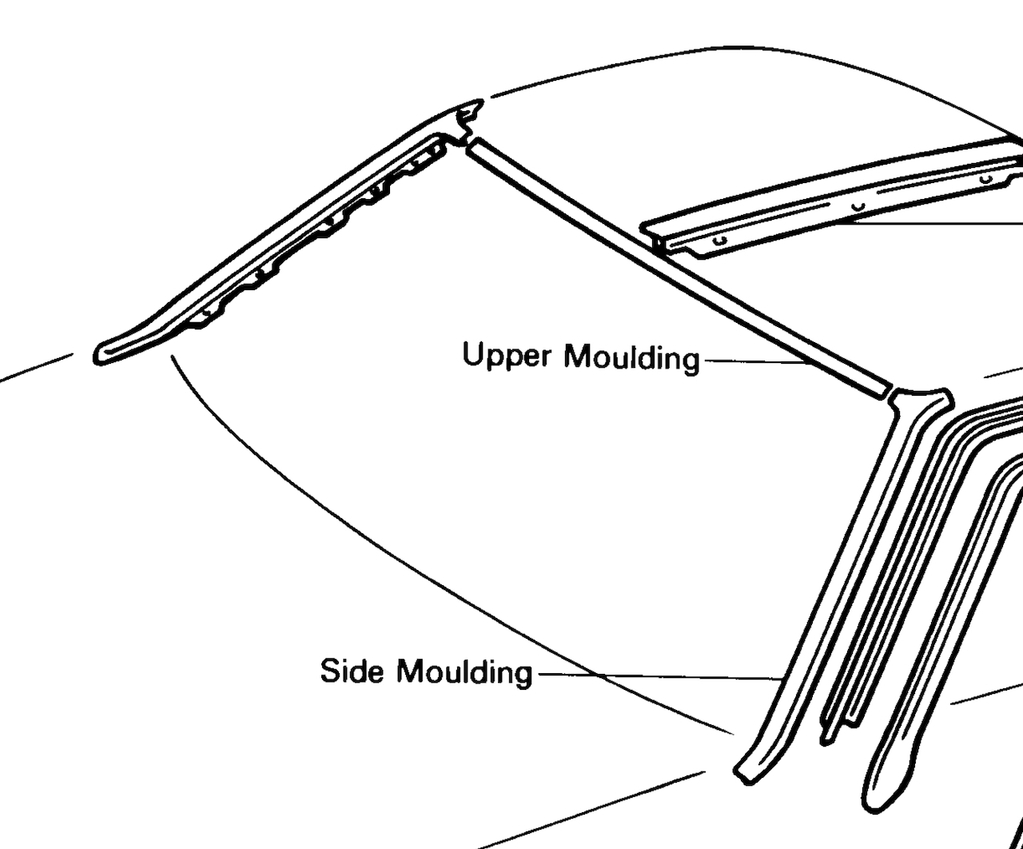 The two side mouldings are an easy win. They are just screwed on. The upper moulding should be held in by a series of clips. However my car has had the windscreen replaced at some point and the clips frequently got damaged, lost, and broken so the trim is likely to be bonded to the car. If that’s the case then I’m in bother because it’s not coming off without a fight. It turned out that the left side moulding was stuck to the windscreen adhesive. In fact the adhesive seems to be better stuck to the moulding than to the glass. 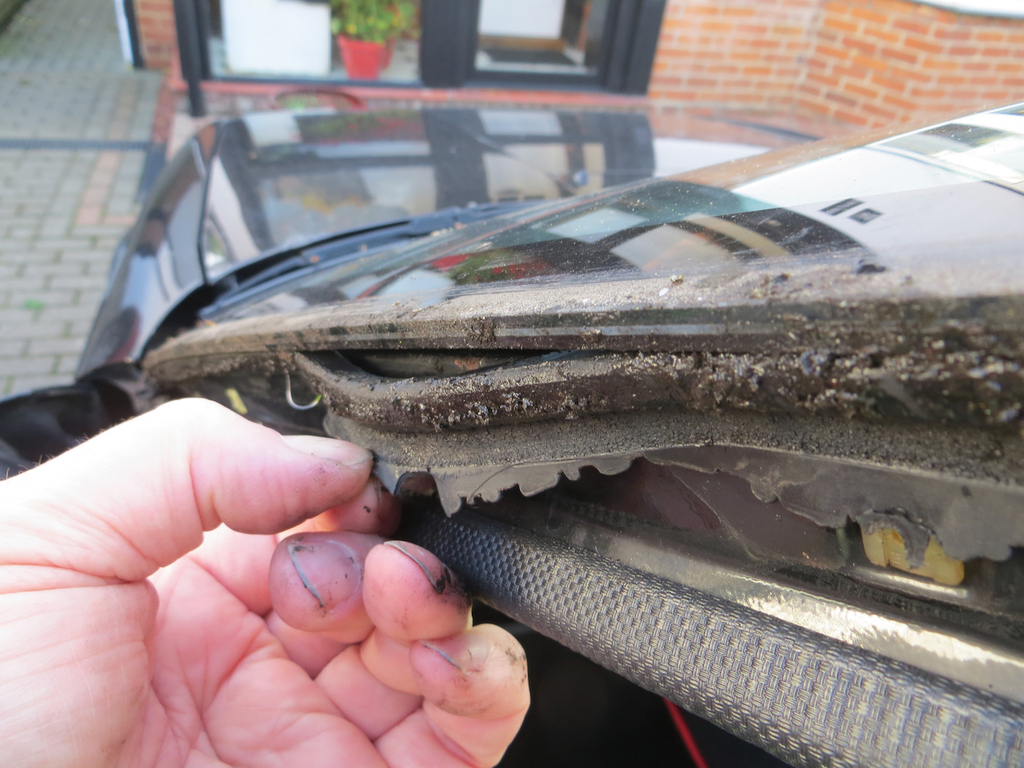 Really??? Yes, really. When the new windscreen was fitted the chap must have put the glue on the glass rather than on the car. He must have run the bead down the very edge of the glass. Now that’s a problem because the glass is wider than the structure of the car and he got it on 6 or 7 mm offset to the left side. That meant that the adhesive on the left side only got a passing contact with the car and didn’t stick properly. 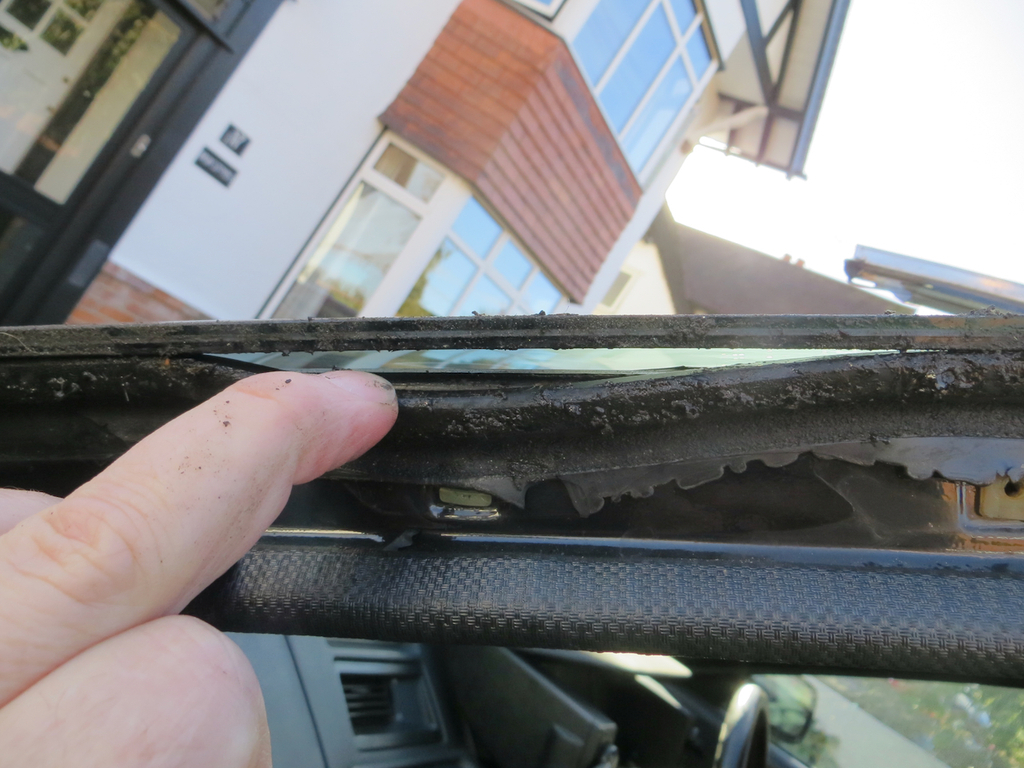 I’m fairly sure if I gave that a pull it’d come out for the whole left side of the glass. Should make it easier to get the glass out without breaking it though. For the record, as well as getting the glass offset to the left of the car it’s also slightly rotated anticlockwise so it’s low on the drivers side. I mean it’s not terrible but it was clearly done with a greater emphasis on speed than finesse. Predictably the top trim was glued in and was a right pain in the biscuits to get off. 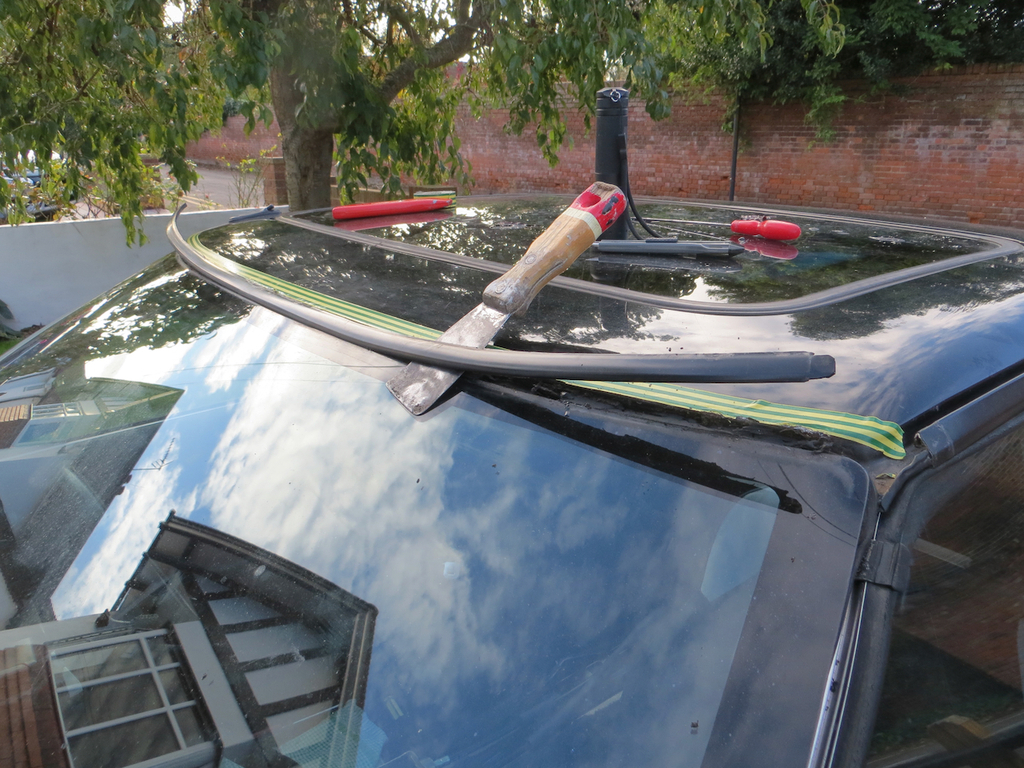 I think I’ve got it out without mangling it too much. I’m not sure I could get a good replacement. Underneath the channel was completely filled with glue. I thought whey’d have spot glued it in but, nope. The windscreen chap didn’t want this trim coming off again. Ever. 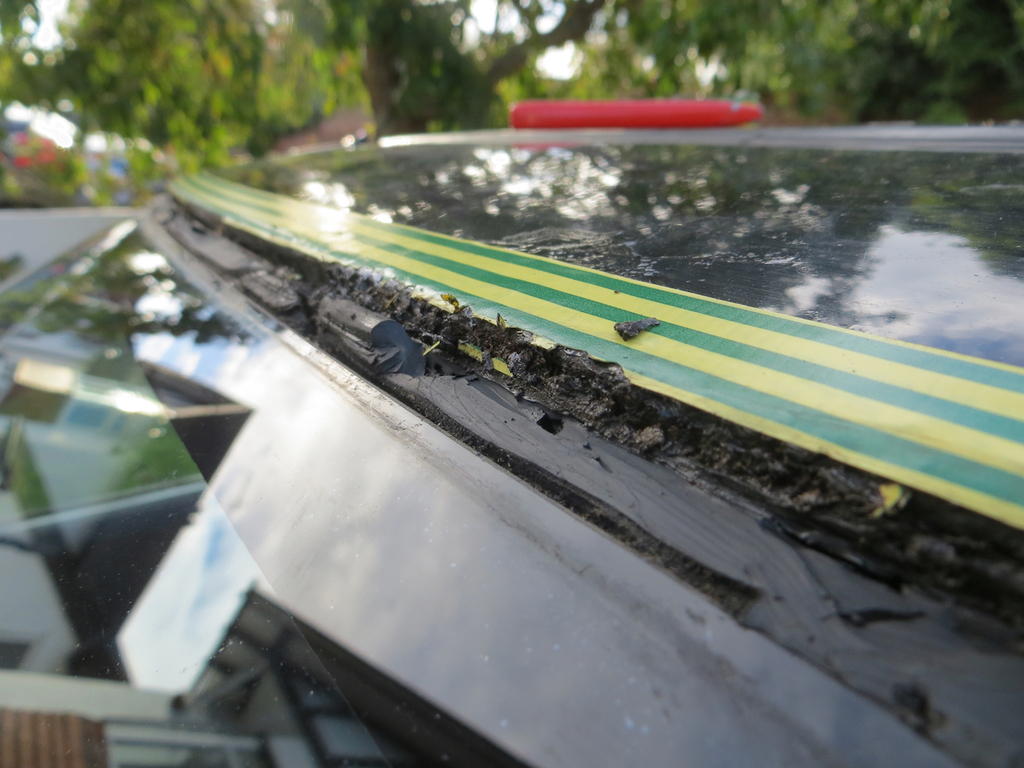 The goo got cut and ripped out so I could see the increasing entropy hidden beneath. 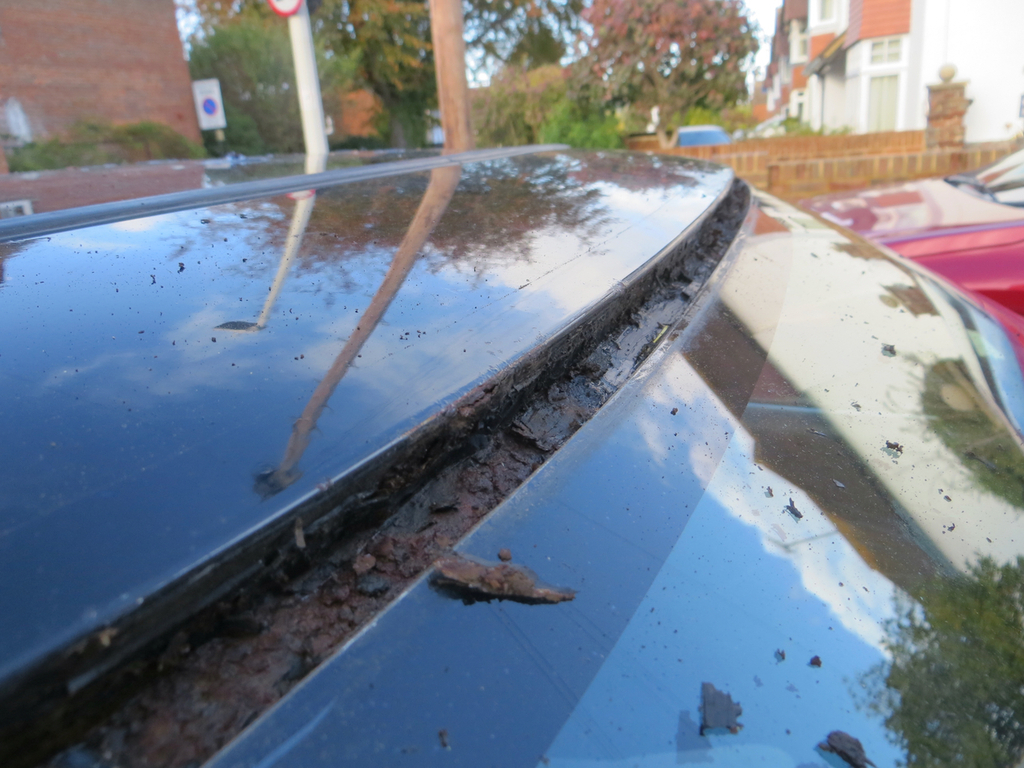 Well it doesn’t look great. And, yes, there is a hole. 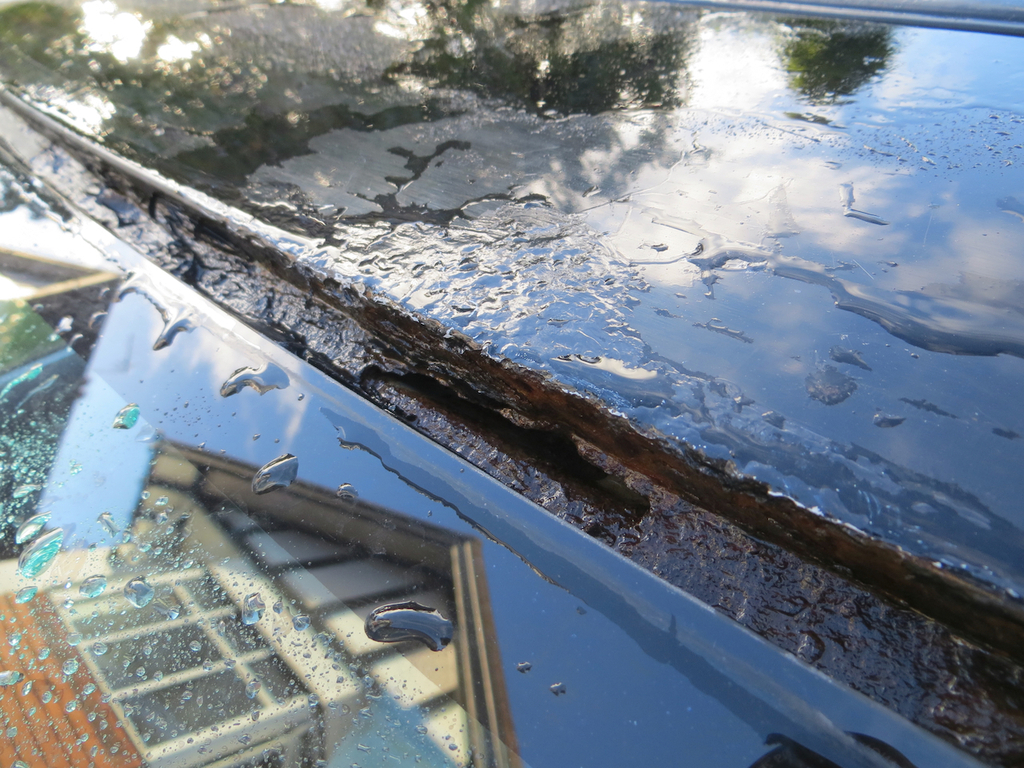 No great surprise as it’s right by a rust blaster on the roof. I tidied up the visible part of it a while back. Partly to make it look a little better but also to hold back the damage. Too late I guess. The hole is about an inch and a quarter long now I’ve poked it a bit. When I’d finished poking it I stuck some gaffer tape over it and went inside for a little weep. So what’s the plan? Well the first thing is to think of some sort of plan… I’m going to spend some time properly cleaning it all out. Then, assuming it’s not completely spanked across the whole width of the car, I can get a load of Hydrate 80 on it to hold back the rust. And then some epoxy primer to keep the water off it. That should stabilise things. Then I’m wondering about fibreglass to bridge the hole… Dunno. Depends on how bad it all is when I clean it up. James |
| |
|
|
|
|
|
|
|
I've investigated further. More later. But to join in on the chat... kevins , Gaffer tape is the current temporary solution. I'd like a more permanent temporary solution. Something that'll buy me a year or two. Or, knowing me, ten. jimi , Thanks for the Paul Woods link. That's roughly the plan but I have a shrinker so that'll make life easier. eurogranada , The major difference is that your car is an absolutely stunning piece of work and mine is a scrap yard that nobody would miss if it got killed off and buried under the patio. In fact the only reason I don't kill it off violently and bury its remains under the patio is that I can't be bothered to dig the patio up. Guess the car's getting fixed then... ivanhoew , Pretty much as Jimi said. The headlining is a moulded fibreboard with a cloth glued over it. I don't think this is a devastating leak, instead it slowly saturated the front edge of the headlining and eventually started running out on the right side of the car. Who knows why it chose that point. vulgalour , Thank you, I'll put that on the list when I work out what to do with it. The windscreen is bonded in, if its leaking at the top then its likely corrosion causing it, needs investigating or it can end up like this (if it isn't already) 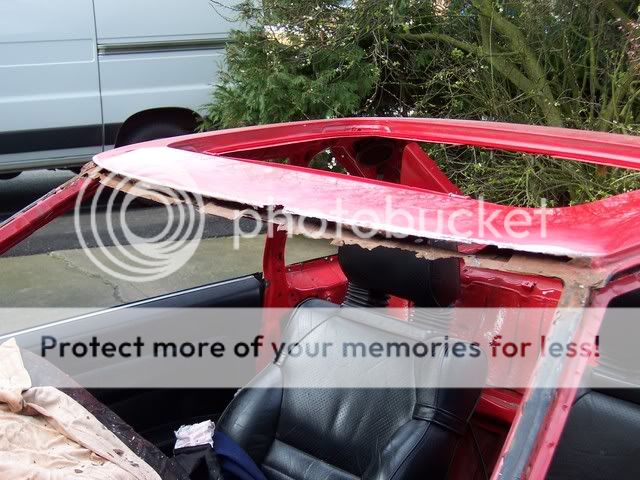 It's trying to look like that. And it's doing a reasonable job too. |
| |
Last Edit: Nov 6, 2023 19:29:38 GMT by Sweetpea
|
|
|
|
|
|
|
I guess we’d better work out why I have a soggy seat. Why has my car (that had been perfectly dry) suddenly sprung a leak at the moment I put the interior back in. (The obvious explanation is that it hates me.) There are a few possibilities but the intriguing one is that something I did caused it. So what was I just doing? Welding up that hole at the bottom of the A pillar. What could I have disturbed? Well the sunroof drain runs right through that area. 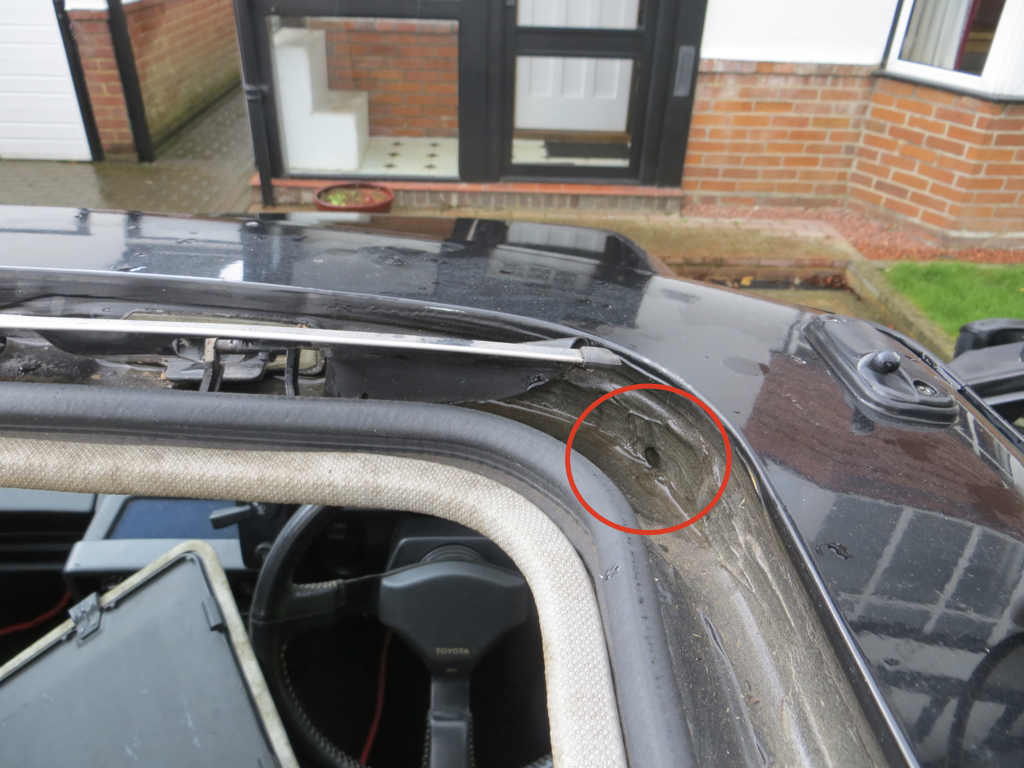 Could I have knocked the drain off at the top? Another thing that runs down the A pillar is the radio aerial. And I happen to know that there is a crack in the plastic mount in the roof. 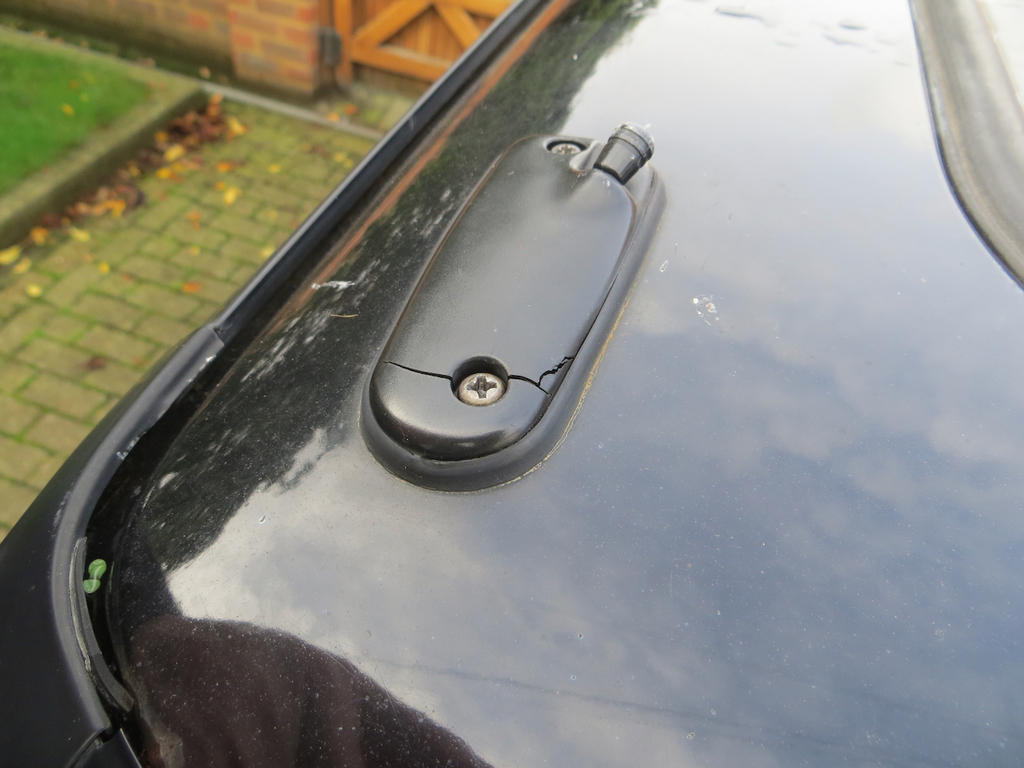 I have to say, I don’t remember it being that bad. Could I have wiggled the bottom of the aerial tube and upset the seal at the top? Another possibility that’s in the same area on the right side of the car is this doofer.  That thing set into the front edge of the sunroof aperture is a socket that carries the front edge of the glass. You can lift the glass out if you wish. On the front edge are 2 tangs that slot into those sockets. Effectively they are the front hinge. Anyway, could the seal have randomly failed? Maybe. But let’s be honest with ourselves. It’s none of these things is it? It’s the heffalump in the room. The thing you dare not mention in case it is. The worst possible thing it could be. The thing that you dread but know deep in your heart to be true. To find out we are going to have to take the head lining out. Well it needs to go in the house in order to dry out anyway. The drivers seat is in the living room drying out too. So what did we find? Well it’s not the sunroof drains because, although everybody says it’s always the sunroof drains, it never is. It’s not the top of the aerial either. Or either of the sunroof sockets. It’s… It’s… It’s… It’s the worst possible thing. The one thing I can’t, and don’t want to, deal with just yet. Yep… It’s… 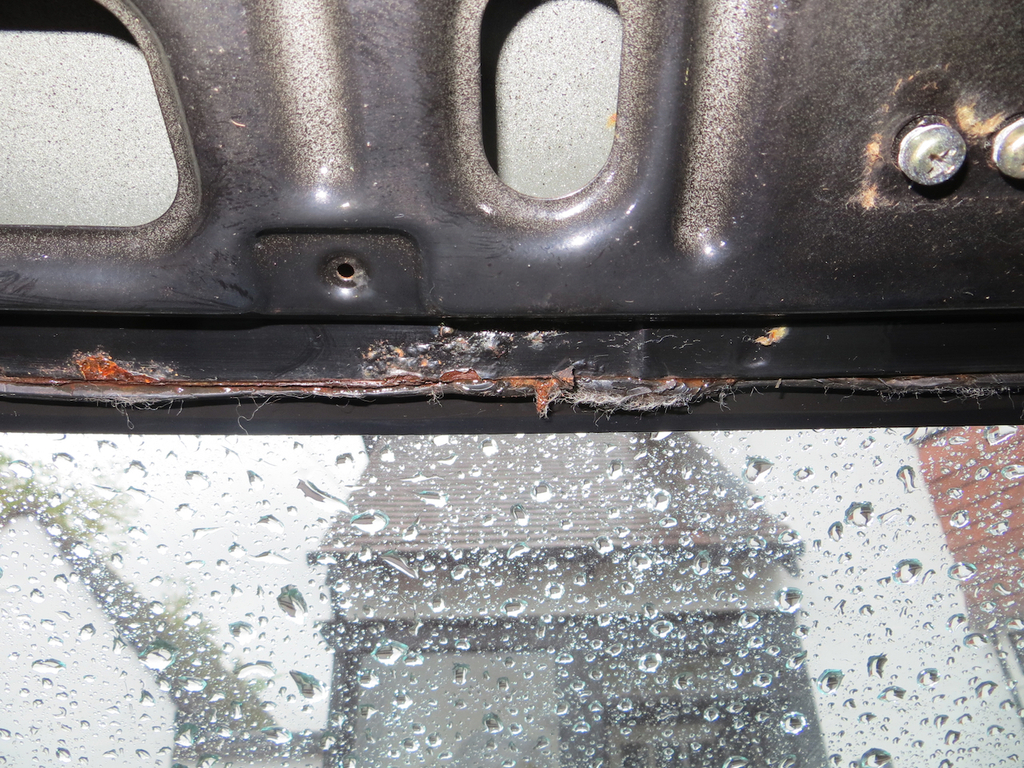 …the windscreen aperture. OH COME ON CAR! FFS WHY? You actually hate me don’t you? James |
| |
|
|
|
|
|
|
|
Just want to say thanks to the great John Cleese who assisted greatly with the text of my last post. You didn't notice I'd stolen some of it!? I've invested in a car cap for the mx5, no more drips and it's even survived the storms. Car cap?  Well, stylistically I wasn't sure to begin with... But yeah, I think we can pull it off. They are fine. And let's face it, on my car it's not going to be that easy. And it's turning out to be that way... Story to follow. |
| |
|
|
|
|
|
|
|
Well, you can’t have missed the fact that it’s been a bit rainy for the last 10 days or so. Assuming you are in good ol’ Blighty anyway. Those of you in climates currently not enduring endless unsettled weather can be excused for not knowing that we’ve been having endless unsettled weather. Get to the point James… It’s an ideal time to find out if the rear quarter light that I fitted is leaking. I took a look… It’s dry! Yay! God, I’m good. Somedays I even impress myself. But… 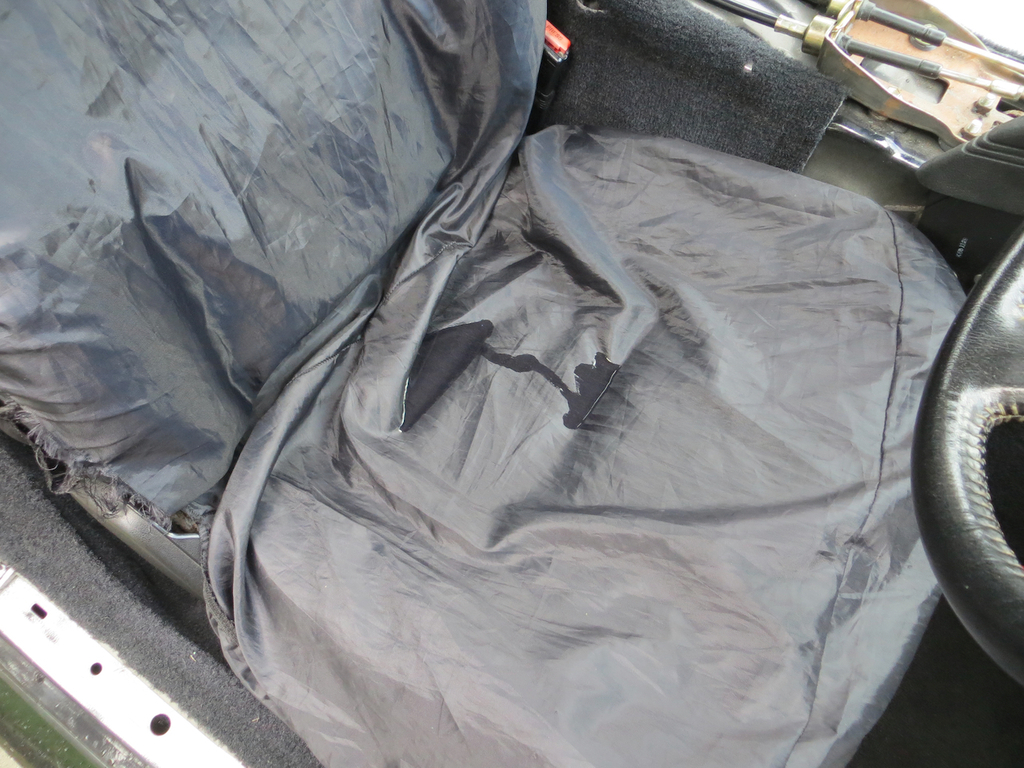 OH COME ON CAR! FFS! Why do you wait until I’ve put a load of soft furnishings in and then spring a leak creating a boating lake on the bloody drivers seat? Why could you not leak in the several months while there was just a metal floor? Right! That’s it! I’ve had enough! You’ve tried it on just once too often! Right! Well, don’t say I haven’t warned you. I’ve laid it on the line to you time and time again. Right, well, this is it! I’m going to give you a damn good thrashing! |
| |
|
|
|
|
|
|
|
sweetpea James The two tone green/beige was called "Sherwood Toning" AFAIK there nothing special about them, it was a standard colour choice for the 1a available from any dealer (not offered on the 1b), no A/C on them in the UK. Hmmm. Maybe I'm muddling two stories up then. Interesting. Well I'm old and increasingly senile so it's ok... It would make a lot more sense for dealers to be using the air con kits that I pondered for the Corolla on their new stock rather than grey importing cars from Japan. James |
| |
|
|
|
|
|
Oct 31, 2023 19:36:16 GMT
|
Any rust like in your photo above I always cover with Hydrate 80 or Kurust. It's not a fix, but it will stop the rust for a year or two while you plan how to fix it prevaricate  Good progress though. Actually that's not a bad idea. Don't know why I didn't think of that, especially as I've done that elsewhere on the car. I feel silly now! That rust is a part of a problem with the outer skin at the bottom of the A pillars. To fix it I'd need to take the front wings and doors off but the bottom of the front wings also have holes in them. I don't want to take the wings off the car until I've got the patches made and tacked in for fear pf losing the positioning and shape. So I have a sequence of repairs carefully thought out and planned. The only thing that that's going to stuff my plans up is if the MOT man disagrees.  James |
| |
|
|
|
|
|
Oct 31, 2023 19:25:24 GMT
|
Up t'north where I live, the milkman brings milk in glass bottles so I don't have that option. Oh man, I never realised. Is that why you have to do stuff properly with a welder and stuff? Send me your address and I'll post you a few plastic milk bottles. You can just glue them to your Beemer and crack on driving it. Lovely work. Those seats sure look good; were they recovered in an earlier post? And other question: does this example have factory A/C fitted? For me, this was a good era for car interior design. I had an ‘83 Celica GT and, not surprisingly of course, it looked not dissimilar to you Mister2. It may have been plastic-rich, but Japanese plastics were quite appealing and held up well. Best, John Hey John, It's definitely got an '80s thing going. Toyota did a blue interior at the time. I had one in a Corolla. It was God awful even back then but I'l love to have one now. The seats are original. The only thing I've done is to Vax them. The interior needs another proper clean to be honest. There are a couple of cigarette burns on them but in general they are in lovely condition. One of the reasons I took the car on is because the interior is in really good condition. Just the odd knick here and there but really it's pretty immaculate. Especially when you consider the state of the rest of the car. Air con? Yeah, chance'd be a nice thing. Like Jimi says it wasn't an option back then on the UK cars. You could retro fit it if you were mad enough. I think the dealers advertised retro fitting it for a while. I asked my dealer about fitting it to the previously mentioned blue Corolla but it would have cost a very significant proportion of the value of the car. I don't think anybody bothered. That said I also have heard of some dealers offering it from new on the MR2. There was a 'Sherwood' version in a dual tone green which I believe had it fitted. But I think that car was only available from one or two dealers. They may have specially imported it but if so I don't know how they would have sidestepped Toyota UK. jimi do you know much about the Sherwood cars? My car is older than Jimi's and has cable operated heating controls rather than the motor driven version on his car. There is still a knock out where the buttons would go. 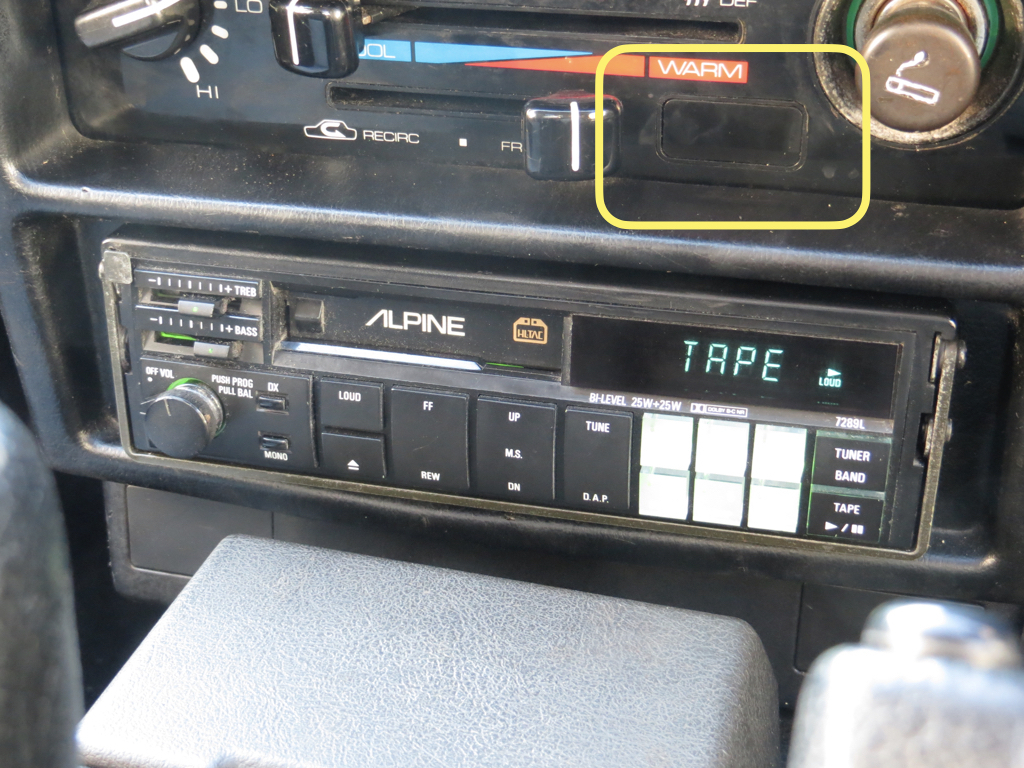 I have no idea if there are switches behind the knockout. James |
| |
Last Edit: Oct 31, 2023 19:27:44 GMT by Sweetpea
|
|
|
|
|
Oct 30, 2023 20:09:54 GMT
|
Some time ago (about 2 months if we are being accurate) I’d found a small leak into the boot through the rear light seal. Toyota used a foam gasket but, 30 years later, those have failed. So I made a new gasket some time ago from neutral cure silicone. That worked quite well but I think I’d made it a little thin so I’d deepened the mould and tried again. Unfortunately, 3 or 4 weeks later the neutral core silicone hadn’t done the neutral curing bit. 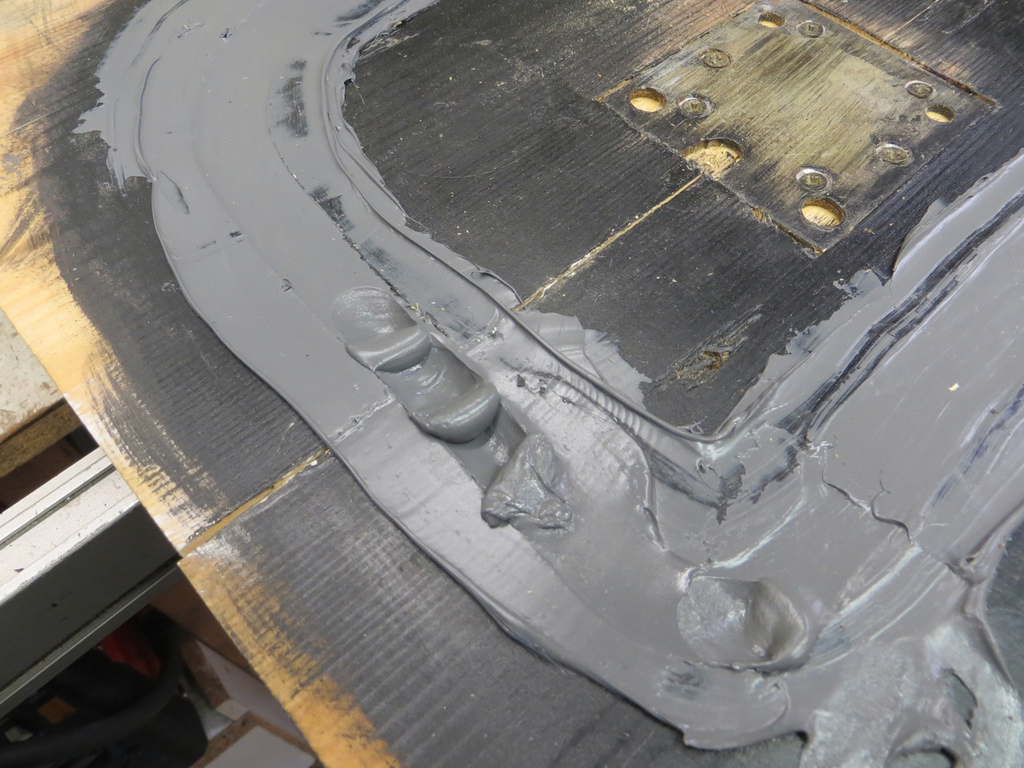 I guess the tube has gone off. It’s been open for years. Bought a new tube and tried again. 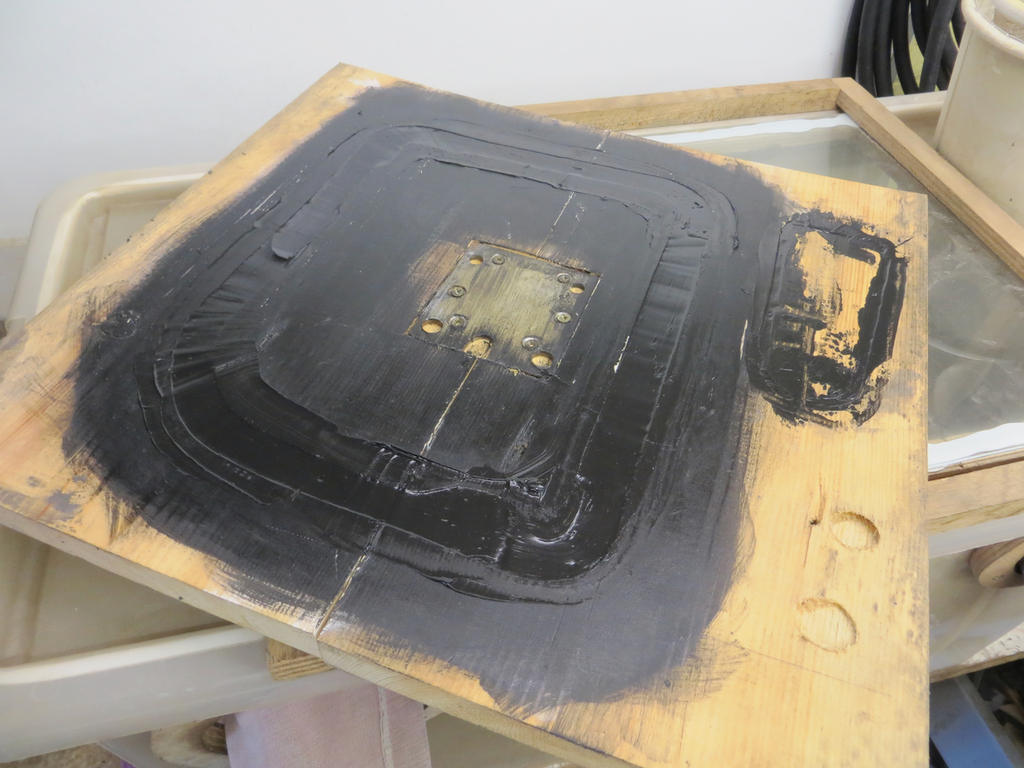 A few days later I have 2 new gaskets to fit so I fitted them. 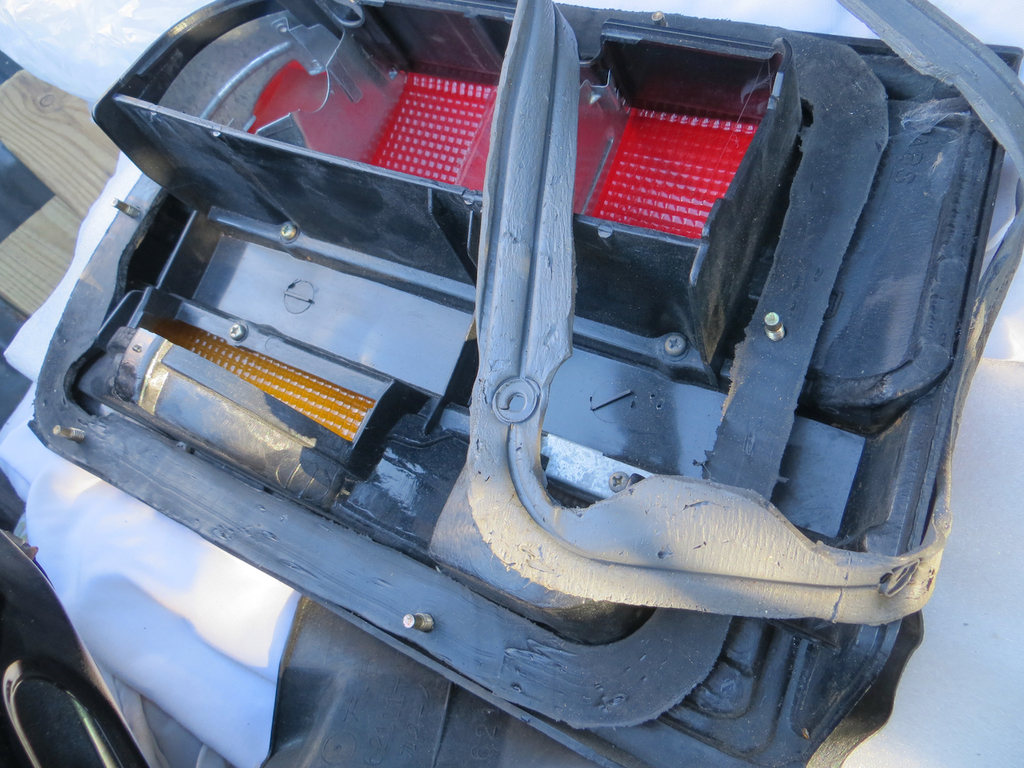 You can see how the ribs on the back of the light block has cut into the back of the old grey gasket. Now I can start putting the interior back in. Except… Some time ago (I can’t be accurate ‘cos I can’t remember when) I’d found a hole in the floor by the throttle pedal where a seam has failed. On the outside it was behind the wheel arch liner so you didn’t see it and on the inside it was under the carpet so you didn’t see it. Being a man of outstanding diligence I found the hole anyway. Being a man of outstanding laziness I decided not to bother fixing it but implemented a temporary solution to keep the water out. Broadly speaking I glued a piece of plastic milk bottle over the hole. 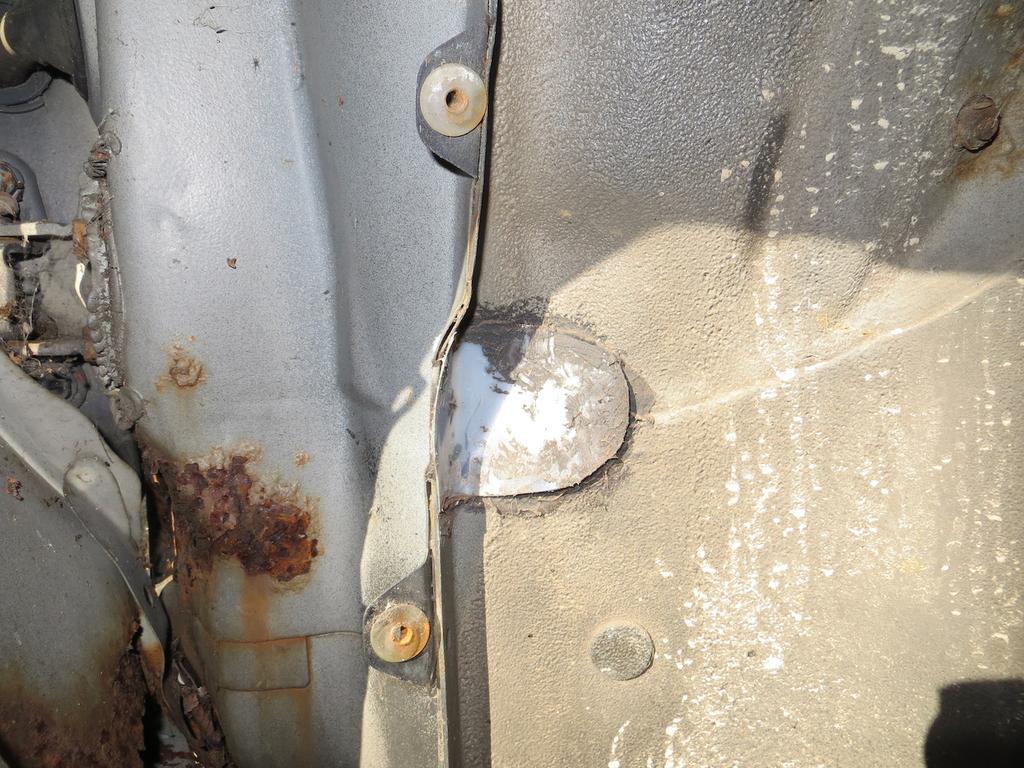 I say temporary but it’s been there for a number of years and was still fine. “Only temporary unless it works.” Anyway, it would seem silly to fix all the other holes in the floor and then leave this one. I’d only have to take the carpets out again to fix it. Ok then. I’ve persuaded myself. I’ll fix it. Job one - chop out the rusty bit and make a pattern. 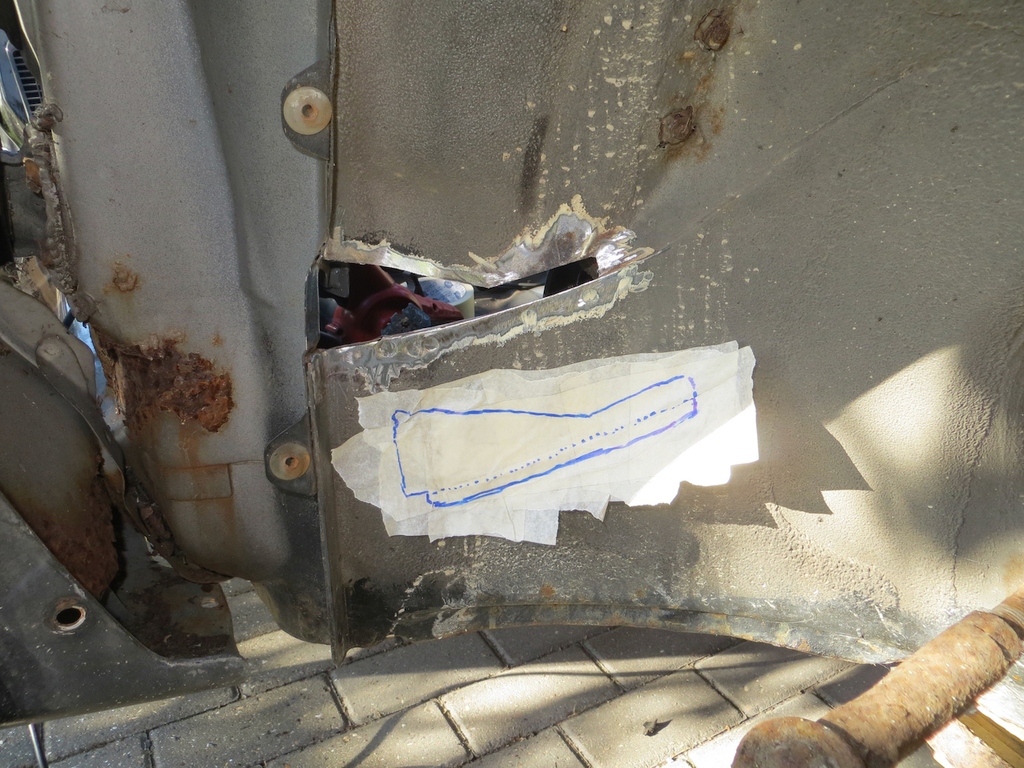 Job two - cut out a bit of metal and run over it a few times with the other car.  It doesn’t look like much does it? But it does fit in the hole. 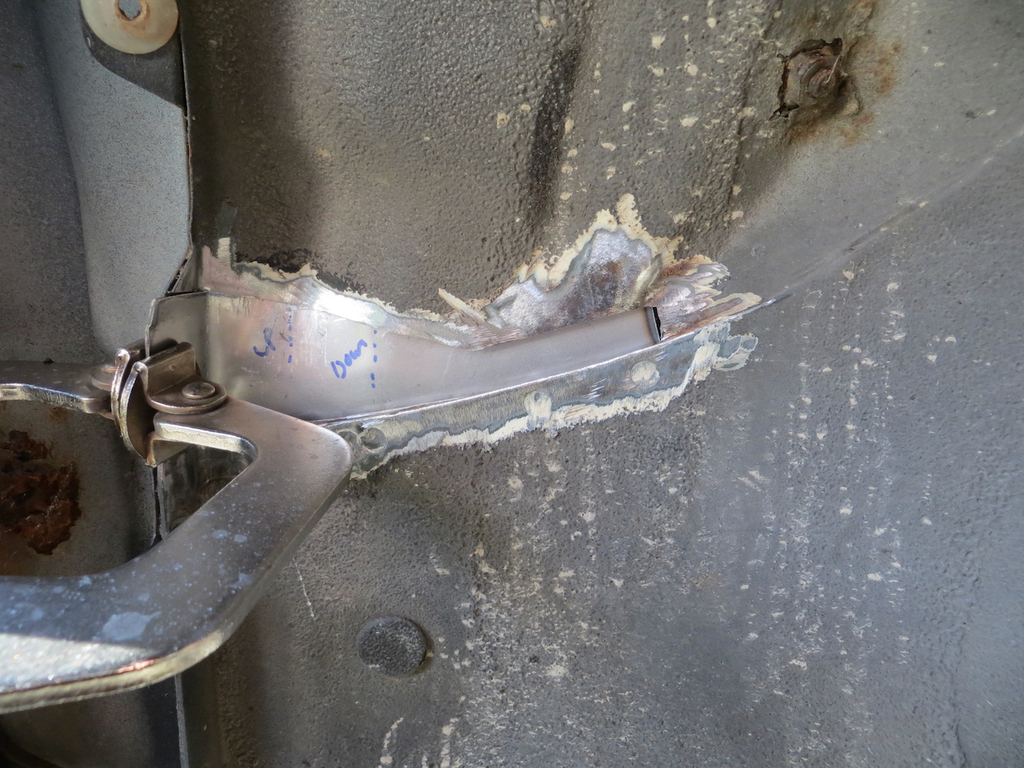 Now, you see, this bit of the car is built like this… 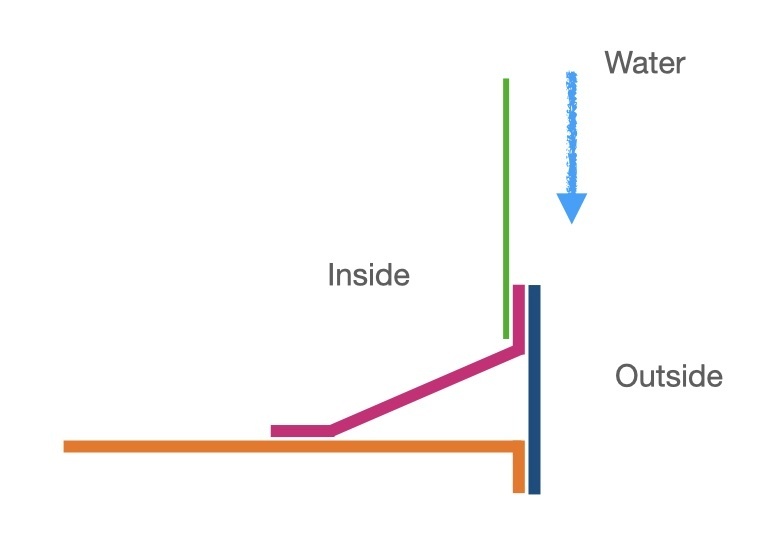 The bit that suffered is the green bit which is about a millimetre thick. The rest of it is pretty thick because it forms a box section that joins the front chassis legs to the sills. The problem is that the thin bit is on the inside of the car so if the seam sealer fails water can run into the seam. I assume this is what went wrong here. To stop that happening again I can change the way it’s welded in. Instead of spot welding it I seam welded it to the top of the box section. 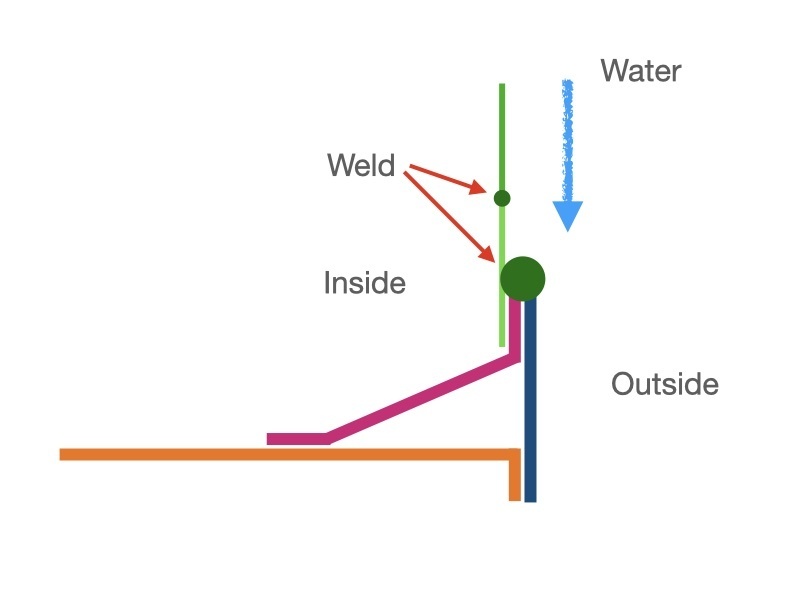 Hopefully if the sealer does fail again the weld bead will shed the water off anyway. Job three - weld. It in. 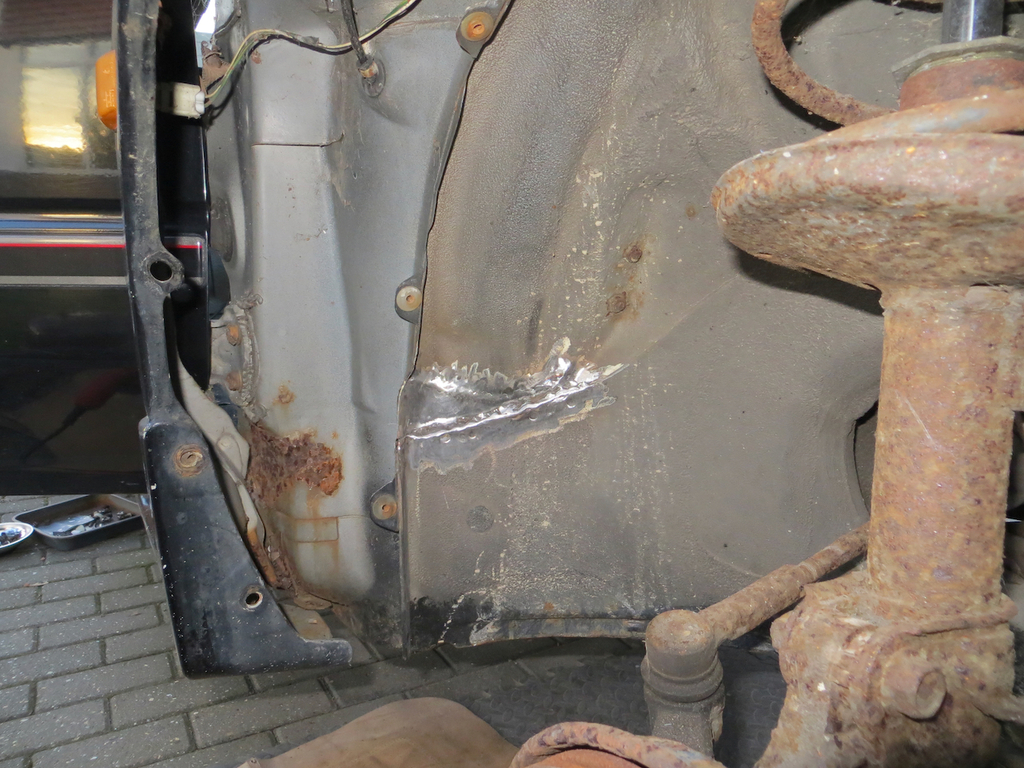 That got epoxy primer and seam sealer on both sides. Don’t worry about that nasty looking rust spot to the left. That doesn’t go through to the interior and will get fixed another day when I take the wing off. For now it just needs some milk bottle glued over it… I reckon we should get the quarter light glass back in eh? There are some clips that attach to the bottom of the surround. They catch the bottom of the glass. 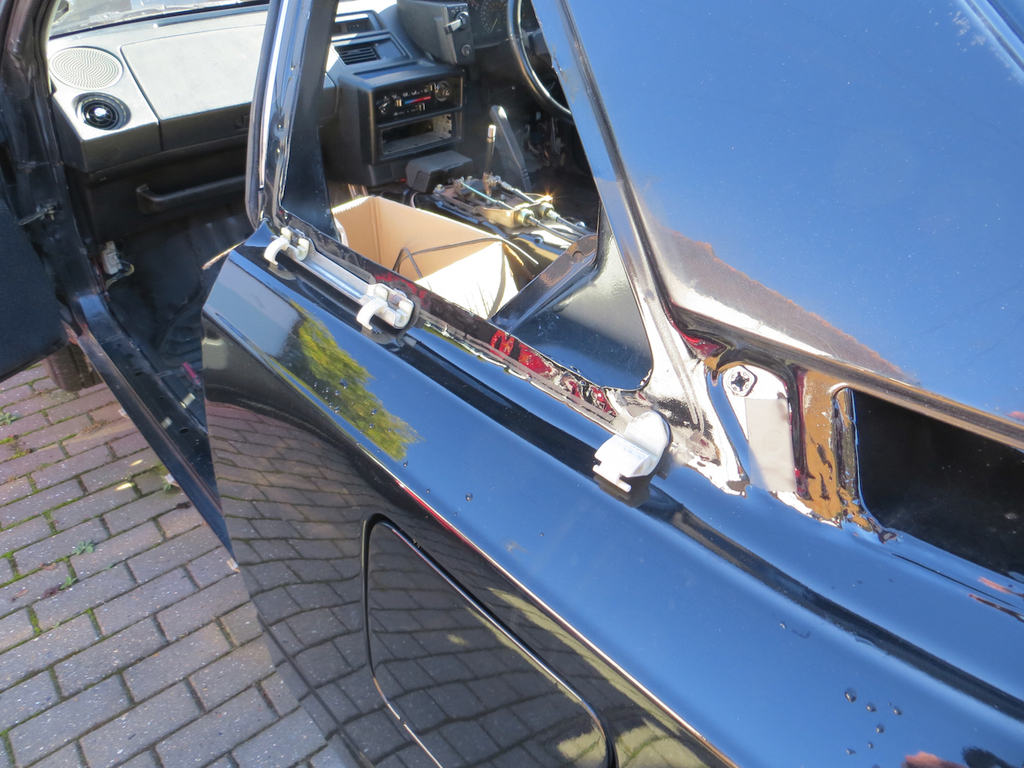 The glass itself is glued into the hole using a butyl tape and held down with the trim. 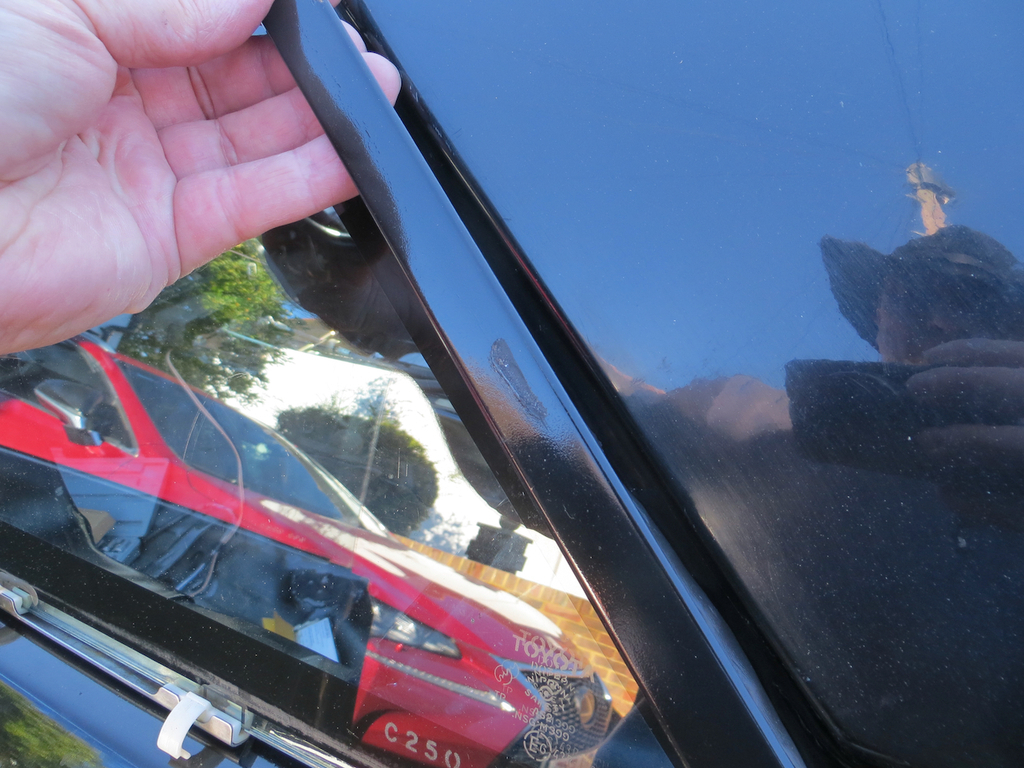 Humph. The trim that I repainted some time ago has got damaged. That’s quite rubbish. After a bit of refinishing it got attached to the car. 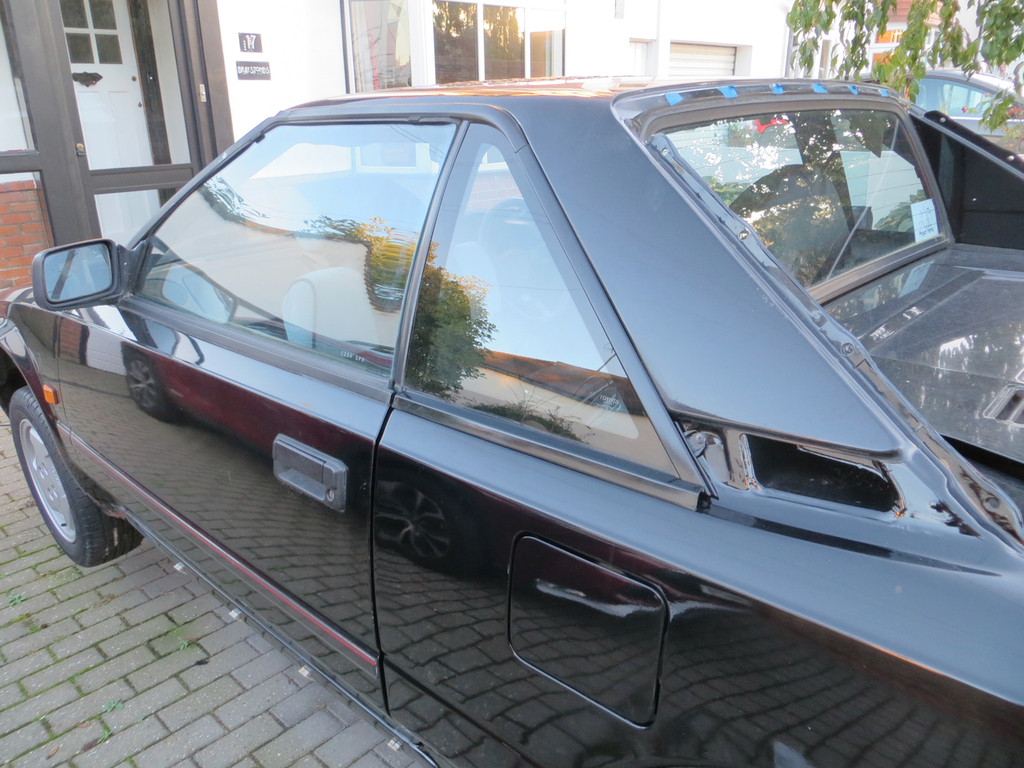 Well that’s the glass in. I still need to fit the trim round the rear pillars but I’ll do that another day. For now I can start getting the interior back in. 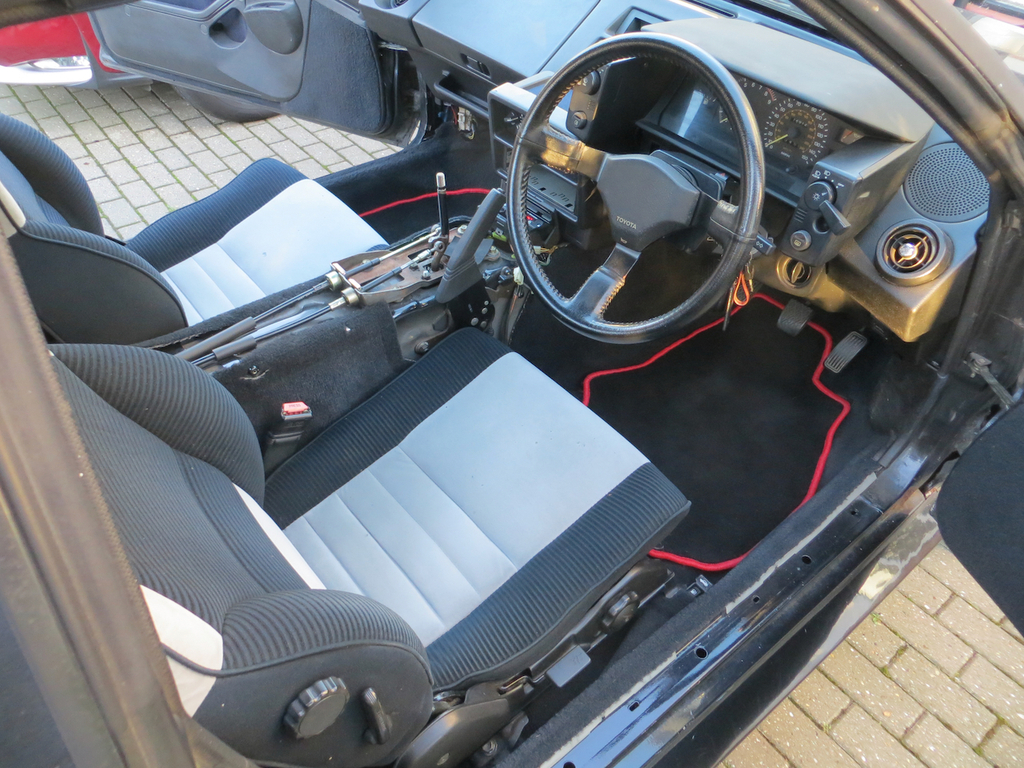 And you know what that means don’t you? Oh yes… It means that I can sit in the car, listen to the radio and make ‘Brum Brum’ noises.  For the first time in as long as I can remember it feels like I’m making progress. James |
| |
|
|


 Don’t tempt me.


