|
|
|
Sept 21, 2019 10:45:10 GMT
|
Hi all, I mentioned at the rather sad end to my Project Wheel-Vo Build, that a certain something I had really enjoyed making had pointed me in a new direction (with the added bonus it can be done in a much smaller space (soon to be built)) to go. The said build as you will of guessed is a power crossfeed conversion on my lathe.. I didn't take any photo's along the way as it wasn't really a planned build, it just sort of happened slowly over time.. But here's a short video I made out it.. Some of you will remember the coolent system was basically a Ford P100 washer bottle with built in pump.  Powered by this model railway controller. 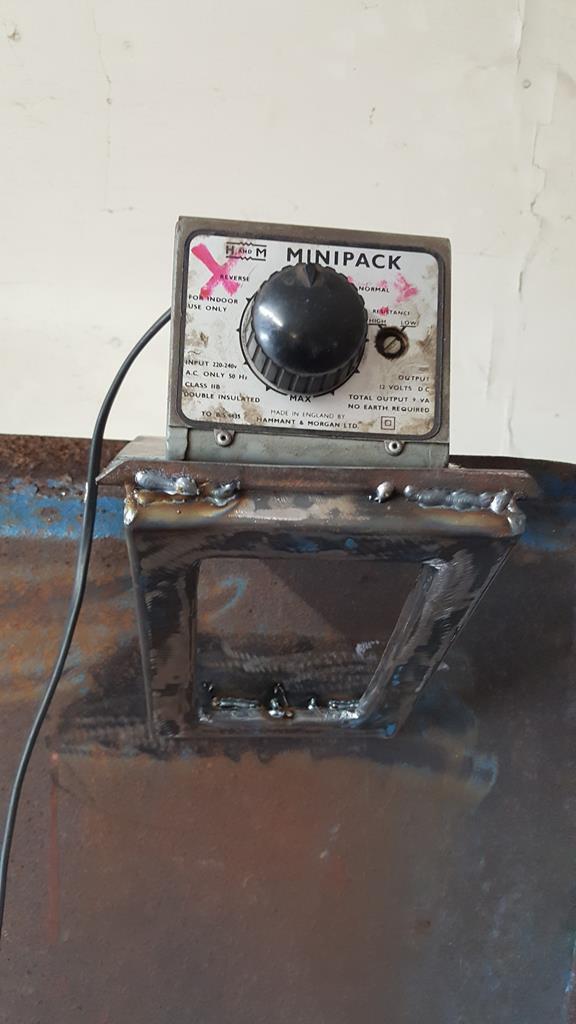 Well, the Ford pump eventually died and as luck would have it I had a twin pump washer bottle from a Volvo kicking about the place. Only one pump is running at the mo but it is now powered by a twin controller unit which will come in handy for powering the other pump.. Why two lots of coolent you ask? There are times mostly when drilling through a long length of bar, that the bar starts to get very hot.. So if I can cool the bar as well as the drill action end of things I might as well.. The Volvo washer bottle even has a "low level" warning thingy built in, so I might as well use it and wire in a warning light  A few pics The new coolent bottle/pump. 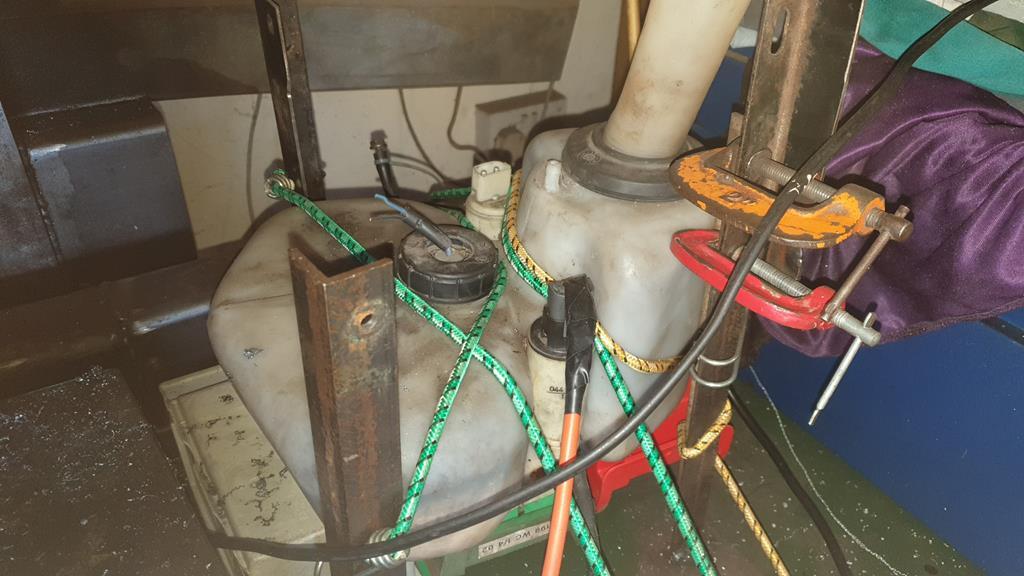 Not the best of photo's, the twin controller is next to the 80mph sign. You can see the old control unit which is now used for sideways action  I have been thinking about making a milling plate thingy so I could also use my lathe as a mill, the face plate is only plonked in place to get my brain chewing ideas over.. If you take the lump of ally out the chuck and put in a milling bit you will get the idea of what I'm on about.. The lathe will give me "in & out" an "side to side", but how to do "up & down" and rotate would be nice... 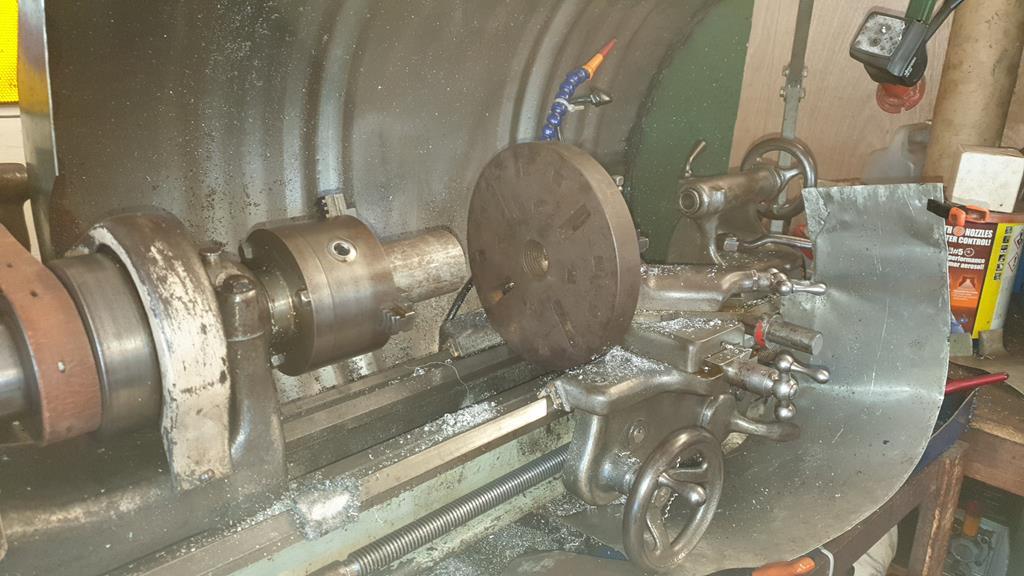 HHmmm..... Some thinking to be done.. But before any of that happens I need to think about repowering the lathe... For many many years the little Southbend was powered by this 3/4hp electric motor..  Then 2 - 3 years ago during a lathe bench rebuild it was repowered using this monster (in size) motor taken from a compost mixing/potting machine.. Short of power it's not! 2.2 kw = 2.9911hp so near a damit 3hp! 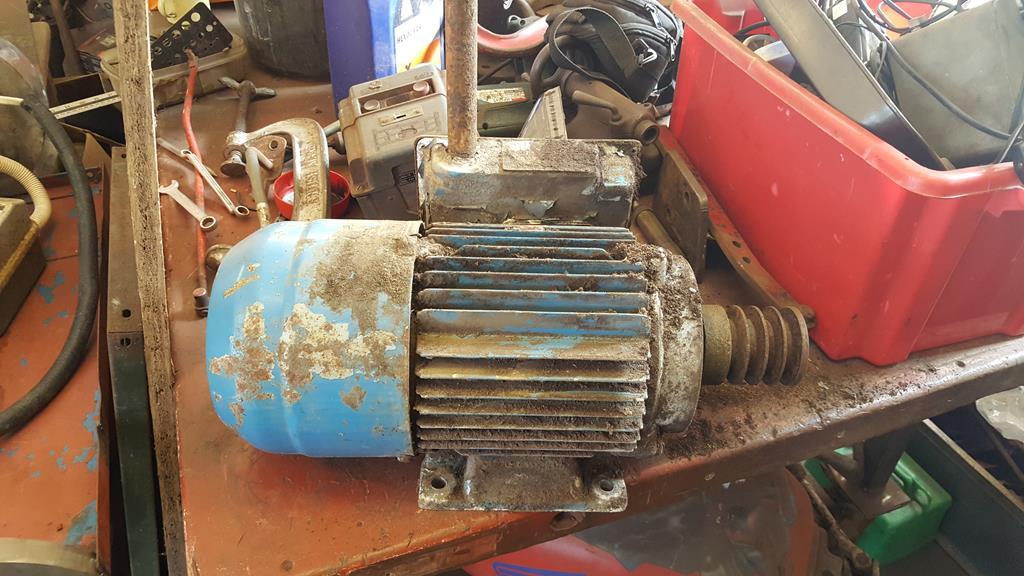 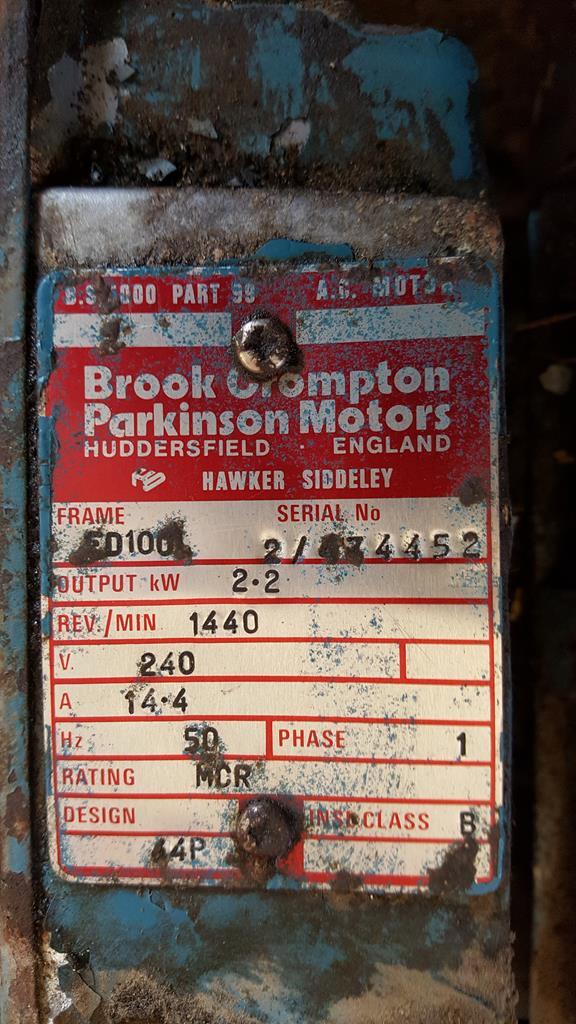 So why am I thinking of repowering my lathe again? 3HP must be enough!! Well, there's two reasons... As all my tools and bit's will be moving to a much smaller space, the current motor on the lathe sticks out the back of the bench a fair way, so the lathe has to be quite a way out from a wall, which would waste space in a small place! Also the 3HP motor must use a fair amount of electricity, so something that uses less would be better.. Which is where this lump of metal and motor come in to things.  Quite out of the blue I was offer a dyna-mix treadmill the other day, and having seen a few people on this fine forum use the motors to power something I said yes. As you can see above the important end was soon chopped of and the rest scrapped.. Apart from the controls of course  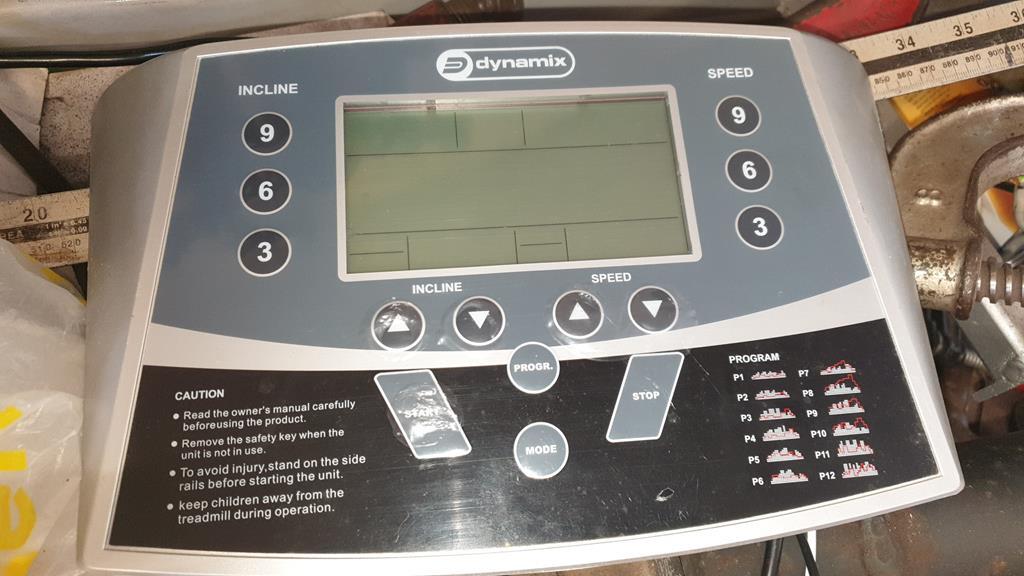 The motor is 1 1/4HP but as the original motor was only 3/4HP it should have enough uummpphh! 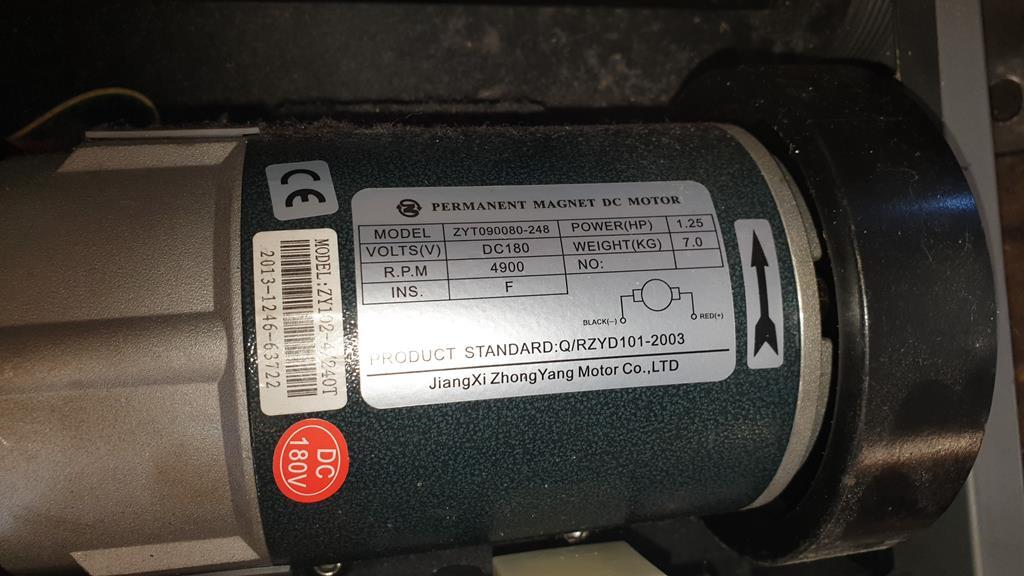 So what's your thoughts on this repower chaps? Will the motor be up to the job? What will be nice if it works is speed control at the touch of a button.. I just need to think of a use for the incline motor.. lol |
| |
Last Edit: Sept 21, 2019 10:48:35 GMT by Stigian
My YouTube Channel www.youtube.com/user/UkWheelHorseBlokeQuote - D'you know, it's people like you, doing totally brilliant and pointless stuff like this that gives me a little hope for humanity |
|
|
|
|
|
|
Sept 17, 2019 15:09:36 GMT
|
Hi all, many thanks for all the kind word, much appreciated. Sorry it's been a while, as is the way when dealing with cancer, life has to stop and go on hold for a while.. Getting stated again is proving a problem.. The good news is my wonderful Wife is currently cancer free, lump removed and no signs of the nasty stuff anywhere else. Thankfully it was caught earlier enough that chemotherapy wasn't needed just 3 weeks of Radiotherapy.. We know the chances of it coming back are high, but were hoping that day is many many years away.. Cancer can be removed, it can't be cured! As for her heart, we shall see what some tests bring tomorrow. So... what's happening with this build? If you have spotted my ad in the classifieds for Volvo parts then you will of guessed "not much"! The past 6 odd months has aged me quite a bit, I suffer with arthritis, fibromyalgia and Dystonia, all of which give me vast amounts of pain... And it's the pain that has got too much.. The next level up pain killer wise would leave me like a zombie, so bad are the side effects.. Which is somewhere I have been in the past.. I DON'T want to go there again! Soooo.... The time has come to scale down quite a bit.. I have given notice on my workshop and am collecting materials to build a small workshop in my garden.. What will I do instead of Wheel Horse's? I will start a new thread on a little something a made for my lathe, which although simple I enjoyed making it so much it has pointed me the direction I want to go... It's also something I can do in a smaller space So yes, all the volvo parts I have are for sale as I won't be needing them now.. link to bit's I have for saleI also found a Ax Micro-car steering rack buried in my wokshop which will be up for grabs shortly. I'm sorry this build has had to end this way, but sometimes the body has to ruke over the brain... |
| |
My YouTube Channel www.youtube.com/user/UkWheelHorseBlokeQuote - D'you know, it's people like you, doing totally brilliant and pointless stuff like this that gives me a little hope for humanity |
|
|
|
|
Sept 12, 2019 15:44:34 GMT
|
|
Boostbarge and rthhb, if your still interested in the parts you ahev asked about please let me know..
Sorry it's taken so long to reply, life had to stop for a while while my wife got better.
|
| |
My YouTube Channel www.youtube.com/user/UkWheelHorseBlokeQuote - D'you know, it's people like you, doing totally brilliant and pointless stuff like this that gives me a little hope for humanity |
|
|
|
|
Apr 29, 2019 10:42:33 GMT
|
Hi all, it's with a heavy heart that I put my Volvo parts up for sale.. This was all removed from a 1994 Volvo SE 2.3 Auto Build Thread LinkThe engine and auto box Both run and do what they should, though the engine could do with a service.. All Parts Must Go, the list includes radiator, intercooler, all pipework, alternator, wiring loom from the front of the car to just behind the front seats including engine looms, Dash panel, Coil,Everything you see in the below pictures.. also not pictured the exhaust downpipe wth the lambada sensor.. How much? Well, that depends on which parts you want, drop me a PM or ask on here. Some small parts I can post, but things like the engine, trans and rear axle are collection only. If you have any qusetions then please ask..  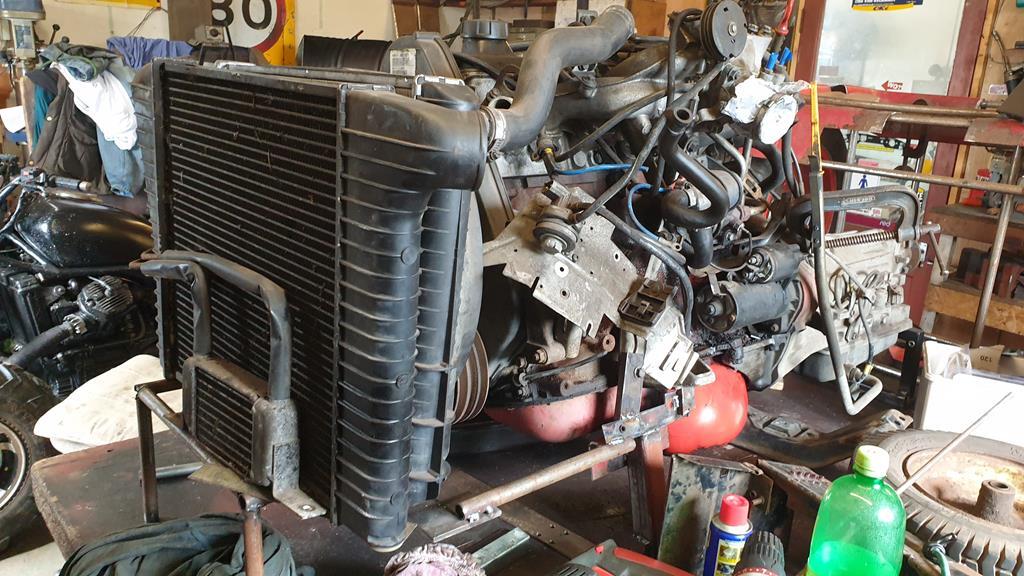 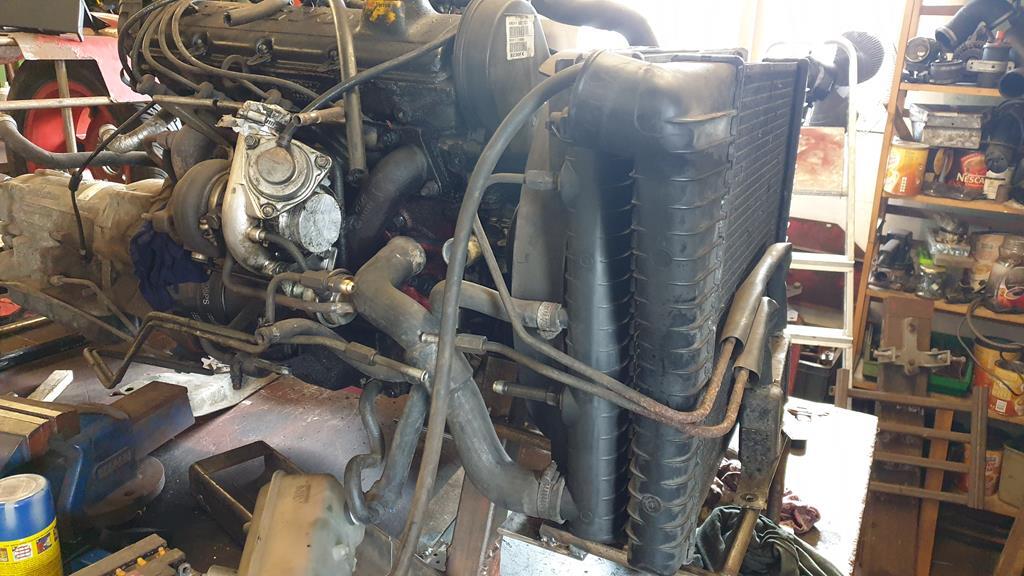 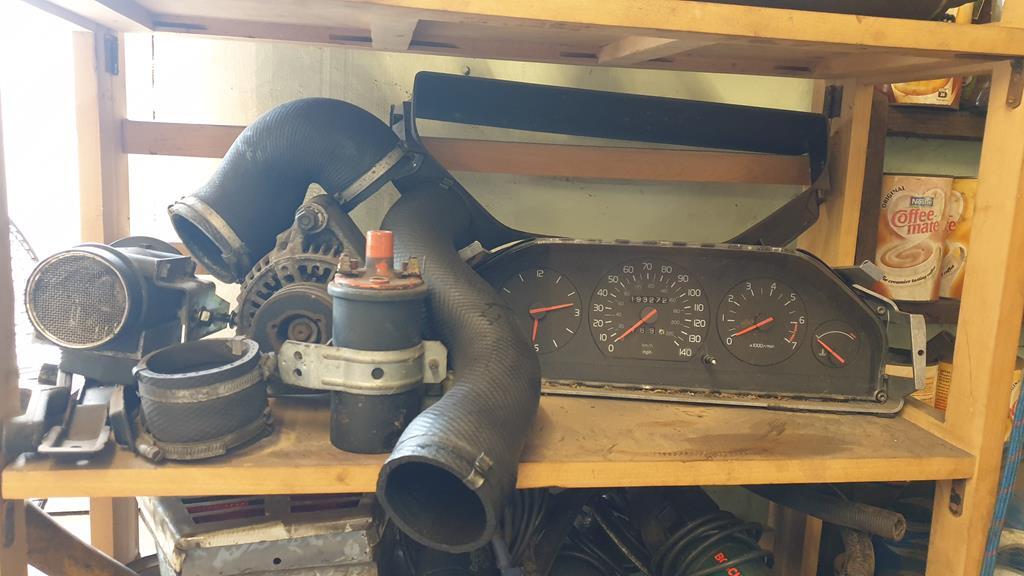 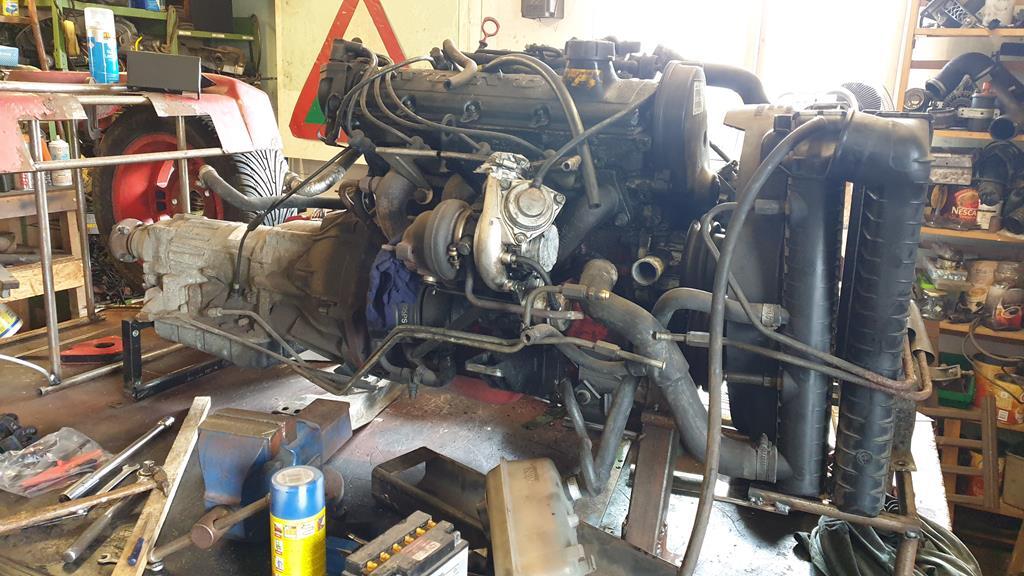 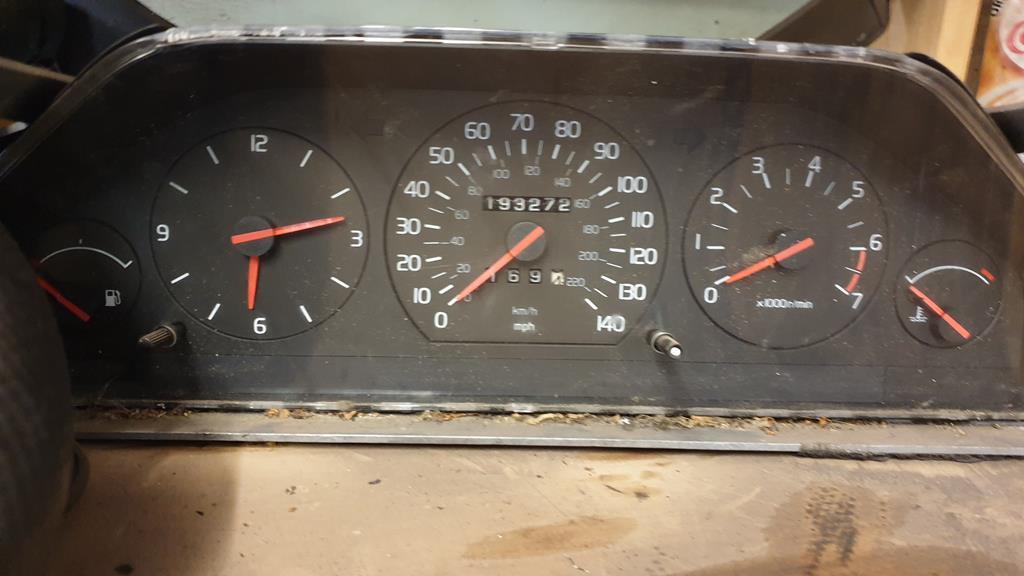 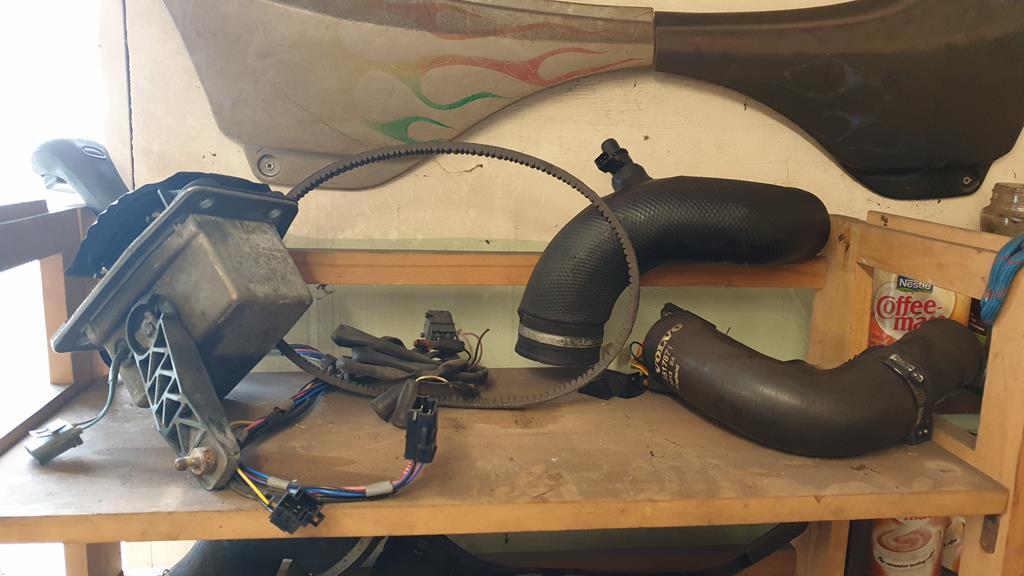 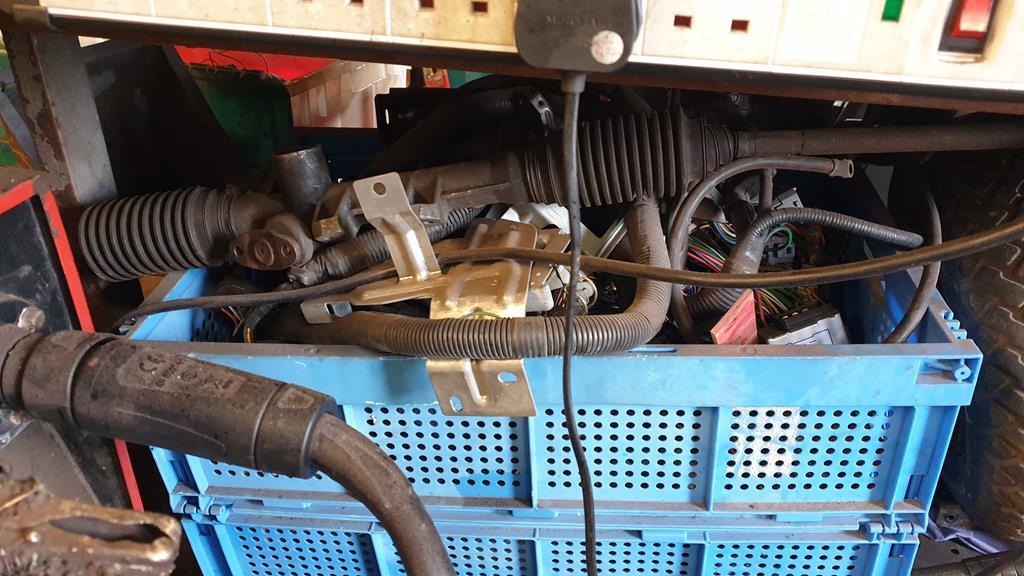 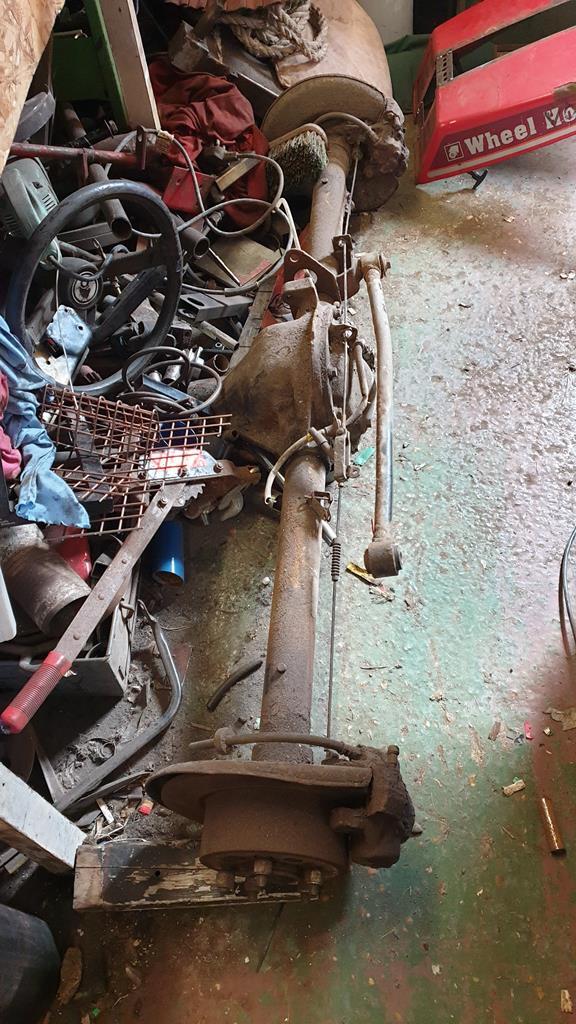 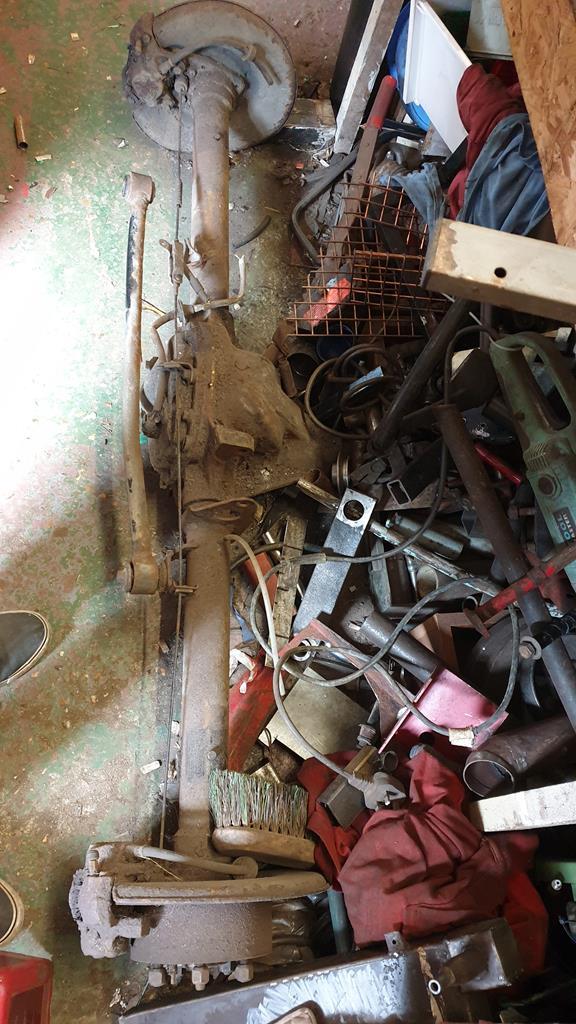 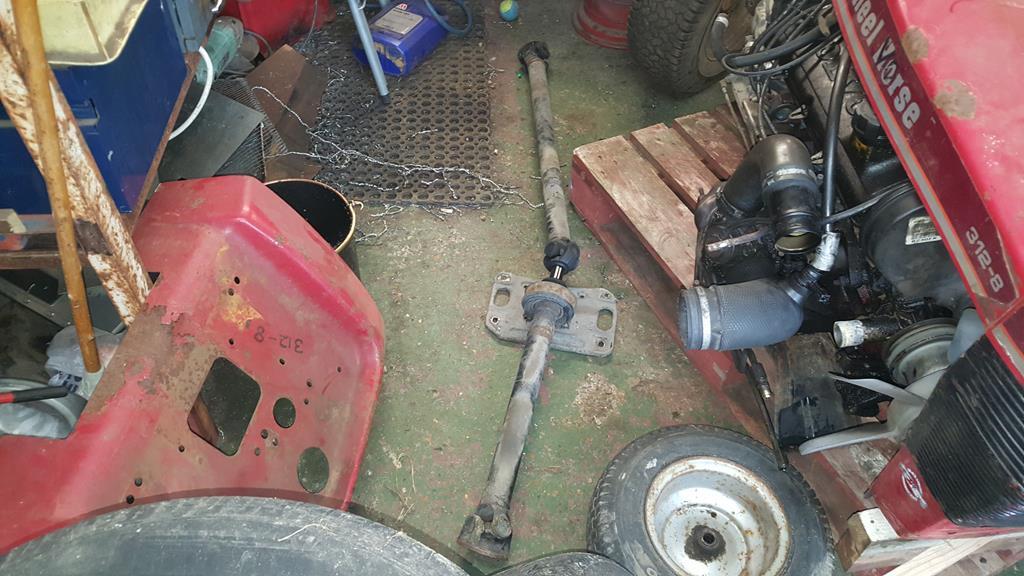 Oh... I'm open to negotiation on the prices but all big parts need to be collected from Hawkhurst, Kent. |
| |
Last Edit: Sept 26, 2019 15:22:48 GMT by Stigian
My YouTube Channel www.youtube.com/user/UkWheelHorseBlokeQuote - D'you know, it's people like you, doing totally brilliant and pointless stuff like this that gives me a little hope for humanity |
|
|
|
|
Apr 28, 2019 20:48:07 GMT
|
|
Well, life sometimes catches up with you or the ones you love in a big way.. This unfortunatly is one of those times that puts life in perspective..
My Wife has just be diagnosed with cancer and a dicky ticker (going by her family history she will need at least a double bypass).
Once she goes under the knife she will no longer be able to work for quite a long time (I'm disbled and can't work) which means we will no longer be able to afford the workshop rent!
Of course being the loving caring hubby that I am, I will be on full nursing duties when she gets out of hospital after the op/ops!
Sooo... Project Wheel-Vo has been cancelled and the Volvo running gear and parts will be put up for sale soon along with a lot of my tools.
Anyone wanna buy a Volvo B230FK turbo engine and auto box?
I will put an ad for the parts up in the right place very soon..
|
| |
My YouTube Channel www.youtube.com/user/UkWheelHorseBlokeQuote - D'you know, it's people like you, doing totally brilliant and pointless stuff like this that gives me a little hope for humanity |
|
|
|
|
Apr 11, 2019 16:00:13 GMT
|
|
|
| |
My YouTube Channel www.youtube.com/user/UkWheelHorseBlokeQuote - D'you know, it's people like you, doing totally brilliant and pointless stuff like this that gives me a little hope for humanity |
|
|
|
|
Feb 27, 2019 18:02:43 GMT
|
This is a good point to drop in a video as it kinda covers all of the above. What it doesn't cover is the fender pan getting lengthened a bit.. 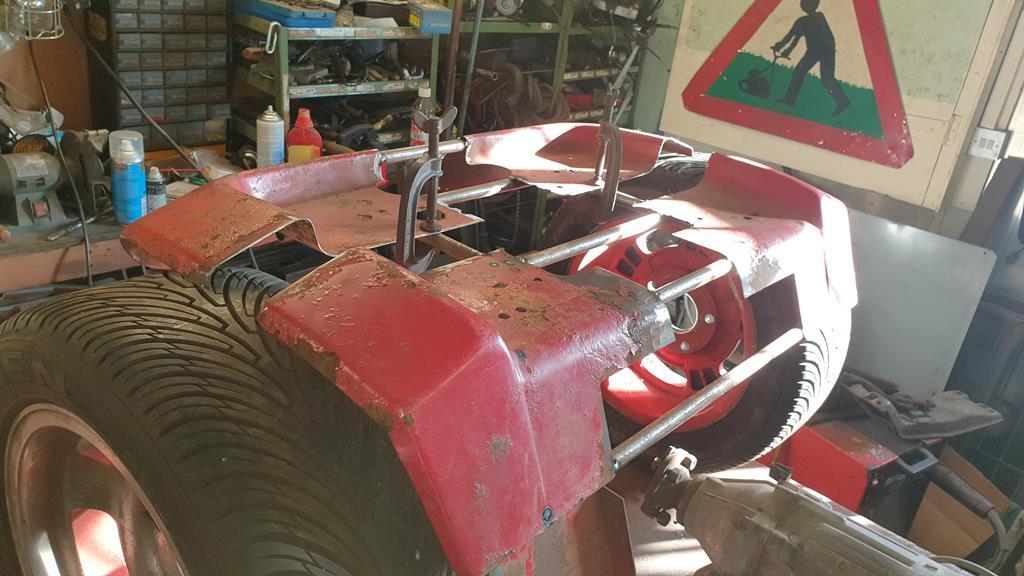 Seeing the fender pan just resting on the top of the tyres was bugging me, so to get it to stay in the right place and height it gained some legs.. 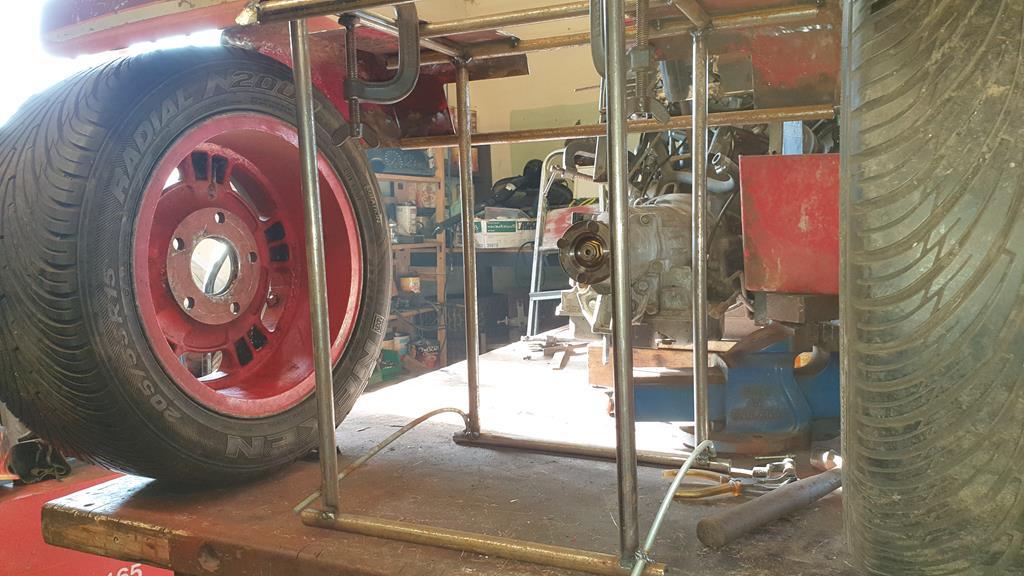 Only one thing for it... Get the ladder out and climb aboard to see how it feels.. The view down the bigger bonnet from the seat is amazing.. You will see it in the next video.. Yes the seating postion looks a bit high, the middle of the fender pan will be chopped out and lowered to get the seat and my vast weight lower..  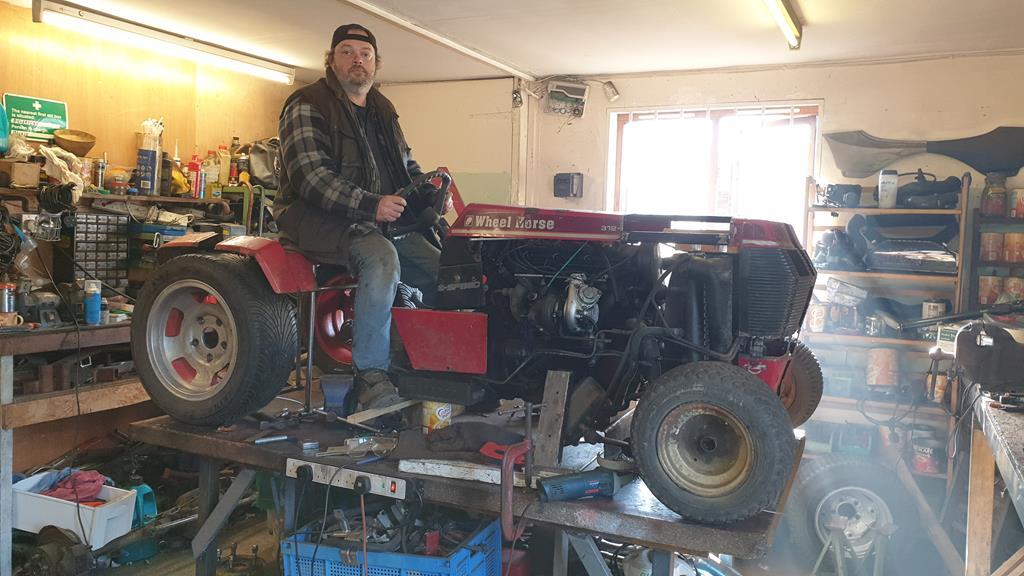 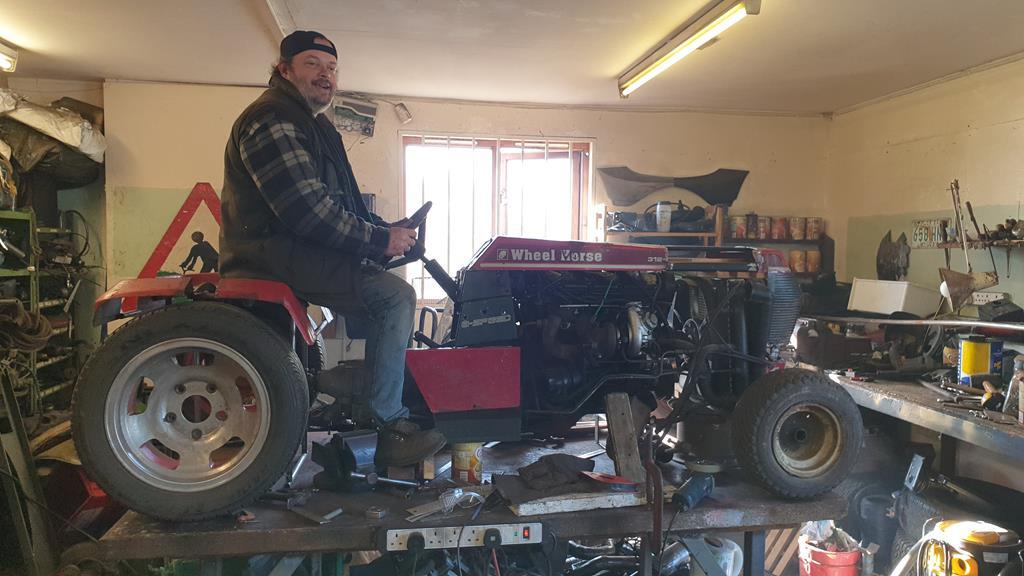 A couple more pic's without the fat bloke... 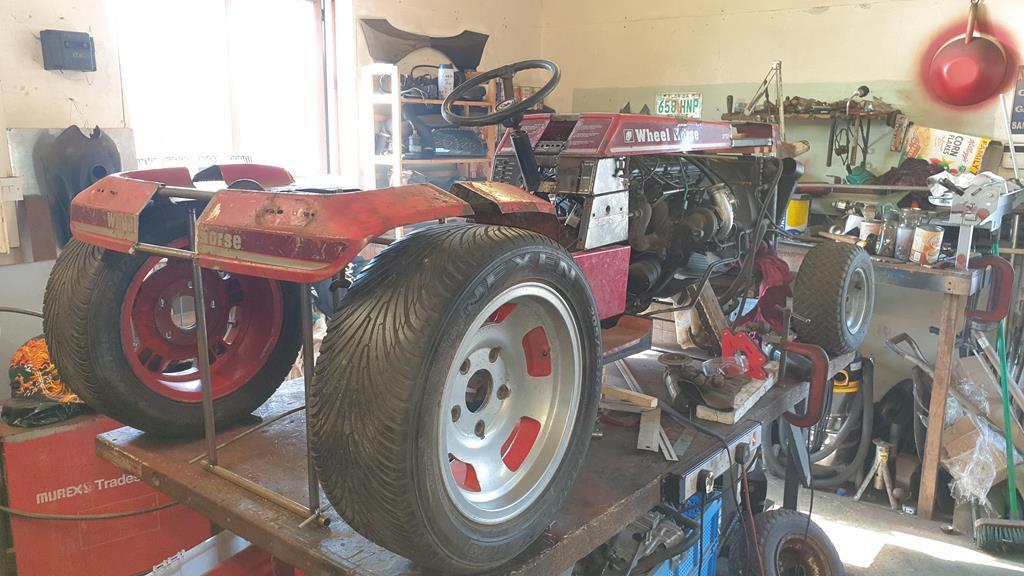  And that's as far as the build has got, the next job is to copy the fender pans lead and makes some legs/stands to hold the engine/trans in the right place and screw it down to the bench. I still need to tweak the panels around a bit, but I'm not that far off of thinking about the chassis.. |
| |
My YouTube Channel www.youtube.com/user/UkWheelHorseBlokeQuote - D'you know, it's people like you, doing totally brilliant and pointless stuff like this that gives me a little hope for humanity |
|
|
|
|
Feb 27, 2019 17:47:01 GMT
|
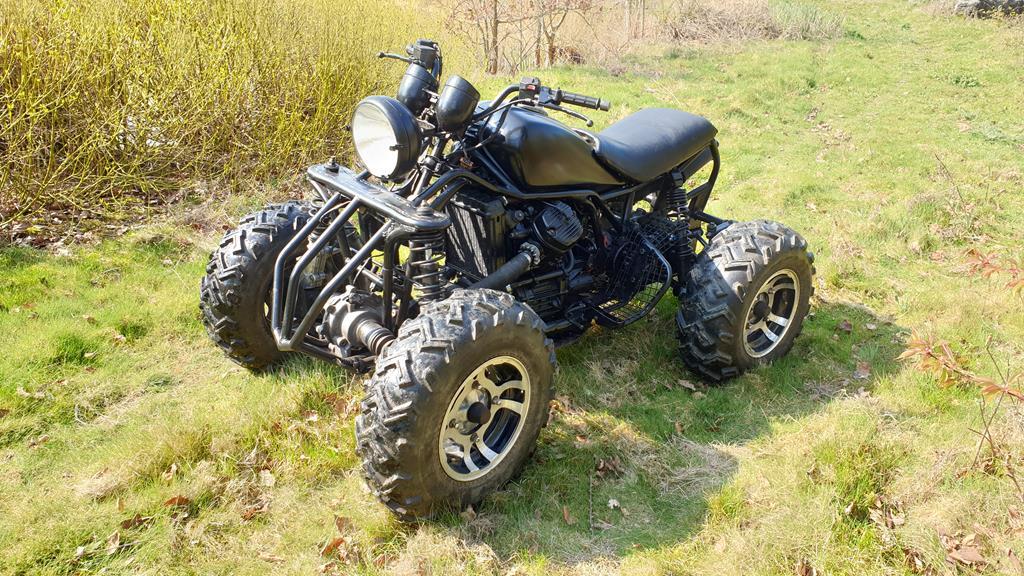
Thanks for all the suspension ideas guys, but for a machine who's main roll in life will be to smoke the rear tyres away, I'm not 100% sure it's going to be needed. with the low height I need there also wouldn't be any real suspension travel, maybe 2-3 inches! Also no suspension would make the build a tad easier!! My current thinking is something I saw on a racing mower which I am told works very well and saves a lot of back pain!! From the front it's hard to spot.. 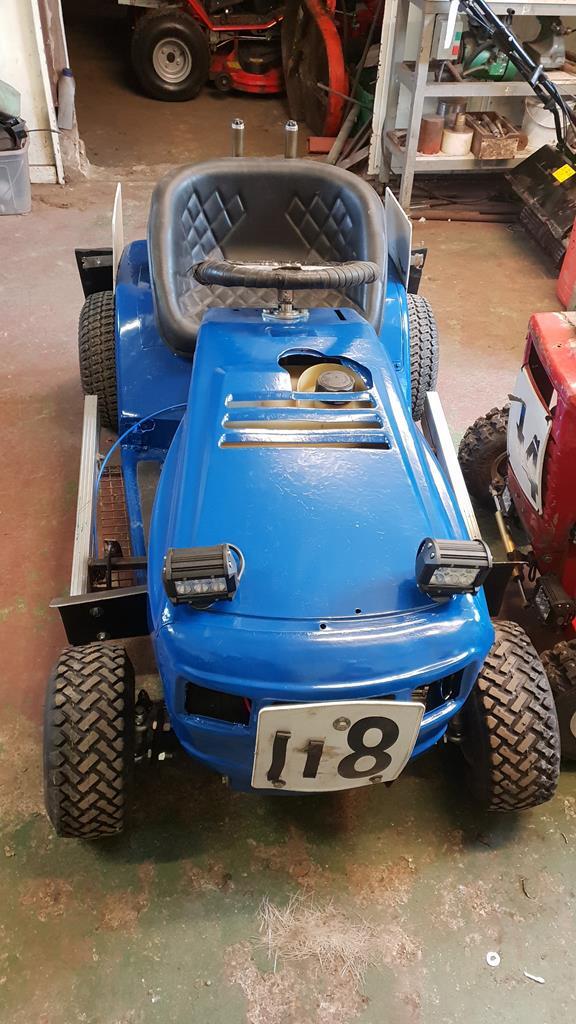 A bit of a give away at the back though 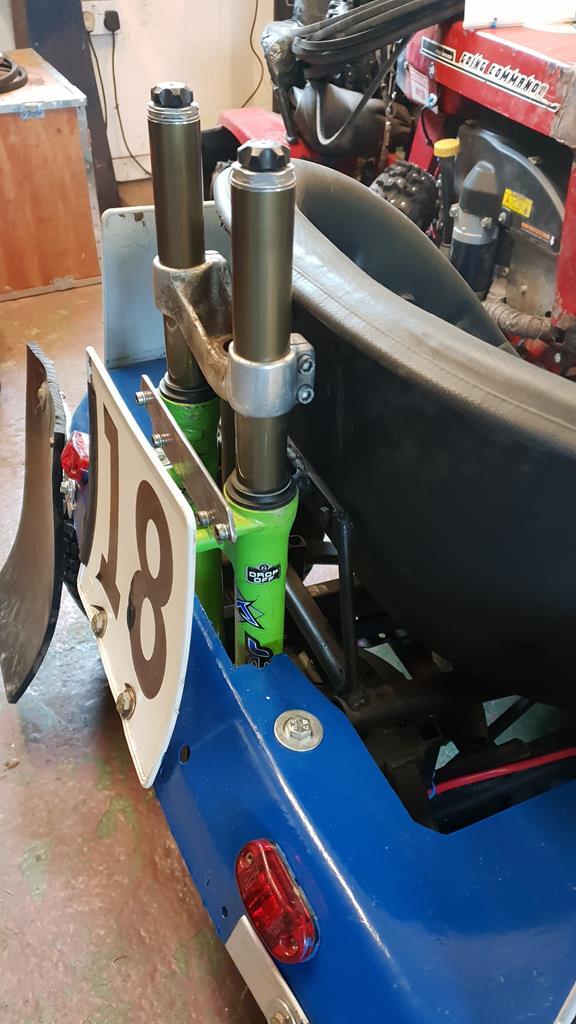 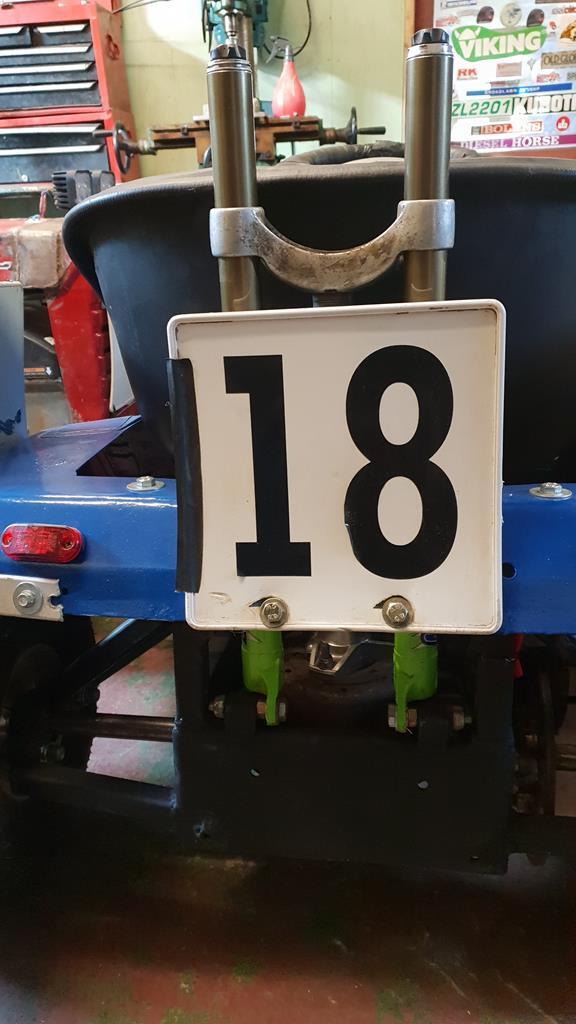 Anyway, I'm not quite at that point in the build yet, but not the far off..... Yes work has finally started on Project Wheel-Vo  I havn't quite finished my MadTrax quad build yet, but I had got to the point where I needed a few bits to finish it but no cash to buy them.. (Ordered this morning by the way) But MadTrax had reached the point where it could come off the bench... And as the bench was empty of course I needed something to put on it Engine, trans, a few wheels and the bonnet plonked in place.. 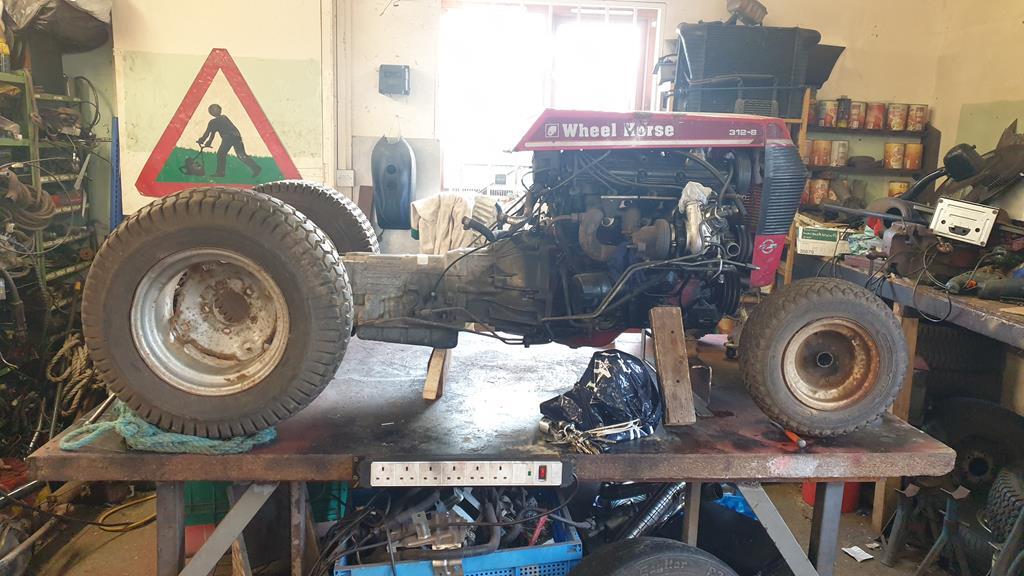 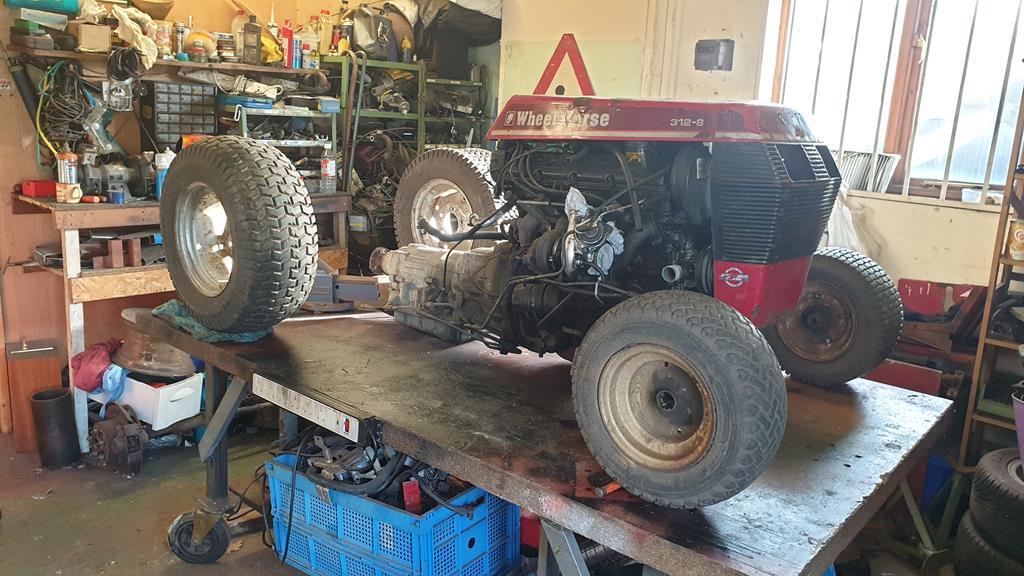 Although the look is rather grin worthy, there are a few problems such as the bonnet is too short, too wide, and not long enough to not onlt fit over the engine but also cover the radiator, intercooler and tran oil cooler! Sooo best add 12 inches to the length and 4 inches to the width.. 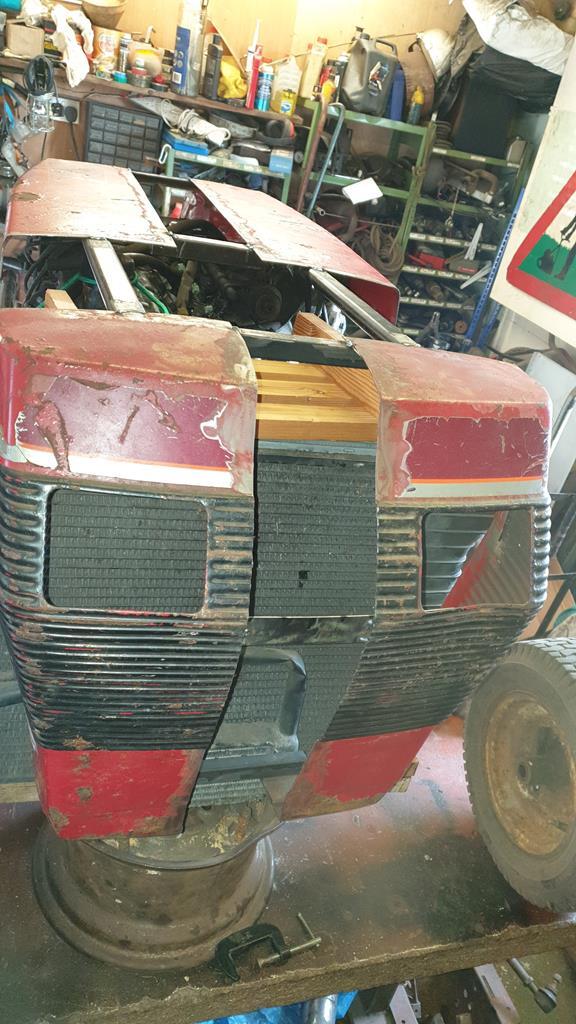 At this point I am not sorting the bodywork out, I just need to stretch things a little until Wheel-Vo looks right hench all the random bit of tube and box holding the bonet together.. 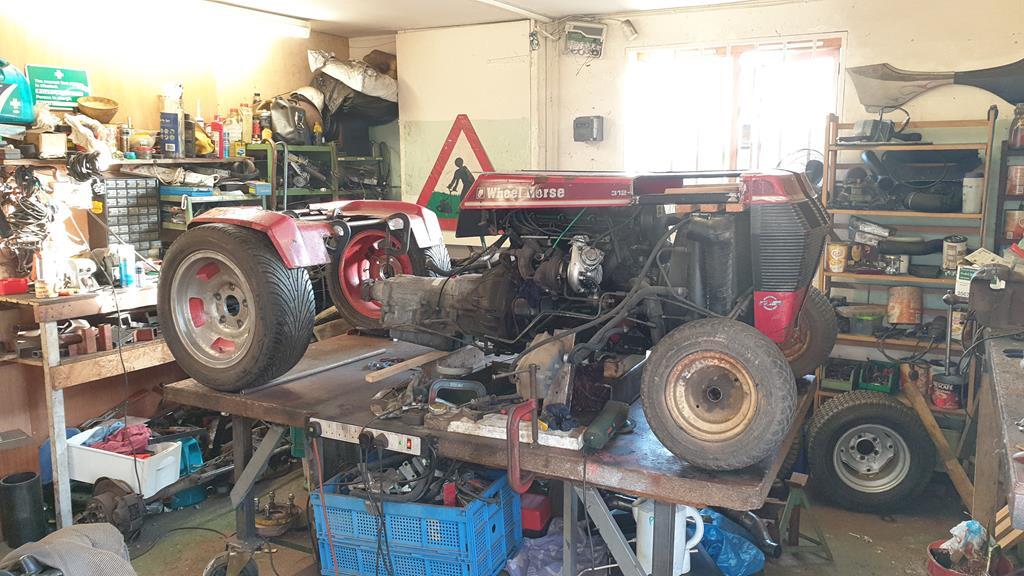 The fender pan got a bit of a stretch as well.. 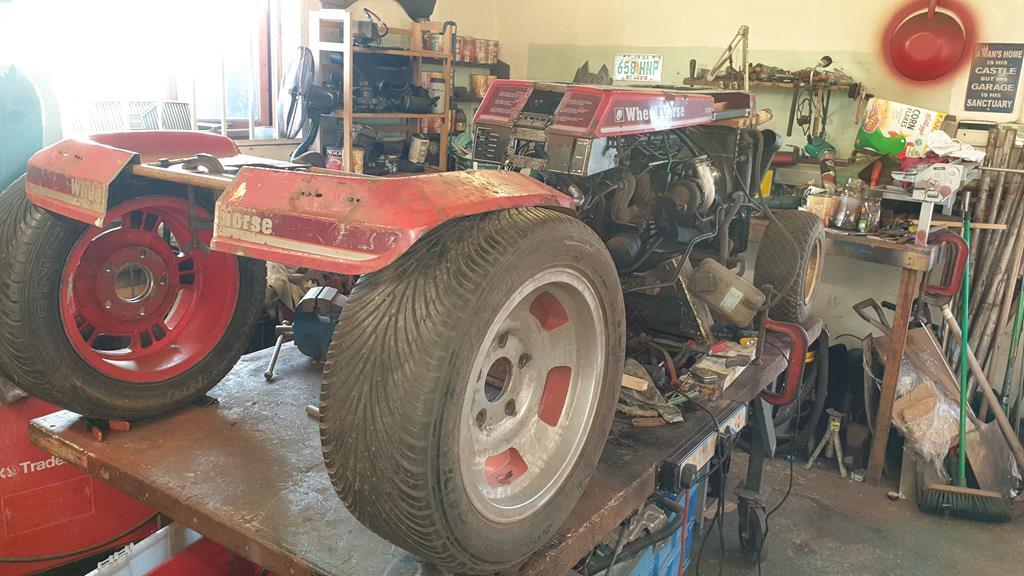 "Now with an added Nigel" to help you work out the scale.. 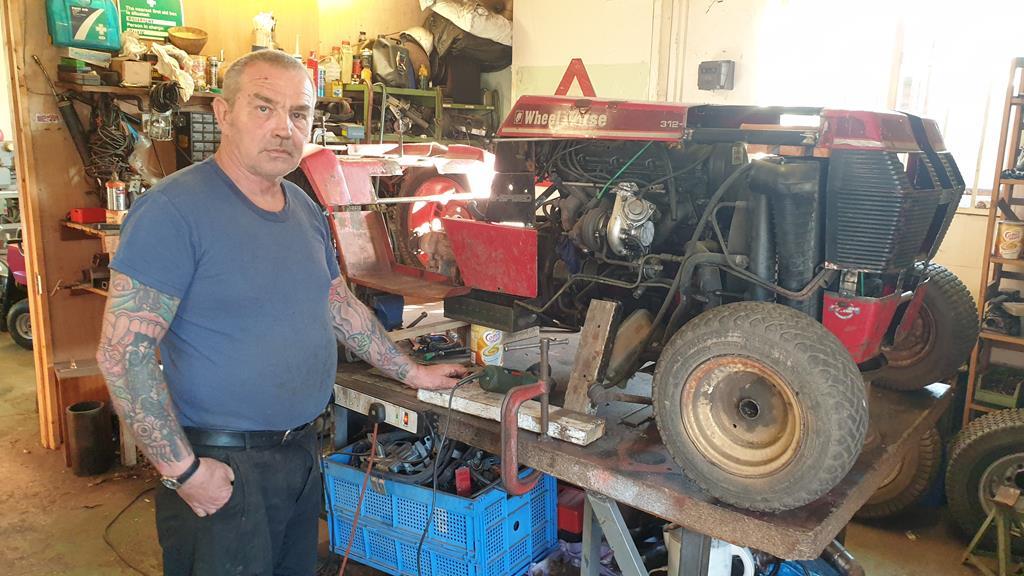 |
| |
My YouTube Channel www.youtube.com/user/UkWheelHorseBlokeQuote - D'you know, it's people like you, doing totally brilliant and pointless stuff like this that gives me a little hope for humanity |
|
|
|
|
|
|
This is great. How have I missed this? I think it must be the colour.. Satin black doesn't stick out as well as bright yellow This is great. How have I missed this? Welcome to the wonderful world of Stigian. Where stuff just happens... Thanks George, it does seem to "just happen"... Just a lot slower than I'd like.. ah Horsewheelbloke or whatever your YT name is! Great to see you on RR - I've fallen in love with the tiny tractor you guys were hooning around the yard - do they become available to buy (project or not) very often, do you know. Its the perfect thing with an engine I can play with that SWMBO would actually enjoy! Hi Autojumbled, yep that's me on YT, you just missed the Uk off the front Another one of my videos coming up here shortly.. The little Trojan tractors do come up for sale every now and then, keep an eye on Fleabay... A project may be cheaper as the one in the video sold last week for £1100!! As promised the next video is a much more happy one I didn't have much time yesterday, but the front end is mostly painted and bolted back on.. 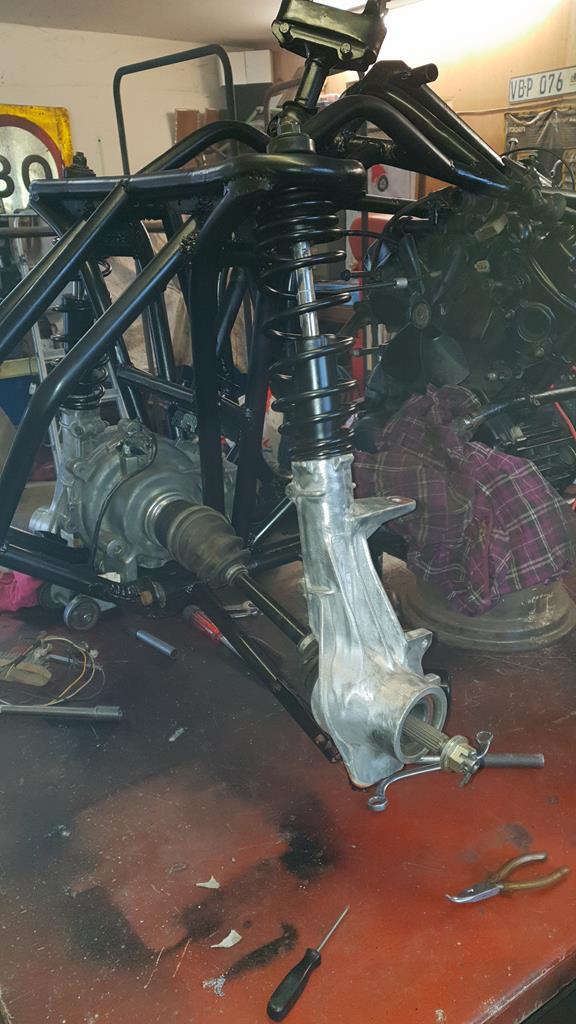 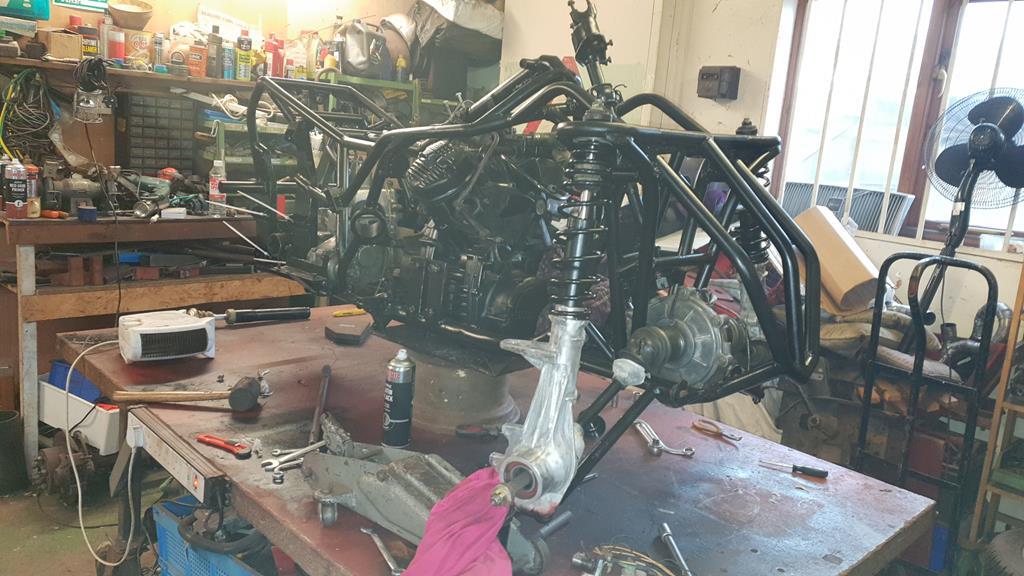  |
| |
My YouTube Channel www.youtube.com/user/UkWheelHorseBlokeQuote - D'you know, it's people like you, doing totally brilliant and pointless stuff like this that gives me a little hope for humanity |
|
|
|
|
Jan 30, 2019 17:11:09 GMT
|
A pile of cleaned and primered parts stashed under the bench waiting for a top coat..  The rest of the suspension components were buried under a bench behind the engine, so of course the engine had to come out.. Might as well plonk it on the bench and have a look.. After cleaning the engine didn't look too bad, only a small bit of paint has come off.. Unsure it needs repainting at this point.. Will have to think on it. 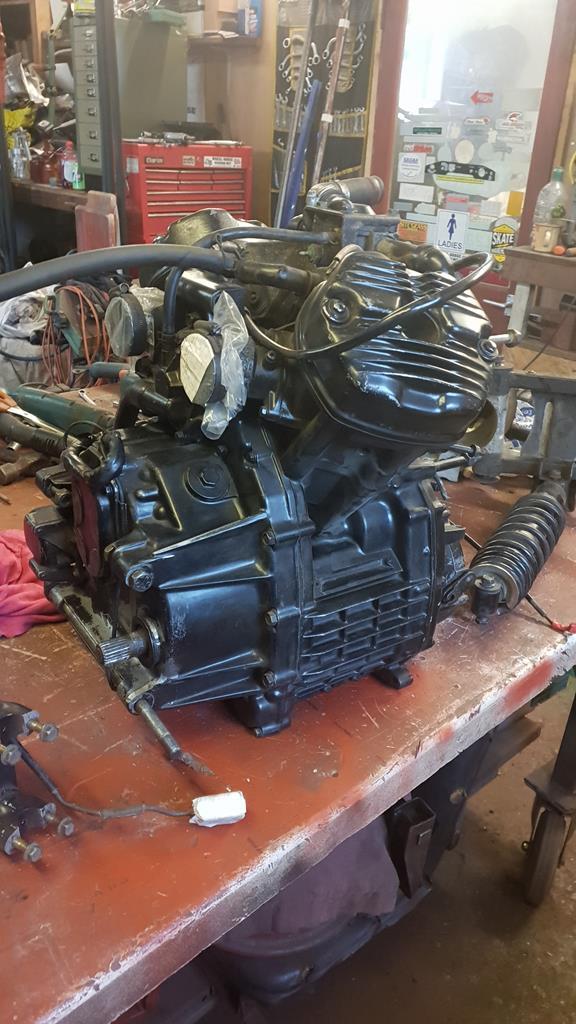 I also made a start sorting the radiator out. 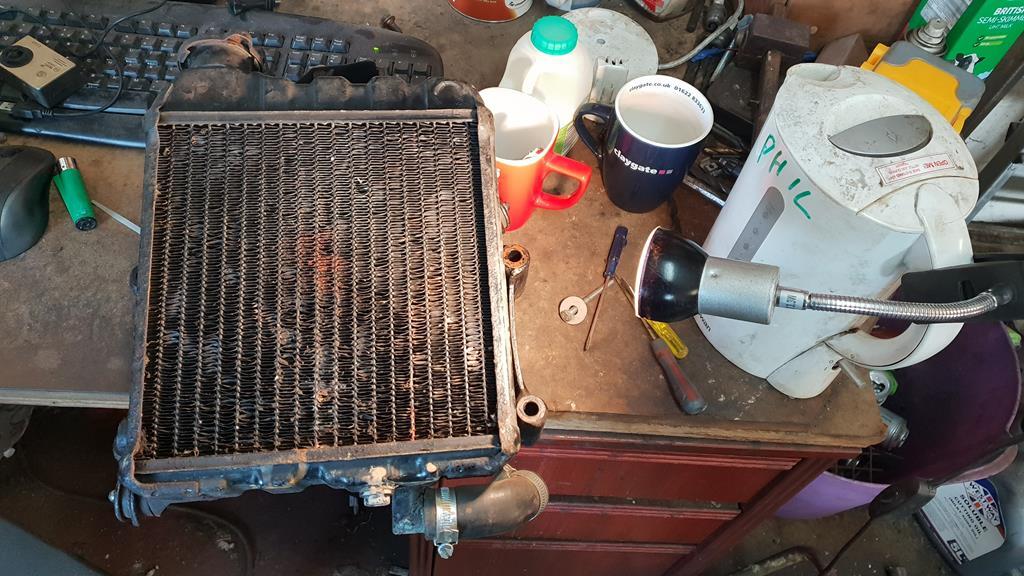 As you can see a lot of fins need straightening out.. it's one of those jobs that gets done a bit at a time sitting at my desk with the heater blowing at me  The exhaust system has been cleaned up and any pin holes found (each section was pressurised to find any leaks) and welded up.. Just for a laugh I thought I'd bolt the exhaust on to the engine to have a look... It looks rather mad 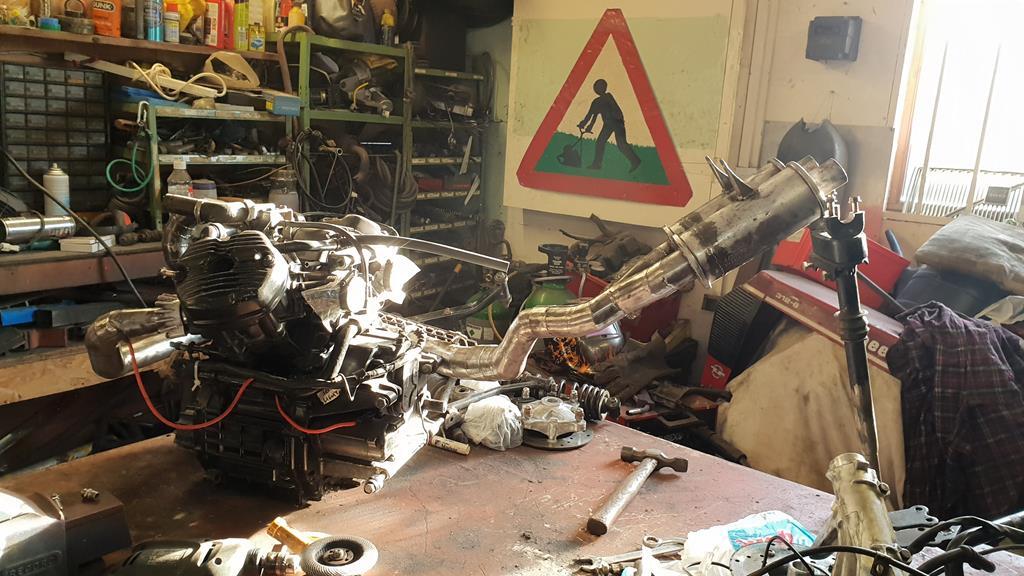  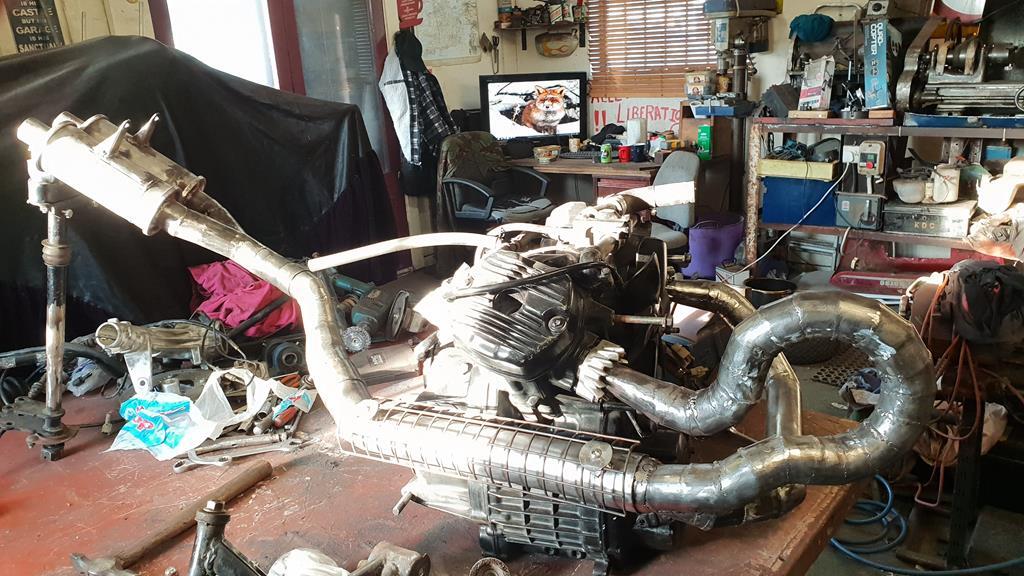 For a few days there wasn't anything I could do on MadTrax until the paint I had ordered turned up, so..... I had a bit of a tidy and clean up in the lathe corner of the workshop. The white doored paint cupboard came out from the corner behind the lathe and now lives in a place I can actually reach it 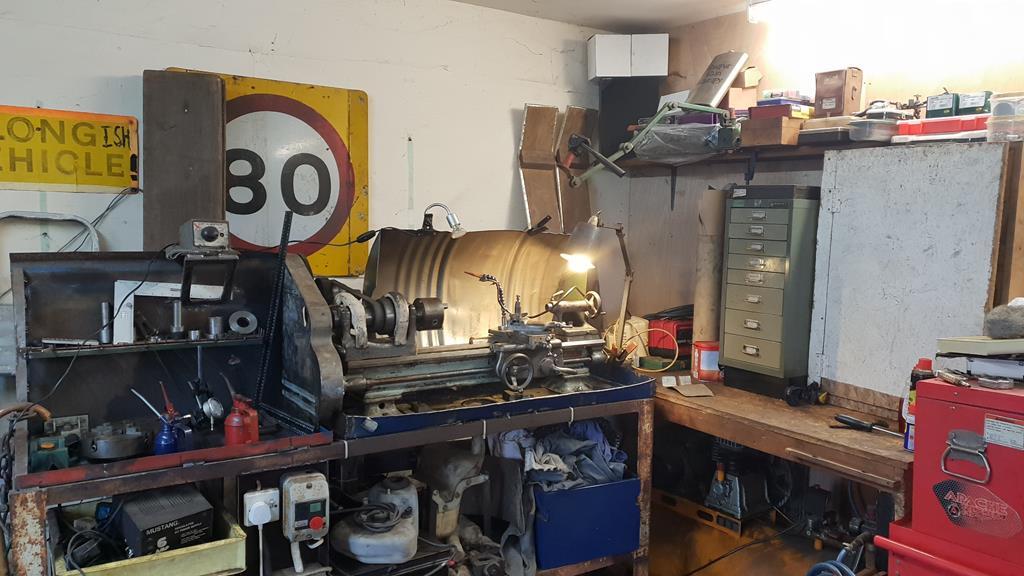 The "lathe shelf" now looks a lot neater and emptier.. 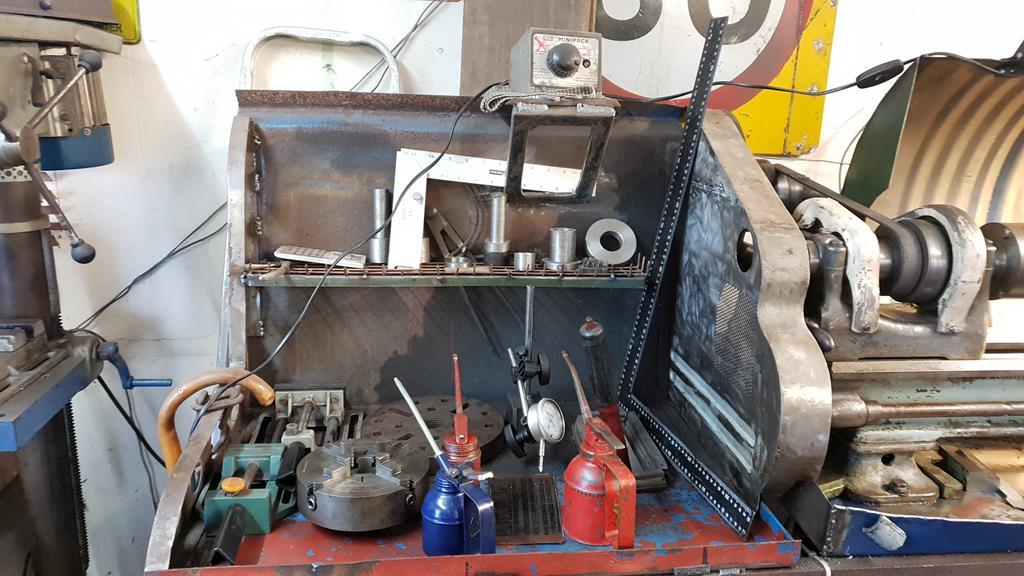 As most of the smaller tools now live in this labeled cabinet.. 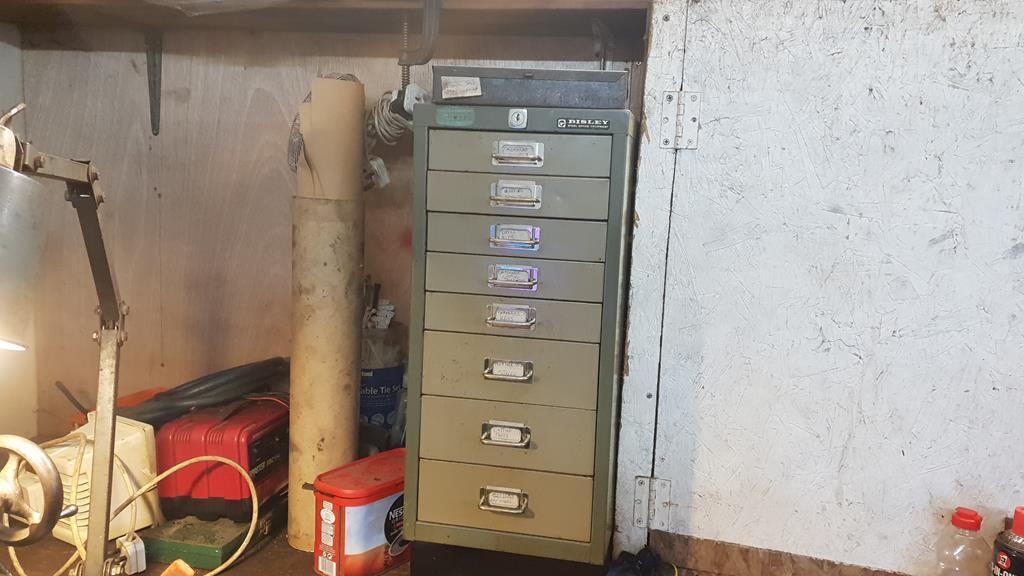 And to finish off the lathe got a much overdue clean up.. 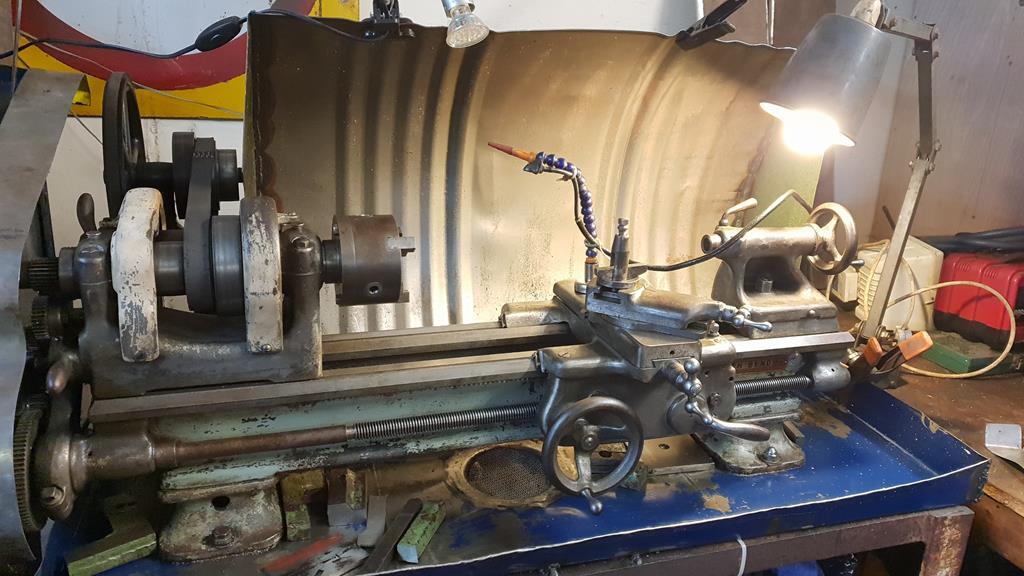 Finally last weekend my long awaited paint turned up, so Monday was paint the frame and engine day 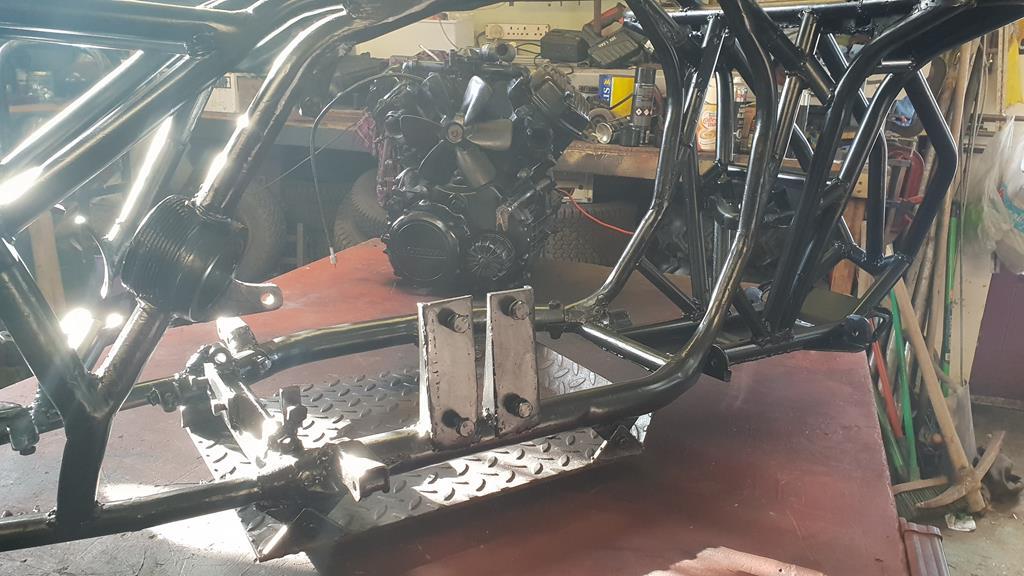 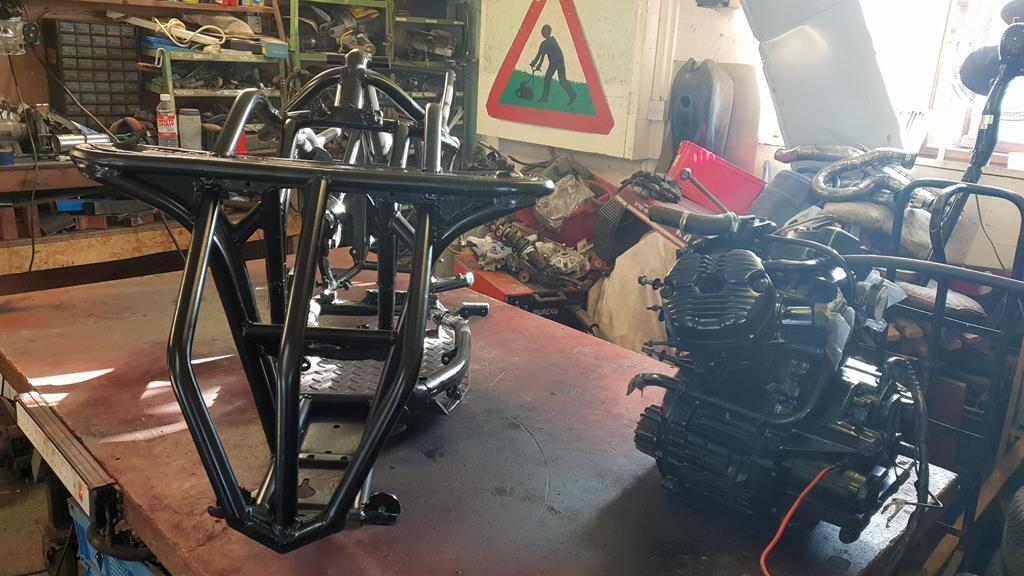 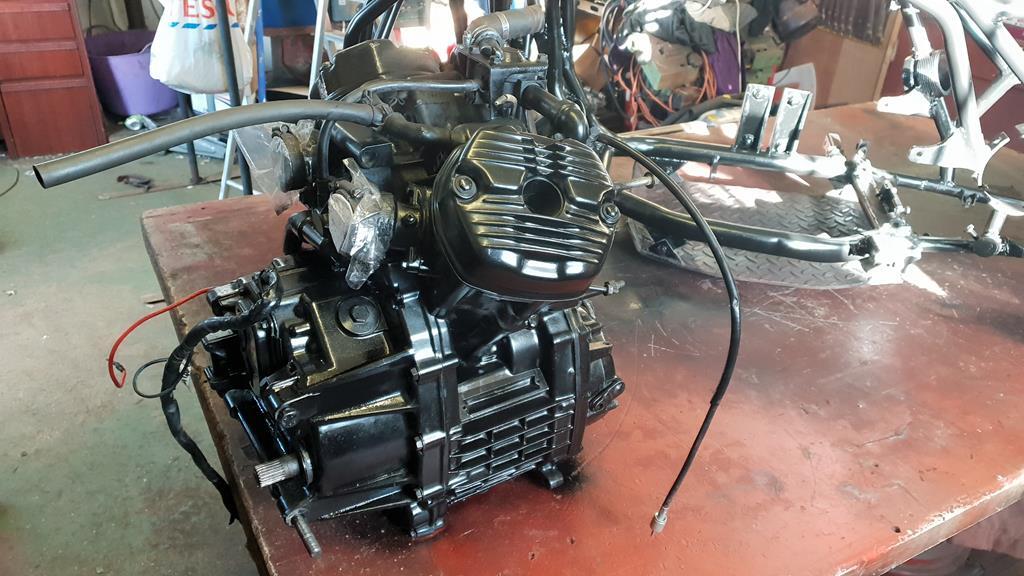 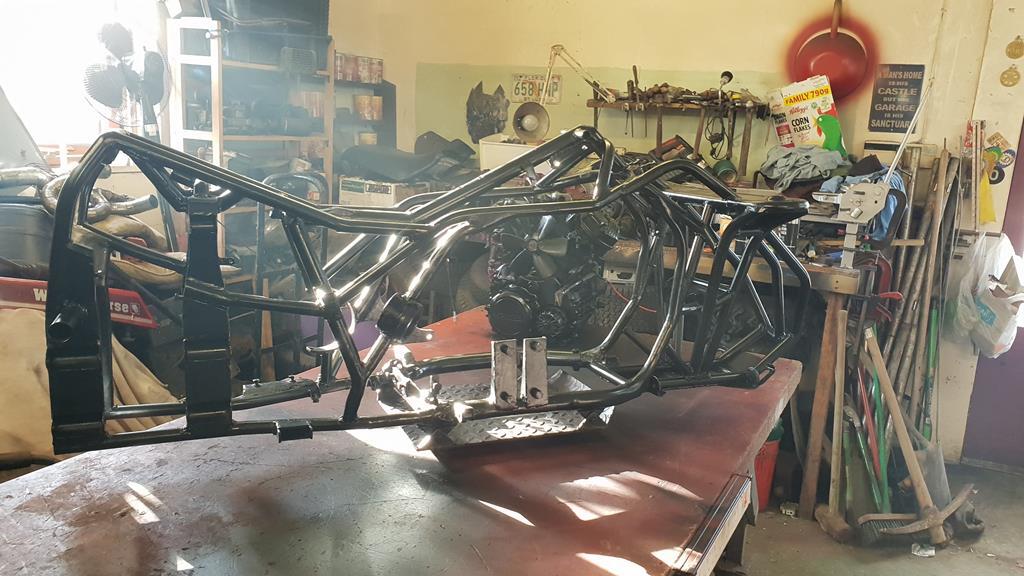 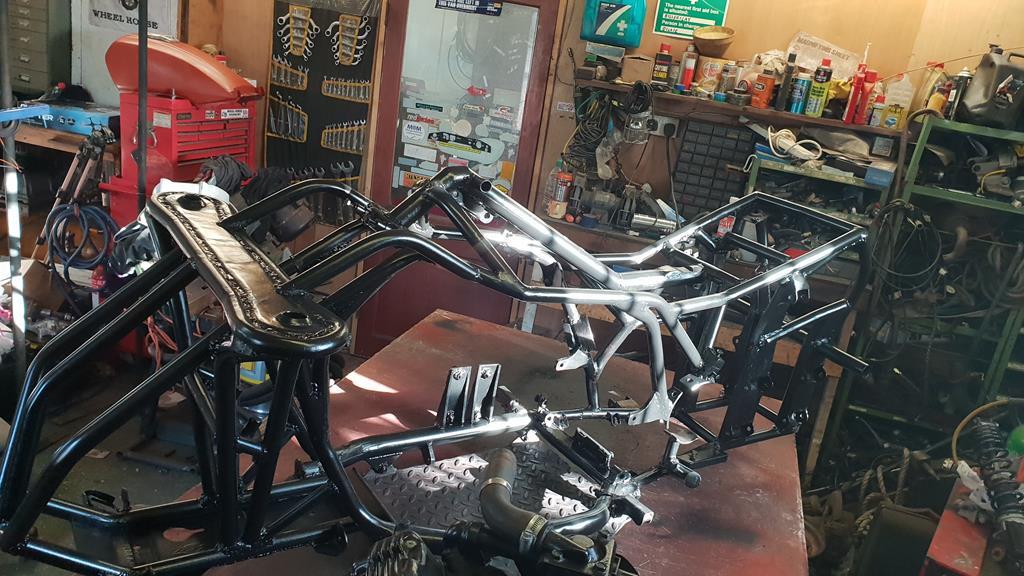 Which made yesterday "get the engine, transfer box and rear end in" day.. A bit thank you to Rob for all your help with this.. Ta muchly mate..    |
| |
My YouTube Channel www.youtube.com/user/UkWheelHorseBlokeQuote - D'you know, it's people like you, doing totally brilliant and pointless stuff like this that gives me a little hope for humanity |
|
|
|
|
|
|
Jan 30, 2019 16:44:41 GMT
|
With the tank and frame stored out the way I had some space on the bench to fill up with parts that need cleaning and painting.  A wire brush on a drill came in handy for cleaning off all the years of crud. It leaves a slightly bright but rough finish which should dull down with age. The transfer box. 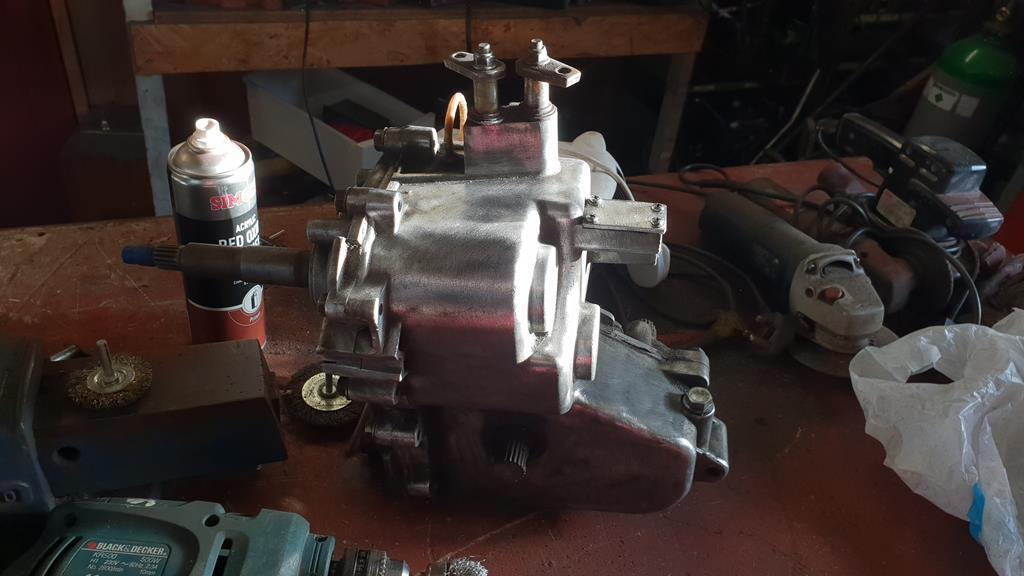 Front end. 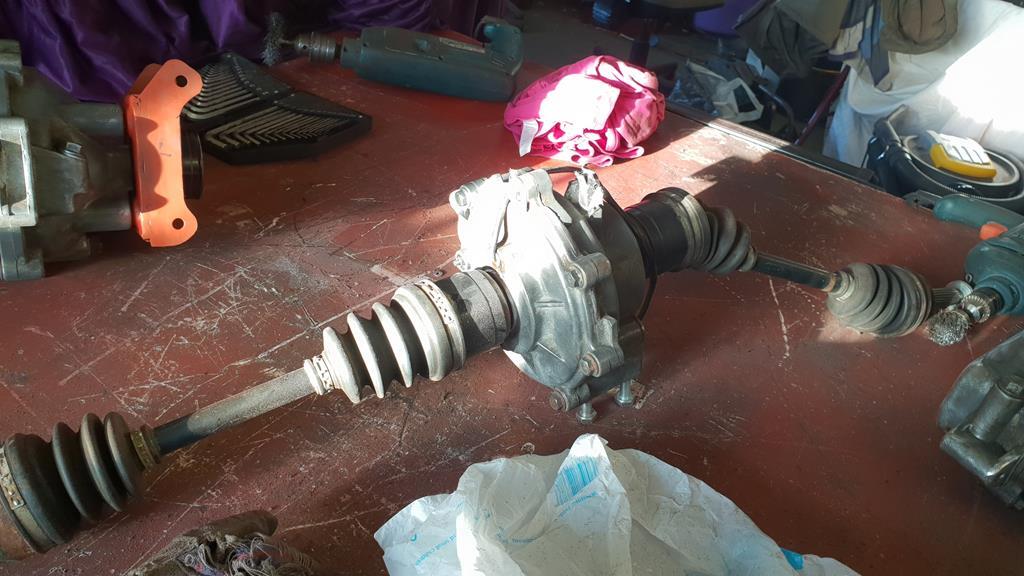 Rear end complete with mounting brackets 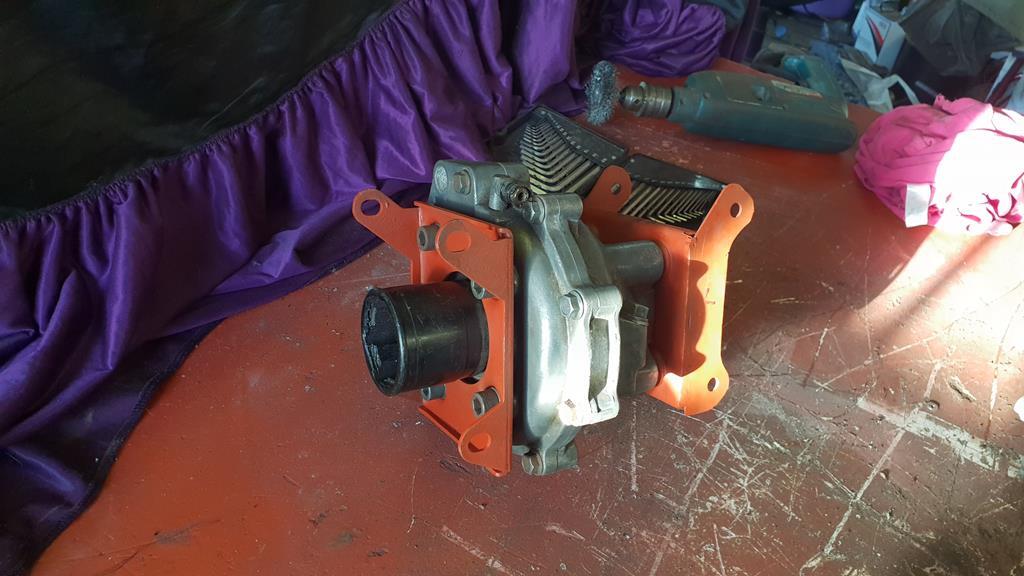 A front suspension strut in need of a de-fur and clean up. 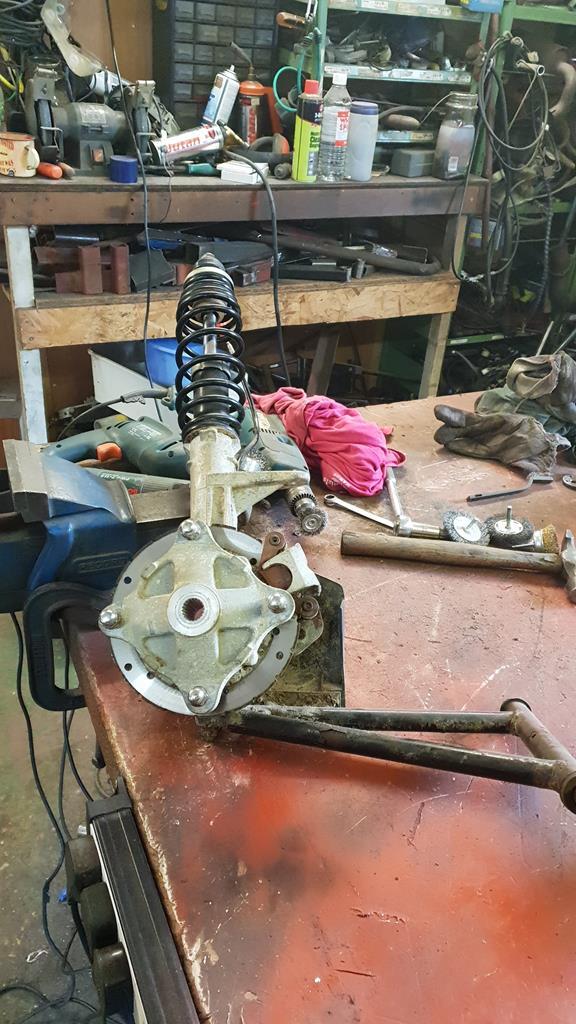 A fury front hub..  And a cleaned up rear hub 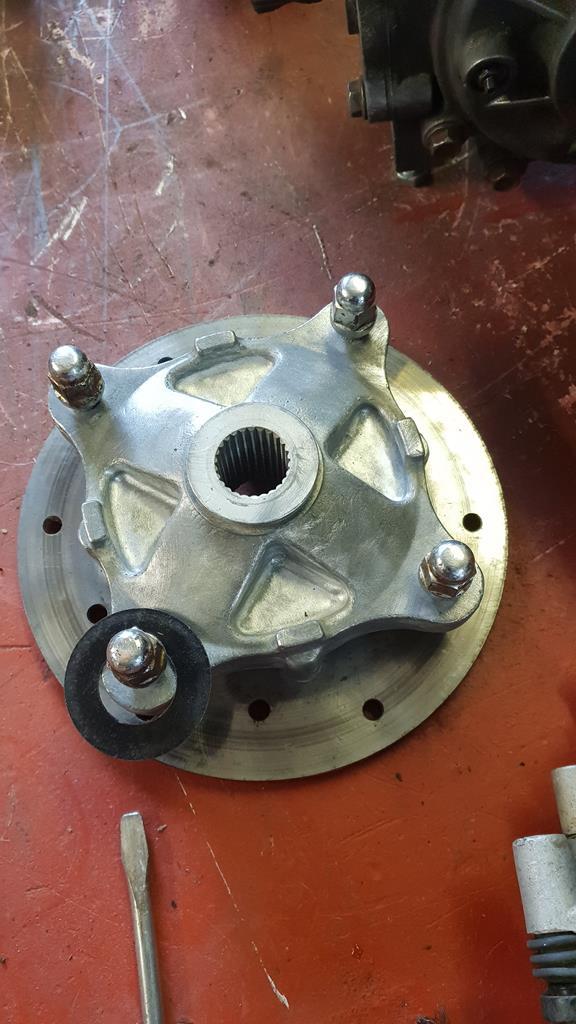 More wire brushing and painting.. 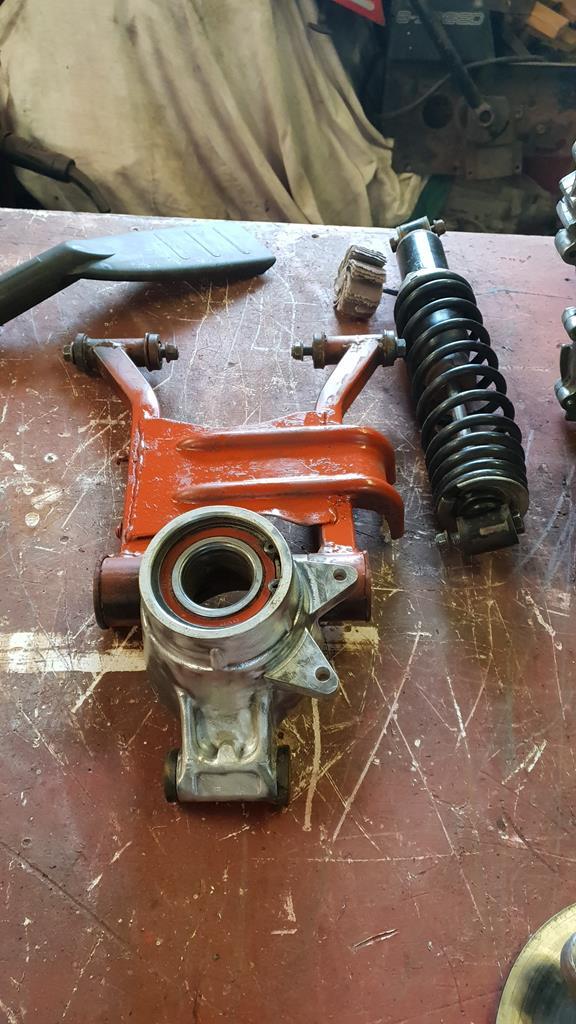 At least the calipers clean up really well 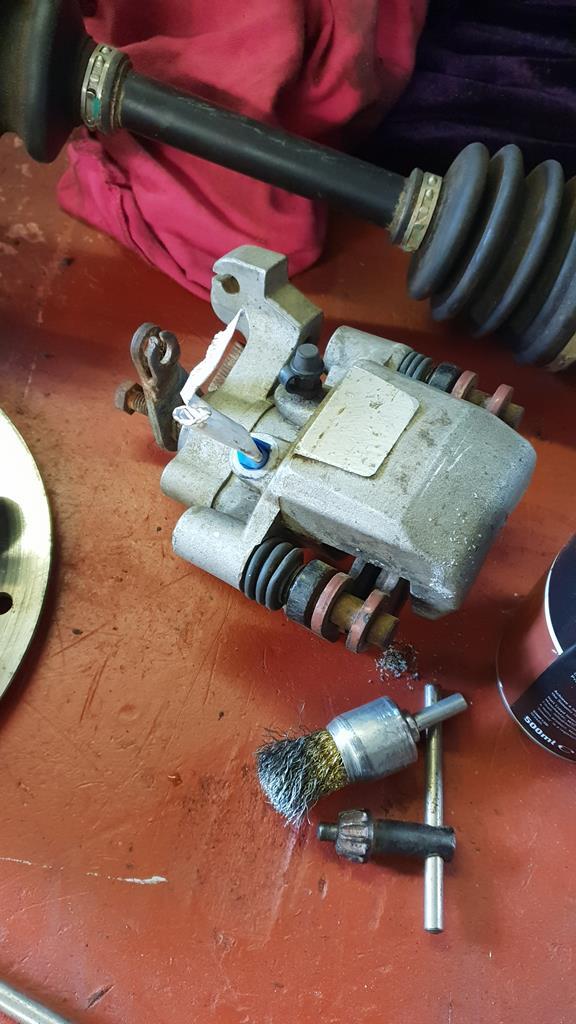 |
| |
My YouTube Channel www.youtube.com/user/UkWheelHorseBlokeQuote - D'you know, it's people like you, doing totally brilliant and pointless stuff like this that gives me a little hope for humanity |
|
|
|
|
Jan 30, 2019 16:39:28 GMT
|
The time had come to sort out the only bit of bodywork on MadTrax, the fuel tank.. At some point I welded on an extension to the back of the tank so it filled a gap left below the seat.. Of course this all now needed to be tidied up, so que the body body filler! Looking a bit rough here still..   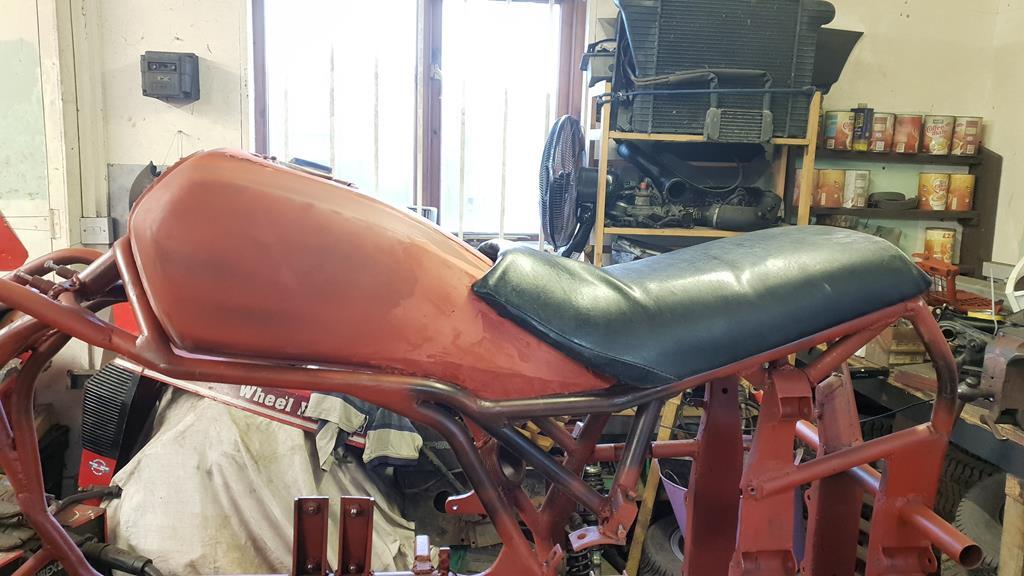 Lots of fillering and sanding later I gave it a squirt of white primer as it's all I had that wasn't red oxide primer! 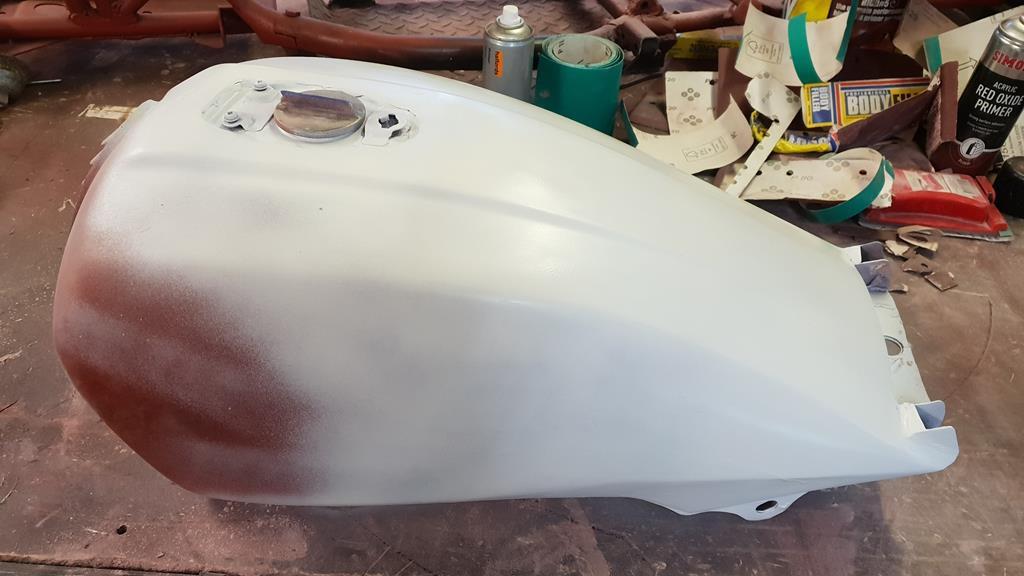 A careful rub down with 800 grade wet 'n' dry later the tank was then hit with 3 heavy red oxide coats... 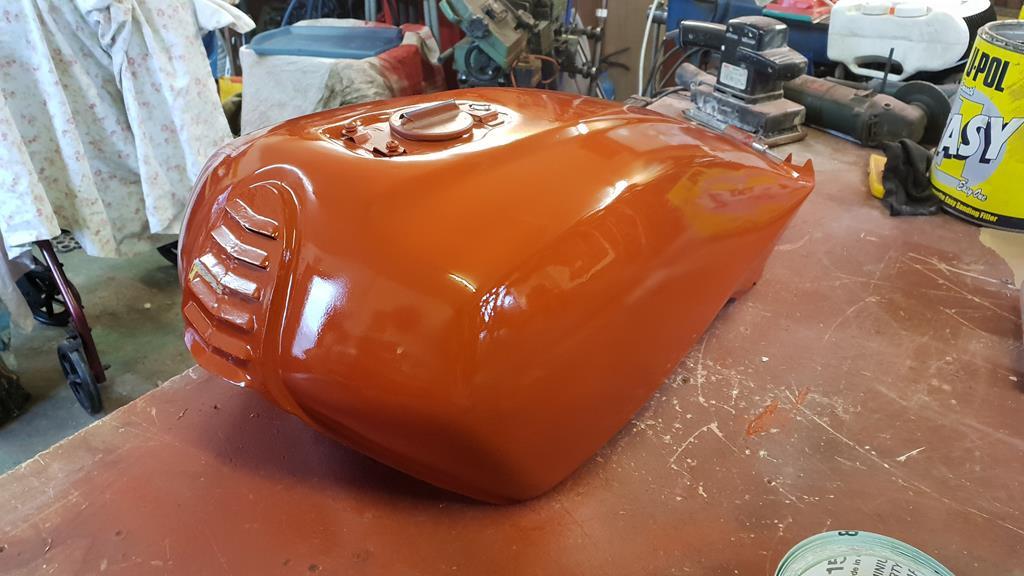 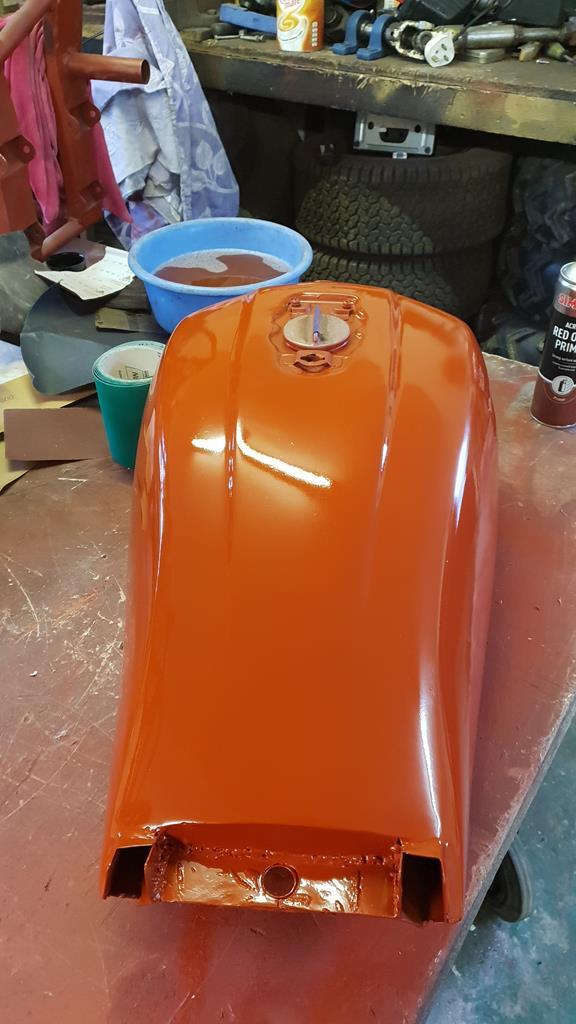 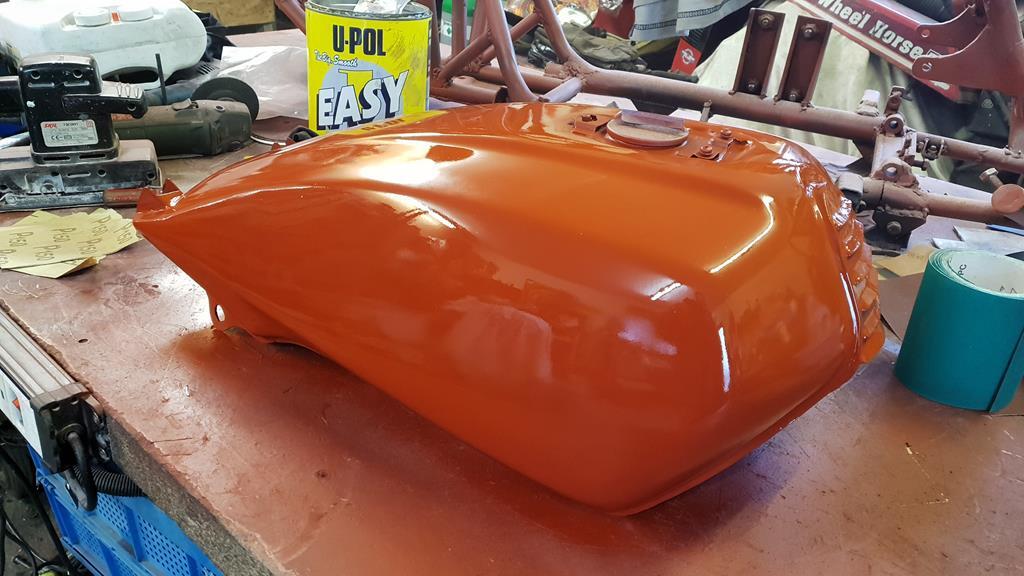 Once the paint had fully hardened it was them flattened back with 1500 grade wet 'n' dry to get it ready for the top coats. 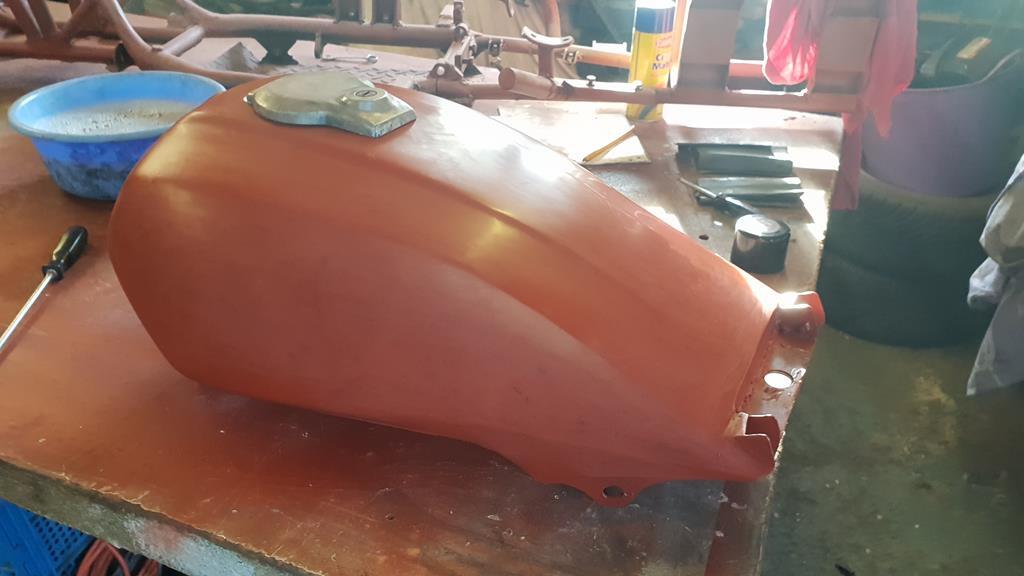 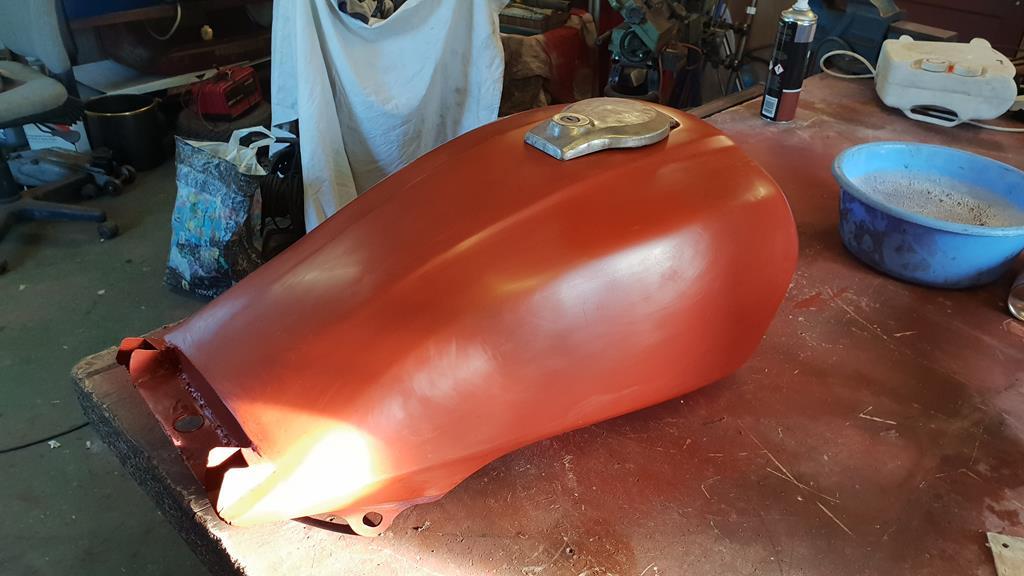 Carefully plonked on the frame along with the seat to have a look... Me likes As it turned out the frame was the only "out of the way, nothing can get dropped on it" place I had to store the tank, so a sheet was put over to keep the dust at bay.. 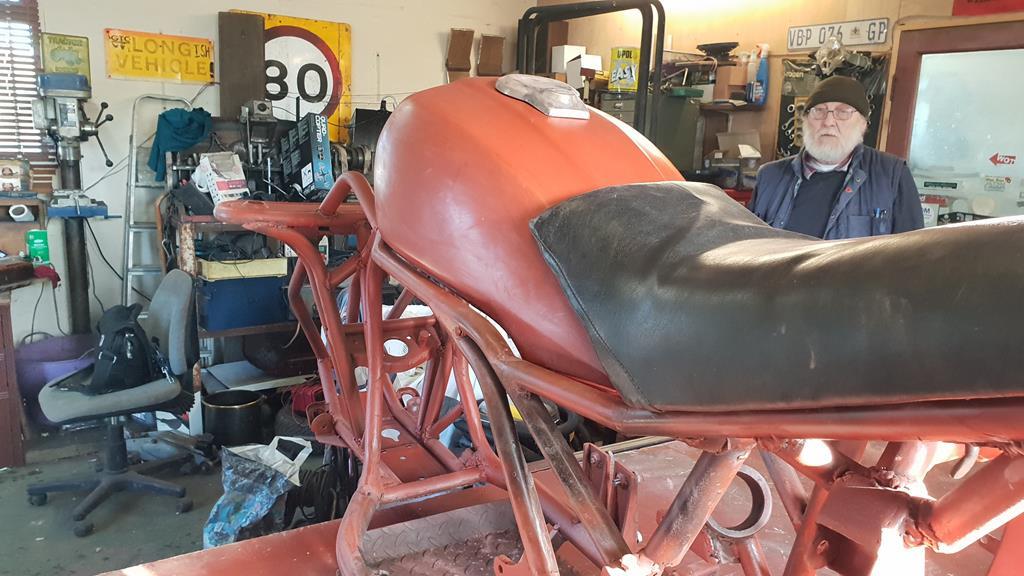 Yes I need to adjust the filler cap. 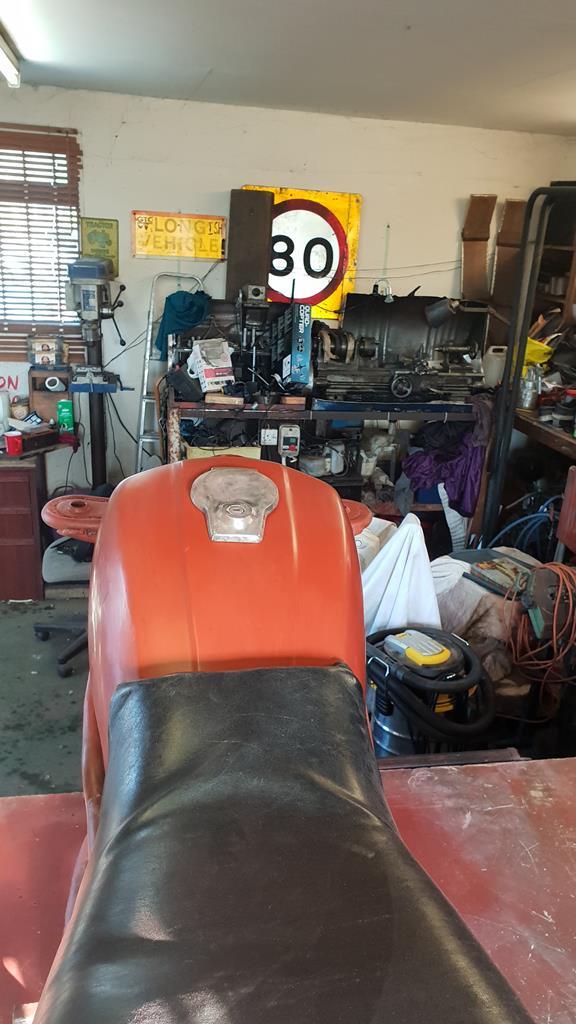 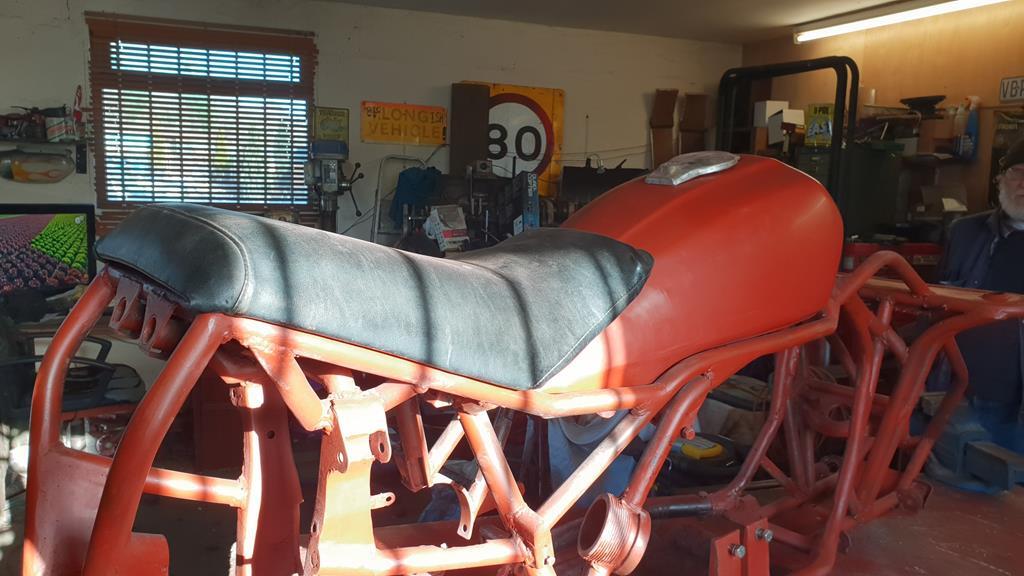 |
| |
My YouTube Channel www.youtube.com/user/UkWheelHorseBlokeQuote - D'you know, it's people like you, doing totally brilliant and pointless stuff like this that gives me a little hope for humanity |
|
|
|
|
Jan 30, 2019 16:33:40 GMT
|
With all welding finally done (have I said that before?) the frame now looks like this with a coat of red oxide in the right places.. Yes the bit I missed at the front has been done. You may notice a few bit's of metal bolted to the frame.. 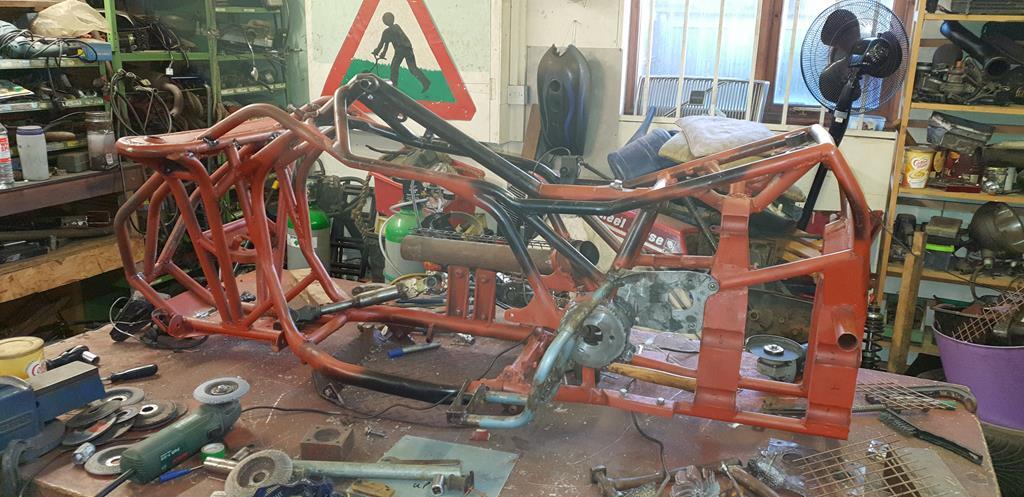 The bit's of metal happen to be foot rests and anything that sticks through them or near them.. This is the N/S.. 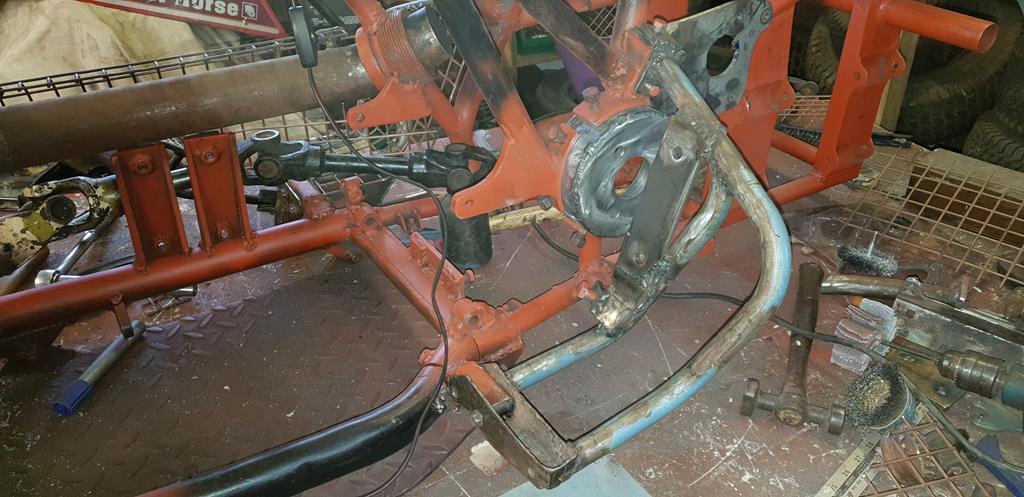 Now skinned with some strong steel mesh and given a squirt of the red stuff. 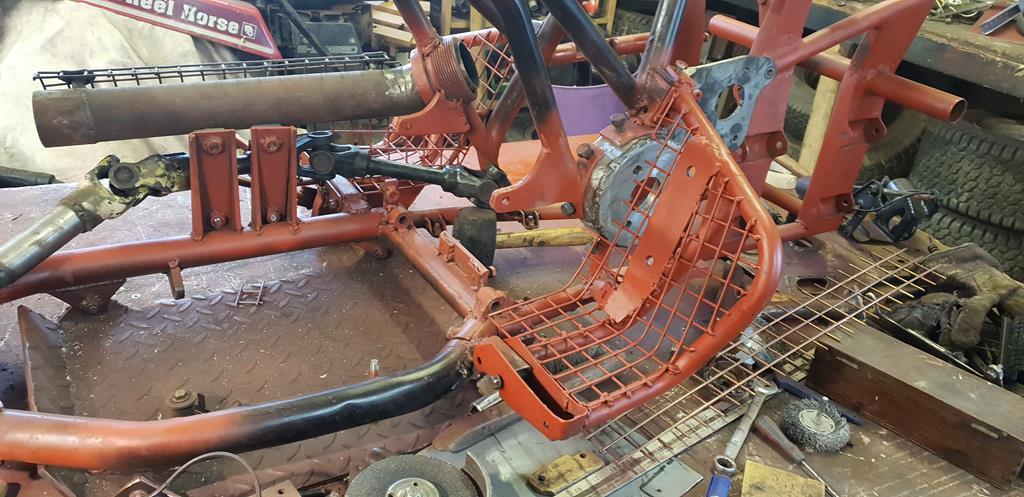 The O/S foot rest thingy taking shape, it also has to hold a a small guard so your legs can't get pulled in by the rotating driveshaft.. Never fun! 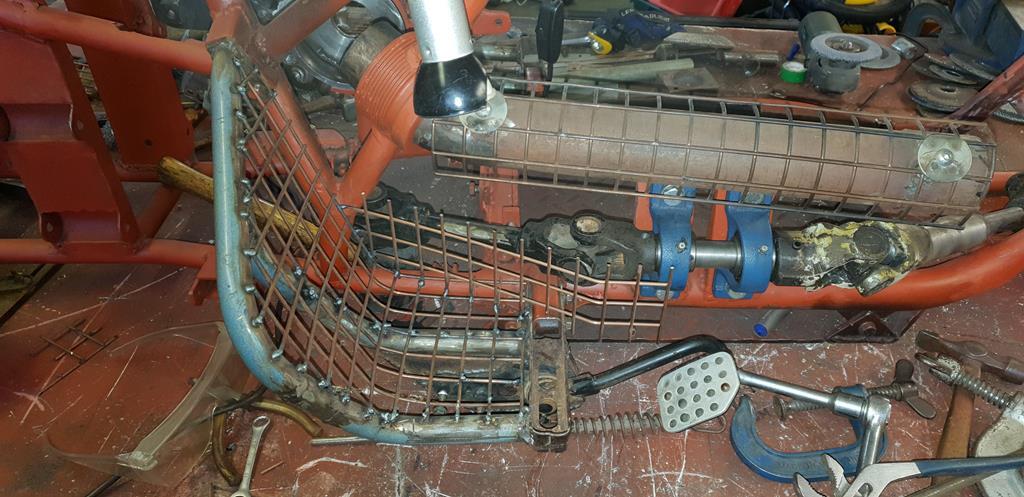 That should do the trick. 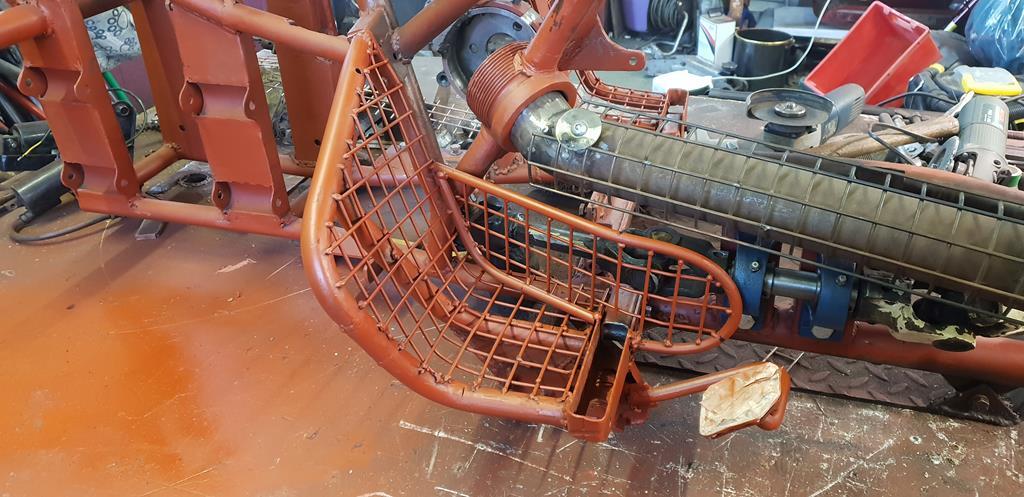 A few parts have been cleaned up and given a coat of the red stuff. 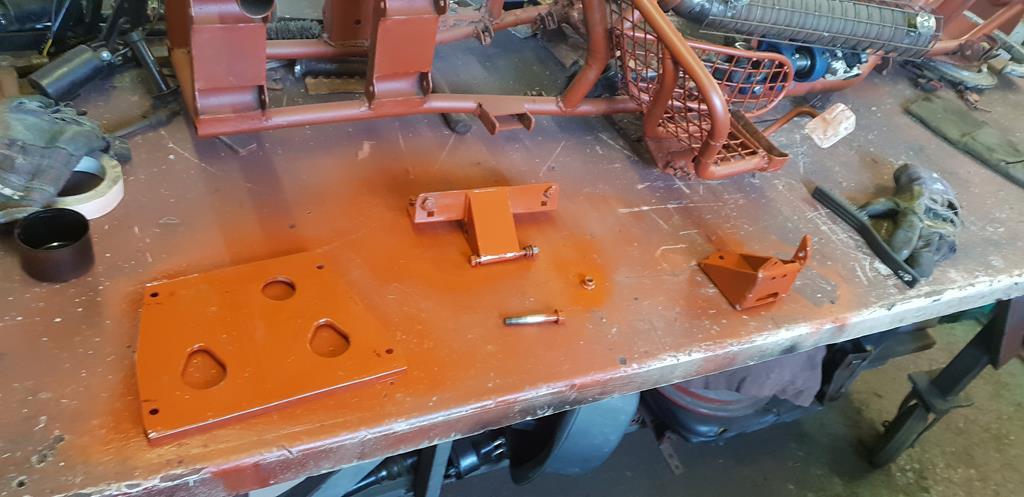 This plate which bolts in the base of the frame to add some extra strength and protection has a lip welded on each end just to make sure it's strong enough for the job. 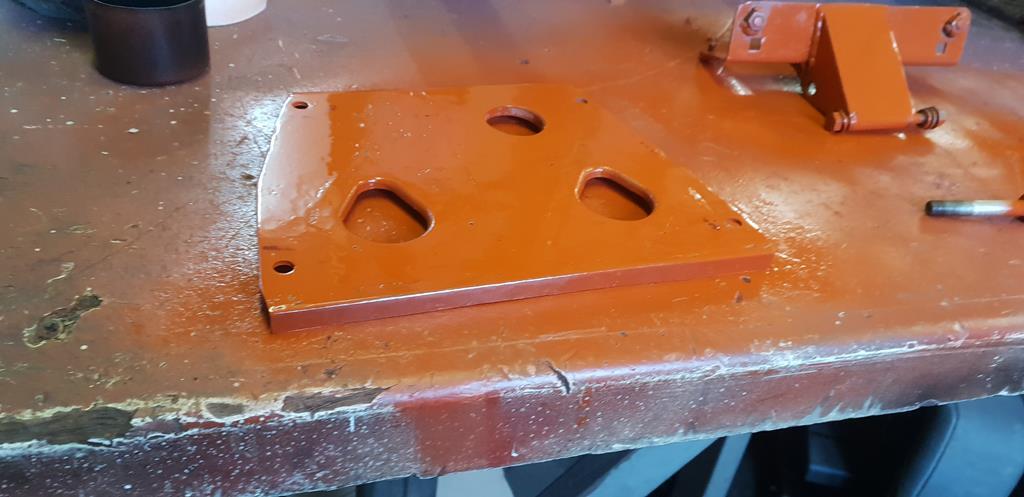 A couple of captive nuts welded in the top tube of the frame.. Yes I did re-weld the top nut once this photo was taken. 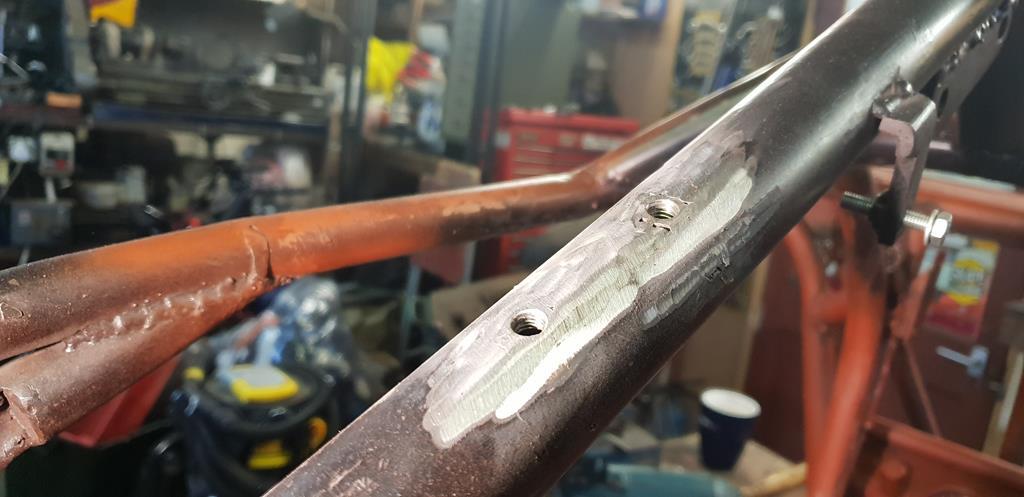 The captive nuts are for bolting this bracket on which also bolts to the top of the engine and is quite handy for holding up the coils 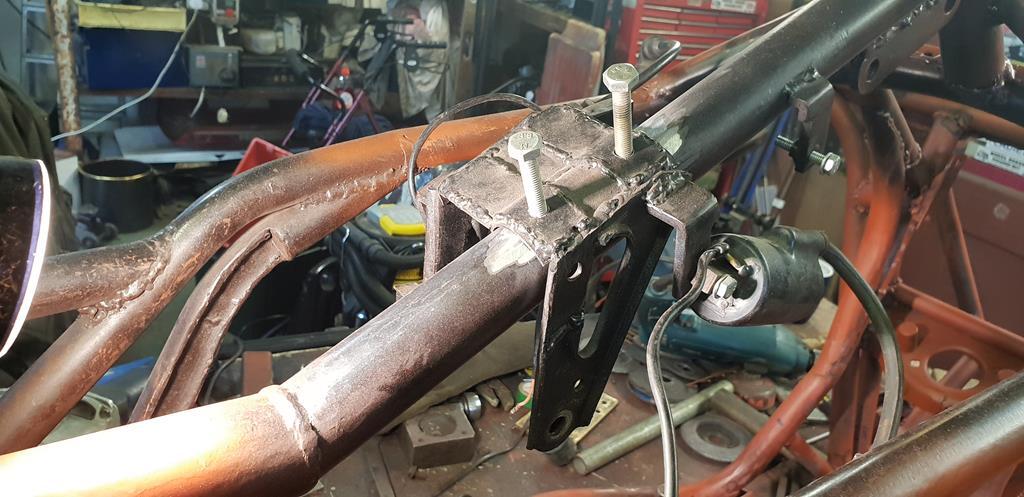 |
| |
My YouTube Channel www.youtube.com/user/UkWheelHorseBlokeQuote - D'you know, it's people like you, doing totally brilliant and pointless stuff like this that gives me a little hope for humanity |
|
|
|
|
Jan 30, 2019 16:25:50 GMT
|
Afternoon all, well it's been a long time since my last update, and quite a bit has happened.. Life on MadTrax has been grind, weld, grind, weld, chop some metal off, weld new stuff in, grind, weld..... you get the idea. The frame has spent most of it's time on one side or the other and even upside down at times! I think in this photo I was adding strentghening to one of the transfer box mounts on the frame. 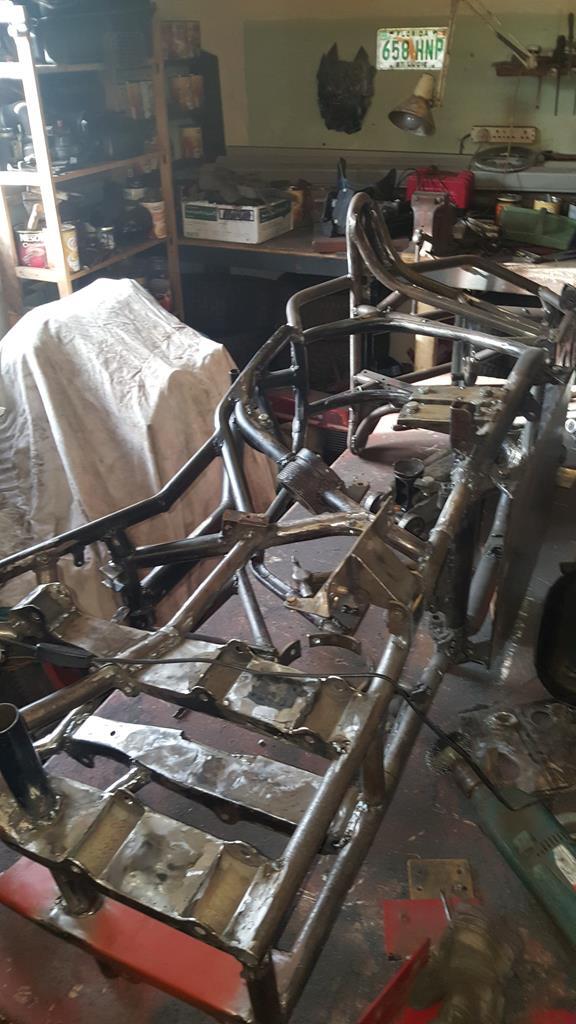 A lot of my "earlier" welds on the frame were done before my Murex Mig welder had an overhaul and a new gun... And it showed on the welds! So a lot of time has been spent grinding out bad welds and replacing them with good welds like this. 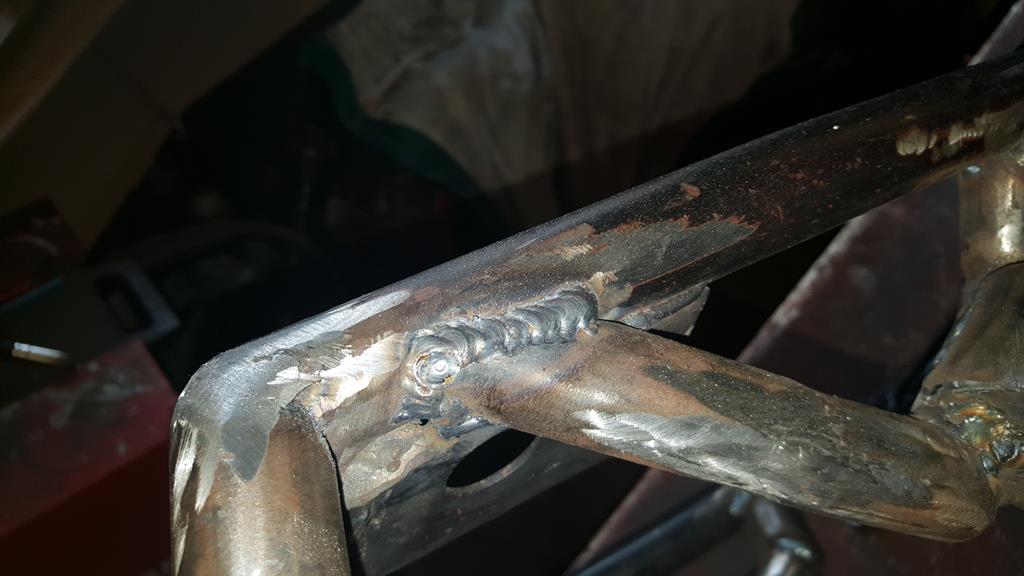 The pressed steel rear suspension uprights had the outside boxed in a long time ago, the inside has been done now.. 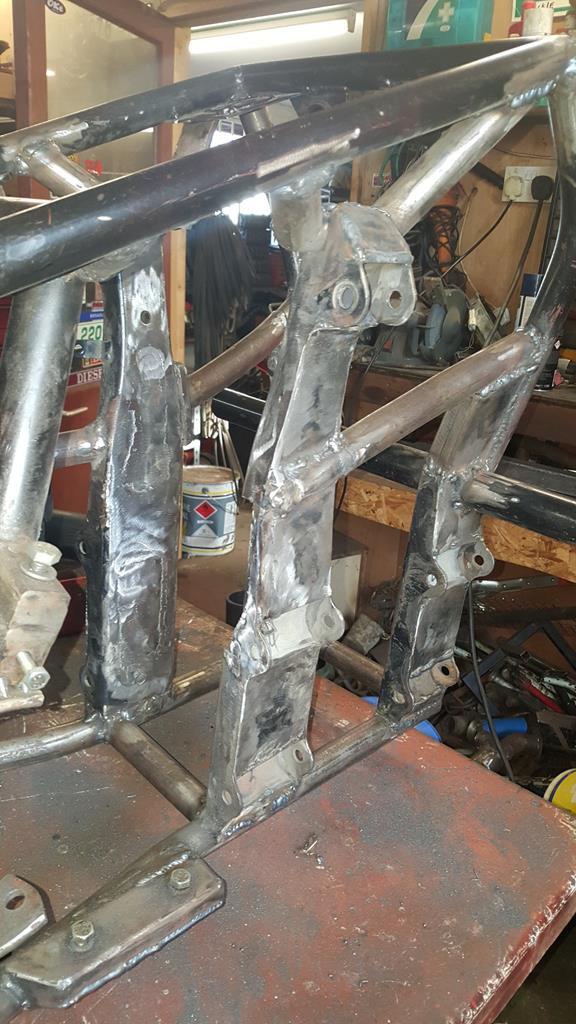 Cleaned up with a touch of red oxide. 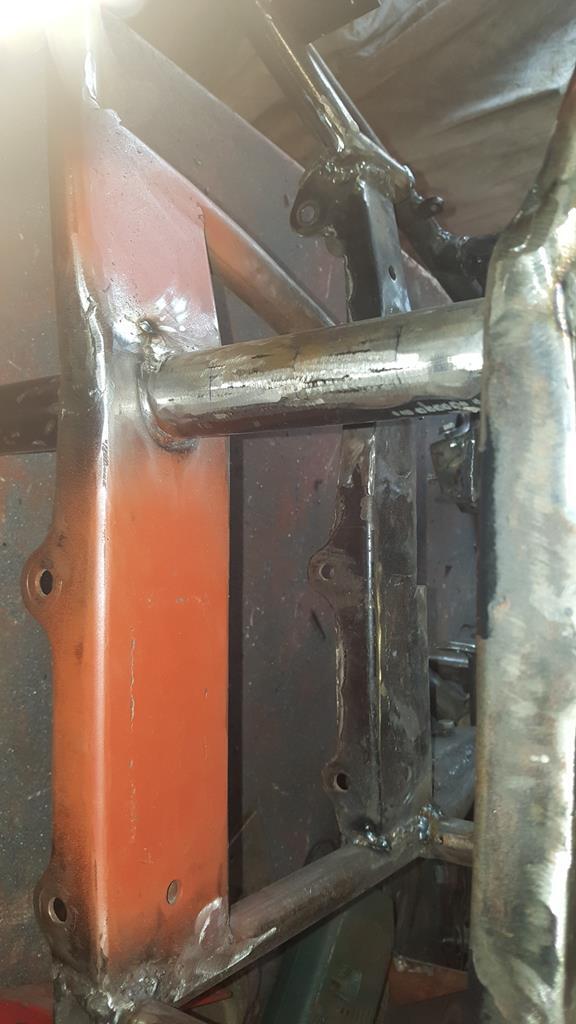 You may remember this orrible bit of Quadzilla frame that was at the front. 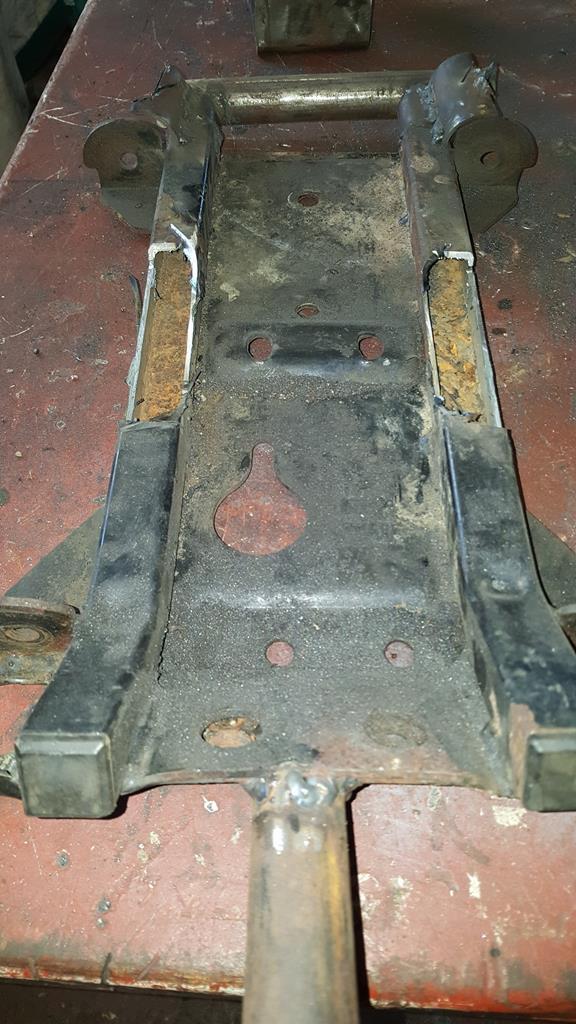 Well, it has been cut out and replaced with some nice tube to match the rest of the frame.. Looks way better. 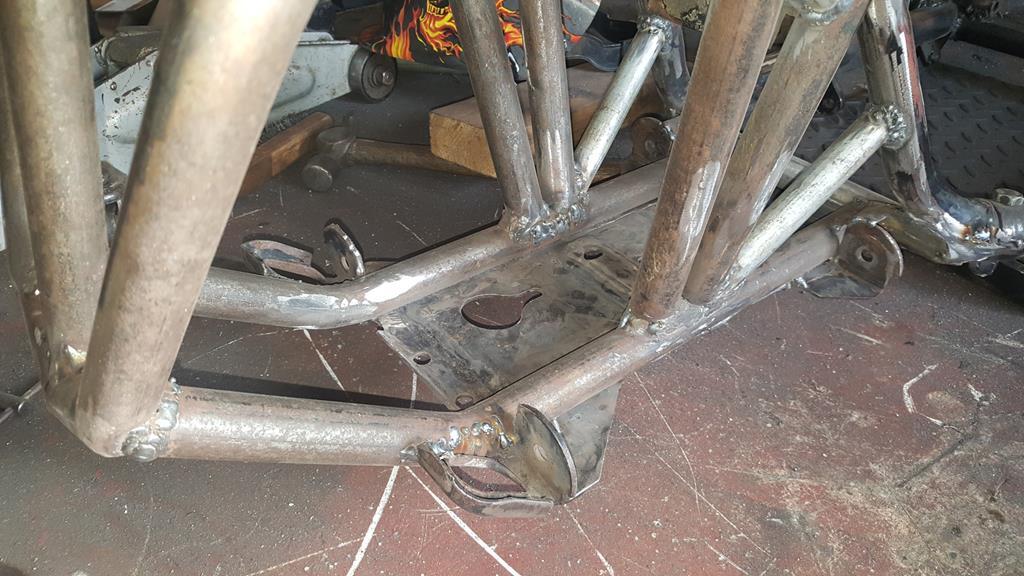 A couple more views.. 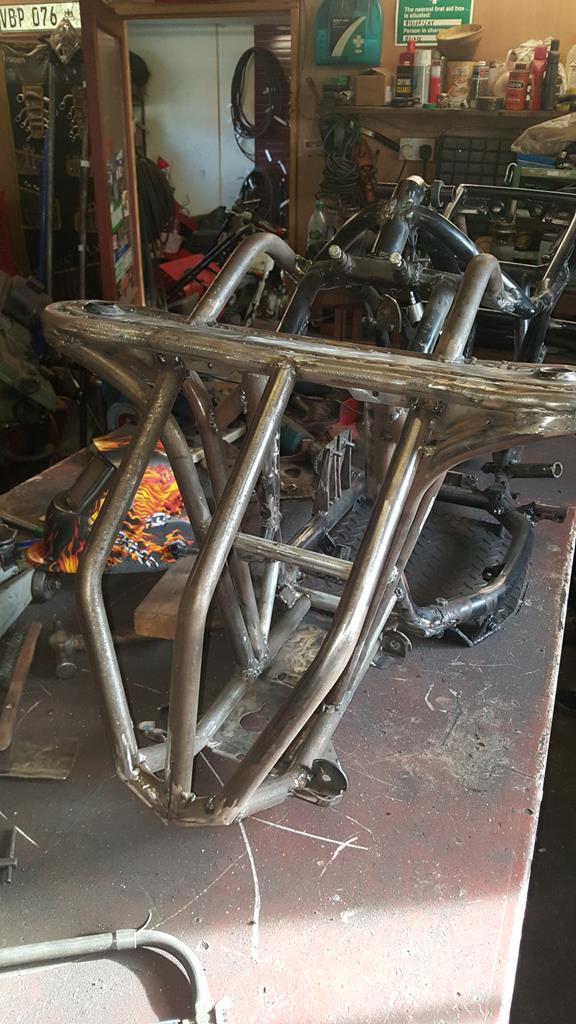 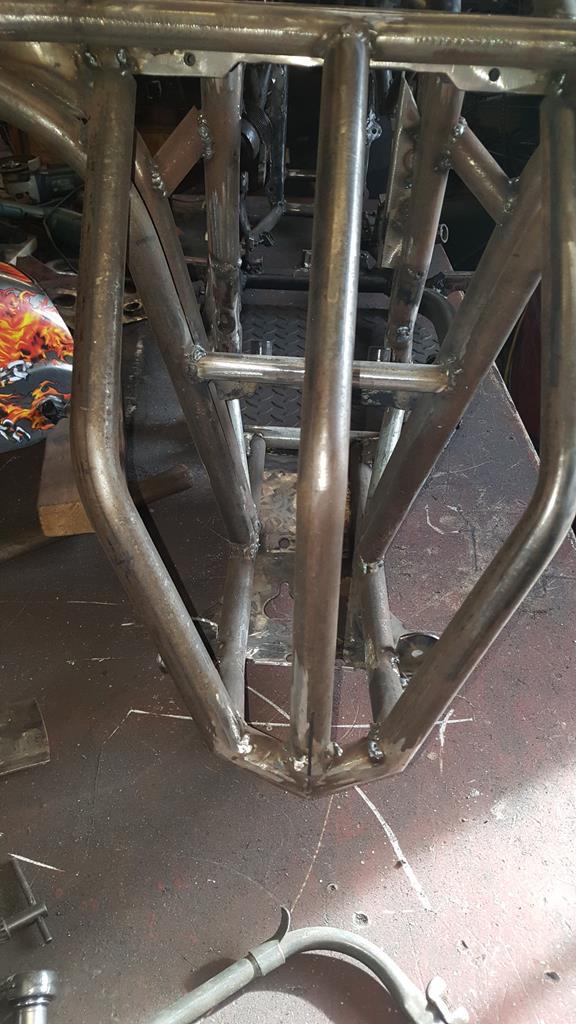 The engine guard has come in very handy when the frame is the right way up, it keeps the frame upright and makes it very easy to turn around on the bench.. 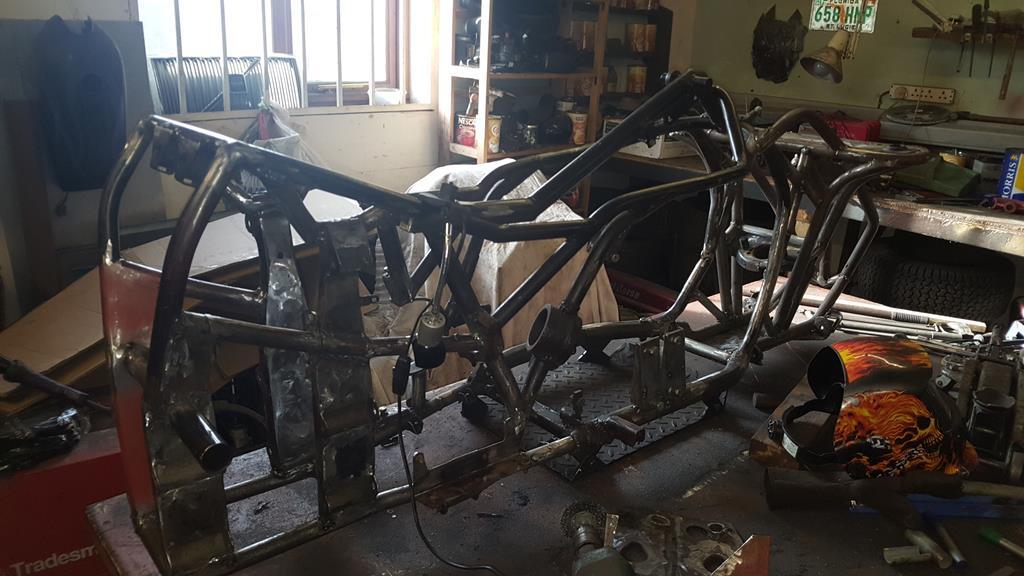 On the next build I will try and fully weld up everything as I go along... I've had to do so much "finishing" welding and grinding it's quite soul destroying! I guess this is the right spot to drop in this video.. Don't worry, I'm much more cheerful in the next vid |
| |
My YouTube Channel www.youtube.com/user/UkWheelHorseBlokeQuote - D'you know, it's people like you, doing totally brilliant and pointless stuff like this that gives me a little hope for humanity |
|
|
|
|
|
|
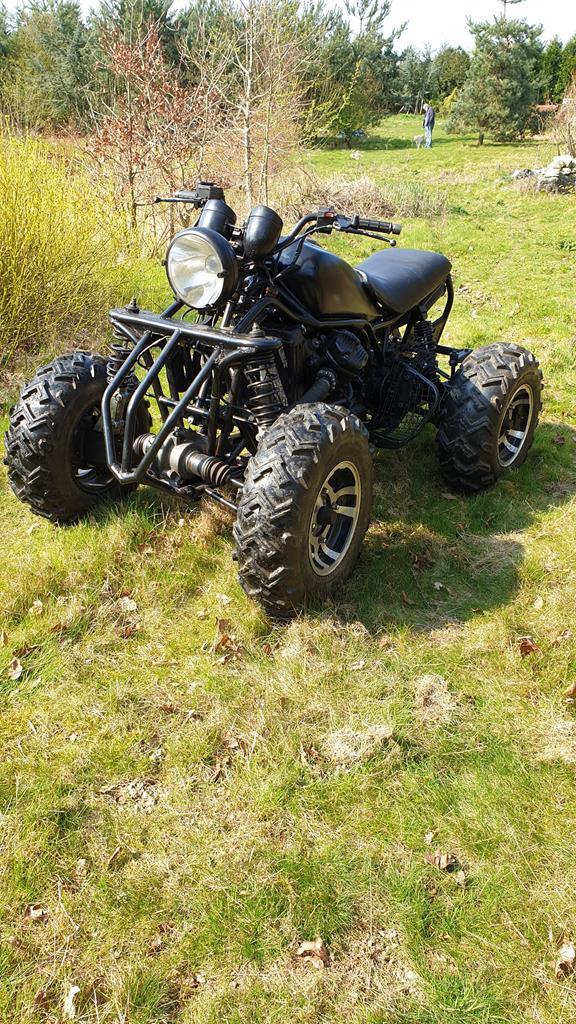
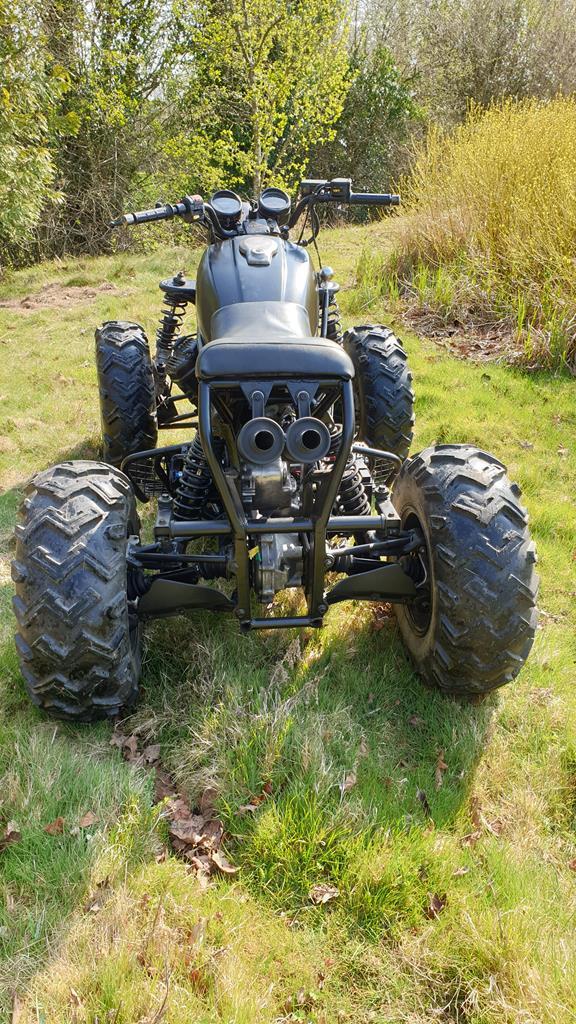
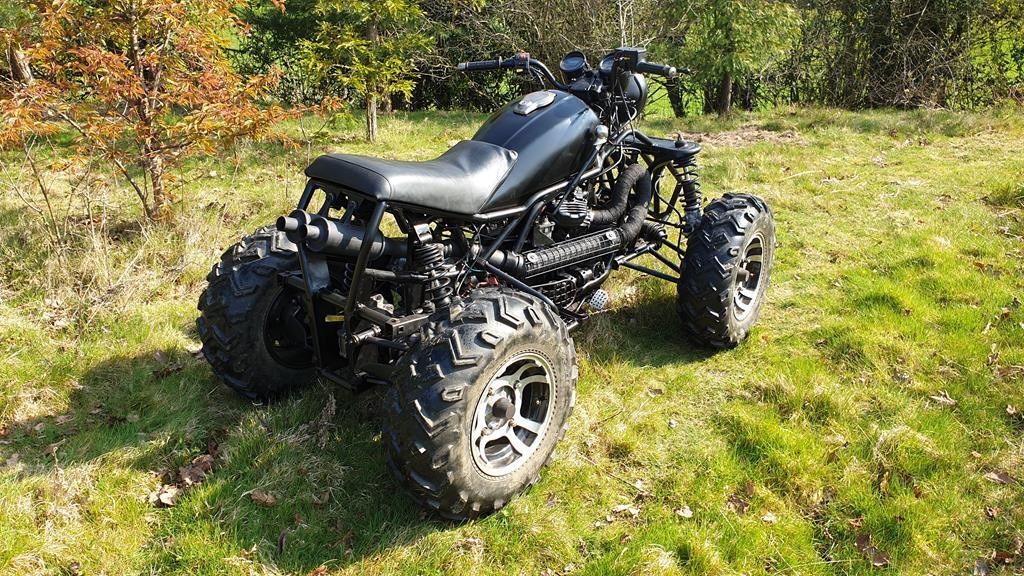
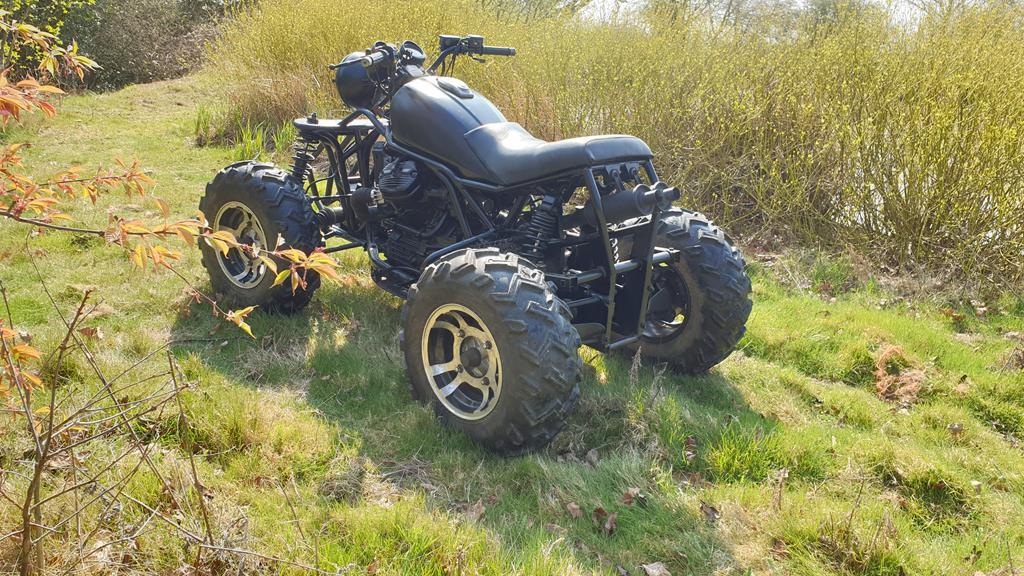
Evening all, no progress has been made on Wheel-Vo at all in quite a while, all the parts have been carefully stashed away until I get MadTrax finished, but some thinking has been happening.. The nice slot mags that came from a CX trike a long long time ago were dug out to see how they looked.. Me rather likes   To get the wheels to fit the Volvo axle I'm going to have to make a pair of wheel adaptors as the PCD on the wheels is a lot bigger than the Volvo PCD.. The trike the wheels came from was running (we think) an Escort rear axle using these adaptors to get the wheel to fit!!! The thought of putting any power through these is scary to say the least!! 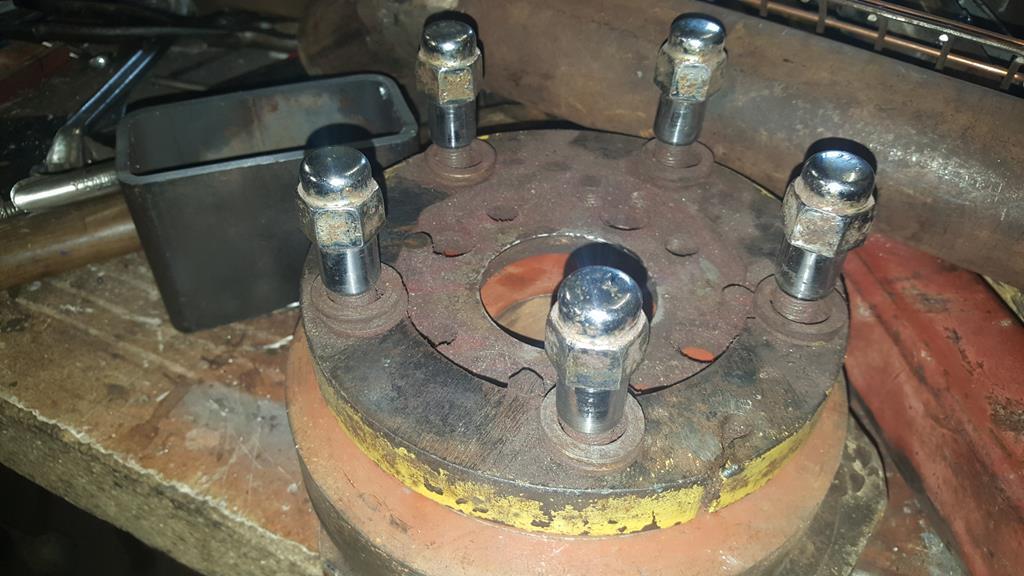 But as luck would have it I did make a start on a pair of wheel adaptors to fit these very wheels onto Project Why Not which saves some work although there is still plenty of lathe time needed to finish them.. 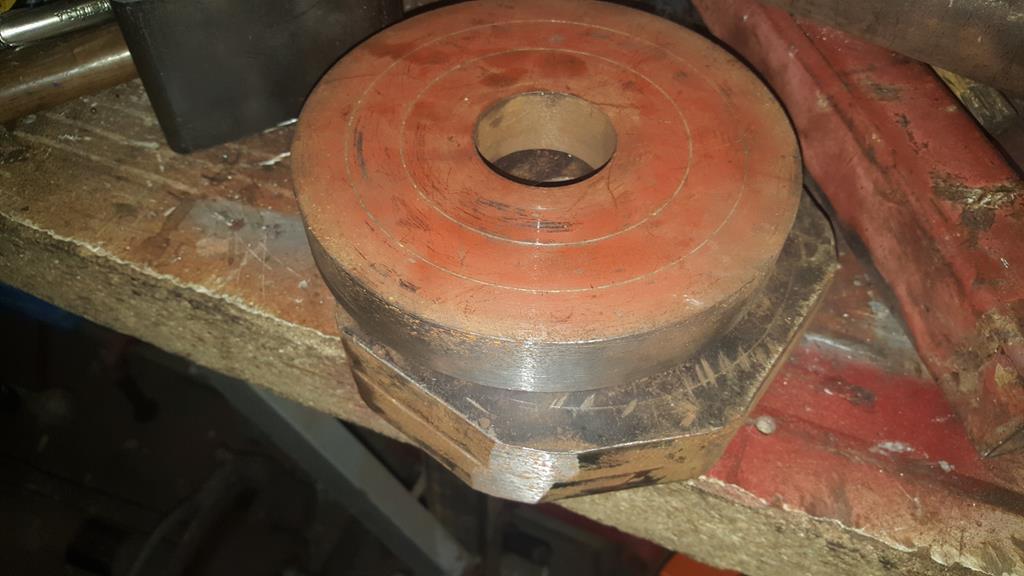 When I start back on this project the first job is to tempoary widen/lengthen/make a bit taller all the panels until the "upscaling?" looks right and of course the engine and other bit's are covered by the bodywork.. Then I can start measuring for a chassis and try to work out how to get suspension under the thing.. No suspension (like Why Not) would be easier, but Why Not gave my body such a hammering that I don't think plonking a cushion on seat would be enough..  The rear suspension should work it's self out as the build goes on, not sure what to do at the front though.. Do any cars have a very small independent front end that could be unbolted, narrow and bolted on something a lot smaller? |
| |
My YouTube Channel www.youtube.com/user/UkWheelHorseBlokeQuote - D'you know, it's people like you, doing totally brilliant and pointless stuff like this that gives me a little hope for humanity |
|
|
|
|
|
|
Well, that's going to be sufficiently crazy... As you probably worked out, the speed signal comes from the back axle - useful if you're going to use the clocks You're right, the EZK box you have is the chippable variety - the silvery gold plastic rather than black is the giveaway. Although you'll get nearasdammit 200hp just by turning the boost up! Try the Volvo 700/900 owners group UK on Facebook for chips. Go here: www.volvowiringdiagrams.com/?dir=volvo/940%20Wiring%20Diagrams for a useful wiring diagram I know a chap selling a pair of 8x15 Volvo PCD steel wheels very local to you, might be suitable for the back? And Colonelk might be interested in some spares before the shell gets scrapped. In fact I'm going to send you a PM Crazy??? Yep that sounds about right Thanks for conferming my guess on the speed signal thingy in the back axle, as you say, very handy as I'm planning in using the clocks.. 200-ish HP sounds a nice amount of power with the boost turned up, it's handy to know I can "chip the box" should I want even moe dangerious amounts of power in a mower... lol I need to check out the farcebook group, but the wiring diagram link will certainly come in very handy when thr dreaded wiring time comes.. Alas the steel wheels were not to be, I think it was just bad timing for both of us..... But I do have a wheel idea which I will get to shortly. I think I may have said it before, but I hope the garden centre pays you for this. "What was that, love?" "You want to go the garden centre this weekend?" "Of course, my sweet, no problem, you go look at daises, here's fifty, no a hundred quid, and I'll just pop over to watch that wheel horse looney. Take your time" Hi George, I wish it was like that (as long as the garden center gives me a cut of course ), but it's mostly random people walking in looking the the mower repair place behind my workshop.. Oh yes! Bookmarked! Carry on with the lunacy sir, I'll get the popcorn. AL. Hi Al, I hope your not still stuffing down popcorn, it's going to be a little while yet until I get started on this project. I think I may have said it before, but I hope the garden centre pays you for this. "What was that, love?" "You want to go the garden centre this weekend?" "Of course, my sweet, no problem, you go look at daises, here's fifty, no a hundred quid, and I'll just pop over to watch that wheel horse looney. Take your time" Husband creche! Now that's a disturbing thought :-D Your mad I cant wait to see it running Thanks for noticing :-D It will be a while yet, but it will be worth the wait :-D been watching your youtube since just before the 6x6 project, cant wait to see how this turns out! Wow! you have managed to stick with my rambling videos for 7 odd years! Thank you for sticking with me all this time... |
| |
My YouTube Channel www.youtube.com/user/UkWheelHorseBlokeQuote - D'you know, it's people like you, doing totally brilliant and pointless stuff like this that gives me a little hope for humanity |
|
|
|
|
|
|
I was looking at the first pic's you posted Iain, and I thought I'd seen the tractors somewhere before!! Fancy bumping in to you here |
| |
My YouTube Channel www.youtube.com/user/UkWheelHorseBlokeQuote - D'you know, it's people like you, doing totally brilliant and pointless stuff like this that gives me a little hope for humanity |
|
|
|
|
|
|
|
Good to see you had a good "silly season" with a "full house" George, do they do the full giving presents over there or does that depend on how much they (not including your family of course) have managed to steal on the seasanal run up?
|
| |
My YouTube Channel www.youtube.com/user/UkWheelHorseBlokeQuote - D'you know, it's people like you, doing totally brilliant and pointless stuff like this that gives me a little hope for humanity |
|
|
|
|
|
|
Dear Sir, Dear God! Please just fix any niggles (not that there'll be any) and pop it in a box addressed to:- George, Casa Santa Ana, Manila. Philippines. Yours sincerely, George. No idea what I'll tell customs, but I'll bloody well think of something. Hi George, I did try taking it to the post office, but for some strange reason they didn't have enough stamps to cover the postage! Thanks for the video plug on your ever excellent Letter from Manila thread by the way. marvelous stuff Thanks Spiny Just read the whole thread start to finish - brilliant! Wow, you must of got through quite a lot of coffee's reading from start to finish, I guess you had a few days to spare no other word, astounded! love my yamaha raptor 700 injected quad for fun, but this looks ace!! but how much does it weigh? Astounded!! That's a new one.. Most people say "What the flock is that?" I guess it weighs quite a bit, though not realy sure on how much. The bare frame is quite light which is handy as I'm busy doing the final welding and the frame get's turned over quite a bit.. With the test drive done, MadTrax needed to go back up on the bench for final welding.. Pictures of the stripdown would be boring, so have a fun video instead The stripdown should of taken a day at the most, but when everything is being video'd using my Camera Panning Jig Thingy, one day gets stretched to five! With the frame stripped down I could make a start on the final welding.. Well, almost.. The last couple of bit's of "made out of a cheap office desk" Quadzilla frame were bugging me.. The only problem was important bits such as front suspension lower mounts and front diff mounts are made out of one big plate that's welded to the Quadzilla frame.. And it's kinda important to make sure these mounts stay in the same place. So after a lot of bracing including something to hold the said plate in the right place, the lower front got the chop!  Would you look at the rust in that!  At some point during the build the bit of tube that these two bit's of desk are attached to was welded in not quite where it should of been.. In other words it looked pished but wasn't noticable until everything had been stripped from the frame!  Cleaning the suspension plate of the left over bit's of rusty desk took a while, here's the plate bolted back on where it should be.. 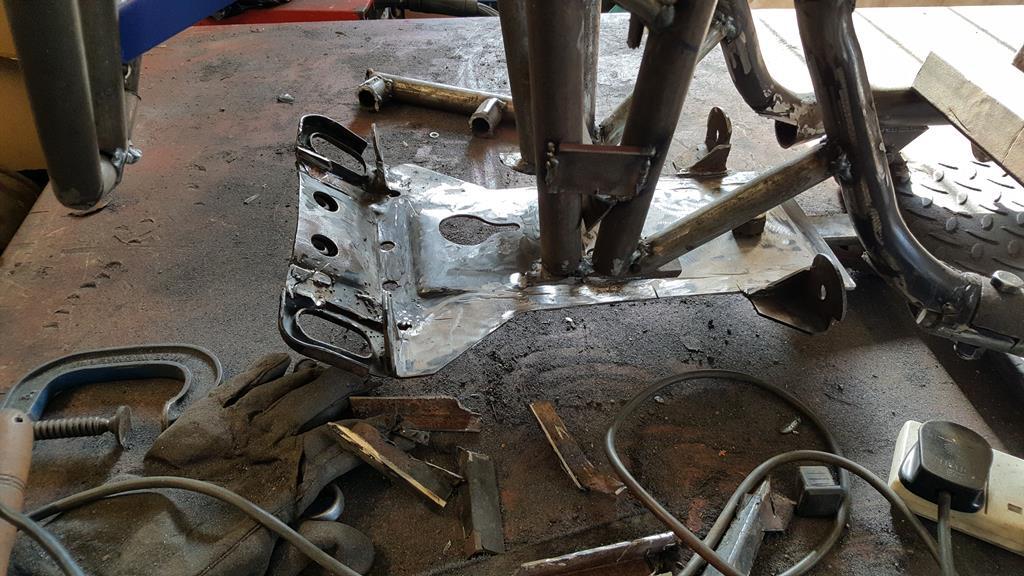 A bit of space to fill to connect everything back up again.. 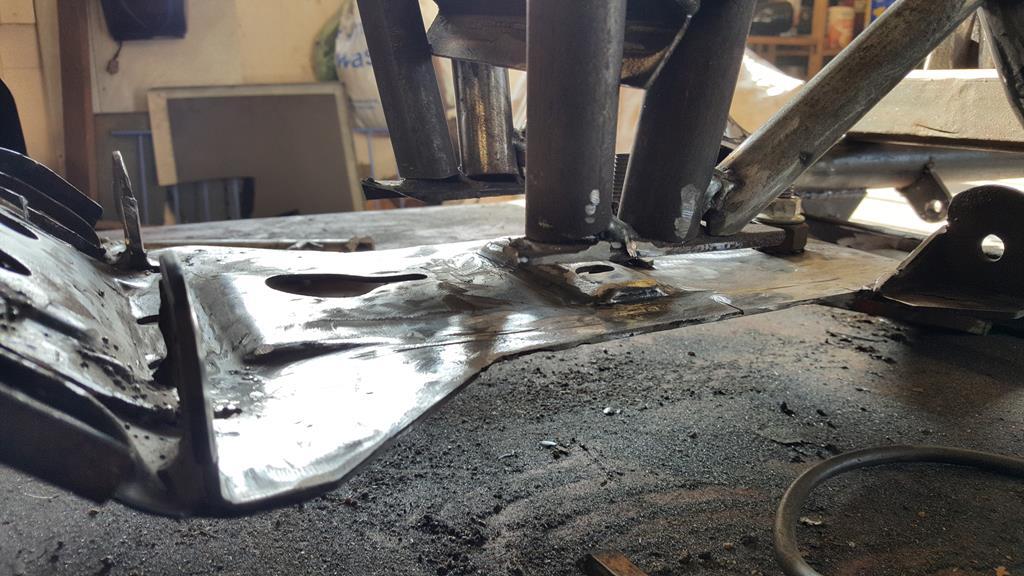 Lot's of welding has been happening, I've just not taken any photo's of it as I've just been getting on with it, but I should take some as the frame looks better, and the front bit looks even better with some tubes welded in |
| |
My YouTube Channel www.youtube.com/user/UkWheelHorseBlokeQuote - D'you know, it's people like you, doing totally brilliant and pointless stuff like this that gives me a little hope for humanity |
|
|
|
|
Oct 10, 2018 10:42:31 GMT
|
Almost 2 years is a long time and quite a lot has changed on the Camera Panning Jig Thingy or CPJT for short.. The bearing wheels lost thier inner tube rubber tyres/tires as well, they kept losing them.. Despite a nice tight fit on the bearings they would work their way one way or the other and come off! String or fishing line was always a bad idea really.. The fishing line was a very strong one, I can't remember now what it was rated at) but it would still stretch and eventually snap! I didn't fancy it breaking when doing a vertical shot and my video camera hurttling towards the ground at a very fast and very damaging rate!   Soooo, now we have a whole lotta thread.. Let's start at the smaller end... That's the end of a rather long length of threaded rod with a "made on the lathe" thingy that screws onto the rod (with a lock nut) and allows me to put a bearing or two on the end of the threaded rod.. Yes you are seeing correctly, that is a skateboard wheel and bearings fixed on the frame The idea is the skateboard wheel allows for a little bit of movement which makes everything run a lot smoother.  Moving along the threaded rod we come to the camera carriage thingy.. 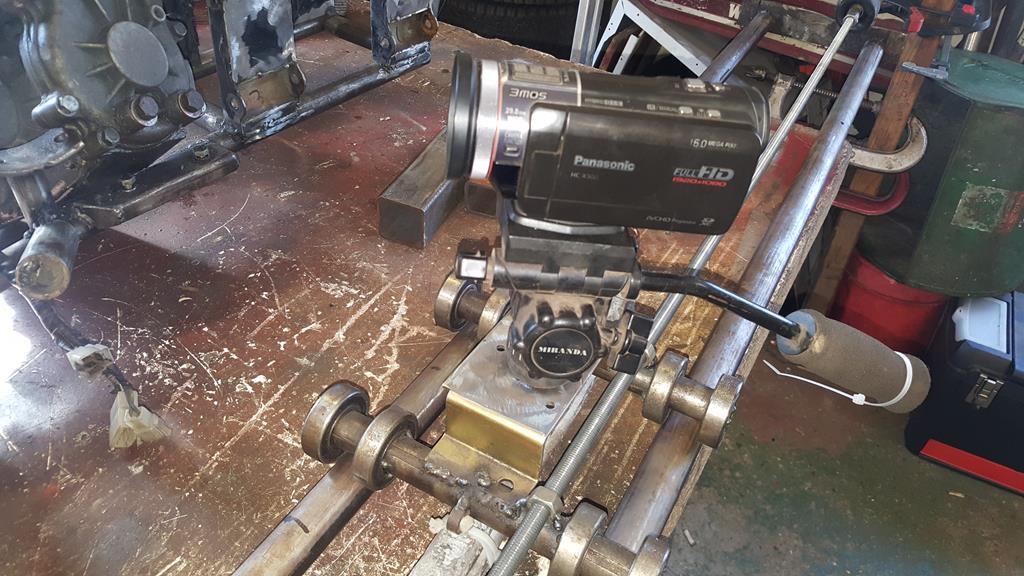 Zoom in a bit and you can see the threaded rod runs through a couple of nut's welded onto the carriage.. As the threaded rod turns, it forces the nut's to wind down (or up) the thread which being welded to the carriage moves the carriage along the rails. Cool eh 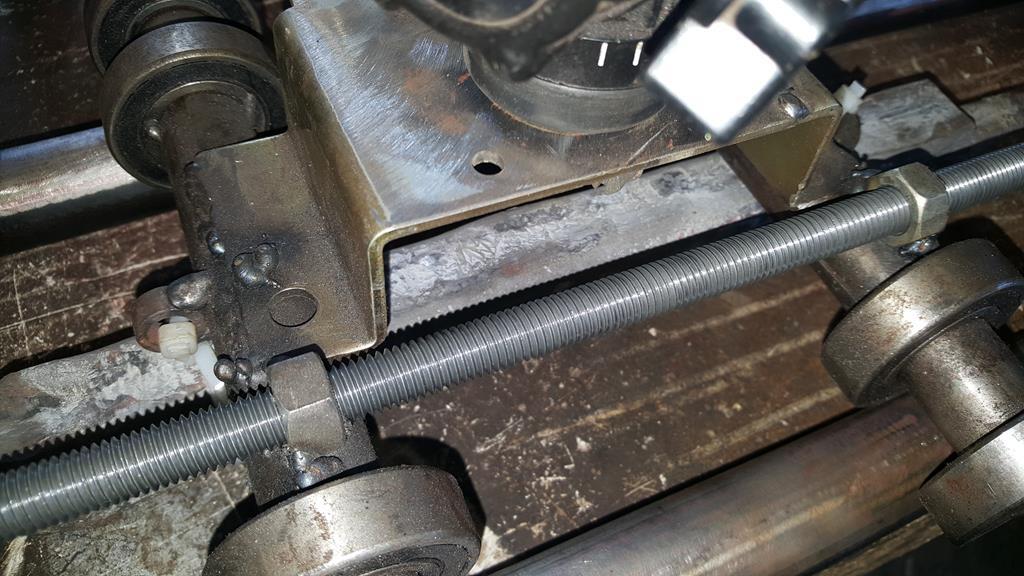 A view from the underside.. The lead pipe is zip tied on to the carriage to counter balance the weight of the carriage and camera on top when the CPJY is being used vertically.. Otherwise know as up and down  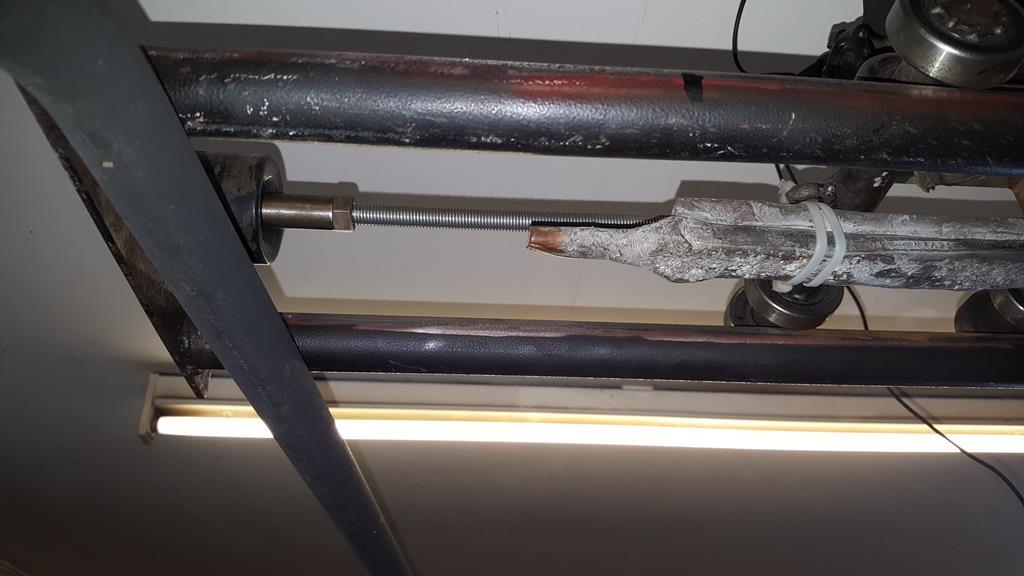 Moving down (or is it up?) to the business end we have a couple of pulleys a belt and half a wiper motor.. With the pulleys set this way the carriage moves down the rails at a ground breaking 1 inch per minute. The carriage has a little over 6 foot of travel along the rails which gives me a 1hr 12mins recording time as the camera pans it's way down the rails.. That may sound like a long time, but is is very handy when filming long scenes such as stripping all the parts off MadTrax If I swap the pulleys around then I get a total travel time of about 6 mins.. I have made a couple of other pulleys (no photo) which can be swapped in giving more travel time options.. 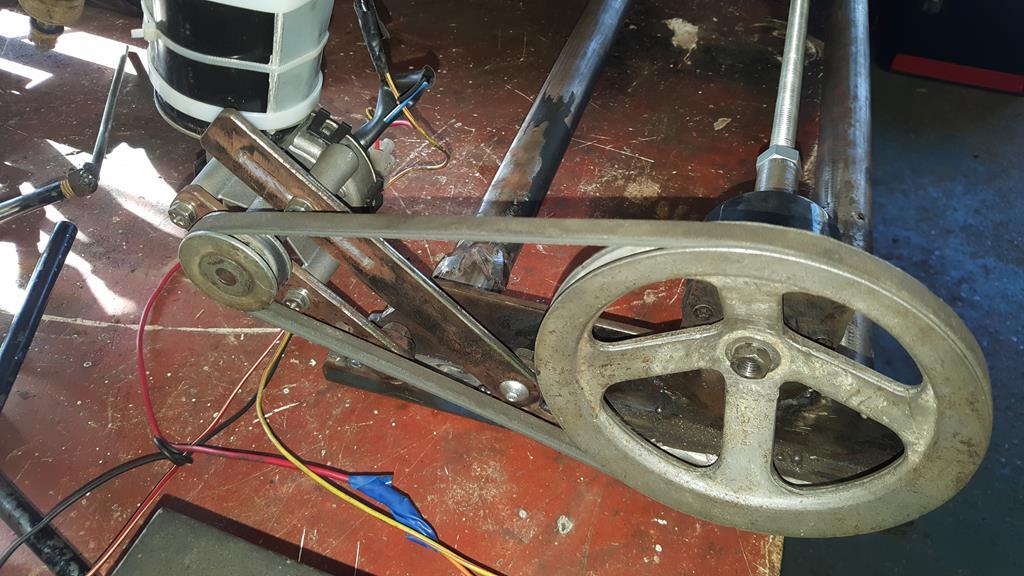 A better view of this end, a computer cooling fan has been fixed on to help keep the wiper motor cool.. It does get a bit hot which I expect it did when it was actually being used as a wiper motor! 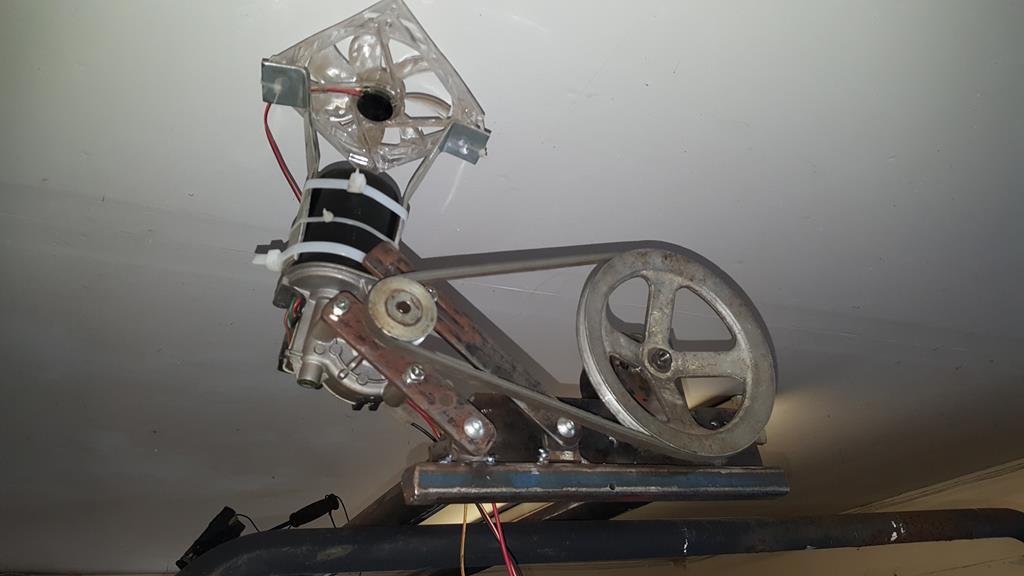 Power now comes (again) from a Mustang CB radio power pack.. No fancy speed control this time (as the pulleys take care of the speed), just forward and back depending on how the two wires are connected. 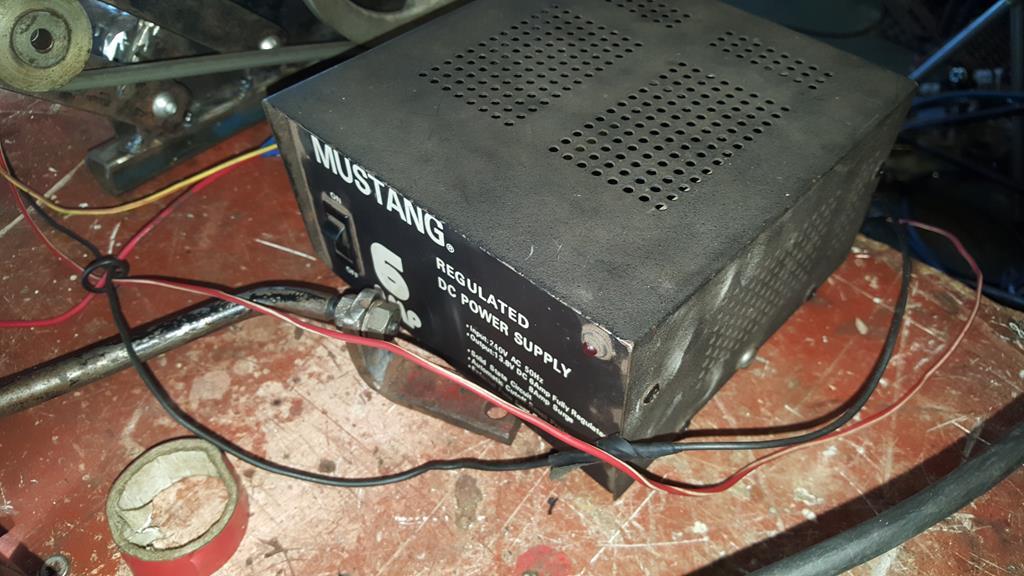 The lengths (and heights) I go to to bring you all good video footage 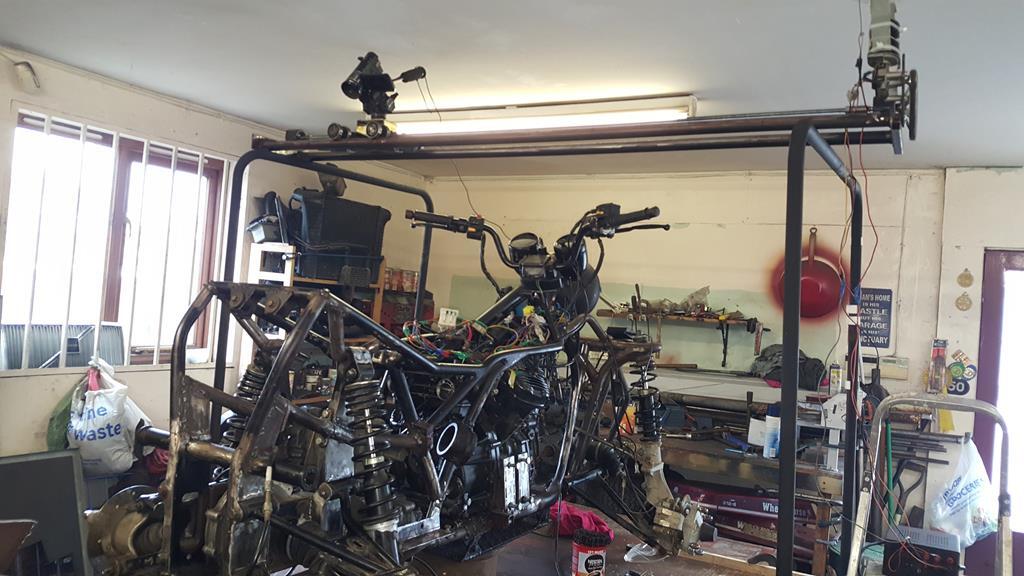 You can see al the "panning action" in the next MadTrax video, strip down in timelapse |
| |
My YouTube Channel www.youtube.com/user/UkWheelHorseBlokeQuote - D'you know, it's people like you, doing totally brilliant and pointless stuff like this that gives me a little hope for humanity |
|